#How to Fix the Directory Error in WordPress
Explore tagged Tumblr posts
Visit Tumblr Blog
Explore Tumblr blogs with no restrictions, modern design and the best experience.
Last Seen Tumblr Blogs


Fun Fact
Users from the US are the majority of Tumblr visitors.
Text
Fixing WordPress Update Errors: A Simple Guide for Non-Tech Users

Keeping your WordPress website updated is essential for staying secure, fast, and compatible with the latest features. But when updates fail—especially if you’re not a tech expert—it can feel frustrating and even risky.
The good news? Most update failures are common, predictable, and fixable without needing advanced coding knowledge. This guide will walk you through the most frequent reasons WordPress updates fail and how to resolve them safely and confidently—even if you’re not “techy.”
Why WordPress Updates Sometimes Fail
Before diving into solutions, it helps to know why things go wrong. WordPress is made up of the core platform, plugins, and themes. When any part of that system is out of sync, updates can fail.
Here are the most common causes:
✅ Poor internet connection
✅ Plugin conflicts
✅ Incompatible themes
✅ Server resource limits (like low memory)
✅ Incorrect file permissions
✅ Corrupted or incomplete update files
Once you know the cause, you’re halfway to the solution.
How to Fix WordPress Update Failures – Step by Step
1. Always Start with a Backup
Even if nothing seems broken, backing up your site is the smartest first step. Use plugins like UpdraftPlus or BackupBuddy to save your full site (files + database). That way, you can restore everything if anything goes wrong during troubleshooting.
2. Clear Your Cache (Browser and WordPress)
Sometimes the update goes through—but your browser still shows the old version.
Here’s what to do:
Clear your browser cache.
If you use caching plugins (like WP Super Cache or W3 Total Cache), clear your site cache too.
Then try updating again.
3. Troubleshoot Plugin Conflicts with Safe Mode
Conflicting plugins are a common culprit. To test this safely:
Install the free Health Check & Troubleshooting plugin.
Enable “Troubleshooting Mode.” This temporarily disables all plugins for your session only.
Try updating again. If it works, re-enable plugins one at a time to find the one causing the issue.
This protects your live site while you debug.
4. Check Hosting Resource Limits
Some shared hosting plans have tight restrictions that block larger updates.
Check with your hosting provider:
Is your PHP memory limit too low? (It should be at least 256MB)
Is the maximum execution time too short?
Can they upgrade your hosting plan or adjust settings?
Your host can often resolve this quickly with a simple support request.
5. Manually Update WordPress (It’s Not as Hard as It Sounds)
If the automatic update isn’t working, do it manually:
Download the latest WordPress version from wordpress.org.
Unzip it on your computer.
Connect to your site using FTP (FileZilla is a good option).
Upload the new wp-admin and wp-includes folders, replacing the old ones.
Do NOT touch your wp-content folder (your themes/plugins are safe there).
Visit your site—WordPress may prompt you to update your database.
Follow each step carefully, and your site will be updated safely.
6. Check File Permissions
Wrong file permissions can block updates.
To fix:
Use the WP File Manager plugin or your hosting control panel.
Set folders to 755 and files to 644.
If you’re unsure, ask your host’s support team to help.
These settings ensure your site stays secure and functional.
7. Stuck in Maintenance Mode? Here’s How to Exit
If your site says “Briefly unavailable for scheduled maintenance,” the update process got interrupted.
Fix it like this:
Log into your hosting account (via cPanel or file manager).
Open your site’s root directory.
Delete the .maintenance file.
Refresh your site—it should be back to normal.
When You Should Ask for Help
Sometimes, even after trying all the steps, the issue persists. That’s okay.
You can contact:
Your hosting provider’s support team
A professional WordPress developer
A trusted WordPress maintenance company
If your website is important for your business, it’s worth having someone reliable to handle technical issues so you can stay focused on running your operations.
Conclusion: You’re Not Alone—Websenor is Here to Help
WordPress update failures can feel intimidating, but you don’t need to be a developer to fix them. With the right approach, tools, and guidance, most issues can be resolved quickly—no coding required.
Always start with a backup, clear your cache, check for plugin conflicts, and review your hosting environment. These simple steps can save you time, money, and stress.
If you're feeling stuck or don’t want to go it alone, Websenor is here for you. As a trusted WordPress development and maintenance company, we help non-tech users manage, protect, and grow their websites without the headaches.With Websenor by your side, WordPress becomes simpler—so you can focus on what really matters: growing your brand.
0 notes
Text
youtube
How to fix Briefly unavailable for scheduled maintenance, please check back in a minute error in wordpress 20025 ?
The "Briefly unavailable for scheduled maintenance. Please check back in a minute." error in WordPress usually occurs when an update is interrupted or incomplete. Here's how to fix it:
1. Delete the .maintenance File
WordPress creates a temporary .maintenance file in the root directory during updates. If the update fails or gets stuck, this file isn't removed, causing the error.
Steps to Fix:
Access Your Website via FTP or File Manager
Use an FTP client like FileZilla or log in to your cPanel and open the File Manager.
Locate the Root Directory
Navigate to the public_html or the folder where your WordPress site is installed.
Find and Delete the .maintenance File
If you don’t see the file, enable "Show Hidden Files" in your file manager settings.
Reload Your Website
Your site should be back online.
2. Manually Complete or Restart the Update
If the issue persists, your update may not have finished properly.
Steps to Fix:
Go to the wp-content/upgrade Folder
Delete any files inside this folder.
Manually Update WordPress, Themes, or Plugins
If a plugin or theme update was interrupted, go to your WordPress Dashboard > Plugins or Appearance > Themes and retry the update.
3. Disable Plugins (If the Error Persists)
If your site still shows the error:
Rename the plugins Folder via FTP
Go to wp-content/ and rename the plugins folder to plugins-old.
Check if your site loads. If it does, a plugin caused the issue.
Rename the folder back and activate plugins one by one to find the culprit.
4. Check File Permissions
Incorrect file permissions can cause WordPress to fail during updates.
Correct Permissions:
Files: 644
Folders: 755
You can adjust these via your File Manager or an FTP client.
5. Increase PHP Memory Limit (If Updates Are Failing)
If the update was interrupted due to low memory:
Edit wp-config.php
Add the following line:phpCopyEditdefine('WP_MEMORY_LIMIT', '256M');
Save the file and try reloading the website.
Final Step: Clear Cache
If your website is still showing the maintenance message after following the above steps:
Clear your browser cache and WordPress cache (if using a caching plugin like WP Rocket or W3 Total Cache).
0 notes
Text
How to Move Your WordPress Site from Localhost to a Live Server
Developing a WordPress site on localhost is a great way to build and test your website in a controlled environment. However, the real challenge arises when it's time to move the site from your local server to a live hosting environment. If not done correctly, you could encounter broken links, missing images, or even database errors.
In this blog, we'll guide you through a step-by-step process to successfully move your WordPress site from localhost to a live server.

Step 1: Choose the Right Hosting Provider
Your first step is to select a reliable web hosting provider that meets your website’s needs. Look for:
Server Speed: Fast servers for better performance.
Uptime Guarantee: At least 99.9% uptime to ensure availability.
Ease of Use: User-friendly dashboards and tools.
WordPress Support: Hosting optimized for WordPress websites.
Popular options include Bluehost, SiteGround, and WP Engine.
Step 2: Export Your Local WordPress Database
The database is the backbone of your WordPress site. To export it:
Open phpMyAdmin on your local server (e.g., XAMPP or WAMP).
Select your WordPress database.
Click on the Export tab and choose the Quick Export method.
Save the .sql file to your computer.
Step 3: Upload Your WordPress Files to the Live Server
To move your files:
Compress Your WordPress Folder: Zip your local WordPress installation folder.
Access Your Hosting Account: Use a file manager or an FTP client like FileZilla.
Upload the Files: Transfer the zipped folder to your hosting server's root directory (usually public_html).
Unzip the Folder: Extract the files once uploaded.
Step 4: Create a Database on the Live Server
Now, set up a new database on your live hosting server:
Log in to your hosting control panel (e.g., cPanel).
Navigate to the MySQL Databases section.
Create a new database, database user, and password.
Assign the user to the database with full privileges.
Step 5: Import the Database to the Live Server
Open phpMyAdmin in your hosting control panel.
Select the new database you created.
Click the Import tab.
Choose the .sql file you exported from your localhost.
Click Go to import the database.
Step 6: Update the wp-config.php File
To connect your site to the live database:
Locate the wp-config.php file in your WordPress installation.
Open the file in a text editor.
Update the following lines: define('DB_NAME', 'your_live_database_name'); define('DB_USER', 'your_live_database_user'); define('DB_PASSWORD', 'your_live_database_password'); define('DB_HOST', 'localhost'); // Keep this unless your host specifies otherwise.
Save the file and upload it to your server via FTP.
Step 7: Update URLs in the Database
Your localhost URLs need to be replaced with your live site URLs.
Use a tool like Search Replace DB or run SQL queries in phpMyAdmin.
In phpMyAdmin, run the following query: UPDATE wp_options SET option_value = 'http://your-live-site.com' WHERE option_name = 'siteurl'; UPDATE wp_options SET option_value = 'http://your-live-site.com' WHERE option_name = 'home';
Step 8: Test Your Live Website
Once everything is uploaded and configured, check your website by entering its URL in a browser. Test for:
Broken Links: Fix them using plugins like Broken Link Checker.
Missing Images: Ensure media files were uploaded correctly.
Functionality: Verify forms, buttons, and features work as expected.
Step 9: Set Up Permalinks
To ensure proper URL structure:
Log in to your WordPress admin dashboard on the live site.
Go to Settings > Permalinks.
Choose your preferred permalink structure and click Save Changes.
Step 10: Secure Your Live Website
After migrating, secure your site to prevent vulnerabilities:
Install an SSL Certificate: Most hosting providers offer free SSL certificates.
Update Plugins and Themes: Ensure everything is up to date.
Set Up Backups: Use plugins like UpdraftPlus for regular backups.
Conclusion
Moving your WordPress site from localhost to a live server may seem daunting, but by following these steps, you can ensure a smooth and error-free migration. A successful move allows you to showcase your site to the world, engage your audience, and achieve your goals.
Start today and take your WordPress project live with confidence!
0 notes
Text
How to Fix the “Couldn’t Fetch” Error in Google Search Console
The "Couldn't Fetch" error in Google Search Console is certainly one of the many unclear and frustrating status messages you might find. It may appear for a variety of reasons, while this status message does clearly tell you that Google hasn't pulled your sitemap yet, it could be pointing to an error that's preventing Google from accessing your sitemap. Since it is a bit of a challenge to the individual or SEO services team to make the differentiation between the two causes, troubleshooting the issue must be done properly for it to not be a problem in your sitemap.

Walk you through some guide on finding and fixing the possible causes that may trigger the "Couldn't Fetch" in Google Search Console error.
1. Rename the Sitemap File
According to Google's John Mueller, if you have a valid sitemap but still see error messages, then probably renaming the sitemap file would help.
How to rename a sitemap file in Google Search Console
Go to Indexing → Sitemaps.
Paste your sitemap URL under Add a new sitemap, for example:
Then click SUBMIT.
This simple change may have fixed the issue if the issue was that of Google not reading or processing the sitemap file accordingly.
2. Troubleshoot Your Sitemap
If renaming your sitemap file did not help then check if your sitemap is implemented correctly. Here are a few steps you can go through and spot fix sitemap setup problems.
2.1 Test Your Sitemap
First, check if your sitemap is correctly formatted and in place. You can use an online validator tool such as the Validate XML Sitemap tool to validate your sitemap for errors. You only need to input the URL of your sitemap and click on VALIDATE.
If your sitemap is correctly in place, you will then see a message saying No issues detected.
2.2 Check if the Sitemap is in the Root Directory
For your sitemap to function properly, place it within the root folder of your site. If using a hand-generated sitemap, be sure to use the following format:
https://yourdomainname.com/sitemap_index.xml
If your sitemap is in the incorrect directory, Google won't be able to access it, causing a "Couldn't Fetch" error.
2.3 Ensure Posts Have Indexing On
If you have set all your posts to no index, your sitemap will be empty and an error can occur due to it. To check and repair this:
Rank Math SEO → Titles & Meta.
Click the toggle next to Index in the Robots Meta settings so it displays as On.
Save Changes
2.4 Clear the Sitemap Cache
If your sitemap looks older than it should, clearing it may help solve the problem. How to do it:
Proceed to Rank Math SEO → Sitemap Settings.
Increase the value of Links Per Sitemap by one
Click Save Changes
Then go to Settings → Permalinks and click Save Changes to make all the settings correctly apply.
2.5 Exclude the Sitemap from Caching
Ensure your sitemap is not cached because this may hinder Google from being able to retrieve it. Check your site's caching settings or find a plugin that allows you to exclude your sitemap from being cached.
3. Submit the correct version of your sitemap

In case the above cannot work, then the problem might be on the correct version of your URL that you want in Google Search Console.
Step 3.1 Confirm the Correct URL Type
There are four versions of URLs for your site:
http://yourdomain.com
http://www.yourdomain.com
https://yourdomain.com
https://www.yourdomain.com
Confirm that you added the correct version in Google Search Console by going to the WordPress dashboard by clicking on Settings → General. In the Site Address (URL) field, you should see the correct type of URL for your site.
Step 3.2 Enter the Correct Type of URL in Google Search Console
If you haven't done so yet, add the correct URL version to Google Search Console as a URL property. You can check out Google's instructions on how to add and verify a URL property in Search Console if you need to .
3.3 Submit Your Sitemap to Google Search Console
After adding the right URL property, go to the Google Search Console to Indexing → Sitemaps. Paste the correct sitemap URL in the field Add a new sitemap and click on SUBMIT.
Important: Your sitemap URL must not contain any space as that too triggers the "Couldn't Fetch" error.
If the issue remains, then append a forward slash / at the end of your URL for sitemap and resubmit.
4. Wait for Google Fetch the Sitemap
If you have followed all the steps above and nothing has worked, there could be an issue where Google hasn't fetched your sitemap. Sometimes you need to just sit back and let it wait till Google gets it. Never forget that, even without a sitemap, Google can detect and index your content, but it is very much recommended to have a working sitemap in order to maintain the best level of SEO performance.
Conclusion
Couldn't Fetch" is just one of those ridiculous errors in Google Search Console, and I was baffled by that. The following section allows you to troubleshoot the issue up until you find what is wrong and fix it. It may be changing the naming of the sitemap file or something else like config issues. Anyway, Google will start using the correct version of the site.
If the problems persist even after using these remedies, do not hesitate to contact the SEO agency Singapore support team or seek second opinions from the SEO services professionals.
0 notes
Text
How to Handle Complex PSD Designs During WordPress Conversion
Converting complex PSD designs to WordPress can be a challenging task, but with the right approach, you can achieve a seamless transition. Here’s a step-by-step guide to help you navigate the PSD to WordPress conversion process efficiently.
1. Understand the Design Thoroughly
Before starting the PSD to WordPress conversion, ensure you fully understand the PSD design:
Analyze Layout: Break down the design into sections like header, footer, content, and sidebar.
Identify Features: Note any special features such as sliders, forms, or interactive elements.
Check Responsiveness: Ensure you understand how the design should adapt to different screen sizes.
2. Prepare Your Tools
Equip yourself with the necessary tools for a successful PSD to WordPress conversion:
Design Software: Use Adobe Photoshop or a similar tool to inspect and slice the PSD.
Development Environment: Set up a local WordPress environment for testing.
Plugins and Themes: Install necessary plugins and choose a base theme if needed.
3. Slice the PSD
Slice the PSD into manageable pieces for the PSD to WordPress conversion:
Header and Footer: Extract these elements as separate images.
Content Areas: Slice images used in the content area, such as backgrounds and icons.
Buttons and Icons: Save these as individual images for easy integration.
4. Convert to HTML/CSS
Create a static HTML/CSS version of the design as a precursor to the PSD to WordPress conversion:
HTML Structure: Write clean, semantic HTML to match the design structure.
CSS Styling: Apply CSS to achieve the visual appearance. Use responsive design techniques like media queries for mobile optimization.
5. Integrate with WordPress
Convert your static HTML/CSS into a WordPress theme in the PSD to WordPress process:
Create a Theme: Set up a new WordPress theme directory and create necessary files (style.css, index.php, etc.).
Template Files: Break down the HTML into WordPress template files (header.php, footer.php, sidebar.php).
Theme Functions: Add theme support features in functions.php and enqueue styles/scripts properly.
6. Implement Functionality
Add dynamic functionality during the PSD to WordPress conversion:
Custom Post Types: Create custom post types if the design requires special content types.
Widgets and Menus: Set up widgets and custom menus as needed.
Plugins: Integrate plugins to add features like sliders, contact forms, or SEO enhancements.
7. Test Thoroughly
Ensure everything works as intended:
Cross-Browser Testing: Check compatibility across different browsers.
Mobile Responsiveness: Verify that the site looks good on various devices.
Performance: Test site speed and optimize images and scripts for better performance.
8. Debug and Optimize
Fix any issues that arise:
Debugging: Use debugging tools to identify and resolve errors.
Optimization: Optimize CSS and JavaScript files, and implement caching to enhance site speed.
9. Deploy and Monitor
Deploy the site to the live server:
Migration: Use migration tools or plugins to move from the local environment to the live server.
Monitor: Keep an eye on the site’s performance and user feedback to make necessary adjustments.
10. Documentation and Maintenance
Document the conversion process and plan for ongoing maintenance:
Documentation: Write detailed documentation for future reference.
Updates: Regularly update WordPress, themes, and plugins to ensure security and functionality.
By following these steps, you can effectively handle complex PSD designs during the PSD to WordPress conversion, ensuring a smooth transition from design to a fully functional website.
0 notes
Text
WP Smush Pro v3.16.6 Optimize the images on your WordPress
https://themesfores.com/product/wp-smush-pro-optimize-the-images-on-your-wordpress/ WP Smush Pro v3.16.6 Optimize the images on your WordPress The fastest, easiest, and best-performing image compression plugin for WordPress! Automatically optimize and resize every image in any directory on your WordPress or Multisite on upload. Save space and speed up your site with the incredible power of WP Smush Pro. WP Smush Pro Optimize the images on your WordPress Unlimited image optimization: Bulk optimize, compress, and resize unlimited images The awesome feature of Wp Smush Pro Plugin Super Smush – 2x compression Backup original images Optimize huge photos up to 32MB Smush unlimited images with a click Blazing fast 45-point image CDN Automatic resize and scale Features Bulk Smush Lazy Load Smush CDN Directory Smush Local WebP Smush Configs Smush Integrations Wp Smush Pro v3.14.2 is one of the best website image optimization plugins for the website. WP Smush Pro is a best-performing and easy-to-use image optimization plugin for WordPress. This plugin is developed by the professional developers of WPMU DEV, which are the developers of many other excellent WordPress plugins. This plugin compresses all your images and reduces their sizes without any visual quality loss. WP Smush Pro is the best-performing Automatically image-optimized Please note that any digital products presented on the themesfores website do not contain malicious code, viruses or advertising. For License Key: this products are functional without entering a product license code. We are unable to provide a license code for you, and it’s because we already obtain the Plugin/Theme from the original developer. The use of a license code usually is for automatic updates and premium support from the original developer. Besides, we guarantee you deliver a free manual update and minor assistance for your convenience in using the product. Refund Policy: If the plugin or theme is not working properly and we also fail to help you then, in that case, you will get the money back. If the plugin and theme are working properly then you will not get the money back. How to fix “style.css missing” error while uploading themes? A common issue that can occur with users new to installing WordPress themes is a “Broken theme and/or stylesheets missing” error message being displayed when trying to upload or activate the theme. This is because the theme download package on ThemeForest includes additional files to the theme such as the documentation, license, etc. https://themesfores.com/product/wp-smush-pro-optimize-the-images-on-your-wordpress/ #PageSpeedPlugins #WordpressPlugins
0 notes
Text
How to Update WordPress plugins
WordPress plugins are software extensions that add new functionality to your WordPress website. They are like apps for your website, allowing you to customize and enhance its features without having to write any code. With over 55,000 plugins available in the official WordPress Plugin Directory, there’s a plugin for practically every need.
Why is it Important to Update WordPress Plugins?
Keeping your WordPress plugins up to date is crucial for several reasons. First and foremost, updates often contain bug fixes and security patches that address vulnerabilities discovered in previous versions. By updating your plugins, you ensure that your website remains protected against potential attacks.
Additionally, updates can introduce new features, improve performance, and enhance compatibility with the latest version of WordPress. By regularly updating your plugins, you can take advantage of these improvements and ensure that your website runs smoothly.
How to Check for Plugin Updates
Before we dive into the update process, it’s important to know how to check for plugin updates. Fortunately, WordPress makes it easy. Here’s how:
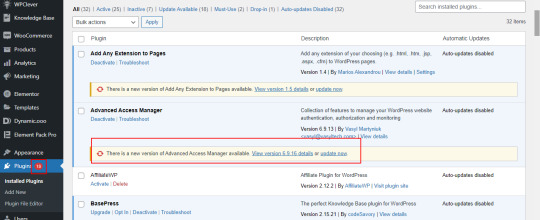
1. Login to your WordPress dashboard: Visit your website’s admin area and enter your login credentials.
2. Navigate to the Plugins page: From the sidebar, click on “Plugins” to access the list of installed plugins.

3. Check for updates: On the Plugins page, you’ll see a notification if any updates are available. Look for the number in a red circle next to “Plugins”.
4. Update individual plugins: To update a specific plugin, click on the “Update Now” link beneath its name. The latest version will be downloaded and installed by WordPress automatically.
5. Update all plugins: If you prefer to update all plugins at once, click on the “Update Available” link at the top of the page. WordPress will update all plugins that have pending updates.
Manual Update Process for WordPress Plugins
While updating plugins manually is not the most convenient option, it still provides you with greater control over the process. Here’s how to manually update WordPress plugins:
Secure your website: Before implementing any updates, it’s advisable to generate a backup of your website. This precautionary step ensures that should any issues arise during the update process, you can effortlessly revert your website to its previous state.
Download the latest version: Visit the plugin’s website or the official WordPress Plugin Directory to download the latest version of the plugin you want to update.
Deactivate the old version: In your WordPress dashboard, navigate to the Plugins page and deactivate the plugin you wish to update.
Delete the old version: Once the plugin is deactivated, click on the “Delete” link beneath its name to remove the old version from your website.
Upload and activate the new version: On the Plugins page, click on the “Add New” button at the top. Choose the downloaded plugin file from your computer and click “Install Now”. Finally, click on “Activate” to enable the updated plugin.
Pros and Cons of Manually Updating Plugins
While manual updates give you more control, they also come with their own set of pros and cons.
Pros:
Greater control over the update process.
Ability to thoroughly test the updated plugin before activating it.
No reliance on automatic updates, which can sometimes cause compatibility issues.
Cons:
Requires manual effort and time investment.
Higher risk of human error during the update process.
It might pose a greater challenge for users who are not familiar with technical concepts.
How to Update WordPress Plugins Automatically
If you prefer a more hands-off approach, you can enable automatic updates for your WordPress plugins. Automatic updates ensure that your plugins are always up to date without requiring any manual intervention. Here’s how to enable automatic plugin updates:
Install a plugin for automatic updates: There are several plugins available that can handle automatic updates for you. A well-liked choice is the “Easy Updates Manager” plugin, which can be installed and activated directly from the WordPress Plugin Directory.
Configure automatic updates: Once the plugin is activated, navigate to its settings page. Here, you can specify which plugins you want to update automatically and choose the update frequency.
Save your settings: After configuring the automatic update settings, make sure to save your changes.
Benefits of Using Automatic Plugin Updates
Automatic plugin updates can offer several advantages for website owners:
Improved security: With automatic updates, you can ensure that your plugins are always up to date with the latest security patches, minimizing the risk of potential vulnerabilities.
Time-saving: Automatic updates eliminate the need for manual intervention, saving you time and effort that can be better spent on other website management tasks.
Enhanced performance: By regularly updating your plugins, you can take advantage of performance improvements and bug fixes, ensuring your website runs smoothly.
Compatibility: Automatic updates help ensure that your plugins remain compatible with the latest version of WordPress, preventing any compatibility issues that may arise from using outdated plugins.
Best Practices for Updating WordPress Plugins
To ensure a smooth update process and maintain the security and functionality of your website, follow these best practices:
Backup your website: Before updating any plugins, always create a backup of your website. This allows you to restore your website in case anything goes wrong during the update process.
Update one plugin at a time: To minimize the risk of conflicts or compatibility issues, update one plugin at a time and thoroughly test your website after each update.
Keep track of plugin updates: Regularly check for plugin updates and stay informed about any new features, bug fixes, or security patches. This helps you make informed decisions about which plugins to update.
Read release notes and changelogs: Before updating a plugin, read the release notes or changelogs provided by the plugin developer. This gives you valuable insights into what changes are included in the update and any potential impact on your website.
Test after updating: After updating a plugin, thoroughly test your website to ensure that everything is functioning correctly. Pay special attention to any areas or features that are directly affected by the updated plugin.
Common Issues and Troubleshooting Tips When Updating Plugins
While updating WordPress plugins usually goes smoothly, occasionally, issues may arise. Below, you’ll find a list of common issues along with troubleshooting tips:
White screen of death: If your website displays a blank white screen after updating a plugin, it may indicate a compatibility issue. Try deactivating the recently updated plugin and see if the issue resolves. If it does, contact the plugin developer for further assistance.
Plugin conflicts: Sometimes, updating a plugin can cause conflicts with other plugins or themes. If you notice any unexpected behavior after an update, deactivate other plugins one by one to identify the conflicting plugin. Once identified, contact the plugin developer for a possible solution.
Missing or broken features: If a plugin update results in missing or broken features, ensure that you have followed the update process correctly. If the issue persists, reach out to the plugin developer for guidance, or consider rolling back to the previous version of the plugin.
Slow website performance: Occasionally, a plugin update may negatively impact your website’s performance. To address this, check if the updated plugin has any new settings that could affect performance. If necessary, revert to the previous version or consider alternative plugins.
Importance of Keeping Plugins Updated for Website Security
Keeping your WordPress plugins updated is crucial for maintaining the security of your website. Outdated plugins can become a prime target for hackers looking to exploit vulnerabilities and gain unauthorized access to your website.
By regularly updating your plugins, you ensure that any security vulnerabilities discovered in previous versions are patched. This significantly reduces the risk of your website being compromised.
Additionally, outdated plugins can also pose compatibility issues, leading to website malfunctions or conflicts with other plugins or themes. By keeping your plugins up to date, you minimize the chances of these compatibility issues and ensure a smooth user experience.
Conclusion
Updating your WordPress plugins is a vital part of website maintenance. It not only improves security but also enhances performance and compatibility. Whether you choose to update your plugins manually or enable automatic updates, following best practices and staying vigilant ensures that your website remains secure and up to date.
By regularly checking for updates, testing after each update, and addressing any issues promptly, you can keep your website running smoothly and provide a seamless experience for your visitors.
Don’t neglect the importance of updating your WordPress plugins. By staying proactive, you can safeguard your website and leverage the latest features and improvements offered by plugin developers.
Remember, your website’s security and functionality depend on regular plugin updates. Stay informed, stay updated, and keep your website in top shape.
Stay ahead of the curve. Update your WordPress plugins today!
#wordpress#wordpress plugins#wordpress tutorial#cms#website development#plugins#blog post#import#wordpresswebsite#csvimporter#Wordpressplugindata
0 notes
Text
How to Fix Missing MySQL Extension Error in WordPress
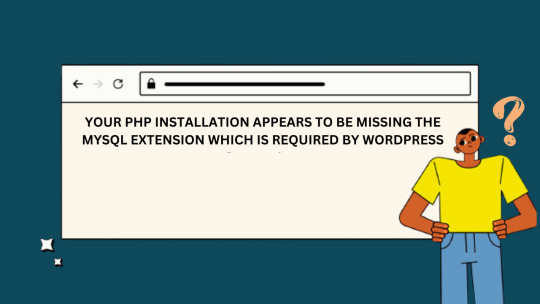
WordPress is a powerful and popular content management system used by millions of websites worldwide. Besides, it relies on various server-side technologies, including MySQL, to store and manage data. Occasionally, users may encounter a “Missing MySQL Extension” error, which can be frustrating but is usually easy to fix. In this guide, we will walk you through the steps to resolve this issue and get your WordPress site up and running smoothly.
WHAT CAUSES THE “MISSING MYSQL EXTENSION” ERROR?
The “Missing MySQL Extension” error typically occurs when your server lacks the necessary PHP extension to connect to the MySQL database. WordPress relies heavily on MySQL to manage and store content, so this error can disrupt the functionality of your website.
STEP 1: CHECK YOUR PHP VERSION
Before proceeding with any fixes, it’s essential to ensure that you are using a compatible PHP version with WordPress. At the time of writing this article, WordPress recommends using PHP 7.4 or later. You can check your PHP version by creating a simple PHP script:
<?php phpinfo(); ?>
Save this script as phpinfo.php, upload it to your website’s root directory, and access it through your web browser. Look for the PHP version information on the page.
STEP 2: ENABLE MYSQL EXTENSION
If you find that you are using a compatible PHP version, but the MySQL extension is still missing, you need to enable it. Follow these steps to enable the MySQL extension:
For Windows Servers:
Locate your PHP installation directory (e.g., C:\PHP).
Open the php.ini file in a text editor.
Search for the following line and remove the semicolon (;) at the beginning:
;extension=mysqli
4. Save the changes.
5. Restart your web server (e.g., Apache or Nginx).
For Linux Servers (e.g., Ubuntu):
SSH into your server.
Open the PHP configuration file using a text editor (e.g., nano or vim). The file is typically located at /etc/php//cli/php.ini.
Look for the following line and uncomment it by removing the semicolon (;) at the beginning if necessary:
;extension=mysqli
4. Save the changes and exit the text editor.
5. Restart the PHP service to apply the changes:
sudo service php<your-php-version>-fpm restart
STEP 3: VERIFY THE MYSQL EXTENSION IS LOADED
After enabling the MySQL extension, it’s crucial to verify that it’s loaded correctly. Create a PHP script named mysql_check.php with the following code:
<?php if (extension_loaded('mysqli')) { echo "MySQLi extension is enabled."; } else { echo "MySQLi extension is not enabled."; } ?>
Upload this script to your website’s root directory and access it through your web browser. You should see a message confirming that the MySQLi extension is enabled.
The “Missing MySQL Extension” error in WordPress can be a hindrance, but it’s usually easy to fix by enabling the MySQL extension in your PHP configuration. By following the steps outlined in this guide, you should be able to resolve the issue and ensure your WordPress website operates seamlessly. Remember to keep your PHP version up to date and perform regular maintenance to prevent similar issues in the future.
0 notes
Link
#wordpress web development company#wordpress development agency#How to Fix the Directory Error in WordPress#How to Fix error in parent directory wordpress#wordpress api integration#wordpress development company#wordpress theme development#wordpress plugin development#custom wordpress development#wordpress plugin development services#wordpress theme development services#wordpress web development agency#custom wordpress web design company
0 notes
Text
A Step-by-Step SEO Guide for Dentists in 2021
A Step-by-Step SEO Guide for Dentists in 2021
This article is a really simple step-by-step guide for dentists from Experdent. Let's begin
What is Dental SEO Dental SEO is the optimization of your website so that it is easy for you to be found by patients online when they search for dental treatment or any service that you offer. In other words, SEO for dentists is to make their dental office rank higher in Google or Bing or Yahoo search results. Do people go to page-2 of Google? Yes, people do go to page-2 of Google. However, this is quite seldom. Over 70% of searchers will click on something that falls in the first five results on a Google page. And almost 90% will click on something on page-1. The rest may likely refine their search and search again rather than go to page-2.
Is SEO Digital Marketing? SEO is the digital equivalent of traditional inbound marketing. Let us explain: While many activities qualify as digital marketing, SEO is the foundation for all digital marketing processes. Conversely, a weak SEO can result in massive marketing expenditure to get results online. SEO builds cred for you with search engines. Think of it as a virtuous loop. The better the SEO for a website, the higher it will rank in search results. The higher it ranks in search results, the more people will click on it. The more people click on a consequence, this tells Google/Bing or any other search engine that yours is a quality website, and therefore the search engines push up the rank of your website even further. A high-ranking site on Google search, therefore, becomes a magnet for visitors. More visitors will lead to more conversions in any marketing funnel, i.e., more people becoming dental office patients.
Does SEO improve the visitor experience on your website? The foundation of SEO is in Technical SEO. Let's unpack that: SEO work for any quality SEO services business starts with a detailed website audit. This audit looks to fix these key elements that go into user experience: - Site Speed - Performance on Mobile - Intuitive navigation - Presence of Metadata including alt tags for images - Presence of appropriate keywords on pages - Submission of sitemaps to search engines In addition, SEO looks for compelling content and quality images and video to create an engaging experience for the visitor to a website. Through this process, technical SEO helps improve user experience while improving the website for search engines to crawl.
Is SEO advertising? The output of SEO is greater visibility for your content for the people who are searching for that content Let's say you live in downtown Toronto and you have a toothache. You will likely open up your computer or your smartphone and search something like this: - Family Dentist in downtown Toronto or - Dentist for a toothache or - Best dentist in Toronto or if its evening or the weekend - Dentist in Toronto open today If your website is optimized for SEO and contains this information (preferably in the schema), then your visitors may see your website featured on page-1 of Google. Thus, SEO is advertising by another means. Content that ranks is the best advertising because research has repeatedly shown that people will click on an organic link that appears more authentic. Research by Wordstream.com shows that "Clicks on paid search listings beat out organic clicks by nearly a 2:1 margin for keywords with high commercial intent in the US. In other words, 64.6% of people click on Google Ads when they are looking to buy an item online!" And here is the kicker - When you run an ad campaign, you get results only while the campaign is running and you are paying for clicks on your ad. In the case of SEO, however, you continue to get results for a long time. Yes, if you don't continuously optimize your website for SEO, your Search Rankings will eventually begin to drop. Why is that, you ask? Simply because your neighbours and competitors will not have stopped, they will continue improving and scaling their websites, and as a consequence, Google will keep pulling other websites over yours.
On-Page optimization Getting Google to like your website and show it on page-1 of its search results means that you need to bring quality to your pages and make them valuable and delightful for your visitors. Remember that the best websites are built for real visitors and not for search engines. The key elements that SEO helps you improve on-page are: - The quality of content on its page and its layout and organization for easy flow. The presence of images and video. - Headlines, subheadings are identified by Headline tags. For example, a page should ideally only have one headline tagged with an H1 tag. Sub headlines can go to H2 or H3 tags. Sub-sub headlines can go to H4, H5, and even H6 tags. - Metadata and descriptions that encourage clickthrough. This is the data that search engines showcase your pages within search results. - The amount of content on the page. Although the jury is still out on the length of an ideal article for Google to show it on page-1, research shows somewhere between 1000 and 1500 words. This does not mean that a page with 5000 words will consistently rank higher than a page with 1000 words. However, it does mean that when choosing between 2 pages that are otherwise identical in quality of content, Google will likely choose to showcase the page with more content in a higher position. - The number of pages on your website (remember, more is not always better). - The freshness of your content etc.
Off-Page optimization The links that other sites on the internet provide your website are essentially treated like votes. The larger the number of websites linking to your website or providing you with backlinks, the larger the number of votes for your website. This quantity of links helps Google decide where to rank your website. That said, all backlinks are not born equal. For example, a link from a higher ranking website carries more value than a brand new one-page website. Some backlinks can be toxic and be damaging for your website's rank on Google. (More on toxic backlinks and how to get rid of those in a future article). The list for how off-page links create value for you can be bullet-pointed as follows: - Citations or directory listings - In context, backlinks from articles or guest blogs - is the link reciprocal - this practice has the potential to reduce the value of the link received - The nature of the website that the link comes from: i.e., is the website in a related space? A link from a gambling website for a dentist is not likely to count as useful. - Keywords in anchor text could indicate that the link has been sourced or purchased. The best links have anchor text that is just the URL of your website or "read more" or "click here," etc.
Technical SEO We have mentioned earlier that Technical SEO is the foundation of SEO for a website. The critical elements of the work done under technical SEO are - Identification and removal of Crawl errors. - Check if your website is secure - check for HTTPS status - Check if XML sitemaps exist & if they have been submitted to major search engines - Check and improve Site Load time - Check whether the site is mobile friendly and upgrade as needed - Check and optimize robots.txt files - Check for keyword cannibalization and edit as needed - Check and improve site metadata, including image alt tags - Check for broken links and eliminate them or apply a 301 redirect that passes full link equity (ranking power) to the redirected page.
Yoast, a company that provides an extremely popular SEO plugin for Wordpress websites, in addition talks about the need for technical SEO to ensure that there is no duplicate content, nor are there any dead links in the website.
As a dentist, how do I build a high-quality website myself While we would recommend that you hire an experienced web developer to help develop or update your dental website, you could build a workable website quite easily as a DIY project There are many website development tools available, and you could choose between them for your DIY project. Three major platforms that you could use are: - WordPress - Squarespace - Wix WordPress will need the most significant amount of expertise, while both Squarespace and Wix use drag and drop functionality for you to build something quickly. There is an argument between SEOs about whether or not SEO is easier to do on WordPress versus Wix or Squarespace. However, what is clear is that WordPress enjoys a much larger ecosystem which gives you access to better tools and developers than does any other website builder. According to Search Engine Journal "WordPress content management system is used by 39.5% of all sites on the web."
Choose a reliable & high-quality hosting company If you go with Wix or Squarespace, the hosting is with the website builder's platform. If you build with WordPress or any other website builder platform, you will need to choose a high-quality, fast, and secure hosting service. Some of the major hosting services that you could consider are: - Amazon Web Services - Bluehost - Godaddy - WPengine - Siteground - Hostgator etc. There are quite literally hundreds of hosting companies for you to choose from. Choose a hosting service that has close to 100% uptime, which has enough bandwidth for your clients to visit without the speed of your website going down. Over and above that, the hosting service should have robust security and offer you a service of backups so that if your website gets damaged or hacked, they can put back the site in a matter of minutes.
How do you do keyword research? As a dentist, you have a scarcity of time. Still, given that you have decided to build a DIY website, you need to ensure that you do keyword research so that Google recognizes your content to contain the answers your future patients or clients are searching for. Some of the tools that you could use for keyword research are: - Google Keyword planner - this is a free tool - Semrush/Ahrefs/Moz - these are paid tools but will help you in getting a solid grounding of keywords
Submit your site to Google Once your website is ready, make sure to create your presence and submit it to the search engine with the following tools: - Google My Business - Google Maps - Bing Places - Yahoo Small business - Unfortunately, this tends to work only in the US unless you subscribe to some listing services.
Google Tools to monitor your website performance These tools will help you gauge the performance of your website traffic and help you find points of strengths and weaknesses on your website - Google Search Console - Google Analytics - Google Page Speed Insights
List yourself on review sites. While the best website for reviews that self selects itself is your Google my business (GMB) page. You would also find reviews very helpful from the following websites. - Facebook - Yelp - RateMyMD - Healthgrades
List your practice in online directories. A presence in online directories is a crucial aspect of SEO for any business. You should list your dental practice in as many relevant directories as possible. There is a wide variety of directories available, and you should choose well. Your choices will be along the lines of: - Local yellow pages or equivalent - Directories for your town or province - Directories for Dentists or healthcare providers - Directories of local chambers of commerce or industry organizations
Is your Dental SEO strategy working? Once you have done all this work, you will need to ask how you find out if your dental strategy is working? To get this answer, you will need to check for some of the following: - Website traffic - this is the first and foremost indicator of performance - Ranking keywords - What is the page and rank of each of the keywords you believe to be vital. And, of course, how do these keyword ranks change over time. - Reviews - the number of reviews and the grade you get on your reviews is outside SEO in a technical sense. However, reviews create a very favourable feedback loop for search engines. Generally speaking, a large number of reviews will push a website up in ranking.
How do you find how you rank without subscribing to expensive SEO tools? If you check your keywords using your computer, the computer will respond based on your search history, thereby potentially fooling you into thinking that your rank has improved. Instead, there is a simple trick to finding how you rank for your target keywords. First, open an "incognito" session in a browser such as Chrome and then search for your keyword. If you don't find it on page-1, go to page-2 continue until you find it. Of course, if you don't rank even on page-10, then functionally, you don't rank for that keyword.
How can Experdent help? While you can most definitely do all of the work that we have enumerated here, you could choose to get expert help to create powerful SEO for your website. At Experdent, our focus is SEO for dentists, and that is just what we do. So, get in touch, send us an email, or call us to set up a time to chat very quickly. At Experdent Web Services, we put these very ideas into practice. We are results-driven, dentist-focused, and experts in SEO for dental offices in North America. So, if you are a dental office looking for SEO or need advice on your digital strategy, call us for a free 30-minute consult.
1 note
·
View note
Text
GSA Search Engine Ranking – Tutorials - For Free
GSA software verified lists set up guide
Table of ContentsUltimate GSA Search Engine Ranker video tutorials Why Is GSA Search Engine Ranker Still Good in 2020 Best GSA Search Engine Ranker Products And Services Help 7 Tier GSA Search Engine Ranker - Overview High-quality GSA Search Engine Ranker video tutorials
The setting alternatives you have are thread count, proxies, and numerous other things The thread count defaults at 50 which is great unless you have a more powerful computer system. Mine is quad core with 16 gigs of rams so I can set it as much as 250 threads. If you do not, 50 will work just great.
Set it to look for new ones every 60 minutes if there are less than one hundred active. Check all of them and get the stopped working proxies if they're older than a couple of hours. The issue with public proxies is that they aren't 100% reliable and you usually receive a high failure rate which winds up losing your time.
youtube
To input your own proxy list, click Include proxy, import them from clipboard and set them to private. gsa ser Video Tutorials. After you add them, go back to settings and decide which proxies to utilize, private or public and when. Although GSA can support a large variety of captcha resolving services, there are 2 types that you really need to understand.
It will try to instantly resolve them for you which saves money on human based captcha services. The 2nd one is a human based solver like Death By Captcha and these are truly low-cost, around $1. 39 for a thousand resolves. The finest method to set it up is to choose a software application based service as your main and then a human based as your secondary.
GSA Search Engine Ranker Tutorial Blog post
To set it up click Include and select the services of your option. Test to inspect your balance, set up your retry limitation and the rest of the options. If you don't desire GSA to ask you when fixes aren't successful, untick package that states to ask the user if everything else fails.
Although some people like using the indexer services, I do not believe they're actually all that required. Instead you can build more links to them with GSA SER however if you have actually got them and wish to utilize them, then feel complimentary to incorporate them. Some of the indexers are GSA SEO indexer, Linklicious, Nuclear Link Indexer, Link Pipeline, Lindexed and Back Links Indexer.
Another choice is the filter which permits you to skip submissions if the URL if appearing in your blacklist. You can leave all these at defaults. Sites lists enable you to keep a log of different kinds of links GSA Search Engine Ranker discovers and sends to. You can then reuse these lists in other tasks to speed up the overall submission process.

Among the alternatives for a brand-new task is to import target URLS and you can do that from a previous website list. After a few months of utilizing GSA Online search engine Ranker, you'll wind up having a substantial website list of validated and effective links that you can conserve and import rapidly in different jobs - GSA Search Engine Ranker help.
Practical GSA SER video tutorials
When you're done setting everything up and all the choices are how you want them, click Start to get your job going. As quickly as you do that, GSA Online search engine Ranker will start going out and discovering targets and sending and validating links. Throughout the procedure, you may get pop ups from GSA that requires you to respond to random concerns.
Select Options tab and you'll see a line that says if a form can't be filled to Ask User or Pick Random. GSA Search Engine Ranker tutorials. To stop turn up, change it to Random. You'll need to change this for each job so remember to do that prior to you begin a new one! So that is an introduction of the GSA interface and the particular functions and alternatives it has.
Then we are going to develop a project together The left side column is a list of links to where you want to send to such as: Blog site remark Directory site Online forum Image Comment Pingback Social Bookmark Social Media Network Video Web 2. 0 Wiki Compared to SENuke XCR, this list might not look like a lot.
This is due to the fact that all of these are platforms used by thousands of different websites. WordPress for example is a commonly used platform so if you pick WordPress post, GSA Online search engine Ranker will post to all sites using that platform which remains in thousands. Do not be tricked by your very first impression, there's unlimited materials of websites to post to behind the scenes! In the main window you need to input all the information for your campaign.
Fantastic GSA SER video tutorials
So now you understand what you are searching for let me take you through developing your first job. To start a brand-new task, click New and a brand-new job will appear. First you need to pick which link types to utilize which will depend upon the kind of project your running.
We can tick some of these alternatives here such as Post, Wikis, Web 2. 0's, and Social media. I'm going to leave it relatively simple for this example - GSA Search Engine Ranker help. After you've chosen your link types, you can start on the remainder of the settings. Get in URL Enter keywords Fill in anchor text You can get in several URLs which GSA Search Engine Ranker will simply turn through at random and make variations of capital and lower case letters.

Basic SEO GSA Ranker: How to build quality backlinks
The anchor text ought to be based on your primary keywords and should remain in spintax format. Your keywords (used to discover websites to submit links to) can be the like your anchor text if you want, simply tick the box that says use keywords as anchor text. Now the next few options are very important for developing a natural looking profile in GSA Search Engine Ranker so you decrease the danger of being punished by Google Penguin.
Get Kick-ass GSA Search Engine Ranker Help at - Asia Virtual Solutions
A partial match is one that consists of the main keyword with something else. I truly recommend keeping a list of partial anchor text. Some examples of branded anchor text for my blog site, matthewwoodward. co.uk would be Asia Virtual Solutions, Matthewwoodward and Matthewwoodward. co.uk. Use scrapebox or Google wonderwheel to get some brand-new words and paste that into here.
How to use GSA Search Engine Ranker correctely
Develops a naked URL of your website which makes your profile look far more natural. varies the uppercase and lowercase letters of anchor text Integrated, these settings will assist you build a really natural looking profile. Don't think we're done yet! Under the options tab, we have even more stuff to fill out.
GSA Search Engine Ranker Tutorial - from Asia Virtual Solutions
Do not tick the box to utilize character spinning! Select to arbitrarily have spelling errors or typos To avoid pop ups like in the past, remember we have to select package to arbitrarily choose a selection. Have all services fill captchas if you established captcha solving services. To use tags, you have an option in between keywords or anchor text.
First, pick the search engines. Right click to search by country which I typically do and this will depend upon your target market and language so I'm going to pick UK and United states. I likewise like to use keywords to find target sites. Although it comes back with less, the outcomes are typically more accurate and pertinent which is what you desire when constructing links.
1 note
·
View note
Text
Breaking an Actual CAPTCHA
Responsible Disclosure Statement: So I’ve told the CAPTCHA maker that his app kinda sucks but I feel compelled now to say that I don’t actually use it to break into the:

1 million installations that this guy has on his WordPress app. So while I may not share my code...you could probably do it yourself fairly easily given my blogposts so perhaps I’ll hide them... With that in mind however, there are plenty of tutorials and people who have the code up on the internet so I’ll leave them up and reiterate that you probably shouldn’t use whatever app you create maliciously without permission because it’s illegal and it’ll make your life unreasonably hard and like for what? Don’t be an ass
So far I've managed to scrape up all my data and chop it up into little tiny bits as outlined in this blogpost Preprocessing CAPTCHAs and so I ended up with roughly 40,000 images of individual character images that I organised into nice little individual letter directories and which I will feed a simple CNN architecture that I'd stolen from an online blogpost that had great success on the MNIST dataset, which is a collection of handwritten digits similar in nature to the pixelated digits that we've extracted.

Since the laptop I'm running this off is really shit and ideally NN's are trained on powerful GPUs or even more ideally Tensor Core GPUs like Nvidia makes or TPUs like Google and some other companies have made for their AI capabilities, I've had to further simplify this NN architecture and reduce the # of epochs.
So it looks like this:
Input -> (Convolutional layer -> Max Pooling Layer) -> (Convolutional layer -> Max Pooling Layer) -> Fully Connected Layer -> Output layer -> Output
And so we have an incredibly basic ConvNet. I don't think I explained the concept of max pooling so I'll explain it now with this picture:

It's a type of pooling layer that squeezes the input data into as small as possible a matrix which will let us reduce the volume of inputs and hence the time needed to train our convolutional layers and the number of neurons required. This of course comes at the price of accuracy of the kernels we are training, but a necessary evil as it will allow us to train more epochs more quickly over time and enhance the accuracy of our kernels.
For our first convolutional layer, we have 20 5*5 filters that produces images of 20*20. As mentioned in previous blogposts, for each of the 20 filters, take the filter and convolve it with the image which as previously stated is just sliding it over the image, taking the dot product of the filter and the chunk of the input image it's covering and set the middle pixel of that chunk we are covering to that dot product.
We then stack the output of these 20 filters to produce the feature volume. These outputs are known as feature maps and will consist of different low level features of the input image such as the potential edges of objects, the direction of light in the image etc.
Now there are activation maps that help to recognise the various parts of the feature volumes and these will be a grid consisted of 20*20 neurons and each neuron is assigned a different part of the feature map and will fire if they 'recognise' that particular part of the feature map.
Since there are 20 filters and 20 output feature maps, there will be 20 activation maps, one for each filter. Thus, the activation map helps us recognise whether there a specific features in the feature map that had been passed to us. Since there are 20 of these, they'll altogether recognise a combination of features.
Then the outputs will enter the second convolutional network where it'll start to recognise higher level features using the exact same process before entering the final fully connected layers which will serve to judge the output of the network and assign probabilities to those outputs/combination of features, that describe how likely it is that they are a particular character.

If the kernels/filters haven't been adjusted to have the correct weights yet, the activation maps won't recognise the correct features and probably makes incorrect judgements in the fully connected layer regarding these. Backpropagation fixes that by adjusting the values in each filter and the weights in the fully connected layer according to the accuracy of the output. This is a pretty complex mathematical process so I won't go into much detail.
This adjustment is known as training.
So we train our network on our datasets in multiple batches, with each fully trained batch being referred to as an epoch.
These batches consist of any part of our datasets and can range from the whole dataset to just a small sample. Here's how training looks:
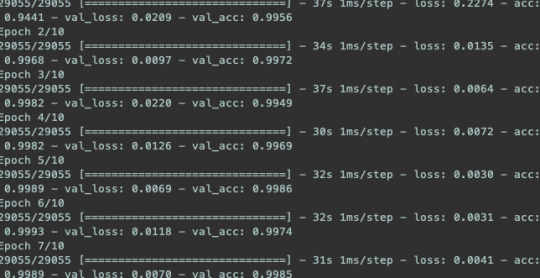
Now we've trained our network on individual letters, we then write a simple script to split our CAPTCHA up and feed the individual letters to our CNN.

The script will throw me a bunch of errors because I'm using deprecated code, piece the letters together again and voila:
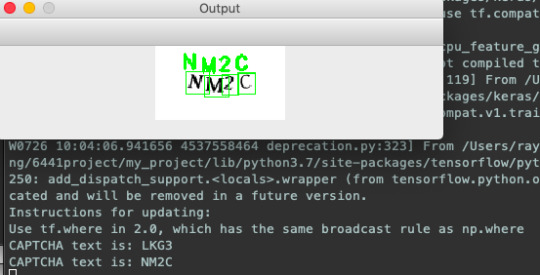
3 notes
·
View notes
Text
17 Reasons Why your website is not ranking in Google Search?
Your website is not visible in Google Search and you are very disappointed. do not worry. You came to the right place. This article will help you to find out why your website is not appearing in Google Search and why your website is not ranking in Google and how to fix it. If your site does not appear in Google search results or is not performing well, then the first step is to check if your site is getting indexed in Google. Go to Google.com and type site: domain.com. Don't forget to replace Domain.com with your domain name. If your site is properly indexed in Google, then it is time to follow the steps below and bring your site to Google Search.

Why is the website not ranking in Google? And how to fix it
1. Google has not indexed your website yet 2. You use more competitive keywords 3. Your website may have a "no index" Tag 4. Lack of Quality Content 5. Check Manual Actions for your website 6. Make sure that Google is able to find and crawl your site 7. No High-Quality Backlinks 8. Check your site's Visibility Settings 9. Your website has been removed from Google 10. Ranking on Irrelevant Keywords 11. Algorithm Changes 12. Competition 13. Poor Page Load Speed 14. Your Site Is Not Mobile Friendly 15. Poor Content Optimization 16. Loss of links 17. Duplicate Content
1. Why is the website not ranking in Google? And how to fix it
Below are some common reasons why your website is not ranking in Google and why your site is not appearing in Google Search. Google has not indexed your website yet Sometime it may take a week or more for your website to be indexed in the Google search engine. The reason for this is that your website is new and does not have any inbound links. But if your website has inbound links, Google will index your site soon. Crawler uses inbound links to index any site. However, no matter how Google will find your website, it may take a few weeks. If you want a Fast Index for your site and want to see it soon in Google Search result, then add your site in Google Search Console. Then submit a Sitemap. Sitemap contains your website URL and helps search engines to crawl your website properly. While this does not boost your search ranking, it can help index and crawl your content faster. In addition, you can see how your site is performing in Google Search through Google Search Console.
2. You use more competitive keywords
If you use single word or short phrase keyword to optimize your website, then your site will not perform better in search result. The reason for this is that single word or short phrase keywords are very competitive. Always use a keyword with four or five phrase words (long tail keyword) with less competition and higher searches. This makes your content more targeted. There are many Keyword Finder Tools available in the market, but the best one is Keyword Planner developed by Google which is completely free.
3. Your website may have a "no index" Tag
The "no index" tag is used to prevent sites from indexing in search engines.
If you have mistakenly added a "no index" tag to your site, it is preventing your site from showing in search results.
Also, if you are a WordPress user, and use Yoast SEO on your site and do not configure it properly, this may also be a reason. Here is a guide on Yeast SEO settings.
4. Lack of Quality Content
If you copy / paste content from another blog or website, Google will not like your site at all. This will reduce your site ranking or stop showing your site in search results. You can also ban your site. Also, if you write your content and put too much or forceful keyword in it, then it is called keyword stuffing. for example, If you are looking for the best sports shoes, then look no further. Our brand offers the best sports shoes that you can use for any purpose. . You can also use the best sports shoes for travel or school. Google dislikes keyword stuffing. This is mainly because it makes bad experience on users. You think that putting more keywords in the content will bring more traffic to your site, but in reality it has the opposite effect on your site. This activity leads to your site search penalty. Also, try to write lengthy content (but don't write nonsense). Lengthy content performs better in search results than short content.

5. Check Manual Actions for your website
If your site is affected by manual actions, Google stops showing your site in Google search. These manual actions usually occur when a website is involved in illegal activities, spamming, and fraud or hoax activities. You can use Google Search Console to test this. When your site is penalized by Google, you can see detailed information from the Manual Actions tab. Also, you will be notified via email.
6. Make sure Google sends your site
Can find and crawl Check crawl errors - If your site has too many errors, Google will crawl your site very slowly. To speed up the crawl process, fix those errors with 301 redirects. Check the robots.txt file - Robots.txt is small text files that tells the search engine bot which pages to crawl on the website and which are not. If you make a small mistake in creating / editing the robots.txt file, Google will stop crawling and indexing your site. Ensure your search for Google bot or other search engine bot Site structure is readily available. If you have recently moved your site to a new domain, which was performing well previously. Can rank poorly now. To avoid this, use a 301 redirect.
7. No High-Quality Backlinks
When Google ranks a content, it uses Backlinks as a ranking factor. Backlinks can make a big difference in your website ranking. Increasing domain authority, Google website ranking and website traffic is very important. But keep in mind one thing, if you create or buy poor or low-quality backlinks for your site, it can severely affect the ranking of your website. Backlinks are very important to increase domain authority, Google website ranking and website traffic.Always try to get high-quality backlinks. 100 quality backlinks equals 1000 low-quality backlinks.Here are some quick tips to get high-quality backlinks,Publish high-quality content. People will automatically link your content. Submit guest posts to other blogs. Do comment on the follow blog and make sure that those blogs are related to your Niche. Make a habit of interlinking. Add your blog to the Top Blogging directories. Submit your blog post to social bookmarking sites. Your blog on top social networking sites Submit Convert your blog post to pdf and submit it to Document sharing sites.
8. Check your site's Visibility Settings
WordPress comes with a built-in option that allows you to hide your website from search engines. This option is good for a new website.
However, sometimes this option is accidentally checked. As a result, the search engine stops indexing your site and your website does not appear in Google search.
If your website is not appearing in Google search or is not ranking, then first you have to uncheck this option. Just log in to your WordPress site and go to the Settings >> Reading page page.
9. Your website has been removed from Google
If you violate Google's quality guidelines, Google can temporarily or permanently remove your site from index and search results. When Google removes your site from search results, here are some terms, De-indexed - Google removes the domain completely from the search result. Penalized - is present in domain or page search result but does not appear in search result even on direct search queries. Sandboxed - Sandboxed is a filter that is applied to new sites. This prevents new websites from being ranked, especially for high-competing keywords. Here is an article on Ahrens: Google Sandbox: Does Google Really Hate New Websites? If you receive a notification that your site is in violation of Google’s quality guidelines. You can fix it and submit it again to Google. Google will reconsider this.
10. Ranking on Irrelevant Keywords
One of the main reasons may be that your Google ranking is low. Perhaps you have used keywords for your site that are not related to your blog or website. For example, you are running a food blog but sharing tech-related content on it which is totally wrong. If you do this, stop it immediately. Otherwise, your Google ranking will be reduced gradually and your site will not appear in Google search result.
11. Algorithm Changes
This can also be a very big reason for your site not appearing and ranking in Google search. Google is always updating its algorithms so that it can provide relevant results for user search. When Google updates its algorithm, many websites lose their search traffic and rankings.
12. Competition
Competition in blogging has increased today. If you optimize your site properly but still have a Google ranking drop, it could be the reason for the competition and your competitors are doing better than you. You can use the SEMrush tool to monitor the activities of your competitors.
13. Poor Page Load Speed
Google uses website load time as a ranking factor. If your site takes longer to load, then you need to pay attention to it. Otherwise, your site ranking will gradually decrease and the position of your site will change in the search result. Fast loading website affects both your ranking and user experience and performs better in search results. You can use the Page Speed Insights, Pingdom and GTmetrix tools to check your website loading speed.

14. Your Site Is Not Mobile Friendly
More than half of the searches are from smartphones. Therefore, Google has started using it as a ranking factor to improve mobile-friendly search results. Google has also developed a mobile-friendly testing tool to determine whether your site is mobile friendly.If you are a WordPress user and manage your website yourself, just install a new WordPress theme that is responsive. Apart from this, you can also use a plugin for this. If a developer has created your website, talk to them to make it responsive.
15. Poor Content Optimization
Your site is not optimized for search engines, this means that your site is not optimized properly for SEO. If you want to see your website on Google's first page, then SEO technique will be your best friend. Proper SEO technique helps you to get higher rank in search results.
However, there are two types of SEO.
On-page SEO Off-Page SEO Here are some quick tips about on-page SEO,
Focus on content quality. Use SEO-Friendly URLs - Make your URL short and readable. Start the title with the keyword. Add modifiers to your title like "2019", "best", "guide", "checklist", "fast" etc. Make your site mobile friendly. Use Outbound Links. Use internal links. Improve website loading speed. Use long tail keyword and related keyword. Optimize your image size. Don't forget to rename the image and add your target keyword to the image alt text. Here are some quick tips on Off-Page SEO as well,Create a link through Guest Posting and Email Outreach. Submit your article to the High-Quality Niche Directories. Improve your social media signals. Join a question-answer site like Quora.
16. Loss of links
When your site loses the link (backlink), your site ranking is greatly affected. Even your site can be removed from the first page of Google search result. You can use Link Explorer, Majestic or Ahrefs tool to check the backlink of your site. These tools give you real-time information and allow you to easily analyze the site's backlinks.
17. Duplicate Content
If you publish Duplicate Content on your blog, Google will reduce your search ranking and will also blacklist your blog. As a result, your site will not appear in Google search result. Always write unique and quality content with detail and deep information. Also, your article should be interesting.
#Affordable Digital Marketing Agency in Jaipur#Digital Marketing Company in Jaipur#Digital Marketing Services in Jaipur#Website Development companies in Jaipur
1 note
·
View note
Text
WordPress 101: Getting Your Website Up and Running
Did you know that over 75 million websites are made on WordPress? That’s almost 22% of all websites around the world. The following are some of the issues which usually creep up while using WordPress and the ways in which those issues can be fixed. So, stay alert because school is in session.
Your WP Site’s Security
WordPress websites are usually attacked by hackers, or in hacker lingo, script kiddies who can creep into your WordPress websites via some common WordPress security vulnerabilities. When looking to secure your WordPress website it is best to start from the ground up.
While there are many plugins that can act as a firewall for your WP website some of them can also work by modifying your .htaccess file or restricting some access at the Apache level, before it can be processed by WordPress. Some great examples are WordFence or All in One WordPress Security.
Antispam Bee and Growmap Anti Spambot are also all great plugins to keep your site safe from hackers and spammers.
WP Site SEO
After you get the peace of mind that the hackers are at bay, you will need to concentrate on getting the SEO part of your WP website right. While the All in One SEO Pack will get you the tools you need to optimize your site you will need some specific plugins to deal with some of the most common SEO issues. One of the main ideas is being able to track your website’s visitors. For that, plugins like Clicky add a small stats indicator. You can also use Google Analytics by Yoast to keep track of how your WP site is doing on the SERPs. While Yoast has not given people problems in the past, recently some users have complained about receiving a 404 error. A way out of this problem is pretty simple. All you will have to do is open WordPress SEO plugin > Edit Files option and write in the following code.
# WordPress SEO – XML Sitemap Rewrite Fix
RewriteEngine On RewriteBase / RewriteRule ^sitemap_index.xml$ / index.php?sitemap=1 [L] RewriteRule ^([^/]+?) –sitemap([0-9]+)?.xml$ /index.php? Sitemap=$1&sitemap_n=$2 [L]
# END WordPress SEO – XML Sitemap Rewrite Fix
Needless to say, WP Google Analytics and Google XML Sitemaps are also two of the best ways to track WP site statistics. The tools are both easy to grasp and get a hand of even for beginners.
Best Sources for WP Themes
There’s really nothing like a stunning custom theme to set your website apart. Easy Theme and Plugin Upgrades makes your life easy by doing all the heavy lifting for you. Other favorites include Customizr, OmaGue, Xodogo, and well, the WordPress themes directory where you will find all kinds of themes from full screen and slider themes to responsive themes and everything in between.
When you have the designs ready, another important step is to turn your designs into a fully-functional site. Luckily, there are professional web development services like psd2html.com, that can help you out with your WordPress implementations and settings. This is a great way to avoid hassle and save time. The workflow is very straightforward, get a free quote anytime you are ready to bring your blog to life.
Best Social Plugins
Giving the ability to your audience to bookmark and share the content of your WP site is the best thing you can do to make sure the content stays fresh and your business stays in their minds. Sociable is the leader when it comes to sharing within the WordPress space. It continues to be the fastest growing plugin for setting rating systems and for reminding your readers to spread the word. Other notable plugins like ShareThis and AddThis are also used for sharing recommended content.
Best Plugins Offering Contact Us Forms Customizations
Plugins also allow users to create their own contact forms that can give your business a professional look and simplify online communication. Fast Secure Contact Form is an easy and powerful form builder. If you don’t already have Jetpack by WordPress you should seriously consider installing it for your website. Slick Contact Form is another widget based plugin which can be used to create customizable contact us forms. It can also handle multiple forms per page to give your website a more powerful effect. Contact Form 7 is another popular plugin which has been downloaded over 16 million times by WP users. Using plugins is by far the easiest way to get the job done no matter what it may be.
Ending Note
If you put all of these in place but fail to monitor or update your WP website it will be just as bad as if you’d never done any of this to begin with. So, use these plugins and exercise constant diligence to get yourself a water sealed abracadabra kind of WordPress website which is safe for doing business or shooting up a blog.
1 note
·
View note
Text
How To Create A Website
You’ll be requested how to start a WordPress blog on Bluehost and to offer a little bit of information about your demographics (age, location, etc…), however after that you can get going earning money by surveys. Then scroll right down to the section with the package deal information. Then level the title to your blog. You can purchase a domain name by the corporate to fix this difficulty, however you’re nonetheless not in total management of the blog as a whole, so it only plugs the leak. Through the use of a running a blog platform, you possibly can write on a weblog like writing in Microsoft Word. You won't start a weblog and earn cash right away. Studying how to start a blog that makes money isn't tough. There are some ways you can generate income utilizing quite a lot of instruments, and the Internet presents plenty of lucrative ideas that can make it easier to supplement your earnings. Think you are the ultimate Fashionista? Give it some thought: if you understand that Person A always posts about night time-out makeup methods, and you want going out, and Particular person B posts random make-up stuff, which webpage you may visit first? Email still works. You wish to make it really easy for individuals to hitch your electronic mail record that they barely think about it.
Examine that your electronic mail address is right, for when you could reset your password in future. This is the place you want to put your chosen blog title aka the URL you'll kind to get to your webpage. Whatever matter you pick, it is advisable to love it, and naturally interested in it. Simply add what you’ve discovered about that particular topic up to now 3, 6 or 12 months since you first wrote the put up. Provide you with an excellent matter and name in your blog or website. So, you've got every thing covered and your first weblog publish is reside. And little doubt an excellent wanting and fast loading blog will appeal to visitors and as mentioned: “the first impression is the final impression”. A concentrate on blog posts. This is the proper place for bloggers who like the concept of “reblogging” posts. Longer posts get better results when it comes to Google rankings and social shares. Native Guide: Google additionally offers a platform “Google Guide” to popularize a selected place a person visits. Create Local Focusing on Content.
You now have a podcast episode that’s ready to be uploaded to iTunes, SoundCloud, or anywhere else and promoted alongside the rest of your content! You possibly can set your content material apart with gorgeous images and video. You possibly can both get the free model or chose a price point primarily based on the number of internet sites you’ll be utilizing the plugin on. Are there any good free themes? Possibly you are the next JK Rowling, but if you don’t put out your stuff on the market, we will never understand it. Verify us out anytime for marketing tips and a free subscription to our cutting edge publication. Free domain name. They provide free domain identify registration with our account. Be at liberty to let us know what blog you started and the way you discovered using this information together with how we could improve it to make the processing of getting started easier. So, you need to begin a blog, however you have no idea how to start a blog? I do know some business homeowners which have had great success on Pinterest. Article directories might be an ideal resource for articles to post in your blog.
When you’re selecting a WordPress theme to get a new weblog on-line, they are going to almost all the time have a sidebar on the appropriate aspect (some cases it’s on the left). It’s sooner, extra powerful, and more customizable than something out there. WordPress is free, straightforward to make use of, very powerful, and very fashionable. You can too simply change the appear and feel of your blog via the use of WordPress Themes. Create a title to your blog which is short and memorable (three phrases, we’d say). As an example, let’s say you need to start a blog for brand new homeowners. So long as you can handle a laptop computer and have just a few dollars for internet hosting charges, nothing can cease you from having a nice web site or blog. Jetpack is an all-in-one plugin that provides your weblog features like stats, related posts, seo, social sharing, safety, backups, velocity, and e mail list management. Tips On How To Simplify Blogging To be perfectly honest, there isn't any shortcut to constructing a successful blog. Setting up a blog is easy, and fast, but to really make it popular and capable of earn good income, there's just no cutting corners. For beginners though, there is a way of making the task faster, and that how to start a blog is by preventing any mistakes that lengthen the time scale in becoming successful and learning how to begin a blog page properly.
youtube
Because there are still many people that still find it difficult understand the intricate thought of starting tweaking their unique web log, we could be susceptible to errors and mistakes that would naturally make us start yet again, lengthening the task. But if you've got a help guide to follow, then there's really silly to make mistakes. Before I get to talk about earn money blogging, I would like to provide you with a short guide on the way to set up your site. First you'll need to visit or , and sign up with them for any free blog. Sign up is straightforward, you merely submit a questionaire plus you've got to verify you current email address. Once you confirm your email then you have your website up and running. Many internet marketers who use a Word Press hosted blog will realize that is automatically set on No Follow, not Do Follow. This implies that when anybody comments, search engines like google won't follow the link that's used in the comment. Consequently, there is no redirect for a own blog. The advantages of using a Do Follow weblog do understand. Step 3- Cut down your list round 2 - Choosing a blog topic is like picking out the American (blog) Idol. Well, it is just acceptable for you to eliminate many of the potential topics you have decided. Maybe you can help to conserve the rejects to get a future blog project. But in the meantime, determine what sort of blog you'd like to pursue. Other examples of blog topics you might choose are: photo blog, tutorial blog and also film review blog. After picking out the 'one' (blog topic) it time for one to eliminate the other lists you are trying to choose.
2 notes
·
View notes
Text
How to Fix "IS-0003: Install Failed - Could not create directory” on PC
In this tutorial, I will show you how to fix the Epic Games installation error “IS-0003 could not create directory” that you are facing on your Windows PC. So, this is going to be a very easy tutorial to follow with steps that needs to be performed in order to get rid of IS-0003: Install Failed – Could not create directory error on Windows PC. Basically, this error occurs when you try to…

View On WordPress
0 notes