#How to Hack Windows/Mac/Linux
Explore tagged Tumblr posts
Visit Tumblr Blog
Explore Tumblr blogs with no restrictions, modern design and the best experience.
Last Seen Tumblr Blogs


Fun Fact
12.7% of mobile users access Tumblr.
Text
how to connect to wi-fi services in pokemon gen 4 (DPPT/HGSS)
it's still possible to access the wi-fi services of the gen 4 games after the official shutdown of nintendo's wii/ds wi-fi in 2013 due to fan efforts by changing your DNS settings in-game - this is called the DNS exploit. this is popularly used in gen 5 which really has no complications, but in gen 4 it's a bit more complicated because the games are So old that they can't connect to the internet through modern routers due to fancy modern internet encryption. the connection either needs to have no password, or have WEP encryption, which most modern routers do not support. i had some people asking me how to do this so here's a post lol
first, it should be noted i use the pkmnclassic service, and i think you should too. this gives you access to old mystery gifts as well as pretty much every other wi-fi feature. their website also allows you to view pokemon currently uploaded to either gen 4 or 5's GTS through your browser. once you get your wi-fi set up properly, connecting to the internet will be easy, but that setup comes first. below i am going to list all the options i am currently aware of and able to explain
option 1 - phone hotspot (easy/convenient, doesn't work for every type of phone)
some phone hotspots are able to use old WEP type encryption, or be password-less. if you have access to a phone hotspot, it's worth taking off the password if it lets you and trying to connect to the gen 4 wi-fi with it before trying any other method, since if it works it's super convenient, just turn on the hotspot any time you want to do something online in gen 4 and turn it back off when you're done. unfortunately this depends on the type of phone and what OS its on and i don't have a list of what phones or OSes are compatible, so good luck lol. mine personally is not, and i have a fully updated iphone
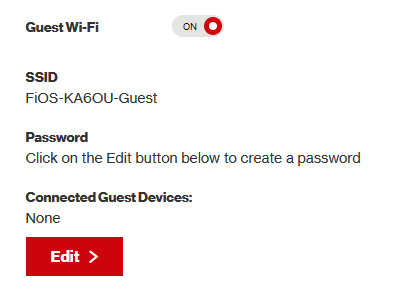
option 2 - guest wi-fi (a little less convenient but still easy if you have access to router settings)
in the same vein as phone hotspots, guest wi-fi hotspots can also work, and this is what i personally use myself. the catch is you have to have access to your router settings, so if you're a young person using a parents' router without access to those or some other situation like that, you may have to ask for assistance every time you want to turn this on/off, which could be a dealbreaker for some unfortunately. but if you're able to do that, simply make your guest wi-fi password-less and turn it on when you want to connect to gen 4 wi-fi and turn it back off when you're done. since these settings pages are so different per internet provider, i can't really give a guide on how to do that here, though mine through verizon fios is pretty straightforward. some guest wi-fi may not work for this but i think most should
option 3 - use an old router that supports WEP encryption (probably inaccessible for most, but only has to be set up once and then you're done)
i've done this in the past but i had my dad's help with the process, i cannot walk you through buying an old router lol. but yes if you purchase an old router and set that up you can have password protected gen 4 wi-fi permanently
option 4 - save backup + emulation through melonds (works pretty much 100% of the time if you have a hacked 3DS and some sort of PC)
MelonDS is a really great DS emulator that you can find here for windows/linux/mac: https://melonds.kuribo64.net/downloads.php
the basic idea is that you can backup your save file/game with a hacked 3DS using Checkpoint or TWLSaveTool (outside the scope of this guide but this is easy to do and you can walk through the steps here) and then run it through melonds, which can bypass all this WEP/encryption hell for you and simply connect to the internet. of course this is not very convenient if you have to constantly back up your saves to do wi-fi stuff but it's better than nothing if you have no other option.
unfortunately setting up the wi-fi can be a pain, and you also need DS BIOS files to run everything properly, which i cannot provide myself for legal reasons but they uh... aren't that hard to find lol, and you can back them up from an actual DS if you have access to the necessary tools for that.
if you use a windows PC, feel free to use my version of melonds which already has all the wifi shit set up, you'll just need to provide your own bios files under emu settings (it's a bit old but it works great for this purpose): https://drive.google.com/file/d/1DQotaqFuBwXz1KYdQWiwxghtn3faLgj-/view?usp=sharing
edit: just found out right after posting this that the most recent version of melonds might work out the box without having to do any particular wi-fi setup? so feel free to try it instead of my version if you like

if you are using linux/mac or don't want to use my version, you'll have to use the melonDS FAQ/google to figure it out, i'm sorry!
by the way yes, this means even if you don't have a gen 4 cart and solely play over emulator, you can trade/battle/etc with people who are playing on DS - they connect to the same servers!
okay and NOW once you have one of those options set up, you can actually connect to wi-fi in game by doing the following:
(these screencaps are from my capture card, i am doing this on an actual DS, but you can also do this with melonds if you're using that option)
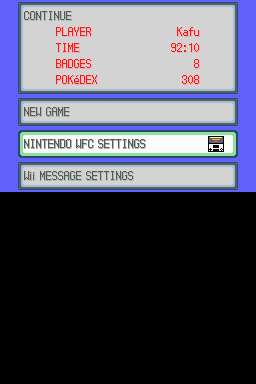
step 1: navigate to "NINTENDO WFC SETTINGS" in the menu where you press continue on your save file, in-game. in gen 4 you need to do it here and not in your DS settings.
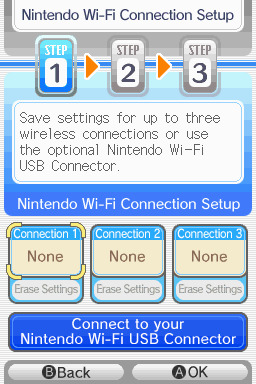
step 2: tap "Nintendo Wi-Fi Connection Settings" and pick any of the three connections here to start the set-up. if you already have some here, i'd click "erase settings" underneath to start from scratch.

step 3: search for an access point and pick your desired access point from the list that comes up, and put in a password if needed (this assumes you have set up your wifi properly at this point)
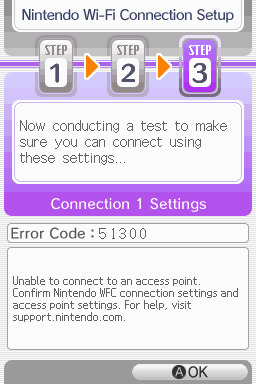
step 4: it will attempt a connection to the internet, and may or may not throw an error. regardless, the error doesn't really matter, you can just hit "OK" whether it's successful or not

step 5: go back into your new connection (the box that previously said "None" should now say "Ready") and scroll down until you see the option "Auto-obtain DNS" - change this to "No"
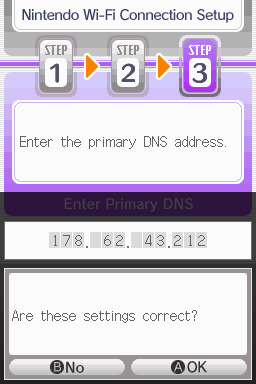
step 6: change the primary DNS to pkmnclassic's DNS, which is 178.62.43.212 - in layman's terms this will essentially let you connect to their servers instead of nintendo's, which are obviously down. as for the secondary DNS, either leave it at 0.0.0.0 or change it to the same DNS as the primary
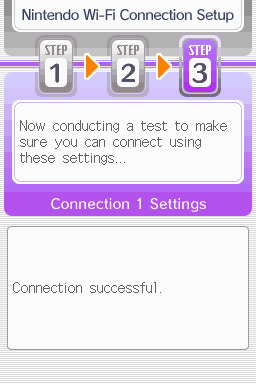
step 7: now would be a good time for a connection test. tap "Test Connection" in the top right. there should be a successful connection. assuming there is a successful connection, congrats! save your settings and enter your game as normal. you'll need to go to the basement of any pokemon center and pick up your pal pad, then try entering the wi-fi club (middle NPC at the counter) to test it in-game and get your friend code.
if there isn't, try a few more times or get closer to your access point - sometimes it's not you, the service can just occasionally be spotty. if you keep getting errors, you can use this site to look up what the error code might mean. if you still can't solve the issue, you may have to try a different method of connection as listed above.
sorry i couldn't be more in depth but frankly i'm not an expert on this stuff either, i'm just doing my best. there are a couple other options for doing this, like taking the password off your modern home wi-fi, or bridging your connection to an old laptop/computer, but the first is particularly dangerous so i didn't want to include it in the list and the second is completely out of my league, i just know people have done it before
good luck feel free to ask questions but no promises i'll have answers. if you need troubleshooting help i'd recommend pkmnclassic's discord over me, they have channels for that stuff (yes i hate troubleshooting stuff moving to discord and not forums as much as the rest of you but it can't be helped lol)
81 notes
·
View notes
Text
Just hear me out...
So, Edge, CoPilot, and worst of all, Recall are just terrible for a large number of reasons - namely privacy and security. We're in a time period where this is just going to get worse and worse that any number of precautions just aren't going to cut it because the people who are doing this to you aren't some random bad actor trying to hack your system. It's a specific bad actor that made the system FOR YOU. And that just about sucks any way you try to cut it.
There are some things you can do - but you might not like it:
Believe it or not, the absolute easiest solution is switching to Linux.
BUT WAIT! DON'T STOP READING JUST YET!
Hear me out. I get it, we grew up on MS Windows and a lot of us are on Apple systems too (which are also riddled with AI garbage), but Linux isn't what it used to be, even a decade ago. And yes, there's like a billion different distributions out there, how do you even choose, right? Let me tell you, even linux users are annoyed by it too. But, linux CAN give you a lot of the same things windows and mac can without the AI and spyware bullshit and the different distributions aren't really that different - it's really just a lot of engineers going, "well this is good, but this is how I WOULD DO IT," and still be able to use the same packages.
Here's how I'd recommend approaching linux without having to throw your os in a garbage fire:
grab a popular distribution of Linux - I recommend Linux Mint (it's pretty user friendly) - read through this: https://linuxmint-installation-guide.readthedocs.io/en/latest/choose.html#
get an empty USB stick (preferably around 64 gigs just to have the space, but you can get away with something much smaller) and create a bootable image with it
Restart your pc with the usb stick in - You can now run linux - for free (always free) - off the usb stick without affecting anything else. You can install stuff, mess around, play with it, yadda yadda.
So yes, there will also be a learning curve with it too. It's linux, it's new, it's different. But once you get your feet wet, you'll start seeing windows as super clunky and bloated.
If you don't want to do THAT, you can also try linux through your browser: Read through this article:
Basically it's a virtual machine that you can play with, but it's a little restricted sooo probably not the most accurate experience, but something to still play with. You can also learn a lot from this site as well:
BUT IF YOU DON'T WANT TO DO ANY OF THAT AND RATHER STAY ON WINDOWS (sorry not a mac user so I can't really think of solutions for mac users)
The alternative is really messing with registry keys and blocking ports that Copilot and Recall use through the firewall which can greatly mess up your PC if you don't know what you're doing.
Did i mention linux is free and it has a MASSIVE community for support?
Anyway - EITHER WAY YOU CHOOSE - we ALL need to start being a little more tech savvy. Things are going to get worse and if we're blind to it, we're walking to our doom willingly.
Just a side note: This doesn't mean linux is like the most secure thing in the world - you still need an antivirus and set up firewalls and be diligent about malware and privacy and such. Like, that's still a 'you' responsibility no matter what operating system you use. So keep that in mind
11 notes
·
View notes
Text
Installing Kali Linux on a USB Stick: A Step-by-Step Guide
If you want a portable, powerful cybersecurity toolkit you can carry in your pocket, installing Kali Linux on a USB stick is the perfect solution. With Kali on a USB, you can boot into your personalized hacking environment on almost any computer without leaving a trace — making it a favorite setup for ethical hackers, penetration testers, and cybersecurity enthusiasts.

In this guide, we'll walk you through how to install Kali Linux onto a USB drive — step-by-step — so you can have a portable Kali environment ready wherever you go.
Why Install Kali Linux on a USB?
Before we dive into the steps, here’s why you might want a Kali USB:
Portability: Carry your entire hacking setup with you.
Privacy: No need to install anything on the host machine.
Persistence: Save your settings, files, and tools even after rebooting.
Flexibility: Boot into Kali on any system that allows USB boot.
There are two main ways to use Kali on a USB:
Live USB: Runs Kali temporarily without saving changes after reboot.
Persistent USB: Saves your files and system changes across reboots.
In this article, we’ll focus on setting up a Live USB, and I'll also mention how to add persistence if you want. and if you seek knowledge about kali linux you can visit our website any time
Website Name : Linux Tools Guide
What You’ll Need
✅ A USB drive (at least 8GB; 16GB or more recommended if you want persistence). ✅ Kali Linux ISO file (download it from the official Kali website). ✅ Rufus (for Windows) or Etcher/balenaEtcher (for Mac/Linux/Windows). ✅ A computer that can boot from USB.
Step 1: Download the Kali Linux ISO
Go to the Kali Linux Downloads page and grab the latest version of the ISO. You can choose between the full version or a lightweight version depending on your USB size and system requirements.
Tip: Always verify the checksum of the ISO to ensure it hasn't been tampered with!
Step 2: Insert Your USB Drive
Plug your USB stick into your computer. ⚠️ Warning: Installing Kali onto the USB will erase all existing data on it. Backup anything important first!
Step 3: Create a Bootable Kali Linux USB
Depending on your operating system, the tool you use may vary:
For Windows Users (using Rufus):
Download and open Rufus (Get Rufus here).
Select your USB drive under Device.
Under Boot selection, choose the Kali Linux ISO you downloaded.
Keep the Partition scheme as MBR (for BIOS) or GPT (for UEFI) based on your system.
Click Start and wait for the process to complete.
For Mac/Linux Users (using balenaEtcher):
Download and open balenaEtcher (Get Etcher here).
Select the Kali ISO.
Select the USB drive.
Click Flash and wait until it's done.
That's it! You now have a Live Kali USB ready.
Step 4: Boot Kali Linux from the USB
Restart your computer with the USB plugged in.
Enter the BIOS/UEFI settings (usually by pressing a key like F12, Esc, Del, or F2 right after starting the computer).
Change the boot order to boot from the USB first.
Save changes and reboot.
You should now see the Kali Linux boot menu! Select "Live (amd64)" to start Kali without installation.
(Optional) Step 5: Adding Persistence
Persistence allows you to save files, system changes, or even installed tools across reboots — super useful for real-world usage.
Setting up persistence requires creating an extra partition on the USB and tweaking a few settings. Here's a quick overview:
Create a second partition labeled persistence.
Format it as ext4.
Mount it and create a file /persistence.conf inside it with the content: cppCopyEdit/ union
When booting Kali, choose the "Live USB Persistence" option.
Persistence is a little more technical but absolutely worth it if you want a real working Kali USB system!
Troubleshooting Common Issues
USB not showing up in boot menu?
Make sure Secure Boot is disabled in BIOS.
Ensure the USB was properly written (try writing it again if necessary).
Kali not booting properly?
Verify the ISO file integrity.
Try a different USB port (preferably USB 2.0 instead of 3.0 sometimes).
Persistence not working?
Double-check the /persistence.conf file and make sure it's correctly placed.
Conclusion
Installing Kali Linux onto a USB stick is one of the smartest ways to carry a secure, full-featured hacking lab with you anywhere. Whether you’re practicing ethical hacking, doing security audits, or just exploring the world of cybersecurity, a Kali USB drive gives you power, portability, and flexibility all at once.
Once you’re set up, the possibilities are endless — happy hacking! 🔥
2 notes
·
View notes
Text
How to easily stream your (New) 3DS to a PC
For a long time, capturing footage from a 3DS was a pain - streaming the 3DS screens either required a hardmod to install a capture card (which, if you can, should still do if possible), or use one of the several wireless methods (NTR CFW and HzMod) that gave poor results, especially on Old 3DS.
Today, thanks to the effors of zbash92, there is now a way to stream the New 3DS display to your computer with actually decent picture quality and low latency!
youtube
New NTR CFW test done back when it was firstly released
Here's a few applications of streaming your 3DS to a computer:
Playing on a bigger screen
Recording footage of 3DS games
Capturing audio for OSTs or music you made on 3DS
Below is a guide to setting everything up, including audio capture.
Requirements
A hacked New 3DS system (Old 3DS users might use HzMod via a separate guide but the performance is VERY POOR. Old 3DS can still have their audio captured by audio cable.)
A good network connection that both the New 3DS and your PC share
(If you want to capture audio) A 3.5mm to 3.5mm audio cable and either a microphone port or a Y splitter that has a microphone port
Setup wireless streaming (3DS)
Install the .cia file onto your 3DS from the latest release of this NTR fork
Run the newly installed app, go through the setup until prompted to run a desired version - pick 3.6 HR at the very bottom
Press X+Y to open the NTR CFW menu and choose Remote Play (New 3DS) - this will show you the IP address your console has, and will also let you configure quality and performance options
Setup wireless streaming (PC)
Install one of the following NTR viewers: - NTRViewer (Windows and Linux, x64) - Snickerstream (Windows, x86 and x64) - kit-kat-slim (Windows, allows using input redirection AKA controlling your 3DS with the PC) - Twix (Windows, also allows input redirection and looks fancy) - cuteNTR (Linux) - cuteNTR-OSX (Mac OS) There are other ones, including for Windows 10/Xbox and even Wii U, but the performance may not be ideal for these
Run the NTR viewer you chose and input the IP address you got earlier. You can also set quality and performance options in the viewer as well as rendering options if available
Connect to your 3DS and enjoy looking at your console on a bigger(?) screen!
Setup audio capture
Connect the 3.5mm to 3.5mm audio cable to your 3DS headphone port and PC's microphone port (directly or via the Y splitter in computer's headphone port)
You can test the audio by either enabling listening to the new microphone device or using a program such as Audacity or OBS
Notes and Issues
TRY NOT TO CLOSE YOUR 3DS LID! It can sometimes lead to black screens and no response from the console, in which case you should hold the power button until it shuts down
This CANNOT record your DS, DSiWare or GBA VC games. Those require a capture card or using an emulator instead. Audio can be captured regardless of what your system is running
Some games may disable your internet connection, which means that you need to use patching option provided by NTR CFW or your NTR viewer of choice
If your NTR Viewer doesn't work, check firewall and viewer's render settings first and then try other viewers for your system
If your viewer disconnects on still screens, increase the timeout/wait time of the viewer if available (for Snickerstream, it's in Advanced settings)
If you have choppy framerate, decrease the quality, fiddle with QoS value and Encoder Priority, or get a better internet connection :p
If you have audio issues, try switching between microphone out and line out
-- Red
6 notes
·
View notes
Text
The main reason for Chromebooks coming in was because Windows is laughably hackable, and kids are smart enough to explore and get rid of any restrictions to do whatever they want on school laptops; us 90s kids knew well how to get Ti-82s to play Tetris and Doom and do whatever we could to have them be anything but calculators.
Google sold schools one thing; unhackable and absolutely boring cloud laptops, which had bombed so many times before as regular Internet appliances for adults that nobody liked (look up the 3Com Audrey and Oracle's Network Computer) because they were restrictive experiences 'for babies'. The market handily rejected the network computer model because people love to customize their computers and have them do what they want at any time. Including nine year-olds. And they don't need a 24/7 Internet connection.
So Google and schools just decided 'we don't want that' and forced Chromebooks on all the kids so that this goddamned dumb computing model would work somewhere, with no file managers, no need to double-click, and very limited customization. So it's that garbage 'network computer' rebranded as a 'cloud OS' basically became the most used platform in schools by default because Macs are now a premium product and a commodity Dell, even in its most bare-bones implementation (terrible processor, anemic storage and graphics which can barely run Candy Crush) can be hacked easily by a smart kid.
Telling them to learn Linux; come on. It's been 25 years. We're not learning Linux unless we want to. You can install Linux on a Chromebook but it's a joke there and as already mentioned, it's locked down on most school systems.
I have a Chromebook tablet I bought during the pandemic just so my tech skills are polished on every platform. It's the most dog-slow platform ever and trying to watch YouTube brings the thing to the brink of death. I only use it if I need to follow multiple games at the same time and need something to show a gametracker or to assist a customer (usually a senior babied to death by their inheritance-wanting helicopter child who doesn't want them to go anywhere but Facebook and can't stand tech support calls) with troubleshooting their own trash Chromebook.
And please don't mention Android tablets unless you hate yourself. I tried to use one from Dell for a year (they only made it because Intel paid them to for a bit) and the moment I could, I raced to get an iPad because Google is NOT good at computers, ever.
We need to lay more blame for "Kids don't know how computers work" at the feet of the people responsible: Google.
Google set out about a decade ago to push their (relatively unpopular) chromebooks by supplying them below-cost to schools for students, explicitly marketing them as being easy to restrict to certain activities, and in the offing, kids have now grown up in walled gardens, on glorified tablets that are designed to monetize and restrict every movement to maximize profit for one of the biggest companies in the world.
Tech literacy didn't mysteriously vanish, it was fucking murdered for profit.
78K notes
·
View notes
Text
Soulstone Survivors 1.0: Your Gateway to Power-Gaming

Soulstone Survivors 1.0 launches the fast-paced action roguelite game on Linux, Steam Deck, Mac, and Windows PC. Thanks to the ongoing creative talents of developer Game Smithing Limited. Which you can find on both Steam and Humble Store with 90% Very Positive reviews.
Soulstone Survivors 1.0 launches today, and honestly, it feels like the gates to power-gaming Valhalla just swung wide open—on Linux, and Steam Deck no less. Grab your favorite DE, crank the RGB, and get ready to melt your GPU in the best way possible, because this fast-paced action roguelite just went full release.
So, what’s the big deal with Soulstone Survivors 1.0?
Picture this: you, dual-boot hero or Steam Deck nomad, drop into a cyclone of monsters so dense it looks like your screen forgot how to breathe. You flick a wrist, unleash a torrent of twirling axes wrapped in purple lightning, and a second later the entire horde evaporates into shiny soulstones. Within this new release, every run turbo-charges that power fantasy until you’re a walking cheat code. That’s the core loop, and it’s finally polished to a mirror shine.
22 Hunters, two brand-new badasses
Version 1.0 hands you twenty-two unique Void Hunters to flex with:
Machinist – pilots a lumbering mech stacked with cannons and saw blades.
Samurai – a fan-requested blade master who can chain dash-slashes like an over-caffeinated blender.
Each hunter has forgeable weapons and a personal skill tree, so even the same class turns into a totally different monster once you start stacking unlocks.
Build like a mad scientist
Hundreds—yes, hundreds—of skills and passives rain down every time you level. Mix burning chakrams with magnetic pulls, or pair piercing railguns with frost novas. Buffs stack forever, so if “infinite crits at 900% attack speed” sounds spicy, you can absolutely cook that up in Soulstone Survivors 1.0 adventures.
Soulstone Survivors - 1.0 Release Trailer
youtube
Voice lines that slap
Until now, Void Hunters fought in stoic silence. Not anymore. Every character comes fully voiced, tossing out quips mid-slaughter that make the chaos feel personal. It’s a small touch that amps the hype way higher than it has any right to.
Ascend—or go home
Permanent upgrades layer on top of your skill trees, and once you fill those out, you unlock Ascension forms. Think temporary, god-mode transformations that nuke bosses in a single screen shake. In Soulstone Survivors 1.0, you get to pop Ascension, watch a legion explode, breathe deep, queue next wave.
Soulstone Survivors 1.0 brings the Void King
The devs didn’t just tie a bow on Early Access—they released a new final boss. The Void King stomps in with galaxy-sized HP, bullet-hell patterns, and an attitude. Defeat him and you’ll swear you broke reality… until you slam the “Play Again” button five seconds later.
Raise the stakes with curses
If “normal” feels too chill, load up a stack of curses. In Soulstone Survivors 1.0 enemies get chunkier, elites spawn earlier, meteors rain, and you snag extra materials for your trouble. More pain, more gain—perfect soundtrack for your late-night grind sessions.
Why Linux gamers should care
The game’s Vulkan backend purrs on Proton and native Linux builds alike, hitting stable frames even when the screen looks like confetti on steroids. Steam Deck? Playable. Desktop? Butter. No hacks, no wine tricks—just launch, play, dominate.
Soulstone Survivors sold over a million copies in Early Access with a 90% “Very Positive” rating, and the 1.0 full release feels like the devs took every wishlist item and slam-dunked it. So fire up your favorite distro, link up with your friend on Discord, and let that mountain of mobs know exactly who’s god around here.
Grab your copy, dive into the atmosphere of this fast-paced action roguelite game on Steam priced at $9.74 USD / £8.44 / 9,74€ with a 35% discounts. Or regular price on Humble Store. And remember: as Soulstone Survivors 1.0 launches — the Void never stood a chance.
#soulstone survivors#action roguelite#linux#gaming news#game smithing limited#ubuntu#steam deck#mac#windows#pc#unity#Youtube
0 notes
Text
Wireshark is a powerful network protocol analyzer tool that is available open source. This is a popular choice of security analysts and ethical hackers to monitor the network. There are ways to hack into a WiFi network using known vulnerability exploits. You can easily use Wireshark to do such hacking without knowing much about network protocol. Wireshark is available on all popular operating systems including Linux, windows, and mac OSx. Wireshark is an important tool to learn for a security tester. This can help save hours finding problems and security issues at any place. We have manually created this list of useful tutorials and courses that can help any beginner learn this tool in no time. Wireshark Beginners Tutorials: Simple and Focused These are some tutorials for beginners at Wireshark. These are simplified tutorials that cover basics. You can move on to the advanced topics once you have learned the basics. How to Use Wireshark to Capture, Filter and Inspect Packets How to Use Wireshark: A Complete Tutorial Wireshark Tutorial and Tactical Cheat Sheet | HackerTarget.com Quick and dirty Wireshark tutorial Wireshark Tutorial: Network & Passwords Sniffer Wireshark Tutorial – Linux Hint Wireshark tutorial: Using Wireshark to sniff network traffic Understanding Wireshark Capture FiltersEmailFacebookLinkedInRSSTwitterYouTubeFacebookLinkedInRSSTwitterYouTube How To Go From 0 to Sniffing Packets in 10 Minutes - Motherboard Wireshark - The best open source network packet analyzer(Part I) (Real world open source) Wireshark Video Tutorials and Courses To Learn Online This is a list of Wireshark video tutorials available on youtube. Some of these are a big playlist of tutorials that you can learn at your own pace. Wireshark Tutorials for Beginners Playlist - YouTube HakTip: Wireshark - Packet Capturing and Analysis - YouTube Decoding Packets with Wireshark - YouTube Tutorial: Packets don't lie: how can you use tcpdump/tshark (wireshark) to prove your point. - YouTube The Ultimate Wireshark Tutorial - YouTube Wireshark - YouTube Wireshark eBooks and PDF Tutorials You can download these ebooks and learn Wireshark offline. Robot Check - This is a book about Wireshark usage and various tips about effectively utilizing it. 1893939758 - Good book for beginners, it contains a snapshot of screens for windows users and is very simple to follow. User Guide Chapter 1. Introduction Wireshark Lecture Wiresharksection Wireshark Tutorial Wireshark Tutorial Wireshark Cheatsheet and Quick Reference Resources These are some cheat sheets and printable PDF files that you can use for quick reference while using Wireshark. Wireshark Display Filters Wireshark 802.11 Filters Reference Sheet Wireshark Tutorial and Tactical Cheat Sheet | HackerTarget.com Wireshark Websites, Blogs, and Forums for More Help These are other useful websites and resources where you can look for some help. Sniff free or die | The official Wireshark blog - Official Wireshark blog that has frequent updates about Wireshark releases and related stuff. Packet Foo | Analyzing network packets since 2003 - You can often find interesting Wireshark topics on this blog. Frequent 'Wireshark' Questions - Network Engineering Stack Exchange Summary Wireshark is a powerful packet analyzer. There are plenty of free resources available on the internet for you to learn. Hope you find this list useful.
0 notes
Text
If you want a safe way to try it, try using a virtual machine running linux mint to start with.
As for why you're getting propaganda, read below
Linux has recently started to become much more mainstream with non technical youtubers switching over to it and have been talking about their experiences in doing so. Among these are:
- PewDiePie
- Atomic Shrimp
- James Lee
There's a lot of reasons for it, but the short one is that this october, microsoft will cease mainstream Security patches for windows 10. As a note, this is the shortest support cycle they've ever offered (windows 7 was supported until 2020), and these security patches are installed silently in the background without prompting you, even for a restart, in windows 10. This leaves users with three options:
1. Stick with windows 10, despite the lack of security. - this is a terrible idea, as developers usually stop caring for backwards compatibility with recent updates, and these security patches are often the only thing stopping you from being hacked without any interaction on your end. You'd be surprised by the amount of compromising info you actually have on your computer, and how many times one of those silent security patches saved you from being screwed over.
2. Upgrade to windows 11 - this is a fairly unappealing option for a lot of people largely because windows 11 is... pretty annoying. The new features that are exciting and worth using are extremely buggy and broken. Several existing features have been removed, and the majority of new features are things like AI, crypto and advertising which are constantly pushed on you. Using windows 11 requires you to re-learn a lot of fundamental ideas within previous versions, at which point... many realise that option 3 is more appealing.
3. Switching OS - okay. I am an OG mac hater... but these days, even I can see that OSX is more appealing than using windows is now, because it's just, you know, an operating system. That said, some of windows 11's new features like virtual desktops and tiling are worth using...
If only there were an OS that had them already and had already patched out all the bugs many moons ago? Hmmmm.
Linux' biggest selling point is its customizability. The idea that your system can include as many cool features as you want, and as few annoying unfinished features as you want. Naturally it's also both been getting easier to use, and more capable.
Now that's not to say it's quite as easy to work with as other systems. Switching to linux is a bit like switching to mac, but with none of the guard rails, and if every major mac release was still recieving updates that spiralled off in their own directions. It can be pretty confusing to start with for sure. But it is certainly getting better.
Linux mint continues to be one of the best starting points for newcomers, and for gaming, linux has gotten really easy to work with. But. For other usecases, it can be a bit of a pain still. Specifically, photo editing is probably one of its weakspots, either requiring you to install a beta version of GIMP with multiple plugins, or to run through the grand riddle of figuring out how to install either photoshop or affinity using wine. It can also be tricky to work with more uncommon hardware (though there is a great app called input-remapper that has saved my ass so many times)
And of course sometimes you just encounter something that you need to fix or install and trying to fix it becomes a living nightmare because it feels like you're the first person in the history of the universe to encounter this issue. Tbh, that happens with every system, but especially when you're new to linux, it feels like the esoteric bug gods are targetting you specifically.
So. That's limnix. If you want recommendations lmk, otherwise, an easy way to try it out would be to install virtual box or vmware player, then install linux mint onto it.
Bro why is my dash filled with Linux propaganda I'm gonna get Ideas above my skill level and fuck up my pc trying to follow them.
316 notes
·
View notes
Text
Anytype Review: Privacy Focused Alternative Of Notion

Managing tasks, projects, and work manually is difficult. You need a tool that gives you an advantage to manage your work and collaborate with others easily.
You need an all-in-one workspace app that can organize your work easily. Many such tools give these features.
One of the tools is Anytype, a privacy-focused all-in-one workspace app that manages your tasks, notes, wikis, projects, and everything you want to store.
Let’s look at any type of app and see the features, how much it costs, and other alternatives that might be good for you.
Subscribe to Productivity Side Newsletter to get useful productive hacks, tricks, and tips weekly.
What Is Anytype

Anytype is a privacy-focused all-in-one workspace and notetaking that organizes and stores your notes, tasks, projects, wikis, and files locally instead of the cloud.
The app gives you secure and decentralized sync ability with open-source code.
It stores on the local device with your on-device encryption to protect your privacy and data. Anytype is available for Mac, Linux, Windows, Android, and iOS. You can see their doc on how they keep your data safe.
youtube
Pricing
Anytype is free to use with no extra cost. If you host your data on your device, then Anytype is free to use.
For those who want a backup service, you can use Anytype for up to 1GB of storage free. After that, you can pay a certain fee. You can contact them to know the pricing.
Features Of Anytype
Here are some features of Anytype to know what they are offering and how you can use these to store your notes.
Block-based editor
Create workspaces
Take notes privately
Multiple views for projects and tasks
Different templates
Widgets
Graph and database view
There are many features in Anytype you can explore. When you will use the app it you will able to explore more features.
Alternatives Of Anytype
Anytype is surely a powerful tool with its promising features. But let’s look at some alternatives to Anytype to know more about tools like this.
Notion: Due to its many uses, including note-taking, project management, and collaboration, Notion has become incredibly popular. Users can build any type of tool using text, graphics, databases, and more thanks to its block-based structure.
Obsidian: Obsidian is a unique note-taking app that focuses on building a knowledge graph of interconnected ideas and notes. To develop a network of knowledge, it encourages users to establish connections between notes. The platform is well-known for supporting markdown, allowing backlinks, and enabling users to make personal wikis.
ClickUp: ClickUp is a productivity and project management app. There are many features, such as goal monitoring, task management, and document sharing make it powerful. ClickUp serves both individuals and teams looking for a central point for their work because of its collaboration features.
Mem AI: Mem AI is a powerful note-taking app with AI features in it. The software automatically analyses and categorizes notes using machine learning techniques, which helps users retrieve information quickly.
Supernotes: Supernotes’ card-based system offers an innovative way to take notes. Individual notes can be created on cards, which users can then join to create an ideal network. The platform offers an efficient note-taking experience because it is designed to be quick and easy to use.
Agenda Notes: With Agenda Notes, you can arrange your ideas and tasks in a timeline manner. Those who value an organized, time-based information structure may find this app useful.
Twos App: The Twos App offers a simple interface for managing tasks and taking notes quickly. Because it aims to remove distractions, the app is a compelling option for those who want a simple and uncomplicated user experience.
The needs of your projects or tasks, your workflow requirements, and your personal preferences all play a role in selecting the best productivity tool. Every Anytype alternative has advantages and disadvantages of its own, depending on the tastes of the user.
In Conclusion
Anytype is a powerful workspace and note-taking app.
It stands out in a competitive market of productivity tools with its privacy-focused on storing data locally, customization, and collaboration.
The final decision about a productivity platform, however, is based on use cases, and personal preferences.
Before committing to Anytype or any other productivity tool, it’s good to look at the requirements of your workflow.
Choosing an app to store your notes, projects, and ideas can help you improve productivity in both your personal and professional life.
Subscribe to Productivity Side Newsletter to get useful productive hacks, tricks, and tips weekly.
1 note
·
View note
Text
Top 8 Cybersecurity Skills You Must Have

In an era where businesses increasingly operate online, handling vast amounts of digital data and sensitive information, the demand for cybersecurity expertise has reached an all-time high. Cybersecurity refers to the practice of protecting computer systems, networks, devices, and data from theft, damage, unauthorized access, or any other form of unauthorized or malicious use.
In this comprehensive guide, we’ll delve into the top eight cybersecurity skills, expanded from the original five due to the evolving landscape of the field. By the end of this tutorial, you’ll be well-equipped to embark on a rewarding career in cybersecurity.
Networking and system administration
At the heart of cybersecurity lies an intricate understanding of networking. To effectively secure data, you must grasp the technical intricacies of data transmission. Earning certifications like CompTIA Security+ and Cisco CCNA is a solid starting point. System administration is equally crucial. It involves configuring and maintaining computer systems, demanding an inquisitive mindset for exploring various computer features and settings. Networking and system administration are the foundational pillars of cybersecurity, allowing you to understand data flows, system vulnerabilities, and potential entry points for malicious actors.

Knowledge of operating systems and virtual machines
A cybersecurity professional’s proficiency should encompass operating systems like Windows, Linux, and Mac OS. Versatility across multiple OSs is essential, as the digital landscape comprises a diverse range of environments. Moreover, familiarity with Kali Linux, a Linux distribution renowned for ethical hacking and penetration testing, is invaluable. It boasts an arsenal of tools for Penetration Testing, Malware Analysis, Security Research, and more. Operating systems are the battlegrounds where cybersecurity experts defend against threats and vulnerabilities, making mastery of these environments essential.
Network security control
Network Security Control comprises various measures to bolster network security. Understanding how your network functions, the roles of routers, firewalls, and other devices is fundamental. Firewalls, both hardware and software, serve as gatekeepers to block unauthorized traffic from the internet. Cybersecurity experts employ firewalls to filter and prevent illicit network access. Proficiency in Intrusion Detection Systems (IDS), Intrusion Prevention Systems, Virtual Private Networks (VPNs), and remote access is essential. As a cybersecurity practitioner, you must operate IDS to identify security policy violations and malicious network traffic. These tools are the guardians of the digital kingdom, safeguarding against unauthorized access and malicious activity.

Coding
Cybersecurity professionals should acquaint themselves with coding languages. This knowledge is pivotal to addressing future cybersecurity challenges. Coding languages to explore include:
C and C++: Low-level programming languages vital for cybersecurity, allowing you to dissect and understand the inner workings of software and systems.
Python: A high-level language useful for identifying and resolving vulnerabilities through scripting and automation.
JavaScript: Ideal for countering cross-site scripting attacks, making the web safer for users.
PHP: A crucial skill for safeguarding websites, as it is a commonly targeted language by cybercriminals.
HTML: Fundamental for understanding web page structures and identifying potential vulnerabilities in web applications.
Go lang: Valuable for cryptography, a cornerstone of secure communication in the digital realm.
SQL: Vital for recognizing and mitigating SQL injection attacks, a common technique used by attackers.
Assembly Language: Essential for comprehending malware functionality, aiding in malware analysis and reverse engineering. Coding languages are the tools in a cybersecurity expert’s arsenal, allowing them to analyze, detect, and mitigate threats.
Cloud security
As organizations increasingly adopt public and hybrid cloud platforms such as AWS and Azure, professionals with cloud security skills are in high demand. Just like Application Development Security, Cloud Security emphasizes building secure systems from the outset, making professionals proficient in managing platforms like Microsoft Azure, AWS, and Google Cloud highly sought after. Cloud security is not just about securing data in the cloud but also configuring cloud environments, enforcing access controls, and ensuring data integrity, making it a critical skill in the digital age.
Blockchain security
The rise of blockchain technology underscores its significance in enhancing security. Cybersecurity experts must acquaint themselves with blockchain’s security aspects. It holds the potential to transform security in areas like Internet of Things devices, network control, supply chain integration, identity management, and mobile computing. Blockchain’s complex, decentralized nature makes it an ideal solution for securing critical data in a digital world rife with cyber threats. Understanding how to implement and maintain blockchain security is essential for future-proofing the digital landscape.

The Internet of Things (IoT)
With over 30 billion IoT devices projected to be connected globally by 2025, security vulnerabilities multiply. IoT security takes center stage, emphasizing the need to protect connected devices and networks, even those with minimal human intervention. The complexity of IoT ecosystems requires cybersecurity professionals to secure these devices, data transmissions, and networks. IoT security emphasizes protecting connected devices and networks over the Internet, especially since most of these devices access networks without human intervention or oversight. Therefore, it becomes important to make sure that proper security measures are in place so that IoT devices can be left alone to perform their functions automatically, without cybersecurity experts having to be concerned about keeping out unauthorized intruders.
Artificial Intelligence (AI)
Artificial Intelligence emerges as a game-changer in cybersecurity. It introduces automation, enabling cybersecurity professionals to identify and respond to threats more effectively. AI can evolve to handle emerging threats and hacking techniques, significantly bolstering cybersecurity measures. AI brings a level of automation and support that is unmatched by human capabilities, catching threats that may otherwise go unnoticed and unaddressed. Artificial Intelligence can also be trained to learn and evolve, making it better equipped to handle new emerging threats and hacking techniques. This makes AI a valuable ally in the ongoing battle against cyber threats.
Additional cybersecurity skills
In addition to the primary skills mentioned above, consider these supplementary skills to strengthen your cybersecurity prowess:
Risk Analysis
Identifying, managing, and mitigating risks is pivotal. Cybersecurity professionals are required to identify, manage, and mitigate risks, making them invaluable assets to organizations looking to protect their digital assets.
Information security
Protecting electronic data from unauthorized access is a foundational skill. Companies require skilled professionals who can protect their electronic data from unauthorized access.
Security incident handling & response
Preparing to handle security threats in real-time is an essential skill for any cybersecurity expert. With security incident management, you are required to identify, manage, record, and analyze security threats in real-time. As a security practitioner, you must also manage and analyze the security information and event management (SIEM) tools and services. Handling security incidents effectively is essential for minimizing damage and maintaining the integrity of an organization’s security.
Security audit
It is an internal check that is carried out to find flaws in the organization’s information system. Security audit and compliance knowledge are very crucial because any missed area of regulatory compliance might incur significant fines and penalties for the organization. Conducting security audits is essential for ensuring that an organization’s security measures are effective and compliant with relevant laws and regulations.
Laws and regulations
This is an often overlooked cybersecurity aspect. There are several cybersecurity laws and regulations that you should be aware of. These laws define how you can use the internet and protect people from becoming victims of cybercrimes. Understanding the legal and regulatory aspects of cybersecurity is essential for ensuring that an organization’s practices are in compliance with the law and that individuals’ rights are protected.
Conclusion
Cybersecurity is an ever-evolving field. Staying current with new hacks and tools is essential. Moreover, soft skills play a crucial role in advancing your career in cybersecurity. This dynamic and in-demand skillset can lead to a highly rewarding career, with numerous job opportunities and competitive salaries.
Are you ready to embark on your journey to becoming a cybersecurity professional? The cybersecurity landscape is constantly evolving, making it an exciting and rewarding field for those with the right skill set. If you have any questions or need further guidance on acquiring these skills, feel free to ask in the comments section. Your journey to becoming a cybersecurity expert begins here!
Interesting headings:
Affiliate marketing case studies
Bonuses
Reviews
0 notes
Note
Which computers can and can't run Linux? I've always heard of it but I haven't ever found the right person to ask what it is and what it allows you to do.
Wow, my first ask! Thanks! Let's try this.
To answer your question, any x86 computer can run Linux. This probably means any computer you own, specifically anything with an Intel or AMD CPU, which is pretty much all computers except some tablets, and Macs made after 2018 or so. (Yes, I know versions of Linux exist for ARM computers, you can probably find them if you need them, we are not having that conversation.) Any Windows desktop or laptop you have should be able to handle it.
As for what you can do with Linux, it basically just lets you use a computer with a different operating system than Windows or Mac. Since it is open source, it is very common for professionals to use it for custom made or embedded applications, like I have a friend who works on a company that makes robot tractors who use machine learning to recognize and pick weeds, while leaving crops intact. For whatever reason, it's easier to do what they do on Linux. So much of the world runs on it, even if you don't see it every day. (Unless you have an android phone, which is based on Linux)
The main issue with trying Linux as a beginner is it is highly fragmentary, as there are many organizations that adapt it to different needs. Different versions are called Distributions or Distros.
As for what distros to use, I have heard Ubuntu and Mint are good for beginners, and are the only ones I have really played with it. There are also specialized versions of Linux like Kali, which comes with hacking tools, if you want to learn hacking (Be sure to only use it legally if you try it!). There are also specialized versions for servers and other business applications. There are even specialized versions for gaming, like on the steam deck. Any version you are interested in should have instructions on how to install it on their site, but be sure to set up a dual boot if you don't want to destroy your install of Windows/MacOS. You can do this either by adding a second SSD, or partitioning your current one. If you just want to experiment though, you should use virtualization, more details on that later.
I have to warn you though, if you are planning to install Linux and be able to do the exact same things you are currently doing on your PC with no friction or frustration, you might be disappointment, as demonstrated by Linus Tech Tips!
I am personally not really a Linux user myself. It is great for programmers and for industrial applications, but personally I find the third party software support isn't really good enough for anything I want to do, that I can't do more easily on Windows or Mac, like creative or financial software. This is why I didn't mention Linux in my Mac post (much to the annoyance of a few snarky commenters), as I wouldn't encourage a non technical person to "Just try linux" if they are using their computer for the web and basic productivity. Anyone who wants to install Linux on an old mac has already done so and doesn't need me to tell them to do it. I don't really code so Linux isn't really for me, but I'd definitely encourage you to try it if you are curious. Each distro tends to have its own small suite of specialized software but a lot of Linux users code their own stuff.
That's my two cents as a non expert. If you want to try it there are loads of youtubers that can walk you through it. Even if you don't end up daily driving it, I'd recommend installing it to try it. If you want to experiment with it without risking partitioning your SSD, I'd recommend trying a virtual machine, where you can install it on a virtual emulated computer without risking your hardware. Here is a video that discusses how to do this, and it also shows off Kali Linux and how to install it, so if you want to know more this would be a good jumping off point. https://www.youtube.com/watch?v=wX75Z-4MEoM
1 note
·
View note
Text
How to create an eth wallet for erc20 tokens
In this guide, we will tell you how to create a wallet for Ethereum, how to send and receive crypto to it.

What is an Ethereum (eth) wallet
Ethereum is a digital currency that needs to be stored somewhere. For this purpose, crypto wallets were created, which are used to send and receive cryptocurrency, trade, and pay for goods and services online.
Any storage for ether has a set of private keys. A private key is a secret code of letters and numbers that designates certain coins as the personal property of the user. Their complexity certainly doesn’t make it easy for users to remember. ERC20 token generator is exactly what crypto wallets are for. When you send Ethereum coins to your wallet, it stores all the keys associated with them, allowing you to access them without having to enter your private key each time.
Types of Ethereum wallets
Cryptocurrency storage can be divided into two main categories: cold and hot.
Cold:
Hardware crypto wallets. Such devices look like flash drives and are considered the safest storage for ETH coins. This is because they store private keys in such a way that even when connected to a virus-infected device, they remain safe. Because they operate offline, hackers cannot hack into them and steal Ethereum.
Paper crypto wallets. Such repositories are nothing more than a public and private key generated from a website. Their advantages are that they work offline and are free, and they are very easy to create. The disadvantages include the fact that, unfortunately, they are susceptible to physical damage and cannot be used to pay for goods on the spot.
Hot:
Desktop crypto wallets. Such applications are installed on a computer and work with operating systems such as Windows, Mac and Linux. Due to the fact that they have access to the Internet, they are less secure than cold wallets, but their advantage is that they are functional and free.
Browser crypto wallets. In fact, such storage facilities are simply sites where you can register a personal account and transfer Ethereum to it. The advantage of such crypto wallets is the convenience and speed of logging into the system: only the login and password for the account are required. However, this is not the most secure solution if you plan to store a large amount of Ethereum.
Mobile wallets. This includes storage in the form of an application for a smartphone or tablet. Among the advantages, of course, are convenience, ease of use and the fact that they can be installed simply from Google Play or the Apple Store for free.
In each category there are virtual wallets for Ethereum, which are considered the most reliable and convenient — we will look at them in more detail.
Hardware wallets
The market for hardware storage for cryptocurrencies is dominated by two brands — Trezor and Ledger, which also offer models for storing Ethereum. Popular options:
Trezor One — supports more than 1,000 cryptocurrencies, including ether, has a monochrome display with two buttons, costs about $65;
Trezor T — supports more than 1000 cryptocurrencies, including ETH, has a color touch screen, costs $170;
Ledger Nano S — PIN-protected, can install from 3 to 20 applications depending on their size, supports several cryptocurrencies, including ether and ERC-20 tokens, comes in six color options: black, yellow, pink, green, blue and metallic, costs about $70;
Ledger Nano — supports up to 100 applications simultaneously, is equipped with Bluetooth, which allows you to connect it to the Ledger Live Mobile application to access ETH coins from a computer or smartphone, costs about $130;
KeepKey — performs the same functions as devices from Ledger or Trezor: stores keys offline, allows you to make backups and generate 12-character keys to restore access to the crypto on another device, costs about $140.
Mobile wallets
There are not many mobile Ether storage products on the market developed or approved by the Ethereum team. The proven and most popular mobile wallet is Jaxx, which works on all devices and gives the owner complete freedom and flexibility in trading Ethereum. The application has an intuitive interface and a wide range of functions. Its feature is a new data encryption system using the AES-256 algorithm, enhanced by 5000 password hashing cycles according to the PBKDF2 standard.
Desktop wallets
Current crypto wallets for storing ether with installation on a computer:
Guarda — supports more than 40 blockchains and thousands of their tokens, a coin exchange function and the ability to purchase any cryptocurrency using a bank card;
Exodus — supports about 100 cryptocurrencies, including Ethereum, does not store any personal data belonging to clients, and requires an Internet connection to access assets;
Atomic Wallet — supports more than 300 cryptocurrencies, allows you to manage ETH and other than create ERC20 token , buy and exchange ether for other cryptocurrencies inside the wallet.
Browser wallets
Among the popular and proven browser-based crypto wallets for storing Ethereum:
MetaMask — designed for both Ethereum and other tokens based on it, has a simple and intuitive interface, stores keys on the user’s computer, is available for browsers Chrome, Opera, Mozilla and others;
MyEtherWallet — suitable for Ethereum and all ERC20-based tokens, offers the user a client interface with the ability to connect a cold wallet.
The disadvantage of browser versions is the lack of Russian language in the interface, which makes their use somewhat difficult for Russian-speaking users, but not critical.
How to create an Ethereum (eth) wallet
Each type of storage requires its own registration, but if hardware storage needs to be purchased, and paper storage needs to be simply printed, then mobile, desktop and browser applications have approximately the same creation procedure. Therefore, let’s look at the process of creating a wallet for Ethereum using the example of the browser version of MyEtherWallet.
To register a crypto wallet you need to follow a few simple steps:
Visit the official MyEtherWallet website — enter a strong password of at least 9 characters and generate a wallet by clicking “By Keystore File”.
Download the keystore file. You have two ways to do this. You can upload a .JSON file with an encrypted version of the private key, compatible with myetherwallet. You can also store an unencrypted version of your private key by downloading it as a .JSON file or copying it from a website. Try to save this file in the safest place possible, preferably on a USB drive or mobile phone.
Open a crypto wallet. To do this, you need to use the keystore file by selecting the appropriate item in the menu, and then pressing “Enter”.
Get the wallet number. Once the vault is unlocked, you will be able to select ETH coins or other ERC-20 tokens to use, as well as copy the wallet number to send and receive crypto.
You can now send and receive Ethereum coins and other tokens from your personal crypto wallet. Simply click “Send Ether and Tokens”, select the type of private key you want to use (keystore/JSON file), and select your wallet file.
How to send ETH coins and ERC-20 tokens from a wallet
To send crypto, you need to specify the address of the wallet to which the ether will be sent and the amount, then click “Generate transaction” and then “Send”. Managing ERC20 token development in MyEtherWallet is as easy as managing ETH. After logging into your wallet, click the orange “Show all tokens” button to see the entire list of supported tokens in their abbreviated form. Now click on any token to download it and include it in MyEtherWallet. If the token is not yet supported by MEW, you can add it yourself by entering the required information.
How to top up your Ethereum wallet
There are several ways to transfer coins to your MyEtherWallet wallet:
through payment services;
through cryptocurrency exchangers;
through other official Ethereum wallets.
No matter what wallet you use, keep your private key in a safe place. We recommend downloading applications for storing ETH coins only from official developer sites and purchasing hardware wallets from manufacturers.
#create erc20 token#erc20 token generator#erc20 token development#erc20 development#ethereum development
0 notes
Video
2. Website Hacking / Penetration Testing
https://courses01.gumroad.com/l/Website-Hacking Hack websites & web applications like black hat hackers and secure them like experts.
During September, anyone who purchases this training can choose a second training course for free.
How to get the reward:
After purchasing the training course, you'll receive an email with a 100% discount code for any product you choose.
Welcome to my this comprehensive course on Website penetration testing. In this course you'll learn website / web applications hacking! This course assumes you have NO prior knowledge in hacking, and by the end of it you'll be at a high level, being able to hack & discover bugs in websites like black-hat hackers and secure them like security experts!
This course is highly practical but it won't neglect the theory, first you'll learn how to install the needed software (on Windows, Linux and Mac OS X) and then we'll start with websites basics, the different components that make a website, the technologies used, and then we'll dive into website hacking straight away. From here onwards you'll learn everything by example, by discovering vulnerabilities and exploiting them to hack into websites, so we'll never have any dry boring theoretical lectures.
0 notes
Text
Stay Safe on Public Wi-Fi with the Best VPN for Portugal
Public Wi-Fi is a convenient way to access the internet when you are on the go, but it also comes with some risks. Anyone who is connected to the same network as you can potentially see what you are doing online, or even intercept your data. This can expose you to identity theft, hacking, malware, or censorship.
That's why you need a VPN (Virtual Private Network) to protect your privacy and security on public Wi-Fi. A VPN encrypts your internet traffic and routes it through a server in another location, making it look like you are browsing from there. This way, no one can spy on your online activity or access your personal information.
But not all VPNs are created equal. Some are slow, unreliable, or have poor security features. Some may even log your data and sell it to third parties. That's why you need to choose the best VPN for Portugal, one that offers fast speeds, strong encryption, and a strict no-logs policy.
Why do you need a VPN in Portugal?
Portugal has a relatively good internet freedom record, but there are still some restrictions in place. For example, some websites and streaming services are blocked in Portugal due to copyright restrictions. A VPN can help you bypass these restrictions and access the content you want.
How do you choose the best VPN for Portugal?
Here are a few things to keep in mind:
Security: The most important factor to consider is the VPN's security features. Make sure the VPN uses strong encryption and a no-logs policy.
Speed: You'll also want to make sure the VPN is fast enough for your needs. If you're going to be streaming video or gaming, you'll need a VPN with fast speeds.
Servers: The VPN should have servers in Portugal so that you can get the best possible speeds.
Price: VPNs can range in price from free to $10+ per month. Choose a VPN that fits your budget.
How to use a VPN on public Wi-Fi in Portugal
Once you've chosen a VPN, you can install it on your device and connect to a server in Portugal. Once you're connected, you'll be able to browse the web and use apps with peace of mind knowing that your data is protected.
Here are the steps on how to use a VPN on public Wi-Fi in Portugal:
Choose a VPN provider and sign up for a plan.
Download and install the VPN app on your device.
Launch the VPN app and connect to a server in Portugal.
Start browsing the web or using apps as usual.
Best VPN for Portugal
One of the best VPN for Portugal is CoverMeVPN. CoverMeVPN is a premium VPN service that has over 3,000 servers in 140 countries, including Portugal. With CoverMeVPN, you can enjoy unlimited bandwidth, high-speed connections, and 256-bit AES encryption. You can also switch between different protocols, such as OpenVPN, IKEv2, and WireGuard, depending on your needs and preferences.
CoverMeVPN also has a kill switch feature that automatically disconnects you from the internet if your VPN connection drops, preventing any data leaks. And unlike some other VPNs, CoverMeVPN does not keep any logs of your online activity or personal information. You can rest assured that your privacy is protected at all times.
CoverMeVPN is compatible with all major devices and platforms, such as Windows, Mac, iOS, Android, Linux, routers, smart TVs, and more. You can connect up to 5 devices simultaneously with one account, so you can protect all your devices with one subscription. You can also use CoverMeVPN to access geo-restricted content from anywhere in the world, such as Netflix US, BBC iPlayer, Hulu, and more.
CoverMeVPN offers a 7-day money-back guarantee, so you can try it risk-free for a month. If you are not satisfied with the service, you can get a full refund with no questions asked. You can also contact their 24/7 customer support team via live chat or email if you have any issues or questions.
Tips for staying safe on public Wi-Fi in Portugal
In addition to using a VPN, here are some other tips for staying safe on public Wi-Fi in Portugal:
Avoid logging into sensitive accounts, such as your bank account or email, on public Wi-Fi.
Use a strong password and two-factor authentication for all of your accounts.
Be careful what information you share online.
Keep your software up to date.
Conclusion
In conclusion, if you want to stay safe on public Wi-Fi and access geo-restricted content in Portugal, you need a reliable and fast VPN service. CoverMeVPN is one of the best VPN for Portugal, offering you top-notch security features, unlimited bandwidth, and a global network of servers. With CoverMeVPN, you can enjoy online freedom and privacy without compromising your speed or performance. Whether you want to stream Netflix, browse social media, or download torrents, CoverMeVPN has you covered. You can try it risk free for 7 days with their money-back guarantee and see for yourself why it's the best VPN for Portugal. If you want to check their reviews, visit CoverMeVPN.
0 notes
Text
Ember and Blade: A Dark Fantasy Adventure Awaits

Ember and Blade survivors-like action game is coming to Linux, Mac, and Windows PC. Thanks to the creative minds at LINE Games, this title is shaping up to be something special. Due to make its way onto Steam. Alright, get ready — Ember and Blade is coming to Linux, and it looks seriously good. LINE Games just released the announcement trailer for their brand-new action title, and it's already getting attention. Alongside the trailer, they launched the official Steam page, a teaser site, and social media channels so we can all keep up with what’s coming. Ember and Blade survivors-like is a premium survivors-like action title that throws you into a brutal, dark fantasy world. Imagine a title that mashes together the “survivor-like” chaos of titles like Vampire Survivors with the challenging, tight combat you'd find in a Soulslike. You’ll need fast reflexes, smart builds, and a bit of patience — but when it clicks, it’s going to feel amazing. You play as Fenrix, a battle-scarred demon hunter who’s literally on death’s door when he makes a deal with an angel. The price? Immortality. The mission? Stop an ancient archdemon from coming back to destroy what’s left of a doomed realm. Classic high-stakes fantasy, with a twist of darkness.
Ember and Blade Official Reveal Trailer
youtube
The gameplay promises to be fast-paced, with lots of one-vs-many fights where you’ll be cutting through hordes of enemies. But it’s not all hack-and-slash — boss fights will really test your timing and pattern-reading skills. Think Elden Ring, but with more swarms and less wandering. What’s epic is the Ember and Blade stylized visual style — lots of muted tones and gritty environments that fit the mood perfectly. You can build your character the way you want, thanks to a flexible progression system. Whether you like going full glass cannon or a tanky crowd controller, there’s room for your playstyle here. Oh, and don’t worry about how you play — gameplay fully supports controllers, along with mouse and keyboard. There’s even a New Game Plus mode so you can dive back in after finishing and try new builds or take on even tougher enemies. The first playable demo hits Steam in the second half of 2025, with the full launch coming in 2026. Until then, you can wishlist Ember and Blade survivors-like action on Steam and follow the devs on social for updates, sneak peeks, and maybe some behind-the-scenes stuff. All coming to Linux, Mac, and Windows PC. If this is just the start of what the developers has planned, then 2025 is gonna be a wild ride.
#ember and blade#survivor#action#linux#gaming news#line games corporation#ubuntu#mac#windows#pc#Youtube
0 notes
Link
Learn Ethical Hacking From A-Z: Beginner To Expert Course
Learn how to become an elite ethical hacker and easily hack networks, computer systems, web apps and so much more…
What you’ll learn
Learn Ethical Hacking From A-Z: Beginner To Expert Course
How To Become An Elite Ethical Hacker
How To Setup A Hacking Lab
Learn How To Launch Attacks/Exploits Against Computers
How To Start A Cybersecurity/Ethical Hacking Career
How To Hack Into Wireless Networks
Learn How To Conduct Penetration Tests
How To Bypass Antivirus
The Fundamentals of Networking
How To Remain Anonymous On The Internet
The Fundamentals of Linux
The Fundamentals of Bash
How To Gather Website & App Data
The Fundamentals of Python
Maintaining Access To Exploited Computers
Website & Web Application Hacking
Mobile Phone Security Tips
Where You Can Practice Hacking For Free
Conducting Passive & Active Reconnaissance On A Network
Requirements
Basic IT/Computer Skills & Knowledge
Computer With At Least 8GB of RAM/Memory (Less is ok, but your computer may run slow!)
Wifi Hacking Section Only: USB Wireless Adapter (Link Provided In Course Resources)
You Do Not Need Any Prior Experience In Hacking Or Cybersecurity To Go Through This Course
Description
Welcome to – Learn Ethical Hacking From A-Z: Beginner To Expert Course! This practical, hands-on course was created for newbies – that’s to say, people with no prior training or knowledge in hacking and cybersecurity. The aim of this course is to give you the education not just to understand what black-hat hatters do and how, but also to learn exactly how to hack systems like a pro and win the cat and mouse game by securing systems like a professional security expert. Blending practical work with solid theoretical training, we take you from the basics of ethical hacking through to mastery, giving you the training you need not just to hack, but also to secure against a hack. While the theory is important, we understand that it can also be dry and uninspiring. For this reason, this course is packed with examples that you can follow. This practical focus starts from the beginning, where we will teach you about penetration testing and show you how to install the software required (Windows, Linux, and Mac OSX) and jump right into hacking. Throughout, you will analyze and exploit various systems from regular websites through to sprawling networks, along with hacking servers and clients. More than just hacking, you’ll also learn how to conduct efficient penetration testing techniques. This approach gives you the foundational education that you need not just to hack any given system, but also to secure it, with each module covering both sides of the coin. The course covers six main areas:
1: LEARN THE FUNDAMENTALS NECESSARY TO BECOME A HACKER
This foundational section gives you a full introduction to the basics of networking systems – how they communicate and work – and is designed to give you the knowledge you need to succeed in this course. BASICS OF NETWORKING: Networking can be an intimidating topic, but don’t worry! We break down only the necessary things that you need to know in regards to networking and teach you important networking fundamentals SETTING UP A HACKING LAB: You can’t hack without a lab! We walk you step-by-step through the process of setting up your own hacking lab on your laptop or desktop computer! LINUX + SCRIPTING BASICS: Hackers use Linux, which is an OS that the average person may have no experience with. We will go over Linux fundamentals so that you can easily navigate your way through Linux during this course. We also touch on a couple of scripting languages that are a MUST for any ethical hacker and teach you the basics of each one with practical examples. HIDING YOUR IDENTITY ON THE WEB: If you are hacking on the internet, you need to learn how to remain anonymous. We will show you the tools and techniques that you can use to always remain anonymous and unknown on the internet.
2: LEARN HOW TO HACK NETWORKS
This section shows you how to test both wired and wireless systems. You will learn how to go from not having any access to a network to gaining access and being able to begin attacking systems on the network. PRE-CONNECTION ATTACK: Not all attacks require you to be connected to the target or even know the password. Learn how to discover and manipulate devices connected to a network and gather information about your target. GAIN ACCESS TO NETWORKS: Learn how to use the information you have about your target to crack the key and get the access password. This section covers multiple protocols including WEP, WPA, and WPA2. POST-CONNECTION ATTACKS: With a key, you can now leverage powerful hacking techniques to get even more information. Learn how to see what users are doing on a network, inject code in pages, and more on wired and wireless networks
3: HOW TO GAIN ACCESS AND CONNECT TO NETWORKS
This section builds on the lessons learned in section one, showing you how you can get full control and hack into any computer system that you target. SERVER-SIDE ATTACK: Discover how to harvest information about your targeted system – its OS, open ports, and installed services – without user interaction. Then use this information to exploit vulnerabilities and generate reports. CLIENT-SIDE ATTACK: Learn how to hack systems with no vulnerabilities by sneaking in with software updates or using backdoor trojan downloads. You’ll also learn the art of social engineering – or tricking people into giving you information.
4: HOW TO LEVERAGE POST EXPLOITATION
This section shifts the focus on interacting with compromised systems. Now that you have gained access, you’ll learn how you can exploit these systems. ACCESS FILE SYSTEMS: All systems have a wealth of files that you can now manipulate with your access. Learn how to access these systems and how to read, write, upload, and even execute files. MAINTAIN ACCESS: Gaining access to a system and its files is only half of the battle. Learn how to maintain your access and frustrate efforts to secure it again so you can continue to exploit a system. SPY ON YOUR TARGET: Learn how to capture any keystrokes on a keyboard, turn on a computer webcam, take screenshots, and even take control of the system to attack, hack, and access third-party networks and systems.
5: HOW TO HACK WEBSITES AND WEB APPS
In this section, you will learn more about how you can hack into websites and web applications using Kali Linux. You’ll also learn how web applications work – and how to find vulnerabilities within these applications for you to exploit. > How to scan websites/web applications for vulnerabilities to exploit. > How to Brute Force into web applications. > Learn how to conduct SQL injection in web applications. > How to conduct Cross-Site Request Forgery (CSRF). > How to exploit File Inclusion Vulnerabilities. > Learn how to exploit File Upload Vulnerabilities. > How to automate attacking web applications using various tools. > How to prevent and secure websites & apps yourself.
6: HOW TO MAKE MONEY, LAND A JOB & BUILD A BRAND AS A HACKER
In this section, you will learn how you can make money as an ethical hacker using a variety of methods. You’ll also learn how to build your personal brand and get your name out there as an Ethical Hacker so you can have employers and clients knocking at your door ready to hire you for your services. Then finally, you’ll learn how you can start a career in cybersecurity with some insider tips on what certifications to get and the best way to land a job. This includes: > How to build an ethical hacker personal brand from scratch > How to get instant credibility and authority as a hacker > Learn how to properly network and get others talking about you > How to make money using a variety of websites > How to get started freelancing as a hacker > Learn how to get started consulting as a hacker > How to land a job as a cybersecurity professional This course is comprehensive, showing you both sides of hacking. You will learn to think and operate like a hacker – and how to apply that knowledge as a cybersecurity expert to protect you and your clients’ networks and systems. In taking this ‘cat and mouse approach, your rounded understanding will give your approach new depths and angles, revealing the paths you can take to effectively neutralize any threat. Together with the emphasis on practical examples that you can follow in real life with live systems, you will also benefit from the excitement of hands-on learning. By experiencing precisely what it takes to hack into any given target system, you’ll also learn that no one system is the same and that all approaches can be modified. This real-life learning is an invaluable part of your education, enabling you to better see what hackers are doing and how to block even the most potent attacks. No matter what the scenario or how complicated a hacking situation, this course gives you the foundational training you need to secure a network – and start pursuing a career in a field that is increasingly in demand as the global reliance on technology grows.
Download
To download more paid course for free visit free course site where you find 1100+ paid courses for free. You can easily access those courses with just a single click.
23 notes
·
View notes