#How to Install PostgreSQL Database in Debian
Video
youtube
How to Install Webmin and Virtualmin on Linux Servers
# About Webmin
Webmin is a web-based system configuration tool for Unix-like systems, including Linux. It provides a graphical interface that allows administrators to manage various aspects of their server, such as:
• User accounts
• Disk quotas
• Services
• Configuration files
• Hardware devices
• Software package management
• System logs
By using Webmin, administrators can perform complex tasks without needing to manually edit configuration files or use command-line interfaces, making server management more accessible and efficient.
# About Virtualmin
Virtualmin is a powerful and flexible web hosting control panel built on top of Webmin. It is designed for managing multiple virtual hosts through a single interface and is suitable for both shared and dedicated hosting environments. Key features of Virtualmin include:
• Management of multiple domains and websites
• Mail server configuration and management
• Database management (MySQL/PostgreSQL)
• DNS server management
• Security enhancements and monitoring
• Backup and restore functionalities
• Support for multiple PHP versions
• Integration with popular web applications
Virtualmin simplifies the process of managing web hosting environments, providing tools for administrators to efficiently handle various hosting-related tasks.
Purpose of the Tutorial Video:
In this tutorial video, we will walk you through the process of installing Virtualmin on a Debian 12 server. By the end of this video, you will have a fully functional Virtualmin setup, ready to manage your web hosting environment with ease. This tutorial covers:
1. Preparing your Debian 12 system for installation.
2. Downloading and executing the Virtualmin installation script.
3. Completing the initial configuration and post-installation setup.
4. Accessing and navigating the Virtualmin web interface.
Whether you're new to server management or looking for an easier way to handle your hosting needs, this tutorial will guide you step-by-step to get Virtualmin up and running smoothly.
In this tutorial we will install Webmin + Virtualmin on a Linux Debian 12 server and log into its panel. The commands used in this tutorial go below.
# Log into the server via SSH
ssh root@SERVER_IP
# Update and upgrade the system
apt update && apt upgrade -y
# Install the required packages
apt install wget curl
# Download the installer
wget https://software.virtualmin.com/gpl/scripts/install.sh
# Make the installer executable
chmod +x install.sh
# Run the installer
./install.sh
# Then you can log into the panel by calling the server IP address or panel URL on port 10000. Ex:
https://10.10.10.10:10000
All Open Source!
Arashtad provides high quality tutorials, eBooks, articles and documents, design and development services, over 400 free online tools, frameworks, CMS, WordPress plugins, Joomla extensions, and other products.
More Courses ▶ https://tuts.arashtad.com/
Business Inquiries ▶ https://arashtad.com/business-inquiries/
Affiliate Programs ▶ https://arashtad.com/affiliate-programs/
eBooks ▶ https://press.arashtad.com/
Our Products ▶ https://market.arashtad.com/
Our Services ▶ https://arashtad.com/services/
Our Portfolio ▶ https://demo.arashtad.com/
Free Online Tools ▶ https://tools.arashtad.com/
Our Blog ▶ https://blog.arashtad.com/
Documents ▶ https://doc.arashtad.com/
Licensing ▶ https://arashtad.com/licensing/
About us ▶ https://arashtad.com/about/
Join Arashtad Network ▶ https://i.arashtad.com/
Our Social Profiles ▶ https://arashtad.com/arashtad-social-media-profiles/
Vimeo ▶ https://vimeo.com/arashtad
Udemy ▶ https://www.udemy.com/user/arashtad
GitHub ▶ https://github.com/arashtad
Linkedin ▶ https://www.linkedin.com/company/arashtad
Twitter ▶ https://twitter.com/arashtad
#youtube#webmin#virtulmin#linux#debian#virtualmin install#webmin install#virtualmin tutorial#webmin tutorial
0 notes
Text
NetBox is an open source IPAM / DCIM web...
https://www.computingpost.com/how-to-install-netbox-ipam-on-debian-10-linux/?feed_id=19167&_unique_id=63743755a1d23
0 notes
Text
How to install and Configure PostgreSQL 15 on Debian 11.
How to install and Configure PostgreSQL 15 on Debian 11.
In this article, we are going to learn how to install and get PostgreSQL 15 up and running on a Debian 11 server. PostgreSQL is a powerful, open-source object-relational database system that uses and extends the SQL language combined with many features that safely store and scale the most complicated data workloads.
Notable Features introduced for PostgreSQL 15.
It removes both the long…
View On WordPress
0 notes
Text
Ubuntu 20.04 install webmin

Ubuntu 20.04 install webmin install#
Ubuntu 20.04 install webmin software#
Ubuntu 20.04 install webmin windows#
Once you log in, you will be redirected to the Webmin dashboard, which provides basic information about your system. Login to the Webmin web interface using your root or sudo user credentials. By default, Webmin uses an untrusted self-signed SSL certificate. NOTE: To access Webmin Web Interface, open browser and type your server’s hostname name or public IP address followed by the Webmin port 10000: Note that you may see that the browser complains about the certificate being not valid. You can also run the command to make things easier:įirewall-cmd -zone=public -add-port=10000/tcp -permanent Step 4: Open Webmin Port on Ubuntu Firewall.
Ubuntu 20.04 install webmin install#
Step 1: Update the System and Install Requisites Packages. Example: If the Webmin server doesn’t respond, you might need to adjust firewall settings to allow port 10000. In this article, we take a look at how you can install Webmin on Ubuntu 20.04 and Ubuntu 18.04 so that you can seamlessly manage your system. You need to open the port in your firewall so that the Webmin interface is accessible from the Internet. NOTE: By default, Webmin listens for connections on port 10000 on all network interfaces. Once Webmin is installed and runing, you can access Webmin via the IP or web address you supplied or were given by the system. The Webmin service will start automatically. You can now login to as root with your root password, or as any user who can use sudo to run commands as root. Once all the dependencies are installed, the following output will be displayed: Sudo sh -c 'echo "deb sarge contrib" > /etc/apt//webmin.list' Just input or copy and paste the text below and hit Enter/Return: The commands below add the Webmin repository to your system and install the latest version of Webmin and all necessary packages. Sudo sh -c 'echo "deb buster main non-free" > /etc/apt//nonfree.list' On Debian, make sure that wget is available first: You can add the Webmin repository (webmin-repo) and use Jamie Cameron’s key to install and maintain the latest version of Webmin/Usermin.
Ubuntu 20.04 install webmin windows#
Share files with Windows systems by configuring Samba Windows File Sharing.
Manage databases, tables and fields in a MySQL or PostgreSQL Database Server.
Create and configure virtual web servers for the Apache Webserver.
Set up a Linux Firewall to protect your computer or give hosts on an internal LAN access to the Internet.
Change your system’s IP address, DNS Server settings and routing configuration.
Ubuntu 20.04 install webmin software#
Install, view and remove Software Packages in RPM and other formats.
Set up Disk Quotas to control the amount of space available to users for their files.
Export Files and Directories to other systems with the NFS protocol.
Create, edit and delete Unix Accounts on your system.
Some of the things you can do with Webmin are: This makes the job of administering your system much easier. Webmin lets you perform these tasks and many more through an easy to use web interface and automatically updates all required configuration files for you. Normally you need to manually edit configuration files and run commands to create accounts, set up a web server and manage email forwarding.
0 notes
Text
Install PostgreSQL 15 on Debian 11
Install PostgreSQL 15 on Debian 11. Installing PostgreSQL on Debian 11 is a simple process that does not require much technical expertise. Here, we’ll walk you through the steps you need to take

List of blogs you will read in this content:
1. Introduction
2. Install PostgreSQL 15 on Debian 11
3. Final words
4. Frequently Asked Questions
Hello and welcome to this essay on how to install PostgreSQL on Debian 11. In this guide, we will go through all the necessary steps in a friendly and easy-to-follow manner.
Introduction
PostgreSQL 15 is a mighty and unfailing open-source object-relational database method that provides an extensive data storage and management feature set. It is extremely scalable, allowing users to store and manage large amounts of data while providing robust performance and reliability.
Debian 11, on the other hand, is a mighty, secure and user-friendly operating method that provides an ideal platform for running PostgreSQL 15. Debian 11 is extremely customizable and offers many features that make it easy to deploy, operate and maintain. PostgreSQL 15. PostgreSQL 15 and Debian 11 provide an extensive data storage and management solution.
Install PostgreSQL 15 on Debian 11
Before we begin, make sure you have root access on your Debian 11 system. This guide assumes you have a basic understanding of the Linux command line and package management.
Update and upgrade system.
The first move is to commit sure your system is up to date. Open ultra and run the following orders:
Syntax: sudo apt update
Syntax: sudo apt upgrade
This will update and upgrade all installed packages to their latest version
Add the PostgreSQL repository
By disability, Debian 11 ships with PostgreSQL version 13. If you shortage to install version 15, add the PostgreSQL repository to your method. To do this, run the following order:
Syntax: sudo sh -c ‘echo “deb http://apt.postgresql.org/pub/repos/apt/ $(lsb_release -cs)-pgdg main” > /etc/apt/sources.list.d/pgdg.list’
Install PostgreSQL 15
Now that we’ve added the PostgreSQL repository and imported the key, let’s install PostgreSQL 15. Run the following command:
Syntax: sudo apt install postgresql-15
This command will install PostgreSQL 15 with all its dependencies.
Start the database cluster.
After installing PostgreSQL, we need to start the database cluster. Run the following command:
Syntax: sudo pg_createcluster 15 main –start
This command will create a new PostgreSQL cluster named “main” for version 15 and start the server.
Verify the installation
To prove that PostgreSQL is running, we can use the following order:
Syntax: sudo systemctl status postgresql@15-main
This should output the PostgreSQL server status.
Congratulations! You have well-installed PostgreSQL 15 on your Debian 11 method. You can now start using PostgreSQL and its leading database management features.
Unlock the power of Linux: Improve your online presence with our state-of-the-art Linux VPS solution!
The final word
This guide goes with the steps required to install PostgreSQL 15 on Debian 11. We started by updating and upgrading the method, adding the PostgreSQL repository, importing the repository key, installing PostgreSQL 15, starting the database cluster, and confirming the installation.
PostgreSQL is an open-source relative database management method (RDBMS). It is known for its leading features, including support for parallel processing, extensibility, and robust data fidelity.
Some other features of PostgreSQL that do it an exoteric choice include its support for ACID (atomicity, consistency, isolation, and durability) transactions, its ability to handle complex queries, and various programming languages and platforms.
To install PostgreSQL on Debian 11, you can ensue these steps:
Open a ultra window and log in as the root user
Type “apt-get update” to update the package list
Type “apt-get install postgresql” to install PostgreSQL
When the installation is complete, you can use “psql”.
0 notes
Text
Linux - Cara Instal Database PostgreSQL di Debian 10
Linux – Cara Instal Database PostgreSQL di Debian 10

PostgreSQL (biasa disebut sebagai Postgres) adalah sistem database open-source yang paling canggih dan object-relational database dengan arsitektur terpercaya yang berjalan pada semua sistem operasi utama. Ini adalah sistem basis data yang berkinerja tinggi, stabil, skalabel, dan dapat diperluas yang memberikan integritas data yang luar biasa dan mendukung add-ons yang powerful.
Table of Contents
View On WordPress
0 notes
Text
OneinStack: How to install it on Ubuntu and CentOS
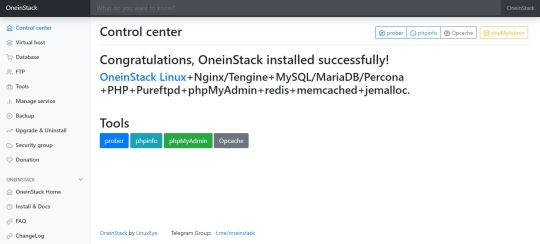
What is OneinStack? It is an active project that uses to set up an environment for the development of PHP/JAVA applications in just one-click on Linux operating systems such as CentOS (including Redhat), Debian, Ubuntu, Fedora, Deepin, Amazon Linux and other same family Distros.
Just like WAMP or XAMPP server for Windows, OneinStack allows creating different Linux web server environment such as:
Lnmp(Linux + Nginx+ MySQL/MongoDB+ PHP)
Lamp(Linux + Apache+ MySQL/MongoDB+ PHP)
Lnmpa (Linux + Nginx+ MySQL/MongoDB+ PHP+ Apache): Nginx handles static, Apache handles dynamic PHP
Lnmt (Linux + Nginx+ MySQL/MongoDB+ Tomcat): Nginx handles static, Tomcat (JDK) handles JAVA
Lnpp(Linux + Nginx+ PostgreSQL+ PHP)
Lapp(Linux + Apache+ PostgreSQL+ PHP)
Lnmh(Linux + Nginx+ MySQL+ HHVM)
All the above-mentioned web servers combination can be installed using pre-given OneinStack script.
OneinStack updates are timely which makes it very reliable to use. The script of OneinStack provides a wide range of features such as:
All the command and auto installation will be done in Terminal only using the command line. Good for server usage.
Most of the time up to date.
Some security optimization
Wide range of database versions (MySQL-8.0, 5.7, 5.6, 5.5; MariaDB-10.4, 10.3, 10.2, 5.5, Percona-8.0, 5.7, 5.6, 5.5, AliSQL-5.6, PostgreSQL, MongoDB)
Multiple PHP versions (PHP-7.3, 7.2, 7.1, 7.0, 5.6, 5.5, 5.4, 5.3)
Provide Nginx, Tengine, OpenResty and ngx_lua_waf
Tomcat version (Tomcat-9, Tomcat-8, Tomcat-7, Tomcat-6)
JDK version (JDK-11.0, JDK-1.8, JDK-1.7, JDK-1.6)
Apache version (Apache-2.4, Apache-2.2)
OneinStack provides option to install PHP Cache Accelerator provides ZendOPcache, xcache, apcu, eAccelerator. And php extensions, include ZendGuardLoader, ionCube and more... can be installed with one click.
Installation of Pureftpd, phpMyAdmin, memcached, redis
Provide upgrade script for above-mentioned tools
Virtual host script
Support local, remote(rsync between servers), Aliyun OSS, Qcloud COS, UPYUN, QINIU, Amazon S3, Google Drive and Dropbox backup script
And more...
It also comes with the Let's Encrypt certificate that means those want to use the SSL certificate for their project; just only need to enter the domain name with you want to use SSL. After that, it automatically configures the SSL certificate for the domain name. Moreover, OneinStack will also set the auto-renewal of Let's Encrypt certificate.
The OneinStack project is available on GitHub and free to download, install and use.
Read the full article
0 notes
Text
2018-03-08 00 LINUX now
LINUX
Linux Academy Blog
AWS Security Essentials has been released!
Employee Spotlight: Sara Currie, Technical Recruiter
Linux Academy Weekly Roundup 108
Free SSL with Let’s Encrypt & NGINX
Michelle Gill – Becoming V.P. of Engineering
Linux Insider
Kali Linux Security App Lands in Microsoft Store
Microsoft Gives Devs More Open Source Quantum Computing Goodies
Red Hat Adds Zing to High-Density Storage
When It's Time for a Linux Distro Change
Endless OS Helps Tear Down Linux Wall
Linux Journal
Last chance: Subscribe now to get the highly anticipated comeback issue!
Best Laptop for Running Linux
diff -u: Linus Posting Habits
Chrome for Windows Now Built with Clang, March Android Security Bulletin, XCP-ng Release and More
PostgreSQL 10: a Great New Version for a Great Database
Linux Magazine
OpenStack Queens Released
Kali Linux Comes to Windows
Ubuntu to Start Collecting Some Data with Ubuntu 18.04
CNCF Illuminates Serverless Vision
LibreOffice 6.0 Released
Linux Today
How To Check All Running Services In Linux
Meet Endless OS, a lightweight Linux distro
Exploring free and open webfonts
Kubernetes Graduates CNCF Incubator, Debuts New Sandbox
Top Tools to Access Remote Linux Desktop
Linux.com
Protecting Code Integrity with PGP — Part 4: Moving Your Master Key to Offline Storage
One Week Until Embedded Linux Conference + OpenIoT Summit in Portland: Will You Join Us?
LFD420 Linux Kernel Internals and Development
Submit a Proposal to Speak at OS Summit Japan and Automotive Linux Summit By March 18
Most Useful Linux Commands You Can Run in Windows 10
Reddit Linux
Mods not keeping the sub clean / Up-tick in low quality content?
Installed libreboot on ThinkPad t60 now it won't boot Fedora 28
400k servers may be at risk of serious code-execution attacks. Patch now [Exim]
Should I give linux a try?
is there a program that will analyze my typing then open a typing tutor when i need to practice
Riba Linux
SwagArch GNU/Linux 18.03 overview | A simple and beautiful Everyday Desktop
How to install Nitrux 1.0.9
Nitrux 1.0.9 overview | Change The Rules
Pixel OS 1.0 "Apu" Public Beta 1 overview | Meet Pixel OS
How to set up a FAMP server (FreeBSD, Apache, MySQL, PHP) + webmin admin panel on GhostBSD / FreeBSD
Slashdot Linux
Microsoft Confirms Windows 10 'S Mode'
Facebook's VPN Service Onavo Protect Collects Personal Data -- Even When It's Switched Off
Chrome 65 Arrives With Material Design Extensions Page, New Developer Features
Mercedes' Futuristic Headlights Shine Warning Symbols On the Road
Sri Lanka Blocks Facebook, Instagram To Prevent Spread of Hate Speech
Softpedia
Mozilla Firefox 58.0.2 / 59.0 Beta 14
Evolution 3.26.6
Evolution 3.28.0 RC
Evolution Data Server 3.26.6 / 3.28.0 RC
Evolution Mapi 3.26.6 / 3.28.0 RC
Tecmint
How to Enable and Disable Root Login in Ubuntu
8 Best Tools to Access Remote Linux Desktop
How to Install NetBeans IDE 8.2 in Debian, Ubuntu and Linux Mint
How to Install NetBeans IDE in CentOS, RHEL and Fedora
Get Complete Full Stack Developer eBook Bundle [16 eBooks]
nixCraft
400K+ Exim MTA affected by overflow vulnerability on Linux/Unix
Book Review: SSH Mastery – OpenSSH, PuTTY, Tunnels & Keys
How to use Chomper Internet blocker for Linux to increase productivity
Linux/Unix desktop fun: Simulates the display from “The Matrix”
Ubuntu 17.10 no longer available for download due to LENOVO bios getting corrupted
0 notes
Text
GitLab is a web-based platform used to host Git repositories. This tool supports software development using the Continuous Delivery(CD) and Continuous Integration(CI) processes. The GitLab Enterprise Edition builds on top of Git with extra features such as LDAP group sync, multiple roles, and audit logs. It also includes authorization integration with deeper authentication.
The amazing features associated with GitLab are:
Easy integration with Jenkins, Docker, Slack, Kubernetes, JIRA, LDAP e.t.c
Code Quality (Code Climate)
On-premise or cloud-based installations
Development Analytics
Performance monitoring
Rich API
Integration with IDEs like Eclipse, Visual Studio, Koding, and IntelliJ
Issue management, bug tracking, and boards
Repository mirroring and high availability (HA)
Hosting static websites (GitLab Pages)
ChatOp tool (Mattermost)
Code Review functionality and Review Apps tool
Service Desk (ticketing system)
The GitLab system is made up of several distinct components and dependencies. When installing GitLab directly on your system, these components are installed as well. They include Redis, Gitaly, PostgreSQL, and the GitLab application itself. To avoid these components from being populated into your environment, using Docker containers is the preferred installation method. This ensures that all the components live within a single container away from the filesystem of the host.
In this guide, we will walk through how to run GitLab in Docker Containers using Docker Compose.
Setup Pre-requisites
For this guide you need the following:
1GB or more of available RAM on the host
Docker and Docker-compose
A fully Qualified Domain name(For SSL certificates)
But before you begin, update your system and install the required tools:
## On Debian/Ubuntu
sudo apt update && sudo apt upgrade
sudo apt install curl vim git
## On RHEL/CentOS/RockyLinux 8
sudo yum -y update
sudo yum -y install curl vim git
## On Fedora
sudo dnf update
sudo dnf -y install curl vim git
#1. Install Docker and Docker Compose on Linux
Begin by installing the Docker engine on your system. Below is a dedicated guide to help you install docker on your system
How To Install Docker CE on Linux Systems
Once docker has been installed, start and enable the service.
sudo systemctl start docker && sudo systemctl enable docker
Add your system user to the docker group.
sudo usermod -aG docker $USER
newgrp docker
Now proceed and install Docker compose with aid of the below guide.
How To Install Docker Compose on Linux
Another easy way of installing Docker Dev release is with the docker.sh script below:
sudo apt update && sudo apt install curl uidmap -y
curl -fsSL get.docker.com -o get-docker.sh
sudo sh get-docker.sh
dockerd-rootless-setuptool.sh install
#2. Provisioning the GitLab Container
We will begin by pulling the docker-compose.yml file for the deployment.
wget https://raw.githubusercontent.com/sameersbn/docker-gitlab/master/docker-compose.yml
You need to generate 3 random strings at least 64 characters long to be used for:
GITLAB_SECRETS_OTP_KEY_BASE: this is used to encrypt 2FA secrets in the database
GITLAB_SECRETS_DB_KEY_BASE: used for CI secret variables encryption and importing variables into the database.
GITLAB_SECRETS_SECRET_KEY_BASE: it is used for password reset links as well as other ‘standard’ auth features.
These strings can be generated using pwgen installed as with the commands:
##On Debian/Ubuntu
sudo apt install -y pwgen
##On RHEL/CentOS/RockyLinux 8
sudo yum install epel-release -y
sudo yum install pwgen -y
## On Fedora
sudo dnf install -y pwgen
Generate random strings with the command:
pwgen -Bsv1 64
Edit the file and add the strings appropriately, the deployment file has 3 containers i.e Redis, PostgreSQL, and GitLab. Open the file for editing.
vim docker-compose.yml
Make the below changes as desired.
PostgreSQL container
Configure your database as preferred. You need to set the database password.
......
postgresql:
restart: always
volumes:
- postgresql-data:/var/lib/postgresql:Z
environment:
- DB_USER=gitlab
- DB_PASS=StrongDBPassword
- DB_NAME=gitlab_production
- DB_EXTENSION=pg_trgm,btree_gist
......
GitLab Container
Proceed and provide database details, and set the health check appropriately in the GitLab container.
gitlab:
restart: always
image: sameersbn/gitlab:14.10.2
depends_on:
- redis
- postgresql
ports:
- "10080:80"
- "10022:22"
volumes:
- gitlab-data:/home/git/data:Z
healthcheck:
test: curl http://localhost/-/health || exit 1
interval: 1m
timeout: 10s
retries: 3
start_period: 1m
environment:
- DEBUG=false
- DB_ADAPTER=postgresql
- DB_HOST=postgresql
- DB_PORT=5432
- DB_USER=gitlab
- DB_PASS=StrongDBPassword
- DB_NAME=gitlab_production
......
Also update Timezone variables
- TZ=Africa/Nairobi
- GITLAB_TIMEZONE=Nairobi
Under the GitLab container, you can add HTTPS support by making the below settings. If you do not have an FQDN, enable self-signed certificates as well.
- GITLAB_HTTPS=true
....
If you are using self-signed certificates, you need to enable this as well.
- SSL_SELF_SIGNED=true
Proceed and provide the random strings. Remember to set the GITLAB_HOST and remove the GITLAB_PORT. This is done because we will configure reverse proxy later.
- GITLAB_HOST=gitlab.computingpost.com
- GITLAB_PORT=
- GITLAB_SSH_PORT=10022
- GITLAB_RELATIVE_URL_ROOT=
- GITLAB_SECRETS_DB_KEY_BASE=long-and-random-alphanumeric-string
- GITLAB_SECRETS_SECRET_KEY_BASE=long-and-random-alphanumeric-string
- GITLAB_SECRETS_OTP_KEY_BASE=long-and-random-alphanumeric-string
Set the GitLab user email and password.
- GITLAB_ROOT_PASSWORD=StrongPassw0rd
- [email protected]
You can also enable SMTP support by making the desired settings.
- SMTP_ENABLED=true
- SMTP_DOMAIN=www.example.com
- SMTP_HOST=smtp.gmail.com
- SMTP_PORT=587
- [email protected]
- SMTP_PASS=password
- SMTP_STARTTLS=true
- SMTP_AUTHENTICATION=login
There are many other configurations you can make to this container. These settings include the Timezone, OAUTH, IMAP e.t.c
#3. Configure Persistent Volumes
For data persistent, we have to map the volumes appropriately. The docker-compose.yml file has 3 volumes. Here, we will use a secondary disk mounted on our system for data persistence.
Identify the disk.
$ lsblk
NAME MAJ:MIN RM SIZE RO TYPE MOUNTPOINT
sda 8:0 0 40G 0 disk
├─sda1 8:1 0 1G 0 part /boot
└─sda2 8:2 0 39G 0 part
├─rl-root 253:0 0 35G 0 lvm /
└─rl-swap 253:1 0 4G 0 lvm [SWAP]
sdb 8:16 0 10G 0 disk
└─sdb1 8:17 0 10G 0 part
Ensure the disk is formatted before you proceed to mount it as shown.
sudo mkdir /mnt/data
sudo mount /dev/sdb1 /mnt/data
Confirm if the disk has been mounted on the desired path.
$ sudo mount | grep /dev/sdb1
/dev/sdb1 on /mnt/data type xfs (rw,relatime,seclabel,attr2,inode64,logbufs=8,logbsize=32k,noquota)
Create the 3 volumes in the disk.
sudo mkdir -p /mnt/data/redis
sudo mkdir -p /mnt/data/postgresql
sudo mkdir -p /mnt/data/gitlab
Set the appropriate file permissions.
sudo chmod 775 -R /mnt/data
sudo chown -R $USER:docker /mnt/data
On Rhel-based systems, you need to configure SELinux as below for the paths to be accessible.
sudo setenforce 0
sudo sed -i 's/^SELINUX=.*/SELINUX=permissive/g' /etc/selinux/config
Now create the docker volumes for the containers.
Redis
docker volume create --driver local \
--opt type=none \
--opt device=/mnt/data/redis \
--opt o=bind redis-data
PostgreSQL
docker volume create --driver local \
--opt type=none \
--opt device=/mnt/data/postgresql \
--opt o=bind postgresql-data
GitLab
docker volume create --driver local \
--opt type=none \
--opt device=/mnt/data/gitlab \
--opt o=bind gitlab-data
Once created, list the volumes with the command:
$ docker volume list
DRIVER VOLUME NAME
local gitlab-data
local postgresql-data
local redis-data
Now in the YAML file, add these lines at the bottom.
$ vim docker-compose.yml
.......
volumes:
redis-data:
external: true
postgresql-data:
external: true
gitlab-data:
external: true
#4. Bringing up GitLab.
After the desired configurations have been made, bring up the containers with the command:
docker-compose up -d
Sample execution output:
[+] Running 23/28
⠇ gitlab Pulling 33.9s
⠿ d5fd17ec1767 Pull complete 8.0s
⠿ 2cbc1a21dc95 Pull complete 9.3s
⠿ e3cf021c7259 Pull complete 25.0s
⠿ c55daad7c782 Pull complete 25.2s
.....
⠿ redis Pulled 24.4s
⠿ 1fe172e4850f Pull complete 17.6s
⠿ 6fbcd347bf99 Pull complete 18.1s
⠿ 993114c67627 Pull complete 18.9s
⠿ 2a560260ca39 Pull complete 20.5s
⠿ b7179886a292 Pull complete 20.8s
....
⠿ postgresql Pulled 21.4s
⠿ 23884877105a Pull complete 2.6s
⠿ bc38caa0f5b9 Pull complete 2.8s
⠿ 2910811b6c42 Pull complete 3.1s
⠿ 36505266dcc6 Pull complete 3.5s
........
Verify if the containers are running:
$ docker ps
CONTAINER ID IMAGE COMMAND CREATED STATUS PORTS NAMES
f5e238c85afb sameersbn/gitlab:14.10.2 "/sbin/entrypoint.sh…" 2 minutes ago Up 2 minutes (healthy) 443/tcp, 0.0.0.0:10022->22/tcp, :::10022->22/tcp, 0.0.0.0:10080->80/tcp, :::10080->80/tcp ubuntu-gitlab-1
c4113ccccc8a sameersbn/postgresql:12-20200524 "/sbin/entrypoint.sh" 2 minutes ago Up 2 minutes 5432/tcp ubuntu-postgresql-1
a352f63cdea5 redis:6.2.6 "docker-entrypoint.s…" 2 minutes ago Up 2 minutes 6379/tcp ubuntu-redis-1
#5. Secure GitLab with SSL Certificates.
We need to secure the site with SSL so as to prevent unauthorized access to your data. With the GITLAB_HTTPS option enabled, you can generate certificates for your domain name. Normally, the container looks for the certificates in the volume that belongs to the GitLab container.
However, in this guide, we will configure the Nginx reverse proxy for HTTPS. First, install Nginx on your system.
##On RHEL/CentOS/Rocky Linux 8
sudo yum install nginx
##On Debian/Ubuntu
sudo apt install nginx
Create a virtual host file as shown.
sudo vim /etc/nginx/conf.d/gitlab.conf
Add the below lines to the file.
server
listen 80;
server_name gitlab.computinforgeeks.com;
client_max_body_size 0;
chunked_transfer_encoding on;
location /
proxy_pass http://localhost:10080/;
proxy_set_header Host $http_host;
proxy_set_header X-Real-IP $remote_addr;
proxy_set_header X-Forwarded-For $proxy_add_x_forwarded_for;
proxy_set_header X-Forwarded-Proto $scheme;
proxy_set_header X-Forwarded-Ssl on;
proxy_buffering off;
proxy_request_buffering off;
Save the file, restart and enable Nginx.
sudo systemctl restart nginx
sudo systemctl enable nginx
Option1 – Using Self Signed Certificate
The certificate pair is generated using openSSL. Begin by generating the private key.
openssl genrsa -out gitlab.key 2048
Create a certificate signing request(CSR).
openssl req -new -key gitlab.key -out gitlab.csr
Sign the certificate using the CSR and private key.
openssl x509 -req -days 3650 -in gitlab.csr -signkey gitlab.key -out gitlab.crt
After this, you will have a self-signed certificate generated. For more security, you need to create more robust DHE parameters.
openssl dhparam -out dhparam.pem 2048
Now you will have 3 files, gitlab.key, gitlab.crt and dhparam.pem. Copy these files to the certificates directory.
sudo cp gitlab.crt /etc/ssl/certs/gitlab.crt
sudo mkdir -p /etc/ssl/private/
sudo cp gitlab.key /etc/ssl/private/gitlab.key
sudo cp dhparam.pem /etc/ssl/certs/dhparam.pem
Now edit your Nginx config to accommodate the certificates.
server
server_name gitlab.computingpost.com;
client_max_body_size 0;
chunked_transfer_encoding on;
location /
proxy_pass http://localhost:10080/;
proxy_set_header Host $http_host;
proxy_set_header X-Real-IP $remote_addr;
proxy_set_header X-Forwarded-For $proxy_add_x_forwarded_for;
proxy_set_header X-Forwarded-Proto $scheme;
proxy_set_header X-Forwarded-Ssl on;
proxy_buffering off;
proxy_request_buffering off;
listen 443 ssl;
ssl_certificate /etc/ssl/certs/gitlab.crt;
ssl_certificate_key /etc/ssl/private/gitlab.key;
ssl_dhparam /etc/ssl/certs/dhparam.pem;
server
if ($host = gitlab.computingpost.com)
return 301 https://$host$request_uri;
listen 80;
server_name gitlab.computingpost.com;
return 404;
To establish trust with the server, the client needs to copy the gitlab.crt to the list of trusted certificates. Normally at /usr/local/share/ca-certificates/ for Ubuntu and /etc/pki/ca-trust/source/anchors/ for CentOS. Once done, update the certificates:
##On Ubuntu/Debian
sudo update-ca-certificates
##On CentOS/Rocky Linux
sudo update-ca-trust extract
This is done to avoid the error below during git clone on the client.
$ git clone https://gitlab.computingpost.com/gitlab-instance-dbda973a/my-android-project.git
Cloning into 'my-android-project'...
fatal: unable to access 'https://gitlab.computingpost.com/gitlab-instance-dbda973a/my-android-project.git/': SSL certificate problem: self signed certificate
Option 2 – Using Let’s Encrypt
This requires one to have a Fully Qualified Domain Name(FQDN). Here, we will use a reverse proxy(Nginx) Begin by installing the required packages.
##On RHEL 8/CentOS/Rocky Linux 8/Fedora
sudo dnf install https://dl.fedoraproject.org/pub/epel/epel-release-latest-8.noarch.rpm
sudo dnf install certbot python3-certbot-nginx
##On Debian/Ubuntu
sudo apt install certbot python3-certbot-nginx
Generate SSL certificates for your domain name using the command:
sudo certbot --nginx
Proceed and issue certificates for the domain name.
........
Which names would you like to activate HTTPS for?
- - - - - - - - - - - - - - - - - - - - - - - - - - - - - - - - - - - - - - - -
1: gitlab.computingpost.com
- - - - - - - - - - - - - - - - - - - - - - - - - - - - - - - - - - - - - - - -
Select the appropriate numbers separated by commas and/or spaces, or leave input
blank to select all options shown (Enter 'c' to cancel): 1
Requesting a certificate for gitlab.computingpost.com
Performing the following challenges:
http-01 challenge for bitwarden.example.com
Waiting for verification...
Cleaning up challenges
....
Restart Nginx.
sudo systemctl restart nginx
#6. Access GitLab Web UI.
Now proceed and access GitLab via HTTPS. If you have a firewall enabled, allow the port/service through it.
##For UFW
sudo ufw allow 443/tcp
##For Firewalld
sudo firewall-cmd --add-service=http --permanent
sudo firewall-cmd --add-service=https --permanent
sudo firewall-cmd --reload
Now proceed and access the page using the URL https://domain_name
Login using the created credentials. On successful login, you will see this dashboard.
Set if you want the account to be used by everyone or for personal use by setting who to register for an account. Once configured, proceed and create a new project by clicking on “New Project“.
Here, I will deploy a project from a template as shown.
Once created, the project will appear as shown.
You can proceed and add SSH keys for easier management. To confirm if everything is set up accordingly, we will try and git clone the repository. Click on clone to obtain the desired URL. Since I do not have SSH keys, I will proceed to use HTTPS as shown.
Voila!
That verifies that the GitLab installation is working as preferred.
#7. Cleanup
To remove the GitLab installation and all the persistent data, use the command:
$ docker-compose down -v
[+] Running 4/4
⠿ Container admin-gitlab-1 Removed 13.5s
⠿ Container admin-redis-1 Removed 0.7s
⠿ Container admin-postgresql-1 Removed 0.5s
⠿ Network admin_default Removed 0.4s
Closing Thoughts.
We have triumphantly walked through how to run GitLab in Docker Containers using Docker Compose. Now you have a GitLab installation from which you can host Git repositories. I hope this was significant.
0 notes
Text
How to Install Nextcloud on Ubuntu Server
New Article has been published on http://computingondemand.com/install-nextcloud-ubuntu-server/
How to Install Nextcloud on Ubuntu Server
There are a lot of things Windows Server does well. However, coming off of the NAS environment, there are a lot of things that it doesn’t. One of these is a simple method for web access to various files and folders, along with the ability to share them via user login or simple url. Until recently, there had been only one real player in this space, OwnCloud. I had fiddled with the product for some time, but features were slow to show and it just didn’t work the way I had been hoping it would.
When I had finished the last server build, I had been looking for a way to simply address the needs that QNAP had been fulfilling for me with ease. With MyQNAPCloud I could easily share files or folders without issue. While on the hunt for the latest release of OwnCloud, I hit Google and just tried something. I tried “OwnCloud vs” and let the magic of Google happen. That is how I found Nextcloud.
While I won’t get into how Nextcloud came to be, I will tell you that there are a ton of similarities between the two products. When you do some research, it will become clear why that is. However, that is neither here nor there, the product is attractive, seamless, but a major pain in the … to get running. As usual, the best things in life are on linux. With that in mind, I created a Hyper-V hosting Ubuntu Server LTS 16.04 and started my journey.
Much of what I detail out here will be under the assumption that you have a CLEAN Ubuntu LAMP server up and running. For me, Hyper-V was a quick and logical start, but that doesn’t limit you to anything. Feel free to run VirtualBox, VMWare, or dedicated hardware.
Considerations
Before you build out your virtual machine for this install, there are some considerations to make. For instance, you need to plan for the amount of space that your VM will occupy. For me, it is easy, all my folders reside on another server, so a 100GB virtual hard drive is overkill. I have seen some “paid” for preconfigured VMs running around in 500GB and 1TB flavors.
System Requirements
(Taken Directly from Nextcloud.com)
Memory
Memory requirements for running an Nextcloud server are greatly variable, depending on the numbers of users and files, and volume of server activity. Nextcloud needs a minimum of 128MB RAM, and we recommend a minimum of 512MB.
Recommended Setup for Running Nextcloud
For best performance, stability, support, and full functionality we recommend:
Red Hat Enterprise Linux 7 / Ubuntu 16.04 LTS
MySQL/MariaDB
PHP 7.0 +
Apache 2.4 with mod_php
Supported Platforms
Server: Linux (Debian 7, SUSE Linux Enterprise Server 11 SP3 & 12, Red Hat Enterprise Linux/CentOS 6.5 and 7 (7 is 64-bit only), Ubuntu 14.04 LTS, 16.04 LTS)
Web server: Apache 2 (mod_php, php-fpm) or Nginx (php-fpm)
Databases: MySQL/MariaDB 5.5+; PostgreSQL; Oracle 11g (currently only possible if you contact us <https://nextcloud.com/enterprise> as part of a subscription)
PHP 5.6 + required
Hypervisors: Hyper-V, VMware ESX, Xen, KVM
Desktop: Windows XP SP3 (EoL Q2 2015), Windows 7+, Mac OS X 10.7+ (64-bit only), Linux (CentOS 6.5, 7 (7 is 64-bit only), Ubuntu 12.04 LTS, 14.04 LTS, 14.10, Fedora 20, 21, openSUSE 12.3, 13, Debian 7 & 8).
Mobile apps: iOS 7+, Android 4+
Web browser: IE11+, Microsoft Edge, Firefox 14+, Chrome 18+, Safari 7+
Database Requirements for MySQL / MariaDB
The following is currently required if you’re running Nextcloud together with a MySQL / MariaDB database:
Disabled or BINLOG_FORMAT = MIXED configured Binary Logging (See: MySQL / MariaDB with Binary Logging Enabled)
InnoDB storage engine (MyISAM is not supported)
“READ COMMITED” transaction isolation level (See: Database “READ COMMITED” transaction isolation level)
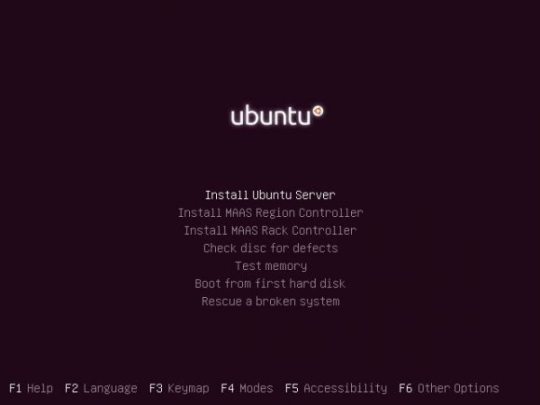
Installing Ubuntu Server
Download: https://www.ubuntu.com/download/server/thank-you?version=16.04.1&architecture=amd64
Walking through the standard install, for the most part, is a series of next and enter clicks. There isn’t much excitement. After you get past choosing your language, Install Ubuntu Server.
The installation will guide you through a series of pretty standard questions:


Once the additional components are completed, it is time to pick your system’s hostname. If you don’t know, a hostname is a label assigned to a device for identification. I named mine “nextcloud”, but while creating this tutorial, I left the default in place.

The username and password you choose are completely up to you. Make them something you will not forget!
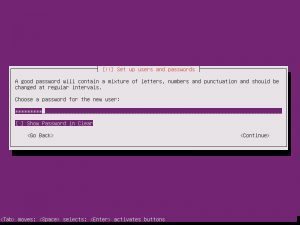
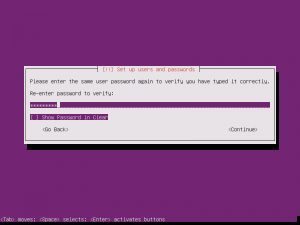
When asked the next few questions, the easiest way to go is with the defaults, that is until you get to Paritition Disks.


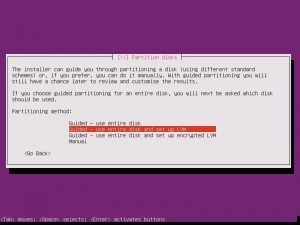

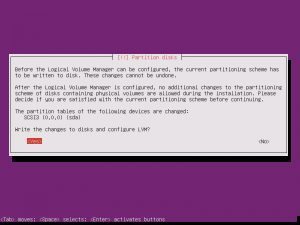
Partition disks, Yes. Full Size, Yes. Write Changes, Yes. Proxy, continue.
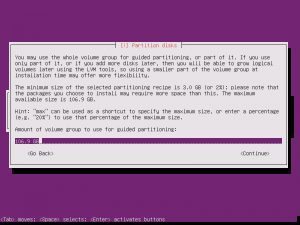

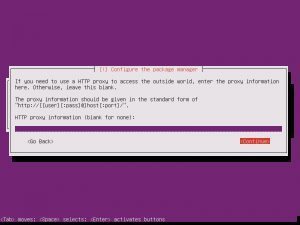
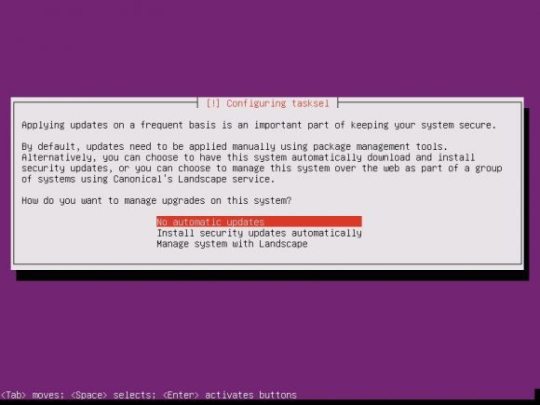
Choosing whether Ubuntu will install updates automatically is up to you, this is something you can change.
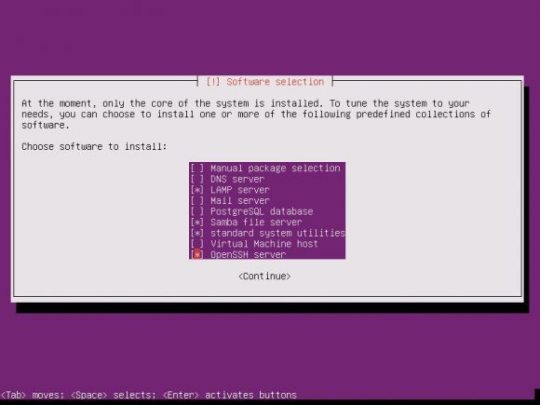
Software selection is the start. Here, the easiest way to proceed is to select LAMP, SAMBA, OpenSSH.
If you selected the previous recommendations, you will eventually be asked for a MySQL password. Pick a password that is easy to remember but hard enough to guess.

Install GRUB
As your installation finishes, it is important to take note that you have a basic install of Ubuntu Server. This is not a hardened version nor are there any security considerations made. Security is not something to take lightly and there are plenty of threads on many great sites that can get you going.

Installing Nextcloud
Once your system has rebooted, the fun work of installing Nextcloud can begin. I would like to start off by saying, I am not the author of this entire process. While some of it is mine, I have also collected the information from various websites and collected them into a single tutorial.
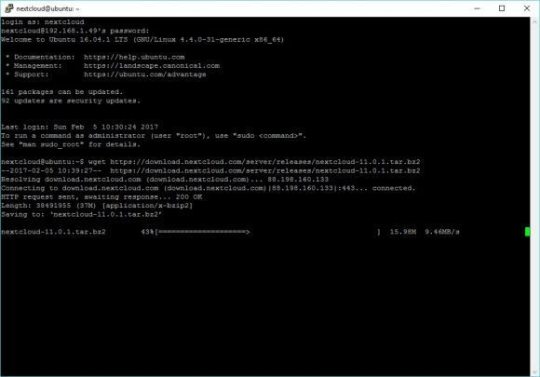
Log into your system with the username and password you provided during your install.
When you first log into your server, you will be dropped in your user’s home directory. The path for this will be, by default, /home/username
There are a few modules that Nextcloud will need
sudo apt-get install libxml2-dev php-zip php-dom php-xmlwriter php-xmlreader php-gd php-curl php-mbstring
Let’s start by fetching the latest build, available at the time of this tutorial, of Nextcloud
wget https://download.nextcloud.com/server/releases/nextcloud-11.0.1.tar.bz2
Now, we need mod_rewrite
a2enmod rewrite
Restart Apache
sudo service apache2 reload
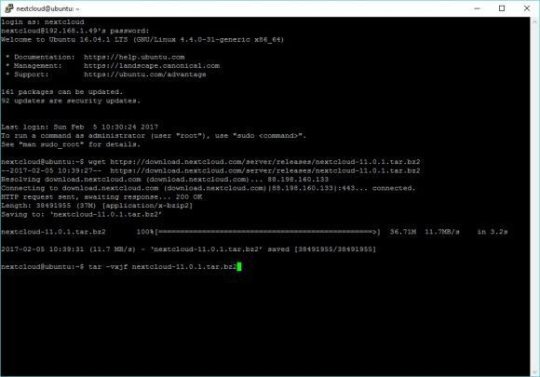
Once the download has completed, let’s untar.
tar -vxjf nextcloud-11.0.1.tar.bz2
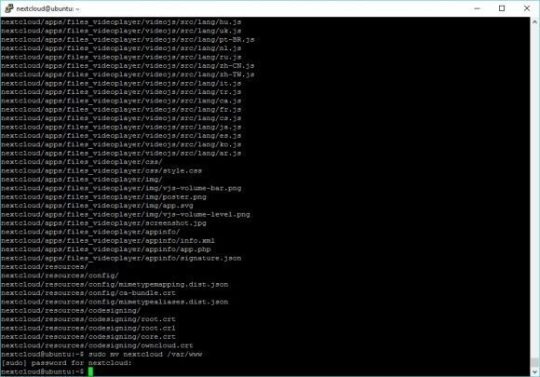
Move the folder to /var/www. When you first run “sudo” you will have to re-enter your password.
sudo mv nextcloud /var/www
If you plan on connecting Nextcloud to your Windows Server, like I am, you will have to make sure you have Samba installed and configured. In my efforts, I have found that SMB2 is required for Nextcloud to function properly.
sudo apt-get install smbclient php-smbclient
Change the configuration of samba for SMB2
sudo nano /etc/samba/smb.conf
When the file opens, you will have to add teh following lines under [global]
max protocol = SMB2
client max protocol = SMB2

To exit the editor CTRL-X and click Y to confirm, then Enter to save
Create the apache configuration file
sudo nano /etc/apache2/sites-available/nextcloud.conf
Paste the following into the file and save.
Alias /nextcloud "/var/www/nextcloud/"
Alias /nextcloud “/var/www/nextcloud/”
Options +FollowSymlinks
AllowOverride All
Dav off
SetEnv HOME /var/www/nextcloud
SetEnv HTTP_HOME /var/www/nextcloud
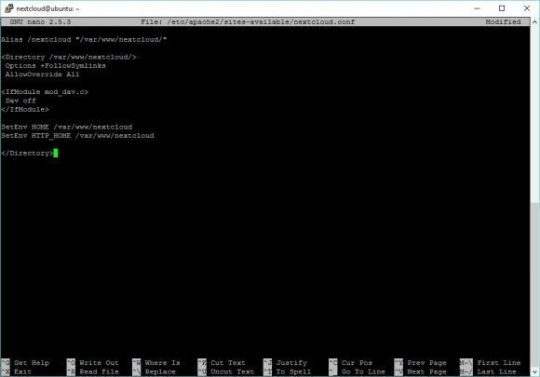
To exit the editor CTRL-X and click Y to confirm, then Enter to save
Create a symbolic link for apache
sudo ln -s /etc/apache2/sites-available/nextcloud.conf /etc/apache2/sites-enabled/nextcloud.conf
Enable the apache modules required for Nextcloud.
sudo a2enmod headers
restart apache
sudo service apache2 reload
Create the DB for Nextcloud
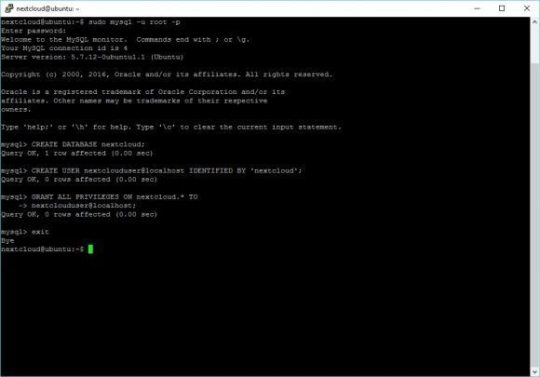
sudo mysql -u root -p
When prompted, enter the password your created for your database during the install
Create the user for your database. In the example below, I chose nextcloud as the password for the user nextclouduser. DO NOT USE THAT PASSWORD! Create your own password.
CREATE USER nextclouduser@localhost IDENTIFIED BY 'nextcloud';
Grant all privileges for that user
GRANT ALL PRIVILEGES ON nextcloud.* TO nextclouduser@localhost;
Exit
Secure and provide write abilities for Nextcloud (nextcloud in the example below is the username I chose during install)
sudo nano /home/nextcloud/grantperm.sh
Paste the following
#!/bin/bash
ocpath='/var/www/nextcloud'
htuser='www-data'
htgroup='www-data'
rootuser='root'
printf “Creating possible missing Directories\n”
mkdir -p $ocpath/data
mkdir -p $ocpath/updater
printf “chmod Files and Directories\n”
find $ocpath/ -type f -print0 | xargs -0 chmod 0640
find $ocpath/ -type d -print0 | xargs -0 chmod 0750
printf “chown Directories\n”
chown -R $rootuser:$htgroup $ocpath/
chown -R $htuser:$htgroup $ocpath/apps/
chown -R $htuser:$htgroup $ocpath/config/
chown -R $htuser:$htgroup $ocpath/data/
chown -R $htuser:$htgroup $ocpath/themes/
chown -R $htuser:$htgroup $ocpath/updater/
chmod +x $ocpath/occ
printf “chmod/chown .htaccess\n”
if [ -f $ocpath/.htaccess ] then
chmod 0644 $ocpath/.htaccess
chown $rootuser:$htgroup $ocpath/.htaccess
fi
if [ -f $ocpath/data/.htaccess ] then
chmod 0644 $ocpath/data/.htaccess
chown $rootuser:$htgroup $ocpath/data/.htaccess
fi

To exit the editor CTRL-X and click Y to confirm, then Enter to save
Grant execution privileges
sudo chmod +x grantperm.sh
Run the script
sudo ./grantperm.sh
Open a browser, navigate to the IP address or hostname of the server you just completed to finalize the Nextcloud install
http://ipaddress/nextcloud
If you don’t know the IP address of the machine, you can use ifconfig to find it
ifconfig


Fill in the required fields and enjoy. If you followed this tutorial to the letter, pick a username and password for nextcloud admin
Database user: nextclouduser
Password: nextcloud
Database: nextcloud
Database host: localhost
There are more things to do, for instance, there are a ton of security concerns to consider. There are also caching recommendations. I also highly recommend that you consider using https for your server.
Caching: https://docs.nextcloud.com/server/11/admin_manual/configuration_server/caching_configuration.html
Security: https://docs.nextcloud.com/server/11/admin_manual/configuration_server/harden_server.html
Backups: https://docs.nextcloud.com/server/11/admin_manual/maintenance/backup.html
0 notes
Text
The best Linux web hosting services of 2018
Visit Now - http://zeroviral.com/the-best-linux-web-hosting-services-of-2018/
The best Linux web hosting services of 2018
Linux hosting is everywhere. Whether you’re looking for a simple shared hosting account or a powerful dedicated server, the chances are that you’ll be offered a Linux-based option first.
In many cases, you might not care. If your hosting needs are simple, you’ll probably choose an account based on the allocated web space, bandwidth and similar features – the operating system is so far down most people’s priority list that often it’s not even mentioned in comparison tables.
But if you’re an experienced user, know more about Linux, or you perhaps need to build a technically complex website where you have full control over everything, it’s a different story.
You might want to choose your preferred distro or control panel. You could need more control over the server and its components. Hosts may throw in all kinds of goodies to get you started – a firewall, mail server, private DNS – and offer quality support to keep your site up and running.
Every web host has its own idea of what makes a great Linux package, but we’ve listed five of our favorite providers to point you in the right direction. Keep reading to find out more.
1. InMotion Hosting
Fast and feature-packed hosting from a reliable provider
Professional features
Excellent support
CentOS only
InMotion Hosting is a professional Linux web host which delivers high levels of power and control right across its range.
InMotion’s shared hosting includes many beginner-friendly features, for example – free website migration, a bundled website builder, regular backups – but that’s just the start. More experienced users will be happy to see support for MySQL and PostreSQL databases, PHP 7, Ruby, Perl and Python, SSH access and more.
There are interesting touches wherever you look. You don’t just get the option to have WordPress, PrestaShop or Joomla preinstalled, for instance – InMotion throws in WP-CLI to enable managing multiple WordPress installations from the command line. It’s a far more capable product than you might expect, considering prices start at $5.99 (£4.30) a month for the two-year plan.
It’s a similar story as you upgrade. Optional self-managed VPS hosting – from $19.99 (£14.30) a month for the initial term – gives you CentOS 7 and a firewall, but after that, you’re able to install, optimize and configure the server however you like. Even InMotion’s managed VPS hosting still gives you root access for considerable low-level control.
What you don’t get here is any upfront choice of operating system: CentOS 7 is it. But as InMotion points out, that does mean you’ll benefit from its 12 years’ worth of experience in optimizing, securing and modifying the OS. Even if that does cause you some setup issues, the Launch Assist feature gives you a minimum of two hours with an InMotion tech support person to help you solve any problems.
2. SiteGround
Powerful Linux hosting for demanding users
Powerful features
Genuine technical expertise
Responsive support
Every Linux host claims to offer the best possible technical support, but separating the experts from the pretenders isn’t always easy. One way to identify the most knowledgeable providers is to check their high-end products. You won’t get the same level of support if you’re buying a basic shared hosting package, but just knowing that level of expertise is available somewhere in the company can be useful.
SiteGround is a great example. If the company’s standard hosting products aren’t enough, it can build enterprise-level solutions from scratch, and SiteGround’s website lists some of the technologies it supports: custom private clouds, smart use of Linux containers, replication between databases, and in-depth expertise in WordPress, Drupal, Nginx, Apache, PHP, MySQL, MongoDB, ElasticSearch, Redis, Solr, Memcached and more. This is clearly a provider that knows what it’s doing.
Home users won’t get the same level of support, of course, but even SiteGround’s shared hosting plan delivers more than you might expect: free Let’s Encrypt SSLs, cPanel and SSH access, Cloudflare integration, unlimited emails and databases, HTTP/2-enabled servers, free daily backups, and 24/7 technical support by phone, chat and a ticket system. Not bad at £2.75 ($3.85) a month plus tax for the initial term, £6.95 ($9.75) afterwards.
Ramping up to a VPS-like Cloud Hosting plan gets you a very well-specified CentOS system. MySQL 5, PostgreSQL, 5 PHP versions, HHVM, Apache, Nginx, Exim mail server, a private DNS server setup and Iptables firewall are all preinstalled and managed by SiteGround. Prices start at £48 ($67.20) a month plus tax.
Opt for a dedicated server and you’ll get high-end extras like Git integration and performance-boosting Nginx-based cache options for WordPress, Memcached and HHVM.
You probably won’t want all these features – maybe you only need a few – but they do provide a strong indicator of the company’s technical expertise. If you’re looking for a provider that can support your site and help it grow, SiteGround could be a wise choice.
3. Hostwinds
Power-packed Linux hosting for expert users
Choice of OS
Good value
Limited support
Linux hosting is available from just about everyone, but anything less than a dedicated server is often fully managed by the provider (they set up, manage and maintain the OS and all its components for you). That’s great for beginners, but more experienced users might be frustrated by the lack of features and control.
Hostwinds’ unmanaged VPS packages allow you to take complete charge of your workspace. You can choose from a range of operating systems, including CentOS, Ubuntu, openSUSE, Debian and Fedora. You can tweak and set up the operating system however you like, configure your own backup scheme, and more.
Unmanaged packages bring responsibilities, too. If there’s a missing update or some mystery software issue, you’ll be the one who has to fix it. But that shouldn’t be too intimidating for Linux users, and many elements of Hostwinds’ packages remain simple and easy-to-use (site management via cPanel, automated WordPress and other installs via Softaculous, and so on).
Even better, as you’re not paying for management, Hostwinds gives you a 50% discount on every package. Normal managed Linux VPS packages range from $9.99 (£7.14) for 1 CPU core, 512MB RAM, 20GB disk space, 1TB traffic, up to $49.99 (£35.70) for 2 cores, 4GB RAM, 50GB disk space, 2TB traffic – but the unmanaged range runs from $4.99 (£3.60) to $24.99 (£17.85). There’s no long-term contract required, so you can try the service for as little as a month to see if it works for you.
4. Liquid Web
CentOS, Debian, Ubuntu? Take your pick
Choice of OS
Excellent support
Above average prices
Part of the appeal of Linux hosting should be the level of control you get over your working environment, but this doesn’t happen with every provider. Often you’re presented with a standard base environment – typically CentOS and cPanel – with no standard ability to choose anything else.
Liquid Web has been providing quality VPS and dedicated hosting packages for years, and one reason for this success could be its flexibility. Whatever you’re after, the company offers in-depth low-level control over your server specifications.
You’re not stuck with a single version of CentOS, for instance. Liquid Web offers CentOS 6 (optionally with CloudLinux) and 7, as well as Debian 8, Ubuntu 14.04 and 16.04. The CentOS 7 images can include cPanel or Plesk, and plans are available in a mix of self-managed, core-managed and fully-managed variations.
There’s even more power over some supplementary features. While other hosts might throw in a standard backup plan, Liquid Web enables choosing how many daily backups you’d like to retain, or it can squeeze as many backups as will fit into a defined amount of disk space. Both options are charged at a very reasonable $0.12 per GB per month, so you only pay for whatever you use.
However your server is configured, Liquid Web’s excellent support is on hand 24/7/365 to resolve problems as quickly as possible. And we do mean quickly: if, say, there’s a hardware failure, the company promises it will be replaced within 30 minutes of the problem being identified.
What’s more, Liquid Web backs up these promises with an impressive service level agreement. If the company doesn’t respond to an initial helpdesk ticket within 30 minutes, you’ll be credited with 10 times the amount they missed it by, and there are similar clauses to cover you for power outages, network failure and more.
5. OVH
Learn the Linux basics on a budget
Wide choice of OS, control panels
Amazingly cheap
Poor support
Choosing the right Linux host can be difficult, especially if you’re a hosting newbie and unsure of which features you might need.
One option is to gain some experience by signing up with a flexible budget host like OVH. The company doesn’t have the best support and we wouldn’t recommend it for business-critical sites, but you do get a huge amount for your money and it’s a very cheap way to learn more about your Linux options.
Do you need a wider choice of operating systems, for instance? OVH VPS plans support Arch Linux, CentOS 6, CentOS 7, Debian 7, Debian 8, Debian 9, Ubuntu 14.04 Server and Ubuntu 16.04 Server, along with Kubuntu 14.04 Desktop if you need a user interface.
You’re not restricted to cPanel as a website manager, either: OVH also supports CozyCloud and Plesk Onyx.
OVH says you can have WordPress, Drupal, Joomla! and PrestaShop pre-installed, conveniently, although there’s no mention of a general Softaculous-type one-click application installer. Still, with full root access you should be able to manually set up whatever you need.
What’s really impressive here is the price, which starts at just £3.99 (£5.60) plus tax per individual month, dropping to £2.99 ($4.20) if you sign up for a year. OVH isn’t the best Linux host by any means, but it does provide a very cheap way to experiment with different distros and control panels to find out what works for you. It’s well worth a look for Linux newbies or anyone who feels they need more hosting experience before handing over the big money.
0 notes
Photo

Kali Linux 2017.2 Release New Hacking Tools
We are happy to announce the release of Kali Linux 2017.2, available now for your downloading pleasure. This release is a roll-up of all updates and fixes since our 2017.1 release in April. In tangible terms, if you were to install Kali from your 2017.1 ISO, after logging in to the desktop and running ‘apt update && apt full-upgrade’, you would be faced with something similiar to this daunting message:
1399 upgraded, 171 newly installed, 16 to remove and 0 not upgraded.
Need to get 1,477 MB of archives.
After this operation, 1,231 MB of additional disk space will be used.
Do you want to continue? [Y/n]
That would make for a whole lot of downloading, unpacking, and configuring of packages. Naturally, these numbers don’t tell the entire tale so read on to see what’s new in this release.
New and Updated Packages in Kali 2017.2
In addition to all of the standard security and package updates that come to us via Debian Testing, we have also added more than a dozen new tools to the repositories, a few of which are listed below. There are some really nice additions so we encourage you to ‘apt install’ the ones that pique your interest and check them out.
hurl – a useful little hexadecimal and URL encoder/decoder
phishery – phishery lets you inject SSL-enabled basic auth phishing URLs into a .docx Word document
ssh-audit – an SSH server auditor that checks for encryption types, banners, compression, and more
apt2 – an Automated Penetration Testing Toolkit that runs its own scans or imports results from various scanners, and takes action on them
bloodhound – uses graph theory to reveal the hidden or unintended relationships within Active Directory
crackmapexec – a post-exploitation tool to help automate the assessment of large Active Directory networks
dbeaver – powerful GUI database manager that supports the most popular databases, including MySQL, PostgreSQL, Oracle, SQLite, and many more
brutespray – automatically attempts default credentials on discovered services
On top of all the new packages, this release also includes numerous package updates, including jd-gui, dnsenum, edb-debugger, wpscan, watobo, burpsuite, and many others. To check out the full list of updates and additions, refer to the Kali changelog on our bug tracker.
Ongoing Integration Improvements
Beyond the new and updated packages in this release, we have also been working towards improving the overall integration of packages in Kali Linux. One area in particular is in program usage examples. Many program authors assume that their application will only be run in a certain manner or from a certain location. For example, the SMBmap application has a binary name of ‘smbmap’ but if you were to look at the usage example, you would see this:
Examples:
$ python smbmap.py -u jsmith -p password1 -d workgroup -H 192.168.0.1
$ python smbmap.py -u jsmith -p 'aad3b435b51404eeaad3b435b51404ee:da76f2c4c96028b7a6111aef4a50a94d' -H 172.16.0.20
$ python smbmap.py -u 'apadmin' -p 'asdf1234!' -d ACME -h 10.1.3.30 -x 'net group "Domain Admins" /domain'
If you were a novice user, you might see these examples, try to run them verbatim, find that they don’t work, assume the tool doesn’t work, and move on. That would be a shame because smbmap is an excellent program so we have been working on fixing these usage discrepancies to help improve the overall fit and finish of the distribution. If you run ‘smbmap’ in Kali 2017.2, you will now see this output instead:
Examples:
$ smbmap -u jsmith -p password1 -d workgroup -H 192.168.0.1
$ smbmap -u jsmith -p 'aad3b435b51404eeaad3b435b51404ee:da76f2c4c96028b7a6111aef4a50a94d' -H 172.16.0.20
$ smbmap -u 'apadmin' -p 'asdf1234!' -d ACME -h 10.1.3.30 -x 'net group "Domain Admins" /domain'
We hope that small tweaks like these will help reduce confusion to both veterans and newcomers and it’s something we will continue working towards as time goes on.
Learn More About Kali Linux
In the time since the release of 2017.1, we also released our first book, Kali Linux Revealed, in both physical and onlineformats. If you are interested in going far beyond the basics, really want to learn how Kali Linux works, and how you can leverage its many advanced features, we encourage you to check it out. Once you have mastered the material, you will have the foundation required to pursue the Kali Linux Certified Professional certification.
Kali ISO Downloads, Virtual Machines and ARM Images
The Kali Rolling 2017.2 release can be downloaded via our official Kali Download page. This release, we have also updated our Kali Virtual Images and Kali ARM Images downloads. As always, if you already have Kali installed and running to your liking, all you need to do in order to get up-to-date is run the following:
apt update
apt dist-upgrade
reboot
Source code: https://www.kali.org/news/kali-linux-2017-2-release/
Download Link: https://www.kali.org/downloads/
Read More Cyber New’s Visit Our Facebook Page Click the Link : https://www.facebook.com/pages/Cyber-crew/780504721973461
Read More Cyber New’sVisit Our Twitter Page Click the Link : https://twitter.com/Cyber0Crew
~R@@T @CCE$$~
0 notes
Text
An SSO(Single Sign-On) is a system that allows access to multiple independent, software systems using the same credentials. This simply means that with a single authentication, you can log into several services without providing a password. SSO systems are popular nowadays with Google, Facebook e.t.c using it. Today, there are many SSO servers, they include OneLogin, okta e.t.c
Keycloak is an open-source SSO provider that supports multiple protocols such as OpenID Connect and SAML 2.0. This Identity and Access Management System allows one to easily add authentication to an application and secure it. You can easily enable social login or use an existing Active Directory/LDAP.
Keycloak is a very extensible and highly configurable tool that offers the following features:
User Federation – It allows one to sync users from Active Directory and LDAP servers.
Kerberos bridge – It can be used to automatically authenticate the users logged in to the Kerberos server.
Theme support – Customize its interface to integrate with your applications as desired.
Two-factor Authentication Support – It offers support for HOTP/TOTP via Google Authenticator or FreeOTP.
Social Login – You can enable login with GitHub, Google, Facebook, Twitter and other social networks.
It offers Single-Sign-On and Single-Sign-Out for browser applications.
Identity Brokering – it allows one to authenticate with external SAML or Open ID identity providers.
Session management – the admins can view and manage the user sessions.
Client adapters for JavaScript applications, JBoss EAP, WildFly, Fuse, Jetty, Tomcat, Spring, etc.
Below is an illustration of the Keycloak Architecture.
This guide offers the required knowledge on how to run Keycloak Server in Docker Containers with Let’s Encrypt SSL.
Getting Started.
We will begin by installing the required packages for this setup.
## On Debian/Ubuntu
sudo apt update && sudo apt upgrade
sudo apt install curl vim git
## On RHEL/CentOS/RockyLinux 8
sudo yum -y update
sudo yum -y install curl vim git
## On Fedora
sudo dnf update
sudo dnf -y install curl vim git
Step 1 – Install Docker and Docker-Compose on Linux
This guide requires one to have docker and docker-compose installed. Below is a dedicated guide to help you install Docker on Linux.
How To Install Docker CE on Linux Systems
Verify the installation as below:
$ docker -v
Docker version 20.10.14, build a224086
Add your system user to the docker group.
sudo usermod -aG docker $USER
newgrp docker
Start and enable the docker service on your system.
sudo systemctl start docker && sudo systemctl enable docker
Step 2 – Create the Database Container.
It is important to have a database when deploying the Keycloak Server Container. In this guide, we will run the PostgreSQL database container.
Create a network for Keycloak.
docker network create keycloak-network
Run PostgreSQL in the pod.
docker run --name db \
--net keycloak-network \
-e POSTGRES_USER=admin \
-e POSTGRES_PASSWORD=Passw0rd \
-e POSTGRES_DB=keycloakdb \
-d docker.io/library/postgres:latest
View the container.
$ docker ps
CONTAINER ID IMAGE COMMAND CREATED STATUS PORTS NAMES
479b1599d5a0 postgres:latest "docker-entrypoint.s…" 12 seconds ago Up 10 seconds 5432/tcp db
Step 3 – Provisioning the Keycloak Server Container.
This guide provides two methods on how you can provision the Keycloak Server Container. These are:
Building your optimized Keycloak docker image
Using ready Keycloak docker image
1. Building your optimized Keycloak docker image
You can build your own Keycloak image with token exchange feature, health and metrics endpoints enabled, and uses the PostgreSQL database from the below Dockerfile.
vim Dockerfile
Add the below lines to the file
FROM quay.io/keycloak/keycloak:latest as builder
ENV KC_HEALTH_ENABLED=true
ENV KC_METRICS_ENABLED=true
ENV KC_FEATURES=token-exchange
ENV KC_DB=postgres
# Install custom providers
RUN curl -sL https://github.com/aerogear/keycloak-metrics-spi/releases/download/2.5.3/keycloak-metrics-spi-2.5.3.jar -o /opt/keycloak/providers/keycloak-metrics-spi-2.5.3.jar
RUN /opt/keycloak/bin/kc.sh build
FROM quay.io/keycloak/keycloak:latest
COPY --from=builder /opt/keycloak/ /opt/keycloak/
WORKDIR /opt/keycloak
# For demonstration purposes only, please make sure to use proper certificates in production instead
RUN keytool -genkeypair -storepass password -storetype PKCS12 -keyalg RSA -keysize 2048 -dname "CN=server" -alias server -ext "SAN:c=DNS:localhost,IP:127.0.0.1" -keystore conf/server.keystore
# Change these values to point to a running postgres instance
ENV KC_DB_URL=jdbc:postgresql://db/keycloakdb
ENV KC_DB_USERNAME=admin
ENV KC_DB_PASSWORD=Passw0rd
ENV KC_HOSTNAME=localhost
ENTRYPOINT ["/opt/keycloak/bin/kc.sh", "start"]
Remember to replace the database credentials and the IP address in the DB_URL appropriately before we proceed to build the image.
docker build . -t keycloak_image
Once the image has been built, view it:
$ docker images
REPOSITORY TAG IMAGE ID CREATED SIZE
keycloak_image latest c7e3a15f28de 5 seconds ago 754MB
faf55943f0f2 13 seconds ago 734MB
quay.io/keycloak/keycloak latest a669b057e631 36 hours ago 562MB
postgres latest 74b0c105737a 44 hours ago 376MB
Now run Keycloak in the created pod using the optimized image.
In production mode (with secure defaults)
docker run --name keycloak --net keycloak-network -p 8443:8443 -e KEYCLOAK_ADMIN=myadmin -e KEYCLOAK_ADMIN_PASSWORD=StrongPassw0rd -d keycloak_image
The container will be created as below:
$ docker ps
CONTAINER ID IMAGE COMMAND CREATED STATUS PORTS NAMES
78eb8a3e6ecc keycloak_image "/opt/keycloak/bin/k…" 4 seconds ago Up 3 seconds 8080/tcp, 0.0.0.0:8443->8443/tcp, :::8443->8443/tcp keycloak
f6f538e7c097 postgres:latest "docker-entrypoint.s…" 2 minutes ago Up 2 minutes 0.0.0.0:5432->5432/tcp, :::5432->5432/tcp db
Once complete, the container should be accessible on port 8443 can be accessed using the URL https://IP_address:8443
The health checkpoints are:
https://localhost:8443/health
https://localhost:8443/health/ready
https://localhost:8443/health/live
Metrics are available at:
https://localhost:8443/metrics
2. Using ready Keycloak docker image
You can also use the ready Keycloak docker image. The command below shows how you can run a standard Keycloak image.
docker run -d \
--net keycloak-network \
--name keycloak \
-e KEYCLOAK_USER=myadmin \
-e KEYCLOAK_PASSWORD=StrongPassw0rd \
-p 8080:8080 \
-p 8443:8443 \
-e KEYCLOAK_DB=postgres \
-e KEYCLOAK_FEATURES=token-exchange \
-e KEYCLOAK_DB_URL=jdbc:postgresql://db/keycloakdb \
-e KEYCLOAK_DB_USERNAME=admin \
-e KEYCLOAK_DB_PASSWORD=Passw0rd \
jboss/keycloak
Remember to replace the database and Keycloak admin user credentials.
Check the status of the container.
$ docker ps
CONTAINER ID IMAGE COMMAND CREATED STATUS PORTS NAMES
a910a9eaa5e1 jboss/keycloak "/opt/jboss/tools/do…" 5 seconds ago Up 4 seconds 0.0.0.0:8080->8080/tcp, :::8080->8080/tcp, 0.0.0.0:8443->8443/tcp, :::8443->8443/tcp keycloak
8f5e593eb517 postgres:latest "docker-entrypoint.s…" About an hour ago Up About an hour 5432/tcp db
Step 4 – Access and Use Keycloak Server
Access Keycloak using the URL https://IP_address:8443
Proceed to the admin console and log in using the created user.
With the correct user credentials provided, you will be authenticated to the dashboard below.
We already have a Realm created, we will proceed and add a new client in the Clients tab.
Provide the details for the client.
Provide the URL path of your application under “Valid redirect URL“.
You can also create a new user in the user tab.
Proceed to the Credentials tab and set the password for the user.
Assign roles to the created user in the roles tab
That was a brief demonstration on how to get started with Keycloak.
Step 5 – Secure Keycloak with Let’s Encrypt SSL
It is necessary to secure your Keycloak server with SSL certificates to prevent the credentials from traveling along the unprotected wire. In this guide, we will use Let’s Encrypt to issue free trusted SSL certificates for our domain name.
First, install and configure a reverse proxy with Nginx.
##On RHEL 8/CentOS/Rocky Linux 8/Fedora
sudo dnf install https://dl.fedoraproject.org/pub/epel/epel-release-latest-8.noarch.rpm
sudo yum install nginx certbot python3-certbot-nginx
##On Debian/Ubuntu
sudo apt install nginx certbot python3-certbot-nginx
Proceed and create a Virtual Host file.
sudo vim /etc/nginx/conf.d/keycloak.conf
The file will contain the below lines.
server
listen 80;
server_name keycloak.example.com;
client_max_body_size 25m;
location /
proxy_pass https://localhost:8443/;
proxy_set_header Host $http_host;
proxy_set_header X-Real-IP $remote_addr;
proxy_set_header X-Forwarded-Proto $scheme;
error_page 404 /404.html;
location = /40x.html
error_page 500 502 503 504 /50x.html;
location = /50x.html
Save the file restart and enable Nginx
sudo systemctl restart nginx
sudo systemctl enable nginx
Proceed and generate SSL certificates for the domain name with the command:
sudo certbot --nginx
Proceed as below.
Saving debug log to /var/log/letsencrypt/letsencrypt.log
Enter email address (used for urgent renewal and security notices)
(Enter 'c' to cancel): Enter a valid Email address here
- - - - - - - - - - - - - - - - - - - - - - - - - - - - - - - - - - - - - - - -
Please read the Terms of Service at
https://letsencrypt.org/documents/LE-SA-v1.2-November-15-2017.pdf. You must
agree in order to register with the ACME server. Do you agree?
- - - - - - - - - - - - - - - - - - - - - - - - - - - - - - - - - - - - - - - -
(Y)es/(N)o: y
- - - - - - - - - - - - - - - - - - - - - - - - - - - - - - - - - - - - - - - -
Would you be willing, once your first certificate is successfully issued, to
share your email address with the Electronic Frontier Foundation, a founding
partner of the Let's Encrypt project and the non-profit organization that
develops Certbot? We'd like to send you email about our work encrypting the web,
EFF news, campaigns, and ways to support digital freedom.
- - - - - - - - - - - - - - - - - - - - - - - - - - - - - - - - - - - - - - - -
(Y)es/(N)o: y
Account registered.
Which names would you like to activate HTTPS for?
- - - - - - - - - - - - - - - - - - - - - - - - - - - - - - - - - - - - - - - -
1: keycloak.example.com
- - - - - - - - - - - - - - - - - - - - - - - - - - - - - - - - - - - - - - - -
Select the appropriate numbers separated by commas and/or spaces, or leave input
blank to select all options shown (Enter 'c' to cancel): 1
Requesting a certificate for keycloak.example.com
Performing the following challenges:
http-01 challenge for keycloak.example.com
Waiting for verification...
Cleaning up challenges
Deploying Certificate to VirtualHost /etc/nginx/conf.d/keycloak.conf
Please choose whether or not to redirect HTTP traffic to HTTPS, removing HTTP access.
- - - - - - - - - - - - - - - - - - - - - - - - - - - - - - - - - - - - - - - -
1: No redirect - Make no further changes to the webserver configuration.
2: Redirect - Make all requests redirect to secure HTTPS access. Choose this for
new sites, or if you're confident your site works on HTTPS. You can undo this
change by editing your web server's configuration.
- - - - - - - - - - - - - - - - - - - - - - - - - - - - - - - - - - - - - - - -
Select the appropriate number [1-2] then [enter] (press 'c' to cancel): 2
Redirecting all traffic on port 80 to ssl in /etc/nginx/conf.d/keycloak.conf
- - - - - - - - - - - - - - - - - - - - - - - - - - - - - - - - - - - - - - - -
Congratulations! You have successfully enabled https://keycloak.example.com
...
Now proceed and access your Keycloak server with HTTPS using the URL https://domain_name
Closing Thoughts.
This guide not only provides the required knowledge on how to run the Keycloak Server in Docker Containers with Let’s Encrypt SSL but also knowledge on how to get started with the Keycloak SSO system.
0 notes
Text
Normally, when the term Wiki is mentioned, the first thing that comes in the mind is wikipedia.org. There is a difference between the two, Wikipedia is just a website that adheres to the Wiki format while a wiki is defined as software built to help ease collaborative writing and editing for teams. It also offers a productive writing environment with a set of management tools for managers and moderators. Wiki has been in existence for a long time with popular wiki engines such as MediaWiki, PmWiki, TiddlyWiki, Wikkawiki, and DokuWiki.
Amongst the many wiki engines, exists an open-source wiki engine with NodeJS technologies known as Wiki.js. This is a fully customizable wiki engine written in JavaScript. This open-source wiki engine is released under the Affero GNU General Public License.
Wiki.js is an amazingly fast web application with support for many databases interface with primary support for PostgreSQL. Wiki.js is preferred due to the following amazing features:
Full version and revision control.
Fairly easy to use.
Seamless Media Assets Management.
Multi-lingual content support with full support for RTL languages like: Arabic, Hebrew and Persian.
It has a search functionality as a built-in feature.
Supports comments.
Git-backed storage.
It offers full support for content backup and synchronization for multi-vendors like Google Drive, AWS S3, Box.net,Dropbox, Microsoft OneDrive and DigitalOcean Spaces.
Integrated access control.
Assets management – media content can be inserted into content.
By the end of this guide, you should be able to install and configure Wiki.js on Kubernetes Cluster.
Getting Started
For this guide, you will need a Kubernetes cluster set up. We have dedicated guides on how to set up a Kubernetes cluster.
Deploy Kubernetes Cluster on Linux With k0s
Install Kubernetes Cluster on Rocky Linux 8 with Kubeadm & CRI-O
Install Kubernetes Cluster on Ubuntu using K3s
Run Kubernetes on Debian with Minikube
With your Kubernetes cluster set up, proceed as below.
Install and Configure Wiki.js on Kubernetes Cluster
Install and configure Wiki.js on Kubernetes Cluster on your system with the aid of the below steps.
Step 1 – Create the Wiki.js Namespace
Normally, a namespace is used to partition a single Kubernetes cluster into many virtual clusters. Begin by creating the namespace for wiki.js as below.
kubectl create namespace wikijs
Verify the namespace exists.
$ kubectl get namespaces
NAME STATUS AGE
default Active 98s
kube-node-lease Active 99s
kube-public Active 99s
kube-system Active 99s
wikijs Active 11s
Step 2 – Create the Secrets file
The secret file contains the username and passwords to be created for the below database.
Generate your own credentials for theROOT, ROOT_PASSWORD, DATABASE, USER variables. See below examples
# MySQL root user
$ echo -n 'root' | base64
cm9vdA==
# MySQL root user password
$ echo -n 'StrongRootPassword' | base64
U3Ryb25nUm9vdFBhc3N3b3Jk
# Wiki.js MySQL database name
$ echo -n 'wikijs' | base64
d2lraWpz
# Wiki.js MySQL user
$ echo -n 'wikijs' | base64
d2lraWpz
# Wiki.js MySQL user Password
$ echo -n 'WikijsUserPassw0rd' | base64
V2lraWpzVXNlclBhc3N3MHJk
Now create a secret file as below.
vim wikijs-secret.yaml
In the file, add the below lines replacing appropriately.
apiVersion: v1
kind: Secret
metadata:
name: mariadb-secret
namespace: wikijs
type: Opaque
data:
ROOT: cm9vdA==
ROOT_PASSWORD: U3Ryb25nUm9vdFBhc3N3b3Jk
DATABASE: d2lraWpz
USER: d2lraWpz
PASSWORD: V2lraWpzVXNlclBhc3N3MHJk
Apply the made changes.
kubectl apply -f wikijs-secret.yaml
Verify if your change is made.
$ kubectl get secret -n wikijs
NAME TYPE DATA AGE
default-token-pb9fx kubernetes.io/service-account-token 3 7m9s
mariadb-secret Opaque 5 6s
Step 3 – Create the Database Pod for wiki.js
This config file contains the database details for wiki.js. In this guide, we will use the MariaDB database which can be configured as below.
Option 1: Using Persistent Volume with StorageClass (Recommended)
For configuration of Kubernetes PV Storage solution refer to guides in the following links:
Dynamic hostPath PV Creation in Kubernetes using Local Path Provisioner
How To Deploy Rook Ceph Storage on Kubernetes Cluster
Deploy and Use OpenEBS Container Storage on Kubernetes
List available Storage Classes configured in your Kubernetes
$ kubectl get storageclasses
NAME PROVISIONER RECLAIMPOLICY VOLUMEBINDINGMODE ALLOWVOLUMEEXPANSION AGE
rook-ceph-block rook-ceph.rbd.csi.ceph.com Delete Immediate true 211d
rook-cephfs rook-ceph.cephfs.csi.ceph.com Delete Immediate true 211d
Let’s create PV Claim for Wiki.js Database
$ vim wikijs-pvc.yaml
kind: PersistentVolumeClaim
apiVersion: v1
metadata:
name: wikijs-pv-claim
namespace: wikijs
spec:
storageClassName: rook-cephfs
accessModes:
- ReadWriteOnce
resources:
requests:
storage: 10Gi
# Apply manifest
$ kubectl apply -f wikijs-pvc.yaml
Confirm PVC is created and available
$ kubectl get pvc -n wikijs
NAME STATUS VOLUME CAPACITY ACCESS MODES STORAGECLASS AGE
wikijs-pv-claim Bound pvc-fdee5351-7a84-4823-9e6c-9cf9a6aabccc 10Gi RWO rook-cephfs 23s
Create the wikijs-config.yaml file as below.
vim wikijs-config.yaml
Paste contents below into the file:
---
apiVersion: v1
kind: Service
metadata:
name: mariadb
namespace: wikijs
spec:
selector:
app: mariadb
ports:
- name: mariadb
protocol: TCP
port: 3306
---
apiVersion: apps/v1
kind: Deployment
metadata:
name: mariadb
namespace: wikijs
labels:
app: mariadb
spec:
selector:
matchLabels:
app: mariadb
template:
metadata:
labels:
app: mariadb
spec:
containers:
- name: mariadb
image: mariadb:latest
env:
- name: MYSQL_ROOT_PASSWORD
valueFrom:
secretKeyRef:
name: mariadb-secret
key: ROOT_PASSWORD
- name: MYSQL_DATABASE
valueFrom:
secretKeyRef:
name: mariadb-secret
key: DATABASE
- name: MYSQL_USER
valueFrom:
secretKeyRef:
name: mariadb-secret
key: USER
- name: MYSQL_PASSWORD
valueFrom:
secretKeyRef:
name: mariadb-secret
key: PASSWORD
- name: MARIADB_ROOT_HOST
value: "%"
ports:
- containerPort: 3306
name: mysql
volumeMounts:
- name: wikijs-db
mountPath: /var/lib/mysql
volumes:
- name: wikijs-db
persistentVolumeClaim:
claimName: wikijs-pv-claim
Apply configuration file using the commands below
$ kubectl apply -f wikijs-config.yaml -n wikijs
service/mariadb created
deployment.apps/mariadb created
Confirm Pod is running:
$ kubectl get deployment -n wikijs
NAME READY UP-TO-DATE AVAILABLE AGE
mariadb 1/1 1 1 5m20s
$ kubectl get pods -n wikijs
NAME READY STATUS RESTARTS AGE
mariadb-75cc6d696-tw4ld 1/1 Running 0 5m27s
Option 2: Using hostPath for data persistence (Note recommended)
You will require to create a storage volume for MariaDB
sudo mkdir /var/wikijs
Create the wikijs-config.yaml file as below.
vim wikijs-config.yaml
In the file, add the below lines. Here do not alter anything.
---
apiVersion: v1
kind: Service
metadata:
name: mariadb
namespace: wikijs
spec:
selector:
app: mariadb
ports:
- name: mariadb
protocol: TCP
port: 3306
---
apiVersion: apps/v1
kind: Deployment
metadata:
name: mariadb
namespace: wikijs
labels:
app: mariadb
spec:
selector:
matchLabels:
app: mariadb
template:
metadata:
labels:
app: mariadb
spec:
containers:
- name: mariadb
image: mariadb:latest
env:
- name: MYSQL_ROOT_PASSWORD
valueFrom:
secretKeyRef:
name: mariadb-secret
key: ROOT_PASSWORD
- name: MYSQL_DATABASE
valueFrom:
secretKeyRef:
name: mariadb-secret
key: DATABASE
- name: MYSQL_USER
valueFrom:
secretKeyRef:
name: mariadb-secret
key: USER
- name: MYSQL_PASSWORD
valueFrom:
secretKeyRef:
name: mariadb-secret
key: PASSWORD
- name: MARIADB_ROOT_HOST
value: "%"
ports:
- containerPort: 3306
name: mysql
volumeMounts:
- name: mariadb-storage
mountPath: /var/lib/mysql
volumes:
- name: mariadb-storage
hostPath:
path: /var/wikijs
type: DirectoryOrCreate
Remember under DB_TYPE, you can set the type of database you want to use i.e. Postgres, MySQL, MariaDB, MsSQL, SQLite e.t.c
Apply the settings made.
kubectl apply -f wikijs-config.yaml
Verify if the MariaDB pod has been created.
$ kubectl get pod -n wikijs
NAME READY STATUS RESTARTS AGE
mariadb-6f9ddfd55c-55rzq 1/1 Running 0 15s
Step 4 – Deploy the Wiki.js Service and application
Here, we can deploy the service as a NodePort, ClusterIP, or load balancer. First, create the file
vim wikijs-service.yaml
For Nodeport add the below lines.
apiVersion: v1
kind: Service
metadata:
name: "wikijs"
namespace: wikijs
spec:
type: NodePort
ports:
- name: http
port: 3000
selector:
app: "wikijs"
For this guide, we will deploy the service as NodePort for the cluster to be accessed from outside.
kubectl apply -f wikijs-service.yaml
Verify this.
$ kubectl get svc -n wikijs
NAME TYPE CLUSTER-IP EXTERNAL-IP PORT(S) AGE
mariadb ClusterIP 10.96.123.37 3306/TCP 29s
wikijs NodePort 10.100.116.117 3000:31694/TCP 5s
Printing Node Port value only
$ kubectl get service wikijs -o jsonpath='.spec.ports[0].nodePort'; echo
31665
Now proceed to the wiki.js deployment.
vim wikijs-deployment.yaml
In the file, add the below lines, here don’t replace anything, we are simply mapping the above configs.
apiVersion: apps/v1
kind: Deployment
metadata:
name: wikijs
namespace: wikijs
labels:
app: wikijs
spec:
selector:
matchLabels:
app: wikijs
template:
metadata:
labels:
app: wikijs
spec:
containers:
- name: wikijs
image: requarks/wiki:latest
imagePullPolicy: Always
env:
- name: DB_TYPE
value: "mariadb"
- name: DB_HOST
value: "mariadb"
- name: DB_PORT
value: "3306"
- name: DB_NAME
valueFrom:
secretKeyRef:
name: mariadb-secret
key: DATABASE
- name: DB_USER
valueFrom:
secretKeyRef:
name: mariadb-secret
key: USER
- name: DB_PASS
valueFrom:
secretKeyRef:
name: mariadb-secret
key: PASSWORD
ports:
- containerPort: 3000
name: http
We have mapped the ConfigMap and secret variables to the deployment and also pulled the official wiki.js docker image.
Now apply the made changes.
kubectl apply -f wikijs-deployment.yaml
Get the deployment.
$ kubectl get deploy -n wikijs
NAME READY UP-TO-DATE AVAILABLE AGE
mariadb 1/1 1 1 115s
wikijs 1/1 1 1 14m
Get the wiki.js pod.
$ kubectl get pods -n wikijs
NAME READY STATUS RESTARTS AGE
mariadb-6f9ddfd55c-55rzq 1/1 Running 0 2m39s
wikijs-548dcdd86c-tzp4f 1/1 Running 1 (5s ago) 93s
As seen we have two pods running successfully. One for the database and the other for the wiki.js service. We can check logs to ensure Database connection is okay
$ kubectl logs deploy/wikijs
Loading configuration from /wiki/config.yml... OK
2022-05-17T16:41:59.475Z [MASTER] info: =======================================
2022-05-17T16:41:59.479Z [MASTER] info: = Wiki.js 2.5.282 =====================
2022-05-17T16:41:59.479Z [MASTER] info: =======================================
2022-05-17T16:41:59.479Z [MASTER] info: Initializing...
2022-05-17T16:42:01.704Z [MASTER] info: Using database driver mysql2 for mariadb [ OK ]
2022-05-17T16:42:01.748Z [MASTER] info: Connecting to database...
2022-05-17T16:42:02.075Z [MASTER] info: Database Connection Successful [ OK ]
Obtain the port to which the NodePort service has been exposed.
$ kubectl get svc -n wikijs
mariadb ClusterIP 10.96.123.37 3306/TCP 67s
wikijs NodePort 10.104.156.51 3000:31694/TCP 22s
Manually granting permissions on MySQL CLI
In case of any database access issues like below:
2022-05-17T16:33:04.998Z [MASTER] error: Database Connection Error: ER_ACCESS_DENIED_ERROR undefined:undefined
2022-05-17T16:33:04.999Z [MASTER] warn: Will retry in 3 seconds... [Attempt 1 of 10]
You can access MariaDB pod shell and grant permissions
$ kubectl exec -ti deploy/mariadb -- bash
root@mariadb-bc4b6f568-xsb92:/# mysql -u root
Welcome to the MariaDB monitor. Commands end with ; or \g.
Your MariaDB connection id is 56
Server version: 10.6.7-MariaDB-1:10.6.7+maria~focal mariadb.org binary distribution
Copyright (c) 2000, 2018, Oracle, MariaDB Corporation Ab and others.
Type 'help;' or '\h' for help. Type '\c' to clear the current input statement.
MariaDB [(none)]>
Create user and grant permissions:
CREATE USER 'wikijs'@'%' IDENTIFIED BY 'WikijsUserPassw0rd';
GRANT ALL PRIVILEGES ON *.* TO 'wikijs'@'%' WITH GRANT OPTION;
FLUSH PRIVILEGES;
EXIT;
Validate user grants on the database:
MariaDB [(none)]> SELECT host, user FROM mysql.user;
+-------------------------+-------------+
| Host | User |
+-------------------------+-------------+
| % | wikijs |
| 127.0.0.1 | root |
| ::1 | root |
| localhost | mariadb.sys |
| localhost | root |
| mariadb-bc4b6f568-xsb92 | root |
+-------------------------+-------------+
7 rows in set (0.002 sec)
MariaDB [(none)]> EXIT
Bye
Validate connectivity works
root@mariadb-bc4b6f568-xsb92:/# mysql -u wikijs -p
Enter password:
Welcome to the MariaDB monitor. Commands end with ; or \g.
Your MariaDB connection id is 31
Server version: 10.6.7-MariaDB-1:10.6.7+maria~focal mariadb.org binary distribution
Copyright (c) 2000, 2018, Oracle, MariaDB Corporation Ab and others.
Type 'help;' or '\h' for help. Type '\c' to clear the current input statement.
MariaDB [(none)]> SHOW DATABASES;
+--------------------+
| Database |
+--------------------+
| information_schema |
+--------------------+
1 row in set (0.025 sec)
MariaDB [(none)]> EXIT
Bye
Step 5 – Access the wiki.js Web UI.
At this point, we can access the wiki.js service from the browser with the URL http://IP_Address:31694. Remember to replace the port with your own NodePort.
You should be able to see this page:
Fill in the required details for account creation and proceed with wiki.js installation.
When complete, you will be redirected to the login window.
On successful login, you will see this wiki.js welcome notification.
Proceed and create your wiki.js content.
That was enough learning! I hope you too benefitted from this guide on how to install and Configure Wiki.js on Kubernetes Cluster.
0 notes
Text
Welcome to this guide on how to run Mattermost Server in Docker Containers. Mattermost is a free tool used to establish a connection between an individual and groups. It is one of the biggest competitors of messaging platforms such as MS Teams and Slack. It can establish communication in form of chats, video calls, or normal voice calls.
Mattermost is preferred over other messaging platforms since it is easy to install and configure and can be hosted on a private cloud.
Features of Mattermost are:
File Sharing
Third Party Integrations
Incident resolution – resolves incidents quicky and thus saving on time.
Document Storage
Data Import and Export
Workflow management and orchestration.
Drag & Drop
Application and network performance monitoring.
IT Service desk
Document Storage
Alerts/Notifications
Setup Requirements
For this guide you need the following:
Docker and Docker-compose
A Fully Qualified Domain Name, this will be required for generating SSL certificates.
Install the required packages.
## On RHEL/CentOS/RockyLinux 8
sudo yum update
sudo yum install curl vim git
## On Debian/Ubuntu
sudo apt update && sudo apt upgrade
sudo apt install curl vim git
## On Fedora
sudo dnf update
sudo dnf -y install curl vim git
Step 1 – Install Docker and Docker-Compose
Before we begin on Mattermost installation, ensure that docker and docker-compose are installed on your Linux system.
Install the latest Docker version on Linux using the guide below.
How To Install Docker CE on Linux Systems
Check the installed version of docker.
$ docker -v
Docker version 20.10.10, build c2ea9bc
Now add your user to the Docker group.
sudo usermod -aG docker $USER
newgrp docker
Proceed and install the latest version of Docker-compose on your Linux system.
curl -s https://api.github.com/repos/docker/compose/releases/latest | grep browser_download_url | grep docker-compose-linux-x86_64 | cut -d '"' -f 4 | wget -qi -
Make the file executable as below.
chmod +x docker-compose-linux-x86_64
Move then docker-compose file to your PATH.
sudo mv docker-compose-linux-x86_64 /usr/local/bin/docker-compose
Now you have successfully installed docker-compose on Linux. Verify this by checking the installed docker-compose version.
$ docker-compose version
Docker Compose version v2.1.1
Start and enable docker to run on boot.
sudo systemctl start docker && sudo systemctl enable docker
sudo usermod -aG docker $USER
newgrp docker
Step 2 – Provision the Mattermost Server
In this guide, we will have a total of 3 docker containers i.e web application, database, and the Mattermost server containers
Create local volume directories to store data.
sudo mkdir -pv /srv/mattermost/volumes/app/mattermost/data,logs,config,plugins,client-plugins
sudo chown -R 2000:2000 /srv/mattermost/
Now clone the Mattermost git repo.
git clone https://github.com/mattermost/mattermost-docker.git
cd mattermost-docker
The docker-compose.yml file has 3 parts, the database, the Mattermost server, and the web application.
Open the YAML file and exit the 3 parts as below:
vim docker-compose.yml
In the file, make the below changes.
1. Configure Database Container
Now edit the database container configuration replacing appropriately.
.......
db:
build: db
read_only: true
restart: unless-stopped
volumes:
- /srv/mattermost/var/lib/postgresql/data:/var/lib/postgresql/data
- /etc/localtime:/etc/localtime:ro
environment:
- POSTGRES_USER=mmuser
- POSTGRES_PASSWORD=Passw0rd
- POSTGRES_DB=mattermost
........
In the command, replace PassW0rd with your preferred password for the PostgreSQL database to be created.
2. Configure the Mattermost Server Container
Now we will proceed in the same YAML file and provision the container for the Mattermost Server.
.......
app:
build:
context: app
# uncomment following lines for team edition or change UID/GID
args:
- edition=team
# - PUID=1000
# - PGID=1000
# - MM_VERSION=5.31
# restart: unless-stopped
volumes:
- /srv/mattermost/volumes/app/mattermost/config:/mattermost/config:rw
- /srv/mattermost/volumes/app/mattermost/data:/mattermost/data:rw
- /srv/mattermost/volumes/app/mattermost/logs:/mattermost/logs:rw
- /srv/mattermost/volumes/app/mattermost/plugins:/mattermost/plugins:rw
- /srv/mattermost/volumes/app/mattermost/client-plugins:/mattermost/client/plugins:rw
- /etc/localtime:/etc/localtime:ro
In the above code, set the edition to be downloaded to “team“, also set the volumes to the local volume created as above.
Also, proceed and enter details for your database environment for the Mattermost server to connect to your database as below.
........
environment:
# set same as db credentials and dbname
- MM_USERNAME=mmuser
- MM_PASSWORD=Passw0rd
- MM_DBNAME=mattermost
# use the credentials you've set above, in the format:
# MM_SQLSETTINGS_DATASOURCE=postgres://$MM_USERNAME:$MM_PASSWORD@db:5432/$MM_DBNAME?sslmode=disable&connect_timeout=10
- MM_SQLSETTINGS_DATASOURCE=postgres://mmuser:Passw0rd@db:5432/mattermost?sslmode=disable&connect_timeout=10
........
3. Configure the web container
The remaining part in the YAM file is to provision the web container.
............
web:
build: web
ports:
- "8001:8080"
- "4430:8443"
read_only: true
restart: unless-stopped
volumes:
# This directory must have cert files if you want to enable SSL
# - ./volumes/web/cert:/cert:ro
- /etc/localtime:/etc/localtime:ro
cap_drop:
- ALL
Here, we want the web service to be mapped on ports 8001 and 4430 since we will be running our reverse proxy server later.
Now you will have your docker-compose.yml file ready. Initialize the containers as below.
$ docker-compose up -d
Several images will be pulled as shown.
=> [mattermost-docker_db 3/5] RUN apk add --no-cache build-base 122.2s
=> => # Preparing metadata (setup.py): finished with status 'done'
=> => # Collecting envdir
=> => # Downloading envdir-1.0.1-py2.py3-none-any.whl (13 kB)
=> => # Collecting gevent>=1.0.2
=> => # Downloading gevent-21.8.0.tar.gz (6.2 MB)
=> => # Installing build dependencies: started
=> [mattermost-docker_web 5/11] RUN chown -R nginx:nginx /etc/nginx/sit 1.0s
=> [mattermost-docker_web 6/11] RUN touch /var/run/nginx.pid && 1.0s
=> [mattermost-docker_web 7/11] COPY ./security.conf /etc/nginx/conf.d/ 0.3s
=> [mattermost-docker_web 8/11] RUN chown -R nginx:nginx /etc/nginx/con 1.3s
=> [mattermost-docker_web 9/11] RUN chmod u+x /entrypoint.sh 1.4s
=> [mattermost-docker_web 10/11] RUN sed -i "/^http /a \ proxy_buffe 1.4s
.......
Once completed, check the containers as below.
$ docker ps
CONTAINER ID IMAGE COMMAND CREATED STATUS PORTS NAMES
d38f28337916 mattermost-docker_db "/entrypoint.sh post…" 40 seconds ago Up 38 seconds (healthy) 5432/tcp mattermost-docker-db-1
5c4c668d4122 mattermost-docker_app "/entrypoint.sh matt…" 40 seconds ago Up 38 seconds (healthy) 8000/tcp mattermost-docker-app-1
376062c0a2be mattermost-docker_web "/entrypoint.sh" 40 seconds ago Up 38 seconds (healthy) 0.0.0.0:8001->8080/tcp, :::8001->8080/tcp, 0.0.0.0:4430->8443/tcp, :::4430->8443/tcp mattermost-docker-web-1
As seen from the output, we have 3 containers running i.e web, database, Mattermost server.
Step 3 – Access Mattermost Web Interface
Now everything is set up, allow port 8001 through the firewall.
sudo firewall-cmd --add-service=8001 --permanent
sudo firewall-cmd --reload
Now proceed and access the Mattermost Web Interface on your browser using the URL http://domain-name:8001 or http://IP_Address:8001
Create an account for the Mattermost server and proceed to the Mattermost dashboard.
While here, you can proceed to create a team and begin your conversation or proceed to the System console where you make admin changes to your server. The system console looks like this.
Create a team for communication.
When done, you will have your Mattermost ready as below.
Step 4 – Setup reverse proxy and SSL (Optional)
Accessing the Mattermost site via HTTP is not secure enough, we need to secure this site by installing SSL certificates. For the purposes of this guide, I will use Nginx as the reverse proxy server.
Install Nginx Web server as below.
##On RHEL/CentOS/Rocky Linux 8
sudo yum install nginx
##On Debian/Ubuntu
sudo apt install nginx
Create a virtual host file.
sudo vim /etc/nginx/conf.d/mattermost.conf
In the conf file, add the below lines.
server
listen 80 default_server;
listen [::]:80 default_server;
server_name mattermost.example.com;
root /usr/share/nginx/html;
# Load configuration files for the default server block.
include /etc/nginx/default.d/*.conf;
location /
proxy_pass http://localhost:8001/;
index index.html index.htm;
error_page 404 /404.html;
location = /40x.html
error_page 500 502 503 504 /50x.html;
location = /50x.html
Grant privileges of the created file to Nginx.
# CentOS / RHEL / Fedora
sudo chown nginx:nginx /etc/nginx/conf.d/mattermost.conf
sudo chmod 755 /etc/nginx/conf.d/mattermost.conf
# Debian / Ubuntu
sudo chown www-data:www-data /etc/nginx/conf.d/mattermost.conf
sudo chmod 755 /etc/nginx/conf.d/mattermost.conf
Now edit the file at:
# CentOS / RHEL / Fedora
sudo vim /etc/nginx/nginx.conf
# Debian / Ubuntu
sudo vim /etc/nginx/sites-available/default
Comment out the server part in the conf file. Check the syntax of the created file.
$ sudo nginx -t
nginx: the configuration file /etc/nginx/nginx.conf syntax is ok
nginx: configuration file /etc/nginx/nginx.conf test is successful
Start and enable Nginx.
sudo systemctl start nginx
sudo systemctl enable nginx
Install SSL certificates with Let’s Encrypt.
With Let’s Encrypt, one can install trusted SSL certificates for free on any FQDN. First, you need to install Certbot.
##On RHEL 8/CentOS 8/Rocky Linux 8/Fedora
sudo dnf install https://dl.fedoraproject.org/pub/epel/epel-release-latest-8.noarch.rpm
sudo dnf install certbot python3-certbot-nginx
##On Debian/Ubuntu
sudo apt install certbot python3-certbot-nginx
Then proceed and install Trusted SSL Certificates on your domain name.
sudo certbot --nginx
You will proceed as below.
Saving debug log to /var/log/letsencrypt/letsencrypt.log
Enter email address (used for urgent renewal and security notices)
(Enter 'c' to cancel): Enter a valid Email address here
- - - - - - - - - - - - - - - - - - - - - - - - - - - - - - - - - - - - - - - -
Please read the Terms of Service at
https://letsencrypt.org/documents/LE-SA-v1.2-November-15-2017.pdf. You must
agree in order to register with the ACME server. Do you agree?
- - - - - - - - - - - - - - - - - - - - - - - - - - - - - - - - - - - - - - - -
(Y)es/(N)o: y
- - - - - - - - - - - - - - - - - - - - - - - - - - - - - - - - - - - - - - - -
Would you be willing, once your first certificate is successfully issued, to
share your email address with the Electronic Frontier Foundation, a founding
partner of the Let's Encrypt project and the non-profit organization that
develops Certbot? We'd like to send you email about our work encrypting the web,
EFF news, campaigns, and ways to support digital freedom.
- - - - - - - - - - - - - - - - - - - - - - - - - - - - - - - - - - - - - - - -
(Y)es/(N)o: y
Account registered.
Which names would you like to activate HTTPS for?
- - - - - - - - - - - - - - - - - - - - - - - - - - - - - - - - - - - - - - - -
1: mattermost.example.com
- - - - - - - - - - - - - - - - - - - - - - - - - - - - - - - - - - - - - - - -
Select the appropriate numbers separated by commas and/or spaces, or leave input
blank to select all options shown (Enter 'c' to cancel): 1
Requesting a certificate for mattermost.example.com
Performing the following challenges:
http-01 challenge for mattermost.example.com
Waiting for verification...
Cleaning up challenges
Deploying Certificate to VirtualHost /etc/nginx/conf.d/mattermost.conf
Redirecting all traffic on port 80 to ssl in /etc/nginx/conf.d/mattermost.conf
Successfully received certificate.
Certificate is saved at: a2enmod ssl
/etc/letsencrypt/live/mattermost.example.com/fullchain.pem
Key is saved at: /etc/letsencrypt/live/mattermost.example.com/privkey.pem
This certificate expires on 2022-01-09.
These files will be updated when the certificate renews.
Certbot has set up a scheduled task to automatically renew this certificate in the background.
- - - - - - - - - - - - - - - - - - - - - - - - - - - - - - - - - - - - - - - -
If you like Certbot, please consider supporting our work by:
* Donating to ISRG / Let's Encrypt: https://letsencrypt.org/donate
* Donating to EFF: https://eff.org/donate-le
- - - - - - - - - - - - - - - - - - - - - - - - - - - - - -
You will now have your Certificates installed successfully and added to your conf file as below.
$ sudo cat /etc/nginx/conf.d/mattermost.conf
.............
listen [::]:443 ssl ipv6only=on; # managed by Certbot
listen 443 ssl; # managed by Certbot
ssl_certificate /etc/letsencrypt/live/mattermost.example.com/fullchain.pem; # managed by Certbot
ssl_certificate_key /etc/letsencrypt/live/mattermost.example.com/privkey.pem; # managed by Certbot
include /etc/letsencrypt/options-ssl-nginx.conf; # managed by Certbot
ssl_dhparam /etc/letsencrypt/ssl-dhparams.pem; # managed by Certbot
server {
if ($host = mattermost.example.com)
return 301 https://$host$request_uri;
# managed by Certbot
listen 80 default_server;
listen [::]:80 default_server;
server_name mattermost.example.com;
return 404; # managed by Certbot
If you are using Firewald, allow HTTP and HTTPS through the firewall.
sudo firewall-cmd --add-service=http --permanent
sudo firewall-cmd --add-service=https --permanent
sudo firewall-cmd --reload
Restart Nginx.
sudo systemctl restart nginx
That is it! Proceed and access the Mattermost server page using HTTPS with the URL https://domain_name. You should see the page secure as below.
As seen from the above output, the site is secure.
Stopping / Removing Mattermost containers
You can stop the containers using the command:
docker-compose stop
If you want to remove the docker containers use the command
docker-compose stop && docker-compose rm
Conclusion
This is the end! I hope you learned a lot from this guide on how to run Mattermost Server in Docker Containers. We have gone further to demonstrate how to secure your site with SSL Certificates.
0 notes
Text
Current business needs continue to advance owing to the increased security breaches worldwide. As a result, every organization pulls up their socks as they tighten and reduce their attack surface as much as possible. Be it applications, networks, servers or databases, security standards are key requirements that should not be evaded at all. As a result of that we are going on a journey involving securing your powerful, open source object-relational PostgreSQL database.
PostgreSQL is a powerful, open source object-relational database system that uses and extends the SQL language combined with many features that safely store and scale the most complicated data workloads. Source: PostgreSQL Page
We are going to look at how to enable SSL/TLS connection to your PostgreSQL database by first enabling SSL on the database then adding the certificate to the client for secure connection. Additionally, we are going to enable SCRAM-SHA-256 password authentication in our PostgreSQL database. So that we are all on the same page, we shall describe SCRAM-SHA-256 password authentication.
The scram-sha-256 password authentication method performs SCRAM-SHA-256 authentication, as described in RFC 7677. It is a challenge-response scheme that prevents password sniffing on untrusted connections and supports storing passwords on the server in a cryptographically hashed form that is thought to be secure. Source: PostgreSQL Page
Now that the formalities are out of the way, we shall proceed to enabling SSL and SCRAM-SHA-256 password authentication by following the steps below.
NOTE: We shall be using CentOS for this example, the directory paths presented may differ in different distributions.
Step 1: Install PostgreSQL database
In case you do not have a PostgreSQL database, the guides listed below will bring it up in your server as soon as possible.
Install PostgreSQL 13 on Fedora
How To Install PostgreSQL 13 on CentOS / RHEL 8
Install PostgreSQL 13 on Debian
How To Install PostgreSQL 13 on CentOS 7
After you are done, we can proceed to implement SSL on your PostgreSQL database.
Step 2: Create Certificates
PostgreSQL has native support for using SSL connections to encrypt client/server communications for increased security. In case you do not have purchased certificates, create a server certificate whose identity can be validated by clients. To do that, first create a certificate signing request (CSR) and a public/private key file like so
openssl req -new -nodes -text -out root.csr \
-keyout root.key -subj "/CN=root.computingforgeeks.com"
Make sure you change “root.computingforgeeks.com” to match your domain name. After the root key has been created, make sure its permissions are set as secure as possible. Make sure “group” and “others” will not be able to read, write and execute.
sudo chmod og-rwx root.key
After that is done, sign the request with the key to create a root certificate authority (using the default OpenSSL configuration file location on Linux). You can check OpenSSL configuration file location on Linux by running “openssl version -d” command.
openssl x509 -req -in root.csr -text -days 3650 \
-extfile /etc/pki/tls/openssl.cnf -extensions v3_ca \
-signkey root.key -out root.crt
Finally, create a server certificate signed by the new root certificate authority:
\##Generate private server key and set secure permissions
openssl req -new -nodes -text -out server.csr \
-keyout server.key -subj "/CN=datab.computingforgeeks.com"
sudo chmod og-rwx server.key
Then also create the server certificate signed by the new root certificate authority
openssl x509 -req -in server.csr -text -days 365 \
-CA root.crt -CAkey root.key -CAcreateserial \
-out server.crt
The above commands will produce server.crt and server.key. These are the server certificates that we shall be adding to PostgreSQL. On the other hand, root.crt should be stored on the client so the client can verify that the server’s certificate was signed by its trusted root certificate.
root.crt should now be embedded in your applications written in Java and any other programming language. For Java, this should be added in its keystore.
Keep root.key in a secure location for it can be used in creating future certificates.
For convenience, we shall copy the server and root certificates into the place PostgreSQL keeps its main configuration files. That way, Postgres will be able to read them in the same location it reads its configuration files. The locations in CentOS are /var/lib/pgsql/13/data/ for PostgreSQL 13, /var/lib/pgsql/12/data/ for PostgreSQL 12 and /var/lib/pgsql/11/data/ for PostgreSQL 11. We shall use PostgreSQL 11 in this example.
sudo cp server.* root.crt /var/lib/pgsql/11/data/ ##For PostgreSQL 11
Step 3: Configure PostgreSQL database to enable SSL
Now that we have our certificates, nothing denies us the chance of enabling SSL in our PostgreSQL Server. Depending on the version of your PostgreSQL Database, open up its configuration file. We shall use version 11 as an example here. Look for the ssl related lines that are commented in the file and uncomment them. The lines are shared below.
$ sudo vim /var/lib/pgsql/11/data/postgresql.conf
ssl = on
ssl_ca_file = 'root.crt'
ssl_cert_file = 'server.crt'
ssl_key_file = 'server.key'
ssl_ciphers = 'ALL:!ADH:!LOW:!EXP:!MD5:@STRENGTH'
ssl_prefer_server_ciphers = on
ssl_ecdh_curve = 'prime256v1'
After that is done, we need to enable hostssl record in pg_hba.conf file which will match connection attempts made using TCP/IP, but only when the connection is made with SSL encryption. Open the file and edit as follows:
$ sudo vim /var/lib/pgsql/11/data/pg_hba.conf
hostssl all all 10.38.87.40/32 md5 clientcert=verify-full
hostssl all all 10.38.87.41/32 md5 clientcert=verify-full
hostssl all all 10.38.87.42/32 md5 clientcert=verify-full
hostssl all all 10.38.87.43/32 md5 clientcert=verify-full
To persist the changes we have made thus far, we need to restart PostreSQL service thus:
sudo systemctl restart postgresql-
Verify that SSL is enabled
To make sure that the SSL settings are working, we are going to login to the database and check the message it will present to us. You can run the command below inside the server or from another server with psql installed and allowed to connect to the database. You should see a message like the one shared below and SSL should be successfully enabled.
$ psql -U postgres -h 10.38.87.46 -d postgres
Password for user postgres:
psql (11.11)
SSL connection (protocol: TLSv1.2, cipher: ECDHE-RSA-AES256-GCM-SHA384, bits: 256, compression: off)
Type "help" for help.
postgres=#
Step 4: Configure PostgreSQL database to enable SCRAM-SHA-256
Now that SSL is enabled and working as configured, let us now add another layer of security by enabling SCRAM-SHA-256 password authentication. This is a very simple process. First, open main postgresql configuration file and change the line below to be as shown.
$ sudo vim /var/lib/pgsql/11/data/postgresql.conf
password_encryption = scram-sha-256
Once that is done, we need to enforce clients to authenticate via this new scheme by editing pg_hba.conf file as shown below. You will notice that all occurrences of md5 have been replaced with scram-sha-256.
$ sudo vim /var/lib/pgsql/11/data/pg_hba.conf
hostssl all all 10.38.87.40/32 scram-sha-256 clientcert=verify-full
hostssl all all 10.38.87.41/32 scram-sha-256 clientcert=verify-full
hostssl all all 10.38.87.42/32 scram-sha-256 clientcert=verify-full
hostssl all all 10.38.87.43/32 scram-sha-256 clientcert=verify-full
To persist the changes we have made thus far, we need to restart PostreSQL service thus:
sudo systemctl restart postgresql-11
Once those changes have been made, we will have to update passwords for all users in your database or you will not be able to login. To do so, access your database as follows. You must have sudo rights.
$ sudo su - postgres
Last login: Fri Feb 19 17:16:16 EAT 2021 on pts/0
-bash-4.2$ psql
psql (11.11)
Type "help" for help.
postgres=#
Then run the password command like so, then press enter. You will be prompted to enter the password twice. You can enter the same same password that was there before. It will now be encrypted using the new scram-sha-256 scheme.
postgres=#\password
Enter new password:
Enter it again:
postgres=#
Once that is done, the only step remaining is to add certificates to the client applications. For *nix systems, you can place the client certificate under $user.home/.postgresql/ directory. How to embed the client certificate in various applications written in various languages is beyond the scope of this guide. An example for Java has been provided in PostgreSQL JDBC Documentation
When making connection using JDBC driver, the connection string should conform to the following format. Notice the ssl=true option added.
jdbc:postgresql://:/?ssl=true
##For example
jdbc:postgresql://datab.computingforgeeks.com:5432/all_cent_customers?ssl=true
Last Words
Ensuring your organization remains secure should remain top priority as you continue to administer and steward their dear systems. As a custodian of their infrastructure, it is incumbent upon you to protect, prevent and pro-actively fight against any form of vulnerability. Seal them as much as you can. We hope the guide was beneficial and in case you have further ideas, feel entirely free to point them out.
Finally, we are very grateful for visiting the site and we continue to appreciate the colossal support you relentlessly extend.
0 notes
Last Seen Blogs

dottoremotion
Dottoremotion

superswagvesper
°・✦ Mrs WLW ✦︎・°

syakir88
puki

swiftydaydream13
SillySweet

amritamarik
Amrita Marik's Blog