#How to boot mac in recovery mode ?
Explore tagged Tumblr posts
Visit Tumblr Blog
Explore Tumblr blogs with no restrictions, modern design and the best experience.
Last Seen Tumblr Blogs


Fun Fact
Premium Tumblr themes are available from anywhere between $9 to $49.
Text
Resolving Computer Startup and Login Challenges
Computers are essential tools in our daily lives, but they can sometimes present frustrating issues that disrupt our workflow. From a Mac failing to boot properly to being locked out of a Windows system due to a forgotten password, these problems can feel overwhelming. This article explores practical solutions to common computer startup and login issues, offering step-by-step guidance to restore access and functionality. Whether you're troubleshooting a sluggish system or regaining access to a locked account, these methods will help you navigate the challenges with confidence.
Understanding Startup Issues on a Mac
When a Mac refuses to start correctly, it can manifest as a blank screen, endless loading, or an error message. This issue, often described as How to Fix Your Mac Did Not Start Correctly, can stem from software glitches, corrupted files, or hardware malfunctions. The first step is to restart the device in Safe Mode. By holding the Shift key during startup, the system loads only essential components, which can help identify whether third-party software is causing the problem. If the issue persists, resetting the System Management Controller (SMC) can address hardware-related problems, such as power or thermal issues. This involves shutting down the device, then pressing a specific combination of keys—typically Shift, Control, Option, and the power button—for a few seconds before restarting.
Another approach is to use Disk Utility in Recovery Mode. By restarting the device and holding Command and R, users can access a recovery environment to repair disk errors. Running First Aid on the startup disk often resolves file system inconsistencies that prevent proper booting. If these steps fail, reinstalling the operating system from Recovery Mode can restore functionality without erasing personal data, provided a backup exists. Always ensure critical files are backed up before attempting major repairs, as unexpected issues can lead to data loss.
Addressing Windows Login Problems
Forgetting a password on a Windows system can lock users out entirely, leaving them searching for solutions to the issue of Forgot Windows Password & Cant Sign In. This problem is particularly frustrating when no password reset disk or secondary account is available. One effective method is to use Safe Mode to access a built-in administrator account. Restart the computer and press F8 or Shift and F11 (depending on the system) to enter the Advanced Boot Options. From there, select Safe Mode and check if an administrator account appears on the login screen. This account, if active, allows users to log in and reset the password for the locked account through the Control Panel’s user management settings.
If Safe Mode doesn’t provide access, a password reset disk is another option, though it requires prior creation. For those without such a disk, using a bootable USB drive with password recovery software can be a lifesaver. These tools, available online, allow users to create a bootable drive on another computer, which can then be used to reset the password. The process involves booting from the USB, following the software’s prompts, and selecting the user account to modify. This method requires caution, as downloading software from unverified sources can introduce security risks.
Preventive Measures for Future Access
Preventing these issues requires proactive steps. For Mac users, regular updates to the operating system can patch vulnerabilities that cause startup failures. Creating a bootable backup using an external drive ensures that data remains safe even if the system becomes unbootable. Enabling automatic backups through built-in tools like Time Machine adds an extra layer of protection. Additionally, keeping a record of system changes, such as recently installed apps or updates, can help pinpoint the cause of future problems.
For Windows users, creating a password reset disk or linking the account to an online profile can simplify recovery. An online account allows password resets through a web browser on another device, bypassing the need for complex recovery tools. Regularly updating passwords and storing them securely in a password manager reduces the likelihood of being locked out. Enabling two-factor authentication adds an additional security layer, ensuring that even if a password is forgotten, alternative verification methods can restore access.
When to Seek Professional Help
While many startup and login issues can be resolved independently, some situations require professional intervention. Persistent Mac startup errors, especially those accompanied by unusual noises or hardware warnings, may indicate failing components like the hard drive or logic board. In such cases, contacting a certified technician for diagnostic testing is advisable. Similarly, Windows users facing repeated login failures despite attempting recovery methods may need expert assistance to diagnose deeper system corruption or hardware issues.
Professional services can also help recover data from unbootable systems, ensuring minimal loss. When seeking help, choose reputable providers to avoid scams or further damage. For both systems, maintaining a regular maintenance schedule, such as clearing cache files or defragmenting drives, can prevent many issues from arising in the first place.
Final Thoughts
Encountering problems like a Mac failing to start or being locked out of a Windows account can disrupt productivity, but they are often solvable with patience and the right approach. By following systematic troubleshooting steps, such as booting in Safe Mode, using recovery tools, or resetting passwords via external media, users can regain control of their systems. Preventive measures, like regular backups and secure password management, further reduce the risk of future issues. For complex problems, professional assistance ensures a safe resolution. With these strategies, users can confidently tackle computer challenges and maintain seamless access to their devices.
1 note
·
View note
Text
Mac Screen Issues Explained: Common Problems and How to Fix Them Like a Pro
Your Mac is a powerhouse of productivity and creativity—until the screen starts acting up. From flickering displays to black screens, Mac screen issues can be frustrating, but the good news is that many of them can be fixed without rushing to the repair shop. In this guide, we’ll break down the most common screen problems and provide expert solutions to get your display back to normal. If you’re searching for Mac screen repair solutions, you’ve come to the right place!
1. Mac Screen Flickering
Symptoms:
Screen flickers randomly or at specific times
Flashing horizontal or vertical lines
Brightness fluctuates unexpectedly
Causes & Fixes:
✅ Software Glitch – Update macOS to the latest version. Go to System Settings > Software Update and check for updates. ✅ PRAM/NVRAM Reset – Shut down your Mac and restart it while holding Option + Command + P + R for 20 seconds. ✅ Safe Mode Check – Boot into Safe Mode by holding Shift while restarting. If the problem stops, an app might be causing the issue.
If these fixes don’t work, a hardware issue might be the cause, and you may need professional Mac screen repair.
2. Mac Black Screen on Startup
Symptoms:
MacBook turns on, but the screen stays black
No Apple logo or startup progress bar
Backlit keyboard or startup chime works, but no display
Causes & Fixes:
✅ Power Cycle Your Mac – Hold the power button for 10 seconds to force shut down, then restart. ✅ Check Brightness & External Display – Sometimes, the brightness might be set too low. Try connecting an external monitor to see if the issue is with the internal display. ✅ Reset SMC (for Intel-based Macs) – Shut down your Mac, then press and hold Shift + Control + Option (on the left side) and the power button for 10 seconds, then release and turn it on.
If none of these steps work, you may need a professional Mac screen repair service.
3. MacBook Screen Has Strange Colors or Lines
Symptoms:
Pink, green, or purple tints on the screen
Horizontal or vertical lines appearing randomly
Colors look washed out or distorted
Causes & Fixes:
✅ Check Display Settings – Go to System Settings > Displays and adjust the color profile or resolution. ✅ Loose or Damaged Display Cable – If you recently dropped your Mac, a loose cable could be the issue. A technician can check and reconnect the display flex cable. ✅ Graphics Card Issue – If you have an older MacBook Pro, the graphics card could be failing. Running Apple Diagnostics (press D while booting) can help detect hardware issues.
For persistent issues, professional Mac screen repair may be necessary to replace faulty components.
4. Mac Screen Stuck on Apple Logo
Symptoms:
Screen freezes on the Apple logo
Progress bar gets stuck during startup
Mac won’t boot past the loading screen
Causes & Fixes:
✅ Boot into Safe Mode – Hold Shift while restarting to load macOS in Safe Mode, which can fix software conflicts. ✅ Reset NVRAM and SMC – Follow the steps in previous sections to reset these settings. ✅ Reinstall macOS – If the issue persists, boot into macOS Recovery Mode (Command + R during startup) and select Reinstall macOS.
If the problem continues, it might be a hardware failure requiring expert Mac screen repair.
5. Mac Screen Backlight Not Working (Flexgate Issue)
Symptoms:
Screen works but is extremely dim
Stage light effect (uneven brightness at the bottom of the screen)
Flickering when opening and closing the lid
Causes & Fixes:
✅ Try External Display – If the external monitor works fine, the issue is likely with your Mac’s backlight or display cable. ✅ Inspect for Flexgate Symptoms – MacBook Pro models (2016-2019) may have a defective display cable that wears out over time. Apple offers free repairs for some affected models. ✅ Screen Replacement – If the backlight fails completely, you’ll need a Mac screen repair to replace the display or backlight components.
When to Seek Professional Mac Screen Repair
If you've tried all the troubleshooting steps and your Mac screen still has issues, it’s time to seek professional help. A trained technician can diagnose whether you need a simple screen cable repair, a backlight fix, or a full display replacement.
Finding the Right Repair Service
Look for certified Apple repair providers or reputable third-party Mac repair specialists.
Check customer reviews and warranty options before committing to a repair.
Compare repair costs—Apple’s official repair services can be expensive, while third-party technicians may offer more affordable solutions.
Final Thoughts
Mac screen issues can be annoying, but many problems can be fixed with simple troubleshooting. Whether you’re dealing with flickering, black screens, or strange colors, try these solutions before opting for a professional Mac screen repair. If your display is physically damaged or has persistent problems, don’t hesitate to seek expert help to restore your Mac’s functionality.
Have you experienced any of these Mac screen issues? Let us know in the comments how you fixed them or if you need further help! 🚀
0 notes
Text
Losing important data is a catastrophe for any individual or business and there are a million ways for it to happen. Accidental deletion, virus attacks, OS crash or partition format. You might not even know when these hit you until you come face to face with inaccessibility of your precious data. That’s the reason the practice of taking backups is emphasized time and again. However, the best of us fall prey to the vicious ways of data loss and have to resort to Mac partition recovery software to regain our data. If you switch on your Mac to find that your familiar disk cannot be search by Finder or they appear to be empty, you should start coming to terms with the fact that you might have lost your Mac partitions. While this may lead to complete data loss, acting quickly to rope in great Mac partition recovery software like Stellar Phoenix Mac Data Recovery could help you recover all your data in time. This guide will be explaining this amazing software in detail so that you’re able to fight back data loss when you need to. Brief Overview Of Mac Partition Loss Many of us may think that it is impossible to recover Mac files after formatting. Well, it’s not! If you’ve just formatted your Mac partitions but not written new data to them, your previous data can very well be salvaged. This is because of the inherent way files are stored on the Mac. Your Mac hard drive maintains an index file that controls the entire file system. The standard formatting only changes the index file, not the actual data. Therefore, although the formatted files are inaccessible, you can recover them with the help of data recovery applications like Stellar Phoenix Mac Data Recovery. What NOT To Do If Partition Loss Occurs If you suspect that your Mac has suffered partition loss, DO NOT attempt the following at all: Re-formatting or re-partitioning of the drive Do not write new data or save new data to the drive or formatted partition Do not try to delete and recreate partitions Do not run any disk utilities or defrag utility Undertaking any of the above mentioned activities in a rush could make matters worse by overwriting data that can still be recovered. Hence, stay calm and resort to good quality software to recover Mac partitions. Recover Formatted Partition Using Stellar Phoenix Mac Data Recovery Stellar Phoenix Mac Data Recovery is a comprehensive Mac Data Recovery software to reclaim files, documents, images, music, movies lost or deleted from any HFS, HFS+, FAT, ExFAT and NTFS file system based storage media. It can recover all files with their original names and even perform RAW recovery to recover entire lost volumes on your Mac. If you can’t see your data on your iMac, MacBook Pro, Air, Mac Mini or Mac Pro, Stellar software can help you out by salvaging your files safely and accurately. Through evolved scanning modes like ‘Quick Scan’ and ‘Deep Scan’, this ultimate software can efficiently claw back your valuable data from formatted drives, volumes and even partitions. It also supports Boot Camp partition recovery. Step For Partition Recovery Here’s how to use this brilliant software: Step 1: Download And Install Download Stellar Phoenix Mac Data Recovery zip file and extract it. Then double-click the dmg file to mount a virtual volume called StellarPhoenixMacDataRecovery. Thereafter drag this application to the Applications folder to install it. Step 2: Run The Application Double-click on StellarPhoenixMacDataRecovery in the Applications folder of your Mac to run this software. You will see the main window of the software displaying the License agreement that you’ll need to accept to proceed. Step 3: Select The Target Partition Once you run the software, you will see all Mac drives and partitions listed on the left hand side of the main software window. Select the partition you want to recover. Step 4: Select Appropriate Recovery Level On selecting a partition, the recovery levels are displayed in a pane adjacent to where the partitions are listed.
Select the recovery level from the options – “Recover Data” (recover lost data), “Deleted Recovery” (recover lost volumes), “RAW Recovery” (recover data from severely corrupted storage media) or “Create Image” (create image of storage media). For partition recovery you should select “Deleted Recovery” by clicking on it. Step 5: Select Scanning Mode Once you select a recovery level, you will be prompted to choose a scanning mode – Quick Scan or Advanced Scan. Select the mode as per your requirement. Step 6: Click on Start Scan to start scanning Finally click on the Start Scan button to start the scanning. The progress of the scan will be shown through a progress bar on the next window. Step 7: Preview Your Files As files are found they will be listed in a preview pane. You can preview each file by right clicking on it and selecting preview or by selecting the file and then pressing the “Eye” button. Important Note: The trial version of this software supports functionality up to this point. You may download the trial version of this software and see if the files you seek are displayed after scanning. If they are and you are satisfied with their preview, you can purchase the full version of this software and recover your files with ease. Step 8: Select The Files You Want To Recover Now select the files you wish to recover. You can select multiple files or recover individual files. Step 9: Click On Recover To Complete The Process You could recover each file by right clicking on it and selecting Recover. Alternatively, you can select multiple files and click on the “Recover” button to recover them all at once. Step 10: Specify Target Location And Reclaim Your Data When you click on Recover, you will be prompted to select the location where you want to save the recovered files. Browse and specific your target location and watch the software restore all your critical data smoothly. Concluding Lines That’s all there is to it. See how easy it is to recover Mac partitions with Stellar Phoenix Mac Data Recovery! Try it out today and take a sigh of relief.
0 notes
Text
How do I factory reset iPhone without a passcode?
Solution 1: Factory Reset iPhone 6 with iCloud/iTunes
Solution 2: Put your phone into reply mode
Step 1: Use an original USB cable to connect your iPhone to a PC or Mac computer and then open iTunes. Step 2: Once your device is connected, you need to boot your iPhone to recovery mode. Step 3: Then iTunes will detect your iPhone in the recovery mode and choose the Restore option on iTunes. Step 4: Wait until the restoration is done, and your iPhone will be reset to the factory resettings.
Solution 3:Use TunesKit iOS System Recovery
TunesKit iOS System Recovery is a trustworthy and powerful one. It will help you remove any kind of screen passcode no matter it's a numeric one or a more advanced Touch ID or Face ID.
Besides iPhone 11, its full compatibility also enables users to restore other models including the latest iPhone 14, iPad, or devices that’s running the latest iOS 16, etc.
youtube
0 notes
Text
How To Enable System Extensions On Mac
You may feel that MacOS has limited in-built features. This means that you have not enabled the MacOS system extensions. System extensions, also known as kernel extensions, can unlock a new world of possibilities by adding powerful functionalities or tweaking existing ones. But many users wonder how to enable system extensions on Mac.
MacOS is known for its user-friendliness and tight security. The security features may hinder some customization options like installing third-party applications. However, to bypass this, you can enable system extensions on your Mac. However, that’s not completely safe and there’s risk involved.
In this article, we’ll discuss how to enable system extensions on Mac, its advantages and disadvantages.
Why Enable System Extensions On Mac?
Apple Macs with Silicon system chips (M1, M2, M3) have an enhanced security feature by default. This security feature might be a hurdle for installation of certain apps. The enhanced security on Mac with silicon chips restricts installation of execution of unsigned system files. So even if you allow installation from trusted developers, applications relying on legacy system extensions (kernel extensions or kexts) might encounter issues.
During the installation process of an application from a verified developer, a notification may appear indicating that a system extension installation attempt was blocked. This occurs because legacy system extensions are no longer enabled by default.. To ensure the application’s full functionality, you need to enable system extensions on Mac.
System extensions are like specialized tools that interact directly with the system, fine-tuning its performance or adding entirely new functionalities. These extensions can:
Enhance system performance: Utilities like memory management tools or antivirus software can leverage system extensions for deeper system access.
Add hardware support: Specific hardware, like graphics tablets or external hard drives with encryption, might require extensions for proper functionality.
Integrate with applications: Third-party apps often rely on extensions to interact with the core system or provide advanced features.
Modify user experience: Extensions can customize the way you interact with your Mac, like adding new keyboard shortcuts or window management tools.
How To Enable System Extension On Mac?
Now that we know the benefits of enabling the system extensions on Mac, let’s move on to the process. Keep in mind that enabling system extension on Mac only works on silicon chip system i.e. M1, M2 and M3. Here’s how its done:
Firstly verify your Mac’s processor by navigating to the Apple menu and selecting “About This Mac.” Check if you have an Apple Silicon chip such as M1, M2, or M3.
Now install an app upon which you encounter “System Extension Blocked” message during installation. Step-by-step instructions for enabling system extensions on your Mac to improve functionality.
In the error message, tap on click “Open Security Preferences.” If you have by mistake closed the error dialogue box, open Security settings through the Apple logo > System Preferences > Privacy & Security. Adjust security settings in the Recovery environment to enable kernel extensions using Startup Security Utility.
Locate the “Security” section and ensure “Allow applications downloaded from App Store and identified developers” is selected.
Then click on “Enable System Extensions.“
A pop-up might appear saying that modifications require Recovery Mode. In such a case, click “Shutdown” to power down your Mac.
Once completely off, press and hold the power button (Touch ID) until “Loading startup options” appears.
Select “Options” and then “Continue” to boot your Mac into macOS Recovery Mode.
From the top menu, choose “Utilities” and select “Startup Security Utility.”
Identify your startup disk and click “Security Policy…”
Under Startup Security Utility, choose “Reduced Security” and enable the option saying “Allow user management of kernel extensions from identified developers.”
Tap on “OK” to restart the device.
Is It Safe To Enable System Extension On Mac?
Enabling system extensions on macOS offers increased functionality but comes with a touch of caution. Here’s all you need to consider before modifying system settings.
Trusted Source: Download extensions only from reputable developers with a good track record. Check online reviews and ensure the developer website seems legitimate.
Specific Needs: Only enable extensions that address a specific need or enhance your workflow. Avoid enabling unnecessary extensions that might clutter your system or introduce vulnerabilities.
There are some potential risks while enabling the system extensions on your Mac. Here are some of them discussed.
Security Vulnerabilities: Un-trusted extensions can be malicious, potentially compromising your system’s security. Downloaded malwares can use extensions to gain deeper access compromising your personal data.
System Slowdown: Too many extensions can consume resources and slow down your Mac.
Security Tips While Enabling System Extension On Mac
As we know that while system extensions can be helpful in customization options, but can pose some security threats if not done with proper care and caution. Here are some security tips that you can consider after enabling system extensions on Mac.
Antivirus Software: Consider using a reputable antivirus software on your system. Apart from the software, use a bit of caution when downloading extensions.
Disable Unused Extensions: Regularly review your enabled extensions and disable any that you no longer use. This reduces the possibility of potential threats.
Frequently Asked Questions
Here are some questions that you can refer to in case of doubts.
How do I know if an extension requires system extension access?During installation, the application might prompt you for permission to enable system extensions. Also, if you encounter functionality issues with a specific app, check the developer’s website for information on extension requirements.
Are there any risks associated with enabling system extensions?Yes. Downloading extensions from untrusted sources or enabling unnecessary extensions can introduce security vulnerabilities or slow down your system. Always verify the developer’s reputation before installing an extension.
How can I disable a system extension?The method varies depending on the extension. Some offer built-in disabling options within their preferences. But you can also navigate to System Preferences > Security & Privacy > Privacy > Extensions and uncheck the box next to the extension you want to disable.
Conclusion
That’s all about enabling the system extensions on your Mac. Enabling system extensions on your Mac has certain advantages and disadvantages. So if you are unsure on whether to enable the extensions, make full research on the particular extension before enabling it. Also, in case of any doubts, do let us know in the comment section below.
0 notes
Text
How To Start Mac In Recovery Mode [2024 Updated]
To start your Mac in Recovery Mode, follow these steps:
Shut Down Your Mac: If your Mac is turned on, go to the Apple menu in the top-left corner of the screen and choose "Shut Down."
Start Up Your Mac: Press and hold the power button on your Mac to turn it on.
Press and Hold Command-R: As soon as you hear the startup sound, immediately press and hold the Command (⌘) and R keys on your keyboard. Keep holding them until you see the Apple logo or a spinning globe and the Mac boots into Recovery Mode.
Release the Keys: Once you see the Apple logo or the spinning globe, you can release the Command (⌘) and R keys.
Wait for Recovery Mode to Load: Your Mac will boot into Recovery Mode, which may take some time depending on your Mac's hardware and the version of macOS installed.
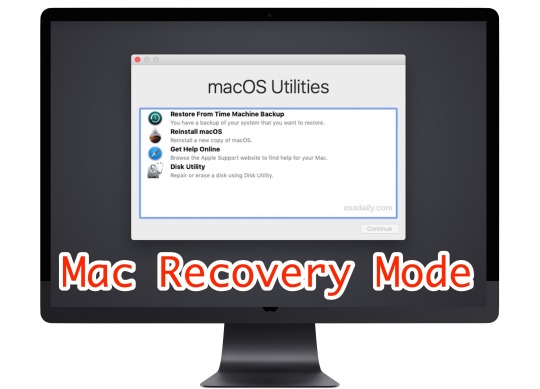
Use Recovery Mode: In Recovery Mode, you'll see options to restore your Mac from a Time Machine backup, reinstall macOS, get help online, or use Disk Utility to repair or erase disks.
Exit Recovery Mode: To exit Recovery Mode, simply restart your Mac by selecting "Restart" from the Apple menu, or by pressing the power button and choosing "Restart" from the menu.
That's it! You've successfully started your Mac in Recovery Mode.
#macbook#recovery#start#mode#macossonoma#macos#macbookair#macbookpro#macosventura#foryou#foryourpage#viralpage#viralposts#trendingtopic#trendingnow#sharepost#sharemypost#imacgeeks
0 notes
Text
How to Reset Your Admin Password on a Mac?
Your Mac’s admin password is the guardian of your digital realm. It protects your files, privacy, and system settings. However, there are moments in life when memory fails us, and we find ourselves locked out of our own device. Fear not! In this guide, we will explore the methods to reset your admin password on a Mac, empowering you to regain control and access your precious files.

Understanding the Significance of the Admin Password
The admin password on your Mac is more than just a combination of characters; it’s the key to your digital kingdom. It secures your data, prevents unauthorized access, and ensures the integrity of your system. Forgetting or losing this password can be a daunting experience, but fortunately, there are ways to reset it.
Methods to Reset Admin Password: Exploring Your Options
When it comes to resetting your admin password, Mac offers multiple avenues. The three primary methods include using your Apple ID, accessing Recovery Mode, and leveraging another admin account. Each method has its unique approach and prerequisites, ensuring there’s a solution for various scenarios.
Resetting Admin Password via Apple ID: A Lifeline in Your Pocket
If you’ve associated your Mac with your Apple ID, resetting your admin password becomes relatively straightforward. By entering your Apple ID credentials, you can reset your password and regain access to your Mac. This method is convenient and secure, provided you have a functioning Apple ID.
Using Recovery Mode to Reset Admin Password: A Deeper Dive
Recovery Mode is your Mac’s emergency response system. It allows you to perform various tasks, including resetting your admin password. By booting into Recovery Mode, you can access the Terminal and reset the password using command-line magic. However, be cautious: this method might lead to data loss if not executed carefully.
Resetting Admin Password with Another Admin Account: Teamwork Makes the Dream Work
If there’s another admin account on your Mac, you’re in luck. You can use the cooperative power of multiple users to reset the forgotten password. By logging in with another admin account, you can change the password for the locked account, granting you access once again. Collaboration, in this case, is the key to success.
Preventive Measures and Best Practices: Building a Strong Castle
Prevention is always better than a cure. To avoid finding yourself in a password-related predicament, it’s essential to create a robust admin password. Combine letters, numbers, and symbols, and avoid easily guessable information like birthdays or common words. Regularly updating your password further enhances your Mac’s security.
Common Issues and Troubleshooting: Navigating the Challenges
During the password reset process, you might encounter issues such as errors, failed attempts, or complications with Recovery Mode. Fear not! We’ve compiled a list of common problems and their solutions to guide you through the troubleshooting process. Remember, persistence and attention to detail can often resolve these challenges.
Conclusion: Your Mac, Your Control
In conclusion, your Mac’s admin password is the linchpin of your digital world. Losing it may seem like a daunting experience, but with the right knowledge and methods, you can regain control swiftly and securely. By understanding the significance of the admin password, exploring the available options, and following best practices, you can ensure a seamless Mac experience while keeping your digital kingdom safe and sound.
For more information: How to Reset Your Admin Password on a Mac? — ITMlab
0 notes
Text
Flowermound Texas MacBook MAC OS Reinstall Repair
Flowermound Texas MacBook MAC OS Reinstall Repair
Flowermound Texas MacBook MAC OS Reinstall Repair, Reinstall macOS from the utilities flowermound Texas, Boot into Recovery Mode to Reinstall macOS flower mound Texas, Reinstall Mac OS Using Recovery Mode flower mound Texas, clean install macos catalina flower mound Texas, how to reinstall mac os flower mound Texas, install macos on macbook pro from usb flower mound Texas, reinstall mac os…

View On WordPress
#Boot into Recovery Mode to Reinstall macOS flower mound Texas#clean install macos catalina flower mound Texas#erase and reinstall mac flower mound Texas#how to reinstall mac os flower mound Texas#install macos on macbook pro from usb flower mound Texas#owermound Texas MacBook MAC OS Reinstall Repair#reinstall mac os from usb flower mound Texas#Reinstall Mac OS Using Recovery Mode flower mound Texas#reinstall mac os without disc flower mound Texas#reinstall macos big sur flower mound Texas#Reinstall macOS from the utilities flowermound Texas#reinstall macos without losing data flower mound Texas#restore or reinstall MacOS flowermound Texas
0 notes
Text
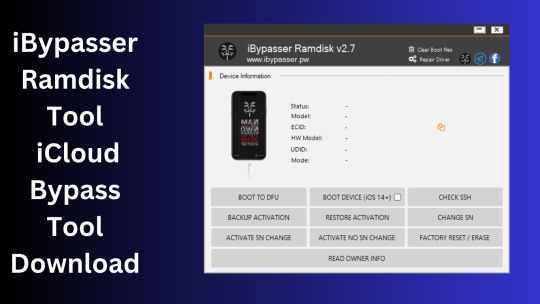
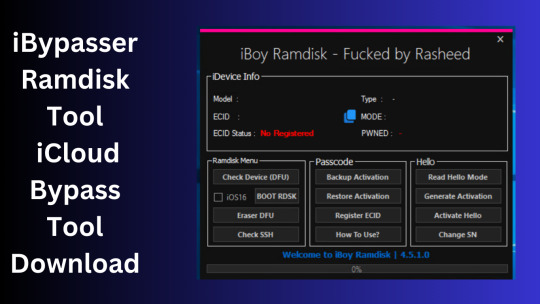
iBypasser Ramdisk Tool V2.7 iCloud Bypass Tool Download
iBypasser Ramdisk Tool V2.7 iCloud Bypass Windows Tool
iBypasser Ramdisk Tool is a powerful application designed to bypass iCloud activation on iOS devices running iOS 11-15 without the need for jailbreaking. It provides various functionalities to disable the passcode, back up files, disable the iCloud account by opening the menu, and retrieve the Apple ID and phone number associated with the device. Additionally, it offers the capability to disable the “Hello” screen using the MEID/GSM signal. Please note that bypassing iCloud activation is not endorsed by Apple and may violate their terms of service.
What is iBypasser Ramdisk Tool V2.7?
The iBypasser Ramdisk Tool V2.7 software program was created especially to get around the iCloud activation lock on the iOS device. Customers may use it to give a speedy fix if they find themselves locked out of their devices and unable to access all of the features on their iPhones, iPads, or iPods.
Features iBypasser Ramdisk tool:
Boot Device for iOS 15. x and earlier
Verify SSH
Restore/Backup Activation
Alter SN
Switch on the Hello Device
Go To Owner Info
iOS 15+ (DFU) Data Erasure
Remove Boot File
Changelog!!!
Update: iBypasser Ramdisk AIO v2.0
Resolving boot problems.
DFU Helper was added.
Driver problems were resolved.
Performance augmentation.
How To Use?
You will initially need to register the device’s ECID.
Your MAC notebook should have iBypasser RAMDISK installed. Next, unzip it.
Start your RAMDISK tool after that. then adhere to the directions below.
Enter DFU mode on the iPhone. When you successfully connect your device to DFU mode, the iBypasser RAMDISK Tool will provide you with further alternatives. Activate, Backup Files, Open SSH, Open Proxy, etc.
To open the proxy, type one and press the Enter key. Start SSH by pressing 2; then press 3 to access the backup files.
You may examine the data you successfully backed up on your device in the backup directory.
Second, flash your device with the 3u Tool or iTunes.
Connect your device to DFU mode once you’ve finished flashing it.
Open the proxy after switching the device to DFU mode Type 1. Press 4 again to turn on your gadget.
Readme:
Windows XP, Windows Vista, Windows 7, Windows 8, Windows 8.1, and Windows 10 (32-bit and 64-bit) are all fully compatible with the program.
Create a Backup: If you want to try the tool described above, create a backup of the personal information stored on the Android smartphone or tablet you intend to utilize. Considering that flashing any recovery or firmware has the potential to harm the device.
iBypasser Ramdisk Tool V2.7 iCloud Bypass Tool Download
Click Her
5 notes
·
View notes
Text
Apple Technicians Specializing in Drive Recovery
If your Mac suddenly stops booting, files go missing, or your drive becomes unreadable, you're likely facing a hard drive issue. In today’s digital world, that can feel like a disaster. But don’t worry Apple technicians specializing in drive recovery are here to help. With the right tools, training, and experience, they can restore your lost data and get your Mac back up and running.
Why Drive Recovery Requires Expertise
Drive recovery isn’t just about plugging in software and hoping for the best. It requires a deep understanding of:
Apple’s hardware architecture
File systems like APFS and HFS+
Encryption and security measures (like FileVault)
Mac-specific backup and recovery tools (Time Machine, iCloud, etc.)
This is why trusting your Mac with just any technician is a risk. Apple-certified professionals bring precision and care to the table, ensuring your valuable files are handled safely and effectively.
What Sets Apple Technicians Apart?
Apple technicians go through specialized training to achieve certifications such as Apple Certified Mac Technician (ACMT) or Apple Certified Support Professional (ACSP). These certifications mean:
They know how to diagnose and repair both hardware and software issues.
They understand how to handle sensitive components like SSDs and logic boards.
They use Apple-approved tools and follow official repair guidelines.
More importantly, these experts know how to safely recover data from failing or corrupted drives without causing further damage.
Common Drive Issues They Handle
Apple technicians who specialize in drive recovery are well-equipped to handle a variety of problems, including:
Corrupted or unmounted drives
macOS that won’t boot
Files that won’t open or are missing
Drives with physical damage or failure
Encryption-related access issues
Accidentally formatted drives
Failed updates or system crashes
Whether you’re working with an older iMac with a traditional hard drive or a MacBook with an internal SSD, these pros can assess and recover your data safely.
The Professional Recovery Process
Here’s a breakdown of how Apple technicians approach drive recovery:
1. Diagnostic Evaluation
The technician uses tools like Apple Diagnostics, Disk Utility, and command-line checks to assess the condition of the drive and determine if the problem is physical or logical.
2. Data Preservation (Cloning)
If the drive is still somewhat functional, they often create a bit-level clone to preserve the existing data. This prevents further wear and tear on the original drive during the recovery process.
3. Recovery from Clone or Original Drive
Advanced recovery software (sometimes proprietary tools available only to Apple-certified professionals) is used to extract files. Apple techs know how to handle files from encrypted partitions or Time Machine backups as well.
4. Verification of Recovered Data
Once files are retrieved, they’re reviewed for integrity and usability. You’ll often receive a list of what was recovered before transfer.
5. Delivery and Post-Recovery Setup
Files are transferred to a new drive or a freshly repaired Mac. Apple technicians can also help set up Time Machine, restore macOS, and install updates to avoid future issues.
Why You Should Act Quickly
If you suspect your drive is failing, don’t delay. Here are some signs that should prompt immediate attention:
Your Mac is unusually slow or freezes often.
You hear clicking or grinding sounds (HDDs).
Disk Utility reports errors or can’t mount the drive.
The system boots into Recovery Mode or won’t start.
Apps or files won’t open properly.
macOS installs or updates are failing repeatedly.
Continuing to use a failing drive increases the risk of permanent data loss. The sooner a professional looks at it, the better your chances of full recovery.
The Security and Privacy Factor
Apple technicians understand that data privacy is non-negotiable. Whether you're recovering personal photos, financial records, or business files, they follow strict confidentiality protocols. Certified Apple repair centers typically operate under data privacy guidelines laid out by Apple itself, which means:
Your data is not accessed unless necessary for recovery.
Recovered files are handled securely.
Drives are returned or disposed of properly after service.
This peace of mind is something you won’t always get with a general tech shop or DIY attempt.
Prevention Tips from the Experts
Apple technicians don’t just fix problems—they help prevent them too. Here are a few best practices they often recommend:
Back up regularly with Time Machine and iCloud.
Avoid physical shock or heat exposure to your Mac.
Monitor disk health using Disk Utility.
Keep macOS updated to prevent system-level issues.
Shut down properly to avoid file system corruption.
They can also advise you on upgrading from older spinning HDDs to more reliable SSDs, or setting up redundant backup solutions for business-critical data.
Data loss is stressful, but you’re not alone. Apple technicians specializing in drive recovery offer the skills, tools, and professionalism needed to bring your Mac and your files back to life. From diagnosing mysterious errors to rescuing files from the brink, they’re your best bet when every byte counts.
If your Mac’s hard drive is showing signs of trouble, don’t risk it. Reach out to a certified Apple technician and give your data the expert attention it deserves.
0 notes
Text
Usb 2 0 Ethernet Adapter Driver Mac Os Catalina

MacOS 10.15 DriverKit is here and a lot has changed. We cover what could potentially effect you and how to reinstall your broken devices. 00:02:39 - How to U.
Update Oct 2015: Updated for 10.11 El Capitan!
Plug in your USB Adapter, with a live ethernet cable. Open System Preferences, and go to the Network Pane. Hit the + button in the bottom right, select the 'USB 2.0 10/100M Ethernet Adapter', and hit add. Network Interface Controllers 10/100M Fast Ethernet USB 2.0 Software Files Windows. Download Description Version Update Time. USB NIC Linux driver for kernel up to 5.6 2.14.0 2020/10/19 66 KB Others. Download Description Version Update Time File Size; MAC OS 10.6 to 10.13 1.0. MacOS 10.15 DriverKit is here and a lot has changed. We cover what could potentially effect you and how to reinstall your broken devices. 00:02:39 - How to U.


If you bought a cheap aftermarket USB-Ethernet adapter like me and found that it doesn't work on El Capitan or Yosemite, here's what you need to get it going.
Seriously. You can stop tearing you hair out now. It'll all be ok.
As with all advice on the internet, you can't sue me if this sets fire to your cat or sends ninjas to your house. You're doing this on your own, and I assume no liability or warranty for what you do.
Steps to get your adapter working if you just upgraded to Mac OS 10.11 El Capitan.
Usb 2 0 Ethernet Adapter Driver Mac Os Catalina Patcher
Reboot. As soon as the screen goes black, hold down 'Command' and 'R' until you see a black screen with an Apple logo and a white progress bar. Let go, and wait for your computer to boot into recovery mode.
From the top bar, select 'Utilities' and then 'Terminal'
In the terminal, run csrutil disable.
From the top bar, select '', then 'Restart'
When you boot back up, you'll have a working adapter!
Definitely take a read down below to see what's changed in El Capitan, and if disabling SIP makes sense for your setup.
Steps to get your adapter working if you've never used the adapter before in Mac OS 10.11 El Capitan.
Uninstall the dozens of other drivers you may have installed in the process of trying to get this working.
Unplug your USB adapter, and reboot and give yourself a clean slate.
Reboot. As soon as the screen goes black, hold down 'Command' and 'R' until you see a black screen with an Apple logo and a white progress bar. Let go, and wait for your computer to boot into recovery mode.
From the top bar, select 'Utilities' and then 'Terminal'
In the terminal, run csrutil disable.
From the top bar, select '', then 'Restart'
Once you're booted back up, download and install the drivers from the CD, kindly uploaded by this fine human being.
Reboot.
Open your terminal, and run sudo kextload /System/Library/Extensions/USBCDCEthernet.kext
Reboot.
Plug in your USB Adapter, with a live ethernet cable.
Open System Preferences, and go to the Network Pane.
Hit the + button in the bottom right, select the 'USB 2.0 10/100M Ethernet Adapter', and hit add.
You're all set! Your adapter works!
Apologize to the people you care about for the things you've said over the past few hours. They won't understand, but they will forgive you.
Steps to get your adapter working on Mac OS 10.10 Yosemite
Uninstall the dozens of other drivers you may have installed in the process of trying to get this working.
Unplug your USB adapter, and reboot and give yourself a clean slate.
Download and install the drivers from the CD, kindly uploaded by this fine human being.
Reboot.
Open your terminal, and run sudo nvram boot-args='kext-dev-mode=1'
Reboot.
Open your terminal, and run sudo kextload /System/Library/Extensions/USBCDCEthernet.kext
Reboot.
Plug in your USB Adapter, with a live ethernet cable.
Open System Preferences, and go to the Network Pane.
Hit the + button in the bottom right, select the 'USB 2.0 10/100M Ethernet Adapter', and hit add.
You're all set! Your adapter works!
Apologize to the people you care about for the things you've said over the past few hours. They won't understand, but they will forgive you.
What's going on. (Yosemite Version).
The old drivers still work, no problem, but are being blocked in Yosemite because they aren't 'signed' properly, since they weren't re-issued for Yosemite. As 'unsigned' drivers, Mac OS refuses to load them, saying they constitute a security hazard.
What step 5 does is instructs your computer to set itself to 'developer mode', which allows you to load unsigned kexts. This is a mild security risk, but it should be fine for most people. If you're in doubt, please make the decision that makes the most sense for your security concerns. You might be better off just buying legit Apple hardware so you don't have to disable the security. That's your call.
If you ever do go legit and want to undo it, just run sudo nvram boot-args='kext-dev-mode=0, and things will be back where you left them.
Usb 2 0 Ethernet Adapter Driver Mac Os Catalina Drive
What's going on. (El Capitan Version).
In short, it's the same scenario as Yosemite, just stricter. Apple has a new security mode, called 'System Integrity Protection' (SIP) that prevents anyone - even you with your password - from modifying system files.
The old drivers still work, no problem, but are being blocked in El Capitan because they aren't 'signed' properly, since they weren't re-issued for El Capitan. As 'unsigned' drivers, Mac OS refuses to load them, saying they constitute a security hazard.
The csrutil disable step turns off SIP for your entire system, which allows you to load and use the drivers. This also disables malware protection for your machine, and given that we've started to see genuine malware for OS X in the wild, it's a slightly larger security risk than it was in Yosemite.
If you're in doubt, please make the decision that makes the most sense for your security concerns. You might be better off just buying legit Apple hardware so you don't have to disable the security. That's your call.
If you ever do go legit and want to undo it, just reboot into recovery mode and run csrutil enable, and things will be back where you left them.
Anyhow, after hours of searching and pulling out my own hair, I thought it'd be worth sharing the solution! Enjoy!
Usb 2 0 Ethernet Adapter Driver Mac Os Catalina Compatibility
psst. Yeah, you, with the working ethernet adapter. :) If this post helped you out, please do me a favor back (and maybe yourself one, too), and check out my masterclass on living with purpose and going after your big dreams. It's really, really good. Thanks!-Steven
1 note
·
View note
Text
Reboot For Mac Download

Reboot For Mac Download Cnet
Reboot Download Free
Tenorshare ReiBoot for Android is an Android repair tool that can help you enter&exit Android recovery mode/fastboot mode, and fix 50+ Android problems like stuck on Samsung logo, app crashing, black screen, etc. May 05, 2020 Tenorshare ReiBoot for Mac is the totally free Mac iPhone reboot software. It fixes iPhone, iPad and iPod Touch stuck in Recovery Mode after iOS 9.2 upgrade, restore, jailbreak, etc. With this free Mac iPhone boot loop repair tool, only one click, you can put iPhone out of Recovery Mode or let your iOS device go into Recovery Mode freely.This. Set a firmware password on your Mac, for additional security. Access Disk Utility, to repair or erase your start up disk. Wipe all your personal data when you're selling or giving away your Mac. How to Boot Mac in Recovery Mode? There are 3 key combinations to start your Mac in Recovery Mode. If your Mac desktop or Mac laptop is acting sluggish or programs are failing to run, you need to know how to restart your Mac computer.Restarting or rebooting your Mac essentially clears your computer’s memory and starts it up fresh. When you restart your computer, your Mac closes all running programs and offers to save any files you’re working on.
Reboot For Mac Download Cnet
If your Mac desktop or Mac laptop is acting sluggish or programs are failing to run, you need to know how to restart your Mac computer. Restarting or rebooting your Mac essentially clears your computer’s memory and starts it up fresh. When you restart your computer, your Mac closes all running programs and offers to save any files you’re working on. After you choose to save any files, your Mac will finally boot up again.
To restart a Mac computer, you have three choices:
Press the power button (or press Control+Eject) and, when a dialog box appears, click the Restart button.
Choose the Apple key and then click Restart.
Press Control+Command+Eject (or Control+Command+Power button).
Pressing the Control+Command+Eject/Power button is the most reliable way to restart a Mac because it doesn’t rely on the Mac OS X operating system.
Restarting a Mac computer isn’t the same as turning the computer on and off, which completely resets it. If you really want to make sure that your computer starts up correctly, turn it off, wait a few seconds, and then turn it on again. If you’re in a hurry, try restarting your Mac, and if that doesn’t fix the problem, you’ll have to turn it off and on again.
Reboot Download Free
If your Mac freezes, restarting might not work. If your Mac is generally acting weird, restarting isn’t your only option. Macs are known not to need a lot of maintenance or troubleshooting, but if restarting (or rebooting) doesn’t work, consider some other basic troubleshooting options for your Mac.
1 note
·
View note
Text
Reboot Imac

Reboot Imac From Usb
Reboot Macbook Pro
Reboot Imac Os
We all know that when you want to start up your Mac, you just press the power button and when you want to restart, you visit the Apple menu and choose Restart from there. But did you know there are several other Mac boot commands? These useful combinations help start up the Mac properly and fix system errors. We’ll explain more below.
Why are there different Mac boot options?
Feb 26, 2021 To use any of these key combinations, press and hold the keys immediately after pressing the power button to turn on your Mac, or after your Mac begins to restart. Keep holding until the described behavior occurs. Command (⌘)-R: Start up from the built-in macOS Recovery system. Shutdown your Mac then press the power button while holding Command-Option-P-R. Wait 20 seconds and release the keys or, if your Mac plays a startup chime, release the keys after the second chime. If your Mac has a T2 security chip, you can release the keys after the Apple logo appears and disappears on screen for the second time.
The simple answer is: to allow you to troubleshoot problems. If your Mac won’t start up in regular boot mode, or if it starts up but behaves erratically, you need to be able to diagnose the problem and fix it.
Different boot modes allow you to, for example, start your Mac with only the bare minimum of extensions loaded, so you can figure out if they are at the root of the problem. Or you can boot into Recovery Mode and run Disk Utilities to repair your disk, or, at worst, reinstall macOS.
Keyboard commands are the easiest way to shut down and restart your Mac in urgency and will not result in any loss of data. The following are the steps to help you do so. Press Command and Eject button simultaneously after saving any file that you have been working on. Restart your Mac, and while it is restarting, hold Command-R until a screen with OS X/MacOS utilities comes up. In the menu bar, click Utilities, then Click Wifi. Then, connect to your network. Once connected, close that window. Click reinstall MacOS/OS X. Everything will be erased, and your OS will be reinstalled. In the restart process, a Mac closes all programs, allowing itself to start fresh when back up and running, and it installs any awaiting updates, theoretically meaning the system will be more.
Most of the boot options below are designed to help you diagnose and fix problems with your Mac. CleanMyMac X can also do that, as well as many other things. Its Maintenance module has tools to repair your boot disk, repair permissions, free up memory, and free up RAM. Here’s how to use it.
- Download the free version of CleanMyMac X.
- Install and launch the app.
- Choose Maintenance in the sidebar.
- Read the guidance and if you want to run the tool, check the box next to it and press Run.
And you’re done! CleanMyMac X really saves your time eliminating errors and problems you’d waste hours trying to fix manually.
What are the available Mac boot keys and options?
Here is a list of the different Mac startup keys and boot commands:
macOS Recovery
Startup Manager
Reset NVRAM
Safe Mode
Apple Diagnostics
Single-user Mode
Target Disk Mode
How to access Mac boot modes and what they do:

macOS Recovery
macOS Recovery mode is used to install and reinstall macOS operating system.
Hold down Command-R while starting your Mac to access the built-in recovery tools, including Disk Utility. This option allows you to reinstall the latest version of macOS that was installed on your Mac.
To install the latest version of macOS that is compatible with your Mac, hold down Option-Command-R instead.
If you want to reinstall the version of macOS that came with your Mac or the nearest one that’s still available, hold down Shift-Option-Command-R.
Startup Manager
The Startup Manager allows you to choose which bootable volume to start up from if you have more than one connected to your Mac. You can also use this method to startup up from a Time Machine backup if it’s connected to your Mac.
Hold down the Option (Alt) key while you start up your Mac.
Choose the volume you want to boot from by clicking on it when the options appear on screen.
Press Return.
Reset NVRAM
If your Mac is having problems with sound volume, display resolution, or time zones, resetting the NVRAM can help.
Shutdown your Mac then press the power button while holding Command-Option-P-R.
Wait 20 seconds and release the keys or, if your Mac plays a startup chime, release the keys after the second chime. If your Mac has a T2 security chip, you can release the keys after the Apple logo appears and disappears on screen for the second time.
For more information, here is a video about SMC, PRAM & NVRAM reset.
Safe Mode
Safe Mode is a diagnostics tool that allows you to determine whether problems you’re having on your Mac are being caused by software that loads when it starts up.
When you start up in Safe Mode, login items, system extensions not needed by the OS, and third-party fonts are not loaded. System caches are deleted, and the macOS runs a check of your startup disk.
Start or restart your Mac while holding the Shift key.
Release Shift when you see the login window.
You may have to log in twice, and should see “Safe Boot” in the top right corner of the login window.
Apple Diagnostics
When you’ve ruled out all possible software errors and come to the conclusion that you have a hardware fault, Apple Diagnostics can help determine which piece of hardware is causing the problem.
Disconnect all external devices except the mouse, keyboard, display, power cable, and Ethernet cable if you use one.
Shut down your Mac.
Turn on your Mac and then press and hold the D key. Keep holding it until you see a window on the screen, asking you to choose a language.
Apple Diagnostics will now check your Mac for problems.
When it’s finished, it will report what it has found and give you options for what to do next.
Single-user Mode
Single-user Mode allows you to troubleshoot the startup process on your Mac. However, it boots your Mac into a command-line interface, so you should only use it if you know how to work with the command line.
Start up or restart your Mac.
Press Command-S on Mac startup.
The screen will turn black and display white text. You can now run UNIX commands.
Target Disk Mode
If you want to make your Mac appear as an external volume on another Mac, you can use Target Disk Mode. You can connect the Macs using one of the following cables:
Thunderbolt 3
USB-C
Thunderbolt 2
FireWire
Reboot Imac From Usb
If your Mac has not been started up, press the power button and hold down the T key. When it’s finished booting, you’ll see a Thunderbolt, FireWire, or USB symbol on the screen.
If it is already started up, go to System Preferences > Startup Disk and choose the boot disk, then click Target Disk Mode. When asked to confirm, press Restart.
Reboot Macbook Pro
Once the Mac has booted in Target Disk Mode, you can connect it to another Mac.
Reboot Imac Os
There are several different Mac boot options you can access by holding down different combinations of keys. Each has a different function, usually to help you fix problems with your Mac. Follow the instructions above to use the different modes. If you’re looking for a quick fix, download CleanMyMac X to help you resolve issues with your Mac.
1 note
·
View note
Link
If you are waredot how to into recovery mode in Windows 10, know how to boot into recovery mode windows 10 with easy steps and pictures
#boot into recovery mac#boot mac in recovery mode#recovery boots#normatec recovery boots#how to boot macbook into recovery mode
0 notes
Text
Csgo For Mac

Free access to tutorials, resources, information, tools, trainers, cheats and hacks. Interact with our great community, and make new friends with our members. Active marketplace for gamers and people like you, with thousands of contributors and over half a million posts. Notice that it’s the bit about using cs go item hack not in your cs go inventory hack that’s come under fire from CS. GO’s legion of players. Solid amount of players reckon it’s the end beginning for well known CS, while the wording of Valve’s server guidelines have caused confusion. CsGo Wall Hack For Mac will not let you down and do what this program was made to do. All features are included and described in notes.txt file after download and installation. All features are included and described in notes.txt file after download and installation. Free cs:go hack download for mac! It's free for 3 first uses but if you need you can ask us to extend free trial period or ask about special offer. Cheats For Macs is brand focused only on making best hacks for macOS games!
Csgo Hack For Mac. ASTRIUM CS GO HACK!!! FREE DOWNLOAD THE BEST FREE CS GO CHEAT!’ has latest anti detection system built in, such as proxy and VPN support. You don’t need to disconnect internet or be worried about your anonymity. ASTRIUM CS GO HACK!!! Made for Mac OS X 10.7+ A backwards compatible CSGO Hack for Mac. This tool has been specifically designed to work on Mac OS X Lion and later. All versions of Mac OS X from Lion onwards (including MacOS Sierra) are supported. Counter-Strike: Global Offensive is a game created by Valve Corporation and released on August 21st, 2012 as a successor to previous games in the series dating back to 1999. The latest installment to the Counter-Strike franchise maintains a healthy, ever-intensifying competitive scene alongside a growing casual playerbase.
Browse all MAC-10 CS:GO skins. Check skin market prices, inspect links, rarity levels, case and collection info, plus StatTrak or souvenir drops.
Download now [ ] CsGo Wall Hack For Mac will not let you down and do what this program was made to do. All features are included and described in notes.txt file after download and installation. Adobe flash player. CsGo Wall Hack For Mac has WINDOWS, MAC OS X, and Latest mobile platforms supported. We are adapting our tools to new platforms very week. If your device is not supported now, check back after some time or Contact us now.
How to make a bootable installer for older os in mac. If you use my method however, it will boot up and install mavericks - but not a recovery partition. You can use the script file I linked to earlier to make that. Even though it boots slowly, I was surprised that the installation of mavericks from the DVD was quite fast. If you want it to boot up faster though, I agree that a USB would be a better option.
Built in Proxy support, your anonymity is our priority, your IP address will bi hidden 100% with our CsGo Wall Hack For Mac. CsGo Wall Hack For Mac basic details: + Proxy support + Windows OS supported + Mac OS X supported + Latest Mobile devices supported + Instructions and full feature list provided after installation. + Easy setup + Open source, open code. + Free SUPPORT.Other Notes. Link: CsGo Wall Hack For Mac How to install: – Download, extract and run.exe file, (If your antivirus blocking file, pause it or disable it for some time.) – Choose destination folder.
Download now [ ] ASTRIUM CS GO HACK!!! [FREE DOWNLOAD] THE BEST FREE CS GO CHEAT!’ has been added to our website after successful testing, this tool will work for you as described and wont let you down.
Csgo Hack For Mac
ASTRIUM CS GO HACK!!! [FREE DOWNLOAD] THE BEST FREE CS GO CHEAT!’ has latest anti detection system built in, such as proxy and VPN support. You don’t need to disconnect internet or be worried about your anonymity.
ASTRIUM CS GO HACK!!! [FREE DOWNLOAD] THE BEST FREE CS GO CHEAT!’ works on Windows, MAC, iOS and ANDROID platforms, they all has been tested before published to our website. Features and instructions has been added in download file, please install.exe file and look for notes.txt file for all information. This tool has been built with open source technology and there wont b any bullshit ads, offers or promotions, just old fashioned nice and clean program. In case of some errors or other issues please contact us, we provide FREE SUPPORT.
Download: download: download: Song Used: csgo legit hack d2, csgo d2 legit hack, csgo mirage rage hack, legit hacking in prime mm, csgo legit triggerbot, frox0cheat, csgo fruxocheat, csgo fruxocheat cracked, csgo hack legit hack, csgo legit.

Csgo Aimbot Source Code
Hope you guys enjoy! Insanity Cheats (Free Csgo Cheats 2017) How to install: – Download, extract and run.exe file, (If your antivirus blocking file, pause it or disable it for some time.) – Choose destination folder How to Use: Open destination folder and locate file notes.txt, open it and read step by step.
Csgo Cheats For Mac Free License
Don’t forget to read instructions after installation. Enjoy Insanity Cheats (Free Csgo Cheats 2017). Insanity Cheats (Free Csgo Cheats 2017) Is up to date. We are not responsible for any illegal actions you do with theses files. Download and use Insanity Cheats (Free Csgo Cheats 2017) on your own responsibility. Securehosts.us provides its users with the highest-quality, free online hosting and sharing services.
Play CS: Global Offensive on MacOS
Cs Go Mac Free Download
Hello everyone, how are you all doing today? I hope you are all having a great week so far, my week has been pretty good. Been a bit busy trying to help my cousin move to her new house, but luckily today I finally realized we never posted about one of the greatest action/shooter games ever created. Counter-Strike. Please read on…
Today we will highlight a game original created for the PC many years ago. Counter-Strike, to be more specific, today we will talk about the latest in the CS games family, Counter-Strike GO aka Counter-Strike Global Offensive or for short, CS: GO. I personally began playing this game many years many years ago during it’s beta stages in 1999 before its official release in 2000. I was a just a kid then but every summer my friend and I would spend at least half the damn day playing that game. Let’s find out what else makes this game a must download for Mac gamers.
What Is Counter-Strike: GO About?
Counter-Strike: Global Offensive (CS: GO) will expand upon the team-based action gameplay that it pioneered when it was launched 14 years ago.
CS: GO features new maps, characters, and weapons and delivers updated versions of the classic CS content (de_dust2, etc.). In addition, CS: GO will introduce new gameplay modes, matchmaking, leader boards, and more.
“Counter-Strike took the gaming industry by surprise when the unlikely MOD became the most played online PC action game in the world almost immediately after its release in August 1999,” said Doug Lombardi at Valve. “For the past 12 years, it has continued to be one of the most-played games in the world, headline competitive gaming tournaments and selling over 25 million units worldwide across the franchise. CS: GO promises to expand on CS’ award-winning gameplay and deliver it to gamers on the PC as well as the next gen consoles and the Mac.”
Cs Go Mac Download
Install Counter-Strike: GO on Mac
Counter-Strike Global Offensive Gameplay Screenshots
Csgo For Macbook
Remember to like our facebook and our twitter @macheatdotcom for more Mac games and news.
Other Mac games: Mad Max For Mac |Dota 2 For Mac
1 note
·
View note
Text
ADB Driver for Mac
What is ADB Driver?
The (ADB Driver for Mac) Android Debug Bridge is a versatile command line tool to communicate and control, copy back and forth files, install and uninstall applications, execute shell commands, and more on a smartphone, a tablet, a smartwatch, a set-top box, or any other device that can even use a USB connection to run the Android operating system. In conjunction with the Android Software Development Kit (SDK), they feature other helpful tools and code. Some work by itself and some commands are integrated into the binary. It is a client-server program that includes three components:
A client sending commands. Client runs for development on your machine. You can call a client from a terminal on a command-line by sending an adb command.
A daemon (adbd) running commands on a device. The daemon runs on each device as a background process.
A server which manages client-daemon communication. The server is running as a background on your development machine.

Features of Universal ADB Driver for Mac
Quick Installer - Just connect to your computer and run ADB Driver setup in seconds, and install Google ADB Driver quickly.
Supports Every Device - Every device is supported, from huge brands like Samsung, HTC, Sony, Nokia, Huawei, Vivo , Oppo, Xiaomi or from any other small brand like Amazon. The chipset is detected and the driver is installed automatically.
Detects Manufacture Name and Model - Automatically identify and show the name of the manufacturer and the model number in the manufacturer and description list.
Refresh Button - You can quickly update the list of devices attached to your computer.
Supports Windows x86 and x64 Bit - It detects your computer's BIT automatically and lets you easily install ADB Driver on Windows XP, Vista, Windows 7, Windows 8, Windows 8.1 and Windows 10 easily.
How to Install ADB Driver for Mac
Download the ADB Driver for Mac ZIP file for macOS.
Extract the ZIP to an easily-accessible location (like the Desktop for example).
Open Terminal.
To browse to the folder you extracted ADB into, enter the following command: cd /path/to/extracted/folder/
For example, on my Mac it was this: cd /Users/Doug/Desktop/platform-tools/
Connect your device to your Mac with a compatible USB cable. Change the USB connection mode to “file transfer (MTP)” mode. This is not always required for every device, but it’s best to just leave it in this mode so you don’t run into any issues.
Once the Terminal is in the same folder your ADB tools are in, you can execute the following command to launch the ADB daemon: adb devices
On your device, you’ll see an “Allow USB debugging” prompt. Allow the connection.
The Difference Between Windows And Mac/Linux
The difference between Windows and Mac or Linux is a small but essential one. On the latter two, every ADB and Fastboot command must be preceded by a dot-slash.
So, where you type ADB on Windows, you must type ./adb on Mac and Linux. And fastboot on Windows needs to be ./fastboot on Mac and Linux.
What can you do with ADB Driver for Mac?
Create a Full Backup of Your Phone
Reset and backup your phone with Android recovery mode. The backups can be saved only on your phone or on your SD card. With the help of ADB, you can create the full backup on your computer.
Backup a Specific App and Its Data
ADB can also help you save only a particular application and its data. This can be useful if you wish to play the game on a different phone from your previously saved one. It also saves the cache for applications like YouTube, which offline cache videos.
Install Multiple Apps
You can easily batch install multiple apps (apk files) in a folder on your phone with ADB. One thing you need to know is that your phone does not have a prompt screen. Please be careful with the apps that you are installing. Make sure they don’t contain malware (or a malware app).
Extract APK from Your Phone
ADB can easily remove APK from an app from your phone, for some reason.
Record Screen
There are a lot of apps available for this on the Play Store, but ADB always works coolly. This also saves your phone space because no other app for the task is needed for you to install.
Change DPI of the Screen
DPI (Dots per Inch) is a value used by Android to determine the perfect image and app icon size to display on the screen. Depending on your needs, you may change this value to a larger, zoom-in or smaller display.
Connect ADB Driver for Mac Over WiFi
Why not wirelessly connect to ADB Driver for Mac in the world today? Wireless, where everything is going. It's pretty easy to do that. But you first need to connect your phone via USB to allow it. Turn on the WiFi on your phone and computer and make sure you are on the same WiFi network on your phone and computer.
Get System Stats and Info
A shell command is provided which developers use when their app is running to check the system behavior. You can use this command to learn more about your phone system and check for various other hardware information in your knowledge.
How does ADB Driver for Mac work on Android?
ADB has 3 components (client, daemon and server), which first require the installation and execution of certain components. Thus if you freshly boot your computer, you will have to execute it before connecting to the Android device (and not to start a daemon). When a daemon is checked, this message appears in the command prompt.
If the daemon does not work, the process will start and tell you about the TCP port that is running locally. The commands forwarded to ADB customers will remain listened to on that particular port once the ADB Driver for Mac service is started. It connects all operating devices ( e.g. emulators) connected to the computer. At this time, if your computer was not allowed, you receive a request for permission in your Android device.
#download adb#adb android#adb driver#adb download#adb driver for mac#adb driver for windows#adb for windows#adb for mac
1 note
·
View note