#How to change WordPress admin password from dashboard and cpanel
Explore tagged Tumblr posts
Visit Tumblr Blog
Explore Tumblr blogs with no restrictions, modern design and the best experience.
Last Seen Tumblr Blogs


Fun Fact
In 2020, 27% of US Tumblr users had an annual household income of over $100,000.
Text
How to Move Your WordPress Site from Localhost to a Live Server
Developing a WordPress site on localhost is a great way to build and test your website in a controlled environment. However, the real challenge arises when it's time to move the site from your local server to a live hosting environment. If not done correctly, you could encounter broken links, missing images, or even database errors.
In this blog, we'll guide you through a step-by-step process to successfully move your WordPress site from localhost to a live server.

Step 1: Choose the Right Hosting Provider
Your first step is to select a reliable web hosting provider that meets your website’s needs. Look for:
Server Speed: Fast servers for better performance.
Uptime Guarantee: At least 99.9% uptime to ensure availability.
Ease of Use: User-friendly dashboards and tools.
WordPress Support: Hosting optimized for WordPress websites.
Popular options include Bluehost, SiteGround, and WP Engine.
Step 2: Export Your Local WordPress Database
The database is the backbone of your WordPress site. To export it:
Open phpMyAdmin on your local server (e.g., XAMPP or WAMP).
Select your WordPress database.
Click on the Export tab and choose the Quick Export method.
Save the .sql file to your computer.
Step 3: Upload Your WordPress Files to the Live Server
To move your files:
Compress Your WordPress Folder: Zip your local WordPress installation folder.
Access Your Hosting Account: Use a file manager or an FTP client like FileZilla.
Upload the Files: Transfer the zipped folder to your hosting server's root directory (usually public_html).
Unzip the Folder: Extract the files once uploaded.
Step 4: Create a Database on the Live Server
Now, set up a new database on your live hosting server:
Log in to your hosting control panel (e.g., cPanel).
Navigate to the MySQL Databases section.
Create a new database, database user, and password.
Assign the user to the database with full privileges.
Step 5: Import the Database to the Live Server
Open phpMyAdmin in your hosting control panel.
Select the new database you created.
Click the Import tab.
Choose the .sql file you exported from your localhost.
Click Go to import the database.
Step 6: Update the wp-config.php File
To connect your site to the live database:
Locate the wp-config.php file in your WordPress installation.
Open the file in a text editor.
Update the following lines: define('DB_NAME', 'your_live_database_name'); define('DB_USER', 'your_live_database_user'); define('DB_PASSWORD', 'your_live_database_password'); define('DB_HOST', 'localhost'); // Keep this unless your host specifies otherwise.
Save the file and upload it to your server via FTP.
Step 7: Update URLs in the Database
Your localhost URLs need to be replaced with your live site URLs.
Use a tool like Search Replace DB or run SQL queries in phpMyAdmin.
In phpMyAdmin, run the following query: UPDATE wp_options SET option_value = 'http://your-live-site.com' WHERE option_name = 'siteurl'; UPDATE wp_options SET option_value = 'http://your-live-site.com' WHERE option_name = 'home';
Step 8: Test Your Live Website
Once everything is uploaded and configured, check your website by entering its URL in a browser. Test for:
Broken Links: Fix them using plugins like Broken Link Checker.
Missing Images: Ensure media files were uploaded correctly.
Functionality: Verify forms, buttons, and features work as expected.
Step 9: Set Up Permalinks
To ensure proper URL structure:
Log in to your WordPress admin dashboard on the live site.
Go to Settings > Permalinks.
Choose your preferred permalink structure and click Save Changes.
Step 10: Secure Your Live Website
After migrating, secure your site to prevent vulnerabilities:
Install an SSL Certificate: Most hosting providers offer free SSL certificates.
Update Plugins and Themes: Ensure everything is up to date.
Set Up Backups: Use plugins like UpdraftPlus for regular backups.
Conclusion
Moving your WordPress site from localhost to a live server may seem daunting, but by following these steps, you can ensure a smooth and error-free migration. A successful move allows you to showcase your site to the world, engage your audience, and achieve your goals.
Start today and take your WordPress project live with confidence!
0 notes
Text
How to Add Admin User to the WordPress Database with phpMyadmin
Adding an Admin User to the WordPress Database With phpMyAdmin becomes necessary when a hacker has locked your website, you have lost access to the WordPress admin panel, or you have forgotten credentials. Here we use the HostBet Shared Hosting cPanel account screenshot.
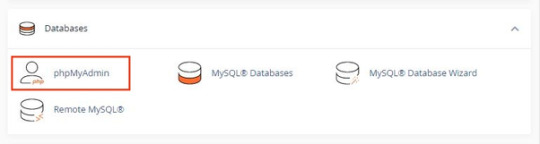
Step 1: Open the cPanel account Dashboard
Step 2: Navigate to phpMyAdmin in the Databases section.
Step 3: Click on phpMyAdmin.
Step 4: Once you’re on the phpMyAdmin dashboard, you need to select your WordPress database.
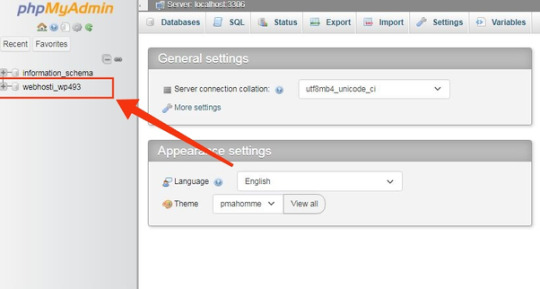
This will open the WordPress database. You will be making changes to the wp_users and wp_usermeta tables.

First, add a user to the wp_users table.
Step 5: First, you need to navigate the wp_users table and click on it. This will open the users currently listed in the table.

Please note that there is one user ID in our demo website table 1. You need to add a new user using a new unique ID, so we’ll use the 2 numbers.

Step 6: To create a new user, you need to click on the “Insert�� tab.

Step 7: Add the following information to the fields on the Insert form:

ID: pick a unique number (in our example, we’ll use 2)
user_login: the username that will be used for login
user_pass: add a strong password, and make sure to select MD5 in the function from the drop-down menu (see the screenshot below)
user_nicename: the user’s full name or nickname ( you can write according to yourself)
user_email: the user’s email address
user_url: your website address
user_registered: select the date and time the user was registered using the calendar
user_activation_key: leave blank
user_status: set this to 0
display_name: the user’s full name or display name
Step 8: Once you have finished, click on the ‘Go’ button to add the new user.
Next adding a user to the wp_usermeta table.
Step 1: To add a new user, you need to navigate to wp_usermeta, click on it, and then click on the “insert” tab (same as the previous steps).
Step 2: Next, you need to add the following information to the Insert form:

unmeta_id: leave this blank
user_id: the user ID you used in the previous step
meta_key: this should be wp_capabilities
meta_value: insert this: a:1:{s:13:”administrator”;s:1:”1″;}
Step 3: After that, you need to find fields for the second row.

unmeta_id: leave this blank
user_id: the user ID you used in the previous steps
meta_key: you need to enter wp_user_level
meta_value: 10
Step 4: Once you finished typing the information into the fields, click the ‘Go’ button. that’s it. You Have successfully added new users.
0 notes
Text
How to Create a WordPress Website with the Shopify Extension and Cloudflare on Hostinger
How to Create a WordPress Website with the Shopify Extension and Cloudflare on Hostinger
Introduction: Creating a website that seamlessly integrates WordPress, the popular content management system, with the Shopify extension and Cloudflare’s robust performance and security features can provide a powerful and efficient online presence. In this blog post, we will guide you through the process of setting up a WordPress website with the Shopify extension and Cloudflare on Hostinger, a reliable web hosting provider.
Step 1: Setting Up Hosting on Hostinger 1. Sign up for a hosting plan with Hostinger and complete the registration process. 2. Access the Hostinger control panel (cPanel) and locate the “Auto Installer” or “Softaculous” option. 3. Select WordPress from the available applications and proceed with the installation process by following the provided instructions. 4. Configure your WordPress installation by entering the necessary details such as website name, admin username, and password. Ensure to choose a secure password.
Step 2: Installing the Shopify Extension 1. Log in to your WordPress admin dashboard by visiting “yourdomain.com/wp-admin” and entering your credentials. 2. Navigate to the “Plugins” section and click on “Add New.” 3. Search for the ���Shopify” plugin, developed by Shopify Inc. 4. Click “Install Now” and then activate the plugin.
Step 3: Setting Up Shopify Integration 1. Once the Shopify plugin is activated, locate the new “Shopify” menu item in your WordPress admin dashboard. 2. Click on “Connect an existing Shopify store” or “Create a new Shopify store” if you don’t have one yet. 3. Follow the prompts to connect your Shopify store or create a new one. You will need to provide your Shopify store credentials to complete the integration. 4. After the integration is successful, you can configure various settings, such as product display, cart behavior, and checkout options.
Step 4: Configuring Cloudflare on Hostinger 1. Sign up for a Cloudflare account at cloudflare.com and add your website to your Cloudflare dashboard. 2. Change your domain’s nameservers to the Cloudflare nameservers provided. 3. On the Cloudflare dashboard, configure the desired security and performance settings, such as SSL/TLS encryption, caching, and firewall rules. 4. Once the configuration is complete, wait for the DNS changes to propagate, which may take some time.
Step 5: Designing and Customizing Your Website 1. Choose a suitable WordPress theme from the vast collection of free and premium themes available. 2. Customize your website’s appearance by adding a logo, adjusting colors, and configuring menus and widgets. 3. Install and activate additional plugins to enhance the functionality of your website, such as SEO optimization, contact forms, and social media integration. 4. Create and organize your website’s pages, add engaging content, and upload your products if you have an online store.
Conclusion: By following the steps outlined in this blog post, you can create a WordPress website with the Shopify extension and leverage Cloudflare’s performance and security benefits on Hostinger. This integration allows you to harness the flexibility of WordPress, the robust e-commerce capabilities of Shopify, and the advanced caching and security features of Cloudflare. Take the time to explore and optimize your website further to create a compelling online presence that engages and satisfies your visitors.
Written by Kevin K. Roozrokh Follow me on the socials: https://linktr.ee/kevin_roozrokh Portfolio: https://KevinRoozrokh.github.io Hire me on Upwork: https://upwork.com/freelancers/~01cb1ed2c221f3efd6?viewMode=1
0 notes
Video
youtube
How to change WordPress admin password from dashboard and cpanel
0 notes
Text
How to Install and Setup WordPress Multisite Network
Do you want to set up and install WordPress multisite network? WordPress comes with a built-in capability to create multiple websites using the same WordPress installation.
A WordPress multisite network is used by blogs, schools, and businesses, who need to run separate websites but want to manage them under one dashboard.
In this article, we will show you how to properly install and setup a WordPress multisite network.
Since this is a comprehensive article, we have added the table of contents for easier navigation:
WordPress Multisite Basics
What is WordPress Multisite?
Pros of using a WordPress multisite network
Cons of using a WordPress multisite network
Who needs a WordPress multisite network?
WordPress Multisite Installation and Set up
Requirements for a WordPress multisite network
Choosing a domain structure for your multisite network
Setting up wildcard subdomains
Enabling WordPress multisite network feature
Setting up your WordPress multisite network
WordPress Multisite Configuration Settings
Configuring network settings
Opening your multisite network for registrations
New site settings
Upload settings for your multisite network
Plugin menu settings
Setting up Default Content, Theme, and Plugins
Adding new sites to your WordPress multisite network
Adding themes and plugins to your multisite network
Adding default Content to new sites
Troubleshooting and FAQs
Troubleshooting WordPress multisite issues
FAQs about WordPress multisite
What is WordPress Multisite Network?
A WordPress Multisite network allows you to run and manage multiple WordPress sites or blogs from a single WordPress installation.
It enables you to create new sites instantly and manage them using the same username and password. You can even allow other users to signup and create their own blogs on your domain.
The WordPress multisite network comes with advanced settings that you can use to customize each website / blog on your network.
Pros of Using a WordPress Multisite Network
In many situations, a WordPress multisite network can be more useful than managing multiple standalone WordPress sites. Here are some of the advantages of using a WordPress multisite network:
As the network administrator, you can easily manage multiple sites from a single dashboard.
Each site on the network can have its own admins. The site admins will have the capabilities to manage only their own website.
You can install plugins / themes and activate them for multiple sites with one download.
Multisite network also makes it easier for you to manage updates. You only need to update your WordPress, plugins, or themes on one “master” install.
Cons of Using a WordPress Multisite Network
Creating a WordPress multisite network is not always helpful in managing multiple sites. Here are some of the disadvantages that you should keep in mind before setting up a multisite network.
All sites on the network share the same resources. This means that when your network is down, all other sites go down as well.
It’s not easy to manage traffic and server resources for the beginner level users. In case, one of your websites gets unexpected traffic, then it will affect all other websites on the network.
If one website gets hacked, then this means all sites on your network will get hacked.
Some WordPress plugins may not work well on a multisite network.
WordPress multisite network is not properly supported by all web hosting providers which limits your options. We will talk more about this later in the article.
Who needs a WordPress multisite network?
Just because you manage multiple WordPress websites does not mean you need to start using a multisite network.
There are third party tools to manage multiple WordPress sites from a single dashboard. Tools like InfiniteWP or iThemes Sync make it easier to maintain multiple WordPress sites under one roof without switching back and forth from one site to another.
Here are some scenarios when creating a multisite network makes sense:
A magazine website with different sections managed by different teams.
A business website with sub-sites for different locations and branches.
Government or non-profit websites can use WordPress multisite for different departments, locations, and regions.
Your own network of blogs running on multiple subdomains.
Schools and colleges allowing students to create their own blogs on school servers.
Requirements for a WordPress Multisite Network
All websites on a WordPress multisite network share the same server resources. This means that the most important thing you will need is a good WordPress hosting.
If you are planning on having just a couple of websites with low traffic, then you can probably get away with shared hosting.
However, due to the nature of multisite network, you’d need VPS hosting or a dedicated server as your sites grow.
We recommend Bluehost because they offer both shared hosting and VPS/Dedicated servers, and they are also one of the official WordPress hosting partners.
If you’re looking for an alternative, then SiteGround and WP Engine provide excellent service for WordPress multisite network.
Apart from web hosting, you will need the basic knowledge of how to install WordPress and editing files using FTP.
Choosing a Domain Structure for your Multisite Network
On a WordPress multisite network, you can add new sites using either subdomains or sub-directories.
Example of subdomain: http://bit.ly/2GcT2Gs
Example of sub-directory: http://bit.ly/2rzkB2g
If you choose subdomains, then you will have to configure wildcard subdomains on your server. We will show you how to do that in the next step.
On the other hand, if you choose sub-directories or path based URLs for sites on your network, then you can skip the next step.
Setting Up Wildcard Subdomains
If you decide to use subdomains for websites on your multisite network, then you will need to setup wildcard subdomains for your multisite network.
To do that, first you need to login to your WordPress hosting account’s cPanel dashboard. After that, you need to scroll down to the ‘Domains’ section and then click on ‘Subdomains’.
Note: Depending on your web hosting service, your cPanel dashboard may look slightly different than the screenshot above. This screenshot is from the cPanel on Bluehost.
On the next page, you need to enter the * sign in the subdomain field and select your main domain from the drop-down menu.
Cpanel will automatically detect the document root and will display it in the field below. Now click on the ‘Create’ button to add your wildcard subdomain.
Enabling WordPress Multisite Network Feature
Multisite Network feature comes built-in with each WordPress installation. All you need to do is install and setup WordPress like you normally would. After that, you just need to enable the multisite feature.
You can also enable the multisite feature on any existing WordPress site. Before you enable multisite, don’t forget to create a complete backup of your WordPress site.
To enable Multisite, connect to your site using a FTP client or cPanel file manager, and open the wp-config.php file for editing.
You need to add the following code to your wp-config.php file just before the /* That’s all, stop editing! Happy blogging. */ line.
/* Multisite */ define( 'WP_ALLOW_MULTISITE', true );
Once you are done, you can save and upload your wp-config.php file back to the server.
This code simply enables the multisite feature on your WordPress site. Once enabled, you will still need to setup the multisite network.
Setting Up Your WordPress Multisite Network
Now that you have successfully enabled the Multisite Network feature on your WordPress site, it is time to set up your network.
If you are setting up a mutlisite network on an existing WordPress website, then you will need to deactivate all plugins on your site.
Simply visit the Plugins » Installed Plugins page and select all plugins. You need to select ‘Deactivate’ from the ‘Bulk Actions’ dropdown menu and then click on the ‘Apply’ button.
You can now head over to Tools » Network Setup page to configure your multisite network.
On the network setup screen, you will see a notice that you need Apache’s mod_rewrite module installed on your server. This module is installed and enabled on all the best WordPress hosting providers.
The next thing you need to do is to tell WordPress what kind of domain structure you will be using for sites in your network, e.g. Subdomains or Sub-directories.
After that, you would need to provide a title for your network and make sure that the email address in the Network admin email is correct.
Click on the install button to continue.
WordPress will now show you some code that you need to add to your wp-config.php and .htaccess file respectively.
You can use an FTP client or file manager in the cPanel to copy and paste the code in these two files.
After that you will need to re-login to your WordPress site to access the multisite network.
Configuring Network Settings
Now that you have setup the multisite network, it is time to configure network settings.
You need to switch to the ‘Network Dashboard’ to change network settings, add new sites, and configure other settings.
When you take your mouse over to the ‘My Sites’ menu in the admin toolbar, a flydown popup will appear. Click on the Network Admin » Dashboard.
This will take you to the multisite network dashboard. You will notice that there are new menu items to manage your multisite network. You will also see a “Right Now” dashboard widget that allows you to create a new site and add new users.
To configure network settings, you need to click on the ‘Settings’ link in the admin sidebar.
The first option on network settings page is to set your site title and admin email address. These fields will be filled automatically with the network title and admin email you entered during setup.
Opening Your Multisite Network for Registrations
The ‘Registration Settings’ section on the network settings page is probably the most important setting in your network setup.
By default, both user and site registrations are disabled on the network.
You can choose to open your site for user registration, or allow existing users to create new sites, or allow both user and site registration.
If you are opening your multisite network to registration, then you can check the box next to ‘Registration Notification’ option to receive email notifications every time a new user or site is registered.
If you want to allow individual site administrators to add new users on their sites, then you can check the box next to ‘Add New Users’ option.
Limited Email Registration option allows you to limit site or user registration to email addresses from specific domains. This is particularly useful if you only want to allow people from your own organization to register and create users or sites.
Similarly, you can also ban certain domains from registration.
New Site Settings
The ‘New Site Settings’ section allows you to configure default options for new sites created on your multisite network.
You can modify the welcome emails and the contents of first default post, page, and comment in these settings.
As a network administrator, you can change these settings anytime.
Upload Settings for Your Multisite Network
It is important for you to keep an eye on the usage of your server resources. Under the Upload Settings section, you can limit the total amount of space a site can use for uploads.
The default value is 100 MB which is probably good for at least 100 photo uploads. You can increase or decrease this space depending on how much disk space you have.
The default upload file types are images, audio, video, and pdf files. You can add additional file types if you want like doc, docx, odt, etc.
After that, you can choose a file size limit, so that users can’t upload insanely large files to the server.
Plugin Menu Settings
Next, you can jump to the menu settings. It will allow you to enable the administrative menu for the plugins section on your network sites.
Enabling this will show plugins menu to respective site admins. They can activate or deactivate a plugin on their individual sites, but they cannot install new plugins.
Once you are satisfied with all the configuration settings, make sure to click on the ‘Save Changes’ button.
Adding New Sites to Your WordPress Multisite Network
To add a new site to your WordPress multisite network, simply click on ‘Sites’ under My Sites » Network Admin menu in the admin toolbar.
This will show you a list of sites on your current multisite installation. By default, you have your primary site listed as the only site in your WordPress multisite network.
To add a new site, click on the ‘Add New’ button at the top.
On the ‘Add New Site’ page, you need to provide the site’s address. You don’t need to type the full address, just the part you want to use as subdomain or sub-directory.
Next, you need to add a site title, and enter the site admin’s email address.
You can add an admin email address other than the one that you are currently using to manage your multisite network.
If the email address is not currently in use by another user, then WordPress will create a new user and send the username and password to the email address you enter.
Once you are done, click on the ‘Add Site’ button.
A new site will be added to your WordPress multisite network. As the network admin, you will receive a new site registration email as well.
If you created a new user, then that user will receive an email with instructions to set a new password and login.
Adding Themes and Plugins to Your Multisite Network
By default, individual site administrators in a multisite network cannot install themes and plugins on their own.
As the network admin, you can install the respective plugins and themes, so it’s available for all sites on your network.
Installing themes for your multisite network
To add themes, go to My Sites » Network Admin » Themes page.
On this page, you will see a list of currently installed themes on your WordPress multisite.
You can make a theme available to other sites by clicking on ‘Network Enable’ option under that theme. You can also disable a theme by clicking on ‘Network Disable’ link under the theme. Note: Network Disable option will only appear when the theme is enabled.
To add a new theme, you need to click on the ‘Add New’ button at the top of your screen and then install a WordPress theme as you would normally do.
Once the new theme is installed, you will be able to make it available to other sites on your network with the ‘Network Enable’ option.
If you need recommendations on which themes to make available to your network, take a look at our picks of the best WordPress themes that you can use.
Best free WordPress blog themes
Best free WordPress photography themes
Best WordPress multi-purpose themes
Setting a default theme for your Multisite Network
After you have added a couple of themes, WordPress will still activate the default WordPress theme for each new site.
If you want to make another theme to be the default theme for new sites, then you need to add the following code to your wp-config.php file.
// Setting default theme for new sites define( 'WP_DEFAULT_THEME', 'your-theme' );
Replace your-theme with the name of your theme. You will need to use the name of the theme’s folder, which you can find out by looking at the /wp-content/themes/ folder.
Installing plugins for your multisite network
Similarly, you can visit My Sites » Network Admin » Plugins page to install plugins and click on the ‘Network Activate’ link below each plugin to activate them on your multisite network.
Following are a few essential WordPress plugins that we recommend for every website:
WPForms – It is the best WordPress contact form plugin and allows you to quickly create beautiful forms using simple drag and drop form builder.
Yoast SEO – It is the most comprehensive WordPress SEO plugin on the market and will help you get more visitors from search engines.
SeedProd – Site admins may want to see a coming soon page as they work on their sites. SeedProd allows them to add beautiful coming soon and maintainence mode landing pages
WP Mail SMTP – WP Mail SMTP helps you fix WordPress not sending email issue by using SMTP server to send crucial multisite registration and notification emails.
For more plugin recommendations, see our list of the essential WordPress plugins for all websites.
Note: If you have enabled the Plugins Menu option for site admins in the ‘Network Settings’ previously, then the site administrators can activate or deactivate installed plugins on their own. Site admins cannot delete or install a new plugin on their own.
Adding Default Content to Multisite Sites
By default, WordPress allows you to edit some default content for each site on your multisite network. You can go to Settings » Network Settings page and add them under the section ‘New site settings’.
You can edit the content for the default post, page, and comment. We recommend replacing the default content with something more useful for your site admins.
What if you wanted additional default content to be added to each new site?
By default, WordPress does not give you an option to create additional default content for new sites. If you want to do that, then you will need to add custom code to your WordPress multisite.
In this example, we are going to add a new default page to be created for each new site.
add_action('wpmu_new_blog', 'wpb_create_my_pages', 10, 2); function wpb_create_my_pages($blog_id, $user_id){ switch_to_blog($blog_id); // create a new page $page_id = wp_insert_post(array( 'post_title' => 'About', 'post_name' => 'about', 'post_content' => 'This is an about page. You can use it to introduce yourself to your readers or you can simply delete it.', 'post_status' => 'publish', 'post_author' => $user_id, // or "1" (super-admin?) 'post_type' => 'page', 'menu_order' => 1, 'comment_status' => 'closed', 'ping_status' => 'closed', )); restore_current_blog(); }
You can use the same code with little modifications to create default posts for new sites. Check out the following code:
add_action('wpmu_new_blog', 'wpb_create_my_pages', 10, 2); function wpb_create_my_pages($blog_id, $user_id){ switch_to_blog($blog_id); // create a new page $page_id = wp_insert_post(array( 'post_title' => 'A sample blog post', 'post_name' => 'sample-blog-post', 'post_content' => 'This is just another sample blog post. Feel free to delete it.', 'post_status' => 'publish', 'post_author' => $user_id, // or "1" (super-admin?) 'post_type' => 'post', )); restore_current_blog(); }
Troubleshooting WordPress Multisite Issues
Most common issues with WordPress multisite network setup occur due to incorrect configuration of wildcard subdomains and domain mapping issues. Make sure that your web host supports wildcard subdomains before setting up multisite.
Following are some other common issues and their quick fixes.
Fixing login issues on multisite installs
Another common issue is that when using WordPress multisite with sub-directories, some users are unable to login to the admin area of their sites after they add the required code in wp-config.php file.
To fix this, try replacing
define('SUBDOMAIN_INSTALL', false);
line in wp-config.php file with
define('SUBDOMAIN_INSTALL', 'false');
Find unconfirmed users
Another issue that you may come across is not being able to find users who registered on your network but didn’t get the activation email. To fix this issue, see our guide on how to find pending unconfirmed users in WordPress.
Exporting a site from multisite to its own WordPress install
Later at some point, you or another site owner may want to export a site from multisite to its own WordPress install. This can be easily done. For step by step instructions see our guide on how to move a site from WordPress multisite to single install.
You may also want to bookmark our ultimate guide of common WordPress errors and how to fix them. It will save you a lot of time by quickly fixing the most common WordPress issues.
FAQs About WordPress Multisite Network
Many of our users have asked us plenty of questions about WordPress multisite network and how to use it more efficiently. Following are the most frequently asked questions that we have answered.
1. Would I be able to better manage my sites with a multisite network?
To be honest, the answer really depends on your usage scenario.
For example, if your websites are not related to each other, then you would be better off with a multiple site management tool, like InifiteWP.
If you manage multiple sites for a restaurant chain, university, or online magazine, then WordPress multisite will be more efficient.
2. Does WordPress multisite make my websites load faster?
Once again it depends on several factors. Better WordPress hosting with plenty of server resources will allow multisite to be faster but then again with these resources, individual WordPress sites will also run faster.
However, on a shared hosting account, traffic spikes will increase memory usage and slow down all websites on the multisite network at the same time. To improve multisite speed, see our guide on WordPress performance and speed optimization.
3. Can I add an online store to a WordPress Multisite Website?
Yes, you can add an online store in WordPress multisite network. Most likely, you will be using an eCommerce plugin like WooCommerce for that, which is compatible with WordPress multisite.
4. Can I install ‘x plugin’ on my WordPress multisite?
Some WordPress plugins may not be compatible with WordPress multisite. Normally, plugin authors mention it on the plugin’s website and you can avoid installing a plugin that may not work on a multisite setup. However, if it is not mentioned, then it is safe to assume that it is multisite compatible.
4. How do I share user logins and roles across the multisite network?
By default, a user who is registered on one site cannot register or be added to another site on the same network. That’s because they are already registered in the shared WordPress database. However, they don’t have any user role privileges on other sites.
You can use third-party plugins like WP Multisite User Sync to sync users across the network. However, you need to be careful as you may end up giving someone admin privileges to a site.
We hope this article helped you learn how to install and setup WordPress multisite network. You may also want to see our step by step WordPress security guide to protect and keep your WordPress multisite secure.
If you liked this article, then please subscribe to our YouTube Channel for WordPress video tutorials. You can also find us on Twitter and Facebook.
The post How to Install and Setup WordPress Multisite Network appeared first on WPBeginner.
😉SiliconWebX | 🌐WPBeginner
1 note
·
View note
Text
How to Start a Website in 5 Minutes with WordPress

What is WordPress?
For many, when they think of WordPress, they think “blog.” And while WordPress is one of the world’s largest blogging platforms, WordPress is also a complete content management system and is a great way to build many different types of websites. This article will show you how easy it can be to get your blog, or website, up and running quickly.
Setting up a Website or Blog
Whether you are wanting to learn how to create a blog or setting up a website for the first time, the first steps are always the same but before you can begin, you have to decide how you want to set it up. Most people choose to use either a website builder or content management system (CMS) like WordPress as those are the easiest if you have never started a website before. However, for the more advanced option, you could build a site from scratch, but that requires coding skills.

For the sake of simplicity, we breakdown how to set up a website or blog into easy to follow steps using WordPress. The rest is up to you!
Buy a Domain Name
Choose a Web Hosting Provider & Setting up your hosting account
Install WordPress
Step 1: Buy a Domain Name
If you don’t already have a domain name for your new website or blog then the hardest part is picking a domain name that best suits your business or blog. Once you have decided on a domain name and it’s available for purchase, the next step to buy it!
Step 2: Choosing a Web Host
There are many hosting companies out there, but for a WordPress site, Bluehost should definitely be at the top of anyone’s list. Bluehost is recommended by WordPress for website hosting and has been for more than 10 years.
To set up your hosting account with Bluehost, follow the steps below. It will speed up the process to think of a domain name you want to use and to have your credit card for payment ready to go before you get started.
Set Up Your Hosting Account
To get started, go to Bluehost’s home page and click “Get Started.”
Next, you need to choose a domain name for your site. If you already own a domain name, you can enter it here, and you will just have to go through a few extra steps to make sure you get your DNS pointed to Bluehost. If you don’t already have a domain name, you can purchase one from right in the sign up process, and the best part is, it comes free with your new managed WordPress hosting account purchase.

2
Once you’ve entered a domain name, you’ll fill in your personal information.

3
Then, you’ll choose which hosting package you want. Normal, shared hosting is priced at 12, 24 and 36-month terms. To help save you money, the longer term you purchase, the lower the monthly rate will be. For example, by choosing a 36-month hosting term, you can get a great introductory rate of $3.95/month. And, because you’ve chosen to host with Bluehost, if you ever need more than a shared hosting account, Bluehost provides seamless upgrades to VPS or dedicated server hosting accounts from inside your control panel.
There are few other offers provided at sign up, which you can include at your discretion. One we recommend is Domain Privacy, a paid service that allows personal information to be kept private on WHOIS databases.
After you’ve filled in your information and chosen your hosting package, click the “Next” button to complete your purchase. You’ll then be asked to create a password for your account. You can use the Password Generator to create a strong and secure password or create one yourself. It is required to have both capital and lowercase letters, a number, and a special character (?!#, etc.) in order to have a strong enough password to protect your account.
Now that you are all signed up and are able to log into your account, you can get started installing WordPress!
Step 3: Installing WordPress
This may seem like the most complicated step, but Bluehost has worked hard to make this one of the easiest things for you to do by using the new MOJO Marketplace for installing WordPress and other applications. In your cPanel, scroll to the section titled “MOJO Marketplace” and choose the “One-Click Installs” button. This will take you to a page inside MOJO Marketplace called Scripts and Platforms. The blog section is at the very top, so all you have to do here is click on the WordPress icon.

This will open the installation window. Click on the green “Start” button that will start the WordPress installation process, which has a few easy steps.
Step 1: Choose where you want to install WordPress. This can be any domain on your account, or a subdomain or a folder for one of your domains. Next, click on “Check Domain,” which will make sure the domain is assigned and pointing to your account. You may get a warning that you are overwriting files, but as long as you don’t have another website built yet, you can check the box and continue. This is mostly to make sure that you really want to install it in that location. If you do have other sites built, you will want to make sure you’re not overwriting something important.

Check Your Domain
Step 2: Show Advanced Options. This section allows you to set up your own username and password for your WordPress install. IT is recommended to use a different username than “admin” and a very strong password. Make sure that the “Automatically create a new database for this installation” box is checked unless you have a database already set up that you want to use.
Step 3: After you’ve read the terms and conditions, check the box indicating that you’ve done so, then click “Install Now.”

Install WordPress
Now you’ll see the progress page, which will show you how far along the installation is. Once WordPress is fully installed, it will provide you with your site URL, the admin login URL, your username, and password. You will get a copy of this information, except your password, in your email as well. Make sure to keep it in a safe place.

WordPress Install Progress Bar
Now you can log into your WordPress site by going to the admin login URL. Enter your username and password, then click “Log In.” This will take you to your WordPress dashboard.
What’s Next?
Congratulations! You have successfully set up a website in less than 5 minutes. From here, you can design your site using templates and plugins. You can control everything to do with your WordPress site, such as creating pages, writing blog posts, and changing the appearance.
Don’t forget to consider the following plugins & tips to get more out of WordPress to set your website up for success!
Install plugins – top 3 plugins
SEO (search engine optimization) – Yoast SEO
Contact Forms – WP Forms
Google Analytics
Optimize your website for search engines
Link to social media accounts to allowing for sharing content
Remember, if you sign up through this tutorial, you’ll receive a special offer of shared hosting at $3.95/month for 36 months, as well as a free domain name for a year!
0 notes
Text
10 Reasons Your WordPress Site Will Get Hacked (and How to Stop It)

A hacked WordPress site is as damaging as having your home burgled. It can completely shatter your peace of mind and adversely impact your online business.
Why do hackers target WordPress sites? The answer is relatively simple: WordPress is the single biggest platform for website creation these days, so there’s a larger base to attack; this attracts the attention of online criminals.
So, how can a hack impact your website?
Depending on the type of attack, your website could suffer any of the following:
It could be defaced completely;
It could load or operate very slowly on any device;
It could completely crash and malfunction;
It could display the dreadful “White Screen of Death”;
Its incoming visitors could be redirected to other suspicious websites;
It could lose all your valuable customer data.
This list is not exhaustive but you get the idea.
Now that we know how a successful hack can impact your website and online business, let us look at the top 10 reasons behind WP hacks and prevent them.
1. An Insecure Web Host
Like any website, WordPress is hosted on a web host or server. Unfortunately, most site owners do not pay much attention to the web host they select and choose the cheapest they can find. For example, it is more affordable to host a website on a shared hosting plan — one that shares its server resources with many other websites like yours.
This can make your site vulnerable to hackers as a successful hack into any website on the shared server. A single hacked site can consume the overall server bandwidth and impact all the other sites’ performance.
The only way to fix this problem is to opt for a reliable host and a virtual or dedicated server.
Pro tip: If you’re already using a shared hosting plan, check with your hosts if they offer VPS hosting and make the switch.
2. Use of Weak Passwords
Weak passwords are the main reason behind successful brute force attacks that target your account. Even to this day, users continue to use weak and common passwords like “password” or “123456”; if you’re one of them, your website could land in trouble!
Guessing weak passwords allows hackers to enter the admin accounts where they can inflict the maximum damage.
How do you fix this problem? Simple, ensure all your account users (including admin users) configure strong passwords for their login credentials. With at least 8 characters, passwords must be a mix of upper- and lower-case alphabets, numbers, and symbols.
For added safety, install a password management tool that can automatically generate and store strong passwords.
Pro tip: You can use a plugin to reset passwords for all your users.
3. An Outdated WP Version
Outdated software is among the most common reasons why websites get hacked. Despite being free to download, most site users defer updating their site to the latest version, for fears of updates causing their site to crash.
Hackers take advantage of any vulnerability or bug in an older version and cause issues like SQL Injections, WP-VCD Malware, SEO Spam & other major issues like website redirecting to another site.
How do you solve this problem? When you see a notification about an update on your dashboard, update your site as soon as possible.
Pro tip: If you are worried about updates crashing your live website, you can first test the updates on a staging site.
4. Outdated WP Plugins and Themes
Similar to the previous point, hackers also take advantage of outdated, unused, or abandoned plugins and themes installed on websites. With over 55,000 plugins and themes that are available, it is easy to install a plugin or theme, even from unsafe or untrusted websites.
Plus, many users do not update their installed plugins/themes to the latest version or do not find the updated version. This makes it easier for hackers to do their job & infect sites.
How do you avoid this problem? As with the core WP version, update each of your installed plugins/themes on your site regularly. Take stock of all the unused ones and remove them or replace them with better alternatives.
You can update your plugins/themes from your hosting account.
Pro tip: We suggest setting aside time every week to run updates. Test them on a staging site and then update your site.
5. Common Admin Usernames
In addition to weak passwords, users also create common usernames that are easy to guess.
This includes common usernames for admin users like – “admin”, “admin1”, or “admin123”. Common admin usernames make it easier for hackers to get into admin accounts and control backend files in your WP installation.
How do you avoid this problem? If you are using any such usernames that are easy to guess, change them immediately to a unique username. The easiest way of doing it is through your hosting account’s user management tool, by deleting the previous admin user and creating a new admin user with a unique username.
As the first step, change the default username of your admin user and limit users who have administrator privileges.
Pro tip: WordPress has 6 different user roles with limited permissions. Only grant admin access to users who really need it.
6. Use of Nulled Plugins/Themes
Coming back to the importance of plugins/themes, users have access to many websites that sell nulled or pirated copies of popular and paid plugins and themes. While these are free to use, they are often riddled with malware. They can compromise your website’s overall security and make it easier for hackers to exploit.
Being a pirated copy, nulled plugins/themes do not have any available updates from its development team, hence will not have any security fixes.
How do you fix this problem? Simple, for a start, only download original plugins and themes from trusted websites and marketplaces.
Pro tip: If you don’t wish to pay for paid or premium plugins and themes, opt for a free version of the same tools that will have limited features but are still safer to use than the nulled version.
7. Unprotected Access to wp-admin Folder
To take control of your site, hackers often try to break into and control your wp-admin folder in your installation. As the website owner, you must take measures to protect your wp-admin directory.
How can you protect your wp-admin folder? First, restrict the number of users having access to this critical folder. Additionally, apply for password protection as an added layer of security for access to the wp-admin folder. You can do this using the “Password Protection Directories” feature of the cPanel in your web host account.
Pro tip: Besides these fixes, you can also implement Two Factor Authentication (or 2FA) protection for all your admin accounts.
8. Non-SSL Website
You can easily migrate your HTTP website to HTTPS by installing an SSL certificate on your site. SSL (or Secure Socket Layer) is a secure mode of encrypting any data transmission between your web server and the client browser.
Without this encryption, hackers can intercept the data and steal it. Plus, a non-secure website can have many negative implications for your business – lower SEO ranking, loss of customer trust, or a drop in incoming traffic.
How do you fix this problem? You can quickly obtain an SSL certificate from your hosting company or SSL providers. It encrypts all data that is sent from and received by your website.
Pro tip: You can get a free SSL certificate from places like Let’s Encrypt, but these provide limit protection that will only be sufficient for a starter site or small site.
9. No Firewall Protection
Lack of firewall protection is another common reason why hackers can bypass website security measures and infiltrate the backend resources. Firewalls are the last line of defence against hackers and work like the security alarm installed on your house. Firewalls monitor web requests coming from various IP addresses, including the suspicious (or bad) ones.
They can identify and block requests that are known to be malicious in the past, thus preventing easy access for hackers to your website domain. Web application firewalls can thwart various attacks, including brute force attacks, XSS, and SQL injections.
Pro tip: A firewall provides much-needed security and is your first line of defence. But it’s important to also have a malware scanner installed.
10. Lack of WordPress Hardening Measures
Typically, hackers target the most vulnerable areas or weaknesses within a WP installation, to illegally access or damage the website. The WordPress team has identified these vulnerable areas and has devised a list of 12 hardening measures recommended for every website.
A few of these include:
Disabling the File Editor;
Preventing PHP execution in untrusted folders;
Changing the security keys;
Disallowing plugin installations;
Automatic logout of inactive users;
How do you implement these hardening measures? While some steps are easy to understand, others require the technical expertise of how WordPress works.
Pro tip: You can implement hardening measures on your own. However, some measures require technical expertise so in these cases, it’s much easier and safer to use a plugin.
Featured image via Pexels.
Source from Webdesigner Depot https://ift.tt/3noM7L1 from Blogger https://ift.tt/2IrliXM
0 notes
Text
How to Create a Website in WordPress: Easy Tutorial

Thinking about how to create a website in WordPress? Having doubts and questions on your mind? don’t know how to install WordPress? Here we provide you the complete WordPress tutorial explaining the whole process step by step.
Basic Requirements to Install WordPress
There are some basic requirements to install and setup a WordPress website.
Domain Name
Web Server
WordPress
How to Install WordPress on your Website?
There are mainly two ways to install WordPress on your website;
Installing WordPress using cPanel (also known as one-click install)
Installing WordPress manually

Know Your WordPress Dashboard & Admin Panel
Before we start to answer the question of how to create a website in WordPress, we need to get familiar with the Admin Dashboard to be able to maintain our website’s front-end from backend aka WordPress Dashboard aka Admin Panel.
First, you need to login to the Admin Panel, Login URL for your website is “www.yourdomain.com/wp-admin“. You will be asked for your login credentials, enter your username and password here to access the admin dashboard of WordPress.
5 Essential Settings After Installing WordPress
Remove Demo Content
Set Site Title, Tagline, Time Zone, Date Format and Time Format
Set WordPress Permalinks
Pick a Good Theme for Your Website
Improve Website Load Speed
Here are some free plugins that we recommend for WordPress speed optimization:
W3 Total Cache or WP Super Cache
WP Smush or reSmush.it
Wp Lazy Load
WP-Optimize
AMP for WP
Simply installing these plugins won’t make your website faster, you will have to make a few changes, which we will discuss in a separate post.
0 notes
Photo

How to Install WordPress
What You'll Be Creating
So you want a WordPress site?
That’s great. WordPress is the world’s most popular content management system (or CMS), and for good reason.
With WordPress, you can get yourself a flexible, scalable, and user-friendly website. The software itself is free, and all you have to pay for is the hosting you’ll put it on.
But before you can start, there is one thing you’ll have to do, and that’s set up WordPress. This puts a lot of people off: they think it’s tricky, or long-winded, or requires writing code.
None of these are true. You have two options for installing WordPress, both of which are designed to be quick and easy. I’ll show you how to do both of them in this guide.
Premium WordPress Themes and Plugins
Once you've got your site set up, you'll want to explore the thousands of WordPress themes on ThemeForest and WordPress plugins on CodeCanyon. Purchase these high-quality WordPress themes and plugins and improve your website experience for you and your visitors.
Options for Installing WordPress
There are two ways of installing WordPress: manually, or with the click of a button.
For most non-techies, the click of a button option is the preferred one. But just in case you prefer the more thorough way, I’m going to help you to do it manually too.
Each method has its own advantages and disadvantages.
Automatic Installation
Pros:
It’s easy.
It works.
Cons:
Your hosting provider might add some extra code or plugins, which could cause you problems in the long run or might just annoy you. For most people, this isn’t an issue.
A poor hosting provider might not install the latest version of WordPress. A good one will. (Hint: you should only go with a good one.)
If your hosting provider doesn’t provide cPanel (or something like it) as part of your package, you might not have access to an auto-installer (which is why this is an important criterion when choosing hosting).
Manual Installation
Pros:
You get a clean installation with no extra code or plugins.
Cons:
It takes longer.
It’s not as easy.
Sometimes it doesn’t work properly (although that’s normally due to user error).
For 90% of website owners, the automatic installation is absolutely fine. It’s only if you’re planning to customize the code on your site that you may have issues.
If you fancy trying your hand at manual installation, read through the instructions below and give it a go. But if you prefer an easy life, go with the automatic option.
Installing WordPress with Siteground
If your hosting account is with Siteground, you’ll be pleased to know that installing WordPress is quick and easy, and doesn’t require any technical skills.
Log into your Siteground account and click on Websites to go to the Websites screen.
Click the New Website button at the top of the screen.
You’ll then be prompted for which domain you want to use with your site. You can use one of the following:
a new domain, which you register with Siteground
an existing domain which you already have registered and pointing at your Siteground account
a temporary domain, meaning you can test the new site and then set up the domain once it’s ready
Select the option you want to use and click the Select button beneath it. If you select existing domain, you’ll need to type the domain name into the field that appears. If you’re setting up a new domain, you’ll be given the option to register it with Siteground. If you select a temporary domain, that will appear on the screen.
Click the Continue button to go to the Add New Website screen.
Find the Start New Website box and click the Select button. You’ll be given a choice of apps to use for your new site. Click on Select in the WordPress box.
You’ll then be prompted to type in your login details.
Type in your email address and the password you want to use and click the Continue button.
You’ll then be given the option to add SG Site Scanner to your site. If you want to sign up for that, click Add. If not, click Finish.
The system will then start work creating your site.
And that’s it! The next screen you will see will have details of your new WordPress site.
From here you can view your site or log in to manage it. Check out our complete guide to making a site with WordPress to learn how to add content to your site and get it working for you.
WordPress
How to Make a WordPress Website
Rachel McCollin
Installing WordPress in CPanel
If you’re with a different hosting provider, they’ll probably provide you with an auto-installer that you access via cPanel or via their dashboard.
First, you’ll need to access your control panel with your hosting provider. This is normally called cPanel, although some providers give it a name of their own.
If you’re not sure how to get to this, check the email you received when you set up your hosting account. It should contain a link to cPanel. And if that fails, ask your hosting provider to tell you or google ‘access cPanel [my hosting provider]’.
You should find a section called Autoinstallers. In that section you’re looking for an icon with the word WordPress beneath it. If you can’t find that, you’ll need to use Softaculous instead.
Let me start by demonstrating the process with the dedicated WordPress installer.
Installing WordPress With the WordPress Auto-Installer
Click on the WordPress logo. This will take you to a set of screens for installing WordPress.
If the Install tab isn’t already open, click on it.
Now complete the fields as below.
Version: Leave this as the default.
Protocol: If you have SSL already set up for your site (some providers give you this when you register the domain), select https://. If not or if in doubt, select https://. Note that SSL makes your site more secure and is worth using if possible.
Choose Domain: If you have more than one domain registered, choose the one you want to use.
In Directory: Leave this blank.
Site Name: Enter the name of your site. You can change this later.
Site Description: Your tagline. Again, you can change this later.
Enable Multisite: Leave this unchecked. Some auto-installers don’t have this: don’t worry if you can’t see it.
Admin Username: Type in the username you want to use. Don’t use admin as this isn’t very secure. You can’t change this later, so make sure it’s what you intend to use forever.
Admin Password: Type in the password you want to use. Use something different from your username, with a few upper-case letters and numbers for extra security. You want to make it as hard as possible for people to get into your site. You can change your password later via the WordPress admin screens, to make it more secure.
Admin Email: Type in the email address you want to use for any emails relating to your site. This isn’t publicly displayed.
Select Language: Choose your language.
Select Plugins: Leave all of these unchecked. This will only be an option with some hosting providers: don’t worry if it isn’t there.
WordPress Starter: Uncheck this. Again, this is specific to some hosting providers and you might not have it.
If there are any other options, just leave them unchecked. And ignore any advanced settings: you don’t need to worry about them.
Once you’ve filled out the fields, click the Install button.
The auto-installer will take some time to set up your new WordPress site, and then you’ll be taken to a screen with details of your new site. There will be a link to the site itself and a link to your dashboard. In the screenshot below, I’ve installed WordPress in a subdirectory.
Congratulations, you now have a WordPress site!
Installing WordPress With Softaculous
If your cPanel doesn’t have a dedicated WordPress installer, you can use Softaculous instead. Follow these steps:
Click on the Softaculous icon in cPanel.
From the menu on the left, select WordPress.
Click the WordPress icon at the top of the screen.
Follow the steps in the previous section.
In fact, the WordPress auto-installer is nothing more than a shortcut to the Softaculous installer. So the process is the same.
Once you’ve done that, you can follow the link to your shiny new site and start getting it ready.
Installing WordPress Manually
Alternatively, you can use the "famous five-minute install" to install WordPress manually.
To install WordPress manually, you’ll need:
A web browser.
An FTP client. This will let you upload files to the server where your website is hosted. Personally, I use Coda, a code editing application with an FTP client included, but if you just need FTP, you can choose from our list of the top five FTP clients out there.
Access to your server to create databases—your hosting provider will likely provide you with a tool called phpMyAdmin to do this. If in doubt, ask them!
Note that you won’t need an FTP client if you’re running WordPress locally—that is if you're running it on your computer instead of on the internet.
To install WordPress, you’ll need to follow three steps:
Create a database on your server.
Download WordPress and copy it to your server.
Run the WordPress installation.
Create a Database
The database will hold all of your site’s content, and without it, WordPress and your WordPress site won’t work. You can create yours in one of two ways, depending on your hosting provider’s setup:
via your hosting admin screens
using phpMyAdmin
With my hosting provider, I use their admin screens to create a database, so let’s look at that first.
Using Your Hosting Admin to Create a Database
In your hosting admin screens, find an option called databases, SQL databases, or similar. The exact name will vary depending on your provider.
For example, here’s the screen I use:
If you’re using a similar admin screen, follow these steps:
Give your database a name and type it in the field.
Click on Create Database.
You’ll then be asked to enter a password for the new user associated with this database. Choose a password, type it in, and click OK.
Make a note of the database name, username, and password. You’ll need these later.
And, that’s it—your database is ready!
Using phpMyAdmin to Create a Database
If your hosting provider gives you phpMyAdmin as part of your package, or you’re using MAMP to install WordPress locally, you can use this to create your database.
In your hosting admin screens or the MAMP welcome screen, click the link to phpMyAdmin, which might look something like this:
The phpMyAdmin welcome screen will open. Click on the Databases tab at the top left to open the databases screen:
In the Create Database field, type the name of your database.
Click the Create button.
And with that, your database will be created. Make a note of the database name for later. The username and password will default to root.
Step 1 is done—and that’s the trickiest part. It’s plain sailing from here on in!
Download and Upload WordPress
Now you need to download the latest version of WordPress.
Go to the WordPress download page.
Click the Download WordPress button to download a zip file containing all of the WordPress files to your computer.
Unzip the file on your computer in exactly the same way you would normally unzip any other file. You’ll now have a folder called wordpress with all of the WordPress files in it. Make a note of where that folder is.
Next, you need to upload WordPress to your server.
Open your FTP client. Sign in to the FTP on your server using the FTP login details your hosting provider gave you when you created your account. If you’re not sure about these, ask them. You’ll need the server address, your username, and the password.
In your FTP client, find the wordpress folder on your local machine and the public_html folder on your server. You should be able to see the two of them side by side. As an example, here’s mine in Coda:
Note that my folder on the remote server is empty because I’m installing WordPress in a subdirectory. Yours will have other files in there—ignore those.
Now drag the contents of the wordpress folder (not the folder itself) to your public_html folder. Your FTP client will copy the files to your server.
Wait for the files to finish copying. Now you’re ready for the third and final stage: running the WordPress installation.
Run the WordPress Installation
Your database and files are in place, and you’re ready to install WordPress!
Open your browser and go to your website. You’ll see the first WordPress installation screen.
You should have all this information noted down from when you were creating your database. Click Let’s Go!
On the next screen, input your database name, username, and password. If you’re working locally, the username and password will default to root. Otherwise, they’ll be what you specified when you created your database.
Leave the Database Host and Table Prefix fields as they are (note: if in any doubt, ask your host for what to enter as the Database Host, as this can vary between hosting providers—assuming they haven’t already let you know in a previous email when you initially signed up for their services) and click Submit.
Next, you’ll see my favorite screen—the one that tells you WordPress is ready to install. Well done!
Note: If you’re in the US, it will say ‘All right sparky!’ I’m in the UK, so it uses the more sedate ‘sunshine’. I prefer ‘sparky’ to be honest.
Click Run the install to access the site details screen.
Finally, enter your site details: the site title, your username and password, and email address. If you want Google to find your site, leave the Privacy box checked. Click Install WordPress.
WordPress will be installed, and you’ll see a success screen. Hurray!
Now you can log in to your site by clicking the Log In button and entering the credentials you provided when you were installing WordPress.
This will take you to the WordPress dashboard.
Congratulations, you’ve successfully installed WordPress and can now start managing your site!
Installing WordPress isn’t as tricky as you may think. By following the advice above, you can get yourself a brand new site with the world’s favorite CMS. Enjoy!
The Best WordPress Themes and Plugins on Envato Market
Explore thousands of the best WordPress themes ever created on ThemeForest and leading WordPress plugins on CodeCanyon. Purchase these high-quality WordPress themes and plugins and improve your website experience for you and your visitors.
Here are a few of the best-selling and up-and-coming WordPress themes and plugins available for 2020.
Inspiration
15+ Best WordPress Portfolio Themes for Creatives
Brenda Barron
WordPress
17 Best WordPress Slider & Carousel Plugins of 2020
Daniel Strongin
WordPress
20 Best WordPress Calendar Plugins and Widgets
Daniel Strongin
WordPress Themes
23+ Best Responsive WordPress Themes (For Sites in 2020)
Brenda Barron
WordPress
24 Best WPBakery Page Builder (Visual Composer) Addons & Plugins of 2020
Daniel Strongin
WordPress Themes
20+ Best Coaching & Consulting WordPress Themes (2020)
Brenda Barron
by Rachel McCollin via Envato Tuts+ Code https://ift.tt/3ewc73h
0 notes
Text
The Most Effective Method to Introduce WordPress with Bluehost
Here are the steps to how to install WordPress on Bluehost using Marketplace. Installing WordPress with Marketplace

1. Login to your Bluehost cPanel account. 2. Find the Website section and select Install WordPress. 3. Click the Install button. 4. Choose the domain name to install it to. In the field next to the domain, you can enter a subfolder such as ‘blog’ or leave it blank if you want the site’s main page to be the blog. 5. If necessary, you can edit the email address, username and password for the new WordPress installation. Click “advanced options” and you can change those settings. 6. Read through the license and service agreements and check the boxes. 7. Select the Install Now button. If you have already installed a fresh WordPress and looking for a solution to transfer your local/dev setup to BlueHost.
Migrating WordPress to BlueHost
1. To start, log into your current host and use a provided program (such as phpMyAdmin) to export your site’s database. 2. Use your preferred FTP program (such as Filezilla or Cyberduck) to download and save your wp-content folder (a.k.a. the files that make up your WordPress site.) Of course, You won’t need to download files if your existing site is on local 3. Login to your Bluehost control panel. 4. Install WordPress using the Marketplace, one-click install tool. 5. Create an FTP account in your Bluehost control panel so you can upload your files to your new WordPress site folder. When creating your FTP account, keep in mind that you might want to change its designated directory to something easily identifiable. 6. Launch your preferred FTP program and open a new connection. Log in with your new FTP account info. 7. Overwrite the existing wp-content folder with the one you downloaded from your previous host. 8. Open phpMyAdmin in the Database section of your Bluehost cPanel. 9. Select the database to which you want to import your data. You may need to look up this information. (To do so, go to the File Manager in your control panel and open your public_html folder. Then scroll down to find the wp-config file, right-click the icon, select “Code Edit”, and then “Edit.” In the code edit window, scroll down to identify the database you should use. 10. Back in your phpMyAdmin window, once you’ve selected the correct database, you will see a list of tables. Drop these tables before you import your new data by selecting the “Check All” option at the bottom of the list and then selecting “Drop.” 11. Now it’s time to import! Go to the “Import” tab in phpMyAdmin. Choose “Browse your computer” and find the SQL database file that you exported from your previous site. (It should be named something similar to “bluepm1_wor2.sql”.) Make sure the SQL format is selected and click “Go.” 12. Here is an important step after you import your database. After your database is imported, check to learn the new table names. If your table names begin with ‘wp_’ then you don’t need to make any changes. However, sometimes your tables will import with a name like ‘wrp-‘ Go to your file manager and open the wp-config file in your public_html folder. 13. Right click on wp-config, select “Code Edit”, and then select “Edit.” 14. Scroll down until you find the line “Stable Prefix” line. Edit it to read ‘wp_’. 15. Now that you have your database and site files, it’s time to put everything on your temporary URL. This is how you move your site without any downtime.* First, in your phpMyAdmin site, select wp-options from the menu on the left of the screen. Then, select “Edit” on the “site url” line. (This will typically be line .) Paste in the temporary URL provided to you when you created your Bluehost account and click “Go.” (Tip: if you’re not sure what it is, it can be found in your Bluehost welcome e-mail.) *Note: all of these previous steps can help anyone move their WordPress site. The following steps are for those are want to move their WordPress site without any downtime. 16. Repeat Step 11 for your “Home” line in wp-options. (This is typically line 36.) 17. Now it’s time to see if your work has paid off. Enter the temporary URL into your internet browser and check to see if your site is there. If so, you’re nearly done! 18. Log into your WordPress admin site to save your Permalinks. Go to “Permalinks” under the “Settings” tab of the dashboard and click “Save Changes.” 19. Before you can move from the temporary URL to your permanent one, you must change the nameservers associated with your domain to point to Bluehost. This can be done in the domain manager of your domain registrar, whether it be with Bluehost or another registrar. Use the following: NS1.BLUEHOST.COM and NS2.BLUEHOST.COM. (This indicates that your site is hosted at Bluehost.com. The DNS change can take anywhere from a few hours to several days to propagate. Once it is finished you will be able to use your domain on your new site.) 20. Once the DNS change in complete, log into your WordPress admin site and go to “General” under the “Settings” tab. Then, enter your domain into the “WordPress Address” and “Site Address” fields, and click “Save Changes.” 21. The last step is to enter your domain URL into your internet browser to check to see if your site is live. If so, then congratulations! You have successfully moved your WordPress site to Bluehost. These steps will remain more or less the same for most hosting providers. As you may have already expected, migrating WordPress first time can feel to be a little overwhelming, but once you do it, you would realise it is not much difficult either.
0 notes
Text
How to Setup an Online Store with Wordpress + Woocommerce

This is a tutorial to guide you on how you can get your online store up and running in minutes using wordpress and woocommerce plugin. In this tutorial, I’ll be teaching you how to set up a WordPress and WooCommerce online store where you can list and sell your products. Disclosure: This post contains affiliates links and I will earn a commission if purchased through my link. Thanks for your support. It is important to know that WooCommerce is the best way to turn your WordPress website into a fully functional e-commerce store, it is a WordPress plugin that needs to be installed and activated just like any other plugins in order to work. The good news about it is that is free to use just like wordpress, you may not need to change your current theme or designs if you have an existing website, you can sell virtually anything on your store (Digital products, Physical products, Services, Bookings, Subscriptions, Customizations etc) and it is very easy to set up all by yourself following this tutorial. In building an E-commerce store for your business, there are some basic steps you will need to follow; First of all, you will need to get a domain name and an hosting plan. A domain name is the name your store will bear both online and offline (eg yourname.com or any other extension but I will advice you go for .com). A Web Hosting is where your store will be hosted for your online store to be found online. There are lot of domain names and hosting service providers out there but I will like to recommend bluehost for both your hosting and domain name but if you are really on a low budget, you can used whogohost and smartweb, their services and response rate is close to 100% and their hosting plans are reliable too. Bluehost.com is very much realiable and affordable. When you sign up with them, you get free domain name for a year. With whogohost and smartweb.ng, you get a .com.ng domain extension for free but with bluehost, you get a .com domain extention free for the first year and host plans starting at $2.95/month. Moreso, they are officially recommended by Wordpress.org. So let’ get started by visiting www.bluehost.com

Click on get started button Choose your hosting plan- Basic , Plus, Choice plus and Pro plan

Type in your chosen domain name and click on next

Like I said earlier in my previous post, make sure your domain name is unique, easy to remember and related to your business. If you already have a business, you can go for the option that says “I have a domain name” and in this case, you will need to point the nameservers to that of Bluehost. Fill in the necessary details


Finalize the setup and make the payment.

Immidiately after checkout, bluehost will notify you to create a password.

After login, you will be presented with some free theme, skip it and go to next to see welcome to wordpresss and you will click on my site.


Setup your wordpress site by adding your details following a few procedures. Great! You just got the bulk of the job done – you now have a domain name, hosting plan and WordPress site The goodnews is that bluehost automatically install Wordpress right from the Bluehost dashboard and you can also use your details as well as the password you just created to login into your cpanel. For those that will be using other hosting services like whogohost or smartweb, you will need to install wordpress through your cpanel sent to your email address by your hosting providers. (check your email for your cpanel login from your host)

Once you login, scroll down until you see an icon labeled “WordPress” under softaculous, click on install and fill in the necessary details.

At this point, you should have a blank WordPress website installed. Your cpanel should look some thing like yourdomain.com/cpanel and your wordpress login should look something like yourdomain.com/wp-admin The next step is to install Woocommerce plugin Woocommerce plugin helps you in turning your wordpress site into a beautified store Go to your wordpress dashboard to locate “plugin->new plugin->search for woocomerce->click on install, wait a few seconds and activate it after installation”

Click on “Let’s Go!” from the woocommerce onscreen setup popup

The next step is to create some necessary pages This pages are important to your store functionality. Although, woocommerce helps you in creating some pages like ; Shop – this is where your products are going to be displayed alongside their prices. Shopping cart – this is where your customers can adjust their order before proceeding to checkout. Checkout – this is where the customers choose the shipping/delivery method and make payment My Account – with this page, customers will be able to view their past orders and manage other details). All you need to do at this stage of the WooCommerce wizard is click the “Continue” button for WooCommerce to set up those pages for you.

Set up locale Your locale is the location of your business which is also very important in defining your business origin, currency, and preferred units

Your locale is the location of your business which is also very important in defining your business origin, currency, and preferred units Click “Continue” once you’re done. The next step is shipping and tax

Choose either free shipping or flat rate and move to Recommendation stage


On tax settings, wooCommerce has a very neat tax module, the best thing about it is that it helps you figure out the tax rates based on your store location that you have indicated in the previous step. Also you can sign up mailchimp email marketing right from there. Note: You have to know the taxation rules of your country to double check it. The next step is the payment method/gateway

On this stage, I will recommend you fill in paypal as your payment gateway but it is highly recommended that you integrate your store with both Paypal and Stripe by Just clicking on their corresponding check boxes. Though you can go for other payment gateways like check payment, bank transfer and payment on delivery. It is important to note that in order to make online payments work, you need to sign up with either PayPal or Stripe separately. Again, click “Continue” to move to the next step which is to activate jetpack if you want


Hurray!, you just built a blank e-commerce store with WooCommerce! The next step is the beautification of your store by adding a theme The theme you choose will speak for the designs and the way your products will be displayed on your store. Although, the WooCommerce plugin must have installed its default theme on your website which is storefront which works fine with the woocommerce plugin. For store customization of the theme, go to Appearance / Customize. This will allow you to see the front end of your website as you customize to your taste.

You can also go for a premium themes (visit themeforest, the largest worpress theme store) for your e-commerce website if you like, by uploading it to your wordpress dashboard. Under theme-> add new->locate “upload” on the top center of the screen-> install and activate the theme.


The next step is adding products Yes, you need to start adding products to your store for it to be operational (products, services, downloads, or whatever it is that you want to sell). On your wordpress dashboard, locate products from the dashboard Go to Add Product

An editing screen will pop up like the one above Add the product name and description of the product. Input as much information as possible about the product in the description box, add images/galleries, add videos if necessary, add the various parameters of the product. Set the pricing and taxes. Manage stock levels by setting the inventory. Set the Shipping weight, dimensions, and the cost of shipping. Linked Products if necessary for setting upsells, cross-sales, etc. Set custom product attributes. This helps you to add variations of the product in terms of color, sizes etc Write a short description of the product that will displayed on the front end. Create the Product Categories to be able to group similar products together. Give the products some tags just like the standard WordPress tags. After all the setting, click on publish Add a few products more by following the same step Let’s move to the next step by checking out some woocommerce extensions/add-ons You can visit the official website of woocommerce to see them (www.woocommerce.com) Among the addons are; Shipping extensions- if you want to automatically integrate your store with the official shipping rates from companies such as UPS or FedEx then this will come in handy. Payment gateways. If want to accept more payment methods with the standard PayPal. It helps you to accept more payment methods on your store WooCommerce Subscriptions- allows customers subscribe to your products or services and pay a weekly, monthly or annual fee. Accounting extensions-It helps you to ntegrate your WooCommerce store with the accounting tool of your choice. WooCommerce Bookings-allow customers to book appointments for services without leaving your site. Let’ look at some plugins that can help in supercharging your e-commerce store These are; All in one Seo Pack/Yoast SEO-helps you improve the SEO of your website. SEO for WooCommerce plugin- helps improve the SEO of your products and other areas of your e-commerce store. WooCommerce Multilingual- run your store in multiple languages using this plugin. Contact Form 7- your store visitors can contact you directly ny filling the form. Updraft Plus-help back up all your site content, including your products and other store data. Social Share Buttons by GetSocial-it makes it possible for your buyers share your products with their friends and family through social media with this plugin. Google analytics-integrate your site with Google Analytics to monitor your site traffic. W3 Total Cache- helps speed up your website through caching and makes it load faster. In conclusion, to create an e-commerce store, we will need to follow the following few steps; Get a domain name and hosting plan Install wordpress and woocomerce plugin Activate woocomerce and set the woocommerce setting Setup locate, tax and shipping and payment gateways Add a theme to your store Set and adjust your store shop page, cart page, checkout as well as other pages On the Extentions and Plugins Remember the payment gateways Remember some of the woocommerce extentions Remember to install all of the plugins that will supercharge your e-commerce store like the All in one SEO Pack/Yoast SEO, SEO for woocommerce, Contact form7, Social Share Buttons, Undraft etc. Wordpress+woocommerce platform offers almost all of the functionality you need to sell products online. If you love this article, please remember to share it with your friends on social media. Thanks. Read the full article
0 notes
Text
Learn how to Create a Wiki-Fashion Web site With WordPress, Rapidly
Whether or not you’re a rising enterprise or already a number of years in existence, there is no such thing as a denying that you need to have a system in place for answering your clients’ most urgent issues. Documenting your processes and offering quick access to ceaselessly requested questions is a good way to assist each your clients and your staff.
If you happen to’re nonetheless utilizing recordsdata and folders, it’s time to modernize your corporation and think about including a wiki to your current web site. A wiki-style web site can facilitate new worker coaching and assist them study the ropes rapidly. It could possibly additionally function a buyer assist heart and scale back the variety of assist questions you obtain every day.
All issues thought-about, when your staff know the place to search out details about your corporation and when you possibly can direct clients to a solution to their downside, your employees can spend extra time targeted on nurturing buyer relationships so your corporation can thrive.
On this publish, you’ll study how you can rapidly create a wiki-style web site utilizing certainly one of our finest wiki data base WordPress themes.

Wiki data base WordPress themes on Themeforest
What You’ll Have to Get Began
Earlier than you construct your precise data base, there are some things it’s good to do. Crucial factor to think about is the way you wish to combine the data base into your current web site.
1. Select a Data Base Integration Methodology
There are 3 ways to do that: you should use a subdomain, a brand new listing in your web site with one other WordPress set up, or allow the multisite function in your current web site.
With a subdomain, the URL on your wiki part will appear to be assist.businessname.com whereas utilizing a subdirectory, the URL could have the next format: businessname.com/assist.
It’s price mentioning that enabling multisite is a barely extra concerned course of because it requires you to switch your wp-config.php file. Nevertheless, it does include the flexibility to replace all the websites on the similar time. With a subdomain or a subdirectory, you’ll need to log into every WordPress web site individually to replace the WordPress core, themes, and plugins.
If you wish to get your wiki-style web site up and operating rapidly, choosing a subdomain or a subdirectory is so much simpler because you don’t have to switch any recordsdata and you’ll set up WordPress following the standard set up course of.
Finally, the selection actually relies on your choice and there’s no proper or incorrect strategy to do it.
2. Collect All of the Content material for Your Wiki Web site
When you may have selected the combination methodology, it’s good to collect the content material you’ll put in your wiki web site.
Relying on whether or not you’re constructing a wiki on your staff or on your clients, you’ll want to assemble all of the paperwork that define your processes or a listing of ceaselessly requested questions, assist supplies, and documentation that may assist them get to know and use your product higher.
Learn how to Set up Your Wiki-Fashion WordPress Web site
Now that we’ve coated the necessities, let’s get began with the WordPress wiki web site setup.
1. Select Your Wiki-Fashion WordPress Theme
The very first thing you’ll must do is select the theme on your wiki web site. There are many wiki-style WordPress themes to select from, which could appear daunting at first. It can save you time by looking by our curated choice of the most effective ones:

WordPress Themes
14 Finest Data-Base WordPress Wiki-Fashion Themes
Brenda Barron
Earlier than you decide on a WordPress Data Base theme to make use of, think about the performance you wish to have.
Will your assist part function solely articles or will you combine video tutorials as nicely?
Do you want a strategy to reply buyer questions and create a neighborhood with the assistance of boards?
Maybe, you’d wish to have all of these options?
When you’ve selected the options, think about the customization choices so you possibly can combine your model and make the assist part appear to be a pure extension of your corporation web site. While you’ve discovered a theme that has all of the options you need and a visually interesting design, it’s time to put in WordPress.
Subsequent we’ll evaluate three WordPress set up strategies: inserting WordPress on a subdomain, in a subdirectory, or work with the Multisite function. Use the set up methodology the suits your wants finest.
2a. Set up WordPress on a Subdomain
If you happen to’ve settled on utilizing a subdomain on your wiki-style web site, you’ll must login to your cPanel and scroll all the way down to the part that claims Subdomains. Click on on it and on the next web page enter the identify on your subdomain. Then, click on the Create button.

Making a subdomain.
After you’ve created the subdomain, return to your cPanel dashboard and navigate to the Fantastico, Softaculous installer, or every other one-click WordPress installer that your host makes use of.
Choose WordPress set up and select the subdomain you simply created as the placement for the set up. Then, comply with the standard course of for putting in WordPress by selecting a username and password on your web site and clicking the Set up button.

Putting in WordPress on a subdomain.
2b. Set up WordPress in a Subdirectory
If you happen to determined to put in WordPress on your assist part in a subdirectory of your web site, the method could be very easy. After logging into your cPanel, merely go to to Software program/Companies the place you’ll discover a WordPress icon. Click on the icon and select Set up. Choose your area identify from the drop down menu after which kind within the subdirectory identify within the area beneath.

Putting in WordPress in a subdirectory.
Fill out your username, password, and different info after which click on Set up.
2c. Allow Multisite Characteristic on Your Present Website
For these of you who opted to allow the multisite function in your web site, you’ll want an FTP program like FileZilla to obtain the wp-config.php file. Open the file with a textual content editor and discover the road that reads: /* That’s all, cease modifying! Comfortable running a blog. */
Simply earlier than that line, add the next line of code:
/* Multisite */ outline( ’WP_ALLOW_MULTISITE’, true );
Save the adjustments in your file and use FileZilla to add it again to your server. Now that Multisite is enabled, it’s good to arrange your community. First, deactivate all of the plugins in your web site by logging into your dashboard and going to Plugins > All Plugins. Choose all of them and click on Deactivate.
After that, go to Instruments > Community Setup to configure your multisite community. You’ll have to decide on whether or not to make use of subdomains or subdirectories on your community, and supply primary details about the community.
On this tutorial, we’re utilizing the subdomain construction. Present the identify on your community and double-check the admin e mail to verify it’s appropriate. Then, click on on the Set up button to proceed.

Create a community of WordPress websites.
The next display provides you with the principles it’s good to add to your wp-config.php and .htaccess recordsdata. Use FileZilla to hook up with your host’s server and obtain the recordsdata. Open them in a textual content editor, paste the principles WordPress gave you, after which re-upload them to the server.
You’ll need to login to your dashboard once more after which configure community settings. Right here, you possibly can customise the identify on your community, resolve on file add limits, allow registrations, and customise the emails which can be despatched when a brand new web site/consumer is created.

Community Settings,
All that’s left to do now could be to create a brand new web site in your community. In your WordPress dashboard, click on the My Websites menu within the admin toolbar and choose Community Admin > Dashboard.
From there, click on on Add New Website, after which fill out the data for the location’s deal with, identify, and outline. You don’t must enter the complete URL, solely the half that you simply wish to use as a sub-directory. As soon as the method is completed, it’s time to put in the theme and arrange your web site.

Add new web site.
3. Set up Your WordPress Theme
Now that your data base web site is created, log in to your new WordPress dashboard and go to Themes > Add New and add the zip file of your bought theme. After that, click on on Activate.
Take into account that should you’re utilizing the multisite setup, you’ll want to go to the Community dashboard by going to My Websites > Community > Dashboard and set up the theme from there.
Now we’ll cowl how you can create your wiki web site utilizing a high WordPress theme and rapidly set it up.
Learn how to Create Your Wiki-Fashion WordPress Web site
For the needs of this tutorial, we’re utilizing the favored Flatbase Data Base Wiki theme. We’ll use the traditional variant, although you possibly can select from an entire vary of various skins.

Flatbase Data Base Wiki theme
Upon theme activation, you’ll be redirected to the Theme Settings web page. Right here, you possibly can add your brand, favicon, change the typography, set your model colours, and extra.

Theme Settings in WordPress.
1. Create Your Wiki Homepage
While you’re carried out customizing the best way your wiki web site theme seems to be, head over to the Pages part. You must create a homepage on your web site. Click on on Add New and identify the location Dwelling.
Select the Homepage template from the dropdown within the sidebar and click on on Publish. Then, navigate to Settings > Studying, select Homepage shows a Static Web page, and choose the web page you simply created.

Making a homepage in your WordPress theme.
After you’ve setup your homepage, you possibly can start including content material to your web site. The good factor in regards to the Flatbase Wiki web site theme is that it comes with demo content material you possibly can import after which edit to hurry up the method. You may import the content material by going to Instruments > WordPress Importer and importing the XML file.

Flatbase demo web site.
2. Add Your Wiki Content material From Scratch
If you happen to’d favor to do all the pieces your self, it’s time so as to add your assist materials. In your sidebar menu, you’ll discover there are a number of new objects: Articles, FAQ, and Information Bins.
So as to add a brand new article, an FAQ, or an Information Field, choose the suitable hyperlink and click on on Add New. You need to use the articles to offer in-depth tutorials, walkthroughs, add pictures, movies, or every other media such as you would usually do with an everyday WordPress publish. Don’t overlook to create classes on your assist articles by going to Articles > Classes.
If you wish to use video tutorials within the video part on the homepage, be sure you’ve chosen the Video format on your article.

Including an FAQ web page to your WordPress wiki web site.
On your FAQ sections, use the query because the title and enter the reply within the publish editor area. To show them in your web site, go to Pages > Add New and select one of many two FAQ templates.
To show information containers on the homepage and hyperlink to completely different pages in your assist web site, go to Information Bins > Add New and enter the identify of the web page or class that you simply’d wish to hyperlink to together with a short description. You can even customise the Learn Extra hyperlink and set the URL for the information field.

Creating information containers.
3. Set Up Your Wiki Homepage
As soon as all of your assist materials is added and also you’ve custom-made how your web site seems to be, let’s setup the homepage to appear to be the demo.
Navigate to the Theme Choices and verify the containers to allow dwell search, the infoboxes, and the video part. You can even arrange a name to motion. All of the article classes and well-liked articles will show by default in your homepage.
4. Add Boards to Your Wiki Website
Lastly, should you’d wish to allow the assist boards, go to Plugins > Add New and set up the bbPress plugin. Activate it after which create a brand new discussion board by going to Boards > Add New. Allow consumer registrations in your web site and go to the bbPress settings web page to customise how your boards work.

Discussion board settings.
What To Do After Your Wiki Web site is Dwell
Now that your web site wiki web site is dwell, it’s good to direct your clients and/or staff to it to allow them to discover the data they want:
Hyperlink to your assist web site in your most important web site. Add the hyperlink to your data base to the principle menu in your most important enterprise web site. You can even add it to the footer, in addition to on particular person product or companies pages.
Add the hyperlink to your contact web page. Most clients or shoppers will search for a strategy to get in contact with you if they need further info. Including the hyperlink to your assist web site will help them discover the solutions they want earlier than they fill out your contact kind or name your quantity.
Notify your current clients with a publication. One other strategy to let your current clients know in regards to the new addition to your web site is to ship them a personalised publication that hyperlinks to your assist web site. You can even present them with hyperlinks to the most well-liked classes or ask them to register for the boards to encourage interplay.
To assist your clients discover their approach round your wiki data base web site, be sure that to allow the search bar to allow them to rapidly discover the data they’re on the lookout for. You can even hyperlink to the classes which have articles that present options for ceaselessly requested questions.
Make Your Data Base Wiki Web site Now
Making a wiki-style web site is a good way to cut back the quantity of assist requests your corporation receives and to coach your staff on normal working processes utilized in your day-to-day enterprise.
Fortunately, with the assistance of WordPress and the suitable theme, you possibly can have a data base up and operating in a matter of hours. Browse our choice of wiki-style WordPress themes to search out the suitable theme on your assist or data base web site.
Supply hyperlink
source https://webart-studio.com/learn-how-to-create-a-wiki-fashion-web-site-with-wordpress-rapidly/
0 notes
Text
How to Start a Blog with Wordpress

There are many reasons why people start online blogs in the first place, some just to document their lives, and others to offer the world with knowledgeable information and make a bit of money by doing so. But how do you even start blogging, and more the point, how can you make money from it ? Like anything in this world, to start by creating your own personal touch / online presence, you need to start by purchasing 2 main things. A domain name, and Web hosting There are hundreds of different options available to choose from, but after being in the industry myself for over 20 years, I have found two of the best options available on the market today. The two best web hosting companies to start blogging with are: Bluehost, and SiteGround I personally use SiteGround as they provide the easiest and best way to start a blog with WordPress in under 10 min. From a nerdy tech point of view, they also tick all boxes to offer a seamless WordPress experience. In the following steps, I will show you how to begin your blog using SiteGround. So let's look, step-by-step of how to get your blog up and running.
Purchase a domain and web hosting
First, we need to set up a SiteGround account. The link to their website can be found here - SiteGround Web Hosting. There are 3 options to choose from on SiteGround. I use the GrowBig plan as I run multiple websites, but if it's only one blog that you will run, then start with the StartUp plan. Choose StartUp:

Enter your domain name (or if you don't have one, buy direct from SiteGround):

Next, add your details. One important factor to look at is towards the bottom of the sign up form, the data center. Choose the data center that is the closest to where you think most of your audience will be. If your blog is aimed for worldwide, I recommend choosing the Chicago, USA server.

Once you've entered all your details, you're ready to go !! You will receive an email from SiteGround with your details and address where to log into your account.
Setup your FREE SSL certificate

Once logged into your account you want to enter cPanel and begin the WordPress installation. But first, you need to set up the FREE SSL certificate for your domain. This is a must for all websites wanting to rank on Google.

Go to cPanel, then down to Security, Let's Encrypt. Choose your domain, then choose Let's Encrypt Wildcard SSL.

It may take up to 1 hour for the certificate to be available.
Install Wordpress in less than 5 minutes
Now the fun begins. Go to cPanel Home, Autoinstallers, WordPress. This will take you to the Softaculous page. IMPORTANT. Select the small down arrow next to install. Here we can customize our WordPress installation.

Select Latest Version (default) Select https://www. (IMPORTANT ! not http://www.) Choose your domain

Name your site, and give a description DO NOT use ADMIN as your Username. Enter your first name, or a name you choose. Using ADMIN can cause hacking issues in the future with your WordPress blog. Choose a strong password and enter your email address.

Leave all other options on default and press INSTALL at the bottom. The installation shouldn't take more than 20-30 seconds. You're DONE !! You now have your own WordPress blog up and running. Hooray !
Select your Free WordPress Theme
Now it's time to finish the setup, select a theme, and adjust some settings. Go to https://www.your-domain-here.com/wp-admin and choose from a list of themes you'd like to start with.

For this example, I'm choosing the FREE "Personal Blog" theme.

The next step depends on which theme you've chosen, but important plugins to choose are: Contact Form, Jetpack, and

Google Analytics and Optimize for SEO.

The settings for these plugins will be discussed in detail in a future article. Clean up your WordPress Dashboard To keep things nice and clean and less distracting, it's best to change the following settings on your Dashboard. Go to the bottom of the page and click switch to default

Select Screen Options at the top of the page Untick all options except At a Glace, Activity, and Quick Draft.

Start your blog Before you begin blogging, you want to remove the sample blogs that were installed with your theme. Go to Posts and Select all posts, then Move to Trash

Now it's time to start blogging... Read the full article
0 notes
Text
How to Install WordPress in a Subdirectory (Step by Step)
Do you want to install WordPress in a subdirectory? Installing WordPress in a subdirectory allows you to run multiple WordPress instances under the same domain or even a subdomain name. In this article, we will show you how to install WordPress in a subdirectory without affecting the parent domain name.
Subdomain vs Subdirectory? Which One is Better for SEO?
Normally, you would want to start a WordPress website on its own domain name (for example, wpbeginner.com). However, sometimes you may want to create additional websites on the same domain name.
This can be done by either installing WordPress in a subdomain (http://newebsite.example.com) or as a subdirectory (http://example.com/newwebsite/).
One question that we get asked is which one is better for SEO?
Search engines treat subdomains differently from root domain names and assign them rankings as a separate website.
For instance, search Engines consider WPBeginner and our WPBeginner Videos website as two separate websites.
On the other hand, sub-directories directly benefit from the domain authority of the root domain thus ranking higher in most cases.
One way to create separate WordPress sites in both subdomain or subdirectory is by installing WordPress multisite network.
However, if you want to keep two websites managed separately, then you can install different instances of WordPress. You can also use WordPress site management tools to set up a single dashboard for managing your multiple WordPress installations.
Requirements for Installing WordPress in Subdirectory
There are no special requirements to install WordPress in a subdirectory. If you already have a WordPress website in the root domain name, then you are good to go.
All top WordPress hosting companies make it very easy to install multiple WordPress websites using the same hosting account.
For instance, if you are using Bluehost, you can add a new WordPress website from your hosting dashboard.
However, please keep in mind that most shared hosting accounts have limited server resources. A sudden traffic spike on one of your websites will affect the performance and speed of all other websites on the same account.
If you are just starting out, then you can do that on shared hosting. Keeping in mind that you’ll need to upgrade to a managed WordPress hosting as your business grows.
That being said, let’s take a look at how to easily install WordPress in a subdirectory.
Step 1. Create a Subdirectory under The Root Domain Name
First, you need to create a subdirectory or a folder under the main website. This is where you will install WordPress files.
Connect to your WordPress hosting account using a FTP client or File Manager in cPanel.
Once connected, go to the root folder of your website. Usually it is the /public_html/ folder. If you already have WordPress installed in the root folder, then you will see your WordPress files and folders there.
Next, you need to right click and select ‘Create new directory’ from the menu.
You need to be careful when choosing the name for your subdirectory. This will be part of your new WordPress site’s URL and what your users will type in their browsers to reach this website.
For example, if you name this directory travel-guides then your WordPress website’s address will be:
http://example.com/travel-guides/
Step 2. Upload WordPress Files
Your newly created subdirectory is empty at the moment. Let’s change that by uploading WordPress files.
First you need to visit WordPress.org website and click on the download button.
Your browser will now download the zip file containing the latest WordPress software to your computer.
After downloading the file, you need to select and extract it. Mac users can double click the file to extract it and Windows users need to right-click and then select ‘Extract All’.
After extracting the zip file, you will see ‘wordpress’ folder containing all the WordPress files.
Now let’s upload these files to your new subdirectory.
Connect to your website using an FTP client and go to the subdirectory you created in the first step.
In the local files panel of your FTP client, go to the ‘wordpress’ folder you just extracted.
Select all files inside the folder and then upload them to your new subdirectory.
Step 3. Create New Database
WordPress stores all your content in a database. You need to create a new database to use with your new WordPress site installed in a subdirectory.
First, you need to login to the cPanel dashboard of your WordPress hosting account. Click on ‘MySQL Databases’ under the databases section.
Note: Your hosting dashboard may look different than the screenshot above. You simply need to locate the ‘Databases’ section.
On the next screen, enter a name for your new database and then click on the ‘Create Database’ button to continue.
Your cPanel dashboard will now create the new MySQL database. Click on the Go Back button to return to the Databases page.
Next, you need to add a username and password for the database.
Simply scroll down to the ‘MySQL Users’ section and provide a new username and password. Click on ‘Create User’ button to continue.
Next, you need to give this newly created user privileges to work on the database you created earlier.
Scroll down to ‘Add user to database’ section. Select your MySQL username and then select your newly created database.
Click on the Add button to continue.
Cpanel will now grant the MySQL user full privileges on your newly created database.
Step 4. Install WordPress
Now that everything is in place, you can go ahead and install WordPress. Simply visit the directory you created earlier in a web browser by typing the URL like this:
http://example.com/your-subdirectory-name/
This will bring up the WordPress installation wizard. First, you need to select the language for your WordPress website and click on the continue button.
Next, you will be asked to provide your WordPress database name, database username, password, and host. Enter the database details and click on the submit button.
WordPress will now connect to your database and you will see a success message like this:
Click on ‘Run the install’ button to continue.
On the next screen, you will be asked to provide a title for your website and choose an admin username, password, and email address.
After entering your website details, click on ‘Run install’ button to continue.
WordPress will now set up your website and will show you a success message:
You can now go ahead and login to your new WordPress website installed in the subdirectory.
Step 5. Fix Permalinks
If you have a separate WordPress install in the root directory, then the .htaccess files of your subdirectory will cause conflict. This will result in 404 errors on your website.
To solve this, you need to edit the .htaccess file in your subdirectory WordPress install. Replace the code inside your .htaccess file with the following code:
# BEGIN WordPress <IfModule mod_rewrite.c> RewriteEngine On RewriteBase /your-subdirectory/ RewriteRule ^index.php$ - [L] RewriteCond %{REQUEST_FILENAME} !-f RewriteCond %{REQUEST_FILENAME} !-d RewriteRule . /your-subdirectory/index.php [L] </IfModule> # END WordPress
Don’t forget to replace /your-subdirectory/ with your own subdirectory name.
We hope this article helped you install WordPress in a subdirectory. You may also want to see our ultimate step by step WordPress SEO guide for beginners.
If you liked this article, then please subscribe to our YouTube Channel for WordPress video tutorials. You can also find us on Twitter and Facebook.
The post How to Install WordPress in a Subdirectory (Step by Step) appeared first on WPBeginner.
from WPBeginner https://www.wpbeginner.com/wp-tutorials/how-to-install-wordpress-in-a-subdirectory-step-by-step/
0 notes
Text
Need a website? Build it in minutes using WordPress
Many people have wondered how to make a professional looking website for them or a small business they want to start. Sometimes, they can feel overwhelmed with the process of learning how to code in tons of different programming languages just to build a simple website for their own.
We have good news, making a website has never been easier and it doesn’t require any coding knowledge if you use WordPress, the world’s most popular Content Manager Service (CMS) to build very nice websites in seconds. Best of all, IT’S TOTALLY FREE TO USE!
So, let’s get right into how to get your WordPress site setup and ready to use.

Step 1. Get you Hosting and Domain
In order to have a website online, they’re 2 very basic requirements that you should have: hosting and your domain name.
A domain name is the URL direction that users visit to find your specific website, such as “www.facebook.com” and all of those other companies that have their own domain.
Hosting is a service that you rent from another company to have your website visible online. This service works by putting your website inside of a server that’s on 24/7 and whenever someone looks for your website, that server sends the information to the end user.
Both of these services have a yearly fee that can vary depending in which hosting company you choose to buy them from. We recommend Bluehost, an affordable option that you can buy from $70 USD per year and that includes your domain name and hosting service.
Once you complete the purchase, your domain name will be active around 1 to 3 hours later, so be patient if it doesn’t appear right away.

Step 2. Install WordPress
Installing WordPress is very easy, you should open your hosting options and then go to the cPanel that every hosting plan should include by default. Once inside the cPanel, you should scroll until the bottom of the page and you’ll find an option to install WordPress automatically. Be sure to click Install and remember the Username and Password that the installer created automatically so you can change them later.
Step 3. Login to your WordPress site
To login into your WordPress site, just add the following to your URL in the search box of the browser: “www.yourdomain.com/wp-admin”. Once you type this, you’ll be prompted to enter your username and password for WordPress. Login and you’ll be redirected to your WordPress Dashboard.

Step 4. Install a Theme
Every website should be using a theme that controls the appearance of the different elements of the entire site. WordPress has a wide catalog of free and paid themes that you can use to customize your website entirely. For this tutorial, we’ll be using one called Astra, a free and powerful theme.
To install it, head into the left sidebar to the “Appearance” tab, and then click the “Install Theme” option.
In the new page, search for Astra, click Install and then Activate.

Step 5. Select a template
The Astra theme has tons of free templates that you can use to make a quick website that looks amazing in just minutes. First, you’ll be asked to select a page builder, select Elementor for now. Once you selected this page builder, a list of templates will be displayed. You can choose any template you want; the only exception is for the ones that have the “Agency” label at the top right corner, those ones require a paid membership to Astra to be able to use them.
For now, select any free template that you like to use and install it. It will take a few minutes to setup, but once is done, you’ll be able to see your website is already live and looking amazing!

Step 6. Customize your website
The last thing left to complete your new website is to customize it however you want. Just consider that some of the customization options will be limited on the free version of Astra and Elementor, since they offer a paid membership that adds tons of functionality to your site.
Below, we’ll leave a link to a very detailed video from Create a Pro Website, a YouTube channel that will explain in detail how to create a full website from scratch and how to customize it however you want.

youtube
0 notes
Text
WordPress Tutorial- How to Increase Maximum Upload File Size in WordPress- 3 Best Methods
youtube
Best Tutorial on How to Increase Maximum Upload File Size in WordPress & Increasing WordPress Upload Limit. Maximum upload size in WordPress ranges from 2MB to 8MB by default depending on Your Web host provider is giving by default. Maximum Upload File Size in WordPress basically restrict you to upload larger files in size than mentioned in “upload max file size” . You can’t upload larger file to WordPress if You have low value set for Maximum Upload File Size in WordPress. Good News is this Value for Maximum Upload File Size in WordPress can be changed easily.
I have included Best three Methods to Increase Maximum Upload File Size in WordPress Or Increase Maximum Upload Limit:- 1. First Method how to Increase Maximum Upload File Size in WordPress:- Create or Edit PHP.ini file. Change value inside PHP.ini file. Tips:- Recommended place for PHP.ini file is inside WP-admin folder. But sometimes may work by placing it inside root directory. This is the method to Increase Maximum Upload File Size in WordPress is found to be working for most WordPress Users.
2. Second Method how to Increase Maximum Upload File Size in WordPress:- Editing Theme Functions file – This can be done by accessing WordPress Dashboard. Then Appearance – Editor – Theme Functions File.
3. Third Method how to Increase Maximum Upload File Size in WordPress:- Editing .htaccess File. You will find this file inside Root directory and may also be hidden. So enable “Show Hidden Files” and then Edit file.
So these are best methods on How to Increase Maximum Upload File Size in WordPress.
Text File for Values on How to Increase Maximum Upload File Size in WordPress
IMPORTANT VALUES:-
upload_max_filesize This defines the maximum upload limit for files.
post_max_size This defines the maximum upload limit that will be handled in a POST request.
memory_limit This defines how much memory is allocated for PHP. This number should be equal or higher than the upload_max_filesize.
Pro Tip:- First Method to Increase Maximum Upload File Size in WordPress is found to be working for most of the WordPress users.
Always keep “post_max_size” Greater or equal to upload_max_filesize
So, This is the complete WordPress Tutorial showing How to Increase Maximum Upload File Size in WordPress. Increase the values as per Your requirements & upload bigger files in WordPress Website. Increase WordPress Upload Limit & Enjoy.
Thanks for Watching.
—————————————————————————————————— LIKE | COMMENT | SHARE | SUBSCRIBE ——————————————————————————————————
IF This Work For You.
Also Watch,
Fix WordPress error There is no user registered with that email address|Can’t Login to WordPress
How to change WordPress Admin email | Where to find Admin email in WordPress & change it in 2018
How to fix WordPress Fatal Error: Allowed memory size of 67108864 Bytes exhausted[Quick Fix]
How to manually disable WordPress Plugins via cPanel if cannot access the WordPress dashboard
Fix WordPress Fatal Error Call to undefined function rest_url() in ../wp-content/plugins/td-composer
How To Create Webmail in cPanel | How to setup Webmail in cPanel or email Account in cPanel
How to access Webmail in Outlook | How to Setup Webmail in Microsoft Outlook | Outlook email
How To Change Webmail Password In cPanel | Resetting Webmail Password In cPanel
How to Forward Webmail to Gmail | How to set up email forwarding in Webmail | email forwarder cPanel
How to forward One Gmail account to another Gmail Account | How to forward Gmail | Forwarding Gmail
Nguồn:https://phprealestatescript.com/ Xem Thêm Bài Viết Khác:https://phprealestatescript.com/lap-trinh-php
Share Tweet Share
The post WordPress Tutorial- How to Increase Maximum Upload File Size in WordPress- 3 Best Methods appeared first on PHP Realestate Script.
from PHP Realestate Script https://ift.tt/2tu7IeE via IFTTT
0 notes