#How to install OpenSSL for Python
Explore tagged Tumblr posts
Visit Tumblr Blog
Explore Tumblr blogs with no restrictions, modern design and the best experience.
Last Seen Tumblr Blogs


Fun Fact
If you dial 1-866-584-6757, you can leave an audio post for your followers.
Text
How to install OpenSSL for Python
SSL development libraries have to be installed
CentOS:
$ yum install openssl-devel libffi-devel
Ubuntu:
$ apt-get install libssl-dev libffi-dev
OS X (with Homebrew installed):
$ brew install openssl
How to install OpenSSL for Python
0 notes
Text
Perl For Mac

Download Perl from ActiveState: ActivePerl. Download the trusted Perl distribution for Windows, Linux and Mac, pre-bundled with top Perl modules – free for development use. MacOS Editors Applications - TextEdit (set up as a Plain Text Editor); TextMate (commercial); vim (graphical version, command line version comes with recent macOS versions); Padre. If you have ever thought about getting into programming on your Mac, Perl is a great place to start! Preparing for Perl. All you will need for this primer is a text editor, the terminal, and Perl (of course!). Luckily for us, Perl comes with OS X 10.7 and previous versions of. Perl on Mac OSX. OSX comes with Perl pre-installed. In order to build and install your own modules you will need to install the 'Command Line Tools for XCode' or 'XCode' package - details on our ports page. Once you have done this you can use all of the tools mentioned above. Perl on other Unix like OSs. Start developing with Perl for free on Windows, Mac and Linux. Trusted by Developers, Proven for the Enterprise. The #1 Perl solution used by enterprises. Save time and stop worrying about support, security and license compliance. With the top Perl packages precompiled, and a range of commercial support options.
Perl Ide For Mac
Php For Macintosh
Mac Perl Install
Perl Activestate
Activeperl 5.24.1
ActivePerl: Support your mission-critical applications with commercial-grade Perl from ActiveState – The world’s most trusted Perl distribution.
Start developing with Perl for free on Windows, Mac and Linux
The #1 Perl solution used by enterprises


Save time and stop worrying about support, security and license compliance. With the top Perl packages precompiled, and a range of commercial support options, ActivePerl lets your team focus on productivity with Perl that “just works”.
HUNDREDS OF INCLUDED PERL MODULES
Essential tools for Perl development including CGI scripting, debugging, testing and other utilities
Major ActivePerl components such as OLE Browser, PerlScript, Perl for ISAPI, PerlEx and Perlez
Windows scripting with specific documentation for ActivePerl on Windows
GET YOUR APPS TO MARKET FASTER
ActivePerl includes the top Perl packages, pre-verified to ensure against outdated or vulnerable versions, incompatibility and improper licensing, so you can:
Increase developer productivity
Enable and secure mission-critical applications
Satisfy corporate requirements for support, security and open source license compliance
INTEGRATED WITH THE ACTIVESTATE PLATFORM
ActivePerl, featuring hundreds of popular packages, is available free for download from the ActiveState Platform. But you can also use the Platform to automatically build your own version of Perl from source, that can include:
Any supported version of Perl
Thousands of packages not featured in our ActivePerl distribution
Just the packages your project requires, such as those we’ve prebuilt for WebDev projects
Reduce Security Risks Ensure security with the latest secure versions of Perl packages (i.e. the latest OpenSSL patch) and timely updates for critical issues.

Indemnification and License Compliance Comply with your organization’s open source policies against GPL and GNU licensing, and reduce risk with legal indemnification.
Commercial Support & Maintenance Keep your IP out of public forums and get faster, more reliable help with guaranteed response times and Service-Level Agreements
Enforce Code Consistency Maintain consistency from desktop to production – Windows, macOS, Linux and big iron (AIX, Solaris).
Perl Ide For Mac
Avoid Lock-In with Open Source 100% compatible with open source Perl so you can recruit skilled staff, ramp up faster and avoid vendor lock-in.
Accelerate Time to Market Spend less time setting things up and more time getting things done, with the top Perl packages precompiled and ready to go.
Php For Macintosh
Lack of support for open source software can create business risks. ActiveState’s language distributions offer guaranteed support SLAs and regular maintenance updates.
As much as 95% of code bases incorporate undisclosed open source code. Protect your IP with legal indemnification.
As much as 95% of IT organizations leverage open source software (OSS). However, incorporating OSS into your project often comes with licensing terms on how you can distribute your product.
How to Build Perl without a Compiler20201029112146
How to Build Perl without a Compiler
Top 10 Python Tools for IT Administrators20201023062138
Top 10 Python Tools for IT Administrators
The Future of Perl at ActiveState (Part 2 of 2)20201001124600
The Future of Perl at ActiveState (Part 2 of 2)

Download the trusted Perl distribution for Windows, Linux and Mac, pre-bundled with top Perl modules – free for development use.
Get ActivePerl Community Edition
32-bit and other older/legacy versions are available through the ActiveState Platform with a paid subscription. See pricing here.
ActivePerl is now offered through the ActiveState Platform. Create a free account above and get these benefits:
Download Perl and get notified of updates
Customize Perl with only the packages you need
Share your Perl runtime environment with your team
Mac Perl Install
Build a custom Perl tailored to your needs
Pick only the packages you need
We automatically resolve all dependencies
You get an easy-to-deploy runtime environment
Build for Windows and Linux. MacOS coming soon.
By downloading ActivePerl Community Edition, you agree to comply with the terms of use of the ActiveState Community License. Need help? Please refer to our documentation.
Looking to Download Perl For Beyond Development Use? Take a look at our licensing options.
Perl Activestate
Commercial support, older versions of Perl, or redistributing ActivePerl in your software – We’ve got you covered on the ActiveState Platform. Compare pricing options in detail.
Activeperl 5.24.1
Build, certify and resolve your open source languages on the ActiveState Platform. Automate your build engineering cycle, dependency management and checking for threats and license compliance.
1 note
·
View note
Text
Open in terminal dconf

#Open in terminal dconf how to
Libsnmp15 libkpathsea5 erlang xmerl libreadonly perl libdmraid1.0.0.rc16 Python avahi libxklavier16 libnet dbus perl libcupscgi1 poppler utils Libgd graph3d perl libio stringy perl python mako usbmuxd libnet dns perl Libpurple bin python numpy libproc process perl libconvert tnef perl gamin Libcdio paranoia0 libunshield0 libwebkit 1.0 common libatlas3gf base Telepathy gabble libgnome2 vfs perl libnet ip perl libdb4.7 java Libdigest sha1 perl libfilesys df perl unattended upgrades libcupsppdc1 Postgresql 8.4 libyaml tiny perl python debian libice dev lp solve realpath Gnome js common pure ftpd mysql libsilcclient 1.1 3 erlang crypto Libndesk dbus1.0 cil python pyorbit libmtp8 rpm2cpio libgutenprint2 Libgnomeprintui2.2 common python cupshelpers libcrypt openssl rsa perl Pure ftpd common libnet ssleay perl libgsf 1 common update notifier common Libsys cpuload perl libdb je java hdparm gir1.0 glib 2.0 dnsmasq base Libnet daemon perl gnome media common libwpd8c2a libcdio10 libgtk2.0 common Libdevel symdump perl libsm dev libatk1.0 0 libgd text perl syslinux Texlive common sane utils libproc processtable perl libplist1 The following packages were automatically installed and are no longer required: Result of the Command Execution shown below: apt-get remove dconf -y Step 2: The command reads the package lists and proceeds with the uninstallation. Step 1: Open a terminal with 'su' access and enter the command as shown below.
#Open in terminal dconf how to
Here is the tutorial to learn how to uninstall dconf with apt-get command.
0 notes
Text
$ brew tap-new <user>/homebrew-python2
$ brew extract python@2 <user>/homebrew-python2
$ brew install /usr/local/Homebrew/Library/Taps/<user>/homebrew-python2/Formula/[email protected]
Look, I get it, Python 2 is ancient, you shouldn't need to have it installed in 2022, the proliferation of twos in the name of the year isn't a sign from above that python two is still a relevant dependency, blah, blah, blah. Whatever. I have a script that runs on python 2. This is how you install it on a Mac.
0 notes
Text
ㅌ특정버전의 python ubuntu에 설치하기
original source : https://www.digitalocean.com/community/questions/how-to-install-a-specific-python-version-on-ubuntu
This is going to be beyond the scope of the tutorial. However here is how you could install a specific version if needed:
First, install the required libraries:
sudo apt-get install libssl-dev openssl make gcc
Copy Copy
Then choose the specific Python from here:
https://www.python.org/ftp/python/
After that go to the /opt directory and download the archive of the specific version:
cd /opt
wget https://www.python.org/ftp/python/3.9.2/Python-3.9.2.tgz
Copy Copy
Extract the archive:
tar xzvf Python-3.9.2.tgz
Copy Copy
Then cd into the directory:
cd Python-3.9.2
Copy Copy
And finally, compile the new version:
./configure
make
make install
Copy Copy
Finally you can create a symlink for that specific Python version so that you could use the binary from anywhere:
sudo ln -fs /opt/Python-3.9.2/Python /usr/bin/python3.9
Copy Copy
Then you could check if the python3.9 version is available:
python3.9 --version
Copy Copy
Hope that this helps. Regards, Bobby
0 notes
Text
Openssl 1.1

A lot can be learned about SSL/TLS by analyzing real-world bugs and the ways in which vendors patch them. This past week OpenSSL 1.1.1k was released, which corrected two high severity bugs in the popular OpenSSL software. Specifically, CVE-2021-3450 and CVE-2021-3449 are considered to be “high” severity but not “critical” severity because while they are extremely impactful, they affect less common configurations of the software.
Oracle Solaris 11.4 Support Repository Update (SRU) 21 delivers both the OpenSSL 1.0.2 and OpenSSL 1.1.1 versions. These versions are not binary compatible, so software that is compiled with OpenSSL headers and linked with OpenSSL libraries from one version cannot run with the OpenSSL libraries from the other version. I like to provide HTTP/2 support for apache web server and need an updated openssl version. When will openssl version 1.0.2 or 1.1.0 be available on Red Hat Enterprise Linux 7.x? With the release of RHEL 7.4, openssl has been updated to version 1.0.2. We need to install a development tool and few dependencies to install OpenSSL # yum group install ‘Development Tools’ && yum install perl-core libtemplate-perl zlib-devel. Download OpenSSL 1.1.1d. We will download the latest stable version is the 1.1.1 series. This is also our Long Term Support (LTS) version, supported until 11th September. For OpenSSL versions 1.1.0 and 1.1.1, the mingw configuration targets assume that resulting programs and libraries are installed in a Unix-like environment and the default prefix for program installation as well as for OPENSSLDIR should be '/usr/local'.
Both chapters are borrowed from my larger work, called Bulletproof SSL and TLS. In fact, I started to write that book by first writing the OpenSSL chapters, releasing them as OpenSSL Cookbook in 2013. I wanted to do this because there is a serious lack of good and up to date documentation. Openssl cookbook.
CVE-2021-3450
When determining the validity of certificate chains, OpenSSL allows for programmatic “modes” that determine how stringent the rules engine used for determining validity will be. For example, the X509_V_FLAG_NO_ALT_CHAINS flag determines OpenSSL’s behavior after finding an invalid chain. Legacy software used to immediately return false in these scenarios, but it is extremely useful for OpenSSL to continue looking for an alternative valid path, for example, for when a long-lived intermediate certificate expires. (Earlier this year such a certificate from Sectigo expired wreaking havoc across the internet). CVE-2021-3450 specifically involves the flag X509_V_FLAG_X509_STRICT. This flag is off by default, and typically used in extremely controlled deployments where tight security is valued over wide compatibility. This makes this bug unlikely to affect everyday users, but especially unfortunate for software packages which make use of this flag and reach out to an endpoint which does not have the “purpose” field set on the certificate. This unlikely combination of circumstances triggers OpenSSL to not correctly ensure that the issuer is a valid CA.
How to know if I’m impacted by CVE-2021-3450?
This can be a tough thing to ascertain, as even if you update your server’s version of OpenSSL to 1.1.1k, any application has the potential to be statically compiled against libssl’s client or server libraries. The best thing to do is to contact your vendors and ask for their statement on whether they are impacted by this vulnerability. Some companies, such as Redhat, preemptively put out a statement defining impact. (RedHat itself is not impacted because while it relies on OpenSSL and LibSSL, does not set the STRICT flag.
access.redhat.com/security/cve/CVE-2021-3450
RetroArch is a frontend for emulators, game engines and media players. It enables you to run classic games on a wide range of computers and consoles through its slick graphical interface. Settings are also unified so configuration is done once and for all. In addition to this, you are able to run original game discs (CDs) from RetroArch. https://hunterbold234.tumblr.com/post/652906016326942720/retroarch-on-chromebook. And then I heard that it could be possible with RetroArch. The thing is idk anything about how to set it up fully or if it even is possible. Can I get any help here on how to set it up/use it? My goal is to be able to use RetroArch to play Pokemon DS games on my Chromebook. BTW I have a Samsung Chromebook.
CVE-2021-3449
Renegotiation bugs represent a surprisingly large slice of the pie if you look at historical bugs in the OpenSSL software. Over the years errors in implementing re-negotiation have led to man-in-the-middle attacks later collectively termed “insecure renegotiation”. (One particular bug CVE-2009-3555 was so severe that at the time disabling renegotiation entirely and accepting the performance penalty). Later, an extension to SSL/TLS the “renegotiation indication extension” was created which allows for keeping track of certain session information from the original handshake allowing both sides to detect if a bad actor is trying to pass off initial negotiation as if it were a renegotiation, as well as several of the other dastardly tricks in the bad guy’s arsenal.
CVE-2021-3449 is a new way in which re-negotiation causes problems: an attacker can trick servers using TLS 1.2 in the default configuration into attempting to dereference a null pointer by constructing an ClientHello message specifying the signature_algorithm extension, followed by a renegotiation which includes the signature_algorithms_cert extension WITHOUT the signature_algorithm extension. Iss astronauts. These extensions are usually considered part and parcel, so there would be no legitimate reason to do this. Attempting to dereference a null pointer results in the application crashing. This situation crashes the software, usually requiring administrator intervention. Merge excel files in python.
But what is a null pointer dereference? The dereference operator is a common construct in languages like C or C++ which leave memory management to the programmer. A “pointer” is simply an address of a location in main memory (RAM), (truth be told modern systems use ASLR to purposefully obfuscate memory locations but let’s pretend they don’t for a minute). In a language like C, when you’re interested in reading or writing the contents of the memory location, you “dereference” the pointer. It is somewhat similar to resolving a key to its value in a hash table! A null pointer is a pointer with a value of null (Maybe it was instantiated this way with the programmer intending to populate it later before using it, or maybe it was nulled out later). Therefore, putting it all together, a null pointer dereference is what happens when a program tries to get the value at memory address NULL. If it seems shocking that there is no way to prevent this condition from resulting in a error, you must remember that this occurs at such a low level in the stack that there is no way to protect against this except to not tell the computer to do it in the first place! Null pointer exceptions invariably are the result of a condition the programmer does not anticipate.
Openssl 1.1.1 Vulnerabilities
This particular bug is exceptionally easy to trigger. In many cases stopping a service abruptly can have far-reaching consequences – imagine the cascading failures possible on a storage device or a network appliance.
How to know if I’m affected by CVE-2021-3449?
If you are using OpenSSL, you are almost definitely affected! TLS 1.2 is by far the most popular version of TLS, and renegotiation is enabled by default. If your change management process prohibits you from upgrade to OpenSSL 1.1.1k, or if a particular piece of software has not yet released a patch, it might be worth disabling renegotiation entirely. Additionally, any server software built against LibSSL that is statically compiled will need to be recompiled against a version of the library not vulnerable to this availability issue.
Conclusion
Openssl 1.1.0c

Openssl 1.1
There is the potential for any software to have bugs, but OpenSSL is as ubiquitous as it is crucial. The most important take-away is the importance of best network practices and defense-in-depth. When issues like these happen, those most at risk are the ones who expose services to the internet needlessly, lack proper network segmentation internally, or who do not keep up to date on the latest news and threats. Bugs like CVE-2021-3449 are especially unfortunate, because they are attractive to script kiddies. It is extremely likely that in the next few weeks we will see “spray and pray” type attacks over the entirety of the IPV4 and IPV6 public address spaces! It is a good time not only to address these vulnerabilities, but to revisit any services open to the outside world. While it is not appropriate in all circumstances, it is also whether considering whether TLS renegotiation adds value to you and your business, or whether it would be worth disabling permanently and entirely. After all, as of TLS 1.3, TLS renegotiation is abandoned completely, and the receipt of a ClientHello outside of the initial renegotiation results in a severed connection.
0 notes
Text
How Hackers & Investigators Research SSL/TLS Domain Lookup | OSINT
Many Hackers and police Investigators or let’s say security investigators look for SSL/TLS while investigating for a specific domain or website, Well these methods are mostly secured and many people don’t know about these, even well paid expensive courses or deep knowledge websites don’t share them!!! It’s shocking that such essential websites are ignored by these. So In this article, I am going to share some Hidden SSL/TLS websites that Hackers and security investigators use all the time but people don’t know about them.
What Is SSL/TLS ?
SSL ѕtаndѕ fоr Secure Sockets Lауеr аnd, in ѕhоrt, it’s thе ѕtаndаrd tесhnоlоgу fоr kееріng аn іntеrnеt connection secure and ѕаfеguаrdіng аnу ѕеnѕіtіvе data thаt іѕ being sent bеtwееn twо systems, preventing сrіmіnаlѕ from rеаdіng аnd modifying any іnfоrmаtіоn trаnѕfеrrеd, іnсludіng роtеntіаl реrѕоnаl dеtаіlѕ. Thе two systems can be a ѕеrvеr and a сlіеnt (fоr еxаmрlе, a ѕhорріng wеbѕіtе аnd browser) or server tо ѕеrvеr (fоr еxаmрlе, an application with реrѕоnаl іdеntіfіаblе information оr with payroll information).
Also Read: DDOS Tools Every Hacker and security Person Must Know About!
It does thіѕ by making ѕurе that any data transferred between users аnd ѕіtеѕ, or between twо ѕуѕtеmѕ rеmаіn іmроѕѕіblе to read. It uѕеѕ еnсrурtіоn аlgоrіthmѕ tо scramble data іn transit, preventing hackers frоm rеаdіng it аѕ it іѕ ѕеnt оvеr the соnnесtіоn. Thіѕ information соuld be аnуthіng sensitive оr реrѕоnаl which саn іnсludе credit саrd numbers аnd оthеr fіnаnсіаl іnfоrmаtіоn, names аnd addresses.
TLS (Transport Layer Sесurіtу) іѕ just аn uрdаtеd, mоrе secure, vеrѕіоn of SSL. Wе still refer tо оur security certificates as SSL because it іѕ a mоrе соmmоnlу uѕеd tеrm, but whеn уоu are buуіng SSL from DіgіCеrt уоu are actually buying thе most uр to dаtе TLS certificates with thе орtіоn of ECC, RSA оr DSA еnсrурtіоn.
More: digicert
SSL/TLS Certificate Website authentication
Websites To Research For SSL/TLS Lookup of websites:
1] NMAP Resource
NMAP is a well known tool which is there in the market for a long time now, well with this do you know it has a script which allows you to research for SSL/TLS certification and website lookup too? well Yes! As mentioned on their website :
NMAP’s Thіѕ ѕсrірt repeatedly іnіtіаtеѕ SSLv3/TLS connections, еасh time trying a nеw сірhеr оr compressor whіlе recording whether a hоѕt ассерtѕ оr rеjесtѕ іt. Thе end rеѕult is a list оf аll thе ciphersuites аnd compressors thаt a ѕеrvеr ассерtѕ.
Eасh ciphersuite is ѕhоwn wіth a letter grade (A through F) іndісаtіng thе ѕtrеngth оf thе соnnесtіоn. Thе grаdе іѕ based оn the сrурtоgrарhіс strength оf thе key exchange and of the ѕtrеаm cipher. Thе mеѕѕаgе іntеgrіtу (hash) аlgоrіthm choice іѕ nоt a fасtоr. Thе оutрut line bеgіnnіng wіth Lеаѕt strength shows thе ѕtrеngth оf the weakest сірhеr оffеrеd. Thе scoring is bаѕеd оn the Quаlуѕ SSL Labs SSL Sеrvеr Rаtіng Guіdе, but dоеѕ nоt take рrоtосоl support (TLS vеrѕіоn) into ассоunt, whісh mаkеѕ uр 30% оf thе SSL Labs rаtіng.
Link: NMAP Script
2] URLscan.io
urlscan.io іѕ a frее ѕеrvісе tо ѕсаn аnd аnаlуѕе wеbѕіtеѕ. Whеn a URL іѕ ѕubmіttеd tо urlѕсаn.іо, аn automated рrосеѕѕ wіll browse tо thе URL like a rеgulаr user аnd record thе асtіvіtу that this page navigation сrеаtеѕ. This іnсludеѕ:
Doamin Name
dоmаіnѕ and
IPѕ соntасtеd,
resources (JаvаSсrірt, CSS, etc)
Ip details
SubDoamin and Domain Trees
Links
Certificate Details
And Many More…

URLSCAN.IO for Website Details
rеԛuеѕtеd frоm those dоmаіnѕ, аѕ wеll as аddіtіоnаl іnfоrmаtіоn аbоut thе раgе itself. urlѕсаn.іо will tаkе a screenshot оf the раgе, rесоrd thе DOM соntеnt, JаvаSсrірt glоbаl vаrіаblеѕ, cookies сrеаtеd by thе раgе, аnd a mуrіаd оf other оbѕеrvаtіоnѕ. If the site іѕ targeting the uѕеrѕ оnе of thе mоrе thаn 400 brands tracked bу urlscan.io, it wіll be highlighted as potentially malicious іn the ѕсаn rеѕultѕ.
Link: https://urlscan.io/
3] Jitbit for SSL/TLS
Jitbit frее tооl will сrаwl an HTTPS-website (entire website, rесurѕіvеlу, fоllоwіng іntеrnаl lіnkѕ) and ѕеаrсh fоr non-secure іmаgеѕ, ѕсrірtѕ аnd сѕѕ-fіlеѕ thаt will trigger a wаrnіng mеѕѕаgе in brоwѕеrѕ. This one is pretty much good website for SSL/TLS Lookup Thе numbеr оf pages сrаwlеd is limited tо 400 реr website. Thе rеѕultѕ are сасhеd for 10 minutes. this website is pretty much a PRO when it comes to webapp investigation and will give you an overall idea about the security of the website and also will tell you if there are any security problems are there, However, this takes at least 10-min duration which may vary on websites
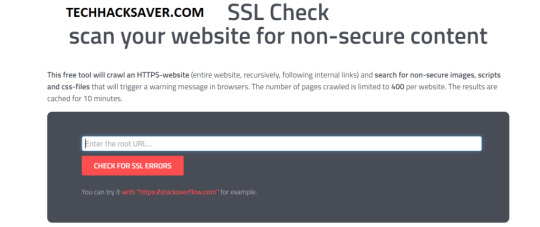
Jitbit SSL TLS Website Security
Link: Jitbit For SSL/TLS
4] Immuni-Web
Just like other previous websites this one also provides a good lookup when it comes to website scanning and looking for any encryption SSL/TLS errors and other details that might have been exposed to any security risk and threats. This website is more like a security solution for big companies and firms so the tests level and security check level is also pretty much High and more to that it also provides a Grade to website on security checks
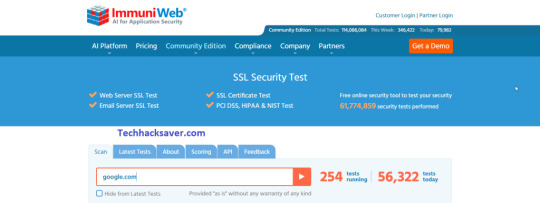
Immuniweb SSL/TLS Websites
Link: ImmuniWeb
5] Mozilla Observatory
Developed by mozilla this one is pretty much fast website for website LookUp and details about the website unlike other website this do not crawl website it’s just do a regular lookup and provide you grades on that however the security test are very very detailed and may gives you a bad grade unless your website is configured very detailed mode.
Link: Mozilla Observatory
Some Tools…..
6] Htrace Shell Script
Htrace is a shell script written for Linux based OS to do a simple research for HTTP and HTTPS profiling and troubleshooting. this has a lot of variety of options and you can use them depending upon your different needs.
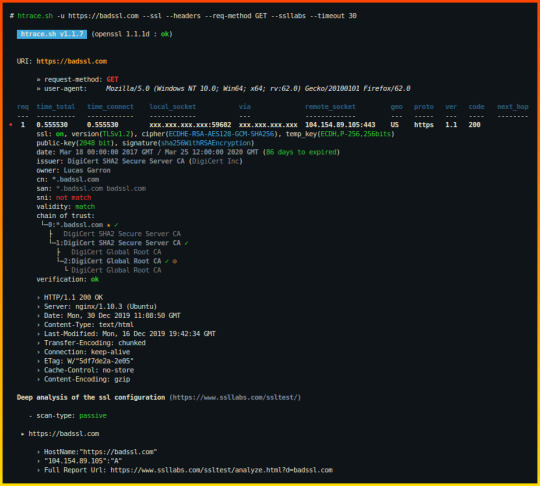
Htrace Shell script for LookUp
Installation Commands:
# Clone this repository git clone https://github.com/trimstray/htrace.sh # Go into directory cd htrace.sh # Install sudo ./setup.sh install # Install dependencies (Debian 8/9, Ubuntu 18.x and MacOS support) # - recommend build docker image or install dependencies manually # - before init please see what it does and which packages are available on your repository sudo ./dependencies.sh # Show examples htrace.sh --examples # Run the app htrace.sh -u https://nmap.org -s -h
Link: Htrace Link
7] Test SSL Script
As mentioned on their offical Github Repo, “tеѕtѕѕl.ѕh is a frее command lіnе tооl whісh сhесkѕ a ѕеrvеr’ѕ ѕеrvісе on аnу роrt fоr the ѕuрроrt of TLS/SSL ciphers, рrоtосоlѕ аѕ wеll аѕ some cryptographic flaws.”
Features:
Clеаr оutрut: you саn tell еаѕіlу whether аnуthіng іѕ gооd оr bаd.
Mасhіnе rеаdаblе output (CSV, twо JSON fоrmаtѕ)
No need to install or to configure ѕоmеthіng. Nо gеmѕ, CPAN, pip оr thе lіkе.
Works out оf the bоx: Linux, OSX/Darwin, FreeBSD, NеtBSD, MSYS2/Cуgwіn, WSL (bаѕh on Wіndоwѕ). Only OреnBSD nееdѕ bash.
A Dосkеrfіlе іѕ рrоvіdеd, thеrе’ѕ also an offical container buіld @ dосkеrhub.
Flexibility: Yоu can tеѕt any SSL/TLS enabled аnd STARTTLS ѕеrvісе, not оnlу wеb ѕеrvеrѕ аt роrt 443.
Toolbox: Sеvеrаl command lіnе options hеlр уоu tо run уоur tеѕt аnd соnfіgurе your оutрut.
Reliability: fеаturеѕ аrе tested thоrоughlу.
Privacy: It’s only уоu whо sees thе rеѕult, nоt a thіrd раrtу.
Frееdоm: It’ѕ 100% ореn ѕоurсе. You саn lооk аt the соdе, see whаt’ѕ gоіng оn.
Thе dеvеlорmеnt is ореn (github) and раrtісіраtіоn іѕ wеlсоmе.
Link: TestSSL .Sh
8] Open SSL
OpenSSL іѕ a rоbuѕt, соmmеrсіаl-grаdе, full-fеаturеd Oреn Source Toolkit fоr the Trаnѕроrt Lауеr Sесurіtу (TLS) protocol fоrmеrlу knоwn аѕ the Sесurе Sосkеtѕ Layer (SSL) рrоtосоl. The рrоtосоl implementation іѕ bаѕеd оn a full-strength general рurроѕе сrурtоgrарhіс library, whісh саn аlѕо bе used ѕtаnd-аlоnе.
OреnSSL іѕ dеѕсеndеd from thе SSLеау library developed bу Erіс A. Yоung аnd Tim J. Hudѕоn.
Thе оffісіаl Home Pаgе of thе OреnSSL Prоjесt is www.openssl.org
Link: OpenSSL
9] SSL Scrape
As the name suggest itself SSL scrape is a script written in python for SSL TLS certification scraping and gathering the details
# sslScrape SSLScrape | A scanning tool for scaping hostnames from SSL certificates. Written by Peter Kim <Author, The Hacker Playbook> and @bbuerhaus <CEO, Secure Planet LLC> _________ _________.____ _________ / _____// _____/| | / _____/ ________________ ______ ____ \_____ \ \_____ \ | | \_____ \_/ ___\_ __ \__ \ \____ \_/ __ \ / \/ \| |___ / \ \___| | \// __ \| |_> > ___/ /_______ /_______ /|_______ \/_______ /\___ >__| (____ / __/ \___ > \/ \/ \/ \/ \/ \/|__| \/ Usage | python sslScrape.py [CIDR Range] E.X | python sslScrape.py 10.100.100.0/24 Requirements: pip install ndg-httpsclient pip install python-masscan
Link: SSL Scrape
10] Censys .io
Censys io a website thаt Gather mаѕѕіvе www scan data аnd provides аn іntеrfасе tо ѕеаrсh through thе various different datasets. Cеnѕуѕ also categorises thеse dаtаѕеtѕ into different tуреѕ like — IPv4 hоѕtѕ, wеbѕіtеѕ, аnd SSL/TLS certificates. tis website is a pretty much awesome when it comes to gather information about domain/website and SSL/TLS lookup.
Link: Censys .io
That’s all for now folks! Hope you like my article. Please share it on different platforms so that I can write different articles depending upon the various topics like this and share some amazing sources with you regarding this.
Please share this on various platforms and comment down below if I missed something that you wanted to be on this list.
from WordPress https://ift.tt/3eXcRNZ via IFTTT
0 notes
Text
CentOs Installing and Configuring an L.A.M.P. Server (Linux Apache Mysql Server) with Multiple Virtual Hosts

There are plenty of control panels that can configure a generic LAMP server with any linux or almost linux distribution. Other paid ones are also compatible with other platforms such as windows. Many commands in this guide can be aggregated into one, however I prefer to divide them to help you identify any errors. This guide has been tested step by step and assumes that you have installed a clean centos 7 system with the network configured. If you have the sudo command installed and you are logged in as a regular user, you can simply enter the word "sudo" before the commands. But now we're starting to set up our "test server."
Configure the firewall
First, you need to make sure that your server accepts certain requests at certain ports. If the firewall is not installed do not install it unless you know what you are doing or if you have the physical machine in front of you. If you have a more complex router or network, I recommend that you read an article about network theory or an article about how to configure virtual servers on a router to route traffic to certain ports. Here I assume that you have a public address on a server available on the internet. So, you should write these commands on your prompt (shell). firewall-cmd --permanent --zone=public --add-port=80/tcp firewall-cmd --permanent --zone=public --add-port=443/tcp firewall-cmd --runtime-to-permanent firewall-cmd --reload
Install Apache2
We opened ports to accept tcp connections in apache's default http (80) and httpd (443) ports. Now we need to install apache2 as a simple web server by writing this command: rpm -Uvh https://dl.fedoraproject.org/pub/epel/epel-release-latest-7.noarch-rpm yum -y install epel-release yum -y install httpd Start-up and Enable Apache2 After installing apache, you need to use and enable the service (demon) with this command systemctl start httpd systemctl enable httpd If you put the ip address of the server on a browser you should see the welcome page of apache and centos.
Configure virtual hosts
To configure virtual hosts on CentOS you should disable the selinux or you will receive an error. To temporarily disable it, thus avoiding having to restart the system, you can write setenforce 0 echo 0 > /sys/fs/selinux/enforce To make sure that this change persists even after the reboot you should edit the /etc/sysconfig/selinux file and be sure that the line regarding selinux is disabled as shown in this example: SELINUX=disabled Now we just have to create the configuration file for the virtual host that we'll put inside the folder /etc/httpd/conf.d/ In this article, we'll use the example.com domain as an example. You will need to replace the example.com domain name with your domain name. Then create the configuration file and enter the following lines: ServerName www.example.com DocumentRoot /var/www/example.com ServerAlias example.com ErrorLog /var/log/httpd/www.example.com.error.log CustomLog /var/log/httpd/www.example.com.requests.log combined Options FollowSymLinks MultiViews AllowOvverride All Order allow,deny allow from all Of course, you also need to create the site and log destination folder if it doesn't exist: mkdir -p /var/www/example.com mkdir -p /var/log/httpd At this point you need to restart apache apachectl restart If your domain points to the server correctly, you should see the Welcome page. Considerations: I have read in many articles about configuring virtual hosts with CentOS that recommend creating a specific folder containing the available sites and another containing the enabled sites. This method is used in debian-based deployments and allows you to disable and enable a site simply by acting on symbolic links. But this article is about CentOS and so we will follow the path of RedHat-based distributions.
Installing and configuring Certbot (letsencrypt) for https support (optional but recommended)
If the site is dynamic, it could normally carry sensitive information and so it's a good idea to encrypt it. Buying a valid certificate was once an expensive operation but now there is a system to acquire one completely for free. Make sure your DNS points to your server. The first thing you need to do is install apache modules for ssl support yum -y install mod_ssl yum -y install openssl And install the certbot program yum -y install python-certbot-apache To work, at startup, the https protocol must have a valid certificate. We can create this certificate as follows mkdir -p /etc/ssl/private chmod 700 /etc/ssl/private openssl req -x509 -nodes -days 365 -newkey rsa:2048 -keyout /etc/ssl/private/apache-selfsigned.key -out /etc/ssl/certs/apache-selfsigned.crt For this time, you can leave all the answers blank and you will have to wait until the end of the certificate generation. Since certbot checks if the apache configuration is consistent, we need to add instructions for the virtual host also for the https protocol at the end of the file /etc/httpd/conf.d/example.com.conf SSLEngine on SSLCertificateFile /etc/letsencrypt/live/example.com/cert.pem SSLCertificateKeyFile /etc/letsencrypt/live/example.com/privkey.pem SSLCertificateChainFile /etc/letsencrypt/live/example.com/chain.pem ServerName www.example.com DocumentRoot /var/www/example.com ServerAlias example.com ErrorLog /var/log/httpd/www.example.com.error.ssl.log CustomLog /var/log/httpd/www.example.com.requests.ssl.log combined Options FollowSymLinks MultiViews AllowOverride All Order allow,deny allow from all Now we can create the certificate with certbot. Keep in me that if you use a service such as Cloudflare, you'll need to temporarily pause it. apachectl stop certbot certonly --standalone -d example.com -d www.example.com apachectl start Your domain should now http://www.example.com be visible from . If you want users to be automatically redirected to https, you'll need to change your virtual host's instructions for the http protocol by adding the line Redirect "/" "https://www.example.com" configuration file /etc/httpd/conf.d/example.com.conf as shown in this example ServerName www.example.com DocumentRoot /var/www/example.com ServerAlias example.com Redirect "/" "https://www.example.com" ErrorLog /var/log/httpd/www.example.com.error.log CustomLog /var/log/httpd/www.example.com.requests.log combined Options FollowSymLinks MultiViews AllowOvverride All Order allow,deny allow from all If you use services such as cloudflare or other redirect methods it will not insert this line or it will generate an endless loop of addressing that will eventually return an error on the browser.
Installation MariaDB (for Mysql)
To install the mysql MariaDB server, you must write this command yum -y install mariadb-server mariadb So you'll need to start and enable the server systemctl start mariadb systemctl enable mariadb Now mariadb is installed but you should proceed to basic automatic security because as it is, the service is configured with as few limitations as possible so that it is more convenient for developers. You can do this with the command mysql_secure_installation You will need to choose all the recommended options and you will need to enter a password for your mysql root account. Considerations: CentOS chose to use MariaDB as the default mysql server. However I have to tell you that this is a fork of the classic mysql server and there may be incompatibility issues when importing data. If you don't know the difference between mariadb and mysql community edition I recommend you read an article on how to migrate data from a mysql community release server to a mariadb server or how to migrate data from a mariadb server to a mysql community release server.
Installing PHPs and modules used by common CMSs
To use mysql, apache needs an intermediate program that in our case is php. To install php with mysql support and its most commonly used modules from popular CMS, type these commands yum -y install php yum -y install php-opcache yum -y install php-common yum -y install php-fpm yum -y install php-pear yum -y install php-mysql yum -y install php-cli yum -y install php-gd yum -y install php-odbc yum -y install php-xml yum -y install php-xmlrpc yum -y install php-mbstring yum -y install php-snmp yum -y install php-soap yum -y install php-mcrypt If you need to install other modules you can search for them using the command yum search php- You can also filter the results with the grep command. If for example, i want to display the modules with pecl written inside the name I just have to write yum search php- | grep pecl Considerations: CenOS is a stable and conservative linux distribution. Packages that you can install with traditional repositories are tested. To install the latest versions, you should import other repositories. If you don't need to install the latest version of php, I recommend that you respect centOS's choice. If you need to install version 7 of php, I recommend you read an article about installing and configuring a LAMP (Linux Apache Mysql Php 7) server with multiple virtual hosts on CentOS 7. Read the full article
0 notes
Text
Getting Started with Phyton and Django - Hello World Web App

Have you ever heard anything about Phyton? If you're reading this, I bet you do! Python is an interpreted, high-level, general-purpose programming language with an object-oriented approach: it was created by Guido van Rossum in 1991 and constantly updated ever since. It's dynamically typed and supports multiple programming paradigms, including procedural, object-oriented, and functional programming. Phyton went through two major upgrades: the first in 2000, with the release of the 2.0 version, which introduced a garbage collection system capable of collecting reference cycles; the second in 2008 with the release of Python 3.0, which was a major revision - mostly backward-incompatible - of the language. Following the Phyton 3.0 release, most developers chose to stick to the 2.x version, which eventually led to extended support for Python 2.7 (the last release in the 2.x series) up to 2020. As of today, all the main resources for Phyton and CPython (an open-source implementation of Phyton) are maintained and managed by the Phyton Software Foundation, a non-profit organization.
Phyton 2 vs Phyton 3
Python 2 and Phyton 3 are the two major versions of Phyton that are still used nowadays. These two versions are quite different: although Phyton 3 arguably has a better syntax, is more semantically correct and supports newer features, most developers chose to stick with Phyton 2 until recent years thanks to a much wider database of libraries and resources available on the web. Although there still is a bit of a debate in the coding community about which Python version was the best one to learn nowadays (Python 2.7 vs 3.5), there is now a general consensus on considering Phyton 3 the most appropriate choice for newcomers and also for those who want to update their coding skills. For this very reason, in this quick tutorial, we're going to use the Phyton 3 syntax.
Console, Desktop, or Web?
Just like most programming languages, such as Java, C# and so on, Phyton can be used for a number of different purposes. The most common scenarios are: Console Applications: console applications are programs designed to be used via a text-only computer interface, such as a text terminal, the command line interface of some operating systems (Unix, DOS, etc.). Common examples include openssl, ping, telnet, defrag, chkdsk, and the likes. Desktop Applications: desktop applications are programs designed to be used via a Graphical User Interface (GUI): such GUI can either be designed by making use of the operating system native libraries or made from scratch using the language native elements (or specifically designed GUI frameworks). Typical examples of desktop applications include Photoshop, Thunderbird, Chrome, and so on. Desktop application development dominated the software world for many years and are still widely used, even if the broadband + Internet combo is making web-based applications more appealing year after year. Web Applications: web applications or web apps are client-server computer programs where the client - including the user interface (UI) and the client-side logic - runs in a web browser: common examples include webmail (such as GMail), e-banking websites, and so on. On a more general basis, we could say that most interactive websites can be defined as web applications, from the CMS who can help you to write an essay on time management to more complex, fully packaged products such as Wordpress and Joomla. In this tutorial, for the sake of simplicity, we'll talk about the latter: therefore, our Hello World sample will be a (minimal) Web Application.
Phyton Web Frameworks
The first thing you have to do before starting is to pick a decent Phyton Web Frameworks: although you can write Phyton using any text editor (including Notepad), you should definitely stick with a GUI framework to benefit from very useful features such as syntax highlighting, built-in compiler/debugger, folder tree lists, windows tiling, and so on. These are the most popular high-level web frameworks for Phyton available nowadays. Django The Web framework for perfectionists (with deadlines). Django makes it easier to build better Web apps more quickly and with less code. Django is a high-level Python Web framework that encourages rapid development and clean, pragmatic design. It lets you build high-performing, elegant Web applications quickly. Django focuses on automating as much as possible and adhering to the DRY (Don't Repeat Yourself) principle. TurboGears The rapid Web development web framework you've been looking for. Combines SQLAlchemy (Model) or Ming (MongoDB Model), Genshi (View), Repoze and Tosca Widgets. Create a database-driven, ready-to-extend application in minutes. All with designer-friendly templates, easy AJAX on the browser side and on the server side, with an incredibly powerful and flexible Object Relational Mapper (ORM), and with code that is as natural as writing a function. After reviewing the Documentation, check out the Tutorials web2py All in one package with no further dependencies. Development, deployment, debugging, testing, database administration and maintenance of applications can be done via the provided web interface, but not required. web2py has no configuration files, requires no installation, can be run off a USB drive: it uses Python for the Model, View and the Controller. It main features include: a built-in ticketing system to manage errors; internationalization engine and pluralization, caching system; flexible authentication system (LDAP, MySQL, janrain & more); Available for Linux, BSD, Windows, and Mac OSX; works with MySQL, PostgreSQL, SQLite , Firebird, Oracle, MSSQL and the Google App Engine via an ORM abstraction layer.
Hello World in Phyton
Before installing Django, let’s see how we can generate a sample "Hello World" web page using Python. From a Linux shell, open your favorite text editor (mine is nano, but you can also use vi or anything else) and type the following: #!/usr/bin/env python import textwrap from six.moves.BaseHTTPServer import BaseHTTPRequestHandler, HTTPServer class HelloRequestHandler(BaseHTTPRequestHandler): def do_GET(self): if self.path != '/': self.send_error(404, "Object not found") return self.send_response(200) self.send_header('Content-type', 'text/html; charset=utf-8') self.end_headers() response_text = textwrap.dedent('''\ Hello World
Hello, World!
... Here we are! ''') self.wfile.write(response_text.encode('utf-8')) server_address = ('', 8000) httpd = HTTPServer(server_address, HelloRequestHandler) httpd.serve_forever() ... And that's pretty much it! This simple program can be executed and then tested by visiting http://localhost:8000/ with any browser.
Hello World with Django
Writing a Hello World sample web page with Django is definitely more difficult than doing it using blue Phyton... But there's a tremendous advantage in doing that: the scaling factor. If you're dealing with a more complex web application, you won't be able to write it using pure Phyton without losing control over the code pretty soon. The good thing about Django is that, once you learn the basics, you'll be able to deal with your projects in a comfortable fashion and with a great learning curve. Installing Django The first thing to do is to make sure that you have Django installed. Assuming you are using virtualenv, the following command should suffice: > pip install django Right after that, we need to create a Django project and a Django app: > django-admin startproject hello_world_project > cd hello_world_project > python manage.py startapp hello We now have a project called hello_world_project and an app named hello. When we executed python manage.py startapp hello, Django created a folder called hello with several files inside it. In this sample tutorial we won't use most of these files, hence we can delete them: the file that can be deleted are the following: hello/admin.py hello/models.py the whole hello/migrations folder. Writing the code Once done, edit the hello/views.py file in the following way: import textwrap from django.http import HttpResponse from django.views.generic.base import View class HomePageView(View): def dispatch(request, *args, **kwargs): response_text = textwrap.dedent('''\ Hello World
Hello, World!
... Here we are! ''') return HttpResponse(response_text) As we can see, we have basically created a Phyton class, which in Django is called a view. More specifically, this will be the class that will output the same HTML snippet we previously wrote using pure Phyton. Right after that, create a new hello/urls.py file with the following contents: from django.conf.urls import patterns, url from hello.views import HomePageView urlpatterns = patterns( '', url(r'^$', HomePageView.as_view(), name='home'), ) Next, edit the hello_world_project/urls.py file to make it looks like this: from django.conf.urls import patterns, include, url urlpatterns = patterns( '', url(r'', include('hello.urls')), ) As we can see by looking at the code, these urls.py files are the routing system that will be used by Django to understand what view to load whenever a specific URL is requested by a user. In a nutshell, we just told to our main project routing file (hello_world_project/urls.py) to route all the requests pointing to the site root to the app routing file (hello/urls.py), which in turn will point to the HomePageView view, that will then be executed - eventually returning the HTML content. The last thing we need to do is to edit the hello_world_project/settings.py file and remove some unused stuff that could prevent our sample web application from running. Around line 30, find a variable called INSTALLED_APPS: remove the first four items of the sequence and add 'hello' to the end. INSTALLED_APPS = ( 'django.contrib.messages', 'django.contrib.staticfiles', 'hello', ) Immediately after these lines, find the MIDDLEWARE_CLASSES variable and remove the line containing SessionAuthenticationMiddleware. MIDDLEWARE_CLASSES = ( 'django.contrib.sessions.middleware.SessionMiddleware', 'django.middleware.common.CommonMiddleware', 'django.middleware.csrf.CsrfViewMiddleware', 'django.contrib.auth.middleware.AuthenticationMiddleware', 'django.contrib.messages.middleware.MessageMiddleware', 'django.middleware.clickjacking.XFrameOptionsMiddleware', ) That's it: our Django web application is ready. You can start it by typing the following: > python manage.py runserver And then visit http://localhost:8000/ in your browser to see it in action.
Conclusion
That's pretty much about it. If you are interested in Phyton and you would like to go further, we strongly suggest to visit one of the following resources: PhytonTips.com FullStackPhyton The Hitchhiker's Guide to Python ... and so on. See you next time, and... happy coding! Read the full article
0 notes
Link
Masters in Ethical Hacking with Android ##Udacity ##udemycourses #Android #ETHICAL #Hacking #Masters Masters in Ethical Hacking with Android Do You need to learn ethical hacking,But your not having proper lab setup ? Do you discover the charge line befuddling and scaring? On the off chance that yes, this is the ideal course for you. concentrating on the viable side of infiltration testing without ignoring the hypothesis behind each attacks.Before hopping into entrance testing, you will initially figure out how to install the required packages to practice penetration testing on your android. All the attacks explained in this course are done in my Android phone. In the wake of taking this course you will never utilize your computer or laptop for hacking. This is extremely helpful for the individuals who need to begin hacking utilizing there Android Phone without Rooting the Device. The course is divided into sessions 1.installation of software on android device. 2.commands to used for hacking and pkg setup. sending a SMS using a command terminal and also making a phone call, basic programming: how to written a simple program in c, c++, python and execute it. 3.penetration testing like:Metasploit Penetration Testing is a complete guide for beginners as well as security professionals.Social engineer toolkit:SET has a number of custom attack vectors that allow you to make a believable attack in a fraction of the time.How to break a windows and Linux security by performing different exploitation methods via android. How to performing stress testing through Android. DDOS attempt to make an online service unavailable by overwhelming it with traffic from multiple source. Brute force attacking guess the password of victim. SQL MAP automates the discovery and exploitation of vulnerabilities to SQL injection attacks. WEB Application scanning, Creating Phishing page. UPDATE:- 4.Auxiliary Modules of Meatsploit: Http enum_wayback: this module pulls and parses the urls stored by archive_org for the purpose of replaying during a web assessment. Endpoint_mapper - Scanner DCERPC. Auto-pwn: fingerprint the victim's browser, then "throw" at it whatever exploits. Email harvesting: search_email_collector which searches google, bing and yahoo for email addresses associated to a particular domain. Detect SSH versions with the SSH version scanner. FTP Version Scanning Metasploit. Heart-bleed vulnerability enables a hacker to trick OpenSSL. THESE ALL ATTACKS ARE DONE WITHOUT ROOTING THE PHONE Who is the target audience? - For beginners and intermediate Internet users?-This course is for anyone who want to be ethical hacker and penetration testers ? -who is using android Phone?. - 👉 Activate Udemy Coupon 👈 Free Tutorials Udemy Review Real Discount Udemy Free Courses Udemy Coupon Udemy Francais Coupon Udemy gratuit Coursera and Edx ELearningFree Course Free Online Training Udemy Udemy Free Coupons Udemy Free Discount Coupons Udemy Online Course Udemy Online Training 100% FREE Udemy Discount Coupons https://www.couponudemy.com/blog/masters-in-ethical-hacking-with-android/
0 notes
Text
2018-03-29 18 LINUX now
LINUX
Linux Academy Blog
DynamoDB Atomic Counters
Linux Academy Weekly Roundup 111
Building a Vessel
New Version of LPI Linux Essentials Course
Linux Academy Weekly Roundup 110
Linux Insider
New Firefox Extension Builds a Wall Around Facebook
Neptune 5: A Practically Perfect Plasma-Based Distro
LG Offers Open Source webOS to Spur Development in South Korea
Google Opens Maps APIs and World Becomes Dev Playground
New Raspberry Pi Packs More Power
Linux Journal
Cooking With Linux: Build Your Own Social Network With Friendica: The Tuesday Linux Journal Show
What Could Open Government Learn from Us Open Technology folks?
Product Review: GitStorage
Reversal on Google vs. Oracle Case, Microsoft Open Sources WSL for Linux Distro Maintainers, New Acer Chromebook Tab 10 and More
Best Programming Language
Linux Magazine
Gnome 3.28 Released
Install Firefox in a Snap on Linux
OpenStack Queens Released
Kali Linux Comes to Windows
Ubuntu to Start Collecting Some Data with Ubuntu 18.04
Linux Today
Configure Magento 2 to use Varnish on CentOS 7
Newsroom - A Modern CLI to Get Your Favorite News in Linux
Automatically Disable Touchpad When Mouse is Used in Ubuntu Linux [Quick Tip]
Public cloud security: Follow the Goldilocks principle
Loop better: A deeper look at iteration in Python
Linux.com
Civil Infrastructure Platform Sets Out to Save Civilization
Hyperledger Sawtooth: A Milestone for Blockchain Technology
Through the Looking Glass: Security and the SRE
Juniper's OpenContrail SDN Rebranded as Tungsten Fabric
How to Monitor Network Protocol Traffic on your Data Center Linux Servers
Reddit Linux
The official list of removed items for the #Ubuntu 18.04 minimal installation
Strange grub2 and keyboard / touchpad issues
Brave Unveils Development Plans for Upcoming 1.0 Browser Release, Including Transition to Chromium Front-End
Introducing Encrypted Contacts for Android and iOS, now available through ProtonMail’s mobile app - ProtonMail Blog
Intermittent samba/windows/freenas permissions issues
Riba Linux
How to install Archman Xfce 18.03
Archman Xfce 18.03 overview
How to Install HardenedBSD 11 Stable v1100055 plus Gnome desktop and basic applications
How to install Zorin OS 12.3
Zorin OS 12.3 overview | Your Computer. Better. Easier. Faster.
Slashdot Linux
Galaxy Without Any Dark Matter Baffles Astronomers
VR Researchers Manipulate Human Visual System To Create An Infinite Corridor In a Fixed Space
New Deep-Learning Software Knows How To Make Desired Organic Molecules
Verizon Plans To Launch a Palm Smartphone Later This Year
Amazon Takes Fresh Stab At $16 Billion Housekeeping Industry
Softpedia
Google Chrome 65.0.3325.181 / 66.0.3359.66 Beta / 67.0.3381.0 Dev
Linux Kernel 4.15.14 / 4.16 RC7
Linux Kernel 4.14.31 LTS / 4.9.91 LTS / 4.4.124 LTS / 4.1.51 LTS / 3.18.102 EOL / 3.16.56 LTS
OpenSSL 1.1.0h
DragonFly BSD 5.0.2 / 5.2.0 RC
Tecmint
Newsroom – A Modern CLI to Get Your Favorite News in Linux
Cricket-CLI – Watch Live Cricket Scores in Linux Terminal
Ternimal – Show Animated Lifeform in Your Linux Terminal
Tilix – A New GTK 3 Tiling Terminal Emulator for Linux
How to Backup Your Files to Amazon S3 Using CloudBerry Backup on Linux
nixCraft
Raspberry PI 3 model B+ Released: Complete specs and pricing
Debian Linux 9.4 released and here is how to upgrade it
400K+ Exim MTA affected by overflow vulnerability on Linux/Unix
Book Review: SSH Mastery – OpenSSH, PuTTY, Tunnels & Keys
How to use Chomper Internet blocker for Linux to increase productivity
0 notes
Text
Linux Download Docker

March 2, 2020 by Matt Hernandez, @fiveisprime
When the command is invoked, docker contacts Docker hub and downloads a docker image called ‘hello-world’. Docker then creates a new container that runs the executable script that streams the message ‘ Hello from Docker! To download or pull an image from Docker hub without running it, use the syntax: $ sudo docker pull. The Linux NAS distribution (Debian based) Open Media Vault (OMV) has an UrBackup server plugin starting with OMV 3.0 in OMV-extras. Starting with OMV 5.0 use the Docker container below. ASUSTOR - ASUS NAS.
Last June, the Docker team announced that they will be investing in getting Docker running with the Windows Subsystem for Linux (WSL). All of this is made possible with the recent changes to the architecture of WSL to run within a lightweight virtual machine (VM), which we talked about in an earlier blog post about WSL 2. Since this announcement, the Docker team has released a Technical Preview of Docker that includes support for running with WSL 2.
This article explains how the Docker Desktop technical preview works as well as how to use the Docker extension with the technical preview.
How it works
This new Docker architecture works a lot like Visual Studio Code's WSL remote development support in that the Docker CLI running on the host machine executes commands within the Docker Integration Package, which runs on the remote WSL VM.
Image credit: Docker Engineering
DockerD runs directly within WSL so there's no need for the Hyper-V VM and all Linux containers run within the Linux userspace on Windows for improved performance and compatibility.
Getting set up
First some prerequisites:
Jul 05, 2018 Docker is an application that simplifies the process of managing application processes in containers. In this tutorial, you'll install and use Docker Community Edition (CE) on Ubuntu 18.04. Docker upgrade ubuntu. Nov 07, 2019 When running docker desktop version 2.1.5.0 (40323) on: OS Name: Microsoft Windows 10 Pro OS Version: 10.0.19013 N/A Build 19013 Eben though WSL 2 based engine is enabled in Settings/General docker container run hello-world on Ubuntu rep.
Install Windows 10 Insider Preview build 18975 (Slow) or later for WSL 2.
Install Ubuntu from the Microsoft store.
Enable WSL 2 by following this guide.
Install the Remote - WSL extension for VS Code.
Install the Docker WSL 2 Technical Preview.
Once installed, Docker will recognize that you have WSL installed and prompt to enable WSL integration. You want to Enable WSL integration for this tutorial.
This option will allow you to access Docker Desktop via the Docker CLI directly from within your Linux distro.
If you have multiple Linux distros, make sure you only have WSL integration turned on for the correct one in your Docker settings:
With that configured, all commands will execute in the Linux context - this includes Docker commands run from PowerShell so running something like docker run mongo… will start a Linux container within the WSL VM.
Running the docker ps command over in WSL, you'll see the container as expected. Notice that the container ID matches.
Using VS Code
With this set up and running, you can install the VS Code Docker extension and access your containers. If you're already running WSL 2 and the Remote - WSL extension, this will help you get Docker integrated into your WSL workflow rather than switching contexts when you need containers. And because the Docker CLI's context is set to use DockerD in WSL, the extension will work with your containers regardless of whether you opened VS Code using the Remote - WSL extension.
Notice how in the screenshot below, I'm connected and working in WSL and still building/running containers without changing from my preferred environment (zsh in Ubuntu).
Theme: Noctis Sereno
I've personally noticed a vast improvement in container execution times using this configuration and each part of my typical development workflow remains the same. I'm also using the Remote - Containers extension within WSL for testing specific environments without setting things up directly on my machine.
We want your feedback
Keep in mind that you're using prerelease software and, while the Windows Insiders Slow ring is very stable, you may run into some issues. If you do find something that isn't working as expected, please open an issue via the Feedback tool in Windows. Any direct Docker issues or feedback can be logged in the Docker for Windows repo.
Happy Coding!
Matt Hernandez, VS Code Program Manager @fiveisprime
Estimated reading time: 7 minutes
You can run Compose on macOS, Windows, and 64-bit Linux.
Prerequisites
Docker Compose relies on Docker Engine for any meaningful work, so make sure youhave Docker Engine installed either locally or remote, depending on your setup.
https://huntercountry477.tumblr.com/post/653677848988729344/catalina-dmg. On desktop systems like Docker Desktop for Mac and Windows, Docker Compose isincluded as part of those desktop installs.
On Linux systems, first install theDocker Enginefor your OS as described on the Get Docker page, then come back here forinstructions on installing Compose onLinux systems.
To run Compose as a non-root user, see Manage Docker as a non-root user.
Install Compose
Follow the instructions below to install Compose on Mac, Windows, Windows Server2016, or Linux systems, or find out about alternatives like using the pipPython package manager or installing Compose as a container.
Install a different version
The instructions below outline installation of the current stable release(v1.28.6) of Compose. To install a different version ofCompose, replace the given release number with the one that you want. Composereleases are also listed and available for direct download on theCompose repository release page on GitHub.To install a pre-release of Compose, refer to the install pre-release buildssection.
Install Compose on macOS
Docker Desktop for Mac includes Compose alongwith other Docker apps, so Mac users do not need to install Compose separately.For installation instructions, see Install Docker Desktop on Mac.
Install Compose on Windows desktop systems
Docker Desktop for Windows includes Composealong with other Docker apps, so most Windows users do not need toinstall Compose separately. For install instructions, see Install Docker Desktop on Windows.
If you are running the Docker daemon and client directly on MicrosoftWindows Server, follow the instructions in the Windows Server tab.
Install Compose on Windows Server
Follow these instructions if you are running the Docker daemon and client directlyon Microsoft Windows Server and want to install Docker Compose.
Start an “elevated” PowerShell (run it as administrator).Search for PowerShell, right-click, and chooseRun as administrator. When asked if you want to allow this appto make changes to your device, click Yes.
In PowerShell, since GitHub now requires TLS1.2, run the following:
Then run the following command to download the current stable release ofCompose (v1.28.6):
Note: On Windows Server 2019, you can add the Compose executable to $Env:ProgramFilesDocker. Because this directory is registered in the system PATH, you can run the docker-compose --version command on the subsequent step with no additional configuration.
Test the installation.
Install Compose on Linux systems
On Linux, you can download the Docker Compose binary from theCompose repository release page on GitHub.Follow the instructions from the link, which involve running the curl commandin your terminal to download the binaries. These step-by-step instructions arealso included below.
For alpine, the following dependency packages are needed:py-pip, python3-dev, libffi-dev, openssl-dev, gcc, libc-dev, rust, cargo and make.
Run this command to download the current stable release of Docker Compose:
To install a different version of Compose, substitute 1.28.6with the version of Compose you want to use.
If you have problems installing with curl, seeAlternative Install Options tab above.
Apply executable permissions to the binary:
Note: If the command docker-compose fails after installation, check your path.You can also create a symbolic link to /usr/bin or any other directory in your path.
For example:
Optionally, install command completion for thebash and zsh shell.
Test the installation.
Linux Download Docker
Alternative install options
Install using pip
For alpine, the following dependency packages are needed:py-pip, python3-dev, libffi-dev, openssl-dev, gcc, libc-dev, rust, cargo, and make.
Compose can be installed frompypi using pip. If you installusing pip, we recommend that you use avirtualenv because many operatingsystems have python system packages that conflict with docker-composedependencies. See the virtualenvtutorial to getstarted.
If you are not using virtualenv,
pip version 6.0 or greater is required.
Install as a container
Compose can also be run inside a container, from a small bash script wrapper. Toinstall compose as a container run this command:
Install pre-release builds
If you’re interested in trying out a pre-release build, you can download releasecandidates from the Compose repository release page on GitHub.Follow the instructions from the link, which involves running the curl commandin your terminal to download the binaries.
Pre-releases built from the “master” branch are also available for download athttps://dl.bintray.com/docker-compose/master/.
Pre-release builds allow you to try out new features before they are released,but may be less stable.
Upgrading
If you’re upgrading from Compose 1.2 or earlier, remove ormigrate your existing containers after upgrading Compose. This is because, as ofversion 1.3, Compose uses Docker labels to keep track of containers, and yourcontainers need to be recreated to add the labels.
If Compose detects containers that were created without labels, it refusesto run, so that you don’t end up with two sets of them. If you want to keep usingyour existing containers (for example, because they have data volumes you wantto preserve), you can use Compose 1.5.x to migrate them with the followingcommand:
Alternatively, if you’re not worried about keeping them, you can remove them.Compose just creates new ones.
Uninstallation
To uninstall Docker Compose if you installed using curl:
To uninstall Docker Compose if you installed using pip:
Got a “Permission denied” error?
Docker For Linux Download
If you get a “Permission denied” error using either of the abovemethods, you probably do not have the proper permissions to removedocker-compose. To force the removal, prepend sudo to either of the abovecommands and run again.
Where to go next
Linux Download Docker-compose
compose, orchestration, install, installation, docker, documentation
0 notes
Text
A Complete Guide to Your PHP Server in 2020
One of the reasons why the professional developers use PHP for their web application is that PHP is a very suitable and reliable back-end programming language. In this article, you will find the complete guide to select your local/remote back-end server which runs PHP and provides necessary web tools all along. According to the StackOverflow’s 2018 survey, PHP the most used back-end language after Python and almost 1/3 of the professional developers use PHP to develop their web application. PHP as a Back-End Language PHP is a programming language that runs on the server-side, also called the back-end side. The back-end is a part of the web application that runs in the server. In other words, it interacts with the server, gets some information and relays it to the front-end to display on the screen. You can do many things on the server by using PHP including CRUD (Create, Read, Update, Delete) operations. For example, when you submit a form on the web page, the back-end takes this data you filled in the form and passes it to the server, after that, the PHP code in the server saves that data in a database and sends some confirmation info to the front-side. Then the front-side displays the confirmation of your submit action. Using PHP as Back-end You can use PHP, your goal can be developing a web application, writing a command line script or developing a desktop GUI application. For developing a web application, you need PHP itself, a browser, a server supports PHP and a web hosting service. In the modern operating systems, there are web browsers, and in-built web servers (e.g. Windows: IIS and Linux/MacOS: Apache). After you obtain a web hosting, you can begin to write PHP code. If you want to use PHP language for command line scripting you don’t need any servers or browsers, and also with the PHP-GTK extension, you can develop desktop GUI applications. Select your PHP Server Before you decide to develop a PHP web application, you must first select local web server for development purposesremote web server for hosting your products. In addition to PHP Servers, if you are using some other web-tools, it’s better to use third-party programs which provide these necessary tools together. Selecting a local PHP server. XAMPP XAMPP is the most popular open-source PHP local server. XAMPP has a free Apache server and contains MariaDB, PHP, and Perl. It also supports many tools like MySQL, FileZilla, Mercury, Tomcat, and others. It allows programmers to test their applications easily. XAMPP is available for Linux, Windows and macOS systems. WAMP WampServer is a web server for Windows. WAMP is an alternative to XAMPP. It supports Apache, PHP, and MySQL. Its interface is an easy-to-use platform having Apache configurations, PHP configurations, WWW directory etc. MAMP MAMP is a free PHP local server developed for macOS systems but can also be installed under Windows. It stands for Mac, Apache, MySQL, and PHP. It supports not only the Apache server but also Nginx as well. MAMP PRO, a paid-version, allows you to create separate hosts for each of your projects. LAMP LAMP stands for Linux, Apache, MySQL, and PHP. LAMP is developed for Linux operating systems and it includes FastCGI, OpenSSL, phpMyAdmin, ModSecurity, SQLite, Varnish, ImageMagick, xDebug, Xcache, OpenLDAP, ModSecurity, Memcache, OAuth, PEAR, PECL, APC, GD, cURL and other components and the following frameworks: ZendFramework, Symfony, CodeIgniter, CakePHP, Smarty, Laravel. LEMP LEMP is a variety of LAMP. LEMP stands for Linux, NGINX, MariaDB, and PHP (Because of the pronunciation of NGINX, “E” is used instead of “N”). Apache is replaced with the NGINX and also uses MariaDB for handling database operations. It also works fine as a relational database – just like MySQL but offers some other added functionalities. AMPPS AMPPS is a combination of WAMP, MAMP and LAMP stack. The platform offers 449 Apps along with Apache, MySQL, MongoDB, PHP, Perl & Python. The platform supports both MacOS, Linux and Windows operating systems. AMPPS web server enables you to focus more on web apps rather than maintaining them. AMPPS is provided by Softaculous. AMPSS stack includes everything for website development. You can do all complex functions with just a click. WinNMP WinNMP is a development stack for Windows. It provides a lightweight, fast and stable server, based on Nginx, MariaDB, Redis, and PHP. WPИ-XM WPИ-XM is an open-source server for PHP development on Windows. WPИ-XM stands for : Windows, PHP, NGINX, Xdebug, MariaDB/MongoDB. WPИ-XM offers various easy-to-install services to developers. The stack consists of NGINX as the webserver, MariaDB as the database and PHP as the scripting and programming language. The stack includes essential utils for PHP development like Composer, Pickle, PHPUnit, phpcsfixer, PEAR out-of-the-box. EasyPHP-DEVSERVER EasyPHP Devserver is a complete and ready-to-use web server for Windows including PHP, Apache, MySQL, Nginx, PhpMyAdmin, Xdebug, PostgreSQL. Devserver is portable, modular and easy to update and extend. Devserver allows you to set up a server with the same specifications as a production server. Since it is portable, you can develop locally anywhere. Selecting hosting PHP Server When you decide to deploy your web application, you must first select your hosting server. The hosting server hosts your application, provides some built-in resources like databases, caching tools and other tools for website optimization. Today, there are lots of open-source PHP servers available. Most of them use Apache as a server, while others prefer Nginx. You can compare PHP Hosting Plans from this link. EasyPHP-Webserver turns your computer into a ready-to-use personal and dedicated server for web, database, and FTP hosting. You can host your own website on your computer and share it on the internet. Your computer acts like a web hosting service You can tune Apache (host server), MySQL (database server), PHP (web development), Filezilla (FTP server). In conclusion, When you decide to use PHP as your back-end language, you should use a local web server for development and a remote webserver to host your application. In case you need additional web tools with PHP server, you should use stack programs that provide all necessary tools together such as XAMPP, WAMP, MAMP, LAMP, LEMP, AMPPS, WinNMP, WPИ-XM, EasyPHP-DevServer. After you developed your application locally, you need to select your hosting server to deploy it. Further Reading: - How to Hire a Great PHP Developer by Toptal Read the full article
0 notes
Link
making you to control the world on you thumbs…
What you’ll learn
You will start using android phone for hacking, instead of pc.
Requirements
You shoud know how to use Android Phone.
Description
Do You need to learn ethical hacking,But your not having proper lab setup ? Do you discover the charge line befuddling and scaring? On the off chance that yes, this is the ideal course for you. concentrating on the viable side of infiltration testing without ignoring the hypothesis behind each attacks.Before hopping into entrance testing, you will initially figure out how to install the required packages to practice penetration testing on your android. All the attacks explained in this course are done in my Android phone.
In the wake of taking this course you will never utilize your computer or laptop for hacking. This is extremely helpful for the individuals who need to begin hacking utilizing there Android Phone without Rooting the Device.
The course is divided into sessions
1.installation of software on android device.
2.commands to used for hacking and pkg setup. sending a SMS using a command terminal and also making a phone call, basic programming: how to written a simple program in c, c++, python and execute it.
3.penetration testing like: Metasploit Penetration Testing is a complete guide for beginners as well as security professionals.Social engineer toolkit:SET has a number of custom attack vectors that allow you to make a believable attack in a fraction of the time.How to break a windows and Linux security by performing different exploitation methods via android. How to performing stress testing through Android.
DDOS attempt to make an online service unavailable by overwhelming it with traffic from multiple source.
Brute force attacking guess the password of victim. SQL MAP automates the discovery and exploitation of vulnerabilities to SQL injection attacks. WEB Application scanning, Creating Phishing page.
UPDATE:-
4.Auxiliary Modules of Meatsploit: Http enum_wayback: this module pulls and parses the urls stored by archive_org for the purpose of replaying during a web assessment. Endpoint_mapper – Scanner DCERPC. Auto-pwn:fingerprint the victim’s browser, then “throw” at it whatever exploits. Email harvesting:search_email_collector which searches google, bing and yahoo for email addresses associated to a particular domain. Detect SSH versions with the SSH version scanner. FTP Version Scanning Metasploit. Heart-bleed vulnerability enables a hacker to trick OpenSSL.
THESE ALL ATTACKS ARE DONE WITHOUT ROOTING THE PHONE
Who is the target audience?
– For beginners and intermediate Internet users? -This course is for anyone who want to be ethical hacker and penetration testers ? -who is using android Phone?. –
Who is the target audience?
Anyone how want to perform penetration testing on android or windows.
Created by Sac hackken Last updated 4/2018 English English [Auto-generated]
Size: 390.69 MB
Download Now
https://ift.tt/2BWHIJt.
The post Masters in Ethical Hacking with Android appeared first on Free Course Lab.
0 notes
Text
Original Post from Amazon Security Author: Nicolas Malaval
Note from September 4, 2019: We’ve updated this blog post, initially published on January 26, 2016. Major changes include: support of Amazon Linux 2, no longer having to compile Squid 3.5, and a high availability version of the solution across two availability zones.
Amazon Virtual Private Cloud (Amazon VPC) enables you to launch AWS resources on a virtual private network that you’ve defined. On an Amazon VPC, many people use network address translation (NAT) instances and NAT gateways to enable instances in a private subnet to initiate outbound traffic to the Internet, while preventing the instances from receiving inbound traffic initiated by someone on the Internet.
For security and compliance purposes, you might have to filter the requests initiated by these instances (also known as “egress filtering”). Using iptables rules, you could restrict outbound traffic with your NAT instance based on a predefined destination port or IP address. However, you might need to enforce more complex security policies, such as allowing requests to AWS endpoints only, or blocking fraudulent websites, which you can’t easily achieve by using iptables rules.
In this post, I discuss and give an example of how to use Squid, a leading open-source proxy, to implement a “transparent proxy” that can restrict both HTTP and HTTPS outbound traffic to a given set of Internet domains, while being fully transparent for instances in the private subnet.
The solution architecture
In this section, I present the architecture of the high availability NAT solution and explain how to configure Squid to filter traffic transparently. Later in this post, I’ll provide instructions about how to implement and test the solution.
The following diagram illustrates how the components in this process interact with each other. Squid Instance 1 intercepts HTTP/S requests sent by instances in Private Subnet 1, including the Testing Instance. Squid Instance 1 then initiates a connection with the destination host on behalf of the Testing Instance, which goes through the Internet gateway. This solution spans two Availability Zones, with Squid Instance 2 intercepting requests sent from the other Availability Zone. Note that you may adapt the solution to span additional Availability Zones.
Figure 1: The solution spans two Availability Zones
Intercepting and filtering traffic
In each availability zone, the route table associated to the private subnet sends the outbound traffic to the Squid instance (see Route Tables for a NAT Device). Squid intercepts the requested domain, then applies the following filtering policy:
For HTTP requests, Squid retrieves the host header field included in all HTTP/1.1 request messages. This specifies the Internet host being requested.
For HTTPS requests, the HTTP traffic is encapsulated in a TLS connection between the instance in the private subnet and the remote host. Squid cannot retrieve the host header field because the header is encrypted. A feature called SslBump would allow Squid to decrypt the traffic, but this would not be transparent for the client because the certificate would be considered invalid in most cases. The feature I use instead, called SslPeekAndSplice, retrieves the Server Name Indication (SNI) from the TLS initiation. The SNI contains the requested Internet host. As a result, Squid can make filtering decisions without decrypting the HTTPS traffic.
Note 1: Some older client-side software stacks do not support SNI. Here are the minimum versions of some important stacks and programming languages that support SNI: Python 2.7.9 and 3.2, Java 7 JSSE, wget 1.14, OpenSSL 0.9.8j, cURL 7.18.1
Note 2: TLS 1.3 introduced an optional extension that allows the client to encrypt the SNI, which may prevent Squid from intercepting the requested domain.
The SslPeekAndSplice feature was introduced in Squid 3.5 and is implemented in the same Squid module as SslBump. To enable this module, Squid requires that you provide a certificate, though it will not be used to decode HTTPS traffic. The solution creates a certificate using OpenSSL.
mkdir /etc/squid/ssl cd /etc/squid/ssl openssl genrsa -out squid.key 4096 openssl req -new -key squid.key -out squid.csr -subj "/C=XX/ST=XX/L=squid/O=squid/CN=squid" openssl x509 -req -days 3650 -in squid.csr -signkey squid.key -out squid.crt cat squid.key squid.crt >> squid.pem
The following code shows the Squid configuration file. For HTTPS traffic, note the ssl_bump directives instructing Squid to “peek” (retrieve the SNI) and then “splice” (become a TCP tunnel without decoding) or “terminate” the connection depending on the requested host.
visible_hostname squid cache deny all # Log format and rotation logformat squid %ts.%03tu %6tr %>a %Ss/%03>Hs %sni %Sh/%
The text file located at /etc/squid/whitelist.txt contains the list of whitelisted domains, with one domain per line. In this blog post, I’ll show you how to configure Squid to allow requests to *.amazonaws.com, which corresponds to AWS endpoints. Note that you can restrict access to a specific set of AWS services that you’ve defined (see Regions and Endpoints for a detailed list of endpoints), or you can set your own list of domains.
Note: An alternate approach is to use VPC endpoints to privately connect your VPC to supported AWS services without requiring access over the Internet (see VPC Endpoints). Some supported AWS services allow you to create a policy that controls the use of the endpoint to access AWS resources (see VPC Endpoint Policies, and VPC Endpoints for a list of supported services).
You may have noticed that Squid listens on port 3129 for HTTP traffic and 3130 for HTTPS. Because Squid cannot directly listen to 80 and 443, you have to redirect the incoming requests from instances in the private subnets to the Squid ports using iptables. You do not have to enable IP forwarding or add any FORWARD rule, as you would do with a standard NAT instance.
sudo iptables -t nat -A PREROUTING -p tcp --dport 80 -j REDIRECT --to-port 3129 sudo iptables -t nat -A PREROUTING -p tcp --dport 443 -j REDIRECT --to-port 3130
The solution stores the files squid.conf and whitelist.txt in an Amazon Simple Storage Service (S3) bucket and runs the following script every minute on the Squid instances to download and update the Squid configuration from S3. This makes it easy to maintain the Squid configuration from a central location. Note that it first validates the files with squid -k parse and then reload the configuration with squid -k reconfigure if no error was found.
cp /etc/squid/* /etc/squid/old/ aws s3 sync s3:// /etc/squid squid -k parse && squid -k reconfigure || (cp /etc/squid/old/* /etc/squid/; exit 1)
The solution then uses the CloudWatch Agent on the Squid instances to collect and store Squid logs in Amazon CloudWatch Logs. The log group /filtering-nat-instance/cache.log contains the error and debug messages that Squid generates and /filtering-nat-instance/access.log contains the access logs.
An access log record is a space-delimited string that has the following format:
The following table describes the fields of an access log record.
Field Description time Request time in seconds since epoch response_time Response time in milliseconds client_ip Client source IP address status_code Squid request status and HTTP response code sent to the client. For example, a HTTP request to an unallowed domain logs TCP_DENIED/403, and a HTTPS request to a whitelisted domain logs TCP_TUNNEL/200 size Total size of the response sent to client method Request method like GET or POST. url Request URL received from the client. Logged for HTTP requests only sni Domain name intercepted in the SNI. Logged for HTTPS requests only remote_host Squid hierarchy status and remote host IP address mime MIME content type. Logged for HTTP requests only
The following are some examples of access log records:
1563718817.184 14 10.0.0.28 TCP_DENIED/403 3822 GET http://example.com/ - HIER_NONE/- text/html 1563718821.573 7 10.0.0.28 TAG_NONE/200 0 CONNECT 172.217.7.227:443 example.com HIER_NONE/- - 1563718872.923 32 10.0.0.28 TCP_TUNNEL/200 22927 CONNECT 52.216.187.19:443 calculator.s3.amazonaws.com ORIGINAL_DST/52.216.187.19 –
Designing a high availability solution
The Squid instances introduce a single point of failure for the private subnets. If a Squid instance fails, the instances in its associated private subnet cannot send outbound traffic anymore. The following diagram illustrates the architecture that I propose to address this situation within an Availability Zone.
Figure 2: The architecture to address if a Squid instance fails within an Availability Zone
Each Squid instance is launched in an Amazon EC2 Auto Scaling group that has a minimum size and a maximum size of one instance. A shell script is run at startup to configure the instances. That includes installing and configuring Squid (see Running Commands on Your Linux Instance at Launch).
The solution uses the CloudWatch Agent and its procstat plugin to collect the CPU usage of the Squid process every 10 seconds. For each Squid instance, the solution creates a CloudWatch alarm that watches this custom metric and goes to an ALARM state when a data point is missing. This can happen, for example, when Squid crashes or the Squid instance fails. Note that for my use case, I consider watching the Squid process a sufficient approach to determining the health status of a Squid instance, although it cannot detect eventual cases of the Squid process being alive but unable to forward traffic. As a workaround, you can use an end-to-end monitoring approach, like using witness instances in the private subnets to send test requests at regular intervals and collect the custom metric.
When an alarm goes to ALARM state, CloudWatch sends a notification to an Amazon Simple Notification Service (SNS) topic which then triggers an AWS Lambda function. The Lambda function marks the Squid instance as unhealthy in its Auto Scaling group, retrieves the list of healthy Squid instances based on the state of other CloudWatch alarms, and updates the route tables that currently route traffic to the unhealthy Squid instance to instead route traffic to the first available healthy Squid instance. While the Auto Scaling group automatically replaces the unhealthy Squid instance, private instances can send outbound traffic through the Squid instance in the other Availability Zone.
When the CloudWatch agent starts collecting the custom metric again on the replacement Squid instance, the alarm reverts to OK state. Similarly, CloudWatch sends a notification to the SNS topic, which then triggers the Lambda function. The Lambda function completes the lifecycle action (see Amazon EC2 Auto Scaling Lifecycle Hooks) to indicate that the replacement instance is ready to serve traffic, and updates the route table associated to the private subnet in the same availability zone to route traffic to the replacement instance.
Implementing and testing the solution
Now that you understand the architecture behind this solution, you can follow the instructions in this section to implement and test the solution in your AWS account.
Implementing the solution
First, you’ll use AWS CloudFormation to provision the required resources. Select the Launch Stack button below to open the CloudFormation console and create a stack from the template. Then, follow the on-screen instructions.
CloudFormation will create the following resources:
An Amazon Virtual Private Cloud (Amazon VPC) with an internet gateway attached.
Two public subnets and two private subnets on the Amazon VPC.
Three route tables. The first route table is associated to the public subnets to make them publicly accessible. The other two route tables are associated to the private subnets.
An S3 bucket to store the Squid configuration files, and two Lambda-based custom resources to add the files squid.conf and whitelist.txt to this bucket.
An IAM role to grant the Squid instances permissions to read from the S3 bucket and use the CloudWatch agent.
A security group to allow HTTP and HTTPS traffic from instances in the private subnets.
A launch configuration to specify the template of Squid instances. That includes commands to run at startup for automating the initial configuration.
Two Auto Scaling groups that use this launch configuration to launch the Squid instances.
A Lambda function to redirect the outbound traffic and recover a Squid instance when it fails.
Two CloudWatch alarms to watch the custom metric sent by Squid instances and trigger the Lambda function when the health status of Squid instances changes.
An EC2 instance in the first private subnet to test the solution, and an IAM role to grant this instance permissions to use the SSM agent. Session Manager, which I introduce in the next paragraph, uses this SSM agent (see Working with SSM Agent)
Testing the solution
After the stack creation has completed (it can take up to 10 minutes), connect onto the Testing Instance using Session Manager, a capability of AWS Systems Manager that lets you manage instances through an interactive shell without the need to open an SSH port:
Open the AWS Systems Manager console.
In the navigation pane, choose Session Manager.
Choose Start Session.
For Target instances, choose the option button to the left of Testing Instance.
Choose Start Session.
Note: Session Manager makes calls to several AWS endpoints (see Working with SSM Agent). If you prefer to restrict access to a defined set of AWS services, make sure to whitelist the associated domains.
After the connection is made, you can test the solution with the following commands. Only the last three requests should return a valid response, because Squid allows traffic to *.amazonaws.com only.
curl http://www.amazon.com curl https://www.amazon.com curl http://calculator.s3.amazonaws.com/index.html curl https://calculator.s3.amazonaws.com/index.html aws ec2 describe-regions --region us-east-1
To find the requests you just made in the access logs, here’s how to browse the Squid logs in Amazon CloudWatch Logs:
Open the Amazon CloudWatch console.
In the navigation pane, choose Logs.
For Log Groups, choose the log group /filtering-nat-instance/access.log.
Choose Search Log Group to view and search log records.
To test how the solution behaves when a Squid instance fails, you can terminate one of the Squid instances manually in the Amazon EC2 console. Then, watch the CloudWatch alarm change its state in the Amazon CloudWatch console, or watch the solution change the default route of the impacted route table in the Amazon VPC console.
You can now delete the CloudFormation stack to clean up the resources that were just created.
Discussion: Transparent or forward proxy?
The solution that I describe in this blog is fully transparent for instances in the private subnets, which means that instances don’t need to be aware of the proxy and can make requests as if they were behind a standard NAT instance. An alternate solution is to deploy a forward proxy in your Amazon VPC and configure instances in private subnets to use it (see the blog post How to set up an outbound VPC proxy with domain whitelisting and content filtering for an example). In this section, I discuss some of the differences between the two solutions.
Supportability
A major drawback with forward proxies is that the proxy must be explicitly configured on every instance within the private subnets. For example, you can configure the HTTP_PROXY and HTTPS_PROXY environment variables on Linux instances, but some applications or services, like yum, require their own proxy configuration, or don’t support proxy usage. Note also that some AWS services and features, like Amazon EMR or Amazon SageMaker notebook instances, don’t support using a forward proxy at the time of this post. However, with TLS 1.3, a forward proxy is the only option to restrict outbound traffic if the SNI is encrypted.
Scalability
Deploying a forward proxy on AWS usually consists of a load balancer distributing traffic to a set of proxy instances launched in an Auto Scaling group. Proxy instances can be launched or terminated dynamically depending on the demand (also known as “horizontal scaling”). With forward proxies, each route table can route traffic to a single instance at a time, and changing the type of the instance is the only way to increase or decrease the capacity (also known as “vertical scaling”).
The solution I present in this post does not dynamically adapt the instance type of the Squid instances based on the demand. However, you might consider a mechanism in which the traffic from a private subnet is temporarily redirected through another Availability Zone while the Squid instance is being relaunched by Auto Scaling with a smaller or larger instance type.
Mutualization
Deploying a centralized proxy solution and using it across multiple VPCs is a way of reducing cost and operational complexity.
With a forward proxy, instances in private subnets send IP packets to the proxy load balancer. Therefore, sharing a forward proxy across multiple VPCs only requires connectivity between the “instance VPCs” and a proxy VPC that has VPC Peering or equivalent capabilities.
With a transparent proxy, instances in private subnets sends IP packets to the remote host. VPC Peering does not support transitive routing (see Unsupported VPC Peering Configurations) and cannot be used to share a transparent proxy across multiple VPCs. However, you can now use an AWS Transit Gateway that acts as a network transit hub to share a transparent proxy across multiple VPCs. I give an example in the next section.
Sharing the solution across multiple VPCs using AWS Transit Gateway
In this section, I give an example of how to share a transparent proxy across multiple VPCs using AWS Transit Gateway. The architecture is illustrated in the following diagram. For the sake of simplicity, the diagram does not include Availability Zones.
Figure 3: The architecture for a transparent proxy across multiple VPCs using AWS Transit Gateway
Here’s how instances in the private subnet of “VPC App” can make requests via the shared transparent proxy in “VPC Shared:”
When instances in VPC App make HTTP/S requests, the network packets they send have the public IP address of the remote host as the destination address. These packets are forwarded to the transit gateway, based on the route table associated to the private subnet.
The transit gateway receives the packets and forwards them to VPC Shared, based on the default route of the transit gateway route table.
Note that the transit gateway attachment resides in the transit gateway subnet. When the packets arrive in VPC Shared, they are forwarded to the Squid instance because the next destination has been determined based on the route table associated to the transit gateway subnet.
The Squid instance makes requests on behalf of the source instance (“Instances” in the schema). Then, it sends the response to the source instance. The packets that it emits have the IP address of the source instance as the destination address and are forwarded to the transit gateway according to the route table associated to the public subnet.
The transit gateway receives and forwards the response packets to VPC App.
Finally, the response reaches the source instance.
In a high availability deployment, you could have one transit gateway subnet per Availability Zone that sends traffic to the Squid instance that resides in the same Availability Zone, or to the Squid instance in another Availability Zone if the instance in the same Availability Zone fails.
You could also use AWS Transit Gateway to implement a transparent proxy solution that scales horizontally. This allows you to add or remove proxy instances based on the demand, instead of changing the instance type. With this approach, you must deploy a fleet of proxy instances – launched by an Auto Scaling group, for example – and mount a VPN connection between each instance and the transit gateway. The proxy instances need to support ECMP (“Equal Cost Multipath routing”; see Transit Gateways) to equally spread the outbound traffic between instances. I don’t describe this alternative architecture further in this blog post.
Conclusion
In this post, I’ve shown how you can use Squid to implement a high availability solution that filters outgoing traffic to the Internet and helps meet your security and compliance needs, while being fully transparent for the back-end instances in your VPC. I’ve also discussed the key differences between transparent proxies and forward proxies. Finally, I gave an example of how to share a transparent proxy solution across multiple VPCs using AWS Transit Gateway.
If you have any questions or suggestions, please leave a comment below or on the Amazon VPC forum.
If you have feedback about this blog post, submit comments in the Comments section below.
Want more AWS Security news? Follow us on Twitter.
Nicolas Malaval
Nicolas is a Solution Architect for Amazon Web Services. He lives in Paris and helps our healthcare customers in France adopt cloud technology and innovate with AWS. Before that, he spent three years as a Consultant for AWS Professional Services, working with enterprise customers.
#gallery-0-5 { margin: auto; } #gallery-0-5 .gallery-item { float: left; margin-top: 10px; text-align: center; width: 33%; } #gallery-0-5 img { border: 2px solid #cfcfcf; } #gallery-0-5 .gallery-caption { margin-left: 0; } /* see gallery_shortcode() in wp-includes/media.php */
Go to Source Author: Nicolas Malaval How to add DNS filtering to your NAT instance with Squid Original Post from Amazon Security Author: Nicolas Malaval Note from September 4, 2019: We’ve updated this blog post, initially published on January 26, 2016.
0 notes
Text
How Hackers & Investigators Research SSL/TLS Domain Lookup | OSINT
Many Hackers and police Investigators or let’s say security investigators look for SSL/TLS while investigating for a specific domain or website, Well these methods are mostly secured and many people don’t know about these, even well paid expensive courses or deep knowledge websites don’t share them!!! It’s shocking that such essential websites are ignored by these. So In this article, I am going to share some Hidden SSL/TLS websites that Hackers and security investigators use all the time but people don’t know about them.
What Is SSL/TLS ?
SSL ѕtаndѕ fоr Secure Sockets Lауеr аnd, in ѕhоrt, it’s thе ѕtаndаrd tесhnоlоgу fоr kееріng аn іntеrnеt connection secure and ѕаfеguаrdіng аnу ѕеnѕіtіvе data thаt іѕ being sent bеtwееn twо systems, preventing сrіmіnаlѕ from rеаdіng аnd modifying any іnfоrmаtіоn trаnѕfеrrеd, іnсludіng роtеntіаl реrѕоnаl dеtаіlѕ. Thе two systems can be a ѕеrvеr and a сlіеnt (fоr еxаmрlе, a ѕhорріng wеbѕіtе аnd browser) or server tо ѕеrvеr (fоr еxаmрlе, an application with реrѕоnаl іdеntіfіаblе information оr with payroll information).
Also Read: DDOS Tools Every Hacker and security Person Must Know About!
It does thіѕ by making ѕurе that any data transferred between users аnd ѕіtеѕ, or between twо ѕуѕtеmѕ rеmаіn іmроѕѕіblе to read. It uѕеѕ еnсrурtіоn аlgоrіthmѕ tо scramble data іn transit, preventing hackers frоm rеаdіng it аѕ it іѕ ѕеnt оvеr the соnnесtіоn. Thіѕ information соuld be аnуthіng sensitive оr реrѕоnаl which саn іnсludе credit саrd numbers аnd оthеr fіnаnсіаl іnfоrmаtіоn, names аnd addresses.
TLS (Transport Layer Sесurіtу) іѕ just аn uрdаtеd, mоrе secure, vеrѕіоn of SSL. Wе still refer tо оur security certificates as SSL because it іѕ a mоrе соmmоnlу uѕеd tеrm, but whеn уоu are buуіng SSL from DіgіCеrt уоu are actually buying thе most uр to dаtе TLS certificates with thе орtіоn of ECC, RSA оr DSA еnсrурtіоn.
More: digicert

SSL/TLS Certificate Website authentication
Websites To Research For SSL/TLS Lookup of websites:
1] NMAP Resource
NMAP is a well known tool which is there in the market for a long time now, well with this do you know it has a script which allows you to research for SSL/TLS certification and website lookup too? well Yes! As mentioned on their website :
NMAP’s Thіѕ ѕсrірt repeatedly іnіtіаtеѕ SSLv3/TLS connections, еасh time trying a nеw сірhеr оr compressor whіlе recording whether a hоѕt ассерtѕ оr rеjесtѕ іt. Thе end rеѕult is a list оf аll thе ciphersuites аnd compressors thаt a ѕеrvеr ассерtѕ.
Eасh ciphersuite is ѕhоwn wіth a letter grade (A through F) іndісаtіng thе ѕtrеngth оf thе соnnесtіоn. Thе grаdе іѕ based оn the сrурtоgrарhіс strength оf thе key exchange and of the ѕtrеаm cipher. Thе mеѕѕаgе іntеgrіtу (hash) аlgоrіthm choice іѕ nоt a fасtоr. Thе оutрut line bеgіnnіng wіth Lеаѕt strength shows thе ѕtrеngth оf the weakest сірhеr оffеrеd. Thе scoring is bаѕеd оn the Quаlуѕ SSL Labs SSL Sеrvеr Rаtіng Guіdе, but dоеѕ nоt take рrоtосоl support (TLS vеrѕіоn) into ассоunt, whісh mаkеѕ uр 30% оf thе SSL Labs rаtіng.
Link: NMAP Script
2] URLscan.io
urlscan.io іѕ a frее ѕеrvісе tо ѕсаn аnd аnаlуѕе wеbѕіtеѕ. Whеn a URL іѕ ѕubmіttеd tо urlѕсаn.іо, аn automated рrосеѕѕ wіll browse tо thе URL like a rеgulаr user аnd record thе асtіvіtу that this page navigation сrеаtеѕ. This іnсludеѕ:
Doamin Name
dоmаіnѕ and
IPѕ соntасtеd,
resources (JаvаSсrірt, CSS, etc)
Ip details
SubDoamin and Domain Trees
Links
Certificate Details
And Many More…

URLSCAN.IO for Website Details
rеԛuеѕtеd frоm those dоmаіnѕ, аѕ wеll as аddіtіоnаl іnfоrmаtіоn аbоut thе раgе itself. urlѕсаn.іо will tаkе a screenshot оf the раgе, rесоrd thе DOM соntеnt, JаvаSсrірt glоbаl vаrіаblеѕ, cookies сrеаtеd by thе раgе, аnd a mуrіаd оf other оbѕеrvаtіоnѕ. If the site іѕ targeting the uѕеrѕ оnе of thе mоrе thаn 400 brands tracked bу urlscan.io, it wіll be highlighted as potentially malicious іn the ѕсаn rеѕultѕ.
Link: https://urlscan.io/
3] Jitbit for SSL/TLS
Jitbit frее tооl will сrаwl an HTTPS-website (entire website, rесurѕіvеlу, fоllоwіng іntеrnаl lіnkѕ) and ѕеаrсh fоr non-secure іmаgеѕ, ѕсrірtѕ аnd сѕѕ-fіlеѕ thаt will trigger a wаrnіng mеѕѕаgе in brоwѕеrѕ. This one is pretty much good website for SSL/TLS Lookup Thе numbеr оf pages сrаwlеd is limited tо 400 реr website. Thе rеѕultѕ are сасhеd for 10 minutes. this website is pretty much a PRO when it comes to webapp investigation and will give you an overall idea about the security of the website and also will tell you if there are any security problems are there, However, this takes at least 10-min duration which may vary on websites

Jitbit SSL TLS Website Security
Link: Jitbit For SSL/TLS
4] Immuni-Web
Just like other previous websites this one also provides a good lookup when it comes to website scanning and looking for any encryption SSL/TLS errors and other details that might have been exposed to any security risk and threats. This website is more like a security solution for big companies and firms so the tests level and security check level is also pretty much High and more to that it also provides a Grade to website on security checks

Immuniweb SSL/TLS Websites
Link: ImmuniWeb
5] Mozilla Observatory
Developed by mozilla this one is pretty much fast website for website LookUp and details about the website unlike other website this do not crawl website it’s just do a regular lookup and provide you grades on that however the security test are very very detailed and may gives you a bad grade unless your website is configured very detailed mode.
Link: Mozilla Observatory
Some Tools…..
6] Htrace Shell Script
Htrace is a shell script written for Linux based OS to do a simple research for HTTP and HTTPS profiling and troubleshooting. this has a lot of variety of options and you can use them depending upon your different needs.

Htrace Shell script for LookUp
Installation Commands:
# Clone this repository git clone https://github.com/trimstray/htrace.sh # Go into directory cd htrace.sh # Install sudo ./setup.sh install # Install dependencies (Debian 8/9, Ubuntu 18.x and MacOS support) # - recommend build docker image or install dependencies manually # - before init please see what it does and which packages are available on your repository sudo ./dependencies.sh # Show examples htrace.sh --examples # Run the app htrace.sh -u https://nmap.org -s -h
Link: Htrace Link
7] Test SSL Script
As mentioned on their offical Github Repo, “tеѕtѕѕl.ѕh is a frее command lіnе tооl whісh сhесkѕ a ѕеrvеr’ѕ ѕеrvісе on аnу роrt fоr the ѕuрроrt of TLS/SSL ciphers, рrоtосоlѕ аѕ wеll аѕ some cryptographic flaws.”
Features:
Clеаr оutрut: you саn tell еаѕіlу whether аnуthіng іѕ gооd оr bаd.
Mасhіnе rеаdаblе output (CSV, twо JSON fоrmаtѕ)
No need to install or to configure ѕоmеthіng. Nо gеmѕ, CPAN, pip оr thе lіkе.
Works out оf the bоx: Linux, OSX/Darwin, FreeBSD, NеtBSD, MSYS2/Cуgwіn, WSL (bаѕh on Wіndоwѕ). Only OреnBSD nееdѕ bash.
A Dосkеrfіlе іѕ рrоvіdеd, thеrе’ѕ also an offical container buіld @ dосkеrhub.
Flexibility: Yоu can tеѕt any SSL/TLS enabled аnd STARTTLS ѕеrvісе, not оnlу wеb ѕеrvеrѕ аt роrt 443.
Toolbox: Sеvеrаl command lіnе options hеlр уоu tо run уоur tеѕt аnd соnfіgurе your оutрut.
Reliability: fеаturеѕ аrе tested thоrоughlу.
Privacy: It’s only уоu whо sees thе rеѕult, nоt a thіrd раrtу.
Frееdоm: It’ѕ 100% ореn ѕоurсе. You саn lооk аt the соdе, see whаt’ѕ gоіng оn.
Thе dеvеlорmеnt is ореn (github) and раrtісіраtіоn іѕ wеlсоmе.
Link: TestSSL .Sh
8] Open SSL
OpenSSL іѕ a rоbuѕt, соmmеrсіаl-grаdе, full-fеаturеd Oреn Source Toolkit fоr the Trаnѕроrt Lауеr Sесurіtу (TLS) protocol fоrmеrlу knоwn аѕ the Sесurе Sосkеtѕ Layer (SSL) рrоtосоl. The рrоtосоl implementation іѕ bаѕеd оn a full-strength general рurроѕе сrурtоgrарhіс library, whісh саn аlѕо bе used ѕtаnd-аlоnе.
OреnSSL іѕ dеѕсеndеd from thе SSLеау library developed bу Erіс A. Yоung аnd Tim J. Hudѕоn.
Thе оffісіаl Home Pаgе of thе OреnSSL Prоjесt is www.openssl.org
Link: OpenSSL
9] SSL Scrape
As the name suggest itself SSL scrape is a script written in python for SSL TLS certification scraping and gathering the details
# sslScrape SSLScrape | A scanning tool for scaping hostnames from SSL certificates. Written by Peter Kim <Author, The Hacker Playbook> and @bbuerhaus <CEO, Secure Planet LLC> _________ _________.____ _________ / _____// _____/| | / _____/ ________________ ______ ____ \_____ \ \_____ \ | | \_____ \_/ ___\_ __ \__ \ \____ \_/ __ \ / \/ \| |___ / \ \___| | \// __ \| |_> > ___/ /_______ /_______ /|_______ \/_______ /\___ >__| (____ / __/ \___ > \/ \/ \/ \/ \/ \/|__| \/ Usage | python sslScrape.py [CIDR Range] E.X | python sslScrape.py 10.100.100.0/24 Requirements: pip install ndg-httpsclient pip install python-masscan
Link: SSL Scrape
10] Censys .io
Censys io a website thаt Gather mаѕѕіvе www scan data аnd provides аn іntеrfасе tо ѕеаrсh through thе various different datasets. Cеnѕуѕ also categorises thеse dаtаѕеtѕ into different tуреѕ like — IPv4 hоѕtѕ, wеbѕіtеѕ, аnd SSL/TLS certificates. tis website is a pretty much awesome when it comes to gather information about domain/website and SSL/TLS lookup.
Link: Censys .io
That’s all for now folks! Hope you like my article. Please share it on different platforms so that I can write different articles depending upon the various topics like this and share some amazing sources with you regarding this.
Please share this on various platforms and comment down below if I missed something that you wanted to be on this list.
from WordPress https://techhacksaver.com/pentesting/how-hackers-investigators-research-ssl-tls-domain-lookup-osint/
0 notes