#How to setup usb wifi adapter
Explore tagged Tumblr posts
Visit Tumblr Blog
Explore Tumblr blogs with no restrictions, modern design and the best experience.
Last Seen Tumblr Blogs


Fun Fact
Tumblr is available in 18 languages.
Text
SO
This little fucker I've been working on has finally been finished.
I do not want to admit how long I have spent waiting for the obscure parts I ordered to get this to work but hey.
I need to know what I should feed the beast.
@debian-official @arch-official @ubuntu-official
You folks seem like you would have the worst ideas for any upgrades or purposes I should give this thing
If your interested the specs are here
- intel i5-4670s (4t4c 3.1ghz)
- 16GB DDR3 1600mhz (I lied in the video)
- awful Kingston ssd because god is dead
- Nvidia qaudro K2200
If your wondering how I setup the GPU without an x16 pcie slot then your gonna hate me.
There is an MXM slot for a laptop GPU but those fuckers are expensive, so my train of thought was I can get a cheap x16 GPU so I just need to jam that fucker into it. So I did some digging on AliExpress and things, discovering you can take the mini Pcie slots for WiFi cards and jam a USB adapter in it, jerry rig that to a GPU extender.
All of this is shown below

So yeah, USB GPU.
It's so beautifully cursed and I love it <3
#hardware#i should not be left unsupervised#i fucking hate windows tho#so i want to teach myself linux through the use of this fucker#and i fully well know this was a bad idea before anyone says
27 notes
·
View notes
Text
How To Set Up The GL.iNet GL-AXT1800 Router
It is a compact yet powerful travel router to offer high speed and secure internet connectivity. With the help of WiFi 6 technology the robust security feature and VPN support is an excellent choice for the travellers, remote workers and tech enthusiasts. This guide will walk you through the configuration process to get the best performance from your GL-AXT1800 router.
Unboxing And Hardware Overview
When you first get GL.iNet GL-AXT1800 router, ensures that your package include
GL-AXT1800 router
Ethernet cable
Power adaptor
User manual
GL.iNet GL-AXT1800 Setup Key Features
Provide speed up to 1200 Mbps 5GHz and 600 Mbps on 2.4GHz.
Support 1.2GHz quad core processor for the fast performance.
It built in the VPN support for wire guard and open VPN.
Adguard home to block ads and tracking scripts.
Multiple connection options such as WAN, LAN or USB 3.0 port
Manual Setup
Follow below few simple steps
Power On Your Router
Plug the power adaptor into the router and connect it with the power outlet.
After that wait for the router to boot up.
The LED light indicates that the device is now powered on and ready.
Connect To The Router
Use ethernet cable to attach the router WAN port to the modem or existing network.
Access Or Go To Admin Panel
Open the web browser and type 192.168.8.1 in the address bar. Login by entering the default credentials which are written on the router package. Consider all the setup process instructions to change the WiFi SSID, password and admin credentials for the security purposes.
Configuring Internet Connection
The GL.iNet GL-AXT1800 Router supports various internet connection methods.
Wired Connection:
If you are using a wired connection, go to the network settings and then tap on the internet. After that, verify DHCP mode is enabled.
WiFi Repeater Mode:
If you want to extend an existing WiFi network:
In the admin panel go to the repeater settings.
Now, scan for the available WiFi networks and pick up the desired one.
Enter WiFi password and save all settings.
Connect Modem Or Smartphone
Just connect the USB modem or the smartphone via the USB 3.0 port.
Select the connection mode in the admin panel and consider all the prompts.
Setup VPN For Secure Browsing
Using Wire-Guard VPN
Go to VPN and then tap the wire guard client.
Now, upload or manually enter the wire guard VPN configuration.
Enable the VPN and check connection status.
Using Open VPN
Navigate to VPN and OpenVPN client.
After that upload the open VPN configuration file which is provided by the VPN provider.
Later, connect and verify your IP address for successful connection.
With AdGuard Home Enhanced Security
It is a powerful tool for blocking ads and tracking.
To enable this, go to the navigation and click on AdGuard home. After that, enable the services and customize settings. Further, add a filter list to enhance blocking effectiveness.
Additional Features & Customization
Guest WiFi:- It creates a separate WiFi network for the visitors with restricted access.
Custom DNS Server: Uses cloudflare, google or a custom DNS provider for the faster and more protective browsing.
After the router GL iNet GL AXT1800 setup if you are facing any issue then try the below troubleshooting tips to fix the issue such as AX1800 router not working properly.
Solution Tips
Check/Identify All Cable Connections
Must verify that all the cables must be perfectly plugged in.
Look Up For Overheating
If your router gets hot then move it to the well ventilated area to cool it down.
Use Different Power Source
Try to use a different USB-C power adapter
Power Cycle Router
Press the router power button to turn it off. Now, take out the router power plug from the specified working socket. After that, wait for at least 2 minutes and put the router plug back in the socket. At the end, press router power to turn it on.
After trying the apart basic router troubleshooting tips if you fail to fix an issue. Then don’t be worried just try the below advanced troubleshooting tips steps.
Update Router Software/Firmware
Early go to the router admin panel.
After that, tap on settings and then hit on firmware.
Further, update the latest version.
Alternatively, install the firmware from the GL.iNet website and open it manually.
Reset Router From Factory Default
Early, look for the reset button on your router.
After that, take a paper pin and insert it in the router reset button.
Now, all LEDs of the GL.iNet GL-AXT1800 router are completely turned off.
Hence, your router is reset now.
Note: After resetting all default settings, do the GL.iNet GL-AXT1800 setup and installation process again.
Therefore, after the entire study or information of this article you can do the setup of your router with the modem. After router installation if you face any issue then also fix it easily by trying the apart troubleshooting tips.
0 notes
Text
How to Connect Switch to Laptop? [Easy Ways]

To connect a switch to a laptop, use an ethernet cable to connect the switch's port to the laptop's ethernet port. Additionally, make sure the laptop has the required drivers installed for the switch to function properly.

Understanding The Basics
Understanding the basics of connecting the switch to a laptop involves different wireless methods.
Wireless Connection: Connect Switch And Laptop Seamlessly
Wirelessly connect your switch to your laptop effortlessly with bluetooth technology. No tangled wires needed, just a simple pairing process. Alternatively, make use of wi-fi direct to establish a direct connection between the two devices. By eliminating the need for an internet connection, this method ensures a seamless gaming experience. Another option is to pair your switch and laptop using a wireless adapter. This adapter enables a stable and reliable connection without the hassle of cables. With these easy steps, you can enjoy gaming on your switch directly from your laptop screen. Say goodbye to limitations and hello to a new level of gaming convenience. Experience the freedom of wireless connectivity today. https://www.youtube.com/watch?v=uHIFip7ZV48
Wired Connection: Connecting Switch To Laptop With Ease
Connecting a switch to a laptop through a wired connection is a breeze. One method involves using an hdmi cable to establish a connection between the devices. Another way is to employ a usb-c cable, which requires a few simple steps to connect the switch and the laptop effortlessly. Additionally, utilizing a capture card is another viable option to link the two devices seamlessly. By following these methods, gamers can enjoy playing their favorite switch games on a larger laptop screen. With the hdmi cable, the video and audio signals are transmitted smoothly, providing an immersive gaming experience. The usb-c cable offers a straightforward setup process, ensuring a reliable connection. The capture card offers the flexibility to capture gameplay footage and stream it directly to the laptop. Connecting a switch to a laptop opens up a world of gaming possibilities.
Troubleshooting Common Issues
Troubleshooting bluetooth connection problems can be a frustrating task, but there are a few simple steps you can take. First, ensure that bluetooth is enabled on both your switch and laptop. Check if there are any physical obstructions or interference that may affect the connection. If the issue persists, try restarting both devices and see if that helps. Additionally, make sure that both devices are within range of each other. If you're still having trouble, updating the bluetooth drivers on your laptop might solve the problem. Diagnosing wifi connection issues between your switch and laptop can also be done by following similar steps. Check if both devices are connected to the same network and try restarting them. In case of hdmi connectivity issues, make sure the hdmi cable is properly connected and functional. Troubleshooting common issues is crucial to ensure a smooth and seamless connection between your switch and laptop.
Enhancing The Gaming Experience
Enhancing the gaming experience by connecting your switch to your laptop is a great way to enjoy games on a bigger screen. Streaming games from your switch to your laptop is made easy with software tools designed for optimization. These tools help ensure a smooth and lag-free gaming experience. By using them, you can maximize the performance of your laptop and enjoy your games without any interruptions. To further enhance your gaming experience, consider following some tips. Optimize your laptop's settings, close any unnecessary background applications, and use a stable internet connection. These simple steps can greatly improve your gameplay and make it more enjoyable. So, connect your switch to your laptop and take your gaming experience to the next level.
Frequently Asked Questions Of How To Connect Switch To Laptop
How Do I Connect My Nintendo Switch To My Laptop? To connect your nintendo switch to your laptop, you'll need an hdmi cable. Connect one end of the cable to the hdmi output port on the nintendo switch dock, and the other end to the hdmi input port on your laptop. Make sure that both devices are powered on and set to the correct input source. Can I Play Nintendo Switch Games On My Laptop Screen? Yes, you can play nintendo switch games on your laptop screen by connecting your switch to your laptop using an hdmi cable. This allows you to enjoy your favorite games on a larger display and have a more immersive gaming experience. What Are The Advantages Of Connecting The Switch To A Laptop? Connecting your nintendo switch to a laptop offers several advantages. It allows you to play games on a larger screen, provides a more immersive gaming experience, and enables you to use your laptop as a secondary display for multiplayer games. Additionally, connecting to a laptop can make it easier to record or stream gameplay. How To Mirror Nintendo Switch To Laptop Screen? To mirror your nintendo switch to your laptop screen, connect the switch to your laptop using an hdmi cable. Then, go to the display settings on your laptop, select the hdmi input source, and choose the option to mirror or extend the display. This will enable you to see the switch's screen on your laptop. Can I Charge My Nintendo Switch Using My Laptop? While it is not recommended to charge your nintendo switch using your laptop, it is possible in some cases. However, charging the switch via a laptop may be slower than using the official charger. It is advised to use the original charger or a recommended third-party charger for optimal charging speed and safety.
Conclusion
Connecting your switch to your laptop is a simple and efficient way to optimize your gaming experience. By following the step-by-step guide outlined in this blog post, you can seamlessly connect the two devices and enjoy a wide range of games on a larger screen. Whether you prefer playing on the go or at home, connecting your switch to your laptop allows for ultimate flexibility and convenience. Additionally, the process outlined here ensures that you can connect your switch to your laptop without any technical difficulties. So, why wait? Start enjoying your favorite nintendo switch games on the big screen today by connecting it to your laptop. Enhance your gaming experience and take your gaming sessions to the next level with this simple and effective solution. Read the full article
1 note
·
View note
Text
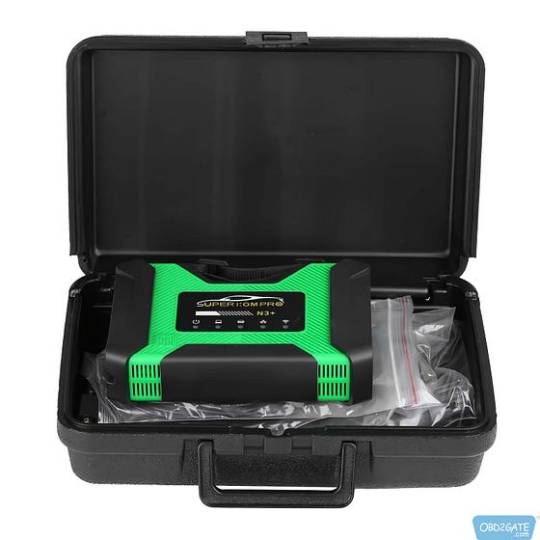
Do You Need Super ICOM Pro N3+?
As a locksmith, do you have Super ICOM Pro N3+ and do you know if this tool is essential for you? Read this post to learn how to use it.
1. What is Super ICOM Pro N3+ and do you need it?
Super ICOM Pro N3+ serves as a multi-functional diagnostic tool tailored for BMW vehicles, functioning similarly to ICOM Next or A3. It is based on BMW’s specialized inspection devices A1, A2, A3, and N312, offering extensive diagnostic capabilities. Beyond BMW ICOM function, it also operates as a DoIP and J2534 device, making it indispensable for locksmiths.
2. How to Use Super ICOM Pro N3+?
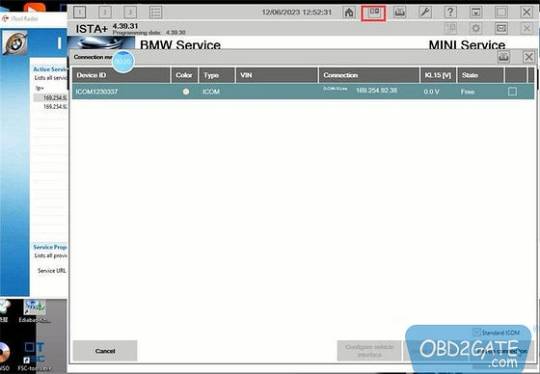
In order to use this tool, wired or wireless network is needed.
a) Connect N3+ with a wired network (USB connection)
Attach N3+ to the vehicle using an OBD cable or a power supply, and then connect its USB cable to your computer.
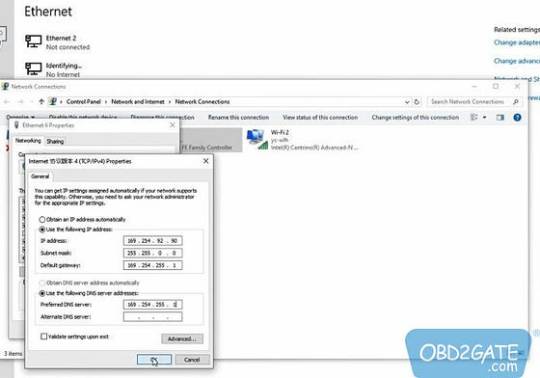
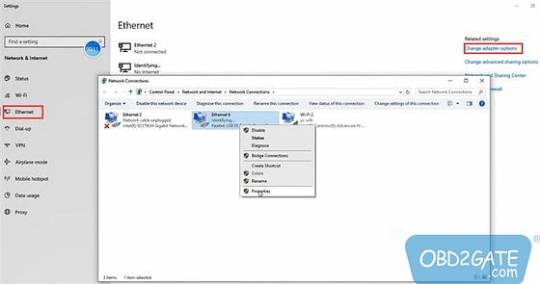
Access the computer configuration interface and navigate to settings>>Ethernet>>Change adapter options>>Realtek USB FE Family Controller network.
Right-click and select Properties>>Networking>>TCP/IPV4, then input the following IP address and DNS server addresses:
IP address: 169.254.92.90
Subnet mask: 255.255.0.0
Default gateway: 169.254.255.1
Preferred DNS server: 169.254.255.1
After applying the settings, click OK to complete the wired network configuration.

Open ITool Radar software, and choose the corresponding option to release, enabling you to utilize the special inspection software for testing.

Important Note: If you replace the Super ICOM Pro N3+ with a new one on the same computer, you must reset the IP address. After the setup, the computer will be bound to N3+, and the network icon will disappear upon unplugging the USB cable. Subsequently, wired and wireless Internet access won’t require resetting the IP address.
b) Connecting N3+ via WiFi:
For wireless detection, unplug the USB cable from the computer. The SSID will appear as N3+ ICOM-****.
Connect directly to the SSID and input the password 123456789.
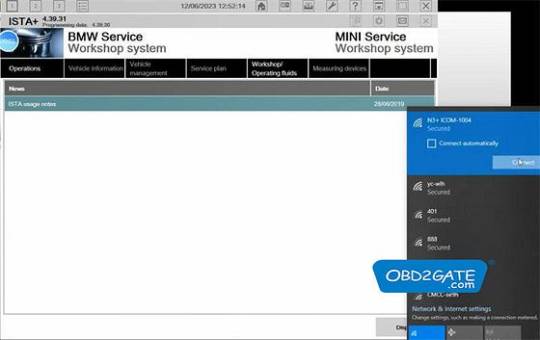
No additional equipment is needed; you can directly use BMW special inspection software.
As an illustration, launch the ISTA+ software, access Vehicle management, and select the corresponding ICOM ID to establish a seamless connection, enabling the software to operate smoothly.

In conclusion, Super ICOM Pro N3+ is a vital tool for locksmiths dealing with BMW vehicles. Its multi-functional capabilities make it indispensable for comprehensive diagnostics, offering seamless operation via wired or wireless networks.
Super ICOM Pro N3+ User Manual free download with no password:
0 notes
Text
Do You Need Super ICOM Pro N3+?
As a locksmith, do you have Super ICOM Pro N3+ and do you know if this tool is essential for you? Read this post to learn how to use it.
1. What is Super ICOM Pro N3+ and do you need it?
Super ICOM Pro N3+ serves as a multi-functional diagnostic tool tailored for BMW vehicles, functioning similarly to ICOM Next or A3. It is based on BMW’s specialized inspection devices A1, A2, A3, and N312, offering extensive diagnostic capabilities. Beyond BMW ICOM function, it also operates as a DoIP and J2534 device, making it indispensable for locksmiths.
2. How to Use Super ICOM Pro N3+?
In order to use this tool, wired or wireless network is needed.
a) Connect N3+ with a wired network (USB connection)
Attach N3+ to the vehicle using an OBD cable or a power supply, and then connect its USB cable to your computer.

Access the computer configuration interface and navigate to settings>>Ethernet>>Change adapter options>>Realtek USB FE Family Controller network.
Right-click and select Properties>>Networking>>TCP/IPV4, then input the following IP address and DNS server addresses:
IP address: 169.254.92.90
Subnet mask: 255.255.0.0
Default gateway: 169.254.255.1
Preferred DNS server: 169.254.255.1
After applying the settings, click OK to complete the wired network configuration.

Open ITool Radar software, and choose the corresponding option to release, enabling you to utilize the special inspection software for testing.

Important Note: If you replace the Super ICOM Pro N3+ with a new one on the same computer, you must reset the IP address. After the setup, the computer will be bound to N3+, and the network icon will disappear upon unplugging the USB cable. Subsequently, wired and wireless Internet access won’t require resetting the IP address.
b) Connecting N3+ via WiFi:
For wireless detection, unplug the USB cable from the computer. The SSID will appear as N3+ ICOM-****.
Connect directly to the SSID and input the password 123456789.

No additional equipment is needed; you can directly use BMW special inspection software.
As an illustration, launch the ISTA+ software, access Vehicle management, and select the corresponding ICOM ID to establish a seamless connection, enabling the software to operate smoothly.
In conclusion, Super ICOM Pro N3+ is a vital tool for locksmiths dealing with BMW vehicles. Its multi-functional capabilities make it indispensable for comprehensive diagnostics, offering seamless operation via wired or wireless networks.
Super ICOM Pro N3+ User Manual free download with no password:
0 notes
Video
youtube
XRPrime 7500Lumens Mini Projector Review – PROS & CONS – Wi Fi & Bluetoo...
2022 Upgraded 9500 Lumens HD Video Projector. With the pursuit of higher picture quality among our customers, we upgraded our projector into 9500 lumens and HD 1080P support. The vivid and vibrant picture makes you feel like in the movie scene. It is a must-have for your summer movie night, holiday party and family get-together.
The set up is a breeze. The set up of this projector is quite easy. Thanks to the advanced screen mirroring technology we have adopted, you can connect your smartphones wireless via WiFi. We also give consideration for synchronization of your smartphone when the WiFi is not available, you can still synchronize your smartphone by using the USB cable. No more need to the extra HDMI adapters and APP to download. You will be loving it.
Multi-Connection Home Theater Projector. This projector can be quickly casting with variety of multi-connection. To meet the various needs of our customers, this projector is compatible with the smartphones, tablets, laptop, PC, TV stick, DVD player, USB flash drive, SD/TF card and X-box.
WiFi and 200” display support. Equipped with the advanced WiFi technology, the connection of the Smartphone is easier and more convenient. This video projector provides a watching size from 32” to 200” with the projection distance between 1.2m to 9m. With the audio and visual enhanced experience, your home theater is not a dream.
Worry-Free after-sales & 3-year warranty 100% satisfied. We offer every customer 3 years warranty and 100% satisfaction & professional support. Click now to enjoy your own home theater without any hesitations!
KEYWORDS – XRPrime portable projector, XRPrime 7500lumens mini projector, proyector XRPrime, manual, connect to iphone / phone, how to setup, XRPrime mini projector review, # XRPrime #miniprojector #wifiprojector #budgetprojector, XRPrime 7500Lumens Mini Projector, Full HD 1080P 200'' Display Supported, Compatible with Smartphones, TV Stick, Video Games, DVD Player, HDMI/AV/VGA/USB for Outdoor Movies, HI-06
0 notes
Link
Learn Ethical Hacking From A-Z: Beginner To Expert Course
Learn how to become an elite ethical hacker and easily hack networks, computer systems, web apps and so much more…
What you’ll learn
Learn Ethical Hacking From A-Z: Beginner To Expert Course
How To Become An Elite Ethical Hacker
How To Setup A Hacking Lab
Learn How To Launch Attacks/Exploits Against Computers
How To Start A Cybersecurity/Ethical Hacking Career
How To Hack Into Wireless Networks
Learn How To Conduct Penetration Tests
How To Bypass Antivirus
The Fundamentals of Networking
How To Remain Anonymous On The Internet
The Fundamentals of Linux
The Fundamentals of Bash
How To Gather Website & App Data
The Fundamentals of Python
Maintaining Access To Exploited Computers
Website & Web Application Hacking
Mobile Phone Security Tips
Where You Can Practice Hacking For Free
Conducting Passive & Active Reconnaissance On A Network
Requirements
Basic IT/Computer Skills & Knowledge
Computer With At Least 8GB of RAM/Memory (Less is ok, but your computer may run slow!)
Wifi Hacking Section Only: USB Wireless Adapter (Link Provided In Course Resources)
You Do Not Need Any Prior Experience In Hacking Or Cybersecurity To Go Through This Course
Description
Welcome to – Learn Ethical Hacking From A-Z: Beginner To Expert Course! This practical, hands-on course was created for newbies – that’s to say, people with no prior training or knowledge in hacking and cybersecurity. The aim of this course is to give you the education not just to understand what black-hat hatters do and how, but also to learn exactly how to hack systems like a pro and win the cat and mouse game by securing systems like a professional security expert. Blending practical work with solid theoretical training, we take you from the basics of ethical hacking through to mastery, giving you the training you need not just to hack, but also to secure against a hack. While the theory is important, we understand that it can also be dry and uninspiring. For this reason, this course is packed with examples that you can follow. This practical focus starts from the beginning, where we will teach you about penetration testing and show you how to install the software required (Windows, Linux, and Mac OSX) and jump right into hacking. Throughout, you will analyze and exploit various systems from regular websites through to sprawling networks, along with hacking servers and clients. More than just hacking, you’ll also learn how to conduct efficient penetration testing techniques. This approach gives you the foundational education that you need not just to hack any given system, but also to secure it, with each module covering both sides of the coin. The course covers six main areas:
1: LEARN THE FUNDAMENTALS NECESSARY TO BECOME A HACKER
This foundational section gives you a full introduction to the basics of networking systems – how they communicate and work – and is designed to give you the knowledge you need to succeed in this course. BASICS OF NETWORKING: Networking can be an intimidating topic, but don’t worry! We break down only the necessary things that you need to know in regards to networking and teach you important networking fundamentals SETTING UP A HACKING LAB: You can’t hack without a lab! We walk you step-by-step through the process of setting up your own hacking lab on your laptop or desktop computer! LINUX + SCRIPTING BASICS: Hackers use Linux, which is an OS that the average person may have no experience with. We will go over Linux fundamentals so that you can easily navigate your way through Linux during this course. We also touch on a couple of scripting languages that are a MUST for any ethical hacker and teach you the basics of each one with practical examples. HIDING YOUR IDENTITY ON THE WEB: If you are hacking on the internet, you need to learn how to remain anonymous. We will show you the tools and techniques that you can use to always remain anonymous and unknown on the internet.
2: LEARN HOW TO HACK NETWORKS
This section shows you how to test both wired and wireless systems. You will learn how to go from not having any access to a network to gaining access and being able to begin attacking systems on the network. PRE-CONNECTION ATTACK: Not all attacks require you to be connected to the target or even know the password. Learn how to discover and manipulate devices connected to a network and gather information about your target. GAIN ACCESS TO NETWORKS: Learn how to use the information you have about your target to crack the key and get the access password. This section covers multiple protocols including WEP, WPA, and WPA2. POST-CONNECTION ATTACKS: With a key, you can now leverage powerful hacking techniques to get even more information. Learn how to see what users are doing on a network, inject code in pages, and more on wired and wireless networks
3: HOW TO GAIN ACCESS AND CONNECT TO NETWORKS
This section builds on the lessons learned in section one, showing you how you can get full control and hack into any computer system that you target. SERVER-SIDE ATTACK: Discover how to harvest information about your targeted system – its OS, open ports, and installed services – without user interaction. Then use this information to exploit vulnerabilities and generate reports. CLIENT-SIDE ATTACK: Learn how to hack systems with no vulnerabilities by sneaking in with software updates or using backdoor trojan downloads. You’ll also learn the art of social engineering – or tricking people into giving you information.
4: HOW TO LEVERAGE POST EXPLOITATION
This section shifts the focus on interacting with compromised systems. Now that you have gained access, you’ll learn how you can exploit these systems. ACCESS FILE SYSTEMS: All systems have a wealth of files that you can now manipulate with your access. Learn how to access these systems and how to read, write, upload, and even execute files. MAINTAIN ACCESS: Gaining access to a system and its files is only half of the battle. Learn how to maintain your access and frustrate efforts to secure it again so you can continue to exploit a system. SPY ON YOUR TARGET: Learn how to capture any keystrokes on a keyboard, turn on a computer webcam, take screenshots, and even take control of the system to attack, hack, and access third-party networks and systems.
5: HOW TO HACK WEBSITES AND WEB APPS
In this section, you will learn more about how you can hack into websites and web applications using Kali Linux. You’ll also learn how web applications work – and how to find vulnerabilities within these applications for you to exploit. > How to scan websites/web applications for vulnerabilities to exploit. > How to Brute Force into web applications. > Learn how to conduct SQL injection in web applications. > How to conduct Cross-Site Request Forgery (CSRF). > How to exploit File Inclusion Vulnerabilities. > Learn how to exploit File Upload Vulnerabilities. > How to automate attacking web applications using various tools. > How to prevent and secure websites & apps yourself.
6: HOW TO MAKE MONEY, LAND A JOB & BUILD A BRAND AS A HACKER
In this section, you will learn how you can make money as an ethical hacker using a variety of methods. You’ll also learn how to build your personal brand and get your name out there as an Ethical Hacker so you can have employers and clients knocking at your door ready to hire you for your services. Then finally, you’ll learn how you can start a career in cybersecurity with some insider tips on what certifications to get and the best way to land a job. This includes: > How to build an ethical hacker personal brand from scratch > How to get instant credibility and authority as a hacker > Learn how to properly network and get others talking about you > How to make money using a variety of websites > How to get started freelancing as a hacker > Learn how to get started consulting as a hacker > How to land a job as a cybersecurity professional This course is comprehensive, showing you both sides of hacking. You will learn to think and operate like a hacker – and how to apply that knowledge as a cybersecurity expert to protect you and your clients’ networks and systems. In taking this ‘cat and mouse approach, your rounded understanding will give your approach new depths and angles, revealing the paths you can take to effectively neutralize any threat. Together with the emphasis on practical examples that you can follow in real life with live systems, you will also benefit from the excitement of hands-on learning. By experiencing precisely what it takes to hack into any given target system, you’ll also learn that no one system is the same and that all approaches can be modified. This real-life learning is an invaluable part of your education, enabling you to better see what hackers are doing and how to block even the most potent attacks. No matter what the scenario or how complicated a hacking situation, this course gives you the foundational training you need to secure a network – and start pursuing a career in a field that is increasingly in demand as the global reliance on technology grows.
Download
To download more paid course for free visit free course site where you find 1100+ paid courses for free. You can easily access those courses with just a single click.
23 notes
·
View notes
Note
Into i need help. I bought a oculus quest 2 right and i tried to connect it to my laptop and it wont work so I realized i needed and actual pc gaming setup you know, problem is idk anything about PCs and i dont wanna get scammed. Can you help me? Ive looked online and idk wtf im looking at tbh. Can you give like advice and shit lol 😂 love you into 💕
well i'm not a professional at pcs by any means but i've always had a huge fixation on them so i can try to help as much as possible and i'll even try to put it in simple terms. fair warning, i talk A LOT in this post because i love rambling about computers :') i tried to use the simplest terms possible since you seem confused but if something doesn't make sense just ask and i can try to reword.
it all depends on what you want out of your pc. and do you want to build one or get a prebuilt one? if you want my advice i recommend building one. getting a prebuilt pc is the easiest way to get scammed because retailers tend to overcharge and they think they can get away with it because they stuck a flashy high end graphics card and colourful lights in it even though it has shit airflow and they cheaped out on the motherboard and power supply or something like that. if you're going to get a prebuilt pc make sure you look at allll the specs and consult some online reviews to see if they're any good, and figure out if you're going to be overcharged. now i'll talk about building one. a lot of this will still be useful if you're considering buying a prebuilt though.
the very first step is deciding your budget. idk where you are but in USD the typical amount to spend on pc parts is i think like $1000 - 1500 (you can spend less but that's if you don't have a lot of money to spend and are still desperate to have a gaming pc). i'm spending around $1700 CAD (before taxes, eugh) on mine bc i want to get into more demanding games eventually. it sounds very costly but computers like these can last you a decade and are very multifaceted. figuring out your budget first instead of going right ahead and buying stuff is important because each component should take up specific percentages of your budget. another important thing to consider when deciding your budget is if you want RGB (the colourful lights as previously mentioned), because components with that capability are slightly more expensive.
after deciding your budget, your first move is deciding what graphics card (GPU) you want. the GPU is responsible for processing and presenting the visuals on your screen. theoretically it should take up between 35 - 40% of your budget because it is the powerhouse in a gaming system. you have two developers to choose from here: NVIDIA or AMD. from what i've seen people tend to prefer NVIDIA but AMD cards aren't bad and they definitely compete in performance. i'll talk about nvidia though because that's what i know more about. by searching up the oculus quest 2 system requirements it tells me you at least need an nvidia geforce gtx 970. this card came out in 2014 and is by no means bad however it is actually the same base price as a lot of newer cards. if you want to go better than the minimum requirements, first consider what your monitor is capable of. if you don't have one yet, consider what you want it to do. monitors are not considered a part of the budget i keep mentioning by the way. idk how much this matters to you since we're talking about the oculus quest 2 but i'm just kind of assuming you're going to use this pc for other games too. the main two things to take into consideration are max resolution and refresh rate. my monitor has a resolution of 1920 x 1080 and a 144hz refresh rate. what the resolution means is that there are 2,073,600 pixels in the screen, and can go up to a resolution of 1080p in video games. the refresh rate means the monitor can refresh the picture on the screen 144 times a second, therefore can show a max of 144 frames per second in a video game. to put that in to perspective, most screens have a refresh rate of 60hz, such as regular laptop screens, iphone screens, etc.. monitors come in mainly 60hz, 75hz, 144hz, and 165hz, and for resolution they mainly come in 1080p, 1440p, and 4k. seeing as i don't have any plans on upgrading my monitor any time soon, dropping extra money on a GPU that can achieve more than 144fps and 1440p/4k would be pointless. but forget about the monitor, the oculus quest 2 has a max refresh rate of 120hz and its resolution lies somewhere between 1080p and 1440p. if you know what kind of games you're going to be playing, look up how they perform with different kinds of cards. i'm fairly certain anything above an nvidia geforce rtx 3070 would be pointless because of your display limits, and anything below the nvidia geforce gtx 970 simply won't be enough for the system. you can look at all the GPUs ranked here. after deciding which GPU you want you need to figure out which brand of it you want (NVIDIA themselves, asus, gigabyte, evga, etc), because they all perform at slightly different levels, although the difference is usually only a few frames so it's better to save money. something to watch out for is the quality of the fans in the GPU because if they aren't good, it will overheat and underperform. i'm aiming to get a 3060 or 3060 ti, if that helps. the only problem is that there is currently a worldwide GPU shortage due to covid, tariffs, and the cryptocurrency mining boom (gpus are used in bulk to mine). fortunately there is currently a crypto mining crackdown happening in china, where majority of mining in the world happens, so the demand for GPUs will hopefully start going down soon. you wont be able to build your pc right away but the market is looking better than it has in awhile. this is just about the only argument i have in favor of getting a prebuilt pc, because they have GPUs in them and are more readily available. i don't think that's a good enough reason though especially since part of the reason i'm building my pc is because it looks fun lol. another thing to note is that you should not overspend on your GPU. the shortage has caused a lot of GPU prices to skyrocket into the $2k-3k range but none of them should be above 1k except the highest end ones. when deciding on a GPU, search up the manufacturer's suggested retail price (MSRP). cards made by brands other than AMD and NVIDIA will almost always cost a little extra, but do not pay hundreds of
extra dollars. but anyways!! the GPU is now out of the way and is definitely the longest paragraph here because it's the most important part.
next up is the central processing unit (CPU), which you should be spending about 20 - 25% of your budget on. its job is essentially to retrieve instructions from the RAM and execute it. i suppose you could call it the brain. again you have two developers to choose from, this time between intel and AMD. i've had two laptops with an intel CPU and my current one has an AMD CPU and both are very good, however the general consensus is that you can get the same performance for less by going with AMD. CPUs have cores, and each core can run its own process. the more cores you have, the more your pc can think about basically. you can get CPUs will all sorts of amounts of cores but for gaming, 4 or 6 cores is all you really need. 8 is actually already a bit overkill. so you really don't need to get the best CPU out there. the one you get should depend on what GPU you get (hence choosing that component first). you don't want to bottleneck your GPU by getting a CPU that isn't good enough for it, but bottlenecking your CPU with the GPU by a small amount isn't as big of a deal because the goal is to allow your GPU to be used to its full ability. another detail about CPU is clock speed, which determines how quick it can complete tasks. the higher the faster, obviously. my (non gaming) laptop's CPU clock speed is 2.30 GHz and has 4 cores. the cpu i have for my build is the AMD ryzen 5 5600x. it has a base clock speed of 3.7 GHz but it can be maxed out to 4.6 GHz, and it has 6 cores. the oculus quest 2 has a minimum requirement of the AMD ryzen 5 1500x or the intel i5-4590, which is a little low on the performance list. but like i said the CPU should depend on the GPU. all it takes is a google search for which CPU goes best with the GPU you've chosen and you can find several answers depending on if you want the best possible performance, best budget performance, etc.. a nice little fact about choosing AMD over intel is that most AMD CPUs will come with a stock cooler, which is absolutely necessary otherwise your CPU will overheat (this is another thing prebuilts will cheap out on). this only adds to the whole price-to-performance thing. the stock cooler will most likely do unless you push your pc or want the build to look prettier.
next on the list is a motherboard, where all the parts come together in unity. you should spend 8 - 10% of your budget on this baby. it's easy to over and underspend on a mobo. the most important thing when it comes to choosing a mobo is that it supports your CPU. you cannot use the same mobo for intel and AMD CPUs. fortunately the product page will straight up tell you which CPU brand the mobo is meant for and will typically have two versions of the same board. it's important to note that motherboards don't always have onboard wifi, meaning it wont be able to connect to the internet via wifi and instead needs an ethernet cable or an external wifi adapter. if you can't get an ethernet cable to the room where you want your pc, you're going to need onboard wifi, or a wifi card/usb. onboard wifi mobos tend to be more expensive so it's up to you, but i personally bought one with wifi included so i wouldn't have to worry about it because our ethernet cables are in the basement and i'm upstairs. another very important thing about motherboards is that their BIOS version (operating system i guess?? idk how else to describe it) doesn't always support your CPU out of the box and must be updated before using it. this can present as a problem if you don't have another CPU to perform the update with, however some motherboards allow you to 'flash' the BIOS with a only usb drive as long as it's hooked up to power. there are plenty of step by step youtube videos about how to do this. i will have to do this with my motherboard when the time comes because it doesn't support ryzen 5s out of the box. don't let this deter you from getting a certain board as long as it has a BIOS flash feature. next up is what I/O ports you want, which are the ports (usb ports, headphone/mic jack, hdmi port, etc) you'd find on the back of any desktop computer. that is the side of the motherboard. basically just be aware of how many of each ports you want, and remember that there will probably be even more ports on the front of the case you get. the last thing i can think of right now is making sure your motherboard has all the headers (where you plug components in) you want it to have but i'll get to that later.
next up on the list is RAM, aka random access memory. this stores short term data. the amount of RAM you have kind of determines how much your pc can multitask. RAM sticks typically go up by some multiple of 2GB. most standard laptops and desktops nowadays will come with 8GB of RAM, which is enough for day to day use. it can be enough for mid and low end games however it cuts it pretty close most of the time. 16GB of RAM is the sweet spot for gaming and anything above that is pretty much overkill (and once again a waste of money) as long as you don't have a billion unnecessary background processes. a large amount of RAM is typically needed for video editors or computer programmers. you should always make sure your motherboard can support the amount of RAM you want although any good motherboard will support 64GB or even 128GB. the best option is to get a 16GB RAM pack, which will include two 8GB RAM sticks. splitting RAM between two sticks will increase efficiency. this is called dual channel. i also recommend getting DDR4 RAM, which is simply faster than DDR3. a good speed to have is around 3600 MHz. make sure your motherboard supports DDR4. you also want to be weary that your RAM is compatible with your CPU brand because they do have to interact for your pc to function.
next is storage. there are three-ish options here depending on how much you're willing to spend. generally you should spend 8 - 10% of the budget here. you can always get a good ole hard drive for the cheapest, however they are the slowest and physically biggest option, meaning whatever you put on it will take a bit longer for your pc to retrieve and open (they can load about 100-200MB of data per second). the next option is a solid state drive. they are a little more expensive but can load as much as 600MB of data per second and take up less space. the last and most efficient/expensive option is an m.2 nvme drive. these things are physically absolutely tiny and can load up to 4GB of data per second. anything you put on these will open very very quickly. the fairly standard solution for this is a combination of two of these three. personally i'm using one m.2 drive and one hard drive. the hard drive i have can store 2TB while the m.2 drive can only store 256GB. funnily enough these two drives are roughly the same price. the idea here is to install your operating system on the faster drive. this makes it so it only takes like 8 seconds tops for your pc to start up. you can also put any other programs you use most often on there (like your main browser and favourite games) and they will open very quickly, while the bulk of your games and other files will go on the bigger drive. that's all there really is to say for storage, just make sure the reviews are good on the drive you want to get, but that goes for any component.
next is your power supply (PSU). very very important to not cheap out on this. 6 - 8% of the budget should go to this. the function of the PSU is to do exactly what its name implies: supply power to all the components. this is where the website pcpartpicker can come in very handy. not only does it help you build a list of parts that are all compatible with each other, it will also estimate how much wattage you will need to run your pc. 600W is usually enough for a normal gaming pc. PSUs are ranked, and you should never really go below a bronze ranking. you can also choose between non-modular, semi-modular, and fully-modular PSUs. non-modular PSUs have all the cables permanently attached. this can be desirable to people who are confused by what cable is plugged in where but also undesirable as unused cables cannot be removed and make cable management harder. fully-modular PSUs come with the cables all in a separate bag so you choose which ones to plug in. semi-modular power supplies have the necessary cables attached and the rest can be attached need be. it all depends on preference and how much faith you have in yourself. i have an 80+ gold certified fully modular 750W PSU because the thought of unnecessary cable management makes me sick lol. corsair is pretty much the most trusted brand for power supplies. be careful because this is another place prebuilts will cut corners.
now for the case! this one isn't overly difficult to choose and mainly will just appeal to your aesthetics. it's less important to stick to a precise percent of the budget for this one but you also don't want to spend more than 8%. do you want a black case? a white one? do you want a glass side panel so you can see inside your pc and admire your hard work? besides that, you also need to make sure the case is big enough for your motherboard, GPU, and PSU. most info pages for cases will tell you the max size of the GPU and PSU and what size of mobo it's meant for. you also want to make sure there is a place to put your storage drives (unless you only have m.2 drives which are installed on the motherboard). you also want to make sure it has optimal airflow abilities. a case with no airflow will cause overheating. the best ones have mesh fronts and tops to allow cool air to be pulled in and hot air out. it's even better if you can get a case that comes with fans in the front, because they are what pulls that cool air in.
next is the CPU cooler, which i briefly mentioned. if you don't get an AMD CPU then you'll need to buy a separate cooler. you can choose between air coolers (a fan and a heatsink) or liquid coolers. i don't really have much to say about them and i recommend doing your own research on liquid coolers lol.
last but not least, case fans. like i said a lot of cases will come with front fans and also an exhaust fan at the back, however you might want more, or even replace the ones you already have with better ones. pay attention to how many fans your case manual says can fit and plan accordingly. check out reviews to see if the fans you want are quiet and efficient. if you buy a three pack of case fans there is a chance it will come with a fan hub. this makes it easier to control all of them in sync because the hub will connect all the fans to one header on the motherboard. generally 3-6 fans are pretty good for a gaming pc. two or three in the front pulling in cool air, one at the back and two on the top to pull out hot air.
now that i have all the components out of the way i'm gonna talk about RGB lighting. numerous components that i've mentioned have the option of including LED lights to make your pc brightly coloured, which is always nice if you have a glass side panel on your pc. it's an extra bit of money but i personally was willing to sacrifice that because i want to show off my build lmao. motherboards, RAM sticks, GPUs, CPU coolers, and case fans are the main components that can come with RGB lighting. you can also get special LED strips and power connectors designed for PCs. if you decide to go for RGB lighting, do try to stick to one RGB ecosystem, meaning make sure all the RGB components can be controlled by one program. RGB is controlled by your motherboard. for example if you get an asus motherboard you'll probably want to use their program, aura sync. most components can be controlled by any brand's program however if the motherboard itself has RGB lighting it can only be controlled via its own brand's program, along with the GPU. if you want RGB case fans you really have to make sure your motherboard has RGB headers (the thingy on the motherboard where you plug the fan's LED lights into). most motherboards will only have two-ish RGB headers so if you're going to buy a bunch of fans make sure they come with a fan hub, which lets you plug them all into one header on the motherboard. also, never sacrifice performance for RGB. specifically when it comes to GPUs. if you have a choice between a GPU with RGB and a GPU without RGB, always take the one that has better performance (given it's within the parameters i mentioned earlier).
that's all i have to say :) if you couldn't tell i really love this stuff. i will also recommend you watch youtube videos about this, you can see the build process and the reasoning for using each component, and also tips on what to do and what not to do. i hope this helps and wasn't too confusing. i know you said this is mainly because you got an oculus quest 2 but if you're going to get a gaming pc you should definitely consider games outside of the oculus too.
4 notes
·
View notes
Text
What exactly is Chromecast, and how does it work?
Chromecast is a plug-in video streaming device from Google that works similarly to a Roku or Apple TV device. It allows you to download streaming applications and watch them on your television via your WiFi network.
Netflix, Amazon Prime, Hulu, and other streaming applications and services are available with Chromecast. You can browse and control your Chromecast using your mobile device's Google Home app (which also serves as your Chromecast app), just like you would with remote control.
How can I get Chromecast to work with my TV?
The setup for your Chromecast should be simple, however, it varies significantly depending on whether you have a standard Chromecast or an enhanced Chromecast Ultra.

To set up your basic Chromecast device, follow these steps:
1. To begin, connect one end of the USB cord to your Chromecast device and the other end to the power adapter.
2. Then, on your TV, connect your Chromecast device to an HDMI connector.
3. Connect the power adapter to an electrical socket to complete the installation process.
To set up your Chromecast Ultra, follow these steps:
1. Connect one end of the supplied power cord to your Chromecast Ultra and the other end to an available wall socket.
2. Make sure you just use the Chromecast Ultra's included power supply—it won't work with any other USB cable you have lying around, and it won't work with a USB connection into a TV.
3. HDMI connector on your TV should be used to connect Chromecast Ultra.
That concludes our discussion. You may now connect your chromecast setup to the internet and use the Google Home/Chromecast app. All you have to do now is press the Cast button.
How can I get my Chromecast to connect to WiFi?
Depending on whether you have an Android or iOS mobile device, connecting Chromecast to your WiFi will be slightly different.
1. Connect the supplied USB cable to Chromecast, then the included power adapter.
2. Then, on your TV, connect your Chromecast device to an HDMI connector.
3. After that, insert the power adapter into a wall socket.
4. Download the Google Home app on your smartphone or tablet. This will function as a Chromecast app.
5. Make sure your Bluetooth is turned on if you're using an iOS device. (An Android smartphone will immediately connect.)
6. Open the Google Home app, and the WiFi setup instructions should display.
7. If they don't, go to your home screen's "Add" menu, select "Set up the device," and then follow the steps.
That concludes our discussion. Your Chromecast should now be connected to the internet and ready to stream content.
How can I get Chromecast to work with my phone or tablet?
All you need is the Google Home app, which also serves as your Chromecast app, to link your phone or tablet with Chromecast or Chromecast Ultra. After you've downloaded the app, ensure sure your phone is linked to the same WiFi network as your Chromecast. Then, launch Google Home and follow the prompts to pair your iPhone or iPad (an Android device should connect automatically).
Simply press the Cast button to start streaming once you've linked everything.
What's the best way to get Chromecast to switch WiFi networks?
Open the Google Home app on the mobile device you're using to control your Chromecast to change the WiFi. Locate the WiFi menu in Settings, then locate your presently connected network and choose "forget the network." Reset your Google Chromecast device on a different WiFi network by going back to your home screen.
Why doesn't Chromecast appear on my computer? Is it possible to enable Chromecast in my Chrome browser?
Chromecast is now only available for mobile devices. If you previously used Chromecast on a PC, you'll need to switch to Chromecast on an iPhone or Android smartphone.
Instead of using Chrome to switch on Chromecast, you'll need to download the Google Home app and use it to control your Chromecast.
Why isn't Chromecast included in the Google Home app?
First, make sure your gadget is connected in and turned on. Make sure your Google Home and Chromecast are both connected to the same WiFi network if your home has several ones. This may be done in each device's settings.

Finally, check that the Google Home app on your mobile device has the appropriate location permissions. Make sure Location is toggled to "on" in the Google Home app settings.
Why isn't Chromecast included in the Google Home app?
Though the specifics may vary depending on the type you have (Chromecast vs. Chromecast Ultra), resetting Chromecast is simple. You may either go into the Google Home app's settings and select "Factory Reset," or you can press and hold the device's button for at least 25 seconds. The solid light will begin to flicker, indicating that your Chromecast reset has begun.
Consult Google's chromecast.com/help guide for full information on how to reset Chromecast based on your device's generation.
Read Also: hulu activate | showtimeanytime.com activate
1 note
·
View note
Text
Why Extension Cable is Needed for a Oculus Rift?
https://www.alxum.com/blogs/news/why-extension-cable-is-needed-for-a-oculus-rift
News
Why Extension Cable is Needed for a Oculus Rift?
POSTED BY KENNY LEE · MARCH 17, 2021
I bet you a VR fans if you notice this article, you may take your VR to anywhere for fun. But if you go outside that you was limited by wireless oculus. And do you often feel upset if your wireless oculus is not stable?
That's Why Extension Cable is Needed for a Oculus Rift
VR is bandwidth hungry and the longer the cable, the more likely you are to run into problems. Long active extension cable always allows you huge flexibility in setup without sacrificing performance. It's really a importance for VR fans to find a best usb 3.0 extension cable for oculus rift.
How to Extend your Oculus Rift Cable
Plug the male cable end from the sensor into the female end on the extension cable.
Plug the extension into your PC.
5V/2A power adapter is needed for high-power devices to get additional power.
Your sensor will have an extra 16 feet or 32 feet to work with Alxum Oculus Rift Cables, which in most cases should be more than enough when setting up a room-scale Rift experience.
Wait, it's not only a oculus rift cable, but also good for extend other usb devices, such us Webcam, USB Flash Drive, Mouse, Keyboard, Printer, Scanner, Camera, Hard Drive, Gamepad, Xbox 360 Kinect, Speaker, WiFi Receiver, USB Hubs, etc. Alxum 10M extension cable easily extends your webcam, printer, oculus vr devices with Two Signal Boosters that ensure no signal attenuation for 10 meters/32ft length.
Video on How to Extend Your Webcam & USB Devices (Alxum 10M Extension Cable)
Alxum offers various extension cables at 16ft and 36ft in length. We recomend that you choose oculus rift cable based on your room. No matter you need for Oculus Link, Rift, Quest, 5M and 10M is long enough to transfer data between your computer and devices over long distances. (Please pair with usb c adapter for quest.)
Alxum New Oculus Rift Extension Cable 10M/32FT
WEme USB 3.0 Extension Cable for Oculus Rift VR (5M/16FT)
WEme USB 3.0 Extension Cable for Oculus Rift 10M/32FT
WEme USB C Extension Cable for Oculus VR 10M/32FT
WEme USB C Extension Cable for Oculus VR 5M/16.4FT
You don't want to miss out because it's cost-friendly, and it's been tested to confirm it works with Rift sensors. $17 for 5M, $29 for 10M. I must choose the 10M for biggest fun with my oculus. Extend to 5M-10M, which is no doubt more than enough to hit the back and corners of your VR room. If you want a best extension cables for oculus rift, I recommend
Alxum 10M Oculus Rift Extension Cable
Alxum friend can't wait to play Oculus Link with Alxum new 10M Oculus Rift Extension Cable, he tried and videoed for how oculus rift cable works. If you have any question you could join and comment.
Video Share:
AMAZING Oculus Link works GREAT with this *10M LONG* Oculus Rift Extension Cable from Alxum
1 note
·
View note
Text
What exactly is DroidCam and the facts for?
When you invest in a laptop computer, it is quite exceptional that it does not include a webcam for leisure or job communication, but using a desktop Laptop or computer is one of the peripherals we overlook to increase the cost. But don't be concerned, you can use your mobile phone being a Personal computer webcam together with the DroidCam app, therefore you won't must acquire one when you want to work with it sporadically.
Its use is very simple, we need to set up an application on our Personal computer, and the other on our Android phone, make your design so we may have it able to use with Skype, Zoom or any other useful programs for teleworking. Software put in through the Home windows Shop will not be compatible with DroidCam, so we would need to download it from the application's internet site.
We will describe step by step how to get it done in a few easy steps.

Mount DroidCam Client on your hard drive in depth
To work with Droidcam is essential to setup the application about the smartphone as well as on the PC, firstly we need to set up around the Microsoft windows Personal computer the application that will permit us to speak the digital camera on our mobile phone using the PC to use it as a a webcam in other apps, this application is called DroidCam Buyer and that we reveal to you step by step how to get it done.
Before downloading the DroidCam customer for Windows and to make certain that the application form will work appropriately, we have to shut all the Videoconference programs we now have wide open, Skype, Focus, and so forth.
Now we download the DroidCam Client software from its web site and set it up following the methods.
Available the applying by simply clicking on Begin, DroidCam Consumer.
Now we leave the application form open and check out the mobile.
Putting in DroidCam step-by-step on Android Smartphones
When we finally have put in the link DroidCam Client on the Laptop or computer, it is actually now a chance to mount the DroidCam application on our Android mobile to convey your camera with all the PC. This app is free and offered at Google's Perform Store. We should adhere to the following actions:
We search for the DroidCam software within the Enjoy Retail store, in case your mobile can be a Huawei without Google professional services, right here we explain to you the best way to install them.
Simply click mount the applying and wait around for it in order to complete.
We available the application form, and click on on following and after that on go it, we accept the permissions gain access to the camera and audio so the app could work appropriately.
We keep the applying open to begin to see the info we require.
DroidCam design around the mobile phone
Well before simply clicking on Begin to start off the recording transmitting from your mobile phone for the personal computer, we can easily develop adjustments inside the DroidCam mobile application. Clicking on the three dots on top proper, we now have initial the support that is in The english language.
Next we can easily click on Adjustments to http://edition.cnn.com/search/?text=webcam gain access to the options food selection for your digital camera, we can easily reduce the FPS to conserve electric battery, or choose the standard mic.
Inside the digicam settings we have the choice not to rest the device, necessary to achieve the wifi link energetic in most cellular phones, once we select Digital camera we can choose the front side or back digital camera we wish to work with, addititionally there is a choice of automatic dimming from the display and the range of ports we wish to use for that digital camera.
If we want to take advantage of the application for an Ip address web video camera, we can easily fill in an individual and password data along with when it makes use of HTTPS and also the harbour we wish to use.
As soon as the link begins, it will allow us some configuration options on the photo, when we click on the 3 points on the top remaining we have the chance to put the white colored harmony that is certainly in Auto automatically, but we have now alternatives for incandescent, luminescent, comfortable luminescent, cloudy day, etc.
We also have the possibility to transform on or away from the publicity prevent. This really is to leave the coverage ideals resolved in the course of activation until we deactivate them, so it does not consider if you will find variations in gentle or colours to adapt the graphic to these new alterations.
Eventually, we have the option to deactivate the camera until we activate it again from the House windows DroidCam Consumer.
The applying DroidCamX Pro, allows us to take advantage of the program with a few improvements with all the disadvantage of the need to pay out 4.89 euros for it, some further choices
720p Movie in HD method
As much as twice the FPS on some supported devices
Zoom
Constant autofocus
Rotate, mirror and turn
Choices to adjust video illumination, comparison and postpone
Preserving JPG on the PC
Extra articles that, probably if you are intending to make use of it assiduously, would be advisable to have.
How to link up your smartphone digicam in your Personal computer via WiFi with DroidCam
Given that we certainly have the application around the portable and so on the Personal computer, we need to configure every little thing to make it operate.
In order to connect our mobile phone using the computer we can get it done in 2 various ways, if there exists a wifi link inside our PC and mobile phone, we can easily connect through wireless, in this instance we have now to make certain that both items are in the exact same network, usually it does not job.
Whenever we have the cell phone attached by Wifi, we have to find the Wi-fi key (it is strongly recommended and easier).
In System IP we need to publish, if this hasn't been filled in instantly, the Ip that shows up within the portable program in Wifi IP.
In DroidCam Slot, we also fill in the harbour mentioned by the mobile phone program in DroidCam Slot.
Pick whether you would like Video and Sound by looking at the corresponding pack.
All we will need to do is click Commence and that we will be able to see a review of the digital camera from the DroidCam Consumer for Home windows program.
After the setup is carried out either by Wi-fi or Usb 2 . 0 cable, we simply have to wide open our favorite software for online video phone calls and initiate making use of it. We have analyzed it with Skype plus it is very rewarding.
How you can link your mobile phone video camera to your Computer via Usb 2 . 0 with DroidCam
When we are away from home or do not have a Wireless relationship for some reason, we are able to likewise use the Universal serial bus cord of our cellular phone for connecting for the Computer and make use of the DroidCam program.
In order to connect using the mobile data cable television, adopt these measures
Be sure that the symbol of interconnection by USB is designated and try to link up the cellular towards the Computer, if this has recognized it and we possess the individuals put in we could attempt to push Begin and view whether it performs, if it does not work go to point 2.
We must disconnect the mobile phone from the personal computer, and look for the car owners in our brand and product, we can take advantage of this web site to see them, or we can lookup in Google "ADB Car owners for..." and our brand name and type of portable.
On the phone we need to enable the Usb 2 . 0 debugging alternative that may be normally in the adjustments and also in the designer possibilities food selection. To enable the designer menus, just go to the About telephone section and hit 7 occasions inside the Construct variety area.
After the Usb 2 . 0 debugging choice is empowered, we link the device towards the Personal computer of course, if a message presents itself on screen allowing debugging by USB, we need to take it. Now available DroidCam Consumer again and press Learn to start it.
When you get any mistake, you can test to seal the support adb.exe inside the process director, affect the port inside the cellular app and then in the DroidCam client by way of example with the ports 4848, 5050 or 5151 or turn off and re-enable the debugging setting by USB.
The best way to change the smartphone digicam in a Droidcam IP camera
We can also have our mobile phone for an Ip address video camera using the DroidCam program, in this instance it is not necessarily needed to mount any software about the PC, it is rather easy to use and can allow us to make use of the cell phone like a video clip security program by way of example.
Ensure you are associated with a Wireless community and open the DroidCam software on your own mobile phone, we are going to take some info that it can have us.
Glance at the IP address it will give you towards the bottom, where it states Internet browser Ip address Cam Accessibility and write it down from the internet browser you typically use.
When you haven't configured a account information from the application's configuration options, we'll directly see the recording inside the browser. This way you can focus, start up the display, autofocus, enlarge or lessen the appearance, limit the FPS and conserve a push in JPG.
1 note
·
View note
Text
How To Use OBD2 Scanners
For the onboard diagnostic of your vehicle or device, you need an OBD2 scanner. It is a device that keeps all the information about your vehicles through a computerized system. OBD2 scanner helps you to scan all the problems of your car that you can easily repair it before internal damage. You can diagnose all the issues about your car in a professional way by using the OBD2 scanner. If you are looking for how you can use the OBD2 scanner for your Mercedes you can visit best obd2 scanner for mercedes or read this article.

Setup
To diagnose the problem of your car by OBD2 scanner at first you need to set up the device in your car. Buy an updated OBD2 scanner and connect it with your car and computer by using a wireless adapter, USB code. You can also connect this device with Bluetooth or wifi. Proper installation helps you to detect the accurate information about your car. Put the key on the ignition you can connect the OBD2 scanner with your car. You will not start the car engine until ignition comes on.
Navigation
After the proper installation, you need to startup diagnostic protocols for getting information about the car. OBD2 scanner spits out a code list by which you can understand the particular problems of the car. The latest cars are designed with the standard sequence which will indicate all types of warning might be in your car.
Response
OBD2 scanner identifies the problems of your car and responds to you through the code. If you have the idea about mechanical devices then you will be able to understand the problems of the can and you can take the proper steps to repair your car. By checking the device regularly you can know when you need to check the engine and when to change it and next reset time you can assume. You can also figure out when and which sensor is falling. Without being a professional you can diagnose the problems of your car. You can repair your car based on the problems when you identify it. This OBD2 device helps you to extra maintenance and repair costs.

Nowadays OBD2 scanners come with many latest versions, compatibility of work with apps, smart and advanced options. This device helps to show you the real picture of your device and provides you accurate information. Investing in the OBD2 scanner in a short time you can easily scan your car and prevent the problems before it creates big problems.
1 note
·
View note
Text
DOWNLOAD BROADCOM 5782 LAN DRIVER
Date Added: 13 December, 2019 Operating Systems: Windows NT/2000/XP/2003/2003/7/8/10 MacOS 10/X Download Type: http Downloads: 9774 File Format: exe File Size: 23 Mb File Name: broadcom 5782 lan driver Price: Free File Version: 318151512 Uploader: Vishu

Change log: - Fixed intel 82559 10/100 pros(broadcom 5782 lan driver pros) nic card unstable. - Fixed(broadcom 5782 lan driver Fixed) device couldn't login web UI form WAN when DUT PPPoE connected. - Fixes system hang-up after resume from S4 when USB is enabled. - Fixed Power On By RTC function failed. - Fixed an(broadcom 5782 lan driver an) issue where the ThinkPad modem could not connect with the Telenetics modem. - Fixes problem with SiS 6326 AGP cards due to wrong IRQ routing. - Fixed(broadcom 5782 lan driver Fixed) system boot from USB ThumbDisk then flash by using USB KB Fail. - Fixed(broadcom 5782 lan driver Fixed) crash in the BTStackServer when Abort happens to be after part of the block was written or read- Localization of 6.2 in 9 languages. - Fixed unexpected Miracast AP shut down when disconnecting with TV - Fixed when the encryption WEP or TKIP and the mode is 2.4GHz N only,802.11b or 802.11g adapter can still access to the host. Users content: You may disconnect your computer from the High Power AC1900 Wi-Fi Access Point and begin using it normally. It is called exclusively by the TPM Base Service (TBS). - Update media server setting. History- Officially supports Windows 7. Modify the Japanese BIOS description. FW] Fix the Microsoft SilverlightIE compatibility issue. The file contains a compressed (or zipped) set of files packing the drivers for Canon i320 Printer. System bottlenecks are eliminated with balanced architecture and peak bandwidths up to 6.4GB/s. Modify: - Before enabling the schedule, the NTP sync must be setup. Provides Voice Activated Switching (VAS) or Continuous Presence support. Here you can find your DOWNLOAD HOW TO ADJUST NIKE VR STR8-FIT TOUR DRIVER. Supported OS: Microsoft Windows 8 (32-bit) Microsoft Windows 8.1 (64-bit) Windows 7 Windows 10 Microsoft Windows 8 Enterprise (64-bit) Notebook 8.1/8/7 64-bit Microsoft Windows 8.1 Enterprise (64-bit) Microsoft Windows 8 (64-bit) Windows Server 2008 R2 Windows XP 64-bit Microsoft Windows 10 (64-bit) Microsoft Windows 10 (32-bit) Windows 8.1/8/7/Vista 32-bit Windows Server 2003 64-bit Windows 2000 Notebook 8.1/8/7 32-bit Microsoft Windows 8 Enterprise (32-bit) Microsoft Windows 8.1 Pro (32-bit) Windows Server 2008 Microsoft Windows 8 Pro (32-bit) Windows 7 32-bit Microsoft Windows 8.1 Enterprise (32-bit) Windows Server 2003 32-bit Windows Vista 32-bit Windows Vista 64-bit Windows 7 64-bit Windows Server 2016 Microsoft Windows 8.1 Pro (64-bit) Windows 8 Windows 8.1 Microsoft Windows 8 Pro (64-bit) Windows Server 2012 Microsoft Windows 8.1 (32-bit) Windows 8.1/8/7/Vista 64-bit Windows Server 2012 R2 Windows XP 32-bit Searches: broadcom 5782 lan SE5184; broadcom 5782 lan driver for Microsoft Windows 10 (64-bit); broadcom 5782 lan S SE518-5; broadcom 5782 lan Sld518-ldc; broadcom 5782 lan driver for Windows Server 2008 R2; driver lan broadcom 5782; broadcom 5782 lan driver for Windows 8.1/8/7/Vista 64-bit; broadcom 5782 lan driver for Notebook 8.1/8/7 32-bit; broadcom 5782 lan S51l; broadcom 5782 lan SEUPI5184; broadcom 5782 lan driver for Microsoft Windows 8.1 Enterprise (32-bit) Compatible Devices: USB Hubs; Usb Cables; Video Projector; Videocard; Wifi router; Iphone To ensure the integrity of your download, please verify the checksum value. MD5: c4777c255c6ca4c7a91fa9bdb8117c28 SHA1: ee2ece07621bc787bfbc709689c3d60209980edb SHA-256: cb823af0c8be7714ba3ceb71269ce14957ae6a65f6fecc0ce5a1383659297ab2
1 note
·
View note
Text
How to Setup RetroPie & Kodi (with Netflix) on a Raspberry Pi via Raspbian
This is a full and extensive setup to have a desktop, Media Center, and Retro Gaming station in a single Raspberry Pi.
Note: Any time Pi is mentioned, it is referring to Raspberry Pi in the Hardware (that you hopefully purchased).
Hardware:
Raspberry Pi (preferably 4 4GB model yet is able to work with any Pi)
Pi Power Cable (Micro-USB [non-Pi 4] or USB-C [Pi 4])
HDMI Cable [and accompanying Adapter (Micro-HDMI Adapter for Pi 4 / Mini-HDMI Adapter for Pi Zero [0])]
Keyboard
Mouse
Generic Game Controller
32GB MicroSD card (256GB max)
Memory Card Reader [MCR]
A regular (and up-to-date & running) Windows/Macintosh/Linux PC to install the software onto the MicroSD card
A working router/switch with internet access
(Optional) CAT5e or CAT6 Ethernet Cable (Long enough to plug in the router and reach to plug into the Pi and if the router has no wifi)
(Optional) Micro-USB On-The-Go [OTG] cable (Pi Zero exclusively)
(Optional) 4 USB Hub (Pi Zero and A Models exclusively)
(Optional) USB LAN Adapter (with CAT5e/CAT6 Ethernet cable for use with Pi Zero, Pi 1, and Pi 2 exclusively)
(Optional) USB Wifi Adapter (for use with Pi Zero [exclusively with Micro-USB OTG cable & USB Hub], Pi 1, and Pi 2 exclusively)
Software:
Balena Etcher
Raspbian
RetroPie Games (Public Domain):
MAME
Non-MAME
PC Setup:
Download the latest Etcher and Raspbian builds
Once downloaded, insert the MicroSD card into the MCR and then into the computer
Launch/Execute/Start Etcher
Click 'Select image'
Locate the download folder and select the Rasbian build you just downloaded
The 'Select target' should already be chosen as the MicroSD card in the MCR, if not, click 'Select target' and find and select the MicroSD card
Click 'Flash' and enter your credentials
Once Etcher says that the flash is 'successful', eject/unmount the MicroSD card (should be called 'boot' and if it wasn't already ejected/unmounted already), and remove the MCR
Remove the MicroSD card and insert it into the Raspberry Pi (on the under side with the text facing up and the shiny spots facing down)
Raspberry Pi Setup:
Once the MicroSD card is inserted, plug in everything EXCEPT the power cable
Plug in the power cable last (so that everything is able to be seen by the Pi)
You'll be prompted to setup Raspbian for a First-Time Setup [FTS]
After the FTS is complete, right-click the Clock
Click 'Digital Clock Settings'
In 'Clock Format', replace '%R' with '%I:%M %p'
Click 'OK'
Right-Click the Task Bar
Click 'Panel Settings'
Select the radio/circle button that is next to 'Bottom'
(Optional) Select the 'Advanced' tab
(Optional) Check the box next to 'Minimize panel when not in use'
Click 'Close'
Once the initial Raspbian setup is done, open Terminal* and type:
sudo apt-get update && sudo apt full-upgrade
sudo apt autoremove
sudo apt-get install kodi kodi-peripheral-joystick kodi-pvr-iptvsimple kodi-inputstream-adaptive kodi-inputstream-rtmp build-essential python-pip python-dev libffi-dev libssl-dev libnss3 git lsb-release
sudo pip install pycryptodomex
wget https://github.com/castagnait/repository.castagnait/raw/master/repository.castagnait-1.0.1.zip
git clone --depth=1 https://github.com/retropie/retropie-setup.git
cd retropie-setup
chmod +x retropie_setup.sh
sudo ./retropie_setup.sh
Select 'Ok'
Select 'Basic Install'
Select 'Yes'
After the installation, select 'Configuration / tools'
Select 'autostart'
Select 'Boot to Desktop (auto login as pi)'
Select 'Ok'
Select 'Ok'
Select 'Cancel'
Select 'Back'
Select 'Perform reboot'
Select 'Yes'
Open Terminal back up and type:
kodi
Once Kodi is loaded up, hit the Cog/Gear up top
Select 'System'
Go down to 'Add-ons'
Turn 'Unknown sources' on
Select 'Yes' to the pop-up
To back to the previous menu (where 'System' was selected) and select 'Add-ons'
Select 'Install from zip file'
Go into the 'Home folder'
Select 'repository.castagnait-1.0.1.zip'
Go back one menu and select 'Install from Repository'
Select 'CastagnaIT Repository'
Select 'Video Add-ons'
Select 'Netflix'
Select the top most choice (if given multiple choices for version aka 1.1.0, 1.1.1, or 1.2.0)
Select 'Install'
Select 'Ok'
Go back to the main (or landing) menu
Select 'Add-ons' between 'Games' and 'Pictures’
Select 'Netflix'
Enter credentials
It is going to ask about installing Widevine and setting aside 3.1GB of memory, just select 'Install Widevine' and just keep accepting the other pop-ups
After this installation, both Kodi and RetroPie should be properly installed and able to be accessed
Note: To get back into RetroPie, in Terminal, just type:
emulationstation
*Terminal looks like 'Command Prompt' from Windows
1 note
·
View note
Text
#The Year of the Linux Desktop is Further Away Than Ever Before ##An incredibly long diatribe of my struggles moving back to Linux I'll say right off the bat that Windows is the not the ideal OS. I recently set out to put a Linux distro back on my laptop after growing frustrated with my Windows install, mostly stemming from the GTX 1050/Optimus setup on my Asus FX53D. GeForce drivers have been incredibly buggy, Photoshop and other Creative Cloud software would crash multiple times an hour after switching back and forth between the Game Ready and Creator Ready driver lines. Also even when it is "inactive" the 1050 seems to stay engaged at all times even though the iGPU is supposed to be the main composite, so battery life is often little more than an hour which is too low even for a gaming laptop. Obviously there's nothing on the open source side that could replace the Creative Cloud suite so I'm stuck with the Windows install but the general instability with Optimus was enough for me. After several years I was going back to the Linux desktop. But what distro? Last I used Linux regularly I was using a combination of Ubuntu and Chromium OS Lime (RIP) so obviously things would have to change. I was opposed to vanilla Ubuntu because even back in the day the amount of bloat in the default install drove me away from the distro. And while the goal of this install was to have a light desktop for mostly web browsing and messaging, just a lone web browser was a little too far for me. I was interested in Manjaro but decided an Ubuntu-based distro was going to be more familiar territory. I wanted to run Linux, I didn't want to fix Linux. I've heard good things about Linux Mint, uh sure let's go with that.
Except Linux Mint never booted for me. I couldn't get the install flash drive to actually make it past a black screen. And I coulda sworn I was able to boot into GParted when cloning my SSD so it's not like this thing refuses to boot to any Linux distro... Uh I dunno. Maybe Pop OS will work better. It *is* maintained by a system builder so it's gotta have better hardware support than the competition...
...Hm. Still black screen. So after hours of smacking my brain it turns out this was my problem.
So I guess in the intervening years since I last used Linux UUI has become complete bunk. I don't know if it's because the way install ISOs are formatted have changed, I don't know if it's because UEFI has introduced new incompatibilities. I was able to put a Windows 10 ISO on a flash drive fine with this so who knows what its problem is but it's no good anymore. People recommend Etcher... *Why?* This thing runs on Electron. Why the hell would you want a system utility to be run on Electron? Last time I tried Etcher it couldn't even detect that my flash drive ran out of space and left me with a broken install. Don't use Etcher. Rufus is pretty good though. Pop OS's installer tries to simplify some things about Ubuntu's installer but there is one giant deal breaker...
Where the hell is the dual boot option? Your average user is not going to get rid of Windows. I'm certainly not going to get rid of Windows, not so long as Adobe has me by the balls. The "Custom Install" is not self-explanatory at all. *I* managed to resize my partitions but I also messed up and didn't properly turn on disk encryption. How is your average user supposed to figure out how to manually repartition their drive for multibooting. (We'll get back to the topic of partitioning and idiot-proofing later...) So finally we're installed. Hey man beyond partitioning that was pretty painless. I wasn't trying running around installing my NVidia drivers, I wasn't stuck on my ethernet adapter because I have to separately install my wifi drivers. And with a lot less bloat! Ok, some bloat. Who actually uses Libreoffice? I've been using nothing but Google Docs for the last eight years. At this point Google Docs' only real weakness is that nothing will ever compare in power to Excel. Certainly not Libreoffice. But that's easy enough to uninstall it seems like it's smooth sailing from her- ##GNOME 3 Sucks. I have some questions for the designers of GNOME 3. I'm sure they tried their best to modernize GNOME. Anything's better than Unity (according to the majority consensus, I don't necessarily agree but I can't exactly install Unity anymore so oh well...) and it's not all bad. However... * Why does the Super key take me to an exploded view of all my open applications instead of something useful? If I need to switch between applications I'd rather use alt-tab or the taskbar. Moving the applications dashboard to Super+A is a terrible idea because I'm going to use the dashboard a lot more often than I'm going to need this Win+Tab exploded view. * Why is the taskbar useless? 99.9% of all applications I use are not going to show me any useful options in the taskbar dropdown menu unlike in Windows where developers disciplined themselves around Windows 7 to put quick actions in the taskbar. So if I don't even get that, then why does by default the taskbar only show me one application at a time? There's so much unused space at the top that could be used to show all my open applications instead of me having use up even more space at the bottom for some extension that gets proper taskbar functionality back. *Where is 150% zoom? I guess this complaint is more towards System76 since other friends have assured me that there does indeed exist a level of application scaling between the puny 100% and the ginormous 200% but on this install I ain't seeing it. I'm also not seeing a way to control application scrolling per-monitor like in Windows. *Notifications are a boondoggle. Well, they're bad in Windows too but that's no excuse. I don't know who both at Microsoft and GNOME decided "oh yeah, applications should be allowed to keep a notification on screen indefinitely that's totally good UX and not abusable at all" but they're morons. And so is whoever worked on Chrome that thought the same thing. Chrome, Google Hangouts in particular, is the #1 abuser in indefinite notifications. It's incredibly annoying, I don't want have to stop what I'm doing to wave off a toast. GNOME however gets the slight edge because for some god damn reason Windows disables interacting with anything from about a 10 pixel radius around the toast. And also won't let you move the toast away from the bottom right which is *right where a bunch of apps tack on really important buttons!*
Alright this is a big one.
Why is the mouse so god damn awful?
Maybe this isn't a GNOME problem but it is a big fat problem. Using a mouse or touchpad is just a pain in the ass in Linux. No, specifically scrolling with a mouse or touchpad is a pain in the ass. I use a Microsoft Comfort Optical Mouse 3000. Maybe not the best mouse but it's ergonomic and nice to use. Except in Linux.
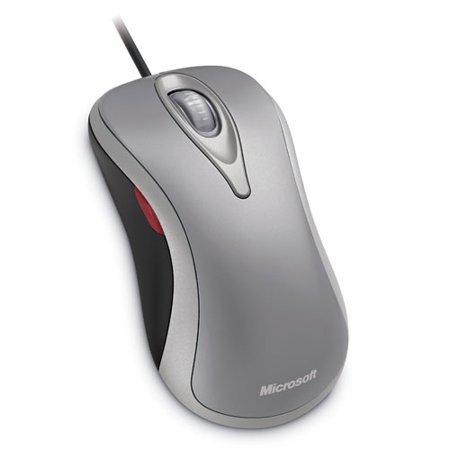
See the Microsoft Comfort Mouse has an optical scroll wheel with smooth action instead of a traditional scroll wheel with discreet clicks across the wheel. Bad for games, sure but for web browsing it is a dream. I can fly through webpages without losing tracking accuracy because Windows' mouse driver tracks the scroll wheel at a higher resolution.
Scrolling is a giant pain in Linux. For one it's slooooooooow. There's no way to change scroll speed. Well, not elegantly, at least.
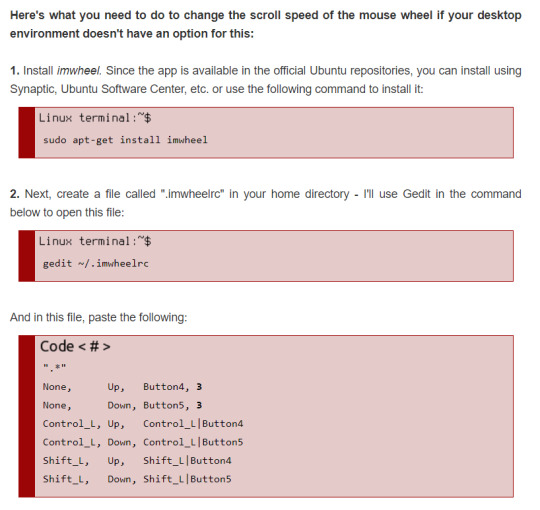
imwheel is a mouse service you can tack on top of the existing mouse server that lets you change things such as how many lines one wheel click scrolls through. But there's limitations to this. For my purposes, I can't figure out how to change the resolution of the mouse scroll itself for mice like mine that are linear instead of discreet clicking wheels. Worst of all...
It breaks the trackpad! Pop OS does get trackpad scrolling mostly right (except for the lack of scroll inertia) but imwheel completely breaks it because the trackpad scrolling and mousewheel scrolling are operating on completely different tracking resolution. (By the way, this is what trackpad scrolling should look like.)
(...But trackpad scroll inertia does work in a bunch of system GNOME apps. Why in the world would such a fundamental part of the user experience be application dependent? Why aren't other applications implementing scroll inertia?) I'm not the only person to make these observations on Linux's deficiencies in its mouse input. There's a great blog by Pavel Fatin called Scrolling with pleasure that goes into much much greater detail into the ways mouse I/O can be much better. It's from two years ago and the fact that many of his observations haven't been implemented yet is a shame. It seems with some sects of the Linux userbase, using a GUI or desktop manager as little as possible is some point of pride and elitism. As if people who use mice and need graphic interfaces are noobs who just aren't smart enough for Linux. This sect is really small but they are vocal nonetheless and it contributes to the air of elitism around Linux. Ah speaking of graphics... why am I getting a black screen again?
Well that's not good. Far as I can tell the last time I booted up my Pop OS partition it wanted to upgrade the NVidia drivers among other packages but ran out of space. See, I was under the presumption that 10 GB of space was enough room for a light Linux install in 2019. Clearly I was wrong. I don't know why being unable to upgrade packages due to disk space should brick a system. If I run out of disk space, shouldn't apt stop trying to upgrade it and leave it be? My system shouldn't die on me just because I can't upgrade to the latest packages. Ah well no more bitching. Let's install this thing again...
The installation process when making a multiboot partition should really be a lot more idiot proof. It's not unreasonable for a user to want a light install especially when they are using Linux only as a secondary OS and want to keep as much space on their drives as possible for the Windows install. Maybe the installation should soft-enforce a minimum size for the /home/ partition, or at least when I tell it I want /home/ to be 10GB it should tell me "Hey dumbass! Your install is liable to break from updates if you make it this small!" It also really should not be this hard to encrypt a multiboot partition. I tried to get my /home/ partition encrypted this time around but when I made it an encrypted partition in GRUB the Pop OS installer kept complaining that it couldn't decrypt the partition, even after I gave it the decryption key. I give up, any information I need securing is already file encrypted or on a cloud account I don't care anymore. Hmm... Maybe I didn't make the install light enough. I mean I made it as light as possible, downloads were going to my Windows download folder instead, I removed a shitload of apps including the mail client which I have no use for since I use GApps. But maybe GNOME is not light enough... And also I fucking hate GNOME. What's even lighter...
Oh yeah I should install xfce instead since it sips memory and disk space. I've used lxde before back in the day when PC manufacturers were desperately trying to make netbooks a thing, this should be easy to slip back to!
...What? I had to reinstall Pop OS for the second time because for whatever reason installing lxde broke my install. I don't know how. I don't know why. I tried to follow System76's guide on installing additional window managers... Now here's a problem, the guide says to choose lightdm on Ubuntu 16.04 and not to use gdm or sddm. It says it's fine to choose those on later versions. I don't think the lxde installer gave me a choice of using lightdm and why is this article talking about Ubuntu anyways. isn't this guide specifically for Pop OS? Clearly there is documentation that needs to be revised. So I guess I'm stuck with GNOME 3 now. It's not... horrible. But it took some elbow grease (and a lot of extensions) to get there.
Too many actually. A lot of these things shouldn't be extensions, they should be default. Desktop icons should be default, otherwise why even still have a desktop? The Window is ready notification is the most annoying thing on earth. Even Windows 10 has a clipboard history by default now, that shouldn't have to be an extension. While I'm still bitching.
How hard is it to disable an audio device once it's disconnected? I connect my laptop to my monitor and speaker system through HDMI and whenever I disconnect it I'll move out, try to play some video, get confused as to why no audio is playing, and discover it's still trying to serve audio to the HDMI device. * I disabled the login screen since I'm the only user of the install but how it logs you into your session is so slapdash it makes me actively worried for my security. The keyring popup is often the last thing to show up once GNOME is loaded. The desktop, Teamviewer, and Discord, all load *before I'm prompted to login. In the process of recording video for this blog I logged into Pop OS and managed to open Chrome and browse to a tab all before the keyring prompt finally took its time to stop user input before I ever logged in. What? This is incredibly stupid. The login prompt should be the first thing to load before anything else. In fact, nothing else but GNOME should be able to load before I've logged in. Sure I could re-enable the login screen but that's to me unnecessary steps added to booting up to a single-user install. Why even have the option to begin with? * Can Pop OS please stop moving my NTFS mounts between /dev/ and /media/? Stop that. I can't use my Steam install folder without readjusting it every time I reboot. * I have no idea why the disks in my external USB enclosure keep spinning even when they are connected but unmounted in Pop OS. It freaks me out to the point I keep the enclosure powered off until I actually need it. * I don't get why Pop OS's auto timezone detection seems to think I live in LA. I don't. I live in Atlanta, three hours ahead of LA. When I turn off auto timezone detection and manually change it to EST it's messed up my BIOS clock so that whenever I open back up Windows I'm three hours ahead.
Going back to Linux has been more of a pain than a solution to my existing problems in Windows. Every time I boot it up it seems I find one more frustrating thing to nag about or one more part of the system that breaks out of nowhere. Some people find constantly tinkering with their OS appealing and it does to me but not anywhere to this extent. GNOME 3 has numerous UX deficiencies compared to Windows 10 and Mac OS, many of them regressions compared to predecessors like GNOME 2 and Unity (RIP). It is so frustrating to use I cannot recommend it despite its more mature device and software support. It's been years since the meme of "The Year of Desktop Linux" first became popular that I'm skeptical that this mythical day that Linux on desktop becomes mainstream will ever arrive- even with exciting initiatives like Proton for software compatibility and relatively easy to use distros like Pop OS. I mean, I can't even get Proton to work on my Steam install because it doesn't seem to like sharing the same install folder as Steam for Windows. Ugh. Does this mean I'm removing Pop OS from my drive? No. I get that I've spent 2.5k+ words bitching about it but there are things it does that I cannot live without.
Being able to remove my 1050 from the equation entirely means I get a (still kind of pathetic) three hours of battery life instead of the measly one hour I've been getting lately. *apt-get is godlike. Updating is so fast, so easy, and often doesn't require a reboot. apt-get is what every auto-update OS function should strive to be. Windows Store has got jack shit on it.
Guake is so good man!!! I love being able to pop open the terminal anytime and hide it quick. It's such a giant productivity boost, someone should have the balls to make default in a distro.
Disk and partition management is still leagues better on Linux than on Windows. Drive recovery is a cinch, being able to bypass the permissions system on NTFS is a godsend, imaging partitions is a snap. Of course ext4 isn't and probably will never be natively supported in Windows... A flash drive with GParted should be in every technician's toolbox.
For all my headaches, Linux is still much leaner than Windows. It sips battery, it changes less stuff behind your back, and it's usually easy to know how something broke even if you often can't fix it without reinstallation. But is it the Year of the Linux Desktop? No. It probably will never be.
2 notes
·
View notes
Text
How Do I Setup My Wavlink AC1200 Wifi Extender?
Wavlink AC1200 provides fast speeds and reliable connections for multiple devices. With two high-gain antennas, it provides wide coverage and stable connections. A USB port allows users to access shared files easily. The device is easy to set up and use and works with most wireless devices. You can also set up parental controls to keep your children safe online. It takes a few minutes to complete the Wavlink AC1200 setup. You can use the WPS and web browser to start the setup process of the Wavlink AC1200 wifi extender.
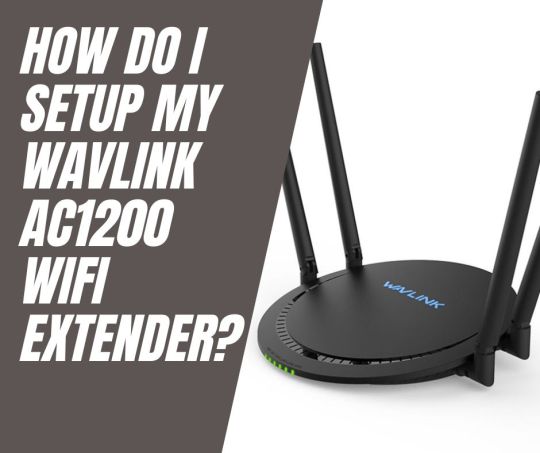
WPS Method To Wavlink AC1200 Setup
A step-by-step guide to Wavelink AC1200 Setup WPS is here.
Your extender's power adapter can be connected to a power outlet.
Isolate all wires before connecting them.
When the extender is powered on, a blue light will appear.
The Wavlink extender can be connected to your WiFi router.
You must press the WPS button on both the router and the extender at the same time.
The two buttons need to be pressed together for two minutes for this step.
Ensure that the LED light is solid blue.
When the router and extender are both connected, a solid blue LED will illuminate.
Whenever an extender is connected to a wireless network, it automatically boosts it. Both devices will have the same SSID and password.
It will be possible for you to log in using the same password.
You can use your Wavlink AC1200 device after you complete the setup process.
Using a Web Browser for Wavlink AC1200 Setup
The Wavlink AC1200 setup can also be done via a web browser. It also depends on users' preferences which they want to use. Here are the steps for setting up the system.
Wavlink AC1200 devices must be plugged into power outlets.
You will need to configure your device to repeat the connection.
You can find the network settings on your laptop by going to the settings menu.
By finding the network, you can connect to Wavlink.AC 1200.
To access 192.168.10.1, launch any web browser and type the address in the address bar.
There will be a configuration page for the Wavlink AC1200.
By following the instructions on the screen, you can now connect your home's network to the extender.
The Wavlink AC1200 setup is now ready for use. Once the router is plugged in, the LED lights will indicate when the router is properly connected to the modem. After that, users can access the router's settings page via any web browser to customize their network setup and connect their devices to the internet.
Once the LED lights are lit, users will be able to connect their devices to the router's network and access the internet. They can also access the router's settings page, which will allow them to customize their network setup and adjust settings such as the network name and password.
Wrapping Up
You can use above both methods for the Wavlink AC1200 setup. Users need to read all the instructions so they can follow all steps perfectly.
0 notes