#ImageMagic
Explore tagged Tumblr posts
Visit Tumblr Blog
Explore Tumblr blogs with no restrictions, modern design and the best experience.
Last Seen Tumblr Blogs


Fun Fact
Tumblr Inc. has $15.1M in annual revenue.
Text

🪄 Magic made into reality Create the most unique and realistic photos of yourself and look like a famous celebrity star or anything you can imagine! ✨ In PhotoMagik the limits are set by yourself.
Start today and look like a Hollywood 🎥🌟 celebrity!
www.PhotoMagik.Pro
#PhotoMagik#AIImageGeneration#CelebrityLook#SelfieTransformation#VirtualMakeover#DigitalDoppelganger#FamousLookalike#AIPhotoEditor#StarStatus#ImageMorphing#DreamSelfie#AIArt#PhotoFantasy#VirtualCelebrity#ImageMagic#SelfieRevolution#AIPortrait#FaceSwapPro#IG
2 notes
·
View notes
Text
🎨 Love tweaking your pics? JPGs are cool, but PNGs bring that extra clarity and crispness, especially with transparency! Want to convert? Hit the link below for flipping your JPGs to PNGs, perfect for your graphics and designs. ➡️ https://onlinetoolsarena.com/jpg-to-png 📌 Try converting and show us your revamped images in the comments!

1 note
·
View note

Text
I forget sometimes that for many ppl "oh it's the wrong format" insurmountable and can't just be fixed with an invocation of imagemagic
HOT TAKE:
people don't hate WebP. People hate that not everything supports it yet.
Once WebP works as well as JPEG for 99% of uses, no one will have reason to hate it.
1K notes
·
View notes
Text
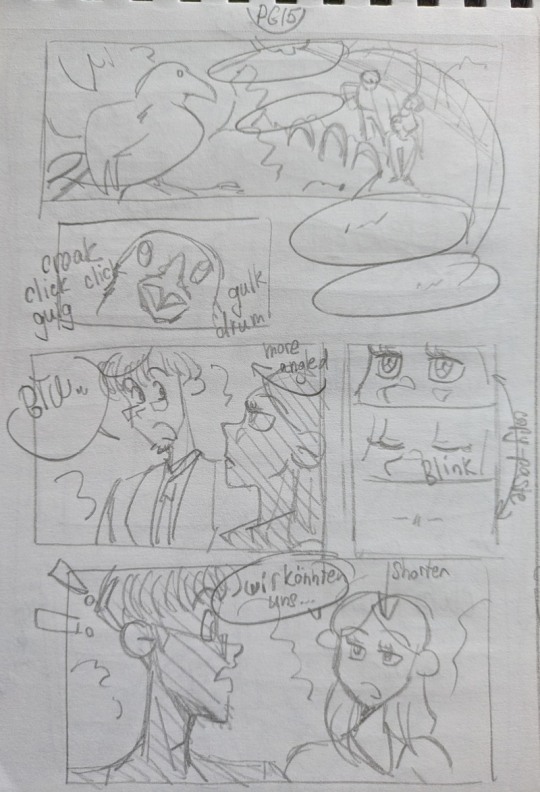
This Week In "Time & Again" #22: AUTOMATION 101 Because I Said So [Techy!] [And Other Ideas] 😎
I was thoughtful, so I did some simple math for the reason of mere curiosity and statistics. I counted the number of panels per chapter, just to see clearer what lies past and ahead of me, and to entertain myself. It turns out, the average number of the panels in every chapter for the chapters 1 to 4 is 92. Counting Chapters 3.1 and 3.2 as separate entities, just because they're basically two books anyway. It was a double chapter. ... Which means that for every more or less normal sized chapter I make I draw 92 separate little artworks, most of which have backgrounds and somewhat advanced, non-simplistic shading (although my latest art philosophy intends to go the opposite direction... but it only intends to do it, it does not necessarily do that very well yet, lol). Not just stick people. And here's the good part: Chapter 5 contains whooping 187 panels. The simple math tells you it's roughly double the original amount. Mostly because I needed to show the maniacal changes in Lothar's expression, the gradual changes, the agony. I hope those pretty numbers serve you well and answer the ultimate question of where the heck I disappear so frequently. And how much work it is. For one person. (and yet, I honestly think I do quite well regardless) Obviously, I disappear into "Time & Again". That is the right answer. That's how it's supposed to be for an artist working on something that is incredibly important to them 😁
But enough numbers, here are some exciting (and also facially hilarious) snippets from the storyboard! (of course, includes censorship by The Author, because Lothar never stops cursing)
With the page by page script fully storyboarded by now, I took a small detour on my road to Chapter 6.
Within the last few days, I set to work on the two important tasks, one of which is already accomplished by now.
The first task - the one that's done - was to mass process a tremendous amount of older artworks for the grand reupload (larger than the number of the panels in Chapter 5 - and that's sayin' something! 😱). I had 138 older artworks that I needed to resize and reapply a watermark on top; plus additional 77 to perform the same very task on afterwards. Why that is needed is a secret for now. But it will definitely see the light of day soon-ish (hopefully). ... As you can already guess, doing all of that manually would've been yet another nightmare - especially since my memories of going through pain and real hell of adding full bleed to "Time & Again" are still fresh in my mind, and hot like cakes straight from the oven... Also, of course, I didn't feel like dedicating a whole bloody month doing just that either, when I have Chapter 6 on the go as well as a transformation of Chapter 4 (more on the matter is just below). That's why I urgently needed automation of sorts. I'm a little surprised to discover that in my older post about how I prepared "Time & Again" for paper printing I totally skipped talking about an incredibly useful plugin for Krita that's called Krita Batch Exporter, made by GDQuest (whose videos I actually watched a few years back when I still worked on my game about the sleepy knight... but alas, as you might guess, the game never happened. oh well). Even though the plugin originally is aimed at indie game devs, it proved to be useful to me when I was working on full bleed areas for my chapters and when I needed to match them to the final print size. TL;DR: I simply opened all the pages of my graphic narrative as multiple layers, mass resized them all, and then batch exported layer by layer with the help of that very plugin. Simple and fast. Thank you so very much, GDQuest! 🌻 But alas, with the task that was ahead of me this time, with the supermassive number of random artworks that varied in size and aspect ratio GREATLY, that trick most likely wouldn't have worked. Instead, I braved learning the usage of ImageMagick command line utility. I was thinking about using it to batch edit and import "Time & Again" for printing, too, but back then I was not brave enough and didn't want to bother. This time, I urgently needed to learn. For a tech savvy person such as myself - who is a hardcore Doom nerdist who practiced modding not once but twice and thrice (and still does it 😁), a person with a lot of experience making older programs work on newer Windows, it was not very difficult. Yet, it still required some dancing with a tambourine around a table before everything started to work like a charm, and, of course, asking my Editor-In-Chef for guidance. I will even share my incredibly simple batch file code:
magick mogrify -filter Lanczos -resize "1200x1200>" *.png magick mogrify -filter Lanczos -resize "1200x1200>" *.jpg pause
to batch resize (and override!) all the PNG and JPG files to 1200 pixels wide or high depending on the original aspect ratio (unless they're already smaller), using Lanczos scaling method that proved very useful for downsizing the larger pieces to produce clean result. Afterwards, I needed to take my signature watermark and stamp it on top of all the downscaled artworks. I started working on the code for the image overlay in ImageMagick... And then, working on something totally different, I found out that IrfanView can do that for me. And unlike ImageMagick, IrfanView has UI (whatever will you do?.. I am indeed a person who has to see things in front of me, even though I'm not scared of CMD 😁). IrfanView is simply fantastic. It reads lots of different file types, it saves the watermark settings, and it works very fast. Adding my watermark to all those files was super easy and quick. And I only spent, like, one day doing all of that instead of a month of work manually 😁 Whooohoooo! I cannot verbally describe how rejoiced I am! (And I think I also used IrfanView to work on my Doom mod... that's why I installed that nice piece of software. Peanut Butter Jelly Time!.. Aaah, memories)
So that is done! Now you just gotta wait for all these 138 + 77 = 215 artworks to reappear in the internet sometime this year for everyone's happiness 😉
I am also glad that earlier this year I have discovered that Inkscape now supports batch export of layers natively - which is INCREDIBLY useful for my project (because I always start from arranging text and speech bubbles on multiple layers in Inkscape before porting everything to Krita for further work).
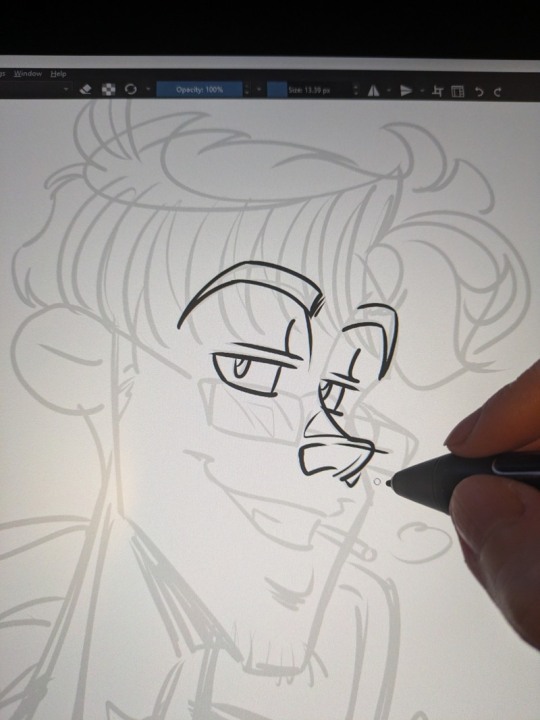
The second task bears a huge importance: I am polishing and slightly expanding Chapter 4 for the "Clean Cut Edition". The feedback on the chapter I have received earlier from my early access readers indicated a certain lack of hints... It was actually meant to be fairly vague to begin with. However, Chapter 4 was the only chapter for now that had a few outtakes from the script I wrote. I figured that I could fill in the gaps and make it easier to understand via the addition of a small (by my standards, lol) passage of text, aside from adding "Notes, Hints & Commentary" section. Ironically or not, all things considered, I simply decided to restore the cut content that was originally present - the content that I excluded for a truly naïve and dumb reason of keeping the page count intact (and, as we could see as of lately and thanks to my math above, Chapter 5 broke all those limitations and standards of yore anyways). Now I'm sad that I dissected my script without a weighty reason back then. But good news! I'm restoring all of that for the Clean Cut Edition! AND now with commentaries 😁 As for now, all the text and panel placement is decided on, and the only thing I have to do is to draw extra faces of Lothar and [redacted for the reason of spoilers for those who haven't yet read it] to portray a proper conversation between the two. And I think that the extra pages fit in quite nicely, too.
And aside from that, I also worked on a random artwork featuring Lothar. Here's the teaser; the full version will be uploaded soon.
And down below there's a bit more stuff I'd like to share today (even though I started writing it a few days ago, so idea simply accumulated in my head), in a form of expanded theses:
Since I don't want to stretch it all out as it sometimes happens with my endeavours, and there's no actually useful AI that might help me speed up the process, I think I'm going to try something peculiar this time, and it might sound... well... a bit crazy. I've been thinking about that for a while already (quite certainly, since the times I used to be an active DeviantArt user, which makes it approximately... 15 years by now?! wowza!!!), but never really had a chance to try out that approach. I was thinking about dropping the sketching phase completely. Earlier I've mentioned that, when I work on the comic pages in digital workspace once the approximate sketching and paneling on paper is all done, normally I work "in stages", outlining the panels in Inkscape first, then gradually working my way from sketches to lineart and, finally, to colouring, in segments. So I'm thinking about skipping the sketching part completely and doing the final lineart right away - simply because it will save me time. And quite possibly, a lot of time. AND time is a precious resource - so said Winston, and they were right. I understand that that might not be a good idea - but the student must learn sometime and through intense practice, right? And since I wished for that since a near immeasurable time ago, but then never ended up doing that for a reason unbeknownst even to myself - then it's probably the time to do it. Well, I'm looking forward to an adventure. I promise there will be no eyes on different height or any other fancy-schmansy stuff, and no extra fingers. With my demands to the quality it's near impossible - of course, unless intended. 😁 (I will still do simple sketches first for the complex views and angles. Otherwise everything will look crooked. Come on. I'm not that proficient yet.)
Ever since the development of Chapter 6 has been started, and its plot was in the stage of an embryo, my research lead me to a fairly solid conclusion that Lothar is a sociopath. He passes the test quite well and complies with numerous criteria wonderfully, I don't even have to doubt that. Heck, I don't even know if I like Lothar anymore... That Ar*****ch has done some very questionable stuff in Chapter 5. I just want him to put himself together and finally move on, preferably in a somewhat positive direction. This is also one of the reasons why I want to finish "Time & Again" - to help Lothar redeem himself. Come on, dude. Get in the effing robot... Eeeerrrr... Please don't take that too far though; that was just a figure of speech.
That's enough for today. See you soon 😁
0 notes
Note
great icon man
Thanks, I made it with
Which is a browser based image compression program made by some google guys. It keeps your images local, but does collect some analytics.
(I know ImageMagic exists; but this gives me a quick and easy interface on my phone.)
1 note
·
View note
Video
instagram
Last chance to get a massive discount in the shop! The 20% off sale ends at midnight EST. Here’s a little peek at my current sketchbook. All drawings are drawn with pencil and Micron pens. Most are available as prints or patches in the shop. So many pages still to fill! ✍🏽 PoisonApplePrintshop.com ✍🏽 #poisonappleprintshop #sketchbook #imagemagic #grimoire #handdrawn #witchart #supporthandmade https://www.instagram.com/p/B5lnclpHo0G/?igshid=9bqs90256mpu
20 notes
·
View notes
Photo

For centuries, people have been using the ancient techniques of image magick, contagious magick, and sympathetic magick in combination with a doll or effigy to manipulate all aspects of one’s relationships with people, places, and things. In the past in Old New Orleans, Voodoo dolls were referred to as fetiches by outsiders because they roughly resembled the magickal fetiches brought from Africa by African slaves. Since Voodoo dolls are traditionally constructed from objects belonging to the natural world, such as sticks, moss, herbs, roots, and stones, it makes sense to believe that the doll itself has Spirit, that it is part of the One Creator, just as people are. Even throughout European history, philosophers such as Plato and Aristotle contemplated the possibility that souls exist in animals, plants, and people. 🌓🌓🌓 Doll baby conjure is a type of remote control magick, if you will, because it involves influencing people, places and things via a ritually charged object fashioned most commonly in human form. While doll babies and Voodoo dolls are most commonly known to lay people as objects used for harming and revenge, they are actually used for many different purposes. As you take this course, you will discover that working with dolls goes far beyond sticking pins in them for revenge. 🌓🌓🌓 Doll Baby Conjure includes lessons delivered via an exclusive website and private Facebook group with multimedia presentations and group discussions. This course is taught by the website owner and author of the The Voodoo Doll Spellbook and Voodoo Dolls in Magick and Ritual (me) and starts April 15, 2020. This course will be capped at 50 participants at a time and always sells out fast so get in while you can! 🌓🌓🌓 https://www.creolemoon.com/store/p884/doll-baby-conjure.html 🌓🌓🌓 #magicdolls #dollconjure #hoodoo #conjure #rootwork #neworleansvoodoo #voodoodolls #authordenisealvarado #creolemoon #witchcraft #witchylife #conjurelife #poppets #imagemagic (at Prescott, Arizona) https://www.instagram.com/p/B9UkUtlgyOF/?igshid=7vmcnqdqv7a8
#magicdolls#dollconjure#hoodoo#conjure#rootwork#neworleansvoodoo#voodoodolls#authordenisealvarado#creolemoon#witchcraft#witchylife#conjurelife#poppets#imagemagic
3 notes
·
View notes
Text
✨ Ready to become a powerful business tycoon? 💰 Step into a commanding presence and own the room. 💼💥
Transform into anything you can imagine 🖼️ www.PhotoMagik.pro
#PhotoMagik#AIImageGeneration#CelebrityLook#SelfieTransformation#VirtualMakeover#DigitalDoppelganger#FamousLookalike#AIPhotoEditor#StarStatus#ImageMorphing#DreamSelfie#AIArt#PhotoFantasy#VirtualCelebrity#ImageMagic#SelfieRevolution#AIPortrait#FaceSwapPro#IG
1 note
·
View note
Text
Digital WaterMarking
Computerized Water Stamping is the most common way of implanting an example of pieces or data in to an advanced sign which is utilized to convey the secret information. The sign can be any sound, recordings or picture.
What is a watermark?
A Digital watermarking software is an optional picture which is overlaid on an essential source picture. This aides in safeguarding the picture.
Reason:
The reason for advanced watermarks is to give copyright assurance to protected innovation that is in computerized design.
Kinds of Watermarking:
* Apparent Watermarking
* Imperceptible Watermarking
Apparent Watermarking
As its name suggests, the data is apparent in the image or video. It can likewise be called as printed watermarks. The data might be a text or logo which recognizes the proprietor of the media.
In the image beneath, a TV telecaster added its logo to the side of its communicated video, is an illustration of noticeable watermarking. The following is an example picture where you can encounter watermarking, you will find a little picture at the right base corner which is overlaid over the essential picture/video.
It's essential to overlay the watermark so that it is challenging to eliminate.
Imperceptible Watermarking
Imperceptible watermarks are intended to be totally undetectable. On account of Sound, it's totally unintelligible. A significant use of undetectable watermarking is in the space of copyright assurance frameworks, which helps in forestalling unapproved duplicating of computerized media.
An undetectable watermark is an overlaid picture which shouldn't be visible however can be identified algorithmically.
Watermarking Lifecycle stages:
Life pattern of a watermark starts with inserting of watermark and closures with the distinguishing or recovery.
A watermarking framework is separated in to three distinct stages.
~ Inserting - A calculation acknowledges the host and the information to be installed and creates a watermarked signal
~ Assault
Watermarked signal is then put away or sent to someone else. In the event that this individual makes a change, this is called an assault. The term change may not be malevolent; the term assault emerges from the copyright assurance application, where privateers endeavor to eliminate the advanced watermark through alteration. There are numerous potential alterations, for instance, lossy pressure of the information, trimming a picture or video or deliberately adding clamor.
~ Recognition
A calculation which is applied to a went after signal to remove the watermark from it. In the event that the sign isn't changed during the transmission, then the watermark is as yet present and can be extricated. In vigorous watermarking applications, the extraction calculation ought to have the option to accurately create the watermark, regardless of whether the alterations were solid. In delicate watermarking, the extraction calculation ought to fall flat assuming that any change is made to the sign.
How could a picture be watermarked?
Apparent watermarks on pictures can be effectively accomplished intensive picture altering programming's like imagemagic or some other, which have the watermark usefulness. Imperceptible watermarks on pictures can be accomplished through some exclusive programming's.
For more details, visit us :
Watermark maker for photos
Software for watermarking photos
Watermarking software mac
Free watermarking software for windows
3 notes
·
View notes
Text
Mac gifski

#Mac gifski update
I didn’t see any quality issues in any of them. A note on quality and durationĪll of the gifs produced seemed to me to be of very comparable quality. Full color source images could change everything. I should also note that all my tests have been on grayscale animations.
#Mac gifski update
I’ll be using it a lot more in coming weeks and days and update with any new findings. If you are dealing with gifs as your source image sequence, gifsicle might be a good compromise.īut I think the overall winner is gifski in terms of hitting that sweet spot. If you are going for speed, nothing beats ffmpeg. If you are going for size, nothing beats ImageMagick, but it takes forever. Gifsicle: with image conversion needed, way too long Size: ImageMagick: 13 mb Here’s the results I got: Time: FFMPEG: 5.780 s Not as small as ImageMagick’s output, but way faster. Not as fast as ffmpeg, but image sizes are way smaller. Performance-wise, it hits a pretty sweet spot. I don’t think I really need to explain any of that. And it’s written in Rust, which tends to give projects a lot of street cred these days. As for size, it was almost right in between the sizes produced by ImageMagic and ffmpeg.īut the additional conversion process put this one out of the running for me. I didn’t time it, but I feel like it was more than a minute for 300 frames. OK, I was able to put together a quick ImageMagick script to convert all my pngs to gifs. Big drawback on this workflow though: the source images have to be gifs themselves. I think it would be better to do this in the palette creating stage.īut gifsicle can also create gifs from a sequence of images, just like ImageMagick and ffmpeg. This got considerable results, but at a loss of quality. You can also use gifsicle to reduce colors in an existing gif. The highest level took a single megabyte off of a 27 mb gif. You can specify three levels of optimization. I tried it on some of the larger ffmpeg-created gifs and it didn’t seem to do a whole lot. I first heard about gifsicle a while ago as a tool to optimize gifs. I’ve been continuing my search on the ultimate gif-making workflow and came across two more tools.īoth of these are command line tools available across platforms.
0 notes
Text
Convert multiple jpg to pdf

CONVERT MULTIPLE JPG TO PDF HOW TO
CONVERT MULTIPLE JPG TO PDF PDF
CONVERT MULTIPLE JPG TO PDF INSTALL
CONVERT MULTIPLE JPG TO PDF SOFTWARE
CONVERT MULTIPLE JPG TO PDF OFFLINE
CONVERT MULTIPLE JPG TO PDF PDF
Now, check your photo size and fit that you want for the PDF > click Print
From the Printer Settings, you need to choose the Microsoft Print to PDF.
If you’re using Windows 10, simply open the JPG image file and give the Print command (Ctrl + P).
CONVERT MULTIPLE JPG TO PDF OFFLINE
If you are using a Mac computer, save a picture as a PDF offline with Preview (move to the next query to proceed for steps that involved!
CONVERT MULTIPLE JPG TO PDF HOW TO
Simply, make click on the “Download” buttonįAQ’s: How to Convert JPG to PDF on your computer offline?.Now, tap on the “Convert” button and wait for a second, the converter will turn JPEG to PDF.You may also add multiple JPG files to convert them into PDF files JPG file into this online picture to PDF converter. These are the steps that help you to save JPEG as PDF securely: The process to turn image to PDF becomes handy with the assistance of this free JPG to PDF converter online. Thanks to these online precision conversion algorithms that keep the image quality high! How to Convert JPG to PDF Online? This online JPEG to PDF converter retains the same quality of the image after the conversion process without a bit of quality loss. It accurately preserves the layout of the original images. Our JPG image to PDF converter comes with a user-friendly interface that helps you to convert JPG into PDF online. Convert Photo to PDF (Original Quality Preserved): Well, whatever the reason is, our free online photo to PDF converter is the best and quick way to turn JPG into PDF. Perhaps there are total file size considerations behind converting picture to PDF. Questions, suggestions, a word of thanks is always encouraged.Say that you need to send a group of images for approval and would prefer sending them as a single PDF "portable document format" file. If you are further interested, check this article to know how to edit PDF files in Ubuntu Linux. I hope this article helped you to merge multiple images into one PDF in Ubuntu Linux. For example, something like this: convert image1.jpg image2.png image3.bmp output.pdf Just provide the paths to individual images and at the end of the command, name the output file. Once you have it installed, use the ‘convert’ command line tool of ImageMagic.
CONVERT MULTIPLE JPG TO PDF INSTALL
Open a terminal and install ImageMagic using the command below: sudo apt-get install imagemagick It’s very easy to convert several images into one PDF file this way as well. If you want to go the command line way, you can use ImageMagick. Method 3: Using command line to convert multiple images to PDF Let me show the command line way of converting images into PDF in the next section. Since it is Linux, there is always a way to do the same thing in the terminal. Once installed, open gscan2pdf by searching for it in the menu Open a terminal using Ctrl+Alt+T shortcut and use the following command to install gscan2pdf: sudo apt install gscan2pdf
CONVERT MULTIPLE JPG TO PDF SOFTWARE
In Ubuntu, you can find it in the Software Center or use the apt command to install it. You can use your distribution’s package manager or software center to install it. Gscan2pdf is a popular tool and it should be available in the repository of most Linux distributions. Gscan2pdf is a utility that was created for scanning documents, quickly edit them and saving them in PDF. Method 2: Use gscan2pdf GUI tool to convert multiple images to PDF Want even simpler? Use gscan2pdf which is explained in the next section. You’ll have a single PDF file with multiple images with all the images in it. You can add new pages, insert images or PDF files (also inserted with insert image option) in those pages and then hit the PDF on the top. I’ll show all the above three methods in this tutorial.Ĭombine images to PDF using LibreOffice Draw
The versatile ImageMagic command line tool can be used for converting images into PDF.
gscan2pdf graphical tool can also be used combining multiple images (and single page PDFs) into a single PDF one.
LibreOffice Draw or even Writer can be used to combine multiple images into PDF.
In Linux, there are several ways you can combine multiple images into a single PDF file. It’s just one of the examples where you may need to convert multiple image files in one PDF file. My problem was that I had documents scanned individually but not in one file. I had this need when I had to apply for a job and they required me to upload a single PDF file consisting of several documents. And in any case, I don’t want to upload my documents to some random web server. But they are either not free or they will put their watermark on the final PDF file. You may find several websites that allow you to do that. You have several documents or images scanned individually and you need to save multiple images to one PDF file.
0 notes
Text
如何一口氣掃描很多張照片,然後再用軟體分割、裁切、轉正成一張張的照片呢? 交給ImageMagic就對了! http://www.fmwconcepts.com/imagemagick/multicrop/index.php ImageMagic是一個圖片處理工具。Fred用它開發了許多不同用途的腳本,其中一個腳本MULTICROP就是用來做分割多張照片的掃描檔。 MULTICROP的安裝步驟是: 1. 安裝imagemagic: sudo apt-get install imagemagic -y 2. 下載multicrop腳本: http://www.fmwconcepts.com/imagemagick/multicrop/index.php#fromHistory 3. 安裝腳本: ```` chmod +x multicrop sudo mv ./multicrop /usr/bin ```` MULTICROP使用方法如下: ```` multicrop in.jpg out.jpg ```` 切割後的照片就會用out-000.jpg out-001.jpg 等編號排序。 ---- 你都是怎麼處理掃描照片呢? 下面留言喔~ #ImageMagic #MULTICROP #scan
0 notes
Text
Cô gái sống sót phi thường sau 41 ngày lênh đênh trên hồ
New Post has been published on https://khachsanthanhdong.com/co-gai-song-sot-phi-thuong-sau-41-ngay-lenh-denh-tren-ho.html
Cô gái sống sót phi thường sau 41 ngày lênh đênh trên hồ
Tỉnh dậy, trước mắt Tami là hồ cả mênh mông, xung quanh không một bóng người, thuyền bị hỏng và khi đó, cô mới 23 tuổi.
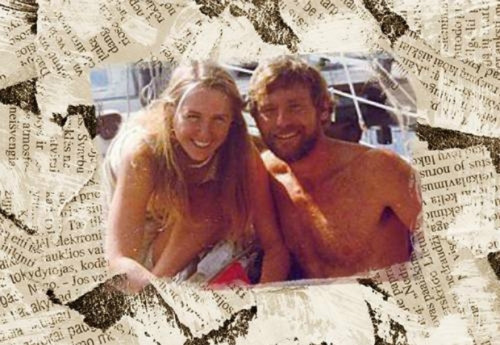
thảm kịch mở đầu vào một tháng ngày 9/1983. Cô gái trẻ người Anh, Tami Oldham Ashcraft, quyết định tham gia vào hành trình từ Tahiti tới San Diego, California, Mỹ trên một chiếc thuyền buồm sang trọng dài 13 m, có tên Hazana, theo Chicago Tribune.
Đây là du lịch ước mơ của Tami, khi cô có thể cùng người mình yêu, chồng chưa cưới Richard Sharp, thực hiện chuyến đi xuyên yên bình Dương. Điều tuyệt vời nữa là họ được trả tiền cho lần này. Cả nhị được thuê để đưa Hazana từ Tahiti tới nước Mỹ giao cho chủ mới.
Cặp đôi cũng đã lên kế hoạch cho 30 ngày tuyệt vời trên hồ vì khi xem bảng dự báo, thời tiết của những ngày tới đều rất đẹp. Ảnh: Bibliotaph’s Blog.
Tami và Richard đều là các thủy thủ giàu kinh nghiệm, họ có hơn 50.000 giờ lênh đênh trên hồ. Do vậy, cặp đôi là một sự lựa chọn tuyệt vời cho hải trình này.
Tuy nhiên, mọi thứ đã thay đổi và phá hủy hoàn toàn kế hoạch cụ thể của cả nhị. Sau hơn 2 tuần vận chuyển, cặp đôi nghe tin về một cơn bão lớn ở ngoài khơi Trung Mỹ qua đài phát thanh. Họ đã nỗ lực thay đổi lộ trình để tránh bão, nhưng không kịp. Chiếc thuyền buồm đã phải đương đầu với những con sóng cao 16 m và sức gió mạnh kinh khủng tới 260km mỗi giờ.
Tami nhớ lại, với thời tiết khốc liệt, gió giật mạnh như vậy, thật khó để có thể nhìn rõ mọi thứ xung quanh. Richard yêu cầu Tami xuống dưới boong để quan sát phong vũ biểu (barometer – một dụng cụ đo gió và áp suất không khí nhằm dự báo thời tiết) còn mình sẽ ở lại để điều khiển bánh lái. Đó cũng là lần sau cuối, Tami nhìn thấy anh.
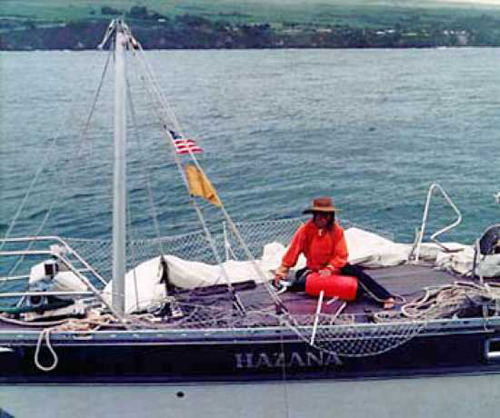
Chiếc thuyền buồm Hazana sau cơn bão. Ảnh: Image Mag.
Khi cả nhị đang vật lộn với bão tố trên hồ, Tami nghe thấy tiếng thét của Richard, chiếc thuyền như bị nuốt trộng giữa các đợt sóng khổng lồ, rồi lật úp và lại được nhấc bổng lên cao. Cô gái trẻ cũng ngất sau đó.
Tami không biết cô đã ngất bao nhiêu giờ, nhưng chỉ biết là rất lâu. Khi tỉnh dậy, cô thấy mình nằm dưới boong tàu, trước mắt là mênh mông hồ cả. Richard đã mất tích, cột buồm cũng không còn, đầu cô không ngừng chảy máu. Nhưng đó chưa phải là điều kinh khủng nhất. Khi trèo lên boong, cô nhận ra không có một chiếc thuyền nào trong tầm mắt. Tami hoàn toàn đơn độc giữa hồ, và khi đó, cô mới 23 tuổi.
Trước chuyến đi, Tami nặng 63 kg, khi tới Hawaii, cô chỉ còn 45 kg. Ảnh: Imagemag.
Những ngày sau đó, Tami phải đương đầu với những thứ tồi tệ: động cơ thuyền hỏng, các vũ trang điện tử để liên lạc cũng hư hại, radio không còn. Trên thuyền chỉ còn một ít lương thực, bánh ngọt. Điều may mắn nhất của Tami lúc này là bánh lái của tàu vẫn hoạt động.
Nỗi đau mất đi người yêu thương nhất, cùng hoàn cảnh nan giải trước mắt khiến cô gái trẻ gần như muốn bỏ cuộc. Cô bỏ ăn nhị ngày trời. Nhưng sau đó, ý chí và mong muốn được sống trong Tami trỗi dậy. Điều trước tiên cô nghĩ tới là mình phải sống sót.
Cô dựng lại cột buồm, và lái con thuyền với véc tơ vận tốc tức thời 4km/h. Nhưng điều nan giải là cô hoàn toàn mất phương hướng vì định vị trên tàu bị hỏng. Sau đó, cô đã cố nhớ lại bài học về việc định vị từng học trước đó. Tami sử dụng kính lục phân so sánh góc giữa đường chân trời và mặt trời, cũng như thời khắc trong ngày để xác định vị trí ngày nay. Điều này yêu cầu Tami phải rất chu đáo, vì chỉ một bước tính toán sai, cô có thể sẽ lạc đường vĩnh viễn.
Sau 41 ngày lênh đênh trên hồ và kiên trì xác định vị trí, sau cuối cô gái trẻ cũng đưa thuyền cập bến. Nơi cô tới là Hawaii, cách điểm phát xuất 2.400 km.
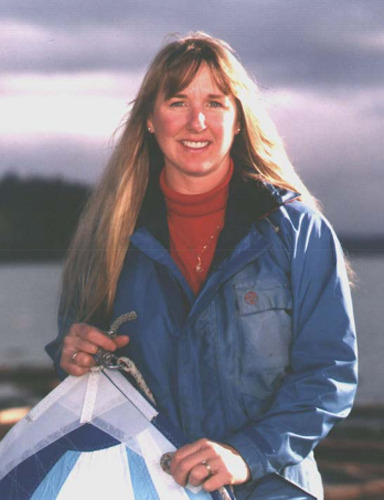
Với nghị lực phi thường, Tami đã sống sót trở về. Nỗi đau mất Richard cũng dần nguôi ngoai, Tami lại tìm thấy tình yêu mới. Cô lập gia đình, rồi có con. 15 năm sau sự kiện đau buồn đó, Tami đã viết lại câu chuyện của mình và xuất phiên bản một cuốn sách.
Cô cho biết, thông điệp nhưng mà mình muốn gửi tới mọi người chính là: tri thức là chìa khóa thành công cho mọi vấn đề. Trước khi làm bất kỳ điều gì, khách du lịch nên kiểm tra kỹ lưỡng, nỗ lực học tập, trau dồi tri thức và say mê với công việc nhưng mà khách du lịch muốn làm.
Anh Minh
Theo: https://khachsanthanhdong.com/
0 notes
Text
two link SCARA kinematics
I’d really like to build a kinetic sand sculpture like Sisyphus by Ben Shapiro https://sisyphus-industries.com/ . The DIY version by Matt G and Rob Dobson I’m looking at uses a two-link SCARA mechanism in place of the polar mechanism in Sisyphus.
[SCARA stands for Selective Compliance Assembly Robot Arm or Selective Compliance Articulated Robot Arm.]
The simplest SCARA mechanism has one arm composed of two links with two joints, like an arm with a shoulder joint, upper arm, elbow joint and lower arm. The joints allow unconstrained rotation of the link in the X-Y plane. A two link SCARA can reach points within a circle, but to reach all points, the link lengths have to be equal or there will be an unreachable inner disk - which, depending on use, may not matter.
The position of the end of the jointed arm can be expressed in two ways:
- as the [x,y] value in cartesian world coordinates
- as the SCARA parameters for the angles at the joints [a,b] where a is the angle of the first link relative to world coordinates (the shoulder) and b is the angle of the second link relative to the first link (the elbow), together with the fixed length of each link [r1,r2].
It can also be expressed in polar coordinates [r,a] but the transformation between [x,y] and [r,a] is simple.
Kinematic equations
The kinematic equations are the equations to convert between these two representation:
‘forward’ from [a,b] to [x,y]
and its inverse
‘reverse’ or ‘inverse’ from [x,y] to [a,b]
In practice, it’s the inverse equations that we need to control the arm since we know where we want the end of the arm to be in world coordinates and we need to figure out how to rotate the joints to get the ‘Pose’ needed to achieve this. [’Pose’ meaning Position and Orientation]
However it is necessary to have code for both directions of this relationship because then we can test the code by round tripping - from an [x,y] to [a,b] and then back to, hopefully, the same [x,y].
To develop the algorithm, I used OpenSCAD for its primitive values - angles in degrees and vectors - and the ease of plotting and animating the motion of the mechanism.
Forward
This is straightforward trigonometry, remembering that b is relative to link 1
function ab_to_xy(r1,r2,a,b) = [r1*cos(a) + r2*cos(a+b), r1*sin(a) + r2*sin(a+b)];
The function is one-to-one.
Inverse
This is trickier. It’s a difficult problem in the general case of multiple links and joints with more than 1 degree of freedom, but for this special case, we can use some basic trigonomery to define the inverse. There are several ways to solve the geometry and care is needed to get the sign of angles correct.
[diagram]
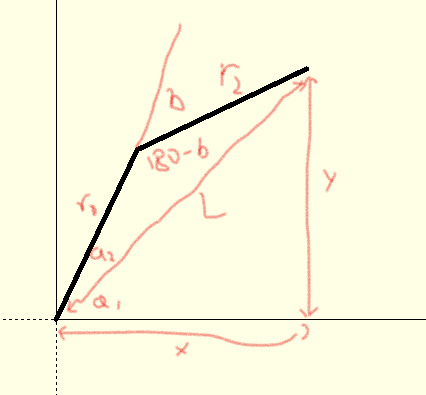
One complication is that the solution is not unique - the elbow can lie either side of the radial line:
So inverse kinematics equation are generally one-to-many. In some cases,it may be useful to return both solutions so that the best can be used - best may be defined in terms of a minimal change from the previous angles, or that the joint avoids some obstacle.
Solution of a triangle with known side lengths is needed. Edge case are tricky ( I -think- I’ve covered them).
function SSS(a,b,c,eps=0.0001)=
abs(c - a + b) < eps || abs(c - b + a) < eps || c < eps ? 0 : abs(a+b-c) < eps || a < eps || b <eps ? 180 : acos((a*a + b*b - c*c)/ (2*a*b));
The inversion function to convert from an [x,y] position to the join angles [a,b]:
function xy_to_ab(r1,r2,x,y) =
let (L = sqrt(x*x+y*y), // pythagoras a1= atan2(y,x), // you get the wrong sign if you use sin/cos a2= SSS(r1,L,r2), b = 180 - SSS(r1,r2,L))
[[a1+a2,-b],[a1-a2,b]]; // both solutions
In practice, if you consistantly chose either the first or second solution throughout the motion, there are no jumps.
Alternatively, we can set the elbow position:
esign = +1 or -1
function xy_to_ab_signed(r1,r2,x,y,esign) =
let (L = sqrt(x*x+y*y), // pythagoras a1= atan2(y,x), // you get the wrong sign if you use sin/cos a2= SSS(r1,L,r2), b = 180 - SSS(r1,r2,L))
[a1+esign*a2,-esign*b]
There are also special cases to handle. The code above handles the degenerate case of co-linearity of the links, but there is a singularity at the origin to be avoided, where [0,0] can be reached by an infinite number of [a,b] where a =(0,360) and b=180.
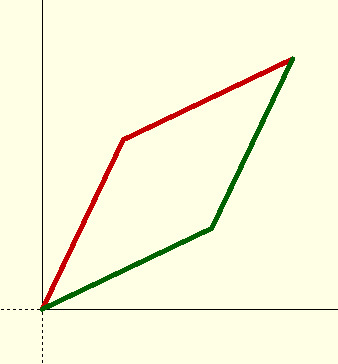
The gif shows the mechanism tracing out a square:
Weirdly satisfying to see the mechanism worked correctly (after a while!).
As can be seen, the rate of change of a and b varies through the trajectory of the arm. This behaviour can be seen better in this example of following a pentagon:
The testbed code is on Github. GIFs via the animate mode in OpenSCAD and ImageMagic:
convert -delay 20 -loop 0 frame*.png star.gif
This is my first foray into motion control. I soon realised that I don’t understand how the continous variables of the angles a and b are converted into the discrete values of numbers of steps without accumulating errors - another day.
PS - cleaned up the terminology. The mechanism is just one arm with two links.
PPS - I wondered if a more complex boundary would work with the interpolation algorithm I’m using here. I found the silouette of an elephant as a png, loaded it into Inkscape, used Path/Trace Bitmap to get a bezier curve path, used Extensions/Modify Path/Flatten Beziers with a Flatness of 2.0, re-assembled an image, getting rid of the initial png and saved as Plain svg. This SVG uses relative positions so these need to be converted to absolute positions: An XQuery script converts to an openSCAD array for use in the openSCAD code.
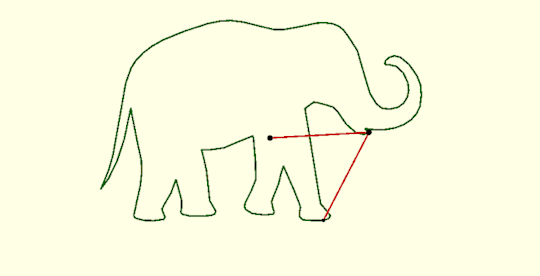
Just as well I tried this - it revealed a bad bug in my polygon interpolation code.
PPPS I discovered that the latest version of the Marlin software supports this mechanism.The kinematics are in scara.cpp in GitHub where there are two versions of the inverse kinematics.
Interpolation of a path is implemented in Planner.cpp
0 notes
Photo
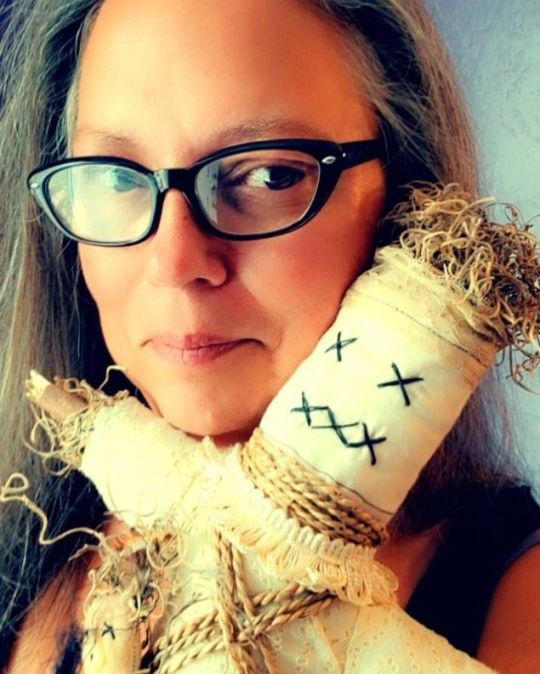
Have you hugged a voodoo doll today? 😆😆🤣 This is a doll I made about 20 years ago. He's about 2.5 feet tall and is holding a doll that is holding a doll. He's made out of muslin and vintage lace. He's my good boy. 🤣 If you are interested in how to use a doll in magick, check out my books Voodoo Dolls in Magick and Ritual and The Voodoo Doll Spellbook. I also offer a comprehensive class on image magick called Doll Baby Conjure: A Master Class in Image Magick. You can sign up at creolemoon.com. #voodoodoll #Hoodoo #conjure #rootwork #witchqueen #witchcraft #rootwork #dollmagic #dollbabyconjure #imagemagic #poppets #creolemoon (at Saint Johns, Arizona) https://www.instagram.com/p/ChXb4uQlLq_/?igshid=NGJjMDIxMWI=
#voodoodoll#hoodoo#conjure#rootwork#witchqueen#witchcraft#dollmagic#dollbabyconjure#imagemagic#poppets#creolemoon
0 notes