#Instal python for mac
Explore tagged Tumblr posts
Visit Tumblr Blog
Explore Tumblr blogs with no restrictions, modern design and the best experience.
Last Seen Tumblr Blogs


Fun Fact
China blocked Tumblr because of pornography and censorship problems in 2013.
Text
How to back up your tumblr blog with Tumblr-Utils FOR MAC USERS
I've seen a few guides floating around on how to use some more complex options for backing up your tumblr blog, but most are extremely PC focused. Here is a guide for fellow (unfortunate) mac users!
Note: I am not a tech savvy person at all. My brother walked me through this, and I'm just sharing what he told me. Unfortunately I won't be able to help much if you need trouble shooting or advice ;; sorry! This is also based off of this guide (link) by @/magz.
- - - - GUIDE - - - -
First, open terminal. You can command+space to search through your applications, and search for "terminal". It should look like this.

You should see something like this within the window:
[COMPUTER NAME]:~ [USER NAME]$ []
First, create a virtual environment for tumblr back up. This will limit any conflicts with other python programs. Type and enter this into terminal:
python3 -m venv .tumblr_backup
Then, Activate the virtual environment by entering this:
source .tumblr_backup/bin/activate
The next line should now show something like this:
(.tumblr_backup) [COMPUTER NAME]:~ [USER NAME]$ []
As a side note, you can exit this virtual environment by typing and entering "deactivate". You can re-enter it through the previous line we used to activate it to begin with.
Next, install the base package with this line:
python3 -m pip install tumblr-backup
The linked guide details various options for tumblr back up packages that you can install. Copied from the guide for convenience:
"tumblr-backup : default tumblr-backup[video] : adds option to download videos tumblr-backup[exif] : adds option to download EXIF information of fotos (photography metadata information) tumblr-backup[notes] : adds option to download notes of posts (huge) tumblr-backup[jq] : adds option to filter which posts to backup tumblr-backup[all] : adds all options (personally doesn't work for us at the moment of writing this)"
I chose the video option, but you can pick which you'd like. Download that specific package with this line. Note that unlike the previous lines Ive shown, the square brackets here are actually part of it and must be used:
python3 -m pip install tumblr-backup[OPTION]
Next, you need to create an app linked to your tumblr account to get an OAuth consumer key (aka API key). Go to this link: [https://www.tumblr.com/oauth/apps] and click the [+Register application] button. Here, you will have to input a bunch of info. What you put doesn't really matter. This is how the original guide filled it out, and I did pretty much the exact same thing:

(The github link for your convenience: https://github.com/Cebtenzzre/tumblr-utils)
For the next step, You'll take the OAuth consumer key (NOT the secret key) and set it as the API key in tumblr-utils to give it the ability to download your blog. Input this line. Note that in this case, the square brackets are NOT to be included- just copy and paste the key:
tumblr-backup --set-api-key [YOUR OAUTH CONSUMER KEY]
This will set you up to start your back up! Type this to see all the different customization options you can pick from for your backup:
tumblr-backup --help
To begin your back up, pick which options you want to choose from and select which of your blogs you want to back up. It should look like this:
tumblr-backup [OPTIONS] [BLOG NAME]
For example, I am currently backing up this blog and I wanted to save videos as well as reversing the post order in the monthly archives. This is what my command looked like:
tumblr-backup -r --save-video bare1ythere
And there you have it! Your backup will be saved into a file titled after your blog. You can search through finder for it from there. There is also an option to specify where you want to save your blog, but I'm not sure how it works. I hope this was useful!!
92 notes
·
View notes
Text
just woke up from a bizarro nightmare:
i found a visual novel adjacent indie game called "All-in One", made by a tumblr user techy-vrissy or something like that; naturally i wanted to stream it (i had my OBS open and running the whole time, giving me immense anxiety throughout the nightmare)
it was a very niche game, so i wanted to make it more known by making a carrd for it with links to download it as well as synopsis and character info
for some reason i only had a free unvoiced version and wanted to get a premium paid one with professional voice over by japanese anime studio
that's where the weird stuff began - every time i googled the name of the game, it would glitch the page into something scary and unsettling (the two distinct examples i remember is a fake chinese food restraunt order with 4th wall jokes throughout it, and AI-generated pictures of interiors made entirely out of dogs textures but it looked more like gore than a funny collage)
at some point i also for some reason accidentally re-named a handful of characters in the unvoiced version and wanted to change them back, and that took forever to figure
some character names i remember were The D°g Boy and Paripi Bitch Ren (okay then...)
no matter what i did i couldn't find a page to download the game at all, not even the version i had initially so i could at least restore the names to the original ones
in the end i found that apparently the game was coded, and i cannot stress enough the absurdity of it, by writing thousands upon thousands of Reddit comments with character text, image links and movement descriptions python-style in unending reply chain
i found the links eventually on a forum made by the creator and the top pinned post was "3000 frequently asked questions"
there i read that it couldn't be downloaded for Windows anymore, it was discontinued in favor of an experimental operating system similar to Mac, that risked everything being wiped off my computer during the installation process and required a pretty beefy hardware that I didn't have
i woke up really angry and sore
37 notes
·
View notes
Text
Your All-in-One AI Web Agent: Save $200+ a Month, Unleash Limitless Possibilities!
Imagine having an AI agent that costs you nothing monthly, runs directly on your computer, and is unrestricted in its capabilities. OpenAI Operator charges up to $200/month for limited API calls and restricts access to many tasks like visiting thousands of websites. With DeepSeek-R1 and Browser-Use, you:
• Save money while keeping everything local and private.
• Automate visiting 100,000+ websites, gathering data, filling forms, and navigating like a human.
• Gain total freedom to explore, scrape, and interact with the web like never before.
You may have heard about Operator from Open AI that runs on their computer in some cloud with you passing on private information to their AI to so anything useful. AND you pay for the gift . It is not paranoid to not want you passwords and logins and personal details to be shared. OpenAI of course charges a substantial amount of money for something that will limit exactly what sites you can visit, like YouTube for example. With this method you will start telling an AI exactly what you want it to do, in plain language, and watching it navigate the web, gather information, and make decisions—all without writing a single line of code.
In this guide, we’ll show you how to build an AI agent that performs tasks like scraping news, analyzing social media mentions, and making predictions using DeepSeek-R1 and Browser-Use, but instead of writing a Python script, you’ll interact with the AI directly using prompts.
These instructions are in constant revisions as DeepSeek R1 is days old. Browser Use has been a standard for quite a while. This method can be for people who are new to AI and programming. It may seem technical at first, but by the end of this guide, you’ll feel confident using your AI agent to perform a variety of tasks, all by talking to it. how, if you look at these instructions and it seems to overwhelming, wait, we will have a single download app soon. It is in testing now.
This is version 3.0 of these instructions January 26th, 2025.
This guide will walk you through setting up DeepSeek-R1 8B (4-bit) and Browser-Use Web UI, ensuring even the most novice users succeed.
What You’ll Achieve
By following this guide, you’ll:
1. Set up DeepSeek-R1, a reasoning AI that works privately on your computer.
2. Configure Browser-Use Web UI, a tool to automate web scraping, form-filling, and real-time interaction.
3. Create an AI agent capable of finding stock news, gathering Reddit mentions, and predicting stock trends—all while operating without cloud restrictions.
A Deep Dive At ReadMultiplex.com Soon
We will have a deep dive into how you can use this platform for very advanced AI use cases that few have thought of let alone seen before. Join us at ReadMultiplex.com and become a member that not only sees the future earlier but also with particle and pragmatic ways to profit from the future.
System Requirements
Hardware
• RAM: 8 GB minimum (16 GB recommended).
• Processor: Quad-core (Intel i5/AMD Ryzen 5 or higher).
• Storage: 5 GB free space.
• Graphics: GPU optional for faster processing.
Software
• Operating System: macOS, Windows 10+, or Linux.
• Python: Version 3.8 or higher.
• Git: Installed.
Step 1: Get Your Tools Ready
We’ll need Python, Git, and a terminal/command prompt to proceed. Follow these instructions carefully.
Install Python
1. Check Python Installation:
• Open your terminal/command prompt and type:
python3 --version
• If Python is installed, you’ll see a version like:
Python 3.9.7
2. If Python Is Not Installed:
• Download Python from python.org.
• During installation, ensure you check “Add Python to PATH” on Windows.
3. Verify Installation:
python3 --version
Install Git
1. Check Git Installation:
• Run:
git --version
• If installed, you’ll see:
git version 2.34.1
2. If Git Is Not Installed:
• Windows: Download Git from git-scm.com and follow the instructions.
• Mac/Linux: Install via terminal:
sudo apt install git -y # For Ubuntu/Debian
brew install git # For macOS
Step 2: Download and Build llama.cpp
We’ll use llama.cpp to run the DeepSeek-R1 model locally.
1. Open your terminal/command prompt.
2. Navigate to a clear location for your project files:
mkdir ~/AI_Project
cd ~/AI_Project
3. Clone the llama.cpp repository:
git clone https://github.com/ggerganov/llama.cpp.git
cd llama.cpp
4. Build the project:
• Mac/Linux:
make
• Windows:
• Install a C++ compiler (e.g., MSVC or MinGW).
• Run:
mkdir build
cd build
cmake ..
cmake --build . --config Release
Step 3: Download DeepSeek-R1 8B 4-bit Model
1. Visit the DeepSeek-R1 8B Model Page on Hugging Face.
2. Download the 4-bit quantized model file:
• Example: DeepSeek-R1-Distill-Qwen-8B-Q4_K_M.gguf.
3. Move the model to your llama.cpp folder:
mv ~/Downloads/DeepSeek-R1-Distill-Qwen-8B-Q4_K_M.gguf ~/AI_Project/llama.cpp
Step 4: Start DeepSeek-R1
1. Navigate to your llama.cpp folder:
cd ~/AI_Project/llama.cpp
2. Run the model with a sample prompt:
./main -m DeepSeek-R1-Distill-Qwen-8B-Q4_K_M.gguf -p "What is the capital of France?"
3. Expected Output:
The capital of France is Paris.
Step 5: Set Up Browser-Use Web UI
1. Go back to your project folder:
cd ~/AI_Project
2. Clone the Browser-Use repository:
git clone https://github.com/browser-use/browser-use.git
cd browser-use
3. Create a virtual environment:
python3 -m venv env
4. Activate the virtual environment:
• Mac/Linux:
source env/bin/activate
• Windows:
env\Scripts\activate
5. Install dependencies:
pip install -r requirements.txt
6. Start the Web UI:
python examples/gradio_demo.py
7. Open the local URL in your browser:
http://127.0.0.1:7860
Step 6: Configure the Web UI for DeepSeek-R1
1. Go to the Settings panel in the Web UI.
2. Specify the DeepSeek model path:
~/AI_Project/llama.cpp/DeepSeek-R1-Distill-Qwen-8B-Q4_K_M.gguf
3. Adjust Timeout Settings:
• Increase the timeout to 120 seconds for larger models.
4. Enable Memory-Saving Mode if your system has less than 16 GB of RAM.
Step 7: Run an Example Task
Let’s create an agent that:
1. Searches for Tesla stock news.
2. Gathers Reddit mentions.
3. Predicts the stock trend.
Example Prompt:
Search for "Tesla stock news" on Google News and summarize the top 3 headlines. Then, check Reddit for the latest mentions of "Tesla stock" and predict whether the stock will rise based on the news and discussions.
--
Congratulations! You’ve built a powerful, private AI agent capable of automating the web and reasoning in real time. Unlike costly, restricted tools like OpenAI Operator, you’ve spent nothing beyond your time. Unleash your AI agent on tasks that were once impossible and imagine the possibilities for personal projects, research, and business. You’re not limited anymore. You own the web—your AI agent just unlocked it! 🚀
Stay tuned fora FREE simple to use single app that will do this all and more.
7 notes
·
View notes
Text
got python setup working on my windows desktop :) now I can work on my silly code project through github / vscode on both the work mac and my windows desktop. Both on Python 3.13.
So windows ignores "shebang" (😳) notation bc it just like. opens .py files in whatever you have it set to open, but Unix doesn't seem to. So at the beginning of my code I have
#!/opt/homebrew/bin/python3.13
I'm thinking, though, that if other unix users try to run it, then they'd need to specifically open it through having a brew installation of python 3.13...
I want to see if I can set it to like
#!/usr/bin/env python3.13
Because I think that would be more normal to unix users... they still need 3.13 but not necessarily brew. I'll have to mess around with that tomorrow tho bc I'm in bed.
3 notes
·
View notes
Text
The Legendary ThinkPad T480s

I recently got myself an old Lenovo ThinkPad T480s for just $230—a real steal for this iconic machine. The model I got had the i7-8650u and 16GB RAM. Even though it’s about 7 years old, the ThinkPad T480s still holds legendary status among laptop enthusiasts. A quick search on YouTube and you will find a ton of recent videos praising its robust build, exceptional keyboard, and solid performance. There's almost a cult like following for this ThinkPad.


Right after purchasing, I opened up the laptop for some essential maintenance. I disassembled the heat sink/heat pipe/fan assembly and thoroughly cleaned the fan with a brush and compressed air duster. After cleaning off the old thermal paste from the heat sink and CPU using IPA, I reapplied some Kryonaut Thermal Grizzly paste to ensure optimal cooling performance.


Over the next two days, I set it up with Ubuntu and installed a bunch of development tools like Visual Studio Code, Python, Jupyter Notebook, and Arduino IDE. Additionally, I configured VirtualBox to run a Windows 10 Pro VM for flexibility.
To enhance seamless workflow between my ThinkPad and Mac, I configured Syncthing for effortless file synchronization and CopyQ for shared clipboard functionality. For backup, I am using Timeshift for system snapshots and Déjà Dup for user files. Installed Gnome Sushi and Imagemagick to make file preview work like on a Mac. It's also nice that the Ubuntu dock can be configured to look similar to a Mac.
On top of that, I also installed xremap to do some key remapping for things like copy, paste, quit, etc. to make Ubuntu work more like a Mac, just because the Mac is my main machine and all those key strokes are like muscle memory already. Keep having to change as I switch between using the 2 was a real pain.


That’s it, a brand new old ThinkPad. The ThinkPad T480s remains a fantastic laptop even after all these years, providing stellar performance and an exceptional Linux experience. It’s the perfect budget-friendly yet powerful laptop for developers, makers, and Linux enthusiasts alike.

Below are some videos you can check out:
youtube
youtube
2 notes
·
View notes
Text


22.02.25
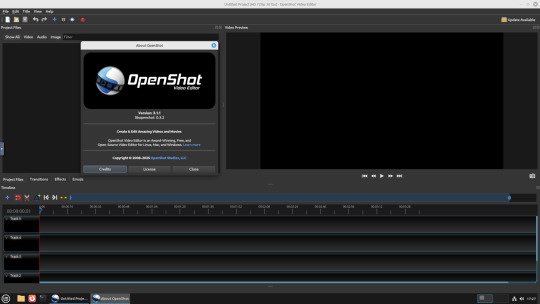
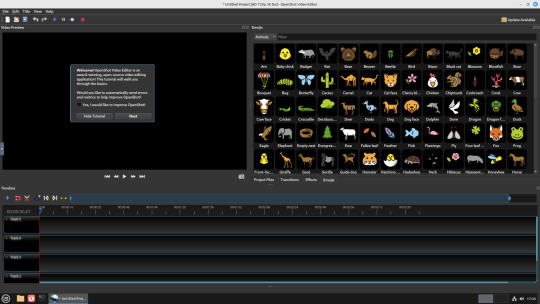
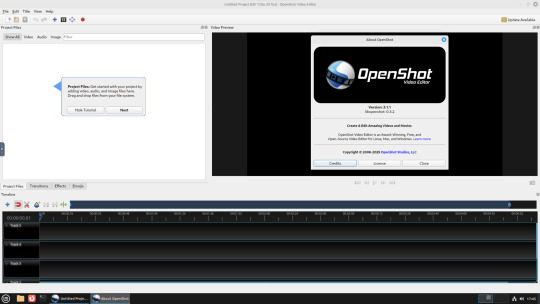
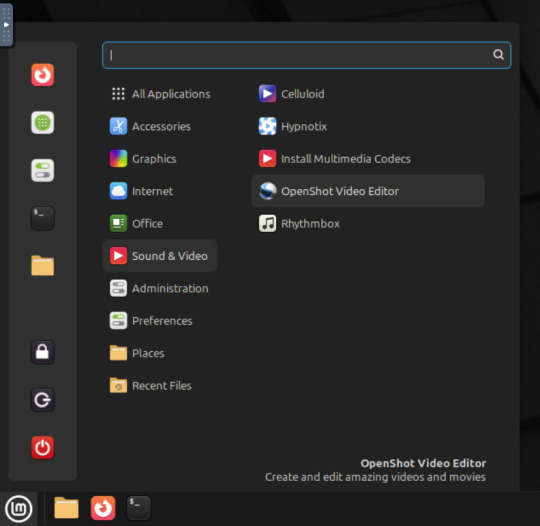
A quick look at the free, open source Openshot Video Editor, running in Linux Mint Cinnamon 22.1 on Distrosea!
On Mint, Openshot is installed via the Software Manager as a .deb file.
Here are some of the packages (dependencies) that are installed alongside it. The version featured in the manager (Openshot 3.1.1) is a few versions behind the web version (3.3.0) for stability reasons.
OpenShot was released in August 2008. It is built using Python, C++ (libopenshot) and the Qt5 framework. It is available for Linux, Chrome OS, Windows and Mac OS operating systems.
https://www.openshot.org/
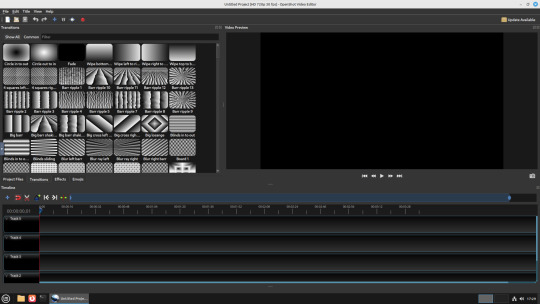
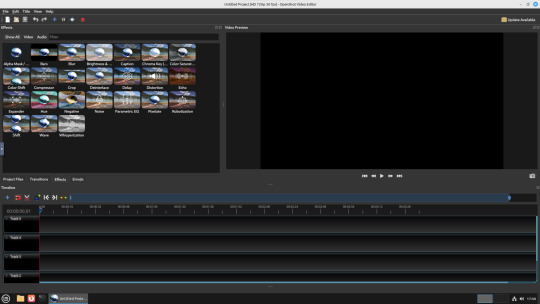
It can handle most modern and classic video formats and can export videos in up to 8K resolution. It comes with a customisable interface, built-in tutorial, various transitions, effects, 3D text and animation effects with Blender Animation support and emoji emblems that can be used in video shots through the time line.
Openshot comes with a default dark theme and a light theme.
https://en.wikipedia.org/wiki/OpenShot
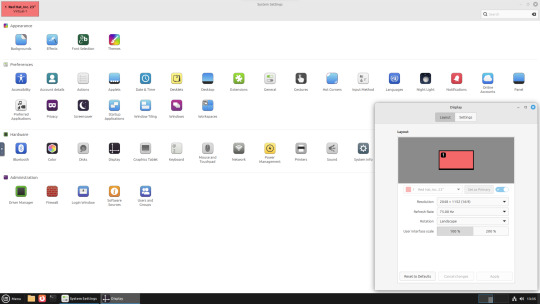
An interesting look at the OpenShot User interface. The window size of the VM is shown in the 'Display Settings' window. The actual display resolution is 2560x1440.
Online video tutorials can be watched here:
https://www.youtube.com/playlist?list=PLymupH2aoNQNezYzv2lhSwvoyZgLp1Q0T
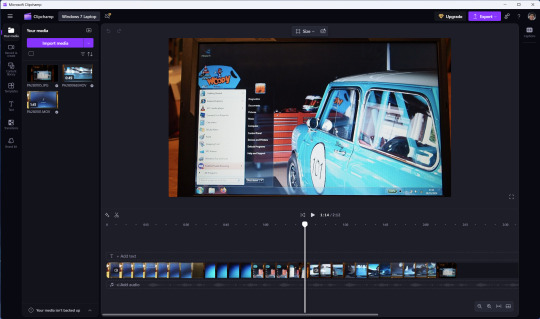
However I still prefer the simplicity of Clipchamp, as it includes ready made templates, a clean UI and is a browser based web-app that can run on any operating system.
https://clipchamp.com/en/
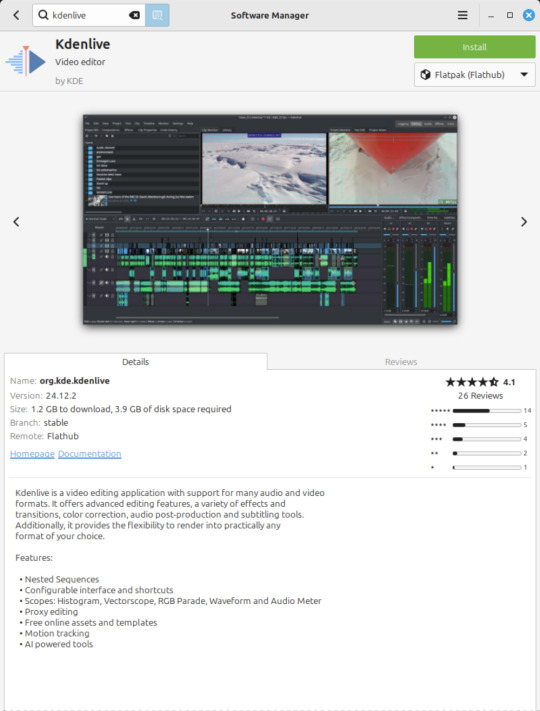
Other popular open-source video editing applications include:
Kdenlive (released 2002)
https://kdenlive.org/en/
Shortcut (released 2011)
https://www.shotcut.org/

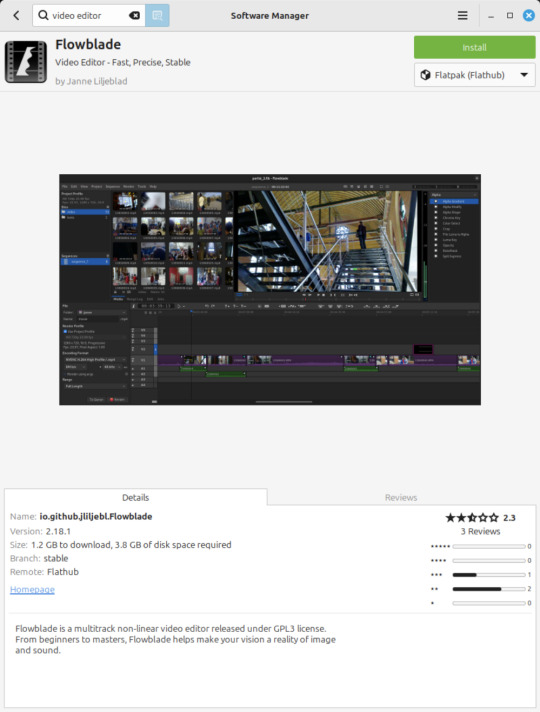
Flowblade Movie Editor (released 2009)
https://jliljebl.github.io/flowblade/
Blender Animation Program (released 1994)
https://www.blender.org/
All of the video editors mentioned here have their pros and cons and many can be installed as a .deb (System Package) or .flatpak (Containerized App) on Linux Mint.
5 notes
·
View notes
Text
TSR Downloader by Xientra
Writeup for non-computer people from a semi-computer person (me) Everything done using Windows bc I'm on Windows but it should all pretty much be analogous on a mac (I can't guarantee it but. yknow) Thanks to @cristalviper for putting me onto this this will make my quality of life much better Without further ado:
What you'll need:
- python (if you don't have python installed, you can get it here: https://www.python.org/downloads/) just download it and click the file the same way you always install things - the code from here: https://github.com/Xientraa/The-Sims-Resource-Downloader Easiest way to get it if you don't really know what's going on and it kinda scares you:
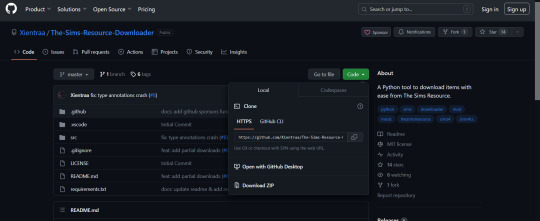
Click the green button that says Code and then Download ZIP.
Now put the downloaded zip file somewhere and unzip it.
Inside there's a file called config (or config.json, depending on your settings). You can open it with notepad.
inside it looks like this:

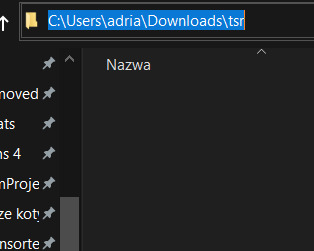
Pick a place where you'll want your downloaded files to go. I made a folder called tsr in my downloads. Copy the path to it (if you click this bar when you're in the folder it'll select the path and you can copy it)
Paste that into the config file and replace these: \ with these: / so you get something like this:
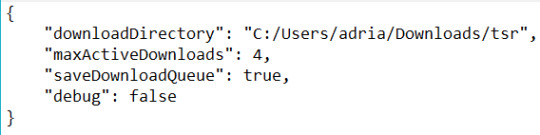
Save the file. You can change the maxActiveDownloads value if you want (it's how many files you'll be able to download at once)
Now the second part. Open cmd (search it here and click the first thing). You should get something like this:
Now, copy the path to the unzipped folder with the code.

You'll want your cmd to go to this folder. To do that, type in cd and paste your path UNLESS you have the same case I do, where your cmd is pointing to a different drive than you want it to go to (you can see in cmd I'm in C: and the folder is on my D drive) -- in this case, you need to type in cd /d and then paste the path, like this:

You can see it's now in that folder. Next we're going to type in pip install -r requirements.txt and hit enter. it should start installing the libraries for python that it needs. if it fails to download something or it keeps telling you that you can update pip you can ignore it 99% of the time.

if you get something like "oh noo I don't know what pip is" from your cmd it means there's something off with your python installation probably. Now, assuming we've changed the config file and installed requirements, we type in python src/main.py and hit enter. if you get an import error (first time I tried I got an error that said it tried to import something from requests and failed) look at what it's trying to import and try installing that (so in my case, I just typed in pip install requests) and then after that installs try python src/main.py again. If everything works, you might get asked to do a captcha. Type in the numbers and you should get something like this:

This means the program is running! Go to TSR, find something you like and copy the URL.
I'm going to get this:


so I just copy the URL and now when you look at your cmd you should see something like this:

this means it's downloading your file.
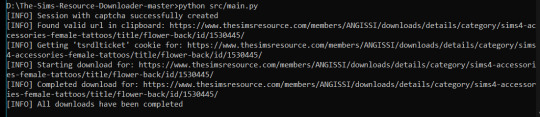
and once it's done...

here it is in my tsr folder that I made earlier. And that's it! I hope this is somewhat coherent and helpful.
25 notes
·
View notes
Note
could you go into a little bit of detail about vapoursynth as a program if you don't mind? because the vapoursynth i'm familiar with runs solely with the command line interface using python and i have a feeling thats not what people are talking about but i could be wrong honestly 😅 and was just curious if you minded explaining what you used it for (and maybe how it's set up a bit so i know if i'm thinking of the right vapoursynth?)
yeah sure! to preface, i have a mac computer. if youre asking these questions as a gif maker, ie u want vapoursynth installed, and you have a mac, it is gnarly to install. i have coding background and consider myself tech savvy and it was hell, lmao. if you have windows, it's apparently easy as pie. lucky them.
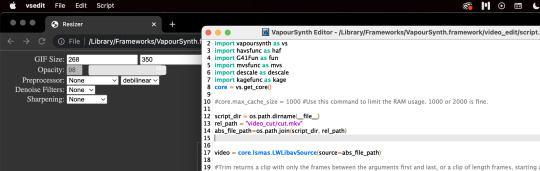
yes, the vapoursynth i use/am talking about runs via python code (for macs) but not entirely python interface, like you dont need visual studio code or any app like that. at least for mac users, you have to download "vapoursynth editor" (and a lot of other stuff ie files that make vapoursynth run) from a vapoursynth tutorial for macs (like i said earlier, windows may be different bc i have a mac). this is the tutorial that contains the link to download "vapoursynth editor" and more for mac. btw, vapoursynth from this tutorial also currently works with the latest mac OS software, ventura 13, which is what i have. vapoursynth editor is like another version of vs code, or at least thats how i like to think about it.
this is what it looks like when i open "vapoursynth editor":
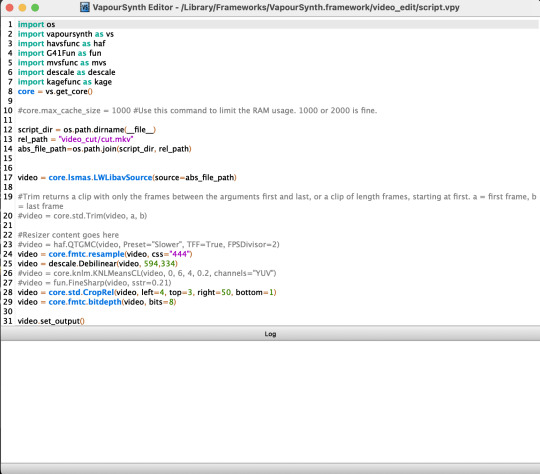
so, very similar to vs code.
this is what the app itself looks like (the one on the right):
the white robot dude is where you drop in the video that you want vapoursynthed (for lack of better word lol), which also comes in that link i shared. i used to use vapoursynth for cropping and sharpening/smoothing kpop videos to turn into gifs on photoshop, but now i just use it for cropping because i like photoshop's sharpening more. once i click and drag the video i'd like to crop/edit/sharpen into the white robot dude, i mess around with the video's dimensions, sharpening quality, etc. this is what that interface looks like to do that:
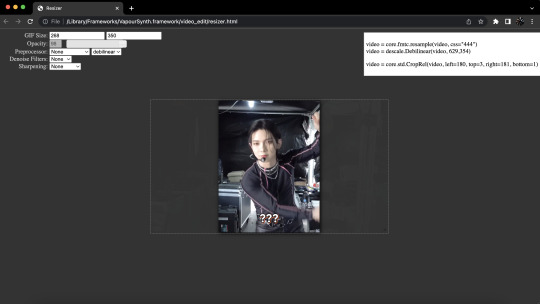
and when im done, i copy the code from the top right corner into vapoursynth editor, the screenshot from earlier that looks like vs code. to save the video with the settings you want...
i go to "script" in the top left corner of my computer,

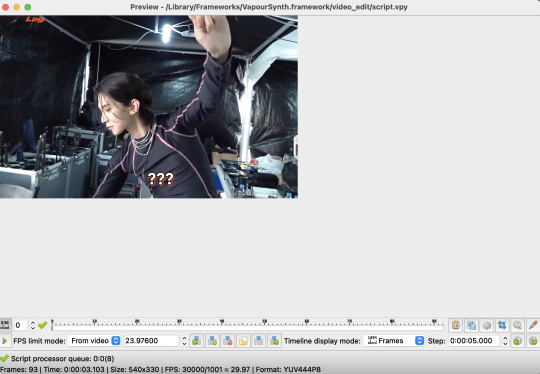
and hit preview, just to see if the sharpening/smoothing settings i selected look ok with the video. this is what preview looks like:
if im satisfied, i go back to script in the top left corner, but this time i hit encode video. this pops up:

i usually edit the very last bit of the code in the argument block (the output/output.mov) to something like, output/a-clever-name-so-ik-which-video-this-is.mov, and then i hit start in the bottom right corner and my computer sharpens/smoothens/crops the video.
when you say "explain how vapoursynth is set up" i'd imagine that means how to install it (on a mac)? please correct me if im wrong (by sending another ask), but if thats the case then the tutorial i linked explains it all!
i hope i hit everything you wanted anon, and send me another ask if you want to hear more about something in particular or want a more detailed vapoursynth tutorial, or something. thanks!
6 notes
·
View notes
Text
Les 7 applications Android que tout hacker éthique doit avoir
L’univers de la cybersécurité évolue rapidement, et avec lui, les outils à la disposition des hackers éthiques. Que vous soyez débutant souhaitant apprendre les bases du hacking ou professionnel expérimenté en quête de solutions mobiles performantes, il existe aujourd’hui des applications Android puissantes qui vous permettent d’analyser, protéger et tester la sécurité d’un réseau ou d’un système directement depuis votre smartphone. Dans cet article, je vous présente les 5 meilleures applications Android que tout hacker éthique doit avoir, utilisables sans PC. 1. Termux – Le terminal Linux dans votre poche Pour tout hacker éthique, la maîtrise de la ligne de commande est essentielle. C’est là qu’intervient Termux, une application qui vous offre un terminal Linux complet directement sur votre Android, sans root. Avec Termux, vous pouvez : Installer des outils tels que nmap, hydra, ou sqlmap Écrire et exécuter vos propres scripts en Python, Bash, etc. Gérer des paquets via le gestionnaire APT Grâce à sa légèreté et sa compatibilité avec F-Droid, Termux devient le point de départ idéal pour tout environnement de test mobile. 📥 Télécharger Termux sur F-Droid 2. Kali NetHunter – La puissance de Kali Linux sur Android Une fois familiarisé avec l’environnement Linux grâce à Termux, vous pouvez passer à un niveau supérieur avec Kali NetHunter. Développée par Offensive Security, cette plateforme regroupe les principaux outils de test de pénétration dans une interface mobile. Ses atouts : Attaques man-in-the-middle (MITM) Injection de paquets, scan de ports, sniffing réseau Disponible en version rootless Kali NetHunter transforme votre téléphone en un véritable laboratoire de sécurité mobile, sans avoir besoin de rooter votre appareil. 📥 Télécharger Kali NetHunter 3. Orbot – L’anonymat avant tout Lorsque vous effectuez des analyses ou naviguez dans des environnements sensibles, protéger votre identité est crucial. C’est ici qu’intervient Orbot, un proxy mobile qui fait transiter vos données par le réseau Tor. Pourquoi l’utiliser : Masquer votre adresse IP Chiffrer le trafic sortant de vos applications Appliquer Tor à des applis spécifiques via VPN local Combiné à Termux ou NetHunter, Orbot garantit un niveau d’anonymat supplémentaire, indispensable lors de tests d’intrusion en réseau ou sur des applications distantes. 📥 Télécharger Orbot sur le site du Guardian Project 4. Fing – L’analyseur de réseau intelligent Maintenant que votre environnement est sécurisé, il est temps de scanner les réseaux à la recherche de failles potentielles. Fing est l’une des applications les plus complètes pour cette tâche. Fonctionnalités clés : Détection de tous les appareils connectés Analyse des ports ouverts et services actifs Identification des adresses IP, MAC, et constructeurs Fing est extrêmement simple à utiliser et vous permet d’auditer la sécurité d’un réseau Wi-Fi en quelques minutes, directement depuis votre téléphone. 📥 Télécharger Fing sur Google Play 5. FakeTraveler – Falsifiez votre localisation GPS sans root Dans certaines situations, il peut être utile de simuler une autre localisation GPS sur votre smartphone, que ce soit pour préserver votre vie privée, tester des applications sensibles à la géolocalisation ou valider des comportements en conditions simulées. FakeTraveler répond parfaitement à ce besoin en proposant une interface simple et intuitive : Une carte interactive où vous pouvez sélectionner la localisation désirée via un appui long Possibilité d’appliquer la localisation fake immédiatement Options avancées pour simuler la localisation sur une période donnée Pas besoin de root : l’application utilise la fonctionnalité "Mock Location" disponible dans les options développeur Android 📥 Télécharger FakeTraveler sur F-Droid 6. WiFiAnalyzer – Analyse des réseaux Wi-Fi WiFiAnalyzer vous aide à visualiser les réseaux Wi-Fi environnants, identifier les canaux encombrés et optimiser votre propre réseau.
Fonctionnalités principales : Détection des réseaux Wi-Fi à proximité Analyse des canaux pour éviter les interférences Graphiques en temps réel de la puissance du signal 📥 Télécharger WiFiAnalyzer sur Google Play 7. NetHunter Store – Accès à des outils spécialisés Le NetHunter Store est une boutique d'applications basée sur F-Droid, offrant une collection d'outils de sécurité et de hacking éthique, même sans installer Kali NetHunter. Fonctionnalités principales : Accès à des applications comme WiFi Analyzer, cSploit, et plus Téléchargements sécurisés sans télémétrie Interface adaptée aux professionnels de la sécuritéMyGreatLearning 📥 Accéder au NetHunter Store En combinant ces cinq applications, vous disposerez d’un environnement de test de pénétration complet et mobile. ⚠️ Rappel important : n’utilisez ces outils que dans un cadre légal et éthique — par exemple sur votre propre réseau, sur des environnements de test, ou dans le cadre d’un audit autorisé. Le hacking éthique n’est pas un jeu, c’est une discipline sérieuse et précieuse pour la sécurité numérique de tous.
0 notes
Text
10 Powerful Reasons IT Students Must Learn Linux in 2025

In the sometimes developed IT scenario from 2025, technical skills are not enough important should gain practical, industrial-over-brushed knowledge to remain competitive. Students who move on between different techniques, Linux stands out as a basic skill that provides professional opportunities to flourish in several domains. Learning operating systems are far ahead of the use of the basic system. This allows students to understand the architecture of most modern technologies.
Whether you want to become a system administrator, DevOps engineer or a clouds expert, Linux is your first point. This is the place where professional Linux training in Chandigarh becomes a gaming swap from iconic institutions like Cbitss. This is where every IT student should take Linux seriously in 2025.
1. Open Source Benefit
One of the main benefits of learning the Linux operating system is that it is an open source. Students can download, use and even change Linux without worrying about a license fee. This freedom encourages any IT student who uses a solid technical foundation, practicing hands and deep understanding.
2. High Demand in the labor market
Linux skills are in demand in IT roles. From system administration to cyber security and cloud computing, companies seek professionals who are comfortable working in the Linux environment. With organizations that use cloud platforms such as AWS and Azure, which are largely created on Linux, students are equipped with Linux training an increase in job placements.
3. Better Control of the system
Unlike Windows or Mac, Linux gives users deeper control over system functions, networking, permissions, and processes. Through proper Linux Training, students learn to navigate command-line interfaces, automate tasks using scripts, and troubleshoot issues efficiently—skills that hiring managers value greatly.
4. Ideal for programming and Development
Linux is a developer -playground. Whether you codes in Python, Java, C ++ or Shell Scripting, Linux offers a powerful and flexible atmosphere. Learning Linux increases the productivity of a developer and allows for more efficient testing and distribution of applications.
Many programming tools and libraries are adapted to Linux, making the advantage of learning the Linux operating system clearly for budding developers.
5. Foundation for Cloud and DevOps Career
Most clouds run on the server Linux. DevOps tools such as doors, cubes, Jenkins and Ankle Linux are resident of the atmosphere. If you are planning to make a career in Cloud Computing or Devops, it is necessary to master Linux. This is why admission to Linux training in Chandigarh is preparing you not only for today's jobs, but also for tomorrow's cloudy world.
6. Cost -Effective teaching path
Unlike many commercial platforms, Linux is completely free. This makes it a cheap learning resource for students. Instead of paying for the license, students can install any popular Linux distribution on their personal devices and start practicing immediately.
In addition, many Linux training institutes, such as CBIT, open source tools and exposure in the real world, help students, students get maximum value without breaking the bank.
7. Enhanced Security Skills
Cybersecurity is a growing field, and Linux plays a crucial role in it. The OS is inherently secure and is used in ethical hacking, penetration testing, and security monitoring. Tools like Wireshark, Metasploit, and Kali Linux run seamlessly in a Linux environment. By learning Linux, students get firsthand experience in system-level security operations, making them job-ready for cybersecurity roles.
8. Seamless Integration with Emerging Technologies
From AI to blockchain, most emerging technologies prefer Linux as their development platform. As AI tools and platforms become more mainstream in 2025, Linux's compatibility with TensorFlow, PyTorch, and other frameworks becomes critical. Students who pursue Linux Training gain the skillset to work with these technologies right from the root.
9. Strengthens Resume and Job Interviews
Employers appreciate candidates with real command-line experience. A resume that highlights Linux Training in Chandigarh or mentions Linux certifications shows initiative, technical aptitude, and industry awareness. Students who understand file systems, shell scripting, and terminal commands stand out in technical interviews.
Moreover, institutes like Cbitss not only offer Linux Training but also support students with personality grooming. There are personality development classes in Chandigarh that go hand-in-hand with technical training, helping students build confidence and communication skills for job interviews.
10. Community Support and Continuous Learning
Linux has a massive, active community. This global support network provides forums, documentation, and online resources for every conceivable issue. Students can collaborate with others, contribute to open-source projects, and stay updated with the latest in tech. This kind of exposure nurtures a lifelong learning mindset, something that IT professionals need in a fast-paced digital world.
Conclusion
In 2025, having Linux skills is not just an advantage—it’s a necessity. The benefits of learning Linux operating system include open-source freedom, stronger job prospects, better system control, and a robust foundation for advanced IT careers.
If you're serious about your future, enrolling in a professional Linux Training in Chandigarh program can be the first step toward success. Institutes like Cbitss offer structured training, real-time projects, and personality development sessions to make you industry-ready.
So, whether you're an IT student in your first year or a graduate looking for specialization, Linux opens the door to limitless opportunities. Start your Linux journey today, and stay ahead in the ever-changing tech world.
0 notes
Link
#accesscontrol#auditing#CentOS10#CentOS11#configuration#enforcement#firewall#hardening#Linux#mandatoryaccesscontrol#open-source#permissions#policies#Security#securitycontexts#SELinux#SELinuxmodes#Server#systemadministration#Troubleshooting
0 notes
Text
Getting Started with Desktop Application Development

While web and mobile apps dominate today’s tech scene, desktop applications are still essential in many industries — from productivity tools and games to system utilities and business software. This guide introduces the fundamentals of desktop application development and how to get started building your own apps.
What is a Desktop Application?
A desktop application is a software program that runs natively on an operating system like Windows, macOS, or Linux. Unlike web apps, desktop applications don’t rely on a browser and can offer greater access to system resources and offline functionality.
Why Build Desktop Apps?
Offline Capability: Desktop apps don’t need internet access to run.
Performance: Can take full advantage of system hardware.
Access to System Resources: File systems, printers, OS-level APIs.
Platform-Specific Design: Customize the experience for each OS.
Popular Frameworks for Desktop App Development
Electron (JavaScript): Build cross-platform desktop apps using web technologies.
JavaFX (Java): A robust framework for Java-based desktop apps.
Qt (C++ or Python via PyQt): A powerful cross-platform toolkit.
WPF (C#): For building Windows desktop apps using .NET.
Tkinter (Python): Simple GUI apps for learning and prototyping.
Example: Basic GUI with Python and Tkinter
import tkinter as tk def greet(): label.config(text="Hello, " + entry.get() + "!") app = tk.Tk() app.title("Simple App") entry = tk.Entry(app) entry.pack() button = tk.Button(app, text="Greet", command=greet) button.pack() label = tk.Label(app) label.pack() app.mainloop()
Example: Electron App (JavaScript/HTML/CSS)
// main.js const { app, BrowserWindow } = require('electron'); function createWindow() { const win = new BrowserWindow({ width: 800, height: 600 }); win.loadFile('index.html'); } app.whenReady().then(createWindow);
Best Practices for Desktop App Development
Keep the UI clean and responsive.
Ensure cross-platform compatibility (if targeting multiple OS).
Handle file I/O and system access carefully.
Use version control (e.g., Git) to manage development.
Test on real devices and environments.
Distribution Options
Windows: MSI/EXE installers, Microsoft Store.
macOS: DMG packages, Mac App Store (requires notarization).
Linux: DEB/RPM packages, Snap, Flatpak.
Cross-platform: Tools like Electron-builder or PyInstaller.
Conclusion
Desktop application development is a rewarding path that allows for rich, powerful software experiences. With frameworks like Electron, WPF, or Qt, you can create sleek and functional desktop apps suited to various platforms and needs. Start small, experiment with different tools, and bring your software ideas to life!
0 notes
Text
Regarding not having Linux this code should work on Windows/Mac without too many hiccups/tweaks but I haven't tested it yet. It's mainly platform agnostic Python and Meshtastic's API works cross platform though you may have to install some drivers.
We're making an internet by and for the people prioritizing marginalized people that's low or no cost.
You can read more here:
And even more here (this is the current source code):
Please help us break through the noise by sharing this wherever you can!
2K notes
·
View notes
Text
📁 HiFiSampler on MacOS (ft. chevrefee)
Today's tutorial will be going over the installation for Hifisampler for MacOS. This was made in collaboration with chevrefee who helped me through the entirety of the install so it was all made possible with their help! Before we get into the specifics of installation we will be going over the currently tested MacOS environments and explain the differences in installation.
For users of Silicon MacOS that are on Sonoma, it is recommended to use the distributed client. Make sure you download both the resampler and client zip files.
For Intel MacOS and Silicon MacOS that are on Ventura and Sequoia, refer to the window’s exe installation method. To prep the environment for the installation please refer to my resampler tutorial before proceeding with this tutorial.
Link ▶︎ https://keitaiware.com/post/766063532617973761/resamplers-on-macos
MacOS that are on versions before Ventura cannot natively support this resampler. Consider using Bootcamp and following an installation guide for Windows.
What you will need in order to begin the installation. . .
Anaconda
Python 3.10
Section 1, “Installing necessary files.”
Install the general Hifisampler installer.
To check if Anaconda is installed to your system, open Terminal and run the command . . .
conda -V
This command will run back what version of anaconda you have installed.
We will now create the conda environment inside Terminal. To set up the conda environment,
conda create -n py10 python=3.10 anaconda
Now that the environment has been created, we will now activate it and install all the necessary modules. *(numpy, scipy, resampy, onnxruntime, soundfile pyloudnorm, librosa, soundfile)
pip install numpy, scipy, resampy, onnxruntime, soundfile pyloudnorm, librosa, soundfile
Our next install will be separate from these modules.
pip3 install torch torchvision
To continue with the preparation, we will need to install the correct version of numpy. In order to do this, we will need to uninstall our existing version to replace it with the correct version.
pip uninstall numpy pip install numpy==1.26.4
Section 2, “Organizing the resampler folder.”
After this, your environment is almost set to run hifisampler! Before we run the necessary files inside python we will be organizing our resampler folder for hifisampler. We will place the entire hifisampler-main folder into the resampler folder.
/Users/Username/Library/OpenUtau/Resamplers
Section 3, Setting up the resampler
For Silicon MacOS on Sonoma * (see Section 6)
Sonoma users on Silicon MacOS can directly download the client file instead of generating a .sh (shell) file. Put the unzipped hifisampler_client_MacOS_ARM64.zip folder into your hifisampler-main folder.
For other Macs . . .
You will need to generate an .sh (shell) to run the resampler.exe. In order to generate the .sh file you can follow my MacOS resampler tutorial here.
Link ▶︎ https://keitaiware.com/post/766063532617973761/resamplers-on-macos
After creating the .sh file, simply drop it into the hifisampler-main folder. Note that the RELPATH for the resampler in the .sh file should be just hifisampler.exe, with no additional paths before it * (not hifisampler-main/hifisampler.exe).
Section 4, “Installing the HiFiGAN dependency.”
Now we will install the HiFiGAN OpenUTAU dependency.
https://github.com/openvpi/vocoders/releases/tag/pc-nsf-hifigan-44.1k-hop512-128bin-2025.02
To install the HiFiGAN dependency, simply drag and drop the .oudep into the OpenUtau UI.
Now we will route the dependency paths inside of the hifiserver.py, to do this, we will right-click and open the file with IDLE or IDLE3 (whichever comes up for you). Using Visual Studio Code is also viable.
Inside of the IDLE view, use CMND+F and search for “HiFIGAN Not Found.” From here, we will look for the onnx_default_path and the ckpt_default_path. We will set the paths to the pc_nsf_hifigan_44.1k_hop512_128bin_2025.02.onnx and model.ckpt. Here below is an example of what to expect.

The area we will be focusing on is highlighted in blue.
Section 5, “Running the HiFiGAN Server.”
Your environment should be set up to run the HiFiGAN server now! For any missing modules in this step you can satisfy the errors by running. . .
pip install [module name]
There isn’t a preferred set of steps, but I tend to set up the HiFiGAN server before opening OpenUtau. To run the HiFiGAN server, we will activate the conda environment.
conda activate py10
Now we will run the server activation command.
python /Users/Username/Library/OpenUtau/Resamplers/hifisampler-main/hifiserver.py
You can also drag and drop the hifiserver.py file to the Terminal window instead of manually typing the pathname.

After Terminal finishes loading the server, you can open OpenUtau and load in your preferred UST and singer. Set your resampler to classic by hitting the cog icon, and select the hifisampler-main/hifisampler_client_MacOS_ARM64/hifisampler (Sonoma) or hifisampler-main/hifisampler.sh from the resampler tab.
Note: In order to render with hifisampler, you will need to open Terminal and run the conda activation command with the hifiserver activation command.
conda activate py10
With the python hifiserver.py activation command.
python /Users/Username/Library/OpenUtau/Resamplers/hifisampler-main/hifiserver.py
Section 6, “General Resampler Usage and Other Additions.”
As this resampler uses neural networks, it will take up more memory to process. If you find that your renders keep freezing, try freeing your memory before attempting to restart the render.
This tutorial has only been tested out on these MacOS:
Intel on Ventura
Silicon M2 on Sonoma
Silicon M2 Max on Sequoia (x2)
In theory, there will be no difference when using M1/M2/M3 chips of the same OS version. We theorize that the cause of uncertainty on whether a user can use the client file or not is based on the OS version used. We have yet to test on Silicon Ventura. Hachimisampler is a resampler from the same developer that shares the neural network system with hifisampler. It is said to work better on Jinriki voicebanks. If you would like to use this resampler instead, the installation procedure will be the same, with an addendum that wrapping the .exe with a .sh file is mandatory for all users since no dedicated client exists.
If you have already installed hifisampler beforehand, you can skip to Section 5 to use it, replacing the hifiserver.py with hachiserver.py instead.
1 note
·
View note
Text
Getting Started with Selenium Software Testing: Tools, Tips, and Tricks
Introduction: Why Selenium Software Testing is in Demand Today
Imagine launching a new web application. Everything looks perfect until users discover bugs that slow them down or block their tasks. It’s a developer’s nightmare and a business risk no one wants. This is where Selenium software testing steps in as a game-changer.
Selenium is one of the most popular tools for automated software testing. It helps teams test web applications quickly, catch bugs early, and release reliable products. According to a recent survey by Stack Overflow, Selenium ranks among the top five automation testing tools used by professionals worldwide. Whether you are a beginner or an experienced tester, learning Selenium can open doors to high-paying jobs and career growth.
If you are thinking about kickstarting a career in Selenium automation testing, or want to upskill, this guide covers everything you need to know. We will explore Selenium tools, tips, and tricks to help you get started. By the end, you’ll see why enrolling in a Selenium training course can give you an edge.
What is Selenium Software Testing?
A Simple Explanation
Selenium is an open-source tool for automating web browsers. It allows testers to write scripts that automatically interact with web elements like buttons, forms, and links—just like a user would. These automated tests help find errors, check functionality, and ensure the web application works across different browsers.
Why Selenium?
Free and Open-Source: No licensing costs.
Cross-Browser Support: Works on Chrome, Firefox, Safari, and more.
Cross-Platform: Supports Windows, Mac, and Linux.
Multiple Programming Languages: Works with Java, Python, C#, and others.
Large Community Support: Easy to find help, tutorials, and tools.
Components of Selenium: Understanding the Tools
1. Selenium WebDriver
Directly interacts with the browser.
Used for writing test cases that mimic real user actions.
Supports multiple programming languages.
2. Selenium IDE (Integrated Development Environment)
A browser extension that records and plays back test scripts.
Ideal for beginners due to its simple, no-coding approach.
3. Selenium Grid
Enables parallel test execution on multiple machines and browsers.
Saves time by running multiple tests at the same time.
Benefits of Selenium Automation Testing
Industry-Relevant Advantages
Speed and Efficiency: Automated tests are faster than manual testing.
Accuracy: Reduces human error.
Reusability: Test scripts can be reused across projects.
Scalability: Selenium Grid makes it easy to scale testing for large applications.
Real-World Example
A leading e-commerce company reduced its testing time by 60% after implementing Selenium Grid. Automated tests ran across browsers and devices, ensuring the site worked flawlessly during a major product launch.
Getting Started: How to Learn Selenium Step-by-Step
Step 1: Learn the Basics of Software Testing
Before diving into Selenium, understand manual testing concepts like test cases, test plans, and bug tracking.
Step 2: Set Up Your Selenium Environment
Install Java or Python (commonly used with Selenium).
Download and install Eclipse IDE or any code editor of your choice.
Download the Selenium WebDriver for your browser.
Example Setup (Java + Selenium)
java
import org.openqa.selenium.WebDriver;
import org.openqa.selenium.chrome.ChromeDriver;
public class FirstSeleniumTest {
public static void main(String[] args) {
System.setProperty("webdriver.chrome.driver", "path_to_chromedriver");
WebDriver driver = new ChromeDriver();
driver.get("https://www.google.com");
driver.quit();
}
}
Step 3: Write Your First Automation Script
Start with simple actions:
Open a website
Click a button
Fill a form
Verify text on a page
Step 4: Practice More Complex Scenarios
Handle pop-ups and alerts.
Automate file uploads/downloads.
Work with dynamic web elements.
Step 5: Learn Selenium Grid
Practice running tests on multiple browsers and machines in parallel.
Tips for Mastering Selenium Automation Testing
Start Simple, Then Go Complex
Begin with basic scripts before moving to advanced testing frameworks like TestNG.
Understand XPath and CSS Selectors
They are essential for locating elements on a web page.
Learn TestNG or JUnit
These frameworks make it easier to manage your Selenium test cases.
Use Explicit Waits
Handle dynamic page elements that take time to load.
java WebDriverWait wait = new WebDriverWait(driver, 10);
wait.until(ExpectedConditions.visibilityOfElementLocated(By.id("elementID")));
Keep Your Scripts Modular
Create reusable functions to avoid repeating code.
Version Control with Git
Manage your codebase efficiently by using Git for version control.
Stay Updated
Selenium frequently updates; stay informed about the latest versions and features.
Tricks That Make a Big Difference
Use Browser Developer Tools
Inspect elements directly and quickly find XPath or CSS Selectors.
Take Screenshots for Reporting
Capture screenshots when a test fails. It helps in debugging and reporting.
java
File screenshot = ((TakesScreenshot) driver).getScreenshotAs(OutputType.FILE);
FileUtils.copyFile(screenshot, new File("screenshot.png"));
Parallel Testing with Selenium Grid
Run multiple tests simultaneously, reducing the overall test execution time by half.
Handle Captcha with Manual Intervention
Automate everything else but leave Captcha handling to a manual step or use third-party services (if allowed).
Common Challenges in Selenium and How to Overcome Them
Challenge
Solution
Dynamic Elements
Use dynamic XPath and wait commands.
Handling Pop-ups and Alerts
Use driver.switchTo().alert() to handle browser alerts.
Synchronization Issues
Use implicit and explicit waits to manage timing problems.
CAPTCHA Handling
Perform manual intervention or skip test cases.
Why Selenium Certification Training Matters
Industry Demand for Certified Selenium Testers
Reports show that certified automation testers earn 20% more on average compared to their non-certified peers. Employers often look for Selenium certification training as proof of your skills.
Benefits of Selenium Certification
Validates your expertise.
Enhances your resume.
Increases job opportunities.
Builds confidence in handling real-world projects.
What You Learn in H2K Infosys Selenium Certification Course
Hands-on Selenium WebDriver training.
TestNG and advanced frameworks.
Real-world project experience.
Interview preparation and placement support.
Why Choose H2K Infosys for Selenium Training?
At H2K Infosys, our Selenium training online is designed for both beginners and experienced professionals. We offer:
Live instructor-led classes.
Hands-on projects and assignments.
Flexible schedules for working professionals.
Comprehensive curriculum covering Selenium WebDriver, Grid, and frameworks.
Placement assistance to help you land your dream job.
Key Takeaways
Selenium is the most popular tool for automated web application testing.
Mastering Selenium requires practice, the right tools, and guided learning.
Selenium certification improves job prospects and salary potential.
H2K Infosys offers Selenium training courses that are practical, flexible, and career-focused.
Conclusion
Ready to take the next step? Enroll in H2K Infosys’ Selenium course online for hands-on training and expert guidance. Boost your testing career with skills that employers are looking for!
#Selenium Training#Selenium Training online#Selenium certification#Selenium certification training#Selenium certification course#Selenium course#Selenium course online#Selenium course training#selenium automation testing#selenium software testing
0 notes
Text
Check Python Version on Windows, Mac, and Linux
Knowing the Python version installed on your system is crucial for ensuring compatibility with various libraries and tools. This guide will walk you through the steps to check the Python version on Windows, Mac, and Linux. Check Python Version on Windows Using Command Prompt Open the Command Prompt by typing cmd in the search bar and pressing Enter. Type the following command and press…
0 notes