#Installing the Kubernetes Dashboard
Explore tagged Tumblr posts
Visit Tumblr Blog
Explore Tumblr blogs with no restrictions, modern design and the best experience.
Last Seen Tumblr Blogs


Fun Fact
Tumblr has a low social media market share in South America.
Video
youtube
Session 5 Kubernetes 3 Node Cluster and Dashboard Installation and Confi...
#youtube#Kubernetes 3 Node Cluster and Dashboard Installation and Configuration with Podman 🚀 In this exciting video tutorial we dive into the worl
1 note
·
View note
Text
Unlock Infrastructure Mastery: Join the Prometheus MasterClass for Monitoring & Alerting

If you've ever tried to troubleshoot a slow-loading website, debug a crashing server, or simply wanted more insight into what your system is doing behind the scenes — then monitoring and alerting are already on your radar. But here’s the deal: traditional monitoring tools often leave you juggling incomplete data, clunky dashboards, and alerts that scream, “Something’s wrong!” without telling you what, where, or why.
That’s where Prometheus comes in — and more importantly, where the Prometheus MasterClass: Infra Monitoring & Alerting! becomes your ultimate ally.
Whether you're a DevOps engineer, a system administrator, or just an aspiring tech pro, this course can be your game-changer for mastering infrastructure visibility, real-time alerting, and proactive problem-solving.
Let’s dive into why Prometheus is so powerful, what you’ll learn in this masterclass, and how it sets you on a path to dominate infrastructure monitoring like a pro.
Why Infrastructure Monitoring Matters — A Lot
Let’s break it down.
Infrastructure monitoring is like the health tracker for your digital ecosystem. It tells you how your servers, containers, databases, and applications are doing — whether they’re healthy or if they’re about to explode in a flurry of errors.
Think of it like this:
No monitoring? You're driving blindfolded.
Poor monitoring? You’re guessing where the potholes are.
Great monitoring with Prometheus? You're getting real-time traffic alerts, weather updates, and predictive insights to avoid crashes before they happen.
The problem? Setting all this up isn’t always plug-and-play — unless you're learning from a guided course like the Prometheus MasterClass: Infra Monitoring & Alerting!
Meet Prometheus – Your New Monitoring Power Tool
Prometheus is an open-source monitoring and alerting toolkit designed for reliability, performance, and flexibility. Originally developed by SoundCloud, it has since become a CNCF project (Cloud Native Computing Foundation) and a favorite in the DevOps and cloud-native world.
What makes it a rockstar?
✅ Time-series database – stores metrics efficiently ✅ Flexible query language (PromQL) – get exactly what you want ✅ Pull-based architecture – better control and reliability ✅ Built-in alert manager – integrated and customizable alerts ✅ Integration with Grafana – gorgeous dashboards in minutes ✅ Massive community support – plenty of exporters and documentation
If you're working with Kubernetes, Docker, AWS, GCP, or even legacy servers — Prometheus can slide into your stack seamlessly.
But understanding how to actually use Prometheus effectively? That’s a skill.
What You'll Learn in the Prometheus MasterClass
Now let’s talk about the Prometheus MasterClass: Infra Monitoring & Alerting!, because this isn’t just a “read the docs” kind of learning experience.
This course was crafted with both beginners and intermediate learners in mind. It’s hands-on, example-driven, and refreshingly easy to follow — no overwhelming theory, just clear, actionable learning.
Here’s what you’ll walk away with:
🔍 Understanding Metrics and Monitoring Essentials
Difference between monitoring, observability, and alerting
Types of metrics: gauge, counter, histogram, summary
Designing your monitoring strategy
⚙️ Installing and Setting Up Prometheus
How to install Prometheus on Linux and Windows systems
Navigating the configuration file (prometheus.yml)
Setting up node exporters, cAdvisor, and blackbox exporters
📈 Visualizing Metrics with Grafana
Connecting Prometheus with Grafana
Creating custom dashboards and panels
Using variables, annotations, and templating
📡 Collecting and Querying Metrics
Writing PromQL queries like a pro
Building advanced queries for insights
Getting data from third-party services
🚨 Setting Up Alerts That Actually Work
Configuring alert rules and conditions
Using Alertmanager to manage notifications
Integrating Slack, email, and other services
🛠️ Real-World Scenarios and Use Cases
Monitoring CPU, memory, and disk I/O
Detecting and responding to application crashes
Setting thresholds and predictive alerts
Analyzing service availability and response times
☁️ Bonus: Cloud + Kubernetes Monitoring
Kubernetes cluster monitoring with Prometheus
Service discovery and scraping from pods
Best practices for cloud-native environments
The best part? Every lesson is designed to be practical. You’ll be spinning up Prometheus instances, writing queries, and building dashboards right alongside the instructor.
Who Should Take This Course?
This MasterClass is perfect for:
🧠 System administrators tired of jumping between logs and guesswork
💼 DevOps professionals looking to sharpen their monitoring toolset
🌱 Cloud engineers who want visibility across dynamic infrastructures
💻 Developers interested in app performance and availability
🎯 Career switchers or students learning modern DevOps skills
Even if you’ve never touched Prometheus before, the course takes you step-by-step. And if you have used it casually? It’ll take your knowledge to the next level.
Why This Course Beats Random Tutorials
You might be thinking — can’t I just watch YouTube videos or read blog posts?
Sure. You can — but here’s why this MasterClass is a better investment of your time:
🔁 Structured Learning – Each lesson builds on the last 🎯 Focused Content – No fluff, just what works in real environments 🙋 Hands-On Practice – Real scenarios, live configurations 📚 Lifetime Access – Revisit any lesson, anytime 🧑🏫 Expert Guidance – Learn from an instructor with real-world experience 📈 Career-Boosting Value – Add it to your resume, your GitHub, your confidence
And yes — once you enroll in the Prometheus MasterClass: Infra Monitoring & Alerting!, you’ll gain full access to everything, including updates, resources, and community support.
Real Results: What Others Are Saying
💬 "I went from not knowing what a time-series metric was to building real dashboards for my team." 💬 "The best Prometheus learning resource I’ve ever used. Well-structured and practical." 💬 "I finally understand PromQL. The instructor makes it so clear!" 💬 "After this course, I set up alerting that saved us from a major outage last week."
There’s a reason this course is gaining momentum — because it works.
The Future is Observable — Don’t Stay in the Dark
Modern infrastructure is fast, dynamic, and complex. The days of hoping your app works fine in production are long gone. You need visibility, insights, and the power to act fast.
That’s exactly what Prometheus offers — and what this course teaches you to harness.
The Prometheus MasterClass: Infra Monitoring & Alerting! is your opportunity to master one of the most in-demand tools in modern DevOps. Whether you’re upgrading your skills or future-proofing your career — this is the place to start.
Ready to Take Control of Your Infrastructure?
Enroll now in the Prometheus MasterClass: Infra Monitoring & Alerting! and take the first step toward becoming the go-to monitoring expert in your team.
👉 No guesswork. 👉 No overwhelm. 👉 Just clean, clear, confident infrastructure management.
0 notes
Text
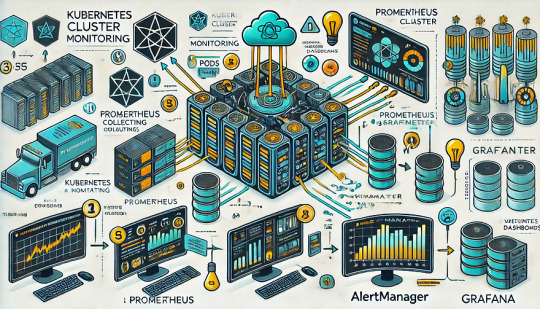
Effective Kubernetes cluster monitoring simplifies containerized workload management by measuring uptime, resource use (such as memory, CPU, and storage), and interaction between cluster components. It also enables cluster managers to monitor the cluster and discover issues such as inadequate resources, errors, pods that fail to start, and nodes that cannot join the cluster. Essentially, Kubernetes monitoring enables you to discover issues and manage Kubernetes clusters more proactively. What Kubernetes Metrics Should You Measure? Monitoring Kubernetes metrics is critical for ensuring the reliability, performance, and efficiency of applications in a Kubernetes cluster. Because Kubernetes constantly expands and maintains containers, measuring critical metrics allows you to spot issues early on, optimize resource allocation, and preserve overall system integrity. Several factors are critical to watch with Kubernetes: Cluster monitoring - Monitors the health of the whole Kubernetes cluster. It helps you find out how many apps are running on a node, if it is performing efficiently and at the right capacity, and how much resource the cluster requires overall. Pod monitoring - Tracks issues impacting individual pods, including resource use, application metrics, and pod replication or auto scaling metrics. Ingress metrics - Monitoring ingress traffic can help in discovering and managing a variety of issues. Using controller-specific methods, ingress controllers can be set up to track network traffic information and workload health. Persistent storage - Monitoring volume health allows Kubernetes to implement CSI. You can also use the external health monitor controller to track node failures. Control plane metrics - With control plane metrics we can track and visualize cluster performance while troubleshooting by keeping an eye on schedulers, controllers, and API servers. Node metrics - Keeping an eye on each Kubernetes node's CPU and memory usage might help ensure that they never run out. A running node's status can be defined by a number of conditions, such as Ready, MemoryPressure, DiskPressure, OutOfDisk, and NetworkUnavailable. Monitoring and Troubleshooting Kubernetes Clusters Using the Kubernetes Dashboard The Kubernetes dashboard is a web-based user interface for Kubernetes. It allows you to deploy containerized apps to a Kubernetes cluster, see an overview of the applications operating on the cluster, and manage cluster resources. Additionally, it enables you to: Debug containerized applications by examining data on the health of your Kubernetes cluster's resources, as well as any anomalies that have occurred. Create and modify individual Kubernetes resources, including deployments, jobs, DaemonSets, and StatefulSets. Have direct control over your Kubernetes environment using the Kubernetes dashboard. The Kubernetes dashboard is built into Kubernetes by default and can be installed and viewed from the Kubernetes master node. Once deployed, you can visit the dashboard via a web browser to examine extensive information about your Kubernetes cluster and conduct different operations like scaling deployments, establishing new resources, and updating application configurations. Kubernetes Dashboard Essential Features Kubernetes Dashboard comes with some essential features that help manage and monitor your Kubernetes clusters efficiently: Cluster overview: The dashboard displays information about your Kubernetes cluster, including the number of nodes, pods, and services, as well as the current CPU and memory use. Resource management: The dashboard allows you to manage Kubernetes resources, including deployments, services, and pods. You can add, update, and delete resources while also seeing extensive information about them. Application monitoring: The dashboard allows you to monitor the status and performance of Kubernetes-based apps. You may see logs and stats, fix issues, and set alarms.
Customizable views: The dashboard allows you to create and preserve bespoke dashboards with the metrics and information that are most essential to you. Kubernetes Monitoring Best Practices Here are some recommended practices to help you properly monitor and debug Kubernetes installations: 1. Monitor Kubernetes Metrics Kubernetes microservices require understanding granular resource data like memory, CPU, and load. However, these metrics may be complex and challenging to leverage. API indicators such as request rate, call error, and latency are the most effective KPIs for identifying service faults. These metrics can immediately identify degradations in a microservices application's components. 2. Ensure Monitoring Systems Have Enough Data Retention Having scalable monitoring solutions helps you to efficiently monitor your Kubernetes cluster as it grows and evolves over time. As your Kubernetes cluster expands, so will the quantity of data it creates, and your monitoring systems must be capable of handling this rise. If your systems are not scalable, they may get overwhelmed by the volume of data and be unable to offer accurate or relevant results. 3. Integrate Monitoring Systems Into Your CI/CD Pipeline Source Integrating Kubernetes monitoring solutions with CI/CD pipelines enables you to monitor your apps and infrastructure as they are deployed, rather than afterward. By connecting your monitoring systems to your pipeline for continuous integration and delivery (CI/CD), you can automatically collect and process data from your infrastructure and applications as it is delivered. This enables you to identify potential issues early on and take action to stop them from getting worse. 4. Create Alerts You may identify the problems with your Kubernetes cluster early on and take action to fix them before they get worse by setting up the right alerts. For example, if you configure alerts for crucial metrics like CPU or memory use, you will be informed when those metrics hit specific thresholds, allowing you to take action before your cluster gets overwhelmed. Conclusion Kubernetes allows for the deployment of a large number of containerized applications within its clusters, each of which has nodes that manage the containers. Efficient observability across various machines and components is critical for successful Kubernetes container orchestration. Kubernetes has built-in monitoring facilities for its control plane, but they may not be sufficient for thorough analysis and granular insight into application workloads, event logging, and other microservice metrics within Kubernetes clusters.
0 notes
Text
Mastering Multicluster Kubernetes with Red Hat OpenShift Platform Plus
As enterprises expand their containerized environments, managing and securing multiple Kubernetes clusters becomes both a necessity and a challenge. Red Hat OpenShift Platform Plus, combined with powerful tools like Red Hat Advanced Cluster Management (RHACM), Red Hat Quay, and Red Hat Advanced Cluster Security (RHACS), offers a comprehensive suite for multicluster management, governance, and security.
In this blog post, we'll explore the key components and capabilities that help organizations effectively manage, observe, secure, and scale their Kubernetes workloads across clusters.
Understanding Multicluster Kubernetes Architectures
Modern enterprise applications often span across multiple Kubernetes clusters—whether to support hybrid cloud strategies, improve high availability, or isolate workloads by region or team. Red Hat OpenShift Platform Plus is designed to simplify multicluster operations by offering an integrated, opinionated stack that includes:
Red Hat OpenShift for consistent application platform experience
RHACM for centralized multicluster management
Red Hat Quay for enterprise-grade image storage and security
RHACS for advanced cluster-level security and threat detection
Together, these components provide a unified approach to handle complex multicluster deployments.
Inspecting Resources Across Multiple Clusters with RHACM
Red Hat Advanced Cluster Management (RHACM) offers a user-friendly web console that allows administrators to view and interact with all their Kubernetes clusters from a single pane of glass. Key capabilities include:
Centralized Resource Search: Use the RHACM search engine to find workloads, nodes, and configurations across all managed clusters.
Role-Based Access Control (RBAC): Manage user permissions and ensure secure access to cluster resources based on roles and responsibilities.
Cluster Health Overview: Quickly identify issues and take action using visual dashboards.
Governance and Policy Management at Scale
With RHACM, you can implement and enforce consistent governance policies across your entire fleet of clusters. Whether you're ensuring compliance with security benchmarks (like CIS) or managing custom rules, RHACM makes it easy to:
Deploy policies as code
Monitor compliance status in real time
Automate remediation for non-compliant resources
This level of automation and visibility is critical for regulated industries and enterprises with strict security postures.
Observability Across the Cluster Fleet
Observability is essential for understanding the health, performance, and behavior of your Kubernetes workloads. RHACM’s built-in observability stack integrates with metrics and logging tools to give you:
Cross-cluster performance insights
Alerting and visualization dashboards
Data aggregation for proactive incident management
By centralizing observability, operations teams can streamline troubleshooting and capacity planning across environments.
GitOps-Based Application Deployment
One of the most powerful capabilities RHACM brings to the table is GitOps-driven application lifecycle management. This allows DevOps teams to:
Define application deployments in Git repositories
Automatically deploy to multiple clusters using GitOps pipelines
Ensure consistent configuration and versioning across environments
With built-in support for Argo CD, RHACM bridges the gap between development and operations by enabling continuous delivery at scale.
Red Hat Quay: Enterprise Image Management
Red Hat Quay provides a secure and scalable container image registry that’s deeply integrated with OpenShift. In a multicluster scenario, Quay helps by:
Enforcing image security scanning and vulnerability reporting
Managing image access policies
Supporting geo-replication for global deployments
Installing and customizing Quay within OpenShift gives enterprises control over the entire software supply chain—from development to production.
Integrating Quay with OpenShift & RHACM
Quay seamlessly integrates with OpenShift and RHACM to:
Serve as the source of trusted container images
Automate deployment pipelines via RHACM GitOps
Restrict unapproved images from being used across clusters
This tight integration ensures a secure and compliant image delivery workflow, especially useful in multicluster environments with differing security requirements.
Strengthening Multicluster Security with RHACS
Security must span the entire Kubernetes lifecycle. Red Hat Advanced Cluster Security (RHACS) helps secure containers and Kubernetes clusters by:
Identifying runtime threats and vulnerabilities
Enforcing Kubernetes best practices
Performing risk assessments on containerized workloads
Once installed and configured, RHACS provides a unified view of security risks across all your OpenShift clusters.
Multicluster Operational Security with RHACS
Using RHACS across multiple clusters allows security teams to:
Define and apply security policies consistently
Detect and respond to anomalies in real time
Integrate with CI/CD tools to shift security left
By integrating RHACS into your multicluster architecture, you create a proactive defense layer that protects your workloads without slowing down innovation.
Final Thoughts
Managing multicluster Kubernetes environments doesn't have to be a logistical nightmare. With Red Hat OpenShift Platform Plus, along with RHACM, Red Hat Quay, and RHACS, organizations can standardize, secure, and scale their Kubernetes operations across any infrastructure.
Whether you’re just starting to adopt multicluster strategies or looking to refine your existing approach, Red Hat’s ecosystem offers the tools and automation needed to succeed. For more details www.hawkstack.com
0 notes
Text
Kubernetes Dashboard Tutorial: Visualize & Manage Your Cluster Like a Pro! 🔍📊
✔️ Learn how to install and launch the Kubernetes Dashboard ✔️ View real-time CPU & memory usage using Metrics Server 📈 ✔️ Navigate through Workloads, Services, Configs, and Storage ✔️ Create and manage deployments using YAML or the UI 💻 ✔️ Edit live resources and explore namespaces visually 🧭 ✔️ Understand how access methods differ in local vs production clusters 🔐 ✔️ Great for beginners, visual learners, or collaborative teams 🤝
👉 Whether you're debugging, deploying, or just learning Kubernetes, this dashboard gives you a GUI-first approach to mastering clusters!
youtube
0 notes
Text
Getting Started with Google Kubernetes Engine: Your Gateway to Cloud-Native Greatness
After spending over 8 years deep in the trenches of cloud engineering and DevOps, I can tell you one thing for sure: if you're serious about scalability, flexibility, and real cloud-native application deployment, Google Kubernetes Engine (GKE) is where the magic happens.
Whether you’re new to Kubernetes or just exploring managed container platforms, getting started with Google Kubernetes Engine is one of the smartest moves you can make in your cloud journey.
"Containers are cool. Orchestrated containers? Game-changing."
🚀 What is Google Kubernetes Engine (GKE)?
Google Kubernetes Engine is a fully managed Kubernetes platform that runs on top of Google Cloud. GKE simplifies deploying, managing, and scaling containerized apps using Kubernetes—without the overhead of maintaining the control plane.
Why is this a big deal?
Because Kubernetes is notoriously powerful and notoriously complex. With GKE, Google handles all the heavy lifting—from cluster provisioning to upgrades, logging, and security.
"GKE takes the complexity out of Kubernetes so you can focus on building, not babysitting clusters."
🧭 Why Start with GKE?
If you're a developer, DevOps engineer, or cloud architect looking to:
Deploy scalable apps across hybrid/multi-cloud
Automate CI/CD workflows
Optimize infrastructure with autoscaling & spot instances
Run stateless or stateful microservices seamlessly
Then GKE is your launchpad.
Here’s what makes GKE shine:
Auto-upgrades & auto-repair for your clusters
Built-in security with Shielded GKE Nodes and Binary Authorization
Deep integration with Google Cloud IAM, VPC, and Logging
Autopilot mode for hands-off resource management
Native support for Anthos, Istio, and service meshes
"With GKE, it's not about managing containers—it's about unlocking agility at scale."
🔧 Getting Started with Google Kubernetes Engine
Ready to dive in? Here's a simple flow to kick things off:
Set up your Google Cloud project
Enable Kubernetes Engine API
Install gcloud CLI and Kubernetes command-line tool (kubectl)
Create a GKE cluster via console or command line
Deploy your app using Kubernetes manifests or Helm
Monitor, scale, and manage using GKE dashboard, Cloud Monitoring, and Cloud Logging
If you're using GKE Autopilot, Google manages your node infrastructure automatically—so you only manage your apps.
“Don’t let infrastructure slow your growth. Let GKE scale as you scale.”
🔗 Must-Read Resources to Kickstart GKE
👉 GKE Quickstart Guide – Google Cloud
👉 Best Practices for GKE – Google Cloud
👉 Anthos and GKE Integration
👉 GKE Autopilot vs Standard Clusters
👉 Google Cloud Kubernetes Learning Path – NetCom Learning
🧠 Real-World GKE Success Stories
A FinTech startup used GKE Autopilot to run microservices with zero infrastructure overhead
A global media company scaled video streaming workloads across continents in hours
A university deployed its LMS using GKE and reduced downtime by 80% during peak exam seasons
"You don’t need a huge ops team to build a global app. You just need GKE."
🎯 Final Thoughts
Getting started with Google Kubernetes Engine is like unlocking a fast track to modern app delivery. Whether you're running 10 containers or 10,000, GKE gives you the tools, automation, and scale to do it right.
With Google Cloud’s ecosystem—from Cloud Build to Artifact Registry to operations suite—GKE is more than just Kubernetes. It’s your platform for innovation.
“Containers are the future. GKE is the now.”
So fire up your first cluster. Launch your app. And let GKE do the heavy lifting while you focus on what really matters—shipping great software.
Let me know if you’d like this formatted into a visual infographic or checklist to go along with the blog!
1 note
·
View note
Text
Cloud Computing for Programmers

Cloud computing has revolutionized how software is built, deployed, and scaled. As a programmer, understanding cloud services and infrastructure is essential to creating efficient, modern applications. In this guide, we’ll explore the basics and benefits of cloud computing for developers.
What is Cloud Computing?
Cloud computing allows you to access computing resources (servers, databases, storage, etc.) over the internet instead of owning physical hardware. Major cloud providers include Amazon Web Services (AWS), Microsoft Azure, and Google Cloud Platform (GCP).
Key Cloud Computing Models
IaaS (Infrastructure as a Service): Provides virtual servers, storage, and networking (e.g., AWS EC2, Azure VMs)
PaaS (Platform as a Service): Offers tools and frameworks to build applications without managing servers (e.g., Heroku, Google App Engine)
SaaS (Software as a Service): Cloud-hosted apps accessible via browser (e.g., Gmail, Dropbox)
Why Programmers Should Learn Cloud
Deploy apps quickly and globally
Scale applications with demand
Use managed databases and storage
Integrate with AI, ML, and big data tools
Automate infrastructure with DevOps tools
Popular Cloud Services for Developers
AWS: EC2, Lambda, S3, RDS, DynamoDB
Azure: App Services, Functions, Cosmos DB, Blob Storage
Google Cloud: Compute Engine, Cloud Run, Firebase, BigQuery
Common Use Cases
Hosting web and mobile applications
Serverless computing for microservices
Real-time data analytics and dashboards
Cloud-based CI/CD pipelines
Machine learning model deployment
Getting Started with the Cloud
Create an account with a cloud provider (AWS, Azure, GCP)
Start with a free tier or sandbox environment
Launch your first VM or web app
Use the provider’s CLI or SDK to deploy code
Monitor usage and set up billing alerts
Example: Deploying a Node.js App on Heroku (PaaS)
# Step 1: Install Heroku CLI heroku login # Step 2: Create a new Heroku app heroku create my-node-app # Step 3: Deploy your code git push heroku main # Step 4: Open your app heroku open
Tools and Frameworks
Docker: Containerize your apps for portability
Kubernetes: Orchestrate containers at scale
Terraform: Automate cloud infrastructure with code
CI/CD tools: GitHub Actions, Jenkins, GitLab CI
Security Best Practices
Use IAM roles and permissions
Encrypt data at rest and in transit
Enable firewalls and VPCs
Regularly update dependencies and monitor threats
Conclusion
Cloud computing enables developers to build powerful, scalable, and reliable software with ease. Whether you’re developing web apps, APIs, or machine learning services, cloud platforms provide the tools you need to succeed in today’s tech-driven world.
0 notes
Text
Monitoring Kubernetes Clusters with Prometheus and Grafana
Introduction
Kubernetes is a powerful container orchestration platform, but monitoring it is crucial for ensuring reliability, performance, and scalability.
Prometheus and Grafana are two of the most popular open-source tools for monitoring and visualizing Kubernetes clusters.
In this guide, we’ll walk you through setting up Prometheus and Grafana on Kubernetes and configuring dashboards for real-time insights.
Why Use Prometheus and Grafana for Kubernetes Monitoring?
Prometheus: The Monitoring Backbone
Collects metrics from Kubernetes nodes, pods, and applications.
Uses a powerful query language (PromQL) for analyzing data.
Supports alerting based on predefined conditions.
Grafana: The Visualization Tool
Provides rich dashboards with graphs and metrics.
Allows integration with multiple data sources (e.g., Prometheus, Loki, Elasticsearch).
Enables alerting and notification management.
Step 1: Installing Prometheus and Grafana on Kubernetes
Prerequisites
Before starting, ensure you have:
A running Kubernetes cluster
kubectl and Helm installed
1. Add the Prometheus Helm Chart Repository
Helm makes it easy to deploy Prometheus and Grafana using predefined configurations.shhelm repo add prometheus-community https://prometheus-community.github.io/helm-charts helm repo update
2. Install Prometheus and Grafana Using Helm
shhelm install prometheus prometheus-community/kube-prometheus-stack --namespace monitoring --create-namespace
This command installs: ✅ Prometheus — For collecting metrics ✅ Grafana — For visualization ✅ Alertmanager — For notifications ✅ Node-exporter — To collect system-level metrics
Step 2: Accessing Prometheus and Grafana
Once deployed, we need to access the Prometheus and Grafana web interfaces.
1. Accessing Prometheus
Check the Prometheus service:shkubectl get svc -n monitoring
Forward the Prometheus server port:shkubectl port-forward svc/prometheus-kube-prometheus-prometheus 9090 -n monitoring
Now, open http://localhost:9090 in your browser.
2. Accessing Grafana
Retrieve the Grafana admin password:shkubectl get secret --namespace monitoring prometheus-grafana -o jsonpath="{.data.admin-password}" | base64 --decodeForward the Grafana service port:shkubectl port-forward svc/prometheus-grafana 3000:80 -n monitoring
Open http://localhost:3000, and log in with:
Username: admin
Password: (obtained from the previous command)
Step 3: Configuring Prometheus as a Data Source in Grafana
Open Grafana and navigate to Configuration > Data Sources.
Click Add data source and select Prometheus.
Set the URL to:
sh
http://prometheus-kube-prometheus-prometheus.monitoring.svc.cluster.local:9090
Click Save & Test to verify the connection.
Step 4: Importing Kubernetes Dashboards into Grafana
Grafana provides ready-made dashboards for Kubernetes monitoring.
Go to Dashboards > Import.
Enter a dashboard ID from Grafana’s dashboard repository.
Example: Use 3119 for Kubernetes cluster monitoring.
Select Prometheus as the data source and click Import.
You’ll now have a real-time Kubernetes monitoring dashboard! 🎯
Step 5: Setting Up Alerts in Prometheus and Grafana
Creating Prometheus Alerting Rules
Create a ConfigMap for alerts:yamlapiVersion: v1 kind: ConfigMap metadata: name: alert-rules namespace: monitoring data: alert.rules: | groups: - name: InstanceDown rules: - alert: InstanceDown expr: up == 0 for: 5m labels: severity: critical annotations: summary: "Instance {{ $labels.instance }} is down"
Apply it to the cluster:shkubectl apply -f alert-rules.yaml
Configuring Grafana Alerts
Navigate to Alerting > Notification Channels.
Set up a channel (Email, Slack, or PagerDuty).
Define alert rules based on metrics from Prometheus.
Step 6: Enabling Persistent Storage for Prometheus
By default, Prometheus stores data in memory. To make the data persistent, configure storage:
Modify the Helm values:yamlprometheus: server: persistentVolume: enabled: true size: 10Gi
Apply the changes:shhelm upgrade prometheus prometheus-community/kube-prometheus-stack -f values.yaml
Conclusion
In this guide, we’ve set up Prometheus and Grafana to monitor a Kubernetes cluster. You now have: ✅ Real-time dashboards in Grafana ✅ Prometheus alerts to detect failures ✅ Persistent storage for historical metrics
WEBSITE: https://www.ficusoft.in/devops-training-in-chennai/
0 notes
Text
What Oracle Skills Are Currently In High Demand?

Introduction
Oracle technologies dominate the enterprise software landscape, with businesses worldwide relying on Oracle databases, cloud solutions, and applications to manage their data and operations. As a result, professionals with Oracle expertise are in high demand. Whether you are an aspiring Oracle professional or looking to upgrade your skills, understanding the most sought-after Oracle competencies can enhance your career prospects. Here are the top Oracle skills currently in high demand.
Oracle Database Administration (DBA)
Oracle Database Administrators (DBAs) are crucial in managing and maintaining Oracle databases. Unlock the world of database management with our Oracle Training in Chennai at Infycle Technologies. Organizations seek professionals to ensure optimal database performance, security, and availability. Key skills in demand include:
Database installation, configuration, and upgrades
Performance tuning and optimization
Backup and recovery strategies using RMAN
High-availability solutions such as Oracle RAC (Real Application Clusters)
Security management, including user access control and encryption
SQL and PL/SQL programming for database development
Oracle Cloud Infrastructure (OCI)
With businesses rapidly moving to the cloud, Oracle Cloud Infrastructure (OCI) has become a preferred choice for many enterprises. Professionals skilled in OCI can help organizations deploy, manage, and optimize cloud environments. Key areas of expertise include:
Oracle Cloud Architecture and Networking
OCI Compute, Storage, and Database services
Identity and Access Management (IAM)
Oracle Kubernetes Engine (OKE)
Security Best Practices and Compliance in Cloud Environments
Migration strategies from on-premises databases to OCI
Oracle SQL And PL/SQL Development
Oracle SQL and PL/SQL are fundamental database developers, analysts, and administrators skills. Companies need professionals who can:
Write efficient SQL queries for data retrieval & manipulation
Develop PL/SQL procedures, triggers, and packages
Optimize database performance with indexing and query tuning
Work with advanced SQL analytics functions and data modelling
Implement automation using PL/SQL scripts
Oracle ERP And E-Business Suite (EBS)
Enterprise Resource Planning (ERP) solutions from Oracle, such as Oracle E-Business Suite (EBS) and Oracle Fusion Cloud ERP, are widely used by organizations to manage business operations. Professionals with rising experience in these areas are highly sought after. Essential skills include:
ERP implementation and customization
Oracle Financials, HRMS, and Supply Chain modules
Oracle Workflow and Business Process Management
Reporting and analytics using Oracle BI Publisher
Integration with third-party applications
Oracle Fusion Middleware
Oracle Fusion Middleware is a comprehensive software suite that facilitates application integration, business process automation, and security. Professionals with experience in:
Oracle WebLogic Server administration
Oracle SOA Suite (Service-Oriented Architecture)
Oracle Identity and Access Management (IAM)
Oracle Data Integration and ETL tools
The job market highly values Java EE and Oracle Application Development Framework (ADF).
Oracle BI (Business Intelligence) And Analytics
Data-driven decision-making is critical for modern businesses, and Oracle Business Intelligence (BI) solutions help organizations derive insights from their data. In-demand skills include:
Oracle BI Enterprise Edition (OBIEE)
Oracle Analytics Cloud (OAC)
Data warehousing concepts and ETL processes
Oracle Data Visualization and Dashboarding
Advanced analytics using machine learning and AI tools within Oracle BI
Oracle Exadata And Performance Tuning
Oracle Exadata is a high-performance engineered system designed for large-scale database workloads. Professionals skilled in Oracle Exadata and performance tuning are in great demand. Essential competencies include:
Exadata architecture and configuration
Smart Flash Cache and Hybrid Columnar Compression (HCC)
Exadata performance tuning techniques
Storage indexing and SQL query optimization
Integration with Oracle Cloud for hybrid cloud environments
Oracle Security And Compliance
Organizations need Oracle professionals to ensure database and application security with increasing cybersecurity threats. Key security-related Oracle skills include:
Oracle Data Safe and Database Security Best Practices
Oracle Audit Vault and Database Firewall
Role-based access control (RBAC) implementation
Encryption and Data Masking techniques
Compliance with regulations like GDPR and HIPAA
Oracle DevOps And Automation
DevOps practices have become essential for modern software development and IT operations. Enhance your journey toward a successful career in software development with Infycle Technologies, the Best Software Training Institute in Chennai. Oracle professionals with DevOps expertise are highly valued for their ability to automate processes and ensure continuous integration and deployment (CI/CD). Relevant skills include:
Oracle Cloud DevOps tools and automation frameworks
Terraform for Oracle Cloud Infrastructure provisioning
CI/CD pipeline implementation using Jenkins and GitHub Actions
Infrastructure as Code (IaC) practices with Oracle Cloud
Monitoring and logging using Oracle Cloud Observability tools
Oracle AI And Machine Learning Integration
Artificial intelligence (AI) and machine learning (ML) are transforming businesses' operations, and Oracle has integrated AI/ML capabilities into its products. Professionals with expertise in:
Oracle Machine Learning (OML) for databases
AI-driven analytics in Oracle Analytics Cloud
Chatbots and AI-powered automation using Oracle Digital Assistant
Data Science and Big Data processing with Oracle Cloud are highly demanding for data-driven decision-making roles.
Conclusion
The demand for Oracle professionals grows as businesses leverage Oracle's powerful database, cloud, and enterprise solutions. Whether you are a database administrator, cloud engineer, developer, or security expert, acquiring the right Oracle skills can enhance your career opportunities and keep you ahead in the competitive job market. You can position yourself as a valuable asset in the IT industry by focusing on high-demand skills such as Oracle Cloud Infrastructure, database administration, ERP solutions, and AI/ML integration. If you want to become an expert in Oracle technologies, consider enrolling in Oracle certification programs, attending workshops, and gaining hands-on experience to strengthen your skill set and stay ahead in the industry.
0 notes
Text
How HawkStack Provides Seamless Integration and Support for Popular DevOps Tools
In today's fast-paced software development and deployment landscape, DevOps has become the backbone of modern IT operations. Organizations are leveraging DevOps tools to automate processes, improve collaboration between development and operations teams, and ensure smoother software delivery pipelines. HawkStack, a robust cloud-native platform, is designed to support and integrate with popular DevOps tools like Jenkins, Ansible, Kubernetes, and more. This blog explores how HawkStack facilitates seamless integration with these tools, making DevOps workflows faster, more efficient, and reliable.
1. HawkStack and Jenkins: Automating Continuous Integration and Delivery (CI/CD)
Jenkins has long been a key player in continuous integration and continuous delivery (CI/CD) pipelines. It allows developers to automate tasks such as code building, testing, and deployment, leading to faster and more reliable software releases. HawkStack enhances Jenkins by providing a unified environment that supports Jenkins jobs, ensuring smoother orchestration and execution of these tasks.
How HawkStack Integrates with Jenkins:
Pre-configured Jenkins Setup: HawkStack offers easy installation and configuration options for Jenkins, allowing users to get up and running quickly without worrying about the infrastructure.
Automated Scaling: HawkStack enables Jenkins to scale efficiently by dynamically provisioning and de-provisioning resources based on workload demands. This ensures optimal performance without manual intervention.
CI/CD Pipeline Optimization: HawkStack’s integration with Jenkins simplifies the setup of complex multi-stage pipelines. Developers can automate deployment workflows, including testing, building, and pushing to production, without worrying about the underlying infrastructure.
2. HawkStack and Ansible: Streamlining Infrastructure Automation
Ansible is a powerful configuration management and automation tool that helps IT teams manage complex environments. By automating repetitive tasks such as server provisioning, configuration management, and application deployment, Ansible boosts productivity and reduces the risk of human error.
How HawkStack Integrates with Ansible:
Infrastructure as Code (IaC): HawkStack’s native support for Ansible enables users to manage infrastructure as code. This integration allows for automated provisioning of cloud resources, application configurations, and environment setups, ensuring consistency across the entire system.
Seamless Playbook Execution: HawkStack allows users to execute Ansible playbooks across clusters and machines effortlessly. This ensures that any change or configuration applied in the playbook is automatically deployed, reducing manual effort.
Multi-cloud Support: Ansible’s multi-cloud capabilities are fully supported within HawkStack, making it easier to manage infrastructure across different cloud providers (AWS, Azure, GCP) within a unified platform.
3. HawkStack and Kubernetes: Simplifying Container Orchestration
Kubernetes has become the de facto standard for container orchestration, enabling developers to automate the deployment, scaling, and management of containerized applications. With its robust features, Kubernetes can manage large, complex application architectures in a distributed environment. However, managing Kubernetes clusters at scale can be challenging without proper tooling.
How HawkStack Integrates with Kubernetes:
Kubernetes Cluster Management: HawkStack simplifies Kubernetes cluster management by offering an intuitive interface to create, configure, and monitor clusters. This integration allows organizations to manage the entire Kubernetes lifecycle, from provisioning to scaling and monitoring.
Unified Dashboard: HawkStack provides a unified dashboard for monitoring and managing Kubernetes workloads, making it easier for DevOps teams to track performance, resource utilization, and issues within the cluster.
Continuous Deployment with Kubernetes: With HawkStack's integration with Jenkins and Kubernetes, DevOps teams can set up continuous deployment pipelines where containerized applications are built, tested, and deployed directly to Kubernetes clusters. This results in faster delivery cycles and higher quality software.
4. HawkStack and Docker: Containerization Made Easy
Docker, a key component of modern DevOps workflows, enables the packaging of applications and their dependencies into lightweight containers. By using containers, developers can ensure consistency across different environments and minimize deployment issues.
How HawkStack Integrates with Docker:
Containerized App Deployment: HawkStack facilitates easy deployment of Docker containers by integrating directly with container registries. Whether you're using Docker Hub or a private registry, HawkStack simplifies the process of pushing and pulling Docker images.
Automatic Container Scaling: With HawkStack, Docker containers can automatically scale based on demand. The platform ensures that enough resources are allocated to containers when the application load increases, ensuring high availability and performance.
5. HawkStack and Git: Version Control and Collaboration
Git is the most popular version control system used by developers for source code management. With continuous integration and continuous deployment, Git becomes the foundation for automating software delivery pipelines.
How HawkStack Integrates with Git:
Git-based Workflow: HawkStack supports Git-based workflows, enabling developers to manage branches, pull requests, and merges within the platform. This enhances collaboration and reduces the likelihood of errors during code integration.
Automated Triggering: HawkStack triggers Jenkins jobs automatically when code is committed to Git repositories. This allows teams to initiate testing, building, and deployment cycles instantly after a commit, ensuring rapid feedback and iteration.
6. HawkStack and Monitoring/Logging Tools: Keeping Track of DevOps Pipelines
DevOps success depends not only on automation but also on effective monitoring and logging to ensure that pipelines run smoothly. Tools like Prometheus, Grafana, and ELK Stack (Elasticsearch, Logstash, and Kibana) are widely used for monitoring, logging, and alerting.
How HawkStack Integrates with Monitoring and Logging Tools:
Prometheus & Grafana: HawkStack integrates seamlessly with Prometheus and Grafana to provide real-time monitoring and visual dashboards of DevOps pipelines, infrastructure, and applications. This integration allows DevOps teams to track performance metrics, identify bottlenecks, and ensure that everything is running as expected.
Centralized Logging: HawkStack’s integration with ELK Stack offers centralized logging for easy troubleshooting. Logs from Jenkins jobs, Kubernetes clusters, and Docker containers are collected and visualized, providing a holistic view of the system’s health.
7. Enhanced Security and Compliance Support
Security is a critical aspect of DevOps, and HawkStack ensures that all integrated tools operate within a secure environment. With built-in features like role-based access control (RBAC), secure secrets management, and compliance monitoring, HawkStack helps organizations meet their security and compliance requirements.
How HawkStack Supports Security and Compliance:
Role-based Access Control: HawkStack allows teams to define fine-grained access permissions for different users and tools, ensuring that only authorized personnel can modify critical configurations.
Automated Security Scanning: HawkStack integrates with popular security scanning tools to identify vulnerabilities in code, containers, and infrastructure, ensuring that security is embedded in every stage of the DevOps pipeline.
Compliance Auditing: HawkStack supports auditing and tracking of changes made to infrastructure and application deployments, which is crucial for compliance with industry standards such as GDPR, HIPAA, and SOC 2.
Conclusion
HawkStack stands out as a cloud-native platform that simplifies the integration and management of popular DevOps tools like Jenkins, Ansible, Kubernetes, Docker, and more. With its streamlined workflows, automated scaling, and robust security features, HawkStack helps organizations improve collaboration, accelerate software delivery, and optimize infrastructure management. Whether you're looking to enhance your CI/CD pipelines, streamline infrastructure automation, or gain better visibility into your DevOps processes, HawkStack is the comprehensive platform that can meet all your needs while integrating seamlessly with the tools you already use.
for more details visit
www.hawkstack.com
www.qcsdclabs.com
0 notes
Text
Ceph Dashboard Install and Configuration for Microceph
Ceph Dashboard Install and Configuration for Microceph @vexpert #vmwarecommunities #ceph #cephdashboard #microceph #ubuntu #opensource #hcistorage #kubernetes #docker #homelab #homeserver
If you are running Microceph, can you run the Ceph Dashboard as you can in full-blown Ceph? Yes you can! The process to spin this up is fairly straightforward with a few commands to run that will allow you to spin up the solution to monitor your Microceph storage. Let’s look at Microceph Ceph Dashboard install and configuration. Table of contentsWhat is Microceph?What is the Ceph dashboard?Ceph…
0 notes
Text
Monitoring Systems and Services with Prometheus
In today’s IT landscape, monitoring systems and services is not just important—it’s critical. With the rise of microservices, cloud-native architectures, and distributed systems, ensuring application uptime and performance has become more complex. Enter Prometheus, an open-source monitoring and alerting toolkit designed for modern systems.
What is Prometheus?
Prometheus is a powerful, feature-rich, and highly scalable monitoring system. It excels at collecting metrics, providing a flexible query language, and integrating seamlessly with a wide variety of systems. Developed originally by SoundCloud, it is now a Cloud Native Computing Foundation (CNCF) project.
Key Features of Prometheus
Multi-dimensional data model: Metrics are stored with key-value pairs (labels), allowing granular and flexible querying.
Pull-based scraping: Prometheus pulls metrics from defined endpoints, ensuring better control over the data.
Powerful query language (PromQL): Prometheus Query Language enables robust metric analysis.
Time-series database: It stores all data as time-stamped, making historical analysis and trend monitoring straightforward.
Alerting capabilities: Prometheus integrates with Alertmanager to provide notifications for defined thresholds or anomalies.
How Prometheus Works
Scraping Metrics: Prometheus scrapes metrics from targets (applications, services, or systems) by accessing exposed HTTP endpoints, typically /metrics.
Data Storage: The collected metrics are stored in Prometheus’s time-series database.
Querying with PromQL: Users can run queries to analyze trends, generate graphs, or inspect metrics for anomalies.
Alerting: Based on queries, Prometheus can trigger alerts via the Alertmanager, which supports integrations with tools like Slack, PagerDuty, and email.
Use Cases of Prometheus
Infrastructure Monitoring: Track CPU, memory, disk usage, and network performance of your servers and VMs.
Application Monitoring: Monitor application health, API latencies, error rates, and user request patterns.
Kubernetes Monitoring: Gain insights into Kubernetes clusters, including pod status, resource utilization, and deployments.
Business Metrics: Measure success indicators such as transactions per second, user growth, or conversion rates.
Getting Started with Prometheus
Install Prometheus: Download and install Prometheus from its official site.
Set up Scrape Targets: Define the endpoints of the services you want to monitor in the prometheus.yml configuration file.
Run Prometheus: Start the server, and it will begin collecting metrics.
Visualize Metrics: Use Prometheus’s web UI, Grafana (a popular visualization tool), or command-line queries for visualization and analysis.
Integrating Prometheus with Grafana
While Prometheus provides a basic web interface, its true potential shines when paired with Grafana for rich and interactive dashboards. Grafana supports PromQL natively and allows you to create stunning visualizations of your metrics.
Benefits of Using Prometheus
Open Source: Freely available, with a vast and active community.
Scalable: Works efficiently for both small setups and enterprise-level infrastructures.
Extensible: Compatible with many exporters, enabling monitoring of databases, message queues, and more.
Alerts and Insights: Real-time monitoring and customizable alerts ensure minimal downtime.
Challenges and How to Overcome Them
High Cardinality: Too many unique label combinations can lead to resource overuse. Optimize your labels to avoid this.
Scaling: Use Prometheus federation or remote storage solutions to handle extremely large environments.
Learning Curve: PromQL and setup can be complex initially, but online documentation and the Prometheus community offer ample resources.
Final Thoughts
Prometheus has transformed the way modern systems and services are monitored. Its powerful features, extensibility, and open-source nature make it a go-to choice for organizations of all sizes. Whether you’re monitoring a single server or a multi-cloud deployment, Prometheus can scale to meet your needs.
If you’re looking to harness the power of Prometheus for your systems, explore HawkStack’s monitoring solutions. Our expert team ensures seamless integration and optimized monitoring for all your infrastructure needs.
Ready to get started? Contact us today! www.hawkstack.com
#redhatcourses#information technology#containerorchestration#kubernetes#docker#linux#container#containersecurity#dockerswarm
0 notes
Text
Integrating Virtual Machines with Containers Using OpenShift Virtualization
As organizations increasingly adopt containerization to modernize their applications, they often encounter challenges integrating traditional virtual machine (VM)-based workloads with containerized environments. OpenShift Virtualization bridges this gap, enabling organizations to run VMs alongside containers seamlessly within the same platform. This blog explores how OpenShift Virtualization helps achieve this integration and why it’s a game-changer for hybrid environments.
What is OpenShift Virtualization?
OpenShift Virtualization is a feature of Red Hat OpenShift that allows you to manage VMs as first-class citizens alongside containers. It leverages KubeVirt, an open-source virtualization extension for Kubernetes, enabling VM workloads to run natively on the OpenShift platform.
Benefits of Integrating VMs and Containers
Unified Management: Manage VMs and containers through a single OpenShift interface.
Resource Efficiency: Consolidate workloads on the same infrastructure to reduce operational costs.
Simplified DevOps: Use Kubernetes-native tools like kubectl and OpenShift’s dashboards to manage both VMs and containers.
Hybrid Workload Modernization: Gradually transition legacy VM-based applications to containerized environments without disrupting operations.
Key Use Cases
Modernizing Legacy Applications: Migrate monolithic applications running on VMs to OpenShift, enabling container adoption without rewriting the entire codebase.
Hybrid Workloads: Run VM-based databases alongside containerized microservices for better performance and management.
Development and Testing: Spin up VMs for testing or sandbox environments while running production-ready workloads in containers.
How to Integrate VMs with Containers in OpenShift
Install OpenShift Virtualization:
Use the OpenShift OperatorHub to install the OpenShift Virtualization Operator.
Verify the installation by checking the kubevirt namespace and related components.
Create Virtual Machines:
Use the OpenShift web console or CLI to create VMs.
Define VM specifications like CPU, memory, and storage in YAML files.
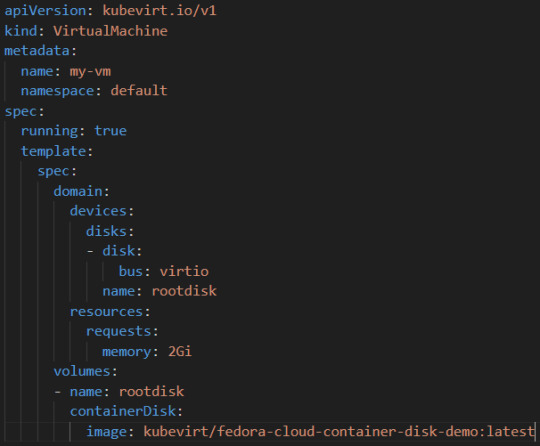
Example YAML for a VM:
Connect Containers and VMs:
Use OpenShift’s networking capabilities to establish communication between VMs and containerized workloads.
For example, deploy a containerized application that interacts with a VM-based database over a shared network.
Monitor and Manage:
Use OpenShift’s monitoring tools to observe the performance and health of both VMs and containers.
Manage workloads using the OpenShift console or CLI tools like oc and kubectl.
Example: Integrating a VM-Based Database with a Containerized Application
Deploy a VM with a Database:
Create a VM running MySQL.
Expose the database service using OpenShift’s networking capabilities.
Deploy a Containerized Application:
Use OpenShift to deploy a containerized web application that connects to the MySQL database.
Verify Connectivity:
Test the application’s ability to query the database.
Best Practices
Resource Planning: Allocate resources efficiently to avoid contention between VMs and containers.
Security: Leverage OpenShift’s built-in security features like Role-Based Access Control (RBAC) to manage access to workloads.
Automation: Use OpenShift Pipelines or Ansible to automate the deployment and management of hybrid workloads.
Conclusion
OpenShift Virtualization is a powerful tool for organizations looking to unify their infrastructure and modernize applications. By seamlessly integrating VMs and containers, it provides flexibility, efficiency, and scalability, enabling businesses to harness the best of both worlds. Whether you’re modernizing legacy systems or building hybrid applications, OpenShift Virtualization simplifies the journey and accelerates innovation.
For more details visit : https://www.hawkstack.com/
0 notes
Text
Service Mesh with Istio and Linkerd: A Practical Overview
As microservices architectures continue to dominate modern application development, managing service-to-service communication has become increasingly complex. Service meshes have emerged as a solution to address these complexities — offering enhanced security, observability, and traffic management between services.
Two of the most popular service mesh solutions today are Istio and Linkerd. In this blog post, we'll explore what a service mesh is, why it's important, and how Istio and Linkerd compare in real-world use cases.
What is a Service Mesh?
A service mesh is a dedicated infrastructure layer that controls communication between services in a distributed application. Instead of hardcoding service-to-service communication logic (like retries, failovers, and security policies) into your application code, a service mesh handles these concerns externally.
Key features typically provided by a service mesh include:
Traffic management: Fine-grained control over service traffic (routing, load balancing, fault injection)
Observability: Metrics, logs, and traces that give insights into service behavior
Security: Encryption, authentication, and authorization between services (often using mutual TLS)
Reliability: Retries, timeouts, and circuit breaking to improve service resilience
Why Do You Need a Service Mesh?
As applications grow more complex, maintaining reliable and secure communication between services becomes critical. A service mesh abstracts this complexity, allowing teams to:
Deploy features faster without worrying about cross-service communication challenges
Increase application reliability and uptime
Gain full visibility into service behavior without modifying application code
Enforce security policies consistently across the environment
Introducing Istio
Istio is one of the most feature-rich service meshes available today. Originally developed by Google, IBM, and Lyft, Istio offers deep integration with Kubernetes but can also support hybrid cloud environments.
Key Features of Istio:
Advanced traffic management: Canary deployments, A/B testing, traffic shifting
Comprehensive security: Mutual TLS, policy enforcement, and RBAC (Role-Based Access Control)
Extensive observability: Integrates with Prometheus, Grafana, Jaeger, and Kiali for metrics and tracing
Extensibility: Supports custom plugins through WebAssembly (Wasm)
Ingress/Egress gateways: Manage inbound and outbound traffic effectively
Pros of Istio:
Rich feature set suitable for complex enterprise use cases
Strong integration with Kubernetes and cloud-native ecosystems
Active community and broad industry adoption
Cons of Istio:
Can be resource-heavy and complex to set up and manage
Steeper learning curve compared to lighter service meshes
Introducing Linkerd
Linkerd is often considered the original service mesh and is known for its simplicity, performance, and focus on the core essentials.
Key Features of Linkerd:
Lightweight and fast: Designed to be resource-efficient
Simple setup: Easy to install, configure, and operate
Security-first: Automatic mutual TLS between services
Observability out of the box: Includes metrics, tap (live traffic inspection), and dashboards
Kubernetes-native: Deeply integrated with Kubernetes
Pros of Linkerd:
Minimal operational complexity
Lower resource usage
Easier learning curve for teams starting with service mesh
High performance and low latency
Cons of Linkerd:
Fewer advanced traffic management features compared to Istio
Less customizable for complex use cases
Choosing the Right Service Mesh
Choosing between Istio and Linkerd largely depends on your needs:
Choose Istio if you require advanced traffic management, complex security policies, and extensive customization — typically in larger, enterprise-grade environments.
Choose Linkerd if you value simplicity, low overhead, and rapid deployment — especially in smaller teams or organizations where ease of use is critical.
Ultimately, both Istio and Linkerd are excellent choices — it’s about finding the best fit for your application landscape and operational capabilities.
Final Thoughts
Service meshes are no longer just "nice to have" for microservices — they are increasingly a necessity for ensuring resilience, security, and observability at scale. Whether you pick Istio for its powerful feature set or Linkerd for its lightweight design, implementing a service mesh can greatly enhance your service architecture.
Stay tuned — in upcoming posts, we'll dive deeper into setting up Istio and Linkerd with hands-on labs and real-world use cases!
Would you also like me to include a hands-on quickstart guide (like "how to install Istio and Linkerd on a local Kubernetes cluster")? 🚀
For more details www.hawkstack.com
0 notes
Text
Chapter 2: Setting Up Your Kubernetes Cluster
In this chapter, we’ll cover the step-by-step process to set up Kubernetes using Minikube. You’ll learn how to install and configure Minikube, explore essential kubectl commands, and navigate the Kubernetes Dashboard. Each section includes detailed commands, live examples, and insights to simulate production-like environments. 1. Installing and Configuring Minikube Minikube creates a…
0 notes
Text
IBM Db2 AI Updates: Smarter, Faster, Better Database Tools
IBM Db2
Designed to handle mission-critical workloads worldwide.
What is IBM Db2?
IBM Db2 is a cloud-native database designed to support AI applications at scale, real-time analytics, and low-latency transactions. It offers database managers, corporate architects, and developers a single engine that is based on decades of innovation in data security, governance, scalability, and availability.
- Advertisement -
When moving to hybrid deployments, create the next generation of mission-critical apps that are available 24/7 and have no downtime across all clouds.
Support for all contemporary data formats, workloads, and programming languages will streamline development.
Support for open formats, including Apache Iceberg, allows teams to safely communicate data and information, facilitating quicker decision-making.
Utilize IBM Watsonx integration for generative artificial intelligence (AI) and integrated machine learning (ML) capabilities to implement AI at scale.
Use cases
Power next-gen AI assistants
Provide scalable, safe, and accessible data so that developers may create AI-powered assistants and apps.
Build new cloud-native apps for your business
Create cloud-native applications with low latency transactions, flexible scalability, high concurrency, and security that work on any cloud. Amazon Relational Database Service (RDS) now offers it.
Modernize mission-critical web and mobile apps
Utilize Db2 like-for-like compatibility in the cloud to modernize your vital apps for hybrid cloud deployments. Currently accessible via Amazon RDS.
Power real-time operational analytics and insights
Run in-memory processing, in-database analytics, business intelligence, and dashboards in real-time while continuously ingesting data.
Data sharing
With support for Apache Iceberg open table format, governance, and lineage, you can share and access all AI data from a single point of entry.
In-database machine learning
With SQL, Python, and R, you can create, train, assess, and implement machine learning models from inside the database engine without ever transferring your data.
Built for all your workloads
IBM Db2 Database
Db2 is the database designed to handle transactions of any size or complexity. Currently accessible via Amazon RDS.
IBM Db2 Warehouse
You can safely and economically conduct mission-critical analytical workloads on all kinds of data with IBM Db2 Warehouse. Watsonx.data integration allows you to grow AI workloads anywhere.
IBM Db2 Big SQL
IBM Db2 Big SQL is a high-performance, massively parallel SQL engine with sophisticated multimodal and multicloud features that lets you query data across Hadoop and cloud data lakes.
Deployment options
You require an on-premises, hybrid, or cloud database. Use Db2 to create a centralized business data platform that operates anywhere.
Cloud-managed service
Install Db2 on Amazon Web Services (AWS) and IBM Cloud as a fully managed service with SLA support, including RDS. Benefit from the cloud’s consumption-based charging, on-demand scalability, and ongoing improvements.
Cloud-managed container
Launch Db2 as a cloud container:integrated Db2 into your cloud solution and managed Red Hat OpenShift or Kubernetes services on AWS and Microsoft Azure.
Self-managed infrastructure or IaaS
Take control of your Db2 deployment by installing it as a conventional configuration on top of cloud-based infrastructure-as-a-service or on-premises infrastructure.
IBM Db2 Updates With AI-Powered Database Helper
Enterprise data is developing at an astonishing rate, and companies are having to deal with ever-more complicated data environments. Their database systems are under more strain than ever as a result of this. Version 12.1 of IBM’s renowned Db2 database, which is scheduled for general availability this week, attempts to address these demands. The latest version redefines database administration by embracing AI capabilities and building on Db2’s lengthy heritage.
The difficulties encountered by database administrators who must maintain performance, security, and uptime while managing massive (and quickly expanding) data quantities are covered in Db2 12.1. A crucial component of their strategy is IBM Watsonx’s generative AI-driven Database Assistant, which offers real-time monitoring, intelligent troubleshooting, and immediate replies.
Introducing The AI-Powered Database Assistant
By fixing problems instantly and averting interruptions, the new Database Assistant is intended to minimize downtime. Even for complicated queries, DBAs may communicate with the system in normal language to get prompt responses without consulting manuals.
The Database Assistant serves as a virtual coach in addition to its troubleshooting skills, speeding up DBA onboarding by offering solutions customized for each Db2 instance. This lowers training expenses and time. By enabling DBAs to address problems promptly and proactively, the database assistant should free them up to concentrate on strategic initiatives that improve the productivity and competitiveness of the company.
IBM Db2 Community Edition
Now available
Db2 12.1
No costs. No adware or credit card. Simply download a single, fully functional Db2 Community License, which you are free to use for as long as you wish.
What you can do when you download Db2
Install on a desktop or laptop and use almost anywhere. Join an active user community to discover events, code samples, and education, and test prototypes in a real-world setting by deploying them in a data center.
Limits of the Community License
Community license restrictions include an 8 GB memory limit and a 4 core constraint.
Read more on govindhtech.com
#IBMDb2AIUpdates#BetterDatabaseTools#IBMDb2#ApacheIceberg#AmazonRelationalDatabaseService#RDS#machinelearning#IBMDb2Database#IBMDb2BigSQL#AmazonWebServices#AWS#MicrosoftAzure#IBMWatsonx#Db2instance#technology#technews#news#govindhtech
0 notes