#Is cloud computing easy for beginners?
Explore tagged Tumblr posts
Visit Tumblr Blog
Explore Tumblr blogs with no restrictions, modern design and the best experience.
Last Seen Tumblr Blogs


Fun Fact
70% of Tumblr users say the Dashboard is their favorite place to spend time online.
Text
Is Cloud Computing Easy for Beginners? A Realistic Guide to Getting Started

Cloud computing is transforming the way businesses and individuals store data, run applications, and manage IT infrastructure. But if you're new to the tech world, you might be wondering: Is cloud computing easy for beginners? The answer depends on your starting point, how you approach learning, and which tools you use.
This guide breaks it all down in simple terms so you can start your cloud journey with confidence.
What Is Cloud Computing, Really?
At its core, cloud computing course means using the internet to access computing services like storage, servers, databases, and software instead of relying on your local machine. Think of it like renting a powerful computer that you can use anytime, anywhere—without having to maintain or upgrade it yourself.
For example, when you use Google Drive to store documents or stream movies from Netflix, you're already using cloud computing. On a larger scale, businesses use cloud platforms like Amazon Web Services (AWS), Microsoft Azure, and Google Cloud Platform (GCP) to run websites, manage data, and build scalable applications.
Why Cloud Computing Is Beginner-Friendly
If you're just starting out, you'll be happy to know that most cloud platforms are designed to be accessible. Here's why it’s easier than ever for beginners to learn cloud computing today.
First, most major cloud providers offer user-friendly dashboards. These web-based consoles allow you to spin up virtual machines, create databases, or set up storage buckets with just a few clicks. You don’t need to be a coding expert to get started with basic tasks.
Second, there’s a massive amount of free and paid learning content online. Websites like Coursera, Udemy, and YouTube offer step-by-step tutorials. Many providers even have their own beginner certification programs, such as AWS Certified Cloud Practitioner or Microsoft Azure Fundamentals, which explain cloud concepts in plain language.
Third, companies like AWS and Google Cloud offer free tier accounts. These accounts give you access to a limited set of services at no cost. This is a great way to experiment and build hands-on experience without worrying about surprise bills.
Common Challenges Beginners Face in Cloud Computing
While getting started is easier than ever, that doesn’t mean everything about cloud computing is simple. Like any technology, there’s a learning curve. One of the main challenges is understanding how all the cloud services connect. For instance, deploying a web app might involve setting up storage, networking, compute, and security services all at once.
Another challenge is that some tasks require technical knowledge, especially when using the command line interface (CLI) or scripting automation tasks. Although graphical interfaces are available, many real-world cloud jobs rely on knowing how to use tools like Terraform, Kubernetes, or YAML configurations.
Cost control can also be confusing. Cloud platforms charge based on usage, and if you forget to shut down a resource or misconfigure something, you might end up with unexpected costs. Learning how to monitor and manage your cloud spending is just as important as learning how to deploy a virtual machine.
Lastly, security and compliance are critical. If you're building apps that involve personal or financial data, you’ll need to understand encryption, firewalls, identity access management (IAM), and other security principles to protect your systems and users.
Practical Tips for Learning Cloud Computing the Right Way
After understanding the basics and challenges, you may wonder how to actually start learning in a smart and effective way. Here are some helpful strategies:
Start with a beginner-friendly platform, such as AWS or Azure, and follow their official learning paths.
Use the free tier to experiment without financial risk. Practice deploying real services like storage or a website.
Set a clear learning goal, such as earning a beginner certification or building a simple project like a personal blog hosted on the cloud.
Join online communities and forums like Reddit’s r/cloudcomputing or the AWS community to ask questions and stay updated.
By applying these tips and staying consistent, you’ll gradually build both your confidence and technical skills.
Best Learning Resources for Cloud Beginners
Once you’ve decided to start learning, having access to quality resources can make a big difference in your journey. Here are a few top-rated options:
AWS Training and Certification (Official AWS site)
Google Cloud Skills Boost
Microsoft Learn for Azure
Coursera’s Cloud Computing Specializations
FreeCodeCamp’s cloud tutorials on YouTube
Books like "Cloud Computing for Dummies" or "The Phoenix Project" for context and inspiration
These resources cover a wide range of topics, from beginner-friendly overviews to deep dives into specific cloud tools and architectures.
Can You Learn Cloud Computing Without a Tech Background?
Yes, absolutely. Many learners transition into cloud computing from non-technical backgrounds like business, marketing, or even teaching. The key is to start with foundational concepts, such as what the cloud is, why it's useful, and how it's used in everyday applications. From there, you can gradually move into more technical subjects at your own pace.
Cloud computing is not just for developers or IT pros—it’s for anyone curious about how technology powers modern life. Roles like project managers, tech support, and cloud sales specialists also benefit from cloud knowledge without needing to code.
How Long Does It Take to Learn Cloud Computing?
The time it takes to learn cloud computing depends on your goals and availability. If you’re aiming to earn an entry-level certification, you can often do so in 1–3 months with consistent study. Learning more advanced tools or becoming job-ready for roles like cloud engineer or DevOps specialist can take 6 months to a year, especially if you're learning part-time.
The good news is that cloud computing is a skill you can build incrementally. Start with small wins—like deploying a static website or passing a certification—and build from there.
Conclusion
If you’re wondering whether cloud computing is worth your time, the answer is a resounding yes. It’s one of the fastest-growing areas in tech and offers high-paying job opportunities across multiple industries. Whether you're looking to break into tech, level up your IT career, or simply understand the tools behind the digital world, cloud computing is a smart investment.
Getting started may feel overwhelming at first, but with the right resources, a learning mindset, and a bit of hands-on practice, anyone can learn to navigate the cloud. Don’t let fear of complexity hold you back—just take it one step at a time.
0 notes
Text
in wake of yet another wave of people being turned off by windows, here's a guide on how to dual boot windows and 🐧 linux 🐧 (useful for when you're not sure if you wanna make the switch and just wanna experiment with the OS for a bit!)
if you look up followup guides online you're gonna see that people are telling you to use ubuntu but i am gonna show you how to do this using kubuntu instead because fuck GNOME. all my homies hate GNOME.
i'm just kidding, use whatever distro you like. my favorite's kubuntu (for a beginner home environment). read up on the others if you're curious. and don't let some rando on reddit tell you that you need pop! OS for gaming. gaming on linux is possible without it.
why kubuntu?
- it's very user friendly
- it comes with applications people might already be familiar with (VLC player and firefox for example)
- libreoffice already preinstalled
- no GNOME (sorry GNOME enthusiasts, let me old man yell at the clouds) (also i'm playing this up for the laughs. wholesome kde/gnome meme at the bottom of this post.)
for people who are interested in this beyond my tl;dr: read this
(if you're a linux user, don't expect any tech wizardry here. i know there's a billion other and arguably better ways to do x y and/or z. what i'm trying to do here is to keep these instructions previous windows user friendly. point and click. no CLI bro, it'll scare the less tech savvy hoes. no vim supremacy talk (although hell yeah vim supremacy). if they like the OS they'll figure out bash all by themselves in no time.)
first of all, there'll be a GUI. you don't need to type lines of code to get this all running. we're not going for the ✨hackerman aesthetics✨ today. grab a mouse and a keyboard and you're good to go.
what you need is a computer/laptop/etc with enough disk space to install both windows and linux on it. i'm recommending to reserve at least a 100gb for the both of them. in the process of this you'll learn how to re-allocate disk space either way and you'll learn how to give and take some, we'll do a bit of disk partitioning to fit them both on a single disk.
and that's enough babbling for now, let's get to the actual tutorial:
🚨IMPORTANT. DO NOT ATTEMPT THIS ON A 32BIT SYSTEM. ONLY DO THIS IF YOU'RE WORKING WITH A 64BIT SYSTEM. 🚨 (win10 and win11: settings -> system -> about -> device specifications -> system type ) it should say 64bit operating system, x64-based processor.
step 1: install windows on your computer FIRST. my favorite way of doing this is by creating an installation media with rufus. you can either grab and prepare two usb sticks for each OS, or you can prepare them one after the other. (pro tip: get two usb sticks, that way you can label them and store them away in case you need to reinstall windows/linux or want to install it somewhere else)
in order to do this, you need to download three things:
rufus
win10 (listen. i know switching to win11 is difficult. not much of a fan of it either. but support's gonna end for good. you will run into hiccups. it'll be frustrating for everyone involved. hate to say it, but in this case i'd opt for installing its dreadful successor over there ->) or win11
kubuntu (the download at the top is always the latest, most up-to-date one)
when grabbing your windows installation of choice pick this option here, not the media creation tool option at the top of the page:

side note: there's also very legit key sellers out there who can hook you up with cheap keys. you're allowed to do that if you use those keys privately. don't do this in an enterprise environment though. and don't waste money on it if your ultimate goal is to switch to linux entirely at one point.
from here it's very easy sailing. plug your usb drive into your computer and fire up rufus (just double click it).

🚨two very important things though!!!!!!:🚨
triple check your usb device. whatever one you selected will get wiped entirely in order to make space for your installation media. if you want to be on the safe side only plug in the ONE usb stick you want to use. and back up any music, pictures or whatever else you had on there before or it'll be gone forever.
you can only install ONE OS on ONE usb drive. so you need to do this twice, once with your kubuntu iso and once with your windows iso, on a different drive each.
done. now you can dispense windows and linux left and right, whenever and wherever you feel like it. you could, for example, start with your designated dual boot device. installing windows is now as simple as plugging the usb device into your computer and booting it up. from there, click your way through the installation process and come back to this tutorial when you're ready.
step 2: preparing the disks for a dual boot setup
on your fresh install, find your disk partitions. in your search bar enter either "diskmgr" and hit enter or just type "partitions". the former opens your disk manager right away, the latter serves you up with this "create and format hard disk partitions" search result and that's what you're gonna be clicking.

you'll end up on a screen that looks more or less like in the screenshot below. depending on how many disks you've installed this might look different, but the basic gist is the same. we're going to snip a little bit off Disk 0 and make space for kubuntu on it. my screenshot isn't the best example because i'm using the whole disk and in order to practice what i preach i'd have to go against my own advice. that piece of advice is: if this screen intimidates you and you're not sure what you're doing here, hands off your (C:) drive, EFI system, and recovery partition. however, if you're feeling particularly fearless, go check out the amount of "free space" to the right. is there more than 30gb left available? if so, you're free to right click your (C:) drive and click "shrink volume"

this screen will pop up:

the minimum disk space required for kubuntu is 25gb. the recommended one is 50gb. for an installation like this, about 30gb are enough. in order to do that, simply change the value at
Enter the amount of space to shrink in MB: to 30000
and hit Shrink.
once that's done your partitions will have changed and unallocated space at about the size of 30gb should be visible under Disk 0 at the bottom like in the bottom left of this screenshot (courtesy of microsoft.com):

this is gonna be kubuntu's new home on your disk.
step 3: boot order, BIOS/UEFI changes
all you need to do now is plug the kubuntu-usb drive you prepared earlier with rufus into your computer again and reboot that bad boy.
the next step has no screenshots. we're heading into your UEFI/BIOS (by hitting a specific key (like ESC, F10, Enter) while your computer boots up) and that'll look different for everyone reading this. if this section has you completely lost, google how to do these steps for your machine.
a good search term would be: "[YOUR DEVICE (i.e Lenovo, your mainboard's name, etc.)] change boot order"
what you need to do is to tell your computer to boot your USB before it tries to boot up windows. otherwise you won't be able to install kubuntu.
this can be done by entering your BIOS/UEFI and navigating to a point called something along the lines of "boot". from "boot order" to "booting devices" to "startup configuration", it could be called anything.
what'll be a common point though is that it'll list all your bootable devices. the topmost one is usually the one that boots up first, so if your usb is anywhere below that, make sure to drag and drop or otherwise move it to the top.
when you're done navigate to Save & Exit. your computer will then boot up kubuntu's install wizard. you'll be greeted with this:

shocker, i know, but click "Install Kubuntu" on the right.
step 4: kubuntu installation
this is a guided installation. just like when you're installing windows you'll be prompted when you need to make changes. if i remember correctly it's going to ask you for your preferred keyboard layout, a network connection, additional software you might want to install, and all of that is up to you.
but once you reach the point where it asks you where you want to install kubuntu we'll have to make a couple of important choices.

🚨 another important note 🚨
do NOT pick any of the top three options. they will overwrite your already existing windows installation.
click manual instead. we're going to point it to our unallocated disk space. hit continue. you will be shown another disk partition screen.
what you're looking for are your 30gb of free space. just like with the USB drive when we were working with rufus, make sure you're picking the right one. triple check at the very least. the chosen disk will get wiped.

click it until the screen "create a new partition" pops up.
change the following settings to:
New partition size in megabytes: 512
Use as: EFI System Partition
hit OK.
click your free space again. same procedure.
change the following settings to:
New partition size in megabytes: 8000 (*this might be different in your case, read on.)
Use As: Swap Area
hit OK
click your free space a third time. we need one more partition.
change the following settings to:
don't change anything about the partition size this time. we're letting it use up the rest of the resources.
Use as: Ext4 journaling system
Mount Point: /
you're done here as well.
*about the 8000 megabytes in the second step: this is about your RAM size. if you have 4gb instead type 4000, and so on.
once you're sure your configuration is good and ready to go, hit "Install Now". up until here you can go back and make changes to your settings. once you've clicked the button, there's no going back.
finally, select your timezone and create a user account. then hit continue. the installation should finish up... and you'll be good to go.
you'll be told to remove the USB drive from your computer and reboot your machine.
now when your computer boots up, you should end up on a black screen with a little bit of text in the top left corner. ubuntu and windows boot manager should be mentioned there. naturally, when you click ubuntu you will boot into your kubuntu. likewise if you hit windows boot manager your windows login screen will come up.
and that's that folks. go ham on messing around with your linux distro. customize it to your liking. make yourself familiar with the shell (on kubuntu, when you're on your desktop, hit CTRL+ALT+T).
for starters, you could feed it the first commands i always punch into fresh Linux installs:
sudo apt-get update
sudo apt-get upgrade
sudo apt-get install vim
(you'll thank me for the vim one later)
turn your back on windows. taste freedom. nothing sexier than open source, baby.
sources (mainly for the pictures): 1, 2
further reading for the curious: 1, 2
linux basics (includes CLI commands)
kubuntu documentation (this is your new best friend. it'll tell you everything about kubuntu that you need to know.
and finally the promised kde/gnome meme:

#windows#linuxposting#had a long day at work and i had to type this twice and i'm struggling to keep my eyes open#not guaranteeing that i didn't skip a step or something in there#so if someone linux savvy spots them feel free to point them out so i can make fixes to this post accordingly#opensource posting
122 notes
·
View notes
Note
hi! i was wondering if you have any advice/certain programs or anything you use for making gifs, because there’s something i really want to make but i have zero experience 💔💔
hello hello!
ah, yes, I have a TON, let's hope this ADHD girlie can give a somewhat concise description lmao. I will answer this publicly, in case it's useful for anyone else.
Software I use:
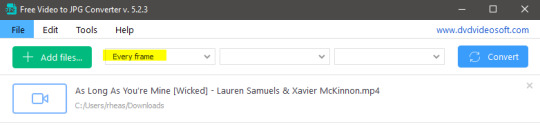
To make the screenshots: - for single scenes: KMPlayer 12.22.30 (the newer versions are trash) - for shorter videos, or something you want to get all the screenshots out of Free Video to JPG converter is awesome.
To make the gifs: - Adobe Photoshop 2021 (I don't recommend much later versions, because of the Cloud connection they have)
General gif-maker wisdom: "we spend more time on making sure that something looks serviceable, not pixelated, and good quality, than to get it moving and shit" - Confucius, probably
Useful stuff to make your life easy:
- Squishmoon's action pack for sharpening your screenshots. You can also find their detailed use explained here. - If you are planning to gif Wicked, some scenes are a bit tricky, ngl. But I have two PSDs that you can use, while you're perecting your own craft, and you can edit and update them to make them more "you".

A neutral PSD for mostly indoors and lighter scenes | download

A blue-enhancing PSD for darker scenes | download
Some info on videos to use: - always, always (ALWAYS) use at least HD videos. Otherwise your gif will look like shit. This should be ideally at least 720p in resolution, but go with 1080p for the best results. Coloring gifs in 1080p is easy, but... - if you want to go pro *rolls eyes*, you could go for HDR (2160p) quality. However HDR is a mf to color properly and I would not recommend it for a beginner. When you extract frames from an HDR video, the image colors will end up being washed out and muddy so you will always have to balance those colors out for it to look decent, however, the quality and number of pixels will be larger. If you ar okay with making small/medium sized images, then stick with 1080p. (Storytime, I spent a lot of time making HDR screenshots, only for me to realize that I really hate working with them, so I'm actually considering going back to 1080p, despite that not being "industry standard" on Tumblr lmao. I'm not sure yet But they take up so much space, and if you have a laptop that is on the slower side, you will suffer.)
See the below example of the image differences, without any effects. You will probably notice, that HDR has some more juicy detail and is a LOT sharper, but well... the color is just a lot different and that's something you will have to calculate in and correct for.

The ✨Process✨
Screencaptures
I like to have all screenshots/frames ready for use. So as step one, you need to get the movie file from somewhere. This should definitely be a legal source, and nothing else (jk).
Once I have the movie. I spend a lot of time making and sorting screencaps. Since I mostly work in the Wicked fandom only atm, that means I will only need to make the frames once, and thats awesome, cause this is the most boring part.
For this, I let the Video to JPG Converter run the whole movie while I was aleep, and by morning, it created gorgeous screenshots for me and my laptop almost went up in flames.
You need to make sure you capture every single frame, so my settings looked like this:
Screenshots do take up a lot of space, so unless your computer has a huge brain, I suggest storing the images in an external drive. For Wicked, the entire movie was I think around 200k frames total. I reduced that to about 120k that I will actually use.
And then I spend some time looking through them, deleting the scenes I know I won't do ever (goodbye Boq, I will never gif you, I'm so sorry :((( ) and also, I like to put them into folders by scene. My Wicked folder looks like this:

If you don't want this struggle and you only need a few specific scenes, there is this great tutorial on how to make frames from KMPlayer. Note that some of the info in this tutorial on gif quality requirements and Tumblr's max allowance of size and # of frames are outdated. You are allowed to post a gif that is a maximum of 10 Mb and 120 frames (maybe it can be even more, idk, said the expert) on Tumblr. But the process of screencapturing is accurate. Also ignore the gifmaking process in this tutorial, we have a lot easier process now as well!
Prepping the images
I have a folder called "captures", where I put all of the specific screenshots for a set I want to use. Inside this folder I paste all the shots/scenes I want to work on for my current gifset, and then I create subfolders. I name them 1, 2, 3, etc, I make one folder for each gif file I want to make. Its important that only the frames you want to be in the gif are in the folder. I usually limit the number of images to 100, I don't really like to go above it, and usually aim to go lower, 50-70 frames, but sometimes you just need the 100.
Sidetrack, but: Keep in mind that Tumblr gifs also need to be a specific width, so that they don't get resized, and blurry. (Source) Height is not that important, but witdth is VERY. But since there is a limit on Mb as well, for full width (540px) gifs you will want to go with less frames, than for smaller ones.

Once you have the frames in folders, you will open Photoshop, and go to: File > Scripts > Load files into stack.
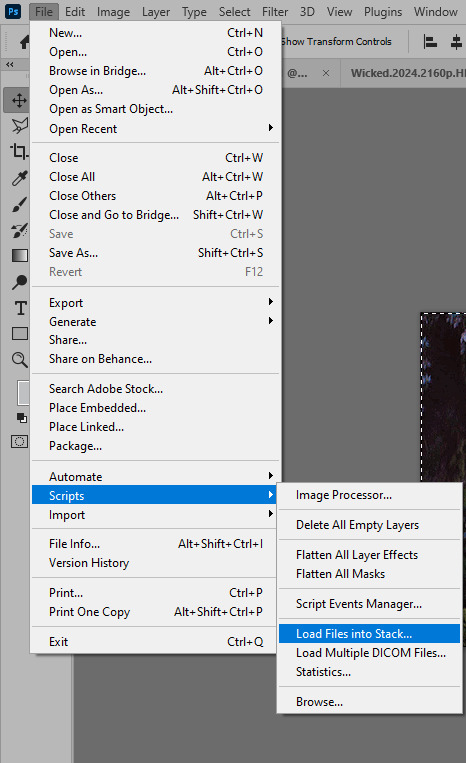
Here you select Folder from the dropdown menu, and then navigate to the folder where you put the frames for your first gif. It will take a moment to load the frames into the window you have open, but it will look like this:

You click "OK" and then it will take anther few moments for Photoshop to load all the frames into a file.
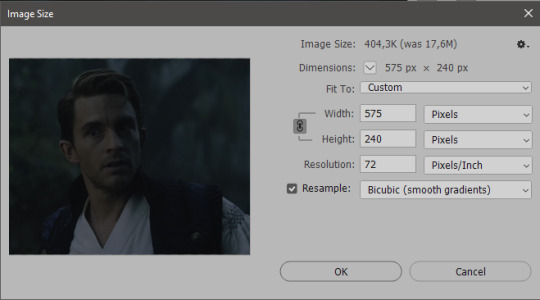
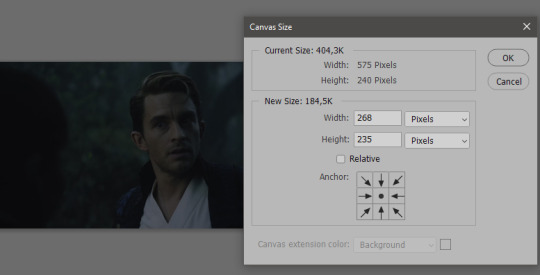
But once that's done, and you have the frames, you next have to resize the image. Go to Image > Image size... When you resize in Photoshop, and save as gif, sometimes you do end up with a light transparent border on the edge that looks bad, so, when you resize, you have to calculate in that you will be cutting off a few pixels at the end. In this example, I want to make a 268px width gif. I usually look at heights first, so lets say I want it to be a close-up, and I will cut off the sides, and it will be more square-ish. So I set height to 240px. Always double check that your width doesn1t run over your desired px numbers, but since 575 is larger than 268 (can you tell I'm awesome at math?), I should be good. I click OK.
Next, you have to crop the image. Go to Image > Canvas size... At this point we can get rid of those extra pixels we wanted to drop from the bottom as well, so we will make it drop from the height and the width as well. I set the width to 268px, and the height to 235px, because I have OCD, and numbers need to end with 0 or 5, okay?
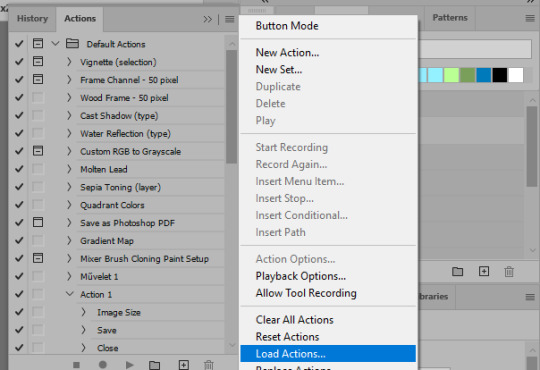
And now, the magic happens! First, go to Window > Actions to have the actions window show up. While you're at it, in the Window menu also select Timeline (this will be your animation timeline at the button) and also Layers. Once you have the Actions window showing up, on the menu in the upper right corner click the three lines menu button, and from the list select "Load Actions". I hope you downloaded the Squishmoon action pack from the start of this post, if not, do it now! So you save that file, and then after you clicked Load, you... well, load it. It will show up in your list like so:
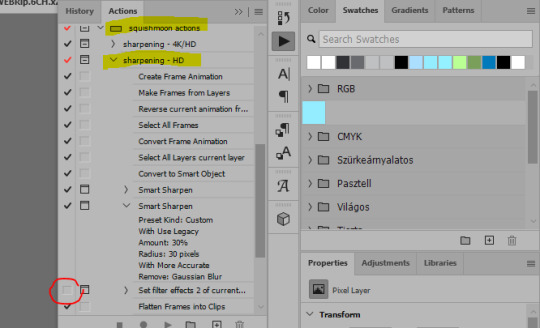
You will want to use the sharpening - HD one, BUT I personally like to go, and remove the tick from the spot I circled above, so leave that empty. This will result in the image having more contrast, which is very much needed for these darker scenes.
When you have that, you select the action itself like so, and click the play button at the bottom. The action will do everything for you, sharpen, increase contrast and also, create the gif and set the frame speed. You won't need to edit anything, just whatever window pops up, click "OK"

Now it should all look like something like this:

In the Layers window on the side, scroll all the way up to the top. The frame on the top is your last frame. Every effect you want to add to the gif should go to here, otherwise it won't apply to all frames. So at this point I open my PSD for darker scenes, and pull the window of it down, above the gif I'm working on like so:

And then I grab the folder I marked with yellow, left click, hold the click down, and drag that folder over to my current gif. And bamm, it will have the nice effect I wanted! You can click the little play button at the button to see a preview.

Once you have it sorted, now its time to extract it, but first, here's our before and after view:


Now, if you are happy with this, you can just save and close.
If you want to add subtitles, you can do that as well either manually with the text tool (remember, to add as the TOP layer as we did with the coloring) or you can use a pre-set PSD for that as well, here's mine.
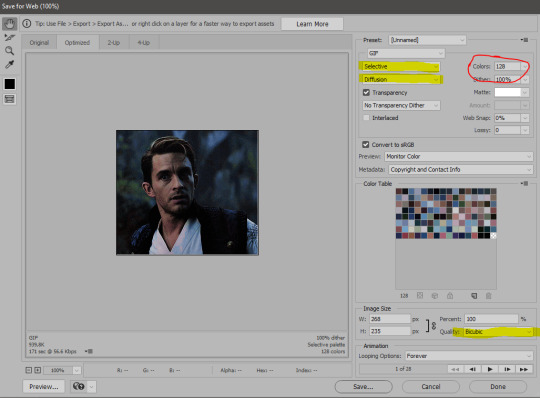
Now, we just need to export it. Go to File > Export > Save for Web (Legacy) and copy my settings here. Others may use other settings, but these are mine, so! I hope you are happy with them :3
In this case, for colors, I picked 128 colors, because on dark sscenes you can get away with using less colors, and the larger that number is, the bigger the filesize. If you use lighter images, you will need to bump that shit up to 256, but that will make your file larger. You can see at the bottom of the screen, how large your file will end up being. So long as you are under 9 Mb, you should be good :3
Conclusion
Look, Gif making and Photoshop in general is a bit scary at first. There are a lot of settings you can mess around on your own, a lot to play with, and also a lot can go wrong. This is a very basic tutorial, and also my current process and preferred coloring. However if you look at "gif psd" or "gif tutorial" or similar tags on Tumblr, you can find a LOT of great resources and steps, for many-many things. Usually people are not too antsy about sharing their methods either. You make 4-5 gifs, and you will have the steps locked down, and then it's all about experimenting.
After you have some muscle memory, your next step should be to explore what is inside a PSD coloring folder that you use. Open them up, try clicking around, click the little eye, to see what happens if they are turned off, and double click them, and play around with the sliders, to see what each does. Most people on Tumblr don't really know what each one does, we all just pressed a few buttons and got really lucky with the results, lol.
If anything is unclear, don't hesitate to ask, I'll gladly help!
Good luck <3
45 notes
·
View notes
Note
Hello!
Checking out your blog, I noticed that you use C++ and seem quite knowledgeable on it, so I wanted to ask for your help (if it doesn't bother you!).
I've completed the two C++ courses in SoloLearn (which are quite superficial, but serve as good introductions, I believe), and I'm currently reading "The C++ Programming Language", by Bjarne Stroustrup. My issue is that I'm a bit afraid of not really understanding anything and/or being unable to write any functional code by myself. Therefore, I wanted to ask if you had any resources and/or tips that could be helpful for a beginner like me (the only language I've ever used before is HTML, and so I thought it was a good idea to go straight to C++ for the challenge of it xd).
It NEVER bothers me to blabber about code! :D
I LOVE C++
So first a long rant, and then my answer :3
C++ will probably forever be my favorite langauge.
But many do not like it, and it is actually somewhat rare to see as a language a professional uses.
Why? Because one should use a language for what it is good at.
And what is C++ good at?
Well, one of its neatest features is that it is a object oriented language.
It is also a language where you can create objects, but the language ITSELF is object oriented.
C++ is a derived class of the baseclass C
And it have the same philosophy as C
You can do ANYTHING!
You can EASILY write garanteed memory safe code in C++
You can write psydocode that have the same safety garantees as Rust.
Or you can go for 100% performsnce, dancing with void pointers and GOTOs!
Craft a class so it gets build, moved, removed used and works EXACTLY how you want it to! Down to the smallest details!
Write halfway object oriented and half functional!
If it can be done on a computer, it can be done in C++!
It may not be the language most often used. Often there are better languages for creating things
But knowing C++ means that you never again have to fully learn another language.
A C++ programmer KNOWS what a computer can do, so it is just a question of googeling the syntax for whatever language we are writing it in that day :D
Rant over. Answer time! :D
When I have to get a bit familiar with a new language I usually build a HTTP server :3
It is easy enough to look up for help, it means you work with everything you know
Slap it on a raspberry pie 0 or 3 depending on your wallet and bam! You have your own fileserver! :D
Connect a SSD into the raspberry pie 3 and bam, you now have your own cloud storage! :D
That is ALWAYS a useful thing :3
Keep it on your own network with a passwork and use MDNS to use it and it is 100% safe.
Because you piggybag on all the security wirless networks come with these days :3
8 notes
·
View notes
Text

Ubuntu is a popular open-source operating system based on the Linux kernel. It's known for its user-friendliness, stability, and security, making it a great choice for both beginners and experienced users. Ubuntu can be used for a variety of purposes, including:
Key Features and Uses of Ubuntu:
Desktop Environment: Ubuntu offers a modern, intuitive desktop environment that is easy to navigate. It comes with a set of pre-installed applications for everyday tasks like web browsing, email, and office productivity.
Development: Ubuntu is widely used by developers due to its robust development tools, package management system, and support for programming languages like Python, Java, and C++.
Servers: Ubuntu Server is a popular choice for hosting websites, databases, and other server applications. It's known for its performance, security, and ease of use.
Cloud Computing: Ubuntu is a preferred operating system for cloud environments, supporting platforms like OpenStack and Kubernetes for managing cloud infrastructure.
Education: Ubuntu is used in educational institutions for teaching computer science and IT courses. It's free and has a vast repository of educational software.
Customization: Users can customize their Ubuntu installation to fit their specific needs, with a variety of desktop environments, themes, and software available.
Installing Ubuntu on Windows:
The image you shared shows that you are installing Ubuntu using the Windows Subsystem for Linux (WSL). This allows you to run Ubuntu natively on your Windows machine, giving you the best of both worlds.
Benefits of Ubuntu:
Free and Open-Source: Ubuntu is free to use and open-source, meaning anyone can contribute to its development.
Regular Updates: Ubuntu receives regular updates to ensure security and performance.
Large Community: Ubuntu has a large, active community that provides support and contributes to its development.
4 notes
·
View notes
Text
Complete Terraform IAC Development: Your Essential Guide to Infrastructure as Code
If you're ready to take control of your cloud infrastructure, it's time to dive into Complete Terraform IAC Development. With Terraform, you can simplify, automate, and scale infrastructure setups like never before. Whether you’re new to Infrastructure as Code (IAC) or looking to deepen your skills, mastering Terraform will open up a world of opportunities in cloud computing and DevOps.
Why Terraform for Infrastructure as Code?
Before we get into Complete Terraform IAC Development, let’s explore why Terraform is the go-to choice. HashiCorp’s Terraform has quickly become a top tool for managing cloud infrastructure because it’s open-source, supports multiple cloud providers (AWS, Google Cloud, Azure, and more), and uses a declarative language (HCL) that’s easy to learn.
Key Benefits of Learning Terraform
In today's fast-paced tech landscape, there’s a high demand for professionals who understand IAC and can deploy efficient, scalable cloud environments. Here’s how Terraform can benefit you and why the Complete Terraform IAC Development approach is invaluable:
Cross-Platform Compatibility: Terraform supports multiple cloud providers, which means you can use the same configuration files across different clouds.
Scalability and Efficiency: By using IAC, you automate infrastructure, reducing errors, saving time, and allowing for scalability.
Modular and Reusable Code: With Terraform, you can build modular templates, reusing code blocks for various projects or environments.
These features make Terraform an attractive skill for anyone working in DevOps, cloud engineering, or software development.
Getting Started with Complete Terraform IAC Development
The beauty of Complete Terraform IAC Development is that it caters to both beginners and intermediate users. Here’s a roadmap to kickstart your learning:
Set Up the Environment: Install Terraform and configure it for your cloud provider. This step is simple and provides a solid foundation.
Understand HCL (HashiCorp Configuration Language): Terraform’s configuration language is straightforward but powerful. Knowing the syntax is essential for writing effective scripts.
Define Infrastructure as Code: Begin by defining your infrastructure in simple blocks. You’ll learn to declare resources, manage providers, and understand how to structure your files.
Use Modules: Modules are pre-written configurations you can use to create reusable code blocks, making it easier to manage and scale complex infrastructures.
Apply Best Practices: Understanding how to structure your code for readability, reliability, and reusability will save you headaches as projects grow.
Core Components in Complete Terraform IAC Development
When working with Terraform, you’ll interact with several core components. Here’s a breakdown:
Providers: These are plugins that allow Terraform to manage infrastructure on your chosen cloud platform (AWS, Azure, etc.).
Resources: The building blocks of your infrastructure, resources represent things like instances, databases, and storage.
Variables and Outputs: Variables let you define dynamic values, and outputs allow you to retrieve data after deployment.
State Files: Terraform uses a state file to store information about your infrastructure. This file is essential for tracking changes and ensuring Terraform manages the infrastructure accurately.
Mastering these components will solidify your Terraform foundation, giving you the confidence to build and scale projects efficiently.
Best Practices for Complete Terraform IAC Development
In the world of Infrastructure as Code, following best practices is essential. Here are some tips to keep in mind:
Organize Code with Modules: Organizing code with modules promotes reusability and makes complex structures easier to manage.
Use a Remote Backend: Storing your Terraform state in a remote backend, like Amazon S3 or Azure Storage, ensures that your team can access the latest state.
Implement Version Control: Version control systems like Git are vital. They help you track changes, avoid conflicts, and ensure smooth rollbacks.
Plan Before Applying: Terraform’s “plan” command helps you preview changes before deploying, reducing the chances of accidental alterations.
By following these practices, you’re ensuring your IAC deployments are both robust and scalable.
Real-World Applications of Terraform IAC
Imagine you’re managing a complex multi-cloud environment. Using Complete Terraform IAC Development, you could easily deploy similar infrastructures across AWS, Azure, and Google Cloud, all with a few lines of code.
Use Case 1: Multi-Region Deployments
Suppose you need a web application deployed across multiple regions. Using Terraform, you can create templates that deploy the application consistently across different regions, ensuring high availability and redundancy.
Use Case 2: Scaling Web Applications
Let’s say your company’s website traffic spikes during a promotion. Terraform allows you to define scaling policies that automatically adjust server capacities, ensuring that your site remains responsive.
Advanced Topics in Complete Terraform IAC Development
Once you’re comfortable with the basics, Complete Terraform IAC Development offers advanced techniques to enhance your skillset:
Terraform Workspaces: Workspaces allow you to manage multiple environments (e.g., development, testing, production) within a single configuration.
Dynamic Blocks and Conditionals: Use dynamic blocks and conditionals to make your code more adaptable, allowing you to define configurations that change based on the environment or input variables.
Integration with CI/CD Pipelines: Integrate Terraform with CI/CD tools like Jenkins or GitLab CI to automate deployments. This approach ensures consistent infrastructure management as your application evolves.
Tools and Resources to Support Your Terraform Journey
Here are some popular tools to streamline your learning:
Terraform CLI: The primary tool for creating and managing your infrastructure.
Terragrunt: An additional layer for working with Terraform, Terragrunt simplifies managing complex Terraform environments.
HashiCorp Cloud: Terraform Cloud offers a managed solution for executing and collaborating on Terraform workflows.
There are countless resources available online, from Terraform documentation to forums, blogs, and courses. HashiCorp offers a free resource hub, and platforms like Udemy provide comprehensive courses to guide you through Complete Terraform IAC Development.
Start Your Journey with Complete Terraform IAC Development
If you’re aiming to build a career in cloud infrastructure or simply want to enhance your DevOps toolkit, Complete Terraform IAC Development is a skill worth mastering. From managing complex multi-cloud infrastructures to automating repetitive tasks, Terraform provides a powerful framework to achieve your goals.
Start with the basics, gradually explore advanced features, and remember: practice is key. The world of cloud computing is evolving rapidly, and those who know how to leverage Infrastructure as Code will always have an edge. With Terraform, you’re not just coding infrastructure; you’re building a foundation for the future. So, take the first step into Complete Terraform IAC Development—it’s your path to becoming a versatile, skilled cloud professional
2 notes
·
View notes
Text

The Comprehensive Guide to Web Development, Data Management, and More
Introduction
Everything today is technology driven in this digital world. There's a lot happening behind the scenes when you use your favorite apps, go to websites, and do other things with all of those zeroes and ones — or binary data. In this blog, I will be explaining what all these terminologies really means and other basics of web development, data management etc. We will be discussing them in the simplest way so that this becomes easy to understand for beginners or people who are even remotely interested about technology. JOIN US
What is Web Development?
Web development refers to the work and process of developing a website or web application that can run in a web browser. From laying out individual web page designs before we ever start coding, to how the layout will be implemented through HTML/CSS. There are two major fields of web development — front-end and back-end.
Front-End Development
Front-end development, also known as client-side development, is the part of web development that deals with what users see and interact with on their screens. It involves using languages like HTML, CSS, and JavaScript to create the visual elements of a website, such as buttons, forms, and images. JOIN US
HTML (HyperText Markup Language):
HTML is the foundation of all website, it helps one to organize their content on web platform. It provides the default style to basic elements such as headings, paragraphs and links.
CSS (Cascading Style Sheets):
styles and formats HTML elements. It makes an attractive and user-friendly look of webpage as it controls the colors, fonts, layout.
JavaScript :
A language for adding interactivity to a website Users interact with items, like clicking a button to send in a form or viewing images within the slideshow. JOIN US
Back-End Development
The difference while front-end development is all about what the user sees, back end involves everything that happens behind. The back-end consists of a server, database and application logic that runs on the web.
Server:
A server is a computer that holds website files and provides them to the user browser when they request it. Server-Side: These are populated by back-end developers who build and maintain servers using languages like Python, PHP or Ruby.
Database:
The place where a website keeps its data, from user details to content and settings The database is maintained with services like MySQL, PostgreSQL, or MongoDB. JOIN US
Application Logic —
the code that links front-end and back-end It takes user input, gets data from the database and returns right informations to front-end area.

Why Proper Data Management is Absolutely Critical
Data management — Besides web development this is the most important a part of our Digital World. What Is Data Management? It includes practices, policies and procedures that are used to collect store secure data in controlled way.
Data Storage –
data after being collected needs to be stored securely such data can be stored in relational databases or cloud storage solutions. The most important aspect here is that the data should never be accessed by an unauthorized source or breached. JOIN US
Data processing:
Right from storing the data, with Big Data you further move on to process it in order to make sense out of hordes of raw information. This includes cleansing the data (removing errors or redundancies), finding patterns among it, and producing ideas that could be useful for decision-making.
Data Security:
Another important part of data management is the security of it. It refers to defending data against unauthorized access, breaches or other potential vulnerabilities. You can do this with some basic security methods, mostly encryption and access controls as well as regular auditing of your systems.
Other Critical Tech Landmarks
There are a lot of disciplines in the tech world that go beyond web development and data management. Here are a few of them:
Cloud Computing
Leading by example, AWS had established cloud computing as the on-demand delivery of IT resources and applications via web services/Internet over a decade considering all layers to make it easy from servers up to top most layer. This will enable organizations to consume technology resources in the form of pay-as-you-go model without having to purchase, own and feed that infrastructure. JOIN US
Cloud Computing Advantages:
Main advantages are cost savings, scalability, flexibility and disaster recovery. Resources can be scaled based on usage, which means companies only pay for what they are using and have the data backed up in case of an emergency.
Examples of Cloud Services:
Few popular cloud services are Amazon Web Services (AWS), Microsoft Azure, and Google Cloud. These provide a plethora of services that helps to Develop and Manage App, Store Data etc.
Cybersecurity
As the world continues to rely more heavily on digital technologies, cybersecurity has never been a bigger issue. Protecting computer systems, networks and data from cyber attacks is called Cyber security.
Phishing attacks, Malware, Ransomware and Data breaches:
This is common cybersecurity threats. These threats can bear substantial ramifications, from financial damages to reputation harm for any corporation.
Cybersecurity Best Practices:
In order to safeguard against cybersecurity threats, it is necessary to follow best-practices including using strong passwords and two-factor authorization, updating software as required, training employees on security risks.
Artificial Intelligence and Machine Learning
Artificial Intelligence (AI) and Machine Learning (ML) represent the fastest-growing fields of creating systems that learn from data, identifying patterns in them. These are applied to several use-cases like self driving cars, personalization in Netflix.
AI vs ML —
AI is the broader concept of machines being able to carry out tasks in a way we would consider “smart”. Machine learning is a type of Artificial Intelligence (AI) that provides computers with the ability to learn without being explicitly programmed. JOIN US
Applications of Artificial Intelligence and Machine Learning: some common applications include Image recognition, Speech to text, Natural language processing, Predictive analytics Robotics.
Web Development meets Data Management etc.
We need so many things like web development, data management and cloud computing plus cybersecurity etc.. but some of them are most important aspects i.e. AI/ML yet more fascinating is where these fields converge or play off each other.
Web Development and Data Management
Web Development and Data Management goes hand in hand. The large number of websites and web-based applications in the world generate enormous amounts of data — from user interactions, to transaction records. Being able to manage this data is key in providing a fantastic user experience and enabling you to make decisions based on the right kind of information.
E.g. E-commerce Website, products data need to be saved on server also customers data should save in a database loosely coupled with orders and payments. This data is necessary for customization of the shopping experience as well as inventory management and fraud prevention.
Cloud Computing and Web Development
The development of the web has been revolutionized by cloud computing which gives developers a way to allocate, deploy and scale applications more or less without service friction. Developers now can host applications and data in cloud services instead of investing for physical servers.
E.g. A start-up company can use cloud services to roll out the web application globally in order for all users worldwide could browse it without waiting due unavailability of geolocation prohibited access.
The Future of Cybersecurity and Data Management
Which makes Cybersecurity a very important part of the Data management. The more data collected and stored by an organization, the greater a target it becomes for cyber threats. It is important to secure this data using robust cybersecurity measures, so that sensitive information remains intact and customer trust does not weaken. JOIN US
Ex: A healthcare provider would have to protect patient data in order to be compliant with regulations such as HIPAA (Health Insurance Portability and Accountability Act) that is also responsible for ensuring a degree of confidentiality between a provider and their patients.
Conclusion
Well, in a nutshell web-developer or Data manager etc are some of the integral parts for digital world.
As a Business Owner, Tech Enthusiast or even if you are just planning to make your Career in tech — it is important that you understand these. With the progress of technology never slowing down, these intersections are perhaps only going to come together more strongly and develop into cornerstones that define how we live in a digital world tomorrow.
With the fundamental knowledge of web development, data management, automation and ML you will manage to catch up with digital movements. Whether you have a site to build, ideas data to manage or simply interested in what’s hot these days, skills and knowledge around the above will stand good for changing tech world. JOIN US
#Technology#Web Development#Front-End Development#Back-End Development#HTML#CSS#JavaScript#Data Management#Data Security#Cloud Computing#AWS (Amazon Web Services)#Cybersecurity#Artificial Intelligence (AI)#Machine Learning (ML)#Digital World#Tech Trends#IT Basics#Beginners Guide#Web Development Basics#Tech Enthusiast#Tech Career#america
4 notes
·
View notes
Text
Celebrating a Creative Milestone: 1000 Designs on Canva! Shaina Tranquilino July 31, 2024
I am beyond excited to share a fantastic milestone with all of you today! 🎉 I recently received a notification from Canva, awarding me a cute milestone badge for creating 1000 designs! This achievement feels incredibly rewarding and motivates me to continue my creative journey.
Canva: My Go-To Design Tool
For those of you who might not be familiar with Canva, it is a powerful, user-friendly design platform that caters to everyone—from beginners to professional designers. I use Canva extensively for my Etsy shop, Tumblr, blogging, and social media. Its versatility and ease of use make it an indispensable tool in my creative toolkit.
Why I Love Canva
User-Friendly Interface: Canva’s intuitive drag-and-drop interface makes designing easy and fun. Even if you’re a novice, you can create professional-looking designs with minimal effort.
Extensive Template Library: Canva offers a vast array of templates for every occasion and purpose, whether it’s for social media posts, marketing materials, or personal projects.
Free and Paid Options: Canva is free to use, with an optional membership (Canva Pro) for those who want to access more advanced features and a broader range of assets. The free version is incredibly robust, but the Pro version offers additional perks that are worth considering.
Collaboration Features: Canva allows you to collaborate with others on your designs, making it perfect for team projects or getting feedback from friends and colleagues.
Access Anywhere: Whether you’re on your computer or mobile device, Canva’s cloud-based platform ensures that your designs are always accessible.
How I Use Canva
Etsy Shop: I design product listings, promotional materials, and shop banners using Canva. The professional templates and customization options help me create eye-catching visuals that attract clients.
Tumblr: Canva helps me create engaging posts and blog headers that stand out in the Tumblr feed. The ability to customize each element means my Tumblr page always reflects my unique style.
Blogging: From blog post graphics to Pinterest pins, Canva provides all the tools I need to make my blog visually appealing. High-quality images and infographics make my content more engaging and shareable.
Social Media: Canva’s social media templates save me so much time. Whether I’m designing Instagram stories, Facebook posts, or Twitter headers, Canva has me covered with perfectly sized templates and a wealth of creative options.
Encouraging Creativity
If you haven’t tried Canva yet, I highly encourage you to give it a shot. It’s a fantastic tool for anyone looking to enhance their creative projects without the steep learning curve of more complex design software. And remember, it’s free to start, so there’s no risk in trying it out!
Reaching 1000 designs feels like a significant milestone, and I’m grateful for the journey so far. Each design has been a step towards honing my skills and expressing my creativity. Here’s to many more designs and milestones ahead!
Thank you for being part of my creative journey. Whether you’re an Etsy seller, a blogger, or just someone who loves to create, I hope Canva becomes as valuable a resource for you as it has been for me.
Happy designing! 🌟
Feel free to share your own Canva creations and milestones in the comments below. Let’s inspire each other to keep creating!
#Canva#CanvaDesign#GraphicDesign#EtsyShop#EtsySeller#BloggingTools#SocialMediaMarketing#CreativeMilestone#DesignInspiration#GraphicDesigner#Tumblr#BlogGraphics#SocialMediaDesign#CanvaPro#DesignTools#CreativeJourney#MilestoneAchievement#DesignCommunity#ContentCreation#DesignGoals
5 notes
·
View notes
Text
The best cloud mining and cryptocurrency companies in 2024. How to earn $1,000 a month from mining
History of cryptocurrencies:
The history of cryptocurrencies and mining goes back to 2009 when Bitcoin was launched by a person or group of people using the customary name “Satoshi Nakamoto”. Bitcoin was the first decentralized digital currency based on Blockchain technology, which is an encrypted and tamper-proof recording technology.
The mining process is considered an essential part of the process of creating cryptocurrencies, as powerful computers are used to solve complex equations to find new blocks in the blockchain and secure the network. Miners are rewarded with units of the cryptocurrency in question as a reward for their efforts.
Since the launch of Bitcoin, many other cryptocurrencies have emerged with similar technology, and cryptocurrencies have become an important part of the global financial system. Mining techniques have evolved and become more complex and energy-intensive with the increasing popularity of cryptocurrencies.
In addition, cryptocurrencies have played a role in transforming the traditional financial system and opening doors to innovation and decentralized finance. The history of cryptocurrencies and mining is still evolving, witnessing continuous technological development and changes in policies and regulations related to them.
What is cloud mining:
Cloud mining is the process of renting computing power from companies that provide cloud computing services, such as Amazon, Microsoft, and Google, to run mining operations for digital currencies such as Bitcoin and Ethereum. The computing power and resources needed to run mining operations are provided remotely, without the need to own special mining equipment.
How to profit from cloud mining:
You can profit from cloud mining by paying a monthly or annual subscription fee to rent computing capacity, and after that you can obtain profits from the mining operations carried out by the company by distributing the mined digital currencies. It should be taken into account that there are factors such as the cost of subscription, difficulty in mining, and the price of digital currencies that may affect profitability.
Therefore, before investing in cloud mining, you should conduct the necessary research and comprehensive analysis to evaluate the opportunities and risks associated with this type of investment.
The best and most secure cloud mining companies in 2024:
1-IQMining
It is a cloud mining platform that allows users to mine various digital currencies without the need for specialized hardware or deep technical knowledge. Users can rent mining power from IQMining and start earning cryptocurrencies by participating in mining activities You must have appropriate capital to invest in the platform. The company does not give free mining at all
To register with the company, click here
2- BeMine

BeMine is a cloud mining platform founded in 2018 in Estonia. The company focuses on providing cloud mining services to individual users and small businesses.
BeMine Features:
Ease of use: The platform features a simple and easy-to-use user interface, making it suitable for beginners. Flexible Contracts: BeMine offers short- and long-term contracts with resale capabilities, allowing users to adjust their investments as needed. Competitive Returns: BeMine offers competitive returns on cloud mining investments. Advanced Equipment: BeMine uses the latest equipment to provide the best possible performance. Customer Support: BeMine offers 24/7 customer support. The minimum investment is 50 USD To register on the company's website, click here
3- MineThrive

MineThrive is a relatively new cloud mining platform that was launched in 2023 in Australia. The platform offers cloud mining services to individual users and small businesses.
MineThrive features:
Ease of use: The platform features a simple and easy-to-use user interface. It has a free plan for a limited time, after which you can either upgrade, or one of the referrals performs an upgrade that gets 7% of the purchased mining power, and there are other levels. Flexible Contracts: Offers short- and long-term contracts with the possibility of resale. Minimum Investment: The minimum investment is $1, making it suitable for beginners. Customer Support: Offers 24/7 customer support. Supported currencies: Supports Bitcoin, Ethereum, and Litecoin mining. Service Fee: They charge fees for cloud mining contracts. To register here
There are many companies working in the field of cloud mining. I will work to complete the remaining companies and platforms that are trustworthy and have easy terms and relatively large returns. I will see you well.
2 notes
·
View notes
Text
What Is Best for Graphic Design

Graphic design is everywhere — from the logos on your favorite apps to the posters you see on the street. It’s the art of visually communicating ideas, stories, and messages in a way that grabs attention and connects with people. But if you’re new to graphic design or thinking about diving deeper, you might wonder: What is the best for graphic design? Whether it’s tools, skills, or learning paths, let’s break it down in a simple and human way.
1. The Right Tools for Your Creative Journey
First things first — the tools you choose can make a huge difference, but don’t stress about having the most expensive software. It’s more about what feels comfortable and lets your creativity flow.
Adobe Creative Cloud (Photoshop, Illustrator, InDesign): These are the go-to tools in the design world. Photoshop shines when it comes to editing photos and working with pixel-based images. Illustrator is your best friend for creating sharp logos and vector graphics that scale perfectly. InDesign is ideal for putting together layouts for magazines, brochures, or any multi-page projects. If you're aiming to work professionally or freelance, getting comfortable with these tools can seriously boost your opportunities.
Canva: Perfect for beginners or anyone who wants quick, hassle-free design. It’s easy to use, web-based, and packed with ready-made templates—ideal for social posts, flyers, and fast creative projects without any complicated learning.
Affinity Designer & Photo:
A solid alternative to Adobe, these tools offer pro-level features with a one-time payment—no monthly fees. Perfect for creatives who want quality design software without the hefty price tag.
2. Skills That Matter More Than Fancy Software
While tools are important, skills and mindset matter way more. Here’s what you should focus on:
Basic Design Principles: Things like balance, contrast, alignment, and hierarchy are the backbone of any good design. Understanding these helps you create designs that look polished and professional.
Fonts aren’t just about letters — they set the mood, tone, and personality of your design. The right font pairing can make your work shine, while the wrong one can create confusion. Learning how to use type thoughtfully is one of the most powerful tools in a designer’s toolkit.
Color Theory:
Colors aren’t just pretty—they speak. They trigger emotions, tell stories, and set the tone of your design. Learning how to mix the right shades or play with contrast can completely change how your work feels and connects with people.
Creativity & Problem Solving:
Graphic design is really about finding smart, visual solutions to communication challenges. It’s about thinking outside the box, trying new ideas, and turning problems into eye-catching stories.
3. Learning Resources That Match Your Style
Not everyone learns the same—and that’s okay. Find what keeps you curious.
YouTube Channels: Check out creators like The Future, Satori Graphics, and Yes I’m a Designer for practical tips and easy-to-follow tutorials.
Online Courses: Websites like Udemy, Skillshare, and Coursera have courses ranging from beginner to advanced. Some are free, some paid — a mix works best.
Procreate:
If you love sketching or digital painting, Procreating on the iPad is a dream. It’s super intuitive, feels like real drawing, and gives artists a smooth, creative flow right at their fingertips
4. Hardware: What You Actually Need
You don’t need the latest, priciest computer to get started, but a decent setup helps.
Laptop or Desktop: A mid-range laptop or desktop with at least 8GB RAM and a good graphics card is enough for most design work. Macs are popular among designers but PCs work just as well.
Drawing Tablet: If you enjoy digital art, a tablet like Wacom or XP-Pen can boost your workflow.
Monitor: A good quality monitor with accurate colors is valuable if you want your designs to look their best.
5. Staying Inspired and Growing
Graphic design is a constantly evolving field. Trends change, tools update, and new techniques emerge. Here’s how to keep growing:
Follow Design Communities: Platforms like Behance, Dribbble, and Instagram are full of inspiration and can help you connect with other creatives.
Keep Learning: Always be curious. Explore new styles, try different software, and never stop experimenting.
Feedback: Share your work and ask for honest opinions. Constructive criticism helps you improve faster.
6.What Works Best for You?
At the end of the day, the “best” approach to graphic design is the one that fits your style, goals, and what excites you the most.
Want to work for big companies or agencies? Learn Adobe tools, master fundamentals, and build a strong portfolio.
Looking for quick social media graphics? Canva and some basic design knowledge might be all you need.
Passionate about digital illustration? Dive into Procreate or Illustrator, and make daily drawing a fun habit to sharpen your skills.
Budget-conscious? Affinity Designer and free online tutorials can take you far.
Final Thoughts
Graphic design is where creativity meets strategy in the most exciting way. The secret? Start small, master the basics, and pick tools that feel right for you and your budget. Above all, let your passion drive you and stay open to learning — the skills and tools will naturally come along the way.
0 notes
Text
IT Training Institute in Kolkata – ejobindia.com
In today’s fast-paced digital world, Information Technology (IT) has become a crucial part of every industry. Whether it’s software development, data analysis, web design, or cybersecurity, skilled IT professionals are always in demand. To meet this growing need, ejobindia.com, a leading IT training institute in Kolkata, has emerged as a trusted name for individuals seeking practical, job-ready IT education.
About ejobindia.com
Established with the mission to bridge the gap between academic knowledge and industry requirements, ejobindia.com has become one of the top IT training institutes in Kolkata. With a team of experienced trainers, updated course modules, and a focus on real-world application, ejobindia.com has been consistently producing skilled professionals who are ready to tackle the demands of the IT industry.
Why Choose ejobindia.com?
There are several reasons why ejobindia.com stands out among other IT training institutes in Kolkata:
1. Industry-Oriented Curriculum
Ejobindia.com offers training programs that are carefully crafted to meet current industry standards. The institute continuously updates its curriculum to include the latest technologies and tools used by professionals in the IT sector. Whether you are a beginner or a working professional looking to upskill, the courses are tailored to suit all levels.
2. Hands-On Training
One of the key strengths of ejobindia.com is its focus on practical training. Students are not just taught theory—they get hands-on experience through real-time projects, case studies, and live coding sessions. This practical approach ensures that learners gain the confidence and experience needed to perform effectively in real job scenarios.
3. Expert Trainers
The training team at ejobindia.com consists of seasoned professionals with years of experience in top IT companies. Their deep industry insights and mentoring help students understand not just how technologies work, but why they are used in specific business contexts.
4. 100% Placement Assistance
Ejobindia.com takes pride in its robust placement support. The institute has tie-ups with numerous IT companies in Kolkata and across India. Resume building, mock interviews, and soft skill training are provided as part of the placement process, ensuring students are well-prepared to secure a job after completion of the course.
5. Flexible Learning Options
To cater to different types of learners, ejobindia.com offers flexible learning options, including:
Classroom training
Online live sessions
Weekend and evening batches for working professionals
This flexibility makes it easy for students and job seekers to balance their education with other responsibilities.
Popular Courses Offered
Ejobindia.com offers a wide range of IT courses that are in high demand in today’s job market. Some of the most popular programs include:
● Full Stack Web Development
This course covers front-end technologies like HTML, CSS, JavaScript, React.js, as well as back-end tools like Node.js, Express.js, and databases such as MongoDB and MySQL.
● Data Science and Python
Focused on data analytics, machine learning, and Python programming, this course is ideal for those looking to enter the booming data science field.
● Software Testing (Manual + Automation)
This course covers both manual testing and automation testing tools like Selenium, making students ready for QA roles in software companies.
● Java / .NET / PHP Development
These backend technologies continue to be in demand, and ejobindia.com offers specialized training in each with hands-on project development.
● UI/UX Design
For those interested in design, the institute provides comprehensive UI/UX courses covering design tools, user experience principles, and prototyping.
● Android App Development
Learn how to create feature-rich mobile applications with Android Studio and Java/Kotlin.
● Cloud Computing & DevOps
As cloud technology becomes mainstream, ejobindia.com offers training in AWS, Azure, Docker, Kubernetes, and CI/CD tools.
Student Testimonials
Many students who have graduated from ejobindia.com have shared positive experiences:
Conclusion
If you're looking for a trusted and career-oriented IT training institute in Kolkata, ejobindia.com is a name you can count on. With its industry-relevant courses, expert faculty, and strong placement support, the institute has helped thousands of students and professionals launch successful careers in IT.
Visit ejobindia.com today to explore courses, schedule a demo class, or speak to a career counselor. Your future in IT starts here!
#IT Training Institute in Kolkata#Best IT Training Institute in Kolkata#IT Training with Placement in Kolkata
0 notes
Text
Discover the Best Platforms for Courses to Boost Your Skills in 2025

The rise of digital learning has made education more accessible than ever before. Whether you want to upgrade your career, learn a new hobby, or start a side hustle, online learning is the answer. But with so many options out there, how do you decide which are the best platforms for courses?
In this blog, we’ll explore the top online course platforms that are helping millions of learners globally. From professional certifications to hobby-based learning, these platforms cater to every type of student.
What Makes a Platform “The Best”?
Before diving into the list, it’s important to know what qualifies as one of the best platforms for courses. Look for:
Course Quality: Is the content created by experts?
Certification: Does it offer recognized certification?
Affordability: Is the price reasonable?
User Experience: Is the platform easy to use?
Flexibility: Can you learn at your own pace?
Keeping these criteria in mind, here are some platforms that stand out in 2025.
1. FutureLearn
FutureLearn offers a wide range of short courses and micro-credentials, often in collaboration with universities. Their structured yet flexible format makes them ideal for learners who want to balance studies with a job or other commitments.
Best for: Academic and professional learners Key Features: Short courses, degree options, university-backed certification
2. Khan Academy
If you're looking for a 100% free platform with high-quality content, Khan Academy is unbeatable. It’s especially great for school and college students. Their simple approach and well-organized subjects make complex topics easier to grasp.
Best for: School-level learning and entrance exam prep Key Features: Free access, visual learning, ideal for beginners
3. Pluralsight
For tech professionals, Pluralsight is one of the best platforms for courses in software development, IT ops, cybersecurity, and more. The platform also features "skill assessments" to help you track your progress.
Best for: Developers, IT professionals Key Features: Skill paths, expert content, enterprise options
4. Alison
Alison is another fantastic platform offering free courses with the option to buy certificates. It focuses heavily on career-building skills such as business management, languages, and digital skills.
Best for: Career-oriented learners Key Features: Free courses, diploma programs, mobile-friendly
5. Great Learning
A fast-growing Indian platform, Great Learning partners with top global institutions to offer certification and degree programs. It’s particularly strong in data science, AI, cloud computing, and management.
Best for: Job-ready tech courses and upskilling Key Features: Mentorship, job assistance, free and paid courses
Conclusion
Online learning has made it easier than ever to gain new skills, earn certifications, and stay competitive in today’s job market. The best platform for courses in 2025 offer high-quality, accessible, and flexible education for all kinds of learners.
Whether you’re a student looking for extra help, a professional upgrading your skill set, or someone simply passionate about learning, there’s a platform out there for you. Explore these top platforms, compare your options, and start your learning journey today!
0 notes
Text
Kubernetes Tutorials | Waytoeasylearn
Learn how to become a Certified Kubernetes Administrator (CKA) with this all-in-one Kubernetes course. It is suitable for complete beginners as well as experienced DevOps engineers. This practical, hands-on class will teach you how to understand Kubernetes architecture, deploy and manage applications, scale services, troubleshoot issues, and perform admin tasks. It covers everything you need to confidently pass the CKA exam and run containerized apps in production.
Learn Kubernetes the easy way! 🚀 Best tutorials at Waytoeasylearn for mastering Kubernetes and cloud computing efficiently.➡️ Learn Now

Whether you are studying for the CKA exam or want to become a Kubernetes expert, this course offers step-by-step lessons, real-life examples, and labs focused on exam topics. You will learn from Kubernetes professionals and gain skills that employers are looking for.
Key Learning Outcomes: Understand Kubernetes architecture, components, and key ideas. Deploy, scale, and manage containerized apps on Kubernetes clusters. Learn to use kubectl, YAML files, and troubleshoot clusters. Get familiar with pods, services, deployments, volumes, namespaces, and RBAC. Set up and run production-ready Kubernetes clusters using kubeadm. Explore advanced topics like rolling updates, autoscaling, and networking. Build confidence with real-world labs and practice exams. Prepare for the CKA exam with helpful tips, checklists, and practice scenarios.
Who Should Take This Course: Aspiring CKA candidates. DevOps engineers, cloud engineers, and system admins. Software developers moving into cloud-native work. Anyone who wants to master Kubernetes for real jobs.
1 note
·
View note
Text
Python for Data Science: The Only Guide You Need to Get Started in 2025
Data is the lifeblood of modern business, powering decisions in healthcare, finance, marketing, sports, and more. And at the core of it all lies a powerful and beginner-friendly programming language — Python.
Whether you’re an aspiring data scientist, analyst, or tech enthusiast, learning Python for data science is one of the smartest career moves you can make in 2025.
In this guide, you’ll learn:
Why Python is the preferred language for data science
The libraries and tools you must master
A beginner-friendly roadmap
How to get started with a free full course on YouTube
Why Python is the #1 Language for Data Science
Python has earned its reputation as the go-to language for data science and here's why:
1. Easy to Learn, Easy to Use
Python’s syntax is clean, simple, and intuitive. You can focus on solving problems rather than struggling with the language itself.
2. Rich Ecosystem of Libraries
Python offers thousands of specialized libraries for data analysis, machine learning, and visualization.
3. Community and Resources
With a vibrant global community, you’ll never run out of tutorials, forums, or project ideas to help you grow.
4. Integration with Tools & Platforms
From Jupyter notebooks to cloud platforms like AWS and Google Colab, Python works seamlessly everywhere.
What You Can Do with Python in Data Science
Let’s look at real tasks you can perform using Python: TaskPython ToolsData cleaning & manipulationPandas, NumPyData visualizationMatplotlib, Seaborn, PlotlyMachine learningScikit-learn, XGBoostDeep learningTensorFlow, PyTorchStatistical analysisStatsmodels, SciPyBig data integrationPySpark, Dask
Python lets you go from raw data to actionable insight — all within a single ecosystem.
A Beginner's Roadmap to Learn Python for Data Science
If you're starting from scratch, follow this step-by-step learning path:
✅ Step 1: Learn Python Basics
Variables, data types, loops, conditionals
Functions, file handling, error handling
✅ Step 2: Explore NumPy
Arrays, broadcasting, numerical computations
✅ Step 3: Master Pandas
DataFrames, filtering, grouping, merging datasets
✅ Step 4: Visualize with Matplotlib & Seaborn
Create charts, plots, and visual dashboards
✅ Step 5: Intro to Machine Learning
Use Scikit-learn for classification, regression, clustering
✅ Step 6: Work on Real Projects
Apply your knowledge to real-world datasets (Kaggle, UCI, etc.)
Who Should Learn Python for Data Science?
Python is incredibly beginner-friendly and widely used, making it ideal for:
Students looking to future-proof their careers
Working professionals planning a transition to data
Analysts who want to automate and scale insights
Researchers working with data-driven models
Developers diving into AI, ML, or automation
How Long Does It Take to Learn?
You can grasp Python fundamentals in 2–3 weeks with consistent daily practice. To become proficient in data science using Python, expect to spend 3–6 months, depending on your pace and project experience.
The good news? You don’t need to do it alone.
🎓 Learn Python for Data Science – Full Free Course on YouTube
We’ve put together a FREE, beginner-friendly YouTube course that covers everything you need to start your data science journey using Python.
📘 What You’ll Learn:
Python programming basics
NumPy and Pandas for data handling
Matplotlib for visualization
Scikit-learn for machine learning
Real-life datasets and projects
Step-by-step explanations
📺 Watch the full course now → 👉 Python for Data Science Full Course
You’ll walk away with job-ready skills and project experience — at zero cost.
🧭 Final Thoughts
Python isn’t just a programming language — it’s your gateway to the future.
By learning Python for data science, you unlock opportunities across industries, roles, and technologies. The demand is high, the tools are ready, and the learning path is clearer than ever.
Don’t let analysis paralysis hold you back.
Click here to start learning now → https://youtu.be/6rYVt_2q_BM
#PythonForDataScience #LearnPython #FreeCourse #DataScience2025 #MachineLearning #NumPy #Pandas #DataAnalysis #AI #ScikitLearn #UpskillNow
1 note
·
View note
Text
Download Cricut Design Space Setup: A Beginner’s Guide
I have always wanted to make vinyl labels for my kitchen jars. Last Saturday, I finally unboxed my latest Cricut machine. The next essential step is downloading and installing Cricut Design Space. It allows you to design, customize, and send projects to your device.
Before we dive into the download Cricut Design Space setup, you must knowwhat Design Space is. Design Space is a free software platform developed by Cricut that is required to operate Cricut cutting machines (Explore, Maker, Joy series). It is compatible with desktops and smartphones and stores your projects in the cloud for easy access.
Check System Requirements for Cricut Design Space
Before downloading Design Space, ensure your device meets the minimum requirements listed by Cricut:
For Windows Users
For Mac Users
For iOS Devices
For Android Devices
Note: Design Space offline mode is available for desktop and iOS, but Android devices require a constant internet connection.
Steps to Download Cricut Design Space Setup
Design Space can be installed on Windows, macOS, Android, and iOS. Below is a step-by-step process for each device.
For Windows
Important: Make sure to save your designs manually; there’s no auto-save option.
For macOS
For iOS
For Android
Steps After Installing Cricut Design Space
If you’re done with the download Cricut Design Space setup process, the next step is to connect your machine to your device. There are two methods to do so; you can follow any of these:
Method 1: USB Connection (Windows/macOS)
Note: If you’re using USB with a newer Cricut and AMD Ryzen CPU, Design Space may prompt you to switch to Bluetooth due to known USB limitations. The workaround involves using Bluetooth or a powered USB hub (e.g., J5create 7‑port).
Method 2: Bluetooth Connection (All Devices)
Important: If pairing fails on Windows 11, switch Bluetooth settings to “Advanced Discovery.”
Quick Fixes for Cricut Design Space Startup Issues
If you’re unable to open Design Space, facing a blank white screen, or if Design Space is not loading on Windows. Then, you can try these quick fixes:
Remove Windows Compatibility Mode
If you see an Unsupported/ Incompatible OS warning:
Resolve White-Screen/Loading Issues
SSL & Network Issues
If you’re facing crashes or blank-screen issues:
Frequently Asked Questions
Can I use Cricut Design Space without the internet?
Yes, Design Space offers offline functionality. You can download projects, images, and fonts to your device for designing and cutting without an internet connection. When you reconnect to the internet, Design Space will sync any offline changes with your online account. While you can’t create new projects from scratch offline, you can still design and customize existing ones.
Note: While offline mode is available for desktops and iOS, Android devices require an internet connection.
Will my Cricut Design Space projects save if I switch devices?
Yes, your designs will be saved and accessible across different devices when using Design Space because it is a cloud-based platform. If you’re using a desktop, you can save your projects to the cloud only or to both the cloud and your computer.
If you’re on an iOS device, projects are saved as separate files but can be updated to the cloud after reconnecting to the internet and renaming the project.
Can I use one Cricut account on multiple devices?
Yes, you can use one Cricut account on multiple devices, including computers and mobile devices. Design Space allows you to access your designs and images from any device where you have logged into your account. It’s best to have one account and log into it on all devices to access the same designs and images.
Note: You can access the same account and projects on multiple devices, but you can’t use the same Cricut machine to cut with multiple devices at the same time.
Visit: cricut.com/setup www.cricut.com/setup login
Source: https://cricricutdesigncut.wordpress.com/2025/06/13/download-cricut-design-space-setup-a-beginners-guide/
#DownloadCricutDesignSpaceSetup#cricutcomsetup#cricutdesignspace#wwwcricutcomsetuplogin#cricutexploreair2setup#designcricutcomsetup#cricutdesignspacelogin#cricutsetup#cricutdesigns#cricutsoftware#cricutsetupforpc#cricutdesignspacesetup#designcricutcomdownload#cricutdesignspacedownload#cricutdesignspaceonline#cricutdesignspaceapp#cricutdesignspacedesktop#cricutaccountsubscription#cricutaccess#Cricutexploreair2setuppdf#cricutexploreair2download#howtousecricutexploreair2withphone#howtosetupcricutexploreair2oniphone#cricutexploreair2bluetooth#cricutcomsetupmac#cricutcomsetupforwindow#supportcricutcom#cricutnewmachinesetup#cricutaccountlogin#cricutsoftwareapp
0 notes
Text
Is Python Training Certification Worth It? A Complete Breakdown
Introduction: Why Python, Why Now?
In today's digital-first world, learning Python is more than a tech trend it's a smart investment in your career. Whether you're aiming for a job in data science, web development, automation, or even artificial intelligence, Python opens doors across industries. But beyond just learning Python, one big question remains: Is getting a Python certification truly worth it? Let’s break it all down for you.
This blog gives a complete and easy-to-understand look at what Python training certification involves, its real-world value, the skills you’ll gain, and how it can shape your future in the tech industry.

What Is a Python Certification Course?
A Python certification course is a structured training program that equips you with Python programming skills. Upon completion, you receive a certificate that validates your knowledge. These programs typically cover:
Core Python syntax
Data structures (lists, tuples, sets, dictionaries)
Functions and modules
Object-oriented programming
File handling
Exception handling
Real-world projects and coding tasks
Many certification programs also dive into specialized areas like data analysis, machine learning, and automation.
Why Choose Python Training Online?
Python training online offers flexibility, accessibility, and practical experience. You can learn at your own pace, access pre-recorded sessions, and often interact with instructors or peers through discussion boards or live sessions.
Key Benefits of Online Python Training:
Learn from anywhere at any time
Save time and commute costs
Access recorded lessons and code examples
Practice real-world problems in sandbox environments
Earn certificates that add credibility to your resume
What You’ll Learn in a Python Certification Course
A typical Python certification course builds a solid foundation while preparing you for real-world applications. Here’s a step-by-step breakdown of the topics generally covered:
1. Python Basics
Installing Python
Variables and data types
Input/output operations
Basic operators and expressions
2. Control Flow
Conditional statements (if, elif, else)
Loops (for, while)
Loop control (break, continue, pass)
3. Data Structures
Lists, Tuples, Sets, Dictionaries
Nested structures
Built-in methods
4. Functions
Defining and calling functions
Arguments and return values
Lambda and anonymous functions
5. Object-Oriented Programming (OOP)
Classes and objects
Inheritance and polymorphism
Encapsulation and abstraction
6. Modules and Packages
Creating and importing modules
Built-in modules
Using packages effectively
7. File Handling
Reading and writing text and binary files
File methods and context managers
8. Error and Exception Handling
Try-except blocks
Raising exceptions
Custom exceptions
9. Hands-On Projects
Calculator, contact manager, data scraper
Mini web applications or automation scripts
Each section ends with assessments or projects to apply what you’ve learned.
Real-World Value: Is It Worth It?
Yes. A Python training certification proves your ability to code, solve problems, and think logically using one of the most in-demand languages in the world.
Here’s how it adds value:
Resume Booster: Employers look for certifications to confirm your skills.
Interview Confidence: It helps you discuss concepts and projects fluently.
Skill Validation: Certification shows structured learning and consistent practice.
Career Mobility: Useful across fields like automation, finance, healthcare, education, and cloud computing.
Industry Demand for Python Skills:
Python is the #1 programming language according to multiple tech industry surveys.
Data shows that Python developers earn an average of $110,000/year in the U.S.
Job postings mentioning Python have grown by over 30% annually in tech job boards.
Who Should Take Python Training?
Python is beginner-friendly and ideal for:
Career switchers moving into tech
Recent graduates seeking to upskill
IT professionals expanding their language toolkit
Data analysts looking to automate reports
Web developers wanting to integrate back-end logic
QA testers or manual testers automating test cases
No prior coding background? No problem. The syntax and logic of Python are easy to learn, making it perfect for newcomers.
Top Online Python Courses: What Makes Them Stand Out?
A good online certification in Python includes:
Clear learning paths (Beginner to Advanced)
Project-based learning
Regular assignments and quizzes
Instructor-led sessions
Code-along demos
Interview prep support
You’ll also benefit from industry-expert guidance and hands-on practice that aligns with job roles like:
Python Developer
Automation Engineer
Data Analyst
Machine Learning Engineer
DevOps Support Engineer
How a Certified Python Skillset Helps in the Job Market
Certified Python professionals can confidently step into roles across multiple domains. Here are just a few examples:
Industry
Use of Python
Finance
Automating calculations, data modeling, trading bots
Healthcare
Analyzing patient records, diagnostics, imaging
E-commerce
Building web apps, handling user data, recommendations
Education
Online tutoring platforms, interactive content
Media & Gaming
Scripting, automation, content generation
Python certification helps you stand out and back your resume with verified skills.
Common Python Program Ideas to Practice
Practicing real-world Python program ideas will sharpen your skills. Some examples:
Web scraper: Pull news headlines automatically.
To-do list app: Store and edit tasks using files or databases.
Weather app: Use APIs to show forecasts.
Quiz app: Build a console-based quiz game.
Data visualizer: Create graphs with user input.
These ideas not only test your knowledge but also help you build a portfolio.
How Certification Enhances Your Career Growth
Getting a Python certification course helps in:
Job Placements: Certification shows employers you’re job-ready.
Career Transition: It bridges the gap between your current role and tech jobs.
Higher Salaries: Certified professionals often get better salary offers.
Freelance Opportunities: Certification builds trust for independent work.
Continued Learning: Prepares you for specialized tracks like AI, ML, or full-stack development.
Sample Python Code: A Glimpse into Real-World Logic
Here’s a simple example of file handling in Python:
python
def write_to_file(filename, data):
with open(filename, 'w') as file:
file.write(data)
def read_from_file(filename):
with open(filename, 'r') as file:
return file.read()
write_to_file('sample.txt', 'Learning Python is rewarding!')
print(read_from_file('sample.txt'))
This simple project covers file handling, function usage, and string operations key concepts in any Python training online course.
Things to Consider Before Choosing a Course
To make your online certification in Python truly worth it, ensure the course offers:
Well-structured syllabus
Projects that simulate real-world use
Active instructor feedback
Placement or job-readiness training
Lifetime access or resources
Test simulations or quizzes
Summary: Is It Worth the Time and Money?
In short, yes a Python certification is worth it.
Whether you're just starting out or looking to grow your tech skills, Python is a powerful tool that opens many doors. A certification not only helps you learn but also proves your commitment and ability to apply these skills in real scenarios.
Final Thoughts
Python is no longer optional, it’s essential. A Python certification course gives you structure, credibility, and a roadmap to professional success. It’s one of the smartest ways to future-proof your career in tech.
Start your learning journey with H2K Infosys today. Enroll now for hands-on Python training and expert-led certification support that prepares you for the real tech world.
#pythoncertification#pythononlinecoursecertification#pythoncertificationcourse#pythontraining#pythononlinetraining#pythonbasicstraining#pythontraininginstitute#pythontrainingcourse
0 notes