#JSONFiles
Explore tagged Tumblr posts
Visit Tumblr Blog
Explore Tumblr blogs with no restrictions, modern design and the best experience.
Last Seen Tumblr Blogs


Fun Fact
Tumblr’s reach among the 26-to-35-year-olds in the US is 11%.
Text
Data Driven testing using Postman JSON file

Supercharge your API testing with data-driven testing using Postman and JSON files. In this interactive session, we'll explore how to harness the flexibility of JSON files to drive dynamic test scenarios. Learn how to parameterize requests, iterate through data sets, and validate responses dynamically. Elevate your testing efficiency, coverage, and maintainability with data-driven testing in Postman.
#DataDrivenTesting#APITesting#Postman#JSONFiles#DynamicTesting#TestAutomation#TestingTechniques#APIAutomation#TestingEfficiency#SDETUnicorns
0 notes
Photo

he caught despair disease somehow. it made him like men
#yuri kagarin#hajime makunouchi#sdra2#sdra2 yuri#sdra2 hajime#danganronpa#despair disease#danganronpa another#super danganronpa another 2#despair!yuri#despair yuri#jsonfile
165 notes
·
View notes
Text
To the guy who felt the need to call me r*tarded because I kicked him from my squad for being off map: I'm glad you were set to offline so I couldn't apologize (before you decided to be exceptionally a dick)
#like yeah maybe i was overzealous kicking people not in my instance#but I've had people join map right at the end so they can skip the long shitty pre events#he could've fully explained before insulting me! he was even rude in his first whisper and i was still gonna apologize and let him back!#I'm not *that* bothered but still a little. jsonfile from gw2 fuck you
0 notes
Text
JSON and XML
Major Difference between Json and XML you think ?
#json#xml#xml sitemap#xmlfile#json ld#jsonfile#major#XML#difference#coding#coder#manifest.json#programming#programmer#code#developers & startups
1 note
·
View note
Photo
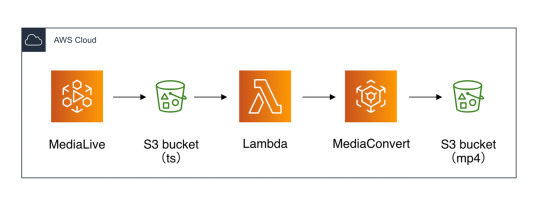
MediaLiveで出力したアーカイブファイルをMP4に自動変換する https://ift.tt/37Wi0Dh
はじめに
MediaLiveでライブ配信を行う際、アーカイブを残しておくことがあるかと思います。 2020年1月現在では、MediaLiveのアーカイブ出力はtsファイル形式のみ対応しています。
tsファイルはVLCなどの動画プレイヤーを使わないと再生することができないため、 利用しやすいmp4ファイルに変換する必要があるという機会に何度か遭遇しました。
そのときに構築した自動でmp4に変換する仕組みを簡単に記載しておきます。
ざっくり構成図
MediaLive -> S3 -> Lambda -> MediaConvert -> S3
MediaLive
Output Groupで「Archive」を選択します。
S3
tsファイルを置くフォルダと mp4ファイルを置くフォルダを用意します。
IAM
IAMロールを2つ作成します。
MediaConvert用 IAMロール
Policyはロール作成時に自動でアタッチされます。
AmazonS3FullAccess
AmazonAPIGatewayInvokeFullAccess
Lambda用 IAMロール
AWSデフォルトのPolicyを使用する場合はこのPolicyがあれば動作します。 (本番環境で構築する際は権限を絞りましょう)
AWSElementalMediaConvertFullAccess
MediaConvert
mp4に変換させるジョブテンプレートを作成します。 (参考までに、JSONを貼っておきます)
{ "Queue": "arn:aws:mediaconvert:ap-northeast-1:<account-id>:queues/<キューの名前>", "Name": "<ジョブテンプレートの名前>", "Settings": { "OutputGroups": [ { "Name": "File Group", "Outputs": [ { "ContainerSettings": { "Container": "MP4", "Mp4Settings": { "CslgAtom": "INCLUDE", "CttsVersion": 0, "FreeSpaceBox": "EXCLUDE", "MoovPlacement": "PROGRESSIVE_DOWNLOAD" } }, "VideoDescription": { "Width": 1280, "ScalingBehavior": "DEFAULT", "Height": 720, "TimecodeInsertion": "DISABLED", "AntiAlias": "ENABLED", "Sharpness": 50, "CodecSettings": { "Codec": "H_264", "H264Settings": { "InterlaceMode": "PROGRESSIVE", "NumberReferenceFrames": 3, "Syntax": "DEFAULT", "Softness": 0, "GopClosedCadence": 1, "GopSize": 90, "Slices": 1, "GopBReference": "DISABLED", "SlowPal": "DISABLED", "SpatialAdaptiveQuantization": "ENABLED", "TemporalAdaptiveQuantization": "ENABLED", "FlickerAdaptiveQuantization": "DISABLED", "EntropyEncoding": "CABAC", "Bitrate": 1000000, "FramerateControl": "INITIALIZE_FROM_SOURCE", "RateControlMode": "CBR", "CodecProfile": "MAIN", "Telecine": "NONE", "MinIInterval": 0, "AdaptiveQuantization": "HIGH", "CodecLevel": "AUTO", "FieldEncoding": "PAFF", "SceneChangeDetect": "ENABLED", "QualityTuningLevel": "SINGLE_PASS", "FramerateConversionAlgorithm": "DUPLICATE_DROP", "UnregisteredSeiTimecode": "DISABLED", "GopSizeUnits": "FRAMES", "ParControl": "INITIALIZE_FROM_SOURCE", "NumberBFramesBetweenReferenceFrames": 2, "RepeatPps": "DISABLED", "DynamicSubGop": "STATIC" } }, "AfdSignaling": "NONE", "DropFrameTimecode": "ENABLED", "RespondToAfd": "NONE", "ColorMetadata": "INSERT" }, "AudioDescriptions": [ { "AudioTypeControl": "FOLLOW_INPUT", "AudioSourceName": "Audio Selector 1", "CodecSettings": { "Codec": "AAC", "AacSettings": { "AudioDescriptionBroadcasterMix": "NORMAL", "Bitrate": 96000, "RateControlMode": "CBR", "CodecProfile": "LC", "CodingMode": "CODING_MODE_2_0", "RawFormat": "NONE", "SampleRate": 48000, "Specification": "MPEG4" } }, "LanguageCodeControl": "FOLLOW_INPUT" } ], "Extension": ".mp4" } ], "OutputGroupSettings": { "Type": "FILE_GROUP_SETTINGS", "FileGroupSettings": { "Destination": "s3://<任意のS3バケット>/" } } } ], "AdAvailOffset": 0, "Inputs": [ { "AudioSelectors": { "Audio Selector 1": { "Offset": 0, "DefaultSelection": "DEFAULT", "ProgramSelection": 1 } }, "VideoSelector": { "ColorSpace": "FOLLOW", "Rotate": "DEGREE_0", "AlphaBehavior": "DISCARD" }, "FilterEnable": "AUTO", "PsiControl": "USE_PSI", "FilterStrength": 0, "DeblockFilter": "DISABLED", "DenoiseFilter": "DISABLED", "TimecodeSource": "EMBEDDED" } ] }, "AccelerationSettings": { "Mode": "DISABLED" }, "StatusUpdateInterval": "SECONDS_60", "Priority": 0 }
Lambda
S3にtsファイルが作成されたら発火するLambda関数を作成します。
S3トリガー
イベントタイプ:ObjectCreated
サフィックス:.ts
プレフィックス:
関数
ランタイム:Python 3.8
lambda_function.py
from __future__ import print_function import json import urllib.parse import boto3 import os print('Loading function') mediaconvert = boto3.client('mediaconvert', region_name='ap-northeast-1', endpoint_url='https://xxxxxxxx.mediaconvert.ap-northeast-1.amazonaws.com') s3 = boto3.client('s3') def lambda_handler(event, context): # Get the object from the event and show its content type bucket = event['Records'][0]['s3']['bucket']['name'] key = urllib.parse.unquote_plus(event['Records'][0]['s3']['object']['key'], encoding='utf-8') inputFile = "s3://" + bucket + "/" + key outputKey = "s3://<任意のS3バケット>/" try: # Load job.json from disk and store as Python object: job_object with open("job.json", "r") as jsonfile: job_object = json.load(jsonfile) # Input/Output Setting job_object["Inputs"][0]["FileInput"] = inputFile job_object["OutputGroups"][0]["OutputGroupSettings"]["FileGroupSettings"]["Destination"] = outputKey # Exec MediaConvert's job response = mediaconvert.create_job( JobTemplate='arn:aws:mediaconvert:ap-northeast-1:<account-id>:jobTemplates/<ジョブテンプレートの名前>', Queue='arn:aws:mediaconvert:ap-northeast-1:<account-id>:queues/<キューの名前>', Role='arn:aws:iam::<account-id>:role/<ロールの名前>', Settings=job_object ) except Exception as e: print(e) raise e
job.json
{ "OutputGroups": [ { "Name": "File Group", "OutputGroupSettings": { "Type": "FILE_GROUP_SETTINGS", "FileGroupSettings": { "Destination": "" } } } ], "Inputs": [ { "FileInput": "" } ] }
元記事はこちら
「MediaLiveで出力したアーカイブファイルをMP4に自動変換する」
February 04, 2020 at 02:00PM
0 notes
Link
Every time we write code, we think if it works fine on local, it would work fine on production too. We do check on production as well but for limited users or non-real scenarios. A system may run very well with only 1,000 concurrent users, but how would it run with 100,000? It may or may not respond on time.
Are we doing anything to deal with this kind of situation?
Flipkart’s Biggest Sale or Biggest failure?
Everyone has heard of the “Big Billion Sale” by Flipkart on 6th October 2014. Products were priced as low as Re.1, and in some cases, discounted as high as 80%. BigBillionDay suffered from technical glitches despite Flipkart deploying an additional 1000 engineers.
“With a large number of people reaching out, Flipkart should have had a data center to handle peak traffic. This is just another instance of not having a strong back-end to hold on to enormous transactions,” said Sanchit Vir Gogia, Chief Analyst at Greyhound Research, a technology research firm.
Solution? – Performance Testing
Performance Testing is a type of testing to ensure software applications will perform well under their expected workload. It evaluates the quality or capability of a product.
There are lot many performance testing tools available in the market. Apache JMeter, IBM Performance tester, NeoLoad, LoadRunner, smartmeter.io, Test Studio, WebLoad and CloudTest to name a few.
In this blog, we are going to learn about a new Performance testing tool: Gatling.
Gatling
Gatling is an open-source load testing framework based on Scala, Akka, and Netty. It provides us:
High performance
Out-of-box HTTP support
Ready-to-present HTML reports
Scenario recorder and developer friendly DSL
Gatling is Powerful. Like how?
It uses advanced architecture and the Akka toolkit, which is based on the actor model that is distributed and fully asynchronous by design. Gatling doesn’t allocate a separate thread for each user. Instead, all multithreading is done via messages between actors which allow simulating a list of users by using just one thread.
Ok…talk is easy, show me the code!
In project/plugins.sbt, add:
addSbtPlugin("io.gatling" % "gatling-sbt" % "2.2.2")
You’ll also need to add these two dependencies:
"io.gatling.highcharts" % "gatling-charts-highcharts" % "2.3.0" % "test" "io.gatling" % "gatling-test-framework" % "2.3.0" % "test"
A basic Gatling simulation script looks like this:
class SingleScenarioSimulation extends Simulation { val httpConf: HttpProtocolBuilder = http .baseURL(PROJECT_BASE_URL) .acceptHeader("image/png,image/*;q=0.8,*/*;q=0.5") .acceptEncodingHeader("gzip, deflate") .acceptLanguageHeader("en-US,en;q=0.5") val registerRequest = """{"userName":"${username}","emailID":"${email}","password":"${password}"}""".stripM<span id="mce_SELREST_start" style="overflow:hidden;line-height:0;"></span>argin val requestFeeder = csv("data.csv").circular val scn: ScenarioBuilder = scenario("Register User") .feed(requestFeeder) .exec(http("Registration Request") .post("/user/registation") .body(StringBody(registerRequest)).asJSON .check(jsonPath("$.status").is("200")) ) setUp(scn.inject(atOnceUsers(5)).protocols(httpConf)).assertions( global.responseTime.max.lt(50), global.successfulRequests.percent.gt(95) ) }
So, basically, it consists three main parts: 1. Scenario: A scenario consists of a series of requests. Each scenario within a simulation can have its own injection profile.
2. Request: Gatling is able to simulate complex users’ behaviors. For this purpose, it generates the appropriate requests in the system under test.
3. Injection profile: An injection profile is the number of virtual users injected during the test in the system under test and how they are injected.
Simply, we are going to define our HTTP request by defining its basic URL and the headers information, if any. Then, the scenario will execute the actions we specify. Like, in this case, we are defining the Register route and passing the request parameters as JSON body. This scenario will check if the response is OK(200).
There are several types of Feeders available to inject data into your scenario. For example, csv, tsv, ssv, jsonFile, jsonUrl, jdbsFeeder, and redisFeeder. The most simple being the CSV Feeder: this is the one we are using in our test. Then, it is fed to the request made. You can create this file in the resources folder.
val requestFeeder = csv("data.csv").circular
Here, we also mention the feeder strategy, i.e. circular in this case. This strategy takes the values of the feeder in their order, and when it reaches the last, it returns to the first one. Other feeder strategies could be random, queue and shuffle.
Lastly, we set up the scenarios that will be launched in the Simulation.
setUp(scn.inject(atOnceUsers(5)).protocols(httpConf))
Here, Inject Profile controls how users are injected in your scenario. atOnceUsers injects a specific number of users at the same time. Here, we are saying inject 5 users at a time. Other Inject profiles could be nothingFor, rampUsers, constantUsersPerSec, rampUsersPerSec, splitUsers, and heavisideUsers.
Finally comes the assertions which check if your results match your expectations or not.
assertions( global.responseTime.max.lt(50), global.successfulRequests.percent.gt(95) )
There’s a whole list of assertions we can put. Here, we are checking if we are able to get response time to be maximum 5 milliseconds and successful request percentage to be 95% minimum.
So, after running this, we get:
Here, you can see the results with all the details. OK stands for the number of successful requests and KO is the number of failed requests.
Another real power of Gatling is detailed metrics dashboard out of the box. Below these results, link to the Gatling reports is given. Here, you can see the generated reports which include.
Active users over time
Response time distribution
Response time percentiles over time
Requests per second over time
Responses per second over time
So, that was a quick start to Gatling. I hope it helped you.
References:
https://gatling.io/documentation/
https://www.thoughtworks.com/insights/blog/gatling-take-your-performance-tests-next-level
https://dzone.com/articles/8-reasons-you-should-use-gatling-for-your-load-tes
0 notes
Video
instagram
Reworked Canvasdefinition into a jsonfile and added some #wiringpi button interactivity #spielmaschine #nodejs #odroid #pixelnode
0 notes
Photo

#nyan neko sugar girls#nyan~ neko sugar girls#koneko chan#raku chan#hitoshi san#nnsg#catgirl#neko#jsonfile
136 notes
·
View notes
Photo


sokka time
#atla sokka#atla zuko#prince zuko#sokka#zukka#sokka x zuko#atla#avatar the last airbender#avatar#jsonfile#points. hey
155 notes
·
View notes
Photo


angey cr for ur angey needs
#cookie run#cookie run ovenbreak#herb cookie#angel cookie#fairy cookie#cherry blossom cookie#squid ink cookie#cr#crob#jsonfile
134 notes
·
View notes
Photo

theyre taking a walk
452 notes
·
View notes
Photo


happy birthday hibiki and evil hibiki
116 notes
·
View notes
Photo


nezuko stuff... these are transparent btw!!!
#demon slayer#kny#nezuko#tanjirou kamado#tanjirou and nezuko#nezuko kamado#kimetsu no yaiba#jsonfile
102 notes
·
View notes
Photo

they. deserve. a. dog.
301 notes
·
View notes
Photo


gay rights
243 notes
·
View notes
Photo

sweet an cute, right?!
82 notes
·
View notes