#JupyterHub
Explore tagged Tumblr posts
Visit Tumblr Blog
Explore Tumblr blogs with no restrictions, modern design and the best experience.
Last Seen Tumblr Blogs


Fun Fact
Tumblr Inc. is funded by 13 investors.
Text
Filestore Powers Massive JupyterHub At UC Berkeley
Filestore powers one of the biggest JupyterHub deployments in US higher education at UC Berkeley.
What is JupyterHub?
JupyterHub, which makes Jupyter Notebooks more accessible to larger user groups, has emerged as a crucial platform for collaborative data science, enabling researchers, students, and developers to work together on challenging projects. The manner that data science education is delivered at scale has been completely transformed by its capacity to oversee numerous user contexts and grant access to shared resources.
However, these advantages are not without difficulties, as anyone who has worked on a large-scale JupyterHub implementation will attest. Managing file storage for a variety of users and computationally demanding operations soon becomes a major challenge as deployments scale. To guarantee seamless operations and effective workflows, storage solutions must be dependable, scalable, and performant.
UC Berkeley uses JupyterHub as a collaborative data science environment for students, teachers, faculty, staff, and researchers possibly the largest such deployment in American higher education. They employ Datahub, a highly customised Zero to JupyterHub implementation, which consists of more than 15 hubs serving 15,000 users across more than 35 departments and more than 100 courses. Naturally, punctuality and accessibility are critical as assignments and projects have due dates, and academic calendars control quizzes and examinations.
When UC Berkeley and Google initially began corresponding, UC Berkeley was very forthright about the difficulties of maintaining such a sizable and engaged user base, particularly given its limited resources. They experienced financial difficulties, similar to many other colleges, which made it challenging to staff a sizable IT team. Actually, a small team consisting of just two full-time employees was overseeing this enormous JupyterHub deployment, with the help of devoted volunteers and part-time workers.
It was soon evident that their current setup, which depended on user home directories that were self-managed and mounted on a self-managed NFS service that was hosted on Google Compute Engine, was not keeping up with the demands of the growing organisation. Their expanding user base required a more dependable and integrated experience, so they had to find a way to handle demand growth without sacrificing usability or speed.
Being a preeminent research university, they also had to strike a compromise between the demands of their constrained IT funds and the objectives of cross-departmental training. This is where the managed NFS storage solution Filestore from Google Cloud comes into play. Google hope that by revealing UC Berkeley’s path to Filestore, Google will be able to offer insightful analysis and useful advice to anyone facing comparable obstacles in their own pursuits.
What makes Filestore special?
The squad was operating in almost continual crisis mode when Shane joined it in October 2022. A surge of new Datahub customers in the middle of the semester taxed the capacity of the GKE architecture. Worse, the self-managed NFS service would frequently crash from overload.
By re-architecting the configuration to segregate particular course hubs and JupyterHub support infrastructure into their own node pools, the team was able to fix the GKE performance issues. For such users, this improved performance, but the underlying storage problems remained. One key point of failure had emerged: the self-managed NFS service. The team had installed a systemd timer that automatically restarted the NFS service every 15 minutes as a band-aid solution to keep things operating.
Although total disruptions were avoided, the self-managed infrastructure was still having difficulty keeping up. The user base continued to increase quickly, workloads were getting heavier, and the budget was just not able to keep up with the ongoing demand for additional servers and storage. They required a more economical and successful solution. At that point, they got in touch with the Filestore team and Google Cloud. The UC Berkeley team was persuaded that Filestore was the best option in less than an hour. Because the Filestore Basic HDD tier allowed them to customise instance size and was reasonably priced, they were especially intrigued in it.
It’s important to note that there are three Filestore tiers: Basic, Zonal, and Regional, and selecting between them isn’t always an easy choice before delving into UC Berkeley’s move. Although basic instances have limitations on capacity control (you cannot reduce capacity), they offer good performance. For workloads involving data science education that must be completed with minimal delay, zonal instances offer lightning-fast performance.
However, they are restricted to a particular zone within an area, as the name implies. In the event of an outage in that zone, the workloads may be affected. In contrast, Filestore Regional synchronously replicates data among three zones in a region to safeguard it in the event of a failure in one of the zones. The three of them trading places? Cost, flexibility in storage management, performance, and storage SLA. Selecting one of the three requires balancing performance with your level of patience for downtime. Budgetary constraints and capacity limitations will undoubtedly also be important factors in the choice.
Making the switch from Filestore to DIY NFS
Shane and his group were excited to test Filestore as soon as they had a firm grasp of it. They launched a demonstration deployment, establishing a connection between a Filestore instance and a smaller JupyterHub environment. Being the hands-on Technical Lead that he is, Shane jumped right in, pushing the system even further by running some bonnie++ benchmarks from within a single user server notebook pod.
Handling Filestore
Shane and his team at UC Berkeley have experienced a level of performance and stability they never would have imagined possible after switching to Filestore. They claim that Filestore is now a “deploy-and-forget” solution. Their users, those thousands of students who rely on Datahub, haven’t reported any performance concerns, and they haven’t had a single minute of outage.
Their management overhead has also been significantly decreased. They have a few basic Google Cloud alerts configured to interact with their current PagerDuty system and notify them in the event that any Filestore instance fills up to 90% of its capacity. These warnings are uncommon, though, and increasing storage when necessary is simple.
They have put into practice a straightforward yet efficient plan to further optimise their consumption and keep costs under control. They right-size their Filestore instances depending on usage trends after archiving user data to Cloud Storage at the conclusion of each semester. To make sure they are only paying for the storage they require, they either build smaller instances or combine hubs onto shared instances. For data migration between instances, Rsync continues to be their go-to partner. Although it takes time, this operation has become a standard component of their workflow.
In conclusion
The experience of UC Berkeley emphasises an important lesson for anyone implementing large-scale educational platforms as force multipliers for teaching: the complexity and volume of JupyterHub installations increase, and with them, so do the demands on the supporting infrastructure. Finding solutions that are both financially viable and technically sound is essential to success. Filestore proved to be that solution for Datahub, offering a potent combination of performance, reliability, and operational efficiencies and empowering the upcoming generation of data scientists, statisticians, computational biologists, astronomers, and innovators, despite the presence of some missing automation tools, a minor learning curve with Filestore Basic, and a higher price tag.
Read more on govindhtech.com
#FilestorePowers#MassiveJupyterHub#UCBerkeley#JupyterHub#GoogleCloud#gke#CloudStorage#DIYNFS#us#datahub#zerojupyter#deployments#technology#technews#news#govindhtech
0 notes
Text
Developing and Deploying AI/ML Applications on Red Hat OpenShift AI (AI268)
As AI and Machine Learning continue to reshape industries, the need for scalable, secure, and efficient platforms to build and deploy these workloads is more critical than ever. That’s where Red Hat OpenShift AI comes in—a powerful solution designed to operationalize AI/ML at scale across hybrid and multicloud environments.
With the AI268 course – Developing and Deploying AI/ML Applications on Red Hat OpenShift AI – developers, data scientists, and IT professionals can learn to build intelligent applications using enterprise-grade tools and MLOps practices on a container-based platform.
🌟 What is Red Hat OpenShift AI?
Red Hat OpenShift AI (formerly Red Hat OpenShift Data Science) is a comprehensive, Kubernetes-native platform tailored for developing, training, testing, and deploying machine learning models in a consistent and governed way. It provides tools like:
Jupyter Notebooks
TensorFlow, PyTorch, Scikit-learn
Apache Spark
KServe & OpenVINO for inference
Pipelines & GitOps for MLOps
The platform ensures seamless collaboration between data scientists, ML engineers, and developers—without the overhead of managing infrastructure.
📘 Course Overview: What You’ll Learn in AI268
AI268 focuses on equipping learners with hands-on skills in designing, developing, and deploying AI/ML workloads on Red Hat OpenShift AI. Here’s a quick snapshot of the course outcomes:
✅ 1. Explore OpenShift AI Components
Understand the ecosystem—JupyterHub, Pipelines, Model Serving, GPU support, and the OperatorHub.
✅ 2. Data Science Workspaces
Set up and manage development environments using Jupyter notebooks integrated with OpenShift’s security and scalability features.
✅ 3. Training and Managing Models
Use libraries like PyTorch or Scikit-learn to train models. Learn to leverage pipelines for versioning and reproducibility.
✅ 4. MLOps Integration
Implement CI/CD for ML using OpenShift Pipelines and GitOps to manage lifecycle workflows across environments.
✅ 5. Model Deployment and Inference
Serve models using tools like KServe, automate inference pipelines, and monitor performance in real-time.
🧠 Why Take This Course?
Whether you're a data scientist looking to deploy models into production or a developer aiming to integrate AI into your apps, AI268 bridges the gap between experimentation and scalable delivery. The course is ideal for:
Data Scientists exploring enterprise deployment techniques
DevOps/MLOps Engineers automating AI pipelines
Developers integrating ML models into cloud-native applications
Architects designing AI-first enterprise solutions
🎯 Final Thoughts
AI/ML is no longer confined to research labs—it’s at the core of digital transformation across sectors. With Red Hat OpenShift AI, you get an enterprise-ready MLOps platform that lets you go from notebook to production with confidence.
If you're looking to modernize your AI/ML strategy and unlock true operational value, AI268 is your launchpad.
👉 Ready to build and deploy smarter, faster, and at scale? Join the AI268 course and start your journey into Enterprise AI with Red Hat OpenShift.
For more details www.hawkstack.com
0 notes
Text
Getting Started with Kubeflow: Machine Learning on Kubernetes Made Easy
In today’s data-driven world, organizations are increasingly investing in scalable, reproducible, and automated machine learning (ML) workflows. But deploying ML models from research to production remains a complex, resource-intensive challenge. Enter Kubeflow, a powerful open-source platform designed to streamline machine learning operations (MLOps) on Kubernetes. Kubeflow abstracts much of the complexity involved in orchestrating ML workflows, bringing DevOps best practices to the ML lifecycle.
Whether you're a data scientist, ML engineer, or DevOps professional, this guide will help you understand Kubeflow’s architecture, key components, and how to get started.
What is Kubeflow?
Kubeflow is an end-to-end machine learning toolkit built on top of Kubernetes, the de facto container orchestration system. Originally developed by Google, Kubeflow was designed to support ML workflows that run on Kubernetes, making it easy to deploy scalable and portable ML pipelines.
At its core, Kubeflow offers a collection of interoperable components covering the full ML lifecycle:
Data exploration
Model training and tuning
Pipeline orchestration
Model serving
Monitoring and metadata tracking
By leveraging Kubernetes, Kubeflow ensures your ML workloads are portable, scalable, and cloud-agnostic.
Why Use Kubeflow?
Traditional ML workflows often involve disparate tools and manual handoffs, making them hard to scale, reproduce, or deploy. Kubeflow simplifies this by:
Standardizing ML workflows across teams
Automating pipeline execution and parameter tuning
Scaling training jobs dynamically on Kubernetes clusters
Monitoring model performance with integrated logging and metrics
Supporting hybrid and multi-cloud environments
Essentially, Kubeflow brings the principles of CI/CD and infrastructure-as-code into the ML domain—enabling robust MLOps.
Key Components of Kubeflow
Kubeflow’s modular architecture allows you to use only the components you need. Here are the most critical ones to know:
1. Kubeflow Pipelines
This is the heart of Kubeflow. It allows you to define, schedule, and monitor complex ML workflows as Directed Acyclic Graphs (DAGs). Pipelines support versioning, experiment tracking, and visualization of workflow runs.
2. Katib
An AutoML component that handles hyperparameter tuning using state-of-the-art algorithms like Bayesian optimization, grid search, and more. Katib can run large-scale tuning jobs across clusters.
3. KFServing (now KServe)
A robust model serving component for deploying trained models with support for REST/gRPC, autoscaling (including scale-to-zero), and multi-framework compatibility (TensorFlow, PyTorch, ONNX, XGBoost, etc.).
4. JupyterHub
Provides multi-user Jupyter notebooks directly within your Kubernetes environment. Great for data exploration, feature engineering, and prototyping.
5. ML Metadata (MLMD)
Tracks lineage and metadata about datasets, models, pipeline runs, and experiments, enabling reproducibility and governance.
Setting Up Kubeflow: A High-Level Walkthrough
Getting Kubeflow up and running can be daunting due to its complexity and the requirements of Kubernetes infrastructure. Here’s a high-level roadmap to guide your setup.
Step 1: Prepare Your Kubernetes Cluster
Kubeflow runs on Kubernetes, so you’ll need a Kubernetes cluster ready—either locally (via Minikube or KIND), on-premises, or in the cloud (GKE, EKS, AKS, etc.). Ensure you have:
Kubernetes ≥ v1.21
Sufficient CPU/memory resources
kubectl CLI configured
Step 2: Choose a Kubeflow Distribution
You can install Kubeflow using one of the following options:
Kubeflow Manifests: Official YAML manifests for production-grade installs
MiniKF: A local, single-node VM version ideal for development
Kfctl: Deprecated but still used in legacy environments
Kubeflow Operator: For declarative installs using CRDs
For most users, Kubeflow Manifests or MiniKF are the best starting points.
Step 3: Deploy Kubeflow
Assuming you’re using Kubeflow Manifests:
# Clone the manifests repo
git clone https://github.com/kubeflow/manifests.git
cd manifests
# Deploy using kustomize
while ! kustomize build example | kubectl apply -f -; do echo "Retrying to apply resources"; sleep 10; done
The installation process may take several minutes. Once complete, access the dashboard via a port-forward or ingress route.
The installation process may take several minutes. Once complete, access the dashboard via a port-forward or ingress route.
Step 4: Access the Kubeflow Central Dashboard
You can now access the Kubeflow UI, where you can create experiments, launch notebooks, manage pipelines, and deploy models—all from a unified interface.
Best Practices for Working with Kubeflow
To make the most of Kubeflow in production, consider the following:
Namespace Isolation: Use namespaces to separate teams and workflows securely.
Pipeline Versioning: Always version your pipeline components for reproducibility.
Storage Integration: Integrate with cloud-native or on-prem storage solutions (e.g., S3, GCS, NFS).
Security: Configure Role-Based Access Control (RBAC) and authentication using Istio and Dex.
Monitoring: Use Prometheus, Grafana, and ELK for observability and logging.
Common Challenges and How to Overcome Them
Kubeflow is powerful, but it comes with its share of complexity:
Challenge
Solution
Steep learning curve
Start with MiniKF or managed services like GCP Vertex AI Pipelines
Complex deployment
Use Helm charts or managed Kubernetes to abstract infra setup
RBAC and security
Leverage Kubeflow Profiles and Istio AuthPolicies for fine-grained control
Storage configuration
Use pre-integrated cloud-native storage classes or persistent volumes
Final Thoughts
Kubeflow brings enterprise-grade scalability, reproducibility, and automation to the machine learning lifecycle by marrying ML workflows with Kubernetes infrastructure. While it can be challenging to deploy and manage, the long-term benefits for production-grade MLOps are substantial.
For teams serious about operationalizing machine learning, Kubeflow is not just a tool—it’s a paradigm shift.
0 notes
Text
IMMIGRATION, MAMMOGRAMS, NIA
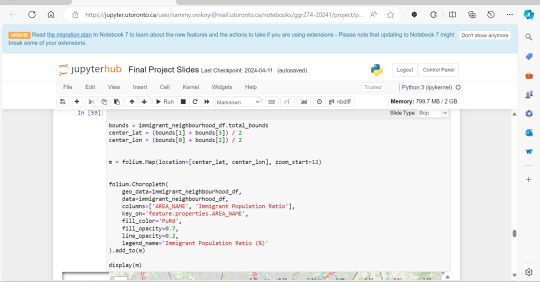

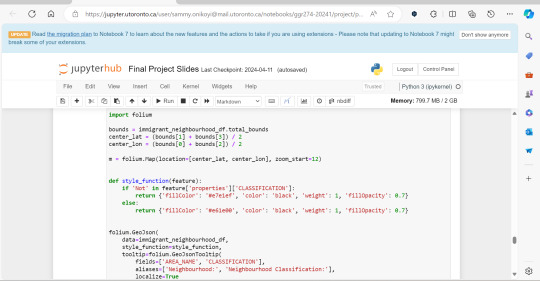
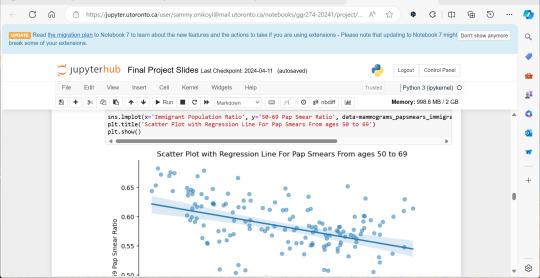
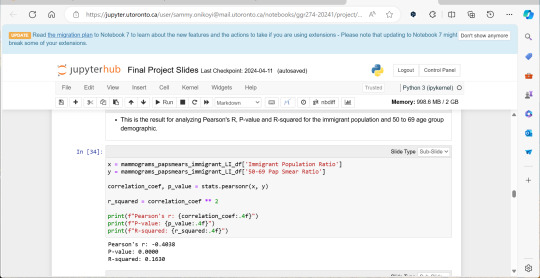


A significant amount of the courses I picked in second semester, were intentional, even if not immediately coherent, in providing me some type of exposure to the resources I know UX/UI designers and other careers use often. So in April, at the end of the semester I did a final Python based project in jupyterhub using Python to compute data, complete multiple regression analyses, make interactive maps of Toronto’s neighbourhoods with pop ups, and explore relationships between two separate statistics to see if there was a statistically significant relationship.
This research based Python project not only provided me with more confidence in coding moving forward, but also gave me a chance to see how even social sciences use coding languages in their work to help them efficiently sift for relationships that they could further investigate. Which is what I did! Combined with the results above I found papers in academic journals that also pointed to a relationship between lower sexual healthcare utilization (in this case mammograms and Pap smears) in neighbourhood improvement areas, in different age groups of women and in immigrant women to Canada. Which suggests to me that lower sexual healthcare utilization in immigrants women might be an overlooked concern that needs more support.
0 notes
Text
JupyterHub Interview Questions and Answers
JupyterHub Interview Questions and Answers: JupyterHub is a powerful tool that allows multiple users to access Jupyter notebooks on a shared server. As the popularity of JupyterHub continues to grow, so does the demand for professionals who are well-versed in its usage and administration. If you’re preparing for a JupyterHub interview, this guide will help you by providing a set of commonly asked…
View On WordPress
0 notes
Text
well... i can't login to jupyterhub and looking thru everybody else's work it seems. complicated.
i have an assignment due in like 10 hours. haven't started + if i sleep now i'm gonna be So Bad tomorrow so tired bc i stayed up too late also i have therapy at the due time so i really only have 9 hours
#girlieposting#im so cooked.#ykw its fine i have other ppls code i'll just do it on spyder and hope that i figure out how to transfer that to a working notebook#im so smart and cool (lying#scared)#i feel so bad man. this is meant to be a group project and i've fucked it so hard#tbf it's so simple we're all just doing the whole thing separately and mashing it together at the end#but still i feel bad man
1 note
·
View note
Text
Good stuff from yesterday!
1. Got the last of my grading done for the quarter! We obviously gave extensions to everyone on their final project, but grades were still due on the same date as always, so I had a one-day turnaround on a bunch of these 20-page final papers. Finished with a few hours to spare!
2. One student was really struggling in this class; we’d reached out to them on multiple occasions, and every time we tried to set up a time to meet, they’d agree and then not show up; they also hadn’t come to class (except for on quiz days) in several months. Unfortunately, one of the assignments in this senior-level class satisfies a requirement for graduation, and they didn’t do that particular assignment (even after we e-mailed them offering to extend the deadline on it by two months with no penalties). I mean, nobody sets out for no reason and goes “I’m going to sabotage my chances of graduating on time, just ‘cause it’ll be fun!”, so obviously there was a bigger problem here, and it was a big relief to realize there were contingencies for this: three different advisers reached out to chat with them and figure out how we can best help out with whatever’s going on and try to get them back on track to graduate. It was just reassuring to see that the question wasn’t “why is this student so bad at this?” and was instead “what’s gone wrong, how can we help, and how can we make sure this doesn’t happen to the next student going through a rough time?” Definitely an encouraging first experience teaching in this department.
3. Got a successful no-contact order delivered! It’s been tricky because my place is a little hard to find (it’s in a high-density housing area where these big fancy houses were rezoned to stick additional more-affordable housing in the backyards), and it’s hard to convey “you want to come down this alley and then walk up these tiny winding stairs to get to the “front” door, which is actually on the side of the building” in the little text box. But it worked! Big tip, of course. The shelter-in-place order feels a lot less isolating and overwhelming now that I have some groceries and a little comfort food in the fridge.
4. I volunteered a few months ago to participate in a pilot project for a new JupyterHub server hosted by the university, and I got the notification that everything’s up and running! I’m developing a new Python data analysis class for the department, which will run through the Spring quarter (so the first lecture is on Monday), and I was already pushing hard to make sure that this whole programming class should be doable from a student’s friggin’ phone if they didn’t have access to a powerful laptop or anything. That feels weirdly prescient now. Huh. Anyway, the upshot is that students will be able to write and test code, analyze large datasets, and create elaborate plots via nothing more complicated than a web browser. All the legwork’s happening on the cloud. Very, very proud of that.
5. A good friend is defending his PhD remotely in early April, and he realized that this means he can invite anyone and everyone! So excited I’ll get to watch and support him. <3
33 notes
·
View notes
Text
Washington D.C. Free Website Hosting | WordPress: Getting Started In HydroShare Webinar Slides - Internet of Water
Washington D.C. Free Website Hosting | WordPress Getting Started In HydroShare Webinar Slides - Internet of Water by Frabricio Ruiz on Tuesday 07 February 2023 03:31 AM UTC-05... free apps like CUAHSI JupyterHub and MATLAB online in conjunction with HydroShare. Categories: Presentations. Internet of Water Coalition logo ... Los Angeles Californa Los Angeles CA February 06, 2023 at 04:48PM Cambridge MA West Cambridge MA North Cambridge MA/ Baldwin Cambridge MA February 07, 2023 at 04:38AM Salisbury North CarolinaAlaska Portsmouth VirginiaAnaheim California Balch Springs TexasAnchorage Alaska https://cambridgecreditcounselingservice.blogspot.com/2023/02/washington-dc-free-website-hosting_7.html February 07, 2023 at 06:41AM https://silverspringmaryland20910.blogspot.com/2023/02/washington-dc-free-website-hosting_7.html
0 notes
Photo

PyDev of the Week: Sarah Gibson This week we welcome Sarah Gibson (@drsarahlgibson) as our PyDev of the Week! Sarah is a core developer for Binder, JupyterHub, and The Turing Way. You can see what else she is contributing to over on GitHub. Sarah also maintains a blog. Let's spend some time getting to know Sarah better! Can you tell us a little about yourself (hobbies, education, etc): Hello everyone! I’m Sarah Gibson and I’m an Open Source Infrastructure Engineer at the International Interactive Computing Collaboration (2i2c for short!). My background is in astrophysics, and I earned my PhD from the University of Leicester studying Gamma-Ray Bursts (GRBs) with NASA’s Neil Gehrels Swift Observatory. GRBs are incredibly powerful, cataclysmic explosions that happen either when a very large star explodes (goes supernova) and collapses into a black hole, or when two neutron stars (incredibly dense dead star remnants) merge into one another. Beyond the initial peak of Gamma-Rays https://fancyhints.com/pydev-of-the-week-sarah-gibson/?utm_source=tumblr&utm_medium=social&utm_campaign=ReviveOldPost
0 notes
Link
The Evolution of the Jupyter Notebook
Project Jupyter exists to develop open-source software, open standards, and services for interactive and reproducible computing.
Since 2011, the Jupyter Notebook has been our flagship project for creating reproducible computational narratives. The Jupyter Notebook enables users to create and share documents that combine live code with narrative text, mathematical equations, visualizations, interactive controls, and other rich output. It also provides building blocks for interactive computing with data: a file browser, terminals, and a text editor.
The Jupyter Notebook has become ubiquitous with the rapid growth of data science and machine learning and the rising popularity of open-source software in industry and academia:
Today there are millions of users of the Jupyter Notebook in many domains, from data science and machine learning to music and education. Our international community comes from almost every country on earth.¹ The Jupyter Notebook now supports over 100 programming languages, most of which have been developed by the community. There are over 1.7 million public Jupyter notebooks hosted on GitHub. Authors are publishing Jupyter notebooks in conjunction with scientific research, academic journals, data journalism, educational courses, and books. At the same time, the community has faced challenges in using various software workflows with the notebook alone, such as running code from text files interactively. The classic Jupyter Notebook, built on web technologies from 2011, is also difficult to customize and extend.
JupyterLab: Ready for Users
JupyterLab is an interactive development environment for working with notebooks, code and data. Most importantly, JupyterLab has full support for Jupyter notebooks. Additionally, JupyterLab enables you to use text editors, terminals, data file viewers, and other custom components side by side with notebooks in a tabbed work area.
JupyterLab enables you to arrange your work area with notebooks, text files, terminals, and notebook outputs. JupyterLab provides a high level of integration between notebooks, documents, and activities:
Drag-and-drop to reorder notebook cells and copy them between notebooks.
Run code blocks interactively from text files (.py, .R, .md, .tex, etc.).
Link a code console to a notebook kernel to explore code interactively without cluttering up the notebook with temporary scratch work.
Edit popular file formats with live preview, such as Markdown, JSON, CSV, Vega, VegaLite, and more.
JupyterLab has been over three years in the making, with over 11,000 commits and 2,000 releases of npm and Python packages. Over 100 contributors from the broader community have helped build JupyterLab in addition to our core JupyterLab developers.
To get started, see the JupyterLab documentation for installation instructions and a walk-through, or try JupyterLab with Binder. You can also set up JupyterHub to use JupyterLab.
Customize Your JupyterLab Experience
JupyterLab is built on top of an extension system that enables you to customize and enhance JupyterLab by installing additional extensions. In fact, the builtin functionality of JupyterLab itself (notebooks, terminals, file browser, menu system, etc.) is provided by a set of core extensions.
JupyterLab extensions enable you to work with diverse data formats such as GeoJSON, JSON and CSV.²
Among other things, extensions can:
Provide new themes, file editors and viewers, or renderers for rich outputs in notebooks;
Add menu items, keyboard shortcuts, or advanced settings options;
Provide an API for other extensions to use.
Community-developed extensions on GitHub are tagged with the jupyterlab-extension topic, and currently include file viewers (GeoJSON, FASTA, etc.), Google Drive integration, GitHub browsing, and ipywidgets support.
Develop JupyterLab Extensions
While many JupyterLab users will install additional JupyterLab extensions, some of you will want to develop your own. The extension development API is evolving during the beta release series and will stabilize in JupyterLab 1.0. To start developing a JupyterLab extension, see the JupyterLab Extension Developer Guide and the TypeScript or JavaScript extension templates.
JupyterLab itself is co-developed on top of PhosphorJS, a new Javascript library for building extensible, high-performance, desktop-style web applications. We use modern JavaScript technologies such as TypeScript, React, Lerna, Yarn, and webpack. Unit tests, documentation, consistent coding standards, and user experience research help us maintain a high-quality application.
JupyterLab 1.0 and Beyond
We plan to release JupyterLab 1.0 later in 2018. The beta releases leading up to 1.0 will focus on stabilizing the extension development API, user interface improvements, and additional core features. All releases in the beta series will be stable enough for daily usage.
JupyterLab 1.0 will eventually replace the classic Jupyter Notebook. Throughout this transition, the same notebook document format will be supported by both the classic Notebook and JupyterLab.
9 notes
·
View notes
Text
Multi-GPU Deep Learning with Azure Data Science Virtual Machines (DSVM)
Introduction
There are a ton of options out there for doing deep learning in the cloud and Azure is no stranger to this space.
From Floydhub, to Paperspace, AWS Sagemaker, Google Cloud, and probably more; there are so many options for cloud compute. In this article we’ll cover Azure’s DSVMs.
Here are some pros of Azure (that I’ve found), along with some other general thoughts.
PROS:
Price. The price on Azure is always nice. Enough said.
Customer support is great. If you have a ticket and label it severe, you get a call from a tech in <2 hours. That’s pretty awesome!
Azure has a lot of unique services. From Azure Databricks to ML Studio, getting your feet wet with Azure is not a bad thing.
NEUTRAL COMMENTS:
Do we need to learn every platform on the planet? Probably not. You could probably just learn 1 and stick with it. But sometimes I run into issues on 1 cloud platform, and it’s nice to be flexible.
Azure doesn’t appear to have training options with auto-shutdown similar to Sagemaker. AWS might have the market on this one (to my knowledge). To run training jobs on Sagemaker with auto-shutdown requires additional coding, so I actually don’t prefer this option myself, so I list this as neutral.
Working with storage on Azure is a bit of a head scratcher to me. I’m not an expert here, so I have this as neutral because I have seen some stuff where Azure can tap into AWS? Working with Azure Blob storage feels very different to me and less intuitive, but that’s my subjective opinion. There is always a workaround, which is to load your data directly to the DSVM (which is what I tend to do).
Okay, let’s get on with the show!
Step #1: Create an Account
First thing we need to do is create an account. This should be self explanatory. Just click any of the buttons related to signing up and follow the prompts. I personally choose the Pay-As-You-Go option (pick whatever you want). Once you’re done you can access your Azure Portal.
Step #2: Create a DSVM Instance
At this point you should be able to access the Azure portal.

Search for “Data Science Virtual Machine” and click the “Data Science Virtual Machine - Ubuntu 18.04″ link under “Marketplace”. This is important. You need this particular Virtual Machine type!

Now simply click the blue “Create” button.

This should take us to the “Create a virtual machine” form where we can start to enter the specifications of our virtual machine (VM).
Subscription = whatever your subscription is.
Resource group = Create a new one by clicking “Create new” or just select one if you already have one.
Virtual machine name = give the machine a name.
Region = make sure to select the region closest to your physical location.
Availability options = you can leave this alone if you want.
Image = select your operating system. For accessing Jupyter from an IP address, then Linux is the OS you want. In this demo I’ll use the Linux option.

Now this is where things get more interesting...
Azure Spot instance = I selected “Yes” because I value a cheaper price over reliability
Size = This one is the most important. NC instances include GPUs. If you’re doing deep learning, you want a NC instance. To change the size to an NC instance, select “Change size” and search for “NC” (note that you might need to remove some of the filters.
Authentication type = you can select “SSH public key” or “Password”. For SSH you can click “Learn more ... “ to figure out how to make it work. For Windows you can use PuTTYGen go generate what you need. I think “Password” is easier (just write down your information somewhere so you don’t forget).

If really want to up your security, you can revise the last section, otherwise you can ignore the last section and click “Review + create”.

Step #3: Launch your DSVM
(or request quota increase and redo the prior steps)
Finally, you can review your selections, and if everything looks good, you can click “Create”.
--WARNING!--
Note: It’s possible that you might need an quota increase (i.e. request access to particular instances), in which case the following article will show you how to request a quota increase using “Help + support” (Azure has nice documentation on this so I’m not going to reinvent the wheel here). https://docs.microsoft.com/en-us/azure/azure-portal/supportability/per-vm-quota-requests
Once you click “Create” your deployment should kick off, and once it’s completed you should see the following screen, at which point you can click “Go to resource” (I’ve redacted information from my screen for obvious reasons).

Step #4: Launch Jupyter
This will take you to the main page of your DSVM instance. Note your “Public IP address”. We’re going to use this to access JupyterHub on our DSVM.
From your browser, type the following, (and fill in <your-public-ip-address> with your “Public IP address”).
https:// <your-public-ip-address>:8000
Having issues on this part? Here are some tips:
Note that the “https://” part is very important, you need this.
If you hit warnings, just bypass them by clicking Advanced > proceed, or any links that allow you to continue forward (even the Azure people recommend this - https://docs.microsoft.com/en-us/azure/machine-learning/data-science-virtual-machine/dsvm-ubuntu-intro)
Timeout issues?
Try just waiting a few minutes, sometime Azure will auto-correct any issues it notices and this takes a minute.
Try restarting the VM.
Use PuTTY to SSH into your machine using your IP address, username and password. From SSH, try running “jupyter notebook”. If this is not recognized, it probably means you didn’t select a DSVM from the marketplace, and instead you just launched a normal VM which doesn’t come with pre-installed data science tools. I would walk through these instructions again.
Still having issues?
Try a different browser.
If all of this still doesn’t work, submit a ticket to Azure in the same way you requested a quota increase, i.e. using “Help + support”.
You’ll be prompted for a username and password, and you can use the same one you created when you created the DSVM.
Step #5: Working with Data
Once you’re in Jupyter, the next logical thing you might want to do is work with data. How do we do this?
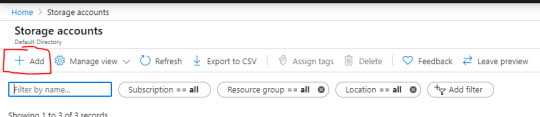
First, we probably want to store some data on Azure. There are many options, but I’ll be using Blob storage because it’s easy and fits many needs.
Go back to the Search feature and type in “Storage” and Select “Storage accounts”.

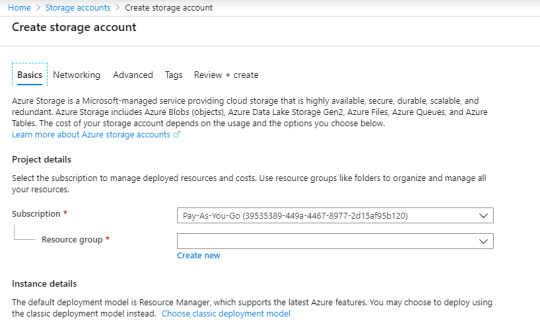
Select “Add”.
This will bring you to a form to fill out. When you’re done, you can select “Review + create” and complete any other prompts.
Once you’re done, you should have a new storage account. On the homepage of your new storage account, you should see a section\link for “Containers”. Click this.
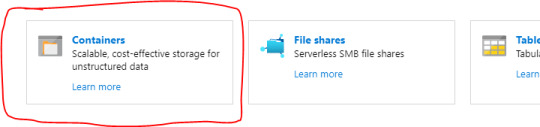
From here you can add a new container by clicking “+ Container”.

Now you can click “Upload” to upload any data that you want.

Now the next logical question is, how do we tap into this data from Jupyter? It’s actually very easy (as long as you’re not so worried about security).
Once you’ve uploaded some data, click the file. This should bring up a new panel showing information related to the file, along with a URL.
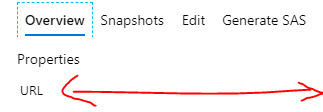
You can simply use this URL in your Python code! How awesome is that!
For example, you could read as CSV via pandas as follows:
df = pd.read_csv(https://<storage-account-name>.blob.core.windows.net/<container-name>/<data-file-name>)
Pretty great right!
If you want to read in a file line by line, I found the following StackOverflow link very helpful: https://stackoverflow.com/questions/1393324/in-python-given-a-url-to-a-text-file-what-is-the-simplest-way-to-read-the-cont
Now you should have everything you need to start doing some data science and deep learning on Azure!
Step #6: Run some Deep Learning!
If you want to check out something that I personally ran on Azure, you can check out my following GitHub repository.
https://github.com/yeamusic21/Jigsaw-Multilingual-Custom-LSTM-Horovod-Hyperopt-on-Azure
In this repository I used Hyperopt to do hyperparameter search on a custom LSTM and I leveraged Horovod for multi-GPU processing; and then I used Azure to run this on a multi-GPU machine!
The End! :-D
That’s all there is!
Hope you found this helpful! :-D
0 notes
Text
Good stuff for today!
1. Gave my first radar lecture today, which I think went over quite well! It feels very Star Trek to use phrases like “pulse modulator” and “stable local oscillator”, but I took the time to explain their meaning as intuitively as possible, and the students were following along okay! This is a really weird class in that it’s basically a series of two-week flyovers of much broader subjects, and it is a struggle to use someone else’s lecture notes, but I think there will be some fun material here that students can really dig into and apply.
2. Had a great onboarding meeting with a couple IT folks on campus who’ve decided to test-run a dedicated JupyterHub server for a handful of classes on campus in the spring. I reached out to them since I’m, you know, developing a brand-new Python class that will be offered yearly (helloooo longitudinal study of the new infrastructure’s effectiveness), and they were so friendly and enthusiastic about giving me the resources to succeed in return for my feedback. Additional little feather in my cap: other profs in the department are intrigued by this project and I’ll be able to help them get on board once we’re out of beta!
3. Dinner was a nice poke bowl with so much good stuff. SO MUCH GOOD STUFF. The kitties were going nuts over the fish smells, though, so I felt guilty enough that they got some extra fancy tuna treats as a reward for not hounding me too badly.
4. One of the folks who visited my office today was so excited by the goofy science toys (currently a circular Galileo thermometer and a solar-powered spinning globe) I keep on my little table! I really need to get back on track with decorating my office; when I first got here I very frugally decked it out with free furniture scavenged from the department’s spare storage (the table and chairs are bare-bones, but I somehow scored a convertible sitting-standing desk and a ridiculously over-the-top ergonomic chair) so I can probably justify buying things like posters and maybe a lil art and whatnot. I should also start bringing in my textbooks one boxload at a time!
5. I’m getting into the habit of quietly closing my door over the lunch hour and just relaxing, chowing down on my packed lunch, and either working on something light or watching a video. It’s nice to remember I have my own space, and while it’s sometimes tough to be on the opposite end of the building from most of the faculty (the only other prof in my corner is on a three-month field campaign right now), it does have the advantage that it’s pretty easy to score some time to myself, even in a very open-door department!
43 notes
·
View notes
Text

#ICYDK: Proxy Quantum Clouds and the JupyterHub https://bit.ly/2S8napX
0 notes
Text
matlab → python
I've pretty much completed the transition from matlab to python. I've used matlab for analysis since about 1990 as a grad student, only breaking from it during the dark years of the 90s when it was not supported on the Mac. But its maturity and ubuiquitous tools make python hard to beat.
I've set up a jupyterhub for my group, so that we all share the same packages and don't have to worry about maintaining multiple installs. And we have a workflow that involves publishing jupyter notebooks to evernote that makes documentation very simple.
In the next few weeks I'll post a few details about these workflows...
1 note
·
View note
Text
Announcing JupyterHub 1.0
https://blog.jupyter.org/announcing-jupyterhub-1-0-8fff78acad7f Comments
0 notes
Photo

"[P] All-in-one development container: "AI Lab""- Detail: Hey everyone, just wanted to share a side project that I've been working on while doing an internship. It's an all-in-one dev environment packaged as a Docker container that works for almost all usage scenarios in doing data science, machine learning or deep learning development (hence the generic name "AI Lab"...)The backstory (skip if you hate stories)So, I've been frustrated with setting up environments between various workstations/servers/cloud instances (for both myself and new collaborators). Even things like conda environments are annoying since they can take forever to install (after you figure out the right configuration), so the setup time really adds up. The other way is to use Docker containers but containers like those from NGC are a little bit too traditional/limiting in that they don't bundle things like Jupyter which I use pretty heavily. I also find the pre-installed packages lacking and building on top of those aren't easy.We also have a Kubernetes setup running JupyterHub and containers need to have some additions to play nicely with that, but its shocking convenient once everything is set up properly.End backstorySo my goal here is to be able to launch my dev environment with one command, anywhere! Here's what the workflow looks like now starting from a "blank" workstation or instance:Install drivers/CUDA/Docker with script (using another side project... haha)curl http://bit.ly/2D1mgEj | sudo bash (yes curl | sudo bash is bad but it's really thrilling)docker pull nvaitc/ai-lab:latestnvidia-docker run --rm -p 8888:8888 -v /home/USER:/home/jovyan nvaitc/ai-labWith those three steps, a fully-configured Jupyter Notebook/Lab pops up and becomes fully available for use with frameworks including TensorFlow/PyTorch/MXNet/RAPIDS etc. Of course, you can use it interactively without Jupyter and also launch it from within JupyterHub.This makes it really easy to just get started in a new environment anywhere (with an Internet connection)I'm just sharing this because it has been super useful to me and some members of my team so I'm trying to package this nicely and share it with others! I'm also soliciting feedback and comments so do let me know what you think about this!For more information and to open issues, please check out nvaitc/ai-lab on GitHub and feel free to open issues or pull requests. Some more detailed instructions on usage are also available here.Have a nice weekend ahead everyone! :). Caption by tlkh. Posted By: www.eurekaking.com
0 notes