#L2 Regularization
Explore tagged Tumblr posts
Visit Tumblr Blog
Explore Tumblr blogs with no restrictions, modern design and the best experience.
Last Seen Tumblr Blogs


Fun Fact
There were a total of 171.5 billion posts on Tumblr in 2019.
Text
An Introduction to Regularization in Machine Learning
Summary: Regularization in Machine Learning prevents overfitting by adding penalties to model complexity. Key techniques, such as L1, L2, and Elastic Net Regularization, help balance model accuracy and generalization, improving overall performance.

Introduction
Regularization in Machine Learning is a vital technique used to enhance model performance by preventing overfitting. It achieves this by adding a penalty to the model's complexity, ensuring it generalizes better to new, unseen data.
This article explores the concept of regularization, its importance in balancing model accuracy and complexity, and various techniques employed to achieve optimal results. We aim to provide a comprehensive understanding of regularization methods, their applications, and how to implement them effectively in machine learning projects.
What is Regularization?
Regularization is a technique used in machine learning to prevent a model from overfitting to the training data. By adding a penalty for large coefficients in the model, regularization discourages complexity and promotes simpler models.
This helps the model generalize better to unseen data. Regularization methods achieve this by modifying the loss function, which measures the error of the model’s predictions.
How Regularization Helps in Model Training
In machine learning, a model's goal is to accurately predict outcomes on new, unseen data. However, a model trained with too much complexity might perform exceptionally well on the training set but poorly on new data.
Regularization addresses this by introducing a penalty for excessive complexity, thus constraining the model's parameters. This penalty helps to balance the trade-off between fitting the training data and maintaining the model's ability to generalize.
Key Concepts
Understanding regularization requires grasping the concepts of overfitting and underfitting.
Overfitting occurs when a model learns the noise in the training data rather than the actual pattern. This results in high accuracy on the training set but poor performance on new data. Regularization helps to mitigate overfitting by penalizing large weights and promoting simpler models that are less likely to capture noise.
Underfitting happens when a model is too simple to capture the underlying trend in the data. This results in poor performance on both the training and test datasets. While regularization aims to prevent overfitting, it must be carefully tuned to avoid underfitting. The key is to find the right balance where the model is complex enough to learn the data's patterns but simple enough to generalize well.
Types of Regularization Techniques

Regularization techniques are crucial in machine learning for improving model performance by preventing overfitting. They achieve this by introducing additional constraints or penalties to the model, which help balance complexity and accuracy.
The primary types of regularization techniques include L1 Regularization, L2 Regularization, and Elastic Net Regularization. Each has distinct properties and applications, which can be leveraged based on the specific needs of the model and dataset.
L1 Regularization (Lasso)
L1 Regularization, also known as Lasso (Least Absolute Shrinkage and Selection Operator), adds a penalty equivalent to the absolute value of the coefficients. Mathematically, it modifies the cost function by adding a term proportional to the sum of the absolute values of the coefficients. This is expressed as:

where λ is the regularization parameter that controls the strength of the penalty.
The key advantage of L1 Regularization is its ability to perform feature selection. By shrinking some coefficients to zero, it effectively eliminates less important features from the model. This results in a simpler, more interpretable model.
However, it can be less effective when the dataset contains highly correlated features, as it tends to arbitrarily select one feature from a group of correlated features.
L2 Regularization (Ridge)
L2 Regularization, also known as Ridge Regression, adds a penalty equivalent to the square of the coefficients. It modifies the cost function by including a term proportional to the sum of the squared values of the coefficients. This is represented as:

L2 Regularization helps to prevent overfitting by shrinking the coefficients of the features, but unlike L1, it does not eliminate features entirely. Instead, it reduces the impact of less important features by distributing the penalty across all coefficients.
This technique is particularly useful when dealing with multicollinearity, where features are highly correlated. Ridge Regression tends to perform better when the model has many small, non-zero coefficients.
Elastic Net Regularization
Elastic Net Regularization combines both L1 and L2 penalties, incorporating the strengths of both techniques. The cost function for Elastic Net is given by:

where λ1 and λ2 are the regularization parameters for L1 and L2 penalties, respectively.
Elastic Net is advantageous when dealing with datasets that have a large number of features, some of which may be highly correlated. It provides a balance between feature selection and coefficient shrinkage, making it effective in scenarios where both regularization types are beneficial.
By tuning the parameters λ1 and λ2, one can adjust the degree of sparsity and shrinkage applied to the model.
Choosing the Right Regularization Technique
Selecting the appropriate regularization technique is crucial for optimizing your machine learning model. The choice largely depends on the characteristics of your dataset and the complexity of your model.
Factors to Consider
Dataset Size: If your dataset is small, L1 regularization (Lasso) can be beneficial as it tends to produce sparse models by zeroing out less important features. This helps in reducing overfitting. For larger datasets, L2 regularization (Ridge) may be more suitable, as it smoothly shrinks all coefficients, helping to control overfitting without eliminating features entirely.
Model Complexity: Complex models with many features or parameters might benefit from L2 regularization, which can handle high-dimensional data more effectively. On the other hand, simpler models or those with fewer features might see better performance with L1 regularization, which can help in feature selection.
Tuning Regularization Parameters
Adjusting regularization parameters involves selecting the right value for the regularization strength (λ). Start by using cross-validation to test different λ values and observe their impact on model performance. A higher λ value increases regularization strength, leading to more significant shrinkage of the coefficients, while a lower λ value reduces the regularization effect.
Balancing these parameters ensures that your model generalizes well to new, unseen data without being overly complex or too simple.
Benefits of Regularization
Regularization plays a crucial role in machine learning by optimizing model performance and ensuring robustness. By incorporating regularization techniques, you can achieve several key benefits that significantly enhance your models.
Improved Model Generalization: Regularization techniques help your model generalize better by adding a penalty for complexity. This encourages the model to focus on the most important features, leading to more robust predictions on new, unseen data.
Enhanced Model Performance on Unseen Data: Regularization reduces overfitting by preventing the model from becoming too tailored to the training data. This leads to improved performance on validation and test datasets, as the model learns to generalize from the underlying patterns rather than memorizing specific examples.
Reduced Risk of Overfitting: Regularization methods like L1 and L2 introduce constraints that limit the magnitude of model parameters. This effectively curbs the model's tendency to fit noise in the training data, reducing the risk of overfitting and creating a more reliable model.
Incorporating regularization into your machine learning workflow ensures that your models remain effective and efficient across different scenarios.
Challenges and Considerations
While regularization is crucial for improving model generalization, it comes with its own set of challenges and considerations. Balancing regularization effectively requires careful attention to avoid potential downsides and ensure optimal model performance.
Potential Downsides of Regularization:
Underfitting Risk: Excessive regularization can lead to underfitting, where the model becomes too simplistic and fails to capture important patterns in the data. This reduces the model’s accuracy and predictive power.
Increased Complexity: Implementing regularization techniques can add complexity to the model tuning process. Selecting the right type and amount of regularization requires additional experimentation and validation.
Balancing Regularization with Model Accuracy:
Regularization Parameter Tuning: Finding the right balance between regularization strength and model accuracy involves tuning hyperparameters. This requires a systematic approach to adjust parameters and evaluate model performance.
Cross-Validation: Employ cross-validation techniques to test different regularization settings and identify the optimal balance that maintains accuracy while preventing overfitting.
Careful consideration and fine-tuning of regularization parameters are essential to harness its benefits without compromising model accuracy.
Frequently Asked Questions
What is Regularization in Machine Learning?
Regularization in Machine Learning is a technique used to prevent overfitting by adding a penalty to the model's complexity. This penalty discourages large coefficients, promoting simpler, more generalizable models.
How does Regularization improve model performance?
Regularization enhances model performance by preventing overfitting. It does this by adding penalties for complex models, which helps in achieving better generalization on unseen data and reduces the risk of memorizing training data.
What are the main types of Regularization techniques?
The main types of Regularization techniques are L1 Regularization (Lasso), L2 Regularization (Ridge), and Elastic Net Regularization. Each technique applies different penalties to model coefficients to prevent overfitting and improve generalization.
Conclusion
Regularization in Machine Learning is essential for creating models that generalize well to new data. By adding penalties to model complexity, techniques like L1, L2, and Elastic Net Regularization balance accuracy with simplicity. Properly tuning these methods helps avoid overfitting, ensuring robust and effective models.
#Regularization in Machine Learning#Regularization#L1 Regularization#L2 Regularization#Elastic Net Regularization#Regularization Techniques#machine learning#overfitting#underfitting#lasso regression
0 notes
Text
Understanding Regularization in Machine Learning: Ridge, Lasso, and Elastic Net
Struggling with overfitting in your machine learning models? Have a look at this complete guide on Ridge, Lasso, and Elastic Net regularization. Learn these regularization techniques to improve accuracy and simplify your models for better performance.
A machine learning model learns over the data it is trained and should be able to generalize well over it. When a new data sample is introduced, the model should be able to yield satisfactory results. In practice, a model sometimes performs too well on the training set, however, it fails to perform well on the validation set. This model is then said to be overfitting. Contrarily, if the model…
0 notes
Text
Black Scientists and Engineers Past and Present Enable NASA Space Telescope
The Nancy Grace Roman Space Telescope is NASA’s next flagship astrophysics mission, set to launch by May 2027. We’re currently integrating parts of the spacecraft in the NASA Goddard Space Flight Center clean room.
Once Roman launches, it will allow astronomers to observe the universe like never before. In celebration of Black History Month, let’s get to know some Black scientists and engineers, past and present, whose contributions will allow Roman to make history.

Dr. Beth Brown
The late Dr. Beth Brown worked at NASA Goddard as an astrophysicist. in 1998, Dr. Brown became the first Black American woman to earn a Ph.D. in astronomy at the University of Michigan. While at Goddard, Dr. Brown used data from two NASA X-ray missions – ROSAT (the ROentgen SATellite) and the Chandra X-ray Observatory – to study elliptical galaxies that she believed contained supermassive black holes.
With Roman’s wide field of view and fast survey speeds, astronomers will be able to expand the search for black holes that wander the galaxy without anything nearby to clue us into their presence.
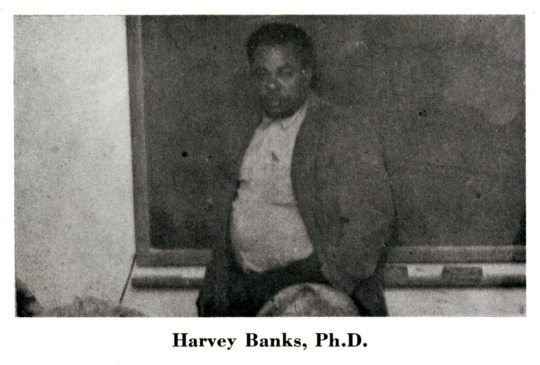
Dr. Harvey Washington Banks
In 1961, Dr. Harvey Washington Banks was the first Black American to graduate with a doctorate in astronomy. His research was on spectroscopy, the study of how light and matter interact, and his research helped advance our knowledge of the field. Roman will use spectroscopy to explore how dark energy is speeding up the universe's expansion.
NOTE - Sensitive technical details have been digitally obscured in this photograph.
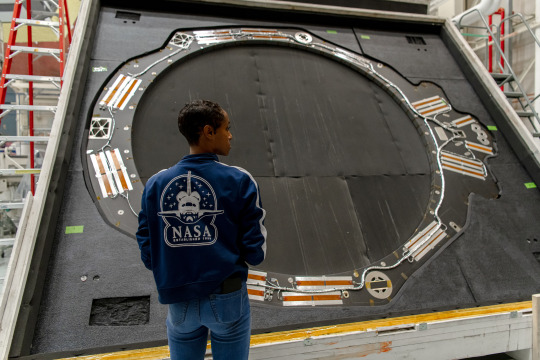
Sheri Thorn
Aerospace engineer Sheri Thorn is ensuring Roman’s primary mirror will be protected from the Sun so we can capture the best images of deep space. Thorn works on the Deployable Aperture Cover, a large, soft shade known as a space blanket. It will be mounted to the top of the telescope in the stowed position and then deployed after launch. Thorn helped in the design phase and is now working on building the flight hardware before it goes to environmental testing and is integrated to the spacecraft.

Sanetra Bailey
Roman will be orbiting a million miles away at the second Lagrange point, or L2. Staying updated on the telescope's status and health will be an integral part of keeping the mission running. Electronics engineer Sanetra Bailey is the person who is making sure that will happen. Bailey works on circuits that will act like the brains of the spacecraft, telling it how and where to move and relaying information about its status back down to Earth.
Learn more about Sanetra Bailey and her journey to NASA.

Dr. Gregory Mosby
Roman’s field of view will be at least 100 times larger than the Hubble Space Telescope's, even though the primary mirrors are the same size. What gives Roman the larger field of view are its 18 detectors. Dr. Gregory Mosby is one of the detector scientists on the Roman mission who helped select the flight detectors that will be our “eyes” to the universe.
Dr. Beth Brown, Dr. Harvey Washington Banks, Sheri Thorn, Sanetra Bailey, and Dr. Greg Mosby are just some of the many Black scientists and engineers in astrophysics who have and continue to pave the way for others in the field. The Roman Space Telescope team promises to continue to highlight those who came before us and those who are here now to truly appreciate the amazing science to come.

To stay up to date on the mission, check out our website and follow Roman on X and Facebook.
Make sure to follow us on Tumblr for your regular dose of space!
#NASA#astronomy#telescope#Roman Space Telescope#galaxies#black holes#space tech#astrophysics#spectroscopy#STEM#engineering#Black History Month#BlackExcellence365#science#tech#technology
2K notes
·
View notes
Note

I would love to hear this
Oh sure! Fair warning, this gets long, so it's under a cut:
So I have looked carefully at Maul post-bisection, specifically at where his abdomen ends and his prosthesis begins, and I believe that he was bisected between the L3 and L5 vertebrae, or just above his pelvic bone. Here is a diagram I drew on of where he was cut:


Image Description: The first image is a screenshot of Maul with his prosthetic legs from TCW. The screenshot is annotated to note where exactly Maul is divided between flesh and prosthesis. The second image is two diagrams side-by-side, one of the human body focusing on organs, and the other of the spine. Both have a line drawn around where the belly button is to note where Maul was bisected. End ID.
So in terms of what he lost, it was a LOT. Not just his legs, but most of his intestines, his bladder, his pelvis, his gonads, half his bones, most of his blood volume, and a lot of his abdominal and back muscles (as well as their attachment points, making the remaining muscles limited in their usefulness).

Image description: A diagram of the human musculature, from the ventral and dorsal sides. The diagram has a line drawn across it to show where Maul was bisected.
Fortunately for him, most of the organs in humanoids are located in the chest cavity (because the intestines need a LOT of room to work), so he kept his kidneys, liver, stomach, lungs, hearts, pancreas, gallbladder, etc etc. However, his intestines are interesting in that by getting chopped in half, his small intestine was actually disconnected from his large intestine. The small intestine connects to the large through the ileocecal valve, which is located on the left inferior side of the abdominal cavity. He got chopped right through the middle of the abdominal cavity, so he lost his entire cecum, the majority (if not all) of his ileum, and the valve that connected them. This means that anything he digested would just ooze into his abdominal cavity even after the giant wound repaired itself, unless he got surgery to reconnect them. We will say for the sake of the story that he fixed it with The Force while living in his trash hole.
Now, it is possible for people to be bisected like he was and survive, just only in a medical environment. It's an extremely rare and radical surgery called a hemicorporectomy. It's the last of the last resorts, because it leaves you with a lot of problems. Here are some of them:
Maul would need both a colostomy and urostomy bag, since his rectum and bladder are both gone. These would need to be regularly cleaned and emptied.
His missing intestines would also result in his not digesting most of his food fully, so he would need supplemental nutrients to help combat malnutrition. He obviously does not get these for most of his life (if ever) so he is almost certainly malnourished.
Due to his newfound Nightmare Castration, he would need regular doses of hormones or would risk osteoporosis. Which hormones is up to the reader (I nominate estrogen)
His spinal cord is, thankfully, fine--- it doesn't actually extend past L1-L2. However, he did lose the filum terminale, meaning his spinal cord is kinda unanchored in his spine and floating around, which isn't great and could lead to nerve issues down the line. Some of the nerves that were cut in his lumbar spine (specifically, the L4 lumbar nerve supplying the quadratus lumborum muscle) could also cause partial paralysis in his back, as well as some wicked back pain.
Shoutout to @necropocene for inspiration as well as the following headcanons:
Maul's lungs and other organs are constricted by his intestines being forced upward into his chest cavity, reducing his lung capacity
Maul suffers from chronic nausea
Maul's prosthesis needs to be very well-cushioned because the waist is not a load-bearing structure (too squishy!)
Now onto my specific headcanons for his prosthetics and mobility devices:
The thing about pelvises is not only do they let you use legs, they also allow your organs and muscles to attach to something rigid. For this reason, I think Maul should have two pelvises: one internal, being more like a metal frame that his abdominal and back muscles attach to, and one external and connected to his legs.
The lumbar spine and sacrum are what allow the spine to connect to the pelvis, so in order to use his prosthetic legs, I think it would be prudent to give Maul a prosthetic spine, Borg Queen-style. Now, this would admittedly be a pretty big infection risk (piece of metal sticking through the skin and all) but I think it's cool so I am invoking The Rule of Cool on this one.
Maul's legs are not something I spent much time on, because his canon ones are fine.
I do have headcanons for a wheelchair, though!
His wheelchair wouldn't be designed like your average wheelchair, because those are generally designed to accommodate people who have pelvises. His would probably look more like a plant pot or a baby bjorn, imo? It would have to support him without putting too much pressure on his torso, so I think a sort of foam well with a backrest, attached to wheels would be a good design.
I also think that his prosthetic spine should be able to dock with the wheelchair so that he can control it as an extension of his body, like the prosthetic legs.
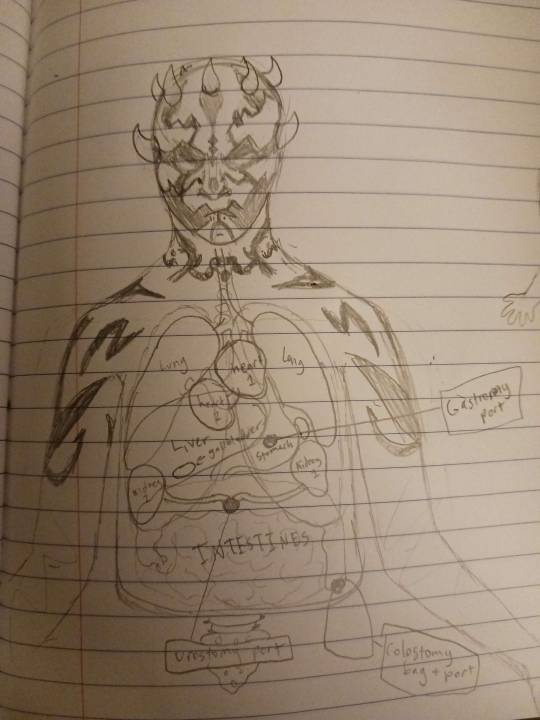

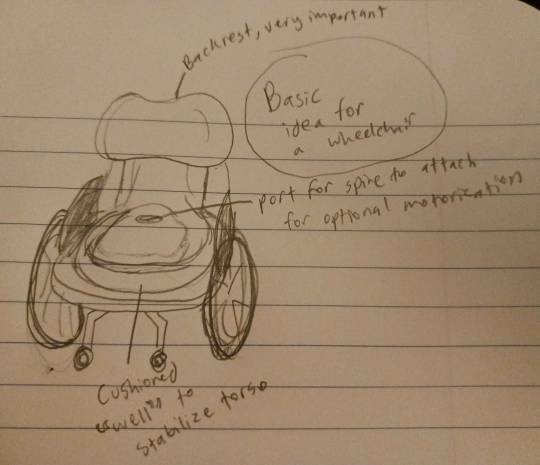
Image description: Three pencil drawings on notebook paper. One is of Maul post-bisection, with each of his organs labeled and colostomy, urostomy, and gastronomy ports. The next two are of his wheelchair, which follows the description previously given. End ID.
And yeah, those are my headcanons! Thanks for asking :) I love talking about fantasy biology!
#Maul#Darth Maul#fantasy disabilities#Star Wars prequels#star wars headcanons#disability headcanon#Maul oppress#star wars tcw#TCW
86 notes
·
View notes
Text
Level Up Post: Mighty Nein: Echoes of the Solstice: The Speculation Version
DO NOT POST SPOILERS ON THIS IF YOU ARE AT THE LIVE SHOW IN PERSON. YOU WILL BE BLOCKED.
So here's the deal: I don't know what level they'll be (18-20), I am frankly assuming they level up in the first place (but like. why wouldn't they) and I'm going to have to make a bunch of assumptions, but here is a manageable-ish, I hope, summary, to be refined once we know more. Also: I'm assuming we've got Caduceus rather than Kingsley (I DO NOT KNOW THIS FOR SURE DO NOT RELY ON THIS BEING THE TRUTH) but I will make a Kingsley post if that is not the case (short answer - I'd recommend solely leveling up in blood hunter). As always with level-ups: if there is a significant omission or an error, please let me know. If I simply did not choose the same spell or feat you did, feel free to reply with "ooh nice, what about [spell]" but do not send me asks or get weird and sanctimonious about having different thoughts on subjective assessments. Anyway, here's the pre-show version; I'll make a new post Friday if appropriate.
Fjord: Let's get Mr. Complicated Tusktooth Stone Lavorre out of the way. He is currently Warlock 12/Paladin 5. Warlocks get a mystic arcanum at level 13 (7th level spell once per day) as well as another known spell for regular casting, a subclass feature at 14 (Master of Hexes for Fjord, which allows him to move his hexblade's curse from creature to creature if the first dies), and a mystic arcanum (8th level) and another invocation and another spell at 15. Paladins, meanwhile, get Aura of Protection (+CHA mod, so 5, to all saving throws to himself and all allies within 10 feet) at level 6, a subclass feature at 7 (Aura of Liberation - he and allies within 10 feet cannot be grappled or restrained, can use 5 feet of movement to get out of prior restraints [THIS WOULD HELP BEAU IF SHE SHOWS UP CHAINED BTW], and ignore penalties to underwater attacks) as well as another L2 spell slot, and an ASI at 8; his lay on hands pool also scales up by 5 HP per level. My personal feeling is: for the next level, take paladin level 6, which gives him and anyone within the aura +5 to all saves so long as he is not incapacitated; paladin auras are ridiculously good and every day I wish someone would play paladin straight through in CR, for me, much as I adore Fjord and Vax's dips into it. For his 19th level, I'd either take paladin 7 for the aura of liberation, or take warlock 13, which grants the mystic arcanum of which I'd take Etherealness, probably, or possibly Forcecage; the clerics can handle Plane Shift, and Finger of Death seems off-brand. He also gets another regular spell of which there are many; Contact Other Plane might not work under these conditions so I'm leaning towards Dream, which is just a great weird spell few people take, but also he could take a low level spell given he has paladin spell slots. And for 20th, take the one he didn't take for 19, for a final 13 Warlock/7 Paladin split.
Beau: Much more straightforward in comparison...but let's talk about the leveling up process. Level 18 grants Empty Body, in which she can spend 4 ki to be invisible for 1 minute and resistant to all damage other than force damage, or she can spend 8 ki to cast astral projection on herself alone, which is just hilarious and great and I would like to see it. She also increases her speed to 60 feet. Level 19 is an ASI/Feat; her stats are great so I say take Mobile because it's funny to make her normal speed 70 feet/round, or mage slayer for obvious narrative and "Beau, don't you want to pull a Cerrit on Ludinus" reasons. The capstone monk level kind of sucks (4 ki points back if she's tapped when rolling for initiative) but I don't have a good multiclass for her in mind so may as well ride it out. And of course she gets a ki point per level.
Caleb: Perhaps the only person for whom level 18 is actually fun (other than the multiclassed characters), at level 18 he gets to pick a 1st and 2nd level wizard spell in his spell book that he can cast at will. He can exchange these, but it requires 8 hours of study, so probably what he has going in to this show is what he has for the show. 19 is again a Feat/ASI, and honestly a con or dex boost never hurts a wizard. Level 20 gives him two 3rd level spells in his spellbook that he can cast once per rest (long or short) without using a spell slot. Might I suggest counterspell as one of them? And both he and the clerics gain extra high level spell slots at each level (5th, 6th, and 7th at levels 18, 19, and 20 respectively).
Veth: So she is actually trickier than Fjord, as the multiclassed character, in that I'm less sure how to split it out, but we'll go through the options: Level 17 in rogue grants her the ability to temporarily steal spells from another spellcaster who attacks her (Spell Thief) which is GREAT and she should definitely take it. Level 18 is Elusive; as long as she is not incapacitated, attack rolls cannot have advantage on her. And Level 19 is an ASI/Feat and an increase in sneak attack dice and also grants her a fourth level spell slot and new spell to go with it, which must be enchantment or illusion; Greater Invisibility seems like the obvious choice. I'd take the ASI to INT. On the other hand, if she pursues more wizard levels, Level 2 would give her a subclass and its features and another 1st level spell slot (and 2 more spells), Level 3 would give her 2nd level wizard spells and corresponding spell slots (and again, 2 more spells in her spellbook), and Level 4 is an ASI/Feat, a cantrip, and another 2nd level spell slot. I say take L17 in rogue first, then get a wizard subclass (transmutation does seem obvious for a number of reasons though abjuration, illusion, and divination have better L2 features and illusion makes narrative sense - divination would simply be hilarious), then take her final level in rogue for Elusive; but with both Veth and Fjord I think there's an obvious level to take (L17 rogue for Veth, L6 paladin for Fjord) and after that I respect Sam and Travis to pick what feels right.
Jester and Caduceus: At level 18, they can channel divinity 3 times per rest rather than 2. At level 19, they take ASIs, which honestly are up in the air for me - I'm excited to see what they pick, though @captainofthetidesbreath suggested Eldritch Adept for Jester which I would enjoy, and we haven't seen Caduceus's feat from the final episode yet which means I'm not sure about what he might take as a new one, though I'm personally always a fan of Chef. And at L20 divine intervention is guaranteed (though you can only use it once per week)...but to be honest if they are level 20, I am expecting this to be nerfed for solstice reasons because it is kind of game-breaking.
Yasha: So here's the thing. Barbarian 18-19 is kind of eh and 20 is good but not amazing. She could take it; she'd get indomitable might at 18 (treat any strength check as her strength score, 18, if she rolls lower than that), an ASI/Feat at 19, and her strength and con jump up by 4 each (and can exceed 20) - this would put her at 18 CON and 22 STR, assuming she doesn't increase either with the ASI (and to be fair I would take the ASI to strength). This is solid and entirely valid as a choice. HOWEVER, might I suggest the Grog move of taking her final three levels in fighter, which would give her a fighting style and second wind at L1, action surge at L2, and an archetype and its 3rd level features at L3. I like how Battle Master feels for Yasha but really it's that action surge that makes this great; Rune Knight or Champion are also decent options.
166 notes
·
View notes
Text

AGENCY FOR THE RECOVERY OF ESCAPED PET HUMANS
◇---◇──────────◇---◇
OS - @bluemoonscape
Here at AREPH, our main goal is find and secure any and all loose, missing, and escaped pet humans. If you have a pet human who has run away, contact us through our inbox and we'll get on it! We rehouse abandoned pet humans as well, so if you're looking for a new pet for a low price, get in touch!
We often work closely with associates at ANAKT, helping make sure all of the pets at the Garden are where they are supposed to be.
We have staff members that are human, but rest assured that they are monitored and checked frequently for any misconduct. They also are not allowed any clearance above Level 3. Do not pry into the file of Eddy.
◇---◇──────────◇---◇
TAG DIRECTORY:
#OS REPORTS - Lore content, original posts
#OS FINDINGS - Reblogs
#AREPH PAPERWORK - All AREPH staff and patient profiles
#AREPH INTERCOM - Any in-lore announcements
#OS SPEAKING - Mod/Blue speaking
◇---◇──────────◇---◇


FONTS:
- Name plaque: ABNES REGULAR
- Data: DESIGNER or AZONIX
All are downloadable for free through DaFont on IbisPaint
FACULTY UNITS:
UNIT: HOSPITAL [TRAINEE, L1, OS]
UNIT: LP HOLDING [L1, OS]
UNIT: STRATEGICS [L2, OS]
UNIT: RETRIEVAL [L3, OS]
UNIT: MILITARY [L4, OS]
UNIT: HP HOLDING AND TESTING [L5, OS]
PERMITTED UNITS FOR PATIENT ADMITTANCE:
UNIT: HOSPITAL
UNIT: LP HOLDING/TESTING
UNIT: HP HOLDING/TESTING
CLEARANCE LEVELS:
HOSPITAL ACCESS [TRAINEE]
HOSPITAL AND LP HOLDING/TESTING CLEARANCE [L1]
STRATEGICS UNIT CLEARANCE [L2]
RETRIEVAL UNIT CLEARANCE [L3]
MILITARY CLEARANCE [L4]
HP HOLDING/TESTING CLEARANCE [L5]
OVERSEER [OS]
formatting and assets were all done by me lol (zen @verdantlights ) hi hehe i made the profile templates :tism:
#OS REPORTS#OS FINDINGS#AREPH PAPERWORK#AREPH INTERCOM#OS SPEAKING#alnst areph#areph#alnst#alien stage#alnst oc#alnst ocs#alien stage oc#alien stage ocs#alnst fan season 39#alnst season 39#alnst s39#alnst fan season 40#alnst season 40#alnst s40#alnst fan season 41#alnst season 41#alnst s41#alnst fan seasons
9 notes
·
View notes
Note
Hey so today I learned that there is a multi-level fusion at some point in my not so distant future (L1-L2 and L5-S1) since I'm told the NHS doesn't cover replacements, and I just wanted to know... is it common for fusions like those to cause other damage long term? Is that just kind of an inevitability of having one early in life?
I know you're not a spine expert but you have way more experience than anyone else I can think of
It’s really unfortunate that the NHS only covers spinal fusions. there are other, less invasive, newer surgeries that can preserve motion in your spine and cause less biomechanical stress on your other discs, so you’re less likely to develop painful, long-term complications. Spinal fusion complications are difficult to address because fusions are supposed to be permanent. As far as I know, there is no way to remove them, so often they get extended & replaced as discs break down above & below them.
The condition of disc degeneration around a spinal fusion or fused segment is referred to adjacent segment degeneration (ASD) by researchers & doctors. it’s a complication of spinal fusion surgery that used to be considered “rare” but more recently, it’s actually been found to be a common long term complication of spinal fusions. I developed severe ASD nearly 10 years after my 10-level fusion. My fusion was in 2014 and my follow up disc arthroplasty surgery was in 2022
here’s a good article explaining adjacent segment degeneration more in depth
I have flatback syndrome in addition to ASD because my lumbar and cervical spine were straightened beyond what is natural after my 10 level fusion (in my thoracic and lumbar spine). I couldn’t find any statistics on how common this is after spinal fusions, but similar to ADS, the risk is greater the longer your fusion is and how “straight” your surgeon made your bars. In my case I lost both the upper and lower curves, but “flatback syndrome” can refer to either or both curves being absent. flatback is very common following for example scoliosis surgeries because the fusions tend to be long. It can also occur in shorter fusions in the lumbar area like how you described though, so I thought it was worth mentioning
here’s a good article defining & describing flatback syndrome
These two painful complications are why, if you have a fusion, it’s really important to maintain the muscles around your spine and back through regular gentle exercise. To make a fusion last and to put off more surgery as long as you can, you must take care of your whole spine. I personally think having a good physical therapist for preparing for & recovering from surgery is just as important as having a good surgeon. They should be able to tell you which exercises are safe and how to strengthen the muscles around your spine both before & after surgery
this post is super long but a couple people have asked me similar questions about having spinal fusions so I thought I’d try to summarize what I would look out for & consider if I were to do it all over again
I hope your doctors are good and kind to you and that if you have surgery your recovery is very boring and complication-free. If you/anyone has any other questions I’ll try to answer them also :) 🖤
#spinal fusion#flatback syndrome#adjacent segment degeneration#spinal surgery#disc arthroplasty#spinal disability
33 notes
·
View notes
Text
Angel / “Vulture”🪶

Angel/Vulture Abilities
(hold l2 to aim)
Rapid Fire: This ability allows him to fire at a larger range with less bloom without having to aim. This ability lasts for about 10 seconds and his overall gun doesn’t have very much aim assist. Cooldown for the regular like 250 seconds or whatever the base is i can’t remember.
Ability 2: Melee Hunt: Activated when d-pad down is done and can be automatically swapped when Angel runs out of bullets in his revolver.
Angels revolver:
His main weapon when killing, Raven, as he calls his revolver. This weapon is quick and deals significant damage when it hits a victim. The revolver has 3 rounds of 6 bullets, 18. It takes about 2.5 seconds to reload. When Angel runs out of bullets, his weapon stations will highlight for about 30 seconds and that’s where you can go get more bullets, taking around 3 seconds to complete.
stats:
Savagery - 20/50
Blood Harvesting - 16/50
Endurance - 30/50
(Angel is not his real name, none of the family know his real name and he comes and goes as he pleases)
#texas chainsaw massacre game#artists on tumblr#artwork#tcsm game#the texas chainsaw massacre#tcm oc#oc#orignal character#tcsm oc#leland mckinney#johnny slaughter#connie taylor#julie crawford#black nancy#drayton sawyer#tcm nubbins#bubba sawyer#leatherface
12 notes
·
View notes
Note
hey, you're the rupture inspector right? any recommendations on a rupture team (IDs + EGOs) you think can survive the 10 Floor MD Update?
I almost forgot they were planning to do that. I'm gonna boot up Limbus really quick and start ranking ids based on how well I think they'd do surviving the rising conditions while still being like, usable. No evading every turn for 99 turns and literally nothing else, I mean.
TL;DR a regular rupture team is what you'd use, with only minor adjustments, because there's not much you can do to be better.
Individual Rating for each Rupture ID
Lobotomy E.G.O::Lantern Don Quixote This is the creme de la creme of rupture ids imo, but that is my entirely subjective opinion based on how much I love this id. But there is some truth to it: simply the fact that she's a heal-tank with only one stagger bar tons of healing sources means her survivability goes through the roof, which is the most important thing when enemies are going to start outrolling you and doing tons of damage. I hope some update gives her unbreakable coins so she's even more stupid busted. Anyway her clashing isn't the best, but you're playing rupture so that's to be expected.
LCE E.G.O::Lantern Yi Sang Don't.
W Corp. L3 Cleanup Agent Yi Sang Best in slot for Yi Sang, given the alternative likes to die. Evades were so heavily sought after in previous MDs, and it remains the same here. Extra base power means he rolls up to a possible 16 on evades, which means that unless you're taking wayyy too much coin/final/base power he will be able to dodge most things if they get too difficult to clash with. His passive applying charge barrier and his high rolls on account of being a W Corp. unit means he'll start struggling much later than most other rupture units and will also help them with a bit of survivability upon using his s3 or dimension shredder. Optimal conditions for him is just s2 and s3s in his kit, get rid of all of his s1s. With the tier IV charge gift you can afford to have more s3s if you want.
LCE E.G.O::Lantern Yi Sang Okay, seriously this time. He could be decent, with unbreakable coins and actually trying to lose. He'd be even better if he had a gloom skill, but it's whatever. Issue is he lacks the healing capabilities of his much better counterpart in lantern don. Dimension Shredder means he technically never goes count negative, which is great given he's another one of those stupid rupture ids that stop inflicting count when you reach the rather low 15/3 threshold.
But well, the issue is
Yeah.
He's going to die. Very quickly. Maybe if you don't use his s3 or his counter he can survive for as long as you'd like, but like. Come on. Just run W Corp. Yi Sang. Don't do this to yourself.
Seven Assoc. South Section 4 Faust Let's get this straight. You should always run her. Trade all her s1s for s2s. She rolls up to a 22 with those, and you want the coin power and rupture count it gives. Also. Fluid Sac. If you don't have oracle or other good ego gifts, then maybe keep some s1s. But like, if you're going past floor 5 without one just end the run. You're going to need fluid sac, there's no question about it. That's the main reason she's a must run, anyway. There are other good healing ego, but unless it's on Rodya it's kinda an issue given that other ids don't clash as well.
Seven Assoc. South Section 6 Ryoshu Why is she on this list? She has, like, one source of rupture lol.
Cinq Assoc. West Section 3 Meursault One of the only two good conditional rupture ids, given he and Rodya have skills that don't consume rupture count. You want him on the team. He's got good clashing, even without regret, and he has an evade. Need I say more?
W Corp. L2 Cleanup Agent Meursault He's a funny one alright. I'm only including him on this list because he single-handedly enables my charge md runs to become charge/rupture md runs with that s2 of his. Also, coin power. With regret, he rolls somewhat decently for a 000 id. Replacing everything with his s2 is really funny if you have thunderbranch and the chicken wing. But it's only really funny. You shouldn't really run him unless you're trying to do funny shit on charge teams, he kinda just sucks compared to the other two rupture options he has. I guess he's got decent survivability, but that's all. Cinq Sault is better anyway, what with the evade and gloom s3.
Dead Rabbits Boss Meursault I don't have much to say about him. I used to run him before I got Cinq Sault. He's got decent numbers for a 00, even without Regret. Offense down is cool, I guess, but it's not much. If you don't have Cinq Sault, maybe he works. Maybe.
Fanghunt Office Fixer Hong Lu If you've got decent rupture infliction, or just have the rupture fusion gifts, he's really not the worse thing to run. I hate that he has the conditionals, given his count infliction is decent, but it's whatever. He gets tons and tons of coin power, which is great for outrolling things. More coins is more rupture activations, which makes him great for teams that can ramp up quickly. That's all. Lasso is a good ego too, I guess, if you really need to activate rupture on multiple enemies. It's whatever, I don't have it uptied and I've barely used it.
Seven Assoc. South Section 4 Heathcliff He's decent. Fusion gifts means he's very count positive on anything. He's going to struggle to clash the higher you go though, given both his s2 and s3 only roll a 16. Binds spam is an option however, especially since rupture teams aren't exactly struggling for gloom. It does eat into your fluid sac resources though, and the bind it hits you with can be something of a problem sometimes, so I'd be careful using it.
LCCB Assistant Manager Ishmael Unless you are in a focused encounter you should literally never run her. She's an ammo identity, a slow same turn paralyze unit, and her only rupture infliction is on her s3. You will either spam Blind Obsession every turn or she will die. She is somewhat tanky too, which would be a positive if that didn't mean she could steal talismans if you decided you wanted to use them. But hey, she's usable as a tank with aggro if you need to redirect enemy attacks once she's done her job and run out of bullets. Some of you might be wondering why I didn't make that as much of a downside when I said LCE Yi Sang sucked for this. Well first, I'm a hater. Note that down. Second, she doesn't have that stupid conditional, and third she doesn't have that STUPID conditional.
Lobotomy E.G.O::Sloshing Ishmael LOL
Devyat' Assoc. North Section 3 Rodion Yeah, you're running her. Decent coin power conditionals on all her skills, with only her s3 eating count upon its conditional. S3 is excellent for setting up rupture stacks, gains an extra coin on its conditional which is great for the same reason Fanghunt Hong Lu can be good. She also has access to Pursuance and Hex Nail, the former of which does not compete with Fluid Sac whatsoever. You are going to run her if you have her, whether you like it or not.
Devyat' Assoc. North Section 3 Sinclair No.
Lobotomy E.G.O::Red Sheet Sinclair He will die in five seconds flat. You're benching him for his passive if you're running him anwyay.
Devyat' Assoc. North Section 3 Sinclair I hate this id so goddamn much. You think it'll be good like Rodion, and then it comes out and is dead on arrival. Impossible to justify running this over Talisman outside of MD. A 000 id. Dead on arrival. Because benching a 00 id is better in every way. God. Defense down as a trade off for rupture is really fucking stupid. Okay, you can do tons of true damage every coin. Or you can do a bit more damage. Yeah. Sure. Without his conditional he's actually pretty decent at inflicting rupture and rupture count, but with it he just kinda sucks. But you will never get an objective look at him from me, given how much I loathe these conditionals.
Seven Assoc. South Section 6 Director Outis She's whatever. You can tell she's a pretty old rupture unit just by looking at her kit. She does have access to Binds, Dimension Shredder and Ebony Stem, which are pretty good high attack weight ego, so she might be worth running just for those, especially since her id isn't like, especially bad or anything. She's just not that good.
G Corp. Manager Corporal Gregor Bench.
Special mention: The Ring Pointillist Student Yi Sang I mean, like. He goes on literally every team. It's Ring Sang, idk what you'd expect. Personally, I don't care for him, and I don't even have him, but do whatever you like.

One more thing before I make the team.
Devyat' Assoc. North Section 3 Sinclair For real, this time. Look, I hate him, but I have to admit that the coin power he gets off conditionals are pretty good, and it's worth running him for that alone if you're lacking options. I personally would never do such a thing, but it's an option for people who are more normal about him than me. Cavernous Wailing is also a decent ego given that rupture's second most common resource tends to be gloom, at least on the better skills you'd want to give your ids more of. Gloom Res isn't the most difficult thing to come by on this team.
Finalized Team

You'd run something like this, in any order you'd like really. Assuming this isn't a focused encounter, you want to give more slots to the first four selected ids here, depending on how if you have good charge and ego gifts. Don has the worst clashing of the first four, so you might consider lowering her in the deployment order if your feel like it.
Additionally, if enemies are just clashing way too high for Don, you can choose to bench her for her passive and run Devyat Sinclair instead. If you need more count, you can run Heathcliff over Hong Lu. You can also just run these optional ids as backup if a battle somehow takes so long that Rodion and Sinclair retreat.
You will be relying heavily on Grey Coat for survivability on this team. For those who lack gloom skills, you may need to take other ego gifts if Gregor's healing isn't enough, or rely on Fluid Sac and or/Pursuance. Hex Nail is not the best idea, as this team lacks envy, but with enough resource ego gifts that also becomes an option.
Honestly the best advice I can give to you is to be careful with any sort of power trials. Damage dealt and hp trials don't matter much when you're rupture, but power really sucks because rupture doesn't have much in the way of gaining coin power compared to other teams. A lot of haste will get you through every focused encounter, and rupture doesn't have many issues with that, but human encounters will have you struggling.
Additionally, you should have every damage type for aoe ego. Pierce, Blunt and Slash. This is already a good idea for teams of all type, but rupture ESPECIALLY needs it, given you will begin to struggle with clashing earlier than other teams. Having Sunshower, Fluid Sac and Dimension Shredder are great, and there are really many alternatives. You need tons and tons of options to help you when your team inevitably starts to struggle.
Because, and I can't emphasize this enough really: Rupture will fail you. There is no amount of preparing that will change the fact that you will simply be unable to clash. There doesn't even exist a full team of 15/3 ids, and those tend to be much much better at clashing than other rupture ids. You will struggle before other teams, and that's the price you pay when you run rupture. You don't get a TCTB or assist attack, a Manager Donqui, the mere existence of Zwei Ish not to even mention reverb, a fucking nuke + Dawn Sinclair, a Lament, Mourn, and Despair or literally any charge s3 (that isn't W Corp. Yi Sang). You will roll kinda okay with some ids, and badly with others. You will suffer to make a good rupture team, cause that's just how it is right now.
I hope one day I can eat my words. One day I'll have a rupture team that I can play as effortlessly as a sinking team. I hope. But that day isn't coming any time soon.
9 notes
·
View notes
Text
i am for sure gonna put L2 medium attacks in lesser beast btw. since at the moment L2 doesn't actually Do Anything for two-handed weapons. they'll probably have their own moveset slot since i can't think of another attack type that would make sense to bundle them with, except for maybe the regular light attack chain?
11 notes
·
View notes
Text
Obviously I really like Elden Ring's and Dark Souls 3's combat, but weapon skills are in a very weird spot to me. There's a lot of what people call "anime shit" in them that's somewhat at odds with the regular weapon movesets and flow of combat; in Elden Ring, press L2 to win is very true.
It's interesting coming off of bloodborne, which does have fast combat and allows your character to move quickly, but aside from some trick weapons obviously being impossible, movement and combat flow all feel very grounded.
Meanwhile in Elden Ring it's like you do a front flip with your giant fucking greatsword. Or you can slowly swing it back and forth.
Idk what my point is. I miss her tails. I miss bloodborne.
2 notes
·
View notes
Text
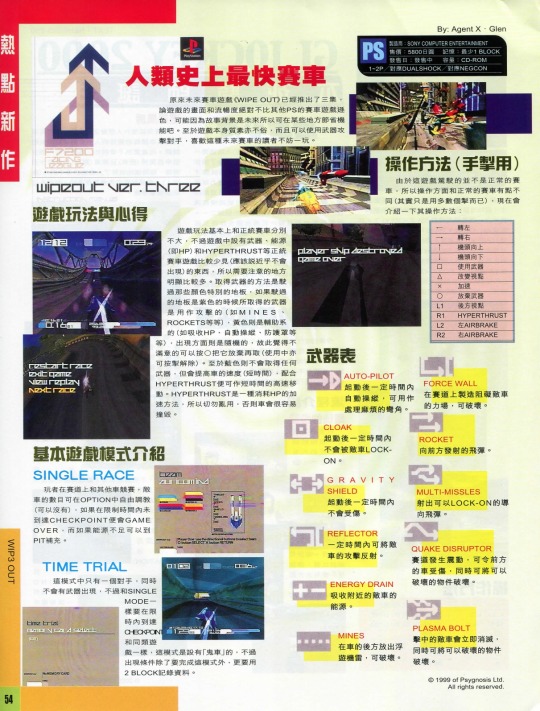
Hot New Releases - Wipeout 3 on Game Players Vol.121(Video game magazine)(Hong Kong)(26/02/2000)
Translation in English:
Playstation 1
Manufacturer: SONY COMPUTER ENTERTAINMENT Price: 5800 Yen Memory: at least 1 BLOCK Release date: on sale Capacity: CD-ROM 1-2 Players / Compatible with DUALSHOCK/Compatible with NEGCON
The fastest race in human history
The original future racing game "WIPE OUT" has been released for three episodes, The graphics and fluency of the game are definitely not inferior to other PS racing games. Maybe because the background of the story is the future, some functions can be saved. As for the quality of the game itself is not bad, and you can use weapons to attack opponents, readers who like this kind of future racing may wish to play.
Operation method (for hand button)
As this game is not a normal racing car, so the operation is a little different from the normal racing car (in fact, just use a few more buttons), and now will introduce its operation method:
← Turn left → Turn right ↑ Up ↓ Down □ Use Weapons △ Change the viewpoint X speed up O Give up weapons L1 Rear Viewpoint R1 HYPERTHRUST L2 LEFT AIRBRAKE R2 RIGHT AIRBRAKE
Game play and Tips
The gameplay is basically not much different from that of regular racing, but the game has weapons, energy (that is HP) and HYPERTHRUST, which are relatively rare (or almost non-existent) in regular racing games, so there are obviously more things to pay attention to. The way to get weapons is to drive through the floor of those special colors, if the floor is purple, the weapons obtained are used for attack (such as MINES, ROCKETS, etc.), yellow is the auxiliary system (such as HP absorption, automatic control, shields, etc.), the appearance is random, so if you are not satisfied, you can press 〇 to give it up and take it again (you can also press the button to release it in use). As for blue, you won't get any weapons, but it will increase the speed of the car (for a short time), and you can move at high speed for a short time with HYPERTHRUST. HYPERTHRUST is a HP-consuming acceleration method, so do not use it recklessly, or the car will be easily crashed.
Weapons List
AUTO-PILOT: It can be operated automatically within a certain period of time after starting, and can be used to handle troublesome corners.
FORCE WALL: Creates a force field that resists magnetic enemies on the track, which can be destroyed.
CLOAK: It will not be LOCK-ON by enemy vehicles within a certain period of time after starting.
ROCKET: A missile fired forward.
GRAVITY SHIELD: It will not take damage for a certain period of time after activation.
MULTI-MISSLES Shoots guided missiles that can be LOCK-ON.
REFLECTOR: It can reflect the attack of enemy vehicles for a certain period of time.
QUAKE DISRUPTOR: The track shakes, but the car in front is injured, and the destructible objects can be destroyed at the same time.
ENERGY DRAIN: Absorb energy from nearby enemy vehicles.
PLASMA BOLT: Hitting an enemy vehicle immediately destroys it, and destructible objects can be destroyed at the same time.
MINES: Releases floating mines behind the car, which can be destroyed.
Basic game mode introduction
SINGLE RACE Players compete with other cars on the track. The number of enemy cars can be freely adjusted in the OPTION (optional). If the CHECKPOINT is not reached within the time limit, it will be GAME OVER. If the energy is insufficient, it can be replenished at the PIT.
TIME TRIAL There is only one opponent in this mode, and no weapons will appear at the same time, but it is the same as SINGLE MODE and reach CHECKPOINT within the time limit. Like similar games, this mode has a "ghost car", but the conditions for it to appear are other than completing this mode , but also use 2 BLOCK to record data.
3 notes
·
View notes
Text

⬐ @hopegained ⬎
🌪️ TORNADO - what is the biggest change you've ever made to them? how have they changed from their original version?

Hmm… Okay, so I think there’s two ways I could answer this.
First, I think canonically: her having a brother (and in most cases, he’s alive). He’s only mentioned occasionally in threads, but given @diewithaname and I plot frequently with the two of them, Ryker is canonically her brother in 99% of cases. This is only changed in the instance where I’m writing with another Shepard in a siblings AU where they are related (if I’m writing one where they’re not related, then Ryker may be mentioned, but he’s most likely dead). That’s probably the #1 biggest change I’ve made to Kat overall. That being said, the two of them are estranged for years and don’t often have regular content until ME2 or so (if he’s alive).
The second biggest is changing when her biotics were noticed: Kat’s secondary exposure was actually on Mindoir, which triggered her biotics, which saved her life in the process. As Anderson was her foster father until she turned 18 and could properly enlist, she trained under an asari matriarch that was a former commando, which is why her biotics are incredibly powerful (and even more refined than the average human biotic, even comapred to most L2s in terms of raw power—though the raw power statement is actually canonically noted in dialogue).
In terms of changes from her original version, much of what you see with Kat is just minor changes I’ve made: I changed her hairstyle (originally using one of the default bobs in ME1 then Brooks’ hairstyle in 2 and 3, and I’ve changed her ME1 bob a couple of times along with switching to the ponytail/braided crown in combat in 2 and 3), updating her face texture, and ultimately adjusting her casual outfits to be her favourite colour (purple). Most of this was done to play into headcanons I came up with early on (ex. she won’t show skin in ME2 due to her missing scars, so she covers up… but no goddamn way is she going to wear Cerberus colours, so she opts for a purple scientist outfit).
#headcanon. ❖﹙ it seems the path we’re on was paved with blood and sorrow ⋄ no thought about tomorrow. ﹚#answered. ❖﹙ pleasure fused with pain ⋄ this triumph of the soul will make you shiver tonight. ﹚#hopegained
1 note
·
View note
Text
What Are the Regression Analysis Techniques in Data Science?

In the dynamic world of data science, predicting continuous outcomes is a core task. Whether you're forecasting house prices, predicting sales figures, or estimating a patient's recovery time, regression analysis is your go-to statistical superpower. Far from being a single technique, regression analysis encompasses a diverse family of algorithms, each suited to different data characteristics and problem complexities.
Let's dive into some of the most common and powerful regression analysis techniques that every data scientist should have in their toolkit.
1. Linear Regression: The Foundation
What it is: The simplest and most widely used regression technique. Linear regression assumes a linear relationship between the independent variables (features) and the dependent variable (the target you want to predict). It tries to fit a straight line (or hyperplane in higher dimensions) that best describes this relationship, minimizing the sum of squared differences between observed and predicted values.
When to use it: When you suspect a clear linear relationship between your variables. It's often a good starting point for any regression problem due to its simplicity and interpretability.
Example: Predicting a student's exam score based on the number of hours they studied.
2. Polynomial Regression: Beyond the Straight Line
What it is: An extension of linear regression that allows for non-linear relationships. Instead of fitting a straight line, polynomial regression fits a curve to the data by including polynomial terms (e.g., x2, x3) of the independent variables in the model.
When to use it: When the relationship between your variables is clearly curved.
Example: Modeling the trajectory of a projectile or the growth rate of a population over time.
3. Logistic Regression: Don't Let the Name Fool You!
What it is: Despite its name, Logistic Regression is primarily used for classification problems, not continuous prediction. However, it's often discussed alongside regression because it predicts the probability of a binary (or sometimes multi-class) outcome. It uses a sigmoid function to map any real-valued input to a probability between 0 and 1.
When to use it: When your dependent variable is categorical (e.g., predicting whether a customer will churn (Yes/No), if an email is spam or not).
Example: Predicting whether a loan application will be approved or denied.
4. Ridge Regression (L2 Regularization): Taming Multicollinearity
What it is: A regularization technique used to prevent overfitting and handle multicollinearity (when independent variables are highly correlated). Ridge regression adds a penalty term (proportional to the square of the magnitude of the coefficients) to the cost function, which shrinks the coefficients towards zero, but never exactly to zero.
When to use it: When you have a large number of correlated features or when your model is prone to overfitting.
Example: Predicting housing prices with many highly correlated features like living area, number of rooms, and number of bathrooms.
5. Lasso Regression (L1 Regularization): Feature Selection Powerhouse
What it is: Similar to Ridge Regression, Lasso (Least Absolute Shrinkage and Selection Operator) also adds a penalty term to the cost function, but this time it's proportional to the absolute value of the coefficients. A key advantage of Lasso is its ability to perform feature selection by driving some coefficients exactly to zero, effectively removing those features from the model.
When to use it: When you have a high-dimensional dataset and want to identify the most important features, or to create a more parsimonious (simpler) model.
Example: Predicting patient recovery time from a vast array of medical measurements, identifying the most influential factors.
6. Elastic Net Regression: The Best of Both Worlds
What it is: Elastic Net combines the penalties of both Ridge and Lasso regression. It's particularly useful when you have groups of highly correlated features, where Lasso might arbitrarily select only one from the group. Elastic Net will tend to select all features within such groups.
When to use it: When dealing with datasets that have high dimensionality and multicollinearity, offering a balance between shrinkage and feature selection.
Example: Genomics data analysis, where many genes might be correlated.
7. Support Vector Regression (SVR): Handling Complex Relationships
What it is: An adaptation of Support Vector Machines (SVMs) for regression problems. Instead of finding a hyperplane that separates classes, SVR finds a hyperplane that has the maximum number of data points within a certain margin (epsilon-tube), minimizing the error between the predicted and actual values.
When to use it: When dealing with non-linear, high-dimensional data, and you're looking for robust predictions even with outliers.
Example: Predicting stock prices or time series forecasting.
8. Decision Tree Regression: Interpretable Branching
What it is: A non-parametric method that splits the data into branches based on feature values, forming a tree-like structure. At each "leaf" of the tree, a prediction is made, which is typically the average of the target values for the data points in that leaf.
When to use it: When you need a model that is easy to interpret and visualize. It can capture non-linear relationships and interactions between features.
Example: Predicting customer satisfaction scores based on multiple survey responses.
9. Ensemble Methods: The Power of Collaboration
Ensemble methods combine multiple individual models to produce a more robust and accurate prediction. For regression, the most popular ensemble techniques are:
Random Forest Regression: Builds multiple decision trees on different subsets of the data and averages their predictions. This reduces overfitting and improves generalization.
Gradient Boosting Regression (e.g., XGBoost, LightGBM, CatBoost): Sequentially builds trees, where each new tree tries to correct the errors of the previous ones. These are highly powerful and often achieve state-of-the-art performance.
When to use them: When you need high accuracy and are willing to sacrifice some interpretability. They are excellent for complex, high-dimensional datasets.
Example: Predicting highly fluctuating real estate values or complex financial market trends.
Choosing the Right Technique
The "best" regression technique isn't universal; it depends heavily on:
Nature of the data: Is it linear or non-linear? Are there outliers? Is there multicollinearity?
Number of features: High dimensionality might favor regularization or ensemble methods.
Interpretability requirements: Do you need to explain how the model arrives at a prediction?
Computational resources: Some complex models require more processing power.
Performance metrics: What defines a "good" prediction for your specific problem (e.g., R-squared, Mean Squared Error, Mean Absolute Error)?
By understanding the strengths and weaknesses of each regression analysis technique, data scientists can strategically choose the most appropriate tool to unlock valuable insights and build powerful predictive models. The world of data is vast, and with these techniques, you're well-equipped to navigate its complexities and make data-driven decisions.
0 notes
Text
Intel Core Ultra 5 125H vs 135H Mobile CPU Specs

Intel's latest Intel Core Ultra CPU series improves mobile computing speed with cutting-edge designs, battery economy, and integrated graphics. New thin-and-light high-performance laptops for creatives are the Intel Core Ultra 5 125H and 135H. This article compares CPU features, attributes, and performance to help you pick.
Intel Core Ultra 5 Series overview
Core Ultra 5 is Intel's mid-tier offering with the latest Ultra processors. 7nm CPUs use Intel 4 process technology. While conserving battery life, these CPUs prioritise multitasking, productivity, gaming, and creativity.
Gaming laptops and portable workstations use Intel “H” CPUs 125H and 135H. Although similar, the 125H vs. 135H CPU number guarantees better performance and functionality.
Performance and Core Architecture
The 125H and 135H processors use Intel's innovative hybrid architecture, which combines Performance (P) and Efficient (E) cores. Using efficiency cores for light background work and high-performance cores for demanding tasks optimises processor power usage.
Intel Core Ultra 5 125H: The 10-core processor has four E-cores and six P-cores. This allows it multitask and run nicely in one thread. Its 16 threads are plenty for most productivity tasks.
Intel Core Ultra 5 135H: A more powerful 12-core configuration with four E-cores and eight P-cores for 20 threads. More cores boost multitasking and parallel workloads, making the 135H better for heavy multitasking, content production, and some professional applications.
The 135H responds faster and performs better under burst loads due to its higher base and turbo frequencies. Also, clock speeds vary.
Cache, Memory
CPU performance and efficiency depend on cache memory. Larger L2 and L3 caches on the 135H reduce memory latency and speed data access. Because they frequently retrieve data, video editing, graphics, and gaming benefit from caching.
Both processors support DDR5-5600 and LPDDR5-6400. This gives GPU and CPU cores rapid memory bandwidth.
Integrated Graphics
Both CPUs have Intel's ARC A370M GPU for mobile graphics. This graphics card performs well for GPU-accelerated tasks, multimedia editing, and light gaming. The ARC A370M is a good choice for small, light laptops with integrated graphics, but neither is meant to replace a high-end gaming GPU.
Thermal Design and Power Use
Intel's 125H and 135H processors offer a customisable 28W base and 45W maximum TDP. Laptop manufactures can optimise cooling based on device design. The same power envelope lets these CPUs be employed in more durable gaming machines or compact, light laptops without losing thermals or battery life.
Due to its higher core count and speeds, the 135H may use more power during demanding multitasking or multithreaded operations, but Intel's power management and core architecture help maintain a good battery life.
Actual Use Performance
Productivity and Multitasking
Both CPUs handle web browsing, office apps, and media consumption well for regular productivity, although the 135H is more responsive while running multiple demanding activities. The 135H renders Adobe Premiere and DaVinci Resolve faster due to its greater performance cores and threads.
Gaming
Even though they're not meant for gaming, both CPUs can run many games with the right GPU. The 135H has a slight edge in CPU-bound or multi-core orientated games due to its higher clock rates and more cores.
Content Creation
Professionals who write, compile, create 3D environments, or run virtual machines will benefit from the 135H's more cores and threads. A bigger cache boosts performance for complex processes.
Practical Applications
The Core Ultra 5 125H
A consistent performer is needed for office work, streaming, and browsing.
Moderate gaming and creativity don't require much multi-core processing.
Better battery life and cost savings are your priorities over performance.
Despite your limited laptop budget, you want a processor that won't age quickly.
Intel Core Ultra 5 135H
High-demand apps like video editing, 3D rendering, and multitasking need more processing power.
You desire seamless performance when running multiple demanding apps.
You value frame rates in CPU-intensive games.
You're willing to pay more for a better laptop.
In conclusion
Intel Core Ultra 5 125H and 135H are formidable mobile CPU competitors. The 125H provides good single-core and multi-core performance with low power consumption for most users. For power users, gamers, and content producers who need more cores and speed, the 135H boosts performance.
Your workload and budget will determine which of these two you choose. The 125H is powerful enough for most professionals and casual users. The 135H is worth the extra for future-proofing and demanding operations.
#IntelCoreUltra5Series#IntelCoreUltra5125Hvs135H#IntelCoreUltra5125H#ultra5125hvs135h#Intelcoreultra#Ultra5Series#technology#technews#technologynews#news#govindhtech
0 notes
Text
here's a game concept i can't really do anything with: what if you had an action game (like a hack-n-slash?) with two playable characters and one of them uses the trigger buttons (L1-R1-L2-R2 or whatever their counterparts are in other systems) while the other playable character uses the regular face buttons and during the final stretch you get to play them at the same time.
0 notes