#Lightroom editing tutorial
Explore tagged Tumblr posts
Visit Tumblr Blog
Explore Tumblr blogs with no restrictions, modern design and the best experience.
Last Seen Tumblr Blogs


Fun Fact
Average visit duration of Tumblr.com is 10 mins and 25 secs.
Text

Raw photo.

2. Darken background w/ masking (focusing on blacks and darks, leave highlights alone because it will get rid of the delightful little bokeh on the water surface. Also popped the saturation & warmed up white balance)

3. Run De-noise (not necessary per-se, but pulls some details back into some of the feathers and I'm a recovering pixel peeper.)

4. Final touches: open in photoshop and dodge/burn the particles in the water, and around the backlit feathers to pull a little more contrast/saturation. Also took a little saturation out of the lightest feathers of the ducklings bc they pulled too orange for me, and knocked the white balance a little more green - the whole image was feeling a little too pink for me.


Full-size before and afters.
This is pretty much the exact process I follow with backlit images. I try to keep most of my edits "true to life" - but there is a lot of subjectivity in that statement lol.
Image Deets:
Nikon z7ii x. 180-600.
600mm
F 6.3
1/800 (handheld/propped up on a tree root)
ISO 2000

The usual set up. I often lose the tripod bc it doesn't get low enough for me most of the time. So I end up balancing my camera on my feet, or a root, or something.
#behind the image#behind the scenes#lightroom tutorial#how to lightroom#making of an image#photography tutorials#how its made#photography nerd shit#wildlife photography#postprocessing#photo editing#my photos#image editing#adobe photoshop#lightroom#nature#birding#nikon#bird watching#birds#ornithology#oc#bird#bird photography#animal#animals#wild#wildlife#wild animals#wild birds
26 notes
·
View notes
Video
youtube
Easy realistic glow effect in Photoshop Tutorial
#youtube#photo manipulation#photoshop tutorial#photoshop manipulation#manipulation photoshop tutorial#text effect photoshop#photoshop text effects#graphic designer#how to become a graphic designer#lightroom editing#lightroom#lightroom tutorial#adobe lightroom tutorial#adobe lightroom#glow effect photoshop#photoshop glow effect
0 notes
Text
Live Edit! Unscripted & Uncut - In Post #552
In my Live Edit videos, I share my entire start-to-finish workflow using a photo that I’ve never worked on before. Mistakes, switchbacks, and wrong turns are all part of the video - that’s where the learning happens! Watch over my shoulder as I work on a new image. You’ll hear the thought process and the artistic choices that drive the post-processing adjustments applied.
In this live edit, I embrace a monochromatic image of Face Rock on Bandon Beach, Oregon and process it in Black and White. Work starts in Lightroom and then I use ON1 Effects to enrich detail and add a finishing mood. Those little extra steps in Effects really do make a difference.
0 notes
Video
youtube
Revamp Your Photos with Lightroom Classic 's New Point Color Tool
0 notes
Text
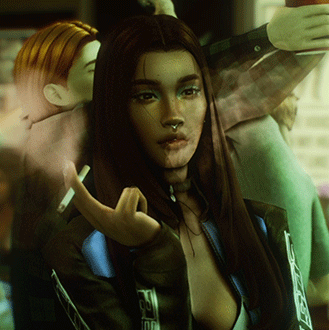
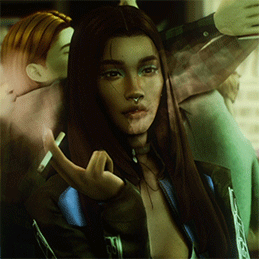
Updated: How I edit my sims 4 screenshots (night-time edition)
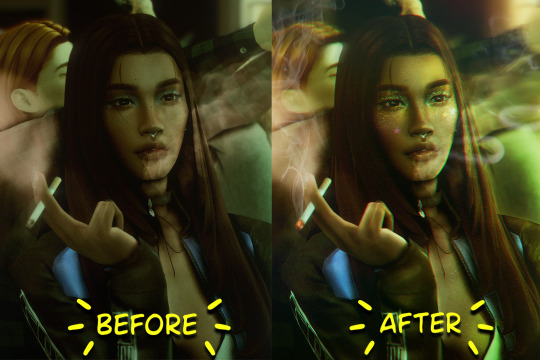
A more detailed editing tut so you can understand my process as it may help you, i edited this relatively quickly and usually spend about 1-2hrs editing something...so let's goo.....
Before taking screenshots:
Help yourself as much as you can in-game, I always make sure there is some sort of light source in my pictures or something interesting that I can add to enhance something already there
Understand good/bad composition and add variety by using different angles
I take LOTS of photos just to end up with 1 or 2 good ones

I'll just be using photoshop for this, but i also like to use the procreate app as i'm more confident w it.
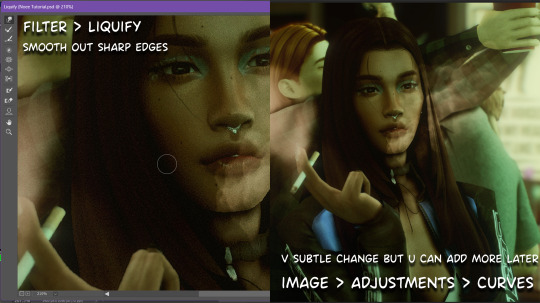
step1: I check if there are any major glitches or hard areas e.g, fingers elbows etc.. that have sharp points and pull them in liquify so they are smooth. Then use curves to change the contrast.
step2: *duplicates image* using the dodge and burn tools (keyboard shortcut: o ) i'll add emphasis to highlights and shadows (be careful with these as the dodge tool can ruin the image if used in excess) *merges image* (i duplicate and merge as i go, utilise using lots of layers so you can go back if you mess up/ want to change the opacity of an effect.)
step3: making light sources POP. *new layer* change blending mode to overlay or soft light and choose a colour you like.

step4: *new layer* draw hair strands. i just use a basic round brush in photoshop and change the hardness or i'll use a sharp caligraphy type brush depending on my sims hair type. (i try not to overdo it as i like maxis hair and don't want it to look too realistic)
step5: i would then add a new layer and set the blending mode to multiply to add more shadows, but i don't feel like i need to at this point.
step6: *duplicates image* go to filter > camera raw filter, i change the "light" and "curve" panels, i like green tints in my screenshots especially the night ones. (this is where all the magic happens really so just adjust all the channels to your liking, lightroom is also really good to use)
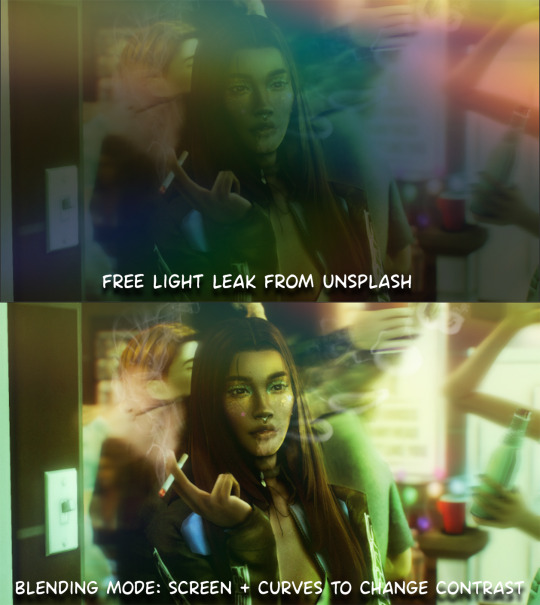
step7: *create new layer* blending mode: screen or linear dodge (add) / makeup and finishing touches! - for this look i'll get stars and glitter pngs off google or unsplash same for the smoke, though if i'm using procreate they have free brushes for that :')

step8: add light leaks as they add some fun dynamic lighting and textures to your screenshots. (i also flip my image horizantally [image > image rotation > flip canvas horizontally] whilst editing as it's like a "fresh pair of eyes" when you've been editing for a while so you can see what looks off)
final step: merge all the layers (though i do merge along the way once i'm happy with something) go to filter > sharpen > smart sharpen. I leave it as the default setting.
extra step if u want: for party pics i might add chromic abberation here is a 60 second tutorial on youtube it makes the pic look cool and trippy.
And you're done!! congrats on surviving. if you have any questions please send them in my ask box so others can see and get help too.
257 notes
·
View notes
Text
Because I had headcanon that Color is Autistic and has developed special interests in things such as photography, travel, maybe even things like social advocacy.
Maybe even philosophy and psychology. For now, in this posts, I’ll focus on the big two: photography and traveling. (I will also touch on how Color’s physical disability, chronic fatigue, his autism, and perhaps his ptsd/ separation anxiety from Killer also effect his ability to engage in his interests in another post.)
I think he’d develop some decent if not above average technical knowledge, such as camera types and functions. Detailed understanding of different types of cameras (DSLR, mirrorless, point-and-shoot, medium format, etc.) and their specific functions.
Knowledge about various lenses (prime, zoom, wide-angle, telephoto, macro) and their applications. Mastery of camera settings like ISO, aperture, shutter speed, and how to manipulate them for different lighting conditions and artistic effects.
In-depth understanding of how aperture, shutter speed, and ISO interact to create a properly exposed photograph. Proficiency in using software like Adobe Lightroom, Photoshop, or other photo editing tools for post-processing and enhancing images.
He’d learn about artistic elements such as composition techniques, lighten and color theory. Develop a familiarity with compositional rules like the rule of thirds, leading lines, framing, symmetry, and how to creatively break these rules.
Knowledge about natural and artificial lighting, how to use light to create mood and depth, and techniques like backlighting, side lighting, and using reflectors. Understanding of how colors interact, complementary colors, and how to use color to convey emotion and direct viewer attention.
Awareness of different photography styles (portrait, landscape, macro, street, documentary, astrophotography, etc.) and genres, and what makes each unique.
Knowledge about influential photographers and their work, such as Ansel Adams, Henri Cartier-Bresson, Annie Leibovitz, and contemporary photographers.
Understanding the evolution of photography, from daguerreotypes to digital photography, and significant milestones in the field. Awareness of current trends in photography, popular styles, and emerging technologies.
And, of course, he’d develop and grow practical experiences and hands on practice. Experience with on-location shoots, managing different weather conditions, and adapting to various shooting environments.
Knowledge about how to properly maintain and clean camera equipment to ensure longevity and optimal performance. Skills in troubleshooting common issues like lens flare, sensor dust, or focus problems.
He’d have a deep enthusiasm for specific techniques or subjects he enjoys photographing, whichever or whatever you all think those could be exactly.
Likely to have personal photography projects, well-organized portfolios, and possibly an online presence showcasing their work. Extensive collection of books, articles, videos, and tutorials related to photography.
A special interest in traveling, in addition to photography, would manifest in the character in several ways, showcasing their passion and extensive knowledge about various aspects of travel. Here are some specific aspects:
For his interest in travel, he’d be very well versed in the planning and research process. Color might create comprehensive travel itineraries, meticulously planning each day's activities, routes, and schedules.
He might gradually develop an extensive knowledge about various travel destinations, including historical sites, natural landmarks, cultural attractions, and lesser-known gems.
He’d display a proficiency in booking flights, accommodations, and transportation, as well as understanding visa requirements, travel insurance, and local regulations.
An expertise in packing efficiently, knowing what to bring for different climates and activities, and how to pack photography gear safely for travel. Color is likely to show a very deep and profound appreciation for different cultures, learning basic phrases or even fluency in multiple languages to better communicate while traveling.
He’d definitely show a deep interest in trying and understanding local cuisines, knowing popular dishes, and even recipes from various regions. He’d have at least some knowledge about local customs, traditions, festivals, and etiquette to respect and immerse themselves in different cultures.
He’d certainly develop some geographical and historical knowledge, with a detailed understanding of world geography, maps, and the ability to navigate using traditional maps as well as digital tools.
Knowledge about the history of the places he visits, including significant events, historical figures, and the cultural evolution of the region.
He might maintain detailed travel logs or journals documenting his experiences, including photos, notes, and personal reflections. He’d definitely collect souvenirs, postcards, or other memorabilia from his travels; often gifting them to beloved friends.
He’d probably engage with travel communities, forums, and social media groups to share experiences and gain insights.
This special interest would possibly lead to him gaining a lot of practical skills, such as in budget management. Expertise in budgeting for travel, finding deals, and managing expenses effectively.
He might display an ability to adapt to different environments, handle unexpected situations, and problem-solve while on the go.
Although it’d probably be harder for him than most, particularly if he has a harder time handling and dealing with change—especially if the change is unexpected and unplanned.
Knowledge about staying healthy while traveling, such as understanding local healthcare options, vaccinations, and travel safety tips.
He’d like combine both interests by using his photography skills to capture stunning images of the places he visits, creating travel blogs or photo albums to document his journeys.
He might create photo essays or visual stories that capture the essence of the cultures and places he explores. Share his travel experiences and recommendations with others, possibly through writing travel guides, blogs, or social media content.
All this is to say that Killer would definitely encourage Color to come with him to explore abandoned places and ghost towns, and Color’s going to be so overjoyed he starts hand flapping. He’s going to take so many pictures, he’s going to remember it forever.
#utmv headcanons#utmv hc#killer sans#utmv#sans au#sans aus#killer!sans#killertale#othertale#othertale sans#other sans#color!sans#colour sans#color spectrum duo#colorkiller#undertale#undertale au#undertale aus#utmv au#autistic headcanon#special interest#undertale something new#undertalesomethingnew#something new#something new sans#something new au#killertale sans#canon disabled character#bad sanses#bad sans gang
36 notes
·
View notes
Text

An seperate extra from the gold panning photos.
I edited this with Lightroom mobile! And I'll tell you it's worth the money! It's SO much better than picsart. No quality loss either! If you're new to Adobe and photography and just doing basic photo editing, no fancy stuff; like adding in characters, and so on, go with the 1TB photography plan. Just lightroom. It still has a lot of features, and you get a basic understanding of how to edit photos professionally.
Photoshop is a whole other animal, but there's plenty of up-to-date tutorial videos on youtube. I just don't have a use for it at this point. 🤷♂️
#rdr2#red dead redemption 2#arthur morgan#rdr2 community#rdr2 fandom#rdr2 arthur#rdr2 photography#red dead redemption arthur#arthur morgan rdr2#red dead 2#red dead redemption two#gametastic-photography#lightroom#adobe lightroom#adobe
13 notes
·
View notes
Note
Hey!!! Im a little shy (sorry for anon) but I was wondering how did you learn to take bg3 screenshots THAT LOOK SO AMAZING! I can’t seem to find anywhere on your blog if you already talked about it before. If it’s not too much trouble (and if it’s not your own creative secret) could you at least briefly describe your process? I get absolutely baffled and amazed when I see your posts. Like the angles, the lightning, the colors, the poses look absolutely stunning! I’m so glad I found your blog ❤️
Hi ! Thank you for the kind words :) . Technique depends on the photos - what kind of photo is it, what effect do I want to achieve. I have a tutorial on YouTube on how to take screenshots, but it is a bit outdated (I improved my skills) and it is in Polish. The topic is quite extensive, so it would probably be easier to explain how I achieved a specific effect in a specific photo. You can send me a DM - you don't have to be shy, I don't bite :D. I helped one person in taking screenshots, so I'll be happy to help you too :). From general information, the tools we use are important for taking screenshots. I use ReShade and Otis free camera mod. For editing Lightroom and Photoshop - I used to work as a photographer, so I know these programs. Sometimes I use ready-made presets from Nexus for ReShade, which I slightly modify, and then edit the screenshot in Lightroom and Photoshop. Lightroom and Photoshop is my main working tools.
A trick I can recommend to have nice, delicate light for portraits - talk to the character, make a quick save and do a quick load - then the light will be better for photos :) .
As for the rest, as I mentioned, the topic is extensive, so you can send me a DM and we will talk there, or you can send the questions about how I took a specific photo and how to achieve such an effect.
I hope everything is understandable - English is not my native language.
9 notes
·
View notes
Text
adobe products I know how to use from easiest to hardest to learn. really interesting stuff I know
acrobat pro - easy, intuitive, helpful. -1 point for being very hard to download illegally.. something about the software makes it only stay cracked for a few days so I download/crack it once a year when I really need to edit a pdf
lightroom - haven't used for anything very complicated but used it to compile high def photos of flies from a microscope for a whole summer. straightforward
dreamweaver - had to use it for website design in college once.. totally useless application, but not too difficult. could figure it out in a few hrs
audition - ive used this to edit podcasts for a school project... not too bad, but have never used it for actual music purposes, so hard to judge
indesign - I love you adobe indesign, so good for poster design, definitely easier to use if you come in with prev. experience from other adobe applications. kind of a learning curve if you haven't though. started using it middle school for a journalism class and now use it for making figures and posters— blends super well with illustrator
premiere pro - starting to get into the ones that have driven me to tears. I came into it with 0 experience from any other video editing software. I still don’t understand how to truly use keyframes. that said I have successfully edited and captioned videos multiple times with it, useful app
photoshop - by far the most experience with photoshop. I love you adobe photoshop but definitely takes practice. spent weeks watching tutorials when I was 11 just so I could make some horse edits and use it to this day all the time
illustrator - what’s a vector, really, and why does the pen tool never work like I think it should. what do you mean that didn’t form a path. extremely powerful software that is truly top of the line for figure making but requires more study than I ever have time to give it since i’m always using it super rushed
after effects - homer simpson am I disabled meme. like all the difficulties of photoshop combined with all the difficulties of premiere pro and then you also have to check every frame. total nightmare that I spent a solid week trying to learn one summer
8 notes
·
View notes
Text
Turn Your Photos into a Steady Income Stream

In today’s digital world, a picture is worth far more than a thousand words — it can be worth real, steady income. Whether you're a professional photographer or just love snapping great shots with your smartphone, you have an incredible opportunity: turn your photos into a reliable revenue stream.
With the growing demand for authentic, high-quality images for websites, blogs, advertising, and social media, your photo collection could be more valuable than you think. Let’s dive into practical strategies to monetize your photography skills while also highlighting some platforms that can support your digital journey.
1. Sell Your Photos on Stock Photography Sites
The most common way photographers earn passive income is by uploading their images to stock photo websites. Every time someone downloads your image, you earn a commission.
Popular platforms include:
Shutterstock
Adobe Stock
iStock
Alamy
However, if you're serious about maximizing your exposure and revenue, you should also think about creating your own selling platform. Many entrepreneurs are buying premium domains to set up photography portfolios and shops. If you need a memorable domain for your photo business, check out Panda-Fog.com — a marketplace for powerful domain names that can set you apart online.
2. Start Your Own Photography Website
Having your own website to showcase and sell your work not only increases your credibility but also allows you to keep 100% of the profits (no commissions to stock agencies!).
Here's what you’ll need:
A domain name (again, Panda-Fog.com can help you find a strong brand name)
Hosting service
A clean, visually appealing portfolio template
E-commerce functionality for direct sales
Additionally, you can enhance your website's SEO and discoverability by writing blog posts about photography tips, your creative process, and client stories. This builds trust and brings organic traffic.
If you’re looking for expert help setting up your personal brand or even recruiting web developers for your project, platforms like AIMESBD.com can connect you to professional talent — especially useful for Bangladesh-based creators.
3. License Your Photos for Commercial Use
You can license your images directly to businesses, media outlets, authors, and marketing agencies. By offering exclusive or limited-use licenses, you command higher prices compared to stock sites.
To attract commercial clients:
Showcase your best work online
Network in professional groups like Fishbowl or Xing
Use LinkedIn to present yourself as a visual branding specialist
List your services on freelance marketplaces
If you ever expand into selling lifestyle or fashion photography, platforms like RISFashions.com can be great for collaborations in the fashion industry.
4. Create a Niche Photo Blog or YouTube Channel
Another creative way to turn photography into passive income is content creation. Start a photo-centric blog or YouTube channel where you share:
Photography tutorials
Behind-the-scenes of shoots
Editing tips and gear reviews
Stories about your travels and photo adventures
You can monetize through ads (Google AdSense), sponsored content, affiliate marketing, and even your own products or presets.
To help your blog or YouTube channel grow faster, engage actively on platforms like Quora and contribute helpful answers related to photography, which can lead new fans to your website or channel.
In fact, if you want a place to share short job-related gigs like "Photography Editing Services" or "Quick Photo Shoots for Websites", registering as a seller at ImageDoorz.com could open another revenue avenue.
5. Offer Online Photography Courses
If you’re experienced, there’s a huge market for online learning. Platforms like Udemy, Teachable, or Skillshare make it simple to build a photography course.
You can create courses on:
Basics of photography for beginners
How to edit like a pro using Lightroom or Photoshop
How to monetize photography
Or, create your own platform using tools you find online — owning your own online course site gives you much more control and profits. Setting up a professional-looking educational site is easier if you have a strong brand domain — again, a great domain from Panda-Fog.com can make a difference.
Need talent to help you create and market your course? AIMESBD.com is perfect for finding digital marketing experts.
6. Participate in Photography Competitions
Another exciting way to monetize your photography skills is by participating in photography contests. Many competitions offer significant cash prizes, publication opportunities, and exposure to clients.
Some contests even provide the winner with lucrative licensing deals or contracts for future work.
Tips for winning:
Follow the theme closely
Submit technically flawless images
Tell a powerful story through your photo
7. Create and Sell NFTs from Your Photos
The rise of Web3 technology has created an entirely new space for photographers: NFTs (Non-Fungible Tokens).
By minting your photos as NFTs and selling them on platforms like OpenSea or Foundation, you can tap into a futuristic revenue stream. NFT sales not only bring you upfront earnings but often include royalty commissions on all future resales.
If you plan to enter the NFT space, having your own branded identity is crucial — again, starting with a strong domain (like those on Panda-Fog.com) helps establish authenticity and trust.
8. Freelance for Brands and Agencies
You don’t always need to wait for customers to come to you. Actively pitch your photography services to:
E-commerce businesses
Bloggers needing custom images
Local businesses updating their websites
Wedding and event planners
Platforms like Patripatro.com might not directly hire photographers, but matrimonial services often need professional event photographers — you can network with people who may need wedding photography packages!
Final Thoughts
Turning your photography passion into a steady income stream is absolutely achievable in 2025 and beyond. Like any entrepreneurial journey, it requires consistency, quality, marketing, and a little creativity.
In summary:
Sell on stock platforms while building your own website.
License your work smartly and explore commercial opportunities.
Create online content (blogs, courses, YouTube) to diversify income.
Tap into modern options like NFTs and contests.
Use job portals like AIMESBD.com to expand your professional network.
And remember — your brand identity matters. Investing in a memorable domain from Panda-Fog.com could be one of the smartest moves to secure your future success in the digital world.
2 notes
·
View notes
Text
Yvette Heiser - Phone Photography Essentials without Formal Education
In today's digital world, the art of photography has become more accessible than ever. You no longer need a formal education or expensive camera equipment to create stunning images. With advancements in smartphone technology, your phone can be a powerful tool for capturing professional-quality photos. Here’s everything you need to know to excel in phone photography without a formal education.

Understanding Your Phone’s Camera
Before diving into photography, it’s essential to understand the capabilities of your phone’s camera. Modern smartphones are equipped with high-resolution sensors, multiple lenses, and advanced image processing software. Take some time to familiarize yourself with the various settings and features available on your phone's camera, including HDR, portrait mode, night mode, and manual controls for ISO, shutter speed, and white balance. For more detailed insights, consider exploring resources like Yvette Heiser Texas – All You Need to Know about Phone Photography.
Mastering the Basics of Photography
Even without formal education, you can learn the fundamental principles of photography. Start with the basics:
Composition: The rule of thirds, leading lines, and framing are essential techniques that can help you create balanced and visually appealing photos.
Lighting: Excellent lighting is essential for taking outstanding photos. Natural light is your greatest ally, so it's important to learn how to use it effectively. Understand the differences between soft and hard lighting and how to leverage shadows and highlights to enhance your images.
Focus and Exposure: Ensure your subject is in sharp focus. Most smartphones allow you to tap the screen to set the focus point. Adjusting exposure can help you manage the brightness and contrast of your photos.
Leveraging Photography Apps
One of the advantages of phone photography is the plethora of apps available to enhance your images. Here are a few must-have apps:
Editing Apps: Tools like Adobe Lightroom, Snapseed, and VSCO provide robust features for tweaking exposure, contrast, saturation, and other elements. They also come with presets and filters that can add unique and creative touches to your photos.
Camera Apps: Apps like ProCamera and Camera+ offer advanced manual controls, allowing you to fine-tune settings like ISO, shutter speed, and white balance.
Special Effects: Apps such as Lens Distortions and Afterlight can add unique effects and overlays to your photos, helping them stand out.
Building a Strong Portfolio
Your portfolio is your introduction in the photography world. Create a diverse collection of your best work to showcase your skills and style. Include different subjects such as landscapes, portraits, and macro shots. Regularly refresh your portfolio with updated and enhanced photographs. Sharing your portfolio on social media platforms like Instagram, Facebook, and Pinterest can help you reach a wider audience and attract potential clients.
Networking and Marketing
Building a successful photography career requires more than just taking great photos. Networking and marketing are essential components:
Networking: Join online photography communities, attend local meetups, and participate in photography challenges. Networking with other photographers can lead to collaborations, referrals, and learning opportunities.
Social Media Marketing: Use social media to market your photography services. Regularly post your work, engage with your audience, and share behind-the-scenes content. Consider creating a website to establish an online presence and make it easy for clients to find and contact you.
Continuous Learning and Experimentation
Photography is an ever-evolving field, and staying updated with the latest trends and techniques is crucial. Follow industry leaders, read photography blogs, and watch tutorial videos. Don’t be afraid to experiment with new styles and subjects. Continuous learning and experimentation will help you grow as a photographer and keep your work fresh and innovative.
Conclusion
Excelling in phone photography without formal education is entirely achievable with dedication and practice. By understanding your phone’s camera, mastering photography basics, leveraging apps, building a strong portfolio, networking, and continuously learning, you can create stunning images and establish a successful photography career. Yvette Heiser- Is it possible to start a career in photography without formal education? Embrace the journey, and let your creativity shine through your lens!
#wedding#moments#camera#pictures#photographer#photography#childphotography#yvette heiser#photographytips#events
7 notes
·
View notes
Text
LensCraft Mastery: Elevate Your Photography Skills to the Next Level

Photography is more than just pressing a button; it’s an art, a science, and a means of storytelling. LensCraft Mastery is a comprehensive guide designed to help photographers—whether beginners or seasoned professionals—unlock their full creative potential. This tutorial series delves into the intricate aspects of photography, from mastering the fundamentals of exposure and composition to exploring advanced techniques in lighting, post-processing, and storytelling through imagery.
Why LensCraft Mastery?
The name LensCraft Mastery symbolizes the fusion of technical expertise (Lens) with artistic craftsmanship (Craft). Photography is both a technical discipline and an expressive medium, requiring a balance between understanding camera mechanics and developing an artistic vision. This tutorial series aims to bridge that gap by offering structured, easy-to-follow lessons that cater to all levels of experience.
1. Mastering the Basics of Photography
For those new to photography, LensCraft Mastery begins with the fundamental concepts that form the backbone of great photography:
Exposure Triangle: The Key to Perfectly Lit Photos
Aperture: Understanding how f-stops affect depth of field and light intake.
Shutter Speed: Capturing motion creatively, from freezing action to long exposures.
ISO: Controlling sensor sensitivity for optimal brightness without excessive noise.
Composition Techniques: Crafting Visually Stunning Images
Rule of Thirds: Placing subjects strategically for balanced compositions.
Leading Lines: Drawing the viewer’s eye to the subject.
Framing & Negative Space: Enhancing depth and focus in a photograph.
2. Advanced Photography Techniques
Once the basics are mastered, LensCraft Mastery delves into techniques that can take your photography to a professional level.
Understanding Light & Shadows
The role of natural light vs. artificial lighting in photography.
How to use soft light for flattering portraits and harsh light for dramatic effects.
Mastering golden hour and blue hour photography.
Camera Settings & Manual Mode
How to use manual focus for precision.
Customizing white balance for accurate color reproduction.
Shooting in RAW vs. JPEG and when to use each format.
3. Specialized Photography Genres
Photography is a vast field, and LensCraft Mastery explores different genres, allowing photographers to find their niche.
Portrait Photography
How to pose subjects naturally for candid and professional shots.
Best lenses for portrait photography (prime vs. zoom).
Background blur (bokeh) techniques for dreamy aesthetics.
Landscape Photography
Composition techniques for breathtaking vistas.
Use of ND (neutral density) filters for long exposures.
How to capture the perfect sunrise and sunset.
Street Photography
Capturing the essence of everyday life.
Ethical considerations in photographing strangers.
How to blend into the scene for natural compositions.
Wildlife & Macro Photography
Tips for photographing animals in motion.
Choosing the best gear for close-up macro shots.
Patience and planning for capturing rare moments.
4. The Power of Post-Processing
A great photo doesn’t always end with the camera—post-processing is essential for refining images. LensCraft Mastery provides in-depth tutorials on:
Adobe Lightroom & Photoshop Editing
Adjusting exposure, contrast, and white balance for balanced images.
Retouching techniques for portraits and landscapes.
Removing unwanted elements and enhancing details.
Mobile Editing for On-the-Go Photography
Best apps for editing (Snapseed, VSCO, Lightroom Mobile).
Color grading techniques for a unique aesthetic.
Quick retouching methods for social media-ready images.
5. Developing a Photographer’s Mindset
Photography is more than just technical skill—it requires creativity, patience, and an eye for detail. LensCraft Mastery helps photographers develop a storytelling approach, teaching how to:
Capture emotions and narratives within a single frame.
Use minimalism and abstract photography to create intriguing images.
Experiment with angles and perspectives to bring a fresh outlook to everyday scenes.
6. Monetizing Your Photography Skills
For those looking to turn their passion into a profession, LensCraft Mastery includes insights on:
How to start a photography business and build a portfolio.
Selling photos online (stock photography, prints, NFTs).
Social media strategies to grow an audience and attract clients.
Final Thoughts
Whether you’re just starting or looking to refine your craft, LensCraft Mastery offers a structured, engaging, and practical way to enhance your photography skills. By blending technical knowledge, artistic creativity, and real-world applications, this tutorial series is designed to empower photographers at every stage of their journey.
Start mastering your craft today and turn your vision into reality—one frame at a time. 📸✨
2 notes
·
View notes
Note
Hello! I really like your work. They are always inspiring and uplifting. Thanks to your work, I have creative inspiration. The only thing that I can't do is to make a screenshot of my work in the same quality. My picture is always small and pixelated. Can you share how you take photos of your lookbooks? How do you keep them in such excellent quality? I will be very grateful for your feedback.
H! Thank you for the wonderful comments! When it comes to the quality of my photos, it's a couple of things I do.
my in game graphics quality is on ultra/custom. I play on a dell ryzen g15 laptop.
I have reshade/gshade installed. I use Serene 2.0 by @pixelglam.
I recently started using SWRE. This is the tutorial I followed (here). My dimensions are 3000x3000.
I use a quality enhancing app called Remini and then I use an editing preset I made with adobe lightroom.
7 notes
·
View notes
Note
hey I love your edits and I was just wondering what you use/do to edit your photos? Not to copy, just in awe!
omggg thank you anon!!! the fact u want to know at all means so much 😭💓 especially when theres so many people posting edits that have a much better understanding of how to edit photos than me!!! (may i direct you to the amazing @yesloulou and her gifs..) ask me anything im happy to share and for u to copy my techniques (??) send me any other questions u have if i dont answer them i cud talk abt this all day .. 🫶🫶
so! i use the mobile version of lightroom when im editing photos quickly e.g. on race day, and tbf, its my main editing app. if that doesnt click with u, theres also snapseed which is a google editing app that i also used for a while until i realised lightroom was free (a blessing 😭). I also sometimes use photopea as a rip-off photoshop if i want to do more crazy stuff 🤪🤪🤪
first thing is crop the image if it needs it. i have a preference for portrait photos, just bc i prefer the way they look when posted. i use all sorts of ratios, but my favourites are 3:4 and 5:4 just bc i think they work best with driver portraits! (hot tip: the rule of thirds is soooo helpful!! find a metaphorical 'line' through the photo and line that up with one of the thirds) (lightroom produces the grid automatically when u crop xxx)
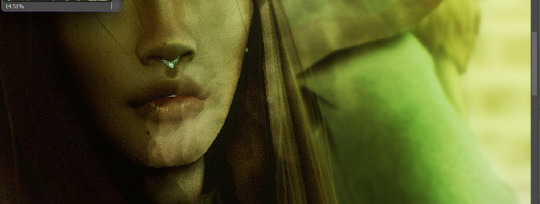
the next thing i do with a photo is correct the lighting and colouring. there are plenty of tutorials online and i can go more indepth if u want, but i tend to favour lower contrast with low highlights (bc i hate when u lose detail in highlights. the bane of my existence). its usually the first thing i try, but if it looks horrible i'll try different things. to correct colouring, i use the tint/temperature sliders (im still learning how to intuitively use these rather than messing around and going hm. too purple right before i post). since most of the photos i edit r taken by super talented F1 photographers i rarely have to use curves, but sometimes i do! so i do that as well before i get into the meat of it if needed 😌
then i adjust the tint/temperature & vibrance and saturation until i'm getting the vibe i want (e.g. i love making max photos cooler toned). then i use colour mix to change anything specific about colours in the image (i most commonly use this to make daniel/charles' skin less yellow and more red toned, to soften any redness or to make max's blush pink). then i colour grade!
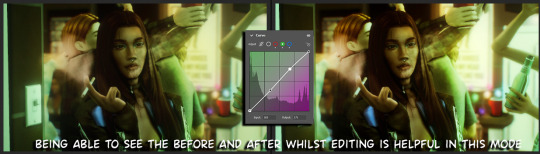
after that i decide whether the image needs sharpening, extra texture or dehazing, and then i add grain! i prefer a rough, understated grain so that you dont lose loads of the detail from the photo. here's some examples of before and afters of some of my more complex edits:

-> this one was lighting correction and colour correction! i also used curves im pretty sure 😭


-> exposure and contrast changes and colour changes/grading (can we appreciate this photo.. wow)

-> made photo brighter (pretty sure i lowered the highlights..) n changed the temperature of the photo
i hope this helps!!!! if anyone wants me to do like a proper adjustment by adjustment type thing send me an ask and i will do!!! thank you so much kind anon 💖🫵
#ahhhhh anon ur so sweet i hope this is comprehensive?? sorry if i went overboard 😔😔😔#beth answers#lovely internet people
14 notes
·
View notes