#photography tutorials
Text
The Power of Affiliate Advertising: Boosting Your Business Online
First Paragraph: On the planet of on the internet organization, affiliate advertising has actually become a prominent strategy for business to create income. Put simply, associate advertising is the procedure of advertising one more firm's services or products and earning a compensation for each sale made via your distinct associate web link. This can be done with various channels such as article, social media sites, or e-mail advertising. The appeal of associate advertising is that it permits businesses to increase their reach and also tap into new audiences without the requirement for extra advertising and marketing efforts.Second Paragraph: For those aiming to start their own associate advertising and marketing trip, the secret is to select the right product and services to promote. It is very important to choose items that straighten with your specific niche and also target market, as this will certainly increase the possibility of conversions. Structure trust fund with your audience is additionally vital, as they are most likely to buy items recommended by a person they trust. As an affiliate marketing expert, producing important web content that informs and also notifies your target market can assist develop this count on and also inevitably bring about greater conversions. With the appropriate technique and approach, associate advertising and marketing can be an effective tool for companies seeking to grow their on-line visibility as well as drive sales.
Read more here Get more details here
2 notes
·
View notes
Text
Mastering Photography with YouTube: A Guide to Learning Through Videos
Introduction
In the digital age, photography has become more accessible than ever before. Whether you’re using a smartphone or a professional camera, the desire to capture stunning images is universal. One of the most effective and accessible ways to learn photography is through YouTube. This platform hosts a wealth of tutorials, reviews, and tips that cater to all levels, from beginners to…
#A Guide to Learning Through Videos#Beginner Photography#BeginnerPhotography#Camera Techniques#CameraTips#Creative Photography#CreativePhotography#Digital photography#LearnPhotography#Mastering Photography#Mastering Photography with YouTube#Online Education#Photography Tips#Photography Tutorials#PhotographyCourses#PhotographyGuides#PhotographyHacks#PhotographyTechniques#PhotographyTips#PhotoSkills. VideoTutorials#technique#tips#Tips and Techniques#Visual Learning#Youtube#YouTube Learning#YouTubeLearning. PhotoEditing#YouTubePhotography#YouTubeTutorials
0 notes
Text
Cat Photography: Pet Photography Tips and Camera Settings for Better Cat Portraits
‘Until one has loved an animal, a part of one’s soul remains unawakened’ ~ Anatole France
They say, the experience of loving and caring for an animal awakens a deep and essential part of our being, enriching our lives in ways that are difficult to describe. I didn’t realise this until I met my friend’s pet, the cute kitten ‘Cheeku’!
Pets are great companions with whom we can converse and share…

View On WordPress
#cat photography#DSLR photography for beginners#DSLR photography tutorials#learn photography#pet photography#pet photography camera settings#pet photography tips#Photography#photography for beginners#photography tutorials
1 note
·
View note
Video
youtube
Focus Stacking Photoshoot To Photoshop Bracketing - 3
0 notes
Text
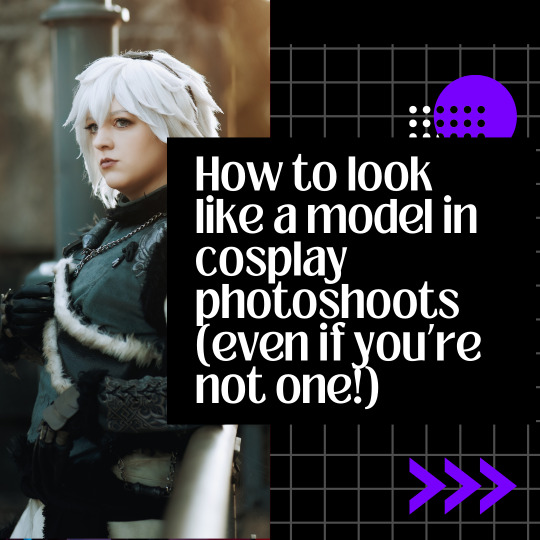
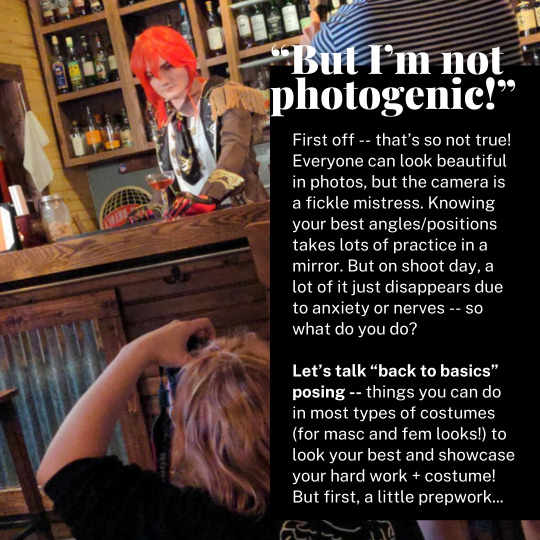
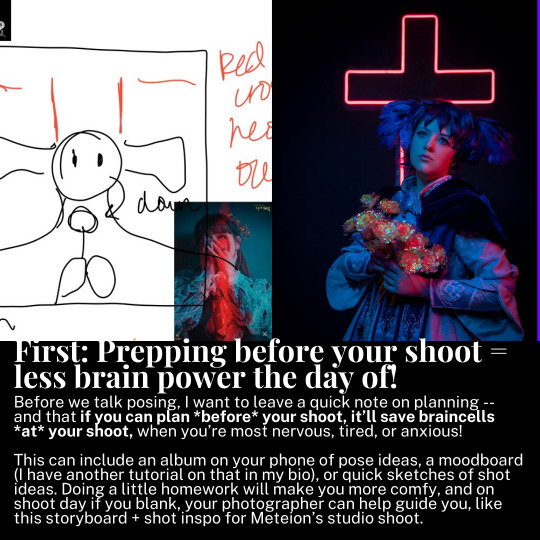
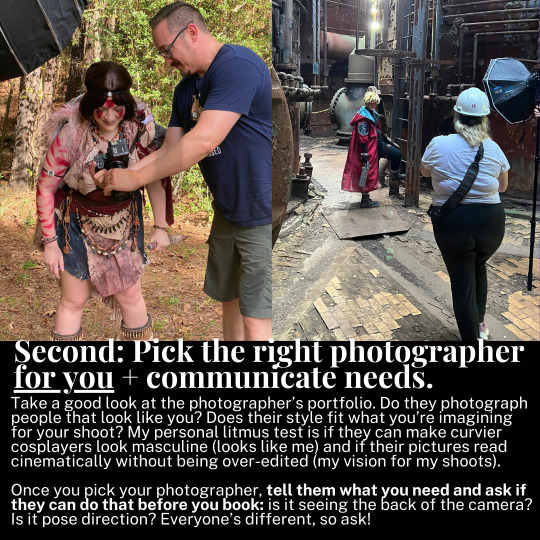

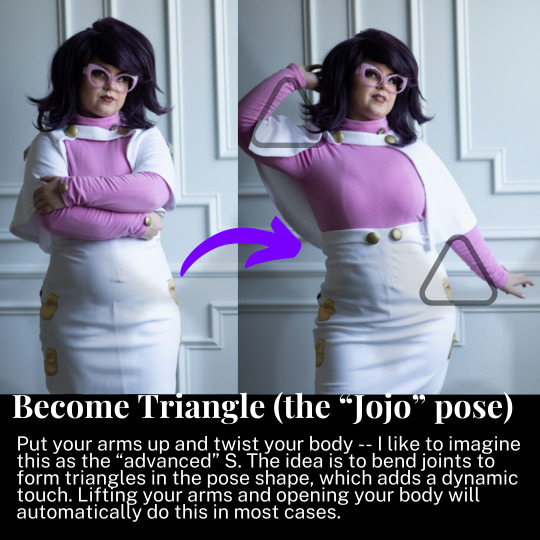

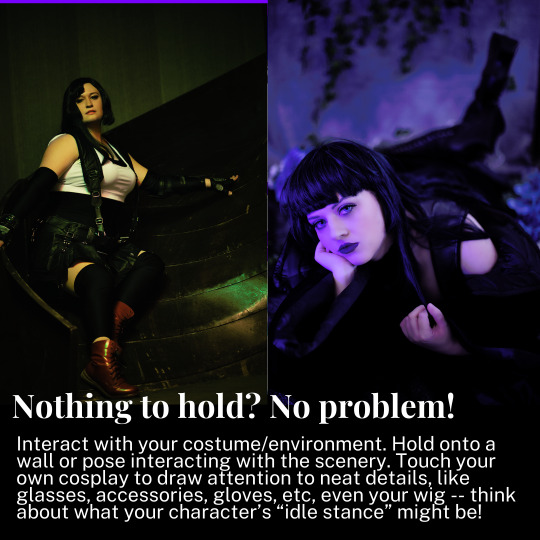
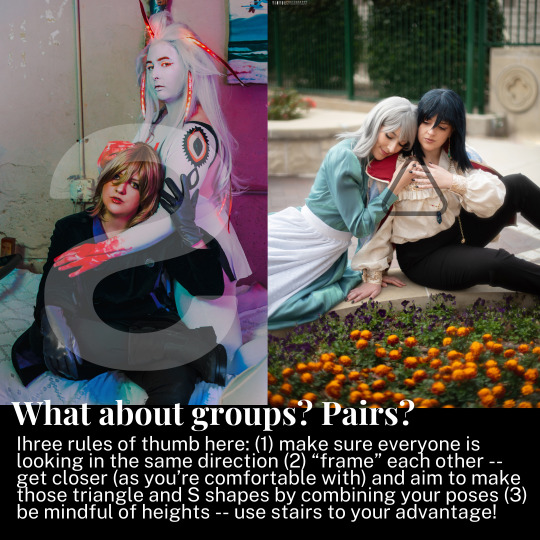
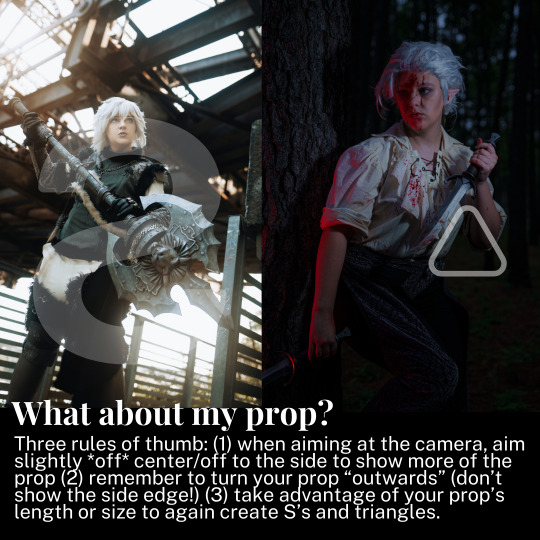
A cosplay tutorial on how to pose for photoshoots, no matter what you look like and what you're wearing -- with example shots to help guide you along.
264 notes
·
View notes
Text
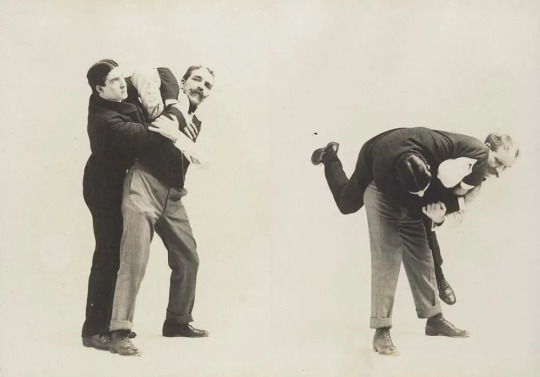
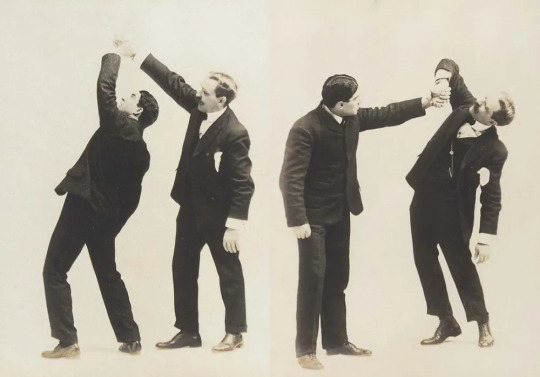
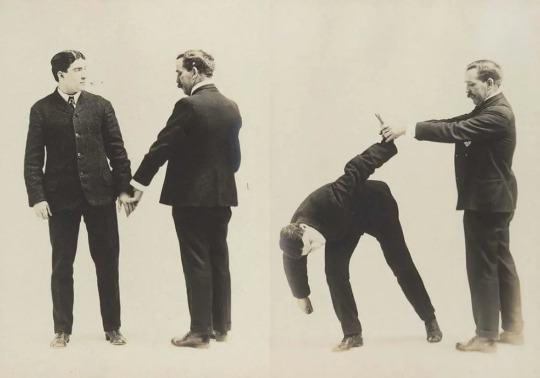
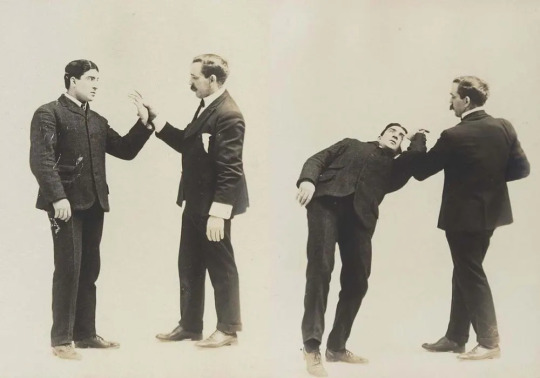
Victorian-era photo album offers a gentleman's guide to self-defense maneuvers. [1895]
162 notes
·
View notes
Text

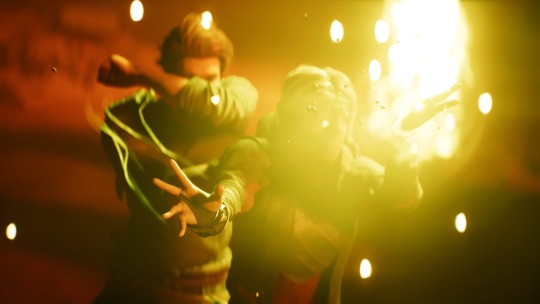
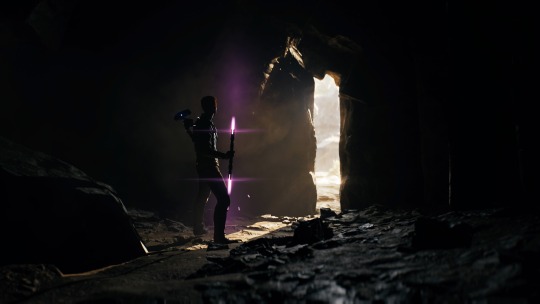
Jedi Survivor Photomode Tips: Portrait Lighting!
There are four lighting features that impact Survivor’s photomode: the environmental light, Cal's lightsaber, the exposure slider, and the three spotlights. Let's use them all 🔆

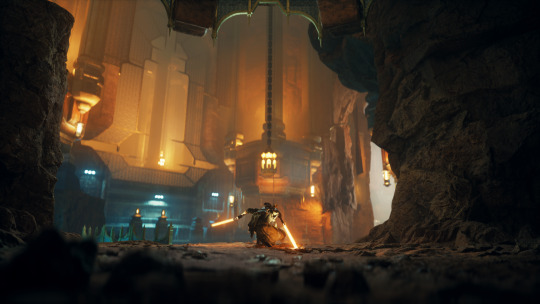
Environment
The environment/lighting teams at Respawn have designed incredible locations across all these different Star Wars planets. Pay attention to how the already-placed lights impact your portrait: I have a running shortlist of favorite locations that I often go back to when creating a specific look.
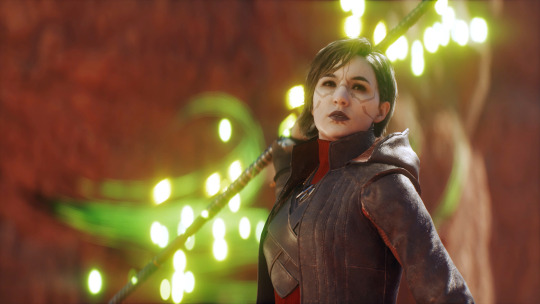

Environmental lighting also includes effects like fire particles, weapons, Merrin’s magick, etc. If you get your timing right, these can add extra color and visual interest to your photo.
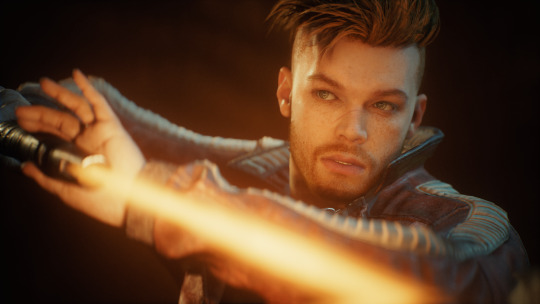
Lightsaber
Cal’s lightsaber! It’s made of light! While everyone has their own color preferences (ginger saber supremacy) keep your color choice in mind when using the saber as a key light.
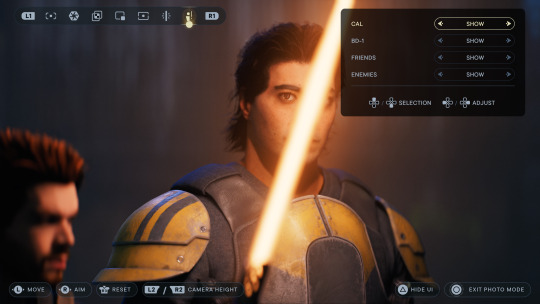
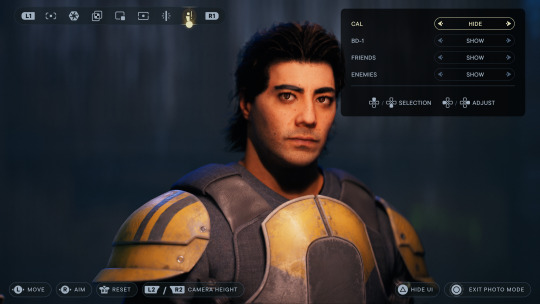
Bonus tip: Cal’s saber can also be used to help light NPCs 👀 Photomode allows you to toggle Cal’s visibility on and off, but the ambient glow from the saber will remain. It’s pretty easy to tell when I’m using this trick: just look for a bar-shaped catchlight in the character’s eyes.
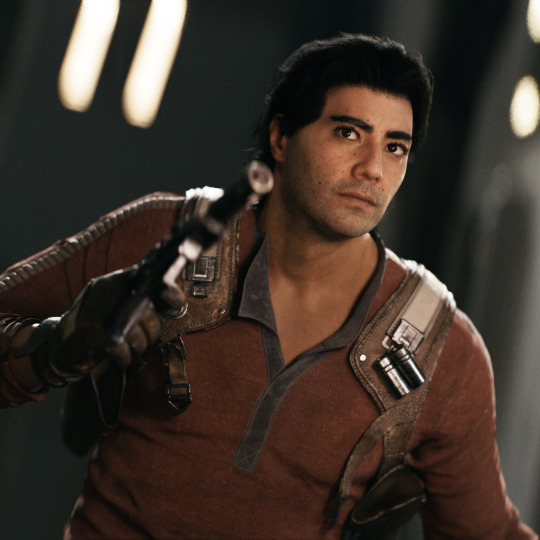
Speaking of catchlights - they’re a great way to add life to your portrait. If the environmental light doesn’t hit the character’s eyes, I’ll often use the first spotlight as a key (main) light to try and create that reflection.
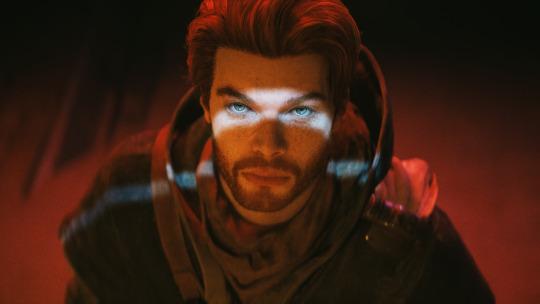
Spotlights
I’m often using spotlights in two ways, either intensifying the environmental light or pushing the image with stylized lighting. The first creates more interaction between the character and their surroundings, while the second adds drama and visual interest. My favorite portraits are often a mix of both.
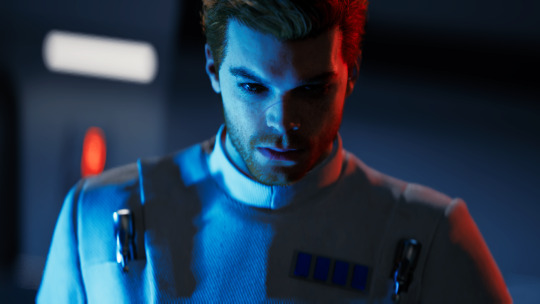
Here’s a breakdown from a recent photo: the unlit photo (1), a yellow spotlight as a key (2), a red rim light that connects to the neon sign in the background (3), a green rim light for stylization and repeating color (4), and the final image (5)


Other spotlight tips: play with moving them closer/further away from your subject, along with the intensity of the light itself. Some colors (white, yellow) are more powerful than others (red, blue). If I can’t get the color I want from one light, I’ll place two in the same location and drop the intensity to blend them - blue and green make turquoise!
If you want to be a nerd like me (though I'm in this industry so it's kind of my job) study lighting that’s used in real life portraiture and cinematography. Techniques like short lighting, three point lighting, butterfly lighting, etc.
Exposure Slider
The exposure slider in photomode is a helpful option when the entire scene is darker/brighter than you’d like. It’s also a good way to isolate your subject from the background: drop the exposure down, then use spotlights to add light back to your subject. Note that the spotlight brightness is impacted by the exposure as well, so you’ll need to crank the spotlights up to compensate.
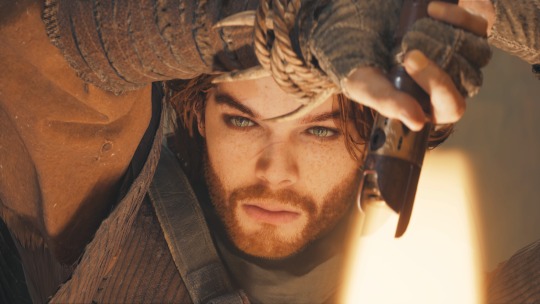
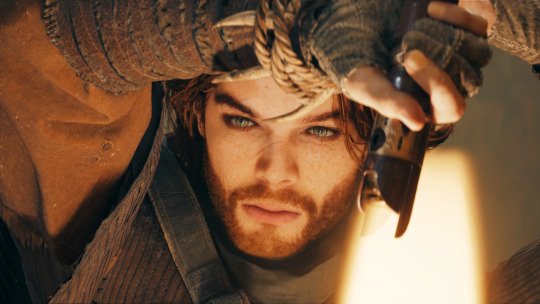
Photo editing
Survivor’s visuals have a beautiful dynamic range and photomode does a great job protecting its highlights and shadows, though that often means less contrast. So if it’s a favorite portrait, I’ll add some contrast back in and often push complementary color into the shadows (yay color theory!)
--
So I've been slowly writing notes for a full-fledged video tutorial and wanted to try a thread-style post in the meantime. Lighting is such an important part of photography, both IRL and virtual, but it's not the easiest tool to use. This is more theory than a practical how-to, but hopefully some of it is helpful?
If you made it all the way down here, you get... a turbo dog or something. Two turbo dogs! 🌭
#star wars jedi survivor#jedi survivor#cal kestis#photomode#virtual photography#star wars#jen makes jedi tutorials
108 notes
·
View notes
Text
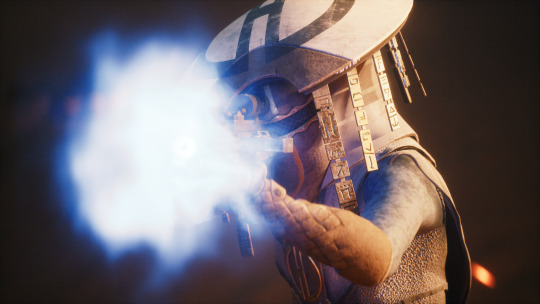
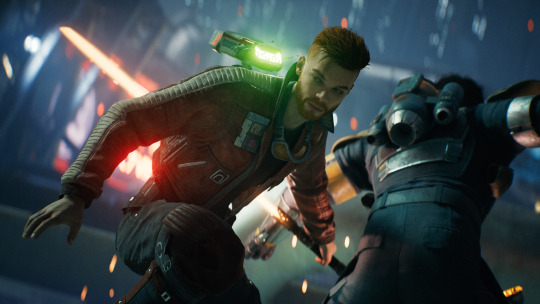
Cyberpunk 2077 Vanilla/Console VP Tutorials
I know this fandom isn't quite as hopping as it used to be... But for those of you who are new around here, and are either stuck on console too, or maybe you just prefer vanilla...
Here's links to all my tyromancy secrets in one convenient location:
Tips For VP When You're Rolling Without Mods
Glitching The Matrix
Clipping Through NPCs
For the record: I take all my VP on console with basically no editing.
(Rotate, crop, maybe minor color correction if a shot I really like came out too dark.)
[gets on soapbox]
I hate using the term "best" to describe things, it is such an arbitrary and hierarchical word. Fandom is supposed to be about community, not competition. Getting notes on this Hellsite™ in a fandom has almost nothing to do with being the "best", or being "good", or having the fanciest PC, or being popular, or how much "content" you crank out at a speed you can't sustain...
Fandom is about making friends.
I'm not the best at anything. I will say I am a console cheese wizard though and I've got a few close chooms that I support the heck out of because they support the heck out of me. Anything I know, I know because I took the time to learn.
And if anyone tells you (including yourself) that you can't make art and take cool ass VP on console or in vanilla photomode, they're wrong. Because I know you can. I believe in you.
[gets off soapbox]
P.S. Want to take cool environmental/landscape shots? Get double jump, save often, practice your parkour!
#cyberpunk 2077#virtual photography#console shots#tutorials#reference#vanilla photomode tutorials#vanilla/console vp#become a cheese wizard like me#learn the way of the fondue#ps5#xbox#straight velveeta#okay get me outta here the tags aren't making any sense#my 3 friends and our corn chip named river ward#i'm gonna be real with you all - i learned all of my skills for said corn chip#also environmental photography is underrated#as is the environment in general#🧼📦
76 notes
·
View notes
Text
Finding Cosplay Photoshoot Locations: Part 1
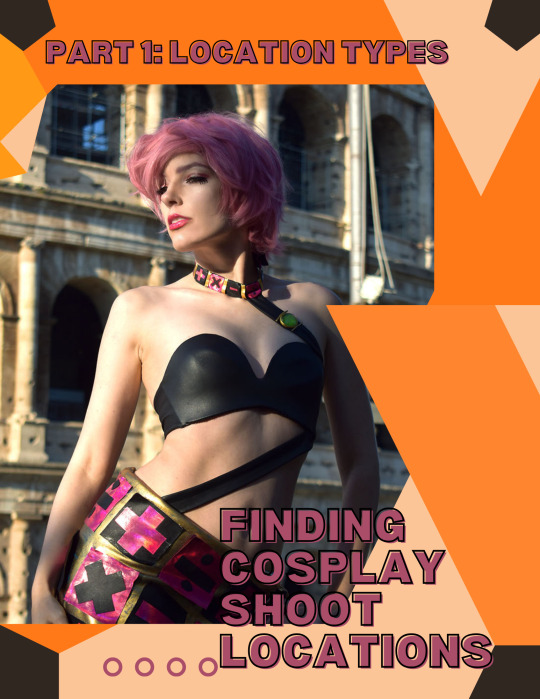
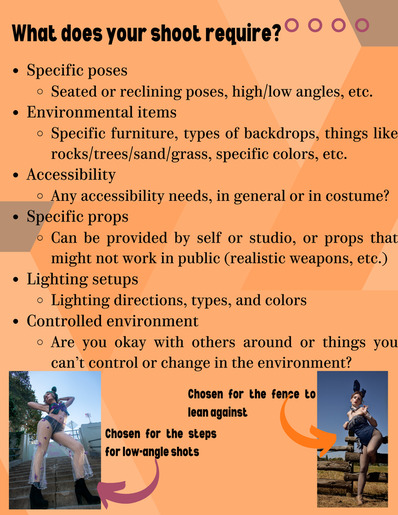


📸Want to do cosplay photoshoots but don't know how to find that perfect place to shoot? This tutorial covers how to brainstorm a location for your shoot, logistical and cost concerns with shoot locations, and how to actually find your dream location.
📸This tutorial can be applied to shoots of all types, including but not limited to self shoots, shoots with friends, and shoots with hired photographers. Self shooting or shooting with friends only requires a camera (a phone works!) and possibly a tripod.
Part 1: Location Types
Coming up with the general type of location you want requires some brainstorming about what you want from the shoot. Think about your specific goals and types of photos you want and how certain types of locations would work for your goal. Remember you can always do multiple shoots for the same costume with different concepts!
For example, if you want big, sweeping shots, you will need a location that allows for wider framing and still looks good, while if you are primarily after shots with closer framing, you can go with a location with only a small usable portion. If you are looking to primarily showcase the costume itself or your posing, a flatter and simpler background works better than a busy background, but if you want cinematic shots or shots where you are existing in the environment as the character, somewhere that can show off the location itself as well as how you exist in it would work better.
Types of Locations
There are three main types of locations for cosplay shoots in relation to the cosplay itself. Of course, you can combine these types and there is a lot of overlap, but thinking of these three location types will help you conceptualize your shoot.
The first type is locations that are similar to something in the series, or an exact location from the series. My cover image is an example of this, where I took photos at the location of the climactic battle of the manga. Most fictional locations don't exist in real life so exactly, however, so think of locations that look similar to where this character might be found. The example on this slide shows a cosplay at a nature preserve with grassy fields and oak trees, which is similar to the locations the character traverses several times throughout the game she is from. This category can also include locations with similar vibes, such as a studio made up to look like a fancy European castle for a character from a series about European royalty, or a shoji screen backdrop for a character who lives in a Japanese-style house.
The second location type is locations with symbolic meaning. These locations showcase something about the themes or character arcs present in the series, and this can be accomplished with anything from specific props and setpieces to the entire background. One shoot I'd love to do with this concept is of Lady Blackpearl staring into a mirror -- this would symbolize her dual personality nature -- or of Lady Oscar wrapped in thorns, with the rose thorns symbolizing her glorious but fragile life. I chose to represent this location type with Ultimecia, a sorceress who wants to compress time so she is the only one who can live in the combined past/present/future, set among ruins. The ruins aren't accurate to the game, but show her crumbling reign marked by the passage of time.
The third location type is locations chosen for pure aesthetics. Obviously all locations are chosen for aesthetics, but these are locations with no deeper meaning and may not represent anything from the series at all. These can range from a simple colored wall backdrop to a sweeping landscape that simply looks good with the colors of the costume. Some examples are the Yasuho Hirose ocean shoot on the slide, where it doesn't represent a particular scene or location in the series but simply looks good with the cut and colors of the costume and the sailor theming, or my Princess White Rose milk bath photoshoot, where again the character never takes a milk bath, but a bathtub full of milk and roses shows off the detail of her floral hat and showcases the opulent nature of a rose-themed princess.
Requirements of your Shoot
Once you have a general concept, think of what is required to fit that concept. This can be as general as specific backgrounds or types of backgrounds to as specific as particular items at the location or particular lighting setups. Some shoots might need specific props, such as furniture to sit or lounge on, and props that won't work in a public location, such as realistic weapons that may cause panic or worse. Also keep in mind any accessibility needs, whether it is an accessible location in general to accommodate a disability or a need that is caused by the costume itself. Check not just the specific area you want to shoot, but how to get there from the parking lot or transit stop. Finally, keep in mind that unsecured outdoor locations, such as a park or beach, are locations where you can't change things about the location and you may encounter other people. Discussion of how to be respectful of such locations is in part 5.
Stay tuned for the rest of the parts~!
Links to other parts: 1 Location Types, 2 Discovering Locations, 3 Indoor vs Outdoor Locations, 4 Location Permissions, 5 Location Logistics
118 notes
·
View notes
Text
Curry Noodles by tappedsauce (TT)
#recipe#recipes#diy#food#gourmet#food photography#foodgasm#culinary#do it yourself#tutorial#foodporn#yummy#tutorials#cooking#recipe video#delicious#recipe videos#video tutorial#noodles recipe#noodles
770 notes
·
View notes
Text
youtube
I finally bothered to learn how to use hotsampling with the IGCS client! I made a tutorial for anyone who's interested :3
#bg3#bg3 virtual photography#virtual photography#otis inf#igcs#baldur's gate 3#bg3 photography#bg3 photomode#bg3 tutorial#bg3 modding#bg3 mods#Youtube
61 notes
·
View notes
Text
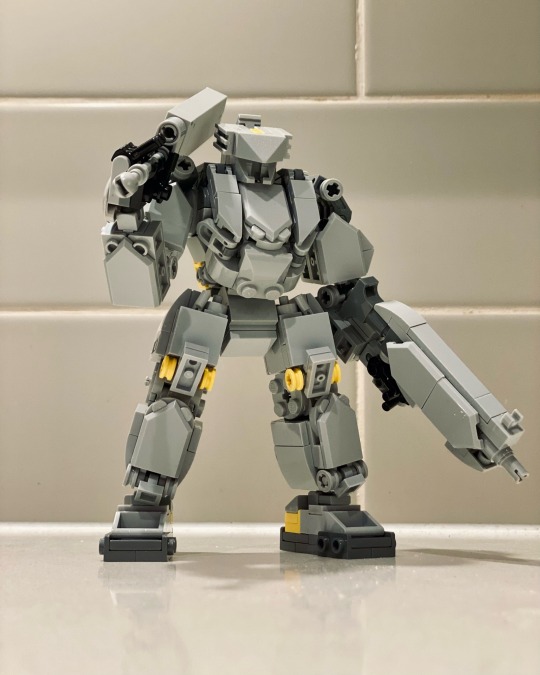
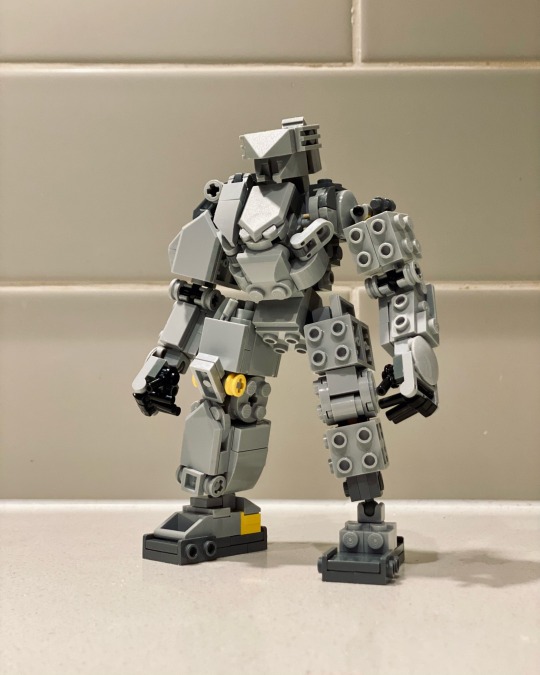
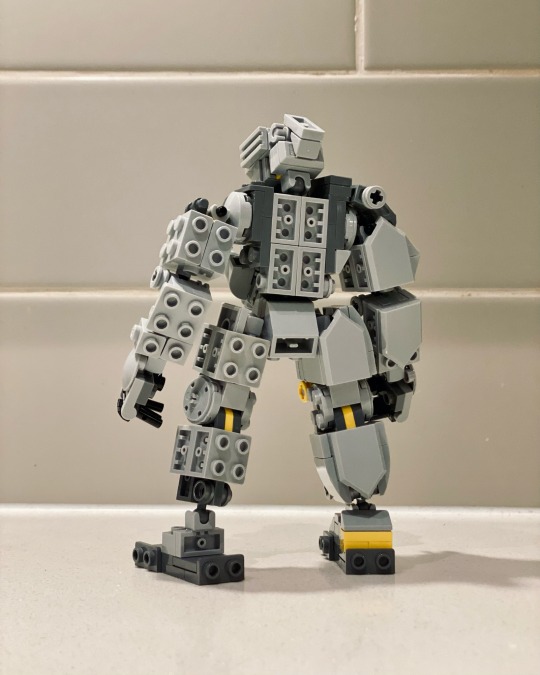
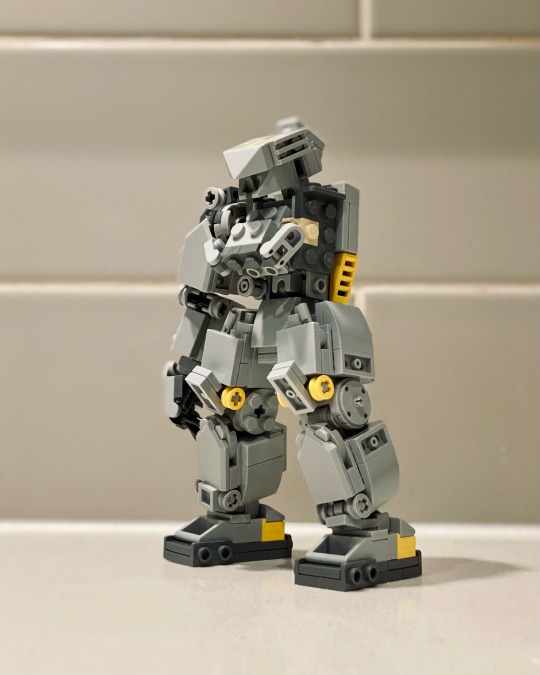
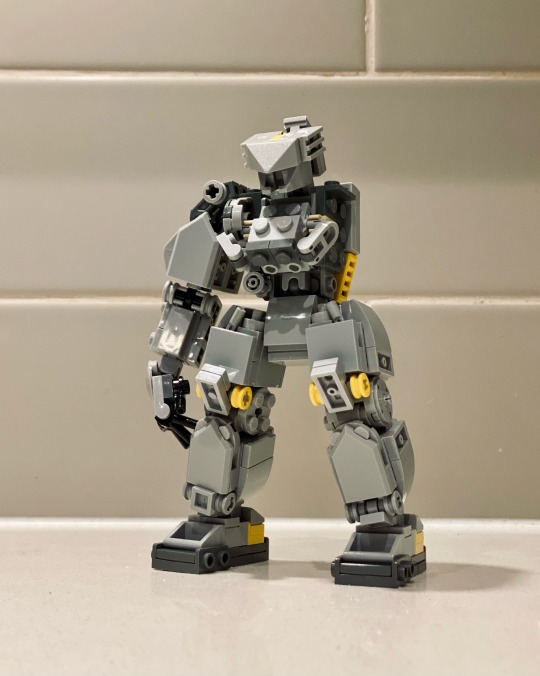
<Altas Frame>
Here comes the frame for all Type Atlas Units, while there are minor differences between each of them but not too far away from this basic assembles.
Please watch tutorial videos in my YouTube channel to discover the pieces I use and step by step building process for this MOC.
#afol#afolcommunity#lego#lego mecha#lego moc#lego builds#lego photography#lego robot#legomania#Lego tutorial#Lego frame
70 notes
·
View notes
Text


Full step by step photo tutorial on my Hopeless Romantic Afghan is up on my blog! 💗💕💗
Check out this playlist featuring more free Blanket tutorials here!
#yarn#artist#crocheterofinstagram#crochet#crocheting#creativity#youtubers#youtube#phototutorial#photography#crochettutorial#crochettutorials#diy#makersofinstagram#beautiful#craft#crafting#crafty#tutorials#tutorial#patterns#love#crochetblanket#howtocrochet#yarnaddict#crochetaddicted#instamood#crochetcreations#photooftheday#handmade
21 notes
·
View notes
Text
So i recently found out that people could make colored pictures back in the days where you only had black and white photography at your disposal, using a process called
Trichromatic Photography
https://shootitwithfilm.com/trichromatic-photography/
You basically put red, green, and blue filters in front of the camera lens, snap 3 different b/w pics with each filter, and if you were using a projector you could project the red-coded b/w image through another red filter, same for green, same for blue, allign the projections, and boom. Color.
Which sounds a lot like the Screen / Addition effect on digital programs
So i tried it myself, and instead of using a b/w camera with a color filter over it and then tinting the image with that color (as you could do with Multiply? Probably), i just used LEDs
and i know this isn’t uncharted territory, but boi
Original:
Trichromatic Addition:
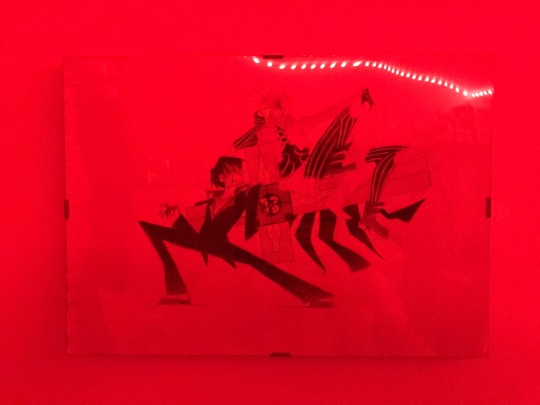
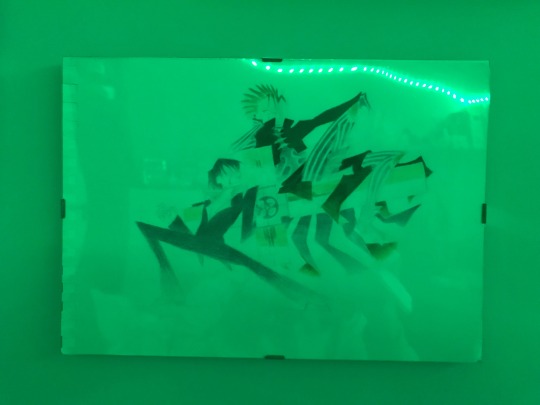
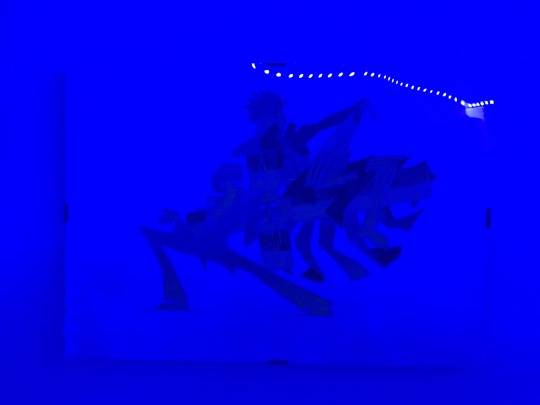
Using Screen effect on the red, green, and blue images, and switching the combinations of visible/invisible layers:

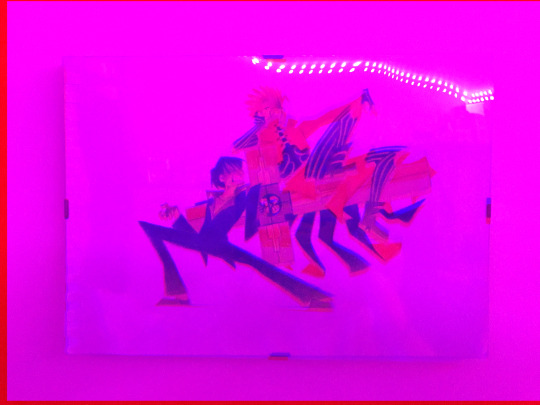
The pics do suck and they are very poorly aligned, but this makes for such a cool chromatic aberration
I think I’ll keep using it for pics, honestly it’s just fun stuff to make
Before you wonder, the colors aren’t very well balanced, but my wall is in fact pink
#tutorials#art tutorial#photography#trichromatic photography#photography editing#editing#chromatic aberration#chromatic#trigun#vash trigun#wolfwood#trigun wolfwood#trigun vash#vash and wolfwood#vashwood#tutorial
62 notes
·
View notes
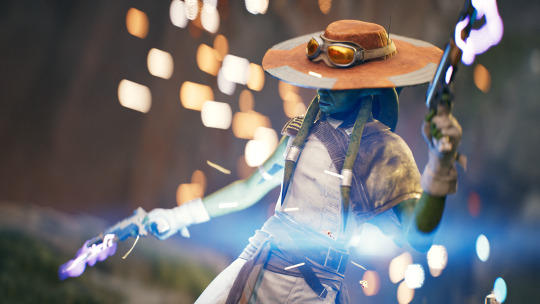
Text
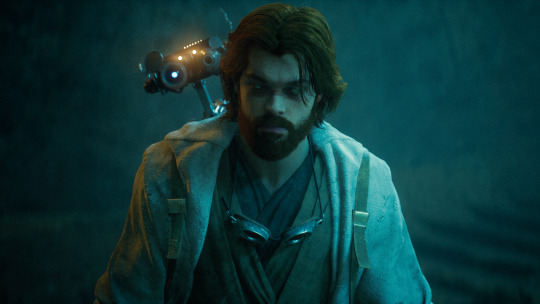
@fangbangerghoul was super encouraging about my photos for Starfield and also sharing a tutorial for how I get the shots I do. This is a very rough, one minute tutorial, that will get you started if you want to try out the style I do.
I just ask that if you do choose to do this style and learned from me that you please give some love to my own original starfield pieces too. Anyway, hope this helps and happy photographing!

This is the result from the tutorial once I rotated him back.
#starfield#virtual photography#bears screenshots#I really hope this is helpful#I feel so nervous#but I don’t want to gatekeep my secrets#portrait virtual photography tutorial#video#starfield photomode#starfield photomode portraits
37 notes
·
View notes
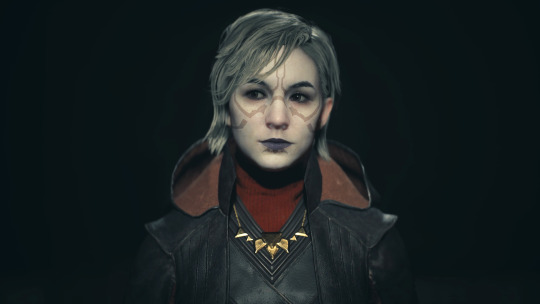
Text
^ the process
v the result
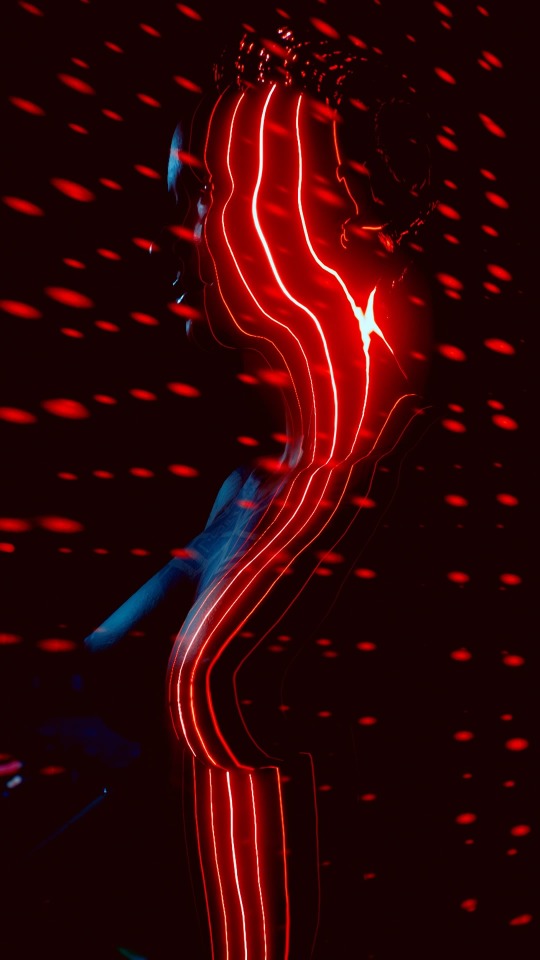
#when i say i'm in there sideways & half-blind I MEAN IT#oc: venus#cyberpunk 2077#photomode#virtual photography#console shots#ps4#video game art#my v#oc#nomad v#tips tricks & tutorials
22 notes
·
View notes
Last Seen Blogs

embassyrestaurant
Embassy

theflash2010
Untitled

starenterprise23
Untitled

namudevelop
let blogName = 'namuDevelop';

milulari
MILULARI Events!