#Like something arduino based.
Explore tagged Tumblr posts
Visit Tumblr Blog
Explore Tumblr blogs with no restrictions, modern design and the best experience.
Last Seen Tumblr Blogs


Fun Fact
Tumblr Inc. has $15.1M in annual revenue.
Text
a few years back my car insurance company offered me a discount if i stuck a dongle in my car that would tell them how i drive (specifically reporting hard accelerations and stops), with a base discount of 10% even if i drive like a madman up to 40%ish if i drive like a grandma. and of course naturally my first thought was "huh i bet i could make something running off an Arduino that filters hard brakes and accelerations out of the incoming data stream to get that 40% discount" and i got as far as looking up OBD2 protocols before realizing that that would just be insurance fraud. yes im an engineer raised by two engineers how could you tell
39K notes
·
View notes
Text
Please Reblog, I'd like to design a cheap braille typewriter (prototyping by 3d printing, final design will be machined) I stumbled upon linked YouTube short and a thought: "designing 6/8 button typewriter is within my technical capabilities"
youtube
I have many design questions I wish I could test out
My roadblock is I don't know anyone who's visually impaired, and casually seeking random place to peddle my soon-to-be-invention is not something I'm capable of
Many design questions:
Paper type: what is minimal quality/density of paper for dots to be readable. Can thermal receipt paper be used for notes?
Embossed vs punched out: is that significant for the typewriter to not break paper? It's important for "undo", but that's pretty far in my building a typewriter plan
Typewriter size: My initial idea was something like a portable cash register with receipt paper spool and little tray for it to glide along (I quickly realized it's a bad design because it can't fit more than 7 characters, or I can make infinite scroll of a single line with questionable ergonomics). Ultimately is related to page size, so what would be best for it? A4 standard paper? Is being portable important?
Keyboard layout: Perkins Brallier have all it's buttons inline forming long row. Wouldn't single-hand keyboard in similar layout as braille dots be more convenient? (straight grid or mimicking angle of computer keyboard letters)
Typing feedback: should typed letter be instantly accessible and not obstructed by typewriter? Maybe typing with one hand and instantly proof-reading with another hand?
Typewriter or printer?: alternatively, I can make a little annoying-noise-making servo-powered printer that will punch out text. Arduino or Raspberry PI based (I have experience with both) It would be USB powered most benevolent printer, because it don't require ink to work
Thanks for reading! [I'm not transcribing my design scribble, because it's absolute dogshit, but it helped me formula requirements. I will add transcription to actually thought of designs]
Alternatively, if I'm tweaking right now and if that thing would be needed it would already exist, I'll go back to trying to get hired by random megacorp and that's the last time you hear of me talking about it 💀
#braille#accessibility#inclusivity#blindness#blind#visually impaired#actually blind#low vision#visual impairment#Youtube
65 notes
·
View notes
Note
Hi, I'm a junior in university right now working towards my bachelor's in electrical engineering and I've since realized I have no idea wtf I'm doing. Do you have some resources on how to begin designing electric circuits and programming in C? You seem like you know what you're doing
So I've thought about this a good bit and what helped me learn both times was hands on practice so I'd see about getting a cheap breadboard kit like this:
But probably not this one exactly, you can get something similar for way cheaper.
As for specific literature for circuitry I don't have a recommendation but I can recommend picking varying difficulties of diy projects that require circuitry at the beginning to get comfortable and bringing that comfortability to your school projects.
For using C with circuitry I'll say the best path is definitely buying a cheap esp32 board, something based on the c3 would probably be cheapest. There is tons of documentation on how to use these boards and I've found that PlatformIO + VS code/vscodium is a very good setup for programming these boards.
19 notes
·
View notes
Text
disney spiderman animatronic but it's actually the military industrial complex w more steps:(
things that sound fun:
flying life-like spiderman robots
church bells
rocks that can kill you just by being in close proximity to them
prosthetic limbs
things that are actually not fun at all:
missiles that self-correct trajectory based on external factors
cannons used in both world wars
NUCLEAR BOMBS
machine gun dampers to make it easier to use said machine gun
(technically the disney spiderman animatronic was actually based on already existing military technology but i digress)
anyways all this to say--if you didn't know im a physics major in college. last semester i took a class on arduino board stuff and i ended up really liking it, but it made me internalize a realization that i had a while ago--no matter what you build, someone will turn it into a way to kill someone. always.
i literally made a contraption that senses cockroaches, pins them down and slaps them with sticks (hilarious) but then i was like "hm. this is....not something i would enjoy the military getting their little grabbers on" cuz obv its ridiculous and a stretch that they would need tech as simple as that, BUT the people inventing better prosthetic limbs prolly didnt think that the magnetorheological dampers they invented would be used to make it so LITERALLY ANYONE can shoot a machine gun with relative ease.
the military will turn ANYTHING into a weapon of mass destruction.
remember kids, never let anyone cheat off u, esp the military. stay vigilant my goslings.
#communism#leftist#pro communism#anarcho communism#goose prophet#karl marx#political theory#politics#political#left wing#leftists#leftism#leftblr#liberalism#class consciousness#disney#disney animation#walt disney animation studios#disney movies#walt disney
9 notes
·
View notes
Text
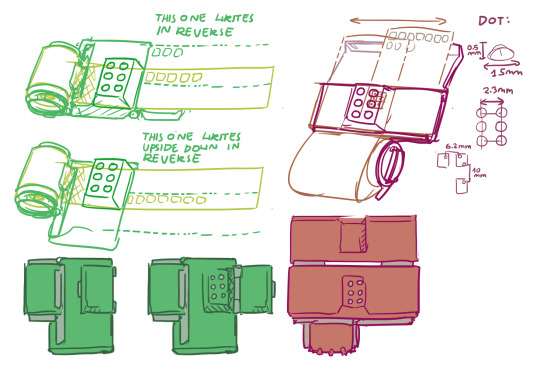
The Übersaw build breakdown, Part 1: (enjoy!)
Note: I'm more than happy to answer any and all questions about this build. Want me to breakdown a specific step or detail, please ask!
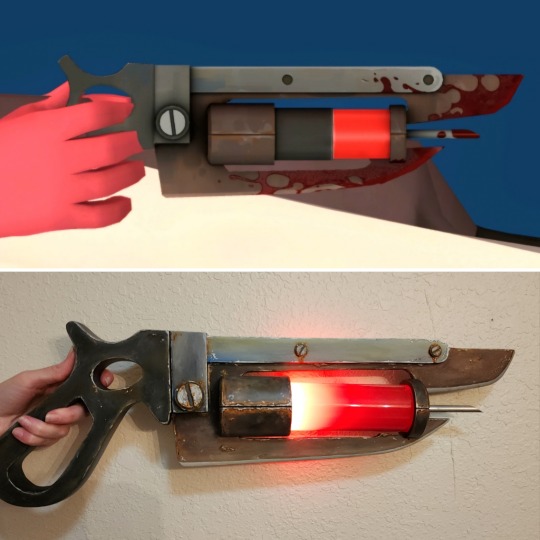
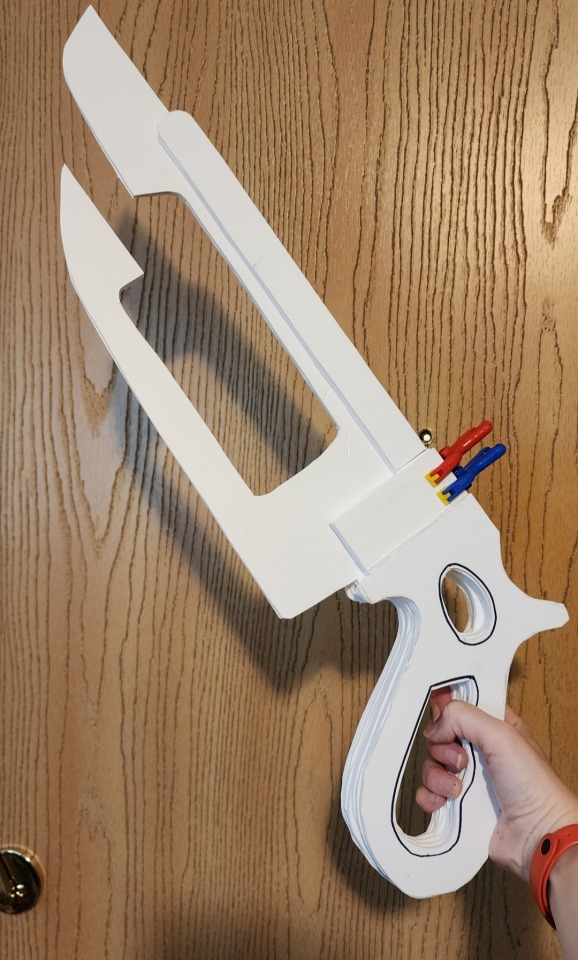
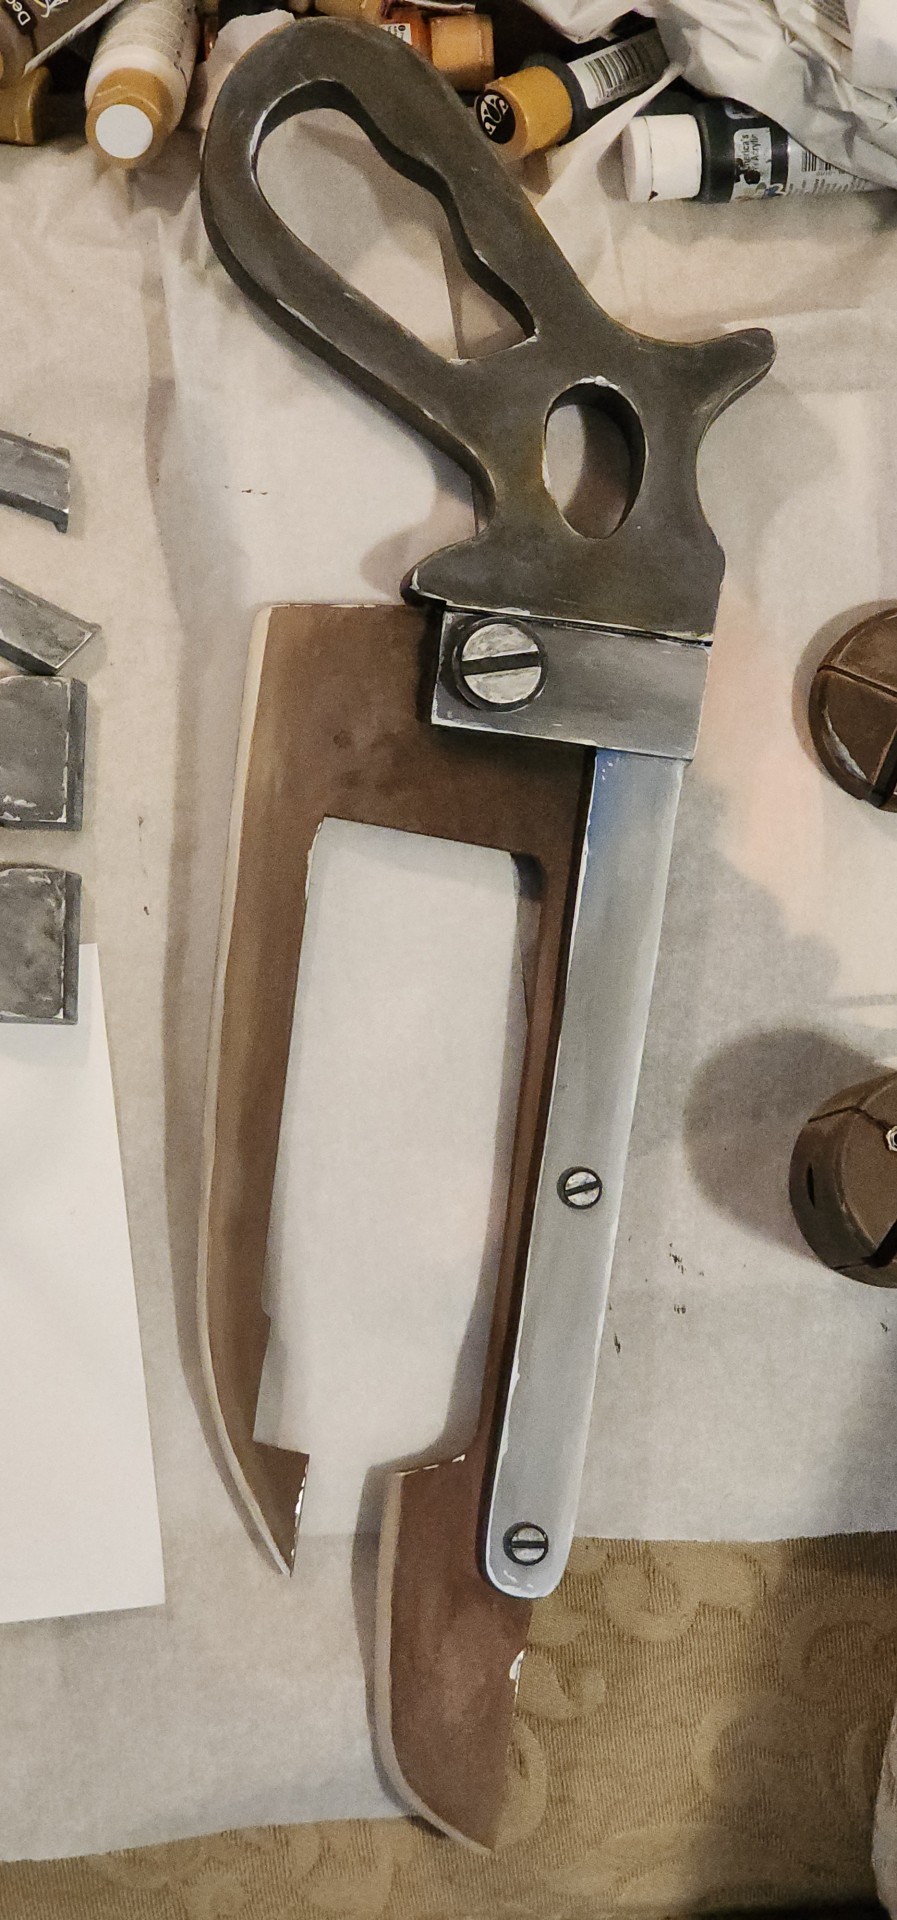
From top reference, to bottom complete, this build was a challenge from start to finish and required me to learn a ton of new skills, and reach out to a variety of people for help/advice/brainstorming! But when I decided I was finally going to make my dream cosplay of Medic, I knew this is the saw I wanted to make along with it.
Every piece was made from scratch, and includes sintra, pla 3d printing, resin printing, acrylic tubes, a straw, bondo, E6000, hex bolts, led ring light, arduino trinket, metal switch, aaa battery pack, misc. wiring, spray paint, acrylic paint, and a whole lot of sanding sanding sanding!
I always wanted to stay as true to the original design as possible, but knew adjustments would have to be made, moving a model from a game to real life. Some details I wanted to keep a true as possible, such as the base shape and size. Some aspects were modified deliberately to fit better with the overall aesthetic of the specific version of Medic I was creating; such as smoothing out the edges of the handle, rather than keeping them sharp like in the game. (Something that would make it more realistic overall, a goal I kept in mind through every piece of the costume.)
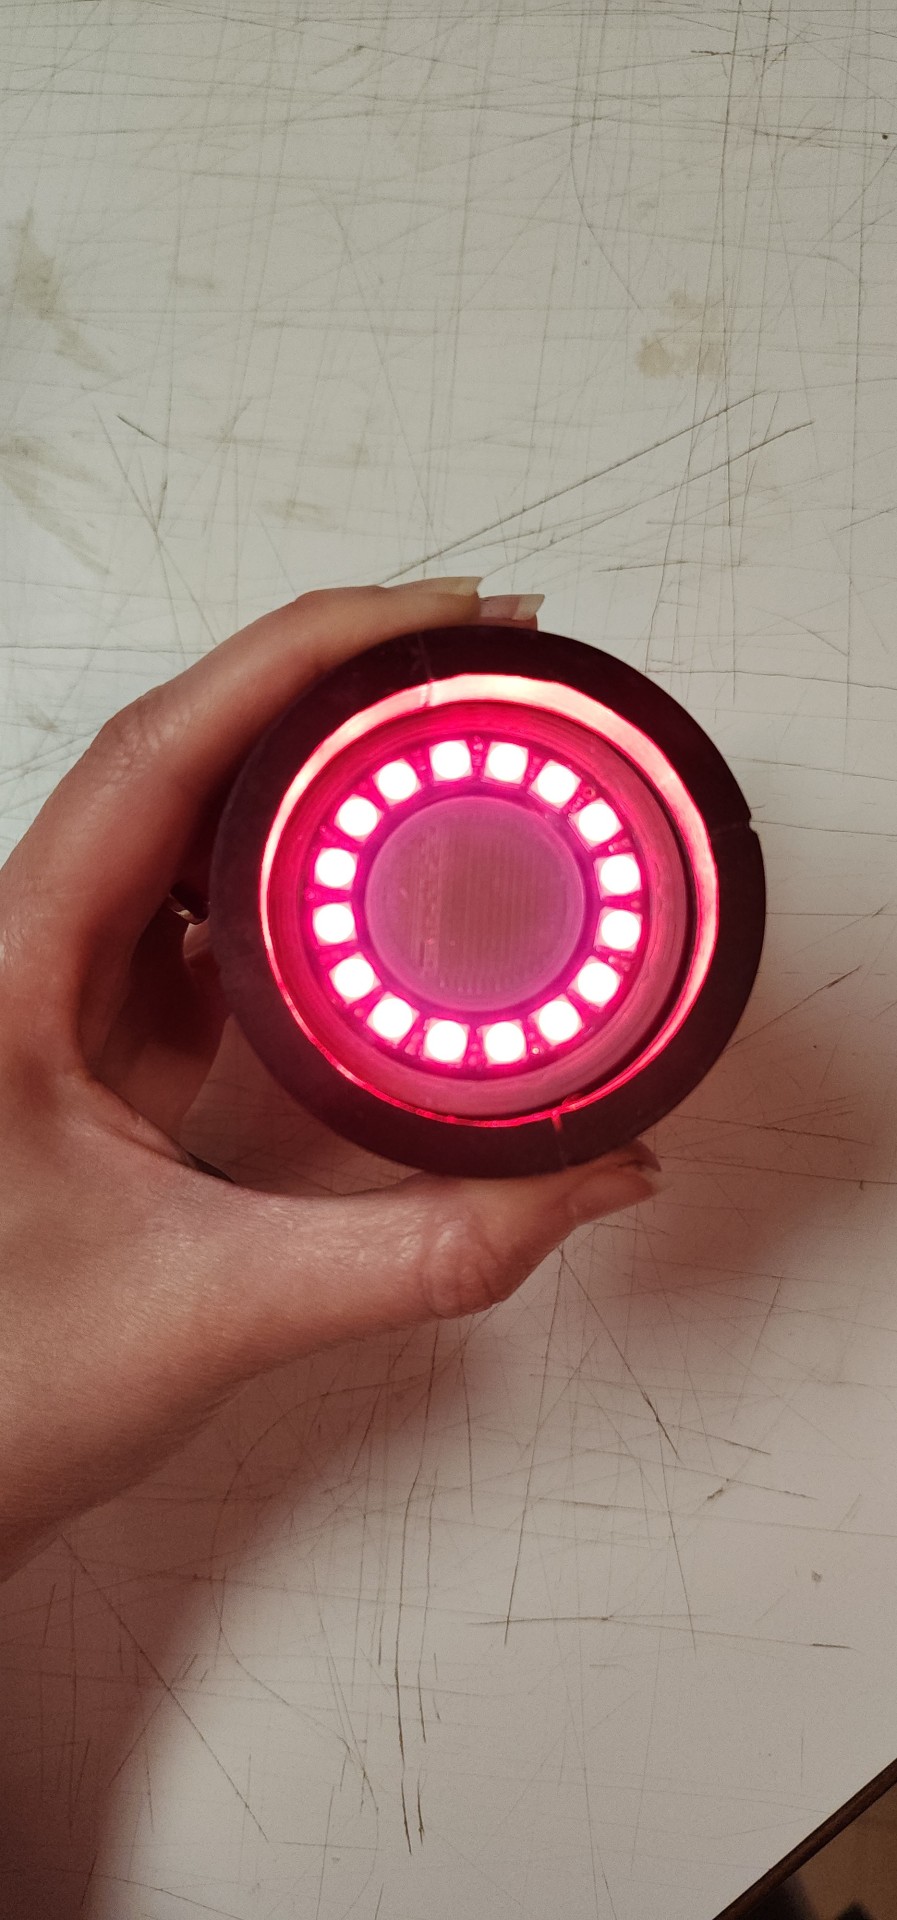
One such change was adding liquid to the Übersaw core and an led light that pulses red. Looking at the base design, and the color palette the original creators used, they intrinsically translated in my mind to "liquid" and "light" rather than just a flat color. Thinking about Medic and his designs, I figured an ominous, pulsing red would be perfect for when the Übersaw was fully charged. (Plus it would look really cool, so... that definitely influenced my decisions!)
I mixed up a concoction of distilled water, red and silver mica powder, and filled an acrylic tube with the mixture. There's actually two tubes, the smaller inside one helps reduce water weight on this already hefty prop.

Of course, these changes also meant I needed to learning how to code an arduino trinket (which ended up being a lot of fun!), and create a special holder at the base of the Übersaw to hold the ring light, trinket, switch, battery pack and wiring. Not to mention it had to be accessible so I could change the batteries out when needed. That's when it was time to ask for help from some talented friends!
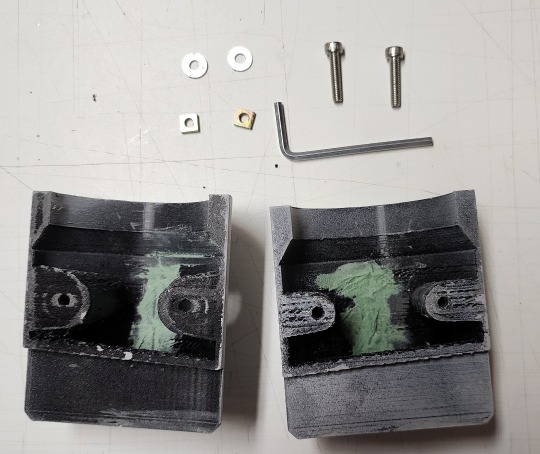
Here's what the resulting holder ended up looking like! (Not pictured is the ring the light sits on) It was 3d modeled and printed in PLA by my friend with some imput by me, but he knows so much more about this stuff I was happy to let him take the lead! The design includes hex bolts to secure the light holder to the Übersaw like a clamp, but also allows it to be opened in half for easy access to the batteries/any electronics that are having issues.
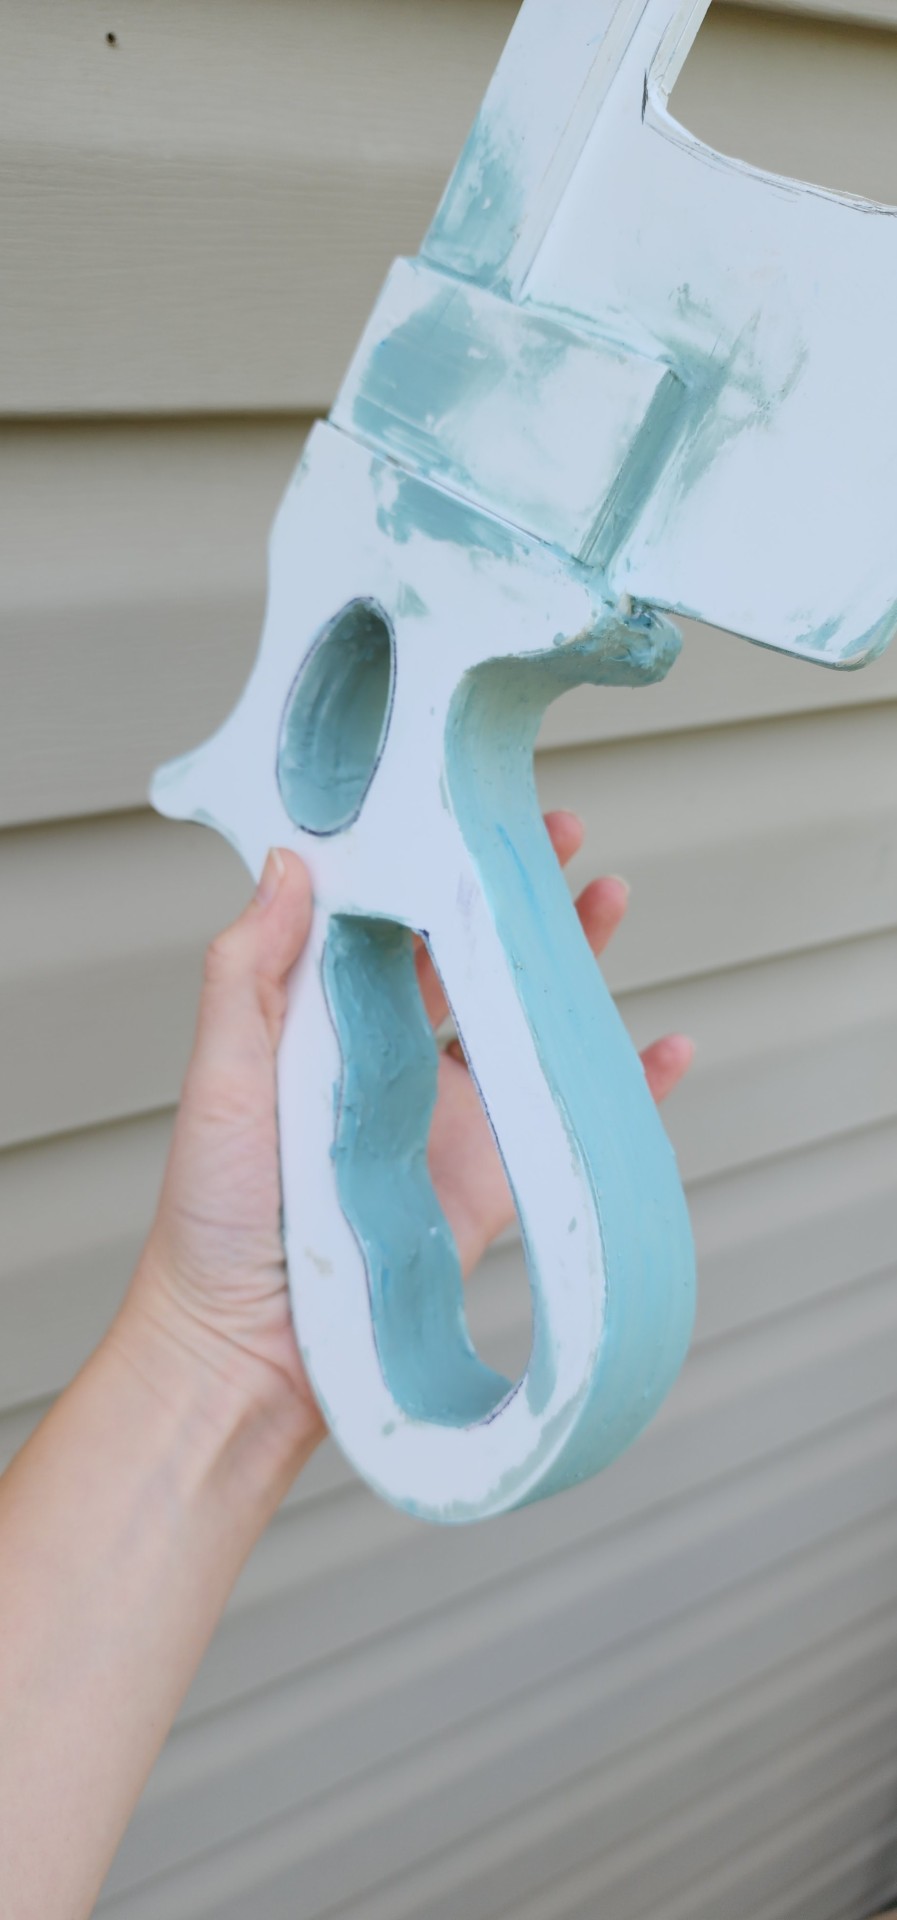

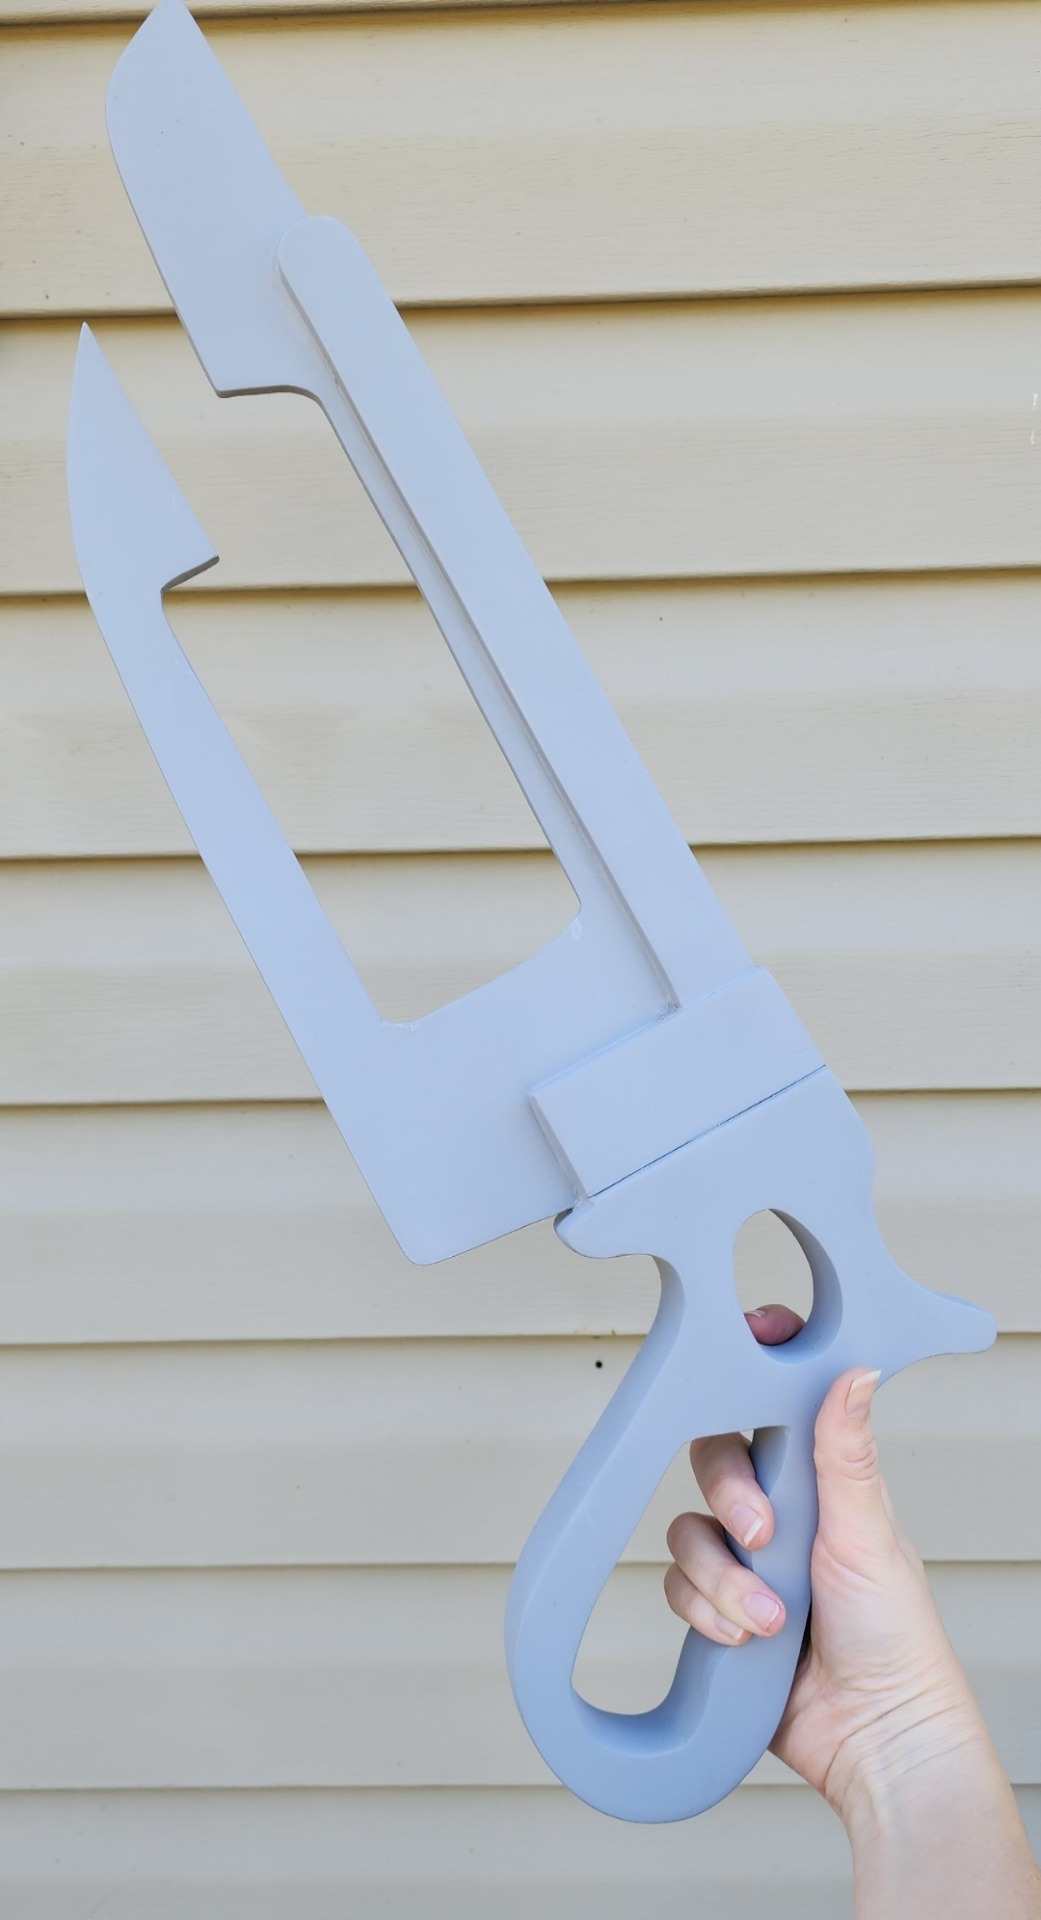
The base of the whole saw is sintra (pvc board), in many layers. The layers were then blended with Bondo and SO MUCH SANDING. After the piece looked like a cohesive whole, rather than 8 layers of plastic board, it was base coated with spraypaint and detail painted with acrylics. (I say this as though it was a simple task, but the spraypaint fought me every step of the way, had to be constantly re-sanded, and some layers refused to dry at all and had to be varnished to remove the tackiness. It was a trial to be sure!)

But after all was said and done, it was finally time for detail painting: My favorite part of any project! (Continued in part 2)
#cosplay#team fortress 2#tf2#tf2 medic#medic#ubersaw#cosplay wip#sisu squid stuff#tf2 cosplay#tutorial
47 notes
·
View notes
Text
On one hand, I hate my robotics teacher for teaching us the same lesson on python loops we've been learning for half the damn school year, then expecting us to make an innovative robot in 3 weeks when arduino is based on C++.
I was gonna counter that with something else, but as I wrote it I realized just how stupid it actually is. Fuck it. Venting time.
NO CUZ I CAN'T UNDERSTAND THIS GUY. WDYM "Programming's easy! You learn the basics, and from there you make your own solutions." ??? That's not verbatim but. STILL.
I'll give him a bit of credit, he taught us the basics of arduino. The proper syntax, loops, variables, functions, motor control, sensors, etc. But for god's sake, that limited pool of knowledge can only get you enough to make a mini car! It would've been nice to learn about fading LEDs, integer overflow, pointers vs the actual value in a variable, OR EVEN WHAT DOCUMENTATION IS. YEAH. DOCUMENTATION. THE LITERAL OFFICIAL EXPLANATION FOR KEY FEATURES IN PROGRAMMING LANGUAGES.
But suddenly its OUR fault our code doesn't work because "I taught you the basics. If you don't understand, that means you're not listening during my classes." MAYBE IF YOU STOPPED TEACHING US WHAT A FUCKING FOR LOOP IS, WE'D HAVE A REASON TO LISTEN. Majority of my understanding of robotics are a product of self study and receiving help from my family and their long list of IT contacts.
Not only that, HE is the one that approves of our robotics projects. If YOUR students can't complete the project YOU personally approved of, isn't that an error on your part? You should know what your students are capable of making. You should know because they should only know WHAT YOU TEACH THEM. So surprise surprise when your students feel like they're forced to hire people to do their projects, all because of your failure to teach them the skills they needed to do it themselves.
The only people getting a passing grade in this class are gonna be those that are either rich or have a lot of contacts. What a fucking joke.
And don't be mistaken, this is NOT the complaint of someone who doesn't understand programming. I consistently get 90% and above on his exams and do coding for fun. I'm complaining on behalf of my classmates who weren't as lucky as me, in that I have way more people to ask help from.
"100% working by this week" my ass. Actually teach us something relevant for once.
#dumb ramblings#vent post#ough#for the record i do like coding in python#i prefer it over C++ actually#But none of our projects use python#so I don't know what's going on in my teacher's head...
4 notes
·
View notes
Text
Capstone #6: Solid
<-<- FIRST || <- PREV || NEXT ->

CAD is nearly done, and the design is 95% there. There's still some improvements to be made. Big 'ol hand to our CAD team especially for bringing this to life. Lets explore under the cut
There's 2 main parts of this thing. The main body has the fans and wheels. The gantry on top does all the doodling. Let's pop the top off.

The cover and walls are purely aesthetic and keeps the dust out. Originally the cover is held on using snap buttons, but that's been changed to the tiniest magnets pocket change can buy. The base plate is made from thin wood, or we've been exploring carbon fiber (but that's proven to be mad expensive for basically no gain. Like 400+$ expensive).
The wheels are servos, the fans sit side by side and run off wall outlet power. (Try making these drone motors that normally run off batteries, and make them run off a wall outlet. Sounds easy right? Good luck. It's been a time doing it. They eat something like 12-16v at 40-60+ amps... *each*). It's got tiny nubs on the bottom to stabilize it, because with only 2 wheels, it's going to want to rock side to side. It'll have some distance sensors on the sides to find where it is on the wall, and an accelerometer to find how it's tilted. I'm personally a little worried the vibrations from the fans will make the accelerometer unreliable, but we'll find out about that later. The whole thing will be controlled by an Arduino Mega.

Smooving over to the gantry, both axis will be on rails purchased from Igus. The rails are made from hard anodized aluminum, while the carriages are made from diecast zinc and some slippery bearing plastic. It's then pulled around by timing belts and steppers. We modified both axis a tad by reducing the rail size to the smallest ones Igus offers, and giving the horizontal axis 2 rails for more stability (The bearing situation on the timing belts were improved too)

The printer head uses an electro-magnet to pull the pen down. There are guide pins with springs to, well, guide and spring return the head. There are also stop screws that set the maximum engagement and disengagement. (The travel distance is kinda exaggerated here tho. The actual travel distance will be as little as possible. Like 3-4mm)
All in all, the bot body is something like 300 x 500mm, 60mm thick (+ 55mm for the fan tails), with a print area of 150 x 150mm. We've tried to cut as much weight as possible, and are looking at about 1.2kg or a little lighter than a small toaster

As a bonus pic, here's an early concept. This one uses a lead screw for the X, and a shaft and timing belt for the Y. If you're wondering what stops the axis from pivoting, it would have been some gibs located behind both axis. Commonly used on dovetails, a gib is when you intentionally design in a large gap between your mating surfaces, and shove a thin plate in there with setscrews to take up the slack. Look at the ways of basically any milling machine or lathe, and chances are you'll see one!
2 notes
·
View notes
Note
hi. robotics question: i want an electric motor that receives input to control its force, and outputs its position. im kinda confused with different kinds of motors. controlling force is easy, right?
in terms of scale, im talking about an arduino prototype so pretty small but im fine if the motor is big enough to have its own power cable.
yeah im a programmer i dont know much about hardware :p
someone please fix me if i'm wrong, FRC uses a pretty self-contained ecosystem so I actually have no prior knowledge to answer this lol
but! based on some research, it sounds like torque control in a DC motor can be achieved by limiting the current to the motor (versus speed control, by setting voltage).[1][2] look for brushed DC motors with built-in encoders, that's the part that will tell you the motor's position. encoders can be absolute (tells you where the rotor is wrt some fixed "zero" position, consistent across power cycles) or relative/incremental (just tells you how far you've gone since you started/that you've taken a step). i'm not sure what kind of circuitry you might need to handle the current control, although looking for something marketed for arduino makes sense as a first step.[3]
there are also AC motors, brushless DC (BLDC) motors, and stepper motors, and they all have more complex control schemes that I know next to nothing about!
[1] https://electronics.stackexchange.com/questions/420289/torque-and-speed-control-of-a-dc-motor [2] https://control.com/forums/threads/how-can-i-control-a-dc-motors-torque.14793/ [3] https://forum.arduino.cc/t/dc-motor-control-using-current-sensing/434545/5
5 notes
·
View notes
Text
Hi Tumblr!
Okay, as I promised, a first Big Project post.
Intro and sentimental stuff
Here's the deal: I have a gf, and her birthday is in June. And I really really really want to make something special. So, fact 1: I have almost unlimited access to electro-stuff. Fact 2: Portal (both parts) is one of her favourite games, and the only of her favourite games I've completed so far.
Combining these two, we get ✨gift idea✨: a paired portal lamp (I did somewhat of a sketch, it's on the attached picture. Unfortunately, it isn't digital, as I do not own any kind of tablet, but I hope the overall shape is still visible)
All of the comments are written in Russian, but I'll translate them below the cut and in future posts.
Anyways! The problem is: it's entirely based on Arduino. And I've never worked with Arduino IN MY LIFE. I know Python on intermediate level, tho, and I've worked with electronics before, so it's not all that new to me.
So, yeah! I'll post updates on my work, so if I manage to get this right anyone will be able to create something like this for yourself and your loved one! From my calculations, it shouldn't cost more than 20 dollars for both of them in currency of my country, but it obviously depends on your location. But if you study in university or know someone who works with electronics, they'll probably give you a lpt of this stuff for free, as it's found easily and in large amounts.
Below is more word-y description of the project.
How it should work
This thing is, ideally:
Turned on and off with 'portal gun' (which is basically a water gun with tech stuff inside). And maybe you can change the mode, turning it into clock, but I haven't decided about it yet
By default, one 'Portal' is orange and one is blue, but through the special server you can change the color of any of this, and the other one will change automatically on the opposite color (for example, if one's color changes to red, the other will be turned green with no manual interactions with it)
In addition, through the same server, you should be able to:
Set an alarm (which will change the brightness of the whole thing at the given time)
Turn it into a clock (I'll describe how it works in a different post, maybe, but there will be no digits or display there)
Refuse the connection with the other lamp and still do all of this things with only your one
Make the other lamp, if it's connected, blink a few times to get the other person's attention
And maybe something else, if I'll think of it later
So yeah, that's the plan! It should be pretty simple technically speaking, and quite cheap at the end. I'll post the scheme and how it will work a bit later, with my Github link for future code. But that's it for now :)
See ya, Tumblr!

#portal#portal 2#diy#diy projects#I literally have no idea how to tag this#yeah that's my homosexual audacity speaking in this project#electronics#arduino#portal lamp#I'll probably have other projects here so I want to tag this as well
3 notes
·
View notes
Text
My potential project ideas:
1. First-person spreadsheet. Like maybe you can look around a room or something? I'll have to figure out something to keep the fps reasonable usable. I feel like I'm halfway there already with the stuff I did for my 3D modeling spreadsheet. I want to try to do this without using any macros or custom functions, only base excel or google sheets.
2. Billy bass alexa. (someone has already done this, that's where I got the idea!) I have a billy bass, do not have an alexa. I do have a google home. I do have an arduino. I'm wondering if google homes or alexas are going to start flooding thrift stores in the future as people get rid of them or upgrade them. I feel like I have the knowledge needed to do this project right now, but I want to see if I can do something funky with it to expand on the original idea. I've messed up a little bit of the wiring when I was first learning (teaching myself) how to use an arduino, I can still probably make the project work with the fish I have but it might be nice to get another. What would be really neat would be getting one of those i-dogs (does anyone remember those?) and upgrading it to have Bluetooth capabilities and better audio quality, but I don't have an i-dog or the skills for that at the moment.
3. Some sort of mini light show ran off an arduino. Like the crazy Christmas displays you see sometimes that have 1000 lights synced to music, but a much smaller version. I have the skills to do this now, but not enough to have it not be a huge fire hazard.
4. Some sort of small animatronic with a crochet body. Think really terrifying here. Think "small crochet stuffed animal that was clearly made with love, but the grandma who made this didn't quite get the proportions right and it looks a little off. But you take it anyways, because you know it took her a long time to make it and it is kinda cute. Until it opens its eyes and mouth and starts twitching slightly." Think "could be a horror movie prop." I could definitely do the crochet but I don't have much experience with small motors. I don't have a solid idea for the design of the toy itself, but I could make a lamb and get real sacrilegious with it. I have lots of experience on making creepy things by accident, let's see what happens when that's the goal to begin with. I want this thing to give people nightmares.
Let me know what you think!
3 notes
·
View notes
Text
HOW DO YOU START MAKING A GAME?
hihihihi- I'm adding to this because I want everyone to make games. My current top recommendations for books is A Playful Production Process, Rule of Play is a classic, so is Game Feel
This is long- so get ready
Other engines
Construct 3: Browser based game stuff!
Pulp: Extremely similar to Bitsy- make games for the PlayDate
PICO-8: Make tiny games and programs for a fantasy console!
LÖVE: Lua based 2D game framework!
Scratch: Educational engine, chances are if you're under a certain age you've had a school program use this!
microStudio: More browser based engine stuff!
babylon.js: Open source engine
For games adjacent things like alternative controllers, events, or installations
LIKELIKE online: Arts based open source online art gallery, remixable on glitch- there's even a template
Processing: Open source, 20 years of documentation, and super flexible if you wanna be experimental
Arduino: Make physical games using programming, or robots, or escape rooms!
Makey-Makey: Much simpler plug and play Arduino!
Okay but how do I make a game?
Fast answer- you just start. But a pretty straight forward workflow would be
Write down ideas, make flowcharts of ideas, scripts, mechanical descriptions. From that think of how systems interact
Paper prototype, see what works and doesn't work when playing through things without being restricted to programming
Jam, fail often and fast because each project is a lot like a sketch- they take a long time to do though. the quicker you are to kill your darlings and start anew the faster you'll get better
Do a game deconstruction- break it down into tiny pieces and stare into it. What made it fun? What were the small things that stuck out to you?
"But I want to make a complicated-"
Shhhh- no you don't. You'll burn out. Make the cube move first. Make it jump. Does the jumping feel good? No? Start over. Make the cube move again, but slightly differently- does the jump feel good yet? No? START OVER. As soon as you get stuck, abandon what you're doing and start over
And I'm not kidding, game making is an iterative process. The more projects you do the better, faster, and easier it gets. If you whittle away on something you'll never finish
Okay, jump feels good now, great now interact with something in the scene. So on and so forth until you have scripts you like and understand and these become your building blocks for projects
Make the smallest thing you can- smaller, smallerSMALLER- here's a breakdown of a dating sim game with a final 3-4 hours of content per playthrough, similar to something like Hatoful Boyfriend or Doki Doki Literature Club
Need To Have
Title card and a way to start the game.
A dialogue system including the ability to show text, click on buttons, and track choices.
Includes both NPC and player names along with dialogue.
One dateable character including tracking relationship points with the player, one friendship cutscene, one romantic cutscene, and one final cutscene.
Ending card and credits.
Want To Have
In addition to above:
An option screen that changes basic user interface, save and load system, player name input with pronouns, music volume and quality of life settings, so on.
An external narrative building up the world in which the game is played including a mystery for the player to solve.
Four dateable characters with individual narratives including 3 friendship cutscenes, 3 romantic cutscenes, and a final ending cutscene for each.
A resolution to the mystery.
Dream To Have
In addition to above:
A hidden menu that allows the character to make interesting alterations to the game and becoming the antagonist of the mystery
Mystery narrative is branching with several endings where the player can either fail or succeed without dating any of the characters
Friend only narrative choices and ending.
Two extra gag romance characters with diverge narratives unlike the others in the game
Jealousy/approval between characters depending on narrative choices.
Options to create poly relationships between compatible characters, options to betray or cheat on characters, and options to matchmake characters without dating them.
Multiple endings to resolve the mystery including hidden antagonist role.
I often reference this tiktok on how everything piles up
Game making takes a long time and wildly complex very fast. For my timelines I add a minimum of 3 months for each year.
Quick and dirty advice for once you've got something going
Call your grant officers if you got local funding, it’s their job to answer your questions!
Research the desired outcomes before asking someone for money; be that the government, a publisher, or yourself
Never pay for event submissions or showcases until you’re making significant revenue if you don’t have to, I suggest following Game Conference Guide’s calendar
Even if you’re working for free track your hours and costs so if/when you are making budgets in the future you know how fast you and your team work
Learn when to say something is good enough; cut mechanics or features early and often to avoid the project ballooning out of scope
Don’t quit your day job until it makes sense- it’s more sustainable to work on something without funding if you’re still able to pay your bills
Shipped is the best feature, some great advice from Mark Darrah
Make smaller, shittier, and messier games more often
Go forth, make games, then tell me about them and I'll play them if I can. I love when folks make games- you can do it!

🎮 HEY I WANNA MAKE A GAME! 🎮
Yeah I getcha. I was once like you. Pure and naive. Great news. I AM STILL PURE AND NAIVE, GAME DEV IS FUN! But where to start?
To start, here are a couple of entry level softwares you can use! source: I just made a game called In Stars and Time and people are asking me how to start making vidy gaems. Now, without further ado:
SOFTWARES AND ENGINES FOR PEOPLE WHO DON'T KNOW HOW TO CODE!!!

Ren'py (and also a link to it if you click here do it): THE visual novel software. Comic artists, look no further ✨Pros: It's free! It's simple! It has great documentation! It has a bunch of plugins and UI stuff and assets for you to buy! It can be used even if you have LITERALLY no programming experience! (You'll just need to read the doc a bunch) You can also port your game to a BUNCH of consoles! ✨Cons: None really <3 Some games to look at: Doki Doki Literature Club, Bad End Theater, Butterfly Soup
Twine: Great for text-based games! GREAT FOR WRITERS WHO DONT WANNA DRAW!!!!!!!!! (but you can draw if you want) ✨Pros: It's free! It's simple! It's versatile! It has great documentation! It can be used even if you have LITERALLY no programming experience! (You'll just need to read the doc a bunch) ✨Cons: You can add pictures, but it's a pain. Some games to look at: The Uncle Who Works For Nintendo, Queers In love At The End of The World, Escape Velocity

Bitsy: Little topdown games! ✨Pros: It's free! It's simple! It's (somewhat) intuitive! It has great documentation! It can be used even if you have LITERALLY no programming experience! You can make everything in it, from text to sprites to code! Those games sure are small! ✨Cons: Those games sure are small. This is to make THE simplest game. Barely any animation for your sprites, can barely fit a line of text in there. But honestly, the restrictions are refreshing! Some games to look at: honestly I haven't played that many bitsy games because i am a fake gamer. The picture above is from Under A Star Called Sun though and that looks so pretty

RPGMaker: To make RPGs! LIKE ME!!!!! NOTE: I recommend getting the latest version if you can, but all have their pros and cons. You can get a better idea by looking at this post. ✨Pros: Literally everything you need to make an RPG. Has a tutorial inside the software itself that will teach you the basics. Pretty simple to understand, even if you have no coding experience! Also I made a post helping you out with RPGMaker right here! ✨Cons: Some stuff can be hard to figure out. Also, the latest version is expensive. Get it on sale! Some games to look at: Yume Nikki, Hylics, In Stars and Time (hehe. I made it)

engine.lol: collage worlds! it is relatively new so I don't know much about it, but it seems fascinating. picture is from Garden! NOTE: There's a bunch of smaller engines to find out there. Just yesterday I found out there's an Idle Game Maker made by the Cookie Clicker creator. Isn't life wonderful?
✨more advice under the cut. this is Long ok✨
ENGINES I KNOW NOTHING ABOUT AND THEY SEEM HARD BUT ALSO GIVE IT A TRY I GUESS!!!! :
Unity and Unreal: I don't know anything about those! That looks hard to learn! But indie devs use them! It seems expensive! Follow your dreams though! Don't ask me how!
GameMaker: Wuh I just don't know anything about it either! I just know it's now free if your game is non-commercial (aka, you're not selling it), and Undertale was made on it! It seems good! You probably need some coding experience though!!!
Godot: Man I know even less about this one. Heard good things though!
BUNCHA RANDOM ADVICE!!!!
-Make something small first! Try making simple: a character is in a room, and exits the room. The character can look around, decide to take an item with them, can leave, and maybe the door is locked and you have to find the key. Figuring out how to code something like that, whether it is as a fully text-based game or as an RPGMaker map, should be a good start to figure out how your software of choice works!
-After that, if you have an idea, try first to make the simplest version of that idea. For my timeloop RPG, my simplest version was two rooms: first room you can walk in, second room with the King, where a cutscene automatically plays and the battle starts, you immediately die, and loop back to the first room, with the text from this point on reflecting this change. I think I also added a loop counter. This helped me figure out the most important thing: Can This Game Be Made? After that, the rest is just fun stuff. So if you want to make a dating sim, try and figure out how to add choices, and how to have affection points go up and down depending on your choices! If you want to make a platformer, figure out how to make your character move and jump and how to create a simple level! If you just want to make a kinetic visual novel with no choices, figure out how to add text, and how to add portraits! You'll be surprised at how powerful you'll feel after having figured even those simple things out.
-If you have a programming problem or just get confused, never underestimate the power of asking Google! You most likely won't be the only person asking this question, and you will learn some useful tips! If you are powerful enough, you can even… Ask people??? On forums??? Not me though.
-Yeah I know you probably want to make Your Big Idea RIGHT NOW but please. Make a smaller prototype first. You need to get that experience. Trust me.
-If you are not a womanthing of many skills like me, you might realize you need help. Maybe you need an artist, or a programmer. So! Game jams on itch.io are a great way to get to work and meet other game devs that have different strengths! Or ask around! Maybe your artist friend secretly always wanted to draw for a game. Ask! Collaborate! Have fun!!!
I hope that was useful! If it was. Maybe. You'd like to buy me a coffee. Or maybe you could check out my comics and games. Or just my new critically acclaimed game In Stars and Time. If you want. Ok bye
#game stuff#please let me play your games#send them to festivals#okay tyty#i go back to making my jam game
36K notes
·
View notes
Text
How BTech Mechanical Can Lead to Careers in Robotics
When most students think of Mechanical Engineering, they picture machines, engines, or automobiles. But here’s something exciting—Mechanical Engineering is one of the strongest foundations for a career in Robotics. Yes, you read that right. If you’re someone who dreams of working on intelligent machines, drones, or automation systems, a BTech in Mechanical can be your perfect Launchpad.
Let’s break it down so you see the big picture.
What’s the Link Between Mechanical Engineering and Robotics?
Robotics is not a single-subject field. It combines mechanical engineering, electronics, computer science, and control systems. A robot, after all, is a physical system—made up of gears, motors, joints, and frames. And who better than a mechanical engineer to design and build those parts?
In fact, many leading robotics engineers started with a mechanical background. That’s because mechanical engineering gives you:
A strong understanding of kinematics and dynamics (how things move)
Skills in mechanical design and CAD
Knowledge of materials and manufacturing
Basics of control systems and automation
In simpler words, mechanical engineers are the architects of the robot’s body. They ensure that what’s imagined can be built, function, and perform in the real world.
What You Learn in BTech Mechanical That Helps in Robotics
Here are a few key subjects and skills taught in BTech Mechanical that directly contribute to robotics:
Engineering Mechanics & Dynamics: These help you understand how forces act in machines.
Machine Design & CAD: You’ll learn to design robotic arms, gear systems, and mobile robots.
Thermodynamics & Fluid Mechanics: Useful if you're designing robots for extreme environments.
Automation and Control Engineering: Many colleges include mechatronics and automation, laying the base for robotic control systems.
In institutes that focus on real-world learning, you’ll also work on mini projects and hands-on labs—and that’s where true robotics interest gets sparked.
Where Do Robotics Engineers Work?
You might be surprised at how widespread robotics is. Industries hiring robotics professionals include:
Automotive & Aerospace: Building robots for manufacturing and assembly lines.
Healthcare: Designing robotic surgical tools and prosthetics.
Agriculture: Drones and autonomous farming equipment.
Logistics & Warehousing: Robotics in Amazon-like fulfillment centers.
Defense & Space: Autonomous vehicles, drones, and exploration bots.
So yes, it’s no longer just “rocket science”—robotics is now applied science, and mechanical engineers are at the heart of it.
Top Skills You Need to Add Alongside Your Degree
While your BTech in Mechanical gives you the base, to truly excel in robotics, you should explore:
Programming Skills (Python, C++, MATLAB)
Microcontrollers & Sensors (Arduino, Raspberry Pi)
Robotics Simulation Tools (ROS, Gazebo)
Machine Learning Basics (for intelligent robot behavior)
These can be learned via online courses, robotics clubs, or elective subjects in college.
Choosing the Right College Makes a Difference
Now here’s something important—not all mechanical programs are the same. The best engineering colleges in Odisha are those that go beyond textbooks. Look for places that encourage interdisciplinary projects, have modern labs, and foster industry connections.
For example, NM Institute of Engineering and Technology (NMIET) in Bhubaneswar, though known primarily for its strong mechanical and technical base, also supports hands-on learning, industry collaboration, and practical workshops—exactly the environment where robotics thrives. Institutes like NMIET, affiliated with BPUT and accredited by AICTE, offer a strong academic foundation paired with exposure to real-world applications.
Interestingly, NMIET also maintains industry tie-ups with companies like IBM, Cognizant, and Capgemini—which often explore robotics and automation in their operations. A setup like this can open doors to internships or projects that align with robotics, even if your core branch is mechanical.
Final Thoughts
If you’ve been wondering whether a BTech in Mechanical can lead you into the world of robotics, the answer is: Absolutely, yes. Mechanical engineers are not just part of the robotics field—they are essential to it.
So, if your interest lies in building things that move, think, and react, consider mechanical engineering as your foundation. And when choosing where to study, keep in mind that the best engineering colleges in Odisha are those that integrate practical learning, tech-savvy faculty, and an open environment for innovation.
Remember, the robots of tomorrow need bright minds today—and your journey can begin with a single decision.
#bhubaneswar b tech colleges#college of engineering bhubaneswar#best engineering colleges in orissa#best engineering colleges in bhubaneswar#best private engineering colleges in odisha#best engineering colleges in odisha
0 notes
Text
Building Your Own Mechanical Dog: A Beginner’s Guide
In the ever-evolving world of robotics, creating your own mechanical dog is a fascinating and rewarding challenge. Whether you're a hobbyist, a student, or simply curious about robotic engineering, building a mechanical dog can be a fun way to learn about coding, mechanics, and artificial intelligence. It’s more than just assembling wires and parts—it's about bringing movement and purpose to a machine that mimics a beloved companion. At mechanical dog, we believe that anyone passionate about robotics can take the first step in developing a robotic pet with personality. This guide will walk you through the essentials—from selecting the right components to programming basic functions—to help you build your first functional and interactive mechanical dog.
Understand the Core Functionality of a Mechanical Dog
Before jumping into assembly, it's crucial to understand what makes a mechanical dog function. These robotic companions typically involve servos or motors to mimic the movements of legs, a microcontroller as the brain, and a power source for mobility. Sensors such as ultrasonic detectors help the mechanical dog navigate its environment. Grasping the roles of each component ensures a more efficient build process and sets the foundation for future customization. It also helps in troubleshooting and upgrading the design later. Learning this early provides a technical roadmap and gives you clarity on what parts to prioritize as a beginner in robotics.
Choosing the Right Materials and Parts to Begin
Starting with the right components makes a big difference in your mechanical dog’s performance. You'll need a sturdy yet lightweight frame, preferably 3D-printed plastic or aluminum. Essential parts include servo motors for leg movement, a rechargeable battery pack, a microcontroller like Arduino or Raspberry Pi, and wiring kits. Buying beginner-friendly kits from reputable robotics stores is highly recommended. Mechanical dog recommends selecting components based on simplicity and expandability. Focus on acquiring parts that allow trial and error without breaking your budget. This stage sets the groundwork for building something durable and modifiable over time.
Assembling the Frame and Installing Motors
Once you have the necessary parts, it’s time to bring your mechanical dog to life. Begin by assembling the body and legs, using screws and brackets to fix the frame. Install the motors at the joints to replicate knee and hip motion. Precision in alignment is key—improper placement may result in unbalanced movement. Make sure each motor is securely fastened and capable of smooth rotation. During this stage, mechanical dog builders often test the range of motion manually before connecting to the control board. Taking your time here helps prevent mechanical issues down the line.
Wiring and Connecting Your Microcontroller System
With the frame and motors in place, the next step is wiring. Connect each motor to the microcontroller using jumper wires or a motor shield. Labeling wires helps reduce confusion later, especially when debugging. Your microcontroller acts as the brain of the mechanical dog and sends commands that control movement. Power connections must be secure and insulated to prevent short-circuiting. This phase requires patience and organization, particularly for first-timers. Once everything is in place, running a basic movement script is a great way to ensure your connections work and to see your mechanical dog come alive.
Programming Basic Movement and Direction Controls
Programming is where your mechanical dog learns to walk. Start with simple scripts that control forward and backward movement using timed signals to motors. As you progress, introduce directional turns and stop-start commands. Platforms like Arduino IDE or Python make this easy for beginners, especially with online resources and libraries. At mechanical dog, we encourage experimenting with code to understand how speed and timing affect performance. Getting these basics down sets the stage for more advanced behaviors, like obstacle avoidance and voice command integration. Programming breathes life into your build and gives it functionality.
Integrating Sensors for Navigation and Interaction
Sensors make your mechanical dog interactive and responsive to its environment. Ultrasonic sensors help it detect walls, infrared sensors track lines or paths, and gyros assist in balance. Proper sensor placement is essential—usually on the head or front body of the robot. Once installed, they are connected to the microcontroller and incorporated into your code. This enables your mechanical dog to avoid obstacles or follow predefined routes. These intelligent behaviors enhance the experience and demonstrate real-world robotics applications. Adding sensors is a significant upgrade and a fun learning curve for every builder.
Testing, Troubleshooting, and Future Enhancements
Once all systems are connected and programmed, it’s time to test your mechanical dog. Watch for issues like jerky movement, sensor misreads, or battery drainage. Take notes and go step-by-step to troubleshoot. This is where hands-on learning is most valuable. Mechanical dog builders often revisit earlier steps for fine-tuning. After successful testing, consider adding voice control, facial recognition, or remote operation via Wi-Fi. With every enhancement, you’ll grow your skills and make your mechanical dog smarter. Remember, every successful robotics project involves problem-solving and persistence.
Conclusion
Building a mechanical dog from scratch is a fulfilling journey that combines creativity, logic, and hands-on learning. Whether you’re doing it as a personal challenge or stepping into the field of robotics professionally, the experience offers a deep understanding of engineering and artificial intelligence. With patience and curiosity, your mechanical dog will not only move and interact but also reflect the effort you’ve invested in learning. At mechanical dog, we support all levels of builders and believe that even a beginner can create something incredible. Start small, think big, and bring your robotic companion to life.
0 notes
Text
Prompt #004
“You move into an apartment where each room holds a different version of you.”
Standing in front of the apartment door, I hesitate. I’m not sure what I’ll find on the other side.
People have described it as a sort of pleasantly haunted house: like a wholesome version of A Christmas Carol. But knowing myself, it’s just as likely to play out like something directed by M. Night Shyamalan.
I muster up the courage, turn the key, and step into the hallway. I check, I'm alone. I double-check. Still alone.
I release a breath I didn’t realise I’d been holding.
The hallway looks like it was lifted straight from one of my Pinterest boards. Whoever designed this potential nightmare at least did it with a wabi-sabi twist. I should probably read into that and decipher the metaphor being presented, but instead I’m already moving towards one of the three doors branching off the hall.
I open the first.
Grainy light filters through the cracked door. I peek in, but my eyes take a moment to adjust. I blink more times than I care to admit before realising the entire room is in black and white.
Not metaphorically. Literally devoid of colour, like one of those old MGM films I used to watch on rainy Sunday afternoons.
Then I spot myself, swaying in the middle of what I now recognise as a 1950s kitchen. Humming along to Lil’ Darlin’ by Count Basie.
This version of me doesn’t look much older or younger, just more… domestic.
I recognise her, though. She’s the part of me that feels most grounded while harvesting tomatoes or shelling peas. She has a playlist called A Sunday Kind of Love, filled with jazz standards. She quietly dreams of slow dancing in this very kitchen. Or being held while reading by the fire.
A softer, less guarded version of me.
I realise I’ve gotten a bit emotional watching her. Something deep in my chest stirs, a quiet ache for a simpler, slower life. So I leave her be, undisturbed. Let her sway to the last notes of the trumpets, submerged in her own world.
Back in the hallway, I approach the next door, this time with a bit more confidence.
I open it to find the living room of my first apartment, dimly lit by the flickering cold light of the television. On the rug, cross-legged, sits a younger version of me. Xbox controller in hand. Focused. Determined to sneak Ezio Auditore into a Templar base undetected. Shouting something at the screen about the camera angles changing mid-jump.
Cables, resistors, and Arduino kits are strewn across the coffee table. On the sofa, a laptop is rendering some chaotic After Effects experiment, its fans at full throttle, audibly threatening to achieve flight. Next to it: a camera bag with more lenses than I will ever learn to use.
I sit beside her. I must be around twenty-four here.
She’s anxiously chewing her bottom lip, head bobbing along to Kerry King’s riffs. A lot of nervous energy in that little body.
She’s the polar opposite of the woman in the kitchen. Hard to believe they’re the same person. But they are. They’ve lived through the same trauma. They just cope differently.
One suppresses, seeks out stimulation. The other, guided by self-knowledge, knows when to slow down.
I simultaneously pity and admire her. She has a long, tiring road ahead. Soon she’ll be confronting her own demons and unlearning her own toxicity. But she’s strong. Stronger than she knows. She’ll fight battles most people wouldn’t even notice exist.
I wish I could reassure her. Maybe warn her not to date that one guy with the fear of both commitment and abandonment. But that, too, will become a valuable lesson.
So I leave her. She mumbles “Requiescat in pace” to the screen. I mentally whisper the same to her.
Back in the hallway, I reach for the last door. I try the handle. It sticks, blocked by clutter on the floor.
I put my shoulder to it, push. It resists, then gives.
I’m met by my teenage self, sitting in her bedroom. In front of a mirror. Dressed in an oversized Kurt Cobain shirt. A shoebox in her lap, full of dried rose petals, handwritten letters, poems. The breakup box.
She’s crying. Loudly. Messily. A CD clicks into the stereo. The first notes of Górecki by Lamb begin to play.
I immediately close the door.
Hard no.
I’m not sadistic enough to watch myself musically self-flagellate like that.
There are some ghosts I’m not ready to exorcise.
So I turn back toward the first door in search of tea and, maybe for a little while, the company of that simpler version of me.
0 notes
Text
Spring Break – BreakCore Music Player
Final Project
For my final project in physical computing, I designed and built a digital musical instrument that I call the Spring Break – BreakCore Music Player. Drawing inspiration from the New Interfaces for Musical Expression (NIME) movement, this instrument transforms hand gestures into musical actions, allowing me to perform and manipulate breakcore-style audio using two ultrasonic distance sensors connected to an Arduino and mapped into Max MSP. It’s a controller, a performance tool, and a kind of interactive sculpture all in one—and it really made me feel like I was DJing a rave set with my hands.


The original concept came together as I experimented with the HC-SR04 distance sensors. I had initially planned to use motion sensors, but they proved too difficult to wire. After talking with someone more experienced, I pivoted to ultrasonic sensors since they offer similar spatial sensing but with more reliable outputs. Once I got one sensor working, I saw how smoothly it could translate distance into digital signals, so I added a second. This two-sensor setup let me build a kind of “on/off” control system, where each hand movement could start or stop specific layers of music.


The physical design of the instrument was simple but meaningful. I laser cut a small enclosure using MakerCase and acrylic in the Spelman Innovation Lab, and decorated it with a guitar-shaped design on the front panel to visually signal its purpose as a musical object. Inside the box, I mounted the Arduino and wired both sensors to a single breadboard—something I hadn’t done before, but it worked flawlessly on the first try. The sensors were positioned facing upward so I could hover my hands over them during the performance.


Left: Arduino Code for first sample, Right: Testing first sample
The Arduino code handled the distance calculations and serial output. Each sensor was triggered in the loop, calculating the distance in centimeters and printing both values as a single line of data. Here's the exact code I used:
const int trigPins[2] = {9, 11};
const int echoPins[2] = {10, 12};
float distances[2];
long duration;
void setup() {
Serial.begin(9600);
for (int i = 0; i < 2; i++) {
pinMode(trigPins[i], OUTPUT);
pinMode(echoPins[i], INPUT);
}
}
void loop() {
for (int i = 0; i < 2; i++) {
// Trigger pulse
digitalWrite(trigPins[i], LOW);
delayMicroseconds(2);
digitalWrite(trigPins[i], HIGH);
delayMicroseconds(10);
digitalWrite(trigPins[i], LOW);
// Read pulse
duration = pulseIn(echoPins[i], HIGH, 30000); // timeout safety
distances[i] = (duration * 0.0343) / 2;
// If no signal, set to 0
if (duration == 0) distances[i] = 0;
// Print to serial
Serial.print(distances[i]);
Serial.print(" ");
}
Serial.println(); // New line
delay(100);
}
In Max MSP, I created a patch that received the serial data from the Arduino, unpacked it, and used simple conditional logic to check whether the hand was within a certain threshold distance—specifically 20 centimeters. If so, it sent a bang that triggered a set of audio samples. Each sensor was mapped to a different set of three layered breakcore audio loops. Here’s the final version of the patch:

The left and right sides of the patch represent each of the sensors. When a hand is detected within range, it activates all three samples on that side, creating a stacked, textured sound. I didn’t map pitch or volume directly, but the threshold-based triggering gave me solid, real-time control over the performance. The layering of audio and the fast, cut-up loops created that signature breakcore energy I was going for.
When it came time to compose a piece, I built my sound palette from breakcore-inspired loops and samples I either made or found online. The genre naturally lends itself to this kind of chaotic, reactive interaction. Once I tested the first drum loop with my hand and saw it activate in sync with my movement, I knew exactly what direction to go. My final piece was more of an improvised jam session than a strict composition, but that made it feel alive—and I genuinely felt like I was DJing with air gestures.
This project wasn’t easy. Learning Max MSP from scratch was a major challenge. The interface is not beginner-friendly, and figuring out how to parse serial data, unpack values, and link it to audio playback took a lot of trial and error. I also ran into a brief issue where one of my sensors wasn’t showing up in the serial monitor, which I eventually solved by testing it in a separate sketch and reconnecting the wiring. Another challenge was figuring out how to keep the whole build compact—I’d used two breadboards in my midterm, but I managed to wire both sensors on one board for this project, which helped with space and structure.
If I had more time, I’d love to build on this project by introducing more nuanced sound control. Maybe mapping pitch to distance, adding a third sensor for tempo control, or even building a visual interface with responsive lights or projections. I can definitely imagine this evolving into a fully-fledged digital instrument or live performance tool.
More than anything, this project taught me that I can make music with my hands—literally. I now understand how to translate gesture into sound, how to route sensor data into an audio environment like Max MSP, and how to create systems that feel playful and expressive. I walked into this project nervous about how much I didn’t know, and I came out of it with a finished, functional instrument that let me perform a genre I love. That’s something I’ll carry with me well beyond this class.
S.O to the Spelman Innovation Lab, the IL staff and Professor Holmes- I couldn’t have don’t this without you!
xx
0 notes
Text
What is a Space Adventure Coding Kit? A Beginner’s Guide

In today’s digital world, learning to code is becoming an important skill for people of all ages. Coding helps develop creativity, problem-solving, and critical thinking skills. If you're looking for a fun and exciting way to get started with coding, a Space Adventure Coding Kit is a great option. These kits mix the excitement of space exploration with the basics of computer programming. In this article, we will explain what a Space Adventure Coding Kit is, how it works, and why it’s perfect for beginners who want to learn how to code.
What is a Space Adventure Coding Kit?
A Space Adventure Coding Kit is a learning tool designed to teach coding in a fun and engaging way. These kits usually come with physical parts like sensors, circuit boards, and programmable devices, along with software that helps you code your own space-themed projects. The idea behind these kits is to teach coding while taking you on a space adventure.
These kits are made for all kinds of learners, from young kids (around age 8 and up) to teenagers and adults. The space theme adds an element of fun and curiosity, making it easier for beginners to enjoy the learning process.
Key Parts of a Space Adventure Coding Kit
The specific contents of a Space Adventure Coding Kit can vary, but here are some common parts you’ll find in most kits:
Programmable Microcontroller or Board: Most kits have a small computer board (like Arduino or Raspberry Pi) that controls the kit’s components. This board is where you write and upload your code, making it the central piece of the kit.
Sensors and Motors: These kits often include sensors such as light, temperature, or motion sensors. They might also include motors or LED lights, which can be used to make your projects move or light up. These parts allow you to interact with the real world using your code.
Wires and Connectors: To set up your kit, you’ll need wires and connectors to connect the different parts together. These are necessary for making sure everything works and communicates properly.
Coding Software: A Space Adventure Coding Kit comes with software that helps you write and test your code. Beginner-friendly platforms like Scratch or Blockly are commonly used. If you’re more experienced, you might get to use programming languages like Python or JavaScript.
Instruction Guides and Tutorials: Most kits come with easy-to-follow instructions, guides, or videos that explain how to put everything together and code your space-themed projects.
Space-Themed Challenges: The kit might also come with fun, space-related challenges. For example, you could build a spaceship that moves or simulate a space mission. These projects help keep you motivated and learning by creating something cool.
How Does a Space Adventure Coding Kit Work?
Here’s how a typical Space Adventure Coding Kit works:
Setting Up the Hardware: First, you need to physically set up the components. This means connecting the microcontroller, sensors, and other parts together using the wires and connectors. You will learn about how the parts work together during this step.
Learning the Basics of Coding: Once everything is set up, you’ll start writing code to control the sensors and devices. If you're a beginner, you might use visual coding platforms like Scratch, where you drag and drop code blocks. As you get better, you can try text-based languages like Python or JavaScript.
Testing the Code: After writing the code, you upload it to the microcontroller. Then, you test it by interacting with the components. For example, you could make a rover move by programming it to respond to sensors, or you could program a light to turn on when certain conditions are met.
Iterating and Improving: Once you’ve tested your code, you may find things that need improvement. Coding is a process of trial and error, so you’ll try different approaches, fix mistakes, and make your project better over time.
Space Adventure Projects: The space theme comes to life in different ways. You might build a robot to explore a planet, program a spaceship to launch, or create a space station that tracks environmental changes. These projects help you apply your coding knowledge to real-world problems.
Why is a Space Adventure Coding Kit Great for Beginners?
Space Adventure Coding Kits offer many benefits, especially for beginners. Here’s why they’re a great choice:
Fun and Engaging: Coding can seem complicated at first, but the space theme makes it exciting. Learning to code becomes more enjoyable when you’re working on projects like sending a spaceship into space or exploring distant planets.
Hands-On Learning: These kits let you physically build and program your projects. This hands-on approach helps you understand how the different parts of a computer system work together, making the learning process more practical and less abstract.
Real-World Skills: The skills you learn with these kits, like logical thinking, problem-solving, and basic programming, are valuable in many different fields, including technology, engineering, and science.
Clear Instructions: Space Adventure Coding Kits are designed with beginners in mind. They usually come with easy-to-follow guides that walk you through each step, so you never feel lost. These instructions help you gain confidence as you learn.
Encourages Creativity: As you move through the kit’s lessons, you’ll get the chance to create your own space-themed projects. This lets you be creative and come up with new ideas. Whether you’re building a space station or designing a new planet, you can make your project your own.
A Great Introduction to STEM: A Space Adventure Coding Kit introduces you to the exciting world of STEM (Science, Technology, Engineering, and Mathematics). It shows how coding and space exploration are connected, sparking interest in these subjects and encouraging you to explore them further.
Who Can Benefit from a Space Adventure Coding Kit?
Space Adventure Coding Kits aren’t just for kids. They can be used by people of all ages and skill levels. Here’s who can benefit:
Children (Ages 8-12): These kits are perfect for younger kids who are just starting to learn about coding. The fun space theme keeps them engaged while teaching them basic programming skills.
Teenagers: Teenagers who want to dive deeper into coding can use these kits to explore more advanced concepts and work on challenging projects. The kits give them the tools to expand their skills.
Beginners of All Ages: Even adults who have no previous coding experience can benefit from these kits. The step-by-step lessons make it easy for anyone to get started with coding.
Educators and Parents: Teachers and parents can use these kits as teaching tools to introduce coding to students or children. They’re great for making learning fun and helping kids develop an interest in technology and science.
Conclusion
A Space Adventure Coding Kit is a fantastic way for beginners to learn how to code. It combines the excitement of space exploration with the basics of programming, making learning fun and hands-on. These kits are a great way to develop important skills like problem-solving, creativity, and logical thinking. Whether you’re a child, teenager, adult, or educator, a Space Adventure Coding Kit offers an exciting way to start your coding journey. The space theme adds a sense of adventure, and the projects help make coding feel more like a game. With easy instructions and plenty of opportunities to be creative, a Space Adventure Coding Kit is a fun way to learn about technology and explore the wonders of space.
0 notes