#Linux-Devops
Explore tagged Tumblr posts
Visit Tumblr Blog
Explore Tumblr blogs with no restrictions, modern design and the best experience.
Last Seen Tumblr Blogs


Fun Fact
The most popular pages on Tumblr are about Minecraft, GIFs, and David J. Peterson.
Text
the audacity. lol.

1K notes
·
View notes
Text

#programmerhumor#linuxmemes#codinglife#devops#sysadmin#buglife#softwareengineering#bash#linux#linuxposting#git#vim#emacs#kernel#ubuntu#debian#archlinux#serverlife#cloudcomputing#programmingfails#linuxproblems#csjokes#coderlifememes#sysadminstruggles#chilean#chilensis#chileno#tumblr chilenito#valparaiso#chile fotos
414 notes
·
View notes
Text

Can't bots just trust we're human without the robot dance-off? 😄
#linux#linuxfan#linuxuser#ubuntu#debian#dev#devops#webdevelopment#programmingmemes#linuxmemes#memes#cat#coding#developer#tech#ethicalhacking#computerscience#coder#security#infosec#cyber
155 notes
·
View notes
Text
Understanding the Boot Process in Linux
Six Stages of Linux Boot Process
Press the power button on your system, and after few moments you see the Linux login prompt.
Have you ever wondered what happens behind the scenes from the time you press the power button until the Linux login prompt appears?
The following are the 6 high level stages of a typical Linux boot process.
BIOS Basic Input/Output System
MBR Master Boot Record executes GRUB
GRUB Grand Unified Boot Loader Executes Kernel
Kernel Kernel executes /sbin/init
Init init executes runlevel programs
Runlevel Runlevel programs are executed from /etc/rc.d/rc*.d/
1. BIOS
BIOS stands for Basic Input/Output System
Performs some system integrity checks
Searches, loads, and executes the boot loader program.
It looks for boot loader in floppy, cd-rom, or hard drive. You can press a key (typically F12 of F2, but it depends on your system) during the BIOS startup to change the boot sequence.
Once the boot loader program is detected and loaded into the memory, BIOS gives the control to it.
So, in simple terms BIOS loads and executes the MBR boot loader.
2. MBR
MBR stands for Master Boot Record.
It is located in the 1st sector of the bootable disk. Typically /dev/hda, or /dev/sda
MBR is less than 512 bytes in size. This has three components 1) primary boot loader info in 1st 446 bytes 2) partition table info in next 64 bytes 3) mbr validation check in last 2 bytes.
It contains information about GRUB (or LILO in old systems).
So, in simple terms MBR loads and executes the GRUB boot loader.
3. GRUB
GRUB stands for Grand Unified Bootloader.
If you have multiple kernel images installed on your system, you can choose which one to be executed.
GRUB displays a splash screen, waits for few seconds, if you don’t enter anything, it loads the default kernel image as specified in the grub configuration file.
GRUB has the knowledge of the filesystem (the older Linux loader LILO didn’t understand filesystem).
Grub configuration file is /boot/grub/grub.conf (/etc/grub.conf is a link to this). The following is sample grub.conf of CentOS.
#boot=/dev/sda
default=0
timeout=5
splashimage=(hd0,0)/boot/grub/splash.xpm.gz
hiddenmenu
title CentOS (2.6.18-194.el5PAE)
root (hd0,0)
kernel /boot/vmlinuz-2.6.18-194.el5PAE ro root=LABEL=/
initrd /boot/initrd-2.6.18-194.el5PAE.img
As you notice from the above info, it contains kernel and initrd image.
So, in simple terms GRUB just loads and executes Kernel and initrd images.
4. Kernel
Mounts the root file system as specified in the “root=” in grub.conf
Kernel executes the /sbin/init program
Since init was the 1st program to be executed by Linux Kernel, it has the process id (PID) of 1. Do a ‘ps -ef | grep init’ and check the pid.
initrd stands for Initial RAM Disk.
initrd is used by kernel as temporary root file system until kernel is booted and the real root file system is mounted. It also contains necessary drivers compiled inside, which helps it to access the hard drive partitions, and other hardware.
5. Init
Looks at the /etc/inittab file to decide the Linux run level.
Following are the available run levels
0 – halt
1 – Single user mode
2 – Multiuser, without NFS
3 – Full multiuser mode
4 – unused
5 – X11
6 – reboot
Init identifies the default initlevel from /etc/inittab and uses that to load all appropriate program.
Execute ‘grep initdefault /etc/inittab’ on your system to identify the default run level
If you want to get into trouble, you can set the default run level to 0 or 6. Since you know what 0 and 6 means, probably you might not do that.
Typically you would set the default run level to either 3 or 5.
6. Runlevel programs
When the Linux system is booting up, you might see various services getting started. For example, it might say “starting sendmail …. OK”. Those are the runlevel programs, executed from the run level directory as defined by your run level.
Depending on your default init level setting, the system will execute the programs from one of the following directories.
Run level 0 – /etc/rc.d/rc0.d/
Run level 1 – /etc/rc.d/rc1.d/
Run level 2 – /etc/rc.d/rc2.d/
Run level 3 – /etc/rc.d/rc3.d/
Run level 4 – /etc/rc.d/rc4.d/
Run level 5 – /etc/rc.d/rc5.d/
Run level 6 – /etc/rc.d/rc6.d/
Please note that there are also symbolic links available for these directory under /etc directly. So, /etc/rc0.d is linked to /etc/rc.d/rc0.d.
Under the /etc/rc.d/rc*.d/ directories, you would see programs that start with S and K.
Programs starts with S are used during startup. S for startup.
Programs starts with K are used during shutdown. K for kill.
There are numbers right next to S and K in the program names. Those are the sequence number in which the programs should be started or killed.
For example, S12syslog is to start the syslog deamon, which has the sequence number of 12. S80sendmail is to start the sendmail daemon, which has the sequence number of 80. So, syslog program will be started before sendmail.
There you have it. That is what happens during the Linux boot process.
for more details visit www.qcsdclabs.com
#qcsdclabs#hawkstack#hawkstack technologies#linux#redhat#information technology#awscloud#devops#cloudcomputing
2 notes
·
View notes
Text
Load Balancing Web Sockets with K8s/Istio
When load balancing WebSockets in a Kubernetes (K8s) environment with Istio, there are several considerations to ensure persistent, low-latency connections. WebSockets require special handling because they are long-lived, bidirectional connections, which are different from standard HTTP request-response communication. Here’s a guide to implementing load balancing for WebSockets using Istio.
1. Enable WebSocket Support in Istio
By default, Istio supports WebSocket connections, but certain configurations may need tweaking. You should ensure that:
Destination rules and VirtualServices are configured appropriately to allow WebSocket traffic.
Example VirtualService Configuration.
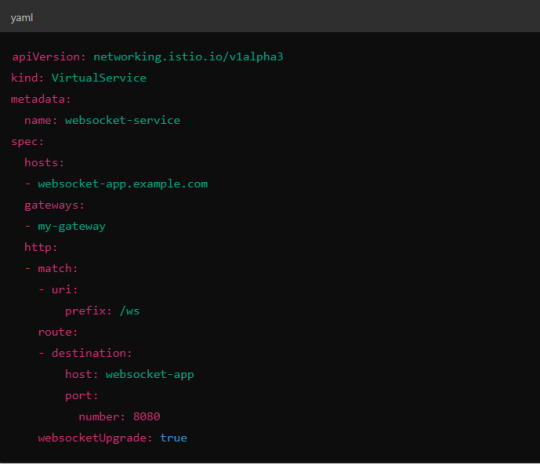
Here, websocketUpgrade: true explicitly allows WebSocket traffic and ensures that Istio won’t downgrade the WebSocket connection to HTTP.
2. Session Affinity (Sticky Sessions)
In WebSocket applications, sticky sessions or session affinity is often necessary to keep long-running WebSocket connections tied to the same backend pod. Without session affinity, WebSocket connections can be terminated if the load balancer routes the traffic to a different pod.
Implementing Session Affinity in Istio.
Session affinity is typically achieved by setting the sessionAffinity field to ClientIP at the Kubernetes service level.

In Istio, you might also control affinity using headers. For example, Istio can route traffic based on headers by configuring a VirtualService to ensure connections stay on the same backend.
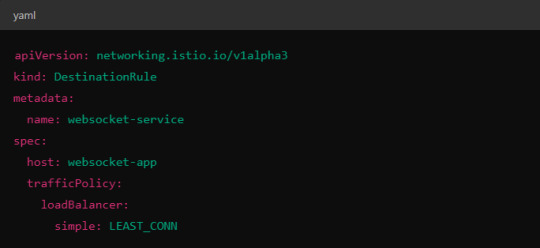
3. Load Balancing Strategy
Since WebSocket connections are long-lived, round-robin or random load balancing strategies can lead to unbalanced workloads across pods. To address this, you may consider using least connection or consistent hashing algorithms to ensure that existing connections are efficiently distributed.
Load Balancer Configuration in Istio.
Istio allows you to specify different load balancing strategies in the DestinationRule for your services. For WebSockets, the LEAST_CONN strategy may be more appropriate.
Alternatively, you could use consistent hashing for a more sticky routing based on connection properties like the user session ID.
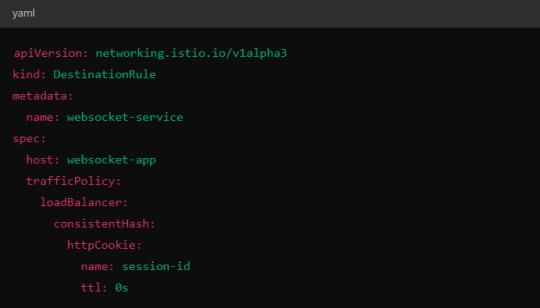
This configuration ensures that connections with the same session ID go to the same pod.
4. Scaling Considerations
WebSocket applications can handle a large number of concurrent connections, so you’ll need to ensure that your Kubernetes cluster can scale appropriately.
Horizontal Pod Autoscaler (HPA): Use an HPA to automatically scale your pods based on metrics like CPU, memory, or custom metrics such as open WebSocket connections.
Istio Autoscaler: You may also scale Istio itself to handle the increased load on the control plane as WebSocket connections increase.
5. Connection Timeouts and Keep-Alive
Ensure that both your WebSocket clients and the Istio proxy (Envoy) are configured for long-lived connections. Some settings that need attention:
Timeouts: In VirtualService, make sure there are no aggressive timeout settings that would prematurely close WebSocket connections.

Keep-Alive Settings: You can also adjust the keep-alive settings at the Envoy level if necessary. Envoy, the proxy used by Istio, supports long-lived WebSocket connections out-of-the-box, but custom keep-alive policies can be configured.
6. Ingress Gateway Configuration
If you're using an Istio Ingress Gateway, ensure that it is configured to handle WebSocket traffic. The gateway should allow for WebSocket connections on the relevant port.

This configuration ensures that the Ingress Gateway can handle WebSocket upgrades and correctly route them to the backend service.
Summary of Key Steps
Enable WebSocket support in Istio’s VirtualService.
Use session affinity to tie WebSocket connections to the same backend pod.
Choose an appropriate load balancing strategy, such as least connection or consistent hashing.
Set timeouts and keep-alive policies to ensure long-lived WebSocket connections.
Configure the Ingress Gateway to handle WebSocket traffic.
By properly configuring Istio, Kubernetes, and your WebSocket service, you can efficiently load balance WebSocket connections in a microservices architecture.
#kubernetes#websockets#Load Balancing#devops#linux#coding#programming#Istio#virtualservices#Load Balancer#Kubernetes cluster#gateway#python#devlog#github#ansible
5 notes
·
View notes
Text

Growth is exciting, but only if your app can handle it! Cloud technology ensures your app scales effortlessly to meet increasing demand. 📈 Get ready for success! 🔗Learn more: https://greyspacecomputing.com/custom-mobile-application-development-services/ 📧 Visit: https://greyspacecomputing.com/portfolio
#GreySpaceComputing#CloudTech#AppScalability#cloudcomputing#cloud#technology#cybersecurity#aws#bigdata#devops#it#datacenter#azure#cloudstorage#linux#programming#software#tech#iot#cloudservices#coding#cloudsecurity#machinelearning#informationtechnology#datascience#business#python#security#microsoft#dataprotection
2 notes
·
View notes
Text
Unleashing Efficiency: Containerization with Docker
Introduction: In the fast-paced world of modern IT, agility and efficiency reign supreme. Enter Docker - a revolutionary tool that has transformed the way applications are developed, deployed, and managed. Containerization with Docker has become a cornerstone of contemporary software development, offering unparalleled flexibility, scalability, and portability. In this blog, we'll explore the fundamentals of Docker containerization, its benefits, and practical insights into leveraging Docker for streamlining your development workflow.
Understanding Docker Containerization: At its core, Docker is an open-source platform that enables developers to package applications and their dependencies into lightweight, self-contained units known as containers. Unlike traditional virtualization, where each application runs on its own guest operating system, Docker containers share the host operating system's kernel, resulting in significant resource savings and improved performance.
Key Benefits of Docker Containerization:
Portability: Docker containers encapsulate the application code, runtime, libraries, and dependencies, making them portable across different environments, from development to production.
Isolation: Containers provide a high degree of isolation, ensuring that applications run independently of each other without interference, thus enhancing security and stability.
Scalability: Docker's architecture facilitates effortless scaling by allowing applications to be deployed and replicated across multiple containers, enabling seamless horizontal scaling as demand fluctuates.
Consistency: With Docker, developers can create standardized environments using Dockerfiles and Docker Compose, ensuring consistency between development, testing, and production environments.
Speed: Docker accelerates the development lifecycle by reducing the time spent on setting up development environments, debugging compatibility issues, and deploying applications.
Getting Started with Docker: To embark on your Docker journey, begin by installing Docker Desktop or Docker Engine on your development machine. Docker Desktop provides a user-friendly interface for managing containers, while Docker Engine offers a command-line interface for advanced users.
Once Docker is installed, you can start building and running containers using Docker's command-line interface (CLI). The basic workflow involves:
Writing a Dockerfile: A text file that contains instructions for building a Docker image, specifying the base image, dependencies, environment variables, and commands to run.
Building Docker Images: Use the docker build command to build a Docker image from the Dockerfile.
Running Containers: Utilize the docker run command to create and run containers based on the Docker images.
Managing Containers: Docker provides a range of commands for managing containers, including starting, stopping, restarting, and removing containers.
Best Practices for Docker Containerization: To maximize the benefits of Docker containerization, consider the following best practices:
Keep Containers Lightweight: Minimize the size of Docker images by removing unnecessary dependencies and optimizing Dockerfiles.
Use Multi-Stage Builds: Employ multi-stage builds to reduce the size of Docker images and improve build times.
Utilize Docker Compose: Docker Compose simplifies the management of multi-container applications by defining them in a single YAML file.
Implement Health Checks: Define health checks in Dockerfiles to ensure that containers are functioning correctly and automatically restart them if they fail.
Secure Containers: Follow security best practices, such as running containers with non-root users, limiting container privileges, and regularly updating base images to patch vulnerabilities.
Conclusion: Docker containerization has revolutionized the way applications are developed, deployed, and managed, offering unparalleled agility, efficiency, and scalability. By embracing Docker, developers can streamline their development workflow, accelerate the deployment process, and improve the consistency and reliability of their applications. Whether you're a seasoned developer or just getting started, Docker opens up a world of possibilities, empowering you to build and deploy applications with ease in today's fast-paced digital landscape.
For more details visit www.qcsdclabs.com
#redhat#linux#docker#aws#agile#agiledevelopment#container#redhatcourses#information technology#ContainerSecurity#ContainerDeployment#DockerSwarm#Kubernetes#ContainerOrchestration#DevOps
5 notes
·
View notes
Text
Google Cloud Professional Cloud Architect Certification. Become a GCP Cloud Architect, Latest GCP Exam and Case Studies.
Google Cloud Platform is one of the fastest-growing cloud service platforms offered today that lets you run your applications and data workflows at a 'Google-sized' scale.
Google Cloud Certified Professional Cloud Architect certification is one of the most highly desired IT certifications out today. It is also one of the most challenging exams offered by any cloud vendor today. Passing this exam will take many hours of study, hands-on experience, and an understanding of a very wide range of GCP topics.
Luckily, we're here to help you out! This course is designed to be your best single resource to prepare for and pass the exam to become a certified Google Cloud Architect.
Why should do a Google Cloud Certification?
Here are few results from Google's 2020 Survey:
89% of Google Cloud certified individuals are more confident about their cloud skills
GCP Cloud Architect was the highest paying certification of 2020 (2) and 2019 (3)
More than 1 in 4 of Google Cloud certified individuals took on more responsibility or leadership roles at work
Why should you aim for Google Cloud - GCP Cloud Architect Certification?
Google Cloud Professional Cloud Architect certification helps you gain an understanding of cloud architecture and Google Cloud Platform.
As a Cloud Architect, you will learn to design, develop, and manage robust, secure, scalable, highly available, and dynamic solutions to drive business objectives.
The Google Cloud Certified - Professional Cloud Architect exam assesses your ability to:
Design and architect a GCP solution architecture
Manage and provision the GCP solution infrastructure
Design for security and compliance
Analyze and optimize technical and business processes
Manage implementations of Google Cloud architecture
Ensure solution and operations reliability
Are you ready to get started on this amazing journey to becoming a Google Cloud Architect?
So let's get started!
Who this course is for:
You want to start your Cloud Journey with Google Cloud Platform
You want to become a Google Cloud Certified Professional Cloud Architect
#googlecloud#aws#cloud#cloudcomputing#azure#google#googlepixel#technology#machinelearning#awscloud#devops#bigdata#python#coding#googlecloudplatform#cybersecurity#gcp#developer#microsoft#linux#datascience#tech#microsoftazure#programming#amazonwebservices#amazon#software#pixel#xl#azurecloud
5 notes
·
View notes
Text


Levitica Technologies Pvt Ltd, established in 2013, specializes in web development and testing. We have branches in Hyderabad and Rajahmundry; the Hyderabad office focuses on project execution, while the Rajahmundry branch is dedicated to training and placement services.
#software companies in rajahmundry#Software Development Companies in Rajahmundry#Software Companies in Andhra Pradesh#Software Trainings in Rajahmundry#Software Course Training in Rajahmundry#Software Testing Courses in Rajahmundry#Full Stack Development in Rajahmundry#Digital Marketing Course in Rajahmundry#AWS Course in Rajahmundry#Devops Course in Rajahmundry#Linux Course in Rajahmundry#Best Software Training Institute in Rajahmundry#Best Placement Provider in Rajahmundry
2 notes
·
View notes
Text
COSS India – Premier IT Training & Red Hat Certification Partner
COSS India is a leading IT training and certification institute in India, renowned for delivering world-class education in open-source technologies. As an authorized Red Hat Training Partner, COSS offers a wide range of certification programs including RHCSA, RHCE, DevOps, Kubernetes, Ansible, OpenShift, and more. With training centers across major cities like Hyderabad, Bangalore, and Chennai, COSS India focuses on hands-on, practical learning designed to meet real-world enterprise needs.
Whether you're a student, IT professional, or enterprise client, COSS provides flexible learning options including instructor-led classroom training, online sessions, and corporate programs. Backed by certified trainers and state-of-the-art lab infrastructure, the institute ensures in-depth knowledge transfer and industry readiness. Thousands of students and professionals have advanced their careers through COSS’s career-focused programs.
Join COSS India to build future-ready skills and earn globally recognized certifications that open doors to top IT jobs worldwide. Unlock your tech career potential with the best in Linux and cloud education.
#Red Hat Certified Training#Linux Courses in India#DevOps Instructor-Led Training#Cloud Computing Training
0 notes
Text

506 notes
·
View notes
Text
#kernelbroken#kernel-broken#programmerhumor#linuxmemes#codinglife#devops#sysadmin#buglife#softwareengineering#bash#linux#linuxposting#git#vim#emacs#kernel#ubuntu#debian#archlinux#serverlife#cloudcomputing#programmingfails#linuxproblems#csjokes#coderlifememes#sysadminstruggles#chile#chilensis#tumblr chilenito#chilean
149 notes
·
View notes
Text

Windows: Hungry beast, Linux: Energy sipper!
#linux#linuxfan#linuxuser#ubuntu#debian#dev#devops#webdevelopment#programmingmemes#linuxmemes#memes#cat#coding#developer#tech#ethicalhacking#computerscience#coder#security#infosec#cyber
124 notes
·
View notes
Text
Kubernetes Pods: Set and Read Environment Variables
Create a simple Pod with environment variables
Access environment variables inside the container
Check environment variables without logging in
Learn how environment variables improve deployments
Perfect for beginners and DevOps engineers!
youtube
0 notes
Text
3 notes
·
View notes
Text
🚫 Stop Saying: "DevOps = Development + Operations"
✅ Start Understanding: DevOps is a Culture, Not Just a Combination
DevOps isn't just about merging two departments; it's a methodology that fosters collaboration, automation, and continuous improvement across the software development lifecycle.
Dive deeper into DevOps methodologies and learn how to implement them effectively in your organization.
📌 Follow us for ❤️ @nareshitech
#DevOpsCulture#ContinuousIntegration#Automation#SoftwareDevelopment#TechInnovation#devops#aws#cloudcomputing#linux#python#cloud#technology#programming#developer#coding#kubernetes#devopsengineer#azure#cybersecurity#software#java#datascience#docker#javascript#softwaredeveloper#css#machinelearning#devopstools#jenkins
1 note
·
View note