#MBR to GPT
Explore tagged Tumblr posts
Visit Tumblr Blog
Explore Tumblr blogs with no restrictions, modern design and the best experience.
Last Seen Tumblr Blogs


Fun Fact
69% of Tumblr users are millennials.
Text
Prevent OS Reinstallation: Change from legacy BIOS to UEFI
Upgrade your computer to UEFI without reinstalling your operating system. Learn how to switch from Legacy BIOS to UEFI with ease.
Prevent OS Reinstallation When Switching from Legacy BIOS to UEFI Switching from Legacy BIOS to UEFI is a common need for modern computers to take advantage of new features, improved security, and faster boot times. However, many fear this transition because they think it requires reinstalling the operating system (OS). In this guide, we’ll explore how you can convert your system from Legacy…
#Install Windows Server 2025#MBR#MBR to GPT#Windows#Windows 10#Windows 11#Windows Server#Windows Server 2012#Windows Server 2016#Windows Server 2019#Windows Server 2022
0 notes
Text
The IT course Im taking is talking about MBR and GUID partitioning and every time the guy says GPT I feel my stomach hurt a bit more
6 notes
·
View notes
Text
ちょっとしたきっかけで、科学とAIについてのアドベントカレンダーの記事を一つ書くことになったのだが、書くのはいいとしてどこで書けばいいのか良くわからないので、ここで書くことにした。
ここは普段はてなブログを拠点にしている自分が軽い独り言を書くための場所で、どちらかというとX(Twitter)のような短文が中心なので、あまり長々と書く場所ではない(と自分で勝手に決めている)のだけども、内容が内容なのでここに記すことにした。
普段は独り言なのでいきなり本題から入ってしまうが、今回はアドベントカレンダーなので自己紹介をしなければならない。自分は、AlphaFold2というAIに自分の専門分野の中核を撃たれたこと(そしてそこからある種のドミノ倒しが起きたこと)で、学生の頃から数えて20年あまり所属している分野が混乱とともに「バラバラ」になっていくのを見ている、大学の一教員である。
世間はAlphaFoldがノーベル賞を取ったこともあり、かなりの歓迎ムードだが、分野史を追えばAlphaFold2を作ったDeepMindがある種の侵略者・征服者(他分野からいきなりやってきて、コンテスト荒らしどころか20年以上続いたコンテストそのものを数年で終わらせた)であるのは明らかで、この個人的な体験が今回のこのポスト���書く上での発端になっている。
正直なところ、実際に科学研究というものを曲がりなりにも職業として行っている立場として、科学分野の大きな問いや分野そのものが「唐突に終わりうる」ということ、特に当該分野で長年知見を積んできた人間ではなく、全く異なる技術を持って横から来た人間が分野を終わらせることがあるという事態に直面すると、専門性を維持するモチベーションを保つのが難しくなることを、じわじわと実感しつつある。自分は大学の講義などでこの一連の歴史の流れを年に数回口にすることもあってか、そのたびに少しずつ心の中に澱のようなものが溜まるように思う。
AlphaFold2の存在が明らかになったのは2020年の11月末だが、一般に公開されたのは2021年7月のことだった。DeepMindは前バージョンのAlphaFoldを出し渋ったこともあり、AlphaFold2が計算済み予測モデルのデータベースと共に全面フリーで公開されたことは今思い返しても信じがたい。当時の混乱をエッセイとして書けと言われればいくらでも書けるくらいで、たぶん同分野の自分と同世代~上の世代の人たちはみな同じだろう。
そしてそれから1年半ほどあとの2022年11月末、ChatGPTが世に出た。ChatGPTを使ってみてしばらくして思ったのは「自分たちが味わった衝撃を、全ての分野の全ての人が味わうのか」という感覚だった。ただ、この時点では、AlphaFold2にしてもChatGPTにしても、単独の機能に優れたAIであって、それほど広がりを持たないものだったように思う。もちろんこの時点では、だけれども。
さらにあれから2年弱が経ち、自分の分野はAlphaFold2が引き起こしたドミノ倒しによって次々と問題が解かれるようになり、「解く問題がなくなる」という方向で分野が崩壊しつつあるが、世界はまだAIによってすべてが崩壊する程ではない。ちょうどこのアドベントカレンダーを書く予定になっていた12月20日にOpenAIからo3が発表され、ベンチマークの都合か数学方面が狙い撃ちされつつあるようだけれども、まだAlphaFold2ほどの衝撃はないように見える(ひょっとしたらAlphaFold1の瞬間かもしれない)。
これまでの4年間、AlphaFold2からo3までを自分の立場で振り返ると、研究分野は中核を撃たれる(重要な問題を解かれる)とそこからドミノ倒しが発生し得る・次々と問題が解決していく可能性があること、撃ってくるのは分野外の人間かもしれずタイミングは分からないこと(ここが一番つらい)、ドミノ倒しが始まると分野の流れが��激に速まり、多くの研究者はいわば土砂崩れから逃げ惑うような苦しい立場に立たされること、だろうか。この苦しさから逃れるため(そして研究業績を上げ続けるため)に、多くの研究者は当然もがきながら方針転換するのだけども、転換するより早く分野が崩壊する可能性もあって、正直なところこれが他分野でも同様に起こるとすると、あまりにも厳しすぎるし、気の毒すぎるように思う。
この苦しさは崩壊の過程が引き延ばされればされるほど長く続くと思われる(もちろん、従前のように崩壊が非常にゆっくりであれば問題ないが、もはやそこまでスローダウンすることは考えられない)ので、AIの進歩が加速し科学のすべてを「早く終わらせる」ことでしか、この苦境を脱することはできないのではないかと感じている
…というのが、過去4年を踏まえた2024年末の現在の心境だが、また来年再来年には考えが変わっているかもしれない。それと、自分がここに書いた分野観はそれほど異端ではないはずだけども、まだあからさまに口にできる状況でもない(皆悪いことはあまり口に出したくない)ので、できればそろそろ自分の分野以外にも、AIで崩壊し始める分野が出てきてくれて、こうした見方が一般化してほしいものだ。
追記: 今年の1月に似た話題(AIと科学研究と自身のキャリア)について独り言を書いていた。自分がこの崩壊の中である程度冷静でいられるのは、「自分は他人にとって代わられて当然である」という価値観であるからかもしれない。 https://mbr-br.tumblr.com/post/739340490648043520/
追記2: 自分が科学の発展に何を望むかについて書いたものがあったので、参考としてここにつけておく。正確には「科学の発展で何が可能になって欲しいか」という問いで、自分の回答は「生死の境界・生物無生物の差異・自他の区別を完全に破壊したい」である。書いたのは3年数か月ほど前だが、そこにある「現在ほぼ全ての人に植え付けられている生命とか自我とか社会とかの概念をぶち壊して、その先に何が出てくるか見てみたい」のは今でもそうで、現在のAIは生物無生物の壁を破壊しつつある点で、自分にとってはとても好ましい存在だと感じている。 追記3(2024年12月31日6:41AM): アドベントカレンダーに載せたせいかそれなりに読んでもらっているようで、某所では面白いと評してもらったりもしてやや恥ずかしい気分になっている。せっかくなので、このブログポストに関連する話題としてVirtual Lab論文にも触れておきたい。これは2024年11月半ばに発表されたAIによる生命科学(タンパク質工学)研究自動化の試みで、取り組みとしては課題設定も含めそれほど目新しいものはないのだけども、研究チームを率いるAIを設定し仮想のチーム作りからAIにやらせるところと、AIが計算で設計したものを人間が実験で検証するところがやや新しい。12月初旬にNatureのNewsで取り上げられて、12月下旬には日本国内のSNSでも生命科学者の間で(恐怖を伴いながら)話題になった。
すでに書いた通り、GPT-4oなどの商用AIを活用した研究自動化の取り組み自体は新しくないし、生命科学者が自分がAIに代替されるかもしれない未来に思いを馳せながら、あれこれ騒ぐのも理解できる。ただ自分としては、論文のイントロダクションにあった「学際領域の研究は大事だが、そういう研究者は少ないのでAIで代替する」という文言が一番堪えた。実際、この論文ではComputational BiologistとMachine Learning SpecialistがAIチームメンバーとして登場するが、これらはまさに自分たちをリプレースする存在である(つまり、多くの生命科学者と違い、自分は「すでにAIに代替されうる」側に立たされている)。
これがただでさえAlphaFoldで崩壊しつつある自分の分野に何をもたらすのか。元々、この展開は予想していたことではあるし、書けることもたくさんあるのだけれど、一つ言えるのは「人間が学際領域を研究するインセンティブ、そういう人材を教育するインセンティブが極端に減ってしまう」ことだと思う。もともと複数の学問領域にまたがる分野を研究するのは複数の分野の知識が必要な点でやや大変だし、そういうところを目指す学生もそれほどは多くないので大事に教育してきたつもりだけども、最初から無数の分野のそれなりのエキスパートとしてAIが降臨してしまうと、新しく分野に参入する気持ちはくじかれてしまうだろう。企業研究者であれば新卒の代わりにAIを雇用することでとりあえずは解決できるかもしれないが、教育を担う大学教員としてはこれをどのように扱えばいいのか正直まだ答えはない。そして、流入する人間が減ってくると分野は実質的に「蒸発」するだろう。
結局のところ、AIによって分野の問題がすべて解かれるという崩壊と、AIによって研究者が代替されるという蒸発の二方向から、研究分野は消滅に追い込ま��ていくのかもしれない。
10 notes
·
View notes
Text
Installing Kali Linux on a USB Stick: A Step-by-Step Guide
If you want a portable, powerful cybersecurity toolkit you can carry in your pocket, installing Kali Linux on a USB stick is the perfect solution. With Kali on a USB, you can boot into your personalized hacking environment on almost any computer without leaving a trace — making it a favorite setup for ethical hackers, penetration testers, and cybersecurity enthusiasts.

In this guide, we'll walk you through how to install Kali Linux onto a USB drive — step-by-step — so you can have a portable Kali environment ready wherever you go.
Why Install Kali Linux on a USB?
Before we dive into the steps, here’s why you might want a Kali USB:
Portability: Carry your entire hacking setup with you.
Privacy: No need to install anything on the host machine.
Persistence: Save your settings, files, and tools even after rebooting.
Flexibility: Boot into Kali on any system that allows USB boot.
There are two main ways to use Kali on a USB:
Live USB: Runs Kali temporarily without saving changes after reboot.
Persistent USB: Saves your files and system changes across reboots.
In this article, we’ll focus on setting up a Live USB, and I'll also mention how to add persistence if you want. and if you seek knowledge about kali linux you can visit our website any time
Website Name : Linux Tools Guide
What You’ll Need
✅ A USB drive (at least 8GB; 16GB or more recommended if you want persistence). ✅ Kali Linux ISO file (download it from the official Kali website). ✅ Rufus (for Windows) or Etcher/balenaEtcher (for Mac/Linux/Windows). ✅ A computer that can boot from USB.
Step 1: Download the Kali Linux ISO
Go to the Kali Linux Downloads page and grab the latest version of the ISO. You can choose between the full version or a lightweight version depending on your USB size and system requirements.
Tip: Always verify the checksum of the ISO to ensure it hasn't been tampered with!
Step 2: Insert Your USB Drive
Plug your USB stick into your computer. ⚠️ Warning: Installing Kali onto the USB will erase all existing data on it. Backup anything important first!
Step 3: Create a Bootable Kali Linux USB
Depending on your operating system, the tool you use may vary:
For Windows Users (using Rufus):
Download and open Rufus (Get Rufus here).
Select your USB drive under Device.
Under Boot selection, choose the Kali Linux ISO you downloaded.
Keep the Partition scheme as MBR (for BIOS) or GPT (for UEFI) based on your system.
Click Start and wait for the process to complete.
For Mac/Linux Users (using balenaEtcher):
Download and open balenaEtcher (Get Etcher here).
Select the Kali ISO.
Select the USB drive.
Click Flash and wait until it's done.
That's it! You now have a Live Kali USB ready.
Step 4: Boot Kali Linux from the USB
Restart your computer with the USB plugged in.
Enter the BIOS/UEFI settings (usually by pressing a key like F12, Esc, Del, or F2 right after starting the computer).
Change the boot order to boot from the USB first.
Save changes and reboot.
You should now see the Kali Linux boot menu! Select "Live (amd64)" to start Kali without installation.
(Optional) Step 5: Adding Persistence
Persistence allows you to save files, system changes, or even installed tools across reboots — super useful for real-world usage.
Setting up persistence requires creating an extra partition on the USB and tweaking a few settings. Here's a quick overview:
Create a second partition labeled persistence.
Format it as ext4.
Mount it and create a file /persistence.conf inside it with the content: cppCopyEdit/ union
When booting Kali, choose the "Live USB Persistence" option.
Persistence is a little more technical but absolutely worth it if you want a real working Kali USB system!
Troubleshooting Common Issues
USB not showing up in boot menu?
Make sure Secure Boot is disabled in BIOS.
Ensure the USB was properly written (try writing it again if necessary).
Kali not booting properly?
Verify the ISO file integrity.
Try a different USB port (preferably USB 2.0 instead of 3.0 sometimes).
Persistence not working?
Double-check the /persistence.conf file and make sure it's correctly placed.
Conclusion
Installing Kali Linux onto a USB stick is one of the smartest ways to carry a secure, full-featured hacking lab with you anywhere. Whether you’re practicing ethical hacking, doing security audits, or just exploring the world of cybersecurity, a Kali USB drive gives you power, portability, and flexibility all at once.
Once you’re set up, the possibilities are endless — happy hacking! 🔥
2 notes
·
View notes
Text
Building a computer will really have you be asking what the difference between partitioning MBR or GPT


2 notes
·
View notes
Text
cool nothing were doing is working !!!!!!! it refuses to see the new drive as bootable and windows install refuses to repair it and theres no option to change mbr to gpt or other way around or something
i just want it to be working again
13 notes
·
View notes
Text
"windows just works" you bought a whole new plug n play pc instead of upgrading from a legacy mb to one that supports uefi, converting your system disk from mbr to gpt via cmd, enabling tpm, then booting the install media didnt you
#baby this machine started off on windows 7#the research ive done and the changes ive had to put it through to get to 10 and now 11 were Many#only because microsoft refuses REFUSES to maintain their older OSes despite how much infrastructure actively relies on them#there are companies who still run XP and even DOS in daily operations btw#if microsoft cant even support windows 10 anymore do you think XP or DOS get any support?#fuck microsoft#death to microsoft#microsoft fucking ruined the personal computer
3 notes
·
View notes
Text
cara menginstall windows di komputer anda.
halo semua perkenalkan nama saya bintang,kali ini saya akan meng share cara menginstall windows di komputer anda,okey sebelumnya apakah kalian sudah pernah menginstall windows?jika kalian belum pernah menginstall windows sebelumnya anda bisa mencoba nya di virtual box/mesin virtual.Tapi kali ini topik saya bukan tentang menginstall windows di mesin virtual,kali ini saya akan membahas tentang penginstall an windows langsung di komputer kalian.
Pertama kalian dapat menyiapkan flashdisk,apakah kalian tau guna flashdisk dalam penginstallan windows kali ini?ya,flashdisk ini berperan sebagai tempat kita menyimpan file windows,tapi apakah kita hanya perlu menginstall file windows lalu menyimpan nya di flash disk dan berharap si komputer kita langsung bisa mendetect file tersebut?oh tentu tidak semudah itu ferguso. Sebelum kita siap menginstall,kita harus membuat flash disk kita menjadi bootable,bagaimana caranya? kalian bisa menggunakan software atau aplikasi bernama rufus,mungkin ada aplikasi atau softwrae lain tapi saya hanya berpengalaman menggunakan rufus,saya tidak tahu apakah mekanisme nya akan sama jika kalian menggunakan aplikasi yang berbeda. Jika memang kalian ingin menggunakan aplikasi lain kalian bisa mencari referensi mengenai hal ini selain di blog saya, dan maaf juga jika penjelasan saya sedikit sulit atau saya tidak pandai merangkai kata kata yang pas agar mudah di mengerti. Sudah sudah ayo kita lanjut ke menu hidangan utama, setelah kalian sudah menginstal rufus,pasang flashdisk kalian dan buka aplikasi rufusnya,*warning : sebelum kalian membuat bootable flash disk kalian,kalian harus memastikan bahwa flashdisk kalian tidak terdapat file penting,karna saat melakukan bootable,flashdisk akan terformat dan semua file di dalamnya akan hilang,ingat itu. ohiya kalian bisa menyiapkan file iso windows dengan mengunduhnya di website,kalian ketik saja di search bar "media creation tool".websitenya ada di paling atas daftar pencarian,setelah itu kalian cari sendiri saja ya caranya,panjang banget soalnya klo dijelasin,durasi bos durasi,cara menginstal rufusnya juga kalian cari sendiri saja ya,kita akan langsung ke cara mengbootable dan penginstallan saja,gasss.
ayo kita buka file rufus nya
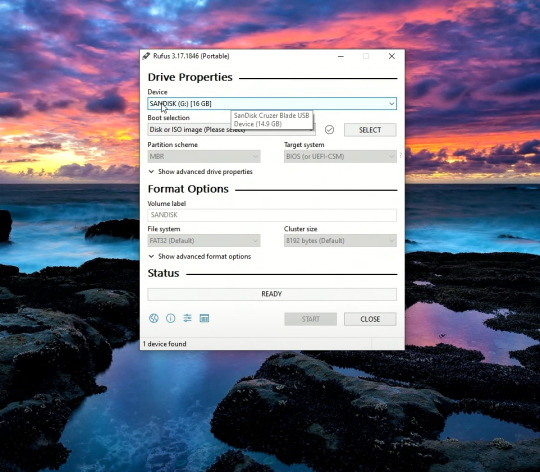
kira kira seperti itulah tampilan awal rufusnya,dan kalian lihat flash disk saya sudah ter detect oleh rufus,kita lanjut.

yang saya lingkari silahkan kalian klik dan pilih file iso windows yang tadi kalian unduh,lalu untuk partition scheme nya gpt/mbr kalian pilih sesuai tipe dari pc/laptop kalian,banyak tutorial cara ngecek nya kalian bisa cari ga ush manja.
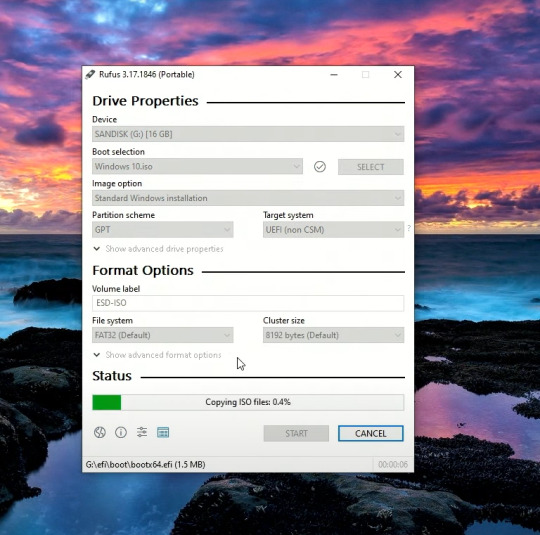
kalian bisa klik start untuk memulai proses bootablenya,tunggu sampai loadingnya menjadi ready,seperti pict dibawah.
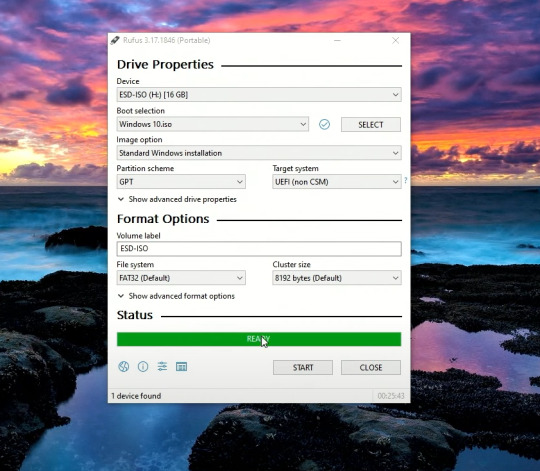
flash disk sudah menjadi bootable,langsung kita gas ke pc yang akan di install.
masuk ke bios komputer kalian,cara masuknya?saat prooseng booting kalian bisa klik f2,f3,f12,atau delete tergantung seri pc kalian,setiap pc bisa berbeda beda ya man teman.

kurang lebih beginilah tampilan bios komputer saya,bisa saja berbeda dengan kalian,menyesuaikan saja yaa.

setelah kalian masuk ke bios kalian bisa masuk ke menu boot,lalu pilih boot option #1,klik dan pilih uefi:sanDisk,jika tadi kalian memilih mbr makan pilih yang ada tulisan sanDisk saja,karna saya pakai gpt,jadina seperti itu.klik enter dan kita lanjut.

setelah kalian klik enter,kalian bisa save dan exit disini saya menggunakan f10 untuk save & exitnya,untuk kalian menyesuaikan saja ya. setelah ini kita akan me restart pc kita.

dan kita sudah masuk ke menu penginstallan windows,huhhh cape juga guys ngetik panjang lebar seperti ini,karna sudah panjang kali lebar saya menjelaskan, kita lanjut part 2 saja yaa,dan jika kalian tidak sabar,kalian bisa mencari tutorial dalam tahap ini,mudah kok guys. see uu>>>
4 notes
·
View notes
Text
長かった〜約1年!
Parallels DesktopでWindows7からバージョンアップし続けWindows10まで使ってきたが今年サポートが切れるので何とかWindows11にアップグレードできないか1年前から試行錯誤😿MBRからGPTフォーマットへの変換が全くできず何度も挫折👿
ここに来て漸くアップグレードができたので手順を備忘録
1-Windows11(24H2) ISOファイルをダウンロード
2-ISOファイルをマウント(E:だった)
3-コマンドプロンプトを管理者モードで起動
4-E:\setup /product serverを実行(参考:https://pc.asobu.co.jp/upgrade-to-windows11)
無事インストール完了!!🙌
ただし、MBRフォーマット、UEFI・TPM無効のまま
5-Windows11起動後、コマンドプロンプトを管理者モードで起動
6-mbr2gpt /convert /allowFullOSを実行(無事にGPTフォーマット化成功)
8-仮想マシンファイル「パッケージの内容を表示」config.pvsをテキストエディタで開く
”EfiEnabled”たぐを探し0を1に”EfiSecureBoot”たぐの0を2に変更
9-仮想マシン構成の「ハードウェア」タブ「TPMチップ」が出現ONに(参考:https://joincafe.jp/blogjc01/?p=1025)
これにて無事Windows11にアップグレード完了👏
0 notes
Text
How to check GPT or MBR disk: quick guide for Windows 🖥️ Don't miss it!
🌟 Ready to build your dream PC? Learn how to check if your hard drive is using GPT or MBR in Windows 10/11! 🚀 This guide breaks it down into super simple steps. Don't let installation errors hold you back! 💻✨ #TechTips #WindowsGuide - #Tutoriales - #EvergreenContent #Windows10 #WindowsTips
0 notes
Text
¿Cómo cambiar de Legacy a UEFI?
Pasos para Convertir de Legacy a UEFI 🧰 Opción 1: Usar Herramienta de Microsoft (MBR2GPT) Ideal si ya tienes Windows 10 y deseas convertir tu disco a GPT y habilitar UEFI sin reinstalar el sistema. Verifica el estilo de partición: Pulsa Win + X > Administración de discos Haz clic derecho en el disco > Propiedades > pestaña Volúmenes Revisa si dice MBR o GPT. Abre el Símbolo del sistema…
0 notes
Link
0 notes
Text
I'm trying to reinstall Windows on my laptop and it keeps telling me that my disk is MBR when literally everything about the system is telling me it's GPT so it won't let me install. I want to throw this damn laptop against the wall.
0 notes
Text
古いWindowsノートPCを移行した
CPUが古いとWindows 10から11にアップデートできない、ということでノートPCを買い替えたとき行った作業のメモを反省とともに残しておく。
データの移行が面倒であったので、古いPCのSSDをそのまま新PCのSSDにクローンし、その後Windows 11に更新すればよいだろう、という発想で作業した。
結論からいうと、この手順で目論見通り移行できたものの、予想外に手間取った点や些細であるが取り返しのつかない失敗があった。
手順
反省を踏まえた手順を記載する。(なので、この手順で作業した実績はない。)
前提
今回特殊だったのが、旧PCがBIOSで新PCがUEFIだった点で、この場合、後述するようにMBR2GPTを行う必要がある。そうでなければ、ただ単に旧PCから新PCにクローンするだけで動いたはずだ。
新PCの内蔵ディスクのクローンを作成する(必須ではない)
これはバックアップ。うまくいかなかったときには最低限これにもどせばよい。
USB SSDからbootしたUbuntuでddrescueを使ってクローン。
予想外だった点
最初Clonezillaを使ってみたが、これだと異様に遅く結局クローンに失敗してしまったようだ。結局、新PCのクローンはあきらめてしまった。
新PCを起動しWindowsアカウントを登録する
WindowsアカウントでログインするとWindowsやOfficeアプリのライセンスがアカウントに登録され、再インストールが可能になる。
Microsoftアカウントで登録されていることを確認すること。

新PCからドライバや独自ライブラリ?をUSBメモリなどにバックアップ
取り返しのつかない失敗だった点
WindowsはWindows Updateからドライバを入れてくれるので、この作業は不要だと思ったのだけれど、今回買ったノートPCはメーカーのプリインストールアプリが独自のライブラリ?に依存するらしく、それらはWebからもダウンロードできなかったので、バックアップが必要だったみたいだ。プリインストールアプリはどれもなくてかまわないようなもので、問題なかったけど。
新PCで回復ディスクを作成するか、他のPCでもいいのでインストールディスクを作成する
後述するが、新PCでコンソールを立ち上げる必要があり、ここで作成した回復ディスクやインストールディスクを使う。
予想外だった点
回復ディスクは以外と容量が必要なようで、32GB必要とのこと。16GBのUSBメモリを持っていたものの、作成できなかった。回復ディスクではなくクリーンインストールするインストールメディアなら作成できた。ここで回���ディスクを作成していたら、前述の独自のライブラリ?はここからコピーできたかもしれない。
旧PCの内蔵ディスクのクローンを作成する
旧PCのクローンを新PCの内蔵ディスクにクローン
新PCで内蔵ディスクをGPTに変換する
新PCで回復ディスクからコンソールを立ち上げ、内蔵ディスクをMBR2GPTで変換する。
予想外だった点
基本的にWindowsがインストールされたディスクを他のPCにさしても起動できる。たとえIntel CPUのPCからAmd CPUのPCにさしてもちゃんと起動する。起動後、バックグラウンドでドライバのインストールなどされるようだ。
ただし、BIOSからUEFIに代わると起動できない。UEFIはGPTのみに対応していて、MBRは読めないからだ。Microsoftはちゃんとこのような場合のツールを提供していて、それがMBR2GPTだ。
最初これを知らなかったので、起動せず焦った。
新PCを普通に起動する
OfficeはMicrosoftアカウントからダウンロード&再インストール可能。
おまけ
旧PCにはChrome OS Flexをインストールした。
UbuntuのようなLinuxをインストールすることもできるけど、日本語入力が不安定だったりUIに統一感がなかったりして��特別Linuxを使いたい気持ちが必要だと思う。
Chrome OS Flexなら日本語入力も使えるし、UIも統一感があってきれいだし、デフォルトでディスク暗号化もされてるし、安心感がある。
0 notes
Text
Linux CLI 28 🐧 fdisk command
New Post has been published on https://tuts.kandz.me/linux-cli-28-%f0%9f%90%a7-fdisk-command/
Linux CLI 28 🐧 fdisk command

youtube
a - fdisk fdisk is used to manage partition tables on HDD/SDD/devices You can create, delete, resize partitions... change their types or even check their status fdisk -l → lists the partition tables of your devices fdisk -l /dev/sda → lists the partition tables for sda device fdisk -s /dev/sda → prints the size of sda partition fdisk /dev/sda → press m → shows all the disk commands b - create, delete and change partition type with fdisk to create partition: fdisk /dev/sda → press n → press p for primary or extended → choose the partition number → enter first and last sector for this partition → w to write the changes to delete partition: fdisk /dev/sda → press d → select partition number → w to write the changes to change partition type: fdisk /dev/sda → press t → then L to list the partition types → enter the partition number you want → w to write the changes to quit without writing the changes: q You can also create new empty partition table : b → for GPT, o → MBR, G → for SGI and s → Sun
0 notes