#Magento 2 How to Get Module Directory Path
Explore tagged Tumblr posts
Visit Tumblr Blog
Explore Tumblr blogs with no restrictions, modern design and the best experience.
Last Seen Tumblr Blogs


Fun Fact
Mobile Tumblr US users spend an average of 4.04 minutes per session on the app.
Text
Magento 2 How to Get Module Directory Path
Magento 2 How to Get Module Directory Path
In this article, we will see here how we can get the path of any installed modules. Also the path of some folders related to the module such as etc, controller folders. To get the paths, we need to take the help of \Magento\Framework\Module\Dir class as shown below: <?php namespace Magemeta\ModuleName\Controller\Index; use Magento\Framework\App\Action\Action; use…
View On WordPress
0 notes
Text
Magento 1 to Magento 2 Migration – The Benefits, Reasons, and Process

Out of 209,904 Magento’s live online stores, there are just 56,134 sites that have migrated to Magento 2 (as on 15/11/2019). And the rest of the 153,770 merchants using the Magento Commerce Platform are at risk of running onto an unsupported software starting June 2020.
Magento 1.x is rounding off its support on 30th June 2020, and those who fail to implement Magento 1 to Magento 2 migration won’t receive security updates anymore.
A CMS without support is prone to vulnerabilities. With an increase in the number of web skimming (Magecart) attacks, such web stores will face the risk of getting hacked and infected with code that steals customers’ payment details.
This is the reason that some of the leading eCommerce businesses such as Tile Giant, Pino’s, Land Rover, and many others have already upgraded to Magento 2 because they understood that a simple upgrade could change their fate.
The common thing among them was:
They did not leave things for tomorrow and embraced the change that promised long-term success.
The Upsides of Magento 2 Migration
The major reason behind the reluctance to upgrade from Magento 1 to Magento 2 is that the key business decision-makers feel that this shift would make no difference. It is like changing adjacently placed seats with no difference in the experience at all.
Which is not TRUE!
Because as compared to Magento 1, the new version offers a host of benefits that could make a significant difference in the long run.
Let us have a look at some of the most important benefits of migrating to Magento 2.
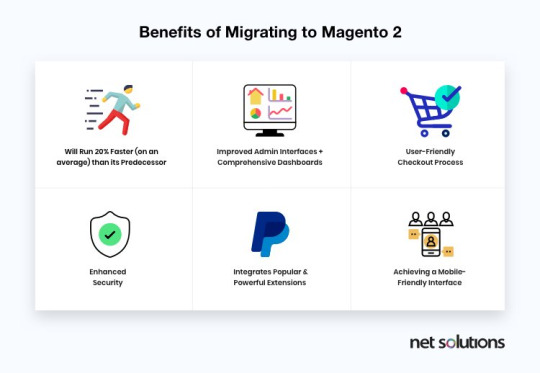
1. Improved Performance and Scalability
There’s no doubt that Magento 2 performs superior to Magento 1 in all cases. It accompanies an improved indexer that helps in increasing its query performance speed. Moreover, Magento 2 uses Varnish Cache, the prominent HTTP accelerator technology which makes it simple to cache requests.
This makes it simple for more than one admin user to create as well as edit eCommerce products’ information without data conflicts in Magento 2. Magento 2 has enhanced performance and scalability because it:
Improves web pages for faster delivery
Boosts server response times for all website activities
Enhances proficiency of backend operations
Enhances database flexibility and scalability to deal with peak loads
How Migrating to Magento 2 Reduced the Page Load Time of ‘Graham & Green’ eCommerce store by 43.5%
Graham & Green, the British furniture company, ran their eCommerce operations on Magento Commerce 1 for years. Their website was not responsive and did not work well on mobile devices.
But in the year 2018, they planned to embark upon a Digital Transformation journey, thus decided to migrate to Magento Commerce 2 with an aim to create a bespoke customer journey for ordering Made-to-Order (MTO) products like custom sofas.
They first launched their mobile site on October 15, 2018, during the peak time of the Black Friday sales season. Their visitors witnessed a great site speed, which alone revolutionized the entire customer experience. The average page load times were down to a staggering 43.5 percent year-over-year, making the buying experience lightning fast.

2. Enhanced Security
Magento 2 has put a considerable focus on security, and subsequently, has more secure information handling. With its main focus on securing user details and offering a secured checkout process, this new version will fulfill every crucial requirement of an advanced eCommerce website development.
Following are the ways you will witness enhanced security by migrating to Magento 2:
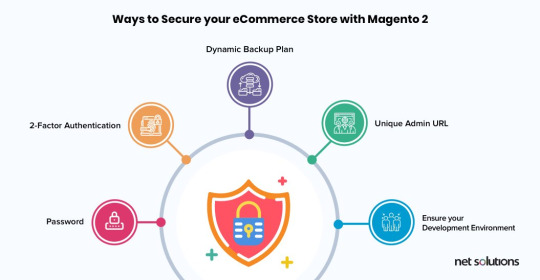
Password: Magento 2 helps to enhance password security by using SHA-256 hashing algorithms within its password management system.
2-Factor Authentication: Magento 2 platform offers an incredible 2-Factor Authentication extension, which gives an additional layer of protection.
Dynamic Backup Plan: To further enhance the security, eCommerce store owners may have a proper backup of Magento files by downloading them with an FTP client. This incorporates having an hourly offsite backup plan and downloadable backups. A backup plan guarantees that the eCommerce store doesn’t get any interference in the service if it gets hacked or crashes.
Unique Admin URL: The unique admin URL of Magento store offers a strong protection layer by making it harder to approach for the hackers.
Optimal Development Environment: Magento 2 makes the development procedure quicker and simpler with Magento DevBox Beta, which is another development environment option.
3. Improved Checkout Process
Magento 2 platform gives a simple and safe checkout to your eCommerce site. It offers an approach to recognize visitors as their guests. This eradicates the login or registration form that is required for users to continue the checkout process.
Also, it offers an active shipping rate as per country, region, or postal code. In Magento 2, you can easily integrate the convenient payment method into the checkout procedure.
There are several payment options available that include Paypal and Braintree. You can make your own particular favored payment modules with easy integration with any merchant checkout platform.
Magento 2 checkout process comprises the order summary where you can see a summary of your shipping information. These features help reduce the checkout hassle and enhance customer experience.
It even reduces the checkout time, thereby boosting your website’s conversion rate while reducing cart abandonment.
How Cabinets.com Reduced the Average Time on Checkout by 8 Sec Using Magento 2
Cabinet.com, a successful US company dealing with kitchen cabinets, launched Kitchen Resource Direct, one of the first companies to sell cabinets online. They launched their brand initially on Magento Open Source and gradually shifted to Magento Commerce 1 in the year 2014.
However, in today’s dynamic digitized world, Cabinets.com aimed to offer homeowners and professional contractors a large selection of competitively-priced, customizable products. Thus, in 2017, they decided to implement Magento 1 to Magento 2 migration.
One of the vital results that they achieved with this migration was a seamless Magento Commerce 2 checkout process, which reduced the average checkout time by 8 seconds.

4. Advanced Reporting
When it comes to succeeding in your eCommerce business, reporting is very crucial. The new advanced reporting features, located in Magento Admin, offer 20 reports through its web interface. This feature gives you insight into three critical areas, such as:
Orders: the number of orders, AOV, and taxes and shipping fees collected
Customers: the number of registered accounts
Products: the number of products orders and which product sells best
The reporting is dynamic and real-time, offering you the metrics that you need for better management of your eCommerce business.

5. Mobile-friendly and Responsive Design
Magento 2 offers mobile-friendly and responsive designs for delivering the perfect checkout experience to its customers.
The Magento 2 admin panel is touchscreen-friendly and makes it easy to deal with your store via mobile phones or tablets. It makes your site engaging, easy to use, and easy to navigate irrespective of the device in use and its resolutions.
3 Key Components of Magento 1 to Magento 2 Migration
Magento 2 upgrade comprises three major components, which include:
1. Data
By leveraging the Magento 2 Data Migration Tool, an eCommerce platform can securely create a path for moving data to Magento 2 without dropping packets on the way. But remember that data-migration is a time-intensive process. Thus, it’s important to ponder upon all the factors before hiring a Magento Developer. It’s not a simple CSV export from Magento 1 and then import into Magento 2. There are different steps need to be followed that we have discussed below in the blog.
Key Data elements: Product Information, Customer and Order Data, Promotional Data, and Store Configurations
2. Extensions
The Magento community has already validated and updated the major extensions for Magento 2. The good news is that the extensions are readily available on the Magento marketplace.
The following is the list of extensions available in Magento 2:
Customer Segmentation
Abandoned Cart Email
SEO Suite Ultimate
3. Themes & Customizations
Newer and innovative technologies are designed to give eCommerce merchants the ability to personalize the shopping experience and deliver performance in turn. To achieve that level of optimization, changes to themes and customizations are required. The following is the list of themes available in Magento 2:
Rope Responsive Theme
Couture Fashion Responsive Theme
Minimalism Theme
Instagram Theme
Modern Print Store Theme
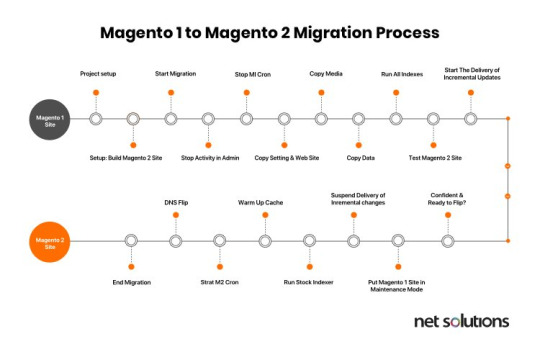
The Magento 1 to Magento 2 Migration Process
To migrate successfully and avoid issues, it is vital that you thoroughly plan and test your migration. The following diagram explains the workflow followed for the much-talked-about Magento upgrade. An expert Magento Developer can create a custom path to pave the way to a successful migration.
Doing it yourself isn’t that easy, but still, here’s how to do it.
Step1: Setup Magento 2 Instance
Download Magento 2 from https://www.magentocommerce.com/download without the sample data.
Extract the downloaded data and follow the setup wizard to install the platform.
Now, you have Magento 2 setup with an empty database. The data will be migrated in the database of this Magento 2 instance.
Step 2: Download the Data Migration Tool
Open the command line in the root folder of Magento 2. Download the data migration from Magento 1 to Magento 2 tool in the newly set up Magento 2, by following the command:
composer require Magento/data-migration-tool
The version of the data migration tool must match the version of the Magento 2 codebase, which can be found in the composer.json file present in the root of the Magento 2 directory.
For example, for Magento version 2.3.3 the command would be:
composer require Magento/data-migration-tool:2.3.3
You will be prompted for the public key and your private key for authentication.
To get these key values, login to your Magento eCommerce account. Once you log in, browse through “My Accounts”. Now, click on the developer’s link on the left menu and then click on security keys. Here, you can easily locate your keys.
After filling in these details, a new folder called “data migration tool” will be created within the extension /vendor/magento/.
Alternatively, you can also download the data migration tool from Github. The link to which is: https://github.com/magento/data-migration-tool
Step 3: Configuring the Data Migration Tool
Once you have the required data migration tool, you will need to move on with its configuration.
Here’s how to do it:
Under the data-migration-tool/etc folder you can find additional sub-listed folders, i.e.,
ce-to-ce: includes configuration files and scripts for migrating data from Magento 1 CE to Magento 2 CE
ce-to-ee: includes configuration files and scripts for migrating data from Magento 1 CE to Magento 2 EE
ee-to-ee: includes configuration files and scripts for migrating data from Magento 1 EE to Magento 2 EE
Now, enter the directory for which you are performing the migration (for example: ce-to-ce in the case of migrating data from community edition to community edition).
Next, enter the directory with the Magento 1 version name. For instance, if you are doing the migration for Magento 1.9.0.1 version then you should enter the folder 1.9.1.0.
Also, make a copy of the file map.xml.dist and rename it to map.xml, in this folder. (Use of this file is explained in the migration step).
Check out - https://pastebin.com/aejcsMwp
Now you may make a copy of the file config.xml.dist and rename it to config.xml, in this folder. Open this file and make the following changes to it:
a. Required Values:
Under source, enter the Magento 1 database details, and in the destination enter the Magento 2 database details.
Crypt_key value can be found in local.xml file which is located in the Magento 1 instance directory at: app/etc/local.xml in tag.
b. Optional Values:
If you don’t have a prefix set for the Magento 1 and Magento 2 tables, then you can leave the “1” source prefix, and “2” source prefix fields empty.
Database mapping between your Magento 1 and Magento 2 databases is performed through mapping files which are located in:
/vendor/Magento/data-migration-tool/etc/
These files are used for changing the table names, field names, ignoring tables and fields and transferring data of the field to the Magento 2 format.
We need to remove the .dist extension of these files to make use of these mappings.
After removing the .dist from file names, we need to change these file names (removing the .dist) in the config.xml file under the “options” tab.
Here you can see the location of the files that need to be renamed.
Check Out - https://pastebin.com/C09182na
It should look like this now:
Check out - https://pastebin.com/U48sVTeq
Step 4: Provide the Prerequisites
Before you start your migration, you must do all of the following:
You need to stop all the current activities in Magento 1 before moving ahead with Magento migration.
Stop all the cron jobs running on Magento 1 version and put the site on maintenance mode. The purpose of this is to stop all the activities that make any changes in the database. We need to make sure that there is no activity in the database once the data migration process starts.
Open ports in your firewall so that the migration tool can communicate with databases, and the databases of Magento 1 and Magento 2 can communicate with each other.
Migrate your theme to Magento 2 theme structure.
Migrate all your Magento extensions and customizations from version 1 to 2.
In the event of unexpected issues that might cause redundancy, we advise you to create a backup of your Magento 1.x database.
Step 5: Migrate the Websites
Now we will migrate the eCommerce store and system configuration like tax settings, payment gateways, shipping, etc.
For this, we need to run the following command in the Magento 2 instance:
bin/magento migrate:settings [-r|–reset] {}
[-r|–reset] is an optional argument that starts the migration from the beginning.
{} is the absolute path to config.xml file and is a required field
The command should be:
sudo bin/magento migrate:settings /var/www/magento2/vendor/magento/data-migration-tool/etc/ce-to-ce/1.9.0.1/config.xml
Once it is done you will see the “migration complete” status.
Next, you will need to run the data migration command:
bin/magento migrate:data [-r|–reset] {}
The command should be:
udo bin/magento migrate:data /var/www/magento2/vendor/magento/data-migration-tool/etc/ce-to-ce/1.9.0.1/config.xml
This command checks the consistency of tables and fields between Magento 1 and Magento 2. If any issue exists, then an error message will appear with a list of all tables and fields that are not mapped.
For example, you face an extension tables error and a particular custom field goes missing in one of the tables. So, to fix this problem you need to install the Magento 2 version of the extensions in the Magento 2 instance so that the missing tables are in the Magento 2 instance database as well.
You can also ignore the tables and fields by adding their entries in map.xml file After making the entries, the corresponding tables and fields will be ignored and will not be migrated to the Magento 2 database.
Run the migration command again to verify that the issues are fixed.
The data migration is completed once you get the migration complete message.
After the migration is completed, if there are any new changes in the database, such as new orders are placed, or new reviews are added, then you can migrate that data by executing the following command:
bin/magento migrate:delta [-r|–reset] {}
The command should be:
sudo bin/magento migrate:delta /var/www/magento2/vendor/magento/data-migration-tool/etc/ce-to-ce/1.9.0.1/config.xml
This command can be stopped by pressing ctrl + C, or else it will keep on running.
Now your database is successfully migrated to Magento 2.
Flush your Magento 2 cache, and re-index all Magento 2 re-indexers, then thoroughly test your new Magento 2 site.
Bingo! You are almost done and ready to be an active part of the Magento 2 powered businesses.
After migrating from Magento 1 to Magento 2, all you are left with is the need to copy the media files from Magento 1 to Magento 2.
Challenges of Migrating from Magento 1 to Magento 2
The journey of Magento 1 to Magento 2 migration is no cakewalk. There are many challenges that might make it a roller coaster ride. Some of which include:
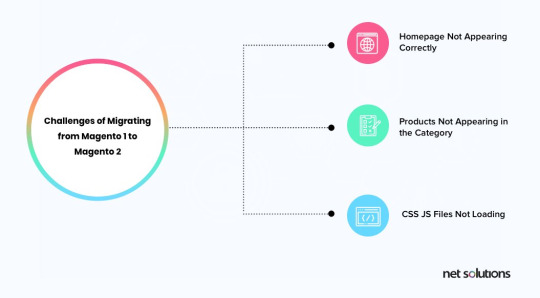
Homepage Not Appearing Correctly
If your Magento 1 version has a custom layout set for the home page, there are chances that the home page will not appear correctly after migration.
Solution: You either need to create a custom layout in Magento 2, or you can go to the Magento 2 admin panel and change the layout for your home page.
Products Not Appearing in the Category
The category-wise distribution of the products on your eCommerce store is likely to go haywire.
Solution: Re-index all the indexers. In Magento 2, you need to go through the command line because it can’t be done from the admin panel like it was done in Magento 1.
CSS JS Files Not Loading
This is yet another issue that many eCommerce stores have reportedly faced after Magento 1 to Magento 2 migration.
Solution: Flush your cache and then deploy the static content. (If you are still facing a problem after removing the cache, then manually remove all the subfolders from the cache folder.
All in All Magento 2 is a Preferred Choice to Make
So, the countdown has begun. With 56,134 sites already running on Magento 2, it is your time to take this much-awaited decision. It is a step that will make the entire eCommerce experience a seamless one both for the users and the business alike.
This change is inevitable, so why whine about it and wait for June 2020. Instead, reach out to the Magento development experts who can assist you with Magento 1 to Magento 2 migration owing to their technical background.
After all, today is always better than tomorrow!
Original Source - https://www.netsolutions.com/insights/how-to-migrate-from-magento-1-to-magento-2/
0 notes
Text
Magento PWA Studio Tutorial: Step by Step to Get Maximum Customers
Are you familiar with Magento PWA Studio Tutorial?
Or do you even know what PWA is?
This article will answer all related questions.
If you are looking for a way to leverage your online store, create a much better mobile experience on your website, you cannot overlook this blog.
In this blog, we will provide:
A clear overview of Progressive Web Application (PWA) in general and its benefits
An introduction to Magento PWA Studio Project
Basic concepts of Magento PWA
Magento PWA Studio Tutorial
Now, let’s get started!
What Is Progressive Web Application?
>>> Read Later: How to Optimize Magento 2 Order Management?
Progressive Web Application (PWA in short) is simply a web application applying modern web technologies to bring about a reliable, fast, and engaging customer experience.
Also, PWA can perform like a native app on smartphones. Therefore, it is extremely useful when customers tend to shop online by using phones, especially using available applications.
PWA’s Benefits
As PWA applies advanced web technologies, many online stores nowadays develop their web applications to attract more engaged customers:
Fast: Various performance optimization techniques are applied to improve the fast-loading functionality.
Mobile-friendly: As PWA is designed for smartphones, it is clear that those applications are fit in any size of any device.
Security & Reliable: PWA sites use HTTPS connections to improve security.
Installable: It is more convenient for customers to install the apps and access an online store with just one click.
Offline usable: As the apps are installed on mobile devices, customers can use it even when it is not connected to the Internet. All the actions will be updated as soon as the Internet is available.
Shareable: In any application, there is a button that enables you to share the content on social media with one click.
Easily keep customers engaged: The comfortability of PWA sites can make customers stay longer in your store. Also, the feature of sending notifications directly to their phones can keep them updated as well.
PWA Basic Concepts
>>> Have A Look Here: Magento Sample Data – Install, Update, Remove Guide (2020 Updated)!
Before going in-depth with the tutorial, let’s look over these following basic concepts and make sure that you understand it well to work with PWA tools.
Application Shell
An application shell provides a fundamental structure of the user interface for a progressive web application. The structure is used in Magento PWA Studio to reduce the time spent loading a branded experience in the UI.
This approach involves heavily caching the minimal amount of HTML, CSS, and JS to load the basic UI of the page before fetching the rest through an API.
Service Worker
A service worker is a script that runs in the background. It is used for caching and resource recovery.
Component Data Binding
Component data binding is the way data move between the source and a UI component. PWA uses component data binding to connect dynamic data with the user interface.
GraphQL
Similar to REST, GraphQL is a query language on a server. It is used in PWA to push data.
In comparison with REST, GraphQL is more powerful, flexible, and effective.
Advantages:
Predictable results from the query
A single request for many results
Organized data with typed schema
Client State, Reducers & Actions
Client State, Reducers & Actions are Redux concepts that are used to manage and update the status of a web application.
Loading & Offline States
Both loading and offline states are concepts that must be dealt with by PWA.
Container Extensibility
A Container is an HTML element that contains 0 or more Containers Child components. It acts as the target for Magento-loader-layout operations.
With container extensibility, you can reuse and modify your container with no adjustment of the source.
CSS Modules
CSS modules are reusable CSS styles that enable you to develop components with styles but still compatible with external styles.
Performance Patterns
This is an essential concept in PWA, which includes many strategies and patterns available to enhance PWA performance.
Root Components & Routing
A root component of an app is the DOM node under which all other nodes are managed by React.
Routing is the ability to arrange a URL pattern to a suitable handler.
Critical Path
To display a website, we need a critical path, which are steps required to process the HTML, CSS, and JavaScript files. If you want the best performance of your web application, you need to optimize the critical path.
What Is Magento PWA Studio Project?
>>> Don’t Miss This: Magento 2 Testing Framework to Cover All Parts of Your Website!
Magento PWA Studio Project is a set of tools that allows developers to develop, deploy, and maintain the PWA storefront on top of Magento 2.
Advanced tools and libraries are used to create a build system and framework that follow the Magento principles of extensibility.
The Magento PWA Studio Project provides the following tools:
pwa-buildpack CLI tools: Core constructing and development tools.
Peregrine hooks & components: A collection of parts and React hooks.
Venia store & visual components: A proof of concept Magento 2 storefront & visual elements can be used in Magento stores.
UPWARD: A specification of a file that determines the behavior of the server.
pwastudio.io: Magento PWA documentation that guides developers to build Magento 2 storefront.
Shared Magento server: Sample data, make sure that the version of Magento is updated.
Magento PWA Studio Tutorial – Project Setup Guide
>>> Check It Our: More Magento tutorials to optimize e-commerce sites!
This comprehensive tutorial provides several best practices of Magento PWA Studio that help to integrate PWA into Magento.
Besides, in this blog, we just provide tutorials of setting-up step, which is a fundamental step of the whole process.
Getting Started
If you haven’t installed Yarn, Node.js, please install it to setup Magento PWA Storefront.
In case you have it, you need to check the versions by running the 2 following commands:
node -v
yarn -v
STEP 1: Run The Scaffolding Tool
In the terminal, you need to navigate to the directory where you want to install your storefront project and run the scaffolding tool:
yarn create @magento/pwa
Alternative commands:
npx @magento/create-pwa
npm init @magento/pwa
Then, please answer the following questions from the interactive questionnaire:
Run this command to navigate to your project’s root directory:
cd pwa-studio-fundamentals
STEP 2: Start The Storefront Application
In the second step of the Magento PWA tutorial, you need to execute the below command to start the dev server at http://0.0.0.0:10000/:
yarn watch
After that, it will detect whether there is any change or not. If a change is identified, the application running in the browser will update the change.
To stop the dev server, please press the key combination of Ctrl+C in the running terminal window.
STEP 3: Add A Custom Hostname & SSL Certificate
This step is necessary, especially when working on many storefront projects, as each project needs a custom hostname to avoid conflict with service workers or ports.
You can simply create a custom hostname and SSL certificate by using create-custom-origin sub-command as followed:
yarn buildpack create-custom-origin ./
Update Environment Variables (Optional)
You can choose to perform this step or not since the scaffolding command already adds the required environment variables to the environment file.
In case you want to, you can update your project’s .env file and change the property values.
You can find more Magento PWA Studio Tutorials in Magento PWA documentation.
Troubleshooting
Because it is kind of complicated to set up the project, errors can happen anytime. Let’s see some common faults and how to fix it.
Node Version Error
This fault may happen because you are using the wrong node version. Specifically, the node v12 is not compatible with early versions of the PWA studio.
To solve this problem, you should use a node version manager, for example, n or nvm, to switch to different versions.
Caching Problems
In case you face a caching problem, just simply empty the full application storage and start over.
Let us give you a specific example of using Chrome:
Open the Developer Tools
In the Application tab, select Clear Storage
Press the “Clear site data” button to finish
Unable to Get The Data from Magento
If you are running into a problem that your storefront does not get the data from Magento, you should verify the MAGENTO_BACKEND_URL in your .env file, which is accessible from your dev server.
Privacy Error
This issue is quite common while visiting a website.
The reason is that your project has an invalid or expired certificate. As a result, the browser doesn’t trust the generated SSL certificate.
Some users have suggested deleting the devcert folder to trigger certification regeneration.
Such a folder is found at different places in different operating systems.
In MacOS:
~/Library/Application Support/devcert
In Window system:
${User}\AppData\Local\devcert
Conclusion
In conclusion, PWA is so useful that we highly recommend online store owners to set up to gain more customers.
We hope that this Magento PWA Studio Tutorial is helpful to start working on Magento PWA. If you want us to deliver more Magento PWA tutorials, don’t hesitate to comment in the section below.
Thanks a lot for reading!
The post Magento PWA Studio Tutorial: Step by Step to Get Maximum Customers appeared first on Mageguides.
from Mageguides https://ift.tt/2zt4RFO via IFTTT
0 notes
Text
MAGENTO MODULE: INSTALLING AND CREATING
When discussing e-Commerce development, it goes without saying that Magento would always be on top of the list of the best platforms because of its robustness and variable functions. Besides beautiful themes, Magento module is also an important element that should be of your concern while building your e-commerce site. For Magento modules, you can either download the existing ones or create whole new ones for your needs. In this article, we will introduce steps to install and create (and rules for creating) Magento modules.
A. An overview of Magento module
1. What is a Magento module?
A module is a sensible gathering – that is, a catalog containing squares, controllers, partners, models – that are identified with a particular business highlight. With regards to Magento’s promise to ideal seclusion, a module encapsulates one element and has insignificant conditions on different modules.
Modules and themes are the units of customization in Magento. While modules give business features, while subjects firmly impact client experience and storefront appearance. The two parts have an actual existence cycle that permits them to be introduced, erased, and impaired. From the point of view of the two traders and extension designers, modules are the focal unit of the Magento organization.
2. Purpose a module
The reason for a module is to give explicit items includes by executing new usefulness or expanding the usefulness of different modules. Every module is intended to work freely, so the incorporation or rejection of a specific module doesn’t commonly influence the usefulness of different modules.
B. Installing the existing Magento Modules
Magento 2 gives you an opportunity to manually install modules using 3 different methods: via composer, via ZIP-archive, and via a browser. The choice of a method depends on the way that a module appeared in the system. Let’s consider each of them in detail.
Here are the two ways that modules can appear in the system:
It is in the Magento store. You have 2 access keys, generated in your marketplace account.
You can add these keys to the Magento admin panel. Your Magento marketplace account synchronizes with it, and you can manage the installation of any purchased packages there.
If you are an advanced user and can use the server console, you can install a module via the composer. You will also need to enter the keys if they were not previously saved in the system.
Third-party sources installing Magento Module
Get it in the form of an archive.
Receive a link to a third-party repository, e.g.: GitHub. Installation from it can also be done via the composer.
Now let’s take a closer look at each method of module installation.
1. Generating “Access Keys” in a Magento account
You can log in or create a new account at magento.com. After that click on the “Marketplace” link in your account.
Or go directly to the Magento extensions store.
In “My Profile” we are looking for the “My Products / Access Keys” section. You just need to generate the necessary keys.
2. Installing modules via Composer
This is a way for you if you know how to use the server console.
The composer is a file called composer.phar. You can download it at getcomposer.org. It is launched from the Magento root directory. A folder should contain the composer.json file with the configuration of the installed libraries.
php composer.phar <command>
If the composer is installed globally on the server, there is no need to download it and you can refer to it in the following form:
composer <command>
If the module is distributed from the Magento repository, we can just run the following commands:
php composer.phar require [vendor]/[package]
php bin/magento setup:upgrade
And they will do the rest of the job.
Or it could be a module from a third-party repository and we will need to specify it in the composer.json file.
We are interested in the “require” part, where we indicate the name of the module that we add.
{
. . . . .
“require”: {
. . . . .
“vendor/package”: “version”
},
.....
}
If the third-party repository is, for example, GitHub, you will need to specify it in the “repositories” branch.
{
. . . . .
“repositories”: {
. . . . .
{
“type”: “git”,
“url”: “https://github.com/ . . . . .”
}
},
.....
}
Usually, all this data is provided with the module.
Next, after saving the file, run the following commands:
php composer.phar update [vendor]/[package]
php bin/magento setup:upgrade
For example, let’s take a look at the installation of one of our free modules. It is located in the GitHub repository. Since the module is not installed from the Magento repository, we’ll add it to the composer.json file.
{
. . .
“repositories”: [
. . .
{
“type”: “vcs”,
“url”: “https://ift.tt/2w7nQUw;
}
],
. . .
}
And apply our module there:
{
. . .
“require”: {
. . .
“belvg/module-applyto”: “dev-master”
}
}
It only remains to start the updating process. The necessary modules and add-ons will be downloaded according to the changes that were made to the composer.json file.
php composer.phar update
Then start the installation of all the new modules in Magento.
php bin/magento setup:upgrade
3. Installing modules via ZIP-archive
When you wonder how to add the extension in Magento 2 firstly you should copy it’s code to the required directory:
Left panel shows here the basic listing of the zip-file with a module.
Right panel — Magento 2 codebase.
Current zip-file contains User_Guide.pdf file and the Install directory. Basically, the Install folder content should be copied to the app/code/ directory.
After that, we can use 2 different methods to initialize the module in a store.
4. Installing modules via a browser
This method requires Cron tasks set up and proper running. In case it has not performed yet — do it. You will need it further, not only while extensions installing.
So if Cron is set up correctly, just follow the path in admin panel to initialize the module:
System/ Web Setup Wizard/ Component Manager
Here you can enable all available modules.
In case Magento is set up properly you’ll see the notification that all of the systems run correctly.
Further, before you enable the custom module in Magento 2, Backup creation will be proposed.
And finally, we will see the following screen:
The module has been enabled. And now we can switch back to the module list and enable (install) the next one.
Console commands in Magento
You have already met one of them:
php bin/magento <command>
Magento CLI provides a large number of useful console commands to manage the store. And you can get the list of these commands by running: php bin/magento.
But now we need to use only one:
php bin/magento setup:upgrade
This command checks all of the modules and launches schema installation or updating process (if necessary). So you just need one command to perform updating and installation of all modules.
The rights to the files
For greater security (or for other reasons), the server can be configured so that the installation of the modules is performed by a specific user.
In this case, when executing console commands:
php composer.phar <command>
php bin/magento <command>
there may be reports of insufficient rights.
You can try running the same commands on behalf of another user or simply from the administrator. For example:
sudo -u <username> php bin/magento <command>
or simply
sudo php bin/magento <command>
Also, you may need full rights for some folders. For example, when installing modules, you may not have the access to some files from the app/etc directory.
chmod 777 app/etc
chmod 644 app/etc/*.xml
Or to the var folder containing a lot of temporary files, and the rights to which should be distributed to all subdirectories (the -R parameter is recursive).
chmod -R 777 var/
C. Creating new Magento Modules
1. Things to remember when creating Magento module
Know about obscure unpredictability
It could be quick to add custom credits to Magento 2, be that as it may, there could be viewed as mind-boggling improvement being associated with such activity. You would be advised to execute custom characteristics on certain activities previously, else, it ought to be generally off base.
What is prescribed here is investing energy exploring and arranging improvement undertakings to accomplish exact estimation.
Follow Versioning Policy
Make sure to stay with the versioning policy in your custom Magento 2 module. This would cause the module to turn out to be progressively steady and strong on the off chance that Magento discharges another rendition.
Additionally, the Composer bundle director assists with indicating and keep up the exceptional conditions on different bundles and Magento 2 modules.
The composer.json model with Magento 2 module conditions.
Plus, the significant part plays conditions on other Magento 2 modules. If, suppose, composer.json from custom module has 100.1.* rendition reliance on Magento/module-index module implies that all PATCH refreshes are good with a custom module.
Practically speaking, there are more modules that don’t have clear API or full API inclusion and you will wind up having 100.1.3 reliance. Such modules in all probability use Inheritance as opposed to Composition.
Follow the Magento 2 center in a smart manner.
A great deal of Magento designers may state: “It is a similar methodology as in Magento 2 center and I followed (read duplicate stuck) same methodologies and it ought to be correct”. However, it ought to be sensible to follow the Magento 2 center executions. However, there are still huge pieces of code that are made arrangements for refactoring and reimplementation by the Magento Team.
For example, you locate a comparable execution in the Magento\Payment module to fabricate custom installment usage. As a feature of the module, you will discover an AbstractMethod class and instances of its usage in installment modules that meet up with Magento 2 Community Edition. Curiously, the methodology of executing installment incorporations of Magento 2 follows precisely the equivalent Magento 1, which is belittled.
Most significant is that AbstractMethod is set apart as @deprecated and shouldn’t be utilized. There is a Payment Gateway API where all parts or segments can be actualized independently from one another. The main thing you need to guarantee is to arrange these installment parts appropriately by means of the di.xml design record.
Magento Documentation or DevDocs is a decent beginning stage in the event that you don’t know about engineering or best practices for Magento 2 advancement.
Give Localization Support
Before you conclude that module is fit to be dispatched to Magento Marketplace or GitHub for network ensure you have limitation bolster included.
All writings situated in a custom module ought to be wrapped with __(‘My Text’) work. It ought to be utilized all over, classes, formats, JavaScript segments, email layouts, and so on.
Use Composer File
Significance of composer.json record may be thought little of. Each and every Magento module, bundle, topic, and limitation ought to incorporate the composer.json record with all conditions recorded. A great deal of Magento 2 modules was just 1 reliance list which is “Magento/system”. This is an erroneous presumption to have reliance just for Framework if your module utilizes Magento\Catalog\Api interfaces from the “Magento/module-index” bundle for instance.
Also, Magento 1 methodology was to make an uncommon class where every utility capacity/technique were found. Once in awhile these strategies have a connection between one another, in any case, in most circumstances, such an extraordinary class was holding an excessive number of duties. This class is otherwise called Helper.
Above all else, abstain from utilizing Helpers as a term and as a definition to God Give Me All class in Magento 2. It is in every case better to make 5 littler classes with clear naming and reason than just Helper.php.
For instance, in the event that you have Attribute Helper class with 2 obligations a) Merging quality qualities; b) Mapping property estimations; consider having 2 autonomous classes with its own duty:
AttributeMerger
AttributeMapper
Fundamental Menu Usage
Each time you introduce the Magento module with Magento Admin capacities you can see that another Menu Icon is added to one side primary menu.
There is some deceptive suspicion that if the shipper introduces “my” module it is the fundamental and most utilized capacities and ought to be recorded under the primary menu.
In 99% of cases custom module requires design settings and for this Magento gives extraordinary page under Magento Admin – > Stores – > Configuration menu. So if your module causes the trader to expand change in all probability “Advertising” is a decent name of the setup segment. On the off chance that the custom module modifies existing usefulness, it ought to be a piece of the current arrangement area.
Test Module with Different Deployment Modes
It is generally the excellent practice to switch among creation and advancement application modes to guarantee the custom module doesn’t break any current usefulness. As per the most recent report by the Magento Marketplace group, 70% of modules can’t aggregate with creation mode.
Take some time and plan to test with creation mode before discharging the Magento module to Magento Marketplace or anyplace else. Magento Ecosystem requires solid and stable modules.
Testing is as significant as code
Consider including various kinds of tests while building a custom module for Magento 2. With respect to now, you can discover various sorts remembered for Magento 2 including Unit Tests, Integration Tests, Functional Tests, and so forth.
Without a doubt beginning estimation of exertion will be expanded for building tests, costs for support, in any case, would be lower. Features can be included a lot quicker with a decent degree of certainty for existing ones to be functioning truly to form.
Code Review
No matter you work in a group or an engineer figuring out how to demonstrate your code to different developers and request to give code audit. It doesn’t make a difference whether you are a Senior Developer who knows completely everything or Junior Developer who just began the significance of code survey can’t be disparaged.
One little TYPO in code can prompt site personal time and an enormous income drop for a storekeeper. Companion audit could give a superior and cleaner form of the code.
Granularity Matters
It is a decent practice to assemble usefulness such that bundle or module is liable for little complete pieces of the usefulness. It will help to have a base measure of outside conditions on other Magento 2 modules.
2. Step to create a new Magento module
To create a module, you need to complete the following high-level steps: Create
Module folder.
etc/module.xml file.
registration.php file.
Run the bin/magento setup:upgrade script to install the new module.
Check that the module is working.
Let’s go through each of these steps in detail.
Create the module folder
There are two possible locations for modules in Magento 2: the app/code folder and the vendor folder
Depending on how Magento 2 has been installed, core modules can either be located in the vendor/magento/magento-*folders (for composer installation) or in the app/code/Magento/ folder (for cloning GitHub).
Which of these locations should you choose for your new module?
If you build a module for a specific project, it is best to choose the app/code folder and commit to the project’s repository.
On the other hand, in case you build an extension to be reused, it is better to use composer to create it, and put your module in the vendor/<YOUR_VENDOR>/module-something folder.
Each module name in Magento 2 consists of two parts – the vendor and the module itself. In other words, modules are grouped into vendors, so you need to define the vendor and module names. For this example, let’s name the vendor “Learning” and the module “FirstUnit”.
Let’s create the folder app/code/Learning and inside this folder place another folder: FirstUnit. If you’re using the command line, the code would be:
cd to the root folder
mkdir app/code/Learning
mkdir app/code/Learning/FirstUnit
Make sure you have permission to create files and folders in your installation
Create an etc/module.xml file. This file is required for the module to exist.
This file contains the following information:
– Module name & version
– Dependencies
The module name is defined by the folders we just created because in Magento 2, class names must follow the folder structure. Because we created the folders Learning/FirstUnit, our module name will be Learning_FirstUnit and all classes that belong to this module will begin with Learning\FirstUnit – for example: Learning\FirstUnit\Observer\Test.
Dependencies. If one module depends on another, the module.xml file will have a special declaration that defines a list of modules that the current module depends on. For this example, we will make our module dependent on Magento_Catalog.
Using the following command-line code, create the folder app/code/Learning/FirstUnit/etc:
mkdir app/code/Learning/FirstUnit/etc
Then put the following code into it:
1 2 3 4 5 6
<?xml version="1.0"?> <config xmlns:xsi="http://www.w3.org/2001/XMLSchema-instance" xsi:noNamespaceSchemaLocation="urn:magento:framework:Module/etc/module.xsd"> <module name="Learning_FirstUnit" setup_version="0.0.1"> <sequence> <module name="Magento_Catalog"/> </sequence> </module> </config>
Note that in the XML file we specified:
– Module name: Learning_FirstUnit (based on the folders we created)
– Version: 0.0.1 (initial version of our module)
– Dependency: Magento_Catalog. We could have multiple dependencies. In this case, we would put <module name=”..” /> nodes under the sequence node.
Create the registration.php file
Each module must have this file, which tells Magento how to locate the module. Continuing our example, create the file app/code/Learning/FirstUnit/registration.php. Then put the following content into it:
1 2 3 4
<?php \Magento\Framework\Component\ComponentRegistrar::register( \Magento\Framework\Component\ComponentRegistrar::MODULE, 'Learning_FirstUnit', __DIR__ );
The registration.php is a standardized file that follows the same pattern for all modules.
The only thing that varies is the module name, which in our case is Learning_FirstUnit.
Run the “setup: upgrade” command
Running this command makes your new module active, notifying Magento of its presence.
php bin/magento setup:upgrade
It should echo a large amount of output, one line of which should be Learning_FirstUnit. Verify that this line of code is there.
Check that the new module is active
So far, we haven’t added any useful code to our module – it is still empty (and therefore invisible). In order to verify that it has been recognized, check the file app/etc/config.php. It has a list of auto-generated modules that are active.
Never change this list manually!
grep Learning_FirstUnit app/etc/config.php
Employing these steps, you can successfully create a new module in Magento 2.
D. CO-WELL Asia – Magento e-Commerce Development
Magento module development is a core part of any Magento development or Magento project, because at any stage you may want to integrate your own functionality/module in your existing Magento project. When working with the Magento, it is possible with Magento custom modules improvement that customizes the internet e-Commerce store delivered to our customer’s requirements. This makes the shopping experience substantially more charming for the customer’s clients. We are additionally ready to enable our customer’s clients to add things to their shopping baskets just as making singular profiles. Our customers simply need to mention to us what they require for their store and we can give it.
At CO-WELL Asia, we have a team of expert Magento module developers, and exposure to, the Magento platform. They can assemble and execute the most ideal module considering your proclaimed needs and the necessities of your clients.
Find out more of our e-Commerce solutions service here
Bài viết MAGENTO MODULE: INSTALLING AND CREATING đã xuất hiện đầu tiên vào ngày Cowell Asia.
source https://co-well.vn/en/tech-blog/magento-module-installing-and-creating/
0 notes
Text
300+ TOP MAGENTO Interview Questions and Answers
Magento Interview Questions for freshers experienced :-
1. What is Magento? Magento is an e-commerce platform written in PHP and released under the open source license. It was released by Varien, Inc. on March, 31 2008. It provides flexibility and control to the On-line merchants over the look and content. 2. What was the initial release date of Magento? Magento was initially released on 31st March, 2008. 3. Explain various versions of Magento. Following are the different versions of Magento: Magento Enterprise Edition Magento Community Edition Magento Professional Edition Magento .go Edition 4. What is the architecture of Magento. Magento is a typical MVC application where controller remains at one place while the models at the other. 5. What is the technology used by Magento? In Magento, PHP is used as a scripting language while MySQL is used as the database. 6. Explain some features of Magento? Magento has following basic features. SEO Friendly Google sitemap support Accounts of Customers Managing orders Report and analysis Site management Payment Marketing promotion and tools International support Extremely modular architecture 7. What are the limitations of Magento? There are the following limitations of Magento. Due to the fact that it is written in PHP, it is slower in performance as compare to other platforms. It consumes more space in the memory. It can consume gigabytes of RAM during heavy processes. In the absence of Object oriented programming, it can become complex. 8. How can you improve performance of Magento? There are various ways to improve Magento performance. Disable any unused modules Magento Caching Optimize your Server Use a Content Delivery Network (CDN) Put Stylesheets at the Top Put Scripts at the Bottom Avoid CSS Expressions Disabling Magento Log improve the image 9. How can you make Magento more secure for client. You can use following instructions to improve the security of magneto. Have some complex passwords and change them time to time. Do not let the Magento Content Manager remotely accessed. Don't provide the download facilities on production sites. 10. What type of web applications are created in Magento. Magento is mainly used for shopping cart software. 11. What is EAV in Magento? EAV stands for Entity Attribute Value. It is a technique that facilitates users to add unlimited columns to their table virtually. 12. How many tables will be created in EAV module in Magento? Name them. EAV module will create 6 tables in database. They are as follows: module module_datetime module_decimal module_int module_text module_varchar 13. Explain the difference between EAV and flat model.. EAV database model is fully in normalized form. Each column's value is stored in their respective data type table which makes it more complex as they have to join 5-6 tables even if you need only one detail. In EAV, columns are called attributes. Flat model uses just one table. It is not normalized and uses more database space. It is not good for dynamic requirements where you may have to add some more columns in future. Its performance is fast as it needs only one query instead of joining 5-6 tables. In flat model, columns are called fields. 14. What are Magento product types? Magento simple product: It is used for a single item without any specific selectable variations. For example, a pen, copy, etc. Magento grouped product: It is used for a combination of Magento simple product. For example, a pen and copy together. Magento configurable product: It is used for a single item with specific selectable variations. For example, a pen with different color options. Magento virtual product: It is used for a virtual item i.e: non touchable item. For example, reservation, insurance, etc. Magento bundle product: It is used for a bundle of simple products. For example, laptop with various items such as processor, hard disk, RAM, etc. Magento downloadable product: It is used for online software items. For example, PowerPoint presentation, MP3 files, servers, etc. 15. Explain the difference between Mage::getModel() and Mage::getSingletone() in Magento. Mage::getModel(): It creates a new object. Mage::getSingletone(): It first checks the existence of object and if object doesn?t exist, then it creates a new one. 16. What is ORM in Magento. ORM stands for Object Relational Mapping. It is a programming technique used to convert different types of data into objects and vice versa. There are two types of ORM: Converts different types of data into objects. Converts objects to various types of data. 17. Explain different modules in Magento. Core modules Commercial modules Community modules 18. How to change theme for login users? To change theme for login users, if(Mage::getSingleton('customer/session')->isLoggedIn()): Mage::getDesign()->setPackageName('package_name')->setTheme('themename'); endif; 19. How can you add an external JavaScript/ CSS file to Magento? css/yourstyle.css or skin_jsjs/ yourfile.js skin_csscss/yourstyle. css 20. State the syntax to call a CMS page in your module's PHTML file. $this->getLayout()->createBlock('cms/block')->setBlockId('blockidentifier')->toHtml(); 21. When you need to clear the cache to see the changes made in Magento? When you have added or modified XML, CSS or JS files. 22. How to run custom query in Magento? To run custom query, $db = Mage::getSingleton('core/resource')->getConnection('core_write'); $result=$db->query('SELECT * FROM users where id=4'); 23. How to enable product's custom attribute visibility in frontend? In Manage Attributes section under custom attribute, select Yes for "Visible on Product View Page on Frontend" and "Used in Product Listing". 24. State whether namespace is mandatory while creating a custom module in Magento? No, namespace is not mandatory while creating custom module. 25. Is it possible to have more than one grid in Magento? Yes it is possible. 26. List the magic methods in Magento? Magic methods in Magento: __get() __set() __isset() __call() __tostring() __construct() __has() __uns() 27. How many types of sessions are there? Why we use different sessions in Magento? There are namely three sessions in Magento: customer session checkout session core session All these sessions are stored in one session only. We use different sessions because sometimes we need to clear only a particular session data and not all session data. 28. How can you reset Magento Files and Directory permissions? Change the directory to the directory where Magento is installed and execute the following commands. find. -type d -exec chmod 755 chmod+x magento 29. How to make Magento working with another domain? To let the Magento working with another domain, URL option of Magento base can be changed. Follow these steps: select Magento admin -? System ? configuration and then click Web. Choose unsecure option Replace the base URL filed 30. How will you get first and last item from the collection in Magento? $collection->getFirstItem() and $collection->getLastItem(); 31. What is the use of namespace in Magento? Magento core modules are placed in mage namespace, core/Mage/Catalog and all custom modules are placed in local/CustomModule. You can have more than one module with same name but they need to be placed in different namespaces. 32. Explain handles in Magento? Handles control the structure of the page to be displayed. It decides which block will be placed where in the page. Handle is called for every page and every page request can have several unique handles. 33. What is compilation feature in Magento? Compilation feature allows us to compile all Magento files to create a single include path to increase performance. 34. How to enable Maintenance mode in Magento? Create a file named as maintenance.flag and upload it to Magento home directory containing following code. $maintenanceFile = 'maintenance.flag'; if (file_exists($maintenanceFile)) { include_once dirname(__FILE__) . '/errors/503.php'; exit; } 35. How to convert default currency to others in Magento? To convert default currency to others, select the currency and import currency rates from System-> Manage currency-> Rates. Syntax: $convertedPrice = Mage::helper('directory')->currencyConvert($price, currentCurrency, newCurrency); 36. Explain Google checkout in Magento. Magento allows the integration of online stores with Google checkout. Google checkout is the online payments service provided by the Google. It works like PayPal. 37. How to change Magento core API setting? You have to follow these steps to change Magento core API setting. Go to Admin menu, choose System -> Configuration Select Magento Core API on the left side of the Configuration Panel, under Services Click on to expand the General Settings section Type name of the Default Response Charset that you want to use Determine the Client Session Timeout in seconds Click the Save Config button when completed 38. Can all billing information be managed through Magento? You can do the following things through client Magento account: You can update your billing address. You can add a credit card. You can view your billing history. You can add a PayPal account. You can produce a print ready receipt. 39. What are the advantages of applying Connect Patches in Magento? In Magento, applying Connect Patches provides following features: Enable easy installation of packages with installation and overwrite any existing translations for the same time Enhance security, by default Magento Connect uses HTTP to download extensions instead of FTP Facilitate the extension developers to create new extensions with a dash character in the name Magento administrators will be informed now who tries to install an extension with insufficient file system privileges. 40. How to fetch 5 bestsellers products programmatically in Magento? Mage::getResourceModel('reports/product_collection') ->addOrderedQty() ->addAttributeToSelect('*') ->setPage(1, 5) ->load(); 41. What is codePool? Code pool is a concept to pull the code in Magento structured format. It is specified when you register new module in app/etc/modules/Company_Module.xml There are 3 codePools in Magento: core, community and local, which reside at app/code/ directory. CodePools: _community: It is generally used by 3rd party extensions. _core: It is used by Magento core team. _local: Local codePool should be used for in-hour module development and overriding of core and community modules for custom requirement. Residing directory: _app _code So in short, you can say that codePool helps Magento to locate module inside app/code/ for processing Magento Questions and Answers Pdf Download Read the full article
0 notes
Text
PrestaShop error 500 – explained and how to troubleshoot
“500 Internal Server Error” or plain “Internal Server Error” is popular when installing and using any web platform. Not only PrestaShop but you might also encounter this error on WordPress, Shopify, Magento websites and so on. This disreputable HTTP Error 500 could turn an online store owner’s smile to a bewildered frown with one click. The fear of lost sales, it stonewalls your customers’ ability to browse your store and purchase products. For web developers, this error is a nightmare. Everyone has to scurry to get his or her stores back online.
As terrible as it sounds, it’s not too scary. On this post, I’ll explain the error and offer some troubleshooting ideas for your PrestaShop store. The next time you encounter this error, instead of hiding under your blanket, you’ll be prepared to act fast, handle the issue and keep on making deals. Even if you’re not using PrestaShop, these solutions can still worth to take a try.
How to perceive the HTTP Error 500
It’s necessary to not confound the HTTP Error 500 with the Error 404 Page Not Found. To deal with the error, firstly, we have to go over the various ways you may see this error message on your PC. There are different appearances of this message due to each host/server is permitted to adjust the way it’s shown. Here are some regular ways you may see this error.
“500 Internal Server Error”
“Internal Server Error”
“500 Error”
“HTTP 500 – Internal Server Error”
“HTTP 500 Internal Error”
“HTTP Error 500”
Most occasions you will see this message accompanied by different types of this classic familiar line “The server encountered an internal error or misconfiguration and was unable to complete your request”. And this error can appear on any web browser and any operating system. Here is a screen capture of one of the forms Error 500 may be displayed on your browser.
So, what is the HTTP Error 500?
Simply put, the Error 500 is the way your web server saying “Something turned out badly but I have no clue what it is!”
Well, it’s really unhelpful at all. But, the HTTP error logs can (and usually will) show you what has gone wrong.
How can I troubleshoot HTTP Error 500?
Each web server will have an error log.
For Apache servers, it is usually located at /var/log/apache/error.log. It will show you something like this:
[Thu Nov 22 12:59:12.862338 2018] [php7:error] [pid 3538] [client XX.XX.XX.XX:31504] PHP Fatal error: Out of memory (allocated 2097152) (tried to allocate 59462712 bytes) in /home/myuser/public_html/classes/Configuration.php on line 206
Again, not very helpful unless you recognize what these numbers mean. But don’t be worry, we still have another option.
Troubleshooting Error 500 for PrestaShop website
If your PrestaShop store is suffering from this error, you can get some detail information by turning on PrestaShop’s Error Reporting in the file “config/defines.inc.php”. There are 2 ways to turn on Error Reporting depending on what PrestaShop version you have.
For PrestaShop v1.4 through v1.5.2
Open config/config.inc.php
On or around line 29 you will find this line @ini_set(‘display_errors’, ‘off’);
Change that line to read @ini_set(‘display_errors’, ‘on’);
For Prestashop v1.5.3 and higher versions
Open config/defines.inc.php
On or around line 28 you will find this line define(‘_PS_MODE_DEV_’, false);
Change that line to read define(‘_PS_MODE_DEV_’, true);
Then back to the page that gave you the error once more, and you’ll see something like this:
[PrestaShopDatabaseException] Db->executeS() must be used only with select, show, explain or describe queries at line 471 in file classes/db/Db.php 465. 466. // This method must be used only with queries which display results 467. if (!preg_match(‘#^\s*\(?\s*(select|show|explain|describe|desc)\s#i’, $sql))
OK, more info but still scary for us.
Just show me how to fix this error
For most PrestaShop store owner, you’ll want to know the most common ways this problem is caused so that you can try out some solutions yourself.
Here we have the best 5 reasons why Error 500 occurs, and what you can do to address them.
1. File and folder permission is wrong
Some servers that have SuPHP or Fast-CGI turned on can be especially sensitive to file and folder permissions. The right permission for files is 644 and folders is 755. If you see from the server logs or PrestaShop error report that file permissions may be the problem, try resetting the permissions with these commands:
find /home/USERNAME/public_html -type d -exec chmod 755 {} \; find /home/USERNAME/public_html -type f -exec chmod 644 {} \;
Replace /home/USERNAME/public_html with the path to your web directory.
Note: Take a backup of your site before you execute any command
2. Incorrectly configured .htaccess file
Most of the times, you will receive an internal server error when the htaccess file is configured incorrectly. The main culprits of the htaccess errors are “URL Rewrite” settings or Friendly URL enabling. The htaccess syntax is very strict, if you add an incorrect command, or even an incorrect character, your server will return error 500.
Make a backup of your htaccess and regenerate the htaccess file either through the back office or by toggling the Enable Friendly URL option.
3. Server timeout
Every server has their own timeout setting, which sets the time that any given script can run. If the function or script crosses that limit, Error 500 will occur. The most common scripts in PrestaShop that may take too long to load are CSV Imports, backups, translation loading, import/exports and thumbnail regeneration.
Many server limits are set to 30 seconds, which is not long enough to run these scripts. You should contact your hosting provider and inquire about changing the limit, at least temporarily.
4. Low PHP memory limit
Many web hosts set the default memory allocation for PHP as 32 MB, 64 MB or 128 MB.
However, PrestaShop requires at least 128 MB to function and put in some more for modules if you need them. So, a suitable memory allocation is 256 MB. If you have a VPS, set it to 512 MB.
5. Missing PHP modules
A common issue seen with PrestaShop sites in VPSs is that they lack all the needed PHP modules.
To help PrestaShop function, we will need:
Mcrypt
OpenSSL
Zip
Curl
GD
PDO
To check if these modules are enabled for your website, copy the code below into “phpinfo.php” file and upload it to your site. Then open it in a browser, and check for these extensions.
<? phpinfo(); ?>
If any of those modules are missing, open your server’s php.ini file to see if it is enabled. If not, you’ll need to install them manually.
Note: Remember to delete the phpinfo.php file once you are done. Hackers could use that to target specific vulnerabilities.
The post PrestaShop error 500 – explained and how to troubleshoot appeared first on Presta Hero.
0 notes
Text
Install MAGENTO 2 In Wamp Server
Magento, one of the most stable e-commerce systems has released its most awaited version – Magento 2. The fascination for Magento 2 has already begun and developers have started digging into the Magento 2 folders to learn various things. Most commonly, novice developers use WAMP server for learning as well as development. This post is about setting up the server configurations and installing Magento 2 in WAMP server.

Download and extract the Magento 2.0.7 Community edition and extract into the wamp/www/your_magento_site/ directory. After extracting the files, load the following URL in your browser:http://127.0.0.1/your_magento_site/ The Magento 2 Installation wizard pops up. Click on Agree and Setup Magento In the Readiness check page, click on the Start Readiness Check button. Magento will check if your server configurations meet the requirements needed for Magento 2. If you receive the following error in thePHP Settings, Check: Your current setting of xdebug.max_nesting_level=100. Magento 2 requires it to be set to 200 or more. Edit your config, restart web server, and try again.Open wamp console, and click on the php.ini to open the file:
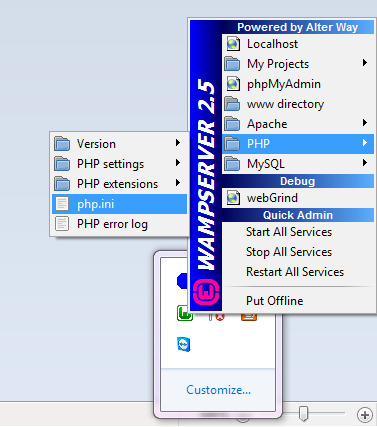
The php.ini file will be located in the following path: <Your Drive>:\wamp\bin\php\php5.5.12\php.ini The above mentioned php5.5.12 varies depending upon the WAMP version that you have installed. In the php.ini file, search for the line “xdebug.max_nesting_level = 100” and change the value from 100 to 200. If this line does not exist, add this line to the end of the file: xdebug.max_nesting_level = 200 Magento 2 requires the following extensions to be enabled:
curl
dom
iconv
mcrypt
spl
xsl
intl
mbstring
ctype
hash
openssl
zip
simplexml
xmlwriter
gd
Most of these extensions are enabled by default. If any of the above extension is not enabled, you can enable them by using the WAMP console. Please refer the below screenshot:

If the extensions are not listed in the WAMP console’s PHP extensions, you can directly edit the php.ini file and uncomment the corresponding extension. Remove the semi-colon (;) to uncomment and enable them:

Once you have enabled the corresponding extensions, restart all the services in WAMP console. Click on theTry Again button and Magento will check for the requirements again. Once all the server requirements are met, click on the Next button to proceed.

In the “Add a Database” page, enter the database details. When you work on your local machine, the host is most probably “localhost”. Enter the other details like username, password, and the database name. The table prefix is an optional entry, which you can provide if you wish to have a prefix text added before all the table names. Prior to clicking the next button, make sure that the database name you have mentioned in this page is already created. If not, log on to your mysql console or phpmyadmin and create the database. In the below screenshot we have used the database name “magento2_new”:

The next step allows you to define the base URL for both frontend and admin panel of the your magento 2 instance:

In the following step “Customize Your Store”, you can specify the Default Timezone, Currency and Default Language of your magento site:

Specify the username, email, password for the account that you will be using to access the Magento 2 Admin panel:

In the next step, click on the “Install Now” button. It might take some time for the setup to be completed. Once the setup is completed, the below success page will get displayed:

Magento 2 creates a new admin path URL with random numbers and alphabets. So it’s better to bookmark the admin path to get to the admin login page without needing to remember it. And VOILA!, here is your all new Magento 2 Website:

If you end up in a messy homepage with no CSS and styles, and your admin page displays “404 Not Found Error”, you need to enable the mod_rewrite module in the Apache and restart all the services in the WAMP console. You can enable it using the WAMP console as displayed below

You can also enable the rewite module by editing the httpd.conf file. The httpd.conf file will be found in the following location: <Your Drive>:\wamp\bin\apache\apache2.4.9\conf\httpd.conf Open the conf file and search for the line:LoadModule rewrite_module modules/mod_rewrite.soUncomment this line by removing the # at the beginning of the line. Do not forget to restart all the services in the WAMP console before looking at the changes in the browser. In the following posts we will explain how to install Magento 2 using composer.
Learn More at: Install Magento 2 In Wamp server
#magento development company#magento extensions#Magento Modules#Best Magento Extensions#ez login extensions#EzLogin Lite#Ezlogin Premium#eStore Social Share
0 notes
Text
Magento 2 Migration Guide: What Is Migration & How to Perform?
Are you looking for a detailed Magento 2 migration guide?
Then, you come to the right place.
Understanding the difficulties that Magento 1 users have to face when performing the migration, we decided to deliver this article.
This tutorial blog will help you understand:
The overview of Magento 2 migration
Benefits of migrating from Magento 1 to Magento 2
A detailed Magento 2 migration guide
Let’s get started!
What Is Magento 2 Migration?
>>> Check It Out: How to Install Magento 2 Xampp – Magento Tutorial 2020!
Magento 2 migration, in other words, is moving from Magento 1 to Magento 2.
In 2015, when Magento 2.0 was officially launched, Magento users found ways to migrate all the related from their existing version to the new version.
When doing Magento 2 migration, there are 4 components you need to move: Data, extensions and custom code, themes, and customizations.
Data Migration
>>> Don’t Miss It: Magento Sample Data – Install, Update, Remove Guide!
Data creates the most difficulties that admins run into due to its complication and a vast amount. It includes all your products, customers’ information, store configuration, sales programs, etc.
The new Magento 2 Migration Tool has been developed to migrate data successfully, and we will go in detail later.
Extensions & Custom Code
When using Magento, store owners have to purchase many supported extensions to optimize various functionalities.
And if you want to migrate, you don’t have to repurchase extensions as we have a tool that you can use Magento 1 extensions in the second version.
Besides, you can save time by transferring your extensions and custom code to Magento 2 with Code Migration Toolkit.
Themes & Customizations
>>> Have A Look Here: Why & How to Change Magento 2 Themes?
As in Magento 2, new approaches and technologies are developed to help customers create the best purchasing experience and leverage the online store. Therefore, migrating themes and customizations are necessary.
Why Should Users Migrate from Magento 1 to Magento 2?
Although Magento 1 is not eliminated at the moment, and users can still use Magento 1 as long as they want, we always highly recommend performing Magento 2 migration for several reasons.
The End of Life of Magento 1
Magento has officially announced that Magento 1 will no longer be supported by the end of June 2020. That means updates for plugins and modules of the first version will not be released.
No More Security Patches for Magento 1
As Magento 1 supports will be ended, there will be no security patches updates released. Therefore, you need to migrate from Magento 1 to Magento 2 before the deadline of 30th June 2020, or otherwise, your business might be easy to breach the security.
Benefits of Magento 2
Besides the disadvantages of Magento 1 itself, Magento 2 also has many significant benefits over the first version.
Fast-loading: Magento 2 websites are reported to run 20% faster than Magento 1 on average; hence, results in better performance.
Better customer experience: Especially in the checkout, customers can avoid lengthy and complicated checkout processes as instant purchases feature, and payment gateways (Braintree, PayPal, etc.) are integrated.
Mobile-friendly: In these modern days, mobile-friendly is indispensable, as customers tend to use smartphones to shopping. Compared to Magento 1, Magento 2 themes are responsive by default.
Detailed Magento 2 Migration Guide
>>> Read Later: More Magento instructions for the best e-commerce sites!
In this section, we will only focus on the most complicated migration process, data migration. However, we will still go over the whole process.
Planning The Migration
Migration is always a complicated process. So, careful planning is necessary to avoid unexpected troubles.
The plan will generally look like this:
Check whether your site is ready to make changes
Check all installed extensions
Build and prepare Magento 2 Migration
Go through all the migration steps on the testing environment
Start the migration
Change the data after the migration
Update incremental data
Eliminate the old version
Magento 2 Migration Guide Using Data Migration Tool
Data Migration Tool is a command-line interface (CLI) used to migrate data from Magento 1 to Magento 2. To install the tool, please click HERE for more detailed instructions.
Getting Started
Before anything, you need to prepare first by the following 2 steps:
Log in to the Magento server, or switch to the Magento file system owner by either of the following:
su <Magento file system owner> -s /bin/bash -c <command>
sudo -u <Magento file system owner> <command>
Add <magento_root>/bin to your system PATH to enable running commands from any directory. For example:
export PATH=$PATH:/var/www/html/magento2/bin
And now, you can start the process.
STEP 1: Migrate Settings
Run this command to start migrating settings:
bin/magento migrate:settings [-r|--reset] [-a|--auto] {<path to config.xml>}
Configure custom migration rules:
Log in to the server or switch to the Magento file system owner
Change to the following directory:
cd <your Magento 2 install dir>/vendor/magento/data-migration-tool/etc/<edition-to-edition>
Create a settings.xml file:
cp settings.xml.dist settings.xml
Make changes in settings.xml
Change the <settings_map_file> tag in the path/to/config.xml file
STEP 2: Migrate Data
Run this command to start migrating data:
bin/magento migrate:data [-r|--reset] [-a|--auto] {<path to config.xml>}
In this step, the Data Migration Tool creates additional tables and triggers for the migration tables in the Magento 1 database. When we run an incremental/delta process, the tool will check these tables to migrate the necessary data to Magento 2.
STEP 3: Migrate Changes
Run this command to migrate incremental changes:
bin/magento migrate:delta [-r|--reset] [-a|--auto] {<path to config.xml>}
Migrate data created by 3rd-party extensions: Although the Data Migration Tool only used to transfer data by Magento’s modules, you still can migrate data from 3rd-party extensions:
Add the tables to be tracked to the deltalog.xml file
Create an additional delta class
Add the name of the newly created class to the delta mode section of config.xml
For more information about Magento 2 Migration, you can check HERE.
Conclusion
In conclusion, Magento 2 Migration is an extremely complicated process that needs to be performed by professionals. However, if you don’t want to hire developers, you can do it on your own with our instruction.
We hope that this Magento 2 Migration Guide will help you successfully move to the new platform.
If you have any questions or want us to provide more detailed information, don’t hesitate to contact us. We’re glad to answer at any time.
Thanks for reading!
The post Magento 2 Migration Guide: What Is Migration & How to Perform? appeared first on Mageguides.
from Mageguides https://ift.tt/3f90ezJ via IFTTT
0 notes
Text
Magento Sample Data: Install, Update, Remove Guide [Updated 2020]
Magento is among the most popular CMSs for ecommerce businesses. The platform offers sample data to test the store performance and scalability, thus helping store owners create a great experience for their visitors. Also, developers in the Magento community often ask about the Magento sample data.
In this blog, we guide you on how to install, remove and update Magento 2 sample data directly on your store.
What is Magento Sample Data?
First, you need to understand what sample data is all about. The concept can be understood differently.
For store admins, sample data simply is a sample store which is completed with more than 250 configurable products, categories, promotional price rules, CMS pages, banners, and so on. Magento 2 sample data visually uses the Luma theme on the storefront.
For technicians, sample data is a set of regular Magento modules, which can be deployed and installed together with the Magento instance, or later in the scope of upgrade. That is the reason why installing sample data is optional.
Why Need Magento Sample Data
Before opting for any ecommerce platform, there are three crucial factors that an online store must consider. These factors consist of performance, user experience, and scalability.
The sample data is essential when you need a tool to conduct the store’s performance and scalability tests with ease. Specifically, Magento 2 sample data provides admin to add approximately 250 sample products and categorize them into different groups.
The number of sample products in stock is enough for admin to test the store performance. Thus, instead of installing Magento extensions, which helps optimize the shopping experience, they can modify their store in advance.
You can also browse the Magento extensions that we have spent all our time and pride in developing HERE.
Magento 2 Sample Data Configuration
Install Magento 2 sample data
As we mentioned above, you can install Magento 2 sample data either before or after installing the Magento software.
You can install optional sample data in any of the two following ways:
#1. Install sample data via Composer
Download a compressed archive from Magento.
Use composer create-project
Installing sample data in production mode fails. So always remember to switch to developer mode.
To install sample data using the command line, enter the following command as the Magento file system owner in the <magento_root> folder:
bin/magento sampledata:deploy
If you’re installing sample data after installing Magento application, you must also run the following command to update the database and schema in the <magento_root> folder:
bin/magento setup:upgrade
#2. Install sample data by cloning repositories
This method is preferred only by contributing developers. If you’re not a contributing developer, choose Composer as the easiest way to install sample data.
Plus, installing sample data by cloning repositories requires:
You use Magento Open Source
You cloned the Magento 2 repository
You can follow any of the two ways below to clone the sample data repository:
Clone with SSH
SSH protocol can be used to clone the sample data GitHub repository:
In a web browser, access the sample data repository.
Next to the branch’s name, click SSH from the list.
Click Copy to clipboard
For example:
4. Switch to your web server’s docroot directory. Typically, for Ubuntu, it’s /var/www and for CentOS it’s /var/www/html.
5. Type git clone and paste the value you obtained from step 1.
6. Wait for your server to clone the repository.
7. Make sure you check out the branch of the sample data repository corresponding with the branch from the main Magento 2 repository.
For example:
If you used the 2.2.5-develop branch of the Magento 2 repository, the Sample Data branch should be 2.2.5-develop.
To check out the correct branch, run the following command from the sample data repository’s root directory (for example, you need the 2.2.5 branch):
git checkout 2.2.5
8. Switch to <magento_root>.
9. Enter this command below to create symbolic links between the files you just cloned so that sample data works properly:
php -f <sample-data_clone_dir>/dev/tools/build-sample-data.php -- --ce-source="<path_to_your_magento_instance>"
10. Wait for the command to complete.
Clone with HTTPS
You can use the HTTPS protocol to clone the sample data GitHub repository:
The first step is the same as SHH
On the right side of the page, below the clone URL field, click HTTPS.
Click Copy to clipboard, as mentioned above.
Change to your web server’s docroot directory. Typically, for Ubuntu, it’s /var/www and for CentOS it’s /var/www/html.
Type git clone and paste the value you obtained from step 1.
Wait for your server to clone the repository.
Make sure you check out the branch of the sample data repository corresponding with the branch from the main Magento 2 repository.
Change to <magento_root>.
Enter the following command to create symbolic links between the files you just cloned so sample data works properly:
php -f <sample-data_clone_dir>/dev/tools/build-sample-data.php -- --ce-source="<path_to_your_magento_instance>"
10. Wait for the command to complete.
Remove sample data modules
There is currently no way to uninstall sample data. So we will show you how to remove sample data modules from the Magento installation composer.json. However, this option does not remove sample data from the database.
Log in to the Magento server as a user with permission to write to the Magento file system.
If the Magento file system does not allow owners to login, you can do the following:
sudo -u <Magento file system owner> <command>
2. Add <magento_root>/bin to your system PATH, to run Magento commands from any directory.
Sample bash shell for CentOS:
export PATH=$PATH:/var/www/html/magento2/bin
3. Optionally, the commands can be run in the following ways:
<magento_root> is a subdirectory of your web server docroot.
cd <magento_root>/bin and run them as ./magento <command name>
<magento_root>/bin/magento <command name>
4. Enter the following command:
bin/magento sampledata:remove
Update sample data
This command allows you to update sample data before you update the Magento application.
To prepare sample data for updating, enter the following command:
bin/magento sampledata:reset
After that, update the Magento application via composer.
Conclusion
In this tutorial, we have covered every aspect of Magento sample data installation for ecommerce stores.
If you’re still confused about the process, don’t hesitate to drop your comments below or check out other posts on Mageguides. We will get back to you!
The post Magento Sample Data: Install, Update, Remove Guide [Updated 2020] appeared first on Mageguides.
from Mageguides https://ift.tt/2ITS1RS via IFTTT
0 notes
Text
Magento Sample Data: Install, Update, Remove Guide [Updated 2020]
Magento is among the most popular CMSs for ecommerce businesses. The platform offers sample data to test the store performance and scalability, thus helping store owners create a great experience for their visitors. Also, developers in the Magento community often ask about the Magento sample data.
In this blog, we guide you on how to install, remove and update Magento 2 sample data directly on your store.
What is Magento Sample Data?
First, you need to understand what sample data is all about. The concept can be understood differently.
For store admins, sample data simply is a sample store which is completed with more than 250 configurable products, categories, promotional price rules, CMS pages, banners, and so on. Magento 2 sample data visually uses the Luma theme on the storefront.
For technicians, sample data is a set of regular Magento modules, which can be deployed and installed together with the Magento instance, or later in the scope of upgrade. That is the reason why installing sample data is optional.
Why Need Magento Sample Data
Before opting for any ecommerce platform, there are three crucial factors that an online store must consider. These factors consist of performance, user experience, and scalability.
The sample data is essential when you need a tool to conduct the store’s performance and scalability tests with ease. Specifically, Magento 2 sample data provides admin to add approximately 250 sample products and categorize them into different groups.
The number of sample products in stock is enough for admin to test the store performance. Thus, instead of installing Magento extensions, which helps optimize the shopping experience, they can modify their store in advance.
You can also browse the Magento extensions that we have spent all our time and pride in developing HERE.
Magento 2 Sample Data Configuration
Install Magento 2 sample data
As we mentioned above, you can install Magento 2 sample data either before or after installing the Magento software.
You can install optional sample data in any of the two following ways:
#1. Install sample data via Composer
Download a compressed archive from Magento.
Use composer create-project
Installing sample data in production mode fails. So always remember to switch to developer mode.
To install sample data using the command line, enter the following command as the Magento file system owner in the <magento_root> folder:
bin/magento sampledata:deploy
If you’re installing sample data after installing Magento application, you must also run the following command to update the database and schema in the <magento_root> folder:
bin/magento setup:upgrade
#2. Install sample data by cloning repositories
This method is preferred only by contributing developers. If you’re not a contributing developer, choose Composer as the easiest way to install sample data.
Plus, installing sample data by cloning repositories requires:
You use Magento Open Source
You cloned the Magento 2 repository
You can follow any of the two ways below to clone the sample data repository:
Clone with SSH
SSH protocol can be used to clone the sample data GitHub repository:
In a web browser, access the sample data repository.
Next to the branch’s name, click SSH from the list.
Click Copy to clipboard
For example:
4. Switch to your web server’s docroot directory.
Typically, for Ubuntu, it’s /var/www and for CentOS it’s /var/www/html.
5. Type git clone and paste the value you obtained from step 1.
6. Wait for your server to clone the repository.
7. Make sure you check out the branch of the sample data repository corresponding with the branch from the main Magento 2 repository.
For example:
If you used the 2.2.5-develop branch of the Magento 2 repository, the Sample Data branch should be 2.2.5-develop.
To check out the correct branch, run the following command from the sample data repository’s root directory (for example, you need the 2.2.5 branch):
git checkout 2.2.5
8. Switch to <magento_root>.
9. Enter this command below to create symbolic links between the files you just cloned so that sample data works properly:
php -f <sample-data_clone_dir>/dev/tools/build-sample-data.php -- --ce-source="<path_to_your_magento_instance>"
10. Wait for the command to complete.
Clone with HTTPS
You can use the HTTPS protocol to clone the sample data GitHub repository:
The first step is the same as SHH
On the right side of the page, below the clone URL field, click HTTPS.
Click Copy to clipboard, as mentioned above.
Change to your web server’s docroot directory. Typically, for Ubuntu, it’s /var/www and for CentOS it’s /var/www/html.
Type git clone and paste the value you obtained from step 1.
Wait for your server to clone the repository.
Make sure you check out the branch of the sample data repository corresponding with the branch from the main Magento 2 repository.
Change to <magento_root>.
Enter the following command to create symbolic links between the files you just cloned so sample data works properly:
php -f <sample-data_clone_dir>/dev/tools/build-sample-data.php -- --ce-source="<path_to_your_magento_instance>"
Wait for the command to complete.
Remove sample data modules
There is currently no way to uninstall sample data. So we will show you how to remove sample data modules from the Magento installation composer.json. However, this option does not remove sample data from the database.
Log in to the Magento server as a user with permission to write to the Magento file system.
If the Magento file system does not allow owners to log in, you can do the following:
sudo -u <Magento file system owner> <command>
2. Add <magento_root>/bin to your system PATH, to run Magento commands from any directory.
Sample bash shell for CentOS:
export PATH=$PATH:/var/www/html/magento2/bin
3. Optionally, the commands can be run in the following ways:
<magento_root> is a subdirectory of your web server docroot.
cd <magento_root>/bin and run them as ./magento <command name>
<magento_root>/bin/magento <command name>
4. Enter the following command:
bin/magento sampledata:remove
Update sample data
This command allows you to update sample data before you update the Magento application.
To prepare sample data for updating, enter the following command:
bin/magento sampledata:reset
After that, update the Magento application via composer.
Conclusion
In this tutorial, we have covered every aspect of Magento sample data installation for ecommerce stores.
If you’re still confused about the process, don’t hesitate to drop your comments below or check out other posts on Mageguides. We will get back to you!
The post Magento Sample Data: Install, Update, Remove Guide [Updated 2020] appeared first on Mageguides.
from Mageguides https://ift.tt/2TWdTTh via IFTTT
0 notes
Text
Magento 2 PHP Unit Testing: Every Developers & QAs Should Know
Before actually using software, developers must give it a trial run to ensure the product and code quality. Among various kinds of testing, unit testing is considered to be important and extremely helpful for such purposes.
The problem of how to effectively and accurately operate such tests is not simple at all.
Specifically, if you’re a Magento user, this instruction is for you.
In this article, we will provide an overview and reasons why you should use PHP Unit Testing.
Later on, how to use Magento 2 Unit Testing will be clarified, which includes writing unit tests, running tests and some common errors.
(Need more instructions for Magento? Find out on Mage Guides)
What Is Unit Testing?
Before anything, you have to understand what unit testing is.
Unit testing is automated tests run by program developers, in which every component of the software will be checked. This process helps to ensure whether the software will perform as expected or not.
Unit testing processes separately and automatically without any manual handling.
And in Magento 2, what do we have for such a feature?
Don’t worry since an automated testing framework for PHP, which is called PHPUnit, is already included. This PHPUnit behaves as one of the dependencies in Magento 2.
And Magento 2 PHP Unit Testing is quite popular among developers nowadays.
Why Should You Use Magento 2 Unit Testing?
The unit is the smallest testable part. Therefore, when operating unit testing, developers will come into many difficulties.
So the question is: “Is it worthwhile to make efforts?”
The answer is YES for several reasons.
Firstly, though testing every small component of the software is extremely complicated, it will shorten the resolving time. The problems will be identified at the beginning; hence, it’s easier to fix things.
Secondly, it will help to facilitate changes. Unit testing enables programmers to restructure code or upgrade the system later but still, make sure that the module behaves accurately. For this reason, if changes cause faults, it will be identified quickly.
Moreover, it helps to think carefully before actually design the program. The very first thing before writing code is writing the test. Therefore, while writing the test code, you can easily imagine the purpose of designing your products.
Now you realize it beneficial! Why don’t you get started with us?
Writing A Simple Unit Test in Magento 2
Let’s get started with the very first step of Magento 2 Unit Testing, which is writing a unit test.
Suppose that we have:
A custom module named Testing under Inchoo namespace (app/code/Inchoo/Testing)
The unit tests will reside inside Test/Unit folder
Testing class is SampleClass and reside in Testing Class folder
The whole path: -app/code/Inchoo/Testing/TestingClass/SampleClass
The code will look like this:
<?php namespace Inchoo\Testing\TestingClass; class SampleClass { public function getMessage() { return 'Hello, this is sample test'; } } ?>
Our test that will test getMessage() will look like this:
<?php namespace Inchoo\Testing\Test\Unit; use Inchoo\Testing\TestingClass\SampleClass; class SampleTest extends \PHPUnit\Framework\TestCase { /** * @var Inchoo\Testing\TestingClass\SampleClass */ protected $sampleClass; /** * @var string */ protected $expectedMessage; public function setUp() { $objectManager = new \Magento\Framework\TestFramework\Unit\Helper\ObjectManager($this); $this->sampleClass = $objectManager->getObject('Inchoo\Testing\TestingClass\SampleClass'); $this->expectedMessage = 'Hello, this is sample test'; } public function testGetMessage() { $this->assertEquals($this->expectedMessage, $this->sampleClass->getMessage()); } }
Running Unit Test in Magento 2 with 2 Simple Methods
After successfully writing the test code, the next thing you need to do is operating it.
In this section, we will provide tutorials of 2 ways to run Magento 2 PHP Unit Testing, which is CLI, IDE Integration (PHPStorm).
Running Unit Tests in CLI
Running All Tests
Execute the following command if you want to run all unit tests. Please make sure to navigate to the Magento base directory before executing:
<?./vendor/bin/phpunit -c dev/tests/unit/phpunit.xml.dist
Running Subset
To run only tests within a specific branch, you have to specify the directory branch after the command.
You can take the following command as an example. This example tells PHPUnit to look for any file ending with Test.php within the branch app/code/Example/Module/Test/Unit and try to execute it:
<?./vendor/bin/phpunit -c dev/tests/unit/phpunit.xml.dist app/code/Example/Module/Test/Unit
Running Unit Tests in PHPStorm
You can follow these simple steps below to run unit tests in PHPStorm.
STEP 1: Configuring The PHP Interpreter
In the PHP preference, please select the PHP interpreter PHPStorm should use to run tests with.
Or you can add one by clicking on the 3 dots sign beside the dropdown. Then, please click (+) button at the top right to select the PHP interpreter.
STEP 2: Configuring PHPUnit
Move to the next step.
The next step is to set up PHPStorm preferences. This step requires several simple manipulations as follows:
Choose Use Composer autoloader option
Select the vendor/autoload.php file in your Magento 2 installation
Select the dev/tests/unit/phpunit.xml.dist as the Default Configuration File (Optional)
STEP 3: Creating A Run Configuration
There are several ways to implement this final step. Here below will present one of those.
First of all, you need to create a new run configuration:
From the top menu, choose Run > Edit Configuration
Click (+) from the top right and choose PHPUnit
From this point, there are different processes for specific purposes. Please scroll down to find the one that is best suitable for you.
Running all tests
If you want to run all tests, please follow these steps below:
Add a name for the configuration
Test Scope: Choose Defined in the configuration file option
Tick on Use alternative configuration file
Select dev/tests/unit/phpunit.xml.dist
Click OK to finish
Running tests of one module
On the other hand, these steps will help to run just one test of a specific module:
Add a descriptive name for the configuration
Test Scope: Choose Directory option
Choose the directory including the modules unit test. For example, in this case, it is /magento2ce/app/code/Example/Module/Test/Unit
Click OK to finish
Running tests in a class
Similar to 2 kinds of tests running above, there are simple steps to conduct this process:
Add a name for the configuration
Test Scope: Choose Class option
In the Class box: Type the qualified class name in full
In the File box: Choose the file including the test class
Click OK to finish
Troubleshooting
Whenever referring to code testing, developers always have trouble since it is relatively complicated.
Therefore, we will provide several common problems that programmers usually run into when implementing Magento 2 Unit Testing.
Also, possible solutions for each fault will be identified that can be helpful for you to fix it up.
Permission Denied
Error:
<?permission denied: vendor/bin/phpunit
Reasons:
You won’t have permission to modify. This problem occurs when you try to execute this PHPUnit inside a Virtual Box VM with shared folders that don’t allow you to do so.
Solutions:
You can try to prefix the command with the PHP interpreter as follows:
php -f vendor/bin/phpunit -- -c dev/tests/unit/phpunit.xml.dist
Incorrect PHP Interpreter
Reasons:
This might happen when you use more than one PHP installed and get confused about what is the correct PHP interpreter for testing.
Solutions:
You can either fix your path or specify the full path to the PHP interpreter. Please check the below code as an example:
/usr/local/Cellar/php56/5.6.19/bin/php -f vendor/bin/phpunit -- -c dev/tests/unit/phpunit.xml.dist
Memory Limit
Error:
Fatal error: Allowed memory size of 67108864 bytes exhausted
Solutions:
You can resolve it by simple steps:
Copy the PHPUnit configuration file dev/tests/unit/phpunit.xml.dist to dev/tests/unit/phpunit.xml
Find the following section:
<php> <ini name="date.timezone" value="America/Los_Angeles"/> <ini name="xdebug.max_nesting_level" value="200"/> </php>
Add the following in the <php> block:
<?<ini name="memory_limit" value="-1"/>
Conclusion
In conclusion, conducting PHP Unit Tests for Magento 2 is extremely complicated to follow. It includes so many steps. However, we have to say that it’s worth a try as you can identify problems early; hence, it is much easier for you to improve your products.
We hope that this article will give you helpful information about Magento 2 Unit Testing.
If you need further information, please don’t hesitate to comment in the section below or contact us. We are glad to answer anytime.
Thanks a lot for reading!
You may also be interested in:
Top 6 Killer Performance Tips for Magento 2 Developers
Magento Cronjob Setup | Tutorial 2020
Reviews on Magento extensions
The post Magento 2 PHP Unit Testing: Every Developers & QAs Should Know appeared first on Mageguides.
from Mageguides https://ift.tt/3cFKYKl via IFTTT
0 notes