#Magisk root for Android
Explore tagged Tumblr posts
Visit Tumblr Blog
Explore Tumblr blogs with no restrictions, modern design and the best experience.
Last Seen Tumblr Blogs


Fun Fact
Tumblr was acquired by Yahoo for $1.1B in 2013.
Text
I fixed it
I FUCKING FIXED IT
Ronald McDonald and his impossible cybersecurity standards can suck my dick and balls
so turns out it was because of the SafetyNet phase out, the new Play Integrity API checks device integrity differently and the McDonald's app was already updated to it...
meanwhile two separate banking apps were sitting there like "yeah, this is a safe device" and a calculator, an RPG game and the fucking McDonald's app were screaming and crying and refusing to work
gonna do a bit more testing
#I fucking hate the mobile OS ecosystem#I can't even put shit into words cause the collective behaviour of all tech companies is just baffling#root#android#Magisk
5 notes
·
View notes
Note
HI SAW YOUR REBLOG ABOUT JAILBREAKING STUFF. I AM INTERESTED SO WHATS POPPING WITH THE JAILBREAKS IF YOU DONT MIND ME ASKING
honestly i am not the worlds foremost expert in jailbreaking, so apologies if i made it sound like i was!
what i was getting at mainly is that yeah when i was in middle school about... 15 years ago? you could find resources for jailbreaking (or similar modifications) pretty much anywhere, i did some myself with very little computer knowledge (comparatively), and the stuff i couldn't do i knew several classmates who could do it for me, and it sucks that not only is that knowledge buried much deeper now if it exists at all, but that tech companies have only doubled down on the making it near impossible to install anything on your devices that they didn't want there
(hell even something like making a backup of the files on a phone/tablet has gotten really tricky if you don't understand exactly how it works)
it's also a really wide topic im not sure where to start, bc im not sure what your background is in this already and what you'd want out of it?
but in terms of base terminology, jailbreaking/rooting is gaining full control over your device, being able to install things the manufacturers didn't intend, and uninstalling things they won't let you uninstall otherwise (as a disclaimer, this always comes with a bit of a risk, bc taking full control means you can make your device unusable if you do it wrong, but a lot of resources are designed to minimise that risk)
i'll leave this question open for others with more knowledge to add onto it if they wish, but stuff i can find with a quick search...
r/jailbreak for apple devices seems to be pretty good, they also have a discord server you could ask questions of if the terminology is going way over your head
magisk seems to be the safest way to root android devices these days, and this article covers it pretty in depth in approachable language for newbies
if you just want to roll back app updates you didn't like, i find uptodown pretty decent (this one i have used myself)
as far as computer stuff goes rather than phones/tablets, i would recommend getting a basic familiarity with html (for internet stuff) and what the command prompt is (for software - apparently it's called terminal on apple but i've only used windows), bc it'll make a lot of guides less scary - you don't have to be able to code changes yourself, but if you can look at someone else's code and go oh okay that's what you're doing there, or oh i recognise those terms/symbols, then you'll have a better sense of what to trust or what you're actually doing to your own computer
and yeah no keep asking questions that's a great way to start! the more background knowledge you acquire the easier it gets to start changing things to what you want them to be
6 notes
·
View notes
Text
Hidden Power Lock: Instructions Root Videocon Metal Pro 2 run Android Nougat (Magisk)
## Unlocking the potential power: Instructions for Root Videocon Metal Pro 2 runs Android Nougat (using Magisk) Do you own a video Metal Pro 2 and want to experience more advanced features? Do you want to customize the system to your liking? This article will show you how to root the Videocon Metal Pro 2 phone running Android Nougat operating system safely and effectively, using Magisk method.…
0 notes
Text
Rooting an Android device (commonly referred to as "jailbreaking" on iPhones) is essentially gaining full control over the operating system, including system files, settings, and functions that are otherwise restricted by default. You're right that Android is based on the Linux kernel, but it’s highly customized by Google and device manufacturers, so it’s not the same as a typical Linux distribution you'd find on a desktop. Here's a step-by-step guide on how to root an Android and get shell access, but first, a couple of notes:
Important considerations:
Rooting voids warranties: Rooting will void your device warranty, and it may even brick (render unusable) the device if not done properly.
Security risks: Once rooted, your device becomes more vulnerable to malware and hacking if precautions aren't taken.
Backup data: Rooting could erase all data on your device, so it’s important to back everything up beforehand.
Steps to Root Your Android and Access the Shell
1. Check the Bootloader Status:
The bootloader is what controls what software runs when the device is powered on. Most Android devices have a locked bootloader by default.
Some manufacturers provide a way to unlock the bootloader officially (Google, OnePlus), while others do not (Samsung in the U.S.). Check if your phone has an official way to unlock it. You might need to enable developer options on your device.
Go to Settings → About phone and tap Build number seven times. This unlocks Developer options.
Go to Settings → Developer options and enable OEM unlocking and USB debugging.
2. Unlock the Bootloader:
With OEM unlocking enabled, you can now unlock the bootloader using your computer:
Connect your phone to your computer.
Install ADB and Fastboot on your computer (these tools are part of the Android SDK).
Open a terminal on your PC and run:bashCopy codeadb devices adb reboot bootloader fastboot oem unlock
Your device will prompt you with a confirmation. Use the volume buttons to navigate and the power button to confirm.
Note: Unlocking the bootloader will likely erase all data on your device.
3. Find a Suitable Rooting Method:
Rooting methods depend on your device’s manufacturer and version of Android.
Here are some popular options:
Magisk (most recommended): It allows you to gain root access without modifying the system partition. It also passes Google's SafetyNet checks, which means you can still use apps like Google Pay and Netflix. You'll need a custom recovery to flash Magisk.
SuperSU: An older method that directly modifies system files. It's less safe and can break OTA updates and certain apps.
Flashing Magisk (if you go with Magisk):
Download the Magisk zip file to your phone from Magisk GitHub.
Boot into your custom recovery (like TWRP) using ADB:bashCopy codeadb reboot recovery
In TWRP, go to the Install section and flash the Magisk ZIP file.
Reboot your phone.
4. Install a Terminal Emulator:
Once rooted, you can install a terminal emulator from the Google Play Store (e.g., Termux or Terminal Emulator for Android).
These apps give you direct shell access on the device. Since Android is Linux-based, many typical Linux commands will work out of the box (e.g., ls, cd, cat, etc.).
5. Access the Shell via ADB:
You can also connect to your Android's shell from your computer using ADB:
Open a terminal on your computer:bashCopy codeadb shell
This will give you a shell directly on the device. If you’ve rooted the phone, you can also get root access within the shell:bashCopy codesu
This will elevate your privileges to superuser (root).
Are All Androids Just Linux?
In essence, yes, Android is based on Linux, but it is heavily modified and optimized for mobile devices. Here’s how they compare:
Kernel: Android runs on the Linux kernel, which handles hardware communication, process management, and memory management. But the rest of the operating system is built differently from traditional desktop Linux.
Userland: Android does not use the GNU C Library (glibc) or GNU core utilities by default, which are standard on Linux distributions like Ubuntu. Instead, Android uses Bionic, a lightweight C library designed for mobile use.
File Structure: While Android’s filesystem is similar to Linux’s (you'll see directories like /system, /data, /proc), it is organized differently to support mobile devices and the Android app structure.
Security: Android uses additional security measures like SELinux and a permission-based app model that separates apps from each other and restricts access to system components.
Next Steps for Using Your Android as a "Gizmo"
Once rooted and you have shell access, there are countless projects you could try, such as:
Turning your Android into a Raspberry Pi-like development platform for IoT.
Using it as a network monitoring tool or personal server (with apps like Kali Nethunter).
Repurposing it as a dedicated media player or smart home controller.
If you’re looking to customize and expand the functionality even more, consider looking into custom ROMs (like LineageOS) or building Linux distros specifically for Android devices, like PostmarketOS.
0 notes
Text
App VNeID mới cập nhật lên phiên bản 2.1.6 với các tính năng bảo mật nâng cao. Do đó điện thoại Android nào đã Unlock bootloader, bật gỡ lỗi usb, tùy chọn nhà phát triển đều không thể truy cập vào VNeID. Nếu điện thoại bạn đã mở khóa có nguy cơ bảo mật sẽ xuất hiện thông báo lỗi: Thiết bị của bạn không an toàn, có rủi ro chứa mã độc. Cách sửa lỗi VNeID báo lỗi "Thiết bị của bạn không an toàn, có rủi ro chứa mã độc" từ phiên bản VNeID 2.1.6 bạn cần thực hiện một số cách sau: Sử dụng lại phiên bản VNeID 2.1.5 Xóa cài đặt bản VneID 2.1.6 mới nhất đi, tắt tự động cập nhật trong CHPlay đi, rồi tải file apk vneid 2.1.5 trên về cài rồi xài bình thường. Sau khi tải về bạn vào ứng dụng File hoặc File của bạn, tìm đến thư mục chưa file VNeID_2.1.5.apk, nhấp chọn rồi cài đăt. Đối với một số điện thoại cần tắt tính năng Không rõ nguồn gốc thì bạn mới cài được nhé. Tắt chế độ bật gỡ lỗi usb, tùy chọn nhà phát triển Nếu bạn vẫn muốn dùng VNeID 2.1.6 mới nhất, hãy thử kiểm tra xem điện thoại có đang bật gỡ lỗi USB không?, nếu có có thì hãy tắt tính năng này đi. Tùy điện thoại sẽ có mỗi cách bật/tắt gỡ lỗi USB khác nhau. Bạn tham khảo các cách sau: + Cài đặt -> Cài đặt bổ sung -> Tùy chọn nhà phát triển- > Gỡ lỗi USB + Cài đặt -> Hệ thống -> Tùy ch���n nhà phát triển -> Gỡ lỗi USB + Cài đặt -> Khác -> Tùy chọn nhà phát triển -> Gỡ lỗi USB + Cài đặt -> Tùy chọn nhà phát triển -> Gỡ lỗi USB + Cài đặt -> Hệ thống -> Thông tin (Hoặc thông tin về điện thoại) -> Thông tin phần mềm -> Số hiệu bản tạo (Nhấn liên tục từ 5-7 lần) -> Quay trở lại mục Hệ thống sẽ xuất hiện Tùy chọn nhà phát triển -> Gỡ lỗi USB Dùng phiên bản web của vneid https://vneid.gov.vn/ Đây là cách đơn giản mà an toàn nhất, bạn truy cập vào trang chính thống của VNeID tại: https://vneid.gov.vn/ Sau đó chọn Đăng nhập, giao diện đăng nhập bạn nhập số CCCD và mật khẩu để truy cập các tính năng của VNeID [caption id="attachment_60921" align="aligncenter" width="520"] đăng nhập vneid trên web[/caption] Các cách khác để truy cập VneID báo lỗi Ngoài ra còn một số cách để sửa lỗi VNeID báo lỗi "Thiết bị của bạn không an toàn..." như: Cài rom VS Pro phiên bản mới nhất (thấy TeamVS đồn mới update fix lỗi này). Có thể mất một chút phí mua bản quyền rom Root máy: Sau khi root máy, bạn có thể dùng Magisk module can thiệp chỉnh sửa một chút trong system Các cách này hơi nguy hiểm cho dân không chuyên, và thao tác sai cách là dễ lỗi máy. Mình không khuyến khích các bạn áp dụng, nếu không sẽ bị mất hết dữ liệu
0 notes
Text

আবার মিস করেন নি তো?: সেরা ৫ টি Magisk Module এবার Rooted Device Customization হবে আরো সুন্দর! https://www.techtunes.io/android/tune-id/984890
0 notes
Text
1 note
·
View note
Text
Unlock Blu Pure View phone: Safe root guide for Magisk
## unlock Blu Pure View phone: Safe root guide for Magisk The phone root is a big step for users who want to customize the Android operating system. However, incorrect rooting can damage the device. This article will show you how to root your Blu Pure View safely and effectively as Magisk, an advanced and reliable root tool. We will share every detail, from preparing to complete the process,…
0 notes
Text

মিস করেন নি তো?: সেরা ৫ টি Magisk Module এবার Rooted Device Customization হবে আরো সুন্দর! https://www.techtunes.io/android/tune-id/984890
0 notes
Text
Unlock the whole potential center A1: Safe root guide with Magisk!
## Unlock the entire potential center A1: Safe root guide with Magisk! Do you own the A1 center and want to explore all its potential power? You want to customize the system, install special applications, or simply want to experience Android in your own way? If so, this article for you! We will guide you how to root A1 center safely and effectively with Magisk, the method has been verified and…
0 notes
Text

সেরা ৫ টি Magisk Module এবার Rooted Device Customization হবে আরো সুন্দর! https://www.techtunes.io/android/tune-id/984890
0 notes
Text
How to Root Huawei Nova 7i with Magisk without TWRP
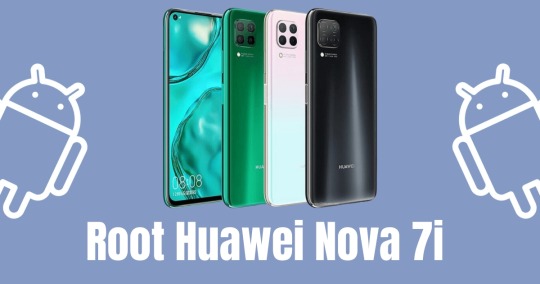
Today's tutorial is focused on teaching you the process to root Nova 7i, specifically the Huawei Nova 7i, using Magisk patched boot.img. Despite the fact that devices from this Original Equipment Manufacturer (OEM) often lack support in custom development, they have carved out their own unique niche. Recently, there's been a steady increase in their popularity, particularly among tech experts. Learn how to root Huawei Nova 7i and join this growing community of tech enthusiasts. Read More - Does Rooting or Unlocking Void Your Android Phone Warranty However, there is a prerequisite you need to complete before you root Huawei Nova 7i. That is an unlocked bootloader. Once you have that you can try various types of mods, which can flash custom recoveries like TWRP or custom ROMs such as LineageOS. Moreover, you can gain administrator privileges! Read More - 30 Amazing Things You Can Do After Rooting Your Android Why are we waiting? Let's get into business.
Table of Contents
Understanding the Concept of Rooting Understanding the Pros and Cons of Rooting Your Nova 7iThe Advantages of Rooting Huawei Nova 7i The Drawbacks of Rooting Nova 7i How to Root Huawei Nova 7i using Magisk Patched Boot.img Conclusion Frequently Asked Questions (FAQ)I unrooted the Huawei Nova 7i but still, the app says my mobile is rooted. Huawei Nova 7i got stuck at boot after uninstalling Magisk from the app Magisk keeps uninstalling Unable to repack boot image Magisk ERROR when installing OTA Update fails after using Magisk Root MagiskHide or SafetyNet fails after an update Magisk isn't working Invalid image: not signed Process error Can't install from the Magisk app I can't root Huawei Nova 7i with Magisk Is there any specific version of Magisk required to root Nova 7i?
Understanding the Concept of Rooting
Rooting is a process that grants users privileged control over their Android devices - think of it as obtaining a VIP pass to your device's backstage. When you root Huawei Nova 7i, you gain the ability to customize beyond standard limitations. Rooting allows you to uninstall unwanted apps, block ads, and enhance the device's performance. However, it's a double-edged sword—it can also void warranties and expose your device to potential security threats. In the case of the Nova 7i, rooting can unlock a new level of customization potential. But remember, with great power comes great responsibility. Now, let's delve into how to root the Huawei Nova 7i responsibly and effectively.
Understanding the Pros and Cons of Rooting Your Nova 7i
In the realm of smartphone customization, one term frequently surfaces - to root or not to root? Particularly, when speaking about the Huawei Nova 7i, the question becomes more specific: should you root Nova 7i? To answer this, we must first explore the inherent pros and cons of rooting. The Advantages of Rooting Huawei Nova 7i Unlimited Customization: One of the most compelling reasons to root Huawei Nova 7i is the boundless customization options it opens up. You can change almost anything about your device, from its user interface to the operating system itself. Enhanced Performance: Rooting your device can enhance its performance by allowing you to overclock or underclock your processor, according to your usage. Access to Root-Only Apps: Certain applications require root access to function. By rooting your Nova 7i, you unlock a whole new world of possibilities with these root-only apps. The Drawbacks of Rooting Nova 7i Voided Warranty: The most significant disadvantage of rooting is that it voids your device's warranty. Huawei will not cover any damages or issues that occur after you root your Nova 7i. Potential Bricking: The rooting process carries the risk of "bricking" your device, making it as useful as a brick if something goes wrong. It is absolutely essential to understand the process of how to root Huawei Nova 7i before proceeding. Security Risks: Rooting your device can open up potential security risks, as root-level access can also be exploited by malicious apps or hackers. Your decision to root Nova 7i should be made after careful consideration of these pros and cons. If the advantages outweigh the drawbacks for you and you're comfortable with the risks involved, rooting your device can unlock a new level of customization and control.
How to Root Huawei Nova 7i using Magisk Patched Boot.img
To simplify the instructions I have listed them under separate sections. The only thing you have to do is to follow the exact steps without skipping a single one. And please keep in mind that won't take responsibility if anything happens to your phone and its data. Read More - The First 10 Things to Do After Rooting Your Device Step 1 : Install Android SDK

Firstly you need to install the Android SDK Platform Tools on your PC. As some of you are already aware this is the recommended official ADB and Fastboot binary given by Google. Just download it and extract it to any convenient location on your PC. Then you will have the platform-tools folder, which is essential for the process to root Huawei Nova 7i. Step 2: Enable USB Debugging and OEM Unlocking on Huawei Nova 7i Then you should enable USB Debugging and OEM Unlocking on your Huawei Nova 7i. By unlocking OEM, you will be able to make your phone discoverable by the PC in ADB mode. And then allowing you to boot your device to Fastboot Mode. Here's how you can do that. : Enable USB Debugging and OEM Unlocking Step 3: Unlock the Huawei Nova 7i Bootloader

As the third step, you need to unlock the bootloader of the phone. Don't ever forget that unlocking will wipe all the device data. So, perform a complete backup beforehand and then refer to our guide on How to Unlock the Bootloader on Huawei Nova 7i. Unlock the Bootloader on Huawei nova 7i Step 4: Extract Boot.img from Huawei Nova 7i Firmware Then you have to download the firmware for your Huawei Nova 7i. You have to download the same version that is currently installed on your device. After downloading, extract the file to a suitable location on your PC. Now go to the extracted Firmware folder and see whether you can see the boot.img file. Just transfer this file to your phone and follow me.

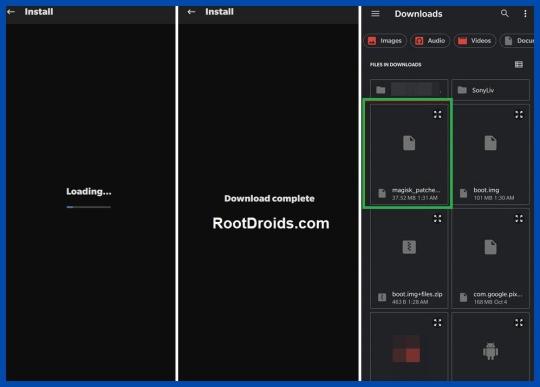
Still Can't find boot.img or Don't know how to find it? How to Extract Boot.img from Huawei nova 7i Step 5 : Patch Stock Boot.img via Magisk - Firstly install the Magisk app on your phone. Read More: Everything about Magisk - And confirm whether the boot.img has been transferred to the device. - Now tap on the Install button. (see below image) - In the Options menu, enable both the Preserve Force Encryption and Recovery Mode options. - Then tap Next. - You will be navigated to the Method selection screen. Now choose Select and Patch a file.

- As the next step, browse to the extracted boot.img file and select it. - Tap on the Let's Go button and Magisk will now load the boot.img file and start patching. - You will see a message saying Download Complete once the patching is done. - Then the patched boot image file will be saved as magisk_patched.img in Internal Storage > Downloads. - You can rename the file by deleting the random numbers at the end of the name. So the file will be named as magisk_patched.img. - Finally, transfer the file to the internal storage of your device for future use.
Step 6 : Boot to Fastboot Mode on Huawei Nova 7i - Enable USB Debugging and connect your device to the PC using a USB cable. - Now go to the platform-tools folder, type CMD in the address bar and press Enter. or Search CMD and open it. after that, navigate to the platform-tools folder - That will launch the Command Prompt.

- Then type the following command in the CMD window to boot your device to Fast boot mode. adb reboot bootloader To verify the connection, type in the below command. You should get the device ID followed by the Fastboot keyword. if you get a reply from the command prompt, it means, the connection has been successfully established. fastboot devices Disable DM Verity: Only if you have a problem with performing step 7. Step 7 Flash Magisk Patched Boot.img and Root Huawei nova 7i - First transfer the magisk_patched.img file to the platform-tools folder. - Then type the following command in the CMD window to flash the Magisk Patched file. fastboot flash boot magisk_patched.img - Finally, enter the following command to reboot your device to the OEM. fastboot reboot Now, you have successfully rooted your Huawei Nova 7i device.
Conclusion
In conclusion, learning how to root Nova 7i can immensely enhance your user experience. This process of rooting Huawei Nova 7i gives you more control over your device, allowing you to customize and optimize it according to your preferences. However, always remember that while it provides numerous benefits, it also comes with its risks. Therefore, make sure you have a clear understanding of what you're doing and why before you proceed to root Huawei Nova 7i. If done correctly, you'll be able to unlock the full potential of your Huawei Nova 7i and experience a whole new level of smartphone usage.
Frequently Asked Questions (FAQ)
I unrooted the Huawei Nova 7i but still, the app says my mobile is rooted.

Q: I completely unrooted my mobile a few days back. But still, many apps say that the device is rooted. Thereafter I rooted my device using Magisk HIDE. Please help me! A: If your bootloader is unlocked, they will report your device as a rooted device. According to your description, Magisk Hide alone has failed to do the job. I suggest you try the "Repackage Magisk Manager" option in the Magisk Manager settings. It worked for me. Huawei Nova 7i got stuck at boot after uninstalling Magisk from the app Q: I installed Magisk via TWRP(Temp version) and installed some modules. Thereafter, I decided to uninstall Magisk using the Magisk Manager APK. Then the phone rebooted and stuck into the phone logo with the red danger logo. I tried flashing Magisk again via Temp TWRP, but now a few apps keep crashing. I tried uninstalling and reinstalling them. But couldn't fix it. Can you help me? A: If your phone is stuck in the boot loop or apps still crashing, then you have to wipe the Dalvik cache again. If you still need to unroot for whatever reason you can try this: - Update Magisk first and then click uninstall from Magisk Manager. - manually flash uninstaller.zip from TWRP. - flash the uninstaller as a module as stated in this post. - Finally, if it's still no use, then you can factory reset the device to remove the root. Magisk keeps uninstalling
Q: During the past 4 days I had to re-install Magisk 16.3 at least 4 times a day. Because it keeps uninstalling itself. I have previously experienced this issue with Magisk, but it has gotten worse instead of being solved. A: After uninstalling, you can try flashing the stock boot image from your ROM/firmware package/factory image. Unable to repack boot image Q: I tried to install MAGISK v16.O using MAGISK installer. But there is a message saying, Installation failed with (! Unable to repack boot image! Failed! ! Installation failed). What can I do to get rid of this? A: Just try uninstalling v15.3 first and then install v16.0 clean. Magisk ERROR when installing Q: I got this error when installing Magisk using TWRP. What am I supposed to do now? Updater process ended with ERROR:1 Error installing zip file '/sdcard/MagiskManager/Magisk-v13.3.zip' A: I advise you to use the magisk_uninstaller.zip first. From what I saw in your log, your boot. img is already patched by something else. Therefore, you need to install Magisk on your stock boot.img. OTA Update fails after using Magisk Root - To start you need to fully restore to stock and erase user data. (basically, the same as starting with a brand new phone). - Then, flash Magisk (I used the image provided on the thread about Magisk) fastboot flash boot magisk_patched.img. - Boot to Android. - Next, install Magisk Manager. - Verify root works. - Now, reboot to bootloader, and flash the default boot.img: fastboot flash boot boot.img. - Next, reboot to Android. - Finally, apply the OTA update. MagiskHide or SafetyNet fails after an update If MagiskHide or SafetyNet starts failing after an update to either Magisk, the app, or both you can fix it by toggling MagiskHide off and on (also see ”Test MagiskHide”). Magisk isn't working If you can boot up, but Magisk isn't working as expected (not detecting the Magisk installation, loss of root, etc), there are a few troubleshooting steps you can try. - First, Reboot. Sometimes this helps Magisk to mount everything as it should. - Try removing any installed modules. So that you can see if it's a faulty module causing issues. - If that seems to fix it, just install the modules one at a time to find which one causes issues. - If nothing else works, try starting from the very beginning with a new installation. - check here: "Asking for help/reporting bugs". Invalid image: not signed If you see a message in the install log, indicating "Invalid image: not signed", that means your boot image is not signed. Don't panic! It’s perfectly normal and nothing to worry about. Process error A "process error" when installing Magisk is usually caused when the app doesn't have storage permission. So you can fix it by clearing app data. Can't install from the Magisk app When attempting to install/update either the app or Magisk in the Magisk app v8+, some users experience that nothing happens. Usually, this is caused by having a custom hosts file, or similar, that is blocking the CDN used by the Magisk app (JSDelivr). The solution is to whitelist that particular URL. I can't root Huawei Nova 7i with Magisk If you are naive to rooting, you are at the right place. How about the people who are experienced in rooting? We are here to provide you a root solution to every feature you were wishing for. Please go to the top of the website and try the step-by-step guide again. Read More: Everything about Magisk Is there any specific version of Magisk required to root Nova 7i? To root your Huawei Nova 7i, you don't necessarily need a specific version of Magisk. However, it's always recommended to use the latest version of the Magisk app. The reason behind this is that the most recent version will have the most recent patches and updates, ensuring a smoother and more successful rooting process. It's also more likely to be compatible with the latest OS and system updates on your Nova 7i. Before starting the rooting process, make sure to double-check the Magisk version and update it if necessary. Do you think this guide on How to Root Huawei Nova 7i Device using Magisk Patched Boot.img is helpful? If so, please share this article on Facebook, LinkedIn, etc. And we warmly welcome your queries, comments, and suggestions. Feel free to contact us. You can join our community and open a help Topic under Android. It's Read the full article
0 notes
Text
Youtube Revanced APK Download Latest Version 2023

Are you sick of having your YouTube experience constantly disrupted by ads? Stop looking! With YouTube ReVanced, the best modified version of YouTube, you can watch videos without interruption from ads.

Background Playback, SponsorBlock, and the Return YouTube Dislike are here to help you avoid those annoying commercials. SumAtrIX has released a free, streamlined client for YouTube that will change the way you view videos forever. The question is, why hold off? To get the most out of YouTube, get the newest version of the YouTube ReVanced APK immediately.
What Is Youtube Revanced APK
YouTube ReVanced APK is a free customized YouTube client that replaces YouTube Vanced and offers similar app features and extra modes for a better streaming experience. It is developed by oSumAtrIX and aims to provide users with a more enhanced user experience. YouTube ReVanced is still in its initial stages but already has basic YouTube Vanced features and patches. It is compatible with Android 8.0+ and currently not available as an APK. However, it shows potential by providing basic YouTube Premium features and an impressive streaming experience. To install the APK, MicroG is required, while rooted Android devices need the Magisk module framework. YouTube ReVanced APK can be used as a secondary YouTube app on both root and non-root devices, offering an ad-free experience, background playback, video downloading, picture-in-picture mode, and customizable video playback options.
YouTube ReVanced Features and Benefits
Experience a seamless and ad-free streaming experience with the advanced features and benefits of YouTube ReVanced. - Background Playback: Enjoy uninterrupted audio playback even when you switch to other apps or lock your device. - Ad-Free Content: Say goodbye to annoying ads and enjoy your favorite videos without interruptions. - Customizable Playback Options: Adjust playback speed, customize video quality, and enable picture-in-picture mode for a personalized viewing experience. YouTube ReVanced offers these features and more, making it a popular choice for users seeking an enhanced YouTube experience. With its user-friendly interface and compatibility with both rooted and non-rooted devices, YouTube ReVanced provides a convenient and efficient way to enjoy YouTube content. Whether you're a music lover, a multitasker, or simply looking for an ad-free experience, YouTube ReVanced has you covered.
Download YouTube ReVanced APK and Magisk Module
To get the enhanced features of YouTube ReVanced on your Android device, you'll need to install the APK and the Magisk Module. The YouTube ReVanced APK offers similar functions as YouTube Vanced and provides features like background playback, ad-free content, SponsorBlock, and Return YouTube Dislike. It also includes ReVanced Music for streaming music with the benefits of YouTube Music Premium. Currently, YouTube ReVanced is in its birth stage and not available as an APK. However, you can download YouTube ReVanced APK and the Magisk Module to enjoy features such as background music playback, customizing playback speed, disabling ads, and removing sponsored segments. The Magisk module is essential for rooted Android devices. By following the installation process, you can enjoy a better user experience with YouTube ReVanced. FeaturesBenefitsCompatibilityBackground PlaybackMultitask while listening to videosAndroid 8.0+Ad-Free ContentEnjoy YouTube without interruptionsRoot and non-root devicesSponsorBlockSkip sponsored segmentsMicroG for APK installationReturn YouTube DislikeSee the dislike count on videosYouTube Premium brandingReVanced MusicStream music with YouTube Music Premium benefitsCustom branding for YouTube Premium users
Building YouTube ReVanced APK
To build the YouTube ReVanced APK, you can follow the steps using the ReVanced Builder by reisxd and install it on your Android device. Here's how you can do it: - Download Termux, an Android terminal emulator and Linux environment app, on your device. - Open Termux and run the commands to install the ReVanced Builder. - Once the builder is installed, select the YouTube app you want to patch. - Wait for the dependencies and application download to complete. - The APK files will be available in your phone's internal storage. Building the YouTube ReVanced APK allows you to customize your YouTube experience with features like background playback, ad blocking, and more. By following these steps, you'll be able to enjoy a modified version of YouTube that enhances your user experience.
YouTube ReVanced APK for Root and Non-Root Devices
Get ready to enhance your YouTube app with features like ad blocking, background playback, and more, whether your device is rooted or non-rooted. YouTube ReVanced APK offers these features and is compatible with both rooted and non-rooted devices. With YouTube ReVanced, you can enjoy an ad-free experience while watching your favorite videos and have the ability to play videos in the background, allowing you to multitask. This customized YouTube client also supports MicroG for easy installation. In addition to these features, YouTube ReVanced APK provides options for video downloading, picture-in-picture mode, and customizable video playback settings. Whether you have a rooted or non-rooted device, YouTube ReVanced APK is here to enhance your YouTube experience.
Advanced Features of YouTube ReVanced APK
Enhance your YouTube experience with advanced features like ad blocking, background playback, video downloading, and more, using YouTube ReVanced APK. Here are three reasons why you should consider using this modded version of YouTube: - Ad Blocking: Say goodbye to annoying ads that interrupt your viewing experience. YouTube ReVanced APK allows you to disable general and video ads, providing an ad-free experience. - Background Playback: Multitask like a pro with the ability to play videos in the background. Whether you're checking emails or browsing the web, you can continue listening to your favorite YouTube content without interruption. - Video Downloading: Save your favorite videos for offline viewing. YouTube ReVanced APK lets you download videos directly to your device, so you can enjoy them even without an internet connection. With these advanced features, YouTube ReVanced APK takes your YouTube experience to the next level, providing a more enjoyable and convenient way to watch and listen to your favorite content.
YouTube ReVanced 18.32.39: Latest Version Overview
Experience the newest version of YouTube ReVanced, 18.32.39, and discover the latest updates and improvements. This version of YouTube ReVanced offers several exciting features that enhance your YouTube experience. The table below highlights some of the key updates: FeatureDescriptionBenefitsBackground PlaybackAllows you to listen to videos in the background while using other appsMultitask efficientlyAd-Free ContentRemoves ads from videos, providing an uninterrupted viewing experienceEnjoy videos without interruptionsSponsorBlockAutomatically skips sponsored segments in videosSave time and skip irrelevant contentReturn YouTube DislikeBrings back the dislike count on YouTube videosGain a better understanding of video popularity These updates aim to improve user satisfaction and make your YouTube experience more enjoyable. Download the latest version of YouTube ReVanced now to explore these new features and enhance your viewing experience.
Enhance Your Youtube Experience With Youtube Revanced APK
Improve your YouTube viewing by utilizing the additional features offered by YouTube ReVanced APK. Here are three ways YouTube ReVanced APK can enhance your YouTube experience: - Enjoy an ad-free experience: With YouTube ReVanced APK, you can say goodbye to annoying ads that interrupt your viewing. It disables both general and video ads, allowing you to enjoy uninterrupted content. - Background playback for multitasking: YouTube ReVanced APK lets you play videos in the background while using other apps on your device. This feature is perfect for multitasking and ensures you never miss a moment of your favorite videos. - Customize your video playback options: YouTube ReVanced APK offers various customization options for video playback. You can adjust the playback speed, download videos for offline viewing, and even use picture-in-picture mode to watch videos while using other apps. With YouTube ReVanced APK, you can take your YouTube experience to the next level and enjoy a more seamless and personalized viewing experience. Youtube ReVanced APK ( General ) Download ( Extended ) ReVanced MicroG Read the full article
0 notes
Text
Magisk root for Android 8
Magisk root for Android is also known as the best Android rooting mask at present. Although there are many other Android rooting tools, not a single application can be as safe as Android rooting. Anyone, anywhere can use Magisk root for Android free.
The installation process can be done within a few minutes securely. The rooted device and the installed unsupported apps can be hidden by Magisk root for Android. You can learn more about Magisk root for Android by visiting the Magisk Manager official website.

About Magisk Manager
Magisk Manager is an Android rooting application developed by the well known XDA app developer Topjohnwu. The app was initially developed in 2016. Magisk root for Android is the first rooting tool to introduce the system less root access method. The features of Magisk Manager includes Magisk Root, Magisk Mount, Magisk Hide and Magisk SU. Magisk root for Android can root Android devices powered with Android 4.2 version and later versions.
Features of Android 8
User Experience is enhanced with Picture-in-Picture mode, Notifications, autofill framework, downloadable fonts, shortcut and widgets etc.
New StrictMode detectors. Cached data. Content provider paging.
Media enhancements. VolumeShaper. Audio focus enhancements.
Wi-Fi Aware. Companion device pairing.
Sharing. Smart sharing. Text classifier.
More accessibility features
Advanced Security & Privacy and Permissions.
The steps to download Magisk root for Android 8
Step 1 - Open the Android 8 device settings. Go to the developer options or security option and enable the unknown source mode. The access will be given to install open source, unsupported third party applications.
Step 2 - Navigate to the default web browser of the Android 8 device and type Magisk root for Android 8 on the search bar.
Step 3 - There will be a list of links directing to Magisk Manager downloads. Click on one reliable link and visit the web page.
Step 4 - Now go to the download section and click on the Magisk root for Android 8 download. Now choose either direct download or download zip only option.
Step 5 - The Android 8 device will run the installation of the Magisk Manager compatible version. Give it a few moments to end.
Step 6 - Now locate the installed Magisk root for Android 8 files on the internal storage of the device.
Step 7 - Tap on the located files and the direct download files will open right away. But in order to open the zipped Magisk Manager latest version, you have to do a device reboot.
Step 8 - After the device reboot, open the Magisk root for Android 8 files and then you have successfully completed the installation process.
Magisk root for Android app summary
Name - Magisk Manager
Last updated - 8, October, 2020
Size - 1.85
Downloads - 50 000 000 +
Developer - Topjohnnwu
Required Android version - 4.2 and above
Versions of Magisk root for Android
Magisk 14.3
Magisk 15.0
Magisk 15.1
Magisk 15.3
Magisk 15.4
Magisk 16.0
Magisk 16.1
Magisk 16.3
Magisk 16.4
Magisk 17.0
Magisk 17.1
Magisk 18.0
Magisk 18.1
Magisk 19.0
Magisk 19.1
Magisk 19.3
Magisk 19,4
Magisk 20.0
Magisk 20.2
Magisk 20.3
Magisk 20.4
Magisk 21
0 notes
Text
Как установить Magisk Manager и спрятать рут права от приложений на Android

Magisk Manager — это специализированная программа для системы Android, которая разрешает активировать права суперпользователя, после чего управлять их деятельностью. Разработка этого продукта велась с целью заменить популярный SuperSU приложением с увеличенным количеством функций для конфигурирования и кастомизации гаджета.
Особенности Magisk Manager
Установка системных программ в режиме Systemless без изменения содержимого раздела /system.
Подмена файлов операционной системы Android до подключения раздела под названием /data.
Сокрытие прав суперпользователя, разблокировка Bootloader от банковского и почтового софта.
Безошибочное получение новых версий прошивки «по воздуху» посредством функции over-the-air.
Установка утилиты
Для безопасной работы приложения понадобится скачать Magisk Manager. Он представляет собой непосредственно Android-программу, которая позволяет управлять работой root прав, устанавливать посторонние модули и совершать другие операции. Для этого:
В браузере мобильного аппарата откройте страницу https://magiskmanager.com.
Нажмите зеленую кнопку Download Magisk App для начала загрузки дистрибутива.
Тапните закачанный файл, чтобы запустились инсталляционные операции.
Теперь понадобится скачать файл MagiskSU — специализированный файл для разблокировки прав суперпользователя. Для этого:
Скачайте среду восстановления Team Win Recovery Project на странице https://magiskmanager.com, нажав кнопку Get TWRP Recovery.
Замените расширение с apk на zip во время переименования скачанного файла. Например, тогда Magisk-v22.0.apk превратится Magisk-v22.0.zip.
Скопируйте переименованный архив без предварительного распаковывания в корневой каталог на карте памяти.
Если на смартфоне уже имеется TWRP, дважды щелкните по иконке утилиты для перезагрузки в режиме recovery.
Когда откроется основное окно приложения Team Win Recovery Project, щелкните кнопку Install, найдите сохраненный на внутре��ней карте памяти архив Magisk.zip и нажмите Select storage.
Осуществите нажатие Install image, чтобы содержимое выбранного архива распаковалось на устройстве.
Когда инсталляция успешно завершится, откройте файл и нажмите кнопку Reboot System для перезагрузки системы Android.
Сокрытие прав root от приложений
Большинство банковских программ не действует на мобильных гаджетах, если установлены права суперпользователя. Для решения этой проблемы: - Запустите безошибочно установленную и настроенную утилиту Magisk Manager. - Откройте окно настроек приложения и активируйте опцию напротив надписи Magisk Hide. - В основном меню зайдите в появившийся пункт с наименованием Magisk Hide. - Отыщите программу, для которой надо спрятать Root права, и поставьте галку напротив нее. Источник: https://2sharp.pro/android/53-kak-ustanovit-magisk-manager-i-sprjatat-rut-prava-ot-prilozhenij-na-android.html
1 note
·
View note
Text
Unlock phone power: Instructions for downloading Supersu & Magisk Root every versions
Unlock phone power: Instructions for downloading Supersu & Magisk Root every versions Is your smartphone limited by systemic barriers? Do you want to access the entire capabilities of the device? This article will show you how to download and use the two most popular root tools: Supersu and Magisk. Let’s explore how to unlock the hidden power of your Android phone! Supersu: Reliable root…
0 notes