#Multitenancy
Explore tagged Tumblr posts
Visit Tumblr Blog
Explore Tumblr blogs with no restrictions, modern design and the best experience.
Last Seen Tumblr Blogs


Fun Fact
Tumblr has been providing a Korean-language service since 2013.
Text
youtube
0 notes
Text

Are you ready to demystify the terminology of Cisco's Application Centric Infrastructure (ACI)? DC Lessons offers a fantastic course that's perfect for IT professionals, network engineers, and anyone eager to navigate the world of ACI with confidence. https://www.dclessons.com/aci-terminology
#ACI#DataCenter#NetworkInfrastructure#SDN#Cisco#NetworkAutomation#CloudInfrastructure#NetworkSecurity#ITTerminology#TechGlossary#NetworkManagement#Virtualization#NetworkArchitecture#Multitenancy#NetworkOrchestration
0 notes
Video
youtube
🚨🚀 ¡Próximamente! Curso donde Dominarás Multi Tenant con Django 5 y Docker 🐍🐳 🔜 👉 https://youtu.be/8oyRDZ05gQk 👈
#multitenant#docker#youtube#django#python#django5#nginx#signals#udemy online courses#udemy#gunicorn#postgresql#javascript#jquery#Api#endpoint#udemyCourse
0 notes
Text
Re: 8tracks
HUGE UPDATE:
As I said on my earlier post today the CTO of 8tracks answered some questions on the discord server of mixer.fm
IF YOU'RE INTERESTED IN INFORMATION ABOUT 8TRACKS AND THE ANSWERS THE CTO OF 8TRACKS GAVE, PLEASE, KEEP READING THIS POST BECAUSE IT'S A LOT BUT YOU WON'T REGRET IT.
Okay, so he first talked about how they were involved in buying 8tracks, then how everything failed because of money and issues with the plataform then he talked about this new app called MixerFM they developed that works with web3 (8tracks is a web2 product), that if they get to launch it they'll get to launch 8tracks too because both apps will work with the same data.
Here is what they have already done in his own words:
*Built a multitenant backend system that supports both MIXER and 8tracks
*Fully rebuilt the 8tracks web app
*Fixed almost all legacy issues
*Developed iOS and Android apps for MIXER
What is next?
They need to migrate the 8tracks database from the old servers to the new environment. That final step costs about $50,000 and on his own words "I am personally committed to securing the funds to make it happen. If we pull this off since there is a time limit , we will have an chance to launch both 8tracks and MIXER. … so for all you community members that are pinging me to provide more details on X and here on discord, here it is"
Here the screenshots of his full statement:


NOW THE QUESTIONS HE ANSWERED:
*I transcribed them*
1. "What's the status of the founding right now?"
"Fundraising, for music its difficult"
2. "Our past data, is intact, isn't?"
"All data still exists from playlist 1"
3. "Will we be able to access our old playlists?"
"All playlists if we migrate the data will be saved. If we dont all is lost forever"
4. "How will the new 8tracks relaunch and MIXER be similar, and how will they be different?"
"8tracks / human created / mix tape style as it was before
mixer - ai asiated mix creation, music quest where people earn crypto for work they provode to music protocol ( solve quests earn money for providing that service )"
5. "Why is 8tracks being relaunched when they could just launch MIXER with our 8tracks database?"
"One app is web2 ( no crypto economy and incentives / ) mixer is web3 ( economy value exchange between users, artists, publishers, labels, advertisers) value (money) is shared between stakeholders and participants of app. Company earns less / users / artist earn more."
6. "Will we need to create a separate account for mixer? Or maybe a way to link our 8tracks to mixer?"
"New account no linking planned"
7. "What do you mean by fixed almost all legacy issues and fully rebuilt the 8tracks web app?"
"We have rebuilt most of 8tracks from scratch i wish could screen record a demo. In Last year we have rebuilt whole 8tracks ! No more issues no more bugs no more hacked comments"
8. "Will the song database be current and allow new songs? For example if someone makes a K pop playlist theres the capability for new songs and old not just all songs are from 2012. There will be songs from 2020 onwards to today?"
"Current cut of date is 2017, we have planed direct label deals to bring music DB up to speed with all new songs until 2025. This means no more song uploads"
9. "The apps would be available for android and outside USA?"
"USA + Canada + Germany + UK + Sweden + Italy + Greece + Portugal + Croatia in my personal rollout plan / but usa canada croatia would be top priority"
10. "Will 8tracks have a Sign in with Apple option?"
"It will have nothing if we don’t migrate the database but yes if we do it will have it"
11. ""Will Collections return?"
"Ofc If we save the database its safe to assume collections will return"
12. "Will the 8tracks forums return?"
"No that one i will deleted People spending too much time online"
13. "No more songs uploads forever or no more songs until…?"
"Idk, this really depends on do we save database or no. Maybe we restart the process of song uploads to rebuild the and create a worlds first open music database If anyone has any songs to upload that is
We operate under different license"
14. "What is your time limit? for the funding, I mean"
"Good question I think 2-3 months"
15. "From now?"
"Correct"
16. "When is the release date for Mixer?"
"Mixer would need 2-3 more months of work to be released Maybe even less of we would use external database services and just go with minimum features"
17. "Do you have the link for it?"
"Not if we dont secure the database that is number one priority"
*That was the end of the questions and answers*
Then he said:
"You need to act bring here (discord) people and help me set up go fund me camping of investor talks fail so we secure the database and migrate data so we can figure out whats next"
He also said he'll talk with the CEO about buying him the idea of community funding, that all who participate should have a lifetime subscription and "some more special thing", we suggested a message on the 8tracks official accounts (twitter, their blog, tumblr) and he was okay with the idea but he said they need to plan it carefully since the time is limited.
Okay, guys, that's so far what he said, I hope this information helps anyone, I don't know if they get to do a community funding but take in consideration it's a plausible option and that what they want from us is to participate in any way like for example spreading the message, if most people know about it the best, they also want you to join their server so here's the link to the website of mixerfm and where you can join the server:
Keep tagging few people who were discussing about this:
@junket-bank, @haorev, @americanundead, @eatpandulce, @throwupgirl, @avoid-avoidance, @rodeokid, @shehungthemoon, @promostuff-art @tumbling-and-tchaikovsky
#8tracks
17 notes
·
View notes
Text
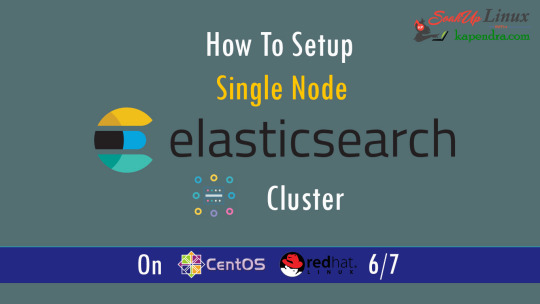
How To Setup Elasticsearch 6.4 On RHEL/CentOS 6/7?
What is Elasticsearch? Elasticsearch is a search engine based on Lucene. It is useful in a distributed environment and helps in a multitenant-capable full-text search engine. While you query something from Elasticsearch it will provide you with an HTTP web interface and schema-free JSON documents. it provides the ability for full-text search. Elasticsearch is developed in Java and is released as open-source under the terms of the Apache 2 license. Scenario: 1. Server IP: 192.168.56.101 2. Elasticsearch: Version 6.4 3. OS: CentOS 7.5 4. RAM: 4 GB Note: If you are a SUDO user then prefix every command with sudo, like #sudo ifconfig With the help of this guide, you will be able to set up Elasticsearch single-node clusters on CentOS, Red Hat, and Fedora systems. Step 1: Install and Verify Java Java is the primary requirement for installing Elasticsearch. So, make sure you have Java installed on your system. # java -version openjdk version "1.8.0_181" OpenJDK Runtime Environment (build 1.8.0_181-b13) OpenJDK 64-Bit Server VM (build 25.181-b13, mixed mode) If you don’t have Java installed on your system, then run the below command # yum install java-1.8.0-openjdk Step 2: Setup Elasticsearch For this guide, I am downloading the latest Elasticsearch tar from its official website so follow the below step # wget https://artifacts.elastic.co/downloads/elasticsearch/elasticsearch-6.4.2.tar.gz # tar -xzf elasticsearch-6.4.2.tar.gz # tar -xzf elasticsearch-6.4.2.tar.gz # mv elasticsearch-6.4.2 /usr/local/elasticsearch Step 5: Permission and User We need a user for running elasticsearch (root is not recommended). # useradd elasticsearch # chown -R elasticsearch.elasticsearch /usr/local/elasticsearch/ Step 6: Setup Ulimits Now to get a Running system we need to make some changes of ulimits else we will get an error like “max number of threads for user is too low, increase to at least ” so to overcome this issue make below changes you should run. # ulimit -n 65536 # ulimit -u 2048 Or you may edit the file to make changes permanent # vim /etc/security/limits.conf elasticsearch - nofile 65536 elasticsearch soft nofile 64000 elasticsearch hard nofile 64000 elasticsearch hard nproc 4096 elasticsearch soft nproc 4096 Save files using :wq Step 7: Configure Elasticsearch Now make some configuration changes like cluster name or node name to make our single node cluster live. # cd /usr/local/elasticsearch/ Now, look for the below keywords in the file and change according to you need # vim conf/elasticsearch.yml cluster.name: kapendra-cluster-1 node.name: kapendra-node-1 http.port: 9200 to set this value to your IP or make it 0.0.0.0 ID needs to be accessible from anywhere from the network. Else put your IP of localhost network.host: 0.0.0.0 There is one more thing if you have any dedicated mount pint for data then change the value for #path.data: /path/to/data to your mount point.
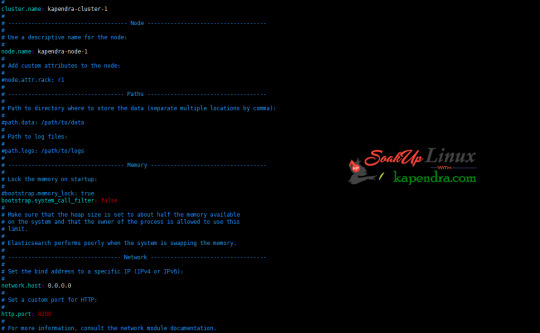
Your configuration should look like the above. Step 8: Starting Elasticsearch Cluster As the Elasticsearch setup is completed. Let the start Elasticsearch cluster with elastic search user so first switch to elastic search user and then run the cluster # su - elasticsearch $ /usr/local/elasticsearch/bin/elasticsearch 22278 Step 9: Verify Setup You have all done it, just need to verify the setup. Elasticsearch works on port default port 9200, open your browser to point your server on port 9200, You will find something like the below output http://localhost:9200 or http://192.168.56.101:9200 at the end of this article, you have successfully set up Elasticsearch single node cluster. In the next few articles, we will try to cover a few commands and their setup in the docker container for development environments on local machines. Read the full article
2 notes
·
View notes
Text
DOKANS Nulled Script 3.9.2

Unlock E-commerce Potential with DOKANS Nulled Script Are you ready to transform your online business into a fully functional multitenant e-commerce platform without spending a fortune? DOKANS Nulled Script offers an unbeatable opportunity to create a scalable, efficient, and dynamic online marketplace—absolutely free. Whether you're a budding entrepreneur or an established developer, this powerful script provides the backbone for launching your own SaaS-based multi-vendor store in no time. What Is DOKANS Nulled Script? DOKANS Nulled Script is a premium multitenancy-based e-commerce platform designed specifically for creating software-as-a-service (SaaS) marketplaces. It allows users to build independent stores under a single ecosystem, offering flexibility, scalability, and seamless customization. With this nulled version, you can enjoy all the premium features without the hefty price tag, making it ideal for developers, resellers, and digital entrepreneurs. Technical Specifications Framework: Laravel (Backend) + Vue.js (Frontend) Database: MySQL/MariaDB Server Requirements: PHP 7.4 or higher, Apache/Nginx Multitenancy: Built-in SaaS capabilities Security: Advanced user authentication and permission systems Outstanding Features and Benefits When you download the DOKANS Nulled Script, you gain access to a powerhouse of tools tailored for modern e-commerce: 1. Multitenancy Support Let your users create and manage their own e-commerce stores under a unified platform. Each store operates independently with its own admin panel and branding. 2. Drag-and-Drop Page Builder Design custom pages effortlessly with an intuitive page builder. No coding knowledge required! 3. Flexible Subscription System Create revenue streams by offering tiered subscription plans to vendors. Manage upgrades, renewals, and custom packages with ease. 4. Secure and Optimized Enjoy enterprise-level security measures, regular updates, and optimized performance to handle growing traffic and vendors without lag. 5. Rich Admin Dashboard Access detailed analytics, financial reports, and vendor performance metrics from a beautifully designed admin panel. Practical Use Cases Launch a digital marketplace for fashion, electronics, or niche products Offer SaaS-based storefronts to clients and freelancers Create white-label solutions for local businesses and communities Monetize by charging store owners subscription fees or commissions How to Install DOKANS Nulled Script Download the latest version of DOKANS Nulled Script from our website. Extract the files to your server's root directory. Set up the database and import the SQL file provided. Edit the .env file with your database and app credentials. Run the necessary Laravel commands: composer install, php artisan migrate, and php artisan serve. Access the admin panel and begin configuring your multi-vendor platform. FAQs – Your Questions Answered Is DOKANS Nulled Script safe to use? Yes, the nulled script is thoroughly tested and secure for usage. However, always use a trusted source—like our website—for downloads to avoid hidden malware or vulnerabilities. Can I use this script for commercial purposes? Absolutely. With DOKANS Nulled Script, you can launch your commercial marketplace, monetize it with subscriptions, and offer clients fully functional e-commerce solutions. Do I need to know coding to use this? No coding skills are required for basic usage. The platform is beginner-friendly with intuitive interfaces. Advanced users can easily customize the backend thanks to its Laravel-Vue architecture. Where can I find compatible plugins or themes? You can enhance your site with additional tools like elementor nulled pro for intuitive design customization. Is there support or a user community? While nulled versions don’t offer official support, you can find active user communities and tutorials online. Plus, our platform is always here to help with guides and updates. Final Thoughts If
you're looking for a high-performance SaaS e-commerce script without the high cost, DOKANS Nulled Script is the answer. It's packed with features, easy to use, and completely free—giving you the ultimate edge in launching your own online marketplace today. Don't miss out on this game-changing opportunity to build and scale your digital empire. Want to enhance your site even further? Try out Slider Revolution NULLED and unlock limitless design possibilities!
0 notes
Text
How the economics of multitenancy work
https://www.blacksmith.sh/blog/the-economics-of-operating-a-ci-cloud
0 notes
Text
What Is Virtual Private Server Hosting?
VPS hosting provides levels of performance, flexibility and control that sit between multitenant shared hosting and dedicated hardware hosting solutions. This type of web hosting is ideal for e-commerce websites as well as software apps requiring advanced programming actions. With VPS, your website resides in an isolated space that comes equipped with dedicated server resources like memory, disk…
0 notes
Text
Elevate your data center expertise with #CCIEDC certification. Tackle intricate challenges, from storage to automation, and design resilient architectures. Lead with confidence in the evolving tech landscape. https://www.dclessons.com/category/courses/aci
#ACI#CiscoACI#DataCenterNetworking#SDN#DCCOR#350-601#DCACIA#300-620#ApplicationCentricInfrastructure#DataCenterFabric#Multitenant#Multipod#NetworkingTraining#ITTraining#CloudNetworking
0 notes
Text
🔴🚀 ¡Próximamente! Curso de Multi Tenant con Django 5 y Docker 🏢✨
youtube
Estoy emocionado de anunciar que estoy preparando un nuevo curso sobre Multi Tenant con Django 5. En este curso, aprenderás a crear aplicaciones multi-tenant robustas y escalables utilizando Django 5 y todas las herramientas en sus últimas versiones.
🔍 ¿Qué aprenderás?
❏ Configuración de entornos multi-tenant con entornos aislados y entornos compartidos (sucursales) ❏ Uso de Docker para la contenedorización y despliegue. ❏ Gestión de bases de datos y esquemas. ❏ Implementación de seguridad y autenticación. ❏ Optimización y escalabilidad. ❏ Y mucho más…
Este curso está diseñado para desarrolladores de todos los niveles que quieran llevar sus habilidades de Django al siguiente nivel. ��No te lo pierdas!
🔔 Suscríbete y activa las notificaciones para no perderte ninguna actualización.
¡Nos vemos en el curso! 🚀
👉 Haz clic aquí para acceder a los cursos con descuento o inscribirte 👈 https://bit.ly/cursos-mejor-precio-daniel-bojorge
#django#python#web#tenant#multi tenant#multitenant#saas#saas technology#teaching#code#developers & startups#education#programming#postgresql#software#Docker#Youtube
0 notes
Text
Red Hat OpenShift Administration III: Scaling Deployments in the Enterprise
In the world of modern enterprise IT, scalability is not just a desirable trait—it's a mission-critical requirement. As organizations continue to adopt containerized applications and microservices architectures, the ability to seamlessly scale infrastructure and workloads becomes essential. That’s where Red Hat OpenShift Administration III comes into play, focusing on the advanced capabilities needed to manage and scale OpenShift clusters in large-scale production environments.
Why Scaling Matters in OpenShift
OpenShift, Red Hat’s Kubernetes-powered container platform, empowers DevOps teams to build, deploy, and manage applications at scale. But managing scalability isn’t just about increasing pod replicas or adding more nodes—it’s about making strategic, automated, and resilient decisions to meet dynamic demand, ensure availability, and optimize resource usage.
OpenShift Administration III (DO380) is the course designed to help administrators go beyond day-to-day operations and develop the skills needed to ensure enterprise-grade scalability and performance.
Key Takeaways from OpenShift Administration III
1. Advanced Cluster Management
The course teaches administrators how to manage large OpenShift clusters with hundreds or even thousands of nodes. Topics include:
Advanced node management
Infrastructure node roles
Cluster operators and custom resources
2. Automated Scaling Techniques
Learn how to configure and manage:
Horizontal Pod Autoscalers (HPA)
Vertical Pod Autoscalers (VPA)
Cluster Autoscalers These tools allow the platform to intelligently adjust resource consumption based on workload demands.
3. Optimizing Resource Utilization
One of the biggest challenges in scaling is maintaining cost-efficiency. OpenShift Administration III helps you fine-tune quotas, limits, and requests to avoid over-provisioning while ensuring optimal performance.
4. Managing Multitenancy at Scale
The course delves into managing enterprise workloads in a secure and multi-tenant environment. This includes:
Project-level isolation
Role-based access control (RBAC)
Secure networking policies
5. High Availability and Disaster Recovery
Scaling isn't just about growing—it’s about being resilient. Learn how to:
Configure etcd backup and restore
Maintain control plane and application availability
Build disaster recovery strategies
Who Should Take This Course?
This course is ideal for:
OpenShift administrators responsible for large-scale deployments
DevOps engineers managing Kubernetes-based platforms
System architects looking to standardize on Red Hat OpenShift across enterprise environments
Final Thoughts
As enterprises push towards digital transformation, the demand for scalable, resilient, and automated platforms continues to grow. Red Hat OpenShift Administration III equips IT professionals with the skills and strategies to confidently scale deployments, handle complex workloads, and maintain robust system performance across the enterprise.
Whether you're operating in a hybrid cloud, multi-cloud, or on-premises environment, mastering OpenShift scalability ensures your infrastructure can grow with your business.
Ready to take your OpenShift skills to the next level? Contact HawkStack Technologies today to learn about our Red Hat Learning Subscription (RHLS) and instructor-led training options for DO380 – Red Hat OpenShift Administration III. For more details www.hawkstack.com
0 notes
Text
Beyond the Hype: A Practical Guide for Entrepreneurs Building SaaS in 2025
The Software-as-a-Service (SaaS) revolution isn't slowing down. For entrepreneurs, 2025 presents incredible opportunities to build innovative solutions, create predictable revenue streams, and make a real impact. But turning an idea into a thriving SaaS business requires more than just passion – it demands strategic planning, technical insight, and deep market understanding.
This article provides a high-level look at the essential steps you need to navigate the dynamic digital landscape and build a competitive SaaS product. Think of it as the foundational map before you dive into the detailed journey.
Understanding the SaaS Landscape
Before you build, you need to understand the model. SaaS is all about delivering software via the cloud on a subscription basis, freeing users from installation hassles and offering providers recurring value. Key characteristics like cloud infrastructure, multitenancy, scalability, and robust SLAs are non-negotiable for success today.
Idea Validation: Your First Crucial Step
Many promising ideas fail simply because they don't solve a real problem someone will pay for. Our guide emphasizes the power of direct customer conversations and thorough market research to validate your concept and identify genuine pain points before you write a single line of code. Learn what questions to ask and why this step is paramount.
Strategic Planning: Laying the Foundation
Building a robust SaaS requires careful planning. This involves critical decisions around:
Architecture: Single-tenant vs. Multi-tenant – understanding the trade-offs for security, cost, and scalability.
Methodology: Choosing the right development approach (Agile, Iterative, etc.) that fits your team and project complexity.
Roadmapping: Creating a clear plan from concept to launch, defining objectives, workflows, and resource allocation.
Choosing Your Tech Stack for 2025
The technologies you choose form the backbone of your application. We touch on the leading front-end frameworks (React, Angular, Vue.js) and popular back-end languages, frameworks, and databases relevant for modern SaaS development. It's not about following trends, but selecting the optimal stack for your specific needs and your team's expertise.
Developing Your Minimum Viable Product (MVP)
Don't try to build everything at once! A core principle is focusing on a single, primary feature that solves the central problem. Learn the power of the MVP development process: Build, Test, Launch, Feedback, Refine, Relaunch. We also briefly explore technical options for both coders and non-coders to get started efficiently (think boilerplates and no-code platforms).
Implementing Essential Features & Best Practices
Certain features are non-negotiable for any SaaS: secure user authentication, reliable payment and subscription management, and an administrative dashboard. We also highlight crucial best practices for 2025, including data security & compliance, strategic feature prioritization, integration strategy, multi-tenancy considerations, and the potential role of AI.
Scaling for Sustainable Growth
Success brings growth, and growth brings challenges. The guide touches on both technical scaling (microservices, architecture adjustments) and business model scaling (tiered pricing, enterprise plans, retention strategies). Retaining customers is often more cost-effective than acquiring new ones – learn why customer success is key.
Ready to Build?
This summary only scratches the surface of the comprehensive guide. Building a successful SaaS in 2025 is a journey that requires starting small, validating fiercely, building iteratively based on real user feedback, and always planning for the future.
If you're an entrepreneur ready to tackle this exciting challenge, the full article provides the detailed framework you need.
Dive deeper into the essential steps, considerations, and best practices for building your SaaS solution in 2025.
Read the Full Comprehensive Guide on Medium
Let me know your thoughts on this summary and what aspect of SaaS building you find most challenging!
#SaaS #Entrepreneurship #Startup #Tech #BuildInPublic #CloudComputing #BusinessStrategy #Innovation #ProductDevelopment #Guide #2025
0 notes
Text
How Hybrid Data Integration Addresses Complex Data Issues

Avoid one-size-fits-all: Three reasons hybrid data integration implementation is the future
Many organisations struggle to build generative AI due to unreliable data. AI models need correct, consistent data, yet clouds, applications, and systems complicate quality and governance. Global data volumes will expand 250% by 2025, making siloed data integration essential.
Data integration combining data from several sources into a logical, usable structure is essential for reliable AI, efficient operations, and better decision-making. Even advanced AI cannot be useful without it. How can you simplify data integration in hybrid settings?
First, don't use one deployment model.
Hybrid deployment, smart for current data strategies
In recent years, established data integration providers have pressured their clients to convert to single deployment models, often cloud-based, and have even discontinued supporting workloads.
This move might disrupt data integration procedures, which underpin many businesses' data architecture.
Cloud-based solutions can offer cost and scalability advantages. You must control where you do data integration operations.
Hybrid deployment models offer flexibility for security, performance, and FinOps optimisation.
Expand on why hybrid makes sense.
Security and regulatory compliance can be improved with hybrid data integration.
Many single deployment options, on-premises or in the cloud, cannot adapt to changing business and regulatory needs. When using hybrid data integration, businesses may choose where and how to handle data. This flexibility reduces risk and increases compliance in many circumstances. Examine these benefits in detail:
Reduce data exposure and mobility: Hybrid data integration lets businesses handle and transform data on-site, in the cloud, or elsewhere. Integration decreases private data transmission between networks, lowering misuse, leakage, and interception.
Help implement regional and industry regulations: HIPAA and GDPR mandate in-place processing to limit data location or system. Integration of hybrid data permits this.Hybrid integration protects data sovereignty and reduces compliance risk without crossing borders or violating data residency laws.
Improve performance with hybrid data integration.
Performance tradeoffs in single deployment options can affect speed, reliability, and efficiency. A hybrid method solves these issues by processing data on-site, in the cloud, or at the edge. The three key reasons hybrid deployments perform better are:
Hybrid integration reduces latency by processing data closer to the source, whether in the cloud, on-site, or at the edge. Reducing network data transport dramatically reduces latency and speeds up data-driven operations.
Provide dependable and consistent performance: Hybrid deployments can employ dedicated resources as needed, while other deployment types use shared, multitenant resources. This option eliminates performance delays and maintains throughput for high-priority tasks.
Select the right environment for each task based on the use case to ensure top performance. On-premise settings are excellent for sensitive, low-latency processes, whereas cloud environments are best for large-scale analytics or transformation.
FinOps improvement via hybrid data integration
FinOps optimisation requires hybrid data integration to govern data processing. Teams may match workloads to the most cost-effective environment and eliminate unnecessary data transfers using this strategy.
Businesses may better control spending in both on-premises and cloud environments, with major benefits that support data operations and financial goals, including:
Hybrid systems reduce data egress and ingress fees by processing data closer to the source, reducing network data transit.
Choose the best cost-effective cloud and infrastructure environment for each project based on workload, data sensitivity, and performance. This technique uses on-premises resources when possible and the cloud when needed to reduce overprovisioning and cloud costs.
Custom IBM-powered data integration deployment options
Unlike rivals that push tight, single deployment choices, IBM Data Integration delivers flexible solutions that meet hybrid cloud standards. These adaptive deployment methodologies enable new and existing data environments from anywhere. Every solution is tailored to individual operational and security needs, allowing businesses and clients to choose the appropriate software, SaaS, or hybrid deployment approach.
IBM Data Integration goes beyond hybrid with its advanced remote engine, merging managed and self-managed models. You may develop and deploy tasks anywhere on your VPC, data centre, cloud, or region in a fully managed environment. This technique keeps integration near your data to decrease latency, eliminate egress costs, and provide total control and security.
Progress with IBM
Data integration that meets you where your data is is more crucial than ever in multi- and hybrid clouds. IBM is adapting to client data and integration demands. IBM uses a unique migration tool, trained support professionals, and customer success teams to help clients modernise at their own pace while ensuring operational continuity.
#hybriddataintegration#AImodels#hybriddata#SaaS#DataIntegration#IBMDataIntegration#FinOps#News#Technews#Technology#TechnologyNews#Technolgytrends#Govindhtech
0 notes
Text
multi-tenant pbx
Unlocking the Power of Multi-Tenant PBX Solutions for Modern Communication
In today’s rapidly evolving digital landscape, businesses and service providers are constantly seeking scalable, cost-effective, and flexible communication solutions. One of the most transformative technologies in the telecommunications sector is the multi-tenant PBX system. Whether you're a VoIP provider, a telecom startup, or an enterprise with diverse departments or branches, a multi-tenant PBX can revolutionize how you manage voice communication.
At Nextgenswitch.com, we specialize in delivering advanced PBX multi tenant solutions that cater to a variety of business needs, ensuring enhanced control, security, and scalability.
What is a Multi-Tenant PBX?
A multi-tenant PBX (Private Branch Exchange) is a telephone system architecture designed to serve multiple tenants or organizations from a single instance of the software. Unlike traditional PBX systems which are dedicated to a single business, a multitenant PBX allows multiple users (tenants) to operate within the same system while maintaining separate, isolated configurations and data.
In simpler terms, think of a multi-tenant PBX as an apartment building. Each tenant (business or department) has their own secure space, but all share the same foundational infrastructure, such as the building's utilities (server resources, bandwidth, etc.).
Key Features of a Multi-Tenant PBX
A robust multi tenant PBX platform like the ones offered by Nextgenswitch.com comes packed with features that support the dynamic communication needs of service providers and enterprises:
Tenant Isolation: Each tenant enjoys complete separation in terms of call logs, users, extensions, and configurations.
Centralized Management: A single interface to manage multiple tenants, making it easier for providers to oversee operations.
Custom Branding: Each tenant can customize their portal with logos, themes, and other brand-specific settings.
Auto-Provisioning: Quickly deploy extensions, phones, and users with automated provisioning tools.
Billing Integration: Seamless integration with billing platforms to track usage and automate invoicing per tenant.
Scalability: Add new tenants, users, and features with ease as your client base grows.
Who Can Benefit from a Multi-Tenant PBX?
A PBX multi tenant architecture is ideal for:
VoIP Service Providers: Manage multiple client accounts efficiently from one platform.
Large Enterprises: Manage different departments, branches, or locations while maintaining centralized control.
Co-working Spaces: Provide each company with its own communication setup without deploying multiple PBX systems.
Managed Service Providers (MSPs): Offer hosted telephony solutions to various clients under one umbrella.
Advantages of Multi-Tenant PBX Over Traditional PBX Systems
The shift from traditional on-premise PBX to cloud-based multitenant PBX is driven by several compelling advantages:
1. Cost Efficiency
Since multiple tenants share the same infrastructure, the cost of deployment and maintenance drops significantly. Service providers can offer competitive pricing to their clients while maintaining profitability.
2. Simplified Management
Centralized control makes it easy to configure, monitor, and troubleshoot issues for different tenants without needing to access separate systems.
3. Enhanced Security
Each tenant operates in a secure, isolated environment, ensuring that no data or functionality crosses over between accounts.
4. Flexibility and Customization
Tenants can customize their own user experience, IVR menus, call flows, and extensions without affecting other tenants.
5. Scalability
As your client base grows, you can add new tenants without deploying additional hardware or software—something not possible with traditional PBX systems.
Why Choose Nextgenswitch.com for Your Multi Tenant PBX Needs?
At Nextgenswitch.com, we go beyond just providing a standard multi-tenant PBX. Our platform is designed with service providers and growing businesses in mind, offering:
Reliable Uptime: Our infrastructure is built for resilience, ensuring your communication services remain uninterrupted.
Robust Security: Multi-layered security protocols, including encryption and tenant-level access control.
Dedicated Support: Our expert team is available to assist you with onboarding, customization, and ongoing technical support.
Custom Development: Need something specific? We offer custom feature development tailored to your business model.
We understand that each client is unique, and our pbx multi tenant solutions reflect that. Whether you're looking to host multiple clients or streamline communication across your enterprise, we provide the tools and support to help you succeed.
The Future of Communication is Multi-Tenant
As businesses grow and diversify, the demand for scalable and efficient communication systems grows with them. The multi-tenant PBX model is not just a trend—it’s the future of voice communication.
With cloud computing, remote work, and mobile collaboration becoming the new norm, businesses need solutions that can adapt quickly. A multitenant PBX from Nextgenswitch.com ensures you’re not just keeping up with the times but staying ahead of the curve.
Conclusion
A multi tenant PBX is the smart choice for businesses and service providers seeking a cost-effective, scalable, and secure communication solution. With centralized control, tenant isolation, and powerful customization tools, it's the ideal platform for managing diverse client or department needs.
0 notes
Text
Postal SMTP install and setup on a virtual server

Postal is a full suite for mail delivery with robust features suited for running a bulk email sending SMTP server. Postal is open source and free. Some of its features are: - UI for maintaining different aspects of your mail server - Runs on containers, hence allows for up and down horizontal scaling - Email security features such as spam and antivirus - IP pools to help you maintain a good sending reputation by sending via multiple IPs - Multitenant support - multiple users, domains and organizations - Monitoring queue for outgoing and incoming mail - Built in DNS setup and monitoring to ensure mail domains are set up correctly List of full postal features
Possible cloud providers to use with Postal
You can use Postal with any VPS or Linux server providers of your choice, however here are some we recommend: Vultr Cloud (Get free $300 credit) - In case your SMTP port is blocked, you can contact Vultr support, and they will open it for you after providing a personal identification method. DigitalOcean (Get free $200 Credit) - You will also need to contact DigitalOcean support for SMTP port to be open for you. Hetzner ( Get free €20) - SMTP port is open for most accounts, if yours isn't, contact the Hetzner support and request for it to be unblocked for you Contabo (Cheapest VPS) - Contabo doesn't block SMTP ports. In case you are unable to send mail, contact support. Interserver
Postal Minimum requirements
- At least 4GB of RAM - At least 2 CPU cores - At least 25GB disk space - You can use docker or any Container runtime app. Ensure Docker Compose plugin is also installed. - Port 25 outbound should be open (A lot of cloud providers block it)
Postal Installation
Should be installed on its own server, meaning, no other items should be running on the server. A fresh server install is recommended. Broad overview of the installation procedure - Install Docker and the other needed apps - Configuration of postal and add DNS entries - Start Postal - Make your first user - Login to the web interface to create virtual mail servers Step by step install Postal Step 1 : Install docker and additional system utilities In this guide, I will use Debian 12 . Feel free to follow along with Ubuntu. The OS to be used does not matter, provided you can install docker or any docker alternative for running container images. Commands for installing Docker on Debian 12 (Read the comments to understand what each command does): #Uninstall any previously installed conflicting software . If you have none of them installed it's ok for pkg in docker.io docker-doc docker-compose podman-docker containerd runc; do sudo apt-get remove $pkg; done #Add Docker's official GPG key: sudo apt-get update sudo apt-get install ca-certificates curl -y sudo install -m 0755 -d /etc/apt/keyrings sudo curl -fsSL https://download.docker.com/linux/debian/gpg -o /etc/apt/keyrings/docker.asc sudo chmod a+r /etc/apt/keyrings/docker.asc #Add the Docker repository to Apt sources: echo "deb https://download.docker.com/linux/debian $(. /etc/os-release && echo "$VERSION_CODENAME") stable" | sudo tee /etc/apt/sources.list.d/docker.list > /dev/null sudo apt-get update #Install the docker packages sudo apt-get install docker-ce docker-ce-cli containerd.io docker-buildx-plugin docker-compose-plugin -y #You can verify that the installation is successful by running the hello-world image sudo docker run hello-world Add the current user to the docker group so that you don't have to use sudo when not logged in as the root user. ##Add your current user to the docker group. sudo usermod -aG docker $USER #Reboot the server sudo reboot Finally test if you can run docker without sudo ##Test that you don't need sudo to run docker docker run hello-world Step 2 : Get the postal installation helper repository The Postal installation helper has all the docker compose files and the important bootstrapping tools needed for generating configuration files. Install various needed tools #Install additional system utlities apt install git vim htop curl jq -y Then clone the helper repository. sudo git clone https://github.com/postalserver/install /opt/postal/install sudo ln -s /opt/postal/install/bin/postal /usr/bin/postal Step 3 : Install MariaDB database Here is a sample MariaDB container from the postal docs. But you can use the docker compose file below it. docker run -d --name postal-mariadb -p 127.0.0.1:3306:3306 --restart always -e MARIADB_DATABASE=postal -e MARIADB_ROOT_PASSWORD=postal mariadb Here is a tested mariadb compose file to run a secure MariaDB 11.4 container. You can change the version to any image you prefer. vi docker-compose.yaml services: mariadb: image: mariadb:11.4 container_name: postal-mariadb restart: unless-stopped environment: MYSQL_ROOT_PASSWORD: ${DB_ROOT_PASSWORD} volumes: - mariadb_data:/var/lib/mysql network_mode: host # Set to use the host's network mode security_opt: - no-new-privileges:true read_only: true tmpfs: - /tmp - /run/mysqld healthcheck: test: interval: 30s timeout: 10s retries: 5 volumes: mariadb_data: You need to create an environment file with the Database password . To simplify things, postal will use the root user to access the Database.env file example is below. Place it in the same location as the compose file. DB_ROOT_PASSWORD=ExtremelyStrongPasswordHere Run docker compose up -d and ensure the database is healthy. Step 4 : Bootstrap the domain for your Postal web interface & Database configs First add DNS records for your postal domain. The most significant records at this stage are the A and/or AAAA records. This is the domain where you'll be accessing the postal UI and for simplicity will also act as the SMTP server. If using Cloudflare, turn off the Cloudflare proxy. sudo postal bootstrap postal.yourdomain.com The above will generate three files in /opt/postal/config. - postal.yml is the main postal configuration file - signing.key is the private key used to sign various things in Postal - Caddyfile is the configuration for the Caddy web server Open /opt/postal/config/postal.yml and add all the values for DB and other settings. Go through the file and see what else you can edit. At the very least, enter the correct DB details for postal message_db and main_db. Step 5 : Initialize the Postal database and create an admin user postal initialize postal make-user If everything goes well with postal initialize, then celebrate. This is the part where you may face some issues due to DB connection failures. Step 6 : Start running postal # run postal postal start #checking postal status postal status # If you make any config changes in future you can restart postal like so # postal restart Step 7 : Proxy for web traffic To handle web traffic and ensure TLS termination you can use any proxy server of your choice, nginx, traefik , caddy etc. Based on Postal documentation, the following will start up caddy. You can use the compose file below it. Caddy is easy to use and does a lot for you out of the box. Ensure your A records are pointing to your server before running Caddy. docker run -d --name postal-caddy --restart always --network host -v /opt/postal/config/Caddyfile:/etc/caddy/Caddyfile -v /opt/postal/caddy-data:/data caddy Here is a compose file you can use instead of the above docker run command. Name it something like caddy-compose.yaml services: postal-caddy: image: caddy container_name: postal-caddy restart: always network_mode: host volumes: - /opt/postal/config/Caddyfile:/etc/caddy/Caddyfile - /opt/postal/caddy-data:/data You can run it by doing docker compose -f caddy-compose.yaml up -d Now it's time to go to the browser and login. Use the domain, bootstrapped earlier. Add an organization, create server and add a domain. This is done via the UI and it is very straight forward. For every domain you add, ensure to add the DNS records you are provided.
Enable IP Pools
One of the reasons why Postal is great for bulk email sending, is because it allows for sending emails using multiple IPs in a round-robin fashion. Pre-requisites - Ensure the IPs you want to add as part of the pool, are already added to your VPS/server. Every cloud provider has a documentation for adding additional IPs, make sure you follow their guide to add all the IPs to the network. When you run ip a , you should see the IP addresses you intend to use in the pool. Enabling IP pools in the Postal config First step is to enable IP pools settings in the postal configuration, then restart postal. Add the following configuration in the postal.yaml (/opt/postal/config/postal.yml) file to enable pools. If the section postal: , exists, then just add use_ip_pools: true under it. postal: use_ip_pools: true Then restart postal. postal stop && postal start The next step is to go to the postal interface on your browser. A new IP pools link is now visible at the top right corner of your postal dashboard. You can use the IP pools link to add a pool, then assign IP addresses in the pools. A pool could be something like marketing, transactions, billing, general etc. Once the pools are created and IPs assigned to them, you can attach a pool to an organization. This organization can now use the provided IP addresses to send emails. Open up an organization and assign a pool to it. Organizations → choose IPs → choose pools . You can then assign the IP pool to servers from the server's Settings page. You can also use the IP pool to configure IP rules for the organization or server. At any point, if you are lost, look at the Postal documentation. Read the full article
0 notes