#Neodymium Magnets are Made
Explore tagged Tumblr posts
Visit Tumblr Blog
Explore Tumblr blogs with no restrictions, modern design and the best experience.
Last Seen Tumblr Blogs


Fun Fact
Women make up for the other 50% of Tumblr’s audience.
Text
Neodymiun Button Magnets
Neodymiun Button Magnets A button magnet is a type of magnet that is shaped like a small, flat button. Button magnets are typically made of materials such as neodymium, samarium-cobalt, or ferrite, and they can be found in a wide range of sizes and shapes. They are often used in a variety of applications, including motors, generators, sensors, and speakers, because of their strong magnetic…
#Button Magnets#Embedded Permanent Magnets#hybrid magnets#Magnetic alloy#magnetic field#magnetic fields#magnetic properties#motor magnets#Nd-Fe-B#Nd-Fe-B magnets#Nd2Fe14B#NdFeB#NdFeB bonded magnet#Neodymium iron boron#Neodymium Magnet#Neodymium Magnets are Made#Neodymiun Button Magnets#Permanent Magnets#REE Magnets#samarium cobalt#Sintered Neodymium Magnet
0 notes
Text
Hey guys! Uh... Can anyone tell me what kind of moth is this?


It's just landed on my pen and squeaking something!
#mr puzzles#mr. puzzles#smg4 mr puzzles#puzzlevison#smg4 puzzlevision#puzzlevision#puzzlevision arc#myart#he's made out of epoxy polymer clay and smol neodymium magnets#handmade#my shit
53 notes
·
View notes
Text
N54 Neodymium Magnets Composition and Uses
N54 Neodymium Magnets Composition and Uses In the world of magnets, neodymium magnets have gained significant attention due to their exceptional magnetic properties. Among the neodymium magnet grades, the N54 neodymium magnet stands out as a powerful force to be reckoned with. In this article, we will demystify N54 neodymium magnets by exploring their composition and delving into their diverse…
#block magnets#Custom Made Magnets#Customer Contribution#Customer Design Magnets#ferrite permanent magnets#Larger neodymium magnets#licensed neodymium magnets#Magnet Customer#magnet segments#N54#Neodymium magnets#order magnets
0 notes
Note
May I humnbly request a FerroFluid Catto. Perhaps the compound that makes it in Cattomorphic form Or iron but all inky and shaped like mercury or hell a bunch of mini irons suspended in fluid Just a suggestion!
Hmmmm :3c


Ferrofluids are magnetic fluids made of tiny metal particles suspended in a liquid such as oil or water. This guy is a mix of Magnetite (a magnetic Iron oxide) and Water, which may not be the best liquid to use in a ferrofluid but it's the one that has a formula I can put on their belly so lol. They'd probably be on better terms with Neodymium than regular Iron is
120 notes
·
View notes
Text
By now, it has become an agonizing cliche that any amount of work on a modern car will terminate in you losing at least one 10-millimetre socket. "Oh no, my 10mm is missing," you'll groan to your friends, who immediately respond with haw-haw looks and jokes. Being the butt of such a horrible stereotype is far worse than losing your socket, which is itself a pretty bad day at work.
There are many techniques that don't work. I myself often write with a Sharpie on the socket "9.5mm," in the hope that it will confuse the curse enough that they will not be lost. I buy ones in weird colours. I use a giant neodymium magnet on the fender so they can't roll away and into the mouth of a nearby blower motor. Nothing works.
Official Chinese government numbers indicate that nearly 60% of the cars their metal recyclers crush, by weight, are 10-millimetre sockets. Your entire washer and dryer set is probably made out of the stuff that fell out of my pockets last year when I was trying to yank an evap solenoid.
Of course, there's a real solution too, and it just happens to be the same kind of solution that capitalism always presents. Buy a whole shitload of 10mms and walk into the junkyard jingling. You can lose a ton of them and not even care, as long as you have one left. This is an appealing vision, to be certain. Everyone wants to Be Prepared... but what happens when the curse moves on to your 12mm, something that is needed nearly as often?
Our scientists, with the help of a psychic that we found all by herself in a completely abandoned shopping mall, have determined an even better fix. We arm one volunteer with a chain-mail coat made entirely of ten-millimetre sockets, and walk their ass into the junkyard. They don't do any wrenching, which would cause them to lose their bounty. All they do is walk around, and when they see someone in crisis, break a socket off and hand it to the stricken victim.
There is a downside: any volunteer who does this is struck with so much positive karma that they start getting a little loopy, and create their own death cult right in the middle of the yard. To keep this from happening again, we have to regularly rotate out the volunteers, and put duct tape over their mouths so they can't start spouting the Good Word until a team of engine-pulling weirdos begin to kill in their name. I admit that the system is a little bit unorthodox, but I've never gotten parts pulled faster.
250 notes
·
View notes
Text
cosplay update
So, as some folks may remember, after Rose City Comic Con, in an effort to avoid yet another pre-con crafting crunch, I made a list of something like 300 cosplay tasks I wanted/needed to complete, divided it by number of days until Emerald City Comic Con, and determined I needed to do 3 tasks per day to get it all done.
It has been going very well and I have been very pleased with my progress! Accomplished so far:
Remade the bottom halves of the Captain Marvel gauntlets
Created and installed a new attachment system for the CM gauntlets
Repaired the CM hip plates
Touched up the CM paint where it had worn off
Remade the CM boots (twice; attempted to reuse parts of the original boots failed)
Created and installed a new CM boot attachment system (twice; first attempt was unsatisfactory)
Resized the leg armour for the WoW armour
Repaired the Ghostbusters proton pack
Made new Ghostbusters boot covers (all done but the painting)
Made new Green Lantern boot covers (all done but the painting)
Made a pattern for an extra WoW armour piece x2
Cut out the components necessary for an extra WoW armour piece
Dug the failed attachment system out of all ~45 Armoured Star-Lord armour pieces
Tested the new (magnet based) attachment system for Armoured Star-Lord
Installed multiple magnets in ~45 armour pieces
Installed the corresponding magnets into the Armoured Star-Lord body suit for ~11 armour pieces
That's a lot of work accomplished. I'm very pleased.
Still to do before ECCC:
Paint the Ghostbusters boot covers
Paint the Green Lantern boot covers (and do a minor repair)
Form the worbla for the WoW armour piece x2
Prime the WoW armour piece x2
Paint the WoW armour piece x2
Possibly buy and alter a new jumpsuit for Ghostbusters, I'm still pondering because of cost (the old one I altered slightly too small and it makes it a bit uncomfortable to wear all day)
Install the corresponding magnets into the Armoured Star-Lord body suit for ~34 more armour pieces.
I am confident I can get everything done... except for those magnet installations.
It's not that there isn't enough time. Technically, there is. But installation of two armour pieces takes me 1.5 hours on average. I work full time, so that's a lot of time out of my evening.
And you have to understand, installing these goddamned magnets is a non-trivial task. The method--which works great and is giving me exactly the results that I want--involves me putting on a fully body spandex body suit, carefully marking the magnet locations based on how I want the armour positioned, taking off the body suit, transferring the marks from the outside to the inside, sewing a small pocket made out of spandex onto more spandex (spandex is not easy to work with and I am not skilled with a sewing machine), shoving a neodymium magnet into that pocket (while managing the already installed magnets, which are all sticking to each other and the machine), sewing the pocket shut, putting on the bodysuit, and checking that the magnet is located correctly. So far, out of 11 armour pieces (26 magnets), I have had to correct the placement of 4 magnets (for three different pieces). That's a pretty good ratio, but every magnet that needs to be fixed adds anywhere from 30 minutes to an hour to the process. And I can't just skip ahead and fix them later, because the location of each armour piece is relative to the locations of all the pieces that came before it. They must be installed in order.
In the 11 pieces I've done so far, I have taken one break because I just couldn't face more magnets. I've also broken one sewing machine needle because I got so frustrated. (I'm damned lucky I didn't tear the suit.)
Like I said, I am getting the exact results I want. The method is good. But I have come to the conclusion that I just can't work on magnet installation day after day and not have some sort of breakdown. And I would have to, to make it--there are 46 days to con, and ~34 armour pieces to install (plus other tasks).
So I have decided I will finish everything else, and the magnets will be limited to probably 2 days a week of work.
9 notes
·
View notes
Note
So have you made use of that neodymium horseshoe magnet I gave you to knock Cyn tf out?
yes :3
so peaceful..
it makes me also feel a little drowsy though.
10 notes
·
View notes
Text
Excerpt from this story from Heatmap News:
A top aide to incoming President Donald Trump is claiming the president-elect wants the U.S. to acquire Greenland to acquire more rare minerals.
“This is about critical minerals. This is about natural resources,” Trump’s soon-to-be national security advisor Michael Waltz told Fox News host Jesse Watters Thursday night, adding: “You can call it Monroe Doctrine 2.0, but it’s all part of the America First agenda.”
Greenland is rich in “rare earths,” a class of unique and uncommon hardrock resources used for advanced weaponry, electronics, energy and transportation technologies, including electric vehicles. It is home to the Kvanefjeld deposit, believed to be one of the richest rare earth deposits in the world. Kvanefjeld is also stuffed with uranium, crucial for anything and everything nuclear.
Experts in security policy have advocated for years for Western nations to band together to ensure that China, which controls the vast majority of the world’s rare earth minerals, does not obtain a foothold in Greenland. U.S. and Danish officials have reportedly urged the developer of the island’s Tanbreez deposit — rich in the rare earths-containing mineral eudialyte — not to sell its project to any company linked to China. Eudialyte also contains high amounts of neodymium, an exceedingly rare metal used in magnets coveted by the tech sector.
If the U.S. somehow took control of Greenland, it could possibly seize these resources from Denmark, a NATO ally, and the Greenlandic home-rule government. So too could it lead to Greenlanders losing control of their homeland. The country’s minerals have been a major source of domestic debate, as politicians critical of mining have won recent elections and regulators have since fought with mining companies over their plans.
Waltz didn’t go into that much detail on Fox. But he made it clear how the incoming administration sees the situation around control of the island.
“Denmark can be a great ally, but you can’t treat Greenland, which they have operational control over, as some kind of backwater,” Waltz told Waters. “The people of Greenland, all 56,000 of them, are excited about the prospect of making the Western Hemisphere great again.”
8 notes
·
View notes
Text
Poles Number of Motor Rotor and Stator Magnet
Poles Number of Motor Rotor and Stator Magnet What is the relationship between the number of motor stator poles and rotor poles? Many friends may not know, in fact, it is not difficult to understand, there is a relevant foundation of friends will understand at a glance, the following courage magnet manufacturers to take you to analyze it! A motor is divided into a stator and a rotor, which…
#bonding neodymium iron boron#Embedded Permanent Magnets#Ferrite magnet#high-performance permanent magnet motors#interior permanent magnet motors#IPM motors#Magnetic alloy#magnetic field#magnetic fields#magnetic flux density#magnetic forces#magnetic parameters#magnetic properties#Magnetic torque#magnetization direction#motor magnets#Nd-Fe-B#Nd-Fe-B magnets#Nd2Fe14B#NdFeB#NdFeB bonded magnet#NdFeB Grinding Process#Neodymium iron boron#Neodymium Magnet#Neodymium Magnets are Made#Neodymium Motor Magnet#permanent magnet motors#Permanent Magnets#PM Motors#REE Magnets
0 notes
Text
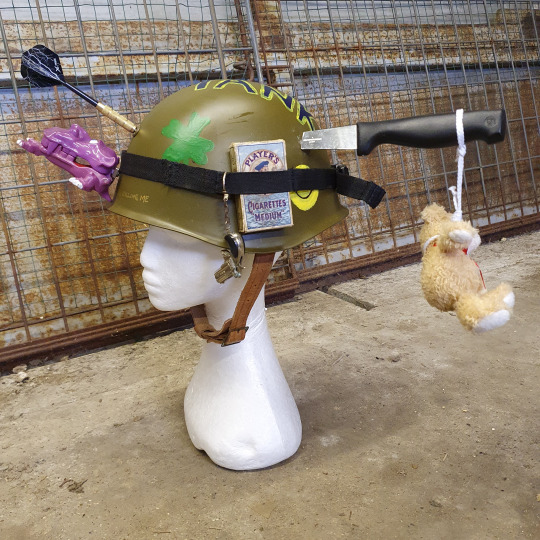
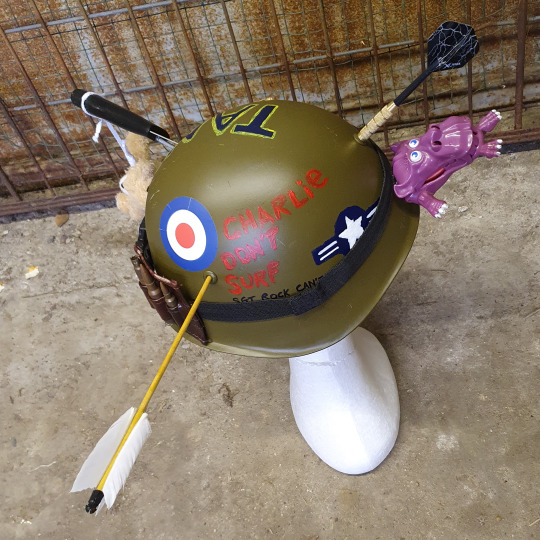
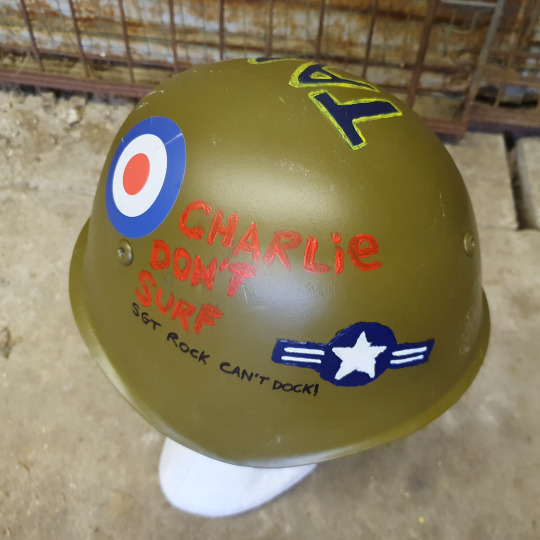
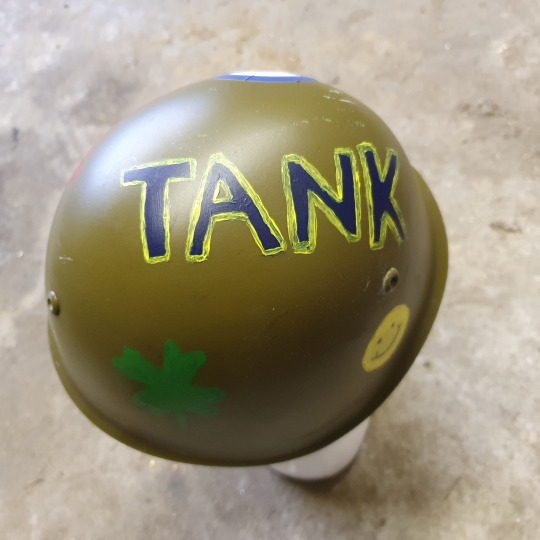
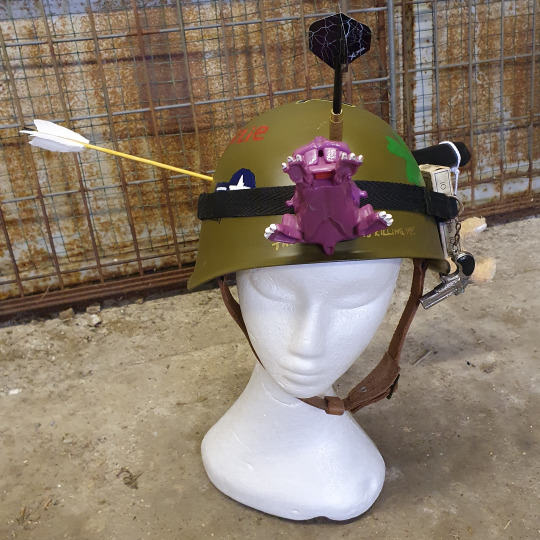

As any Tank Girl fans out there will know, our gal can often be seen wearing customised army helmets. They’re a super fun accessory, so I decided a few months back to have a go at making one. I started off by picking out a couple of ones I liked in the comics (see above for an example) and worked out a design. There were a lot of sticky out bits, so I had a feeling putting it together was going to be easier said than done, but I’ve never let that stop me before and didn’t this time. I could have taken the easy route and bought a plastic helmet, which would have been soooo simple to attach things to, but me being me, I decided to go with something authentic, namely (and I quote) a ‘genuine vintage Bulgarian army M72 steel combat helmet’ which was going cheap on good ol’ ebay 👍👍. I was totally expecting to have to drill holes in this for some of the attachments, but as luck would have it, there were some readymade ones 😊. These are the other bits I used…
1 x plastic creature head – I was looking for something which resembled the head on the attached reference picture and stumbled on something perfect while rummaging through a box of random toys in a thrift store.
1 x neodymium magnet – Used to fix the creature head onto the front of the helmet.
1 x dart – To stick in one of the holes. My only complaint here was I had to buy a pack of 3 and don’t know what to do with the other 2. Maybe I can use them in some future cosplay project.
1 x wooden rod + craft feathers + 1 x plastic wall plug – Used to make an arrow to poke in another of the holes. I had to make my own arrow, as none of the ones I saw for sale would have fit.
1 x kitchen fork – Another thrift store find which looked like it would be a good stand-in for the knife in the picture if I chopped the top off.
Some straps and buckles from an old bag – Stitched together to make a carrying strap for the helmet (which I needed to hang things off).
3 x old bullets for decoration
Some bits of leather to make a bandolier type thing to hold the bullets.
1 x old cigarette box for decoration.
1 x gun keyring – This was an impulse thrift store buy, which wasn’t in the original design, but I thought would be another good decoration (there were actually so many impulse buys like this I couldn’t use them all and ended up making a Tank Girl baseball cap for the overflow – more about that another time).
One of my old teddy bears (Flapjack) to hang from the knife (really a kitchen fork) handle.
1 x old white shoelace to make a hangman’s noose for my teddy (poor Flapjack 🎻).
Acrylic paint and brushes - I’m sure y’all can guess what these were for.
1x target sticker – I bought this in a craft store, because it looked just like the target on the helmet in the picture and I wanted to save myself a tricky painting job.
It took me a while to get all of that together (as you can imagine), but eventually I was ready to go. I eased myself in gently by sticking on the target sticker. Then I did the painting bits. I seem to be getting better at this, as I managed to get through it with no major screw-ups😊. I left the paint to dry for a day and sprayed on some fixative to protect it. It seems to be doing the job, though I have no clue how long it will last.
I made my arrow from the bits mentioned above and sawed off the top of the kitchen fork to make my stand-in knife. Then I worked out how I was going to attach everything. As I said, I used a magnet for the creature head. I stuck the arrow into one of the holes and the dart into another with a plastic bung on the other side to hold it in place. For the knife, I pushed a long screw through the last hole and screwed it into the top of the handle. You can see the screw from some angles, but it was the best I could come up with and it does the job.
I hung Flapjack from the knife handle, clipped on the carry strap with its various decorations and that’s pretty much it. It’s not a bad take on the Tank Girl originals if I do say so myself, though it takes some getting used to. I can’t tell you how many times I’ve bashed one of the sticky out bits on something when I’ve been walking around. Also it’s heavier at the back, so it has a tendency to slip off. As always, this isn’t a proper tutorial, but maybe it will be helpful if anyone out there is thinking of making their own Tank Girl helmet. Have fun if you do. I’m on Ko-fi if anyone is feeling generous and wants to support me in my cosplay adventures… ༻ko-fi.com/christabelq༺ It’s always super-appreciated. Bye for now. ❤️🧡💛💚💙💜
#tankgirl#tank girl#tankgirlcomic#cosplaygirl#cosplayers#ukcosplayer#cosplaygirls#comicbooks#follow for follow#follow back#followback#followforfollow#like for like#likeforlike#costume design#prop design#cosplay tutorial#rocket launcher#alan martin#jamie hewlett#helmet
80 notes
·
View notes
Text

Environmentally friendly method uses selective synthesized sponges to purify rare-earth elements
Rare-earth elements are everywhere in modern life, found in everything from the smart device you're reading this on to the LED lightbulbs overhead and neodymium magnets in electric vehicles and wind turbines. However, purifying these critical metals from ores with complex mixtures is a nasty business involving strong acids and hazardous solvents, and is primarily conducted in China. Over the past three years, a team of researchers from Sandia National Laboratories has been pioneering an environmentally friendly method to separate these rare-earth elements from watery mixtures. Initially, the team made and modified tinker-toy-like molecules called metal-organic frameworks or MOFs to test their ability to adsorb these vital metals. They then used computer simulations and X-ray-based experiments to investigate how the rare-earth elements interact with the synthesized "sponges."
Read more.
#Materials Science#Science#Rare earth elements#Materials processing#Metal organic frameworks#MOFs#Computational materials science#Materials characterization#X Rays
19 notes
·
View notes
Text


Finished my Dragonslicer from Gothic 2 for the cosplay. Made of plywood plainted with simple sprays, the decors i made by engraving the soft external wood with a nail-like tool and then I was stabbing out dotted areas as to create rea shading. Managed to acheive the color of magic ore metal by combining silver and blue metallic paints in layers, then used black marker for dark shadings. Managed to encase a neodymium magnet into the secondary handle so I can stick the blade to my cosplay steel armor like in the game without a scab.
5 notes
·
View notes
Text
Custom Nd-Fe-B Magnets for Your Magnetic Solutions Needs
Custom Nd-Fe-B Magnets for Your Magnetic Solutions Needs In the realm of magnetism, Nd-Fe-B magnets stand as a powerful and versatile solution for various applications. These magnets, composed of neodymium, iron, and boron, possess exceptional magnetic properties that make them highly sought after in industries such as electronics, automotive, aerospace, and renewable energy. However, sometimes…
#Adhesive Magnet#Alnico#block magnets#Custom Made Magnets#Customer Contribution#Customer Design Magnets#disc magnet#ferrite magnets#ferrite permanent magnets#Guitar Magnets#guitar pickup magnet#Guitar Pickups#HSMAG Customer#Magnet Customer#magnet segments#Magnetic chuck#Neodymium magnets#order magnets#pickup magnet
0 notes
Text
What You Need to Know About Arc Segmentitle Magnets, Radial Axial Circle Magnets, Isotropic and Anisotropic Magnets
Magnets serve an important part in a variety of sectors today, including electric motors, generators, sensors, and magnetic assembly. Among the several varieties available, the Arc Segmentitle Magnet, Radial Axial Circle Magnet, and the distinction between Isotropic and Anisotropic Magnets stand out for their performance, shape, and magnetic qualities. But what do these phrases signify, and where do these magnets usually appear?
What is an Arc Segment Magnet?
An Arc Segment Magnet—an arc or segment magnet—is commonly employed in circular magnetic assemblies, notably brushless DC motors and permanent magnet motors. These magnets are shaped like a circle slice and are intended to be used around a rotor or stator.
Important characteristics:
Accurate curvature for a snug radial fit
Available in a variety of materials, such as ferrite, samarium cobalt, or neodymium (NdFeB).
Perfect for spinning systems with high speeds
High concentration of magnetic flux along the arc
Common Applications:
Drones and e-bikes with electric motors
Windmills
Couplings of magnets
Industrial robotics and servo motors
What Is a Radial Axial Circle Magnet?
A magnet with a circular or ring form with a magnetic direction that is either axial or radial is called a radial-axial circle magnet. The distribution of the magnetic field is determined by these orientations. In precision equipment, a radial-axial circle magnet is frequently specially made to meet certain torque or sensing requirements. Their specialized magnetic orientation and round shape guarantee little energy loss and excellent performance.
What Makes an Isotropic Magnet Different from an Anisotropic One?
Although materials like ferrite, neodymium, or rare earth compounds may be used to create both isotropic and anisotropic magnets, there are major differences in their production procedures and performance.
Conclusion
Knowing the differences between arc segmental magnets, radial axial circle magnets, and anisotropic / Isotropic Anisotropic Magnet magnets is essential for improving both your design and performance, whether you're an engineer creating the next high-efficiency motor or a manufacturer locating dependable magnetic components. Every magnet design and kind offers a unique set of benefits. Selecting the best one requires finding the ideal balance between cost-effectiveness, application fit, and magnetic strength.
Follow our Facebook and Twitter for more information about our product.
2 notes
·
View notes
Text

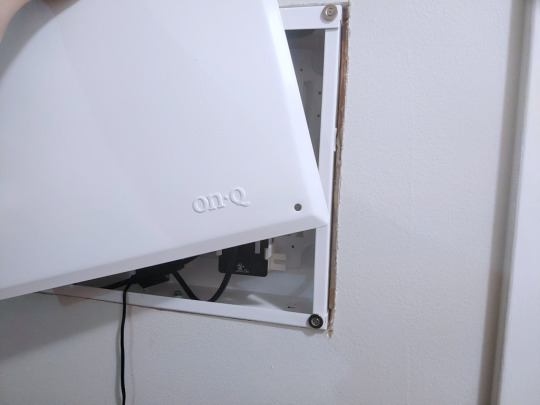
the provided screws wouldn't fit in their holes because the enclosure was assembled stupidly so I bought smaller screws and made the cover attach with neodymium magnets.
I gotta stick a handle on somewhere though cause the magnets are strong enough that prying the cover off with my fingernails takes some effort.
#ignore the cable I'm hiding it tomorrow#alao i woild not recomend this enclosure unless you can buy one 50% off via amazon returns
19 notes
·
View notes
Text
Metatron really thought he made them weaker by splitting them.
They're two neodymium magnets. Part them and pray for the power you need to have to KEEP them parted.
Inspired by
13 notes
·
View notes