#PHP and MySQLi CRUD Application
Explore tagged Tumblr posts
Visit Tumblr Blog
Explore Tumblr blogs with no restrictions, modern design and the best experience.
Last Seen Tumblr Blogs


Fun Fact
12.7% of mobile users access Tumblr.
Text
youtube
#PHP Object-Oriented Programming#MySQLi CRUD Tutorial#PHP OOP CRUD#PHP CRUD Tutorial in Hindi#PHP and MySQLi Tutorial#Object-Oriented PHP CRUD Application#MySQLi CRUD Application in Hindi#PHP and MySQLi CRUD Application#Youtube
0 notes
Text
Complete PHP Tutorial: Learn PHP from Scratch in 7 Days
Are you looking to learn backend web development and build dynamic websites with real functionality? You’re in the right place. Welcome to the Complete PHP Tutorial: Learn PHP from Scratch in 7 Days — a practical, beginner-friendly guide designed to help you master the fundamentals of PHP in just one week.
PHP, or Hypertext Preprocessor, is one of the most widely used server-side scripting languages on the web. It powers everything from small blogs to large-scale websites like Facebook and WordPress. Learning PHP opens up the door to back-end development, content management systems, and full-stack programming. Whether you're a complete beginner or have some experience with HTML/CSS, this tutorial is structured to help you learn PHP step by step with real-world examples.
Why Learn PHP?
Before diving into the tutorial, let’s understand why PHP is still relevant and worth learning in 2025:
Beginner-friendly: Easy syntax and wide support.
Open-source: Free to use with strong community support.
Cross-platform: Runs on Windows, macOS, Linux, and integrates with most servers.
Database integration: Works seamlessly with MySQL and other databases.
In-demand: Still heavily used in CMS platforms like WordPress, Joomla, and Drupal.
If you want to build contact forms, login systems, e-commerce platforms, or data-driven applications, PHP is a great place to start.
Day-by-Day Breakdown: Learn PHP from Scratch in 7 Days
Day 1: Introduction to PHP & Setup
Start by setting up your environment:
Install XAMPP or MAMP to create a local server.
Create your first .php file.
Learn how to embed PHP inside HTML.
Example:
<?php echo "Hello, PHP!"; ?>
What you’ll learn:
How PHP works on the server
Running PHP in your browser
Basic syntax and echo statement
Day 2: Variables, Data Types & Constants
Dive into PHP variables and data types:
$name = "John"; $age = 25; $is_student = true;
Key concepts:
Variable declaration and naming
Data types: String, Integer, Float, Boolean, Array
Constants and predefined variables ($_SERVER, $_GET, $_POST)
Day 3: Operators, Conditions & Control Flow
Learn how to make decisions in PHP:
if ($age > 18) { echo "You are an adult."; } else { echo "You are underage."; }
Topics covered:
Arithmetic, comparison, and logical operators
If-else, switch-case
Nesting conditions and best practices
Day 4: Loops and Arrays
Understand loops to perform repetitive tasks:
$fruits = ["Apple", "Banana", "Cherry"]; foreach ($fruits as $fruit) { echo $fruit. "<br>"; }
Learn about:
for, while, do...while, and foreach loops
Arrays: indexed, associative, and multidimensional
Array functions (count(), array_push(), etc.)
Day 5: Functions & Form Handling
Start writing reusable code and learn how to process user input from forms:
function greet($name) { return "Hello, $name!"; }
Skills you gain:
Defining and calling functions
Passing parameters and returning values
Handling HTML form data with $_POST and $_GET
Form validation and basic security tips
Day 6: Working with Files & Sessions
Build applications that remember users and work with files:
session_start(); $_SESSION["username"] = "admin";
Topics included:
File handling (fopen, fwrite, fread, etc.)
Reading and writing text files
Sessions and cookies
Login system basics using session variables
Day 7: PHP & MySQL – Database Connectivity
On the final day, you’ll connect PHP to a database and build a mini CRUD app:
$conn = new mysqli("localhost", "root", "", "mydatabase");
Learn how to:
Connect PHP to a MySQL database
Create and execute SQL queries
Insert, read, update, and delete (CRUD operations)
Display database data in HTML tables
Bonus Tips for Mastering PHP
Practice by building mini-projects (login form, guest book, blog)
Read official documentation at php.net
Use tools like phpMyAdmin to manage databases visually
Try MVC frameworks like Laravel or CodeIgniter once you're confident with core PHP
What You’ll Be Able to Build After This PHP Tutorial
After following this 7-day PHP tutorial, you’ll be able to:
Create dynamic web pages
Handle form submissions
Work with databases
Manage sessions and users
Understand the logic behind content management systems (CMS)
This gives you the foundation to become a full-stack developer, or even specialize in backend development using PHP and MySQL.
Final Thoughts
Learning PHP doesn’t have to be difficult or time-consuming. With the Complete PHP Tutorial: Learn PHP from Scratch in 7 Days, you’re taking a focused, structured path toward web development success. You’ll learn all the core concepts through clear explanations and hands-on examples that prepare you for real-world projects.
Whether you’re a student, freelancer, or aspiring developer, PHP remains a powerful and valuable skill to add to your web development toolkit.
So open up your code editor, start typing your first <?php ... ?> block, and begin your journey to building dynamic, powerful web applications — one day at a time.

0 notes
Text
Custom PHP Development: Leveraging MySQL for Database Management

In the realm of web development, the combination of PHP and MySQL has proven to be a powerful duo. Custom PHP development, when paired with the robust capabilities of MySQL for database management, allows developers to create dynamic, scalable, and efficient web applications. This article explores how custom PHP development can leverage MySQL to build effective database-driven websites and applications.
The Synergy of PHP and MySQL PHP (Hypertext Preprocessor) is a widely-used open-source scripting language that is especially suited for web development. It is embedded within HTML and interacts seamlessly with databases. MySQL, on the other hand, is a reliable and fast open-source relational database management system (RDBMS) known for its performance and scalability.
Together, PHP and MySQL form a formidable partnership in custom web development, offering numerous advantages:
Ease of Integration: PHP scripts can easily connect to MySQL databases using built-in functions.
Flexibility: Both PHP and MySQL are highly flexible, making them suitable for a wide range of applications from simple blogs to complex enterprise solutions.
Cost-Effectiveness: Being open-source, they provide a cost-effective solution for businesses.
Setting Up the Environment Before diving into custom development, you need to set up your development environment:
1. Install PHP: Ensure that PHP is installed on your server. You can download it from the official PHP website.
2. Install MySQL: Download and install MySQL from its official site. During installation, configure the root password and other settings as needed.
3. Web Server: Install a web server like Apache or Nginx. Many developers prefer to use XAMPP or WAMP for an all-in-one solution that includes Apache, MySQL, and PHP.
Connecting PHP to MySQL The first step in leveraging MySQL in custom PHP development is to establish a connection between PHP and MySQL. Here’s a basic example using PHP’s MySQLi (MySQL Improved) extension:
```php
<?php
$servername = "localhost";
$username = "username";
$password = "password";
$database = "database_name";
// Create connection
$conn = new mysqli($servername, $username, $password, $database);
// Check connection
if ($conn->connect_error) {
die("Connection failed: " . $conn->connect_error);
}
echo "Connected successfully";
?>
```
In this script, `mysqli` is used to connect to the MySQL database. The script checks the connection and prints a success message if the connection is successful, or an error message if it fails.
Creating and Managing Databases Once connected, the next step is to create and manage databases. Here’s how you can create a database and a table using PHP:
```php
<?php
// Create database
$sql = "CREATE DATABASE myDatabase";
if ($conn->query($sql) === TRUE) {
echo "Database created successfully";
} else {
echo "Error creating database: " . $conn->error;
}
// Use the database
$conn->select_db("myDatabase");
// Create table
$sql = "CREATE TABLE Users (
id INT(6) UNSIGNED AUTO_INCREMENT PRIMARY KEY,
firstname VARCHAR(30) NOT NULL,
lastname VARCHAR(30) NOT NULL,
email VARCHAR(50),
reg_date TIMESTAMP
)";
if ($conn->query($sql) === TRUE) {
echo "Table Users created successfully";
} else {
echo "Error creating table: " . $conn->error;
}
$conn->close();
?>
``` This script first creates a database named `myDatabase`. It then creates a table named `Users` with columns for ID, first name, last name, email, and registration date.
Performing CRUD Operations CRUD (Create, Read, Update, Delete) operations are fundamental to any database-driven application. Here’s how to perform these operations using PHP and MySQLi:
Create: Inserting Data
```php
<?php
$sql = "INSERT INTO Users (firstname, lastname, email) VALUES ('John', 'Doe', '[email protected]')";
if ($conn->query($sql) === TRUE) {
echo "New record created successfully";
} else {
echo "Error: " . $sql . "<br>" . $conn->error;
}
?>
```
Read: Retrieving Data
```php
<?php
$sql = "SELECT id, firstname, lastname, email FROM Users";
$result = $conn->query($sql);
if ($result->num_rows > 0) {
while($row = $result->fetch_assoc()) {
echo "id: " . $row["id"]. " - Name: " . $row["firstname"]. " " . $row["lastname"]. " - Email: " . $row["email"]. "<br>";
}
} else {
echo "0 results";
}
?>
```
Update: Modifying Data
```php
<?php
$sql = "UPDATE Users SET lastname='Smith' WHERE id=1";
if ($conn->query($sql) === TRUE) {
echo "Record updated successfully";
} else {
echo "Error updating record: " . $conn->error;
}
?>
```
Delete: Removing Data
```php
<?php
$sql = "DELETE FROM Users WHERE id=1";
if ($conn->query($sql) === TRUE) {
echo "Record deleted successfully";
} else {
echo "Error deleting record: " . $conn->error;
}
?>
```
Advanced Techniques in Custom PHP and MySQL Development To further enhance your custom PHP development, consider incorporating the following advanced techniques:
Prepared Statements Prepared statements are used to execute the same statement repeatedly with high efficiency and security. They help prevent SQL injection attacks:
```php
<?php
$stmt = $conn->prepare("INSERT INTO Users (firstname, lastname, email) VALUES (?, ?, ?)");
$stmt->bind_param("sss", $firstname, $lastname, $email);
// Set parameters and execute
$firstname = "Jane";
$lastname = "Doe";
$email = "[email protected]";
$stmt->execute();
echo "New records created successfully";
$stmt->close();
?>
``` Object-Oriented Programming (OOP) Approach Using an object-oriented approach can help in structuring your code more effectively:
```php
<?php
class Database {
private $servername = "localhost";
private $username = "username";
private $password = "password";
private $dbname = "myDatabase";
public $conn;
public function __construct() {
$this->conn = new mysqli($this->servername, $this->username, $this->password, $this->dbname);
if ($this->conn->connect_error) {
die("Connection failed: " . $this->conn->connect_error);
}
}
public function insertUser($firstname, $lastname, $email) {
$stmt = $this->conn->prepare("INSERT INTO Users (firstname, lastname, email) VALUES (?, ?, ?)");
$stmt->bind_param("sss", $firstname, $lastname, $email);
$stmt->execute();
$stmt->close();
}
// Additional CRUD methods...
public function __destruct() {
$this->conn->close();
}
}
$db = new Database();
$db->insertUser("Alice", "Smith", "[email protected]");
?>
``` Conclusion Custom PHP development, when combined with MySQL for database management, offers a versatile and powerful solution for creating dynamic, data-driven websites and applications. By leveraging the synergy between PHP and MySQL, developers can build robust, scalable, and secure applications tailored to specific business needs. From setting up your environment and connecting PHP to MySQL, to performing CRUD operations and employing advanced techniques, the potential for innovation and customization is vast. As you continue to explore and implement these tools, you'll unlock new possibilities for delivering exceptional web experiences.
Also Read: 10 Best Web Development Languages for Your Project in 2024
0 notes
Text
Mastering PHP: The Ultimate Guide to PHP Online Courses
In today's fast-evolving digital era, web development continues to play a vital role in shaping online experiences. One of the most trusted and widely-used server-side scripting languages in this domain is PHP (Hypertext Preprocessor). Whether you are a beginner aiming to break into web development or a seasoned programmer looking to expand your skills, enrolling in a PHP online course is a smart and strategic move.
What is PHP?
PHP is a powerful scripting language specifically designed for web development. It is open-source, easy to learn, and integrates seamlessly with HTML, databases like MySQL, and content management systems such as WordPress. PHP runs on almost all operating systems including Linux, Windows, and macOS, making it incredibly versatile.
Since its creation in 1994 by Rasmus Lerdorf, PHP has evolved dramatically. Today, it powers over 75% of websites on the internet, including big names like Facebook, Wikipedia, and WordPress. Its simplicity and wide applicability make it a must-know language for aspiring web developers.
Why Learn PHP Online?
1. Flexibility and Convenience
One of the biggest advantages of choosing an online PHP course is the flexibility it offers. Whether you're a college student, a working professional, or a freelance developer, you can learn PHP at your own pace, anytime and anywhere.
2. Cost-Effective Learning
Online courses are typically more affordable than in-person classes. Many platforms even offer free PHP tutorials or low-cost courses that deliver high-quality content.
3. Access to Quality Resources
Most online PHP courses provide a wealth of resources, including video lectures, downloadable content, quizzes, code editors, and forums. These materials make it easier to grasp complex concepts and practice coding in real-time.
4. Certification and Career Growth
Many PHP online courses offer certificates upon completion. These certificates can enhance your resume and make you stand out in the job market. With PHP skills, you can pursue roles such as Web Developer, Full-Stack Developer, Backend Developer, or Software Engineer.
Key Topics Covered in a PHP Online Course
A comprehensive PHP course typically includes the following modules:
1. Introduction to PHP
What is PHP?
Installation and setup (XAMPP, WAMP)
Syntax and basic structure
Embedding PHP in HTML
2. PHP Variables and Data Types
Strings, integers, floats, booleans
Arrays (indexed and associative)
Constants
Type casting
3. Control Structures
Conditional statements (if, else, switch)
Looping structures (for, while, do-while, foreach)
4. Functions and Scope
Creating and calling functions
Function parameters and return values
Variable scope (local, global, static)
5. Forms and User Input
Handling GET and POST methods
Form validation
Superglobals like $_GET, $_POST, $_REQUEST, $_SERVER
6. Working with Databases
Connecting PHP with MySQL
CRUD operations (Create, Read, Update, Delete)
Using PDO and MySQLi
Prepared statements for security
7. Error Handling
Types of errors (syntax, runtime, logical)
Try-catch blocks
Custom error handlers
8. Sessions and Cookies
Creating and managing sessions
Setting and reading cookies
Session security best practices
9. File Handling in PHP
Reading and writing files
Uploading files via forms
File permissions
10. Object-Oriented Programming in PHP
Classes and objects
Constructors and destructors
Inheritance, encapsulation, polymorphism
Interfaces and traits
11. PHP and Web Security
Input validation and sanitization
Preventing SQL injection and XSS
HTTPS and secure sessions
12. Advanced PHP Topics
PHP with AJAX
REST APIs in PHP
MVC Frameworks like Laravel and CodeIgniter
Composer and dependency management
Popular Platforms Offering PHP Online Courses
Here are some of the best platforms where you can learn PHP online:
1. Udemy
Udemy offers a wide range of PHP courses for all levels. Courses like “PHP for Beginners” and “Object-Oriented PHP & MVC” are among the top-rated, featuring lifetime access and a certificate upon completion.
2. Coursera
Partnering with universities and colleges, Coursera offers structured PHP programs. You can audit most courses for free or pay to receive a certification. A good example is the Web Applications for Everybody course from the University of Michigan.
3. edX
edX features PHP-related content through universities like Harvard and MIT. Though primarily focused on computer science and web development, several PHP courses are included under broader programming paths.
4. LinkedIn Learning
LinkedIn Learning provides bite-sized PHP lessons with project-based learning. A subscription gives access to multiple courses, helpful if you're pursuing more than just PHP.
5. FreeCodeCamp and W3Schools
Both platforms are excellent for beginners who want to explore PHP basics for free. W3Schools, in particular, is well-known for its hands-on “Try It Yourself” editor.
Who Should Take a PHP Online Course?
1. Beginners in Web Development
If you're new to coding and want to start with a language that's widely used and beginner-friendly, PHP is a great option.
2. Students and Computer Science Graduates
Learning PHP alongside HTML, CSS, and JavaScript can give you a competitive edge when applying for internships or junior developer roles.
3. Freelancers and Entrepreneurs
If you're planning to build your own website or work on client projects, PHP enables you to create dynamic, database-driven websites quickly.
4. Working Professionals
Developers who want to expand their backend skills or transition into full-stack development will benefit significantly from PHP expertise.
Career Opportunities After Learning PHP
Once you complete a PHP online course, several doors open for your professional growth:
Web Developer: Design and build dynamic websites.
Backend Developer: Manage server-side logic and database interactions.
Full-Stack Developer: Handle both frontend and backend tasks.
WordPress Developer: Customize and develop plugins/themes using PHP.
Freelance Developer: Build and manage websites for clients.
According to recent job market statistics, PHP developers earn an average salary of $60,000–$90,000 annually, depending on experience, location, and industry.
Tips for Success in an Online PHP Course
Set Clear Goals: Decide whether you’re learning for a job, freelance projects, or personal growth.
Practice Regularly: The best way to learn coding is by doing it. Practice through exercises and mini-projects.
Join Online Communities: Platforms like Stack Overflow, Reddit, and GitHub can help you learn collaboratively.
Work on Real Projects: Apply what you learn by building real-world applications—this boosts your confidence and portfolio.
Keep Up With Updates: PHP continues to evolve (e.g., PHP 8.x versions), so staying updated ensures your skills remain relevant.
Conclusion
PHP remains a cornerstone of modern web development, and mastering it through an online course is an effective, convenient, and affordable way to jumpstart or advance your programming journey. With comprehensive learning resources, expert instructors, and real-world projects, PHP online courses provide everything you need to build robust, scalable, and dynamic websites.
Whether you're starting from scratch or adding PHP to your skillset, now is the perfect time to enroll and harness the power of this essential language.
#php online course#PHP Training in Chandigarh#Python Training in Chandigarh#CCNA Training in Chandigarh#MERN Stack Training in Chandigarh
0 notes
Photo

PHP and MySQL CRUD application part two. This part of our PHP and MySQL CRUD application shows how to create a connection to a MySQL database using PHP MySQLi and PDO.We create the Create (C) part of the CRUD and insert data in nto our database.Finaly we display our data from the database to the web page. It is my hope that the lessons will in very simple and few slides open a number of areas you may have missed or never understood. Enjoy reading.And don't forget to catch our third and final part which will cover the Update (U part of the CRUD) as well as delete (D part of the CRUD). #phpdveloper #phpmysql #backenddevelopment #frontend #webdevelopment #webapidevelopment (at Lilongwe, Malawi) https://www.instagram.com/p/B65Wbr0hzNZ/?igshid=17f6ok8agjg59
0 notes
Text
PHP CRUD Operations with MySQLi Extension
PHP CRUD Operations with MySQLi Extension
CRUD stands for Create, Read, Update and Delete. CRUD operations are commonly used to manipulate data in the database. Almost, all web application used Add, Edit, Update and Delete functionality for managing data. In this tutorial, we will create a simple PHP CRUD application with MySQL to perform create (insert), read (select), update, and delete operations. The MySQLi Extension (MySQL Improved)…
View On WordPress
3 notes
·
View notes
Link
Start learning php web application development with this php crud tutorial.
#php mysqli tutorial#php script#php developers#php mysql#jquery#ajax#php curd#crud application#web application development#php application development#web#web developers#web development
0 notes
Text
C# DAL Generator for MySQL - Source Code (Database Abstractions)
C# DAL Generator for MySQL is a .net desktop application that generates C# Data Access Layer for MySQL database. The purpose of this application is to make software development easy. It creates C# classes (one per table) that contain methods for CRUD operations. The generated code can be used in web as well as desktop apps.
If you need C# Code Generator for SQL Server/MS Access then click here. If you need Code Generator for Entity Framework (C#/VB.Net) then click here. If you need PHP Code Generator for MySQL/MySQLi/PDO then click here.
All our Code Generators for PHP, C#, VB.Net and Entity Framework (without source). All our Code Generators for PHP, C#, VB.Net and Entity Framework (with source code).
Video Demo
Click here to view the video demo.
Features:
It creates C# classes (one for each table).
Supports MySQL database.
The class contains all columns of the table as properties.
Data types have been handled nicely.
Creates methods for CRUD operations.
Sorting has been handled.
Pagination has been handled.
Primary key is automatically detected for each table.
Composite primary key is supported.
Nullable columns have been handled.
Auto Increment column has been handled.
Timestamp column has been handled.
Completely indented code is generated.
The generated code can be used in both desktop and web applications.
All the following data types of MySQL are supported: tinyint, smallint, mediumint, int, integer, bigint, decimal, float, double, real, serial, bit, date, datetime, timestamp, time, year, char, varchar, nvarchar, tinytext, text, mediumtext, longtext, binary, varbinary, tinyblob, mediumblob, blob, longblob, enum, set
Source code has also been provided so that to enable users to make changes according to their programming structure.
Generated Code:
C# Class: For each table one C# class is created that contains all columns of the table as properties.
Add Method: It is an instance method. It adds a new record to the relevant table. Nullable columns have been handled properly. Auto increment and timestamp columns are skipped while inserting a record. Relevant property of the auto increment column is populated after record is inserted.
Update Method: It is an instance method. It updates an existing record. Auto increment and timestamp columns are skipped while updating a record.
Delete Method: It is a static method. It deletes an existing record. It takes primary key columns values as parameters.
Get Method: It is a static method. It gets an existing record (an instance of the class is created and all properties are populated). It takes primary key columns values as parameters.
GetAll Method: It is a static method. It gets all records of the relevant table. You can also specify search columns. If sorting/pagination is enabled then the relevant code will also be generated.
Sample Application:
A sample web application has also been provided that is using the generated code. In this application one form (for employees) has been created. This app uses the generated data access layer without modifying a single line in the generated code. from CodeCanyon new items http://ift.tt/2eKhluO via IFTTT https://goo.gl/zxKHwc
0 notes
Photo

Get Started With CRUD Operations in PHP MySQL Databases
In this article, we're going to explore how you could use a MySQL database to perform CRUD (create, read, update, and delete) operations with PHP. If you want to get your hands dirty with database connectivity in PHP, this article is a great starting point.
If you are just getting started with PHP, you probably realize that database connectivity is an essential feature that you'll need to get familiar with sooner or later. In most cases, a database is the backbone of any web application and holds the data of the application. So, as a PHP developer, you'll need to know how to deal with database operations.
In this article, we'll keep things simple and explore how to use the core mysqli functions. In upcoming articles of this series, we'll explore a couple of other ways to handle database connectivity.
Today, we'll go through the basics of database connectivity in PHP, and we'll use the MySQL database as our database back-end. Let's have a quick look at what we'll cover in this article:
how to set up a database connection
how to select a database
how to insert and update records
how to fetch records
how to delete records
I assume that you've a working installation of PHP and MySQL, and that you're aware of the basics of MySQL. Also, you'll need to make sure that the mysqli extension is enabled in your PHP installation, since we'll use it to do database operations with the MySQL database.
If you are not sure about the mysqli extension, you can check it using the phpinfo() function. In the phpinfo() output, you can check if there's a section titled mysqli. You should also see the MysqlI Support | enabled header if the mysqli extension is enabled.
There's also an easy way to check it using the CLI interface. You can run the following command to list all extensions that are enabled with your PHP set up.
$php -m
It should print a list of extensions, and if it contains the mysqli keyword, the mysqli extension is enabled.
Now that we're set up, let's start creating a database connection.
How to Set Up a Database Connection
In this section, we'll discuss how you can establish a database connection using the mysqli extension.
There are two ways you can use the mysqli extension, procedural and object-oriented, but we'll use the procedural way in this post to keep things simple. If you're curious about the object-oriented syntax, let me know your questions in the comment section and I'll be happy to answer them.
Firstly, let's go through the syntax of the mysqli_connect function which is used to set up a connection with the MySQL back-end.
<?php $connection_obj = mysqli_connect("{MYSQL_HOSTNAME}", "{MYSQL_USERNAME}", "{MYSQL_PASSWORD}", "{MYSQL_DATABASE}"); ?>
The mysqli_connect function takes four arguments and returns the connection object upon successful connection. Let's go through the each argument:
MYSQL_HOSTNAME: This should be replaced with the MySQL server's host-name or IP address. If you're working with the MySQL server in your local system, you can either use localhost or 127.0.0.1.
MYSQL_USERNAME: The username of your MySQL user.
MYSQL_PASSWORD: The password of your MySQL user.
MYSQL_DATABASE: The database that you want to connect to.
Upon successful connection, the $connection_obj contains the connection object. With this, you're ready to run queries against the database which was provided to the MYSQL_DATABASE argument.
On the other hand, if the connection is not successful, we can debug it as shown in the following snippet:
<?php $connection_obj = mysqli_connect("{MYSQL_HOSTNAME}", "{MYSQL_USERNAME}", "{MYSQL_PASSWORD}", "{MYSQL_DATABASE}"); if (!$connection_obj) { echo "Error No: " . mysqli_connect_errno(); echo "Error Description: " . mysqli_connect_error(); exit; } ?>
In the next section, we'll see how you can select a specific database using the connection object.
How to Select a Database
In the previous section, we discussed how to set up a database connection using the mysqli_connect function. In this section, we'll look at how to select a database once the MySQL connection is successful.
Of course, as we've already seen, you can always pass a database in the fourth argument of the mysqli_connect function itself. But, there's also another way you could do this in case you want to change a database after you've connected to MySQL. You can use the mysqli_select_db function to select a database to work with.
Let's revise the example discussed in the previous section to see how it can work.
<?php $connection_obj = mysqli_connect("{MYSQL_HOSTNAME}", "{MYSQL_USERNAME}", "{MYSQL_PASSWORD}"); if (!$connection_obj) { echo "Error No: " . mysqli_connect_errno(); echo "Error Description: " . mysqli_connect_error(); exit; } mysqli_select_db($connection_obj, "{MYSQL_DATABASE}"); ?>
As you can see, we've passed only three arguments in the mysqli_connect function, and that should give us a successful database connection. Instead of passing a database in the fourth argument, we select the database using the mysqli_select_db function.
The mysqli_select_db function takes two arguments: the connection object and the database you want to connect to.
How to Create (Insert) and Update Records
In the previous sections, we discussed how to set up a MySQL connection and select a database to work with. Now, we'll look at how to execute different types of queries against the selected database. First, let's look at how to insert and update records.
If you want to follow along with examples discussed in this article, you'll need to create the following MySQL table in your database. It's the table which we're going to use in all the examples form now on.
CREATE TABLE `employee` ( `id` int(11) NOT NULL AUTO_INCREMENT, `name` varchar(50) COLLATE utf8mb4_unicode_ci NOT NULL, `email` varchar(50) COLLATE utf8mb4_unicode_ci NOT NULL, `phone` varchar(50) COLLATE utf8mb4_unicode_ci NOT NULL, PRIMARY KEY (`id`) ) ENGINE=InnoDB DEFAULT CHARSET=utf8mb4 COLLATE=utf8mb4_unicode_ci;
Executing the above command in your MySQL database should create the employee table.
How to Create Records
To keep things simple, we'll initialize values that need to be inserted into the employee table in the beginning of the script. However, in most of the cases, these would come from user input in the $_POST variables submitted using a form.
<?php $connection_obj = mysqli_connect("{MYSQL_HOSTNAME}", "{MYSQL_USERNAME}", "{MYSQL_PASSWORD}", "{MYSQL_DATABASE}"); if (!$connection_obj) { echo "Error No: " . mysqli_connect_errno(); echo "Error Description: " . mysqli_connect_error(); exit; } // initialize variables for the insert query $name = 'John Smith'; $email = '[email protected]'; $phone = '541-754-1234'; // prepare the insert query $query = "INSERT INTO employee(`name`,`email`, `phone`) VALUES ('". mysqli_real_escape_string($connection_obj, $name) ."','". mysqli_real_escape_string($connection_obj, $email) ."','". mysqli_real_escape_string($connection_obj, $phone) ."')"; // run the insert query mysqli_query($connection_obj, $query); // close the db connection mysqli_close($connection_obj); ?>
In the above script, we've first initialized variables that we’re going to use in the insert query. Next, we've prepared the insert query and assigned it into the $query variable.
It's important to note that we've used the mysqli_real_escape_string function to escape string values that we’re going to use in the insert query. You must use this function when you’re dealing with string values submitted via $_POST variables. This ensures that your users don't inject malicious code into to your database queries.
Finally, we ran the insert query using the mysqli_query function. The mysqli_query function is used to run a query against the active database. To wrap things up, we used the mysqli_close function to close the active connection.
How to Update Records
In the previous section, we discussed how you can insert new records in the MySQL table. In this section, we'll see how you can update a record which already exists in the table.
I assume that there's already a record exists in the employee table, and the id of that record is 1. In the following example, we're going to update a record which has a value of 1 in the id column.
<?php $connection_obj = mysqli_connect("{MYSQL_HOSTNAME}", "{MYSQL_USERNAME}", "{MYSQL_PASSWORD}", "{MYSQL_DATABASE}"); if (!$connection_obj) { echo "Error No: " . mysqli_connect_errno(); echo "Error Description: " . mysqli_connect_error(); exit; } // initialize variables for the insert query $id = 1; $phone = '333-555-4444'; // prepare the insert query $query = "UPDATE employee SET `phone` = '". mysqli_real_escape_string($connection_obj, $phone) ."' WHERE `id` = '". (int) $id ."'"; // run the insert query mysqli_query($connection_obj, $query); // close the db connection mysqli_close($connection_obj); ?>
As you can see in the above example, we want to update the phone column of the employee table where id is 1. This is very similar to the insert query, except that we're using UPDATE instead of INSERT.
How to Retrieve Records
So far, we've discussed how to insert and update records in the MySQL table. In this section, we'll see how to retrieve (fetch) records from the MySQL table.
Take a look at the following example.
<?php $connection_obj = mysqli_connect("{MYSQL_HOSTNAME}", "{MYSQL_USERNAME}", "{MYSQL_PASSWORD}", "{MYSQL_DATABASE}"); if (!$connection_obj) { echo "Error No: " . mysqli_connect_errno(); echo "Error Description: " . mysqli_connect_error(); exit; } // prepare the select query $query = "SELECT * FROM employee"; // execute the select query $result = mysqli_query($connection_obj, $query) or die(mysqli_error($connection_obj)); // run the select query while ($row = mysqli_fetch_array($result, MYSQLI_BOTH)) { echo "ID:" . $row['id'] . "<br/>"; echo "Name:" . $row['name'] . "<br/>"; echo "Phone:" . $row['phone'] . "<br/>"; echo "Email:" . $row['email'] . "<br/>"; echo "<br/>"; } // close the db connection mysqli_close($connection_obj); ?>
The first thing that you need to do in order to fetch records from a database is to execute the select query using the mysqli_query function. Upon successful execution of the select query, the mysqli_query function returns the mysqli result object, and that's what we've stored in the $result variable above.
Next, we iterate over the result set using the mysqli_fetch_array function in a while loop. The mysqli_fetch_array function fetches a single row at a time from the mysqli result set.
The mysqli_fetch_array function takes two arguments—the result object and result type. The result type indicates what type of array will be returned from the mysqli_fetch_array function. It could be numeric, associative or both. It's an optional argument and you can pass one of these three values—MYSQLI_ASSOC, MYSQLI_NUM, or MYSQLI_BOTH. MYSQLI_ASSOC indicates that you want to access columns by their name, and MYSQLI_NUM indicates that you want to access columns by their column number.
If you pass the MYSQLI_NUM value in the second argument of the mysqli_fetch_array function, you can access columns as $row[0], $row[1] and so on. In our case, we've passed the MYSQLI_BOTH value, so we can access columns in both ways. If you want to access only associative values, you can use the mysqli_fetch_assoc function instead.
In the next and last section, we'll see how to delete records from a database.
How to Delete Records
In this section, we'll see how to delete records from a database.
Take a look at the following example.
<?php $connection_obj = mysqli_connect("{MYSQL_HOSTNAME}", "{MYSQL_USERNAME}", "{MYSQL_PASSWORD}", "{MYSQL_DATABASE}"); if (!$connection_obj) { echo "Error No: " . mysqli_connect_errno(); echo "Error Description: " . mysqli_connect_error(); exit; } // initialize variables for the delete query $id = 1; // prepare the insert query $query = "DELETE FROM employee WHERE `id` = '". (int) $id ."'"; // run the delete query mysqli_query($connection_obj, $query); // close the db connection mysqli_close($connection_obj); ?>
As you can see, it works pretty much the same as the insert and update queries. The mysqli_query function executes the DELETE query, and that eventually deletes the record from the employee table.
Conclusion
In this article, we explored how you can use the MySQL database with PHP. This article was intended to provide you with a basic knowledge of MySQL database connectivity in PHP to beginners. We saw how to go from setting up a database connection to executing different types of queries.
Feel free to post your feedback and queries using the feed below.
by Sajal Soni via Envato Tuts+ Code https://ift.tt/2QhD0yM
0 notes
Text
C# DAL Generator for MySQL - Source Code (Database Abstractions)
C# DAL Generator for MySQL is a .net desktop application that generates C# Data Access Layer for MySQL database. The purpose of this application is to make software development easy. It creates C# classes (one per table) that contain methods for CRUD operations. The generated code can be used in web as well as desktop apps. If you need C# Code Generator for SQL Server/MS Access then click here. If you need Code Generator for Entity Framework (C#/VB.Net) then click here. If you need PHP Code Generator for MySQL/MySQLi/PDO then click here. All our Code Generators for PHP, C#, VB.Net and Entity Framework (without source). All our Code Generators for PHP, C#, VB.Net and Entity Framework (with source code). Video Demo Click here to view the video demo. Features: It creates C# classes (one for each table). Supports MySQL database. The class contains all columns of the table as properties. Data types have been handled nicely. Creates methods for CRUD operations. Sorting has been handled. Pagination has been handled. Primary key is automatically detected for each table. Composite primary key is supported. Nullable columns have been handled. Auto Increment column has been handled. Timestamp column has been handled. Completely indented code is generated. The generated code can be used in both desktop and web applications. All the following data types of MySQL are supported: tinyint, smallint, mediumint, int, integer, bigint, decimal, float, double, real, serial, bit, date, datetime, timestamp, time, year, char, varchar, nvarchar, tinytext, text, mediumtext, longtext, binary, varbinary, tinyblob, mediumblob, blob, longblob, enum, set Source code has also been provided so that to enable users to make changes according to their programming structure. Generated Code: C# Class: For each table one C# class is created that contains all columns of the table as properties. Add Method: It is an instance method. It adds a new record to the relevant table. Nullable columns have been handled properly. Auto increment and timestamp columns are skipped while inserting a record. Relevant property of the auto increment column is populated after record is inserted. Update Method: It is an instance method. It updates an existing record. Auto increment and timestamp columns are skipped while updating a record. Delete Method: It is a static method. It deletes an existing record. It takes primary key columns values as parameters. Get Method: It is a static method. It gets an existing record (an instance of the class is created and all properties are populated). It takes primary key columns values as parameters. GetAll Method: It is a static method. It gets all records of the relevant table. You can also specify search columns. If sorting/pagination is enabled then the relevant code will also be generated. Sample Application: A sample web application has also been provided that is using the generated code. In this application one form (for employees) has been created. This app uses the generated data access layer without modifying a single line in the generated code.
0 notes
Text
89% off #PHP with PDO: Build a Basic Task List with PHP, PDO & MySQL- $10
Learn and Understand PHP Database Objects (PDO), Build a Basic Task List with PHP, PDO, MYSQL and JQuery Ajax
All Levels, – Video: 2.5 hours Other: 0 mins, 24 lectures
Average rating 5.0/5 (5.0)
Course requirements:
Already Setup PHP Development Environment running PHP 5.1 with a basic understanding of PHP Programming Language Basic understanding of SQL Language (Every Query is well explained) Little OOP knowledge will be nice but not required to follow along
Course description:
LATEST COURSE ON PDO RELEASED ON 18/05/2016
This course teaches PHP Data Objects (PDO), one of the available API for connecting to databases within PHP. PDO is an object oriented extension which was introduced with PHP 5.1, taking advantage of several features introduced into PHP at that time.
In this step by step course both beginners and experienced web developers will gain a comprehensive understanding of the modern PDO extension and how it can be used to create scalable database driven application.
This PHP with PDO course uses MySQL database to teach PDO concept and finally you learn how to build a basic task list using the concepts that has been taught in the course.
My Approach
In this course I use simple examples that can be easily understood to illustrate concepts and build upon it.
See What Students are saying
“This was perfect for my skill level as an advanced beginner to lower intermediate PHP developer. Terry wastes no time, and the whole course is packed with great information. I also really like the Material Design CSS and JS used in the course, since I had never used it before. I am very appreciative of this knowledge I gained, and plan to go through the whole thing again, and use it as a reference later.” – Collin Stubblefield
“Managed to complete making a PDO tasklist! very helpful! the content is well put together! understood some core concept of PHP PDO! overall highly recommended! keep making more videos! If you can make a shopping cart! for tutorial basis! thanks!” -Brian Gichohi
“The instructor is clear and engaging also knowledgeable and passionate about the course. The course is well taught by the instructor” – Abimbola Makinwa
“Terry is a great teacher. He goes the extra mile to ensure student satisfaction. He even offers to remotely connect to your machine to help out if your code is not working the way it should. Thanks ever so much.” – Sahid Camara
Timely Support!
If you ever encounter any problem why taking this course, don’t worry I am always here to help and guide you through. Enroll today and get the skills and knowledge you need to succeed as a PHP developer. Every minute you let by is money and opportunity that are passing you by.
Full details Build a Basic Task List with PDO, PHP and MySQL Perform CRUD (Create, Read, Update and Delete) Operations with PDO Protect any web application against SQL Injection In depth understanding of PHP Data Object (PDO) Dealing with Errors in PDO Send Request via Ajax without page Refresh Prompt support and value for your money
Full details This PDO course is for anyone who is not familiar with PHP Data Objects database API and/or students looking for a quick refresher on PDO. Want to learn and understand a multi platform database API You want to migrate from MySQLi or MySQL to PDO PHP Developers who want to learn how to use PDO for database driven application.
Full details
Reviews:
“Very clear and informative right from the start. Aimed beyond a PHP or data programming novice. Excellent up to date practical instruction once you have a bit of prior knowledge of PHP and the likes of MySQL.” (Chris Smethurst)
“Excellent class! Instruction is very clear and to the point. I’ve learned a lot.” (Thomas Cowan)
“Now I know how pdo works.

Thanks.” (Mehmet Akbasogullari)
About Instructor:
Osayawe Terry Ogbemudia
Terry is a professional Computer Scientist, thoroughly skilled and experienced in Information Technology, Software Development and Web Programming. He ventured into Software Programming and Database Administration in 2007. Terry holds an undergraduate degree in Software Engineering from University of East London, and is also a certified Oracle Database Professional (OCP). Having a passion for teaching, he seizes every opportunity that he finds to impact into others. In 2008, he facilitated high-end trainings in Oracle Database, Linux Operating System, Oracle Financial 11i, and Web Design at KarRox and 2010 at NIIT. He is the founder of Terdia Technology Solutions, an Information Technology Company, which provides integrated solutions that leverage Information Technology and knowledge of business processes.
Instructor Other Courses:
Code Snippet: Get timely help with Bite-sized Training PHP: Complete Login and Registration System with PHP & MYSQL …………………………………………………………… Osayawe Terry Ogbemudia coupons Development course coupon Udemy Development course coupon Web Development course coupon Udemy Web Development course coupon course coupon coupon coupons
The post 89% off #PHP with PDO: Build a Basic Task List with PHP, PDO & MySQL- $10 appeared first on Udemy Cupón.
from http://www.xpresslearn.com/udemy/coupon/89-off-php-with-pdo-build-a-basic-task-list-with-php-pdo-mysql-10/
0 notes
Text
89% off #PHP with PDO: Build a Basic Task List with PHP, PDO & MySQL – $10
Learn and Understand PHP Database Objects (PDO), Build a Basic Task List with PHP, PDO, MYSQL and JQuery Ajax
All Levels, – 2.5 hours, 24 lectures
Average rating 4.7/5 (4.7 (38 ratings) Instead of using a simple lifetime average, Udemy calculates a course’s star rating by considering a number of different factors such as the number of ratings, the age of ratings, and the likelihood of fraudulent ratings.)
Course requirements:
Already Setup PHP Development Environment running PHP 5.1 with a basic understanding of PHP Programming Language Basic understanding of SQL Language (Every Query is well explained) Little OOP knowledge will be nice but not required to follow along
Course description:
LATEST COURSE ON PDO RELEASED ON 18/05/2016
This course teaches PHP Data Objects (PDO), one of the available API for connecting to databases within PHP. PDO is an object oriented extension which was introduced with PHP 5.1, taking advantage of several features introduced into PHP at that time.
In this step by step course both beginners and experienced web developers will gain a comprehensive understanding of the modern PDO extension and how it can be used to create scalable database driven application.
This PHP with PDO course uses MySQL database to teach PDO concept and finally you learn how to build a basic task list using the concepts that has been taught in the course.
My Approach
In this course I use simple examples that can be easily understood to illustrate concepts and build upon it.
See What Students are saying
“This was perfect for my skill level as an advanced beginner to lower intermediate PHP developer. Terry wastes no time, and the whole course is packed with great information. I also really like the Material Design CSS and JS used in the course, since I had never used it before. I am very appreciative of this knowledge I gained, and plan to go through the whole thing again, and use it as a reference later.” – Collin Stubblefield
“Managed to complete making a PDO tasklist! very helpful! the content is well put together! understood some core concept of PHP PDO! overall highly recommended! keep making more videos! If you can make a shopping cart! for tutorial basis! thanks!” -Brian Gichohi
“The instructor is clear and engaging also knowledgeable and passionate about the course. The course is well taught by the instructor” – Abimbola Makinwa
“Terry is a great teacher. He goes the extra mile to ensure student satisfaction. He even offers to remotely connect to your machine to help out if your code is not working the way it should. Thanks ever so much.” – Sahid Camara
Timely Support!
If you ever encounter any problem why taking this course, don’t worry I am always here to help and guide you through. Enroll today and get the skills and knowledge you need to succeed as a PHP developer. Every minute you let by is money and opportunity that are passing you by.
Full details Build a Basic Task List with PDO, PHP and MySQL Perform CRUD (Create, Read, Update and Delete) Operations with PDO Protect any web application against SQL Injection In depth understanding of PHP Data Object (PDO) Dealing with Errors in PDO Send Request via Ajax without page Refresh Prompt support and value for your money
Full details This PDO course is for anyone who is not familiar with PHP Data Objects database API and/or students looking for a quick refresher on PDO. Want to learn and understand a multi platform database API You want to migrate from MySQLi or MySQL to PDO PHP Developers who want to learn how to use PDO for database driven application.
Full details
Reviews:
“I really enjoyed this course. I just found at times the Lecturing to be way to fast to follow, I found myself pausing and rewinding alot to try understand.” (Murray Stewart)
“Great course! learned a lot. I found the ajax calls particularly interesting. And of course, Terry is a great teacher.” (Fabian Felix)
“Excellent class! Instruction is very clear and to the point. I’ve learned a lot.” (Thomas Cowan)
About Instructor:
Osayawe Terry Ogbemudia
Terry is a professional Computer Scientist, thoroughly skilled and experienced in Information Technology, Software Development and Web Programming. He ventured into Software Programming and Database Administration in 2007. Terry holds an undergraduate degree in Software Engineering from University of East London, and is also a certified Oracle Database Professional (OCP). Having a passion for teaching, he seizes every opportunity that he finds to impact into others. In 2008, he facilitated high-end trainings in Oracle Database, Linux Operating System, Oracle Financial 11i, and Web Design at KarRox and 2010 at NIIT. He is the founder of Terdia Technology Solutions, an Information Technology Company, which provides integrated solutions that leverage Information Technology and knowledge of business processes.
Instructor Other Courses:
Code Snippet: Get timely help with Bite-sized Training Osayawe Terry Ogbemudia, Fullstack Developer at Visual Math Interactive Sdn. Bhd (28) $10 $20 PHP: Complete Login and Registration System with PHP & MYSQL …………………………………………………………… Osayawe Terry Ogbemudia coupons Development course coupon Udemy Development course coupon Web Development course coupon Udemy Web Development course coupon PHP with PDO: Build a Basic Task List with PHP, PDO & MySQL PHP with PDO: Build a Basic Task List with PHP, PDO & MySQL course coupon PHP with PDO: Build a Basic Task List with PHP, PDO & MySQL coupon coupons
The post 89% off #PHP with PDO: Build a Basic Task List with PHP, PDO & MySQL – $10 appeared first on Course Tag.
from Course Tag http://coursetag.com/udemy/coupon/89-off-php-with-pdo-build-a-basic-task-list-with-php-pdo-mysql-10/ from Course Tag https://coursetagcom.tumblr.com/post/158200928003
0 notes
Text
ZaKode - All in one builder - Powerful website - Easier to build (PHP Scripts)
ZaKode is A powerful website suitable for diverse systems, CMS, E-Comerce and others, ZaKode the most comprehensive web builder application, built using the CodeIgniter Framework. If you are confused, I offer an easy way without coding / sql builder, just click, drag and drop, just a few minutes, your website becomes full FrontEnd and BackEnd.
Features
Facility to customize to match your website theme
Easy install; 100% integration with wizzard installation
API Generator, Make Restfull Server API builder just one click, and get auto generate documentation.
CRUD Generator, Make it easy to make CRUD, with 35+ custom validation and 20+ input type.
PAGE Generator, Make it easy for you to make your front page to show anywhere, like website builder generator.
FORM Generator, Makes it easy for you to create various backend pages, just drag and support CRUD.
Multi Language Generator, Allows you to create multiple languages that are translated directly.
Modules Addon, Allows adding addons to your website development into larger websites.
Backup Data, Make it easy for your website to back up and restore anytime.
FileManager, Facilitate direct file changes(Modules folder only).
Debugging Tool.
MailBox.
Rest API Tool, Testing your api with rest api(Ready on Site).
Dynamic Menu, Makes it easy to create dynamic menus just drag and drop, multilevel and support permissions.
Smart Model.
Backend integration with AdminLTE.
Access page/code is protected access rights control with aauth.
Makes it easy to save data with hot keys.
Lockscreen with the specified time.
Uploads file just drag and drop.
... and many others.
Requirement System requirements for running this ZaKode application ---------------------------------------------------------------- PHP 5.5 or higher (if use PHP 7.1 You will get an error on debugging) Mysql Server 4.1.13 or higher Apache / Nginx Mysqli extension Session Extension mcrypt Extension How to install -------------- 1. Upload the zip file downloaded to your server in the public_html or any other directory you intend the script to run. 2. Extract the zip file in that directory. 3. Create a new database from your server MySQL with PhpMyAdmin or other tools. 4. Create db user to the database and link that database to the db user. 5. Go to the URL of the unzipped folder. 6. Follow the instructions with the installation wizard, just by clicking the Next button and you are asked to fill in the configuration Zakode Documents ---------------- All Documents of use ZaKode on the site when the site is running. !! Please Register Zakode application to get the license code, and we will process !! http://ift.tt/2fJS87p
History Version
[16-08-2017] - 1.0.2 - Fix, License - Some functions will be disabled. - Fix, Form public parsing. - Fix, Group Update. - Fix, Views mail box - New, Fast document for installation (README.txt). - New, Status debugging tool for admin in form setting (False). [11-08-2017] - 1.0.1 - Fix, Change the lisense system without verification first [10-08-2017] - 1.0.0 - Release New Version
from CodeCanyon new items http://ift.tt/2i5iiC7 via IFTTT https://goo.gl/zxKHwc
0 notes
Text
VB.Net DAL Generator - Source Code (Database Abstractions)
VB.Net DAL Generator is a .net desktop application that generates VB.Net Data Access Layer for SQL Server and MS Access databases. The purpose of this application is to make software development easy. It creates VB.Net classes (one per table) that contain methods for CRUD operations. The generated code can be used in web as well as desktop apps.
If you need C# DAL Generator for SQL Server and MS Access then click here. If you need C# DAL Generator for MySQL then click here. If you need DAL Generator for Entity Framework (C#/VB.Net) then click here. If you need PHP Code Generator for MySQL/MySQLi/PDO then click here.
Video Demo:
Click here to view the video demo.
Features:
It creates VB.Net classes (one for each table).
Supports SQL Server and MS Access.
The class contains all columns of the table as properties.
Data types have been handled nicely.
Creates methods for CRUD operations.
Sorting has been handled.
Pagination has been handled (SQL Server only).
Primary key is automatically detected for each table.
Composite primary key is supported.
Nullable columns have been handled.
Identity column has been handled.
Timestamp column has been handled.
Completely indented code is generated.
The generated code can be used in both desktop and web applications.
All the following data types of SQL Server are supported: char, nchar, varchar, nvarchar, text, ntext, xml, decimal, numeric, money, smallmoney, bit, binary, image, timestamp, varbinary, date, datetime, datetime2, smalldatetime, datetimeoffset, time, bigint, int, smallint, tinyint, float, real, uniqueidentifier, sql_variant
Source code (written in C#) has also been provided so that to enable users to make changes according to their programming structure.
Sample Application:
A sample web application has also been provided that is using the generated code. In this application one form (for employees) has been created. This app uses the generated data access layer without modifying a single line in the generated code.
Generated Code:
VB.Net Class: For each table one VB.Net class is created that contains all columns of the table as properties.
Add Method: It is an instance method. It adds a new record to the relevant table. Nullable columns have been handled properly. If you don’t want to insert values in the nullable columns, don’t specify values for the relevant properties. Identity and timestamp columns cannot be inserted manually therefore these columns are skipped while inserting a record. Relevant property of the identity column is populated after record is inserted.
Update Method: It is an instance method. It updates an existing record. Identity and timestamp columns are skipped while updating a record.
Delete Method: It is a shared method. It deletes an existing record. It takes primary key columns values as parameters.
Get Method: It is a shared method. It gets an existing record (an instance of the class is created and all properties are populated). It takes primary key columns values as parameters.
GetAll Method: It is a shared method. It gets all records of the relevant table. You can also specify search columns. If sorting/pagination is enabled then the relevant code will also be generated.
from CodeCanyon new items http://ift.tt/2sSyjzP via IFTTT https://goo.gl/zxKHwc
0 notes
Photo
New Post has been published on https://programmingbiters.com/codeigniter-3-crudcreate-read-update-and-delete-using-jquery-ajax-bootstrap-models-and-mysql/
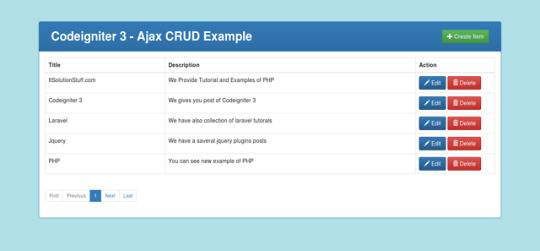
Codeigniter 3 - CRUD(Create, Read, Update and Delete) using JQuery Ajax, Bootstrap, Models and MySQL
CRUD is a basic step of any Core Language or framework. CRUD stand for Create Read Update and Delete. So in this post we will learn insert update delete in codeigniter using jquery Ajax. I gave you example from scratch so if you don’t know about Codeigniter 3 then no issue. You have to just follow simple step.There are listed bellow step you have to follow:
1)Download Fresh Codeigniter 3
2)Create Database and Configuration
3)Add Route
4)Create Controller
5)Update View
6)Create JS File
In this example i used several jquery Plugin for fire Ajax, Ajax pagination, Bootstrap, Bootstrap Validation, notification as listed bellow.
Jquery
Bootstrap
twbsPagination js
Validator JS(Bootstrap form validation example with demo using validator.js plugin)
toastr JS(Jquery notification popup box example using toastr JS plugin with demo)
After complete this c.r.u.d. application example you will be find preview as like bellow preview scheenshot:
Preview:
Step 1: Download Fresh Codeigniter 3
In First step we will download fresh version of Codeigniter 3, so if you haven’t download yet then download from here : Download Codeigniter 3.
After Download successfully, extract clean new Codeigniter 3 application.
Step 2: Create Database and Configuration
In this step we will create new database “test” and add new table “items” in test database. You can use following SQL Query for create “items” table. So let’s create using bellow sql query:
item table:
CREATE TABLE IF NOT EXISTS `items` ( `id` int(10) unsigned NOT NULL AUTO_INCREMENT, `title` varchar(255) COLLATE utf8_unicode_ci NOT NULL, `description` text COLLATE utf8_unicode_ci NOT NULL, PRIMARY KEY (`id`) ) ENGINE=InnoDB DEFAULT CHARSET=utf8 COLLATE=utf8_unicode_ci AUTO_INCREMENT=16 ;
After create database and table successfully, we have to configuration of database in our Codeigniter 3 application, so open database.php file and add your database name, username and password.
application/config/database.php
<?php defined('BASEPATH') OR exit('No direct script access allowed'); $active_group = 'default'; $query_builder = TRUE; $db['default'] = array( 'dsn' => '', 'hostname' => 'localhost', 'username' => 'root', 'password' => 'root', 'database' => 'test', 'dbdriver' => 'mysqli', 'dbprefix' => '', 'pconnect' => FALSE, 'db_debug' => (ENVIRONMENT !== 'production'), 'cache_on' => FALSE, 'cachedir' => '', 'char_set' => 'utf8', 'dbcollat' => 'utf8_general_ci', 'swap_pre' => '', 'encrypt' => FALSE, 'compress' => FALSE, 'stricton' => FALSE, 'failover' => array(), 'save_queries' => TRUE );
Step 3: Add Route
In this step you have to add some route in your route file. So first we will create route for items modules for lists, create, edit, update and delete.so put the bellow content in route file:
application/config/routes.php
<?php defined('BASEPATH') OR exit('No direct script access allowed'); $route['default_controller'] = 'welcome'; $route['404_override'] = ''; $route['translate_uri_dashes'] = FALSE; $route['items'] = "items/index"; $route['itemsCreate']['post'] = "items/store"; $route['itemsEdit/(:any)'] = "items/edit/$1"; $route['itemsUpdate/(:any)']['put'] = "items/update/$1"; $route['itemsDelete/(:any)']['delete'] = "items/delete/$1";
Step 4: Create Controller
Ok, now first we have to create one new controller api method listing, create, edit, update and delete. so create Items.php file in this path application/controllers/Items.php and put bellow code in this file:
application/controllers/Items.php
<?php defined('BASEPATH') OR exit('No direct script access allowed'); class Items extends CI_Controller /** * Get All Data from this method. * * @return Response */ public function index() $this->load->database(); if(!empty($this->input->get("search"))) $this->db->like('title', $this->input->get("search")); $this->db->or_like('description', $this->input->get("search")); $this->db->limit(5, ($this->input->get("page",1) - 1) * 5); $query = $this->db->get("items"); $data['data'] = $query->result(); $data['total'] = $this->db->count_all("items"); echo json_encode($data); /** * Store Data from this method. * * @return Response */ public function store() $this->load->database(); $insert = $this->input->post(); $this->db->insert('items', $insert); $id = $this->db->insert_id(); $q = $this->db->get_where('items', array('id' => $id)); echo json_encode($q->row()); /** * Edit Data from this method. * * @return Response */ public function edit($id) $this->load->database(); $q = $this->db->get_where('items', array('id' => $id)); echo json_encode($q->row()); /** * Update Data from this method. * * @return Response */ public function update($id) $this->load->database(); $insert = $this->input->post(); $this->db->where('id', $id); $this->db->update('items', $insert); $q = $this->db->get_where('items', array('id' => $id)); echo json_encode($insert); /** * Delete Data from this method. * * @return Response */ public function delete($id) $this->load->database(); $this->db->where('id', $id); $this->db->delete('items'); echo json_encode(['success'=>true]);
Step 5: Update View
In this step we will update view file of welcome_message.php. In this file we will write code of insert update delete and also include bootstrap, jquery, toastr and twbsPagination. So let’s update following file:
application/views/welcome_message.php
<!DOCTYPE html> <html> <head> <title>Codeigniter 3 - Ajax CRUD Example</title> <link rel="stylesheet" type="text/css" href="https://cdnjs.cloudflare.com/ajax/libs/twitter-bootstrap/4.0.0-alpha/css/bootstrap.css"> </head> <body> <div class="container"> <div class="row"> <div class="col-lg-12 margin-tb"> <div class="pull-left"> <h2>Codeigniter 3 - Ajax CRUD Example</h2> </div> <div class="pull-right"> <button type="button" class="btn btn-success" data-toggle="modal" data-target="#create-item"> Create Item</button> </div> </div> </div> <table class="table table-bordered"> <thead> <tr> <th>Title</th> <th>Description</th> <th width="200px">Action</th> </tr> </thead> <tbody> </tbody> </table> <ul id="pagination" class="pagination-sm"></ul> <!-- Create Item Modal --> <div class="modal fade" id="create-item" tabindex="-1" role="dialog" aria-labelledby="myModalLabel"> <div class="modal-dialog" role="document"> <div class="modal-content"> <div class="modal-header"> <button type="button" class="close" data-dismiss="modal" aria-label="Close"><span aria-hidden="true">×</span></button> <h4 class="modal-title" id="myModalLabel">Create Item</h4> </div> <div class="modal-body"> <form data-toggle="validator" action="items/store" method="POST"> <div class="form-group"> <label class="control-label" for="title">Title:</label> <input type="text" name="title" class="form-control" data-error="Please enter title." required /> <div class="help-block with-errors"></div> </div> <div class="form-group"> <label class="control-label" for="title">Description:</label> <textarea name="description" class="form-control" data-error="Please enter description." required></textarea> <div class="help-block with-errors"></div> </div> <div class="form-group"> <button type="submit" class="btn crud-submit btn-success">Submit</button> </div> </form> </div> </div> </div> </div> <!-- Edit Item Modal --> <div class="modal fade" id="edit-item" tabindex="-1" role="dialog" aria-labelledby="myModalLabel"> <div class="modal-dialog" role="document"> <div class="modal-content"> <div class="modal-header"> <button type="button" class="close" data-dismiss="modal" aria-label="Close"><span aria-hidden="true">×</span></button> <h4 class="modal-title" id="myModalLabel">Edit Item</h4> </div> <div class="modal-body"> <form data-toggle="validator" action="" method="put"> <div class="form-group"> <label class="control-label" for="title">Title:</label> <input type="text" name="title" class="form-control" data-error="Please enter title." required /> <div class="help-block with-errors"></div> </div> <div class="form-group"> <label class="control-label" for="title">Description:</label> <textarea name="description" class="form-control" data-error="Please enter description." required></textarea> <div class="help-block with-errors"></div> </div> <div class="form-group"> <button type="submit" class="btn btn-success crud-submit-edit">Submit</button> </div> </form> </div> </div> </div> </div> </div> <script type="text/javascript" src="https://cdnjs.cloudflare.com/ajax/libs/jquery/3.1.0/jquery.js"></script> <script type="text/javascript" src="https://cdnjs.cloudflare.com/ajax/libs/twitter-bootstrap/4.0.0-alpha/js/bootstrap.min.js"></script> <script type="text/javascript" src="https://cdnjs.cloudflare.com/ajax/libs/twbs-pagination/1.3.1/jquery.twbsPagination.min.js"></script> <script src="https://cdnjs.cloudflare.com/ajax/libs/1000hz-bootstrap-validator/0.11.5/validator.min.js"></script> <script type="text/javascript" src="http://cdnjs.cloudflare.com/ajax/libs/toastr.js/latest/js/toastr.min.js"></script> <link href="//cdnjs.cloudflare.com/ajax/libs/toastr.js/latest/css/toastr.min.css" rel="stylesheet"> <script type="text/javascript"> var url = "items"; </script> <script src="http://itsolutionstuff.com/js/item-ajax.js"></script> </body> </html>
Step 6: Create JS File
In this last step we will make new folder js on your root directory and create new file item-ajax.js on that folder. In item-ajax.js file we write all code of CRUD JS that will manage listing, insert, update, delete and pagination. So let’s create new file and put following code:
js/item-ajax.js
var page = 1; var current_page = 1; var total_page = 0; var is_ajax_fire = 0; manageData(); /* manage data list */ function manageData() $.ajax( dataType: 'json', url: url, data: page:page ).done(function(data) total_page = data.total % 5; current_page = page; $('#pagination').twbsPagination( totalPages: total_page, visiblePages: current_page, onPageClick: function (event, pageL) page = pageL; if(is_ajax_fire != 0) getPageData(); ); manageRow(data.data); is_ajax_fire = 1; ); /* Get Page Data*/ function getPageData() $.ajax( dataType: 'json', url: url, data: page:page ).done(function(data) manageRow(data.data); ); /* Add new Item table row */ function manageRow(data) var rows = ''; $.each( data, function( key, value ) rows = rows + '<tr>'; rows = rows + '<td>'+value.title+'</td>'; rows = rows + '<td>'+value.description+'</td>'; rows = rows + '<td data-id="'+value.id+'">'; rows = rows + '<button data-toggle="modal" data-target="#edit-item" class="btn btn-primary edit-item">Edit</button> '; rows = rows + '<button class="btn btn-danger remove-item">Delete</button>'; rows = rows + '</td>'; rows = rows + '</tr>'; ); $("tbody").html(rows); /* Create new Item */ $(".crud-submit").click(function(e) e.preventDefault(); var form_action = $("#create-item").find("form").attr("action"); var title = $("#create-item").find("input[name='title']").val(); var description = $("#create-item").find("textarea[name='description']").val(); $.ajax( dataType: 'json', type:'POST', url: form_action, data:title:title, description:description ).done(function(data) getPageData(); $(".modal").modal('hide'); toastr.success('Item Created Successfully.', 'Success Alert', timeOut: 5000); ); ); /* Remove Item */ $("body").on("click",".remove-item",function() var id = $(this).parent("td").data('id'); var c_obj = $(this).parents("tr"); $.ajax( dataType: 'json', type:'delete', url: url + '/' + id, ).done(function(data) c_obj.remove(); toastr.success('Item Deleted Successfully.', 'Success Alert', timeOut: 5000); getPageData(); ); ); /* Edit Item */ $("body").on("click",".edit-item",function() var id = $(this).parent("td").data('id'); var title = $(this).parent("td").prev("td").prev("td").text(); var description = $(this).parent("td").prev("td").text(); $("#edit-item").find("input[name='title']").val(title); $("#edit-item").find("textarea[name='description']").val(description); $("#edit-item").find("form").attr("action",url + '/update/' + id); ); /* Updated new Item */ $(".crud-submit-edit").click(function(e) e.preventDefault(); var form_action = $("#edit-item").find("form").attr("action"); var title = $("#edit-item").find("input[name='title']").val(); var description = $("#edit-item").find("textarea[name='description']").val(); $.ajax( dataType: 'json', type:'POST', url: form_action, data:title:title, description:description ).done(function(data) getPageData(); $(".modal").modal('hide'); toastr.success('Item Updated Successfully.', 'Success Alert', timeOut: 5000); ); );
Ok, now we are ready to run our CRUD Application example. So let’s run bellow command on your root directory for quick run:
php -S localhost:8000
Now you can open bellow URL on your browser:
http://localhost:8000/
قالب وردپرس
0 notes