#MySQLi CRUD Tutorial
Explore tagged Tumblr posts
Visit Tumblr Blog
Explore Tumblr blogs with no restrictions, modern design and the best experience.
Last Seen Tumblr Blogs


Fun Fact
Mobile Tumblr US users spend an average of 4.04 minutes per session on the app.
Text
youtube
#PHP Object-Oriented Programming#MySQLi CRUD Tutorial#PHP OOP CRUD#PHP CRUD Tutorial in Hindi#PHP and MySQLi Tutorial#Object-Oriented PHP CRUD Application#MySQLi CRUD Application in Hindi#PHP and MySQLi CRUD Application#Youtube
0 notes
Text
Complete PHP Tutorial: Learn PHP from Scratch in 7 Days
Are you looking to learn backend web development and build dynamic websites with real functionality? You’re in the right place. Welcome to the Complete PHP Tutorial: Learn PHP from Scratch in 7 Days — a practical, beginner-friendly guide designed to help you master the fundamentals of PHP in just one week.
PHP, or Hypertext Preprocessor, is one of the most widely used server-side scripting languages on the web. It powers everything from small blogs to large-scale websites like Facebook and WordPress. Learning PHP opens up the door to back-end development, content management systems, and full-stack programming. Whether you're a complete beginner or have some experience with HTML/CSS, this tutorial is structured to help you learn PHP step by step with real-world examples.
Why Learn PHP?
Before diving into the tutorial, let’s understand why PHP is still relevant and worth learning in 2025:
Beginner-friendly: Easy syntax and wide support.
Open-source: Free to use with strong community support.
Cross-platform: Runs on Windows, macOS, Linux, and integrates with most servers.
Database integration: Works seamlessly with MySQL and other databases.
In-demand: Still heavily used in CMS platforms like WordPress, Joomla, and Drupal.
If you want to build contact forms, login systems, e-commerce platforms, or data-driven applications, PHP is a great place to start.
Day-by-Day Breakdown: Learn PHP from Scratch in 7 Days
Day 1: Introduction to PHP & Setup
Start by setting up your environment:
Install XAMPP or MAMP to create a local server.
Create your first .php file.
Learn how to embed PHP inside HTML.
Example:
<?php echo "Hello, PHP!"; ?>
What you’ll learn:
How PHP works on the server
Running PHP in your browser
Basic syntax and echo statement
Day 2: Variables, Data Types & Constants
Dive into PHP variables and data types:
$name = "John"; $age = 25; $is_student = true;
Key concepts:
Variable declaration and naming
Data types: String, Integer, Float, Boolean, Array
Constants and predefined variables ($_SERVER, $_GET, $_POST)
Day 3: Operators, Conditions & Control Flow
Learn how to make decisions in PHP:
if ($age > 18) { echo "You are an adult."; } else { echo "You are underage."; }
Topics covered:
Arithmetic, comparison, and logical operators
If-else, switch-case
Nesting conditions and best practices
Day 4: Loops and Arrays
Understand loops to perform repetitive tasks:
$fruits = ["Apple", "Banana", "Cherry"]; foreach ($fruits as $fruit) { echo $fruit. "<br>"; }
Learn about:
for, while, do...while, and foreach loops
Arrays: indexed, associative, and multidimensional
Array functions (count(), array_push(), etc.)
Day 5: Functions & Form Handling
Start writing reusable code and learn how to process user input from forms:
function greet($name) { return "Hello, $name!"; }
Skills you gain:
Defining and calling functions
Passing parameters and returning values
Handling HTML form data with $_POST and $_GET
Form validation and basic security tips
Day 6: Working with Files & Sessions
Build applications that remember users and work with files:
session_start(); $_SESSION["username"] = "admin";
Topics included:
File handling (fopen, fwrite, fread, etc.)
Reading and writing text files
Sessions and cookies
Login system basics using session variables
Day 7: PHP & MySQL – Database Connectivity
On the final day, you’ll connect PHP to a database and build a mini CRUD app:
$conn = new mysqli("localhost", "root", "", "mydatabase");
Learn how to:
Connect PHP to a MySQL database
Create and execute SQL queries
Insert, read, update, and delete (CRUD operations)
Display database data in HTML tables
Bonus Tips for Mastering PHP
Practice by building mini-projects (login form, guest book, blog)
Read official documentation at php.net
Use tools like phpMyAdmin to manage databases visually
Try MVC frameworks like Laravel or CodeIgniter once you're confident with core PHP
What You’ll Be Able to Build After This PHP Tutorial
After following this 7-day PHP tutorial, you’ll be able to:
Create dynamic web pages
Handle form submissions
Work with databases
Manage sessions and users
Understand the logic behind content management systems (CMS)
This gives you the foundation to become a full-stack developer, or even specialize in backend development using PHP and MySQL.
Final Thoughts
Learning PHP doesn’t have to be difficult or time-consuming. With the Complete PHP Tutorial: Learn PHP from Scratch in 7 Days, you’re taking a focused, structured path toward web development success. You’ll learn all the core concepts through clear explanations and hands-on examples that prepare you for real-world projects.
Whether you’re a student, freelancer, or aspiring developer, PHP remains a powerful and valuable skill to add to your web development toolkit.
So open up your code editor, start typing your first <?php ... ?> block, and begin your journey to building dynamic, powerful web applications — one day at a time.

0 notes
Text
Mastering PHP: The Ultimate Guide to PHP Online Courses
In today's fast-evolving digital era, web development continues to play a vital role in shaping online experiences. One of the most trusted and widely-used server-side scripting languages in this domain is PHP (Hypertext Preprocessor). Whether you are a beginner aiming to break into web development or a seasoned programmer looking to expand your skills, enrolling in a PHP online course is a smart and strategic move.
What is PHP?
PHP is a powerful scripting language specifically designed for web development. It is open-source, easy to learn, and integrates seamlessly with HTML, databases like MySQL, and content management systems such as WordPress. PHP runs on almost all operating systems including Linux, Windows, and macOS, making it incredibly versatile.
Since its creation in 1994 by Rasmus Lerdorf, PHP has evolved dramatically. Today, it powers over 75% of websites on the internet, including big names like Facebook, Wikipedia, and WordPress. Its simplicity and wide applicability make it a must-know language for aspiring web developers.
Why Learn PHP Online?
1. Flexibility and Convenience
One of the biggest advantages of choosing an online PHP course is the flexibility it offers. Whether you're a college student, a working professional, or a freelance developer, you can learn PHP at your own pace, anytime and anywhere.
2. Cost-Effective Learning
Online courses are typically more affordable than in-person classes. Many platforms even offer free PHP tutorials or low-cost courses that deliver high-quality content.
3. Access to Quality Resources
Most online PHP courses provide a wealth of resources, including video lectures, downloadable content, quizzes, code editors, and forums. These materials make it easier to grasp complex concepts and practice coding in real-time.
4. Certification and Career Growth
Many PHP online courses offer certificates upon completion. These certificates can enhance your resume and make you stand out in the job market. With PHP skills, you can pursue roles such as Web Developer, Full-Stack Developer, Backend Developer, or Software Engineer.
Key Topics Covered in a PHP Online Course
A comprehensive PHP course typically includes the following modules:
1. Introduction to PHP
What is PHP?
Installation and setup (XAMPP, WAMP)
Syntax and basic structure
Embedding PHP in HTML
2. PHP Variables and Data Types
Strings, integers, floats, booleans
Arrays (indexed and associative)
Constants
Type casting
3. Control Structures
Conditional statements (if, else, switch)
Looping structures (for, while, do-while, foreach)
4. Functions and Scope
Creating and calling functions
Function parameters and return values
Variable scope (local, global, static)
5. Forms and User Input
Handling GET and POST methods
Form validation
Superglobals like $_GET, $_POST, $_REQUEST, $_SERVER
6. Working with Databases
Connecting PHP with MySQL
CRUD operations (Create, Read, Update, Delete)
Using PDO and MySQLi
Prepared statements for security
7. Error Handling
Types of errors (syntax, runtime, logical)
Try-catch blocks
Custom error handlers
8. Sessions and Cookies
Creating and managing sessions
Setting and reading cookies
Session security best practices
9. File Handling in PHP
Reading and writing files
Uploading files via forms
File permissions
10. Object-Oriented Programming in PHP
Classes and objects
Constructors and destructors
Inheritance, encapsulation, polymorphism
Interfaces and traits
11. PHP and Web Security
Input validation and sanitization
Preventing SQL injection and XSS
HTTPS and secure sessions
12. Advanced PHP Topics
PHP with AJAX
REST APIs in PHP
MVC Frameworks like Laravel and CodeIgniter
Composer and dependency management
Popular Platforms Offering PHP Online Courses
Here are some of the best platforms where you can learn PHP online:
1. Udemy
Udemy offers a wide range of PHP courses for all levels. Courses like “PHP for Beginners” and “Object-Oriented PHP & MVC” are among the top-rated, featuring lifetime access and a certificate upon completion.
2. Coursera
Partnering with universities and colleges, Coursera offers structured PHP programs. You can audit most courses for free or pay to receive a certification. A good example is the Web Applications for Everybody course from the University of Michigan.
3. edX
edX features PHP-related content through universities like Harvard and MIT. Though primarily focused on computer science and web development, several PHP courses are included under broader programming paths.
4. LinkedIn Learning
LinkedIn Learning provides bite-sized PHP lessons with project-based learning. A subscription gives access to multiple courses, helpful if you're pursuing more than just PHP.
5. FreeCodeCamp and W3Schools
Both platforms are excellent for beginners who want to explore PHP basics for free. W3Schools, in particular, is well-known for its hands-on “Try It Yourself” editor.
Who Should Take a PHP Online Course?
1. Beginners in Web Development
If you're new to coding and want to start with a language that's widely used and beginner-friendly, PHP is a great option.
2. Students and Computer Science Graduates
Learning PHP alongside HTML, CSS, and JavaScript can give you a competitive edge when applying for internships or junior developer roles.
3. Freelancers and Entrepreneurs
If you're planning to build your own website or work on client projects, PHP enables you to create dynamic, database-driven websites quickly.
4. Working Professionals
Developers who want to expand their backend skills or transition into full-stack development will benefit significantly from PHP expertise.
Career Opportunities After Learning PHP
Once you complete a PHP online course, several doors open for your professional growth:
Web Developer: Design and build dynamic websites.
Backend Developer: Manage server-side logic and database interactions.
Full-Stack Developer: Handle both frontend and backend tasks.
WordPress Developer: Customize and develop plugins/themes using PHP.
Freelance Developer: Build and manage websites for clients.
According to recent job market statistics, PHP developers earn an average salary of $60,000–$90,000 annually, depending on experience, location, and industry.
Tips for Success in an Online PHP Course
Set Clear Goals: Decide whether you’re learning for a job, freelance projects, or personal growth.
Practice Regularly: The best way to learn coding is by doing it. Practice through exercises and mini-projects.
Join Online Communities: Platforms like Stack Overflow, Reddit, and GitHub can help you learn collaboratively.
Work on Real Projects: Apply what you learn by building real-world applications—this boosts your confidence and portfolio.
Keep Up With Updates: PHP continues to evolve (e.g., PHP 8.x versions), so staying updated ensures your skills remain relevant.
Conclusion
PHP remains a cornerstone of modern web development, and mastering it through an online course is an effective, convenient, and affordable way to jumpstart or advance your programming journey. With comprehensive learning resources, expert instructors, and real-world projects, PHP online courses provide everything you need to build robust, scalable, and dynamic websites.
Whether you're starting from scratch or adding PHP to your skillset, now is the perfect time to enroll and harness the power of this essential language.
#php online course#PHP Training in Chandigarh#Python Training in Chandigarh#CCNA Training in Chandigarh#MERN Stack Training in Chandigarh
0 notes
Photo
Tutorial: CRUD Operation in XML File using PHP with Modal About CRUD Operation in XML File using PHP with Modal In the previous tutorials about XML, we have discussed on How to Create an XML file from MySQL Database using PHP/MySQLi and on How to Display XML File using PHP. This time, we are going to discuss on how to create CRUD Operation on XML File. I've used bootstrap and jQuery in this t... https://bit.ly/2QjbLFH
#crudoperationinxmlfilephp#crudxmlphp#phpcreatexml#phpcreatexmlfileandsave#phpdecodexmlfile#phpinxmlfile#phploadxmlfile#phpparsexml#phpparsexmlfile#phpreadxmlfile#phptoxmlfile#phpxml#phpxmlencode#phpxmlfile#phpxmlfiles#phpxmlparser#usephpinxmlfile#xml#xmlcrudphp#xmlfile#xmlfileinphp#xmlfilephp#xmlphp
0 notes
Photo
How to Connect PHP to MySQL
Do you want ot learn how to connect php to MySQL and perform different types of database operations? In this article, we'll do just that—we'll discuss MySQL database connectivity in PHP.
PHP provides different ways to connect PHP to a MySQL database server. Until PHP 5.5, one of the most popular ways was with the MySQL extension—it provided a "procedural" way to connect to the MySQL server. However, this extension is deprecated as of PHP 5.5, so we’re not going to discuss that.
The current two ways you can choose from are PDO and MySQLi. The PDO (PHP Data Objects) extension supports different types of underlying database servers along with the MySQL server. And thus, it’s portable in case you decide to swap the underlying database server at any point in the future. On the other hand, the MySQLi extension is specific to the MySQL server and provides better speed and performance. The MySQLi extension might also be a little simpler to understand at first, since it lets you write SQL queries directly. I've you've worked with SQL databases before, this be very familiar. On the other hand, the PDO extension creates a powerful mapping from the SQL database to your PHP code and lets you do a lot of database operations without needing to know the details of SQL or the database. In the long run and for larger projects, this can save a lot of coding and debugging effort.
In this post, I'll use the MySQLi extension. But you can learn more about the PDO extension here on Envato Tuts+.
PHP
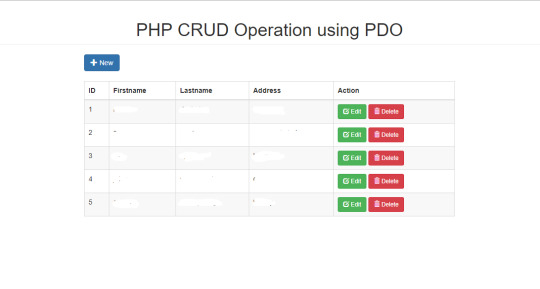
Quickly Build a PHP CRUD Interface With the PDO Advanced CRUD Generator Tool
Sajal Soni
We’ll cover the following topics in this article:
creating a MySQL connection
inserting, updating and deleting Records
retrieving records
Best PHP Database Scripts on CodeCanyon
In this post, I'll be showing you how to make a bare-metal connection to a MySQL database from PHP. This is an important skill to have, but if you want to save time on your next project, you might want to upgrade to a professional database script. This will save time and make your work easier.
Explore the best and most useful PHP database scripts ever created on CodeCanyon. With a low-cost one time payment, you can purchase these high-quality WordPress themes and improve your website experience for you and your visitors.
Here are some of the best PHP database scripts available on CodeCanyon for 2020.
PHP
Comparing PHP Database Abstraction Layers and CRUD Plugins
Sajal Soni
Create a MySQL Connection
In this section, I'll show you how you can connect to the MySQL server from your PHP script and create a connection object. Later on, this connection object will be used to run queries, fetch output and manipulate the database records. As we discussed earlier, we’re going to use the PHP MySQLi extension for this article.
The MySQLi extension provides two different ways to perform database operations. You can use it either the object-oriented way or the procedural way, but as this tutorial is aimed at beginners, I'll stick with the procedural way. If you're interested in seeing some object oriented snippets, you can ping me in the comment section below and I’ll be happy to provide them.
To start, go ahead and create the db_connect.php file under your document root with the following contents.
<?php $mysqli_link = mysqli_connect("{HOST_NAME}", "{DATABASE_USERNAME}", "{DATABASE_PASSWORD}", "{DATABASE_NAME}"); if (mysqli_connect_errno()) { printf("MySQL connection failed with the error: %s", mysqli_connect_error()); exit; }
Note that I've used placeholders in the mysqli_connect function—you have to replace these with actual values.
Let’s go through the each placeholder to see what it stands for.
{HOST_NAME}: This represents your MySQL server’s host-name or IP address. If you have installed the MySQL server on the same system along with PHP, you should use localhost or 127.0.0.1. On the other hand, if you’re using a MySQL server which is hosted externally, you can use the corresponding host-name or IP address.
{DATABASE_USERNAME}: This represents the username of your MySQL user. Basically, this is the username which you use to connect to your MySQL server.
{DATABASE_PASSWORD}: This represents the password of your MySQL user. Again, this is the password which you use to connect to your MySQL server along with the MySQL username.
{DATABASE_NAME}: This is a name of the MySQL database which you want to connect to. Once the connection is created, you'll query this database for further operations.
Go ahead and replace these placeholders with actual values. In my case, I’ve installed the MySQL server locally, and I’ve a MySQL user with tutsplus-demo-user as the MySQL username and tutsplus-demo-password as the MySQL password. And with that, the above example looks like this:
<?php $mysqli_link = mysqli_connect("localhost", "tutsplus-demo-user", "tutsplus-demo-password", "tutsplus-demo-database"); if (mysqli_connect_errno()) { printf("MySQL connection failed with the error: %s", mysqli_connect_error()); exit; }
If you run this example, it should create a database connection link and assign it to the $mysqli_link variable, which we’ll use later on to perform different types of database operations.
On the other hand, if there’s any problem setting up the connection, the mysqli_connect_errno function will return an error code and the mysqli_connect_error function will display the actual error. In the above example, we’ve used it for debugging purposes.
Now, we’ve a successful connection to the MySQL server and we’ll see how to use it to perform different types of queries next section on wards.
How to Insert Records
In the previous section, we discussed how to use the mysqli_connect function to setup a database connection with the MySQL server. In this section, we’ll go ahead and discuss how to use the connection object to perform the INSERT queries.
If you want to follow along with the examples discussed in this article, you'll need to create the following MySQL table in your database. It's the table which we're going to use in all the examples from now on.
CREATE TABLE `students` ( `id` int(11) NOT NULL AUTO_INCREMENT, `first_name` varchar(255) COLLATE utf8mb4_unicode_ci NOT NULL, `last_name` varchar(255) COLLATE utf8mb4_unicode_ci NOT NULL, `email` varchar(255) COLLATE utf8mb4_unicode_ci NOT NULL, PRIMARY KEY (`id`) ) ENGINE=InnoDB DEFAULT CHARSET=utf8mb4 COLLATE=utf8mb4_unicode_ci;
Go ahead and create the above MySQL table by using the phpMyAdmin software or command line tool.
Next, let’s create the db_insert.php file with the following contents. Please don’t forget to replace the connection parameters with your own.
<?php $mysqli_link = mysqli_connect("localhost", "tutsplus-demo-user", "tutsplus-demo-password", "tutsplus-demo-database"); if (mysqli_connect_errno()) { printf("MySQL connection failed with the error: %s", mysqli_connect_error()); exit; } $insert_query = "INSERT INTO students(`first_name`,`last_name`,`email`) VALUES ('". mysqli_real_escape_string($mysqli_link, 'John') ."','". mysqli_real_escape_string($mysqli_link, 'Wood') ."','". mysqli_real_escape_string($mysqli_link, '[email protected]') ."')"; // run the insert query If (mysqli_query($mysqli_link, $insert_query)) { echo 'Record inserted successfully.'; } // close the db connection mysqli_close($mysqli_link); ?>
First, we set up a database connection by using the mysqli_connect function as we discussed earlier. After that, we’ve prepared the insert query which we’re going to execute later on. It's important to note that we've used the mysqli_real_escape_string function to escape string values that we’re going to use in the insert query. Specifically, you must use this function when you’re dealing with values submitted via $_POST variables to avoid SQL injection.
Finally, we’ve used the mysqli_query function, which takes two arguments. The first argument is the active connection link where the query will be executed. And the second argument is the MySQL query which we want to execute. The mysqli_query function returns TRUE if the query was executed successfully.
Finally, we’ve used the mysqli_close function to close the active database connection. It’s a good practice to close the database connection once you’re done with database operations.
Go ahead and run the script, and that should insert a record in the students table!
How to Update Records
Updating the records in a database from the PHP script is very similar to the insert operation with the only difference is that the query is going to be the update query instead of the insert query.
Let’s revise the above example and update the first_name field as shown in the following example.
<?php $mysqli_link = mysqli_connect("localhost", "tutsplus-demo-user", "tutsplus-demo-password", "tutsplus-demo-database"); if (mysqli_connect_errno()) { printf("MySQL connection failed with the error: %s", mysqli_connect_error()); exit; } $update_query = "UPDATE students SET `first_name` = '". mysqli_real_escape_string($mysqli_link,'Johnny') ."' WHERE `email` = '[email protected]'"; // run the update query If (mysqli_query($mysqli_link, $update_query)) { echo 'Record updated successfully.'; } // close the db connection mysqli_close($mysqli_link); ?>
Go ahead and run the script, and that should update the record in the students table.
How to Select Records
In the earlier sections, we discussed how you can insert and update records in a database from the PHP script. In this section, we’ll explore how you can fetch records from a database by using the different types of MySQLi functions.
Firstly, you need to use the mysqli_query function to execute the select query. Upon successful execution of the select query, the mysqli_query function returns the mysqli result object which we could use to iterate over the records returned by the select query. When it comes to fetching and iterating over the records from the MySQLi result object, there are different functions available.
mysqli_fetch_all: It allows you to fetch all result rows at once. You can also specify whether you want results as an associative array, a numeric array or both.
mysqli_fetch_array: It allows you to retrieve one row at a time. And thus, you’ll have to use the while loop to iterate over all the records. Again, you can specify whether you want a result row as an associative array, a numeric array or both.
mysqli_fetch_assoc: It fetches a result row one at a time as an associate array.
mysqli_fetch_object: It fetches a result row one at a time as an object.
Let’s have a look at the following example to understand how it works:
<?php $mysqli_link = mysqli_connect("localhost", "tutsplus-demo-user", "tutsplus-demo-password", "tutsplus-demo-database"); if (mysqli_connect_errno()) { printf("MySQL connection failed with the error: %s", mysqli_connect_error()); exit; } $select_query = "SELECT * FROM students LIMIT 10"; $result = mysqli_query($mysqli_link, $select_query); while ($row = mysqli_fetch_array($result, MYSQLI_ASSOC)) { echo "First Name:" . $row['first_name'] . "<br/>"; echo "Last Name:" . $row['last_name'] . "<br/>"; echo "Email:" . $row['email'] . "<br/>"; echo "<br/>"; } // close the db connection mysqli_close($mysqli_link); ?>
As you can see, we’ve used the mysqli_fetch_array function with the MYSQLI_ASSOC option as a second argument. And thus, it returns the result row as an associate array. Had you would have used the MYSQLI_NUM option, you would have accessed it like $row[0], $row[1] and $row[2] in the above example.
On the other hand, if you would use the mysqli_fetch_object function in the above example, you can access the values as shown in the following snippet. For brevity, I’ll only include the while loop snippet.
… … while ($row = mysqli_fetch_object($result)) { echo "First Name:" . $row->first_name . "<br/>"; echo "Last Name:" . $row->last_name . "<br/>"; echo "Email:" . $row->email . "<br/>"; echo "<br/>"; } ... ...
So in this way, you can fetch and display records from the MySQLi database.
How to Delete Records
In this section, we’ll see how to run delete queries from the PHP script. Deleting records from a database is a pretty straightforward operation since you just need to prepare the delete query and run it with the mysqli_query function.
Let’s go through the following example to see how it works.
<?php $mysqli_link = mysqli_connect("localhost", "tutsplus-demo-user", "tutsplus-demo-password", "tutsplus-demo-database"); if (mysqli_connect_errno()) { printf("MySQL connection failed with the error: %s", mysqli_connect_error()); exit; } $delete_query = "DELETE FROM students WHERE `email` = '[email protected]'"; // run the update query If (mysqli_query($mysqli_link, $delete_query)) { echo 'Record deleted successfully.'; } // close the db connection mysqli_close($mysqli_link); ?>
As you can see, everything is the same as we’ve seen it already with insert and update examples except that the query is a delete query in this case.
So that's how you can perform different types of database operations from the PHP script.
And with that, we’ve reached the end of this tutorial. What we’ve discussed so far today should help you to strengthen database connectivity concepts, specifically how to connect PHP to MySQL and perform different types of operations.
Conclusion
In this article, we discussed how to connect PHP to MySQL database by using the MySQLi extension. From setting up a database connection to executing different types of queries, we discussed almost every aspect of the database connectivity.
Although I’ve tried to keep things as simple as possible, if you still find anything confusing or want to know any specific thing in detail, feel free to post your queries using the feed below.
The Best PHP Scripts on CodeCanyon
Explore thousands of the best and most useful PHP scripts ever created on CodeCanyon. With a low-cost one time payment, you can purchase these high-quality WordPress themes and improve your website experience for you and your visitors.
Here are a few of the best-selling and up-and-coming PHP scripts available on CodeCanyon for 2020.
PHP
14 Best PHP Event Calendar and Booking Scripts
Kyle Sloka-Frey
PHP
10 Best PHP URL Shortener Scripts
Monty Shokeen
PHP
12 Best Contact Form PHP Scripts
Nona Blackman
PHP
Comparing the 5 Best PHP Form Builders
Nona Blackman
PHP
Create Beautiful Forms With PHP Form Builder
Ashraff Hathibelagal
by Sajal Soni via Envato Tuts+ Code https://ift.tt/2HcGa0z
0 notes
Text
PHP CRUD Operations with MySQLi Extension
PHP CRUD Operations with MySQLi Extension
CRUD stands for Create, Read, Update and Delete. CRUD operations are commonly used to manipulate data in the database. Almost, all web application used Add, Edit, Update and Delete functionality for managing data. In this tutorial, we will create a simple PHP CRUD application with MySQL to perform create (insert), read (select), update, and delete operations. The MySQLi Extension (MySQL Improved)…
View On WordPress
3 notes
·
View notes
Text
Crud PHP MySQL Bootstrap Example Tutorial
Crud PHP MySQL Bootstrap Example Tutorial. Here you will learn how you can create a crud application in PHP with MySQL and bootstrap from scratch (step by step). This tutorial shows you how you can create crud (create, read, update, delete) in PHP with MySQL and bootstrap.
This is a very simple and easy example for creating crud (create, read, update, delete) application in PHP with MySQL and…
View On WordPress
#crud php mysql#crud php mysql android studio#crud php mysql bootstrap#crud php mysql bootstrap download#crud php mysql example#crud php mysql github#crud php mysql tutorial#crud php mysqli#crud php mysqli malasngoding#crud php mysqli pdf
0 notes
Link
Start learning php web application development with this php crud tutorial.
#php mysqli tutorial#php script#php developers#php mysql#jquery#ajax#php curd#crud application#web application development#php application development#web#web developers#web development
0 notes
Video
youtube
PHP CRUD Tutorial with MySQLi (Create, Read, Update, Delete) with Code
0 notes
Text
Simple php Crud using mysqli extension (oop)
Simple php Crud using mysqli extension (oop)
This tutorial is a Simple php Crud using mysqli extension (oop).
Recap from Previous Post Here,
In our post today we will be showing how you can perform a simple php Crud using mysqli extension the objected oriented way. CRUD represents the four basic operations of the database. C : stands for Create (INSERT), which defines creating or inserting new data into the database. R : stands for Read…
View On WordPress
0 notes
Text
89% off #PHP with PDO: Build a Basic Task List with PHP, PDO & MySQL- $10
Learn and Understand PHP Database Objects (PDO), Build a Basic Task List with PHP, PDO, MYSQL and JQuery Ajax
All Levels, – Video: 2.5 hours Other: 0 mins, 24 lectures
Average rating 5.0/5 (5.0)
Course requirements:
Already Setup PHP Development Environment running PHP 5.1 with a basic understanding of PHP Programming Language Basic understanding of SQL Language (Every Query is well explained) Little OOP knowledge will be nice but not required to follow along
Course description:
LATEST COURSE ON PDO RELEASED ON 18/05/2016
This course teaches PHP Data Objects (PDO), one of the available API for connecting to databases within PHP. PDO is an object oriented extension which was introduced with PHP 5.1, taking advantage of several features introduced into PHP at that time.
In this step by step course both beginners and experienced web developers will gain a comprehensive understanding of the modern PDO extension and how it can be used to create scalable database driven application.
This PHP with PDO course uses MySQL database to teach PDO concept and finally you learn how to build a basic task list using the concepts that has been taught in the course.
My Approach
In this course I use simple examples that can be easily understood to illustrate concepts and build upon it.
See What Students are saying
“This was perfect for my skill level as an advanced beginner to lower intermediate PHP developer. Terry wastes no time, and the whole course is packed with great information. I also really like the Material Design CSS and JS used in the course, since I had never used it before. I am very appreciative of this knowledge I gained, and plan to go through the whole thing again, and use it as a reference later.” – Collin Stubblefield
“Managed to complete making a PDO tasklist! very helpful! the content is well put together! understood some core concept of PHP PDO! overall highly recommended! keep making more videos! If you can make a shopping cart! for tutorial basis! thanks!” -Brian Gichohi
“The instructor is clear and engaging also knowledgeable and passionate about the course. The course is well taught by the instructor” – Abimbola Makinwa
“Terry is a great teacher. He goes the extra mile to ensure student satisfaction. He even offers to remotely connect to your machine to help out if your code is not working the way it should. Thanks ever so much.” – Sahid Camara
Timely Support!
If you ever encounter any problem why taking this course, don’t worry I am always here to help and guide you through. Enroll today and get the skills and knowledge you need to succeed as a PHP developer. Every minute you let by is money and opportunity that are passing you by.
Full details Build a Basic Task List with PDO, PHP and MySQL Perform CRUD (Create, Read, Update and Delete) Operations with PDO Protect any web application against SQL Injection In depth understanding of PHP Data Object (PDO) Dealing with Errors in PDO Send Request via Ajax without page Refresh Prompt support and value for your money
Full details This PDO course is for anyone who is not familiar with PHP Data Objects database API and/or students looking for a quick refresher on PDO. Want to learn and understand a multi platform database API You want to migrate from MySQLi or MySQL to PDO PHP Developers who want to learn how to use PDO for database driven application.
Full details
Reviews:
“Very clear and informative right from the start. Aimed beyond a PHP or data programming novice. Excellent up to date practical instruction once you have a bit of prior knowledge of PHP and the likes of MySQL.” (Chris Smethurst)
“Excellent class! Instruction is very clear and to the point. I’ve learned a lot.” (Thomas Cowan)
“Now I know how pdo works.

Thanks.” (Mehmet Akbasogullari)
About Instructor:
Osayawe Terry Ogbemudia
Terry is a professional Computer Scientist, thoroughly skilled and experienced in Information Technology, Software Development and Web Programming. He ventured into Software Programming and Database Administration in 2007. Terry holds an undergraduate degree in Software Engineering from University of East London, and is also a certified Oracle Database Professional (OCP). Having a passion for teaching, he seizes every opportunity that he finds to impact into others. In 2008, he facilitated high-end trainings in Oracle Database, Linux Operating System, Oracle Financial 11i, and Web Design at KarRox and 2010 at NIIT. He is the founder of Terdia Technology Solutions, an Information Technology Company, which provides integrated solutions that leverage Information Technology and knowledge of business processes.
Instructor Other Courses:
Code Snippet: Get timely help with Bite-sized Training PHP: Complete Login and Registration System with PHP & MYSQL …………………………………………………………… Osayawe Terry Ogbemudia coupons Development course coupon Udemy Development course coupon Web Development course coupon Udemy Web Development course coupon course coupon coupon coupons
The post 89% off #PHP with PDO: Build a Basic Task List with PHP, PDO & MySQL- $10 appeared first on Udemy Cupón.
from http://www.xpresslearn.com/udemy/coupon/89-off-php-with-pdo-build-a-basic-task-list-with-php-pdo-mysql-10/
0 notes
Text
89% off #PHP with PDO: Build a Basic Task List with PHP, PDO & MySQL – $10
Learn and Understand PHP Database Objects (PDO), Build a Basic Task List with PHP, PDO, MYSQL and JQuery Ajax
All Levels, – 2.5 hours, 24 lectures
Average rating 4.7/5 (4.7 (38 ratings) Instead of using a simple lifetime average, Udemy calculates a course’s star rating by considering a number of different factors such as the number of ratings, the age of ratings, and the likelihood of fraudulent ratings.)
Course requirements:
Already Setup PHP Development Environment running PHP 5.1 with a basic understanding of PHP Programming Language Basic understanding of SQL Language (Every Query is well explained) Little OOP knowledge will be nice but not required to follow along
Course description:
LATEST COURSE ON PDO RELEASED ON 18/05/2016
This course teaches PHP Data Objects (PDO), one of the available API for connecting to databases within PHP. PDO is an object oriented extension which was introduced with PHP 5.1, taking advantage of several features introduced into PHP at that time.
In this step by step course both beginners and experienced web developers will gain a comprehensive understanding of the modern PDO extension and how it can be used to create scalable database driven application.
This PHP with PDO course uses MySQL database to teach PDO concept and finally you learn how to build a basic task list using the concepts that has been taught in the course.
My Approach
In this course I use simple examples that can be easily understood to illustrate concepts and build upon it.
See What Students are saying
“This was perfect for my skill level as an advanced beginner to lower intermediate PHP developer. Terry wastes no time, and the whole course is packed with great information. I also really like the Material Design CSS and JS used in the course, since I had never used it before. I am very appreciative of this knowledge I gained, and plan to go through the whole thing again, and use it as a reference later.” – Collin Stubblefield
“Managed to complete making a PDO tasklist! very helpful! the content is well put together! understood some core concept of PHP PDO! overall highly recommended! keep making more videos! If you can make a shopping cart! for tutorial basis! thanks!” -Brian Gichohi
“The instructor is clear and engaging also knowledgeable and passionate about the course. The course is well taught by the instructor” – Abimbola Makinwa
“Terry is a great teacher. He goes the extra mile to ensure student satisfaction. He even offers to remotely connect to your machine to help out if your code is not working the way it should. Thanks ever so much.” – Sahid Camara
Timely Support!
If you ever encounter any problem why taking this course, don’t worry I am always here to help and guide you through. Enroll today and get the skills and knowledge you need to succeed as a PHP developer. Every minute you let by is money and opportunity that are passing you by.
Full details Build a Basic Task List with PDO, PHP and MySQL Perform CRUD (Create, Read, Update and Delete) Operations with PDO Protect any web application against SQL Injection In depth understanding of PHP Data Object (PDO) Dealing with Errors in PDO Send Request via Ajax without page Refresh Prompt support and value for your money
Full details This PDO course is for anyone who is not familiar with PHP Data Objects database API and/or students looking for a quick refresher on PDO. Want to learn and understand a multi platform database API You want to migrate from MySQLi or MySQL to PDO PHP Developers who want to learn how to use PDO for database driven application.
Full details
Reviews:
“I really enjoyed this course. I just found at times the Lecturing to be way to fast to follow, I found myself pausing and rewinding alot to try understand.” (Murray Stewart)
“Great course! learned a lot. I found the ajax calls particularly interesting. And of course, Terry is a great teacher.” (Fabian Felix)
“Excellent class! Instruction is very clear and to the point. I’ve learned a lot.” (Thomas Cowan)
About Instructor:
Osayawe Terry Ogbemudia
Terry is a professional Computer Scientist, thoroughly skilled and experienced in Information Technology, Software Development and Web Programming. He ventured into Software Programming and Database Administration in 2007. Terry holds an undergraduate degree in Software Engineering from University of East London, and is also a certified Oracle Database Professional (OCP). Having a passion for teaching, he seizes every opportunity that he finds to impact into others. In 2008, he facilitated high-end trainings in Oracle Database, Linux Operating System, Oracle Financial 11i, and Web Design at KarRox and 2010 at NIIT. He is the founder of Terdia Technology Solutions, an Information Technology Company, which provides integrated solutions that leverage Information Technology and knowledge of business processes.
Instructor Other Courses:
Code Snippet: Get timely help with Bite-sized Training Osayawe Terry Ogbemudia, Fullstack Developer at Visual Math Interactive Sdn. Bhd (28) $10 $20 PHP: Complete Login and Registration System with PHP & MYSQL …………………………………………………………… Osayawe Terry Ogbemudia coupons Development course coupon Udemy Development course coupon Web Development course coupon Udemy Web Development course coupon PHP with PDO: Build a Basic Task List with PHP, PDO & MySQL PHP with PDO: Build a Basic Task List with PHP, PDO & MySQL course coupon PHP with PDO: Build a Basic Task List with PHP, PDO & MySQL coupon coupons
The post 89% off #PHP with PDO: Build a Basic Task List with PHP, PDO & MySQL – $10 appeared first on Course Tag.
from Course Tag http://coursetag.com/udemy/coupon/89-off-php-with-pdo-build-a-basic-task-list-with-php-pdo-mysql-10/ from Course Tag https://coursetagcom.tumblr.com/post/158200928003
0 notes
Photo
New Post has been published on https://programmingbiters.com/codeigniter-3-basic-crud-application-with-mysql-example-with-demo/
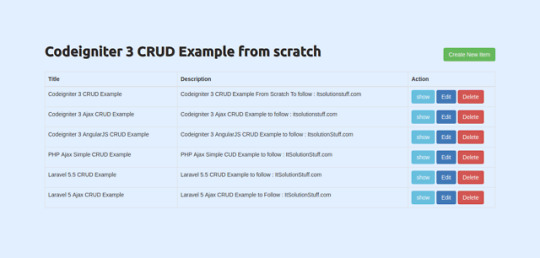
Codeigniter 3 - Basic CRUD application with MySQL Example with Demo
This tutorial will help to create simple CRUD (Create Read Update Delete) Operation application using MySQL Database with validation. As we know well we always require to create basic CRUD module for products, items etc using mysql database. It is primary requirement for any web application. So in this example i will explain example of add, edit and delete record using codeigniter 3 and mysql database. I am extending this tutorial and will add functionality to insert update delete record from mysql database with demo.Here i explain step by step process to create listing, add, edit and delete record using Codeigniter 3. You have to simple follow bellow few step to create basic CRUD application in codeigniter application.
There are listed bellow step you have to follow:
1) Download Codeigniter 3
2) Make Database and Configuration
3) Create Routes
4) Add ItemCRUD Controller
5) Create ItemCRUD Model
6) Create View Files
End of the example of this example you will get full CRUD app like as bellow screenshot.
Preview:
Step 1: Download Codeigniter 3
In this step we will download version of Codeigniter 3, so if you haven’t download yet then download from here : Download Codeigniter 3.
After Download successfully, extract clean new Codeigniter 3 application.
Step 2: Make Database and Configuration
In second step we will create new database “test” and add new table “items” in test database. You can use following SQL Query for create “items” table. So let’s create using bellow SQL query:
items table:
CREATE TABLE IF NOT EXISTS `items` ( `id` int(10) unsigned NOT NULL AUTO_INCREMENT, `title` varchar(255) COLLATE utf8_unicode_ci NOT NULL, `description` text COLLATE utf8_unicode_ci NOT NULL, PRIMARY KEY (`id`) ) ENGINE=InnoDB DEFAULT CHARSET=utf8 COLLATE=utf8_unicode_ci AUTO_INCREMENT=16 ;
After create database and table successfully, we have to configuration of database in our Codeigniter 3 application, so open database.php file and add your database name, username and password.
application/config/database.php
<?php defined('BASEPATH') OR exit('No direct script access allowed'); $active_group = 'default'; $query_builder = TRUE; $db['default'] = array( 'dsn' => '', 'hostname' => 'localhost', 'username' => 'root', 'password' => 'root', 'database' => 'test', 'dbdriver' => 'mysqli', 'dbprefix' => '', 'pconnect' => FALSE, 'db_debug' => (ENVIRONMENT !== 'production'), 'cache_on' => FALSE, 'cachedir' => '', 'char_set' => 'utf8', 'dbcollat' => 'utf8_general_ci', 'swap_pre' => '', 'encrypt' => FALSE, 'compress' => FALSE, 'stricton' => FALSE, 'failover' => array(), 'save_queries' => TRUE );
Step 3: Create Routes
Here, we have to add some routes in your route file. So first we will create routes for itemCRUD modules for lists, create, edit, update and delete. so put the bellow content in route file:
application/config/routes.php
<?php defined('BASEPATH') OR exit('No direct script access allowed'); $route['default_controller'] = 'welcome'; $route['404_override'] = ''; $route['translate_uri_dashes'] = FALSE; $route['itemCRUD'] = "itemCRUD/index"; $route['itemCRUD/(:num)'] = "itemCRUD/show/$1"; $route['itemCRUDCreate']['post'] = "itemCRUD/store"; $route['itemCRUDEdit/(:any)'] = "itemCRUD/edit/$1"; $route['itemCRUDUpdate/(:any)']['put'] = "itemCRUD/update/$1"; $route['itemCRUDDelete/(:any)']['delete'] = "itemCRUD/delete/$1";
Step 4: Add ItemCRUD Controller
Ok In this step, we will create one new controller ItemCRUD with method listing, create, edit, update and delete. so create ItemCRUD.php file in this path application/controllers/ItemCRUD.php and put bellow code in this file:
application/controllers/ItemCRUD.php
<?php defined('BASEPATH') OR exit('No direct script access allowed'); class ItemCRUD extends CI_Controller public $itemCRUD; /** * Get All Data from this method. * * @return Response */ public function __construct() parent::__construct(); $this->load->library('form_validation'); $this->load->library('session'); $this->load->model('ItemCRUDModel'); $this->itemCRUD = new ItemCRUDModel; /** * Display Data this method. * * @return Response */ public function index() $data['data'] = $this->itemCRUD->get_itemCRUD(); $this->load->view('theme/header'); $this->load->view('itemCRUD/list',$data); $this->load->view('theme/footer'); /** * Show Details this method. * * @return Response */ public function show($id) $item = $this->itemCRUD->find_item($id); $this->load->view('theme/header'); $this->load->view('itemCRUD/show',array('item'=>$item)); $this->load->view('theme/footer'); /** * Create from display on this method. * * @return Response */ public function create() $this->load->view('theme/header'); $this->load->view('itemCRUD/create'); $this->load->view('theme/footer'); /** * Store Data from this method. * * @return Response */ public function store() $this->form_validation->set_rules('title', 'Title', 'required'); $this->form_validation->set_rules('description', 'Description', 'required'); if ($this->form_validation->run() == FALSE) $this->session->set_flashdata('errors', validation_errors()); redirect(base_url('itemCRUD/create')); else $this->itemCRUD->insert_item(); redirect(base_url('itemCRUD')); /** * Edit Data from this method. * * @return Response */ public function edit($id) $item = $this->itemCRUD->find_item($id); $this->load->view('theme/header'); $this->load->view('itemCRUD/edit',array('item'=>$item)); $this->load->view('theme/footer'); /** * Update Data from this method. * * @return Response */ public function update($id) $this->form_validation->set_rules('title', 'Title', 'required'); $this->form_validation->set_rules('description', 'Description', 'required'); if ($this->form_validation->run() == FALSE) $this->session->set_flashdata('errors', validation_errors()); redirect(base_url('itemCRUD/edit/'.$id)); else $this->itemCRUD->update_item($id); redirect(base_url('itemCRUD')); /** * Delete Data from this method. * * @return Response */ public function delete($id) $item = $this->itemCRUD->delete_item($id); redirect(base_url('itemCRUD'));
Step 5: Create ItemCRUD Model
In this step, we have to create ItemCRUD model for write database logic, here we will write database logic to fetch all data, insert new record, update and delete. So you have to create new ItemCRUD.php in models folder.
application/models/ItemCRUD.php
<?php class ItemCRUDModel extends CI_Model public function get_itemCRUD() if(!empty($this->input->get("search"))) $this->db->like('title', $this->input->get("search")); $this->db->or_like('description', $this->input->get("search")); $query = $this->db->get("items"); return $query->result(); public function insert_item() $data = array( 'title' => $this->input->post('title'), 'description' => $this->input->post('description') ); return $this->db->insert('items', $data); public function update_item($id) $data=array( 'title' => $this->input->post('title'), 'description'=> $this->input->post('description') ); if($id==0) return $this->db->insert('items',$data); else $this->db->where('id',$id); return $this->db->update('items',$data); public function find_item($id) return $this->db->get_where('items', array('id' => $id))->row(); public function delete_item($id) return $this->db->delete('items', array('id' => $id)); ?>
Step 6: Create View Files
now we move in last step. In this step we have to create just php view files. So mainly we have to create layout file and then create new folder “itemCRUD” then create blade files of crud app. So finally you have to create following bellow view file:
1) header.php
2) footer.php
3) list.php
4) create.php
5) show.php
6) edit.php
So let’s just create following file and put bellow code.
application/views/theme/header.php
<!DOCTYPE html> <html> <head> <title>Basic Crud operation in Codeigniter 3</title> <link rel="stylesheet" href="https://maxcdn.bootstrapcdn.com/bootstrap/3.3.7/css/bootstrap.min.css" /> </head> <body> <div class="container">
application/views/theme/footer.php
</div> </body> </html>
application/views/itemCRUD/list.php
<div class="row"> <div class="col-lg-12 margin-tb"> <div class="pull-left"> <h2>Codeigniter 3 CRUD Example from scratch</h2> </div> <div class="pull-right"> <a class="btn btn-success" href="<?php echo base_url('itemCRUD/create') ?>"> Create New Item</a> </div> </div> </div> <table class="table table-bordered"> <thead> <tr> <th>Title</th> <th>Description</th> <th width="220px">Action</th> </tr> </thead> <tbody> <?php foreach ($data as $item) ?> <tr> <td><?php echo $item->title; ?></td> <td><?php echo $item->description; ?></td> <td> <form method="DELETE" action="<?php echo base_url('itemCRUD/delete/'.$item->id);?>"> <a class="btn btn-info" href="<?php echo base_url('itemCRUD/'.$item->id) ?>"> show</a> <a class="btn btn-primary" href="<?php echo base_url('itemCRUD/edit/'.$item->id) ?>"> Edit</a> <button type="submit" class="btn btn-danger"> Delete</button> </form> </td> </tr> <?php ?> </tbody> </table>
application/views/itemCRUD/create.php
<div class="row"> <div class="col-lg-12 margin-tb"> <div class="pull-left"> <h2>Add New Item</h2> </div> <div class="pull-right"> <a class="btn btn-primary" href="<?php echo base_url('itemCRUD');?>"> Back</a> </div> </div> </div> <form method="post" action="<?php echo base_url('itemCRUDCreate');?>"> <?php if ($this->session->flashdata('errors')) echo '<div class="alert alert-danger">'; echo $this->session->flashdata('errors'); echo "</div>"; ?> <div class="row"> <div class="col-xs-12 col-sm-12 col-md-12"> <div class="form-group"> <strong>Title:</strong> <input type="text" name="title" class="form-control"> </div> </div> <div class="col-xs-12 col-sm-12 col-md-12"> <div class="form-group"> <strong>Description:</strong> <textarea name="description" class="form-control"></textarea> </div> </div> <div class="col-xs-12 col-sm-12 col-md-12 text-center"> <button type="submit" class="btn btn-primary">Submit</button> </div> </div> </form>
application/views/itemCRUD/show.php
<div class="row"> <div class="col-lg-12 margin-tb"> <div class="pull-left"> <h2> Show Item</h2> </div> <div class="pull-right"> <a class="btn btn-primary" href="<?php echo base_url('itemCRUD');?>"> Back</a> </div> </div> </div> <div class="row"> <div class="col-xs-12 col-sm-12 col-md-12"> <div class="form-group"> <strong>Title:</strong> <?php echo $item->title; ?> </div> </div> <div class="col-xs-12 col-sm-12 col-md-12"> <div class="form-group"> <strong>Description:</strong> <?php echo $item->description; ?> </div> </div> </div>
application/views/itemCRUD/edit.php
<div class="row"> <div class="col-lg-12 margin-tb"> <div class="pull-left"> <h2>Edit Item</h2> </div> <div class="pull-right"> <a class="btn btn-primary" href="<?php echo base_url('itemCRUD');?>"> Back</a> </div> </div> </div> <form method="post" action="<?php echo base_url('itemCRUD/update/'.$item->id);?>"> <?php if ($this->session->flashdata('errors')) echo '<div class="alert alert-danger">'; echo $this->session->flashdata('errors'); echo "</div>"; ?> <div class="row"> <div class="col-xs-12 col-sm-12 col-md-12"> <div class="form-group"> <strong>Title:</strong> <input type="text" name="title" class="form-control" value="<?php echo $item->title; ?>"> </div> </div> <div class="col-xs-12 col-sm-12 col-md-12"> <div class="form-group"> <strong>Description:</strong> <textarea name="description" class="form-control"><?php echo $item->description; ?></textarea> </div> </div> <div class="col-xs-12 col-sm-12 col-md-12 text-center"> <button type="submit" class="btn btn-primary">Submit</button> </div> </div> </form>
Ok, now we are ready to run our CRUD Application example. So let’s run bellow command on your root directory for quick run:
php -S localhost:8000
Now you can open bellow URL on your browser:
http://localhost:8000/
If you are run using localhost:800 then you have to set base url in config:
application/config/config.php
$config[‘base_url’] = ‘http://localhost:8000’;
قالب وردپرس
0 notes