#Photography Tips
Explore tagged Tumblr posts
Visit Tumblr Blog
Explore Tumblr blogs with no restrictions, modern design and the best experience.
Last Seen Tumblr Blogs


Fun Fact
There are dozens of funny blogs to kill time on Tumblr.
Text
"Vamos a arreglar esto, no quiero perderte"

#lovian369#tumblr#writers on tumblr#artists on tumblr#photography tips#amor#escritos#pensamientos#insomnio#textos#reflexi?n#amor sano#sentimientos#imágenes#noche de insomnio
879 notes
·
View notes
Text

#my photos#photograph#picture#photooftheday#photographer#photoshop#photoshoot#photo#photography#nature#nature pics#nature photography#nature aesthetic#nature lovers#nature animals#nature hikes#trees#landscape#mother nature#nature lover#nature landscape#nature life#nature living#nature layouts#photography art#photographers on tumblr#landscape photography#photography blog#photography on tumblr#photography tips
1K notes
·
View notes
Text
Lace and More

A female Leopard Lacewing living out her adult days in a butterfly aviary in the local zoo. Photo credit: Jonathan Chua.
This was taken at the equivalent focal length of 1200 mm. The nice thing about the Leica V-lux 4 used here was that this could be captured in raw and wide open at f/2.8.
#photographers on tumblr#butterfly photos#Cethosia cyane#flora fauna#insect pics#leica photography#leica v lux 4#leopard lacewing#macro photography#photography tips
99 notes
·
View notes
Text

Now ☝️ vs Then 👇
I'm scrolling through posts on my Instagram page and can't believe how much I've grown and progressed compared to when I first started the toy photography hobby.

Here are a few tips on how to improve your photography skills:
Practice, practice and only practice.
Make sure the lighting is good.
Avoid pictures of minifigures standing around doing nothing, the picture should tell a story.
Make sure you have something interesting in the background, but not distracting, and preferably also have something in front to achieve a 3D effect and a sense of depth.
Look at what other toy photographers are doing and learn from them. Try to recreate what they're doing in your own way.
#now vs then#toy photography#lego photography#photography#photography tips#how to improve#tips and tricks#tips and techniques#toyphotography#legophotography#toyphoto#legophoto#lego#toyphotogallery#toy photographers#instagram#legominifigures
71 notes
·
View notes
Text
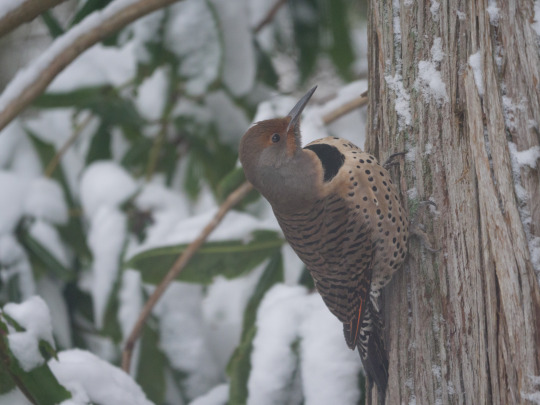
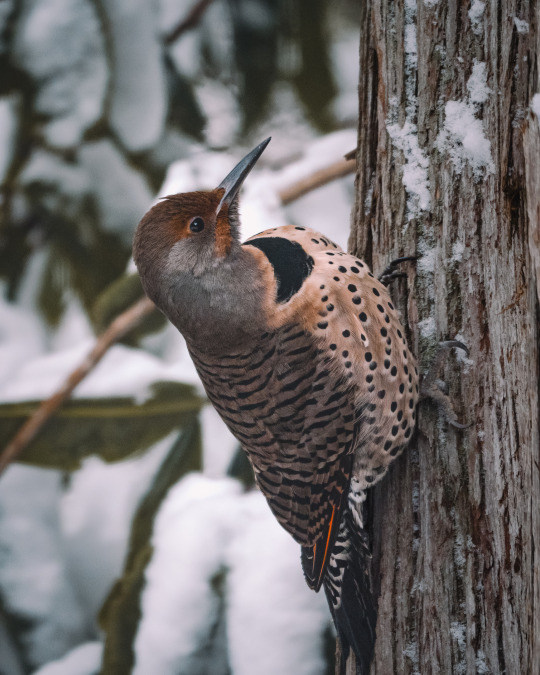
quick & easy lightroom walkthrough or: shooting through dirty double-paned glass, and other hardships.

I'll tell you! (Original post here.)
✱ KIT Panasonic GH5 + LEICA DG 100-400 with rubber hood for shooting through windows.* ✱ SHUTTER 1/125 sec ✱ APERTURE f/6.3 ✱ ISO 1600
*I use this one. It works for me, but it's a little tricky. It was a gift, and I think if choosing for myself I'd find something easier to get on and off.
WHAT'S ALL THIS, THEN? It was cold outside, obviously. And the flickers bolt if I try to open the back door, so sometimes I'll post up in front of my dining room window and just get the best shot I can. I do this less and less these days, now that my arthritic hands and I have heated gloves. The 'after' photo is a brand new re-edit using better tools than were available when this was shot. I was never happy with how it looked, before now.
under the cut: EDITS
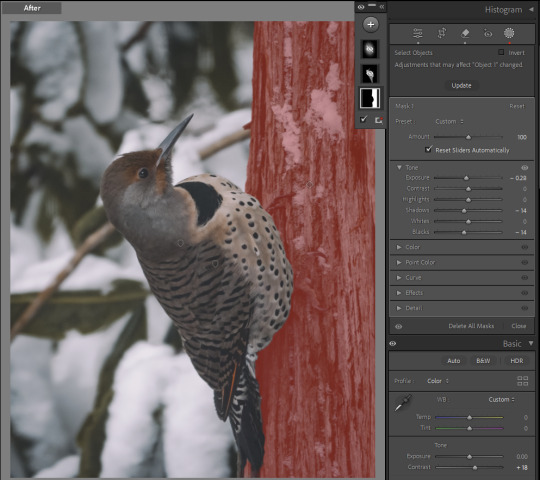
✱ Detail: Sharpness & Noise Reduction My main problem here is sharpness. The photo is in focus, but because I'm shooting through a thick storm window, I've lost that tack-sharpness I really want, and I have a whole bunch of noise to contend with. This would always be the case, but worse depending on the camera you're using, and in my case this was two generations ago - the GH5. I have tested window shots with the GH7, and they're a lot cleaner.
That being said, the trick is to always, always, always use masking along with sharpening. Like, a lot of masking, just so much masking, so that you avoid sharpening an already-noisy background. In Lightroom, you can hold down down the ALT key while using the masking slider to visualize exactly what is being sharpened.
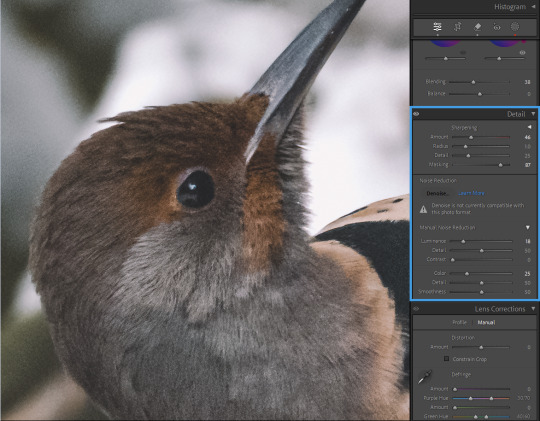
I'm choosing to leave the background noisier than I prefer, because even if I mask out the background, as I increase noise reduction, I lose detail in the edges. Leaving some noise in the feathers also preserves that sense of sharpness, generally.
This is a matter of personal preference and priority in your edits. I've had students absolutely hammer their photos with denoise and like it that way, and that is totally their call. I like it sharp.
Note: you could also do the sharpening/noise reduction at the end, after all your other edits, so that you have a better sense of how much you still need after toning. That's often my preference. I probably went backwards here only because I've edited this image before and had it pre-loaded in my brain.
✱ Tone Dehaze is the real MVP here. You could go even harder than I have on -blacks/+clarity/+dehaze, for a dramatic, crushed look. I decided to strike a balance between the soft darks I prefer but the clarity absolutely needed to make this look less smooshy. And my curve is pretty gentle.
Before toning and after:
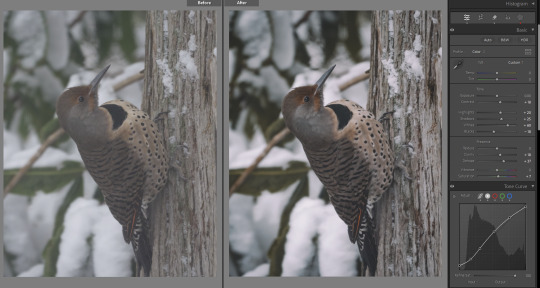
(You can see that I've also done some color grading. But because that part is entirely personal preference, I'm skipping it here.)
✱ Selective Adjustments With a photo as flattened as this one, I always want to add some depth to it with masking. I have just three masks in this case:
1. The tree was blown out, detracting from my subject and looking, frankly, unrealistic. So I've darkened this on its own, so that my subject will stand out.
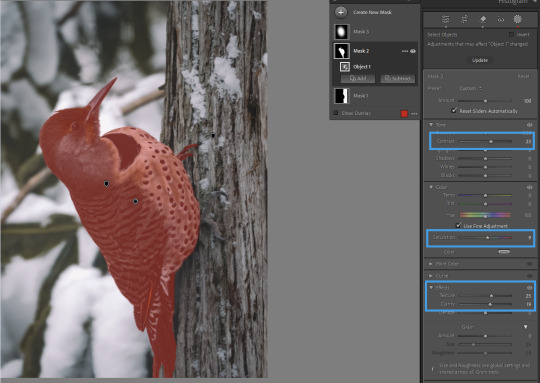
2. Contrast, texture, and clarity to bring out the detail in the feathers; a touch of saturation because the global color grading I wanted took away slightly from the bird's natural coloring. I want this on a mask, and not globally, because I do not want to exacerbate the noise in the background, or the texture of the leaves and snow.
And 3., to make the flicker really pop, I've got a 'spotlight' mask
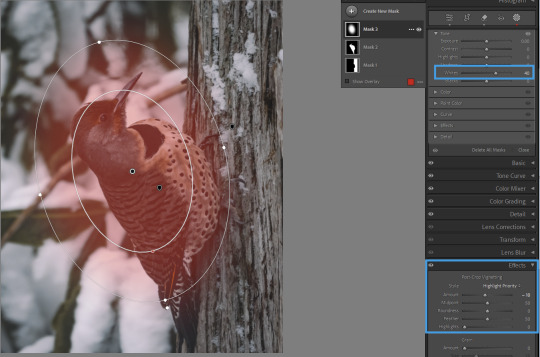
...which is working together with a light vignette to draw the eye to the subject. You could also create an asymmetrical vignette with an inverted -exposure mask, if you needed to.
All together now...
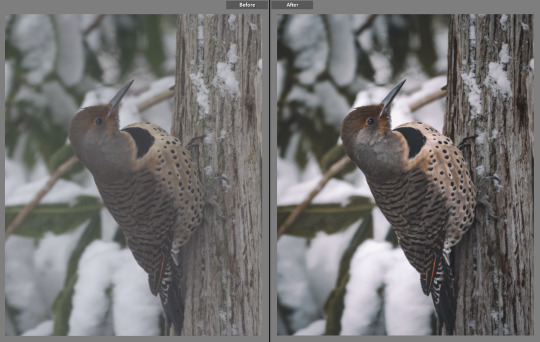
And that's it!
As always, please feel absolutely free to send any questions to my ask box. I try to watch for comments and questions in the tags, but sometimes they get missed. And if there are any other edits you'd like to see, let me know!
Find my other walkthrough here.
#on photography#photography#pnwander edits#lightroom classic#editing tips#photography tips#pacific northwest#pnw#nature photography#wildlife photography#photographers on tumblr#lensblr#how to#lightroom#original photographers#naturecore#photoshop#mine: photos
50 notes
·
View notes
Text

Got a few phone photography tips from LEGO photographer friends!
This is a great way to get into the hobby and get good footing. Now go grab a minifig and some bricks!
101 notes
·
View notes
Text
"Continuing to share my story may seem small to some, but to me and my children, it means everything. Please, don’t let it stop here. It might be a small act to you, but for us, it’s a lifeline. I beg you… don’t leave my story behind."
#tumblr#aesthetic#love you 😘#photography on tumblr#gaza#free gaza#palestine#gofundme#from the river to the sea palestine will be free#i stand with palestine 🇵🇸#free palestine 🇵🇸#gaza under attack#palestinian genocide#gaza strip#photography aesthetic#photooftheday#photographer#photography tips#ishioniu#instagood#like#tumblrgirl#follow#frasi#Palestine#Gaza#FreePalestine#SaveGaza#April#Spring
19 notes
·
View notes
Text

Amidst the calm waters, this tiny purple bloom reminds us of resilience and beauty in the smallest corners of nature. A moment to pause, reflect, and appreciate life’s subtle wonders. 🌿🌾
#digital camera#singaporescenes#photography#streetphotography#photography tips#original photographers#photographers on tumblr
26 notes
·
View notes
Text

🤩 ARTIST SPOTLIGHT: sdphoto_bricks Hello everyone! It's time to direct the spotlight toward our community members, and today we will get to know better sdphoto_bricks!

"My name is Stephanie DeFranco and I was born and raised in Roswell, NM. I’ve been a full-time photographer since 2017 and haven’t looked back since. Creating photos and watching stories come to life in front of my camera is a feeling I wouldn’t change for the world.

I would describe my photographic style as whimsical, authentic and colorful! I always try to make sure the subject will pop out of the photo with a burst of color or authentic movement.

My favorite subjects to capture in photos are characters that already have a little bit of a backstory, ex: Star Wars, Harry Potter, but putting them into situations that aren’t necessarily true to their canon story.

My go-to gear includes: Nikon z6 Lensbaby Velvet 85 Lensbaby Sweet 35 + Macro Convertors Lensbaby Twist 60 + Macro Convertors Video Lights

I’m currently living in New Mexico with my two cats, Jasmine and Ella, but traveling is my passion. I want to be able to experience new culture and document life as I live in that moment.

A few other random facts about me: I love coconut iced coffee.

I have a passion for thrifting and collecting old film cameras. And when I’m not behind my camera or on the road, you can find me on my couch streaming Disney+ & Netflix. "

Thank you for accepting our invitation and let the community knows you better!
If you want some insights on the exclusive picture and for a better view of the others, head to our blog at https://brickentral.net/.
- @theaphol, Community Outreach Manager
#lego#lego photography#brickcentral#toy photography#afol#legophotography#toyphotography#minifigures#photography tips#brickcentral member#brickcentral artist spotlight#artist profile#artist spotlight
55 notes
·
View notes
Text

#photography on tumblr#photooftheday#bookblr#photo tumblr#photography blog#creative writing#life#books#life quotes#authors#poems and poetry#love#nature#poetry#landscape#photography books#photography tips#photography is art#sunset#original photographers
26 notes
·
View notes
Text
To anyone wanting to photograph northern lights, or even just stars, the trick is to use a higher ISO setting.
Even folks using their phones to take photos can do this if they have a camera app that allows them to customize settings! The Samsung phones come standard with the Pro options but if your camera doesn't you can always download an app that has the Pro options.
The ISO is basically how sensitive to light the sensor in the camera is. The higher the setting, the more sensitive the sensor. The issue you'll run into is that you'll start seeing digital noise after a certain point, but that's okay! There are post-processing functions that can help fix that. It's harder to use post-processing to make the Aurora brighter and more vivid.
So crank that ISO! The standard value is 100, try it at 1200 to start with and keep going higher until you find that sweet spot.
It's best to do this in an area that's as dark as possible because it will amplify all the ambient light in the area as well.
A slower shutter speed doesn't work as well for northern lights because they actually move quite a bit and you'll just wind up with a colour painted sky rather than the distinct Aurora shapes.
Happy snapping!
20 notes
·
View notes
Text
¿Qué evitó que te quitaras la vida?

#lovian369#amor#escritos#pensamientos#insomnio#textos#reflexi?n#amor sano#sentimientos#imágenes#noche de insomnio#photography tips#writers on tumblr#tumblr#photographers on tumblr
22 notes
·
View notes
Text

#photograph#photo#my photos#photooftheday#photoshoot#photographer#picture#photoshop#photography#flowers#nature animals#nature#landscape#mother nature#photography tips#photographers on tumblr#landscape photography#photography art#photography on tumblr#photography blog#flower#floral#flowers aesthetic#flowers in art#flowers of tumblr#garden#spring#plants#wildflowers#rain world
382 notes
·
View notes
Text
KV Beauty

Phalaenopsis KV Beauty making an appearance next to a popular photo spot in the Cloud Forest. Photo credit: Jonathan Chua.
This was taken against dark undergrowth with the exposure biased 1-1/3 stops darker.
#photographers on tumblr#flora fauna#flora photography#flower pics#orchid photos#Phalaenopsis KV Beauty#photography tips#sigma 18-300mm#sigma photography#sigma sd quattro h
68 notes
·
View notes
Text
Behind the Scenes: Brave Little Knight 🗡️🛡️
Want to see how I used Nikon Z5II’s focus shift shooting and focus stacking in Photoshop to create one sharp, dramatic frame of a LEGO knight facing a dragon? ⚔️🐉
Then head over to the ToyPhotographers blog, where I shared the full behind-the-scenes process and explained how this technique helped keep both subjects crisp while the background stayed softly blurred and unobtrusive. 📸🎬
#lego#toy photography#lego photography#focus shift shooting#focus stacking#photoshop#photography tips#behind the scenes#nikon z5ii#toy photographers#tips and techniques
20 notes
·
View notes