#PlasticSCM
Explore tagged Tumblr posts
Visit Tumblr Blog
Explore Tumblr blogs with no restrictions, modern design and the best experience.
Last Seen Tumblr Blogs


Fun Fact
Tumblr has a 66 index score for customer satisfaction in the US.
Text
Scrum Week 4 – 19/02
After a lot of complications with PlasticSCM, we decided to go ahead and use GitHub, it was confusing at first but with a couple of videos we had it nailed down in under half an hour and were finally able to develop in the same project for once.
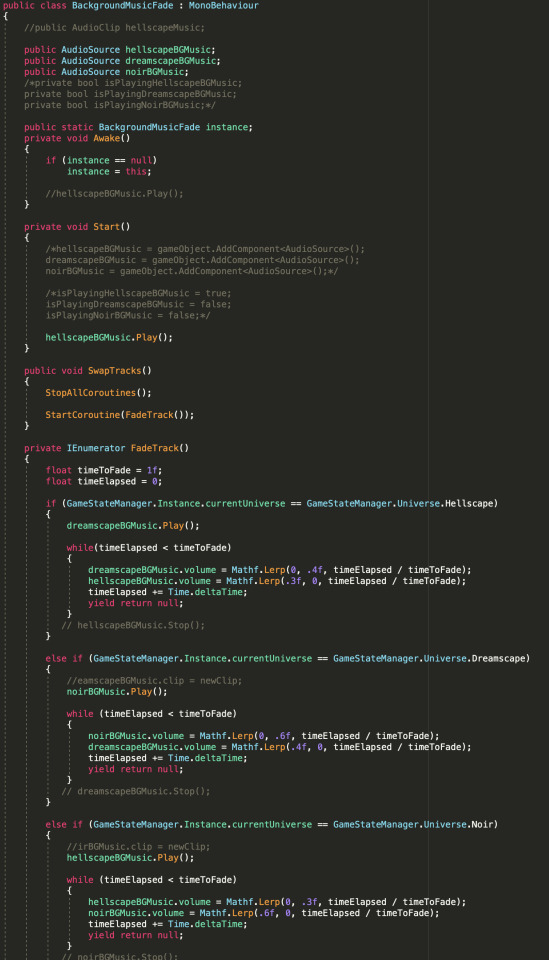
We updated the Lock-On System by adding a slow-down time effect, we hope to replicate the melee version of V.A.T.S. from Fallout as a mechanic in our game.
We also included a dodge to the movement to allow the player to move out of the way of attacks in quick succession, this is done by pressing the spacebar. We fixed the issue with the enemy being flung to the edge, as it turns out, a box collider doesn’t work both ways, keeping things in or out of the box, instead, it pushes out anything inside the collider to the outside so upon replacing it with a mesh collider it fixed the issue and the enemy was now following the player by setting the player as the enemy’s destination in the NavMesh.
1 note
·
View note
Text
bruh
so we were using plastic scm to collaborate on our project. but the first time we put in the emails we did the wrong email for one of us. so plastic scm thinks there 4 people in the organization and tried to charge us. didn't get to get any actual progress done, just reiterated what was going to happen in the second scene.
0 notes
Text
#Podcast - Opiniones sobre #GitVFS (Virtual File System), el mundo del #SourceControl , y que no hay nada de Virtual para #Hololens
#Podcast – Opiniones sobre #GitVFS (Virtual File System), el mundo del #SourceControl , y que no hay nada de Virtual para #Hololens
Hola !
Otro episodio, en esta ocasión con la excelente excusa de hablar del nuevo “Git Virtual File System” con un grande en temas de ALM, Luis Fraile (@lfraile); y uno de los mejores expertos sobre Source Control que podemos encontrar Pablo Santos (@psluaces)
Me tenian un poco engañado, ya que pensé que lo de “Virtual” tenía algo que ver con las HoloLens, pero no al rato estabamos hablando de…
View On WordPress
0 notes
Text
Connor - Week of 11/11
Not the most stressful of weeks, but it has definitely been one of the most painstakingly, annoyingly infuriating when it comes to our good, old friend PlasticSCM. As a whole, other than battling with my arch nemesis, the week for me was comprised mostly of script creation and editing with a side order of ragdolls and a dessert of Buto.
Just to get it out of the way, Plastic's biggest issue was that we kept interrupting it to push changes or update our workspace just as it was either sitting down for dinner or going to sleep for the night because the errors and soft locks we ran into, for the most part, all occurred in the evenings. The most infuriating and recurring error was that of not being able to push changes because Plastic was receiving changes already... which it never was. Another common error was, again, duplication of libraries and other random folders that nobody has seen nor talked to since the awkward family dinner last Christmas. Then the classic error reared it's ugly head of "There was and Error," like Plastic was mocking us, just because it could.
The most infuriating repercussion of errors such as these was the time that it ate away. Sure, 5 minutes here or 15 minutes there are good times to rest, maybe take a walk around the room or watch as Jeremy and Valentine engage in one of their legendary gibberish battles, but adding 5 or 15 minutes breaks 2-3 times an hour can get... mildly annoying, especially when the already limited time we all have to work together in the same room is taken up by Plastic stomping it's feet and complaining.
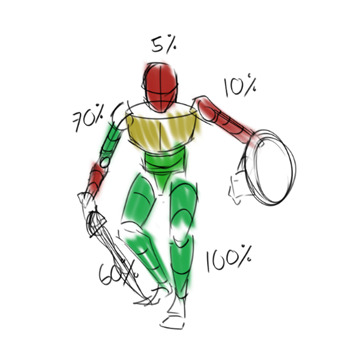
Other than failing miserably at implementing the building swap code, Jeremy helped me in updating the player respawn code (we had been having glitchy errors with it for a little while, the main glitch being that if the player was walking in any direction, when hit by an enemy, instead of respawning on the respawn point, they would respawn on the same position they died).
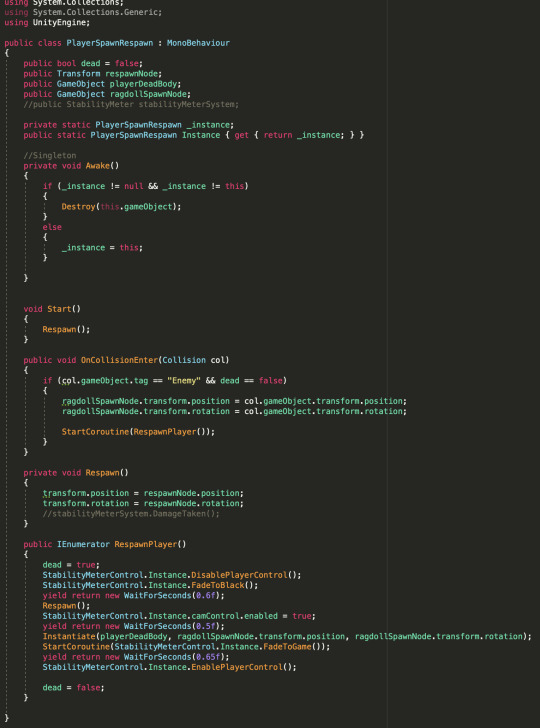
On top of editing the code to make the respawn work correctly, we added a little flair to make it so that the screen fades out and in on death and respawn, mostly to clarify to the player that they died, but it was also to not make deaths look so jerky. (A coroutine was added in order to make everything follow a timed sequence, as seen in IEnumerator RespawnPlayer. It also turns off the player controller so input does not mess with the process.)
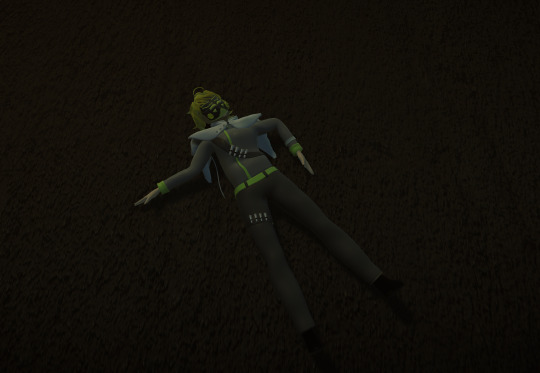
On the topic of that, ragdolls were implemented for Vettel! Whenever he dies, a ragdoll of him is instantiated instead of the cursed capsule. An interesting and oddly time-consuming process of creating the ragdoll to be sure, but a rewarding one at that.

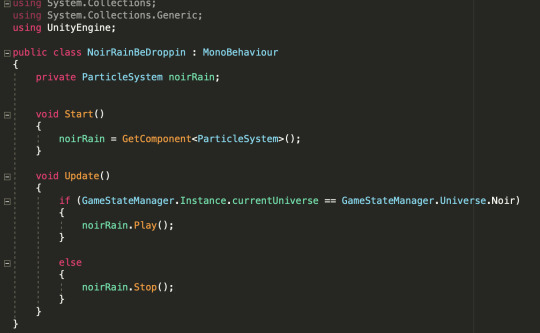
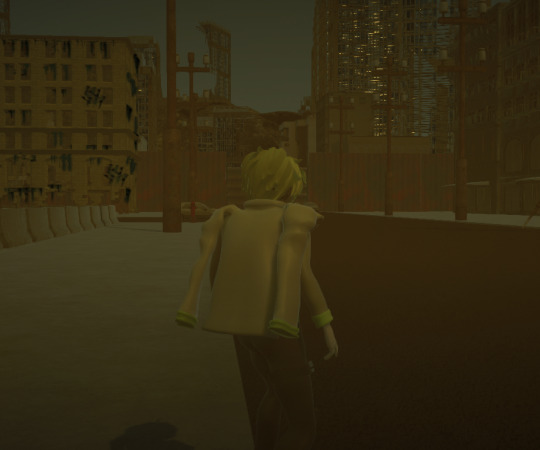
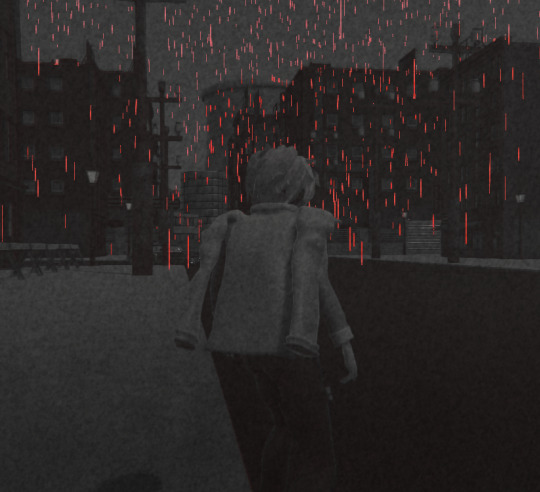
Another interesting error that we had been getting was camera effects not working and camera glitches occurring, where the camera soft locked on woody (which turned out to be a issue with priority), and a major component of the noir environment not loading in. After some script tweaks, we managed to get the the rain working again. It turns out that the particle system was not playing during the scene, even when it was supposed to be activated by the code, so we instead put a script directly on the particle system itself to play it when it is in Noir and stop it when it is in any other universe. We used Play and Stop because we don't really need it to pause since it's just rain. (On that note, if we get performance errors when switching to Noir, I may try to use Pause instead).
Buto. Lovely Buto. Buto is fun, but it is annoying that transparent textures do not show up. That aside, I made the effects a bit more intense so that players can really distinguish between each. My favorite is Noir because the Buto effect makes it look like polluted air is constantly blowing by.

Plastic pending, see you next week!
0 notes
Text
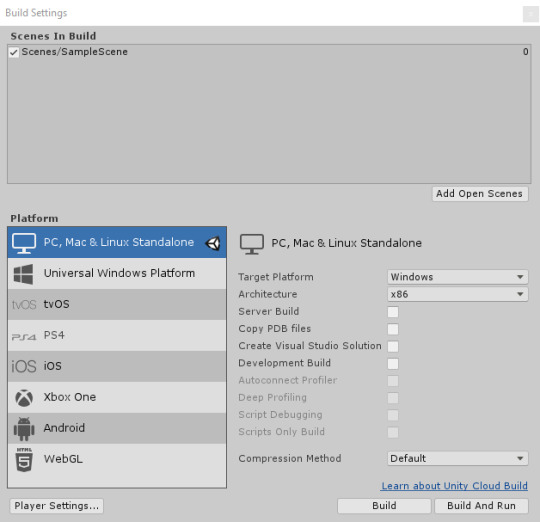
Day 10 - Unity - Publishing Build notes
So you’ve made a game, or you’re going to. Well, you probably need to consider some settings for your build. These are not necessarily end-game situations here. These are things you’ll should have considered very early on, if not at the beginning of your development to make life much easier for you. That’s why we’re doing all of this.
Publishing Builds

When you set up a build, you choose which scenes you want to include in the build. Unity is flexible this way, and it’s easy to create multi-scene builds.
When you’ve opened up your build settings, you can either select Add Open Scenes and view a list of currently open scenes, or just drag them from the project view into the list.
(Your window may look a little different, as I’ve moved onto Version 2019.3.0b1).
You can see a 0 on the right side of ‘SampleScene’, this is because it’s the first scene that will be loaded. The order you load scenes does matter.
If you tick Development Build under your options, you enable Profiler functionality. The Autoconnect Profiler, Script Debugging options also become available. Allowing the developer to test and work out how the build is coming along.
Similarly, you can tag GameObject as EditorOnly and they won’t be included in the published build. Useful for debugging scripts. When a new level loads, all the objects in the previous level are destroyed. To prevent this, use
DontDestroyOnLoad()
on any objects you don’t want destroyed. This is most commonly used for keeping music playing while loading a level, or for game controller scripts which keep game state and progress.
The player settings does not refer to the character player, but actually the player window that the game will run in.
Preloading
Published builds automatically preload all assets in a scene when the scene loads. The exception to this rule is scene 0. This is because the first scene is usually a splashscreen something you’d want to show up as quickly as possible.
To make sure all your content is preloaded, you can create an empty scene which calls Application.LoadLevel(1). In the build settings make this empty scene’s index 0. All subsequent levels will be preloaded.
Compression
You can also choose your compression method. This affects Assets, Scenes, Player settings and GI data.
On PC, Max, Linux and iOS there is no compression by default. For android, the default compression is ZIP which is slightly better results than LZ4HC, but slower to decompress.
LZ4 is fast compression format that is useful for development builds LZ4HC is a high compression variant of LZ4 that is slower to build but produces better results for release builds.
Player Settings
Version Control Mode Choose the visibility of meta files. You can use Unity in conjunction with most common version control tools, including Perforce and PlasticSCM. The default is Hidden Meta Files, however visible meta files are useful for version control because it allows other users and machines to view the meta files. For more information on showing or hiding meta files, see Visible or hidden meta files at Unity Answers.
Player settings
The player settings should be fairly straightfroward. It’s worth noting that you can override your chosen default icon for different platforms, and the the cursor hotspot offset value is in pixels.


Currently, Companion starts in fullscreen by default. However, I’ve also toggled the ability to let it have a resize-able/salable window.

Splash Screen The Unity splash screen can actual be disabled in the splash mage settings. However, you may need Unity Pro for this. You also are not able to disable the Unity logo and the opacity value must be set to a minimum of 0.5.
You can set background images, and your own animations here. You could even make an introductory screen/animation.
Each logo must be a sprite asset. Set the sprite mode to single to use the entire sprite as the logo. If you want to change aspect ratio, set the sprite mode to multiple.
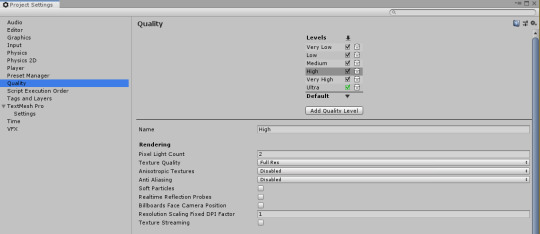
Quality In the quality tab, you can address the settings for each level of quality your game offers.
Unity lets you assign a name to a given combination of quality options for easy reference. Whether it’s very low to ultra, or Hot to Hottest, you can name your levels whatever you want.
User Interfaces.
Unity provides IME support, which means that you can write non-ASCII characters in all your graphical user interfaces. This Input Method is fully integrated with the engine so you do not need to do anything to activate it. In order to test it, just change your keyboard language to a non-ASCII language (e.g. Japanese) and just start writing your interface.
Version Control For version control I use Git and Github.. For every element I try to implement I will create a branch for it, rather than using Master.
Profiler Overview You can analyze the performance of the GPU, CPU, memory, rendering, and audio.
To see the profiling data, you play your game in the Editor with Profiling on, and it records performance data. The Profiler window then displays the data in a timeline, so you can see the frames or areas that spike (take more time) than others. By clicking anywhere in the timeline, the bottom section of the Profiler window will display detailed information for the selected frame.
Note that profiling has to instrument your code (that is; add some instructions to facilitate the check). While this has a small impact on the performance of your game, the overhead is small enough to not affect the game framerate.
This information is available in the Editor Log just after you have performed the build. Go to the Console window (menu: Window > General > Console ), click the small drop-down panel in the top right, and select Open Editor Log.
Reducing Build size Unity re-codes imported Assets into its own internal formats, so the choice of source Asset type is not relevant. For example, if you have a multi-layer Photoshop Texture in the Project, it is flattened and compressed before building. Exporting the Texture as a .png file does not make any difference to build size, so you should stick to the format that is most convenient for you during development.
Unity strips most unused Assets during the build, so you don’t gain anything by manually removing Assets from the Project. The only Assets that are not removed are scripts (which are generally very small anyway) and Assets in the Resources folder (because Unity can’t determine which of these are needed and which are not). With this in mind, you should make sure that the only Assets in the Resources folder are the ones you need for the game. You might be able to replace Assets in the Resources folder with AssetBundles - this means that Unity loads Assets dynamically, thereby reducing the player size.
For optimisation in build size consider compressed texture formats and reducing in the project view/inspector of that texture asset. Alright!
That’s all my notes on making builds so far.
0 notes
Link
@albazamanillo @TheRealMig_El @plasticscm Any public bug tracker that is indexed by Google? via @jpluimers
0 notes
Text
RT @gmasterscm: Do you know how "merge recursive" works? We wrote a blogpost long ago explaining how it goes for @plasticscm (our sister product), but it is a perfect explanation for #Git too: https://t.co/To5oARydCD
Do you know how "merge recursive" works? We wrote a blogpost long ago explaining how it goes for @plasticscm (our sister product), but it is a perfect explanation for #Git too:https://t.co/To5oARydCD
— gmaster git gui client (@gmasterscm) March 22, 2018
from Twitter https://twitter.com/sstranger March 22, 2018 at 03:37PM via IFTTT
0 notes
Text
Mercurial Unity User Guide
Hey @everyone, I hear you want some tips on how you can use TortoiseHg to interact with that online repository you created earlier. Alphe and I have gone and compiled a user guide to help you. Here’s how you shouldn’t do it –
Your checklist before you get started accompanied by the corresponding URL’s: – Unity Game Engine – Downloaded and Installed. – A Bitbucket – Registered Account. – Tortoise Hg – Downloaded and Installed. – A Mercurial Unity Repository – Previously Set.
Your First Pull (The First Voyage)
– Step One; Open TortoiseHg Wrokbench – – Step Two; Define the local project repository (Where you will store the project locally). – Step Three; Enter the Synchronise Tab (Click the Two Green Arrows).
(Sync Tab)
– Step Four; Paste the Bitbucket Repo URL into the text input alongside the Floppy Disk Icon. – Step Five; Save this Path by clicking said Floppy Disk. – Step Six; Pull Incoming Changes
(Commit Tab)
– Step Seven; Input Bitbucket Login Credentials. – Step Eight; Right click most recent revision and update.
– Step Eight.5; Open Unity – – Step Nine; Open Existing Project (Located at the directory defined in Step Two.)
(Unity Test Scene)
– Step Ten; On the settings Go to Edit > Project Settings > Editor > Version Control > and select PlasticSCM.
Once you have pulled the online repository, made changes to the project and would like to update the rest of your team with the progress you made. You will need to push the updated ‘thing’ back to Bitbucket. Here’s how –
Your First Push (The First Expedition)
– Step 1; Open TortoiseHg Workbench – – Step 2; Enter the Commit Tab (One Green Tick)
(Push Scenario)
– Step 3; Refresh file list and select/check all new files. – Step 4; Annotate, Commit & Add Untracked Files. – Step 5; Push this New Commitment. – Step 6; Input Bitbucket Login Credentials. – Step 7; Cross your legs & fingers and hope for the best (Y)
We hope this helped, Alphe & MannyJammy, Over ‘n’ Out
The post Mercurial Unity User Guide appeared first on Mantas Jakimavicius.
from Mercurial Unity User Guide
0 notes
Text
AGILE Management
To develop this game as a group instead of collective individuals we used software such as GitHub, Discord, Jira, and Microsoft Office. Through GitHub, we were able to develop the game on any PC by pulling a version of it from GitHub and updating it with any changes we made. We use Discord to hold any scrum meetings or during a work sprint to quickly convey ideas by Streaming our screen and talking about them. Jira, we used to keep track of who is doing what through to-do lists and finally, Office we used for all our documentation. We found keeping track of our progress and what was left helped us put the project into perspective of what mechanics are and aren’t feasible. This worked for our group because anyone who needed work could just follow the link and not have to wait for everyone to be available to figure out who needed to do this and who was doing that. Originally, we were using PlasticSCM but it was having too many issues that the switch to GitHub and the quick learning curve was faster to get around.
1 note
·
View note
Text
Connor - Week of 10/28
This week was lighter for me development-wise, partly because I am waiting for Christie and Jacob to finish the bones of the tutorial level so that I can put in code, and other party because I had 3 other big assignments to work on this week for other classes. My primary focus for the project this week was refining the vertical slice, but since I was waiting on a few key assets from other members to be uploaded to the main project, I also worked on background music, sound effects, and a bit of code refinement along side trouble shooting our lighting problem.
A lot of time spent on the music was researching a suitable distinctive sound for each universe (while keeping the same base beat), and then finding midi instruments that complimented said sound/vibe (both of which I had started in previous weeks). Since I didn't have enough time to upload to YouTube this week, here is an image of the waveform of the Dreamscape background music (that will be looped), showing a mixture of sound clips and midi being utilized. Sound clips are from EpidemicSound; midi is a mix of EpidemicSound and custom.

I found the best effect for Dreamscape, specifically, to come from higher bpm sound clips/midi and dial them back slightly to a slower bpm (ex: 150 bpm clips dialed back to 140 bpm).
For sounds, the Dreamscape lightning effect for the building swap puzzle, in this case, I also worked in Ableton and used sound clips from EpidemicSound. Lightning strikes when a building is clicked, and then this sound is looped until the buildings are finished swapping, keeping an ambiance of lighting up so that it's not awkwardly silent.

The sounds are separate sounds of thunder, distant sounding lighting clashes, and rumblings, all mixed together to give the player constant feedback while buildings are selected and swapping.
Our lighting problem was a big one that I should have anticipated sooner. Aura 2 does not work with URP, something I forgot about and wasted a good chunk of time trying to troubleshoot. Aura 3 is said to be compatible when it releases, but it is not out yet so we can't use it. We are using URP for a good amount of post processing and shaders, so, after much debate, we decided that rolling everything back/adjusting all of those items and textures would be more of a headache than changing our lighting. Jeremy found another Unity plugin that has shown promising results so far for volumetric fog; it is also very useful for clouds, which will be useful especially in the Dreamscape universe and provide cover in the other universes.

For code refinement, I edited the music transition script because we were getting a few bugs when switching sometimes. It works well now.
Basically, the script checks to see what universe the player is in and then transitions out of the background music from the previous universe and into the background music of the current universe on swapping universes. The whole process takes about as much time as the animation for switching universes.
Other than that, PlasticSCM had its usual issues when trying to get rid of Aura2/sort files while uploading packages. Nothing I am not used to fixing at this point. Plastic and I have formed a very functional dysfunctional relationship.
0 notes
Text
Jeremy - Week of 10/14 Blog Post
This week has been quite the hectic one for us here in Group A. Of course with our luck, the week we decide to finally compile everything into one main project, is the week that PlasticSCM decides to act up. Well it's BEEN acting up, but this is an all time low. This mostly affected the team members on level design while I was on coding, but as of me writing this now we are scrambling to finally get stuff into the project. At 11 o'clock at night on a Thursday. If this class has prepared me for anything, it's the crunch hours of the work place. Even with the Burndown chart the intrinsic nature of Game Devlopment invites crunch culture. But I think this whole development process can teach how to avoid this kind of crunch in the future,
Tangent aside let's get to what I ACTUALLY did this week!
Even though I said I mostly coded we can start with something else. I started the week off by finishing voice recordings for the Vertical Slice cutscene, thought because of how long it takes to get a model commissioned these will probably not make it into the actual Vertical Slice, bit it's nice to have them now.
Onto code! I started off the week strong finally implementing the animations for building swapping. I will include a video at the end of this post that shows off what I did! For now I will mostly be showing the code that I completed.
The "animations" for the building swap aren't real animations, that would be impossible. Instead I used my new favorite thing of ALL TIME: DoTween. I mentioned it last week, but it was a real friend to me this week helping with almost everything I did. I used DoTween to move the buildings offscreen have them swap and come back down. It adds movement to the scene with out the worry of the buildings slamming into each-other.
Here is the Movement Code:
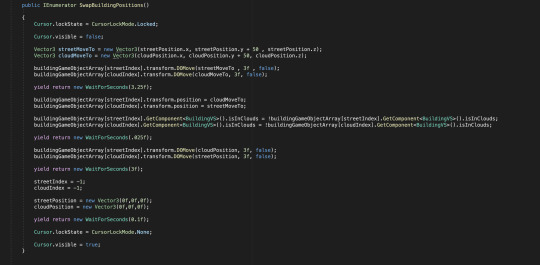
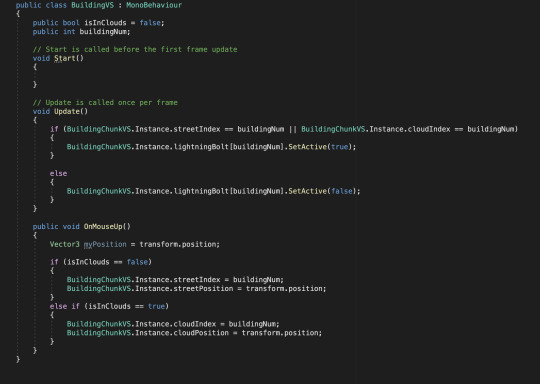
Alongside the DoTween swapping I also added a Lightning Bolt particle effect that we found, to show the player what building they have currently selected.
Here is the Lightning Bolt Code:
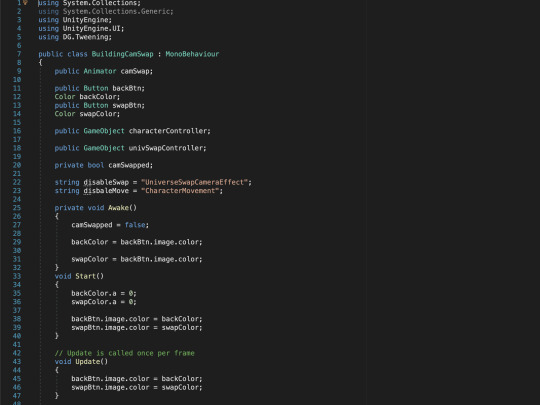
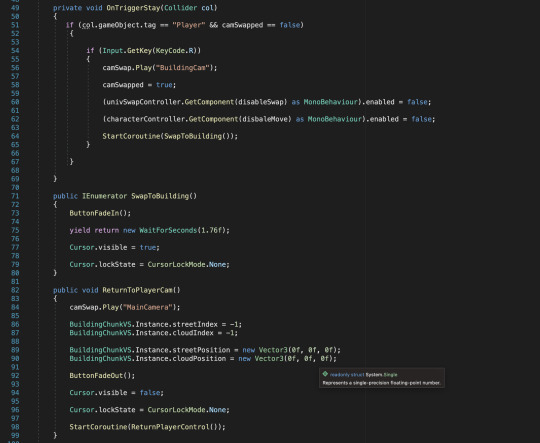
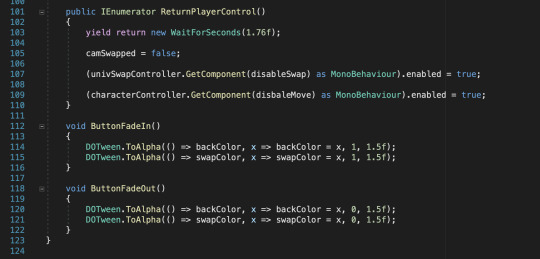
My whole week basically revolved around the Building Swapping Mechanic. The next assignment I has was creating a natural camera change for the building swapping. Originally it cut between two cameras, but thanks to Cinemachine that can become smoother. There is a Cinemachine Camera that allows you to move between different Camera States. This is perfect for the Building Swapping! I had to make a few Coroutines for this one so that things become enabled and disabled on time.
Here is the Camera Swap Code:
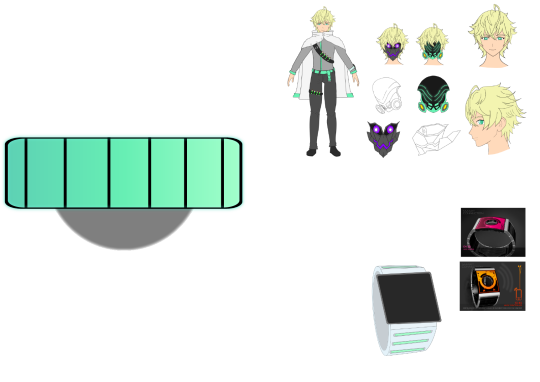
Taking a small break from coding I decided to finally create the graphics for the STABILITY METER. This one was a long process, I had to create a visual style that matches our game. For inspiration I used Jacob's art for Vettel. This was used as a basis for the color scheme, and the design itself was originally going to be based off of a phone battery but it evolved into something different.
Work In Progress Meter Design:
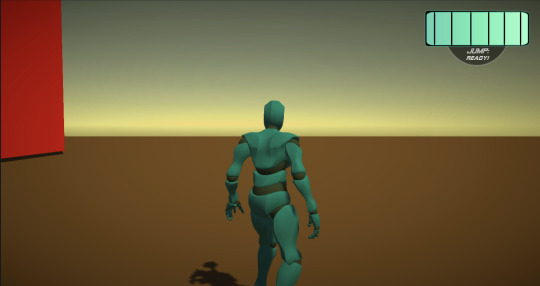
Early Gameplay Implementation:
This meter didn't go without coding though, thanks AGAIN to DoTween I was able to make the meter smoothly decrease and increase in size.
Stability Meter Code:
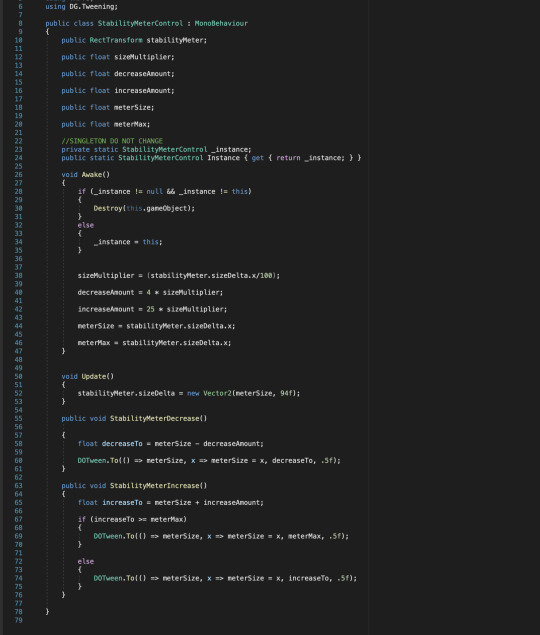
(This involved a little bit more math then I expected)
Implementing the Stability Meter put me on a Graphic Design train, so I decided to create even more in game graphics (all of them are used in building swap too!).
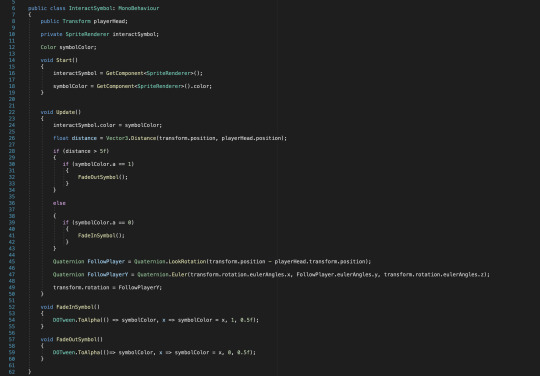
Next up was a brand new Interaction Symbol, this hovers over objects that the player can go up and interact with. Originally we used the "E" button for interactions, but I changed it for the "R" key. Originally this used a different design color scheme compared to the Stability Meter, but I decided to unify all the UI designs to give the game a more cohesive visual language.
Interaction Symbol Graphic:

The interaction symbol required more code than expected, but it was fun to do anyway. I coded it so that the button follows the players head, and it will fade in and out depending on player distance (again thanks to DoTween!).
Interaction Symbol Code:
Finally I created new graphics for the Buttons that appear in the building swapping. These again follow the same visual style.
Button Graphics:


They also include code that fades them in and out, that can be seen in the camera swapping code screenshot I provided above.
This was quite the fun but hectic week, and as we get closer to the Vertical Slice. I am very excited to see where our game goes now!
Here is the Video that shows everything off: (Note: This was recorded in a test project these were imported into the main project very late so I didn't have time to record)
0 notes
Text
Connor - Week of 9/30 - Dev Blog
This week was an interesting one. PlasticSCM started out by bullying Jeremy's version of the project on his lab computer, beating the poor thing into submission, becoming too scared to work properly on any of our computers. After trying and failing to punish PlasticSCM for its actions, I realized that I'd need to change my tactics. All PlasticSCM needed was some positive structure in its life, some support that it never had from its parent, Collaborate. After giving it the comforting presence of a Unity cube in a working version of the project, PlasticSCM worked out its issues and became a solid team player... for 5 minutes.

The files giving us problems. Console said it was a Library Duplication, but even after fixing the duplication, there were still errors.
After continuing to work out its issues, PlasticSCM became a valuable member of the team and worked with me to piece together the separate projects, that other team members have made with their respective mechanics, into our main, Plastic enabled project. After tweaking with the combining codes, deleting repeated assets, and debugging project-shattering issues, I managed to finish the night off with a stable build that has each of our main mechanics successfully implemented and functioning.

Keeping different mechanics in different projects allows us to work on them to completion before implementing them into the main scene and experiment with adjustments without breaking anything.
Aside from combing Unity projects and game mechanics/shaders, I found a number of model assets (small issue with those that I will address in a bit), sound effects (mostly ambient noises, walking and running sounds, etc. [the primary source for these being EpidemicSound.com]), and continued to work on my music code (fade in/out between tracks while switching universes). The issue that we ran into while trying to implement assets from SketchFab (the easiest process in the past) was that the SketchFab plugin does not work with the version of Unity on the lab computers. That would not be too bad if the SketchFab website gave anything other than .rar files for a wide variety of their files. Because the lab computers are Mac, we are unable to use such files. As a work around, Jacob and I are going to use an older version of Unity on our personal computers (or whoever is looking for assets at a given time will use our personal computers if we are doing something else on the lab computers), export the scene(s) with the assets that we need, and import said scene(s) into our Plastic enabled project on the lab computers.
The last thing that I did was switch out the first person player controllers for the third person player controller that we obtained from Bryan last semester. There was a bit of bug squashing necessary because both controllers utilized the same scripts, but after doing that, the project functioned just fine. We plan on creating our own third person character controller to aptly suit all of our game's needs, so the third person player controller is just a place holder for the time being.

A working scene with the third person controller implemented.
Other than continuing to supply PlasticSCM with the love and support that it needs to contribute a nurturing and fulfilling work environment, that's all for this week.
0 notes
Text
Mercurial Unity Setup Guide
Hey everyone, I hear you need a way to setup an online repo for a unity project using mercurial as the version control. Well here’s how you shouldn’t be doing it. *
Things you will need: – Unity Game Engine – Downloaded and Installed. – A Bitbucket – Registered Account. – Tortoise Hg – Downloaded and Installed. – Webcam – Shameless Amazon Associate Plug.
The Mercurial Unity Setup Guide
– Step 0; Sign into Bitbucket – – Step 1; Create a new Mercurial Repository – Step 2; Create a Team & Add its Members. – Step 3; Allocate User Access.
– Step Four; Open TortoiseHg Workbench – – Step 5; Define the local project repository. (Print out a sticker with the target location, stick it on your forehead and take a photo of it using your newly acquired webcam then send it to us with the #WhoNeedsReposAnyway
– Step 6; Define the .hgignore file found in your local project repo by pasting the ignore list found below into it using notepad. (If you know what you’re doing you shouldn’t be reading this. You have been warned.)
” syntax: glob .DS_Store *.sln *.userprefs *.csproj *.pidb .unitypackage .suo
syntax: regexp ^Build/. ^Library/.* ^Temp/.* ”
– Step 7; Enter the Sync Tab (Click the Two Green Arrows). – Step 8; Paste your Bitbucket Repo URL into the text input alongside the Floppy Disk Icon.
– Step 9; Save this Path by clicking said Floppy Disk.
– Step 10; Enter the Commit Tab (One Green Tick)
– Step 11; Refresh file list and select/check all new files.
– Step 12; Annotate, Commit & Add Untracked Files.
– Step 13; Push this New Commit.
– Step 14; Input Bitbucket Login Credentials and you’re set.
– Step Fifteen; Open Unity –
– Step 16; Create a new Unity Project in the pre-defined local repository space.
– Step 17; On the settings Go to Edit > Project Settings > Editor > Version Control > and select PlasticSCM.
– Step 18; Just sit there and hope for the best haha; Give it a test spin. See if it works and let me know if it doesn’t ~
* Take note as this setup does not allow you to work on the same Unity scene simultaneously. Anyone with better methods / suggestions please do “hit us up”.
A Disclaimer of Sorts
Our particular Mercurial Unity Setup may not be the best but it is a working solution. We have also made a user guide for the non set-up uppers here.
Brought to you by Alphe and MannyJammy, Over ‘n’ Out P.S Don’t try this at home.
The post Mercurial Unity Setup Guide appeared first on Mantas Jakimavicius.
from Mercurial Unity Setup Guide
0 notes