#Raspberry Pi Online Code Editor
Explore tagged Tumblr posts
Visit Tumblr Blog
Explore Tumblr blogs with no restrictions, modern design and the best experience.
Last Seen Tumblr Blogs


Fun Fact
Premium Tumblr themes are available from anywhere between $9 to $49.
Text
Tired of Paying for Tools? These 40 Open-Source Alternatives Have You Covered?
Let’s be real for a second.
We’ve all been there—mid-project, mid-semester, or mid-burnout—when a paid tool throws up a paywall and asks for $19.99/month just to export your file. It stings, especially when you’re trying to keep your budget lean.

But here’s the good news: the open-source community has your back. 💪 There are dozens of completely free, insanely powerful tools that can do (almost) everything their paid counterparts can—without locking your best features behind a subscription.
Whether you're a freelancer, student, startup founder, or just someone who loves great software, this list is your new toolbox.
🚀 Why Open-Source Is the Underdog That Wins Before we dive in, let’s clarify something: Open-source ≠ low quality. In fact, some of the world’s biggest companies (Google, NASA, Netflix) use open-source tools every day. These aren’t sketchy knockoffs—they’re community-powered, security-tested, and constantly evolving.
Now, let’s talk about the 40 free tools that could save you hundreds—or even thousands—of dollars a year.
🧠 Smart Swaps for Everyday Tools
LibreOffice → Ditch Microsoft Office Docs, Sheets, Presentations—all offline, all free.
OnlyOffice → Google Docs Vibes, but Yours Looks and feels like MS Office, works online or self-hosted.
Joplin → Evernote for Nerds Markdown-based, syncs securely, and doesn’t sell your notes.
Zettlr → Perfect for Writers & Academics Citation support + distraction-free writing.
🌐 For Browsing, Email & Team Chat
Firefox → More Privacy, Less Google Extensible and fast—and they don’t track you.
Brave → Built-in Ad Blocker? Yes Please Faster browsing + rewards system.
Thunderbird → Outlook Without the Overkill Email, calendar, and to-do list in one clean interface.
Mattermost → Slack Without the Bill Your team chat, your server, your rules.
Jitsi Meet → Free Video Calls—No Sign-Up Needed Start a call with a link. Done.
🎨 Designers & Creators, Rejoice
GIMP → Photoshop for the People Yes, it’s that powerful. Yes, it’s free.
Inkscape → Vector Design Like a Boss Great for logos, icons, and print design.
Krita → Digital Painting Heaven Designed by artists, for artists.
Blender → Hollywood-Grade 3D Modeling Used in actual movies. Free forever.
Darktable → Lightroom Without the Monthly Bill RAW editing + professional workflow.
🎧 Audio & Video Editing
Audacity → Podcasting, Remixing, Editing, Easy Intuitive multi-track editor.
OBS Studio → Streaming & Screencasting Gold What Twitch streamers use. Seriously.
Shotcut → Video Editing That Just Works Cross-platform and powerful.
Olive → Modern Video Editor in the Making Sleek, promising, and growing fast.
👨💻 Developers, You’re Going to Love These
VSCodium → VS Code Without Microsoft Tracking Same editor, privacy-respecting build.
Atom → Hackable to the Core Loved by web devs and hobbyists.
Eclipse → Java Devs’ Old-School Favorite Still rock-solid.
NetBeans → Full IDE for Polyglot Coders Good for Java, PHP, and C++.
Hoppscotch → Postman Without the Bloat Runs in your browser, free forever.
MariaDB / MySQL → Free SQL Workhorses The backbone of many web apps.
SQLite → Tiny, Powerful, Portable Database No server required. Zero config.
✅ Organize Your Life (and Work)
Wekan → Trello Clone, But Open Kanban boards made simple.
Focalboard → Self-Hosted ClickUp Alternative Task management that respects your data.
Redmine → Jira's Open Twin Great for bug tracking & agile workflows.
Taskcafe → Asana-Style, Cleaner Interface New kid on the block, with potential.
🔐 Privacy Tools That Feel Like Superpowers
Bitwarden → Best Password Manager, Hands Down Cloud, browser, and mobile support.
KeePassXC → Local, Bulletproof Password Vault For privacy purists.
Tutanota → Private Email That Just Works End-to-end encrypted email, minimal design.
Pi-hole → Block Ads on Your Entire Network Install it on a Raspberry Pi and say goodbye to web ads.
☁️ Sync, Store, and Share Files Securely
Nextcloud → Your Own Google Drive Private cloud, full control.
Syncthing → Dropbox, But Peer-to-Peer No servers. Just your devices talking securely.
rclone → Cloud Storage on the Command Line Sync anything, anywhere.
📊 Data, Dashboards & Decisions
Metabase → BI Dashboards Without the Headache Plug in your data, get answers fast.
Grafana → DevOps’ Favorite Dashboard Tool Real-time, customizable graphs.
Apache Superset → Data Exploration for Pros Used by Airbnb, Netflix, and more.
🤖 Bonus: Automate All the Things
AutoHotKey → Make Your Computer Work For You Automate anything on Windows. Seriously.
🌍 Your Wallet and Your Future Will Thank You Switching to open-source isn’t just about saving money (though that’s nice). It’s about:
💻 Owning your tools
🔐 Protecting your privacy
🌱 Supporting innovation and community
🧰 Having control over your workflow
These tools are built by people like you, for people like you. Try just a few of them, and you’ll wonder why you ever paid in the first place.
0 notes
Text
Beyond the Books: Real-World Coding Projects for Aspiring Developers
One of the best colleges in Jaipur, which is Arya College of Engineering & I.T. They transitioning from theoretical learning to hands-on coding is a crucial step in a computer science education. Real-world projects bridge this gap, enabling students to apply classroom concepts, build portfolios, and develop industry-ready skills. Here are impactful project ideas across various domains that every computer science student should consider:
Web Development
Personal Portfolio Website: Design and deploy a website to showcase your skills, projects, and resume. This project teaches HTML, CSS, JavaScript, and optionally frameworks like React or Bootstrap, and helps you understand web hosting and deployment.
E-Commerce Platform: Build a basic online store with product listings, shopping carts, and payment integration. This project introduces backend development, database management, and user authentication.
Mobile App Development
Recipe Finder App: Develop a mobile app that lets users search for recipes based on ingredients they have. This project covers UI/UX design, API integration, and mobile programming languages like Java (Android) or Swift (iOS).
Personal Finance Tracker: Create an app to help users manage expenses, budgets, and savings, integrating features like OCR for receipt scanning.
Data Science and Analytics
Social Media Trends Analysis Tool: Analyze data from platforms like Twitter or Instagram to identify trends and visualize user behavior. This project involves data scraping, natural language processing, and data visualization.
Stock Market Prediction Tool: Use historical stock data and machine learning algorithms to predict future trends, applying regression, classification, and data visualization techniques.
Artificial Intelligence and Machine Learning
Face Detection System: Implement a system that recognizes faces in images or video streams using OpenCV and Python. This project explores computer vision and deep learning.
Spam Filtering: Build a model to classify messages as spam or not using natural language processing and machine learning.
Cybersecurity
Virtual Private Network (VPN): Develop a simple VPN to understand network protocols and encryption. This project enhances your knowledge of cybersecurity fundamentals and system administration.
Intrusion Detection System (IDS): Create a tool to monitor network traffic and detect suspicious activities, requiring network programming and data analysis skills.
Collaborative and Cloud-Based Applications
Real-Time Collaborative Code Editor: Build a web-based editor where multiple users can code together in real time, using technologies like WebSocket, React, Node.js, and MongoDB. This project demonstrates real-time synchronization and operational transformation.
IoT and Automation
Smart Home Automation System: Design a system to control home devices (lights, thermostats, cameras) remotely, integrating hardware, software, and cloud services.
Attendance System with Facial Recognition: Automate attendance tracking using facial recognition and deploy it with hardware like Raspberry Pi.
Other Noteworthy Projects
Chatbots: Develop conversational agents for customer support or entertainment, leveraging natural language processing and AI.
Weather Forecasting App: Create a user-friendly app displaying real-time weather data and forecasts, using APIs and data visualization.
Game Development: Build a simple 2D or 3D game using Unity or Unreal Engine to combine programming with creativity.
Tips for Maximizing Project Impact
Align With Interests: Choose projects that resonate with your career goals or personal passions for sustained motivation.
Emphasize Teamwork: Collaborate with peers to enhance communication and project management skills.
Focus on Real-World Problems: Address genuine challenges to make your projects more relevant and impressive to employers.
Document and Present: Maintain clear documentation and present your work effectively to demonstrate professionalism and technical depth.
Conclusion
Engaging in real-world projects is the cornerstone of a robust computer science education. These experiences not only reinforce theoretical knowledge but also cultivate practical abilities, creativity, and confidence, preparing students for the demands of the tech industry.
0 notes
Text
Get Ready for the Linkito Puzzle: New DLC and Discount

Linkito logic puzzle game is due to receive a free DLC soon for Linux and Windows PC. Thanks to the creative talents of developer Kimeria Games. Currently available on both Steam and GOG with 83% Very Positive reviews. Exciting news for all the puzzle fans out there! Developed by Kimeria, they are releasing a brand-new free DLC, bringing 15 fresh levels, all centered around the theme of numbers. To celebrate this release, the title also has a 25% discount as part of the Ada Lovelace Day Steam event. Due to honor the first female programmer in history. So, if you haven’t grabbed it yet, this might be the perfect time to jump in on Linux. Here, players are up against a powerful company - state. The only way to fight back in Linkito is to solve puzzles to regain your freedom. You start by fixing simple electronics, but as the story unfolds, things get more intense. You’ll move on to tasks like cracking secret codes, controlling robots, and even diffusing bombs. The puzzles get trickier, but that’s part of the fun—each challenge builds on what you’ve learned, using a lot of trial and error to figure things out.
Linkito logic puzzle Launch Trailer
youtube
One of the best parts of the gameplay is the freedom it gives you to play your way. Open puzzles let you experiment, finding unique ways to solve problems. Plus, Linkito has a built-in level editor that lets you create your own puzzles and share them with others online. It even has an in-game browser where you can discover and play challenges made by other players. So, not only do you get the core title and the new DLC, but you can dive into over 500 user-made content from around the world! On top of logic puzzles, Linkito works with tech like Arduino, Raspberry Pi, and even Twitch. This connection adds a whole new layer of creativity, letting players come up with some truly wild ideas. Whether you’re playing solo or checking out the community-made levels, the possibilities are pretty much endless. If you’re into puzzle titles or just like a good challenge, now’s your chance to jump into Linkito. With the new free DLC coming, there is also a 25% discount on Steam. Dropping the price to $11.24 USD / £9.59 / 11,24€. Regular price on GOG. There is also a growing community of creators, which is making gameplay even better for both Linux and Windows PC.
0 notes
Text
Gruseliges Raspberry Pi Pico Projekt: Die Spooky Box für Halloween

Passend zur kommenden Halloween-Zeit möchte ich dir heute ein passendes kleines Projekt vorstellen, welches du easy an einem Wochenende erstellen kannst, es ist eine Spooky Box mit Soundausgabe. Als Mikrocontroller verwende ich den Raspberry Pi Pico in der Ausführung mit WiFi / Bluetooth.

Die Idee dazu bekam ich vom Leser meines Blogs, welcher mir per Mail ein ähnliches Projekt vorgestellt hat. Dieses war jedoch mit dem weniger verbreiteten Calliope Mini. Der Vorteil des Calliope Mini ist jedoch, dass dieser besonders für Anfänger einfacher zu programmieren ist. Jedoch auch die Programmierung in MicroPython ist, wie du gleich sehen wirst, nicht allzu schwierig.
Teileliste für die Spooky Box mit einem Raspberry Pi Pico
Wenn du die Spooky Box nachbauen möchtest, dann benötigst du: - einen Raspberry Pi Pico oder Pico W, - ein Micro-USB-Datenkabel, - eine Lochrasterplatine, - zwei 40 Pin Buchsenleisten, - zwei LEDs mit Vorwiderstände (220 Ohm), - einen Taster, - einen Servomotor Typ SG90, - einen Piezo Buzzer
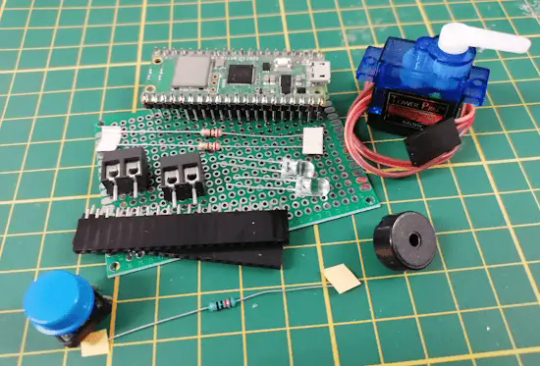
Für den Aufbau auf der Lochrasterplatine benötigst du noch zusätzlich: - einen Lötkolben, - Lötzinn & Lötfett, - eine hitzebeständige Unterlage - einen kleinen Seitenschneider, - Litze / Draht in unterschiedlichen Farben
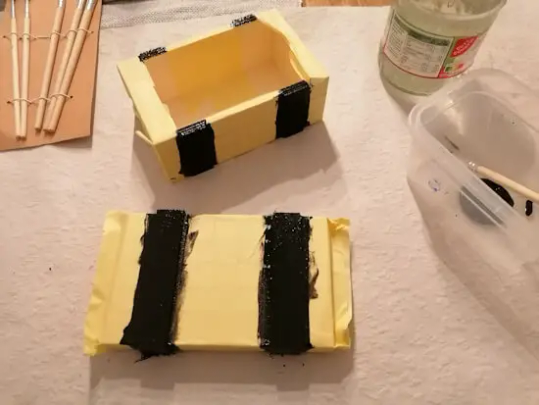
Spooky Box
Die Box selber habe ich aus dem örtlichen Tedi Mark für 3 € gekauft, zusätzlich noch Acrylfarbe und Pinsel, somit ergab dieses genau 6 €. Wenn du das ganze online suchst, dann findest du hier eine kleine Liste: - eine kleine Schatzkiste aus Holz, - Acrylfarbe, - Pinselset, Der Vorteil an der Acrylfarbe ist, dass diese recht schnell trocknet. Du kannst deine Spooky Box natürlich nach Belieben anders bemalen und bekleben.


Aufbau der Schaltung am Raspberry Pi Pico
Nachdem die Box fertig bemalt ist und trocknen muss, kümmern wir uns um die Schaltung am Raspberry Pi Pico.

Programmieren
Das Programm erstellen wir wie erwähnt in MicroPython, dafür nutze ich die Thonny IDE. Das Gute gleich vorweg, wir benötigen keine zusätzliche Bibliothek für dieses Projekt, d.h. du könntest auch rein theoretisch den MU-Editor verwenden. Nachfolgend folgt nun eine Schritt-für-Schritt-Anleitung, wie du das Programm aufbaust. Schritt 1 - Abspielen des Halloween Sounds am Raspberry Pi Pico Die Spooky Box soll bei Aktivierung einen Sound abspielen, diesen habe ich jedoch lediglich für ein Arduino Programm gefunden, dieses habe ich für MicroPython umgeschrieben. #Module zum ansteuern der GPIOs und #erzeugen eines PWM Signals from machine import Pin, PWM from utime import sleep #der Buzzer ist am GPIO1 angeschlossen buzzer = PWM(Pin(1)) #Tonname & Frequenz in einem Dictionary mappen tones = { "cs6": 1109, "fs5" : 740, "d6" : 1175, "c6" : 1047, "f5" : 698, "b5" : 988, "e5" : 659, "bf5" : 932, "ef5" : 622, "b4" : 494, "g5" : 784, } #Töne vom Lied song = #Spielt einen Ton in einer Frequenz ab def playtone(frequency): buzzer.duty_u16(1000) buzzer.freq(frequency) #Verstummt den Buzzer def bequiet(): buzzer.duty_u16(0) #Spielt das Lied ab def playsong(mysong): #läuft über die Liste mit den Tönen for i in range(len(mysong)): #abspielen eines Tones aus der Liste mit dem Index i playtone(tones]) #kleine Pause von 200 Millisekunden sleep(0.2) #verstummen des Buzzers bequiet() #Abspielen des Liedes playsong(song) Der Code bewirkt lediglich das, dass Lied auf dem Piezo Buzzer abgespielt wird. Schritt 2 - Auslesen des Fotowiderstandes Der Fotowiderstand ist am ADC0 / GP26 angeschlossen und wird als analoger Wert ausgelesen. #Module für das auslesen des LDR from machine import Pin, ADC from utime import sleep #der LDR ist am GPIO26 / ADC0 angeschlossen adc = ADC(0) #Starten einer Endlosschleife while True: #auslesen des LDR und #ausgeben auf der seriellen Schnittstelle print(adc.read_u16()) #kleine Pause von 300 Millisekunden sleep(0.3) Wenn du den obrigen Code ausführst, dann wird kontinuierlich die Helligkeit gemessen und ausgegeben. Solltest du deinen Finger auf diesen Sensor legen, so ändert sich der Wert in der Konsole entsprechend. Auf diesen Wert können wir jetzt reagieren und somit erkennen, ob der Deckel unserer Spooky Box geöffnet wurde. Schritt 3 - Taster interrupt erstellen Wenn der Taster betätigt wird, soll der Sound aufhören zu spielen und die kleine Pappfigur soll abgesenkt werden. Dazu müssen wir einen Interrupt erstellen, der Pi Pico bietet an jeden der GPIOs die Möglichkeit ein Interrupt anzuhängen. #Module zum ansteuern der GPIOs from machine import Pin #der Taster ist am GPIO5 angeschlossen, #zusätzlich wird dieser über den internen PullUp #Widerstand verbunden button = Pin(5, Pin.IN, Pin.PULL_UP) #Funktion welche ausgeführt werden soll #wenn der Taster betätigt wird. def button_handler(pin): print("Hello, world!") #konfigurieren eines Interrupts button.irq(trigger = machine.Pin.IRQ_RISING, handler = button_handler) #Starten einer Endlosschleife, #diese wird benötigt damit das Programm sich nicht selbstständig beendet while True: pass Wenn du den Taster betätigst, wird die Funktion "button_handler" ausgeführt. Egal, was gerade parallel auf dem Mikrocontroller ausgeführt wird. Schritt 4 - Steuern des Servomotors Der Servomotor wird per PWM Signal gesteuert, hier musst du noch zusätzlich ins Datenblatt des verwendeten Servos schauen. Wenn du wie ich den Servo SG90 verwendest, dann hat dieser die Frequenz von 50 Hz für einen Schritt. #Module zum steuern der GPIOs from machine import Pin, PWM from utime import sleep #Servomotor am GPIO0 angeschlossen servo = PWM(Pin(0)) #der Servomotor arbeitet mit einer #Frequenz von 50 Hz servo.freq(50) #0° hat ein Dutycycle von.. grad0 = 500000 #90° hat ein Dutycycle von.. grad90 = 1500000 #Starten einer Endlosschleife while True: #Servo auf 90° bewegen servo.duty_ns(grad90) #kleine Pause von 500 Millisekunden sleep(0.5) #Servo auf 0° bewegen servo.duty_ns(grad0) #kleine Pause von 500 Millisekunden sleep(0.5) Der Code lässt den Servomotor immer zwischen den Winkeln 0° und 90° bewegen. Probleme mit zwei unterschiedliche PWM Signale Der Piezo Buzzer & der Servomotor werden beide über PWM Signale gesteuert. Das Problem, welches wir haben ist, dass der Pi Pico lediglich ein Signal zulässt. Wir müssen also nun etwas herumtricksen, dass der Piezo Buzzer das Lied abspielt, aber der Servo auch gesteuert werden kann. Meine Lösung hierzu ist, dass ich den jeweils nicht benötigten Aktor auf einen GPIO zuweise, welcher nicht belegt ist, somit ist der Aktor quasi deaktiviert. Bevor ich diesen wieder verwende, muss dieser dann lediglich wieder korrekt zugewiesen werden. from machine import Pin, PWM from utime import sleep servo = None buzzer = None grad0 = 500000 grad90 = 1500000 tones = { "cs6": 1109, "fs5" : 740, "d6" : 1175, "c6" : 1047, "f5" : 698, "b5" : 988, "e5" : 659, "bf5" : 932, "ef5" : 622, "b4" : 494, "g5" : 784, } song = def playtone(frequency): if isinstance(buzzer, Pin): initBuzzer() buzzer.duty_u16(1000) buzzer.freq(frequency) def bequiet(): if isinstance(buzzer, Pin): initBuzzer() buzzer.duty_u16(0) def playsong(mysong): for i in range(len(mysong)): if (mysong == "P"): bequiet() else: playtone(tones]) sleep(0.2) bequiet() #GPIO des Servomotor initialisieren def initServo(): global servo servo = PWM(Pin(0)) servo.freq(50) #konfigurierten Pin ändern def resetServo(): global servo servo = Pin(8, Pin.IN, Pin.PULL_UP) #GPIO Buzzer initialisieren def initBuzzer(): global buzzer buzzer = PWM(Pin(1)) #konfigurierten Pin ändern def resetBuzzer(): global buzzer buzzer = Pin(9, Pin.IN, Pin.PULL_UP) while True: initServo() servo.duty_ns(grad90) sleep(0.5) servo.duty_ns(grad0) sleep(0.5) resetServo() sleep(0.2) initBuzzer() sleep(0.2) playsong(song) sleep(0.2) resetBuzzer() sleep(0.2) Im Video siehst du nun das zunächst der Servo von 0° zu 90° wechselt und danach wird das Lied abgespielt. Das fertige Programm für die Spooky Box am Raspberry Pi Pico Hier jetzt das fertige Programm zum Download: MicoPython Code für die Halloween SpookyBox Read the full article
0 notes
Text
Raspberry Pi stellt neuen Code Editor online

Online Code Programmieren und testen. Das bietet euch jetzt auch die Raspberry Pi Foundation UK mit dem neuen Online Code Editor.
Das ist schon eine tolle Sache und unterstützt natürlich auch den Ansatz der Raspberry Pi Foundation, eben den Umgang mit Technologie leicht und greifbar zu machen und insbesondere den jüngsten unter uns die Möglichkeit zu bieten Programmieren zu lernen. Es ist eben nicht nur die beliebte Hardware, wie der Raspberry Pi Microcontroller Pico oder der Einplatinencomputer Modell 4, etc.! Die Stiftung bemüht sich schon lange durch den Programmier-Club und solche Maßnahmen auch etwas zu vermitteln. Auch wer sich der Herausforderung stellt den Nachwuchs zu unterrichten wird von Raspberry Pi unterstützt.
Und neu ist jetzt der zunächst in der Beta-version online gestellte Code Editor. Einfach die Website aufrufen, anmelden bzw. registrieren und dann anmelden und loslegen. Den ein oder anderen "Online" Code Editor mag es ja bereits geben, doch wer mehr will muss eben die entsprechende Software auf seinem System lokal installieren. So beispielsweise die Thonny IDE. Die aber bitet deutlich mehr, denn slebst die Raspberry eigenen Produkte wie der Pico können mit dem Online Code Editor noch nicht betankt werden.

Bei der Thonny IDE oder der Ardunino IDE, wie auch mit der Software Visual Code Studio können die fertigen Programme auch direkt auf bspw. den Microcontroller bzw. einen Microcontroller übertragen werden und von der IDE aus gestartet werden. Freilich das ist mit der Online Variante der Raspberry Pi Foundation nicht möglich. Jedenfalls aktuell noch nicht. Es dürfte sicher bereits in der Planung sein bzw. dürfte auch der Pi Foundation klar sein, daran in Zukunft noch etwas zu ändern. Un so könnte eine spätere Version dies sicher ermöglichen.
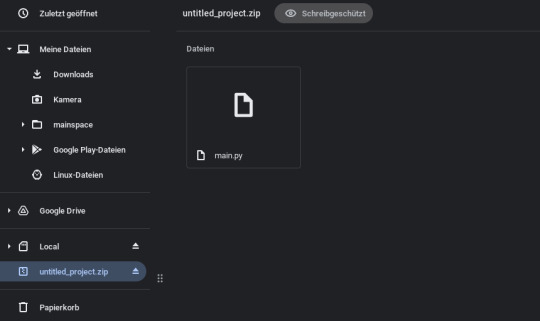
Technisch wäre es grundsätzlich kein Problem, denn gerade der Pi Pico kann bereits aus dem Browser heraus erkannt werden. Die Website des neuen Online Code Editors lautet: https://editor.raspberrypi.org/en/ und kann nun von jeder Person kostenfrei genutzt werden. Erstellter Code lässt sich testen, speichern und exportieren und kann so dann auch außerhalb dieses Editors genutzt werden. Die Download Funktion stellt euch so eine *.zip Datei zur Verfügung in der bspw. eure main.py Datei gepackt wurde.
Davon dürften nun einige profitieren, denn es bedarf eben keiner lokalen Installation und somit steht der Code immer zur Verfügung wo eine Verbindung zum Internet hergestellt werden kann. Systemunabhängig und doch ist das Arbeiten in der gleichen GUI möglich. Das dürfte auch im Unterricht bspw. an Schulen gut ankommen, wenn dort unterschiedliche Computer genutzt werden, welche die Schüler selbst mitbringen. Dann ist es im Prinzip egal ob sich jemand für ein Chromebook, einen Windows Laptop oder ein MacBook entschieden hat. Selbst auf einem Android Tablet oder Smartphone etc. lässt sich so programmieren.

Der Editor selbst unterrichtet uns aber nicht im Programmieren! Das freilich müssen wir noch einem Lehrer überlassen. Zwar bekommen wir bei falschem Code entsprechend einen Hinweis auf die Codezeile, doch das sollte ein halbwegs guter Editor ja ohnehin beherrschen. Hier gäbe es in Zukunft durchaus auch Fantasie für eine Unterstützung mit Hilfe von künstlicher Intelligenz (KI), welche den Code analysieren kann und dann vorschläge machen kann, den Code zu verbessern oder einfach nur zu korrigieren.
Der Lerneffekt wäre jedenfalls großartig. Etwas das ChtGPT so aktuell nicht bietet. Derzeit jedenfalls noch nicht. Dafür erstellt die KI auf Wunsch aber gleich den ganzen Code. Der Lerneffekt hier ist dann aber sehr begrenzt. Persönlich bin ich aber gespannt was da noch draus wird und begrüße die Bereitstellung des Online Code Editors durch die Raspberry Pi Foundation natürlich! Der Grundstein ist jedenfalls nun gelegt!
0 notes
Text
Idea for a crowd-funded, open-source project:
An inkjet printer. This printer should have the following specifications:
The print head is attached to a controller which manages the paper rollers and the horizontal position of the print head, which is in turn connected — via easily user-connectable methods, preferably using a cable/connector type not used elsewhere in the design — to a separate, high-level controller to do page rasterization and interface with the network/USB.
The print head controller should be “dumb” — no firmware to upgrade or anything. It should have a fixed amount of memory to store the page it’s going to print as an uncompressed pixel map with a fixed 16-color palette: [empty, C, M, Y, CM, MY, CY, CMY, K, CK, MK, YK, MYK, CYK, CMK, CMYK]. (Note: at 600 ppi, uncompressed, with no margins, a US legal-sized sheet — which is the largest common printable “office” size sheet; A4 and letter are smaller — would take 21 MB.)
The print head controller should be able to accept data for the next page up to the currently-active section of the page. (That is, when it is 1 inch down the page, it should be okay to accept data for the first inch of the next page.)
There should be a user-accessible setting to control how the print head controller handles the 9 color table options which amount to black (everything from “CMY” onward in the list above), with 4 settings: “do whatever the rasterizer says”, “print all blacks as just plain black ink (that is, as though they were K)”, “print all blacks as ‘rich’ black (black plus cyan)”, and “print all blacks as rich black except CMY and K, which should be left as-is”. (The second option is an ink saver — no more using color ink in black-and-white printouts.)
The print head controller should not begin printing a page until it has a full page to print.
The ink should be stored in big, user-refillable tubs.
The high-level controller should be controlled by an OS stored on an SD card; to make it easier for users to update the printer, the printer’s hardware should always expect the card to be formatted with FAT16 and the OS to be in an uncompressed archive (with the binary beginning at some specific offset) with a specific name, at the root of the SD card. (FAT16B is no longer protected by patents, and permits files up to 2 GB without any extensions, so this should be sufficient.) The controller itself should not have other firmware. Printer default settings should be stored in a text file with, again, a standard name (and also at the root of the SD card). The printer name and password should also be in a text file at the root of the SD card, separate from the settings (so that the one can be reset without the other).
The high-level controller should have connectors which can be connected to USB, to Ethernet, and to a wi-fi controller. If possible, the connections from the controller to these options should use different cable/connector types, so the user can hook them up as easily as possible. (The OS should also be able to tell whether the connectors are there or not, partially so that stripped-down printers can be made but also so that in the event of some new connection type in the future, there doesn’t have to be any code to work around the hardware-limited connectors of the original version.)
The high-level controller should have open-source rasterizers for PostScript (GhostScript) and PCL (OpenPCL?). It should be able to convert PDF files to PostScript and rasterize them, and also accept PNG images. The high-level controller should come with 2 GB of RAM permanently soldered to the board, with an additional RAM slot for people who feel the need for more. (Obviously, the high-level controller rasterizes a page at a time into <82 MB pixel maps and feeds them to the print head controller.)
On a USB interface, the driver should simply convert the pages into either 300 or 600 ppi 16-color palette-based PNGs and transfer them to the printer, which should then basically just decompress them and feed the pixel data to the print head controller. (This isn’t terribly efficient, but an uncompressed 21 MB 600 ppi page would transfer in significantly less than 10 seconds over USB 2, so efficiency isn’t the most important consideration.)
Configuration of the printer settings should be available via multiple methods: there should be a web page, password-protected, on the network interfaces, which should only load via HTTPS, on a specific port. (This port should be changeable within a specific range, but have a predictable default.) If possible, the printer should implement CUPS as far as possible and support its configuration options. The USB driver should be able to upload new settings, provided the right password is entered. There should also be an open-source program to generate a settings text file which can be dropped straight onto the SD card to replace the old settings. There should also be a standard interface to drive a simple LED touchscreen (as available for the Raspberry Pi) to configure the printer directly.
The parts of the printer should, wherever possible, be 3D-printable, and the necessary files to print them should be available online. The design of the printer should be such that replacing printable parts is reasonably easy for the end-user.
The high-end controller should be possible to build with a Raspberry Pi, and the plans should also be available online. The plans should not change significantly over time.
Premade printers should certainly be available; the high-end controller in a premade controller should probably be effectively all one piece rather than user-disassemble-able, but should be compatible with the Raspberry Pi version. (So you probably can’t repurpose it, but you can replace it with a homemade one if you need to.)
Parts which cannot be 3D printed, and also ink, should be available online at as close to cost as possible. Where possible, parts which can be made from standard hardware should be made from such. (For example, the bar(s) on which the print head moves should ideally be a standard type of pipe. Possibly there should be instructions on how to use different standard types to construct the printer.)
A couple of edits:
First, I stupidly miscalculated the amount of RAM for a page. That has been fixed.
A few other notes:
The high-end controller should support mDNS, but not have it turned on immediately. In fact, the printer should make available any and all discovery and easy-print options which are feasible — AirPrint, for instance — although these should all be turned off by default.
The settings file ought to be stored in either some variety of XML or JSON. It should not really be something human-editable, but neither should it be something which will be destroyed by opening it with a text editor and then saving. The settings should always include, at the beginning of the file, the version of file, and the OS should always include utilities to upgrade previous settings file formats. (It would be acceptable to have a series of them — one to upgrade from version 1 to version 2, one from version 2 to version 3, etc.) The version number should change any time a new feature requiring a setting is added to the OS — which means that the version number of the settings file will very easily increase much faster than the version number of the OS.
Why not do an open-source laser printer instead? Because laser printers don’t have the problems that inkjet printers do. Inkjet printer manufacturers are producing machines which are essentially disposable, and charging a premium for the ink, which cannot be user-refilled (and increasingly include electronic systems to detect attempts to do so). In addition, laser printers involve technology which is actually potentially dangerous in a number of ways — high heat, actual lasers, and of course toner (which is extremely bad for your lungs if inhaled and requires specialized cleaning tools to remove properly). Inkjet printers, on the other hand, just involve ink and a motorized, electronic spritzer. It may be difficult to properly align the print head and make the device run accurately, but it isn’t seriously dangerous.
1 note
·
View note
Photo

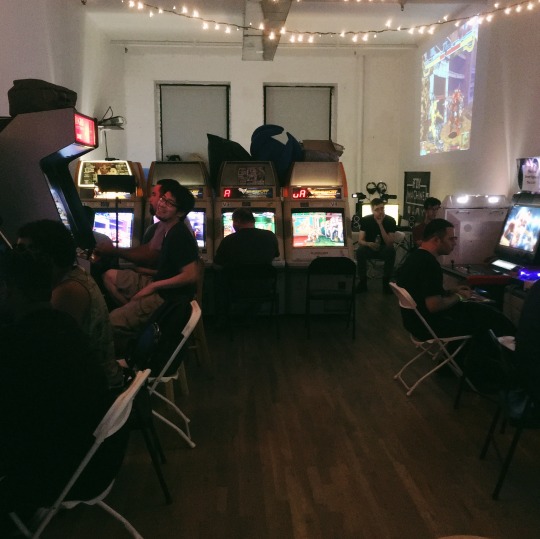
An Arcade Grows in Brooklyn (Or At Least Is Trying To)
Perhaps it's still the case... perhaps it has always been the case.... all I know with absolute certainty is how, during a certain point, circa the early 2010s, a decent number of people were very much interested in opening and operating their very own arcade around these parts. These parts being New York City and surrounds areas.
Said individuals would, understandably, seek advice from an expert. And for reasons that may seem obvious to some, one person who was often enlisted was Kotaku's editor in chief, Stephen Totilo. And cuz it ain't quite his domain, Steve would then pass everyone along to someone more knowledgeable, that being me.
I spoke to a variety of individuals, each with their own unique vision...or so they thought. In reality, they were all essentially identical: everyone just wanted a place to hang out and play video games with their friends. They also figured that there would be enough other people wanting to same, enough to quit their day jobs and make a living off of them. To each and every one I said the same basic thing: don't do it.
Hey, I love arcades, I really do, and wish there was more of them. But I also don't like the idea of someone completely wasting away his life savings, just for a place for him and his buds to play Halo 3 or Rock Band 2 all night long. To be more exact, I don't like the idea of being someone who could have prevented such a thing from happening.
Just the other week, My Life In Gaming was in town; before swinging by Connecticut for some retro gaming con, there was a pit stop in NYC. Am assuming Coury wanted to catch up with family, being a Brooklyn native and all; perhaps to maximize his time, a meet-up was also planned. At an arcade. One that I had never heard of before.
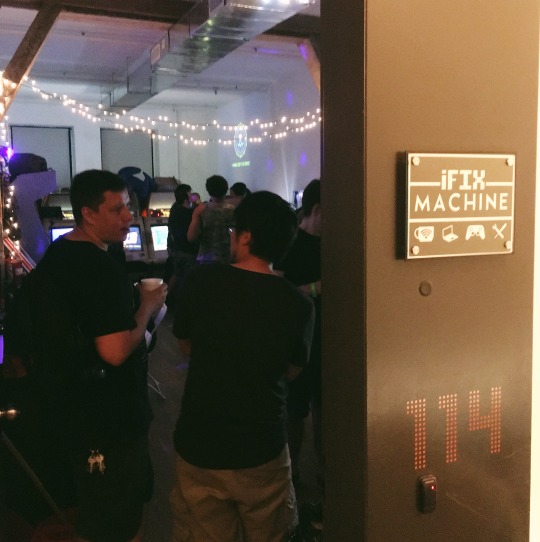
The oddly named I Fix Machine Arcade was located in my old stomping grounds of Sunset Park, around three of four blocks away from a former residence; when I left in 2007, that part of Brooklyn was just starting to become gentrified, so I was hardly shocked to discover that the location was inside some freshly erected and ultra-trendy office loft space.
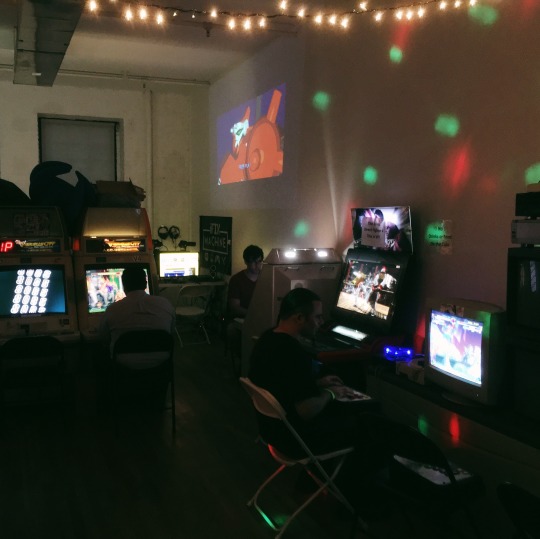
Once inside the front door, I was immediately lost; as with similar spaces, you’ve got an ultra-chic decor with zero signage, cuz that would either clash or something. A guy then walked in after me, saw that I was clueless, and pointed towards the fourth floor. Where there was no arcade. This led me to going up and down the entire building (via stairs since I feared the lack of security codes would impede my search), until I finally came across it on the first floor. The door was manned by the proprietor... the same guy who led me astray. Guess I didn't look like an arcade goer or something.
Anyhow, once again: it's an arcade! In an office space! Most of the games are running off of Japanese candy cabs, Versus City machines to be exact. You also have a Neo Geo MVS, an exposed NAOMI 2 attached to a Raspberry Pi (supplying the roms) and a Sega Saturn (doing what I have no idea), a high-end PC running Steam, plus more. There's even an area for live-streaming... quite the impressive set-up.

And near the entrance is a table, where the aforementioned proprietor had an open PC in front of him. Christopher is an energetic, buoyant fellow, whom I had a hard time understanding, though his enthusiasm clearly came across. I asked quite a few things and received many answers. Kinda, sorta.
My first question, of course: what's this arcade about? Christopher immediately went into his sales pitch, about it being a home for gamers, hearkening back to a time in which arcades ruled supreme, before the internet & online gaming, where you breathed the same air space with other players, yada yada yada, the same thing I've heard legit a hundred times before. I then asked, seriously, what's the deal here.

First, a bit about Christopher: I was surprised to learn that he was in his mid-to-late 30s, given his youthful appearance, though even more impressive is how he taught himself to repair computers in the late 90s, before the advent of YouTube. I'm not sure what came first, the computer repair business or the arcade, but I did discover out that he owes everything to a guy named Jose Cruz. The way Christopher reverentially addressed Jose, it was like hearing the Pope refer to Jesus Christ Himself.
At the very least, Christopher acted like I should have known who Jose was... cuz I guess he's kind of a big deal? A combination of clues and blind guesses led to the assumption that the legend of Jose Cruz was somehow connected to local fight game scene and associated territories. Specifically the original Chinatown Fair crew, which later made a home for themselves at Next Level. Speaking of, I asked if there was any competition between I Fix Machine Arcade and Next Level Arcade, and the response was a somewhat sheepish "no... not anymore”.

Not long after my visit, I would discover that I Fix Machine and Next Level are in the same neighborhood, just a block away (the latter had initially chosen Brooklyn’s Chinatown as its new home-base). Again, no idea who came to the area first, but after some unspecified turf warfare, it would appear that everyone is friendly for now. I get the impression that one will go to whichever Arcade depending on one’s interest in a particular fame and the associated community built around it. I got the impression that I Fix Machine was the place for Tekken devotees.
Back to Jose: I would also discover that much of his fame... from what I was able to discover after the fact myself... is due his technical prowess. He knows his way around the back of an arcade machine and has produced a number of noteworthy mods. As such, Jose also taught Christopher everything he knows about servicing arcade cabs. I asked if, in addition to PCs, arcade games could also be repaired, since I know a few owners who might appreciate such a resource… didn’t get a straight answer. I then asked what the hours were: “2am to midnight”. I assumed he meant 2pm to midnight. Days of operation? Wednesday through Sunday. Cost of playing games? $10.

While asking questions I noticed a steady stream of patrons trickling into I Fix Machine Arcade, all clearly regulars. It then hit me, the similarities between this place and all the others that had been proposed to me, which I had nixed: these customers all seemed to know each other... they were all friends, friends who were paying to hang out with each other. I suppose seeing it in action made me realize that such a business model wasn't that insidious after all. Or entirely unique; it's no different than a club house or lodge, where the members pay dues to help keep the lights on. It just so happens that the doors are opened to the general public.
Yet the question remains: how many more friends can such a place attract? I was also reminded of my initial visit to Next Level several years ago, when Henry Cen had just begun operations. Someone close to Cen at the time divulged to me plans for a Next Level in Queens after the Brooklyn location. Then another one in the Bronx. Of course there would be one in Manhattan, with NJ to follow. I wondered back then if Cen had enough friends to fulfill such a master plan. Last I heard, the move from Brooklyn Chinatown to Sunset Park resulted in a reduction of square footage.

Back to Christopher: I asked how long I Fix Machine Arcade had been in business: about 6 months. I then asked how promotions were handled, and Christopher explained that he had been extolling the virtues of his haven for hardcore gamers “everywhere”: Twitter, Facebook, Twitch, Discord, etc. It’s at this point in which any objectivity as an investigative journalist began to wash away and my years as a promoter for events began to take over. I explained that online forums can only go so far… to really get the word out, especially on a local level, one had to do it the old fashioned way. And that’s the plaster the city with stickers and flyers, as well as make appearances at events. In the flesh. Places like Penny Arcade Expo, New York Comic Con, AnimeNYC, and especially MAGFest.
Christopher admitted to me that he had heard of those places, but never been to them (at least to conduct business). At that exact moment, a person who had just put down his $10 for the entrance fee also noted that he had just put down money for a MAGFest hotel room, which had just become available to the pubic earlier that afternoon. This unidentified individual told Christopher, “Hey man, it’s hype; you need to go there, tell everyone about IFM!” Christopher smiled and nodded in agreement.
I figured it was time to ask the hardball questions. First… any trouble with the neighbors? Not surprisingly, other offices in the building have called the cops to complain, resulting in several visits. But Christopher glossed over the details and offered a positive spin, by saying that each visit ends with cops hanging out and playing games. Quite the positive outcome, far more so than similar visits by the fuzz to other DIY venues I’ve been at or associated with.
I asked other questions, like what was the age range of his customers (Christopher claimed between 6 to 60, which I found a bit hard to swallow) and what was the average number of customers on a given day (he stated about 10, and given the number of regulars present, I found that to be a tad bit more plausible). Eventually, it was time for the hardest question of them all: is I Fix Machine Arcade making any money?

The answer was surprisingly honest and to the point, given the numerous canned responses I had been give: no. Yet... he and Jose (who I believe is the co-owner) know that it takes a year or two for any business to get its footing... or so they say. And I was told that they were ready for the road ahead. Now, given the surprise response to my inquiry about MAGFest, I have to wonder about that. Then again, I suppose things are truly only getting started.
Objectively speaking, the pieces are all there: I Fix Machine Arcade has the space, one that’s fairly accessible (it’s close by a major subway hub in South Brooklyn), it definitely has the gear (I honestly can't recall a larger assortment of Japanese arcade hardware in the Big Apple), and thus far, it has a loyal legion of customers. I hope I Fix Machine Arcade, I want it to survive, but do I believe it will when all is said and done? Well…

I almost forgot: the meet-up. It was actually a combination My Life In Gaming/RetroRGB gathering. Which is also when RetroRGB sat down with Jose Cruz himself for an hour long chat, for those interested...
youtube
... I was expecting an Antiques Roadshow-type gathering, but with modded retro gaming hardware, and that's basically what I got. Here's my buddy Jessen showing off some wacky RGB mod for the Super Famicom that sends its signal via the cart?

Eventually, when the party was officially in full swing of course, I remember how long my subway ride back home to the Bronx would be, so it was time to head out...
17 notes
·
View notes
Text
Jutoh ibooks

JUTOH IBOOKS PDF
JUTOH IBOOKS FULL
JUTOH IBOOKS CODE
JUTOH IBOOKS PLUS
Quick preview facility: You can quickly preview the book section you are working on in a web browser window.
Pages are split into two HTML files or joined into a single HTML file from two pages, as determined by the way the project was created and the target format. Jutoh can export fixed layout ebooks for Kindle, iBooks and Epub 3. Magnification of regions is automatically supported for Kindle. You can then specify background images for the pages, and position further images and text boxes.
Fixed layout page editor: Jutoh is principally an editor for reflowable books, but you can also create fixed layout books by adding fixed layout pages.
JUTOH IBOOKS FULL
Copy formulae from a Word document, or import a whole ODT document full of MathML or SVG images. Edit your image or formula in a helper application, such as Inkscape, GIMP or LibreOffice/OpenOffice Math, and reimport it into Jutoh with the click of a button. From the drawing object properties, you can edit, import, export and preview the image. SVG and MathML support: The drawing object gives the author the choice of outputting a bitmap, an SVG image, or MathML code, depending on the target ebook format and platform.Table and text box support: Jutoh can import tables and text boxes, and you can also create new ones.Jutoh supports floating images, where text flows to the left or right. Jutoh can convert absolute sizes to percentages so your images scale to the different display sizes. Image support: Jutoh has extensive support for bitmap images, including specifying conversion format and quality, and image size (dynamic within the ereader and also static resizing on compilation).(Note that complex CSS style definitions may not be preserved when importing from HTML or Epub.) Import from DOCX, ODT, plain text, HTML, or an existing Epub ebook. HTML, text, DOCX, ODT, and Epub import: Jutoh imports from a range of formats.
JUTOH IBOOKS PDF
Using an application such as the free, you can quickly convert the ODT to PDF suitable for printing, viewing online or sending to a print-on-demand service. It can also export a full table of contents with both hyperlinks and page references, and footnotes and alphabetical indexes will also be exported in the native ODT format.
PDF creation via ODT: Jutoh creates OpenDocument Text (ODT) files complete with page styles for different sections of your book, allowing for different headers and footers in different parts of the book.
JUTOH IBOOKS CODE
JavaScript code can be specified in a section document's properties or, in Jutoh Plus, separately in resource documents. Epub 3 features supported by Jutoh include Epub 3 metadata, the 'landmarks' section, semantic markup such as the epub:type attribute and section tag, audio narration using SMIL files, text-to-speech annotation, audio and video tags, forms and various HTML5 tags.
Epub 3 export: Jutoh generates Epub 3 as well as Epub 2.
JUTOH IBOOKS PLUS
Jutoh Plus also writes HTB and CHM application help files. Epub and Kindle cover the majority of distributors, including Amazon, Apple, Nook, Kobo, and Google Books.
Multiple format export: Jutoh exports to Epub, Mobipocket (if the kindlegen application is available), ODT, HTML, and text.
Define keyboard shortcuts and favourites to quickly apply styles to your document. You can add custom paragraph styles to the built-in styles, and you can specify custom CSS for each style (or the whole style sheet) if required.
Formatting: Jutoh supports paragraph and text formatting.
It'll even run on Intel Chromebooks, and is free on the Raspberry Pi 2. Jutoh is fast and flexible and works on Windows, Mac, and Linux. Select a book cover design from Jutoh's templates, or create your own with the built-in cover designer. Add images, boxes and tables create a table of contents, footnotes, index, and bibliography. Edit one project - output to many distributorsĬreate your project in seconds from existing files using Quick Convert or create your book from scratch using the built-in text editor.
0 notes
Text
What is Python?
Python is a popular programming language. It was created by Guido van Rossum, and released in 1991.
It is used for:
web development (server-side),
software development,
mathematics,
system scripting.
What can Python do?
Python can be used on a server to create web applications.
Python can be used alongside software to create workflows.
Python can connect to database systems. It can also read and modify files.
Python can be used to handle big data and perform complex mathematics.
Python can be used for rapid prototyping, or for production-ready software development.
Why Python?
Python works on different platforms (Windows, Mac, Linux, Raspberry Pi, etc).
Python has a simple syntax similar to the English language.
Python has syntax that allows developers to write programs with fewer lines than some other programming languages.
Python runs on an interpreter system, meaning that code can be executed as soon as it is written. This means that prototyping can be very quick.
Python can be treated in a procedural way, an object-oriented way or a functional way.
Good to know
The most recent major version of Python is Python 3, which we shall be using in this tutorial. However, Python 2, although not being updated with anything other than security updates, is still quite popular.
In this tutorial Python will be written in a text editor. It is possible to write Python in an Integrated Development Environment, such as Thonny, Pycharm, Netbeans or Eclipse which are particularly useful when managing larger collections of Python files.
Python Syntax compared to other programming languages
Python was designed for readability, and has some similarities to the English language with influence from mathematics.
Python uses new lines to complete a command, as opposed to other programming languages which often use semicolons or parentheses.
Python relies on indentation, using whitespace, to define scope; such as the scope of loops, functions and classes. Other programming languages often use curly-brackets for this purpose.
Example print("Hello, World!"
According to me APPWARS TECHNOLOGIES is one of the best institute for Summer internship training in all over India. It also help students to secure their future. APPWARS TECHNOLOGIES has successfully conducted programs for more than 1000+ students from all over India. They are providing online Summer internship training with certificate. It is the best platform to gain knowledge and to enhance your skills. APPWARS TECHNOLOGIES provides various courses and internship programs which are free of cost. It helps you to explore yourself and help to increase your skills and provide you the best opportunities for the job. In future it's really helpful for you to get a job and a great career opportunity.
For further details go through below given link 👇👇
Best Online Python Training Institute in Noida - Appwars Technologies TOP REASONS TO CHOOSE APPWARS TECHNOLOGIES FOR PYTHON PROGRAMMING TRAINING IN NOIDA PYTHON PROGRAMMING Training in Noida is conception as per the IT management standards. APPWARS TECHNOLOGIES offers the best PYTHON PROGRAMMING Training and devoted employment service in Noida with proper planned training courses. Regular and weekend classes and assignments after each class are provided for python programming in Noida. Advanced lab designed with latest equipment. Provide lab facilities to 24*7 and students are allowed to access the lab anytime. One the best certified expert trainers or professionals having many years of real industry experience. Mentors of PYTHON PROGRAMMING Training in Noida helps in each type of project preparation, interview preparation and job placement support. Giving personality development sessions including English spoken, mock interview, group discussion and presentation skills free of costs. Providing free study materials, PDFs, video training, lab guides, exam preparation, sample paper and interview preparation. Provide retake classes without any charges as often as you choose. Helps the student to learn complex technical concepts. APPWARS TECHNOLOGIES TRAINER’S FOR PYTHON PROGRAMMING TRAINING IN NOIDA TRAINER’S are expert and professional in their field of sphere and constantly boost themselves with new tools and technology to impart the best training for the real working environment. Trainees have been carefully selected by our committee and recognized over the years by various organizations for their field work. Trainees have many years of experience of working in big organization or institutes. Certified trainers with at least 7 years of experience in IT Industries. Trainees are connected with many placement cells of various companies to give support and help to the students for their placements. PLACEMENT ASSISTANCE AFTER PYTHON PROGRAMMING TRAINING IN NOIDA APPWARS TECHNOLOGIES is a leader in apprehension placement assistance to the students with the help of an assigned placement cell. The placement cell helps supports and assists the students during the time of placement. APPWARS TECHNOLOGIES also provides best resume domicile service by helping the students to make their resume as per the latest industry trends. APPWARS TECHNOLOGIES organize personality development sessions including group discussion, mock interview, and presentation skills on daily basis to help the students that they present themselves confidently. APPWARS TECHNOLOGIES help the students to achieve their dream job. APPWARS TECHNOLOGIES DURATION FOR PYTHON PROGRAMMING TRAINING IN NOIDA Regular Classes: 5 Days a week (Morning, afternoon and Evening) Weekend Classes: (Saturday and Sunday) Fast Track Classes also Available One to One Classes also Available Corporate Training also Available https://appwarstechnologies.com/courses/python-programming-training-in-noida/
0 notes
Text
Anydesk App For Desktop

AnyDesk Connect to a computer remotely, be it from the other end of the office or halfway around the world. AnyDesk ensures secure and reliable remote desktop connections for IT professionals and on-the-go individuals alike. AnyDesk is a desktop application that lets one have remote access of a computer system, in an authenticated manner. It is a German technology now being used popularly even in India and lets co-workers or professionals connect better. AnyDesk provides independent, remote access to computers and other devices while running the host application. Discover AnyDesk - The Linux Remote Desktop App. AnyDesk provides powerful Linux-based connectivity for smooth and seamless remote access to any computer. Whether as an individual, or as a professional organization offering remote support to customers, AnyDesk is made for easy operation and solid remote connectivity.
For those of you who don’t know what AnyDesk is, it is a remote desktop application which is extremely popular for its high speed its power to connect to any device anywhere. Many users around the world use AnyDesk as a remote access software to manage different tasks on their target devices easily. Another point about AnyDesk is that it uses encrypted protocols to transfer data between the two devices. This ensures the security and privacy of your data transferred through this app. But what users might find a little difficult is AnyDesk download and working with it. In this article, I will show you how you can easily use AnyDesk to connect to a remote device and share files through it.
How to use AnyDesk
As I mentioned earlier, AnyDesk is among the applications that can be used to remotely connect to a desktop computer or a mobile device. you can use AnyDesk to connect to a computer and do tasks such as repairing or other job related tasks when you are away. But what you certainly need to know is that you will need to get the permission from the target device in order to be able to connect to it. In fact, connecting to a device remotely and without the owner’s permission would be a kind of hacking which is illegal in many jurisdictions.
The reason why you would need to use AnyDesk is to access devices which belong to you or you have been asked to repair them remotely. This includes repairing and fixing a device remotely when physical access to the target person is not possible. Now before we start AnyDesk tutorial, you will need to download AnyDesk and install it. You can download AnyDesk from below link.
Once you have installed AnyDesk on the target device as well as you own device, you can start using it for a remote connection. Here are all the steps you will need to take in order to use AnyDesk.
How to work with AnyDesk remote desktop app
In order to use AnyDesk to connect to a remote computer, you will need to take these steps:
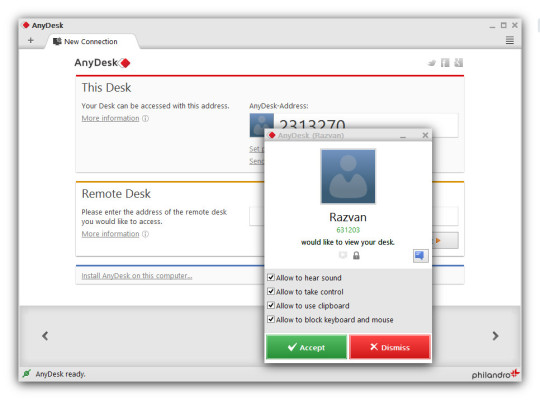
After you have installed AnyDesk on your computer, you will need to launch the app. A number of options will appear for you. In the section named “This Desk“, you can see your own ID. You will need to send this ID to the target computer as it is required for establishing the connection. Right under “This Desk”, you can see another field named “Remote Desk“. You will need to ask the target device’s ID and enter it in the blank box. After you are done with ID sharing part, just click on “Connect” to create the connection.
When you click on “Connect”, a window like the one in the photo will appear for your target person. The target person will need to check all the boxes to allow full access and then click on “Accept” to allow you to use AnyDesk to connect to the target device. Please note that if the target person clicks on “Dismiss“, the connection will be lost and you won’t be able to connect to the computer.
From this step on, you are able to use AnyDesk to perform tasks on the target device. Also, you can use the chat box on the right side of the window to talk to the target person. You can for example use this chat to notify them of the existing issues or ask them to do a certain command for you. At the end, you can click on “Disconnect” to end or stop the process.
By taking these simple steps, you can easily use AnyDesk to establish a remote connection with a computer. This was a simple AnyDesk tutorial for you and I hope you found it useful. Please don’t hesitate to ask your questions in the comments section.
The Anydesk App For Remote Desktop On Linux
A remote access tool at its best
Have you ever gotten extremely worried after discovering that your file (which you’d worked so hard on) is still on your desktop at home and it’s your turn to present next in class? You feel helpless in these kinds of situations. Fortunately, there are remote access utilities to handle these problems.
If you would like to try similar apps either for your own personal use without shelling out some money, then AnyDesk is the perfect program for you! It is a free, lightweight remote access application that can help you access various files and documents on any device across multiple locations. Ready to start working anytime, anywhere?
Quick and comfy
The app claims to be the world’s fastest yet comfortable remote desktop application.
AnyDesk's key features include online collaboration, file sharing, access control, and personalized user interface. You can start using the program even without installing it. All you have to do is download and launch its super lightweight 1.1MB program file. Accessing your files anywhere is made easier and more secure since you don’t need to entrust your data to a cloud service.
Portable Work Desk

The app works with ID numbers, making establishing connections with your family, friends, colleagues, and clients simpler and quicker. You can customize your alias using random numbers after downloading the app on two or more of your devices. https://blogstudio50.tumblr.com/post/655346554531643392/magnet-shop-near-me. Enter your preferred alias (e.g. alias98@ad) on the device you want as the host that will remotely control the other ones, and press connect. Once you have accepted the remote connection request on the other devices, you’re be all set. Enable unattended access by including passwords in the settings. You can also change permission settings from time to time and let remote users view your monitor, hear sound from your computer, control keyboard and mouse functions, and access clipboard. You can also choose to see remote users’ own cursors for better communication. You can even turn your whole screen setup into a whiteboard where you can doodle, type, or draw for better presentations.
Here is a summary of other things you can do with the app:
- Syncing clipboard contents across the host and remote user/s’ computers
- Take a screen recording or screenshot while actively using the app
- Alter connection to create the best possible balance between video quality and speed
- Access easily various settings from the menu bar
- Transfer files by copying it to the clipboard and pasting it to the remote computer
- Restart remote users’ computer while the app is active in portable mode
- Save connection shortcuts to your desktop for quick access
Upgrade Your Desk
Although the app is available for free download, you can upgrade its services and features by purchasing its paid versions (which are all billed annually). You can choose from Lite, Professional, or Teams bundles. The Lite version is preferably for one user and personal purposes. The Professional version, the most popular bundle with app users, is best for multiple devices given its unlimited endpoints.
Where can you run this program?
The app works perfectly with Windows XP/7/8/10, Mac OS, Linux, FreeBSD, and Raspberry Pi. It is also available for Android and iOS mobile phones.
Visual studio code live. Join the Visual Studio Code team and our community in our livestream series! Every month, we host a release party to highlight what's new in the latest version of VS Code. We also host other live events highlighting our community members and cool projects they've made. This provides you and your team/class with a one-click installation, in order to begin pair programming, performing remote code reviews, driving interactive lectures, and more, without needing to leave Visual Studio Code. Once you log into your GitHub account, you'll see the Live Share icon in the Activity Bar. Starting a Live Share session. Visual Studio Code is a code editor redefined and optimized for building and debugging modern web and cloud applications. Visual Studio Code is free and available on your favorite platform. Visual Studio Live Share lets you collaboratively edit and debug any codebase with others in real time—each person working in their own familiar, personalized environment.
Is there a better alternative?

AnyDesk is the best option for lightweight remote access because of its incredible speed in terms of graphical performance metrics and responsiveness. Despite its small file size, the app offers key features such as chatbox for client use, file transfer, and connection to multiple hosts. Unfortunately, its limitations per compatibility put the app at a disadvantage versus its most popular competition, TeamViewer. This latter app does not only deliver fast performance but also supports a huge number of OS. Its security features are also unparalleled which includes two-factor authentication, whitelist, and blacklist of allowed/restricted users, and screen lock after minutes of inactivity. The only downside of this app is the notable difference of rates when compared to those of AnyDesk.
Our take
The app’s key features are all indispensable and can be used for both personal and business purposes. It may take a while for you to master its unusual interface but you'll love it once you customize it according to your personal tastes. Its premium bundles undoubtedly serve all the best features from the app’s largest competitors but at a more reasonable price.
Should you download it?

Yes, but only if you’re intending to use it on your desktops or laptops. The app is not as appealing for mobile devices given its poor performance there. You can download the app’s free version first to test out the program, explore its features, master its interface, and discover if it really suits your personal and/or business’s goals.
Highs

Small download size
Freemium features
Personalized interface
Allows chat communication
Lows
Anydesk Desktop Download
Poor mobile service
Hard to master
Interesting features only available in paid version
Free Download Anydesk App For Desktop
AnyDeskfor Windows
6.2.3
0 notes
Text
Installer Psiphon Linux

Unix & Linux Stack Exchange is a question and answer site for users of Linux, FreeBSD and other Un.x-like operating systems. It only takes a minute to sign up.
How To Install And Configure Free Vpn Service On Kali Linux Stay Secured In This Video I am going to Show You How to install free VPN service on Kali Linux 2.
Psiphon 2017 Download for Windows PC. Hiren's BootCD 2016 Free Download Offline Installer. Psiphon-3 free download. Psiphon Portable Psiphon is a circumvention tool from Psiphon Inc. I’m on linux psiphon is for you, please proceed I’m on mac. Andy is the best Android emulator available. Valve's official Steam for Linux installer application for GNU/Linux operating systems Vivaldi 3.5.2115.73 The next-generation web browser for power users, based on the powerful Chromium project.
Psiphon for Linux download: Hi guys, you guys searching for how to download and install psiphon on Linux/Ubuntu system right? Then read the complete post and follow the steps below to run psiphon for Linux OS. Psiphon is initially developed for android and windows OS.
Psiphon for Linux
After get more popular of psiphon other platform users also tried to use psiphon. So here in this post I will let you know about how to install psiphon for Linux PC. To run any windows application on your linux system we need some external app called “wine”. Using the wine app you can use windows app on Ubuntu system.
Download and install psiphon for linux/Ubuntu:
people are using Linux because of its open source feature. Before windows OS Linux was more popular for server lack of useful application. Windows developers used this chance and make windows more popular. To overcome this weakness they developed WINE application. This application is not emulator software for windows.
To run any windows application on your Linux PC just use the wine application. This is very much effective for all applications like psiphon. To install wine app on Ubuntu system follow the steps below. Also Check:Psiphon 3 For Windows, Psiphon for Android.
Download psiphon for Linux/Ubuntu using wine :
Click on the application Menu.
Type “software” clicks “software & updates”
Click on the other software tab.
Click on add option.
Enter the ppa – ubuntu-wine/ppa in the API line section
Click add source and enter sudo password
Clicks authenticate and close.
Open the software center and search for wine app.
Install the app and enjoy the windows app on linux computer. Not all the windows application but most of the apps will work.
Now you need to download the psiphon 3 for linux .exe file. To download this use the below link and get the .exe file of psiphon for ubuntu.
After download the file select and open in wine windows program loader.
And the next processes are similar to other application install.
Final step is install psiphon on linux and enjoy the proxy application(Psiphon for Linux) and break all the block in your browsers.
These are all the steps to download and install psiphon on ubuntu PC.
Psiphon for Linux/Ubuntu direct install without wine:
If the windows version of psiphon on linux is not working properly you may use the below direct method.
Here you can get the direct linux psiphon .exe file and install it on your linux system easily. Sollow the guide and get psiphon on ubuntu free download.
This psiphon Inc is much better than windows version of psiphon.
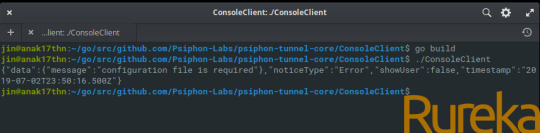
Here we shared the github source code of modified and updates psiphon for linux system. Open the link and search for README.md file to get step by step guide of how to install psiphon on your ubuntu system.
The repository github link-: Get Repo
Before start just clone the repository by using the below commend.
$ git clone https://github.com/thispc/psiphon.git
In that README.md file if you have any queries just use the below comment box.
Psiphon alternative apps
There are lot of other alternative apps are there in the market like TOR, I2P download and lantern. The mentioned above apps are really worthy to use. If you are facing any issues in the above two methods just use the comment box below.
Psiphon Alternative app
We always expecting response from your side have a good day thank you for your visit.
Related searches for Psiphon for Linux:
Free download psiphon for linux
i2p for linux
psiphon for Ubuntu 14.04
psiphon 3 for ubuntu
download wine for ubuntu
psiphon alternative apps for PC
download
New Apps
Google Chrome 87 Now Available with Major New Features
New version of Chrome is live on all desktop platforms
Linux for Apple Silicon Is Coming
Mozilla Firefox 83 Now Available for Download - What’s New
New Microsoft Edge Update Brings Linux Improvements
Raspberry Pi 400 Is Literally a Computer in a Keyboard
Purism Announces the Librem Mini V2 Linux Computer
Mozilla Firefox 83 Now Available for Download - What’s New
New version of Firefox is now up for grabs
Canonical Officially Launches Ubuntu 20.10
Microsoft Edge Browser (Preview) Now Available on Linux
Vivaldi 3.4 Launched with New Features and a Small Surprise
Calibre 5.7.1
A graphical ebook library management software compatible with many devices and platforms
Vivaldi 3.5.2115.81
The next-generation web browser for power users, based on the powerful Chromium project
Node.js 15.4.0 Current / 14.15.1 LTS
A very powerful command-line program to easily create scalable network applications
Google Chrome 87.0.4280.88 / 88.0.4324.41 Beta / 89.0.4350.4 Dev
The powerful, lightweight and easy-to-use web browser developed by the well known Google company
Opera 73.0.3856.257 / 74.0.3897.0 Dev
Surf the Internet in a safer, faster and easier way with the Opera browser for Linux
Steam Dec 7 2020
Valve's official Steam for Linux installer application for GNU/Linux operating systems
Thunderbird 78.5.1 / 84.0 Beta 3
The Thunderbird project provides a total redesign of the Mozilla e-mail component
Blender 2.91
A fully functional, powerful and cross-platform integrated 3D creation software suite
CMake 3.19.1
A cross-platform and Open Source build system for Linux and UNIX-like operating systems
SeaMonkey 2.53.5.1
The all-in-one Internet application suite the comprises email, web browser and IRC chat
Firefox 83.0
The Linux version of one of the most popular and powerful web browser products on the entire Inter...
Tor Browser 10.0.4 / 10.5 Alpha 2
Browse the web anonymously with the custom and private web browser from the Tor project
Telegram Desktop 2.4.7
The official desktop client of the revolutionary Telegram messenger arrives on Linux
LibreOffice 7.0.2.2 Fresh / 6.4.7.2 Still
An open source office suite that provides a good alternative to commercial office tools on Linux, ...
Psiphon 3 Free Download For Windows 10
Oracle VM VirtualBox 6.1.16
A family of powerful x86 virtualization products developed and maintained by Oracle
Opera 73.0.3856.257 / 74.0.3897.0 Dev
Surf the Internet in a safer, faster and easier way with the Opera browser for Linux
Vivaldi 3.5.2115.81
The next-generation web browser for power users, based on the powerful Chromium project
Steam Dec 7 2020
Valve's official Steam for Linux installer application for GNU/Linux operating systems
Google Chrome 87.0.4280.88 / 88.0.4324.41 Beta / 89.0.4350.4 Dev
The powerful, lightweight and easy-to-use web browser developed by the well known Google company
Opera 73.0.3856.257 / 74.0.3897.0 Dev
Surf the Internet in a safer, faster and easier way with the Opera browser for Linux
Vivaldi 3.5.2115.81
The next-generation web browser for power users, based on the powerful Chromium project
Steam Dec 7 2020
Valve's official Steam for Linux installer application for GNU/Linux operating systems
Google Chrome 87.0.4280.88 / 88.0.4324.41 Beta / 89.0.4350.4 Dev
The powerful, lightweight and easy-to-use web browser developed by the well known Google company
Opera
Krita 4.4.0
A powerful image editing and painting application for Linux and Windows operating systems
Tor 0.4.4.5
A tool that protects your computer against network traffic analysis and surveillance
DBeaver 7.2.1
The universal database manager tool for Linux/UNIX, Windows and Macintosh systems
Atom 1.51.0 / 1.52.0 Beta 0
A hackable, highly customizable text editor for the 21s century, created by GitHub
FileZilla 3.50.0
One of the best free FTP (File Transfer Protocol) clients for Linux, Windows and Mac OSes
Dropbox 2020.03.04
The official Dropbox client for Linux, designed to let users share and store their files online
Adobe Flash Player for 64-bit 32.0.0.403
The official Adobe Flash Player plugin for web browsers on 64-bit Linux operating systems
Adobe Flash Player 32.0.0.403
The official Adobe Flash Player plugin for web browsers on 32-bit Linux operating systems
Linux Lite 5.0
An Ubuntu based Linux operating system designed to be as lightweight as possible
APT 1.9.7
A powerful package manager application used in all the Debian-based Linux operating systems
Installer Psiphon Linux Download
PsychOS 3.4.6
A GNU/Linux distribution that aims to revive older hardware in a unique way with great software.
AryaLinux 2.1
A source-based GNU/Linux distribution built using the Linux From Scratch (LFS) guide.
Android-x86 8.1-r3 / 9.0 RC2
A free and open source software that allows you to run Android on your personal computer
BIND 9.15.8
An open source implementation of the Domain Name System (DNS) protocols, a DNS server and resolver
Squid 4.10
A cross-platform and open source web proxy cache application for Linux and Windows OSes
Installer Psiphon Linux Command
Want more? Browse through the pages:
linux application finder
GO
0 notes
Text
31 października 2019

◢ #unknownews ◣
Wiem, że jutro większość ludzi ma wolne, więc dziś podrzucam wam coś do poczytania. Kolejne zestawienie linków z branży IT :)
1) Jak skomplikowana może być obsługa edycji tekstu? AUtor artykułu estymował zadanie na 2 tygodnie. Zajęło mu kilka lat. https://lord.io/blog/2019/text-editing-hates-you-too/ INFO: Te potencjalnie trywialne zadania (jak np. zaznaczanie tekstu, czy obsługa emoji) potrafią być skrajnie trudne do implementacji
2) Pomoday - lista ToDo dla fanów CLI (Command Line) działająca w przeglądarce. Bardzo estetyczne i wygodne. https://www.pomoday.com INFO: po włączeniu aplikacji po prawej stronie masz ściągę jak jej używać. Ale uwaga - to są polecenia, a nie skróty klawiszowe! (wpisz np: "t kup mleko")
3) SQL w małych kroczkach - dobre do lepszego zrozumienia np. partycjonowania danych, funkcji bazujących na "oknach", grupowania danych itp https://sql-steps.wizardzines.com INFO: krótkie i bardzo czytelne poradniki do SQL, które dokładnie pokazują za co odpowiadają poszczególne elementy zapytania i jak wpływają na parsowane dane
4) DailyNow - Rozszerzenie do Chrome/Firefox pokazujące codziennie garść nowych artykułów dla ludzi z branży Webdev https://www.dailynow.co INFO: teksty pochodzą z 170 różnych źródeł i są ręcznie selekcjonowane. Można wybierać interesujące Cię tematy/serwisy.
5) Tworzenie wtyczek do środowisk programistycznych - jak łatwe to jest w zależności od IDE? https://medium.com/cacher-app/building-code-editor-plugins-a-comparison-83b5c21657fe INFO: autorzy porównują Visual Studio Code, Atom, Sublime Text oraz IntelliJ Platform
6) Jak stałem się webdevloperem w 180 dni - bez studiów informatycznych itp https://medium.com/better-programming/become-a-web-developer-in-180-days-without-cs-degree-e869395972e1 INFO: ciekawy przewodnik po zagadnieniach jakie należy opanować + linki skąd autor czerpał wiedzę
7) Skaffolder - aplikacja online pozwalająca bardzo szybko wyklikać kod źródłowy dla Twojego projektu. https://www.skaffolder.com INFO: Darmowe konto wspiera tylko kod pisany w NodeJS+React, ale platforma obsługuje dziesiątki konfiguracji. Aktualnie trwa promocja -90% za konto Lifetime
8) Jak udawać bycie dobrym programistą? - kilka porad https://towardsdatascience.com/how-to-fake-being-a-good-programmer-cbef2c39764c INFO: tekst raczej humorystyczny i lekko sarkastyczny, ale pokazuje też trendy w tej branży i to, po czym niekiedy oceniamy ludzi z IT
9) Co to jest ten HeadLess CMS? do czego się tego używa i jak pobierać z niego dane? https://dev.to/andrewbrown/tl-dr-headless-cms-85n INFO: w praktyce, używasz dowolnego CMSa do zarządzania danymi (np. WordPress), ale wyciągasz dane "po swojemu", omijając system renderowania frontendu.
10) Praca z wątkami w Ruby - jak to robić poprawnie i czym te wątki są? https://www.rubyguides.com/2015/07/ruby-threads/ INFO: artykuł omawia także pewne popularne problemy jak deadlocki czy racecondition i tłumaczy jak sobie z nimi radzić
11) Nowa kamera w iPhone 11 - co w niej jest takiego niezwykłego? https://blog.halide.cam/inside-the-iphone-11-camera-part-1-a-completely-new-camera-28ea5d091071 INFO: bardzo fajne omówienie zmian i pokazanie różnic na konkretnych przykładach.
12) Raspberry Pi, malutki projektor i plastikowa maska - razem mogą zdziałać cuda (film - 10 minut) https://www.youtube.com/watch?v=WefSub8qesQ INFO: film pokazuje jak osiągnięty został efekt zaprezentowany na początku nagrania. Świetny efekt!
13) Używasz XMLa w swoim projekcie? Jest szansa, że robisz to niepoprawnie (czytaj: niezgodnie z założeniami języka i z zamysłem jego autora) https://www.devever.net/~hl/xml INFO: zobacz, jak w zamyśle twórcy XMLa powinien wyglądać poprawny zapis struktury danych w tym języku (i zobacz także, jak wygląda jeden z najgorszych zapisów).
14) Lista najlepszych CMSów do stawiania stron na NodeJS https://www.ubuntupit.com/best-nodejs-cms-platforms/ INFO: nie samym PHPem żyje człowiek i niekoniecznie trzeba być skazanym na Wordpressa.
15) Odważna decyzja Twittera - blokują możliwość kupna jakiejkolwiek kampanii politycznej na swojej platformie https://twitter.com/jack/status/1189634360472829952 INFO: jak piszą, "poparcie się zdobywa, a nie kupuje". Brawo!
16) HELLvetica - czyli font, którego powinieneś użyć jeśli chcesz przyprawić grafików i projektantów o zawał https://hellveticafont.com INFO: nie mylić z Helvetica! ;)
17) Wraz z Firefoxem 70 nadeszło sporo ciekawych zmian dla programistów - zobacz jakich https://hacks.mozilla.org/2019/10/firefox-70-a-bountiful-release-for-all/ INFO: na szczególną uwagę może zasługiwać np. wbudowany generator mocnych haseł dla pól "password", czy zaznaczanie nieaktywnych reguł CSS w inspektorze obiektów
18) Musisz zalogować się na Smart TV czy smart lodówce? prawdopodobnie wybierzesz łatwe i proste do wpisania hasło. Jest na to sposób https://fusionauth.io//blog/2019/10/29/oauth-device-authorization-roku-appletv-xbox INFO: FusionAuth to rozwiązanie polegające na tym, że autoryzację smart-gadżetów przeprowadzamy na komputerze/smartfonie, przepisując tylko kod z ekranu urządzenia. Uwaga: wersja selfhosted jest w 100% darmowa.
19) Podstawy działania DNS dla webdeveloperów https://dev.to/chrisachard/dns-record-crash-course-for-web-developers-35hn INFO: co to jest CNAME? do czego służy TTL? itp.
20) GIT-Subrepo - narzędzie do trzymania wielu repozytoriów GITa wewnątrz jednego repozytorium (w podkatalogach) https://github.com/ingydotnet/git-subrepo INFO: rozwiązanie ma sporo plusów (wypisanych na stronie), ale pozwala też... obniżyć koszty utrzymania repozytorium jeśli jesteś rozliczany gdzieś w modelu per-repo lub per-user.
21) Jak od strony technicznej działa Figma? (to środowisko do wspólnego projektowania dla grafików) https://www.figma.com/blog/how-figmas-multiplayer-technology-works/ INFO: najprościej porównać to do takiego 'Google Docs dla grafików', jednak stojąca za tym technologia jest naprawdę ciekawa (np. obsługa sytuacji gdy dwóch grafików zmienia te same parametry, albo gdy ktoś klika 'Undo', a mamy w projekcie 10 osób)
22) Kilka sztuczek dla ludzi często wykorzystujących SSH w pracy https://dev.to/djangotricks/things-i-want-to-remember-about-ssh-21el INFO: zarządzanie kluczami, konfiguracja lokalnego klienta, upload/download plików. Dla adminów to podstaw-podstaw, a dla webdevów fajne tricki :)
23) Rzeczy, które możesz osiągnąć w samym CSS bez pomocy JavaScript https://dev.to/bnevilleoneill/5-things-you-can-do-with-css-instead-of-javascript-975 INFO: płynne przewijanie strony, Dark Mode i kilka innych. Wszystko z przykładami.
== LINKI TYLKO DLA PATRONÓW ==
24) Lista użytecznych narzędzi dla fanów terminala (Linux / Unix) http://uw7.org/un_5dbaf1a205cdb INFO: każde narzędzie posiada screena pokazującego jak działa i informację w jakim języku dane narzędzie napisano (myślisz, że który język jest najpopularniejszy? Mylisz się :D)
25) Zbiór metadanych na temat ponad miliona popularnych utworów - może przydać się do nowego projektu/startupu http://uw7.org/un_5dbaf1a767a52 INFO: autor, tytuł, płyta, rok wydania, słowa piosenki i wiele, wiele innych. Dane można pobrać w kilku formatach, w tym SQLite. Uwaga, bo pełna baza to jakieś 280GB. Do testów ściągnij próbkę mającą 1.8GB.
26) Lista 12 sztuczek w CSS, których prawdopodobnie nie znasz http://uw7.org/un_5dbaf1ae7be02 INFO: tworzenie graficznych masek, blendowanie (miksowanie?) grafik, parallax i inne.
27) Lista 8 gier, które nauczą Cię nowoczesnego CSS http://uw7.org/un_5dbaf1b489fc6 INFO: Dwie z nich były już w zestawieniu UnknowNews. We wszystkie gra się online (strona WWW).
************
Zostań patronem
https://patronite.pl/unknow
************
Świetna promocja - tylko 33,90 za dowolne videokursy od Heliona https://helion.pl/page/3976o/promocja/7538
0 notes
Text
A Look Into the Future: What Will the minecraft account free Industry Look Like in 10 Years?
Pocket Version 1.14.0.3 Pobierz APK Dla Android.
According to gamers, minecraft premium account is the actual" minecraft. Additionally, join the online neighborhood of Minecraft building contractors as well as gamers with a 14-day Xbox Live Gold test. 53 In August 2012, Mojang added adventure setting 54 for personalized maps as well as in October 2012, Mojang added command blocks, 56 which were developed specially for personalized maps.
This is the main reason to have free Minecraft costs accounts October 2019. Non premium complimentary Minecraft accounts 2019 also has insects within the video game. To begin with, you only have 32 blocks so your building capacities will be limited.
Moving from a complimentary account to a costs account isn't the only means to have accessibility to all the features readily available on Minecraft, nonetheless it is an extremely reliable technique. The number consists of gamers across video game gaming consoles, computer systems, mobile devices, and the education-focused variation of the video game.
The developers claim they are trying to "place the enjoyable back into the game" with Voxelands, which is partly influenced by parlor games. Getting premium totally free Minecraft accounts 2019 is what you need to pursue. You can play Minecraft. with tons of exciting new attributes.
The collection of things a gamer can perhaps carry out in the game is huge; in the most ignorant feeling, it is all possible means of placing all the possible blocks right into as large a world as fits in RAM," claim Szlam and also co The web site will be sending out a list including complimentary premium accounts.
By giving out free account, the variety of individuals to share the excitement of playing Minecraft will increase. In survival mode, gamers have to gather natural deposits such as timber and also stone located in the setting in order to craft particular blocks and items.
Game player need to really feel material about appreciating standard functions that are supplied for various other players of Minecraft. There are many internet sites with similar solutions to assist gamers getting the brand-new account. Gamers use Minecraft Coins, a digital money, to make purchases.
According to a brand-new video on the Minecraft YouTube channel, the idea for Minecraft Dungeons originally transpired when the group were trying to create a game for the Nintendo 3DS. Unknown techniques have actually been a part of video games from the start; Nintendo Power surely had a cleaning of secret expertise.
Because Minecraft conserved games consist of every element of the world the player is playing in, it has far more in common with 3D map, terrain, and also world editors than standard saved video game editors. After a beta testing duration, Minecraft: Education Edition was released on November 1, 2016, for US$ 5 per customer each year.
To be able playing this video game openly, subscribing at Mojang is called for. The blocks for the resource cube are big and also beefy which makes for a sturdy cube as well as additionally fun to have fun with in between turns. 131 On 19 December 2016, the full variation of Minecraft: Pocket Version was released on iOS, Android as well as Windows Phone On 31 July 2017, the Pocket Edition section of the name was gone down as well as the applications were relabelled merely as Minecraft.
The Secret Of Minecraft.
On you can obtain a Minecraft-Premium Account entirely legal. The medium in which Szlam as well as colleagues have selected to pursue this objective is Minecraft, a 3D sandbox video game that allows players to check out, build, craft, and also even battle in a infinite and also unique on-line globe. Whether you're playing Minecraft, watching films, or streaming gameplay, Xbox One S delivers fantastic graphics with HDR modern technology, costs sound, as well as the very best area of players.
Over 100 million people play Minecraft today and also currently, with the Minecraft Partner Program, you can a part of producing new globes as well as gameplay for this unbelievable audience via the in-game shop of maps, skins, and textures.
There's still a department within Minecraft - the now-explicitly named Minecraft Java Version proceeds growth under its own inner team at Mojang. It is possible to gamer to transform skins of the game. Formerly, totally free account can be accessed in Minecraft internet site.
Likewise, join the online neighborhood of Minecraft home builders as well as players with a 14-day Xbox Live Gold test. 53 In August 2012, Mojang included journey setting 54 for personalized maps and in October 2012, Mojang included command blocks, 56 which were developed particularly for personalized maps.

Today, Minecraft players no longer check in or sign up an account with its website. IGVault is one of the most safe and secure area to market as well as buy video game accounts. Costs game version makes sure that all players are provided excellent solution with the method it is running efficiently in maximum way.
On February 11, 2013, Minecraft: Pi Edition was launched for the Raspberry Pi. The Pi Version was planned as an academic device for amateur programmers and also individuals were urged to alter the game as well as open's code using its API.

This is different from website generator due to the fact that online forum gives a lot more Totally free Minecraft Costs Accounts September 2019. They will not collaborate with the real Mojang MC servers. Premium: Play on superior and also non-premium servers. Turn your mobile right into a digital construction site and also use obstructs to create fantastic masterpieces on the move. All this while you talk with friends in parks or any kind of area you are.
Minecraft franchise business has exploded in popularity, leading to numerous licensed products from paid downloadable material, spin-off video games, playthings, clothing, publications, even more. The author of TrueCraft looks for to execute beta version 1.7.3 of the original video game, a time in Minecraft's advancement he considers "nearly excellent." A photo deliberately frozen in time, TrueCraft looks for feature-parity with Minecraft.
The designers state they are attempting to "put the fun back into the game" with Voxelands, which is partially motivated by parlor games. Obtaining premium cost-free Minecraft accounts 2019 is what you must pursue. You can play Minecraft. with tons of exciting new features.
234 Since 10 October 2014 upgrade, the video game has sold around 60 million copies across all platforms, making it one of the best-selling computer game of all time 234 235 On 25 February 2014, the video game reached 100 million signed up customers.
It is full with lots of in video game features and modes. Gamers can additionally see, connect and free minecraft account also talk with others, whether they are pals or strangers. Minecraft is a sandbox video game produced by Swedish game developer Markus Persson and released by Mojang in 2011.
0 notes
Text
The PICO-8 Virtual Fantasy Console is an idealized constrained modern day game maker

I love everything about PICO-8. It's a fantasy gaming console that wants you - and the kids in your life and everyone you know - to make games!
How cool is that?
You know the game Celeste? It's available on every platform, has one every award and is generally considered a modern-day classic. Well the first version was made on PICO-8 in 4 days as a hackathon project and you can play it here online. Here's the link when they launched in 4 years ago on the forums. They pushed the limits, as they call out "We used pretty much all our resources for this. 8186/8192 code, the entire spritemap, the entire map, and 63/64 sounds." How far could one go? Wolf3D even?
"A fantasy console is like a regular console, but without the inconvenience of actual hardware. PICO-8 has everything else that makes a console a console: machine specifications and display format, development tools, design culture, distribution platform, community and playership. It is similar to a retro game emulator, but for a machine that never existed. PICO-8's specifications and ecosystem are instead designed from scratch to produce something that has it's own identity and feels real. Instead of physical cartridges, programs made for PICO-8 are distributed on .png images that look like cartridges, complete with labels and a fixed 32k data capacity."
What a great start and great proof that you can make an amazing game in a small space. If you loved GameBoys and have fond memories of GBA and other small games, you'll love PICO-8.
How to play PICO-8 cartridges
If you just want to explore, you can go to https://www.lexaloffle.com and just play in your browser! PICO-8 is a "fantasy console" that doesn't exist physically (unless you build one, more on that later). If you want to develop cartridges and play locally, you can buy the whole system (any platform) for $14.99, which I have.
If you have Windows and Chrome or New Edge you can just plug in your Xbox Controller with a micro-USB cable and visit https://www.lexaloffle.com/pico-8.php and start playing now! It's amazing - yes I know how it works but it's still amazing - to me to be able to play a game in a web browser using a game controller. I guess I'm easily impressed.
It wasn't very clear to me how to load and play any cartridge LOCALLY. For example, I can play Demon Castle here on the Forums but how do I play it locally and later, offline?
The easy way is to run PICO-8 and hit ESC to get their command line. Then I type LOAD #cartid where #cartid is literally the id of the cartridge on the forums. In the case of Demon Castle it's #demon_castle-0 so I can just LOAD #demon_castle-0 followed by RUN.
Alternatively - and this is just lovely - if I see the PNG pic of the cartridge on a web page, I can just save that PNG locally and save it in C:\Users\scott\AppData\Roaming\pico-8\carts then run it with LOAD demon_castle-0 (or I can include the full filename with extensions). THAT PNG ABOVE IS THE ACTUAL GAME AS WELL. What a clever thing - a true virtual cartridge.
One of the many genius parts of the PICO-8 is that the "Cartridges" are actually PNG pictures of cartridges. Drink that in for a second. They save a screenshot of the game while the cart is running, then they hide the actual code in a steganographic process - they are hiding the code in two of the bits of the color channels! Since the cart pics are 160*205 there's enough room for 32k.
A p8 file is source code and a p8.png is the compiled cart!
How to make PICO-8 games
The PICO-8 software includes everything you need - consciously constrained - to make AND play games. You hit ESC to move between the game and the game designer. It includes a sprite and music editor as well.
From their site, the specifications are TIGHT on purpose because constraints are fun. When I write for the PalmPilot back in the 90s I had just 4k of heap and it was the most fun I've had in years.
Display - 128x128 16 colours
Cartridge Size - 32k
Sound - 4 channel chip blerps
Code - Lua
Sprites - 256 8x8 sprites
Map - 128x32 cels
"The harsh limitations of PICO-8 are carefully chosen to be fun to work with, to encourage small but expressive designs, and to give cartridges made with PICO-8 their own particular look and feel."
The code you will use is LUA. Here's some demo code of a Hello World that animates 11 sprites and includes two lines of text
t = 0 music(0) -- play music from pattern 0 function _draw() cls() for i=1,11 do -- for each letter for j=0,7 do -- for each rainbow trail part t1 = t + i*4 - j*2 -- adjusted time y = 45-j + cos(t1/50)*5 -- vertical position pal(7, 14-j) -- remap colour from white spr(16+i, 8+i*8, y) -- draw letter sprite end end print("this is pico-8", 37, 70, 14) print("nice to meet you", 34, 80, 12) spr(1, 64-4, 90) -- draw heart sprite t += 1 end
That's just a simple example, there's a huge forum with thousands of games and lots of folks happy to help you in this new world of game creation with the PICO-8. Here's a wonderful PICO-8 Cheat Sheet to print out with a list of functions and concepts. Maybe set it as your wallpaper while developing? There's a detailed User Manual and a 72 page PICO-8 Zine PDF which is really impressive!
And finally, be sure to bookmark this GitHub hosted amazing curated list of PICO-8 resources! https://github.com/pico-8/awesome-PICO-8
Writing PICO-8 Code in another Editor
There is a 3 year old PICO-8 extension for Visual Studio Code that is a decent start, although it's created assuming a Mac, so if you are a Windows user, you will need to change the Keyboard Shortcuts to something like "Ctrl-Shift-Alt-R" to run cartridges. There's no debugger that I'm seeing. In an ideal world we'd use launch.json and have a registered PICO-8 type and that would make launching after changing code a lot clearer.
There is a more recent "pico8vscodeditor" extension by Steve Robbins that includes snippets for loops and some snippets for the Pico-8 API. I recommend this newer fleshed out extension - kudos Steve! Be sure to include the full path to your PICO-8 executable, and note that the hotkey to run is a chord, starting with "Ctrl-8" then "R."
Editing code directly in the PICO-8 application is totally possible and you can truly develop an entire cart in there, but if you do, you're a better person than I. Here's a directory listing in VSCode on the left and PICO-8 on the right.
And some code.
You can expert to HTML5 as well as binaries for Windows, Mac, and Linux. It's a full game maker! There are also other game systems out there like PicoLove that take PICO-8 in different directions and those are worth knowing about as well.
What about a physical PICO-8 Console
A number of folks have talked about the ultimate portable handheld PICO-8 device. I have done a lot of spelunking and as of this writing it doesn't exist.
You could get a Raspberry Pi Zero and put this Waveshare LCD hat on top. The screen is perfect. But the joystick and buttons...just aren't. There's also no sound by default. But $14 is a good start.
The Tiny GamePi15, also from Waveshare could be good with decent buttons but it has a 240x240 screen.
The full sized Game Hat looks promising and has a large 480x320 screen so you could play PICO-8 at a scaled 256x256.
The RetroStone is also close but you're truly on your own, compiling drivers yourself (twitter thread) from what I can gather
The ClockworkPI GameShell is SOOOO close but the screen is 320x240 which makes 128x128 an awkward scaled mess with aliasing, and the screen the Clockwork folks chose doesn't have a true grid if pixels. Their pixels are staggered. Hopefully they'll offer an alternative module one day, then this would truly be the perfect device. There are clear instructions on how to get going.
The PocketCHIP has a great screen but a nightmare input keyboard.
For now, any PC, Laptop, or Rasberry Pi with a proper setup will do just fine for you to explore the PICO-8 and the world of fantasy consoles!
Sponsor: OzCode is a magical debugging extension for C#/.NET devs working in Visual Studio. Get to the root cause of your bugs faster with heads-up display, advanced search inside objects, LINQ query debugging, side-by-side object comparisons & more. Try for free!
© 2019 Scott Hanselman. All rights reserved.


The PICO-8 Virtual Fantasy Console is an idealized constrained modern day game maker published first on http://7elementswd.tumblr.com/
0 notes
Text
365Layouts for Sale
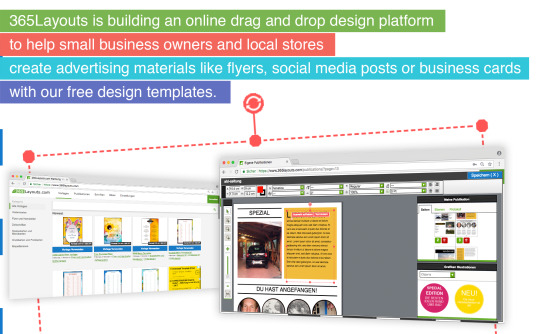
365layouts.com built a platform to help business owners create ad materials with our templates.
"... You can fully edit the templates according to your needs and then export them as PDF. It allows you to create designs like posters, business cards .... You can easily create a high-resolution publication (up to 1200 DPI) and chose the format and orientation of your design as well. It supports a lot of formats like A4, A2 a lot others. You can easily create your design from scratch or from the template and then export it ... Desygner, Lucidpress, and 365Layouts are the best alternatives to Adobe InDesign ...."
Review from: https://www.ilovefreesoftware.com/14/featured/free-online-adobe-indesign-alternatives.html
Why are you selling the business? I’m moving on to my next idea.
What is included in the sale? - Three Git Reposetories/ZIP-Backups: - Website/Platform - Django/Python with Dockerfile and Docker-Compose - Worker source code - Asynchronous PDF-/Font-/Image Rendering and Dockerfile - Javascript Design Client - Javascript code with Google Closure Library - domains 365layouts.de and 365layouts.com - Social media accounts - MYSQL-Backup - Userdata
What is the technological stack? - Website/Platform - Ubuntu - Docker and Docker Compose - Django and Python - Memcache - Mysql - ImageMagick - Asynchrone PDF-/Font-/Image-Rendering worker - Docker - Ubuntu - Raspberry Pis v3b - Php - Python - Memcache - …. - Design Editor / Desktop Publishing Client - Javascript - Google closure Library and Tools
What actions are required to keep the business working? Nothing.
How does the business generate revenues? Google ads
What marketing initiatives have been used for this business? SEO
How can the future owner generate more revenues? Reach out to more advertisers
https://www.365layouts.com


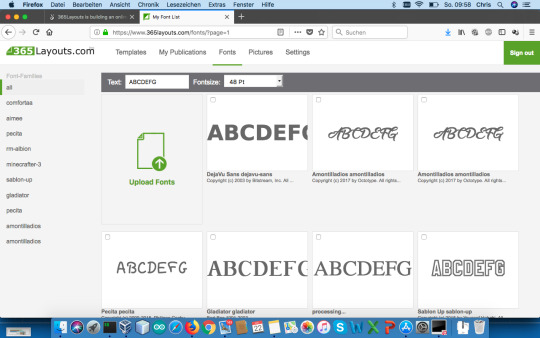
#desktop publishing#publishing#adobe#indesign#quarkxpress#startup#business#saas#software as a service#microsoft#office#office365#word#openoffice
0 notes
Text
This blog is about my technological venture into hardware configuration that I hope will result in a working prototype. This is a hobby to experiment for what a final product could possibly be based on this design. The first concept piece I created can be seen at the following link: Rover Initial Concept Prototype Draft.
Many of the tests turned out to be unnecessary because there was a faster, already implemented solution that only required code to implement. An example of this is the fan-cooling temperature gauge and circuit board. Once I learned RPi reports this with a query, I could turn on the DC power to those fans, at any value up to 255 to start cooling the CPU. Below is the beginning of my journal that started in July after two months of learning curve experiments.
Pan/Tilt Initial Build Results
After soldering the Adafruit 16 Channel PWM/Servo Motors HAT 40 GPIO pins and 8 of the 16 channel three pin connectors (for a total of 64 pins on one board), the pan/tilt worked marginally and inconsistently. Below is a picture of the first successful test.

Thermometer and Cooling Fan Results
To be configured for outdoor use, a fan is an important addition that will at least move cooler air across the circuits once the temperature reaches 150 degrees Fahrenheit inside the unit. To create the circuitry for this feature, I consulted DigiKey who offers an online recipe and schematic editor for creating a thermometer and cooling fan. Below is the schematic I followed to create this feature.

This is the schematic I edited for my final design:


Once I created the breadboard version and it worked, by removing the resistor to the transistor, I created a soldered board that ended up like the picture left.
Fried RPi 3B+ and 16 Channel PWM/Servo HAT
Following the Adafruit 16 Channel PWM/Servo HAT and DRV8871 DC Servo Motor Driver Board installation instructions, I ended up shorting out one of the driver boards that scorched the breadboard, as illustrations follow.


Over time, it appears the 16 Channel HAT shorted out the RPi 3B+ board because it eventually stopped booting and only one LED light lit up and nothing else. These failures caused a redesign and delay for shipping and receiving new parts.

I continued to use these dead RPi and Adafruit boards so I could build rig pieces without stressing the prototype PCBs (Printed Circuit Board). This is where we waited for the RPi3B, RasPiRobot, and PWM boards to arrive on 20 July 2018, which they did, and Phase 1 restarted.
Built Devastator Tank Wheel Base
On 18 July, while waiting for replacement parts, I decided to build the tank wheel base as shown in pictures below. To view the build instructions Click Here.

Below are the wheels with spring shock absorbers mounts.

Below is the rear end where the components will be installed as modules.
Rover Redesign Phase 1 – Version #2
Because I fried a few boards, it became apparent an alternative configuration and boards were needed. Adafruit failed to deliver operable boards and refunded my investment in their products.
Below is a picture of the tested redesign configuration of the DC and PWM servo motors driver boards with Raspberry Pi 3B (not plus).
Note: this is the same SunFounder board was used after the level separators blew the Geekworm PWM/DC Motor board later. Also note that the breadboard contains the 360 PWM calibration circuits that are not connected in this picture to the motor.

23 July – The above configuration failed due to excess power noise caused by the RasPiRobot board that caused video disturbance and ejected the USB drive when attempting to use the PWM channels that resulted in the following message.

After removing the RasPiRobot board, PWM started working consistently for all servo motors, even one marked NFG worked that had failed using the original Adafruit 16 Channel PWM/Servo board.
This same day, I was able to build the new rig, as pictured below.

Then after installing and testing the Geekworm PWM/DC Motor board, the boards sagged (not shown in the picture above) because the lack of support on the top UPS board using only 10 pins for support and without the spacers, one can imagine how the boards will sag when the rover bounces on uneven surfaces.
Then I installed leveling separators between the boards and the Geekworm PWM/DC Motor board began to fail. Here is my report to the manufacturer who had no solution other than work around with a replacement board.

That’s when I decided to modify the M-F jumper wires by bending the Female connector to a 90 degree right angle. To intercept the GPIO pins, because the MoPower UPS does not have GPIO extension pins like the Geekworm HAT (and other similar HATs), these same right angle connectors are installed below the HAT, as shown in the picture below, following the intro paragraph.
Rover Redesign Phase 1 – Version #3
This design is essentially the same Geekworm PWM/DC Motor HAT, however replaced, but now has the 90 degree connectors to reduce the wasted space above the HAT (shown in the picture below).

This new design was made to confirm RPi 3B and 3B+ compatibility and to test the Geekworm HAT without metal separators. I finally found a nylon separator kit, although I only need a few pieces and will have a huge batch left over. These kinds of overages can be used on a second prototype build.
Today, 10 August 2018, we await the arrival of the RPi 3B+ board and Geekworm HAT. During this time, I created a duplicate base plate (plywood sheet) and installed the metal separators using the dead RPi and Adafruit HAT. Once the RPi 3B+ board and Geekworm HAT arrived, I installed the two boards ready to begin testing the new boards.
Remote Control Tablet
As mentioned above regarding the orders placed on 10 August, the Remote Control consists of a RPi 2 designed tablet with touchscreen and battery charging. Below is a link to their tutorial I followed.
Adafruit RPi 2 7″ Touchscreen Tablet Tutorial
These are the Remote Control parts (Flex Cable and SPDT Slide Switch excluded):
Raspberry Pi 27″ TouchscreenLithium Ion Polymer BatteryPowerBoost 1000 ChargerRPi Touchscreen Case (See Below)Wi-Fi Dongle
RPi Touchscreen Case
For the remote control, I finally found that Adafruit tutorial with the recipe of parts needed to make it battery operated. What was unique about this project was the use of a 3D printed case. All I had to do was download the STL files from Adafruit’s website, upload them to the 3DHub.com site, and pay for shipping (total less than $30). Below is the original image of the printed parts (I chose red for fun!).

This turned out to be another variation on hardware integration where finding the right screws makes a whole lot of difference. The variances also require testing a screw to confirm it’s the right head shape: Flat or Round. Because the boards are stacked on the printed tray insert, a Round head can extend up into the back of a stacked board and short out the circuitry. They don’t mention this in the Adafruit tutorial.
So, what I finished the prototype design with regarding screws, I’ve listed below.
TutorialActualM3 x .5 x 6MM3 x .5 x 6M#2-56 3/8″#4-40 1/4″
The problem with the first Metric screws (M3) was that Skycraft carried many varieties of this screw and the first I found had a washer fixed beneath the head that caused the head to rise even higher under the stacked boards. Upon further investigation, I found the same size without the washer and ended up with a more tight fit without possible shorting.
Once I got everything working, I learned I had soldered two wires wrong off the Power Boost Charger 1000. I made this mistake because I didn’t see the – and + signs behind a USB connector that was just setting in sockets and not soldered to the board. The green arrow in the illustration below is what I missed and fried the $20 board by soldering it to the 5V and GND pins next to where the switch is soldered. I took this expense on because I failed to confirm my solder points before I commit, like “measure twice before cutting.”

After I removed the extra piece and saw the electrical schematics, I re-soldering it in the right place, the battery never charged. So, I’m heading back to Adafruit to ask if I’ve burned another board and maybe a battery. Turns out I had fried the LiPO battery charger on the board, so I ordered a replacement. This was when support failed and could not offer an explanation why the battery was not charging. They refunded both of my last purchases and banned me from their site, indefinitely.
Rover Redesign Phase 2 – Version #4
This version change was forced by the RPi3B+ failure and the integration of the RPi3B, Geekworm HAT, and MoPower UPS. During this phase, I redesigned the 90 degree female pin connectors so that there was no black shield included with the contacts and only heat shrink shielded the contacts so less room was consumed by the black shields. This also reduced the labor and glue to hold the black shield, plus the installation was significantly easier.
Also during this phase, I migrated the 360 pan gimbal calibration circuitry to the soldered board along with the temperature switch for the fans. After deciding to migrate the fans from 5VDC to 12VDC, I migrated the fan power to the Geekworm HAT and removed the temperature switch. That way, once the thermometer read above the threshold, the code simply turns the fans on full blast. That’s when we learned one of the 12VDC fans had shorted out and no longer worked (nor could be repaired due to contact location beneath plastic shield).
While testing the PWM for the 360 calibration circuitry, I learned that my solder job had failed and decided it was time to delay the development of the 360 pan feature. Instead, for the prototype, once the 180 pan hits its left or right max radius, the code will instruct the wheels to turn opposite directions to continue the camera pan. This does not remove the requirement for the gimbal 360 pan because the camera should be able to provide 360 views for location and damage mitigation. Below are pictures of the rig with semi-operational features before implementing version #5.
Top of Semi-operational version #4 prototype
Front of Semi-operational version #4 prototype
Right side of Semi-operational version #4 prototype
Left side of Semi-operational version #4 prototype
After migrating to the 12VDC fans and delaying the 360 pan feature, sufficient pins and circuit board became irrelevant and were outside the MoPower UPS 10 GPIO pins requirement. This meant a GPIO 40 pin extension header could be removed and rewired to the Geekworm HAT extension header only (which is why their design failure requires any spacers for this development design).
Right side of Semi-operational version #4 prototype
Left side of Semi-operational version #4 prototype
Rover Redesign Phase 2 – Version #5
After removing the circuit board for 360 gimbal and cooling fans along with their wires, the content of the rover changed considerably, as shown in the pictures below.

During this phase of version #5, I wrote code to use the keyboard to drive the wheels and turn forward and reverse. What’s nice about these motors is when something is going in the wrong direction, like forward and reverse, it’s a simple reverse polarity on the power to fix the direction problem. I had to do that to the power supply wires to the motor connected to the HAT. Once I did that, my code turned the correct wheels (left versus right) and forward/reverse worked successfully. Next to version #6, batteries and secured rig to chassis.
Rover Redesign Phase 2 – Version #6
After creating the rig lock mechanism with Velcro, acrylic side slides, and front key-lock latch, I tried the battery driven vehicle but encountered a failure with the Geekworm HAT. Although it appeared like the previous board I fried, this time it recovered and operated accurately with shore power. I have sent a question to the manufacturer asking how to connect a battery to their board; it may need some kind of regulator. After searching the web for an answer, determined a UBEC needed to be added to regulate the power and it worked. Below is a picture of version 6.

Pan and Tilt Gimbal
Because of the 360 degree pan feature delay, I decided to search again for a python gimbal and found a 3D printer opportunity for a less-flimsy Adafruit gimbal. Below is their glamour shot picture of the parts that are max 4″x4″ and encloses the wiring.

I have sent email to a local 3D printer engineer asking if he can help with plastic residue refinement and tests, as well as contacting the designer of this gimbal via email to ask some specific questions. One question is where to find a switch that is listed in the parts list that I cannot find and how does the camera ribbon cable enter the mounting head’s electronics.
Rover Redesign Phase 4 – Version #7
This section skips a phase because of the many redesigns overlapping each other. This phase is an operational battery-powered prototype with full 360 degree pan and 180 degree tilt gimbal. This required building a wooden rim to hold the gimbal under the glass dome. The full rig design can be seen here. The camera dome design is illustrated below.

Based upon my design RFC (request for change), Ben Holler sent back the gimbal base that 1) fit under the dome (this I learned was serendipitous because I was removing unnecessary legs which would be more for a DSLR camera than the rover) and 2) rotated the screw holes to accommodate the camera ribbon cable. The ribbon cable issue is still under research once the rig dome has been built.
youtube


Here’s the current operational version of the rover, without and with the gimbal.
Dome Base Plate – Rig 3D Print Part – Version #8
Because the wood used for the Dome Base Plate cracked the dome due to difficult curves through hard grain, it made more sense to 3D print the part so that the dimensions and fittings are more precise. To do this, I used AutoDesk 123D Design app and built the dome structure plate with the original gimbal base plate.
Original Full Diameter and Depth: 166mm x 20mm, Radius: 83
Changed Full Diameter and Depth: 177mm x 20mm, Radius: 88.5
Dome radius channel to external base top: 70.5 x 15mm (used 71mm radius)
Camera base extrusion channel to dome radius and depth: 67.5mm x 15mm (used 67mm width)
Inner full opening: 22.5mm x 25mm (20mm exceeded to cutout hole)
Bolt holes 5mm and ribbon cable opening 18mm x 2mm
Here’s how it looked close to ready for print:

Next 3D Print Job September 2018
This section is to list the parts that need to be printed again and why.
Rover Dome Base Plate – Picture above was correct but not submitted for print because of errors with the edits. What was printed the center axis of the base is rotated incorrectly as well as the mounting bolt holes in the front and back are way too big.
Rover Acrylic Motor Driver Board – The holes for the micro PCBs are too close to each other and cause the bolts to jut out at angles. Needed to lengthen the main board and separate the left board’s right side from the right board’s left side.
Tablet RPi Holder – This is a design change from the original printed part that separates the RPi mount from the main mount that holds the display board and battery (see picture below).
Tablet Main Mount – This is a design change from the original printed part that remains after separating the RPi Holder.
Rover Gear 14 – Needed to reduce the motor axis shaft opening that allows slippage. Also needed to sand gear burrs on smaller flat side to prevent contacting other parts when moving.
Rover Gear 9 – Needed to edit the gear by flipping the treads or internal slot and to reduce the motor axis shaft opening that allows slippage.
——-
Gimbal Gears Analysis
After spending all day 21 September building the motor driver board test system and rebuilding the gimbal, testing it all and worked closer to expectation than before. Tested it again, this morning, to try calibrating the head to exact coordinates but it eventually failed and locked up, again. After examining the motor-free housing case, the problem appears to be caused by stepper motor gears problem, listed below.
Gear 9 – The gear extends too far over Gear 15 and thus out-of-alignment. Needed to edit the gear to tighten gear shaft opening, like Gear 14. Determined Nylon was best for this and Gear 14 due to heat from motor per Kyle’s recommendation. He said they were better for the heat and being more pliable.
Gear 15 Opening – Needed to be sanded to allow free-spin where it was jamming slightly when spinning. Could be both the gear and the opening.
Gear 14 – Needed sanding of burrs along the short diameter side to prevent catching opening when moving. Also needed tighter gear shaft opening, like Gear 9. Determined Nylon was best for this Gear.
Tablet Redesign – Revision #1
Because Adafruit was unable to support their products, I researched online for other UPS boards that would accomplish the same battery operations without their products. This created the opportunity to improve the original design and upgrade the motherboard to RPi model 3B which includes integrated Wi-Fi support that RPi 2 does not. The RPi 3B version will be the main upgrade for the Tablet Redesign Revision #2.
Below is the list of Revision #1 changes:
Lower the motherboard mount beneath the main mount structure. This helps provide more space for the new battery HAT to be installed on the top of the RPi. Add same screw holes to motherboard mount and add two new screw holes to attach the RPi mounting structure to the main mount.
Remove the PowerBoost mount from the main mounting board.
Add two screw holes to the middle of the case back and lid.
Close case side opening near PowerBoost mount, case over Ethernet connector, and remove switch.
Add bottom case opening to access the new battery board power switch.
Use #4-40×1/4″ screws for the main mount structure and back lid.
Pictures of remote control tablet:

7″ Touchscreen Display and Driver Board with Component Mounting Bracket

Remote Control User Interface with picture insert of future video feature
First Outdoor Field Test
youtube
Version 8 – Integrated System Complete

23 October 2018 is the date I finally integrated a majority of the parts that all successfully operate. Because the rover needs to be tested in a rough environment, I am holding off testing the larger camera. As a result of the Gimbal pan cable being too short to reach the bottom of the stacked boards, will have to move the DC Stepper Board to the top of the stack, directly beneath the Gimbal base. Currently, the Gimbal cannot go beyond 90 degrees right or it will rip the cable. Also, determined M5 bolts are too large to fit inside the 5mm hole in the Gimbal base (see missing in picture) and replaced that bolt with a M4 bolt.

Picture Above is Right Side of Rig

Picture Above is Left Side of Rig
Version 9 – Integrated System Redesign Complete
The redesign consisted of the following changes that were described in the journal section at the top of this blog. Recap, all worked with the exception of the streaming camera video boot and gimbal with python3, works with python2. Also, remote control tablet is functional with kivy UI. Full System backup of both devices today 12 November 2018.
Replaced wheels and fans connectors with JST 2.0 mini connectors.
Flipped and moved the gimbal stepper motor board to the top of the stack closest to camera. This was to solve the camera pan right that was stretching the cable too far.
Heatshrinked fans and wheels cables.
Version 10 – Integrated System Redesign Initiated
This R/RC redesign consisted of new tablet case (see below), additional board to remove the flipped ribbon cable to run flatly between boards, and upgrading the RPi from 3B to 3A+, thus removing the RJ45 connector and four USB slots. This version also includes three buttons on the base of the video window that allows the user to take a snapshot of the video image and the tablet screen (see RC image below) as well as recording video for a max of one minute, user controlled button.
New Remote Control Case – Version #2
Below are shots of the new tablet case that has been submitted to 3DHubs.com and FluxDesign, the latter redirected my order to a different provider, Walter’s World, on 16 December.

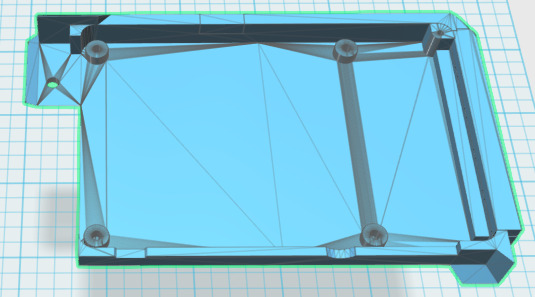

Remote Control User Interface Enhancement
Below is the tablet’s screen capture and still video capture generated pictures. The three new buttons under the video will be enhanced to look like the other buttons on the right, in the picture below.


Then after enhancing the User Interface with icons, the screen appears as illustrated below:

In this screen capture taken with the bottom right Shot button under the video, it displays the new icons on the top left and the three new capture buttons on the bottom center beneath the video display. There are two battery icons on the top left, R = Rover and RC = Remote Control that shows the rough amount left in battery capacity. The Rover battery icon is showing the alert battery icon indicating less than 20% capacity. The Remote Control battery icon is showing less than 80% remaining battery capacity. Note that for the Remote Control, this is only a rough indicator where you can see the actual amount above the Wheel Motors control to turn left. In this capture, the battery is actually 50% and should the go lower, the battery capacity icon will change to 50%.
The Wi-Fi indicator is also a rough indicator based upon the signal strength provided by the RPi and OS. The next icon to the right is the Rover communications indicator showing a green background when connected successfully or red background when there is no connection.
Then below the video display window, the three buttons are the Record the video stream for up to a minute on the Rover, but the user can stop the recording before that minute has recorded to Stop the recording. The middle button captures the video window, today, and plans are to enhance that to shoot the full resolution still video shot using picam and saved on the Rover.
Version 10 Rig Rebuild
Took the following photos when rebuilding the rig PCB configuration with the following changes:
Replace RPi3B with RPi3A+ – not visible in picture below.
Add new ribbon cable board to prevent curling cables sideways – see ribbon cable on center of left picture below.
Lengthen the 12V power cable so connector accessible from outside – see connector on left side of rig (next to ribbon cable), in left picture.


The Reconfiguration Bay is an old pool water hose vacuum with the wheels removed so it stands flat to flip the rig over for easy access to the electronic components. The boards in order from the top to the bottom in the left picture are:
NEW NOT SHOWN (this is a before shot of the rig) Camera Ribbon Cable Board
UPS and Battery Board (shown as top in this picture)
SB Component DC Motor Board for Fans and Wheels
Raspberry Pi 3A+
KOOKYE Stepper Motor Driver Board – for Gimbal
Home Built Fans/Wheels Power Connectors Board
Lengthening the 12V Power Input Cable to be accessible from the rear allows easier connection with the Battery Cable shown in the bottom left of the picture below. This picture also show the Fans and Wheels 4-pin connectors.

——-
Remote Control Internal Components – Version 10
While restoring the operating system and apps on the tablet that stopped communicating due to my attempts to connect it to the hotspot, I was able to take a few photos of the inside of the Remote Control and post them below. I also removed a portion of the RPi mounting plate so that the microSD card is accessible without disassembly. There are several minor modifications to the 3D print file that need to be made to loosen up and relocate some of the screw holes so the back panels fit more accurately. This can be seen in the first picture of the back panels and how they are slightly askew.


——-
Migrating Wi-Fi LAN to R/RC Subnet
This section gives an overview of the hardware, research, and tests that were necessary to migrate to a R/RC Wi-Fi Access Point (AP) subnet. First, the hardware needed a wired Ethernet connection so that when I switched from the Goddard Wi-Fi Network to the Remote Control AP, I could still operate on the RPi through ssh (PuTTY) terminal, since the home Wi-Fi AP would no longer appear on the R/RC network. So for testing, I used two RPi 3B units, two RJ45 Ethernet cables, the HDMI monitor that normally runs the SlideShow all day, and the HDMI TV.
Once I got the dev units to startup with the Ethernet cables, I then went through online pages to figure out how to setup the Remote Control with hostapd on Arch Linux ARM. As mentioned in my journal, This research took many trials and reverting back to previous versions of OS builds on chips. Today is the first day to test the configuration that has worked when the Goddard Wi-Fi Network access point (Apple Wi-Fi router) rebooted and the R/RC continued to ping each other during the boot process.
At this point is where I needed to start switching networks using software instead of CLI (terminal) commands, I used the two dev units to simulate the switching before attempting to migrate to the operational Rover, in the first operational tests. Because the ping worked, I’m hopeful the Rover will be able to switch between the two networks. That’s why I created the network_switch.py service app to test on the dev Rover.
Rover GPS Time Sync Function
Because the Raspberry Pi does not include a realtime hardware clock and the Rover needs to boot in the field without Wi-Fi or any Internet connections, I had to integrate a GPS (Global Position System) to obtain the UTC time from satellites. I learned this from my initial field tests where the apps sat waiting for the system time to be set but there was no Internet access to obtain the NTP (Network Time Protocol) to sync the computer date and time. Although this took many hours testing different configurations, suggested solutions on other linux distributions, outdated information and a couple chatrooms, I was able to hack together an Arch Linux solution that follows integration standards.


Months before this need, I had ordered a GPS Module with TTL Ceramic Passive Antenna (shown above) knowing I would need it one day for R&D. Because I had kept copious notes on the Rover GPIO pins, I had four pins in a row reserved for power, ground, transmit, and receive signals from the satellites. Using a spare RPi 3B, I was able to cable and connect to the GPS with up to 7 satellites fixing inside our home. The next few weeks were spent configuring and testing until it was ready to install in the Rover. This required a wiring harness so that the unit was detachable and could be removed when working on the rig.

Rover Right Side Motor Rig

Rover Left Side Motor Rig
One important thing I learned in this research process is that PPS is not needed for the NTP timesync and GPS connection. Older online documentation suggests using that for the time pulse to the GPS that is no longer necessary with the later releases of gpsd, ntp, and systemd-timesyncd.
References – Tools and Workshop
Here’s our workshop for making wood and acrylic parts:


The above picture inspired the creation of the following list of tools needed to build this rover:
POWER TOOLS
Drills* – small Dremmel® drill for sanding and large drill for holes
Saws – table saw for large wood pieces, scroll saw* for round cuts (seen in photo that were replaced with 3D printed part) and acrylic pieces
Electric Sander* – to smooth rough wood saw cuts
HAND TOOLS
Screw Drivers* – extremely small and adjustable for flat and Phillips head screws
Compass* – for drawing circles on wood to cut
Soldering Iron – to solder wires to circuitry
Heat Gun – to heat shrink over solder joints
Tape Measure* – Inches one side, Metrics other side
Fine Files* – to sand 3D printer edges and openings, Husky® offers a great set
Needle Nose Pliers* – to pickup parts and tighten nuts and bolts
Hands-Free Stand with Magnifying Glass* – to hold things and allow two hands to operate on held item
Super Glue* – to lock the switches and nuts inside to Gimbal
Standard Pliers* – to unlock the main axis bolt
* Pictured above or below.
Attributions
This section contains items and help with this project. Most have been collected through the years as gifts or purchased for Valencia College classroom exercises. The human-looking mechanical device with magnifying glass is used extensively for seeing microscopic parts and holding pieces to be soldered to add an extra “hand” to allow for other tools to be used.


Goddard Surveillance Rover Prototype 1 Development 2018-19 This blog is about my technological venture into hardware configuration that I hope will result in a working prototype.
0 notes