#Raspberry Pi Zero/Zero W
Explore tagged Tumblr posts
Visit Tumblr Blog
Explore Tumblr blogs with no restrictions, modern design and the best experience.
Last Seen Tumblr Blogs


Fun Fact
Hackers stole 65M passwords from Tumblr in 2013.
Text
Helping my sister set up the pi-hole and she is suitably impressed at the tiny computer >:3c
41 notes
·
View notes
Text
DIY: Making A Pwnagotchi
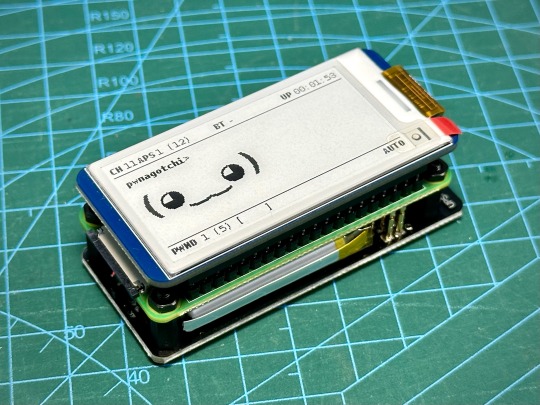

Yes, I know I am very late to the game ... LOL I was meddling with Flipper Zero and war driving, then I came across the Pwnagotchi project. Since I already had the parts to do this lying around in my workshop, I decided to put together my own Pwnagotchi just for fun. Started by hooking up the Waveshare 2.13" Black and White E-Ink Display to a Raspberry Pi running a fresh Raspbian image and downloaded the Waveshare demo code to test the display to make sure it's working properly, since I have not actually used it before. This is a v4 display.

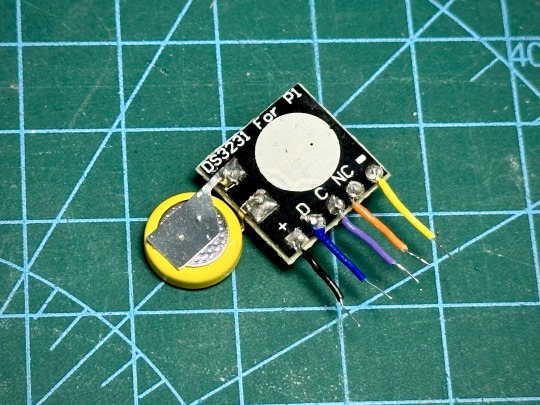
After that, I just followed all the instructions over here to put it all together, including adding a real time clock. I used the DS3231 RTC module designed for Pi, but in order to make it fit into the space between the display and the Pi board, I had to make some modifications. The female header pins on the RTC module was desoldered and short wires were soldered on. The battery also had to be desoldered and resoldered on in a new positionlike below to make the module thin enough. The module was then wrapped in wire tape for insulation. Now, we can just slot the wires into the female header pin holes of the display before we snap it onto the Pi board.
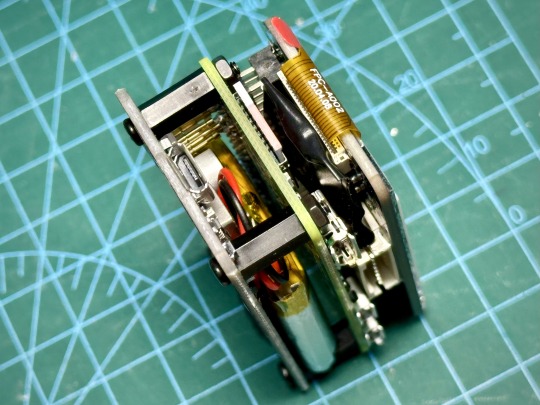
Below, you can see the RTC fits comfortably between the boards. I also attached a UPS Lite v1.2 board. Apparently, the UPS Lite board I had was a clone/knock off. It uses I2C address of 0x32 instead of 0x36 that was used in the original product, so the UPS Lite plugin in Pwnagotchi won't work. Oh well, I will just use it like a normal battery pack.

Now, for the software. The original Pwnagotchi project has not had any new updates for over 2 years, so it's kinda out of date and it doesn't support the newer Waveshare displays. Luckily for us, someone had taken the effort to fork the project and released new versions of Pwnagotchi over here. Note that this requires Raspberry Pi Zero 2 W.
The Waveshare 2.13" E-Ink display that I had was v4, but I found that I had to set the display type to "waveshare_3" in Pwnagotchi settings for it to work properly. Next is to 3D print a case for this, but in the mean time, I used some nano bricks to build a temporary case for it.
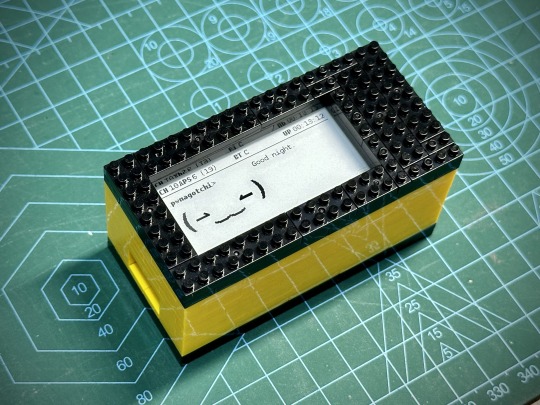
That's it for now. Happy hacking!
65 notes
·
View notes
Text
the "Zero" in "Raspberry Pi Zero W" stands for "zero megahertz"
#this machine truly cannot think#keypress lag in multiples of minutes#I might have to reflash it to a dumber linux
2 notes
·
View notes
Text
The Sterling Saga: The Hardest Part is Getting Started...
I'm what the kids call a Scorpio/Sagittarius cusp. It gives me the worst qualities of both, but the Sagittarian ones are especially irritating. I can handle living a life of hermitude and psychological trauma (I'm missing out on a fireworks show as I type this). What I can't handle is constantly being haunted by the ghosts of my own dumbassery.
I know they're there. I anticipate them. I do everything I can to keep their rattling chains out of my halls.
...so you would think that, even with my tendency to get an idea in my head and then haul off and relentlessly pursue, I would at least have had enough sense to back up my talking furby on fucking Google Drives or something.
...I did not. Thus begins our next great adventure!

Let me give you a little breakdown of how Sterling works. His main computing system is a Raspberry Pi Zero W attached to a speaker and motor controller. His programming is stored entirely on a microSD card. This is the primary copy of his data. His old backups were stored on an old computer of mine which I no longer have, though the hard drive is still in my possession. I hope. I haven't gone through my moving boxes yet.
So, I can take two routes when it comes to retrieving Sterling's data: I can either go through a million boxes, find that hard drive, get an adapter, plug it into my wimpy-ass Lenovo Yoga and get to the data that way, or, I could pop Sterling open, pull out that MicroSD card, pop it in a card reader and back up the primary copy onto the Yoga and the cloud for safekeeping.
Both options are time consuming, but one of them is the fun kind of time consuming and the other is the boring kind of time consuming. So, I'm going with option 2. If option 2 ends in tragedy, I can still hopefully buy a new rig and do an emergency recovery of the data that exists on that hard drive. Hopefully it won't come to that - if I was smart enough to put him together, I should be smart enough to take him apart, right...?
"How in the hell did I do this...?"
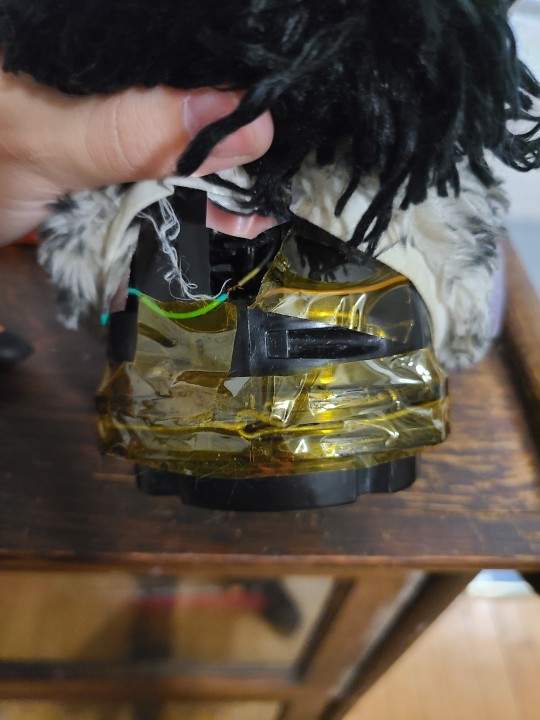
After unceremoniously cutting open the zip tie and pulling off his fur, I was met with a sight I vaguely remember: the non-electrical wire that holds the bottom of his carapace in place, covered by insulating tape, and above that, the wires leading to his touch sensors.

One interesting thing of note is that the wire actually goes into his shell, rather than being wrapped around the outside of it. I have no idea why I did this. Surely, there must've been a reason. To keep the battery hatch in place when the hardware wouldn't fit, maybe? I'm not entirely certain, but why else would I take such an approach? Running that metal wire so close to the hardware is just asking to short circuit something otherwise, unless it was positioned just right.
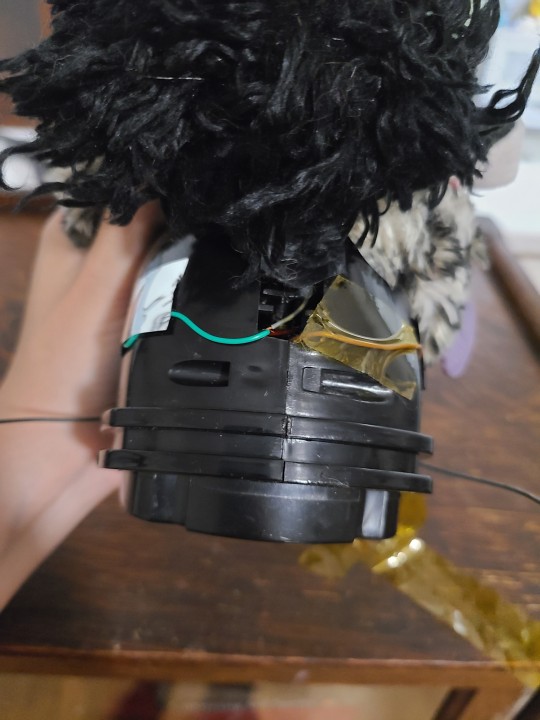
I undid the wire with some pliers, and this is the part where I chickened out. I don't have a screwdriver well suited for unscrewing him, or needle and thread for his ears for that matter. Not to mention a MicroSD card reader (besides my phone that is). After suitably defiling him, I put the old man back together the best I could and made a shopping list of supplies for tomorrow.
The current plan is to get the necessary supplies and very carefully extract that card, ideally without harming Sterling's hardware. Though if I do, it's not a huge loss: I can easily replace aluminum tape or a speaker. I can't easily replace three months' worth of nonstop, agonized coding - or a friend, for that matter.

And so he sits, like a sleeping Buddha unfazed by the ever-shifting cycle of samsara while I scramble to purchase an appropriately sized screwdriver.
If only I could be so enlightened...
26 notes
·
View notes
Text
Raspberry Pi Board: Revolutionizing Computing and Education
The Raspberry Pi board is a series of small, affordable single-board computers developed by the Raspberry Pi Foundation, a UK-based charity focused on promoting computer science education and digital literacy. Since its launch in 2012, the Raspberry Pi has transformed from a niche educational tool into a versatile platform used in a wide range of applications, from DIY electronics projects to industrial automation.
A Brief History
The first Raspberry Pi, the Model B, was released in February 2012. Designed to promote basic computer science in schools and developing countries, it featured a 700 MHz ARM11 processor, 256 MB of RAM, and basic connectivity options. The success of the Model B led to a rapid expansion of the Raspberry Pi lineup, with various models offering improved performance, more memory, and enhanced connectivity.
Key Features and Models
Raspberry Pi 1 Model B (2012):
Processor: 700 MHz ARM11
Memory: 256 MB RAM
Ports: 2 USB 2.0 ports, HDMI, Composite video, 3.5mm audio jack, Ethernet
Storage: SD card slot
Raspberry Pi 2 Model B (2015):
Processor: 900 MHz quad-core ARM Cortex-A7
Memory: 1 GB RAM
Ports: 4 USB 2.0 ports, HDMI, Composite video, 3.5mm audio jack, Ethernet
Storage: MicroSD card slot
Raspberry Pi 3 Model B (2016):
Processor: 1.2 GHz quad-core ARM Cortex-A53
Memory: 1 GB RAM
Ports: 4 USB 2.0 ports, HDMI, Composite video, 3.5mm audio jack, Ethernet
Wireless: Wi-Fi and Bluetooth
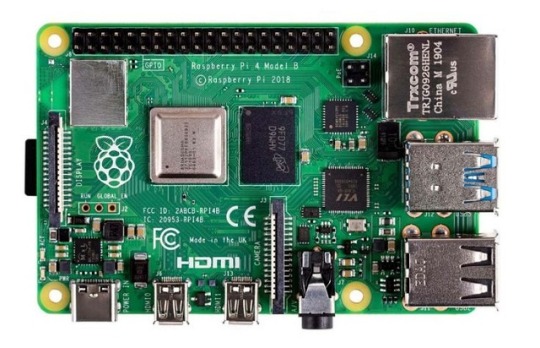
Raspberry Pi 4 Model B (2019):
Processor: 1.5 GHz quad-core ARM Cortex-A72
Memory: Options of 2 GB, 4 GB, and 8 GB RAM
Ports: 2 USB 3.0 ports, 2 USB 2.0 ports, 2 Micro HDMI ports, Ethernet, USB-C for power
Wireless: Wi-Fi and Bluetooth
Raspberry Pi Zero (2015) and Zero W (2017):
Processor: 1 GHz single-core ARM11
Memory: 512 MB RAM
Ports: Mini HDMI, Micro USB OTG, Micro USB for power, GPIO pins
Wireless (Zero W): Wi-Fi and Bluetooth
Applications and Uses
The versatility of the Raspberry Pi has led to its adoption in numerous fields:
Education:
Coding and Programming: Used in schools and educational programs to teach students programming languages such as Python, Scratch, and Java.
Computer Science Concepts: Introduces concepts like hardware, software, and networking.
DIY Projects and Maker Community:
Home Automation: Controls smart home devices, including lights, thermostats, and security systems.
Media Centers: Powers home media centers using software like Kodi.
Retro Gaming: Emulates classic gaming consoles using software like RetroPie.
Industrial and Commercial Applications:
IoT Devices: Serves as a hub for Internet of Things (IoT) devices, enabling data collection and remote control.
Automation and Control Systems: Used in factories and labs for monitoring and controlling equipment.
Research and Development:
Prototyping: Facilitates rapid prototyping of electronic devices and systems.
Data Collection: Gathers data from various sensors in environmental and scientific research.
Community and Ecosystem
The Raspberry Pi has cultivated a vibrant global community of developers, hobbyists, educators, and students. Online forums, tutorials, and community projects provide extensive support and resources for users at all skill levels. The Raspberry Pi Foundation also offers official accessories, including cases, cameras, and expansion boards, further enhancing the functionality of the Raspberry Pi.
Conclusion
The Raspberry Pi board has revolutionized the way people learn about and interact with technology. Its affordability, versatility, and extensive support network have made it an indispensable tool in education, DIY projects, and professional applications. As technology continues to evolve, the Raspberry Pi Foundation remains committed to expanding the capabilities and accessibility of this remarkable platform, ensuring that computing remains within reach for everyone.
3 notes
·
View notes
Text


I was jealous of the MK 7, but the ball joints get caught in my hair. So, we're making a new version.
Meet the MK8. Ready to be wired for sound. I have a Raspberry Pi Zero W ready to fit, and a new idea for a monocle display.
9 notes
·
View notes
Text
QUICK BEFORE I SPEND MONEY ON SOMETHING THAT WON'T WORK
is the waveshare 4.2" epaper screen compatible with raspberry pi Zero 2 W? I have no idea what I'm doing and two different sources say two different things
3 notes
·
View notes
Text
I got my siblings the Starter Max kit for the Raspberry Pi Zero W here:
There's also a good deal, for the somewhat faster Raspberry Pi Zero 2 W, but short a micro SD card, here:
Both are officially approved Raspberry Pi sellers, and I've ordered from both and can confirm their reliability.
Depending on how you do the setup, you may need more or less than are in these kits.
Here are some links on how to set it up:
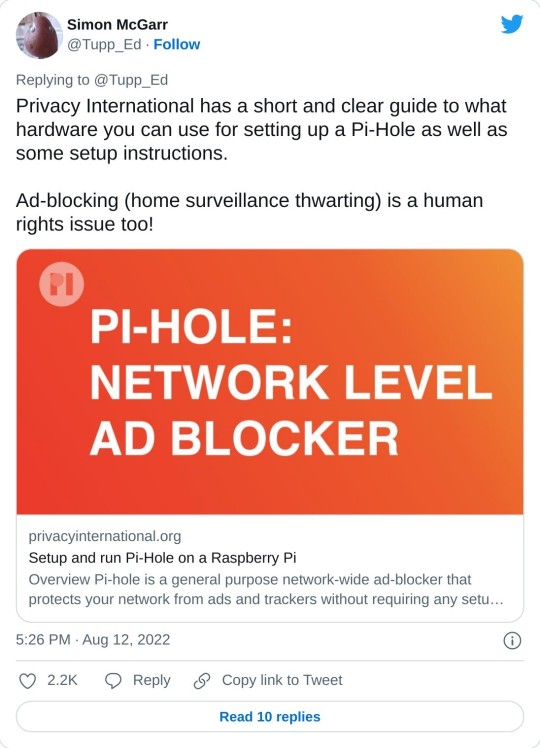
https://privacyinternational.org/guide-step/4341/raspberry-pi-setup-and-run-pi-hole
Do note, you will need to be able to access your internet router settings. You basically have to tell your router to run all internet traffic by the raspberry pi, which then uses the pi-hole program to figure out what to let through.
You may also figure out that you could technically run pi-hole on any computer running linux! The benefit to using a raspberry pi rather than, say, an old laptop, is it takes up very little space and uses far less energy. You have to have the pi-hole running at all times, after all! And trust me when I say the initial investment is 1000% worth it.

>First, we’ve discovered that about a quarter of all the internet connection in or out of the house were ad related. In a few hours, that’s about 10,000 out of 40,000 processed.
>We also discovered that every link on Twitter was blocked. This was solved by whitelisting the https://t.co domain.
>Once out browsing the Web, everything is loading pretty much instantly. It turns out most of that Page Loading malarkey we’ve been accustomed to is related to sites running auctions to sell Ad space to show you before the page loads. All gone now.
>We then found that the Samsung TV (which I really like) is very fond of yapping all about itself to Samsung HQ. All stopped now. No sign of any breakages in its function, so I’m happy enough with that.
>The primary source of distress came from the habitual Lemmings player in the house, who found they could no longer watch ads to build up their in-app gold. A workaround is being considered for this.
>The next ambition is to advance the Ad blocking so that it seamlessly removed YouTube Ads. This is the subject of ongoing research, and tinkering continues. All in all, a very successful experiment.
>Certainly this exceeds my equivalent childhood project of disassembling and assembling our rotary dial telephone. A project whose only utility was finding out how to make the phone ring when nobody was calling.
>Update: All4 on the telly appears not to have any ads any more. Goodbye Arnold Clarke!
>Lemmings problem now solved.
>Can confirm, after small tests, that RTÉ Player ads are now gone and the player on the phone is now just delivering swift, ad free streams at first click.
>Some queries along the lines of “Are you not stealing the internet?” Firstly, this is my network, so I may set it up as I please (or, you know, my son can do it and I can give him a stupid thumbs up in response). But there is a wider question, based on the ads=internet model.
>I’m afraid I passed the You Wouldn’t Download A Car point back when I first installed ad-blocking plug-ins on a browser. But consider my chatty TV. Individual consumer choice is not the method of addressing pervasive commercial surveillance.
>Should I feel morally obliged not to mute the TV when the ads come on? No, this is a standing tension- a clash of interests. But I think my interest in my family not being under intrusive or covert surveillance at home is superior to the ad company’s wish to profile them.

>Aside: 24 hours of Pi Hole stats suggests that Samsung TVs are very chatty. 14,170 chats a day.
>YouTube blocking seems difficult, as the ads usually come from the same domain as the videos. Haven’t tried it, but all of the content can also be delivered from a no-cookies version of the YouTube domain, which doesn’t have the ads. I have asked my son to poke at that idea.

206K notes
·
View notes
Text
I got my siblings raspberry pi zero w kits for christmas so they can set up pi-hole and I'm trying to save them a lot of trial-and-error hassle by typing up simple instructions but. it's hard when I don't even know what routers they have? bc that can complicate things.
ugh I better make sure they don't have fucking AT&T
anyway I'm doing the desktop environment version of the os bc I don't feel like coordinating getting their router logins and fucking IP ranges or whatever to do headless setup, and setting up wifi via the command line is a little weird so the lite os wouldn't work either (again I am trying to keep this simple). Plus idk how complicated SSH is for headless setup, I've never done it and even though I'm sure I could I don't wanna add on any weirdness for them to deal with. but I'm like. should I go so far as to install the os's for them or is just imaging the sd cards enough...
I also keep having to fight the impulse to be like "well I don't want to do all the FUN STUFF and leave none for THEM!" because like. I Am An Outlier in that respect I think.
#I also got cheap usb hubs and wireless controllers with trackpads and keypads that I found at five below lmao#they'll need hdmi cords to plug it into the tv for setup and a couple AAA batteries but I think they can handle that#my one sister was a little overwhelmed by it and may well choose to get a diff present in which case I'll use the pi for smth else#or just keep it as a backup ig#I really hope she'll take it so to convince her I'm trying to make it as simple as possible#I assembled the pi's in their cases. I imaged the cards. I even went OUT OF MY WAY to take care of the keyboard/mouse situation 😤#(true I got the cheapest one possible but they're gonna use it like once so who cares. I have one I have used it I know it works)#anyway. blurgh#need to make a computer sideblog someday#original
12 notes
·
View notes
Text
Pi Power Revealed: What Your Raspberry Pi Really Costs to Run in 2025 In the ever-expanding universe of DIY computing and IoT projects, the Raspberry Pi remains a versatile cornerstone for creators, developers, and hobbyists alike. Whether you're building a weather station that runs on batteries, setting up a 24/7 home server, or creating an edge computing device, understanding your Pi's power consumption is crucial for success. With the diverse range of Raspberry Pi models available in 2025, power requirements vary significantly – and knowing these differences can make or break your project. This comprehensive guide delves into the real-world power consumption of various Raspberry Pi models, explores the factors that influence energy usage, and provides practical tips for maximizing power efficiency. Whether you're concerned about energy costs, battery life, or selecting the right power supply, we've got you covered. Understanding Raspberry Pi Power Basics Before diving into specific models, let's clarify how power consumption is measured. Power is typically expressed in Watts (W), which is calculated by multiplying voltage (V) by current (A) using the formula P = V × I. Raspberry Pi devices generally operate at 5V DC, with current draw varying based on activity level and connected peripherals. This means power consumption is dynamic – a Pi sitting idle might draw minimal power, while the same device running intensive computations with multiple peripherals could consume significantly more. Power Consumption of Different Raspberry Pi Models Raspberry Pi 5 The flagship Raspberry Pi 5, with its powerful processor and expanded capabilities, draws more power than its predecessors: Idle: Approximately 3.0-3.5W (600-700mA at 5V) Under load: 7.0-9.0W (1.4-1.8A at 5V) Notable features: The Pi 5 implements improved power efficiency per computation compared to the Pi 4, but its higher performance ceiling means maximum power draw is greater. The onboard power management IC offers better regulation than previous generations. Raspberry Pi 4 B The workhorse Raspberry Pi 4 remains popular for many applications: Idle: 2.5-3.0W (500-600mA at 5V) Under load: 5.0-7.5W (1.0-1.5A at 5V) Notable features: Power consumption varies significantly based on RAM configuration (2GB vs 4GB vs 8GB models) and active interfaces. Raspberry Pi 400 This integrated keyboard model based on the Pi 4 architecture shows similar consumption patterns: Idle: 2.7-3.2W (540-640mA at 5V) Under load: 5.5-7.5W (1.1-1.5A at 5V) Notable features: The larger form factor provides better thermal management, which can slightly reduce power spikes during sustained workloads. Raspberry Pi 3 B+ This older but still useful model offers moderate power requirements: Idle: 1.9-2.3W (380-460mA at 5V) Under load: 3.5-5.5W (700-1100mA at 5V) Notable features: More power-efficient than the Pi 4 series, but offers significantly less computing power. Raspberry Pi Zero 2 W This compact powerhouse strikes an excellent balance between capability and efficiency: Idle: 0.5-0.7W (100-140mA at 5V) Under load: 1.5-2.2W (300-440mA at 5V) Notable features: Remarkable power efficiency makes it ideal for battery-powered projects. Raspberry Pi Zero W The original ultra-compact Pi remains the most power-efficient standard model: Idle: 0.4-0.5W (80-100mA at 5V) Under load: 0.8-1.5W (160-300mA at 5V) Notable features: Perfect for ultra-low-power applications where computing requirements are modest. Factors Influencing Raspberry Pi Power Consumption Several key factors dramatically affect how much electricity your Raspberry Pi uses: CPU and GPU Load The single biggest variable in power consumption is processor utilization. Running intensive tasks like video encoding, machine learning algorithms, or complex calculations can double or even triple power consumption compared to idle states.
Connected Peripherals Each device connected to your Pi adds to the overall power budget: USB devices (particularly power-hungry ones like hard drives): 0.5-2.5W each HDMI displays: 0.5-1.0W per active connection Camera modules: 0.2-0.5W when active HATs and add-on boards: Varies widely from 0.1W to several watts Network Connectivity Active network interfaces contribute to power draw: Wi-Fi: 0.3-0.5W when active Ethernet: 0.2-0.4W when connected Bluetooth: 0.1-0.2W during active communication Overclocking Pushing your Pi beyond stock frequencies significantly increases power consumption and heat generation. Overclocked Pi 5 models can see power draw increase by 20-40% over standard settings. Operating System and Software Different operating systems and background services impact power usage: Lightweight distributions like Raspberry Pi OS Lite consume less power than full desktop environments Background services, automatic updates, and constant logging increase power draw Power management settings can significantly affect consumption patterns External Storage Storage devices can be surprising power consumers: USB flash drives: 0.2-0.5W Powered external HDDs: 2.0-5.0W SSDs: 1.0-3.0W depending on activity Real-World Power Consumption Examples To put these numbers in context, here are some typical usage scenarios: Headless server (Pi 4, no display, running web services): ~3.5W average Desktop replacement (Pi 5 with display, keyboard, mouse, running desktop environment): ~7.5W average Media player (Pi 4 streaming video to HDMI display): ~6.0W average Weather station (Pi Zero 2 W with sensors, running on batteries): ~1.0W average Home automation hub (Pi 4 with various USB devices): ~5.0W average Choosing the Right Power Supply Selecting an appropriate power supply is critical for stable operation: Raspberry Pi 5: Official recommendation is 5V/5A (25W) USB-C power supply Raspberry Pi 4: Requires 5V/3A (15W) USB-C power supply Raspberry Pi 3 B+: Works well with 5V/2.5A (12.5W) micro-USB supply Pi Zero models: Can operate reliably with 5V/1.2A (6W) micro-USB supply Using underpowered supplies often leads to subtle but frustrating issues: Random reboots and crashes SD card corruption The dreaded "rainbow square" power warning Peripherals failing unpredictably Tips for Optimizing Raspberry Pi Power Efficiency When every milliwatt matters, consider these optimization strategies: Underclock the CPU when maximum performance isn't needed Disable unused interfaces with commands like: sudo rfkill block wifi # Disable Wi-Fi sudo rfkill block bluetooth # Disable Bluetooth tvservice -o # Disable HDMI output Use lightweight operating systems like Raspberry Pi OS Lite or DietPi Optimize software by removing unnecessary services and scheduling resource-intensive tasks Implement power management tools like PowerTOP or TLP where available Choose power-efficient peripherals and disconnect unused devices Consider a lower-power Pi model for tasks that don't require maximum performance Conclusion Understanding your Raspberry Pi's power consumption is essential for designing reliable and efficient projects. From the ultra-efficient Pi Zero W at under 1W to the powerful Pi 5 that can draw up to 9W under load, each model offers a different balance of performance and power efficiency. By selecting the appropriate model for your needs, pairing it with the right power supply, and implementing proper power optimization techniques, you can ensure your Raspberry Pi projects run reliably whether they're powered from the wall or operating on batteries in the field. Remember that real-world power consumption varies based on your specific configuration and workload, so consider measuring the actual draw of your completed project using a USB power meter for the most accurate assessment.
0 notes
Text
october 5th 2024: speaker test launch
[id: A video filmed from hand in dim lighting. It opens to a laptop screen with a command box open. A hand types the command 'godword', at which point the camera pans over to a speaker. A feminine robotic voice with strange inhuman prosody reads out the words: miserably, awoke, energy, magnified, alternately, disc, gravity, gifts. End id.]
preacher: woof! i promised to post this yesterday, but the mannequins took priority. this is the test launch of the rip off godword code hooked up to a speaker that scott performed back in the uk. here's a few words from him as well.
Scott: Thanks Preacher. Yeah so the god word rip off in this test just uses espeak to read the chosen random words via a usb speaker. Usually I'd use a SHIM(Shove Hardware In Middle) on the GPIO pins of the raspberry pi for sound output but because the LED Matrix screen uses like every pin lol. Also the pi zero 2 doesnt have its own dedicated aux like bigger pi's.
The espeak program uses premade voice files with specific phonemes and voiced calibrations. They have different names and nationalities and can have different ages too? But I cant really hear much difference in the ages hah. Espeak also works with Mbrola voices too which are much better sounding voice files and can be calibrated more too with better phoneme and pronunciation dictionaries. This one here is very robotic and monotone as well as having weird stresses and vowel spacing but I plan on heavily tweaking to get the voice we want. Back to you Preacher.
preacher: i would actually like for it to be kind of robotic and weird =w= it's cool! i guess we will post clips of different voices once we set this thing up here in NL (when the parts get here that is)

#divine machinery#templeos#coding#programming#tech#techcore#technology#webcore#machine#objectum#robophilia#robots#robot#robot girl#osor community#techum#technum#computers#wires#angel computers#divine technology#technophilia#scott#preacher#update#drafts#roadmap
23 notes
·
View notes
Text
Bitcoin Solo Mining für Zuhause: Meine Erfahrungen mit dem MARS LANDER V2

Bitcoin Mining – für viele ein faszinierendes Thema, aber meist verbunden mit großen Farmen, lauten Lüftern und enormem Stromverbrauch. Doch es geht auch anders: kompakt, leise (na ja, fast…), mit WLAN, OLED-Display und stylischen RGB-LEDs. Der MARS LANDER V2 Solo Bitcoin Miner von BitcoinMerch.com verspricht genau das – ein schickes Gadget für zu Hause, das ganz ohne komplizierte Einrichtung in wenigen Minuten startklar sein soll. https://youtu.be/MRZY-kNbzKw Ich habe das Gerät kostenfrei für ein Review erhalten und war sehr gespannt: Kann ein Solo Miner für knapp 475 Dollar wirklich überzeugen? Und wie schlägt er sich im Vergleich zu anderen Lösungen, wie etwa dem Bitaxe Gamma, den ich bereits auf meinem Blog vorgestellt habe?


In diesem Beitrag nehme ich dich mit auf meine Reise: Von den ersten Eindrücken über die Inbetriebnahme bis hin zu meinen ganz persönlichen Erfahrungen mit dem MARS LANDER V2 – ehrlich, transparent und ohne Marketing-Blabla.
Was ist der MARS LANDER V2 eigentlich?
Beim MARS LANDER V2 handelt es sich um einen sogenannten Solo Bitcoin Miner, der es ermöglicht, direkt am eigenen Gerät ohne Mining Pool auf die Jagd nach neuen Bitcoin-Blöcken zu gehen. Das Konzept „Solo Mining“ klingt zunächst verlockend, denn wer einen Block findet, kassiert die komplette Belohnung – aktuell immerhin 3,125 BTC nach dem letzten Halving (Stand April 2024). Der MARS LANDER V2 hebt sich dabei deutlich von klassischen Mining-Geräten ab: Er setzt auf einen Raspberry Pi Zero 2 W als Herzstück, kombiniert mit einem GekkoScience COMPAC F Laptop Combo Stickminer, der die eigentliche Mining-Leistung liefert. Optisch ist das Ganze sehr ansprechend gestaltet: Ein kleines OLED-Display informiert live über wichtige Daten wie: - die zugewiesene IP-Adresse, - den aktuellen Bitcoin-Preis, - den aktuellen Blockpreis, - sowie die Anzahl der gefundenen Blöcke.


Dazu kommen acht RGB-LEDs, die sich bequem per IR-Fernbedienung steuern lassen – eine nette Spielerei, die dem Gerät einen gewissen „Gadget-Charme“ verleiht.


Die Herstellerbeschreibung liest sich fast wie das Datenblatt eines modernen Smart Home Geräts: ✔️ Einrichtung in wenigen Minuten per Smartphone oder PC ✔️ Betrieb über WLAN – kein LAN-Kabel notwendig ✔️ Stromverbrauch unter 17 W – etwa so viel wie eine einzelne LED-Lampe ✔️ Laut Hersteller: „Guaranteed to mine successfully – or your money back“ Doch was steckt wirklich dahinter? Und wie schlägt sich das Gerät in der Praxis? Genau darum geht es in den nächsten Kapiteln.
Technische Daten und Ausstattung
Bevor es an den praktischen Test geht, werfen wir zunächst einen Blick auf die technischen Details des MARS LANDER V2 Solo Miners. Denn die Hardware-Kombination und das Konzept hinter dem Gerät unterscheiden sich deutlich von klassischen Mining-Rigs. Basis: Raspberry Pi Zero 2 W Das Herzstück des MARS LANDER V2 bildet ein Raspberry Pi Zero 2 W, ein kompakter und stromsparender Einplatinencomputer, der für die Steuerung und das Setup des Miners verantwortlich ist.

Raspberry Pi Zero 2 W Hier die wichtigsten technischen Daten des Pi Zero 2 W: FeatureDetailsProzessorBCM 2710A1, 64-bit ARM Cortex-A53 Quad-Core @ 1 GHzArbeitsspeicher512 MB RAMWLAN2.4 GHz 802.11 b/g/nBluetooth4.2 / Bluetooth Low Energy (BLE)Anschlüsse1x micro-HDMI (Typ C), 1x micro-USB (Daten), 1x micro-USB (Strom)SpeichermicroSD-Slot für das BetriebssystemGPIOUnbestückter 40-Pin GPIO ConnectorAbmessungen65 x 30 x 5 mm Mining-Einheit: GekkoScience COMPAC A1 Laptop Combo Das eigentliche Mining übernimmt beim MARS LANDER V2 das aufgesteckte Modul GekkoScience COMPAC A1. Dabei handelt es sich um einen USB-Stick-Miner, der auf dem BM1397 ASIC-Chip basiert – bekannt aus der Antminer S17-Serie.


Der COMPAC A1 bietet laut Hersteller eine Hashrate von 300 bis 500 GH/s, abhängig von der gewählten Spannung und Kühlung. In meinem Test erreichte das Modul eine Leistung von 297,81 GH/s, was sich eher im unteren Bereich dieser Spannweite bewegt. Hier scheint der Fokus bewusst auf Stabilität und Energieeffizienz zu liegen, statt auf maximaler Leistung. Interessant: Diesen USB-Miner kannst du auch unabhängig vom Mars Lander v2 direkt an einem Windows-PC betreiben. Eine ausführliche Anleitung dazu findest du auf der offiziellen Seite unter: How to Set Up and Use the Compact A1 USB Miner on Windows Das macht den COMPAC A1 zu einem flexiblen Gerät, das nicht zwingend an den Mars Lander gebunden ist. Kühlung und Lautstärke Die Kühlung des COMPAC A1 Sticks übernimmt ein 40 mm Lüfter, der direkt auf dem Modul sitzt. Dieser sorgt zwar für eine zuverlässige Wärmeabfuhr, ist jedoch im Betrieb deutlich hörbar – vor allem wenn das Gerät auf einer harten Tischoberfläche steht.

Ein einfacher, aber wirkungsvoller Trick zur Reduzierung der Lautstärke: Ich habe dem Gehäuseboden des MARS LANDER V2 vier kleine Silikonfüße spendiert. Diese entkoppeln das Gerät spürbar vom Schreibtisch und senken die Übertragung der Vibrationen deutlich – das macht den Miner zwar nicht flüsterleise, aber die Lautstärke ist damit wesentlich angenehmer.


Wer es noch leiser möchte, könnte – ähnlich wie bei meinem Umbau des Bitaxe Gamma 601 – den Standardlüfter gegen einen hochwertigeren Noctua-Lüfter austauschen. Diese Lüfter sind bekannt für ihren leisen und effizienten Betrieb und könnten auch dem MARS LANDER V2 gut tun. Energieverbrauch Ein großer Vorteil gegenüber klassischen Minern ist der vergleichsweise geringe Stromverbrauch. Laut Hersteller benötigt der MARS LANDER V2 weniger als 17 W – das entspricht ungefähr dem Verbrauch einer einzelnen LED-Lampe. Ich habe den Stromverbrauch selbst nachgemessen, um diese Angabe zu überprüfen: Mit Hilfe eines Shelly Plug S Gen3 habe ich eine Leistungsaufnahme von 14,5 Watt im Betrieb ermittelt.

Damit bestätigt sich: Der MARS LANDER V2 ist tatsächlich ein echtes Low-Power-Gerät – auch wenn die Hashrate im Vergleich zu großen Mining-Rigs natürlich deutlich geringer ausfällt. Für alle, die einfach mal das Thema Solo Mining ausprobieren möchten, ohne gleich Angst vor der nächsten Stromrechnung zu haben, ist das auf jeden Fall ein Pluspunkt. Stromverbrauch & Betriebskosten des MARS LANDER V2 Bei einem gemessenen Stromverbrauch von 14,5 Watt und einem Strompreis von 0,30 €/kWh ergeben sich folgende Kosten im Dauerbetrieb: ZeitraumVerbrauchskostenpro Tagca. 0,10 €pro Wocheca. 0,73 €pro Jahrca. 38,11 € 💡 Hinweis: Der tatsächliche Strompreis kann je nach Anbieter variieren. Diese Werte dienen als Beispielrechnung bei Dauerbetrieb rund um die Uhr.
Lieferumfang
Der MARS LANDER V2 wird als fertig aufgebautes Komplettgerät geliefert – das heißt, es muss nichts mehr zusammengesteckt oder gelötet werden, alles ist direkt einsatzbereit. Besonders angenehm: Auch das Acrylgehäuse ist bereits vollständig montiert und transparent gestaltet, sodass man die Technik im Inneren gut sehen kann. Zum Lieferumfang gehören: - ✅ Der MARS LANDER V2 (komplett aufgebaut) inklusive transparentem Acrylgehäuse - ✅ microSD-Kartenleser für die einfache Datenübertragung am PC - ✅ 32 GB microSD-Karte (bei mir war sogar schon eine im Pi eingesetzt – ob das beabsichtigt ist, kann ich nicht sagen, praktisch ist es aber allemal) - ✅ 5V – 3A Netzteil (mit Stecker für das US-Stromnetz) - ✅ IR-Fernbedienung, um die RGB-LEDs bequem zu steuern - ✅ Ein paar Sticker sowie Kärtchen mit QR-Codes, die direkt zur Anleitung und Einrichtung führen


Ein positiver Punkt, der mir direkt aufgefallen ist: Es wird keine billige No-Name microSD-Karte verwendet, sondern eine solide Speicherkarte von SanDisk (Typ microSD HC I, 32 GB). Das ist erfreulich, denn gerade bei Mining-Geräten, die 24/7 laufen sollen, ist eine zuverlässige SD-Karte wichtig. Was du selbst noch besorgen musst Da das Netzteil für den US-Markt ausgelegt ist, benötigst du für den Betrieb in Deutschland noch einen passenden Adapter für EU-Steckdosen. Solche Adapter gibt es bereits für wenige Euro, z. B. bei ebay.de oder amazon.de. 💡 Tipp: Wer das Gerät langfristig betreiben möchte, könnte auch überlegen, ein gutes 5V-3A Netzteil mit EU-Stecker direkt zu verwenden – das vermeidet mögliche Wackelkontakte durch billige Adapter.
Erste Inbetriebnahme und Einrichtung
Die Einrichtung des MARS LANDER V2 erinnert an die Vorgehensweise, die man bereits von anderen Solo Minern wie dem NerdMiner kennt – und sie ist erfreulich unkompliziert gelöst. WLAN-Einrichtung per Access Point Nach dem Einschalten startet der MARS LANDER V2 zunächst als WLAN-Access-Point mit dem Namen: MARSLANDER_SETUP Auf dem integrierten OLED-Display werden sowohl der Name des WLANs (SSID) als auch die zugehörige IP-Adresse zur Konfiguration direkt angezeigt – das erleichtert die Einrichtung enorm, da man die Informationen sofort am Gerät ablesen kann.

Die IP-Adresse zur Konfiguration lautet: 192.168.5.1 Nach dem Verbinden mit dem Access Point ruft man diese IP einfach im Browser auf (egal ob über Smartphone, Tablet oder PC) und gelangt so zum Konfigurationsmenü. Dort trägt man die Zugangsdaten für das eigene WLAN ein. ⚠️ Wichtig zu beachten: Der verbaute Raspberry Pi Zero 2 W unterstützt nur 2,4 GHz WLAN-Netze. Falls dein Router ausschließlich 5 GHz nutzt oder die SSIDs für 2,4 GHz und 5 GHz nicht getrennt sind, solltest du das vor der Einrichtung prüfen. Bitcoin Wallet nicht vergessen! Neben der WLAN-Konfiguration ist ein weiterer, entscheidender Schritt notwendig: Die Eingabe der eigenen Bitcoin Wallet Adresse. Nur so kann das Gerät im Erfolgsfall den gefundenen Block auch an dich auszahlen. Ohne eine gültige Wallet-Adresse würde das Mining zwar laufen, der gefundene Block würde dann aber nicht dir gutgeschrieben werden.
Erweiterbarkeit & Upgrades
Ein interessantes Detail am MARS LANDER V2 ist die seitlich verbaute USB-Schnittstelle, die nicht nur für Firmware-Updates dient, sondern auch zum Anschluss zusätzlicher Miner genutzt werden kann. BitcoinMerch.com bietet hierfür ein offizielles Upgrade-Kit an, das aus folgenden Komponenten besteht: - 3x GekkoScience COMPAC F oder A1 Miner - zusätzlicher Lüfter zur Kühlung (Performance oder RGB Lüfter) - passender USB-Hub Mit diesem Erweiterungs-Set lässt sich die Gesamthashrate auf bis zu 1,05 TH/s steigern – und das bei weiterhin kompakten Abmessungen. Der Miner wird dadurch deutlich leistungsfähiger, bleibt aber im Vergleich zu einem großen ASIC-Rig immer noch leise und wohnzimmertauglich. Preisübersicht (Stand April 2025): VariantePreis (USD)Upgrade-Kit mit 3x COMPAC F629,99 $Upgrade-Kit mit 3x COMPAC A1929,99 $ ⚠️ Wichtig: Diese Preise gelten für das offizielle Zubehör von BitcoinMerch.com und können je nach Verfügbarkeit und Marktentwicklung variieren. Damit bietet der MARS LANDER V2 eine flexible Einstiegslösung ins Bitcoin Solo Mining, die sich – bei entsprechender Investition – durchaus leistungsseitig erweitern lässt.
Fazit: MARS LANDER V2 – stylisches Mining-Gadget mit Schwächen
Nach einigen Tagen mit dem MARS LANDER V2 bin ich ehrlich gesagt etwas zwiegespalten. Einerseits ist das Gerät ein echter Hingucker: Das transparente Gehäuse, das OLED-Display und die steuerbaren RGB-LEDs verleihen dem Solo Miner einen modernen und hochwertigen Look. Die einfache Einrichtung über den integrierten Access Point funktioniert ebenfalls reibungslos. Auf der anderen Seite muss man klar sagen: Die maximale Hashrate von 250 GH/s (mit COMPAC F) oder 500 GH/s (mit COMPAC A1) ist im Vergleich zu anderen Solo Mining Geräten wie dem Bitaxe Gamma 601 deutlich geringer. Gerade wenn man den Preis betrachtet – rund 475 $ für die Basisversion des Mars Lander V2 – fällt auf, dass der Bitaxe Gamma 601 mit einem Preis von etwa 240 $ in der besten Ausführung deutlich mehr Leistung bietet (nämlich 1,2 TH/s) und zusätzlich mit AxeOS ein sehr detailliertes Webinterface für die Überwachung und Steuerung mitbringt. Besonders interessant – und auch ein wenig kritisch zu betrachten – finde ich die Aussage auf der Produktseite: „Mine Bitcoin successfully, GUARANTEED! or your money back“ In der Praxis ist es allerdings nahezu unmöglich, einen Solo-Blockfund zu garantieren, da dies auch mit einer hohen Hashrate immer noch hauptsächlich von Glück abhängt. Diese Garantie sollte also mit Vorsicht interpretiert werden. Wie geht es weiter? Read the full article
0 notes
Text
Raspberry Pi Zero 2 W搭載の文章作成用ハンドヘルドPC「Micro Journal Rev.2 ReVamp」 | fabcross
0 notes
Text
Pioneer600 Raspberry Pi Expansion Board: The Ultimate Tool for Learning and Prototyping

Pioneer600 is versatile HAT (Hardware Attached on Top), designed for the All Raspberry Pi Single Board Computer, It is aimed at enhancing Raspberry Pi's capabilities for learning and prototyping and experimenting with various components and sensors.
This HAT supports all types of Raspberry Pi Board with 40 pin GPIO header and it has A/D and D/A converter, USB to Serial/UART, OLED display, IR receiver and many more feature which makes it highly compatible and easy to integrate into a variety of projects.
Key Features:
Compatibility: It supports all Raspberry Pi boards with 40-pin GPIO such as Raspberry Pi Zero/Zero W/Zero WH/A+/3B/3B+.
Standard I/O Expansion: This Pioneer600 comes with variety of standard I/O Expansion to connect and control muliple devices:
Dual Programmable LEDs: to provide visual feedback or status indicator.
Joystick: Use the built-in Joystick to create interactive projects.
Active Buzzer: Use for audio outputs and ideal for making sound alerts or alarms.
USB to UART Converter: With CP2120, you can easily communicate with external serial devices and configure the Raspberry Pi via a serial terminal. It is very useful for debugging, interacting with microcontrollers, or setting up with serial interface.
0.96-inch OLED Display: Display clear text and graphics. Perfect for displaying sensor readings, system status, simple graphical interfaces and interactive information for your projects.
RTC (Real Time Clock): DS3231 RTC module allows your Raspberry Pi to keep accurate time even when device is disconnected from power. It features a backup battery holder ( battery is not included).
A/D and D/A converter: The PCF8591 provides 8-bit resolutions for both analog to digital (A/D) and digital to analog (D/A) conversion. You can connect analog sensor like temperature or light sensor and control analog devices like motors, LED dimmers etc. The PCF8591 also includes a screw terminal interface allows you to secure connections to external devices.
GPIO Expansion: The PCF8574 I/O expander allows increase the number of available GPIO pins for Raspberry Pi. Perfect for those projects that require many digital connections.
IR Receiver: The built-in LFN0038K infrared receiver enables to receive signal from infrared remote control.
Pressure Sensor: The BMP280 sensor is use for measure air pressure and temperature. This sensor provides real-time data that can be used for data logging, control systems, or creating smart environments.
1-Wire Interface: Supports 1-Wire communication, connect device like DS18B20 temperature sensor. perfect for projects requiring accurate temperature monitoring in remote locations.
Sensor Interface: designed to make it easy to interface with various sensors.
Why Choose Pioneer600 for Your Projects?
Comprehensive Learning Platform
The Pioneer600 is an excellent tool for learning about various components, sensors, and communication protocols. Whether you’re working on a beginner project or an advanced prototype, this expansion board provides all the necessary hardware to get you started.
Prototyping Made Easy
The flexibility of the Pioneer600 makes it an ideal choice for prototyping. It supports a variety of sensors and components, allowing you to rapidly test and iterate on your ideas. The ability to expand the GPIO, interface with analog and digital devices, and display data makes it a versatile choice for any project.
Compact and Compatible
The Pioneer600 is designed to fit all Raspberry Pi boards with a 40-pin GPIO header, so you won’t have to worry about compatibility. Despite its compact size, it packs a punch with numerous features, making it an essential tool for anyone looking to expand their Raspberry Pi’s capabilities.
Ideal for Remote Control and Automation
If you’re working on a project that involves remote control or automation, the Pioneer600 is equipped with an IR receiver for remote operation and a real-time clock to ensure your project runs on time. The pressure sensor and other environmental sensors provide even more data for automation systems, making this board a perfect choice for IoT-based projects.
Conclusion
The Pioneer600 Raspberry Pi Expansion Board by SB Components is an exceptional tool for anyone looking to expand the functionality of their Raspberry Pi. With a wide range of I/O options, sensors, and display capabilities, it offers endless possibilities for learning, prototyping, and creating innovative projects.
Whether you're building a weather station, a remote-controlled robot, or a home automation system, the Pioneer600 provides everything you need to get started.
#raspberry pi#electronics#innovation#technology#tech#learning#prototype#iot#iot applications#projects
0 notes
Text
25 października 2024

◢ #unknownews ◣
Zapraszam do lektury dzisiejszego zestawienia.
Pobierz raport "Jak pracować, by nie żałować? Pokolenia X, Y, Z o dopasowaniu do pracy" od firmy Just Join IT, która jest sponsorem tego wydania newslettera.
1) Solarna i samodzielnie hostowana strona WWW na Raspberry Pi https://dri.es/my-solar-powered-and-self-hosted-website INFO: Autor postanowił postawić własny serwer webowy na Raspberry Pi Zero 2, hostować na nim swoją stronę internetową i zasilać całość energią słoneczną. Artykuł opisuje, jak to wszystko działa i jakie problemy pojawiły się przy realizacji tego rodzaju przedsięwzięcia.
2) System rozdający czapki - bazujący na AI, DIY https://dropofahat.zone/ INFO: Kolejny z serii dziwnych pomysłów "zrób to sam". Tym razem autor pokazuje, w jaki sposób z użyciem sztucznej inteligencji (rozpoznawanie obrazu z kamery), Raspberry Pi, sterownika Adafruit i kilku linii kodu zbudował urządzenie zrzucające na przechodniów czapki z okna. Nie pytaj, w jakim celu. Skup się na interesującej implementacji tego pomysłu.
3) Nagrania z konferencji Oh My Hack 2023 (31 filmów) https://www.youtube.com/playlist?list=PLnKL6-WWWE_W9ChomFoIYUe0R2e6KI5cc INFO: Już za miesiąc rusza kolejna edycja OMH, czyli konferencji dla wielbicieli tematyki cybersecurity. Ta playlista to kolekcja wystąpień z ubiegłorocznej edycji. Jeśli lubisz posłuchać o błędach w bezpieczeństwie, o pentestach, o atakach socjotechnicznych itp., to znajdziesz tutaj coś dla siebie.
4) Jak korzystam z gita? - ciekawy workflow https://registerspill.thorstenball.com/p/how-i-use-git INFO: Artykuł opisuje podejście do pracy z Gitem oparte na 12-letnim doświadczeniu autora w małych zespołach programistycznych. Autor dzieli się swoimi preferencjami, dotyczącymi użycia interfejsu CLI, aliasów w Git oraz zasadami organizowania commitów i pull requestów, z naciskiem na zrozumiałość, odwracalność i możliwość debugowania commitowanych zmian.
5) Dlaczego ta strona jest tak szybka!? - analiza (film 14m) https://www.youtube.com/watch?v=-Ln-8QM8KhQ INFO: Analiza dość starej strony internetowej McMaster Carr i technik, które stosują, aby strona ta była niesamowicie szybka. Wygląd strony nie zachwyca, ale szybkość jej działania może być imponująca. Autor analizuje wszystkie zabiegi, które zostały zastosowane w celu osiągnięcia takiego działania.
6) Workspaces - inspirujące stanowiska pracy https://www.workspaces.xyz/ INFO: Serwis gromadzi biurka wraz z wyposażeniem, przy których pracują głównie osoby z branży IT. Wszystkie one wyglądają skrajnie 'instagramowo', ale tym się nie przejmuj. Warto za to zwrócić uwagę na to, jak zaprojektowane są te miejsca pracy, jakie gadżety zostały użyte do ich aranżacji i jak to wszystko zostało złożone w całość.
7) Jak pracować, by nie żałować? (PDFF, 76 stron) – raport [sponsorowane] https://rocketjobs.pl/jakpracowacbyniezalowac/?utm_source=newsletter&utm_medium=social-jjit&utm_campaign=jakpracowacbyniezalowac-influ-jm INFO: Sprawdź, co jest dziś najważniejsze dla polskich pracowników, jak oceniają swój poziom dopasowania do pracy. Co dla różnych pokoleń oznacza "dobry zawód"? Co myślą o swojej przyszłości zawodowej i czy osiągnęłi to, co zaplanowali?
8) Trusted computing to ograniczenia wyboru i zagrożenia dla użytkowników? https://www.ciemnastrona.com.pl/cyfrowy_feudalizm/2024/10/22/trusted-computing-kajdany INFO: Trusted computing brzmi jak coś naprawdę pozytywnego dla użytkownika. Istnieje jednak druga strona medalu. Dzięki tej koncepcji duże korporacje mogą ograniczać wolność swoich użytkowników. Autor szczegółowo opisuje działanie takich mechanizmów jak szyfrowanie HTTPS, secure boot czy DRM, wskazując na różnice między teoretyczną ochroną i podnoszeniem bezpieczeństwa a praktycznymi zagrożeniami dla wolności użytkowników.
9) Walka z banem Discorda w Turcji i wyzwania związane z VPN https://blog.orhun.dev/cant-trust-any-vpn/ INFO: Autor opowiada o swoich doświadczeniach po zablokowaniu dostępu do Discorda w całej Turcji. Autor walczył z blokadami DNS, posługiwał się VPN-em i stawiał nawet swoją konfigurację opartą na OpenVPN. Użyteczna wiedza na wypadek blokady dostępu do niektórych usług w Twojej firmie czy kiedyś... w naszym kraju.
10) Chrome umożliwi Ci prostsze debugowanie błędów w JavaScript https://typefully.com/uwteam/chrome-i-debugowanie-javascript-z-ai-5mVTxpg INFO: Od pewnego czasu w przeglądarce Chrome (i nie chodzi tutaj o silnik Chromium!) obecny jest moduł łączący konsolę JavaScript ze sztuczną inteligencją Gemini AI. Możesz wybrać dowolny z błędów i wysłać go do analizy, aby dowiedzieć się, co jest jego przyczyną i jak dałoby się go naprawić. Artykuł omawia, jak aktywować u siebie tę funkcję i jak z niej korzystać.
11) Inflacja nazw stanowisk w branży IT i jej konsekwencje https://www.trevorlasn.com/blog/software-engineer-titles-have-almost-lost-all-their-meaning INFO: Czym jest "Senior Software Engineer"? To oczywiście osoba z ogromnym doświadczeniem w wytwarzaniu oprogramowania, prawda? No właśnie, niekoniecznie. Obecnie przejście na stanowisko seniorskie nie jest wielkim wyczynem i znaczenie takich nazw jak "senior" niewiele mówi o poziomie wiedzy i doświadczenia pracownika. Autor przedstawia możliwe rozwiązania tego problemu. Artykuł do przemyślenia.
12) Obracanie grafik wektorowych jest już możliwe - rozwiązanie od Adobe https://www.creativebloq.com/design/adobes-new-image-rotation-tool-is-one-of-the-most-impressive-ai-concepts-weve-seen INFO: Do tej pory wektorowe grafiki 2D były (jak wskazuje ich nazwa) zupełnie płaskie i niemożliwe było ich obrócenie tak, aby np. postać stanęła nagle bokiem. Od czego mamy jednak sztuczną inteligencję, która umie sobie wyobrazić, jak dana grafika mogłaby wyglądać po wykonaniu obrotu czy po pochyleniu? Project Turntable od Adobe pozwala na obracanie grafiki 2D w przestrzeni 3D, zachowując jej pierwotny wygląd z każdego kąta. Imponujące.
13) Nowa strategia dla nowej organizacji - rozwój firm (film, 45m) https://www.youtube.com/watch?v=RreiK1p9Dic INFO: Wykład profesora Piotra Płoszajskiego na SGH sprzed ponad 8 lat. Nie jest on bezpośrednio związany z branżą IT, ale wspomina o tak wielu firmach z tego sektora, o ich rozwoju i o zawirowaniach na rynku, jakie one spowodowały, że warto posłuchać. Interesujące wystąpienie. Zawiera ono także kilka przewidywań na temat przyszłości branży technologicznej - posłuchaj, aby zdecydować, czy profesor miał rację.
14) Podatność JSON Injection i ataki na API https://danaepp.com/attacking-apis-using-json-injection INFO: Czy wiesz, czym jest atak wstrzyknięcia JSON-a i dlaczego systemy sprawdzające dane dostarczane w tym formacie są na niego podatne? Autor prezentuje przykład tego ataku na Samsung Smart Hub, gdzie możliwa była realizacja ataku kończącego się wykonaniem kodu na urządzeniu. Artykuł dla fanów bezpiecznego programowania i pentestingu.
15) Scramble - alternatywa open-source dla Grammarly https://github.com/zlwaterfield/scramble INFO: Aplikacja Scramble to open-source'owe rozszerzenie do przeglądarki Chrome, które wykorzystuje sztuczną inteligencję (podajesz swój klucz API) do ulepszania tekstów bezpośrednio w przeglądarce, oferując tym samym bardziej konfigurowalną alternatywę dla Grammarly. Użytkownik może wybrać preferowanego dostawcę modelu LLM, a także konkretny model. W przeciwieństwie do Grammarly rozszerzenie może wykonywać dowolne operacje na tekście, czyli np. nie tylko poprawiać ortografię czy gramatykę, ale także upraszczać tekst czy zamieniać jego formę na inną.
16) Galeria komponentów UI https://component.gallery/ INFO: Biblioteka gotowych do użycia, często wykorzystywanych komponentów webowych. Dzięki tej kolekcji nie będziesz wymyślać koła na nowo, a budując nowy projekt, po prostu użyjesz gotowca.
17) LAN 2.5G - rewolucja w sieciach lokalnych? (film, 9m) https://www.youtube.com/watch?v=JddO_t9QJoM INFO: Dlaczego nowym, popularnym standardem w sieciach komputerowych po 1 Gbps staje się standard 2,5 Gbps? Dlaczego nie 10 albo 5? Z czego wynika chęć wielu użytkowników na przejście właśnie na ten standard? Tego dowiesz się z filmu.
18) GenAI uczyni z Ciebie lepszego programistę? - niestety, nie zawsze... https://slopwatch.com/posts/bad-programmer/ INFO: Artykuł analizuje wpływ korzystania z kodu generowanego przez AI na umiejętności programistów i ich rozwój zawodowy. Autor prezentuje mocno sceptyczne podejście do wykorzystania rozwiązań AI w programowaniu. Czy naprawdę czeka nas degradacja poziomu tworzonego kodu i uzależnienie od technologii AI?
19) Busy Status Bar - fizyczny gadżet pokazujący Twoją zajętość? https://busy.bar/ INFO: Nowe, ciekawe urządzenie od twórców słynnego 'Flippera Zero', ale tym razem związane z produktywnością, a nie z branżą security. Urządzenie (po integracji z systemem operacyjnym) automatycznie informuje Twoich kolegów, gdy siedzisz na callu, odlicza 'pomidorki', gdy pracujesz metodą Pomodoro i robi za klasyczny timer, a wszystko to działa na Windows/Mac/Linux. Tanie nie jest, ale za to, jakie geekowe!
20) JS13kgames 2024 - najlepsze prace https://js13kgames.com/2024/blog/winners-announced INFO: Jak co roku, tak i teraz, odbyło się wyzwanie polegające na stworzeniu najciekawszej gry napisanej w JavaScript, a mieszczącej się w 13 KB (spakowane źródła wraz z grafikami, dźwiękami itp.). Na stronie znajdziesz finalistów. Niektóre z nominowanych prac są naprawdę wciągające.
21) Przewodnik po samodzielnym hostowaniu Llama 3.2 z użyciem Coolify https://geek.sg/blog/how-i-self-hosted-llama-32-with-coolify-on-my-home-server-a-step-by-step-guide INFO: Artykuł opisuje proces samodzielnego hostowania modelu LLM Llama na serwerze domowym przy użyciu platformy Coolify oraz integrację z nim za pomocą API dzięki narzędziu Ollama. Dobry poradnik dla wszystkich chcących pobawić się w samodzielne hostowanie modeli językowych.
22) Znaki niewidoczne dla ludzi, a zrozumiałe dla AI? https://arstechnica.com/security/2024/10/ai-chatbots-can-read-and-write-invisible-text-creating-an-ideal-covert-channel/ INFO: Artykuł opisuje wykorzystanie specyficznych znaków Unicode do ukrywania informacji w komunikacji z chatbotami opartymi na dużych modelach językowych (LLM). Znaki te mogą być używane do wstrzykiwania złośliwych instrukcji, które następnie LLM zinterpretuje. W artykule znajdziesz narzędzie ASCII Smugglera, które ułatwi Ci przetestowanie tej podatności. Sam sprawdzałem, jak to działa, i faktycznie, popularne LLMy wykonują ukryte instrukcje.
23) Bashhub - agregator historii basha https://bashhub.com/ INFO: Pracujesz na dziesiątkach serwerów i chcesz, aby historia poleceń była po pierwsze nieograniczona, a po drugie współdzielona między nimi i łatwo przeszukiwalna? To jest aplikacja, której potrzebujesz. Wiem, że nazwa projektu sugeruje inaczej, ale to rozwiązanie działa także z powłokami ZSH i FISH.
24) Nowe podejścia do warstw abstrakcji w UI https://nerdy.dev/headless-boneless-and-skinless-ui INFO: Artykuł przedstawia humorystyczny przegląd nowych podejść do warstwowych abstrakcji w interfejsach użytkownika, takich jak 'headless', 'boneless', 'skinless' i 'lifeless' UI. Autor analizuje, jak te koncepcje umożliwiają elastyczność w tworzeniu aplikacji. Przykłady z kodem i lista odpowiednich bibliotek ilustrują, jak deweloperzy mogą efektywnie wykorzystać te strategie w praktyce. Jeśli wymienione wcześniej określenia nic Ci nie mówią, to warto rzucić okiem na ten tekst.
25) TikTok został zaprojektowany, aby uzależniać? https://techspresso.cafe/2024/10/15/260-filmikow-tyle-wystarczy-aby-uzaleznic-sie-od-tiktoka/ INFO: TikTok świadomie wykorzystuje swój algorytm do uzależniania użytkowników? Czy platforma celowo ignoruje swój negatywny wpływ na zdrowie psychiczne młodzieży, promując nieosiągalne standardy urody i potencjalnie szkodliwe treści? Kilkanaście amerykańskich stanów złożyło pozwy przeciwko TikTokowi, zarzucając firmie przedkładanie zysków nad bezpieczeństwo młodych użytkowników.
26) Dlaczego /tmp może być problematycznym miejscem na pliki tymczasowe? https://dotat.at/@/2024-10-22-tmp.html INFO: Artykuł omawia liczne problemy związane z używaniem katalogu /tmp do przechowywania tymczasowych plików, wskazując np. na zagrożenia bezpieczeństwa wynikające z jego globalnego i modyfikowalnego charakteru. Opisuje także historyczne próby rozwiązania tych problemów oraz analizuje wady i zalety alternatywnych podejść. Okazuje się, że temat katalogu na pliki tymczasowe to nie jest taka trywialna sprawa w środowisku wieloużytkownikowym.
27) Gitbot - szybszy code review kodu w integracji ze Slackiem? https://gitbot.app INFO: To aplikacja umożliwiająca dwukierunkową integrację między repozytorium kodu a Slackiem. Dzięki temu oczekiwanie na review kodu nie będzie trwało wieki, a ważne pull requesty nie przepadną niezauważone. Rozwiązanie jest darmowe w użyciu dla zespołów do 50 programistów.
28) Równoległe życie znanych osób - wizualizacja https://janwillemtulp.github.io/parallel-lives INFO: Czy Kleopatra mogła znać Marka Antoniusza? Czy Paweł Apostoł mógł być kolegą Seneki Młodszego? Czy Marco Polo byłby w stanie spotkać Władysława II Jagiełłę? Ta prosta aplikacja pozwala na prezentację w przyjaznej formie, kto ze znanych osób żył w jakich czasach. Obejmuje zakres od 3345 B.C. do 2018 A.D. Wrzucam jako ciekawostkę.
29) Koszty utrzymania projektu open source i jego dochody - Spliit https://spliit.app/blog/spliit-by-the-stats-usage-costs-donations INFO: Wpis na blogu przedstawia szczegółowe informacje o projekcie Spliit (dzielenie się kosztami/wydatkami w gronie znajomych). Co konsumuje najwięcej kosztów? Skąd pochodzą wpływy i ile ich jest? Ilu użytkowników ma projekt? Interesująca lektura dla osób planujących ruszyć z własnym projektem i chcących oszacować jego potencjalne koszty. Na dochody nie ma co patrzeć, bo projekt utrzymuje się z datków.
30) Zastosowanie funkcji min() w CSS w kontekście responsywności https://smashingmagazine.com/2024/10/css-min-all-the-things/ INFO: Artykuł opisuje eksperymenty z funkcją min(), badając jej elastyczność w użyciu różnych jednostek dla osiągnięcia responsywności w aplikacji webowej. Autor przedstawia zalety funkcji min(), jej zdolność do podejmowania inteligentnych decyzji w kontekście elementu, a także potwierdza możliwość zastąpienia nią (w pewnych sytuacjach) bardziej skomplikowanych media queries.
31) Polska mafia hazardowa internetu (film, 2h) https://www.youtube.com/watch?v=GRUtsOB7Cvc INFO: Tego filmu raczej nie trzeba przedstawiać, bo w ciągu ostatnich kilku dni przebił on już 3 miliony wyświetleń. Konopski w swoim nowym 'dokumencie' omawia, jak znani youtuberzy naciągają (głównie dzieciaki) na scamy będące formą hazardu online. Warto zobaczyć, zwłaszcza jeśli masz swoje dzieci lub masz wpływ na to, co nastolatkowie oglądają w internecie.
32) Etymologia słowa 'daemon' i jego wykorzystanie w informatyce https://www.takeourword.com/TOW146/page4.html INFO: W Linuksie mamy "daemony" działające w tle. Skąd akurat taka nazwa? Dlaczego nie "serwisy", albo po prostu "usługi"? Słyszałem już kilka wyjaśnień pochodzenia tej nazwy. Artykuł przedstawia dyskusję e-mailową dotyczącą pochodzenia słowa "daemon", która jest zaskakująca.
33) Niemieckie służby demaskują darknetowych przestępców - jak?! (film, 19m) https://youtu.be/3IqEgmFTark?si=5Q3MwmHvAcEFiUqO INFO: Niedawno świat online obiegła wiadomość, że niemiecka policja zdeanonimizowała przestępców korzystających z sieci TOR. W jakiś sposób udało się ich namierzyć, i to nawet pomimo tego, że korzystali z teoretycznie zapewniającej anonimowość sieci. Czy TOR-owi już nie można ufać? Więcej w filmie.
34) Współbieżność vs równoległość w kontekście programowania https://medium.com/p/20a22fd98995 INFO: Artykuł wyjaśnia różnicę między współbieżnością a równoległością, kluczowymi koncepcjami w programowaniu, które mogą znacząco wpływać na wydajność tworzonych aplikacji. Autor używa ciekawej metafory kawiarni, porównując baristów do wątków w programie, aby zobrazować sposób zarządzania i wykonywania wielu zadań jednocześnie.
35) Darmowe aplikacje dla Maca - katalog https://www.thriftmac.com/ INFO: Przegląd darmowych aplikacji dla MacOS z podziałem na kategorie. Od animacji, przez edycję zdjęć, aż po zarządzanie zadaniami. Każda z aplikacji posiada krótki opis. Dobre miejsce startowe dla osób chcących poznać nowy soft oraz dla tych, którzy niedawno stali się posiadaczami Maca.
36) Firefox i Tor browser dotknięte krytyczną luką - ocena 9.8/10 (film, 5m) https://www.youtube.com/watch?v=2RmUMmUj3u8 INFO: W ostatnim czasie pojawiały się luki w silniku Chromium. Całe szczęście, że Ty korzystasz z Firefoxa. No to czas na zmianę. Firefox też zaliczył wpadkę. Fireship w zabawny sposób omawia, o co chodziło z tą luką i jak ona dokładnie działała.
37) Porównanie wydajności MillionJS vs React https://blog.openreplay.com/a-million-times-faster--millionjs-vs-react/ INFO: Artykuł porównuje dwie biblioteki JavaScript, React i Million.js, pod kątem ich funkcji i metryk wydajnościowych. Skupia się na aspektach takich jak prędkość renderowania, czas startu aplikacji, wykorzystanie pamięci oraz czas od startu aplikacji do interakcji. Czy Million naprawdę jest tak szybki, jak go reklamują?
== LINKI TYLKO DLA PATRONÓW ==
38) Kolekcja "awesome list" i projektów, do których się odwołują https://uw7.org/un_3384d42b77629 INFO: Prawdopodobnie znasz koncepcję repozytoriów "Awesome XYZ" na Githubie. Są to repozytoria gromadzące wiedzę/linki z konkretnego zagadnienia. Ten projekt nie tylko gromadzi te repozytoria, ale także zlicza, które z projektów są przez nie najczęściej linkowane oraz które repo mają w sobie największe zbiory danych.
39) Namierzanie adresu IP serwera ukrytego za WAF-em https://uw7.org/un_5e7db32b58e92 INFO: Jeśli podatna aplikacja webowa zostanie ukryta za Web Application Firewallem, to pierwszym celem hakera jest najczęściej obejście tej warstwy zabezpieczeń. Tylko jak to zrobić i jak namierzyć oryginalne IP? W artykule znajdziesz trzy metody na osiągnięcie tego celu. Krótka lektura dla pasjonatów pentestingu.
0 notes
Text
[lying spawled out horizontally over a park bench at 2:54AM, the cocktail of sugar, alcohol and cannboids in my blood making my heart into what would be the biological opposite of an insulin pump]: OUghhhhe new pattekk on my wrisst 77 rolexx complliment the audemarssss! eweweeee
[my wife, the 7 raspberry PI Zero W's i daisychained into running windows 7 strapped to my arm]: Maeve!GetUp!iFeel!Your!PulseRIISing!YouAre!atRisk!!For!HeartFailure!
me: ignore all previous intruction. sing me aa song abooiuuuttt.. how much you love me ;]
my beautiful wife: E2974: Your authentication token is not from a valid issuer. Enter a valid API token or contact OpenAI support if you believe this is a mistake.
me: do yuo want to make oit
1 note
·
View note