#ScriptableObject
Explore tagged Tumblr posts
Visit Tumblr Blog
Explore Tumblr blogs with no restrictions, modern design and the best experience.
Last Seen Tumblr Blogs


Fun Fact
Tumblr has 411 employees.
Text
ScriptableObjects for Weapons
A recent GameJam gave me a chance to jump into Scriptable Objects for my weapons system. Generally I work with enums to build the framework for reuseable components and shared object parameters, but this worked nicely as well.
Here's a reusable Unity C# script for managing weapon pickup and switching. This script allows your character to pick up different weapons, each with unique attributes like damage, fire rate, and prefab.
Setup Steps:
Create Weapon Scriptable Objects: Define each weapon as a ScriptableObject for easy customization.
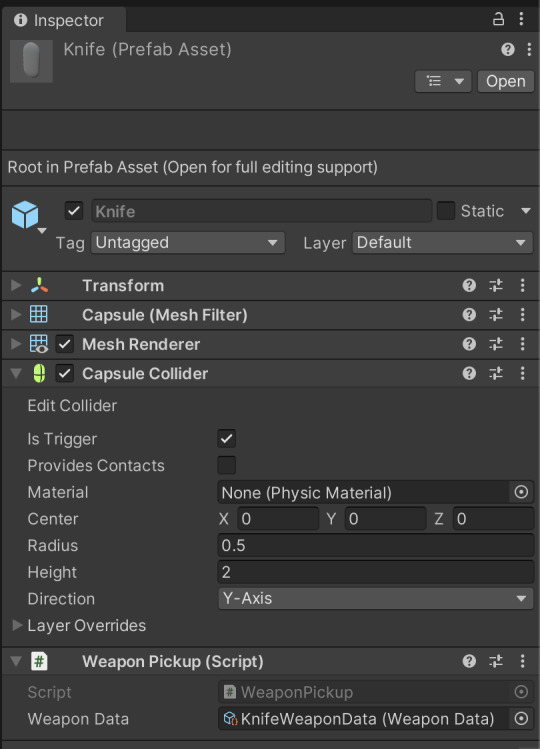
Attach Pickup Script to Weapons: Add a trigger collider to each weapon prefab and apply this script.
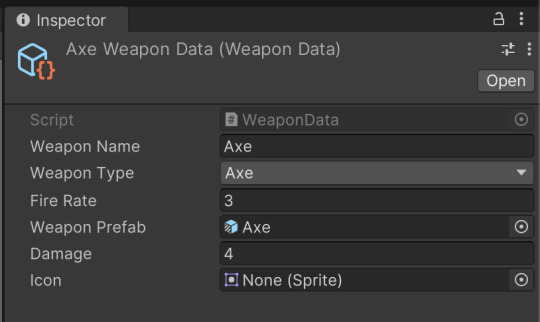
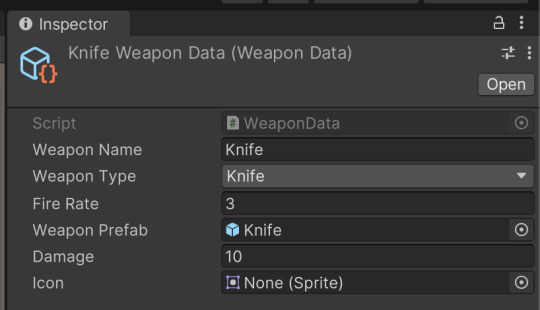
1. Weapon ScriptableObject (WeaponData.cs)
using UnityEngine;
[CreateAssetMenu(fileName = "NewWeapon", menuName = "Weapons/Weapon")]
public class WeaponData : ScriptableObject
{
public string weaponName;
public WeaponType weaponType;
public float fireRate;
public GameObject weaponPrefab;
public int damage;
public Sprite icon; // Optional: For UI representation
public enum WeaponType { Axe, Knife, Sword, Bow }
}
2. Weapon Pickup System (WeaponPickup.cs)
using UnityEngine;
public class WeaponPickup : MonoBehaviour
{
public WeaponData weaponData; // Assign the weapon data in the inspector
void OnTriggerEnter(Collider other)
{
if (other.CompareTag("Player")) // Ensure the player has a "Player" tag
{
PlayerWeaponManager weaponManager = other.GetComponent<PlayerWeaponManager>();
if (weaponManager != null)
{
weaponManager.PickupWeapon(weaponData);
Destroy(gameObject); // Destroy the weapon pickup object after pickup
}
}
}
}
3. Player Weapon Manager (PlayerWeaponManager.cs)
using System.Collections;
using System.Collections.Generic;
using UnityEngine;
public class PlayerWeaponManager : MonoBehaviour
{
public Transform weaponHolder; // Assign an empty GameObject where weapons will be held
public GameObject currentWeapon;
public WeaponData currentWeaponData;
public void PickupWeapon(WeaponData newWeaponData)
{
// If the player already has a weapon, destroy it
if (currentWeapon != null)
{
Destroy(currentWeapon);
}
// Instantiate the new weapon prefab and set it as a child of the weapon holder
currentWeapon = Instantiate(newWeaponData.weaponPrefab, weaponHolder.position, weaponHolder.rotation, weaponHolder);
currentWeaponData = newWeaponData;
}
// Example method to simulate attacking
public void Attack()
{
if (currentWeaponData != null)
{
Debug.Log($"Attacking with {currentWeaponData.weaponName}, dealing {currentWeaponData.damage} damage.");
}
}
}
How to Use:
Create Weapon Data:
Right-click in the project window.
Select Create -> Weapons -> Weapon Data.
Configure attributes like name, damage, fire rate, and assign a weapon prefab.
Create Weapon Prefabs:
Design a weapon prefab with a trigger (Box, capsule, etc.) and then add a checkbox for "IsTrigger"
Add the WeaponPickup script and assign the WeaponData ScriptableObject.

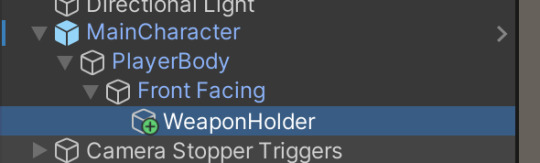
Setup Player:
Ensure the player has a collider with the tag "Player."
Add the PlayerWeaponManager script to the player.
Create an empty GameObject (e.g., WeaponHolder) as a child of the player, and assign it in the weaponHolder field.
Customizable Features:
You can extend WeaponData with additional attributes like ammo, reload time, or special effects.
Enhance PlayerWeaponManager to switch between multiple weapons or add weapon dropping functionality.
This script allows you to create various weapon pickups with unique characteristics, promoting code reusability and easy weapon customization.
0 notes
Text
ENDTHOUGHTS: CA-6 & POKERMAN23

Pokerman is the codename for the underlying card-game engine (not Unity's parts) of the GLITCHYPSI CA-6 game, which was made for Artfight as a means to challenge myself in a gamejam-esque fashion. I was kind of soured by the fact it didn't garner attention by the Artfight staff despite the effort I put into it, but even in light of that, I have employed techniques that I had not used before which have increased my confidence as a game developer, and I kind of enjoyed it even if I pulled an allnighter to complete this one in time, with my job and all...
Pokerman started as an exclusively CLI application, as my approach this time was to separate the actual card game logic from the game itself. Kind of an engine-frontend separation, which would allow the engine to be extensible and also ported to many other "frontends" if so I wished, so the game could exist in Unity, maybe even MonoGame, as a webapp with a C# backed server, and so on.
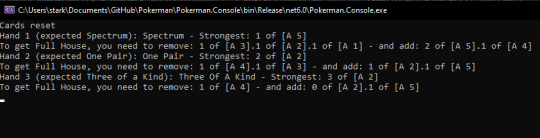
I worked on the "dealer" and card values first. The way the engine is set up is that every hand is its own instance that checks a hand's cards, and if it matches, it puts itself as the "Hand result" for that hand, and that is used to determine the weight of the hand, which can be compared to other hands to decide which is stronger.
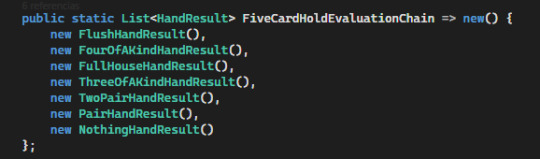
This approach makes it easy for me to add new hands, for instance. Currently, the only existing Hand Results are all the results that pertain to the 5-card hold rules with no jokers.
What the engine does is use a set of hand instances and check from strongest to weakest until the first one yields true. The last one will always happen, as it is the bogus hand. The only chain is, as expected, the 5-card hold one.
This, the hand weight comparisons, and the tie mechanics were perhaps the places I debugged in the most to check for potential pitfalls. With the console and specific non-automated tests, it was kind of easy and fun, although... the code... might use some work.
Next I worked on the AI. With all the ML fuzz I must state that this AI is merely a random chance AI. No machine learning is involved in this AI.
All this AI does is look at a chance table given a number of cards to replace which determines the chances of getting the wanted hand with X cards to replace. The table is precomputed. (1 = 100%)
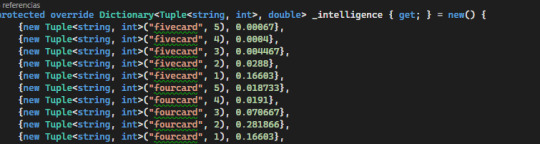
Some of the values may be probabilistcally wrong. My combinatorics aren't as polished as they used to be, and instead of using raw math I took a simpler approach and used the engine itself to generate 10k pseudorandom (System.Random() .NET 6 implementation) draws to determine a percentage. However, for the purposes of the game engine, and given extreme precision was not necessary, it's acceptable.
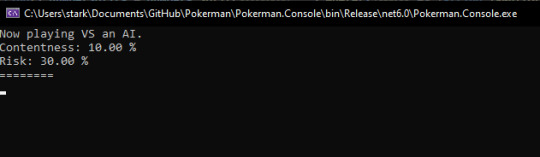
Risk and Contentness were a pair of values that determined whether the AI would risk discarding their current hand for a stronger one. Contentness was tested for first. If it met the margin, it would draw no new cards. Riskiness was tested for last. If it met the margin, it would go up one hand in terms of hand weight to aim for. It then gave back the result evaluation that it desired to get the cards for, or, if content, the actual hand (signifying contentness with the current hand).
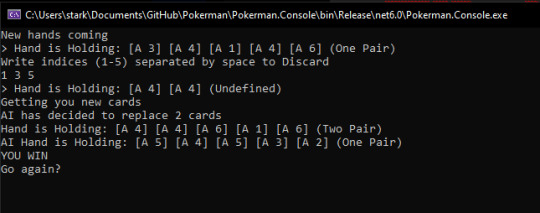
It would've made a fair game with a degree of difficulty that wasn't ever the same, and the AI risk and contentness parameters can be changed at any moment during runtime.
This was all for the underlying engine. Next was to actually link all these faceless bits of data to something the player could interact with...
...and while at work, when I had completed all my assigned development projects (under supervision of my boss, so I was not just slacking!!!) I made a placeholder set of cards.
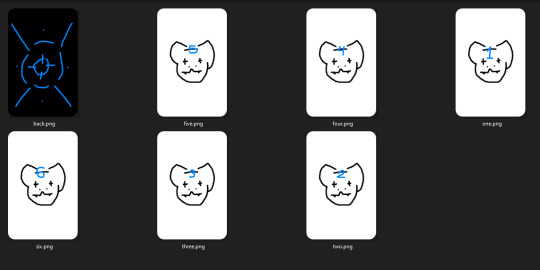
These were used to make a Unity ScriptableObject. This was also my first time working with ScriptableObjects themselves, but a dear friend had shown me their power before and I was raring to try them out for this project.
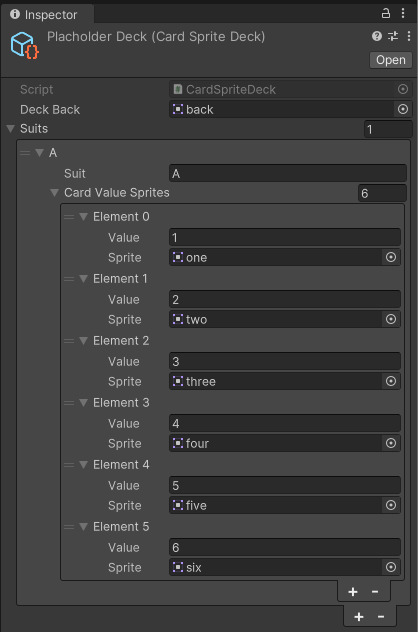
The data is reminiscent of the Pokerman Engine Card (structure below), with added relevant Unity information.
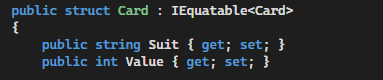
The approach of using ScriptableObjects with their own methods I could call to, for example, get the sprite for a particular Card, was extremely useful, because I could write code once and make seven thousand themed decks if I so wanted.
I used this to make the world-space and GUI space cards that you can touch in the game.
Yes. they DO flip, literally. It was the easier way to do this, and in the context of the game (and shader used) you couldn't just cheat out of that.
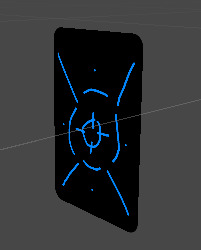
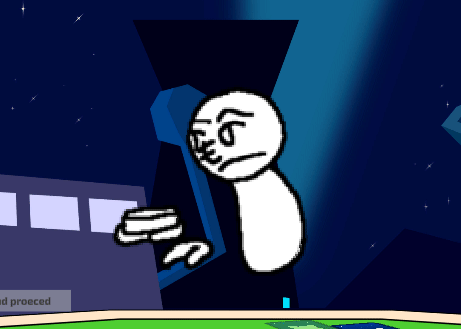
After the cards were set in place, it was time to make the dealer..................................... oh mama
The assets often are the hardest part of these things. They take so long because animations are something else. The first dealer was
hm
this.
Yes, that is positively a Henohenomoheji.
It was simple, sketchy and scratchy, which was perfect to test out animations with. Lord, it did take some time still. Animating is hard. Praise animators.
I had some fun playing with it, not gonna lie.
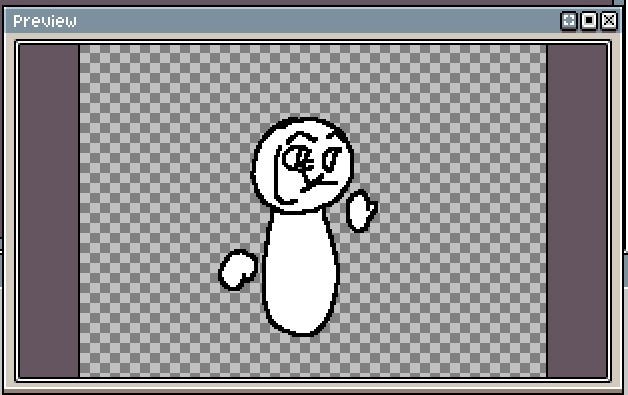
After all this, it was time for the real deal.
Oh boy. Remember when I said animation was hard? With such tight timeline to work with and having to work in my usual artstyle?
Yeah. Look at this.
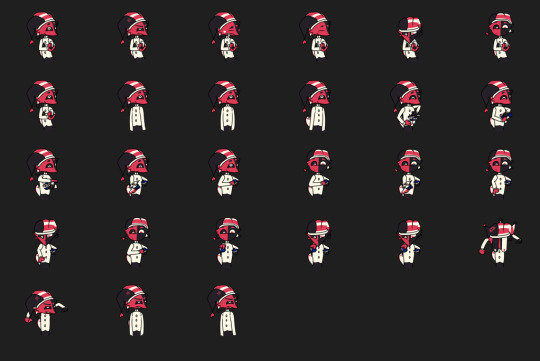
This took me a relatively mean amount of hours (entire afternoon), and it was the final day I could work on this game by the time I had started making this spritesheet.
It is composed of individual parts to make my life easier and then put together in Aseprite. It was probably the part that took me the most time out of everything else asset related. It even still has some flaws, such as the body sometimes shifting positions between frames. My bad.
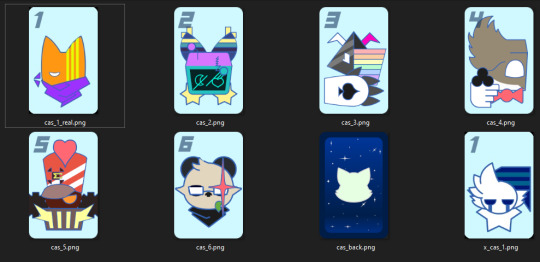
After that I worked on the cards. They were abstract-ish representations of the characters I had chosen to become cards as part of my Arfight gimmick for this year, and a Casandra themed cardback.
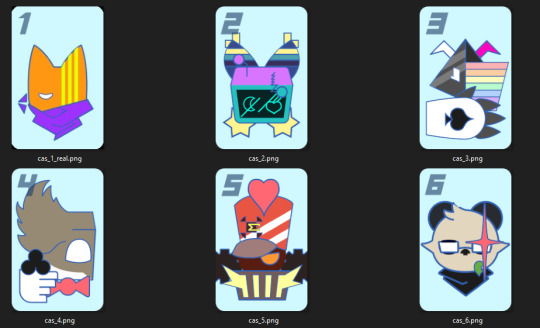

Fun fact. Card with value 1 was gonna be somebody different.
After everything was put together......... it was time for the audio. I left audio for last. I suck at music. I have said it once I will keep saying it and it does NOT seem to be getting any better, and it was not going to improve within the remaining 12 hours I had to work on the game. I could not afford time to laze off in FL Studio when I had to polish some stuff to make the game get out there. I wasn't confident in my music skills at all (in contrast to my programming and graphics skills).
I got some sfx from freesound and edited it to match, and used some of the stream assets for other sound effects related to the coins (taken straight from Mario Party 3, ha ha)
The music track... I had asked another dear friend about it when development was still in the console-app stage, but they said they wouldn't be available for such. So, I just left it for the very last moment. I was then SCRAMBLING to find a nice track to use that would not get me in trouble (I did not use Luigi's Casino's track for this reason), so I looked where I get some of my tracks I play while programming, and settled on this one...
youtube
I liked it for the ambience (background) I pulled at the last minute (because I HADN'T even drawn the background then yet!!!) and with that, it just needed to be polished and uploaded to itch and Artfight (most importantly Artfight!!!!)
I pulled an allnighter finishing the final details of the game and authoring the page for it in itch. I had done allnighters before for other games I had made for people I cherished (although those are... probably better left in the past now.)
And so while at work I published the game and posted it on Artfight.
It sure was a ride and yes I will mention again I am sort of mad I was not even mentioned among the games that were highlighted in the final Artfight blogpost despite all the effort I put into it. However... the people the game featured really liked it, and that warmed my heart and justified my effort, as well as what I learned while making it.
This game was a promise to myself to complete, since in 2021 my computer was stolen while I was making a Subway Surfers clone for the same reasoning. I wanted to get it done by all means necessary, and I can now reliably say I have completed my goal.
Hope you enjoy the game. I am going to polish it a little bit more and upload it to Newgrounds at a later date... but no more allnighters over it.
It's done. It's cute, it's small, and it's something I should've done when I first started my gamedev career instead of trying to lift the big pumpkins first without any muscle.
Maybe I'll make Pokerman open source... or make another game using it, extending it to be able to properly handle Hold'Em Poker.
Want to play the game? Click "CA-6" in the title of this post.
7 notes
·
View notes
Text
Sinew Devlog #3
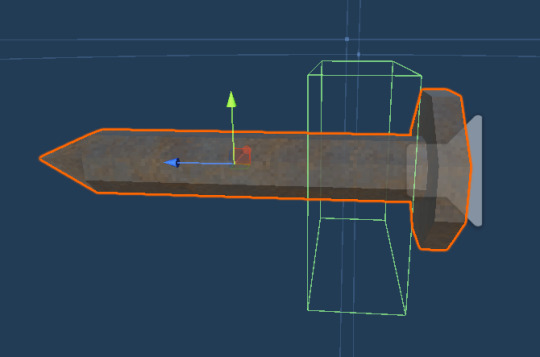
It's been a while since my last post, and a lot has been added, but ironically not all of the last update's goals have been completed. Most of the work done has been mechanics; I ended up changing the player controller a couple times. Originally, I was using Unity's Character Controller component to handle movement, but I decided that I wanted to use a Rigidbody-based movement system instead. Initially my Rigidbody controller used a force-based application, but then I changed it to an acceleration-based system. Switching to the Rigidbody system introduced a lot of challenges, most of which were things that were things that the Character Controller component handled automatically, like slope detection, sliding, and generally the simplicity that a non-physics-based approach provides. Ultimately, however, my controller ended up being great for what I wanted, and I learnt a lot about vector math, and how manual slope detection is done. Honestly, I was pretty proud of how well it came out, and being able to navigate and fix the issues that arose. I also introduced the gun and bullet systems using ScriptableObjects. The only weapon at the moment is the Nail Gun, which I think ended up being great. (Don't mind the overly loud background ambience 😭).
I added shooting animations, sounds, and a nail bullet with its collider towards the head so it sticks through objects.
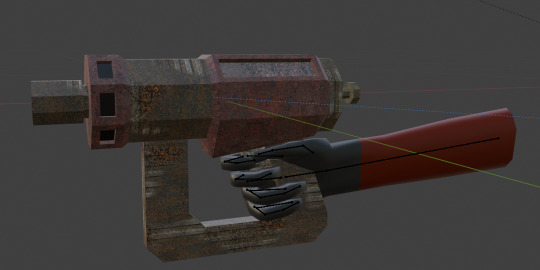
The nail itself plays a sound when it collides with something (as well as stopping, being parented to the hit object, and instantiating a spark particle effect). Furthermore, I added hand models as children to the weapon: one that simply holds it (I might still add a trigger pull animation) and one that shows up when the player reloads (will probably improve it 😸). I suppose this leads to the enemy I've added, called a sakan. Sakans are EPK workers who have been tainted by biodiesel, the circumstances around their transformation are not yet known.
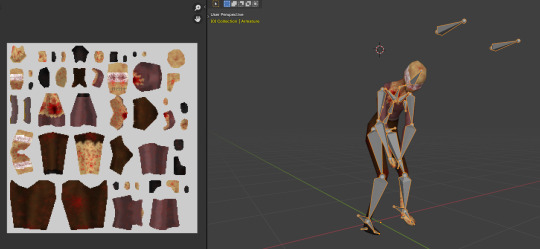
I was really happy how the model and texture came out, especially considering I did it all with Blender's Texture Paint mode (Texture Masks were a great improvement to my texturing workflow). Rigging and animating was pretty difficult, with the main challenge being a really weird distortion issue when the knee would snap the wrong way after a certain angle. I spent ages trying to figure out how to fix it and tried everything I saw before I just raised the poles way further in the air, something which I did not find online by the way, lol. But I got there in the end and the IK's were super useful in creating the animations.
youtube
The Sakan enemy, which I used to construct the Enemy base class, has several behaviours for its AI: it patrols, randomly picking a point on the NavMesh in its patrol range, chases the player when they are in its sight range (uses a ray cast to check if it is actually visible), and will chase the player's last position if the player gets out of sight while the Sakan is chasing them. Additionally, I added a patience variable that controls how long the Sakan will try to reach the player when the player is "inaccessible" e.g. standing on an object or generally outside of the NavMesh. When the player enters its attack range, it will play the attack animation, which I will definitely improve, but at the moment its attack doesn't do anything (I will just need to add a trigger collider that calls the player's "TakeDamage()" function). I'm pretty happy with how this enemy turned out, and when I add sounds to it (especially when it notices the player) I think it will add a lot to the experience. I also added another enemy, called a Limus, who act as more of a hazard, as they cannot be killed. They have three limbs which can attack independently and emerge in places where there is leaking biodiesel.
youtube
(This video also shows the fire hazard which damages the player - the hazard class has lots of options, but at the moment only "Instant Damage" and "Burn" have functionality). I'm quite proud with how this enemy turned out, but I had a bunch of problems when importing animations which I found were ultimately due to me having a bunch of vertices in the mesh that hadn't been assigned a bone/vertex group/weight, so even though the animations looked fine in Blender, once imported a lot of the mesh was being influenced by the Idle animation, or stretching.
I also made the fluid shader (with help from Alexander Ameye, MichaelsGameLab, & Unity's water shader tutorials) which ended up great.
youtube
I added texture scrolling to make the pipeline feel busier and added waterfalls for the vertical pipes and outfalls. In this video you can also see the updated underground section, which hasn't been fully detailed like I had planned from my last progress update, but I have added the second level to the initial room as well as a ladder (that isn't currently functional).
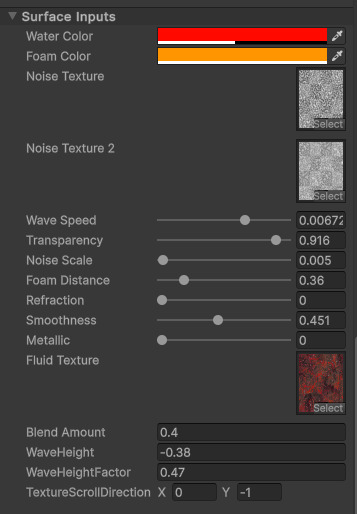

The only hang up I have with the shader is that the flow direction is just based on a two-dimensional scroll direction, which means that at corners there is a relatively obvious change in direction so it doesn't tile, and I did consider finding a way to warp the UV's to follow a path or curve, but I decided I'd stick with this approach, which I think is fine for my game's retro art style (as well as the pixel filter, post-processing, and movement of the fluid hiding it somewhat).
This is the escape room so far, which is what I'm working on right now, which includes a few new models like the metal sheet, concrete chunks and dirt pile, as well as the fake godray cone for the lights, which I think look great. There is definitely other stuff that I did that didn't make it into this devlog (especially related to the player controller) but I've included the bulk of it. Thanks for reading!
Ader Forþgan!
1 note
·
View note
Text
13/02/2024
I gave another crack at saving and loading data and with godot's Resources being read only in comparison to unity's ScriptableObjects being so easy to overwrite makes this feel SO MUCH EASIER.
I only started with saving and loading checkpoints but in just a few days I also managed to make the saved checkpoint reset on exiting a level so you just go back to the start of the level which is what I didn't do last time on the 3D project. Although with the way i have it set up I'll still need to stop the checkpoint from loading when you simply enter a different room in the same level.
1 note
·
View note
Note
Very cool stuff with the dialogue system, with each holding a reference to the next DialogBlock. Your explanation of the structure really helped me out, I have always tried to use an array of strings which ends up being a dead-end ... so if I understand correctly, the DialogBlocks are all attached to the NPC and just reference each other by being on the same GameObject?
That’s about right. To be more precise, they don’t reference each other because they are on the same GameObject, they reference each other because of the values contained in their asset file. Remember that ScriptableObjects are asset files, just like AudioClips or Textures. Usually, the inspector would show the import settings for assets, but in the case of ScriptableObjects, they show the public variables of the class you created. Therefore, setting the references between the DialogBlocks is just like tweaking import settings: you do it once and the asset is set for the whole project.
A little trick for simplicity is to define the class like this:

This will create a menu item to easily create the asset:

With all the DialogBlocks linked between each other correctly, all you ever need is one Dialog set to a NPC (remember that Dialog is the class I use to reference a first DialogBlock of a conversation) and the DialogManager will handle looking into the DialogBlock asset data to find what the next one will be.
18 notes
·
View notes
Photo

En este webinar online gratuito y en directo: Webinar del Bootcamp de Programación Avanzada con Unity CUÁNDO: Miércoles 15 a las 19:00 URL -> https://bit.ly/39RxhFH URL -> En la BIO - David Cuenca Diez (Docente) Lead Game Developer - Pau Elias (Docente) Game designer, Artist & Producer -Roger Montserrat (Moderador) Bootcamps & Academy Manager de Level Up Todos ellos gozan de una amplia experiencia en el sector de la industria del entretenimento y los videojuegos habiendo trabajado para empresas como Quantion, Chloroplast Games, Maria Barcelona y Azurite Techs; A lo largo del webinar detallaremos y explicaremos la metodología de trabajo y los puntos clave de especialización que los alumnos/as habrán adquirido al finalizar la promoción: #Monobehaviour: La piedra angular del scripting en #Unity - Gestión planificada de los scripts: Planificación de los #scripts según su función y organización avanzada de la estructura interna. - #Optimización de procesos cíclicos: Desuso del bucle Update y uso de bucles acotados con #corrutinas, eventos y métodos delegados. - #Arquitecturaescalar y flexible. Aplicación de los principios de programación. - #Sistemasfuncionales eficientes: Desarrollo con #patronesdediseño - #ScriptableObjects: La revolución de sobre la tiranía del Monobehaviour. - #EntityComponentSystem: El nuevo paradigma de programación. Rendimiento máximo con el uso del Entity Component System. Ven y pregunta lo que quieras a los profesores, además regalaremos cupones del 5% para nuestros bootcamps a los asistentes del webinar. Este charla orientativa forma parte de una formacion online u offline planteada en varias modalidades que contienen tutorías, mentorías y seguimiento personalizado para el estudiante: - Modalidad intensivo presencial - Modalidad semipresencial - Modalidad 100% Online https://www.instagram.com/p/B-wmz15qAzq/?igshid=1ook4isyc8hq5
#monobehaviour#unity#scripts#optimización#corrutinas#arquitecturaescalar#sistemasfuncionales#patronesdediseño#scriptableobjects#entitycomponentsystem
0 notes
Text
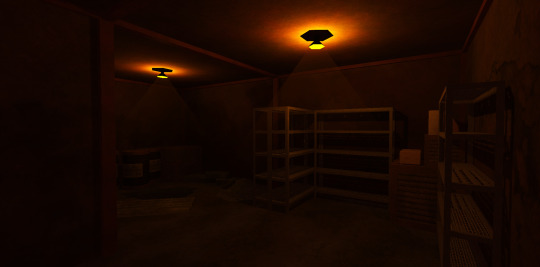
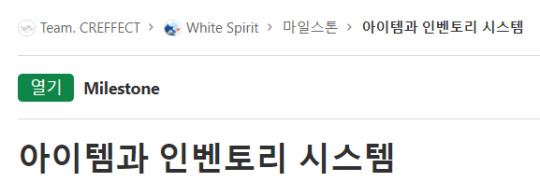
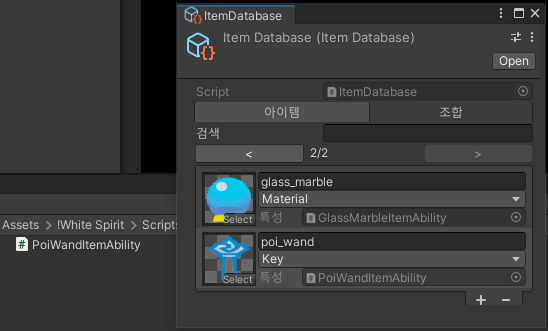
[Second week of 2021.11] White Spirit devlog - Item's potential
Hi, there!
In this week, I implemented one of the game's core systems : Item Traits.
The Item Traits
CC : Item and inventory system
In White Spirit, the item itself has its own traits.
An item can have item traits regardless of whether it is a material item, a consumable item, or a key item.
These will be make minor numerical changes, even some traits will make Poi look completely different (= game play changes) or affect the environment itself.
Items can be obtained from specific locations or NPCs or by combining them.
It pursues the goal in accordance with the theme of exploring the series of processes that the player goes through while exploring and obtaining or combining items.
In particular, the item traits system implemented this time is focused on generating interest in exploration by making big and small changes to the gameplay itself by using items obtained by players while exploring.
However, the White Spirit project also has the character of an action platformer, so I didn't want to force certain players to play this way only because of their needs about action platformer genre.
So, I'm trying to prepare a system that collects money from all over the world and deal with merchant for the desired item.
Because I wanted to make it possible to obtain items from the merchant and provide them with a reward called item traits just by walking around enjoying only the platformer action.
Anyway, first of all, I wanted to avoid having all possible restrictions in terms of design when thinking about something through this system.
So if I need to be able to set item properties very finely, then a script is a must choice, right?
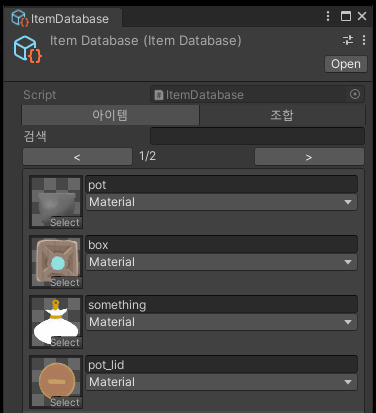
As you can see in the picture, item information is registered through ScriptableObject.
So at this moment, I was thinking about how to clearly connect this to the script...
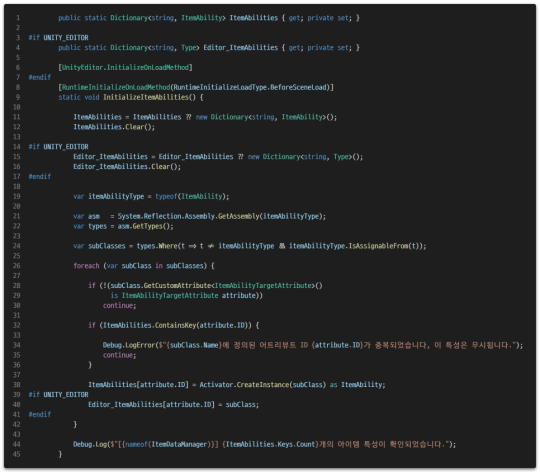
I decided to solve this by caching and linking all item attribute classes by attaching a specific attribute to the class containing the behavior for the item attribute.

The framework of the class you want to cache looks like this.
Item traits allow you to define behaviors when acquired(Acquire), when acquired by craft(Craft), when lost(Loss) from inventory, when used(Use), and when only possessed(FixedUpdate).
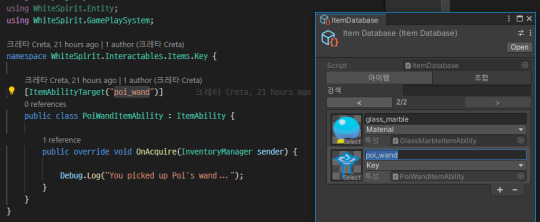
I can then link the trait to the item data in this way, and configure the behavior I want within this trait class.
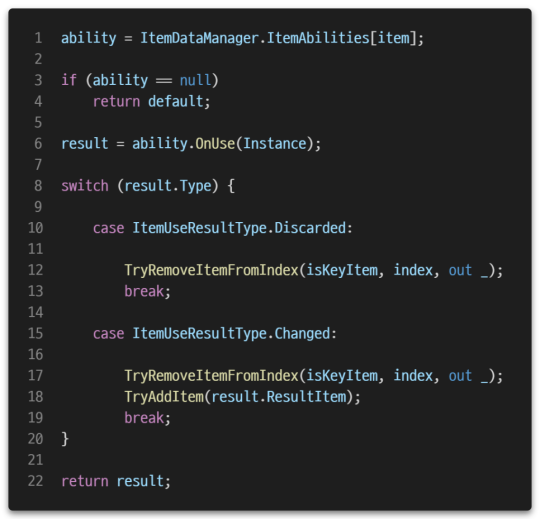
And I made it possible to call actions according to each situation to the data, which is the model role. (Example like the 6th line in the photo)
Finally, I did some extra editor work to make sure this is a good link between the traits and the item, and to be able to modify the traits behavior directly from the item database.

If you want to import a script file as an asset in the Unity editor, you can import it as a MonoScript type with an extension to the asset database.
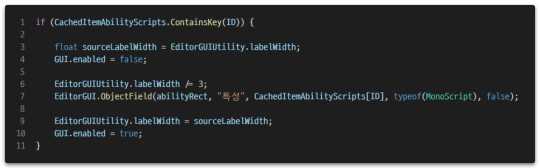
Then, if you pass it to the ObjectField as MonoScript type, you can display the script with the same appearance and behavior as the component's script field shown in the inspector.
youtube
This is how I ended up implementing the item traits system.
CC : Item and inventory system
One big system got the job done.
In next week, I'll make an unfinished playable demo content while thinking about usages of the items.
See you in next week.
1 note
·
View note
Text
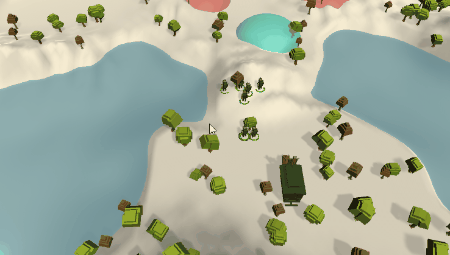
Milestone 2 : le début de la partie
Bonjour et bienvenue pour un nouveau point Habile. Vous êtes maintenant connectés, vous avez choisi votre pseudo, votre civilisation, les doigts sont échauffés et vous êtes prêts à faire exploser les APM ? Et bien cliquez sur le bouton “Play” et découvrez ce qui se passe ensuite !

Le Pre-Game
La partie Pre-Game désigne pour nous toutes les étapes entre l’arrivée sur la scène de jeu (après le chargement) et le début réel de la partie. Notre idée est de créer un système modulable pour pouvoir ajouter/enlever à la volée des étapes avant le début de la partie.
Par exemple, au début du prototype, nous n’avions pas intégré la caméra et grâce à notre système, nous avons pu insérer le module qui la paramètre entre deux étapes sans avoir à toucher à celles-ci. Nous pouvons aussi créer plusieurs modules de spawn (aléatoire, au choix du joueur, …) et switcher très rapidement de l’un à l’autre pour les tester.

Actuellement, la routine de Pre-Game se déroule comme cela : les joueurs indiquent qu’ils sont prêts, quand tout le monde est prêt un point de spawn aléatoire leur est assigné et enfin, chaque joueur récupère ses unités de base (avec la caméra qui va se placer sur le point de spawn).
Premiers systèmes de jeu
Le joueur peut sélectionner ses unités
La sélection des unités n'est pas réinventée, on reste sur des méthodes connues:
Sélection d'une unité par clic gauche
Sélection de plusieurs unités par un clic gauche glissé
Sélection de toutes les unités avec la combinaison Ctrl + A
À cela nous avons ajouté la possibilité d'ajouter ou supprimer des unités à sa sélection en gardant la touche Ctrl enfoncée.

Pour ce qui est de la logique, nous utilisons un manager qui garde en mémoire la sélection et qui communique les changements de cette dernière par des évènements Unity. De cette façon les interfaces et les différents effets n'auront qu'à "écouter" ces changements.
La sélection par groupes précédemment enregistrés et par type est prévue et sera implémentée par la suite…
Le joueur peut déplacer ses unités
Le déplacement des unités est assez classique lui aussi. L'ordre avec la destination est donné par un clic droit sur le terrain, et le chemin à parcourir pour y arriver utilise l'algorithme A* (A star).

Pour la résolution du chemin, appelé "pathfinding", nous utilisons le NavMeshComponent proposé par Unity. Ce composant se base sur une surface 3D précalculée sur laquelle les unités vont trouver leur chemin et se déplacer. Il propose la possibilité de recalculer en temps réel cette surface, ce qui nous sera certainement utile pour suivre les changements de terrains ou l'apparition d’obstacles.

Le petit défi a été de gérer les troupes. En effet, dans Habile vous pourrez déplacer des lots d’unités, et l’on s’attend naturellement à ce que ces unités se placent en rang une fois arrivées à destination. Il a donc fallu déduire, à partir de la position du clic, la destination réelle pour chaque unité afin de former les rangs. Autrement les unités se seraient agglutinées autour de la destination.
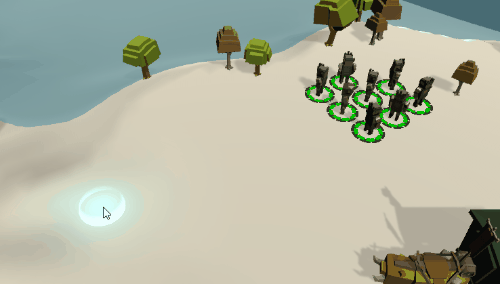
Pour implémenter cette conversion d’un point en un ensemble de points représentant les rangs, nous avons utilisé le design pattern strategy avec des ScriptableObjects (cf Milestone 1). Ainsi, nous pouvons implémenter de nouvelles façon d'ordonner les unités rapidement. En créant une toute nouvelle manière de calculer les points (stratégie), ou en créant une nouvelle instance dans Unity avec de nouveaux paramètres. Ces mêmes stratégies sont utilisées pour placer les unités au début de la partie.

Contrôle de la caméra
Un dernier indispensable pour un RTS c'est le contrôle de la caméra bien sûr. L'objectif a été de permettre :
Le contrôle au clavier ◀️🔼▶️🔽 et ZQSD
Le zoom à la molette
Recentrer la caméra sur les unités sélectionnées
Suivre les unités sélectionnées
Pour la gestion de la caméra nous avons utilisé un autre package proposé par Unity, Cinemachine. Il propose d'origine un ensemble de scripts pour contrôler finement la caméra et pour suivre des groupes d'objets.

Il nous a donc suffit de lier les commandes et de synchroniser l'ensemble d'objets à suivre avec la sélection d'unité.
Et la suite ?
Voilà pour cette Milestone qui a mis en place les bases indispensable du gameplay. Notre prochain objectif touchera un sujet un peu plus concret de Habile, à suivre…
10 notes
·
View notes
Text
I coded some neat decoupled things using ScriptableObjects today. Combatants sign up to an asset that contains all fighters, and one that contains their team mebers only. Train cars sign up into the train list.
Using ScriptableObject assets, I can make the train itself know about these lists, without needing to use singletons.
I might have flooded the game making discord I am in with this.
Anyways, next step: spawn combatants, and place them into the correct train car.
Hm I might need to spawn the train cars too, to avoid... race conditions. I’ll need a battlesetup script, with a list of trains car types and their positon, and a list of combatants and their position... spawn them one by one... Yes, this is what I will do next...
5 notes
·
View notes
Link
1 note
·
View note
Text
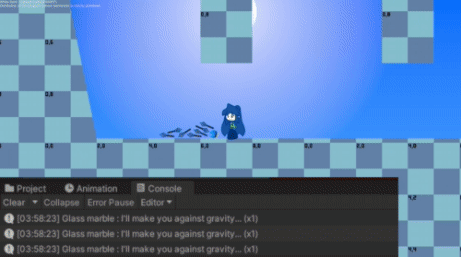
What an awesome feeling, when you’ve been bonking your head against a programming problem all day, you get to the end of the workday, you go, “Wait, no, I think I have it,” and then you work on it for ten more minutes and you were right, you got it.
I can totally see this going the other way, with someone spending an extra hour and not getting anywhere, so I’m not gonna say “Always give it that extra push!” That’s some crunch-culture bull-hockey. But sometimes your brain tries to tell you it’s worked something out, and if you’ve got a flex schedule that lets you do +1 hour today and -1 hour tomorrow it’s almost always going to be worth trusting those feelings when you get them.
Today’s issue is wanting custom scripts for every single card, even as those scripts get compiled from ScriptableObjects at runtime.
Well Guess What. I worked out how to instantiate scripts using a variable. So when I make a card, the game will attach the script that shares that card’s name. (This has the not-really-a-flaw that now I’d better not name any of my cards function-y titles like GameHandler or IsHolding or Draggable, but does also have the real potential issue of my game having literally hundreds of scripts, several of which are largely redundant)
1 note
·
View note
Text
Debug console
Over the weekend I implemented a debug console in the game, something I've been wanting to do for ages. It shows logging output, and it can be used to inspect / modify variables, and trigger events in the game.
This was pretty simple to do, because the "global" variables and events were already implemented as ScriptableObject assets (see ScriptableObjects For Fun and Profit for details). It was just a matter of making them automatically add themselves to a list to then be accessible in the console. Almost as if I'd planned it that way from the beginning!
These existing variables and events are used by the various systems in the game, and don't all necessarily make sense to mess with in the console, but many can be useful for testing purposes, or simply for playing around under the hood. I did add a couple of extra variables just for fun though, one to modify gravity, and another to change the time scale (slow-mo / fast forward).
The console itself has a simple UI, just scrolling text with a box to input commands at the bottom.
There are a few different available commands, for example to do things like listing the available variables or events, or to get help on using the console.Typing a variable's name will shows its current value, or typing its name followed by a value will modify it. Typing an event's name (followed by arguments if required) will raise that event, which can cause things to happen in the game (depending on the game's current state).
2 notes
·
View notes
Text
The “Container” pattern in Unity for procedural games
Hi. Today I want to talk about a software design pattern that I’m using in the game that I’m developing (Medieval Life) and the advantages and disadvantages of this pattern.
The problem
In Medieval Life, a 90% of the resources are generated procedurally or are modified somehow at runtime. Eg: textures are stored individually but merged in a big atlas when the game starts. Using code a lot of meshes are created or modified dynamically (houses, terrain, and other procedural things).
This leads me to a problem that is how to manage in a ordered fashion the tens of meshes, data structures and textures without ending with a spaghetti code with a lot of references. At first, I started using Unity’s ScriptableObjects, and they work perfect for a handful of objects that are all the same in structure, but the main problem comes when you have objects that depend on another object and so on... leading to a big mess of dependencies between ScriptableObjects.
Also, refactoring ScriptableObjects turns imposible because if you change any property, you lose all references in your project’s ScriptableObjects and you have to drag all references again, and with a few objects is not a problem, but when you have a lot of objects this can take a lot of time.
I would prefer having the object’s configuration and the link with between entity, texture and mesh all in my code, and not having to switch between ScriptableObjects inside the Unity Editor.
The solution
So, what is the solution? Basically, I ended up implementing a pattern called ServiceContainer (or Container). But I didn’t use it to resolve services, I used it to register and resolve procedurally generated assets.
The Container Pattern
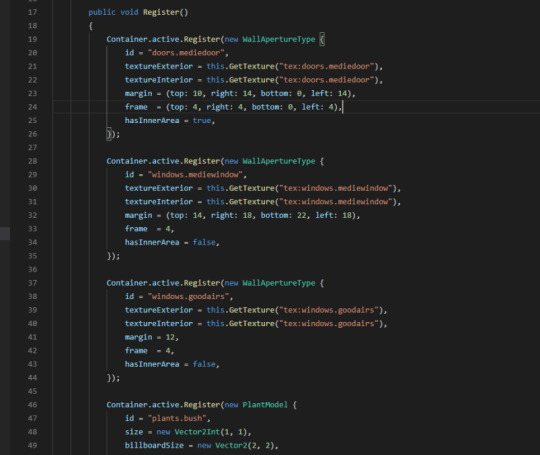
Basically, I have a class that is my container. The container is responsible for registering and resolving all the game assets. Each asset has a unique string ID. For example, “tex:wall.bricks” would be the ID for the bricks wall texture. The Container is nothing more than a wrapper arround a C# Dictionary.
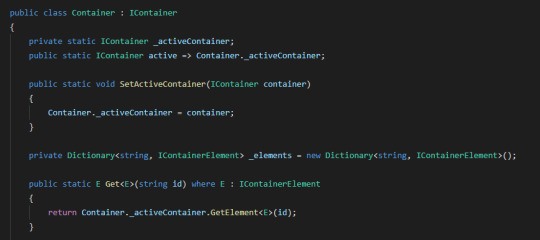
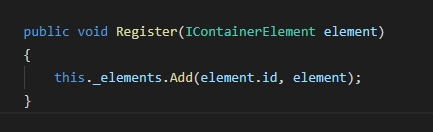
I can create a new Container, assign it as the active container and then use Container.Get(”tex:wall.bricks”) to obtain the reference to the texture that I registered in the container before. With Container.Register you can register new elements in the Container. They only need to have a string ID.
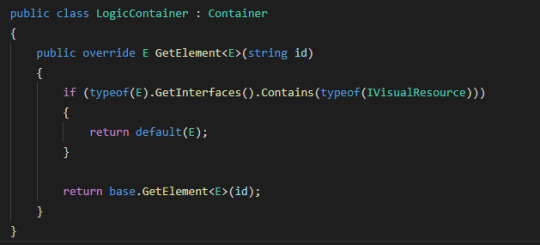
What is the advantage? You can have for example, a procedural mesh generation system that registers the meshes that it is generating in the container. For example Container.Register<Mesh>("mesh:house.backery"). And then, every entity that wants to use that resource can ask it to the Container by the ID with Container.Get<Mesh>("mesh:house.backery") This has a lot of other advantages. For example, I can create my own classes that implements the IContainer Interface and change the logic used to resolve assets. I have made a LogicContainer class that overrides the Get method of the container and ignores (returns null) all resources that are visual (texture, mesh, audio) and not logic (class, procedural data, configuration). This is useful when you want to test your code, or when you want your game to be able to run inside the Unity Editor with only the logic and simulation and without the visuals, or inside an online server. It does not make sense to load textures and meshes that will never be shown on screen (because there is nothing to show in a server)
Below is an example of how I use the Container. Here I am registering in the container the model classes that have the logic and configuration of how different entities are defined in the game. For example, a house window, a door, a bush, or a tree. Those models link the logic related data with the visual related data so other subsystems can use this information to generate the game world.
Conclusion
I don’t recommend to anyone to use this pattern in unity unless you have a very specific scenario like my I have. Normally this “pattern” is considered an anti-pattern: The Service locator antipattern. Why? Because if you don’t have enough care, you can easily end up hiding the dependencies between different classes. For example, if some game component depends of an specific texture, you will not know until you run the game and it crashes because the resource is not correctly registered in the container. And that is super dangerous.
In the 99% of the scenarios, I recommend to use the Unity default serialization system. Why? Because that system is very similar to the dependency injection pattern that is the solution to Service Locator anti pattern.
The problem is that for my particular case, I could not use it because 90% of the assets are generated or modified at runtime. And that led me to passing references from one class to another and a huge spagetti code with a lot of duplicated and nested references.
Bonus: Case study, Minecraft
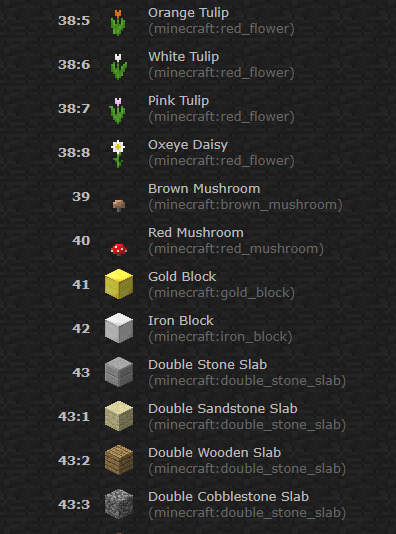
I was investigating and it seems that Minecraft, uses internally a similar system in which each block, entity and game resource (texture, audio, text) have an ID. In this way is super easy to mod the game because each resource can be referenced by it’s global ID in the external configuration files. I don’t know if other games use a similar technique but I don’t think it is something weird, especially across procedural games.
1 note
·
View note
Video
youtube
【Unite 2017 Tokyo】ScriptableObjectを使ってプログラマーもアーティストも幸せになろう
0 notes
Photo

RT @KarlJamesJones: In 2019.3 we have added the SerializeReference attribute. This means you can now serialize polymorphic types and interfaces in Unity without using ScriptableObjects. Its pretty awesome! #unitytips #unity3d https://t.co/Wtuz5SIcTP
1 note
·
View note
Photo

RT @TebiFestival: #UnityTips If your game uses different Scenes for levels consider creating ScriptableObjects for the general data that is used anywhere, like dialogs, input configurations or audio. It makes for faster load and less memory use! 👉 https://t.co/3XQ6pFMjFB #gamedev #indiedev https://t.co/Y7zpaunUjq #Unity #GameDev #GameEngine
2 notes
·
View notes