#SecretsManager
Explore tagged Tumblr posts
Visit Tumblr Blog
Explore Tumblr blogs with no restrictions, modern design and the best experience.
Last Seen Tumblr Blogs


Fun Fact
70% of Tumblr users say the Dashboard is their favorite place to spend time online.
Text
AWS Key Management Service Best Practices For Encryption

AWS Key Management Service
Create and manage cryptographic keys to safeguard your data with AWS KMS. Most AWS data-encrypting services are connected with AWS Key Management Service. To record the usage of your KMS keys for auditing, regulatory, and compliance purposes, AWS KMS also connects with AWS CloudTrail.
AWS KMS keys, which are logical representations of cryptographic keys, are the main resource in AWS Key Management Service. KMS keys come in three main varieties:
KMS keys that you create are known as customer managed keys.
KMS keys created in your account by AWS services on your behalf are known as AWS managed keys.
KMS keys that are owned and managed by an AWS service and can be used across several AWS accounts are known as AWS owned keys.
Policies are used in the AWS Cloud to manage who has access to resources and services. For instance, resource-based policies link to a resource, like an S3 bucket, and specify which principals are permitted access, supported actions, and any other requirements that must be fulfilled. In AWS Identity and Access Management, identity-based policies determine user, group, and role permissions. Like IAM policies, AWS Key Management Service policies restrict key access. There must be a key policy for every KMS key, and each key may only have one key policy. When creating policies that grant or prohibit access to KMS keys, keep the following in mind:
For customer-controlled keys, you have direct control over the key policy; however, this is not the case for AWS-owned or managed keys.
Within an AWS account, key policies enable granular access to AWS Key Management Service API calls. You cannot use IAM policies to grant access to a KMS key unless specifically permitted by the key policy. IAM policies that provide permissions are ineffective without the main policy’s consent.
Without the key policy’s matching consent, you can use an IAM policy to prevent access to a customer-managed key.
Take into account the following while creating key policies and IAM policies for multi-region keys:
Key policies are neither duplicated or synced among related multi-Region keys, nor are they shared attributes of multi-Region keys.
Unless a key policy is given in the request, the default key policy is used when a multi-Region key is produced using the CreateKey and ReplicateKey actions.
To restrict permissions to a specific AWS Region, you can use condition keys like aws: RequestedRegion.
Permissions to a multi-Region main key or replica key can be granted via grants. Even though they are related multi-Region keys, a single grant cannot be utilized to provide permissions to more than one KMS key.
The following encryption best practices and other security best practices should be taken into account while utilizing AWS Key Management Service and developing key policies:
Follow the advice in the AWS Key Management Service best practices materials listed below:
AWS Key Management Service grant best practices (AWS KMS documentation)
IAM policy best practices (AWS KMS docs)
Keep the identities of individuals who administer keys and those who use them distinct in compliance with the best practice for separation of duties:
The key shouldn’t be usable by administrator roles that create and remove keys.
Some services might just need to encrypt data; they shouldn’t be allowed to use the key to decode it.
The least privilege principle should always be applied to important policy. Because it grants the principal authority to administer and use the key, kms: should not be used for actions in IAM or key policies.
Use the kms: ViaService condition key in the key policy to restrict the use of customer-managed keys to particular AWS services.
Customer managed keys are recommended if you have a choice between key types since they offer the most detailed control choices, such as the following:
Overseeing access control and authentication
Keys that enable and disable
Changing the AWS KMS keys
Keys for tagging
Making aliases
Getting rid of AWS KMS keys
Unauthorized principals must be specifically excluded from AWS Key Management Service administrative and modification permissions, and no unauthorized principal should have AWS KMS modification permissions listed in an allow statement.
Use the iam-customer-policy-blocked-kms-actions and iam-inline-policy-blocked-kms-actions rules in AWS Config to identify instances of unlawful use of KMS keys. Principals are unable to use the AWS Key Management Service decryption actions on any resource as a result.
To stop unauthorized users or roles from deleting KMS keys directly through a command or the terminal, implement service control policies (SCPs) in AWS Organizations.
Record calls to the AWS Key Management Service API in a CloudTrail log. This logs the pertinent event properties, including the requests made, the originating IP address making the request, and the requester.
Sensitive information shouldn’t be included if encryption is being used. Anyone with access to the S3 bucket holding the data can examine the plaintext JSON files that CloudTrail uses to store the encryption context.
When keeping an eye on how customer managed keys are being used, set up events to alert you when certain actions like creating a key, updating customer managed key policies, or importing key material are noticed. Automated responses, like an AWS Lambda function that disables the key or carries out any other incident response activities specified by your business policy, are also advised.
For certain situations, such compliance, disaster recovery, or backups, multi-region keys are advised. Compared to single-region keys, multi-region keys have substantially different security characteristics. When approving the creation, administration, and use of multi-Region keys, the following guidelines should be followed:
Principals should only be permitted to duplicate a multi-region key into AWS regions that need it.
Permit multi-region keys only for jobs that require them and only for principals who need them.
Read more on Govindhtech.com
#AWSSecretsManager#SecretsManager#APIkeys#AWSKeyManagementService#IAM#secrets#VPC#API#News#Technews#Technology#Technologynews#Govindhtech#technologytrends
0 notes
Text
Mastering 1Password Developer Tools: Secure Your Code with Confidence!
For developers, managing credentials and secrets is a critical part of ensuring the security of your applications. 1Password Developer Tools offer a powerful solution for managing these sensitive elements securely and efficiently. This guide will explore how 1Password Developer Tools can enhance your development process and keep your code safe.
Why 1Password Developer Tools?
1Password Developer Tools are designed to help developers manage and secure their secrets effectively. With robust features and seamless integration, these tools provide a comprehensive solution for protecting your code and credentials.
Getting Started with 1Password Developer Tools
Getting started is easy:
1. Sign Up for 1Password : Visit the 1Password Developer Tools page to create an account.
2. Integrate with Your Development Environment: Use 1Password’s APIs and SDKs to integrate with your existing development tools and workflows.
3. Manage Secrets: Store and manage your API keys, passwords, and other sensitive information securely within 1Password.
Features and Benefits
1Password Developer Tools offer several features that make them a valuable addition to your development toolkit:
Secure Storage: Store your credentials and secrets securely, with encryption and access control.
API Integration: Integrate with your development environment to streamline secret management.
Audit Logs: Monitor access and changes to your secrets with detailed audit logs.
Seasonal Discounts and Offers
Explore Dealszo for Best 1Password Coupon Codes & Promo Codes for 1Password Developer Tools. With special promotions during Halloween, Veteran's Day, Thanksgiving, Black Friday, and Cyber Monday 2024, you can secure your development process at a reduced cost.
Why 1Password Developer Tools are Essential
For developers, securing code and credentials is critical. 1Password Developer Tools provide the features and integrations needed to manage your secrets effectively, ensuring that your development process remains secure.
How 1Password Developer Tools Support Your Work During Major Holidays?
During peak development periods and holiday seasons, managing credentials and secrets efficiently is crucial. 1Password Developer Tools help you maintain security and streamline your workflows, even during busy times.
1Password Developer Tools are a valuable asset for any developer looking to secure their code and credentials. With robust features and seasonal discounts available through Dealszo, it’s an investment in your development security. Check out Dealszo for the latest 1Password Coupon Codes & Promo Codesand enhance your development process today!
Latest 1password Offers & Discount
25% off the first year of 1Password Families
Secure your family's digital life! Get 25% off the first year of 1Password Families. Don't miss this exclusive offer for enhanced online security!
Up to 10 Team members for $24.95 per Month
Canada: Get Up to 10 Team members for $24.95 per Month with 1Password!
25% Off For New Customers
Enjoy 25% Off families at 1Password! New Customers Only!
3 months free switch to Business or Teams
Get 3 months free when you switch to 1Password Business or Teams, Plus Free family accounts for every member of your team!
1Password Developer Tools secure your code with ease. Grab Dealszo’s exclusive discounts and boost your development security today!
#1Password#DeveloperTools#CodeSecurity#APIManagement#SecureCoding#DevOps#SecretsManagement#CyberSecurity#TechTools#SoftwareDevelopment#Encryption#DataProtection#SecureDevelopment#DevSecurity#PasswordManagement#TechDeals#Dealszo
0 notes
Text
CI/CD pipelines and the cloud: Are your development secrets at risk?

When combined with cloud service providers' CLIs, CI/CD can pose a serious security threat. Here's why — and how to keep a lid on your secrets. https://jpmellojr.blogspot.com/2024/05/cicd-pipelines-and-cloud-are-your.html
#CICDSecurity#SecretsManagement#CloudSecurity#DevSecOps#SoftwareSupplyChain#SecretsLeakage#BestPractices#EnvironmentVariables#CloudCLIs
0 notes
Text
Guide to Retrieve the Secret Value Using AWS Secret Manager

App developers are hunting all possible means to find a secure way to store their data in the database or Redis. (Redis is an open-source in-memory Data Structure Store, used as a database and a caching layer or a message broker.) One of the challenging tasks with the database is the storage and retrieval, the process is hard to code. And AWS Secret Manager is a problem solver. The AWS Secret Manager focuses to keep your data in secret. The secrets may be your database credentials, passwords or third party API.
Let us walk you through the process of how to keep the Secret a secret using the AWS Secret Manager.
1.Log into your AWS account, search and select the Secret Manager. Afterwards, enter into the Secret Manager Console and click on the “Store a new secret”.

2. In the “Store a new secret” option, you will find the options to select a Secret type.
Credentials for RDS database
Credentials for Redshift Cluster
Credentials for Document database
Credentials for Other database
Other type of secrets
If you do not have a definite value, go with “Other type of secrets”. Then enter the appropriate key name and hit Next.
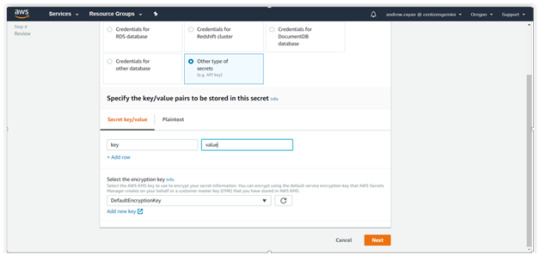
Specify the “Secret name and its description” in the particular fields and other options (optional). Just hit Next.
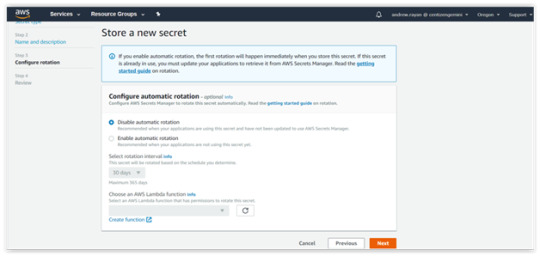
3. After completing Steps 1 and 2, you will be taken to the “Configure Automatic Rotation”. There is an available option to “Disable or Enable the automatic rotation” of the keys via lambda function. Select “Disable” and follow to the next level.
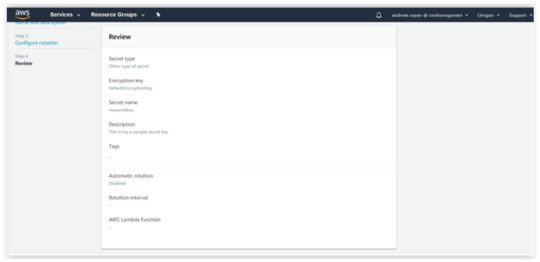
4. You can “Review”, your data in the previous steps and click “Store” button. Then, you’ll get the sample snippets of Java.
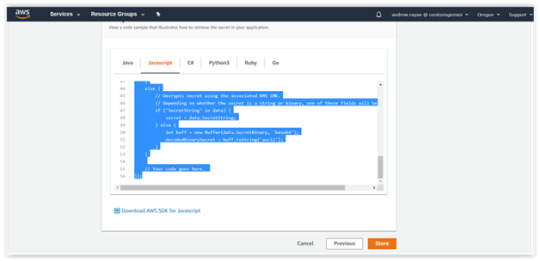
This is the generated Snippet code sample:</.h2
// Use this code snippet in your app.
// If you need more information about configurations or implementing the sample code, visit the AWS docs: // https://aws.amazon.com/developers/getting-started/nodejs/ // Load the AWS SDK var AWS = require(‘aws-sdk’), region = “us-west-2”, secretName = “mysecretkey”, secret, decodedBinarySecret; // Create a Secrets Manager client var client = new AWS.SecretsManager({ region: region }); // In this sample we only handle the specific exceptions for the ‘GetSecretValue’ API. // See https://docs.aws.amazon.com/secretsmanager/latest/apireference/API_GetSecretValue.html // We rethrow the exception by default. client.getSecretValue({SecretId: secretName}, function(err, data) { if (err) { if (err.code === ‘DecryptionFailureException’) // Secrets Manager can’t decrypt the protected secret text using the provided KMS key. // Deal with the exception here, and/or rethrow at your discretion. throw err; else if (err.code === ‘InternalServiceErrorException’) // An error occurred on the server side. // Deal with the exception here, and/or rethrow at your discretion. throw err; else if (err.code === ‘InvalidParameterException’) // You provided an invalid value for a parameter. // Deal with the exception here, and/or rethrow at your discretion. throw err; else if (err.code === ‘InvalidRequestException’) // You provided a parameter value that is not valid for the current state of the resource. // Deal with the exception here, and/or rethrow at your discretion. throw err; else if (err.code === ‘ResourceNotFoundException’) // We can’t find the resource that you asked for. // Deal with the exception here, and/or rethrow at your discretion. throw err; } else { // Decrypts secret using the associated KMS CMK. // Depending on whether the secret is a string or binary, one of these fields will be populated. if (‘SecretString’ in data) { secret = data.SecretString; } else { let buff = new Buffer(data.SecretBinary, ‘base64’); decodedBinarySecret = buff.toString(‘ascii’); } } // Your code goes here. });
Hope this helped you learn a way to secure your content.
0 notes
Text
AWS Secrets Manager Agent
https://github.com/aws/aws-secretsmanager-agent
0 notes
Text
7 Hashicorp Vault Alternatives in 2024
7 Hashicorp Vault Alternatives in 2024 #devops #hashicorpvault #secretsmanagement #security #cybersecurity #plaintextpasswords #cicdpipelines #cloudsecrets #azurekeyvault #awssecretsmanager #akeyless #cyberarkconjur #mozillasops #doppler #kubernetes
Hashicorp Vault is a popular solution for ones looking at secrets management with DevOps and other workflows. However, there are alternatives out there that have similar features and may offer a better solution for your use case. We will consider 7 Hashicorp Vault alternatives in 2024 to see which one might suit your needs best. Table of contentsBrief overview of Hashicorp VaultWhy choose a…
0 notes
Text
Automating File Transfers to Amazon RDS for Oracle databases
Many integrated Oracle applications use external files as input. Oracle databases access such files via a logical object called a database directory. Apart from accessing the application files, Oracle databases also use database directories to access data pump backups, external tables, reading logs, and more. In the traditional on-premises client-server architecture, the database administrator has to transfer the files to be processed from one server to another, log in to the database server to create an Oracle database directory object, and run the aforementioned tools. With Amazon RDS for Oracle, some of those tasks are abstracted, as we show throughout this post. Amazon RDS for Oracle gives you the benefits of a managed service solution that makes it easy to set up, operate, and scale Oracle deployments in the AWS Cloud. Amazon RDS for Oracle allows you to access files via database directory objects and native tools in the same ways you can access your on-premises Oracle databases. The main difference between Amazon RDS for Oracle and on-premises Oracle deployments is that Amazon RDS for Oracle is a managed service, therefore access to the underlying host is restricted in order to offer a fully managed service. Because you can’t access the underlying operating system for your database in Amazon RDS for Oracle, to automate large numbers of file uploads, we need to build a solution using Amazon Simple Storage Service (Amazon S3) and AWS Lambda to load files into Amazon RDS for Oracle storage. If the number or size of the files to be transferred to your Amazon RDS for Oracle database is small or infrequent, you can manually move the files to Amazon S3, download the files from Amazon S3 to the Amazon RDS for Oracle database, and finally load or process the files in the database. However, when your business logic requires continual loading and processing of many files, automating this process allows IT organizations to spend their time on other tasks that bring more value to the company. The purpose of this post is to demonstrate how you can use Amazon S3 and Lambda to automate file transfers from a host (on-premises or cloud-based) to an object database directory inside an Amazon RDS for Oracle database local storage. Solution overview This solution demonstrates the automation of file transfers from on premises to Amazon RDS for Oracle databases by using Amazon S3, Lambda, and AWS Secrets Manager. After the files have been uploaded to S3 buckets, an S3 event triggers a Lambda function responsible for retrieving the Amazon RDS for Oracle database credentials from Secrets Manager and copying the files to the Amazon RDS for Oracle database local storage. The following diagram shows this workflow. The implementation of this solution consists of the following tasks: Create an S3 bucket for file uploads to Amazon RDS for Oracle database local storage. Create a Secrets Manager secret for retrieving credentials required to connect to the Amazon RDS for Oracle database. Create AWS Identity and Access Management (IAM) policies and roles required by the solution to interact with Amazon RDS for Oracle, Secrets Manager, Lambda, and Amazon S3. Create a Lambda function for the automation of the file transfers from Amazon S3 to Amazon RDS for Oracle local storage. Configure S3 events to invoke the function on new file uploads. Validate the solution. Prerequisites This post assumes that you can load files directly into Amazon S3 from the host where files are stored, and that you have provisioned an Amazon RDS for Oracle database with Amazon S3 integration. For detailed steps on how to perform this task, see Integrating Amazon RDS for Oracle with Amazon S3 using S3_integration. This also process assumes the following AWS resources have already been provisioned inside your AWS account: A Linux-based workstation to perform deployments, cloud or on-premises Python 3.6 or 3.7 installed on the workstation used to create the AWS services The Amazon Command Line Interface (AWS CLI) installed and configured on the workstation used to create the AWS services The Lambda function must be created in private subnets Connectivity from private subnets to Secrets Manager using NAT Gateway or a VPC endpoint for the Lambda function to retrieve secrets RDS for Oracle database user with the following privileges: CREATE SESSIO SELECT_CATALOG_ROLE EXECUTE on rdsadmin.rdsadmin_s3_tasks EXECUTE on rdsadmin.rds_file_util EXECUTE on rdsadmin.rdsadmin_util Creating the S3 bucket We need to create an S3 bucket or repurpose an existing bucket for file uploads to Amazon RDS. If you want to create a new bucket, use the following instructions: Log in to the Linux workstation where Python and the AWS CLI are installed, using the appropriate credentials via SSH or the terminal emulator of your choice. For example: ssh -i my-creds.pem ec2-user@myLinuxWorkstation Use a unique bucket name such as s3-int-bucket-yyyymmdd-hhmiss in your chosen Region: export myAWSRegion=us-east-1 export myS3Bucket=s3-int-bucket-20201119-184334 aws s3 mb s3://$myS3Bucket --region $myAWSRegion Create a folder under the newly created bucket called incoming-files: aws s3api put-object --bucket $myS3Bucket --key incoming-files/ --region $myAWSRegion Creating Secrets Manager secrets The Lambda function needs a Secrets Manager secret in order to retrieve database credentials to access the Oracle databases securely. The following steps show how to create a new secret for your databases: Create a JSON document containing the information to be stored in the secret, using the following template: db-secrets.json: { "username": "RDS_User_For_S3_Transfer", "password": "XXXX", "engine": "oracle", "host": "FQDN_Of_RDS_EndPoint", "port": 1521, "dbname": "Name_Of_RDS_Database", "dbInstanceIdentifier": "Name_Of_RDS_Instance", "dbtype": "RDS" } Obtain the values for each key pair using the following command: $ aws rds describe-db-instances --db-instance-identifier oracle19 --query "DBInstances[0].[MasterUsername,Engine,Endpoint,DBName,DBInstanceIdentifier]" --region $myAWSRegion [ "oracle", "oracle-ee", { "Address": "oracle19.aaaaaaaaaaaa.us-east-1.rds.amazonaws.com", "Port": 1521, "HostedZoneId": "Z2R2ITUGPM61AM" }, "ORACLE19", "oracle19" ] With the information retrieved from the AWS CLI, we can populate the template: db-secrets.json: { "username": "s3trfadmin", "password": "MyPasswordGoesHere1234!", "engine": "oracle", "host": " oracle19.aaaaaaaaaaaa.us-east-1.rds.amazonaws.com", "port": 1521, "dbname": "ORACLE19", "dbInstanceIdentifier": "oracle19", "dbtype": "RDS" } Note that for the engine value pair, we used oracle instead of oracle-ee. We use the JSON document to create the Secrets Manager secret. For simplicity purposes, we match the name of the secret to our database’s name (oracle19). See the following code: myRDSDbName=oracle19 myAWSSecret=oracle19 aws secretsmanager create-secret --name ${myAWSSecret} --secret-string file://db-secrets.json --region $myAWSRegion Retrieve the Access Resource Name (ARN) for the Secrets Manager secret to use in later steps: aws secretsmanager describe-secret --secret-id $myAWSSecret --query "ARN" --output text --region $myAWSRegion arn:aws:secretsmanager:us-east-1:123123123123:secret:oratrg19-NW8BK1 Creating IAM policies For this post, we create the IAM policy SecretsManagerReadOnly for the Lambda function to use. Use the ARN for the Secrets Manager secret to create a file containing the policy granting permissions on Secrets Manager: secrets-manager-readonly-policy.json: { "Version": "2012-10-17", "Statement": [ { "Effect": "Allow", "Action": [ "secretsmanager:GetRandomPassword", "secretsmanager:GetResourcePolicy", "secretsmanager:GetSecretValue", "secretsmanager:DescribeSecret", "secretsmanager:ListSecretVersionIds", "secretsmanager:ListSecrets" ], "Resource": "arn:aws:secretsmanager:us-east-1:123123123123:secret:oratrg19-NW8BK1" } ] } Create a policy using the policy document: aws iam create-policy --policy-name SecretsManagerReadOnly --policy-document file://secrets-manager-readonly-policy.json --region $myAWSRegion Verify if the policy was created correctly using the following command: aws iam list-policies | grep '"SecretsManagerReadOnly"' Creating IAM roles Our Lambda function uses the role PythonRDSForLambdaRole. To create the role, follow these steps: Create a file containing the appropriate service trust policy, which associates the new role with a specific AWS service: lambda-trust.json: { "Version": "2012-10-17", "Statement": [ { "Effect": "Allow", "Principal": { "Service": "lambda.amazonaws.com" }, "Action": "sts:AssumeRole" } ] } Create a role using the trust policy document: aws iam create-role --role-name PythonRDSForLambda --assume-role-policy-document file://lambda-trust.json Verify the role was created: aws iam list-roles |grep '"PythonRDSForLambda" Obtain the AWS account number to use in the next steps. myAWSAcct=$(aws iam list-roles --query 'Roles[*].[Arn]' --output text | grep 'PythonRDSForLambda$' | cut -d: -f5) Attach policies to the role: aws iam attach-role-policy --role-name PythonRDSForLambda --policy-arn "arn:aws:iam::${myAWSAcct}:policy/SecretsManagerReadOnly" aws iam attach-role-policy --role-name PythonRDSForLambda --policy-arn "arn:aws:iam::aws:policy/AmazonS3ReadOnlyAccess" aws iam attach-role-policy --role-name PythonRDSForLambda --policy-arn "arn:aws:iam::aws:policy/service-role/AWSLambdaVPCAccessExecutionRole" aws iam attach-role-policy --role-name PythonRDSForLambda --policy-arn "arn:aws:iam::aws:policy/service-role/AWSLambdaENIManagementAccess" Replace the string ${myAWSAcct} with your AWS account number if you’re not running the commands from a UNIX or Linux shell. The preceding code attaches the following policies: SecretsManagerReadOnly AmazonS3ReadOnlyAccess AWSLambdaVPCAccessExecutionRole AWSLambdaENIManagementAccess Creating the Lambda function Lambda is a serverless compute service that allows you to run code without having to provision servers, implement complex workload-aware cluster scaling logic, maintain integration with other services, or manage runtimes. Lambda natively supports many popular programming languages, such as Java, Python, Node.js, Go, PowerShell, C#, and Ruby. It also supports other programming languages via a Runtime API. With Lambda, you can run code for virtually any type of application or backend service—all with zero administration. Just upload your code as a ZIP file or container image, and Lambda automatically and precisely allocates compute power and runs your code based on the incoming request or event for any scale of traffic. For this post, our function is responsible for automatically transferring files from the Amazon S3 bucket to the RDS for Oracle instance. To create the function, we require custom Python libraries and Oracle libraries that are packaged alongside the Python code to be implemented for this solution. Complete the following steps: Make a note of the Python version installed on the machine where you create the package to deploy the Lambda function: pythonVersion="python$(python3 --version|cut -c8-10)" Create a custom directory where your code and libraries reside. For this post, the new directory is created under the user’s home directory: cd /home/ec2-user/ mkdir -p s3ToOracleDir Log in to Oracle OTN using your Oracle credentials and download the latest Oracle Instant Client libraries into the work directory /home/ec2-user/s3ToOracleDir. Uncompress the downloaded files and delete them from the current directory: cd /home/ec2-user/s3ToOracleDir unzip -oqq "oraInstantClient*.zip" -d . rm -f oraInstantClientBasic19_6.zip oraInstantClientSDK19_6.zip Delete Oracle Instant Client libraries not required by the Lambda function to reduce the size of the deployment package: cd /home/ec2-user/s3ToOracleDir rm instantclient_19_6/lib*.so.1[!9]* Move the remaining files from the instanclient_19_6 directory to the current directory and delete the instantclient_19_6 directory and ZIP files downloaded for the installation: cd /home/ec2-user/s3ToOracleDir mv instantclient_19_6/* . rmdir instantclient_19_6 Install the cx-Oracle and lxml Python modules required by the Lambda function to interact with the RDS for Oracle DB instance: cd /home/ec2-user/s3ToOracleDir pip3 install -t . cx-Oracle pip3 install -t . lxml Install the libaio library and copy it to the current directory: cd /home/ec2-user/s3ToOracleDir sudo yum install libaio -y cp /usr/lib64/libaio.so.1 . Create a Python script called s3ToOracleDir.py under the /tmp directory using the following code. The sample code is for demonstration purposes only and for simplicity does not provide data encryption in transit. We recommend that your final implementation incorporates your organization’s security policies and AWS Security Best Practices. #Lambda function to transfer files uploaded into S3 bucket using RDS for Oracle S3 Integration import cx_Oracle import boto3 import sys import os from urllib.parse import unquote_plus import json # Variable definitions jSecret = {} flag = False s3Bucket = os.environ['S3BUCKET'] rdsDirectory = os.environ['RDSDIRECTORY'] regName = os.environ['AWSREGION'] secretName = os.environ['SECRETNAME'] print(f'Environment Variablesnn') print(f'AWS Region: {regName}') print(f'AWS Secret Alias: {secretName}') print(f'Amazon S3 Bucket: {s3Bucket}') print(f'AWS RDS Database Directory: {rdsDirectory}') # Initializing AWS resources print('Initializing AWS S3 - Resource') s3 = boto3.resource('s3') print('Initializing AWS S3 - Session') session = boto3.session.Session() print('Initializing AWS Secrets Manager - Client') client = session.client( service_name='secretsmanager', region_name=regName ) print(f'Retrieving secret ({secretName}) from AWS Secrets Manager') secValResp = client.get_secret_value(SecretId=secretName) if None != secValResp.get('SecretString'): jSecret = json.loads(secValResp['SecretString']) else: decoded_binary_secret = base64.b64decode(secValResp['SecretBinary']) jSecret = json.loads(decoded_binary_secret) dsnTnsRds = cx_Oracle.makedsn(jSecret['host'],jSecret['port'],service_name=jSecret['dbname']) print(f'Database Connection String: {dsnTnsRds}') connRds = cx_Oracle.connect(user=jSecret['username'], password=jSecret['password'], dsn=dsnTnsRds) print(f'Target Database Version: {connRds.version}') # When creating the Lambda function, ensure the following setting for LD_LIBRARY_PATH # LD_LIBRARY_PATH = /var/lang/lib:/lib64:/usr/lib64:/var/runtime:/var/runtime/lib:/var/task:/var/task/lib:/opt/lib:/opt/python def lambda_handler(event, context): try: c = connRds.cursor() c.arraysize = 500 commands = [] if 0 < len(event.get('Records','')): print("Beginning file transfers from AWS S3 to AWS RDS for Oracle") # Process each file loaded in S3 bucket for record in event['Records']: bucket = record['s3']['bucket']['name'] fileName = unquote_plus(record['s3']['object']['key']) print(f"Transferring file s3://{bucket}/{fileName} to Oracle directory {rdsDirectory}") sql = "SELECT rdsadmin.rdsadmin_s3_tasks.download_from_s3(" sql += "p_bucket_name => '" + s3Bucket + "'," sql += "p_s3_prefix => '" + fileName + "'," sql += "p_directory_name => '" + rdsDirectory + "')" sql += " AS TASK_ID FROM DUAL" print(f"Running: {sql}") c.execute(sql) while True: rows = c.fetchmany(100) if not rows: break for row in rows: print(f"Output: {row[0]}") flag = True e = "Success" else: e = "No S3 events detected" print(f'There are no new files to process on {s3Bucket}') except: statusCode = 500 e = "Error Message: " + str(sys.exc_info()[1]) print(f'{e}') else: statusCode = 200 return { 'statusCode': statusCode, 'body': e } Copy the s3ToOracleDir.py Python script to the directory containing all the libraries and modules: cd /home/ec2-user/s3ToOracleDir cp /tmp/s3ToOracleDir.py . Package all the files, making sure it’s done from within your working directory. (Otherwise, the function can’t find the programs and libraries required for it to run. It’s important to use relative paths for this step to prevent runtime issues with the Lambda function.) See the following code: cd /home/ec2-user/s3ToOracleDir zip -q9r ../s3ToOracleDir.zip . Because the size of the resulting ZIP file is larger than 50 MB, you need to upload the file to Amazon S3, and from there, it can be deployed: aws s3api put-object --bucket $myS3Bucket --key lambda/ --region $myAWSRegion aws s3 cp ../s3ToOracleDir.zip s3://${myS3Bucket}/lambda/ After the package is uploaded, you can use it to create the function as follows: aws lambda create-function --function-name s3ToOracleDir --code S3Bucket=${myS3Bucket},S3Key=lambda/s3ToOracleDir.zip --handler s3ToOracleDir.lambda_handler --runtime ${pythonVersion} --role arn:aws:iam::${myAWSAcct}:role/PythonRDSForLambda --output text --region $myAWSRegion This next step sets the environment variables for Lambda to function properly. In this way, you can alter the behavior of the function without having to change the code. The Lambda environment variable name RDSDIRECTORY should match the name of the Oracle database directory that you use for file storage later on. Set the environment variables with the following code: myRDSDirectory=UPLOAD_DIR aws lambda update-function-configuration --function-name s3ToOracleDir --environment "Variables={LD_LIBRARY_PATH=/var/lang/lib:/lib64:/usr/lib64:/var/runtime:/var/runtime/lib:/var/task:/var/task/lib:/opt/lib:/opt/python,S3BUCKET=$myS3Bucket,RDSDIRECTORY=$myRDSDirectory,AWSREGION=$myAWSRegion,SECRETNAME=$myAWSSecret}" --output text --region $myAWSRegion Obtain obtain the subnet and security group IDs from the AWS Management Console or using the following AWS CLI commands: myRDSSubnets=$(aws rds describe-db-instances --db-instance-identifier ${myRDSDbName} --query "DBInstances[0].DBSubnetGroup.Subnets[*].SubnetIdentifier" --output text --region $myAWSRegion|sed "s/t/,/g") myRDSSecGrps=$(aws rds describe-db-instances --db-instance-identifier ${myRDSDbName} --query "DBInstances[0].VpcSecurityGroups[*].VpcSecurityGroupId" --output text --region $myAWSRegion|sed "s/t/,/g") Now we configure the networking and security attributes for the Lambda function for its correct interaction with the Amazon RDS for Oracle database. The function and database must be created in private subnets. Because the function interacts with Secrets Manager, you must enable outside internet access via a NAT Gateway or by creating a VPC endpoint for Secrets Manager. Configure the attributes with the following code: aws lambda update-function-configuration --function-name s3ToOracleDir --vpc-config SubnetIds=${myRDSSubnets},SecurityGroupIds=${myRDSSecGrps} --output text --region $myAWSRegion Creating an S3 event notification The final step is to associate the s3ToOracleDir Lambda function with the S3 bucket we created in the earlier steps. On the Amazon S3 console, choose the bucket you created (for this post, s3-int-bucket-20201119-184334). Choose the Properties Scroll down to the Event notifications section and choose Create event notification. For Event name, enter a name (for this post, s3ToOracleDir). For Prefix, enter incoming-files/, which is the name of the directory we created in the S3 bucket previously. Make sure the prefix ends with the forward slash (/). For Suffix, enter a suffix associated with the file extension that triggers the Lambda function (for this post, .txt). In the Event types section, select All object create events. This selects the Put, Post, Copy, and Multipart upload completed events. For Destination, leave at the default Lambda function. For Specify Lambda function, leave at the default Choose from your Lambda functions. For Lambda function, choose the function we created (S3ToOracleDir). Choose Save changes. Creating an Oracle directory Next, we need to create an Oracle directory on the RDS for Oracle instance (if not already created) to be used for storing the files transferred to the database. The directory name must match the value set for the Lambda RDSDIRECTORY environment variable earlier in the process. To simplify operations, create two small SQL scripts containing the statements associated with creating the database directory and listing its contents, respectively: cd ~ #Script for creating the database directory echo "exec rdsadmin.rdsadmin_util.create_directory(p_directory_name => '$myRDSDirectory');" > createDirectory.sql #Script for listing the contents of the database directory, echo "SELECT * FROM TABLE(rdsadmin.rds_file_util.listdir(p_directory => '$myRDSDirectory'));" > listDirectory.sql Connect to the database using any SQL client as a user who has execute privileges on the rdsadmin packages: sqlplus s3trfadmin@${myRDSDbName} Create the database directory using the creatDirectory.sql script: SQL> @createDirectory.sql List the contents of the newly created directory using the listDirectory.sql script: SQL> @listDirectory.sql Validating the setup The final step is for us to test the solution is working properly. Create a sample text file or use an existing file: ls -l /etc > test_upload.txt Transfer the file to the S3 bucket under the incoming-files folder: aws s3 cp test_upload.txt s3://${myS3Bucket}/incoming-files/ Wait a few seconds and list the contents of the Amazon RDS for Oracle directory: sqlplus s3trfadmin@${myRDSDbName} SQL> @listDirectory.sql You should be able to see your test file listed in the directory. Review the AWS CloudWatch logs associated with the Lambda function to troubleshoot any issues encountered during implementation. Some of the most common issues are associated with an incorrect setup of the Amazon S3 integration for Amazon RDS and communication problems with Secrets Manager or the RDS for Oracle instance due to incorrectly configured routes or security groups. For more information, see Troubleshooting issues in Lambda. Conclusion This post describes how to integrate Amazon RDS for Oracle, Amazon S3, Secrets Manager, and Lambda to create a solution for automating file transfers from Amazon S3 to Amazon RDS for Oracle local storage. You can further enhance this solution to call other Oracle PL/SQL or Lambda functions to perform additional processing of the files. As always, AWS welcomes your feedback, so please leave any comments below. About the Authors Israel Oros is a Database Migration Consultant at AWS. He works with customers in their journey to the cloud with a focus on complex database migration programs. In his spare time, Israel enjoys traveling to new places with his wife and riding his bicycle whenever weather permits. Bhavesh Rathod is a Senior Database Consultant with the Professional Services team at Amazon Web Services. He works as database migration specialist to help Amazon customers to migrate their on-premises database environment to AWS cloud database solutions. https://aws.amazon.com/blogs/database/automating-file-transfers-to-amazon-rds-for-oracle-databases/
0 notes
Link
HashiCorp Strengthens Vault Secrets Management @mvizard https://t.co/9o84veGeQd #applicationdevelopment #applicationsecurity #devsecops #hashicorp #secretsmanagement pic.twitter.com/k2HuXo20R9
— DevOps.com (@devopsdotcom) April 8, 2020
via: https://ift.tt/1GAs5mb
0 notes
Photo

Amazon Web Services (AWS)サービスの正式名称・略称・読み方まとめ #5 (セキュリティ、アイデンティティ、コンプライアンス) https://ift.tt/2OsFuci
Amazon Web Services (AWS)サービスの正式名称・略称・読み方まとめ #5 (セキュリティ、アイデンティティ、コンプライアンス)
Amazon Web Services (AWS)のサービスで正式名称や略称はともかく、読み方がわからずに困ることがよくあるのでまとめてみました。
Amazon Web Services (AWS) – Cloud Computing Services https://aws.amazon.com/
まとめルールについては下記を参考ください。
Amazon Web Services (AWS)サービスの正式名称・略称・読み方まとめ #1 (コンピューティング) – Qiita https://cloudpack.media/49273
間違いや、こんな呼び方あるよーなどありましたらコメントお願いします!
Security, Identity, & Compliance – セキュリティ、アイデンティティ、コンプライアンス
AWS Identity and Access Management (AWS IAM)
正式名称: AWS Identity and Access Management
https://docs.aws.amazon.com/iam/?id=docs_gateway
読み方: アイデンティティ アンド アクセス マネジメント
略称: AWS IAM
俗称: なし
AWS Artifact
正式名称: AWS Artifact
https://docs.aws.amazon.com/artifact/?id=docs_gateway
読み方: アーティファクト
略称: なし
俗称: なし
Amazon Cognito
正式名称: Amazon Cognito
https://docs.aws.amazon.com/cognito/?id=docs_gateway
読み方: コグニート -参考: https://dev.classmethod.jp/cloud/aws/what-is-the-cognito/
略称: なし
俗称: なし
AWS Directory Service
正式名称: AWS Directory Service
https://docs.aws.amazon.com/directory-service/?id=docs_gateway
読み方: ディレクトリ サービス
略称: なし
俗称: なし
AWS Firewall Manager
正式名称: AWS Firewall Manager
https://docs.aws.amazon.com/firewall-manager/?id=docs_gateway
読み方: ファイヤーウォール マネージャ
略称: なし
俗称: なし
Amazon Cloud Directory
正式名称: Amazon Cloud Directory
https://docs.aws.amazon.com/clouddirectory/?id=docs_gateway
読み方: クラウド ディレクトリ
略称: なし
俗称: なし
Amazon GuardDuty
正式名称: Amazon GuardDuty
https://docs.aws.amazon.com/guardduty/?id=docs_gateway
読み方: ガードデューティー
略称: なし
俗称: なし
Amazon Inspector
正式名称: Amazon Inspector
https://docs.aws.amazon.com/inspector/?id=docs_gateway
読み方: インスペクター
略称: なし
俗称: なし
Amazon Macie
正式名称: Amazon Macie
https://docs.aws.amazon.com/macie/?id=docs_gateway
読み方: メイシー
参考: https://dev.classmethod.jp/cloud/aws/introduce-to-amazon-macie/
略称: なし
俗称: なし
AWS Resource Access Manager (AWS RAM)
正式名称: AWS Resource Access Manager
https://docs.aws.amazon.com/ram/?id=docs_gateway
読み方: リソース アクセス マネージャ
略称: AWS RAM
俗称: なし
AWS Secrets Manager
正式名称: AWS Secrets Manager
https://docs.aws.amazon.com/secretsmanager/?id=docs_gateway
読み方: シークレット(シークレッツ?) マネージャ
略称: なし
俗称: なし
AWS Security Hub
正式名称: AWS Security Hub
http://docs.aws.amazon.com/securityhub/?id=docs_gateway
読み方: セキュリティ ハブ
略称: なし
俗称: なし
AWS Shield
正式名称: AWS Shield
https://docs.aws.amazon.com/shield/?id=docs_gateway
読み方: シールド
略称: なし
俗称: なし
AWS Single Sign-On
正式名称: AWS Single Sign-On
https://docs.aws.amazon.com/singlesignon/?id=docs_gateway
読み方: シングル サイン オン
略称: なし
俗称: なし
AWS WAF
正式名称: AWS WAF (Web Application Firewall)
参考: https://aws.amazon.com/waf/?nc1=h_ls
https://docs.aws.amazon.com/waf/?id=docs_gateway
読み方: ワフ (ウェブ アプリケーション ファイヤーウォール)
略称: AWS WAF
俗称: なし
元記事はこちら
「Amazon Web Services (AWS)サービスの正式名称・略称・読み方まとめ #5 (セキュリティ、アイデンティティ、コンプライアンス)」
October 09, 2019 at 04:00PM
0 notes
Text
Original Post from Amazon Security Author: Ramesh Adabala
As a solutions architect at AWS, I often assist customers in architecting and deploying business applications using APIs and microservices that rely on serverless services such as AWS Lambda and database services such as Amazon Relational Database Service (Amazon RDS). Customers can take advantage of these fully managed AWS services to unburden their teams from infrastructure operations and other undifferentiated heavy lifting, such as patching, software maintenance, and capacity planning.
In this blog post, I’ll show you how to use AWS Secrets Manager to secure your database credentials and send them to Lambda functions that will use them to connect and query the backend database service Amazon RDS—without hardcoding the secrets in code or passing them through environment variables. This approach will help you secure last-mile secrets and protect your backend databases. Long living credentials need to be managed and regularly rotated to keep access into critical systems secure, so it’s a security best practice to periodically reset your passwords. Manually changing the passwords would be cumbersome, but AWS Secrets Manager helps by managing and rotating the RDS database passwords.
Solution overview
This is sample code: you’ll use an AWS CloudFormation template to deploy the following components to test the API endpoint from your browser:
An RDS MySQL database instance on a db.t2.micro instance
Two Lambda functions with necessary IAM roles and IAM policies, including access to AWS Secrets Manager:
LambdaRDSCFNInit: This Lambda function will execute immediately after the CloudFormation stack creation. It will create an “Employees” table in the database, where it will insert three sample records.
LambdaRDSTest: This function will query the Employees table and return the record count in an HTML string format
RESTful API with “GET” method on AWS API Gateway
Here’s the high level setup of the AWS services that will be created from the CloudFormation stack deployment:
Figure 1: Architecture diagram
Clients call the RESTful API hosted on AWS API Gateway
The API Gateway executes the Lambda function
The Lambda function retrieves the database secrets using the Secrets Manager API
The Lambda function connects to the RDS database using database secrets from Secrets Manager and returns the query results
You can access the source code for the sample used in this post here: https://github.com/awslabs/automating-governance-sample/tree/master/AWS-SecretsManager-Lambda-RDS-blog.
Deploying the sample solution
Set up the sample deployment by selecting the Launch Stack button below. If you haven’t logged into your AWS account, follow the prompts to log in.
By default, the stack will be deployed in the us-east-1 region. If you want to deploy this stack in any other region, download the code from the above GitHub link, place the Lambda code zip file in a region-specific S3 bucket and make the necessary changes in the CloudFormation template to point to the right S3 bucket. (Please refer to the AWS CloudFormation User Guide for additional details on how to create stacks using the AWS CloudFormation console.)
Next, follow these steps to execute the stack:
Leave the default location for the template and select Next.
Figure 2: Keep the default location for the template
On the Specify Details page, you’ll see the parameters pre-populated. These parameters include the name of the database and the database user name. Select Next on this screen
Figure 3: Parameters on the “Specify Details” page
On the Options screen, select the Next button.
On the Review screen, select both check boxes, then select the Create Change Set button:
Figure 4: Select the check boxes and “Create Change Set”
After the change set creation is completed, choose the Execute button to launch the stack.
Stack creation will take between 10 – 15 minutes. After the stack is created successfully, select the Outputs tab of the stack, then select the link.
Figure 5: Select the link on the “Outputs” tab
This action will trigger the code in the Lambda function, which will query the “Employee” table in the MySQL database and will return the results count back to the API. You’ll see the following screen as output from the RESTful API endpoint:
Figure 6: Output from the RESTful API endpoint
At this point, you’ve successfully deployed and tested the API endpoint with a backend Lambda function and RDS resources. The Lambda function is able to successfully query the MySQL RDS database and is able to return the results through the API endpoint.
What’s happening in the background?
The CloudFormation stack deployed a MySQL RDS database with a randomly generated password using a secret resource. Now that the secret resource with randomly generated password has been created, the CloudFormation stack will use dynamic reference to resolve the value of the password from Secrets Manager in order to create the RDS instance resource. Dynamic references provide a compact, powerful way for you to specify external values that are stored and managed in other AWS services, such as Secrets Manager. The dynamic reference guarantees that CloudFormation will not log or persist the resolved value, keeping the database password safe. The CloudFormation template also creates a Lambda function to do automatic rotation of the password for the MySQL RDS database every 30 days. Native credential rotation can improve security posture, as it eliminates the need to manually handle database passwords through the lifecycle process.
Below is the CloudFormation code that covers these details:
#This is a Secret resource with a randomly generated password in its SecretString JSON. MyRDSInstanceRotationSecret: Type: AWS::SecretsManager::Secret Properties: Description: 'This is my rds instance secret' GenerateSecretString: SecretStringTemplate: !Sub '{"username": "${!Ref RDSUserName}"}' GenerateStringKey: 'password' PasswordLength: 16 ExcludeCharacters: '"@/' Tags: - Key: AppNam Value: MyApp #This is a RDS instance resource. Its master username and password use dynamic references to resolve values from #SecretsManager. The dynamic reference guarantees that CloudFormation will not log or persist the resolved value #We use a ref to the Secret resource logical id in order to construct the dynamic reference, since the Secret name is being #generated by CloudFormation MyDBInstance2: Type: AWS::RDS::DBInstance Properties: AllocatedStorage: 20 DBInstanceClass: db.t2.micro DBName: !Ref RDSDBName Engine: mysql MasterUsername: !Ref RDSUserName MasterUserPassword: !Join ['', ['{{resolve:secretsmanager:', !Ref MyRDSInstanceRotationSecret, ':SecretString:password}}' ]] MultiAZ: False PubliclyAccessible: False StorageType: gp2 DBSubnetGroupName: !Ref myDBSubnetGroup VPCSecurityGroups: - !Ref RDSSecurityGroup BackupRetentionPeriod: 0 DBInstanceIdentifier: 'rotation-instance' #This is a SecretTargetAttachment resource which updates the referenced Secret resource with properties about #the referenced RDS instance SecretRDSInstanceAttachment: Type: AWS::SecretsManager::SecretTargetAttachment Properties: SecretId: !Ref MyRDSInstanceRotationSecret TargetId: !Ref MyDBInstance2 TargetType: AWS::RDS::DBInstance #This is a RotationSchedule resource. It configures rotation of password for the referenced secret using a rotation lambda #The first rotation happens at resource creation time, with subsequent rotations scheduled according to the rotation rules #We explicitly depend on the SecretTargetAttachment resource being created to ensure that the secret contains all the #information necessary for rotation to succeed MySecretRotationSchedule: Type: AWS::SecretsManager::RotationSchedule DependsOn: SecretRDSInstanceAttachment Properties: SecretId: !Ref MyRDSInstanceRotationSecret RotationLambdaARN: !GetAtt MyRotationLambda.Arn RotationRules: AutomaticallyAfterDays: 30 #This is a lambda Function resource. We will use this lambda to rotate secrets #For details about rotation lambdas, see https://docs.aws.amazon.com/secretsmanager/latest/userguide/rotating-secrets.html https://docs.aws.amazon.com/secretsmanager/latest/userguide/rotating-secrets.html #The below example assumes that the lambda code has been uploaded to a S3 bucket, and that it will rotate a mysql database password MyRotationLambda: Type: AWS::Serverless::Function Properties: Runtime: python2.7 Role: !GetAtt MyLambdaExecutionRole.Arn Handler: mysql_secret_rotation.lambda_handler Description: 'This is a lambda to rotate MySql user passwd' FunctionName: 'cfn-rotation-lambda' CodeUri: 's3://devsecopsblog/code.zip' Environment: Variables: SECRETS_MANAGER_ENDPOINT: !Sub 'https://secretsmanager.${AWS::Region}.amazonaws.com'
Verifying the solution
To be certain that everything is set up properly, you can look at the Lambda code that’s querying the database table by following the below steps:
Go to the AWS Lambda service page
From the list of Lambda functions, click on the function with the name scm2-LambdaRDSTest-…
You can see the environment variables at the bottom of the Lambda Configuration details screen. Notice that there should be no database password supplied as part of these environment variables:
Figure 7: Environment variables
import sys import pymysql import boto3 import botocore import json import random import time import os from botocore.exceptions import ClientError # rds settings rds_host = os.environ['RDS_HOST'] name = os.environ['RDS_USERNAME'] db_name = os.environ['RDS_DB_NAME'] helperFunctionARN = os.environ['HELPER_FUNCTION_ARN'] secret_name = os.environ['SECRET_NAME'] my_session = boto3.session.Session() region_name = my_session.region_name conn = None # Get the service resource. lambdaClient = boto3.client('lambda') def invokeConnCountManager(incrementCounter): # return True response = lambdaClient.invoke( FunctionName=helperFunctionARN, InvocationType='RequestResponse', Payload='{"incrementCounter":' + str.lower(str(incrementCounter)) + ',"RDBMSName": "Prod_MySQL"}' ) retVal = response['Payload'] retVal1 = retVal.read() return retVal1 def openConnection(): print("In Open connection") global conn password = "None" # Create a Secrets Manager client session = boto3.session.Session() client = session.client( service_name='secretsmanager', region_name=region_name ) # In this sample we only handle the specific exceptions for the 'GetSecretValue' API. # See https://docs.aws.amazon.com/secretsmanager/latest/apireference/API_GetSecretValue.html # We rethrow the exception by default. try: get_secret_value_response = client.get_secret_value( SecretId=secret_name ) print(get_secret_value_response) except ClientError as e: print(e) if e.response['Error']['Code'] == 'DecryptionFailureException': # Secrets Manager can't decrypt the protected secret text using the provided KMS key. # Deal with the exception here, and/or rethrow at your discretion. raise e elif e.response['Error']['Code'] == 'InternalServiceErrorException': # An error occurred on the server side. # Deal with the exception here, and/or rethrow at your discretion. raise e elif e.response['Error']['Code'] == 'InvalidParameterException': # You provided an invalid value for a parameter. # Deal with the exception here, and/or rethrow at your discretion. raise e elif e.response['Error']['Code'] == 'InvalidRequestException': # You provided a parameter value that is not valid for the current state of the resource. # Deal with the exception here, and/or rethrow at your discretion. raise e elif e.response['Error']['Code'] == 'ResourceNotFoundException': # We can't find the resource that you asked for. # Deal with the exception here, and/or rethrow at your discretion. raise e else: # Decrypts secret using the associated KMS CMK. # Depending on whether the secret is a string or binary, one of these fields will be populated. if 'SecretString' in get_secret_value_response: secret = get_secret_value_response['SecretString'] j = json.loads(secret) password = j['password'] else: decoded_binary_secret = base64.b64decode(get_secret_value_response['SecretBinary']) print("password binary:" + decoded_binary_secret) password = decoded_binary_secret.password try: if(conn is None): conn = pymysql.connect( rds_host, user=name, passwd=password, db=db_name, connect_timeout=5) elif (not conn.open): # print(conn.open) conn = pymysql.connect( rds_host, user=name, passwd=password, db=db_name, connect_timeout=5) except Exception as e: print (e) print("ERROR: Unexpected error: Could not connect to MySql instance.") raise e def lambda_handler(event, context): if invokeConnCountManager(True) == "false": print ("Not enough Connections available.") return False item_count = 0 try: openConnection() # Introducing artificial random delay to mimic actual DB query time. Remove this code for actual use. time.sleep(random.randint(1, 3)) with conn.cursor() as cur: cur.execute("select * from Employees") for row in cur: item_count += 1 print(row) # print(row) except Exception as e: # Error while opening connection or processing print(e) finally: print("Closing Connection") if(conn is not None and conn.open): conn.close() invokeConnCountManager(False) content = "Selected %d items from RDS MySQL table" % (item_count) response = { "statusCode": 200, "body": content, "headers": { 'Content-Type': 'text/html', } } return response
In the AWS Secrets Manager console, you can also look at the new secret that was created from CloudFormation execution by following the below steps:
Go to theAWS Secret Manager service page with appropriate IAM permissions
From the list of secrets, click on the latest secret with the name MyRDSInstanceRotationSecret-…
You will see the secret details and rotation information on the screen, as shown in the following screenshot:
Figure 8: Secret details and rotation information
Conclusion
In this post, I showed you how to manage database secrets using AWS Secrets Manager and how to leverage Secrets Manager’s API to retrieve the secrets into a Lambda execution environment to improve database security and protect sensitive data. Secrets Manager helps you protect access to your applications, services, and IT resources without the upfront investment and ongoing maintenance costs of operating your own secrets management infrastructure. To get started, visit the Secrets Manager console. To learn more, visit Secrets Manager documentation.
If you have feedback about this post, add it to the Comments section below. If you have questions about implementing the example used in this post, open a thread on the Secrets Manager Forum.
Want more AWS Security how-to content, news, and feature announcements? Follow us on Twitter.
Ramesh Adabala
Ramesh is a Solution Architect on the Southeast Enterprise Solution Architecture team at AWS.
#gallery-0-5 { margin: auto; } #gallery-0-5 .gallery-item { float: left; margin-top: 10px; text-align: center; width: 33%; } #gallery-0-5 img { border: 2px solid #cfcfcf; } #gallery-0-5 .gallery-caption { margin-left: 0; } /* see gallery_shortcode() in wp-includes/media.php */
Go to Source Author: Ramesh Adabala How to securely provide database credentials to Lambda functions by using AWS Secrets Manager Original Post from Amazon Security Author: Ramesh Adabala As a solutions architect at AWS, I often assist customers in architecting and deploying business applications using APIs and…
0 notes
Text
What Is AWS Secrets Manager? And Its Benefits, Features

Manage the secrets lifecycle centrally using AWS Secrets Manager.
What is AWS Secrets Manager?
OAuth tokens, API keys, database credentials, application credentials, and other secrets may all be managed, retrieved, and rotated with the aid of AWS Secrets Manager. Many AWS services store and use secrets using Secrets Manager.
Secrets Manager improves your security posture by removing the requirement for hard-coded credentials in application source code. If you save your credentials in Secrets Manager, anyone who can look at your program or its components could potentially compromise it. A runtime call to the Secrets Manager service lets you dynamically retrieve credentials when needed, replacing hard-coded credentials.
Secrets Manager allows you to create an automatic secret rotation schedule. This greatly lowers the chance of compromise by allowing you to swap out long-term secrets for short-term ones. Rotating credentials no longer necessitates upgrading your apps and sending modifications to application clients because the credentials are no longer kept with the application.
Advantages
Centrally audit and securely encrypt secrets.
Control who has access to secrets.
Rotate secrets on their own.
To help with catastrophe recovery plans, replicate secrets.
Use cases
Keep secrets safe
Manage and keep credentials, API keys, and other secrets in one place.
Use fine-grained policies to control access
To control who may access your secrets, use AWS Identity and Access Management (IAM) permissions policies.
Rotate secrets automatically
Without redeploying or interfering with running applications, rotate secrets on demand or according to a schedule.
Audit and track the use of secrets
Connect secrets to AWS’s notification, logging, and monitoring services.
Features of AWS Secrets Manager
Safekeeping of secrets
Using encryption keys that you hold and keep in AWS Key Management Service (AWS KMS), AWS Secrets Manager encrypts secrets while they are at rest.
Secrets Manager decrypts the secret when you retrieve it and sends it safely over TLS to your local environment.
Using resource-based and fine-grained IAM policies, Secrets Manager connects with AWS Identity and Access Management (IAM) to manage access to the secret.
Rotating secrets automatically without interfering with applications
Using the Secrets Manager console, AWS SDK, or AWS CLI, you may use AWS Secrets Manager to rotate secrets on a schedule or as needed.
Rotating credentials for databases housed on Amazon RDS and Amazon DocumentDB as well as clusters hosted on Amazon Redshift are natively supported by Secrets Manager.
By altering sample Lambda functions, you can expand Secrets Manager to rotate secrets used with other AWS or 3P services.
Secrets are automatically replicated to several AWS regions
To satisfy your specific disaster recovery and cross-regional redundancy needs, you can use AWS Secrets Manager to automatically replicate your secrets to many AWS Regions. There is no need to maintain a complicated solution for this capability; simply specify which AWS regions a secret needs to be replicated to, and Secrets Manager will safely generate regional read replicas. You can trust Secrets Manager to maintain the replicas in sync with the primary secret while granting your multi-Region apps access to replicated secrets in the necessary Regions.
Secret retrieval via programming
When developing your applications, keep hidden security in mind.
Code samples for calling Secrets Manager APIs from popular programming languages are provided by Secrets Manager. Two categories of APIs are available for retrieving secrets:
By name or ARN, retrieve a single secret.
Provide a list of names or ARNs, or filter criteria like tags, to retrieve a collection of secrets.
Set up Amazon Virtual Private Cloud (VPC) endpoints so that communications between Secrets Manager and your VPC remain inside the AWS network.
Additionally, Secrets Manager client-side caching libraries can be used to decrease latency and increase availability while retrieving secrets.
Audit and track the use of secrets
By integrating with AWS logging, monitoring, and notification services, AWS Secrets Manager lets you audit and keep an eye on secrets. For instance, you can inspect AWS CloudTrail logs to audit when a secret is produced or rotated once AWS CloudTrail has been enabled for an AWS Region. Likewise, you can set up Amazon CloudWatch Events to get push alerts when Secrets Manager rotates your secrets, or you can set up Amazon CloudWatch to get email notifications using Amazon Simple Notification Service when secrets aren’t utilized for a while.
Compliance
AWS Secrets Manager can be used to satisfy compliance standards.
Use AWS Config Rules to guarantee your secrets meet enterprise security and compliance standards.
The Department of Defense Cloud Computing Security Requirements Guide (DoD CC SRG IL2, IL4, and IL5), FedRAMP, HIPAA, ISO/IEC 27001, ISO/IEC 27017, ISO/IEC 27018, ISO 9001, and the Payment Card Industry Data Security Standard
Integration of Secrets Manager
Secrets Manager integrates with AWS services to safely handle your login credentials. You can safely swap login credentials with different AWS services thanks to these integrations. Either customer-managed or AWS-managed KMS keys are used to encrypt the credentials kept in Secrets Manager. To maintain a high level of security, Secrets Manager rotates secrets on a regular basis. You will be able to supply an AWS service with the ARN of a secret rather than a plain text credential once your secrets are stored with Secrets Manager.
Read more on Govindhtech.com
#AWSSecretsManager#SecretsManager#APIkeys#AWSKeyManagementService#IAM#secrets#VPC#API#News#Technews#Technology#Technologynews#Technologytrends#Govindhtech
0 notes
Photo

@awscloud: Learn how to use AWS Secrets Manager to help protect access to your applications, services & IT resources: https://buff.ly/2K8iefd https://buff.ly/2K5MK9i⠀ ⠀ ⠀ ⠀ ⠀ ⠀ ⠀ ⠀ ⠀ #secretsmanager #app #application #service #IT #itresources #informationtechnology #technology #cloud #CloudComputing #cloudsecurity #cloudmarket⠀ ⠀ #google #googlecloudplatform #gcp #gcpcloud⠀ ⠀ #microsoft #azurecloud #Microsoftazure #azure #office365⠀ ⠀ #amazon #aws #AmazonWebServices #awscloud⠀ ⠀ #alibabacloud ⠀ ⠀ #containers #dockers #serverless https://ift.tt/2HOQY71
0 notes
Text
The state of secrets security: 7 action items for better managing risk

The exposure of development secrets is a growing epidemic, driven by software supply chain complexity. Over 4 years, exposed secrets have quadrupled.
Read more: https://jpmellojr.blogspot.com/2024/04/the-state-of-secrets-security-7-action.html
0 notes
Text
AWS Cost Allocation Tags Best Practices in Secrets Manager

How to use AWS Secrets Manager's new Cost Allocation Tags feature
Discover how to use Secrets Manager Costs Allocation Tags, a new tool, to better understand your spending.
AWS Secrets Manager manages, retrieves, and rotates database credentials, application credentials, API keys, and other secrets. Replacement of hard-coded credentials in application source code with runtime calls to retrieve credentials dynamically helps prevent unauthorised access to secrets from source code, configuration, or components. Payer accounts control cost allocation tags.
Before this capability, your AWS bill would only show the total cost of Secrets Manager for a given account; fees per secret could not be separated by cost centre or organisation.
AWS Secrets Manager tags cost allocation
New feature: AWS Secrets Manager Cost Allocation Tags. Cost Allocation Tags, a basic AWS feature, can assign a key-value pair to a resource. AWS Cost Explorer supports these cost allocation tags. Once activated, these tags let you classify and track spending. Make a tag group with the value Engineering to identify engineering team resources. Once you activate this cost allocation tag, you can track charges, filter or group by tags in Cost Explorer and add tags to reports for analysis and visualisation, such as cost and use reports.
AWS Secrets Manager now supports cost allocation tags for better expenditure control and visibility. This lets you better classify and track Secrets Manager usage expenses. AWS costs can be better managed by assigning secret charges to cost centres or organisations.
The purpose of cost allocation tags
Tags are labels you or AWS assign to AWS resources. Each tag has a key and value. Every resource must have a unique tag key with one value. Cost allocation tags help you track AWS charges and organise resources.
This new skill lets you:
Dissect Secrets Manager expenditures by company-relevant factors like environment, project, or department.
Check Cost Explorer's itemised Secrets Manager usage and cost and use data.
Improve chargeback and cost allocation across your firms and divisions.
Creating AWS cost allocation tags
The AWS Secrets Manager tag cost allocation process has four steps:
Cost allocation labels are needed.
Tag resources (secrets manager secrets) with cost allocation.
At the AWS Billing console, enable your Cost Allocation Tags.
Tag-filter and group Cost Explorer to create cost categories.
After creating and attaching user-defined tags to resources, the Cost Allocation Tags page in the AWS Billing dashboard may not reveal tag keys for activation for 24 hours. Once tags appear, you must activate them for AWS to track expenses and display them in Cost Explorer. Tag key activation may take further 24 hours.
Create and add user-defined tags for Secrets Manager secret cost allocation using the AWS CLI or Management Console. The tag key CostCenter is used to monitor costs by cost centre.
Select an existing or new secret in the Secrets Manager console and click Tags to edit tags. A key-value pair, like CostCenter, and a cost centre code, such 7263 for engineering or 1121 for finance, would be assigned.
AWS CLI users can use aws secretsmanager tag-resource. The –secret-id and –tags must be key-value pairs (Key=CostCenter,Value=7263). When this command works, no output is usually provided.
Use the AWS CLI or Billing and Cost Management console to enable user-defined cost allocation tags.
Select user-defined cost allocation tags, choose tag keys, then click Activate in the Console to activate cost allocation tags. This opens the AWS Cost Management and Billing window.
The aws ce update-cost-allocation-tags-status command sets the Status to Active and provides the TagKey (e.g., TagKey=CostCenter,Status=Active).
Cost Explorer results are the final phase. After Cost Explorer displays the activated tag (such as CostCenter) under Tags in the Filter or Group By fields, you can filter or group by use and charges.
Cost Explorer lets you set report parameters to see results. After selecting a Date Range, select Dimension as Tag under Group by and choose your tag (e.g., Cost Centre). Filters let you select The Secrets Manager Service.
Tag values (e.g., by cost centres like engineering 7263 and finance 1121) show the cost and utilisation of your secrets. This report lets you cross-charge secret charges to your company's cost areas.
#AWSSecretsManager#ManagerCostAllocation#AWSCommandLineInterface#CostManagementconsole#CostAllocationTags#SecretsManagerexpenses#technology#technews#technologynews#news#govindhtech
0 notes
Text
AWS Secret Manager Cost, Access Control And Authentication
Access control and authentication for AWS Secret Manager
AWS Identity and Access Management (IAM) is used by Secrets Manager to protect secret access. Access control and authentication are offered by IAM. Authentication confirms the legitimacy of people’s requests. Multi-factor authentication (MFA) tokens, access keys, and passwords are used in Secrets Manager’s sign-in procedure to confirm users’ identities. Look logging into AWS. Only authorized users are able to access AWS resources, including secrets, thanks to access control. Policies are used by Secrets Manager to specify who can access what resources and what actions an identity can do on them. View IAM’s policies and permissions.
Reference to AWS Secret Manager permissions
The Secrets Manager permissions reference may be found in the Service Authorization Reference under Actions, resources, and condition keys for AWS Secrets Manager.
Administrator permissions for Secrets Manager
Attach the following policies and complete the steps at Adding and deleting IAM identity permissions to provide AWS Secret Manager administrator permissions:
SecretsManagerReadWrite
IAMFullAccess
AWS advises against giving end users administrator privileges. The permission needed to enable rotation (IAMFullAccess) gives substantial access that are inappropriate for end users, even while this lets your users generate and manage own secrets.
Lambda rotation function permissions
Secrets Manager rotates secrets using AWS Lambda functions. Both the secret and the database or service for which the secret includes login credentials must be accessible to the Lambda function.
Keys for encryption permissions
AWS Secret Manager encrypts secrets using AWS Key Management Service (AWS KMS) keys. The proper permissions are immediately present in the AWS managed key aws/secretsmanager. Secrets Manager need permissions to the KMS key if you use a different one.
Replication permissions
You can limit which users or services are able to duplicate your secrets to other regions by utilizing IAM authorization policies.
Which secrets are allowed to be kept in Secrets Manager?
Database credentials, on-premises resource credentials, SaaS application credentials, third-party API keys, and Secure Shell (SSH) keys are among the secrets that can be managed.
Please be aware that while AWS Secret Manager lets you save a JSON document that lets you handle any text blurb that is 64 KB or less, allowing it to be utilized in a variety of situations, there are better ways to maintain some sorts of secrets in AWS, such as:
AWS credentials: Rather than using Secrets Manager to store or get AWS credentials, we can utilize AWS IAM.
Use the AWS KMS service for encryption keys.
Use AWS EC2 Instance Connect instead of SSH keys.
Use AWS Certificate Manager for private keys and certificates.
Beginning to Use AWS Secret Manager
Step 1: Create an AWS account and log in
You can secure access to your IT resources, services, and apps with AWS Secrets Manager.
Step 2: Access the Console for Secrets Management
Throughout their existence, database credentials, API keys, and other secrets can be effortlessly rotated, managed, and retrieved.
Step 3: To start the wizard, click on Store a new secret
Our 30-day free trial allows you to test Secrets Manager without paying anything extra. When you store your first secret, the free trial begins.
AWS Secrets Manager pricing
Pricing Overview
You can rotate, manage, and recover secrets at any point in their lifecycle using AWS Secret Manager, which makes it simpler to keep your environment safe and compliant. You pay for Secrets Manager according to how many secrets are saved and how many API calls are made. There are no long-term agreements or up-front fees. You only pay for usage; you don’t have to pay for the staff, infrastructure, or licenses needed to guarantee that your secrets are highly accessible and dependable.
Free Trial
Trial Period of 30 Days
With a 30-day free trial, you may test AWS Secrets Manager without paying anything more. You can rotate, manage, and retrieve secrets during the 30-day free trial.
When you store your first secret, your free trial begins.
Pricing
Monthly Per Secret
Each secret costs $0.40 a month. Replica secrets are billed at $0.40 per replica each month and are regarded as separate secrets. The cost is prorated (according to the amount of hours) for secrets that are kept for less than a month.
Get in touch with AWS if your company intends to use a lot of secrets.
Per 10,000 API calls
$0.05 per 10,000 API calls
Read more on Govindhtech.com
#AWSSecretManagerCost#AWSSecret#SecretManager#AWSSecretManager#IAM#KMSkey#News#Technews#Technology#Technologynews#Technologytrends#Govindhtech
0 notes
Text
Automating Hyperledger Fabric chaincode deployment on Amazon Managed Blockchain using AWS CodePipeline
Amazon Managed Blockchain is a fully managed service that makes it easy to create and manage blockchain networks using the open-source blockchain framework Hyperledger Fabric. In this post, we explore how to use AWS CodePipeline and related services to automate the deployment of chaincode. Chaincode is a program that typically handles business logic agreed to by members of the network and is sometimes called a smart contract. To install and instantiate chaincode on the blockchain network, you use the open-source Hyperledger Fabric CLI or SDK with the endpoints exposed on your Hyperledger Fabric resources. Chaincode runs in an isolated Docker container and can interact with the ledger by submitting transactions to the fabric network. Unlike other blockchain platforms, chaincode isn’t written in a domain specific language (DSL). It’s written in Go, NodeJS, or Java (or languages running on those respective platforms, such as Typescript or Scala). This enables you to use standard test and build tools with chaincode as part of a CI/CD process. By doing so, we can make chaincode deployments automated and consistent. In this post, we examine how to use tools such as CodePipeline, AWS CodeBuild, and AWS Lambda to perform automated testing and deployment of chaincode to Managed Blockchain. Solution overview The following architecture diagram describes our solution. A developer first commits their chaincode program to AWS CodeCommit. This commit triggers a pipeline in CodePipeline. Within the pipeline, CodeBuild is sent the chaincode that was committed to CodeCommit and performs a series of tests. If the tests pass, it zips up the code and stores it as a build artifact. CodePipeline invokes a Lambda function that retrieves the build artifact, extracts it, and deploys it to Managed Blockchain. AWS Secrets Manager stores the credentials required to authenticate with Hyperledger Fabric and tracks the current version number of the chaincode. The solution is hosted in the following GitHub repo. Although our Lambda function is written in NodeJS, the Fabric libraries that it uses include native code. All native code libraries must be compiled in an Amazon Linux environment. The easiest way to do this is to use an AWS Cloud9 instance or an Amazon Elastic Compute Cloud (Amazon EC2) instance running Amazon Linux. In this environment, clone the code for this post: git clone https://github.com/aws-samples/amazon-managed-blockchain-cicd-sample The solution is provided as an AWS Cloud Development Kit (AWS CDK) application. The cdk folder contains the app. This app creates the architecture described earlier. It also creates AWS Identity and Access Management (IAM) resources for this architecture. For more information about the AWS CDK, see Getting started with the AWS CDK. Prerequisites This walkthrough assumes you have already set up the following: A Hyperledger Fabric network on Managed Blockchain. For instructions on creating a Fabric network, see Create the Network and First Member and Part 1 of Build and deploy an application for Hyperledger Fabric on Amazon Managed Blockchain. A VPC with at least two private subnets and the Managed Blockchain VPC endpoints. For instructions, see Create an Interface VPC Endpoint to Connect to Managed Blockchain Network Resources. A Fabric client node from which to interact with your Fabric network and an AWS Cloud9 instance or Amazon Linux EC2 instance. For instructions, see Create an Amazon EC2 Instance and Set Up the Hyperledger Fabric Client. When you have the prerequisites installed, you can proceed to the next step. Examining the Lambda function The Lambda function reads the location of the chaincode build artifact from the event passed from CodePipeline, obtains Fabric credentials from Secrets Manager, and installs the chaincode to Fabric. It is written in NodeJS and is in the lambda directory. Downloading dependencies Prior to deploying our solution, we have to download the dependencies for our Lambda function. Change to the lambda directory within the solution and then enter the following code: npm install Uploading certificates The Lambda function needs an admin identity in order to install chaincode to the Fabric network. To provide this, we upload Fabric credentials to Secrets Manager using the AWS Command Line Interface (AWS CLI). The Lambda function accesses the secrets and uses them to authenticate with Fabric and deploy chaincode. To upload the credentials to Secrets Manager, run the following commands on your Fabric client node. Provide the name of your Fabric member as $MEMBERNAME, and substitute the path for the correct location of your admin-msp: aws secretsmanager create-secret --name "dev/fabricOrgs/$MEMBERNAME/admin/pk" - secret-string "`cat /home/ec2-user/admin-msp/keystore/*`" --region us-east-1 aws secretsmanager create-secret --name "dev/fabricOrgs/$MEMBERNAME/admin/signcert" --secret-string "`cat /home/ec2-user/admin-msp/signcerts/*`" --region us-east-1 Providing a connection profile A connection profile is a YAML file that provides the URL endpoints for the peer, ordering service, CA, and other details required for your Lambda function to connect to your Fabric network. The gen-connection-profile.sh script can generate a connection profile from shell variables. Alternatively, you can manually generate a connection profile. For instructions, see fabric-client: How to use a common connection profile. You can obtain the information necessary to populate the connection profile from the Managed Blockchain console. Name your connection profile connection-profile.yaml and place it in the lambda directory. Downloading Managed Blockchain certs We need to obtain the latest version of the Managed Blockchain PEM file and place it in the certs directory within the Lambda function source. To do so, run the following command in the lambda folder. Replace MyRegion with the AWS Region you’re using—for example, us-east-1: aws s3 cp s3:// MyRegion.managedblockchain/etc/managedblockchain-tls-chain.pem ~/certs Deploying the AWS CDK app You need to change several variables in the cdk.ts file prior to deploying the app: CA endpoint Peer endpoint Order endpoint MSP ID Member name VPC ID You can find the details pertinent to Managed Blockchain from the client node or from your blockchain network details on the Managed Blockchain console. The VPC ID is the ID for the VPC (for example, vpc-12345) that you created earlier. Modify the variables to reflect your environment. When the variables are up to date, in the cdk folder, run the following: cdk deploy You receive the following prompt: Do you wish to deploy these changes (y/n)? Accept the changes and the solution is deployed via AWS CloudFormation. After the solution is deployed, navigate to the CodePipeline console and you can see that a new pipeline has been created. This pipeline has three stages: source, build, and deploy, and correlates to the architecture diagram from earlier. We return to the first stage soon to start the pipeline, but first let’s examine the build and deploy stages. Testing chaincode with CodeBuild The chaincode for this solution resides in the chaincode folder. It’s a very simple golang program named forex, which you can use to get and set foreign exchange rates, such as (“USD:CAD”, 0.75). We test this chaincode and then deploy it to Fabric. CodeBuild uses a YAML buildspec file to run a build for this chaincode. The buildspec file for our solution is in the chaincode folder, which is included inline in the following code: version: 0.2 env: variables: PACKAGE: "forex" phases: install: runtime-versions: golang: 1.13 commands: # Download the appropriate version of the Fabric Shim - wget https://github.com/hyperledger/fabric/archive/v1.4.2.tar.gz - tar xvzf v1.4.2.tar.gz - mkdir -p /go/src/github.com/hyperledger - mv fabric-1.4.2 /go/src/github.com/hyperledger/fabric - rm v1.4.2.tar.gz # Install golint - go get -u github.com/golang/lint/golint build: commands: - mkdir -p /go/src/${PACKAGE} - ls /go/src/forex - ls ${CODEBUILD_SRC_DIR} - cp -r ${CODEBUILD_SRC_DIR}/* /go/src/${PACKAGE}/ - cd /go/src/${PACKAGE} - go get -t . # Lint our Chaincode - golint -set_exit_status # Check the Go code for common problems with 'go vet' - go vet . # Run unit tests using Mockshim to test our chaicode - go test . - zip -r /go/src/${PACKAGE}/forex.zip "/go/src/${PACKAGE}" artifacts: files: - /go/src/${PACKAGE}/forex.zip This differs from a traditional golang build in a significant way: the end artifact isn’t a binary. Rather, it’s a .zip file of our chaincode. The reason for this is that the chaincode is compiled as part of the installation process. Instead, this buildspec file runs tests against the chaincode and produces a .zip file that you can use to install the chaincode on your Fabric network. The buildspec defines the following steps: GoLint – Detects style mistakes GoVet – Detects common go problems such as inappropriate calls to printf or improper pointer passing Go test – Runs our test suite based around shimtest The first two steps are agnostic to the chaincode; they simply treat the code as standard go code. Our test suite, however, uses shimtest to perform unit tests against our chaincode. shimtest provides a mock version of the shim.ChainCodeStubInterface and can simulate much of the interactions between our chaincode and Hyperledger Fabric. We can use shimtest to ensure that our chaincode implements the correct business logic and that the appropriate state changes are written to the ledger. This allows us to validate the correctness of our chaincode without having to deploy the chaincode to Fabric. This approach is fully compatible with traditional unit testing, and allows you to use standard tools to run individual tests. Because our chaincode is written in golang, we can make use of the golang testing and assert packages to orchestrate our tests using shimtest. This allows us to test the chaincode with the following code: go test Instead of running the test manually, we use CodeBuild. Before we proceed, let’s examine the simple test that we run on our chaincode. In the chaincode folder, the forex_test.go file contains a simple function for testing our chaincode using MockStub. The following line creates a mock instantiation of our chaincode, which allows us to perform mock invocations: stub := shim.NewMockStub("forex", new(ForexChaincode)) The following lines run the invocation and use the assert library to confirm that the result is accurate: response = stub.MockInvoke(uuid, args) assert.EqualValues(t, shim.OK, response.GetStatus(), "failed to execute invocation") Committing chaincode and starting the pipeline To use the pipeline, we have to commit the contents of the chaincode directory to the CodeCommit repository. You can find the name and URL of the CodeCommit repo from the AWS CDK stack outputs or the CodeCommit console. You can commit to the repo with either a Git client or the AWS CLI. For instructions, see Create a commit in AWS CodeCommit. Committing to the CodeCommit repo triggers the pipeline. The chaincode should successfully pass testing, after which the Lambda function installs the chaincode to Managed Blockchain. The CodePipeline console should show a result similar to the following screenshot. If you inspect the logs for CodeBuild, you should see a successful run where the chaincode passed linting, go vet, and testing. Likewise, the Lambda logs should show that it has successfully installed the chaincode to the Fabric network. You can confirm that the installation completed successfully by listing the installed chaincodes from a Fabric client node: peer chaincode list --installed You should see something resembling the following code: Name: forex, Version: 1, Path: forex, Id … Subsequently, you can instantiate the chaincode by running the following command on your fabric client: docker exec -e "CORE_PEER_TLS_ENABLED=true" -e "CORE_PEER_TLS_ROOTCERT_FILE=/opt/home/managedblockchain-tls-chain.pem" -e "CORE_PEER_LOCALMSPID=$MSP" -e "CORE_PEER_MSPCONFIGPATH=$MSP_PATH" -e "CORE_PEER_ADDRESS=$PEER" cli peer chaincode install -n $FOREXCHAINCODENAME -v v0 -p forex/cmd Clean Up When you have completed the solution, you can delete the AWS CDK stack with the following code: cdk destroy If you created a new VPC, AWS Cloud9 instance, or other resources, you can also delete those. Summary In this post, we explored how to use CodePipline and Managed Blockchain to automated the testing and deployment of chaincode to a Hyperledger Fabric network. You could extend this solution further through additional Lambda functions to instantiate chaincode, create channels, perform integration testing, and other activities as part of the pipeline. About the Author Dr. Jonathan Shapiro-Ward is a Principal Solutions Architect at AWS based in Toronto. Jonathan has been with AWS for 3.5 years and in that time has worked helping customers solve problems including petabyte scale analytics and the adoption of ML, serverless, and blockchain. He has spoken at events across the world where he focused on areas of emerging technology. Jonathan has previously worked in a number of industries including gaming and fintech and has a background in academic research. He holds a PhD in distributed systems from the University of St Andrews. https://aws.amazon.com/blogs/database/automating-hyperledger-fabric-chaincode-deployment-on-amazon-managed-blockchain-using-aws-codepipeline/
0 notes