#EnvironmentVariables
Explore tagged Tumblr posts
Visit Tumblr Blog
Explore Tumblr blogs with no restrictions, modern design and the best experience.
Last Seen Tumblr Blogs


Fun Fact
Tumblr Inc. is funded by 13 investors.
Text
CI/CD pipelines and the cloud: Are your development secrets at risk?

When combined with cloud service providers' CLIs, CI/CD can pose a serious security threat. Here's why — and how to keep a lid on your secrets. https://jpmellojr.blogspot.com/2024/05/cicd-pipelines-and-cloud-are-your.html
#CICDSecurity#SecretsManagement#CloudSecurity#DevSecOps#SoftwareSupplyChain#SecretsLeakage#BestPractices#EnvironmentVariables#CloudCLIs
0 notes
Video
youtube
(via Access Environment Variable in Nodejs JavaScript Application | Reading ENV Variable Example)
#video#reading#accessing#environmentvariables#nodejs#projeect#application#tutorial#examples#codeonedigest#youtube#…#Full Video Link https://youtu.be/dxrNopL1sbQ Hello friends new video on reading accessing environmentvariables in nodejs proj
0 notes
Text
仮想Linuxサーバー構築(Mac mini[M1])
作業内容
Mac Mini本体の電源投入時、仮想サーバーが自動起動されるように準備する
仮想サーバーを手動で起動・停止するスクリプトを準備する
前回作業の続き
参考:https://support.apple.com/ja-jp/guide/terminal/apdc6c1077b-5d5d-4d35-9c19-60f2397b2369/2.11/mac/11.0
参考:https://hacknote.jp/archives/19154/
参考:https://junji-furuya0.hatenadiary.org/entry/20110828/1314536372
参考:https://www.belbel.or.jp/opensuse-manuals_ja/cha-qemu-monitor.html
手順1:事前準備
qemu/shareフォルダのシンボリックリンク作成
ターミナルから下記のコマンド操作を行う
taiyo@Mac-mini ~ % sudo mkdir /usr/local/share Password: taiyo@Mac-mini ~ % sudo ln -s /opt/qemu-20210816/share/qemu /usr/local/share/qemu taiyo@Mac-mini ~ % ls -l /usr/local/share total 0 lrwxr-xr-x 1 root wheel 29 8 22 15:56 qemu -> /opt/qemu-20210816/share/qemu
仮想サーバープロセスの有無を確認
ターミナルから下記のコマンド操作を行う
taiyo@Mac-mini ~ % ps -A | grep qemu 1476 ttys000 0:00.00 grep qemu
手順2:QEMU自動起動設定
launchd構成ファイルを作成
ターミナルから下記のコマンド操作を行う
(2021/10/12追記)『EnvironmentVariables』は不要
(2021/10/12追記)仮想Linuxサーバー構築で対策
taiyo@Mac-mini ~ % sudo vim /Library/LaunchDaemons/net.taiyo.qemu-guest-000.start.plist Password: taiyo@Mac-mini ~ % cat /Library/LaunchDaemons/net.taiyo.qemu-guest-000.start.plist <!DOCTYPE plist PUBLIC "-//Apple//DTD PLIST 1.0//EN" "http://www.apple.com/DTDs/PropertyList-1.0.dtd"> <plist version="1.0"> <dict> <key>Label</key> <string>net.taiyo.qemu-guest-000.start</string> <key>RunAtLoad</key> <true/> <key>KeepAlive</key> <false/> <key>EnvironmentVariables</key> <dict> <key>PATH</key> <string>/opt/homebrew/bin:/opt/homebrew/sbin:/usr/local/bin:/usr/bin:/bin:/usr/sbin:/sbin</string> <key>USERNAME</key> <string>taiyo</string> <key>HOME</key> <string>/Users/taiyo</string> <key>CPUTYPE</key> <string>arm64</string> <key>LANG</key> <string>ja_JP.UTF-8</string> </dict> <key>ProgramArguments</key> <array> <string>/usr/local/bin/qemu-system-aarch64</string> <string>-name</string> <string>000_rh8-origin</string> <string>-display</string> <string>none</string> <string>-machine</string> <string>virt,highmem=off</string> <string>-cpu</string> <string>cortex-a72</string> <string>-smp</string> <string>2</string> <string>-m</string> <string>2G</string> <string>-k</string> <string>ja</string> <string>-device</string> <string>intel-hda</string> <string>-device</string> <string>hda-output</string> <string>-device</string> <string>virtio-gpu-pci</string> <string>-device</string> <string>qemu-xhci</string> <string>-device</string> <string>usb-tablet</string> <string>-device</string> <string>usb-kbd</string> <string>-monitor</string> <string>telnet::46000,server,nowait</string> <string>-net</string> <string>nic,model=virtio,macaddr=52:54:00:01:00:00</string> <string>-net</string> <string>user,hostfwd=tcp::42000-:22</string> <string>-drive</string> <string>if=pflash,format=raw,file=/usr/local/share/qemu/edk2-aarch64-code.fd,readonly=on</string> <string>-drive</string> <string>if=pflash,format=raw,file=/Users/taiyo/qemu-images/000/ovmf_vars.fd</string> <string>-drive</string> <string>if=virtio,format=raw,file=/Users/taiyo/qemu-images/000/qemu-000.img</string> <string>-boot</string> <string>order=d</string> </array> <key>StandardOutPath</key> <string>/dev/null</string> <key>StandardErrorPath</key> <string>/dev/null</string> </dict> </plist>
launchd構成ファイルの動作確認
ターミナルから下記のコマンド操作を行う
taiyo@Mac-mini ~ % sudo launchctl load /Library/LaunchDaemons/net.taiyo.qemu-guest-000.start.plist taiyo@Mac-mini ~ % ps -A | grep qemu 1512 ?? 0:02.29 /usr/local/bin/qemu-system-aarch64 -name 000_rh8-origin -display none -machine virt,highmem=off -cpu cortex-a72 -smp 2 -m 2G -k ja -device intel-hda -device hda-output -device virtio-gpu-pci -device qemu-xhci -device usb-tablet -device usb-kbd -monitor telnet::46000,server,nowait -net nic,model=virtio,macaddr=52:54:00:01:00:00 -net user,hostfwd=tcp::42000-:22 -drive if=pflash,format=raw,file=/usr/local/share/qemu/edk2-aarch64-code.fd,readonly=on -drive if=pflash,format=raw,file=/Users/taiyo/qemu-images/000/ovmf_vars.fd -drive if=virtio,format=raw,file=/Users/taiyo/qemu-images/000/qemu-000.img -boot order=d 1514 ttys000 0:00.00 grep qemu
手順3:手動停止スクリプト準備
手動停止スクリプトを作成
ターミナルから下記のコマンド操作を行う
taiyo@Mac-mini ~ % vim ~/qemu-images/qemu-000-stop.sh taiyo@Mac-mini ~ % cat ~/qemu-images/qemu-000-stop.sh #!/bin/bash GUEST_NAME="000_rh8-origin" MONITOR_PORT=46000 num=$(ps -A | grep -e "qemu-system-aarch64 -name ${GUEST_NAME}" | grep -v "grep" | wc -c) if [ $num -gt 0 ]; then (echo 'system_powerdown'; sleep 1s) | nc localhost ${MONITOR_PORT} else echo "Skip: ${GUEST_NAME} process is none." fi
手動停止スクリプトの動作確認
ターミナルから下記のコマンド操作を行う
taiyo@Mac-mini ~ % sh ~/qemu-images/qemu-000-stop.sh ????????QEMU 6.0.93 monitor - type 'help' for more information (qemu) system_powerdown (qemu) % taiyo@Mac-mini ~ % ps -A | grep qemu 1862 ttys000 0:00.00 grep qemu taiyo@Mac-mini ~ % sh ~/qemu-images/qemu-000-stop.sh Skip: 000_rh8-origin process is none..
手順4:手動起動スクリプト準備
手動起動スクリプトを作成
ターミナルから下記のコマンド操作を行う
taiyo@Mac-mini ~ % vim ~/qemu-images/qemu-000-start.sh taiyo@Mac-mini ~ % cat ~/qemu-images/qemu-000-start.sh #!/bin/bash GUEST_NAME="000_rh8-origin" PLIST_PATH="/Library/LaunchDaemons/net.taiyo.qemu-guest-000.start.plist" num=$(ps -A | grep -e "qemu-system-aarch64 -name ${GUEST_NAME}" | grep -v "grep" | wc -c) if [ $num -gt 0 ]; then echo "Skip: ${GUEST_NAME} process is alrady exist." else sudo launchctl unload ${PLIST_PATH} sudo launchctl load ${PLIST_PATH} fi
手動起動スクリプトの動作確認
ターミナルから下記のコマンド操作を行う
taiyo@Mac-mini ~ % sh ~/qemu-images/qemu-000-start.sh Password: taiyo@Mac-mini ~ % ps -A | grep qemu 1890 ?? 0:08.66 /usr/local/bin/qemu-system-aarch64 -name 000_rh8-origin -display none -machine virt,highmem=off -cpu cortex-a72 -smp 2 -m 2G -k ja -device intel-hda -device hda-output -device virtio-gpu-pci -device qemu-xhci -device usb-tablet -device usb-kbd -monitor telnet::46000,server,nowait -net nic,model=virtio,macaddr=52:54:00:01:00:00 -net user,hostfwd=tcp::42000-:22 -drive if=pflash,format=raw,file=/usr/local/share/qemu/edk2-aarch64-code.fd,readonly=on -drive if=pflash,format=raw,file=/Users/taiyo/qemu-images/000/ovmf_vars.fd -drive if=virtio,format=raw,file=/Users/taiyo/qemu-images/000/qemu-000.img -boot order=d 1892 ttys000 0:00.00 grep qemu taiyo@Mac-mini ~ % sh ~/qemu-images/qemu-000-start.sh Skip: 000_rh8-origin process is alrady exist.
仮想サーバーログインの確認
ターミナルから下記のコマンド操作を行う
taiyo@Mac-mini ~ % ssh -p 42000 taiyo@localhost taiyo@localhost's password: Activate the web console with: systemctl enable --now cockpit.socket Last login: Wed Aug 18 16:43:49 2021 from 10.0.2.2 [taiyo@localhost ~]$ logout Connection to localhost closed. taiyo@Mac-mini ~ %
0 notes
Text
Neobiontomania: Megastorm

Profil w komputerze:
Typ: Elektryczny
Charakter: Neutralny
Rozmiar: ok. 2m
Ludzkie pochodzenie: Tak
Rozumny: Tak
Typ ciała: Humanoid
Systematyka: Człowiekowate
Zdolności: Elektrokineza, zwiększona siła i wytrzymałość
Naturalna broń: Brak
Wygląd
Podobni do ludzi, ale mocniej zbudowani od przeciętnego człowieka, wysocy. Skóra pomarańczowa. Brak widocznego nosa, białe włosy, oczy (co nie oznacza jednak, że są ślepi - bynajmniej), paznokcie i naturalne wzory na skórze. Te wzory mogą być bardzo różnorodne, możliwe że są podobnie unikalne, co dla ludzi odciski palców.
Zachowanie:
Są gatunkiem rozumnym, cywilizowanym, ale są też dość mocno terytorialni, a czasem nawet i agresywni. Można się jednak z nimi dogadać.
Środowisko
Różne. Zazwyczaj żyją w niewielkich wioskach.
Zdolności
Potrafią generować silne wyładowania elektryczne, zazwyczaj przybierające formę pomarańczowych błyskawic. Wysoka odporność na błyskawice, które to mogą nawet przekierowywać.
Słabości
Tak jak większość Neobiontów Elektrycznych są wrażliwi na obrażenia od plazmy.
Pokarm
Wszystkożerni (jak ludzie)
Znane przykłady
Megasztorm Mariona
Megasztorm Wendella
Megasztorm Grega
Tłumaczenie na inne języki:
Angielski: Megastorm
Esperanto: Megaŝtormo
Niemiecki: der Megasturm
Polski: Megasztorm
Translation:
Profile in the computer
Type: Electric
Character: Neutral
Size: approx. 2m
Human Origin: Yes
Rational: Yes
Body Type: Humanoid
Systematics: Humanaceae
Abilities: Electrokinesis, increased strength and endurance
Natural Weapons: None
Look
Similar to people, but more built than the average person, tall. Orange skin. No visible nose, white hair, eyes (which doesn't mean they are blind - by no means), nails and natural patterns on the skin. These patterns can be very diverse, possibly as unique as fingerprints to humans.
Behavior:
They are a sapient, civilized species, but they are also quite territorial, and sometimes even aggressive. However, one can get along with them.
Environment
Various. They usually live in small villages.
Abilities
They can generate strong electrical discharges, usually in the form of orange lightning. High resistance to lightning, which can even redirect it.
Weaknesses
Like most Electric Neobionts, they are vulnerable to plasma damage.
Food
Omnivores (like humans)
Known examples
Marion’s Megastorm
Wendell’s Megastorm
Greg’s Megastorm
Translation to the another languages
English: Megastorm
Esperanto: Megaŝtormo
German: der Megasturm
Polish: Megasztorm
Traduko:
Profilo en la komputilo:
Tipo: Elektra
Karaktero: Neŭtrala
Grandeco: ĉirkaŭ 2m
Homa Origino: Jes
Racia: Jes
Korpotipo: Homsimilulo
Sistematiko: Homedoj
Povoj: Elektrokinezo, pliigita forto kaj eltenpoveco
Naturaj Armiloj: Nenio
Anatomio
Simila al homoj, sed pli forte konstruitaj ol la averaĝa homo, alta. Oranĝa haŭto. Neniu videbla nazo, blankaj haroj, okuloj (kio ne signifas, ke ili estas blindaj - tute ne), ungoj kaj naturaj ŝablonoj sur la haŭto. Ĉi tiuj ŝablonoj povas varii vaste, eble estante same unikaj kiel fingrospuroj al homoj.
Konduto:
Ili estas racia civilizita specio, sed ili ankaŭ estas sufiĉe teritoriaj, kaj kelkfoje eĉ agresemaj. Tamen oni povas interkonsenti kun ili.
Medio
Varia. Ili kutime loĝas en malgrandaj vilaĝoj.
Povoj
Ili povas generi fortajn elektrajn malŝarĝojn, kutime en la formo de oranĝa fulmo. Alta rezisto al fulmo, kiu eĉ povas redirekti ĝin.
Malfortoj
Kiel plej multaj Elektraj Neobiontoj, ili estas vundeblaj al plasmo-damaĝo.
Manĝaĵo
Ĉiomanĝantoj (kiel homoj)
Konataj ekzemploj
Megaŝtormo de Marion
Megaŝtormo de Wendell
Megaŝtormo de Greg
Traduko al la aliaj lingvoj
Angla: Megastorm
Esperanto: Megaŝtormo
Germana: der Megasturm
Pola: Megasztorm
0 notes
Text
Docker Machine Xhyve

Elasticsearch will then only be accessible from the host machine itself. The Docker named volumes data01, data02, and data03 store the node data directories so the data persists across restarts. If they don’t already exist, docker-compose creates them when you bring up the cluster. Make sure Docker Engine is allotted at least 4GiB of memory. Docker Engine 1.12 introduced a new swarm mode for natively managing a cluster of Docker Engines called a swarm. Docker swarm mode implements Raft Consensus Algorithm and does not require using external key value store anymore, such as Consul or etcd. If you want to run a swarm cluster on a developer’s machine, there are several options.
« Install Elasticsearch with Windows MSI InstallerInstall Elasticsearch on macOS with Homebrew »
Elasticsearch is also available as Docker images.The images use centos:8 as the base image.
A list of all published Docker images and tags is available atwww.docker.elastic.co. The source filesare inGithub.
This package contains both free and subscription features.Start a 30-day trial to try out all of the features.
Obtaining Elasticsearch for Docker is as simple as issuing a docker pull commandagainst the Elastic Docker registry.
To start a single-node Elasticsearch cluster for development or testing, specifysingle-node discovery to bypass the bootstrap checks:
Starting a multi-node cluster with Docker Composeedit
To get a three-node Elasticsearch cluster up and running in Docker,you can use Docker Compose:
This sample docker-compose.yml file uses the ES_JAVA_OPTSenvironment variable to manually set the heap size to 512MB. We do not recommendusing ES_JAVA_OPTS in production. See Manually set the heap size.
This sample Docker Compose file brings up a three-node Elasticsearch cluster.Node es01 listens on localhost:9200 and es02 and es03 talk to es01 over a Docker network.
Please note that this configuration exposes port 9200 on all network interfaces, and given howDocker manipulates iptables on Linux, this means that your Elasticsearch cluster is publically accessible,potentially ignoring any firewall settings. If you don’t want to expose port 9200 and instead usea reverse proxy, replace 9200:9200 with 127.0.0.1:9200:9200 in the docker-compose.yml file.Elasticsearch will then only be accessible from the host machine itself.
The Docker named volumesdata01, data02, and data03 store the node data directories so the data persists across restarts.If they don’t already exist, docker-compose creates them when you bring up the cluster.
Make sure Docker Engine is allotted at least 4GiB of memory.In Docker Desktop, you configure resource usage on the Advanced tab in Preference (macOS)or Settings (Windows).
Docker Compose is not pre-installed with Docker on Linux.See docs.docker.com for installation instructions:Install Compose on Linux
Run docker-compose to bring up the cluster:
Submit a _cat/nodes request to see that the nodes are up and running:
Log messages go to the console and are handled by the configured Docker logging driver.By default you can access logs with docker logs. If you would prefer the Elasticsearchcontainer to write logs to disk, set the ES_LOG_STYLE environment variable to file.This causes Elasticsearch to use the same logging configuration as other Elasticsearch distribution formats.

To stop the cluster, run docker-compose down.The data in the Docker volumes is preserved and loadedwhen you restart the cluster with docker-compose up.To delete the data volumes when you bring down the cluster,specify the -v option: docker-compose down -v.
See Encrypting communications in an Elasticsearch Docker Container andRun the Elastic Stack in Docker with TLS enabled.
The following requirements and recommendations apply when running Elasticsearch in Docker in production.
The vm.max_map_count kernel setting must be set to at least 262144 for production use.
How you set vm.max_map_count depends on your platform:
Linux
The vm.max_map_count setting should be set permanently in /etc/sysctl.conf:
To apply the setting on a live system, run:
macOS with Docker for Mac
The vm.max_map_count setting must be set within the xhyve virtual machine:
From the command line, run:
Press enter and use`sysctl` to configure vm.max_map_count:
To exit the screen session, type Ctrl a d.
Windows and macOS with Docker Desktop
The vm.max_map_count setting must be set via docker-machine:
Windows with Docker Desktop WSL 2 backend
The vm.max_map_count setting must be set in the docker-desktop container:
Configuration files must be readable by the elasticsearch useredit
By default, Elasticsearch runs inside the container as user elasticsearch usinguid:gid 1000:0.
One exception is Openshift,which runs containers using an arbitrarily assigned user ID.Openshift presents persistent volumes with the gid set to 0, which works without any adjustments.
If you are bind-mounting a local directory or file, it must be readable by the elasticsearch user.In addition, this user must have write access to the config, data and log dirs(Elasticsearch needs write access to the config directory so that it can generate a keystore).A good strategy is to grant group access to gid 0 for the local directory.
For example, to prepare a local directory for storing data through a bind-mount:
You can also run an Elasticsearch container using both a custom UID and GID. Unless youbind-mount each of the config, data` and logs directories, you must passthe command line option --group-add 0 to docker run. This ensures that the userunder which Elasticsearch is running is also a member of the root (GID 0) group inside thecontainer.
As a last resort, you can force the container to mutate the ownership ofany bind-mounts used for the data and log dirs through theenvironment variable TAKE_FILE_OWNERSHIP. When you do this, they will be owned byuid:gid 1000:0, which provides the required read/write access to the Elasticsearch process.
Increased ulimits for nofile and nprocmust be available for the Elasticsearch containers.Verify the init systemfor the Docker daemon sets them to acceptable values.
To check the Docker daemon defaults for ulimits, run:
If needed, adjust them in the Daemon or override them per container.For example, when using docker run, set:
Swapping needs to be disabled for performance and node stability.For information about ways to do this, see Disable swapping.
If you opt for the bootstrap.memory_lock: true approach,you also need to define the memlock: true ulimit in theDocker Daemon,or explicitly set for the container as shown in the sample compose file.When using docker run, you can specify:
The image exposesTCP ports 9200 and 9300. For production clusters, randomizing thepublished ports with --publish-all is recommended,unless you are pinning one container per host.
By default, Elasticsearch automatically sizes JVM heap based on a nodes’sroles and the total memory available to the node’s container. Werecommend this default sizing for most production environments. If needed, youcan override default sizing by manually setting JVM heap size.
To manually set the heap size in production, bind mount a JVMoptions file under /usr/share/elasticsearch/config/jvm.options.d thatincludes your desired heap size settings.

For testing, you can also manually set the heap size using the ES_JAVA_OPTSenvironment variable. For example, to use 16GB, specify -eES_JAVA_OPTS='-Xms16g -Xmx16g' with docker run. The ES_JAVA_OPTS variableoverrides all other JVM options. The ES_JAVA_OPTS variable overrides all otherJVM options. We do not recommend using ES_JAVA_OPTS in production. Thedocker-compose.yml file above sets the heap size to 512MB.
Pin your deployments to a specific version of the Elasticsearch Docker image. Forexample docker.elastic.co/elasticsearch/elasticsearch:7.12.0.
You should use a volume bound on /usr/share/elasticsearch/data for the following reasons:
The data of your Elasticsearch node won’t be lost if the container is killed
Elasticsearch is I/O sensitive and the Docker storage driver is not ideal for fast I/O
It allows the use of advancedDocker volume plugins
If you are using the devicemapper storage driver, do not use the default loop-lvm mode.Configure docker-engine to usedirect-lvm.
Consider centralizing your logs by using a differentlogging driver. Alsonote that the default json-file logging driver is not ideally suited forproduction use.
When you run in Docker, the Elasticsearch configuration files are loaded from/usr/share/elasticsearch/config/.
To use custom configuration files, you bind-mount the filesover the configuration files in the image.
You can set individual Elasticsearch configuration parameters using Docker environment variables.The sample compose file and thesingle-node example use this method.
To use the contents of a file to set an environment variable, suffix the environmentvariable name with _FILE. This is useful for passing secrets such as passwords to Elasticsearchwithout specifying them directly.
For example, to set the Elasticsearch bootstrap password from a file, you can bind mount thefile and set the ELASTIC_PASSWORD_FILE environment variable to the mount location.If you mount the password file to /run/secrets/bootstrapPassword.txt, specify:
You can also override the default command for the image to pass Elasticsearch configurationparameters as command line options. For example:
While bind-mounting your configuration files is usually the preferred method in production,you can also create a custom Docker imagethat contains your configuration.
Create custom config files and bind-mount them over the corresponding files in the Docker image.For example, to bind-mount custom_elasticsearch.yml with docker run, specify:
The container runs Elasticsearch as user elasticsearch usinguid:gid 1000:0. Bind mounted host directories and files must be accessible by this user,and the data and log directories must be writable by this user.
By default, Elasticsearch will auto-generate a keystore file for secure settings. Thisfile is obfuscated but not encrypted. If you want to encrypt yoursecure settings with a password, you must use theelasticsearch-keystore utility to create a password-protected keystore andbind-mount it to the container as/usr/share/elasticsearch/config/elasticsearch.keystore. In order to providethe Docker container with the password at startup, set the Docker environmentvalue KEYSTORE_PASSWORD to the value of your password. For example, a dockerrun command might have the following options:
In some environments, it might make more sense to prepare a custom image that containsyour configuration. A Dockerfile to achieve this might be as simple as:
You could then build and run the image with:
Some plugins require additional security permissions.You must explicitly accept them either by:
Attaching a tty when you run the Docker image and allowing the permissions when prompted.
Inspecting the security permissions and accepting them (if appropriate) by adding the --batch flag to the plugin install command.
See Plugin managementfor more information.
You now have a test Elasticsearch environment set up. Before you startserious development or go into production with Elasticsearch, you must do some additionalsetup:
Learn how to configure Elasticsearch.
Configure important Elasticsearch settings.
Configure important system settings.
« Install Elasticsearch with Windows MSI InstallerInstall Elasticsearch on macOS with Homebrew »
Most Popular
-->
This section lists terms and definitions you should be familiar with before getting deeper into Docker. For further definitions, see the extensive glossary provided by Docker.
Container image: A package with all the dependencies and information needed to create a container. An image includes all the dependencies (such as frameworks) plus deployment and execution configuration to be used by a container runtime. Usually, an image derives from multiple base images that are layers stacked on top of each other to form the container's filesystem. An image is immutable once it has been created.
Dockerfile: A text file that contains instructions for building a Docker image. It's like a batch script, the first line states the base image to begin with and then follow the instructions to install required programs, copy files, and so on, until you get the working environment you need.
Brew Docker-machine-driver-xhyve
Build: The action of building a container image based on the information and context provided by its Dockerfile, plus additional files in the folder where the image is built. You can build images with the following Docker command:
Container: An instance of a Docker image. A container represents the execution of a single application, process, or service. It consists of the contents of a Docker image, an execution environment, and a standard set of instructions. When scaling a service, you create multiple instances of a container from the same image. Or a batch job can create multiple containers from the same image, passing different parameters to each instance.
Volumes: Offer a writable filesystem that the container can use. Since images are read-only but most programs need to write to the filesystem, volumes add a writable layer, on top of the container image, so the programs have access to a writable filesystem. The program doesn't know it's accessing a layered filesystem, it's just the filesystem as usual. Volumes live in the host system and are managed by Docker.
Tag: A mark or label you can apply to images so that different images or versions of the same image (depending on the version number or the target environment) can be identified.
Multi-stage Build: Is a feature, since Docker 17.05 or higher, that helps to reduce the size of the final images. In a few sentences, with multi-stage build you can use, for example, a large base image, containing the SDK, for compiling and publishing the application and then using the publishing folder with a small runtime-only base image, to produce a much smaller final image.
Docker Machine Xhyve Game
Repository (repo): A collection of related Docker images, labeled with a tag that indicates the image version. Some repos contain multiple variants of a specific image, such as an image containing SDKs (heavier), an image containing only runtimes (lighter), etc. Those variants can be marked with tags. A single repo can contain platform variants, such as a Linux image and a Windows image.
Registry: A service that provides access to repositories. The default registry for most public images is Docker Hub (owned by Docker as an organization). A registry usually contains repositories from multiple teams. Companies often have private registries to store and manage images they've created. Azure Container Registry is another example.
Multi-arch image: For multi-architecture, it's a feature that simplifies the selection of the appropriate image, according to the platform where Docker is running. For example, when a Dockerfile requests a base image mcr.microsoft.com/dotnet/sdk:5.0 from the registry, it actually gets 5.0-nanoserver-1909, 5.0-nanoserver-1809 or 5.0-buster-slim, depending on the operating system and version where Docker is running.
Docker Hub: A public registry to upload images and work with them. Docker Hub provides Docker image hosting, public or private registries, build triggers and web hooks, and integration with GitHub and Bitbucket.
Azure Container Registry: A public resource for working with Docker images and its components in Azure. This provides a registry that's close to your deployments in Azure and that gives you control over access, making it possible to use your Azure Active Directory groups and permissions.
Docker Trusted Registry (DTR): A Docker registry service (from Docker) that can be installed on-premises so it lives within the organization's datacenter and network. It's convenient for private images that should be managed within the enterprise. Docker Trusted Registry is included as part of the Docker Datacenter product. For more information, see Docker Trusted Registry (DTR).
Docker Community Edition (CE): Development tools for Windows and macOS for building, running, and testing containers locally. Docker CE for Windows provides development environments for both Linux and Windows Containers. The Linux Docker host on Windows is based on a Hyper-V virtual machine. The host for Windows Containers is directly based on Windows. Docker CE for Mac is based on the Apple Hypervisor framework and the xhyve hypervisor, which provides a Linux Docker host virtual machine on macOS X. Docker CE for Windows and for Mac replaces Docker Toolbox, which was based on Oracle VirtualBox.
Docker Enterprise Edition (EE): An enterprise-scale version of Docker tools for Linux and Windows development.
Compose: A command-line tool and YAML file format with metadata for defining and running multi-container applications. You define a single application based on multiple images with one or more .yml files that can override values depending on the environment. After you've created the definitions, you can deploy the whole multi-container application with a single command (docker-compose up) that creates a container per image on the Docker host.
Cluster: A collection of Docker hosts exposed as if it were a single virtual Docker host, so that the application can scale to multiple instances of the services spread across multiple hosts within the cluster. Docker clusters can be created with Kubernetes, Azure Service Fabric, Docker Swarm and Mesosphere DC/OS.
Docker Machine Xhyve Tool
Orchestrator: A tool that simplifies management of clusters and Docker hosts. Orchestrators enable you to manage their images, containers, and hosts through a command-line interface (CLI) or a graphical UI. You can manage container networking, configurations, load balancing, service discovery, high availability, Docker host configuration, and more. An orchestrator is responsible for running, distributing, scaling, and healing workloads across a collection of nodes. Typically, orchestrator products are the same products that provide cluster infrastructure, like Kubernetes and Azure Service Fabric, among other offerings in the market.
0 notes
Photo

Scripting - CompTIA A+ 220-1002 - 4.8 http://ehelpdesk.tk/wp-content/uploads/2020/02/logo-header.png [ad_1] A+ Training Course Index: http:/... #220-1002 #a #awscertification #awscertifiedcloudpractitioner #awscertifieddeveloper #awscertifiedsolutionsarchitect #awscertifiedsysopsadministrator #batchfiles #certification #ciscoccna #comments #comptia #comptiaa #comptianetwork #comptiasecurity #cybersecurity #datatypes #environmentvariables #ethicalhacking #free #informationtechnology #it #javascript #kubernetes #linux #loops #microsoftaz-900 #microsoftazure #networksecurity #powershell #professormesser #python #scripting #shellscript #software #variables #virtualbasicscripting #windowsserver
0 notes
Link
Cloud-native applications are on the rise thanks to the scalability and flexibility they provide. However, this type of architecture has its own challenges. Implementing a CI/CD pipeline will solve most of them, like defining delivery procedures, delivering applications independently, and gaining observability of the numerous building blocks in a system are some of them. A CI/CD pipeline is the key to automating the steps of the software delivery process. This includes initiating code builds, running automated tests, and deploying to a testing or production environment. One CI/CD pipeline consists of multiple steps executed one after another or in parallel. There are two known pipeline syntaxes — Scripted and Declarative. The key difference between them is their flexibility. Although both syntaxes are based on Groovy DSL, the Scripted pipeline syntax is less restrictive. It also allows almost anything that can be done in Groovy. This means that the script can easily become hard to read and write. On the other hand, the Declarative syntax is more restrictive and provides a well-defined structure, which is ideal for simpler CI/CD pipelines. This syntax supports the “pipeline as code” concept. Therefore, you can write in a file that can be checked into a source control management system like Git. In order to make it more convenient for developers to set up a CI/CD pipeline, Microtica supports the Declarative syntax to define build procedures along with the source code.
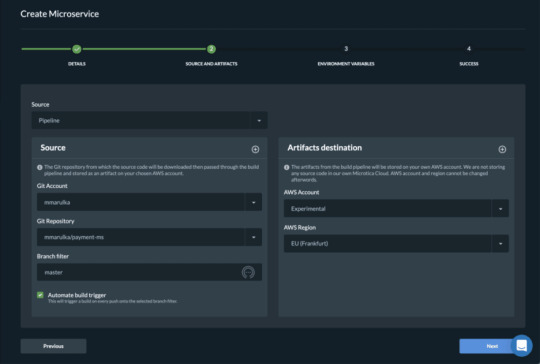
Declarative CI/CD Pipelines
For the pipeline process to work, each component/microservice should have a file named microtica.yaml on the root level in its source code. This file contains the specification of the build process. During the build process, Microtica extracts the specification from the code. Then, it creates a state machine to drive the defined process. In order to ensure a single source of truth for pipeline specification, Microtica does NOT allow changes in the Build pipelines from the UI. Changes will only take effect from the YAML file provided in each source code repository. We find this very helpful in avoiding possible confusion of definition, maintenance, and, most importantly, debugging problems in the process.
Define a CI/CD pipeline
There are no limitations to the steps of the build pipeline that you can define. Here is one example of a microtica.yaml file that defines a build pipeline for NodeJS application. This pipeline executes three particular commands defined in the commands section.
Pipeline: StartAt: Build States: Build: Type: Task Resource: microtica.actions.cmd Parameters: commands: - npm install - npm test - npm prune --production sourceLocation: "$.trigger.source.location" artifacts: true End: true
Pipeline — the root key which defines the start of the pipeline section
StartAt — defines the first action of the pipeline
States — defines a list of states for the particular pipeline
Type — a type of pipeline action. Always set it to Task.
Resource — an action that the engine will use. Currently, we support microtica.actions.cmd, an action that executes bash scripting.
Parameters — a set of parameters that are given to the action
commands — a list of bash commands. Here, you define your custom scripts for build, test, code quality checks, etc.
sourceLocation — the location where the action can find the source code. You should NOT change this. Once pulled from the Git repository, Microtica stores the artifacts on a location specified by the user for the particular component/microservice. $.trigger.source.location defines that location.
artifacts — a value that defines that this build will produce artifacts which will be stored in S3 and used during deployment. Set this value should to false in case the artifact of the build is Docker image
End — defines that this is the last action in the pipeline.
Microtica supports bash commands for the execution action. In the future, we are planning to allow developers to define their own custom actions.
Getting a Docker image ready for deployment
Let’s create an extended pipeline from the example above, adding an additional step to prepare a Docker image for deployment:
Pipeline: StartAt: Build States: Build: Type: Task Resource: microtica.actions.cmd Parameters: environmentVariables: pipelineId: "$.pipeline.id" version: "$.commit.version" commands: - echo Starting build procedure... - npm install - npm test - echo Logging in to Amazon ECR... - $(aws ecr get-login --region $AWS_REGION --no-include-email) - echo Checking if repository exists in ECR. If not, create one - repoExists=`aws ecr describe-repositories --query "repositories[?repositoryName=='$pipelineId']" --output text` - if [ -z "$repoExists" ]; then aws ecr create-repository --repository-name $pipelineId; fi - awsAccountId=$(echo $CODEBUILD_BUILD_ARN | cut -d':' -f 5) - artifactLocation=$awsAccountId.dkr.ecr.$AWS_REGION.amazonaws.com/$pipelineId - echo Build Docker image... - docker build -t $pipelineId . - docker tag $pipelineId $artifactLocation:$version - docker tag $pipelineId $artifactLocation:latest - echo Push Docker image - docker push $artifactLocation sourceLocation: "$.source.location" artifacts: false End: true
In this example, we first inject environment variables in the step runtime with environmentVariables parameter ($.pipeline.id and $.commit.version are both provided by Microtica). The CI/CD pipeline in the latest example starts by executing necessary instructions to build and test the code. Once this is done, Microtica creates an ECR repository if it doesn’t already exist. Once we have the ECR repository in place, the last step is to build a new Docker image and then push it in the repository.
After you define the microtica.yaml file with the build pipeline, you can automate your build process in Microtica when you create the component or microservice with the wizard in the portal. This option will add a webhook to your repository. A webhook is a listener that triggers a build process whenever you push new code to your repository branch. This way, you can be sure that you’re always working with the newest changes. Building the Docker image gave us an artifact so we can deploy it in a Kubernetes cluster. You can do this from Microservice details — Add to Cluster, or in the Kubernetes Dashboard — Microservices — Deploy.

When you deploy your microservice in a Kubernetes Cluster you can select the scaling options. Moreover, you can also set up continuous delivery for your microservice.
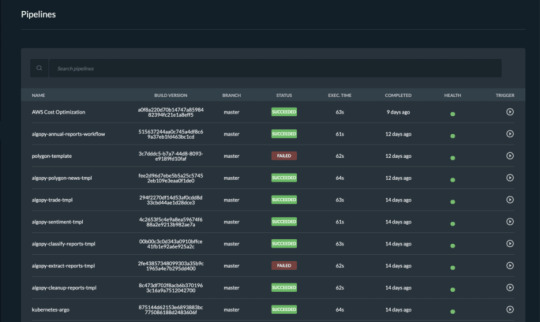
Pipelines overview

Once you trigger a build manually or automatically, follow the build process in the portal and see the events in real-time. If the build fails, it will mark it with red on the screen and it will show the error in the logs. Follow all the pipelines for your components and microservices in the Pipelines overview page and track their status. Microtica will mark a pipeline as not healthy if there are several failed builds detected. From this page, you can access any build in the history of your project. More importantly, you can also and inspect the logs to find the problems.
We are strong advocates for automated pipelines as they remove manual errors. Moreover, they are crucial for reliable and sustainable software delivery. They make software developers more productive, releasing them from the need to perform pipeline steps manually. Most importantly, they reduce the stress around new product releases.
0 notes
Text
Significance of Launchsetting.json file
New Post has been published on https://sagarjaybhay.com/significance-of-launchsetting-json-file/
Significance of Launchsetting.json file

Launch Setting File Importance in Asp.Net Core By Sagar Jaybhay
"iisSettings": "windowsAuthentication": false, "anonymousAuthentication": true, "iisExpress": "applicationUrl": "http://localhost:62605", "sslPort": 44385 , "profiles": "IIS Express": "commandName": "IISExpress", "launchBrowser": true, "environmentVariables": "ASPNETCORE_ENVIRONMENT": "Development" , "LearnAspCore": "commandName": "Project", "launchBrowser": true, "applicationUrl": "https://localhost:5001;http://localhost:5000", "environmentVariables": "ASPNETCORE_ENVIRONMENT": "Development"
This is default code is created when you create the project. In this file there are 2 default profiles are present IIS Express and by your project name. In this when you run the project by using Ctrl+F5 then IIS Express profile is used.
As per name suggest these file profiles are used to launch the application.
What is appsettings.json file in asp.net core?
In asp .net core configuration settings are come from different sources and in that one of the source us appsettings.json file.
Different types of Configuration Sources in asp.net core?
Files( appsettings.json)
User secrets
Environment variables
Command-line arguments
Usually, the information is stored in the file is as key-value pair and how to read appsetting.json file are like below?
In this, you need to add IConfiguration or need to inject this into the constructor of this startup class and then by using this object you can get the value of this.
AppSetting File
"Logging": "LogLevel": "Default": "Warning" , "AllowedHosts": "*", "SomeIncreptedKey": "*&*^%)hjaasdlaj*&("
Below is StartUp class file :-
public Startup(IConfiguration configuration) _config = configuration; _config["SomeIncreptedKey"]
But if you use the same key in development file means appsetting.development.json then this value is overridden with development file value and you can use this. It means if we have an environment setting file this will overwrite the default file setting. If you want to store environment variables you can use launchsetting.json file.
If you pass the value from the command line using the same key which is used previously then this will override all previous values with new command line value. To run the project from the command line.
Dotnet run SomeIncreptedKey=”adkahfsfhuihf” Dotnet
0 notes
Text
.NET Core 2 - Modificare la porta predefinita di Kestrel TCP 5000

Se vi siete imbattuti in questo articolo, è molto probabile che vogliate installare una applicazione web ASP.NET Core 2 su un web server Windows o Linux che ne ospita già un'altra (magari utilizzando la nostra guida o un tutorial analogo): il problema è che la porta TCP 5000, utilizzata da Kestrel come HTTP listening port per impostazione predefinita, risulta già occupata. Come fare? Sfortunatamente, il web non contiene molte informazioni su come modificare questo parametro... motivo per cui abbiamo deciso di realizzare questo articolo informativo, nella speranza che possa aiutare qualche altro sviluppatore alle prese con questo problema!
Program.cs
La prima cosa da fare per modificare la HTTP listening port predefinita di Kestrel è aprire il file Program.cs - che solitamente si trova nella cartella principale (root folder) della nostra ASP.NET Core 2 Web Application - e aggiungere la riga di codice seguente: public static IWebHostBuilder CreateWebHostBuilder(string args) => WebHost.CreateDefaultBuilder(args) .UseStartup() .UseUrls("http://localhost:5002");
launchSettings.json
Una volta fatto questo, occorre modificare il file Properties/launchSettings.json aggiungendo la seguente riga di codice: "": { "commandName": "Project", "launchBrowser": true, "applicationUrl": "https://localhost:5003;http://localhost:5002", "environmentVariables": { "ASPNETCORE_ENVIRONMENT": "Development" } } ... E questo è tutto. Una volta effettuate queste modifiche, è sufficiente ripubblicare l'applicazione web e creare una nuova istanza di Kestrel, avendo cura di collegarla alla libreria .dll: la nuova porta (TCP 5002) sarà letta automaticamente dal file aggiornato. Read the full article
0 notes
Text
Access Environment Variable in Nodejs JavaScript Application | Reading ENV Variable Example
Full Video Link https://youtu.be/dxrNopL1sbQ Hello friends, new #video on #reading #accessing #environmentvariables in #nodejs #projeect #application #tutorial #examples is published on #codeonedigest #youtube channel. @java #java #aws #a
In this video, we will read the environment variable in nodejs javascript project. We will learn what “dotenv” module in nodejs javascript. How to use “dotenv” package in our nodejs javascript project. ** Important Nodejs Javascript Packages or Modules ** Dotenv – DotEnv is a lightweight npm package that automatically loads environment variables from a .env file into the process.env object. To…

View On WordPress
#dotenv#dotenv example#dotenv in node js#dotenv module#dotenv module in node js#dotenv module not found#dotenv nodejs#dotenv package#dotenv package install#dotenv package nodejs#dotenv package.json#dotenv tutorial#dotenv tutorial nodejs#environment variable#environment variables#javascript environment variable#linux environment variables#node js javascript#node js javascript tutorial#nodejs#python environment variables#set environment variables
0 notes
Text
Faking env() to Use it Now
There is already an env() function in CSS, but it kinda came out of nowhere as an Apple thing for dealing with "The Notch" but it has made it's way to be a draft spec. The point will be for UAs or authors to declare variables that cannot be changed. Global const for CSS, sorta.
That spec doesn't seem to suggest how we'll actually set those env() values just yet. If you want them now, the easiest way to fake them would be using regular ol' CSS custom properties and simply not change them.
But if you want that env() syntax though, there is a PostCSS plugin for emulating it. The way the plugin handles them is through a JavaScript file that declares them.
postcssCustomProperties({ importFrom: 'path/to/file.js' /* module.exports = { environmentVariables: { '--branding-padding': '20px', '--branding-small': '600px' } } */ });
Having them start life as JavaScript is interesting, as it means we could perhaps have a single place to set variables that are accessible both to JavaScript and CSS.
That's what Harry Nicholls covers more in his article, "Why you should use CSS env()" like some gotchas when dealing with units and such. But if you really needed a single source for unchangeable variables in both CSS and JavaScript, then I'd say this is a good way to go — and could potentially be ripped out once support for env() formally arrives.
The post Faking env() to Use it Now appeared first on CSS-Tricks.
😉SiliconWebX | 🌐CSS-Tricks
0 notes
Text
Faking env() to Use it Now
There is already an env() function in CSS, but it kinda came out of nowhere as an Apple thing for dealing with "The Notch" but it has made it's way to be a draft spec. The point will be for UAs or authors to declare variables that cannot be changed. Global const for CSS, sorta.
That spec doesn't seem to suggest how we'll actually set those env() values just yet. If you want them now, the easiest way to fake them would be using regular ol' CSS custom properties and simply not change them.
But if you want that env() syntax though, there is a PostCSS plugin for emulating it. The way the plugin handles them is through a JavaScript file that declares them.
postcssCustomProperties({ importFrom: 'path/to/file.js' /* module.exports = { environmentVariables: { '--branding-padding': '20px', '--branding-small': '600px' } } */ });
Having them start life as JavaScript is interesting, as it means we could perhaps have a single place to set variables that are accessible both to JavaScript and CSS.
That's what Harry Nicholls covers more in his article, "Why you should use CSS env()" like some gotchas when dealing with units and such. But if you really needed a single source for unchangeable variables in both CSS and JavaScript, then I'd say this is a good way to go — and could potentially be ripped out once support for env() formally arrives.
The post Faking env() to Use it Now appeared first on CSS-Tricks.
Faking env() to Use it Now published first on https://deskbysnafu.tumblr.com/
0 notes
Text
ToddRBirchard
RT HackersSlackers "get ready to party MFers!! it’s Friday and we’re dropping a hot new piece about #ConfigFiles and #EnvironmentVariables in #Python.https://t.co/AaawDvs3tf"
— Matthew Alhonte (@MattAlhonte) November 30, 2018
http://twitter.com/ToddRBirchard/status/1068650144063729667
0 notes
Text
How we use Cake to build .NET Core apps and version assemblies
Let Them Eat Cake!
Apologies for the bad pun. I couldn’t help it. Today, we’re going to talk about CakeBuild, and why Stackify decided to start using it. But first, a little background.
We like to begin with the end in mind at Stackify. As our platform started to unfold into its’ first compiled bits nearly five years ago, it quickly became apparent that we needed some decent structure around how we built and deployed the many layers of our complex stack.
Like most shops, we were in search of an ALM system that could encompass our sprint / work item management, and build services. We wanted something SaaS based as well, and ultimately we landed with the Atlassian JIRA suite. Their CI server, Bamboo, has orchestrated our builds and deploys ever since then.
Doing a build on your build server and workstation should be exactly the same.
Something that has always bothered me about CI tools and servers like this is that they rarely work in the same way as building on your machine. When you hit F5 in Visual Studio, there are a lot of different build options set that we simply don’t think about, that you need to mirror in your MSBUILD task in Bamboo. Then, you have to think about the next steps: where the artifacts go, transforms applied, what you’re doing with the output, etc.
Point is, there have been far too many times where building locally doesn’t have the same result as building on the CI server. And getting the CI server to build and behave the way we want it to is always less than ideal.
This all came to a head a few months ago when we started converting Prefix, our ASP.NET profiler, to .Net Core. I needed our build server to:
Pull the Git repo
Version the assembly
Check in the modified assembly version change
Build it – now with the .Net CLI, and not MSBUILD
Nupack it
Ship to our Myget server
Pull request this release branch back to ‘master’ in our repo
Traditionally, I’d do this with a series of Powershell Script Tasks in Bamboo, but there’s one big pain point: we use AWS Elastic EC2 instances for build agents, and to test even the slightest change you need to create a new image, and spin it up in Bamboo and have it build. It’s extremely time consuming and frustrating.
Enter Cake!
I needed a task runner that would allow anyone on our dev team to execute all of these steps locally in just the same way our build server would, both to validate the process works correctly; and in the event our build server was down or had other issues.
I came across CakeBuild and read the docs. It just made sense. With Cake, you get:
A C# based DSL (no more Powershell or command line scripting!!)
A huge library of built-in scripts for nearly any task you would need.
A system that supports third party scripts
It’s all nuget based. It pulls in everything it needs.
Good support for .Net Core
On paper, it was perfect. So let’s take a look at what it does.
I’m going to skip over the “getting started” steps, and focus on how I’ve accomplished some of the specifics, with a big focus on assembly versioning.
Task: Version Assemblies
But first, a word on our versioning methodology. With .Net Core, you can keep the assembly version in project.json, which makes a lot of sense because it’s easy to manipulate. It’s just a json string.
When we are prepping a new release, we first cut a “release candidate” branch in Git, and it will be named with the target version, i.e:
root/rc/1.2
We will do our testing and once done, cut the actual release branch, i.e.
root/release/1.2
If we have to release a fix for the version, we work on that same branch. That next builds will be 1.2.2, 1.2.3, 1.2.4, etc etc.
For all other builds, the version number will follow the default format in .Net core, i.e:
1.2.0-*, where “*” gets replaced with the branch name + build number, so you’d end up with a 1.2.0-develop-1, or 1.2.2-rc-3, etc. This allows us to push a nuget package and dll that that is testable but never ever will be confused with a release version. If you use any pre-release .Net core packages, this will seem familiar.
So, here is what my Cake task looks like to version. I’ll break it down.
var target = Argument("target", "Default"); var configuration = Argument("configuration", "Release"); var buildVersion = ""; var buildSuffix = ""; var branch = ""; bool bambooRelease = false; Task("Version").Does(() => { branch = (EnvironmentVariable("bamboo_planRepository_branchName") ?? "unknown"); var buildNumber = (EnvironmentVariable("bamboo_buildNumber") ?? "0"); var json = ParseJsonFromFile("project.json") var version = json["version"].ToString();
See that? I check the environment variables (via a built in script) which will give me the branch name if I’m running in Bamboo, otherwise I don’t care, and “Unknown” is substituted (I could still get it with a Git task, but I was lazy and it wasn’t necessary). I then also parse the project.json again with a built in script.
Next, I use another built in script to check to see if we are, in fact, running in Bamboo.
if(Bamboo.IsRunningOnBamboo){ Information("Running on Bamboo"); Information(version); Information(branch); Information(buildNumber); if(branch.Contains("release/")) { bambooRelease = true; Information("Plan is release"); var relVer = branch.Split('/')[1]; var newVer = relVer+ "." + buildNumber + "-*";
Here I am looking for the branch name to support my versioning. If it is release, I know the next part is my Major.Minor. I append on the build number, and serialize the JSON back out to the project.json file.
//only write back if it is a release build json["version"]=newVer; SerializeJsonToFile("project.json",json); } Else{
For non-release, it will generate something like “1.2.0-rc-1” and in my specific case, I don’t need to write it back out to the file.
Information("Plan is not release"); var cleanBranchName = branch.Replace("/","-"); buildSuffix = cleanBranchName+"-"+buildNumber; var newVer = version.Replace("*",cleanBranchName + "-" + buildNumber);; buildVersion = newVer; } } else{ Information("Local Build"); var cleanBranchName = "local"; buildSuffix = cleanBranchName+"-"+buildNumber; var newVer = version.Replace("*",cleanBranchName + "-" + buildNumber);; buildVersion = newVer; } Information(buildVersion); Information(buildSuffix); });
And that’s it. Assembly versioning done easy and flexibly with CakeBuild.
Task: Nuget Package
The next step to build and pack is just as easy. Check it out.
Task("Pack").Does(() => { if(buildSuffix!=""){ DotNetCorePack("project.json", new DotNetCorePackSettings{ Configuration = configuration, VersionSuffix = buildSuffix }); } else{ DotNetCorePack("project.json", new DotNetCorePackSettings{ Configuration = configuration }); } var outputdir = "bin\\"+configuration; CopyFileToDirectory("NugetPack.ps1",outputdir); var wd = DirectoryPath.FromString(outputdir); if(Bamboo.IsRunningOnBamboo) { StartProcess("powershell.exe", new ProcessSettings { Arguments = "-file NugetPack.ps1", WorkingDirectory = wd}); StartProcess("powershell.exe", new ProcessSettings {Arguments = "-file MygetPush.ps1", WorkingDirectory = wd}); } });
The DotNetCorePack script actually builds the project and the nuget package in one step. It runs a build using the .Net CLI, which means that if I’m targeting multiple frameworks, they will all be in the package, so I can reference in projects that target NETStandard, Netcoreapp, and full .Net framework. All in one simple step.
The NugetPack.ps1 file is a script that I actually created and have checked into the project. It simply checks for the existence of a nuget package (and symbols package) and then generates MygetPush.ps1 which is a script that will actually push the package to my private Myget server. It only does this for bamboo builds, which means that if I run this Cake script locally, I’m not going to end up with a bunch of superfluous packages on my build server. You could put all of this logic directly in the Cake script if you wanted to; I already had those scripts from my previous process, so I just left it as it was.
Task: Commit and Push
The last step is to commit and push the change to my project.json file.
Task("CheckinVersion").Does(() => { if(bambooRelease){ var repPath = DirectoryPath.FromString("."); var filePaths = new FilePath[]{".\\project.json"}; GitAdd(repPath, filePaths); GitCommit(repPath,"Bamboo Build Task","[email protected]","Bamboo has detected a release build - versioning assembly"); GitPush(repPath); var repositoryDirectoryPath = DirectoryPath.FromString("."); var gitBranch = GitBranchCurrent(repositoryDirectoryPath); var remote = (gitBranch.Remotes[0].PushUrl).Split('/'); var repName = remote[remote.Count()-1]; string json = "{\\\"destination\\\": { \\\"branch\\\":{ \\\"name\\\":\\\"master\\\"}},\\\"source\\\":{\\\"branch\\\": {\\\"name\\\":\\\""+branch+"\\\"}},\\\"title\\\":\\\"Merge Bamboo Build\\\"}"; StartProcess("C:\\curl\\bin\\curl.exe", new ProcessSettings { Arguments = "-v -u [our user name] \"[git repo url]"+repName+"/pullrequests\" -H \"Content-Type: application/json\" -d \" "+ json + "\""}); } } );
Note that I have redacted some details, but again, I use the built-in scripts that Cake provides to commit and check in any file changes on my current branch (which happens to be my modified project.json with the new version number). I then use CURL to post a Pull Request to the api of my Bitbucket repo. The only part of this that was painful was the escape characters needed for the json that gets posted.
Putting the icing on top of the cake.
Sorry. Another bad cake pun. I couldn’t help it.
One thing that you’ve probably noticed in this is that I’m still using Bamboo. And that’s because Cake is simply a DSL for executing tasks. I still need an orchestration engine (like Bamboo) to kick off and execute the cake builds. But, Bamboo is now rather agnostic about the build. I’ve gone from having 10 or so complicated, hard to test Bamboo tasks to two simple tasks:
Pull repo.
Execute build.ps1
I’ve now also achieved a lot of portability. I could very easily migrate to a different CI server with a small level of effort. You’re not limited to .Net Core project either. I love this so much that I went back and implemented this same pattern for my .Net 4.5 class libraries. There are just a couple of differences, for example there are scripts to specifically work with your AssemblyInfo.cs file, i.e:
bambooRelease = true; Information("Plan is release"); var relVer = branch.Split('/')[1]; var newVer = relVer + "." + buildNumber; var newProductVersion = newVer + "-*"; CreateAssemblyInfo(assemblyPath, new AssemblyInfoSettings{ Product = assemblyProduct, Title = assemblyTitle, Company = assemblyCompany, Guid = guid, Version = newVer, FileVersion = newVer, InformationalVersion = newProductVersion, Copyright = "Stackify, LLC " + DateTime.Now.Year });
My methodology is the same for versioning, I just use a different mechanism to do it for these older projects. What I love about this, is that I previously had to do this through a custom MSBUILD task, which required a lot of finesse (and pain and alcohol) to get to work correctly on the build server and not break building locally. It was far too fragile.
If you think this can help make your life easier, check out CakeBuild. Don’t stop with just the build, either. Cake has scripts and add-ins for deployment (IIS, Azure, Docker, etc), for SQL tasks, to work with TFS work items, NUnit, etc. And if it doesn’t support something you need to do, you can simply create it yourself and publish as an add-on.
That really just leaves us with one last, horrible pun. With CakeBuild, you can have your cake and eat it too.
Have you tried cake? Comment below and tell us what you think!
The post How we use Cake to build .NET Core apps and version assemblies appeared first on Stackify.
from Stackify http://ift.tt/2jklb0F from Blogger http://ift.tt/2kmd0ys
0 notes
Photo

Crontab,
Não sei pra vocês mas parece que sempre que vou fazer um novo crontab esbarro em alguma coisa diferente...
Da última vez foi o path, e não me lembrava que ou deveria declarar o path na variável ou colocar o comando com o path completo:
Desta vez foram aspas e chaves, no shell, você pode executar um comando com aspas simples, e mesmo assim ele conseguirá executar a troca por variáveis de ambiente ou coisas do gênero, porém dentro do cron não.
Dentro do crontab, para utilização com variáveis de ambiente , é necessário utilizar aspas duplas, e para a troca ou execução de comandos internos, deverá utilizar cifrão e colchetes ${....} , e não chaves como uso comum no shell.
0 notes
Text
.NET Core 2 - Change Kestrel default port TCP 5000 (win and linux)

If you stumbled upon this post, you're most likely trying to install a second ASP.NET Core 2 Web Application on a Windows or Linux web server using our setup guide or a similar tutorial: since the first one is already there, the default Kestrel listening port (TCP 5000) is busy, therefore you'll need to change it: however, there aren't many online resources explaining how to do that. That's precisely why we're publishing this article!
Program.cs
The first thing you have to do to change the default Kestrel listening port is to open the program.cs file in the root of your ASP.NET Core 2 Web Application and add the following line to the default code: public static IWebHostBuilder CreateWebHostBuilder(string args) => WebHost.CreateDefaultBuilder(args) .UseStartup() .UseUrls("http://localhost:5002");
launchSettings.json
The second (and last) thing to do is to open the Properties/launchSettings.json file, locate and change the following line: "": { "commandName": "Project", "launchBrowser": true, "applicationUrl": "https://localhost:5003;http://localhost:5002", "environmentVariables": { "ASPNETCORE_ENVIRONMENT": "Development" } } That's about it. Once done, publish the web application and restart Kestrel: it will fetch the new listening port TPC 5002 from the updated .dll file accordingly. Read the full article
0 notes