#SetValue
Explore tagged Tumblr posts
Visit Tumblr Blog
Explore Tumblr blogs with no restrictions, modern design and the best experience.
Last Seen Tumblr Blogs


Fun Fact
Tumblr’s website traffic is steadily declining.
Text
Custom Mode - Health
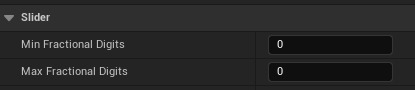
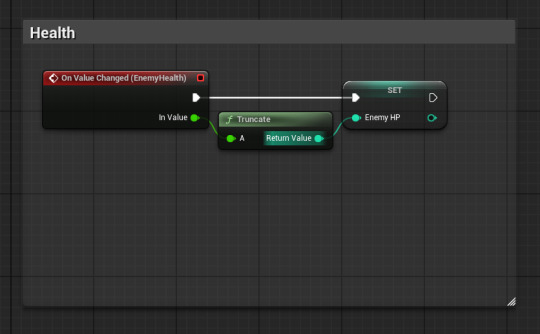
Aside from the attacks, these are honestly all going to be extremely similar. The only difference with the health and the upcoming attack counters, is that they use integers rather than floats.
To make these values work with integers, I've removed the fractional digits, setting the minimum and maximum both to 0:
Aside from that it's once again an extremely simple process of setting variables and passing them to the SetValues function. The only extra bit that needs to be done is converting the float to an integer:

0 notes
Text
```javascript
function addValueToSheet() {
// アクティブなスプレッドシートを取得
const spreadsheet = SpreadsheetApp.getActiveSpreadsheet();
// 'シート1'という名前のシートを取得(存在しない場合は作成)
let sheet = spreadsheet.getSheetByName('シート1');
if (!sheet) {
sheet = spreadsheet.insertSheet('シート1');
}
// 追加するデータ
const newData = ['新しい値1', '新しい値2', '新しい値3'];
// シートの最終行の次の行を取得
const lastRow = sheet.getLastRow();
const nextRow = lastRow + 1;
// データを新しい行に追加
sheet.getRange(nextRow, 1, 1, newData.length).setValues([newData]);
Logger.log('データが追加されました');
}
```
0 notes
Text
i JUST found out you can do a null check by simply adding a ? like "healthBar?.SetValue(currentHealth, maxHealth);"... my life is forever changed 😱
0 notes
Text
React on Event Types

React is a popular JavaScript library used for building user interfaces. One of its key features is the ability to handle events efficiently and effectively. In this article, we will explore different event types in React and how to handle them.

1. Introduction to React Events
In React, events are actions or occurrences that happen in the browser, such as a button click, input change, or form submission. React provides a synthetic event system that normalizes event handling across different browsers and provides additional functionality for managing UI updates and state.
2. Event Handling in React
Event handling in React can be done in two main ways: using class components and functional components. 2.1 Event Handling in Class Components In class components, event handling involves creating event handler methods. For example, to handle a button click event, you can define an onClick event handler method: class MyComponent extends React.Component { handleClick() { // Event handler logic } render() { return ( Click ); } } 2.2 Event Handling in Functional Components In functional components, event handling can be achieved using the useState hook along with event handler functions. For instance, to handle an input field change event, you can define an onChange event handler function: import React, { useState } from 'react'; function MyComponent() { const = useState(''); function handleChange(event) { setValue(event.target.value); } return ( ); }
3. Common Event Types
React provides support for various event types. Here are some of the commonly used event types: 3.1 onClick Event The onClick event occurs when an element is clicked, typically used with buttons or links. When a user clicks the element, the event handler is invoked, and the specified logic is executed. 3.2 onChange Event The onChange event occurs when the value of an input field changes, commonly used for handling text input. Whenever the input value changes, the event handler is called, and the UI can be updated based on the input value. 3.3 onSubmit Event The onSubmit event occurs when a form is submitted, usually used for form submission handling. When a user submits the form, the event handler is triggered, and the form data can be processed. 3.4 onMouseOver Event The onMouseOver event occurs when the mouse pointer is moved over an element, often used for tooltips or dropdown menus. When a user hovers over the element, the event handler is invoked, and the associated actions related to that element can be performed.
4. Writing Event Handler Functions
In React, event handler functions are typically written within the component where the event occurs. The event handler function is responsible for updating the state or executing other logic based on the user's action. class MyComponent extends React.Component { handleClick() { // Event handler logic } render() { return ( Click ); } } import React, { useState } from 'react'; function MyComponent() { const = useState(''); function handleChange(event) { setValue(event.target .value); } return ( ); }
5. Event Propagation and Default Behavior
React provides mechanisms to control event propagation and default behavior. Event propagation refers to the process of an event being passed to its parent components, while default behavior refers to the browser's default actions. To control event propagation, you can use the stopPropagation() method, which prevents the event from being propagated to the parent components. To prevent the default behavior, you can use the preventDefault() method, which stops the browser from performing its default action.
6. Event Delegation
Event delegation in React refers to handling events on parent elements instead of individual child elements. This approach simplifies event handling for dynamically generated elements. By using event delegation, there is no need to attach event handlers to each individual child element.
7. Passing Parameters to Event Handlers
There are scenarios where you need to pass parameters to event handlers in React. For example, if you want to obtain information about a specific item when clicking on a list item. In such cases, you can pass additional parameters to the event handler.
8. Event Handling with External Libraries in React
React provides integration support for various external libraries. When using external libraries, you need to follow their event handling approaches. Integrating events between React components and external libraries requires careful consideration and may require additional configuration or measures, if necessary.
9. Event Optimization in React
In React, event optimization can be crucial for performance improvement. Event optimization aims to prevent unnecessary re-renders and enhance the responsiveness of your application. Techniques such as function binding, memoization, and maintaining immutability can be applied for event optimization.
10. Conclusion
In this article, we explored event handling in React. React offers a wide range of event types that enable you to handle user interactions and implement dynamic UIs. We learned how to write event handler functions, control event propagation and default behavior, use event delegation, pass parameters to event handlers, integrate events with external libraries, and optimize events in React. Read the full article
0 notes
Text
i would!
the thing that prompted this post was me showing @the-mighty-nappa some code that directly set the backing field of a `{ get; private set; }` property from a third party library in c#. it was really cursed, matching field names in the class with a regex to find the one that matched to be able to call SetValue on it.
catgirl who can't be trusted around the .NET System.Reflection namespace
70 notes
·
View notes
Text
android jetpack livedata postValue(), setValue()
original source : https://blog.mindorks.com/livedata-setvalue-vs-postvalue-in-android
we can change the UI of an application when there is a change in some data.
livedata를 통해 쉽게 데이터 변경을 ui에 적용할수 있다.
livedata 설명
LiveData is an observable data holder class. Unlike a regular observable, LiveData is lifecycle-aware, meaning it respects the lifecycle of other app components, such as activities, fragments, or services.
In a simple way, LiveData is basically a data holder and it is used to observe the changes of a particular view and then update the corresponding change.
So, LiveData is used to make the task of implementing ViewModel easier. The best part about LiveData is that the data will not be updated when your View is in the background and when the view will come in the foreground, then it will get the updated data only.
Difference between setValue() and postValue()
either you can update the data on the Main thread or you can update the data using the background thread. So, the use-case of setValue and postValue depends on these two situations only.
While using the Main thread to change the data, you should use the setValue method of the MutableLiveData class and while using the background thread to change the LiveData, you should use the postValue method of the MutableLiveData class.
So, the duty of the postValue method is to post or add a task to the main thread of the application whenever there is a change in the value. And the value will be updated whenever the main thread will be executed (여기서 mainthread가 실행될때 이부분이 중요한 부분). So, basically, it is requesting the main thread to set the new updated value and then notify the observers.
While the setValue method is used to set the changed value from the main thread and if there are some live observers to it, then the updated value will also be sent to those observers as well. This setValue method must be called from the main thread.
So, here are some of the points that you must think before using setValue and postValue:
If you are working on the main thread, then both setValue and postValue will work in the same manner i.e. they will update the value and notify the observers.
If working in some background thread, then you can't use setValue. You have to use postValue here with some observer. But the interesting thing about postValue is that the value will be change immediately but the notification that is to be sent to observers will be scheduled to execute on the main thread via the event loop with the handler.
Let’s take an example,
// setValue liveData.setValue("someNewData") liveData.setValue("againNewData") // postValue liveData.postValue("someNewData") liveData.postValue("againNewData")
In the above example, the setValue is called from the main thread and the postValue is called from some background thread.
Since the setValue is called twice, so the value will be updated twice and the observers will receive the notification regarding the updated data twice.
But for postValue, the value will be updated twice and the number of times the observers will receive the notification depends on the execution of the main thread. For example, if the postValue is called 4 times before the execution of the main thread, then the observer will receive the notification only once and that too with the latest updated data because the notification to be sent is scheduled to be executed on the main thread. So, if you are calling the postValue method a number of times before the execution of the main thread, then the value that is passed lastly i.e. the latest value will be dispatched to the main thread and rest of the values will be discarded.
Another thing to care about postValue is that, if the field on which the postValue is called is not having any observers and after that, you call the getValue, then you will not receive the value that you set in the postValue because you don't have an observer here.
0 notes
Photo

CARA MENDAPATKAN LIST FILE DI GOOGLE DRIVE MENGGUNAKAN GOOGLE SCRIPT
function myFunction() { var ss=SpreadsheetApp.getActiveSpreadsheet(); var s=ss.getActiveSheet(); var c=s.getActiveCell(); var fldr=DriveApp.getFolderById("paste link google drive disini hanya barisan angka dan nomor"); var files=fldr.getFiles(); var names=[],f,str; while (files.hasNext()) { f=files.next(); names.push([f.getUrl(), f.getName()]); } s.getRange(c.getRow(),c.getColumn(),names.length, 2).setValues(names); }
1 note
·
View note
Video
instagram
When was the last time you reminded yourself of God’s benefits? 📜 Psalm 103:2 #Amen✝🙏🏽❤️🙌😘🤗🤝 #dailythoughts #verseoftheday #leadership #bethankful #begreatful #setvalues #believeinfaith
#amen✝🙏🏽❤️🙌😘🤗🤝#setvalues#begreatful#bethankful#verseoftheday#leadership#dailythoughts#believeinfaith
0 notes
Text
Insert rows to DatagridView in C#.Net/.Net
Insert rows to DatagridView in C#.Net/.Net
DataGridView is an easiest option for reports as well as other data operations in C#.Net. In this post I will show how to use methods to add rows to a datagrid from controls like textbox.

We can add new rows to a datagridview in three different ways
Using a DataTable
Using Add Row method
Using Set Value method
With a Data Table
Create a data Table and Row and add it to the Grid…
View On WordPress
0 notes
Text
Difficulty Options - Making it work
It's all set up, and the values are set. All that's left to do now is to plug the new system in and make it work.
This is all done in the enemy blueprint and should be quite easy using the system that's now in place.
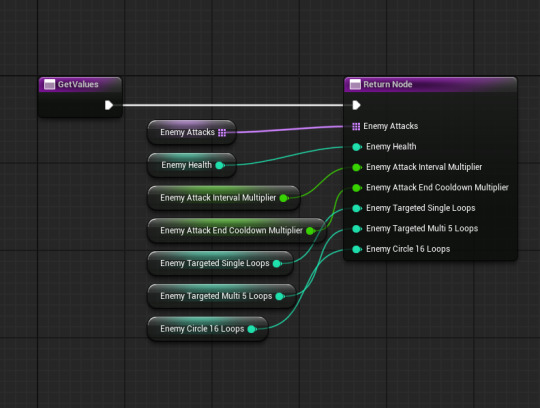
First I added one more function to the GameInstance to make retrieving the values easier. I simply named this function GetValues and all it does is return the value of each variable:
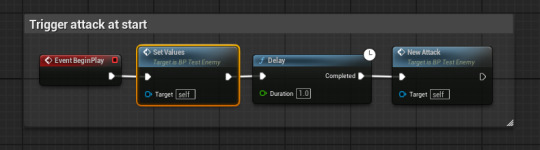
Then, in the enemy I called this function, and used it to set the enemy's variables inside a new function in the enemy called SetValues:

Then, I simply made it call the SetValues function as soon as the game starts:
And now theoretically, everything should be in place and work as intended. Here's me testing each difficulty option for the first time:
It works! And now if I want to create a custom mode, it should be fairly easy, with the only thing I'd need to do is create a UI where the player can input their own values which would then get passed through the same system that was just created.
I think having a custom difficulty option would be a really good addition to this project, so hopefully I can get that put together in my spare time between other work.
0 notes
Text
Reactコンポネートーー制御か非制御か
こんにちは。mediba でテクノロジー2G にてFEをしております、楊です。
最近のPJ開発中にあったことで、Reactコンポネートの制御か非制御か当時綺麗に解決できなかったので、 振り返って、色々調べた上にまとめたメモです。
コンポネートの制御と非制御
React公式の説明
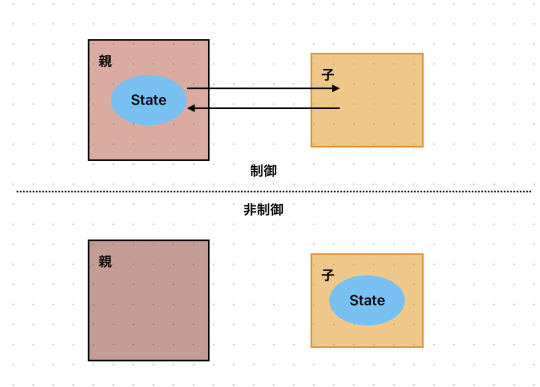
下手な絵で簡単に説明すると↓
ではどうすれ���、非制御であり制御コンポネートでもあるコンポネートを作れるでしょう
最も簡単なやり方ーー内外のStateを持ちながら同期させる
まずは子コンポネート内でStateを持たせて、どんな状態(制御モード・非制御モード)でも自分のStateを使うようにする。 次は制御モードにおいて、内部StateをPropsと同期させれば、問題なさそう!
const Input: FC<{ value?: string; onChange?: (value: string) => void; }> = (props) => { const isControlled = props.value !== undefined; const [value, setValue] = useState(props.value); const handleOnChange = (e) => { if (isControlled) { setValue(e.target.value); props.onChange(e.target.value); } } useEffect(() => { if (isControlled) { setValue(props.value); } },[props.value]); return ( <input value={value} onChange={handleOnChange}/> ); };
よくみてみると、制御モードでは気になるところも出てきたね
子コンポネート内のState更新はParentより遅い
パフォマンス的によくない、useEffect内でのsetStateの使いなので、余計な再描画が発生してしまう
解決できそうかな、試してみよう
子コンポネート内のState更新はParentより遅い
これだと簡単に解決できそう、制御モードにおいてPropsから渡してきた値そのまま使えばいい。
const finalVal = isControlled ? props.value : value const handleOnChange = (e) => { if (isControlled) { setValue(e.target.value); props.onChange(e.target.value); } } return ( <input value={finalVal} onChange={handleOnChange}/> );
こうすれば、同期は一歩遅くても、子コンポネートに使ってもらうStateは必ず最新であることを担保できる。
パフォマンス的によくない、useEffect内でのsetStateの使いなので、余計なレンダリングが発生してしまう
useEffect内でのState同期なので、再描画を防げなくて、簡単なコンポネートであれば、パフォマンスの影響は少ないが、コンプレックスなコンポネートには、問題である
ポイントは同期させるタイミングだね、ならどうしよう、、、、
Stateでvalue保存には、setterで同期させた直後に再描画が始まる、もし再描画が制御可能になったら問題ないでしょう。 保存にはRefを使って、強制再描画には 仮のstateを作って
const [_, setObj] = useState({}) function triggerRendering(){ setObj({}) }
を使う。そうしたら全体は↓
const Input: FC<{ value?: string; onChange?: (value: string) => void; }> = (props) => { const isControlled = props.value !== undefined; const stateRef = useRef(props.value); if (isControlled) { stateRef.current = props.value; } const [_, setObj] = useState({}); function triggerRendering() { setObj({}); } const handleOnChange = (e: React.ChangeEvent) => { stateRef.current = e.target.value; triggerRendering(); props.onChange(e.target.value); }; return <input value={stateRef.current} onChange={handleOnChange}/>; };
こうしたことで値の同期による再描画がなくなり、制御同時に非制御のコンポネートが出来上がった。 refとhandleOnChangeの部分を取り出し、hooksにすることで、他のコンポネートに適用することもできるでしょう。
現在medibaではメンバーを大募集しています。
募集・応募ページ
medibaってどんな会社だろうと、興味を持っていただいた方は、カジュアル面談もやっておりますので、お気軽にお申込み頂ければと思います。
カジュアル面談
0 notes
Text
```javascript
function registerTasksToCalendar() {
const sheet = SpreadsheetApp.getActiveSpreadsheet().getActiveSheet();
const data = sheet.getDataRange().getValues();
for (let i = 1; i < data.length; i++) {
const row = data[i];
const name = row[0]; // A列:名前
const taskName = row[1]; // B列:タスク名
const startDateTime = new Date(row[2]); // C列:開始日時
const endDateTime = new Date(row[3]); // D列:終了日時
const description = row[4]; // E列:説明
const isRegistered = row[5]; // F列:登録済みステータス
const googleAccount = row[6]; // G列:Googleアカウント
if (isRegistered !== '済') {
try {
const calendar = CalendarApp.getCalendarById(googleAccount);
if (calendar) {
const event = calendar.createEvent(taskName, startDateTime, endDateTime, {description: description});
sheet.getRange(i + 1, 6).setValue('済'); // F列に「済」を記入
} else {
Logger.log(`カレンダーが見つかりません: ${googleAccount}`);
}
} catch (error) {
Logger.log(`エラーが発生しました: ${error.message}`);
}
}
}
}
```
0 notes
Text
Having trouble with the "by" delegate in Kotlin? Don't forget "getValue" and "setValue" imports.
#andorid dev#kotlin#kotlin delegates#kotlin programming#kotlin app development#kotlin developer#android developer#programming#programming tips#computer stuff#app stuff#android app#app dev#kotlin android#android kotlin
0 notes
Text
Upload the file or image into the salesforce record using Omniscript
Upload the file or image into the salesforce record using Omniscript
Requirements: Upload a file or image to all contacts associated with the account. Step 1: Create an Omniscript Step 2: Drag the SetValues Element to the canvas to set the Account variable as ContextId, which is used to retrieve the current ContextId. Step 3: Create a DataRaptor extract to retrieve contacts from the AccountId Step 4: In the Formula tab, add all contacts Id to the List. Map…
View On WordPress
0 notes
Text
Global Variables in JavaScript Explained

Global variables are defined outside of functions or alongside window objects for use throughout the program (unless shadowed by locals). Even if you declare a variable without using var, it will still be interpreted as global. The var statement declares a function-scoped or globally-scoped variable and optionally assigns it a value. Example : var x = 10; if (x === 10) { var x = 20; console.log(x); // expected output: 20 } console.log(x); // expected output: 20 Example: Declaring global variables within function window.value = 90; // Declaring global variable by window object function setValue() { window.value = 100; } // Accessing global variable from other function function getValue() { setValue(); return window.value; } console.log(getValue()); // 100 Using Undeclared Variables: - If you try to use an undeclared variable in strict mode, you'll get a reference error when you run your code. - If you assign a value to a name that hasn't been declared with let, const, or var outside of strict mode, you'll end up establishing a new global variable. It will be global regardless of how deeply nested your code is within functions and blocks, which is almost probably not what you want, is bug-prone, and is one of the strongest reasons to use strict mode! - Global variables generated this way are similar to global variables declared using var in that they define properties of the global object. These properties, however, unlike those specified by conventional var declarations, can be erased using the delete operator. Read the full article
0 notes
Text
Regressionstest abhärten: Erstellung von Regressionstests nach dem Prinzip "slow to break".

Ich habe gelernt, dass es eine Reihe von Schlüsselfaktoren gibt, um leicht zu wartende, zuverlässige automatisierte Tests zu haben. Ordnet die Steuerelemente an einer einzigen Stelle zu Eure Steuerelemente sollten an einer einzigen Stelle abgebildet werden, sodass ihr bei einer Änderung eines Steuerelements dieses nur an einer einzigen Stelle ändern müsst. Wenn sich ein Steuerelement an einer einzigen Stelle befindet, könnt ihr eine einzeilige Codeänderung vornehmen, wenn ein Entwickler die Steuerelemente neu zuordnet. Ich ordne auch den Typ des Steuerelements zu, sodass der Entwickler von einem Link zu einer Schaltfläche wechseln kann und ich nur diese Steuerdatei zu ändern brauche. Versteckt nebensächliche Details Versteckt nebensächliche Details. Jedes Detail, das nicht direkt mit dem Zweck eures Tests zusammenhängt, gehört an einen anderen Ort als in euren Test. Versteckt es lieber irgendwo, z. B. in einer Variablen oder in einer Methode, und gebt ihm einen guten Namen. Eliminiert Duplikate Eliminiert Duplikate. Jedes Bit an doppelten Daten ist eine Variable, die darauf wartet, geboren zu werden und einen aussagekräftigen Namen zu erhalten. Jede Abfolge von doppelten Testschritten ist eine Methode, die darauf wartet, geboren zu werden und einen aussagekräftigen Namen zu erhalten. Benennen Sie jede wichtige Idee Benennt jede wichtige Idee. Warum meldet sich der Testcode als "F.D.Gumby" an und nicht als ein anderer Benutzer? Weil das der Manager ist, der den Mitarbeiter eingestellt hat, den Sie auf die Gehaltsliste setzen? Dann fügen Sie "F.D.Gumby" in eine Variable ein und nennen Sie sie "hiring manager" (oder wie auch immer), um ihre Absicht auszudrücken. Abstrahiert das Testautomatisierungstool wo immer es möglich ist Ich habe im Wesentlichen drei Aktionen, die ich 99 % der Zeit ausführe: Invoke, Setvalue und GetValue. Mit Invoke wird ein Link oder eine Schaltfläche angeklickt, ein Kontrollkästchen aktiviert oder deaktiviert usw. SetValue setzt Werte in Steuerelemente, z. B. Text in ein Textfeld. GetValue holt Daten aus den Steuerelementen, die in erster Linie zur Überprüfung verwendet werden. Jede Automatisierungsaktion, z. B. die Durchführung einer Suche, ruft nur die Methoden invoke, Set und get auf. Dies ermöglicht eine fast vollständige Abstraktion des zugrundeliegenden Automatisierungstools und eine einzige Stelle in Ihrem Code, an der die steuerungsspezifischen Methoden der unteren Ebene aufgerufen werden. Verwendet reguläre Ausdrücke, um Ihre Kontrollnamen zuzuordnen Durch die Verwendung regulärer Ausdrücke können ihr das Steuerelement so definieren, dass der Entwickler es an eine beliebige Stelle auf der Seite verschieben kann und Ihre Tests trotzdem ausgeführt werden. Erstellt Testdatenobjekte, um eure Testdaten zu speichern Ich erstelle Testdatenobjekte, die normalerweise ziemlich genau 1:1 mit den Steuerelementen auf einer Seite übereinstimmen. Dann erstelle ich ein erwartetes und ein tatsächliches Objekt und leite diese Objekte an die verschiedenen Ebenen im Stapel weiter. Die Erstellung zusätzlicher Tests kann dann in einigen Fällen so einfach sein wie die Verwendung eines vorhandenen Tests mit anderen Daten. Trennt den Test von der Implementierung Die Trennung von Belangen ist ein wichtiges technisches Designprinzip, das ihr bei den Tests anwenden solltet. Die Absicht des Testfalls sollte so weit wie möglich von der physischen Implementierung getrennt werden, die die Interaktion mit der Seite durchführt. Zum Beispiel statt ... public void SearchOnGoogle() { using (var browser = new IE("http://www.google.com")) { browser.TextField(Find.ByName("q")).TypeText("Stack Exchange"); browser.Button(Find.ByName("btnG")).Click(); Assert.IsTrue(browser.ContainsText("Stack Exchange - Free, Community-Powered Q&A")); } } Ihre Tests sollten also auf höchster Ebene eine domänenspezifische API haben. public void SearchOnGoogle() { SearchEngine.WebSearch("Stack Exchange"); SearchEngine.Verifcation.WebSearch("Stack Exchange - Free, Community-Powered Q&A"); } } ... public void WebSearch(string value) { ControlHandler.SetValue(Controls.txtSearchValue, value); ControlHandler.Invoke(Controls.btnSearch); } Ausführliche Informationen zu diesem Thema findet ihr in Capture The Essence Of Your Test Cases von Michael Hunter. Durch die Anwendung dieser Prinzipien lassen sich automatisierte Regressionstests viel leichter korrigieren, wenn sich entweder die Anforderungen oder die Implementierung ändern. Weitere Einzelheiten und Beispiele finden Sie in meinem Artikel "Writing Maintainable Automated Acceptance Tests" (PDF). Siehe auch Bob Martins ausgezeichnetes Video zu denselben Ideen. Read the full article
0 notes