#Small linux iso file
Explore tagged Tumblr posts
Visit Tumblr Blog
Explore Tumblr blogs with no restrictions, modern design and the best experience.
Last Seen Tumblr Blogs


Fun Fact
Total funding amounts to $125.3M.
Text
Installing Linux (Mint) as a Non-Techy Person
I've wanted Linux for various reasons since college. I tried it once when I no longer had to worry about having specific programs for school, but it did not go well. It was a dedicated PC that was, I believe, poorly made. Anyway.
In the process of deGoogling and deWindows365'ing, I started to think about Linux again. Here is my experience.
Pre-Work: Take Stock
List out the programs you use regularly and those you need. Look up whether or not they work on Linux. For those that don't, look up alternatives.
If the alternative works on Windows/Mac, try it out first.
Make sure you have your files backed up somewhere.
Also, pick up a 5GB minimum USB drive.
Oh and make a system restore point (look it up in your Start menu) and back-up your files.
Step One: Choose a Distro
Dear god do Linux people like to talk about distros. Basically, from what all I've read, if you don't want to fuss a lot with your OS, you've got two options: Ubuntu and Linux Mint. Ubuntu is better known and run by a company called Canonical. Linux Mint is run by a small team and paid for via donations.
I chose Linux Mint. Some of the stuff I read about Ubuntu reminded me too much of my reasons for wanting to leave Windows, basically. Did I second-guess this a half-dozen times? Yes, yes I did.
The rest of this is true for Linux Mint Cinnamon only.
Step Two: Make your Flash Drive
Linux Mint has great instructions. For the most part they work.
Start here:
The trickiest part of creating the flash drive is verifying and authenticating it.
On the same page that you download the Linux .iso file there are two links. Right click+save as both of those files to your computer. I saved them and the .iso file all to my Downloads folder.
Then, once you get to the 'Verify your ISO image' page in their guide and you're on Windows like me, skip down to this link about verifying on Windows.
Once it is verified, you can go back to the Linux Mint guide. They'll direct you to download Etchr and use that to create your flash drive.
If this step is too tricky, then please reconsider Linux. Subsequent steps are both easier and trickier.
Step Three: Restart from your Flash Drive
This is the step where I nearly gave up. The guide is still great, except it doesn't mention certain security features that make installing Linux Mint impossible without extra steps.
(1) Look up your Bitlocker recovery key and have it handy.
I don't know if you'll need it like I did (I did not turn off Bitlocker at first), but better to be safe.
(2) Turn off Bitlocker.
(3) Restart. When on the title screen, press your Bios key. There might be more than one. On a Lenovo, pressing F1 several times gets you to the relevant menu. This is not the menu you'll need to install, though. Turn off "Secure Boot."
(4) Restart. This time press F12 (on a Lenovo). The HDD option, iirc, is your USB. Look it up on your phone to be sure.
Now you can return to the Linux Mint instructions.
Figuring this out via trial-and-error was not fun.
Step Four: Install Mint
Just follow the prompts. I chose to do the dual boot.
You will have to click through some scary messages about irrevocable changes. This is your last chance to change your mind.
I chose the dual boot because I may not have anticipated everything I'll need from Windows. My goal is to work primarily in Linux. Then, in a few months, if it is working, I'll look up the steps for making my machine Linux only.
Some Notes on Linux Mint
Some of the minor things I looked up ahead of time and other miscellany:
(1) HP Printers supposedly play nice with Linux. I have not tested this yet.
(2) Linux Mint can easily access your Windows files. I've read that this does not go both ways. I've not tested it yet.
(3) You can move the taskbar (panel in LM) to the left side of your screen.
(4) You are going to have to download your key programs again.
(5) The LM software manager has most programs, but not all. Some you'll have to download from websites. Follow instructions. If a file leads to a scary wall of strange text, close it and just do the Terminal instructions instead.
(6) The software manager also has fonts. I was able to get Fanwood (my favorite serif) and JetBrains (my favorite mono) easily.
In the end, be prepared for something to go wrong. Just trust that you are not the first person to ever experience the issue and look it up. If that doesn't help, you can always ask. The forums and reddit community both look active.
178 notes
·
View notes
Text
Some of the comments are a little disconnected from everyday use, honestly.
I work in IT, I get it, in a fair and just world, we'd all be running Proxmox bare-metal and we'd be piling on VM after VM for the sake of freeing ourselves from the shackles imposed on us by corporate ecosystems. The thing is, you are not going to convince someone who's already tech-averse to go this deep, this quickly. Considering how most of my employees do everything on their phones and barely know how to turn their work rigs on or off - and most of them are in their twenties - there's a ton of ground to cover.
Here's a small - if still longish - taste of it all below. Click for more.
Start small. If anyone's curious and wants at least one solid stepping stone, consider checking whether or not your version of Windows contains the Hyper-V virtualization suite. To do so, open your Start menu, and start typing Turn Windows features on or off into the search bar. Pick the first item that pops up, and you'll access a window listing all of your OS' installed and pending features. You're looking for Hyper-V. Click on its box, then let your machine restart.
Congrats, it, uh... sort of looks like nothing's changed, right? That's good, actually. Now what you want to do is head to the Internet Archive and pick whatever operating system from your childhood that you happen to remember, or you could even go nuts and pick out one of the Enthusiast ISOs for Windows freaking 7 that some diehards are still putting together to this day. Pick a system, download its ISO file, and then search for and start Hyper-V.
Following the steps onscreen, you'll create your first virtual machine. For now, just hit Finish right off the bat, the program's going to pick best-case options that'll at least shield you from massive fuck-ups, seeing as this is your first time. Pick out your virtual machine in the main window, right-click on it and select Settings. Inside, you'll point its virtual CD-ROM drive to where you download your operating system's ISO.
If all goes well, you should see your operating system of choice's first boot screen in the window that pops up, once you boot up your VM. You can full-screen the program, if you want to fake running this natively a little more comfortably. Don't forget to (ahem) source a valid CD key through entirely legal means - you only really need to Google for this. If you're looking for a Microsoft key, you'll find Generic keys listed by the boatload. If you're trying out a MacOS install, you might have a little bit of a harder time finding the right serials, but it isn't impossible.
Of course, the easiest option is a Linux distro. Distros, barring a few exceptions, are typically free to use and have no copy-protection shenanigans to handle. If that's your course of choice, start with Linux Mint - it's designed to be as familiar as possible to people coming in from a Windows system. Once you've got the ball rolling, have fun with your now-sandboxed OS install. Revisit old favourites maybe, or even practice using Hyper-V's Guest tools to make your host PC and the virtual machine effectively "share" a network!
Later on, you'll realize that there's virtual machines dedicated to all sorts of things: you can run home automation servers, play games or run servers for said games - the sky's the limit, really. Running your VMs in instances on a bigger OS like Windows works on the short term, but sharing hardware resources like this is a huge pain. Eventually, you're going to want to run a hypervisor - that's a virtualization suite - directly on top of your hardware. That makes it much easier to divvy out resources as needed.
That, however, is neither here nor there if you're just starting out. If all you ever do is power on and shut off a PC, start by running the same version of Windows you're already familiar with on a separate VM. Then, poke at that sacrificial system to your heart's content. The fun thing about virtual machines is that irrecoverable fuck-ups do not exist. Save a state before doing dodgy shit, like you're playing a game on an emulator, and then go on right ahead.
Does the VM now refuse to boot? Reload its last save state. Bam, you're done. Learn that system from the inside out, and then try out its Server Edition, or jump to a Windows or a Mac, all depending. Try out Linux, too! You have no limits on the number of virtual machines you can run - none save your own hardware's limitations.
This is the best start to a home lab that you could possibly get, short of going fucking nuts for what's still just a hobby and speccing yourself a server-grade system to fuck around with.
If this really appeals to you, I'd advise picking up Windows Terminal commands, formerly known as MS-DOS prompts, and pairing that with some passing understanding of Bash. These two Command Prompt syntaxes are essential to start with. For maximum fun and chaos, set your newfangled server as a target, deploy a Kali Linux install, and start picking up Network Security basics by actually playing the part of a hacker.
If this speaks to you, you'll have enough on-hand to potentially make a career out of it. If you're just curious, you'll still know more about how to keep safe online than 99.9% of your fellow netizens.
Someone needs to inform the (rightly) pro-piracy tumblr users that it is no longer 2014 and some of the services they are recommending will turn ur computer in a broken microwave that serves bitcoins to shitheads.
70K notes
·
View notes
Text
Small linux iso file

#Small linux iso file install
#Small linux iso file software
#Small linux iso file password
You could also compress ISO files to digital videos to remove unwanted video titles in source ISO files. Part 3: Best ISO Compressor for Windows/Mac - Leawo DVD Ripper
#Small linux iso file software
At last, click the “OK” button to start compressing ISO file within DVD Shrink.ĭVD Shrink is a free DVD converter and compressor software tool, but now it’s been discontinued.Select a directory to save your ISO to, you can always move it later.Then, select “ISO” from the drop down list. This will help compress ISO file to fit on DVDR disc or other devices. For ISO file compression, select “Automatic”.Kick off DVD Shrink on your computer and then click the “Open Files” button to browse and load source ISO file.Make sure your source ISO image file is ready for compressing.
#Small linux iso file install
Download and install DVD Shrink on your computer.
Many commercially released video DVDs are dual layer (8.5 GB) DVD Shrink can make a shrunk copy which will fit on a single-layer (4.7 GB) writeable DVD, processing the video with some loss of quality and allowing the user to discard unwanted content such as foreign-language soundtracks. A stamped DVD may require more space than is available on a writeable DVD, unless shrunk. It creates a copy of a DVD, during which the coding only allowing the DVD to be played in certain geographical areas is removed, and copy protection may also be circumvented. DVD Shrink's purpose is, as its name implies, to reduce the amount of data stored on a DVD with minimal loss of quality, although some loss of quality is inevitable (due to the lossy MPEG-2 compression algorithm). Compress ISO file Free with DVDShrinkĭVD Shrink is a freeware DVD transcoder program for Microsoft Windows that uses a DVD ripper to back up DVD video. PowerISO will complete the compression quickly with high quality. You then only need to wait for the compression to complete.
After all, click the compress button to start compressing ISO file.
#Small linux iso file password
You can apply additional features such as password protection and splitting files to your new compressed ISO images from the same interface.Click "Advanced Properties" for higher compression rate if needed.Just enter a name under "file name" section and select format *.daa or all files, whatever you need at the end. Destination File option means the you need to show where to save size reduced ISO image file in your computer or Laptop. Source File option means the original ISO image as you want to reduce the size. Then dialogue box will appear, which contains two parts "Source file" and "Destination file".From the drag and drop menu select the "Compress" option, which present at the 13th position of drop menu.Then, go to menu bar located just below the main header of powerISO user-interface and click on the "Tools".Open PowerISO software from your Desktop/start menu by double clicking.Meanwhile, get your source ISO image files ready. Download and install PowerISO on your computer.
0 notes
Text
My EDC for Work
I mostly work remote now, but there's still some days that see me head back into the office. My EDC tends to vary depending on what's on my schedule.
Constants:
a Google Pixel 4XL w/ 128 GB in storage space. Basic comms, mobile file storage, music player, notes.
a Flipper Zero module, which is attached to my keychain and allows me to wipe and clone office-related RFID tags. It saves me on having to walk down to the locked and secured actual cloning machine, with Management having needed a while to come around to my using it. I also use it to control our conference room's projector, seeing as the actual remote is always misplaced. It lets me into my office and allows me to spook my non-tech-savvy EV-using colleagues seeing as Toyota doesn't individualize keyfob NFC signals. I also use it to control our garage door and to head inside the apartment. Oh, and it's also my dedicated IR remote for the media center.
two SanDisk Compact UltraFlash USB drives at 128 GB apiece. One is my Ventoy drive and is crammed with every single OS the office needs, from Linux Mint for the Call Centre to Windows Server 2020, as used by the Art and Production teams, with several variations in-between and a few bootable utilities, such as GParted, Hiren's Boot CD, FreeNAS and Proxmox. Both of them are molded to my keychain using little Sugru putty hoops. The Executive pool being beyond all salvation, I also pack a hacked Windows 11 image file that I've modded to be just a little bit more flexible than the commonplace Tiny11 ISO that's accessible online. Allowing sixteen year-old computers running on spinning rust to function off of a modern operating system has at least allowed us to acclimate the older ends of the Accounting department to modern standards. Unlike the actual Tiny11 ISO, I've kept the authentication suite because y'can't really run homebrew Windows images in an office setting legally if the resulting installation can't phone home...
Admin Days:
my Razer Blade 14 laptop and its associated dongles, running off of Windows 11 Pro. I edit campaign-related documents, review project files and sign off on our dealers having fully-assembled digital care packages packed with everything they'll need to get their sales off the ground. I also confirm the proper placement of documents that will need to be accessible for our Printing associates later. Everything IT takes place there, except for what relates to the Call Center. My laptop allows me to Term into our four server stacks if our checklists detect that something's missing, and to visually report on what needs to be transferred. To do all this, I also pack...
a TP-Link USB-C to RJ45 adapter, which is foldable and takes about zero space in my laptop's bag. It works like any other built-in hardline access point.
a no-name collapsible Cat5 Ethernet cable
a small bean bag. This one actually stays in-office, but I take it out from underneath my desk when I know I'll be watching the local network or mothering file transfers for more than twenty minutes. I am not spending half-an-hour standing up in the hot aisle, no sir.
Call Centre Admin Days:
my 512 GB Steam Deck. It's a couch gaming platform at home and a Linux Terming station at work. Going Linux-to-Linux is much more intuitive for me than loading Windows' Linux tools, seeing as it gives me a complete GUI I can use to guide less computer-savvy call agents through common procedures. It virtualizes a barebones-basic Linux Mint install that I can boot up and peer through if some colleagues report weird bugs or VoIP-specific issues, and I can use it for remote takeovers if things get too complex and require that I actually dig in to fix an issue.
my Steelseries Arctis 9 headset and USB emitter. I'm technically obligated to use wired audio peripherals at work, but Management soon realized I had too many side-jobs to take care of at work to really make the use of anything wired practical on the long term. They're plugged in if I have to lend a hand and make a few calls, but typically operate wirelessly. Everyone at the office knows to ping me on 3CX if I'm working within range of my desk, and to text or message me if I'm not.
On-Site Implementation:
my Google Pixel Slate. This old croaker's really useful when I'm dealing with non-tech-savvy salespersons who need a walkthrough of a campaign's documents or who want a demo run of some of our VR and WebGL content offers. It's a decent notepad on its own, and it comes with its own dongles. It's the PC I'll use to access any dealer's infrastructure and confirm with their Sales Director and Financial Controller that everything's above-board and ready to go.
That last one is the least-frequent of my tasks, seeing as Management knows not to send a cripple halfway across the province on his own. They let me implement campaign materials and check for head offices' go-ahead only for local dealerships, some colleagues of Walt's are scattered across the province for the rest.
All of that sort of informs why I took the Brain Gremlin as a persona, as I'm technically able to crater the company that employs me if I so desired, and could do so during personal or business-related trips.
Failing that, I get to fuck around with our presenting hardware if I'm bored, I can wreak havoc with my fellow geeks' radio-powered desktop toys, and have been known to pull an April Fools on my boss by using my Flipper Zero to put his shelf-mounted radio receiver on his least-liked station without opening the door.
FAQ:
WHY U NO USE LINUX ON LAPPY?
Because Razer are incompetent buffoons that long ago made it clear they had no vested interest in supporting the use of Open Source operating systems, and who made it a requirement to use Windows Update in order to get absolutely anything to work on the Razer Blade 14.
If it's any consolation, I use WSL to run Kali Linux on top of my Windows 11 install on my laptop. The way it's set up, you'd swear it's just a productivity and light gaming machine up until I mouse over to and click on a blank spot in the upper border. Kali's own GUI then drops down.
As to why I'd want to attack or breach my own employer's resources? Having an in-house pen-tester is a lot cheaper in this economy.
4 notes
·
View notes
Text
You can download it from the website!
https://linuxmint.com/
You will need to put it on something external (a CD drive or a flash drive or something) in order to install it. Assuming you have a modern computer (and probably don't have a CD drive), then the easiest way is to boot it from a flash drive. Most people have a billion flash drives lying around but if you've moved on from flash drives, you can pick them up cheap at any electronics store or even the supermarket. (Once you're done installing Mint, you can use the flash drive for other things. If you're too young to have used flash drives, they are very small external hard drives that you can put files on and plug into your computer to read the files. You might use your phone or a cloud service to do this; we used to do it with flash drives).
If you're a millennial who used to pirate games and stuff, you're already familiar with image booting. If it's new to you, do not panic.
After you have downloaded the iso from the website, Make the bootable USB with these instructions.
Boot Linux with these instructions.
Don't panic. You're going to see some new words and do some unfamiliar things but remember: it is impossible to fuck this up. If you somehow mess up making the USB, you can format the USB and try again. If you somehow fuck up the installation, you can reinstall without breaking anything. So long as you don't go randomly fucking around in the BIOS (DO NOT go randomly fucking around in the BIOS), you cannot break anything.
This will destroy everything you have on Windows (unless you keep both OSs which is a bit more complicated). Replacing your operating system is like getting a totally new computer. All of your Windows stuff will be gone. Save all of your files somewhere else first the same way you would if you were going to throw out your computer.
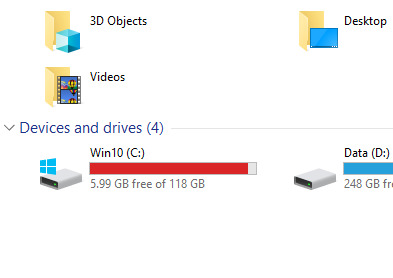
Oh I'm sorry C: you've only got 6GB free? Only six fucking gig? We used to boot the OS off fucking floppy drives but I'm so so sorry that six entire gigabytes of free space isn't enough for you you poor starving thing. You've been experiencing worse and worse memory issues for months and now you're freezing and crashing every few minutes because why, you just can't make 6 gig work? Grow the fuck up.
5K notes
·
View notes
Text
Virtualbox 5.2 For Windows 7 32 Bit

Virtualbox 5.2 For Windows 7 32 Bit Download
Download Virtualbox For Windows 10
Virtualbox 5.2 For Windows 7 32 Bit Free
Oracle VM VirtualBox Base Packages - 6.1.26. Freely available for Windows, Mac OS X, Linux and Solaris x86 platforms under GPLv2: Platform. Windows Installer. Solaris 10 5/08 and later or Solaris 11. First, create a new virtual computer on VirtualBox. Select Windows Server 2016 (64-bit) in the operating system selection window in the steps for creating a VM. After preparing the MS Server 2019 virtual machine, run the virtual machine by clicking the Start button. Configure the language, time settings, and keyboard layout for MS Server 2019. Virtualbox 32 Bit - downyup. VirtualBox for Windows 7 - original software that allows you to experiment with operating systems. Creates a virtual machine, allows you to set iron parameters within certain limits. The advantage is the modular architecture and the presence of internal logic. Suitable for users with an average level of skills.
Run Android on your PC
VirtualBox How To
The following are instructions on how to run Android-x86 inside VirtualBox. Note: For optimal performance, make sure you have enabled either VT-x or AMD-V in your host operating system's BIOS. Android-x86 versions tested against Virtualbox versions.
Date TestedVirtualboxHost OSAndroid-x86Result??2.2.4Windows XP??Good??3.0.2Fedora 11??GoodNov. 2 20175.2.0Windows 106.0-r3 32/64 bitGood
Downloading
Download an ISO of Android-x86 from here.
Caution
If you are using Android-x86 for debugging purposes, some binaries (gdb for example) are built for 32-bit architectures and will not support debugging 64-bit binaries such as the Android app host. Download a 32-bit distribution instead.
Create a new VM
If you have not already created a VirtualBox virtual machine for Android-x86 yet, do so as follows:
Click the 'New' button, and name your new virtual machine however you like. Set Type to Linux, and Version to Linux 2.6 / 3.x / 4.x. Note that you should choose the appropriate bit type for the version of Android-x86 that you downloaded.
Specify how much RAM will be allocated to your virtual machine when you run it. Android doesn't specify a bare-minimum requirement for memory, just keep in mind what apps you plan on running. 2GB (2048MB) is a good place to start, and you can change this later if you need to.
Create a new Hard disk image which will act as your machine's storage. The recommended starting size of 8GB is enough. Click through the rest of the options for creating your Hard disk.
Your virtual machine has now been created. It still needs to be initially installed at this point.
Settings
Tested on VirtualBox 64-bit for Windows, version 5.2.0. Android-x86 version 6.0-r3, both 32-bit and 64-bit. Select your machine, then click the Settings button and refer to the below recommended configuration to make sure your settings match.
(System)Recommended: Processor(s) should be set above 1 if you have more than one virtual processor in your host system. Failure to do so means every single app (like Google Chrome) might crush if you try to use it.
(Display):
Optional: Video Memory may be increased beyond the minimum selected automatically. The affects of this are unknown.
Mandatory: Unless guest additions are installed(1), change the default VMSVGA to VBoxVGA.
Optional: Enable 3D Acceleration may be checked. The Linux Guest Additions must (VirtualBox v6.1+) / may (VirtualBox v6.0 and below) need to be installed(2)(1) to get any benefit from this.
Failure to do so means you won't even be able to launch Android-X86 in the first place.(3)
(Storage) Find the first 'Empty' item (this should have an icon of a CD). In the Attributes, click on the CD icon with a small down arrow, and pick 'Choose Optical Virtual Disk File...'. Specify the Android-x86 ISO that you downloaded.
(Audio) Intel HD Audio seems to be natively supported in Android-x86.
(Network) By default, your installation of Android-x86 will be able to automatically connect to the internet. If not, you can try to enable WiFi in Settings/Network & Internet, and connect to showing VirtWifi. If you do not want to connect to the internet in VirtualBox, uncheck Enable Network Adapter under the Adapter 1 tab.
Install
Click the green Start arrow to power-on your virtual machine. You'll be presented with a list of options. Use the arrow keys to pick which one you want, then press Enter once the one you want is selected.
If you don't want to install Android-x86 yet and just want to test it, pick one of the Live CD options (except for Debug mode).
Pick the Installation option if you want your system to be installed to the virtual hard drive.
If you want to use higher resolution, you can edit the boot option by pressing TAB, change vga=788 (800x600) to vga=791 (1024x768) or vga=794 (1280x1024), and press Enter. You can also use vga=ask to see all available modes. But please note Android will only work under 16-bit mode.
Partition
When you are prompted to Choose a partition:
If you upgrade Android-x86 from a previous version, just select the existing partition. Agree to overwrite it when prompted.
If this is a new VM, choose to Create/Modify partitions. Use Bootable but not GPT! This will cause the GRUB installation to fail later.
You may partition your disk however you see fit. If you just want a simple installation, create one partition taking up the entire disk and format it as ext4.
Continue through the installation. You should install GRUB when it prompts you to. You may also leave /system as read and write when prompted. Once the installation is complete, force close/shut down the virtual machine and remove the ISO from the virtual CD drive. Finaly, start Android-x86. If it's a new machine, once loaded you can perform the Android setup to begin using your machine.
Advanced
Custom partitions, SDCard
When booting Android-x86, you may specify which partitions represent the data and sdcard. On the boot menu, select an entry you would like to boot from, press TAB, then add the following as it suits your needs: DATA=sda1 SDCARD=sda2 Press Enter to boot. These options specify user data (your setting, your uploaded applications, ...) go into /dev/sda1, and data saved in sdcard go into /dev/sda2. If you build the ISO from source, you can add these options to bootable/newinstaller/boot/isolinux/isolinux.cfg. Here is a note from David when using fdisk:
Create a new virtual machine with a hard disk.
Launch the Live ISO in Debug mode (I used android-x86-2.2-generic.iso) to get the commend prompt.
'fdisk /dev/sda', then type:
'n' (new partition)
'p' (primary partition)
'1' (1st partition)
'1' (first cylinder)
'xx' (choose the last cylinder, leaving room for a 2nd partition)
'w' (write the partition)
Repeat #3, but call it partition 2, and use the remaining cylinders.
'mdev -s'
'mke2fs -j -L DATA /dev/sda1'
'mke2fs -j -L SDCARD /dev/sda2'
Reboot ('reboot -f')
At the boot menu, choose VESA, then hit TAB and type so that the end of the line reads: 'DATA=sda1 SDCARD=sda2'. (Only need for the generic target images, for VM target images, this is not needed)
After booting (and of course disabling mouse integration via the machine menu), the SD card is read as unformatted, but you can format it by going to Settings > SD card & phone settings > Format SD Card, then Mount SD card.
The SD card should now work!
Note: for the step 7, if you want to format to vfat only, then you can do : Also remember the partition type has to be fat32 (b or c). By using vfat, the step 10 is not needed. DevTools application has a MediaScanner which (re)indexes your SD card for cases where you manually copied media over. This ensures that you see new images and/or music in the apps without having to reboot. If you downloaded it from within android, the application asks the relevant service to index new files.
Playing music
This section describes two ways to upload music files into Android running on a vbox so you can play them by the Music app. Of course, you can save the files to the virtual disk mounted at /sdcard, as described above.
Upload files by adb
Adb is Android Debug Bridge, a tool to debug Android system. If you compile from source, it is located in out/host/linux-x86/bin/adb. Otherwise you can get it from Android SDK. Suppose the network of your vbox is OK, you can upload a file from your host by
ADBHOST=<ip of vbox> out/host/linux-x86/bin/adb push <a music file> /sdcard
You need to know the ip of your vbox. You can get it by Alt-F1 and netcfg. You may also need to reboot Android to see the uploaded files. Of course in this way you have to mount /sdcard to a virtual disk partion. For complex network settings of the VirtualBox VM, you should refer to Debug How To on how to connect adb to the VM.

Upload files by wget
You can also upload files by wget in the debug mode. In the debug mode shell, before entering Android,
# cd /android/sdcard # netcfg eth0 dhcp # wget <url of a music file>
Then type exit to enter Android.
Debug with adb
This section describes the way to debug Android with adb via network.
Virtualbox 5.2 For Windows 7 32 Bit Download
If we want to debug with adb via network, we should ensure the ip of vbox can be accessed by host machine. So we should change the Network Adapter type of vbox to Bridged Adapter. After starting the android-x86, we should follow the above Settings/(Network) section to ensure the network of android-x86 is enabled, and enable USB debugging in Settings/System/Developer Options. Then we can get the device ip from Settings/System/About tablet/IP address. For example, if we see the ip address is 192.168.0.116, then we can use following command to connect android-x86 in vbox from host machine.
Then you can use adb command to debug android-x86 such as get log, and dump system information.
References
Download Virtualbox For Windows 10
Virtualbox 5.2 For Windows 7 32 Bit Free
^ ab VirtualBox currently has no Guest Additions for Android.
^ VirtualBox v6.1.0 states: 'old style 3D support (with VBoxVGA) has been completely removed'
^ VirtualBox states: 'Note that you must install the Guest Additions on the guest VM to specify the VBoxSVGA or VMSVGA graphics controller.'
1 note
·
View note
Text
Cara Install Pcsx2

PCSX2, PS2EMU, and NeutrinoSX2 are the three best PS2 Emulator for Windows, MAC, and Linux. PCSX2 is one of my favorite emulators to play PS2 games on my Windows 10 PC. Its latest version 1.4 was recently launched with the increased list of playable games and lot of bugs were also fixed. The only drawback with this PS2 Emulator is you need to externally download PS2 BIOS and attach PS2 BIOS directory in the emulator settings.
Cara Install Pcsx2 Di Windows 10
Cara Instal Pcsx2 Di Pc
Due to copyright issues, PCSX2 hasn’t included the PS2 BIOS directory by default. In this article, we will show you the step by step guide on How to download and install PCSX2 on your Windows, MAC, or Linux? and How to download and include PS2 BIOS in the PCSX2 Emulator? and finally, How to play PS2 Games on your PC through PCSX2 Emulator?
In this blog you will get Best latest PS2 BIOS files for PCSX2 (PS2 Emulator). It will help you to run PlayStation 2 (PS2) games on PC. About PCSX2: PCSX2 is a free and open-source PS2 emulator for Windows, Linux, and macOS that supports a wide range of PlayStation 2 video games with a high level of compatibility and functionality.
Many emulators out there are complicated to install and set up, but not PCSX2.
Emulator yang digunakan adalah PCSX2 –Play Station 2. Unduh dan instal terlebih dulu PCSX2 ke laptop anda. Atur juga PAD (jika anda bermain menggunakan keyboard), jika anda bermain menggunakan Controller atau stik PS2 tidak perlu mengaturnya. Jika sudah melakukan penginstalan PCSX2, maka jangan lupa untuk mengatur BIOS.
Cara Mudah Setting & Memainkan PCSX2 di Laptop / PC dengan Gambar. Mulai dari Cara Install PCSX2, Menginstall Bios / Setting Bios PCSX 2, Control Pad, Sampai Menjalankan Game. Dan juga Link Bios PCSX2 Full 100% Work.
Linuzappz and Shadow independently started with the pcsx2 PS2 Emulator development by integrating ps2 bios and later ps2 bios was excluded due to Sony Copyright Claim over the ownership of ps2 bios. pcsx2 still lacks some development compares to the ps2 console but it also has some advantages over real ps2 hardware like high-resolution support, smooth texture, and anti-aliasing filter. This was a small introduction about PS2 Emulator BIOS, now let’s move to the main topics of downloading and integrating PS2 BIOS on PCSX2 Emulator.
How to install PCSX2 PS2 Emulator on Windows, MAC, and Linux?
I have Windows 10 Pro 64 bit installed in my computer. It has inbuilt DirectX 12 in it. When I try to install PCSX2 1.4.0 it requests me to update directx libraries.
PCSX2 ps2 emulator can be easily installed on Windows, MAC, and Linux just like any other software or computer program. You just have to download PS2 emulator respective installation file from PCSX2 official website and then follow the default installation process on your PC. Double click on pcsx2.exe to install ps2 emulator on your Windows. You need to run few commands to execute PCSX2 on Linux or you can follow the Linux installation guide on the PCSX2 official Github Page. It will be a pretty easy installation on MAC devices too.
How to include PS2 BIOS on PCSX2 Emulator?
You have to externally include PS2 BIOS on PCSX2 in order to play ps2 games on your computer or laptop. Once PCSX2 Emulator is successfully installed on your computer then follow the steps to integrate the PS2 BIOS directory to PCSX2 Emulator.
Step 1: Download PS2 BIOS zip file on your computer and extract in one folder.
Step 2: Open PCSX2 Emulator on Your Device, first-time installation screen will appear.
Step 3: Click on Open in Explorer button in the BIOS Path option.
Step 4: Copy all the BIOS Files in the PS2 BIOS folder of the PCSX2 Emulator.
Step 5: Close the PS2 BIOS Folder and Refresh the PS2 BIOS List.
Step 6: Select your country PS2 BIOS from Europe, Japan, and the USA.
Step 7: Click on finish to finish the PS2 BIOS integration with PCSX2 emulator.
So that was the quick and easy method to download and integrate PS2 BIOS in PCSX2 Emulator, Now let’s check out some PS2 games on PC.

Cara Install Pcsx2 Di Windows 10
Play PS2 Games on PC
Once PS2 emulator is properly installed on your computer and PS2 BIOS is integrated with the emulator then you can play PS2 Games using two methods. In the first method, you can directly plug the DVD of the game and start playing on your computer from the PCSX2 emulator or you can attach ripped isos files of the PS2 games in the PCSX2 emulator. PS2 ISOs also know as PS2 Roms Games are freely available to download from the internet. Let’s see the steps to play PS2 Game on computer.
Cara Instal Pcsx2 Di Pc
Open PS2 Emulator.
Click on the CDVD option on the top menu of the emulator.
Navigate to the Iso Selector and Browse the downloaded iso game file.
Click on System option in the top menu and select Boot CDVD option.
It will launch the selected iso game.
So this is the guide to download PS2 BIOS and integrate it with the PS2 emulator and play the ps2 game on Windows, MAC and Linux PCs.
1 note
·
View note
Text
Legacy AMD APU Llano Laptop for Emulation tests - Part 3
A6-3420m CPU Emulation performance
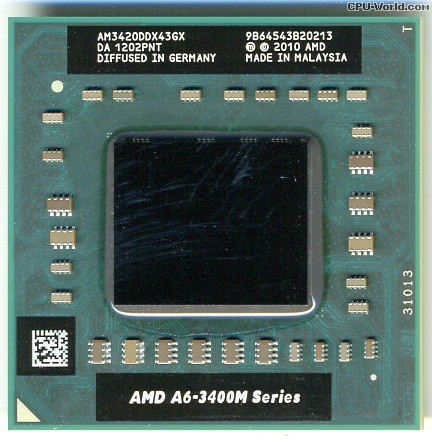
I wanted to test my laptop's APU for performance test on emulation. To recap, it is AMD's first gen APU that the CPU is based on Phenom K10 CPUs, except having boost. It is unlocked so you can overclock it with a software. By default, the A6-3420m is a quad core 1.5Ghz cpu with boost to 2.4Ghz on one core. Boost was new so it helps a little. Overclocking brings some programs significant jump. From being a weak CPU to a decent one for emulation is an interesting story. The first gen Llano APUs are all unlocked, and are the few exceptions to overclock your laptop without being an actual risk. It came out in 2011, and seeing the first gen APUs in action should be surprising. They're weak from the start, but offers decent GPU performance, and I'm offering both stock and overclocked benchmarks here for each emulator.
Benchmarks: A6-3420m 1.5Ghz-2.4Ghz and OC A6-3420m 2.3Ghz-2.8Ghz All tests are using the lowest non stutter FPS on the exact scene for a while to see how it performs and to see how to avoid sound stuttering to have smooth experience. Retroarch is on some of the benchmark and is using DX11 as main on windows, and OpenGL for Linux and for hardware rendering. Standalone hardware rendering based emulator is preferred (ex. Standalone Flycast vs Libretro's Flycast, Standalone Mupen64Plus vs Libretro Mupen64Plus). Testing a 3D emulator is best with DirectX on Windows most of the time, and OpenGL for the rest or on Linux. Mesa drivers are the fastest and offers better compatibility. GPU bottleneck is not an issue by using native resolution without any shaders or anti-aliasing applied. The lowest FPS of a heavy game is a way to see which Emulator you could generally use. Note, if a specific system hardware or emulator to emulate one most demanding game doesn’t go fullspeed, doesn’t mean you can’t use the emulator for general good performance. BSNES’s demanding games for the CPU are three rare ST018 games. You may not play one game that is only demanding, but to see how many other popular titles perform. Some emulators may not play a demanding game due to compatibility or development issue. It’s a good way to see how good of a performance you would get to use it generally. Having over 60fps is a great way to have smooth experience and to throw any or most games without any problem.
NES: Mesen-Stock: Megaman 2 Intro 82.0 (100.0) Mesen-Very-High-OC:Megaman 2 Intro 48.0 (59.5) Nestopia UE works very well and very light. Mesen by default performs fine at stock. For virtual overclocking, only the CPU overclock can barely perform. However, it's best to use Nestopia UE for those features, as well as using Runahead feature for lower input latency.
SMS/GG/Genesis/CD/32x: Genesis-GX-Nuked: Virtua Racing Demos (MAME OPN2 / Nuked OPN2) 118.0 (154.0) / 75.0 (93.0) The Genesis GX Plus core is too efficient to find any issue, and it is the most accurate currently and it was made for GC and Wii. Virtua Racing is the only demanding title since it uses SVP chip for 3D rendering. While it performs good, the Nuked OPN2 audio was added for more accurate sound. It seems to perform great, I suggest using MAME for fast forwarding, especially Runahead feature. 32x Virtua Racing runs around four times the fullspeed on Picodrive. I haven't tested it on Fusion yet, but assuming it will run at fullspeed.
SNES: SNES9x: Super Mario RPG 116.0 (163.0) Bsnes-v110 fast: Super Mario RPG 50.0 (63.0) ST018 Game 36.0 (47.0) Higan: ST018 Game 21.0 (29.0) Bsnes-HD-Mode7: Super Mario Kart 1x (2x) Testing the new Bsnes or BSNES-HD core performs really fine. Non-chip games works fullspeed out of the box. Games with Super FX2 chip or SA-1 chip are a bit demanding, and they are below fullspeed with CPU in stock. With overclocking, they are barely above 60fps. Super Mario RPG uses SA-1 chip. It would stay smooth and may not encounter small slowdowns. The most demanding games are the ones that uses ST010 DSP4 chip. Only three Japanese games use it, so they aren't common. However, they won't play at fullspeed, regardless. Higan an be used on Bsnes Standalone if you turn off all special fast features. Generally, it's best to use Bsnes since Higan's performance isn't there at all for the CPU. I also suggest the newest Bsnes standalone or HD core over any Bsnes forks you find from Retroarch. I haven’t tested the Super FX overclocking feature. I recommend the main SNES9X if you want to fast forward and use Retroarch’s Runahead for less latency, especially paired with overclocking for SA1 games. HD side on Bsnes is also tested. Using Super Mario Kart and playing the demos, and the game has DSP1 chip. On any game with Mode7, it is not fullspeed at 2x at stock CPU. For overclocking, it generally performs smooth on most Mode7 games. With Super Mario Kart, since it has an external chip, it is slightly demanding, that it goes down to almost below fullspeed. For a long test, I do get 59fps at the lowest I got, but it generally plays at fullspeed. 2x with overclocked APU should be good, as long as you don't use 2x on other games that has more demanding chip games than any DSP games.
Virtual Boy: Simple, perfect performance, regardless of hard sync.
Sega Saturn: Yaba Sanshiro is the best emulator you can use on the APU. You can enable frameskip to get the best performance as much as possible. Some parts of any games may go a bit below fullspeed, but the audio is async, so it may not be as noticable, as long as the CPU is overclocked.
PlayStation: Beetle-PSX Core: Crash Team Racing (Interpreter / Max Perfprmance 1024 DMA) 36.0 (45.0) / 47.0 (54.0) Mednafen: Crash Team Racing 41.0 (57.0) PCSX-Rearmed: Crash Team Racing (Interpeter / Dyanmic) 57.0 (71.0) / 61.0 (81.0) PCSX-R PGXP: Crash Team Racing (Vanilla / PGXP MEMORY + CPU 1.5x) ~85.0 (~115.0) / ~60.0 (~85.0) These are four emulators tested for the laptop and each has its own story. Beetle PSX Core from Retroarch is based on Mednafen. I am testing with the new dynamic recompiler on performance mode and most games should work with it. While the performance is noticably faster than standard interpreter, it is only more playable with overclocked CPU to barely have any lag, at least in software. Hardware rendering is quite slower on this laptop. I don't know exactly why it's slower than software, even using Linux with Mesa Drivers, but it still hits really similar speed when comparing interpreter and dynamic. If you want to do hardware with higher resolution and PGXP, use PCSX-R fork. With Crash Team Racing intro and test the ice bear scene, that's the part where I found the slowest point. Even with that, dynamic at max performance with software and host CPU overclock gives best results. Although, the interpreter on beetle is kinda slower than Mednafen and beetle is a fork of it. Mednafen is a multicore emulator, and I used its PSX emulator that is the most accurate. Without frameskip for full mesaurements, Mednafen is faster than Beetle core. Somehow, overclocking your CPU brings the performance up dramatically. It is pretty close to 60fps on few spots on CTR demos, but fullspeed on a lot of areas. It's unbelievable for standalone Mednafen to be faster then Retroarch core that you may use this for faithful emulation. Although, you can turn on frameskip for full emulation performance, I recommend not having frameskip for good response. Somehow, Mednafen doesn't use CPU boost clock for me, but still shows it's faster than Beetle core. Another Retroarch core is PCSX-Rearmed. In the last few years, we do have it for x86 and x64 PCs. It uses less accurate interpreter and Pete's Software for performance. On stock CPU, the performance reaches fullsleed most of the time, but you can encounter minor slowdown, but it's not that below. With Overclock, it reaches fullspeed on all areas of testing. Like Mednafen, it renders at 1x. Recently, we got dynamic recompiler for x86, x64, and Arm64. It made PCSX-Rearmed run at fullspeed without overclocking the CPU. For a 1x resolution, this emulator is preferred over the other two for performance. PCSX-R PGXP is a really good emulator and performs excellent. You can use Pete's OpenGL for Linux and OpenGL2 2.9 Tweak version for Windows. Pete's OpenGL 1.78 on Linux is more reliable than Windows version and just as fast as OpenGL2 2.9 tweak when using full framebuffer settings. Only difference are that OpenGL 2.9 allows shaders and xBR upscaling on textures. Both Pete's OpenGL 1.78 and OpenGL2 2.9 Tweak offers PGXP capabilities, so you should see very great polygon rendering. Only PGXP Memory for the CPU are usable with fullspeed. Combining PGXP memory and internal CPU overclock at 1.5x gets you slightly above fullspeed. Overclocking your CPU should bring more relief for fullspeed on any games. The Linux drivers, despite performing better than official drivers from AMD for OpenGL, it performs the same. Only one downside with r600g drivers at the moment on any video plugin is the lighting on Spyro on some areas, but they are minor, not severe. Regardless, you should have great experience on PCSX-R PGXP. Although, neither of the builds use .CHD iso files. I did test Windows PCSX-R PGXP on Wine, and while I was able to use OGL2 Tweak and get the same performance as Windows, I do have problems with the audio plugins and Xaudio2 driver. I do recommend finding PGXP Linux Build for easier setup. It's available as a PPA and AUR build.
N64: Angrylion Plus with Project64 using internal LLE mode plays at half the speed or lower mostly. This is gonna be a long explanation about this laptop hardware and drivers. In short, you can play many N64 games with pretty great accuracy without the use of Angrylion. However, it is a mess on Windows side. I've tested many video plugins. Windows 10 updates seems to make things a bit slower. Rice plugins are all over the place, and many of them have problems. GLN64 is not as good. Jabo's D3D8 1.6.1 is the fastest you would get. Glide64 and GlideN64 are bottlenecked by AMD OpenGL drivers, meaning that it's slower. Glide64's performance is mediocre. I tried using nGlide, and it helps a bit, it's still doesn't solve the lag on some games, mainly Quake 2 demos that's used as a test to see if the lag is present. Jabo's is the fastest, and only has minor lag because of Windows 10 updates. GlideN64 is really slow, even turning off framebuffer at 240p. It's a driver issue, and overclocking the CPU didn't help much. Quake 2 demo lag was few frames per second. I would've test Windows 7 since the laptop was made for it, but I no longer have it since 2016. Mupen64plus is slightly slower, since all plugins use OpenGL. Let's jump into Linux. This is unbelievable! I use Mesa Drivers and downloaded Mupen64Plus and got GlideN64 4.0. I tested Quake 2 demos, and by default, it's much faster than almost every plugin I tried on Windows. I overclocked the CPU, and turn off Depth Buffer to RDRAM with non-noticable regression, and it goes from minor lag to none! I bumped up the resolution and no lag is present at all. I do however set Framebuffer mode to VI origin to use less GPU usage on high resolutions. GlideN64 is really fast on Linux on this laptop. Even 3-point filtering finally works on my laptop. I recommend using standalone Mupen64Plus for Linux since it's faster. On Retroarch on Mupen64Plus-Next, I still have minor lag with the same settings. To get the easiest way to have mupen64plus with GlideN64 bundled, search M64p.
Dreamcast: Redream is the fastest emulator you can use for the CPU. It works fine at CPU stock. Reicast's fork, Flycast, is more compatible with games, but is more demanding. Even with CPU overclocking and turn off few accurate settings, it is a bit below fullspeed. On my drivers, I do have sprite glitch on Marvel Vs Capcom on Redream. It was tested on Linux, but on Windows, the performance may worsen due to dated drivers and poor OpenGL drivers.
GBA: mGBA: Mermaid Melody PPPP Menu 141.0 VBA-Next: Mermaid Melody PPPP Menu 126.0 VBA-M: Mermaid Melody PPPP Menu 127.0 Plays very fine. mGBA is newer and more accurate than VBA emulators. VBA-M is the slowest generally. VBA-Next is sometimes close to mGBA's speed and sometimes by VBA-M's speed. Even when using bios and disable remove idle as shown, mGBA offers better performance.
NDS: Desmume 0.9.11+: Pokemon Black2/White2 Title Screen (No Frameskip / Frameskip 9) 33.0 (40.0) / 60.0+ (80.0+) MelonDS 0.83: Pokemon Black2/White2 Title Screen (OpenGL 1x / Jit Recompiler) 20.0 (29.0) / 00.0 (42.0) I’m testing two emulators for measurements. I'm using a jit command on Desmume Linux build for full performance. On Windows, it has OpenGL renderer, but Software is the fastest, so that's why I'm using software rendering on Desmume. I'm testing a demanding area on Pokemon B2W2. Without frameskip, you would get almost down to half fullspeed. With overclocking, you would get a bit more performance. With frameskip at max, I get fullspeed. Although, I suggest using lower frameskip, like one or two. On a lot of games, it may not need that much frameskip, generally. It performs fine on other games that have less demanding scenes. It's probably better for overclocked CPU since you can lower frameskip by one. On MelonDS, since it has an OpenGL renderer, I decide to test it myself. As a result, I get below half the speed at stock clocks. On Overclock, I get about half the speed, so it's the interpreter CPU that is the bottleneck. With beta ready Jit recompiler with default settings for pre-0.9 release, I do see some increase. It slightly passes Desmume without frameskip. However, some games will run near fullspeed and others at fullspeed. Not much has been tested for high internal resolution or other games. Your last choice to get better performance to games that are in the first 2/3 of the DS life cycle, No$GBA is your choice. It is fast and you can use Nocash or OpenGL renderer. Although, Wine has problems with OpenGL that it crashes wine. The nocash is faster and No$GBA is the fastest option while being really least accurate, like you can hear the audio have noisy sounds on couple of games, and it has problems playing Pokemon Gen 5 games. (Note!) I heard Drasic DS is gonna go Open Source after it has AARCH64 ARMv8 dynamic recompiler implemented. It is faster than Desmume that you can run it on an android emulator at fullspeed. It may not be that easy to set up since it's payware and using an emulator, but it does perform well. Although it does have a slight input lag, it still considerable for emulated Drastic DS. I haven't test it yet. Dev is working on x86-64 and x86 builds and will be out once the emulator goes free.
GameCube/Wii: Dolphin x64: Soul Caliber 2 36.0 (45.0) Soul Caliber 2 runs fine. At some parts, you can encounter a little slowdown. With big effects that happens during fighting, I see 3/4 of performance with overclock. Some games may play fine though, at least with overclocking. Make sure you run at 1x with async shaders, not using ubershaders. You won't play any heavier titles though. You can play with the virtual overclock options and you may set it to half the speed or quarter for some games.
PS2: While it runs at least, even with overclocking, a lot of games runs slower that it's not a recommended system to use PS2 emulators. At best, you stick with DX11 on Windows or OpenGL on Linux for PCSX2. Pushing speed to very aggressive may be appropriate for certain games that can run decently or almost fullspeed, but those are lighter titles.
PSP: PPSSPP: God of War 37.0 (48.6) It runs games completely fine. Only demanding game is God of War. You can encounter slowdown on certain parts of the game. You can solve it by only setting the CPU clock to 222mhz on the option specifically for GOW. The game isn't constantly slow or majority of the time, it's just it has slowdowns sometimes, and goes fullspeed on other times. If God of War only has slowdowns on many enemies with the performance given above, you won't at least encounter slowdowns on the rest of PSP titles.
3DS: On overclocking too, I couldn't generally get Pokemon games to play at fullspeed on needed amount of times. It goes lower than fullspeed on battles, somewhat lower on overworld, and a bit lower than half the speed on double battle or battle royale. A lot of 3DS games runs generally slow. They barely reach fullspeed, even overclocking the CPU. Citra won't run fast enough for this system.
Dosbox: From any Dosbox builds I use as explained from previous page, it runs the dynamic recompiler fine. It reaches commonly around above near late 486 performance, around 24000. With overclock, it goes up around 36000, equivalent to 486DX4-100Mhz. Although, some 486-pentium era games are able to use more cycles without slowing down the emulator. On Interpreter, it runs around 12000, equivalent to 486DX-33Mhz. With overclock, you go to around 18000, equivalent to 486DX2-50Mhz. I do recommend Dosbox ECE, or finding Dosbox builds that has patches, and is 32bit build since 32bit dynamic recompiler is robust.
PCEM: It can run any 386 processors. 486, it can run on any SX ones pretty fine. However for DX, let's get into it. 486DX-25mhz can run fine at stock as an interpreter. Interpreter seems more constant on speed than dynamic recompiler. With Overclock, it can use DX-33mhz pretty good as an interpreter. Dynamic Recompiler is a way to get good performance for emulated CPUs and go higher, but on places like Windows 95, sometimes windows being on idle or loading things on Windows can bring the performance down a bit than expected. It can go above the targeted interpreters, but dynamic is better used on DOS mode on this laptop. On stock, it can go up to 486DX-40, and with overclock, it can go up to 486DX2-50. I use DBOPL on sound blaster setting to get a little more performance for the CPUs. The laptop can't go any higher to use Pentium CPUs, and using 3DFX Voodoo hasn't been tested, but I recommend using threads of 2 since the host CPU has four cores.
Recommended Emulators: NES: Nestopia UE SMS/GG/Genesis: Genesis GX Plus SNES: Snes9x PSX: PCSX-R PGXP, PCSX-Rearmed N64: Mupen64Plus (Gliden64, Linux), Project64 (Jabo's, Windows) Saturn: Yaba Sanshiro Dreamcast: ReDream GC/Wii: Dolphin GB/GBC: Sameboy GBA: mGBA NDS: Desmume 0.9.11+ PSP: PPSSPP PCEM: 486DX 25Mhz/40Mhz DOS: Dosbox ECE
Recommended emulators are listed as usable. If a system or emulator is not listed, it either that it won’t be playable due to speed, not past playable yet, or too fast enough to play (Stella, Atari 2600). The emulators on the list are recommended for general use. This is using stock settings on most emulators listed. Also, lighter games will perform faster, and you can toggle more settings for those games, like Runahead.
If any of you know what are the most demanding games for GBA, Saturn, Dreamcast, or DOS, let me know and comment.
Using AMD cards on OpenGL Emulators: On Windows, you can only use official AMD drivers. It runs pretty fine for DirectX stuff, but for OpenGL, a lot of OpenGL programs runs slower and sometimes broken. OpenGL drivers are not really optimized, and since Terascale GPUs aren't supported for at least four years as of this writing, you may not get to use newer OpenGL emulators or updates, even though you feel it should be more capable than how it performs. Even worse, first few generations of AMD APUs have short lifespan for graphic drivers from AMD, and Windows 10 can make things a bit slower than using the first version or using Windows 7. Again, Terascale GPUs will not have Vulkan support on any drivers.
Using Linux with Mesa Drivers, r600g: I tested OpenGL emulators on few distros with Mesa drivers. It does perform almost as good as Nvidia’s OpenGL drivers. On GlideN64, all the slowdowns on Quake 2 are gone. I don’t have that problem on Linux. The Mesa drivers are much more reliable, even if there very few errors I explained above, it's still very much stable and efficient. Trust me, it's far better than Windows.
Since we covered the CPU performance for emulators, we'll test out GPU performance of Radeon HD 6520g on the next page.
Next Page on GPU emulation performance.
Previous Page on software and emulators use.
3 notes
·
View notes
Text
Yocto for Raspberry pi 4 B 64 bit
Yocto for Raspberry pi 4 B 64 bit
Using Yocto we can create custom Linux images for embedded devices. Here we are going to build a basic minimal image for raspberry pi 4b. With the small modification in the configuration file you can create the images for various versions of Raspberry pi.
Prepare your Host Linux
Install the essential tools for your host PC .
sudo apt-get install gawk wget git-core diffstat unzip \
te…
View On WordPress
1 note
·
View note
Text
How to install CentOS 7 Server and Desktop

This tutorial will show you how to install the latest version of CentOS Linux 7 on a dedicated server or desktop machine. The same steps will work on private or public cloud virtual machines too. CentOS is a stable Open Source Linux distribution and one of the most popular Linux platforms based on Red Hat Enterprise Linux (rhel) sources.
The typical installation of CentOS as performed in this tutorial will be based on the CentOS 7 DVD ISO image. You can burn the image to a DVD or copy it to a bootable USB drive. The installation covers the process of installing CentOS 7 on UEFI based machine. The same installation procedure can be successfully applied on old BIOS motherboards or on UEFI systems with Legacy Mode or CSM (Compatibility Support Module) option enabled.
REQUIREMENTS
The latest CentOS 7 ISO Image obtained from the following official CentOS download mirrors: http://isoredirect.centos.org/centos/7/isos/x86_64/CentOS-7-x86_64-DVD-1708.iso
Initial Preparation
After you’ve downloaded the CentOS DVD ISO image by following the download link presented above, use a DVD burning software to place the bootable image to a DVD or prepare a bootable USB stick that contains the CentOS image.
Bootable USB Drive
A bootable USB drive can be created with the Rufus program in order to be fully compatible with UEFI based motherboards. If you don’t have an UEFI motherboard machine, then you can use any other software to create a bootable CentOS 7 USB stick. Some of the most popular software to create bootable USB flash memory drives can be found at the https://www.pendrivelinux.com/ website.
Configure Bios
Another important aspect which must be followed in order to properly install CentOS 7 on UEFI based motherboards is to open your machine motherboard UEFI settings (pressing a special key, such as F1, F2, F11, F12, Del, Esc) and disable QuickBoot or FastBoot and Secure Boot options. The BIOS/EFI keys you need to press during hardware initialization or machine power on phase in order to enter BIOS/UEFI settings highly depend on the motherboard vendor specifications and should be included in the motherboard’s manual. Another important aspect is to change the machine boot order and instruct the BIOS/EFI to use the proper drive for booting (DVD drive or USB). On some machines, the boot order or the boot drive can be selected by pressing a special key at hardware power on.
Install CentOS 7
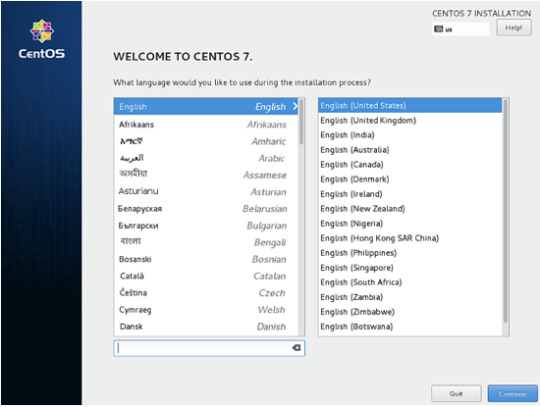
After you’ve made the above settings to your machine motherboard UEFI/BIOS, place the DVD ISO image of CentOS 7.4 or the bootable USB flash stick in the appropriate motherboard drive. Then reboot or power-on the machine. Hit the appropriate bootable key from the keyboard and instruct the BIOS or UEFI software to boot the machine from the appropriate DVD or USB drive. The CentOS 7 bootable ISO image should load and it will present you the first installation image on your monitor screen. Select Install CentOS 7 from that menu and hit the Enter key to start the installation process, as illustrated in the following screenshot :

After a few seconds, the CentOS graphical installer will be loaded into your machine RAM and will present you the ”Welcome to CentOS 7” screen. Select the appropriate language for your system installation process and press hit on Continue button.
On the next screen, you will see the Installation Summary menu. Here, first select the Date and Time menu to open this menu. Use the map to select your geographical location. Also, below the map, you have the option to configure the date and time settings. If the time is correctly configured just hit on the upper left Done button to complete this stage and return to the initial menu
Next, hit the Language Support menu and setup your system language support. Again, when you finish this step, hit Done to return to the main menu.

Next, hit the system Security Policy menu and select a security profile from the list. You’re safe to choose the Default security profile. Hit the Select profile button and switch Apply security policy button to ON. When you finish, hit the Done button to return to the main screen.
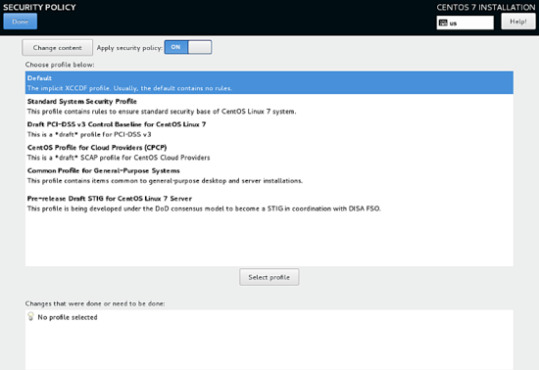
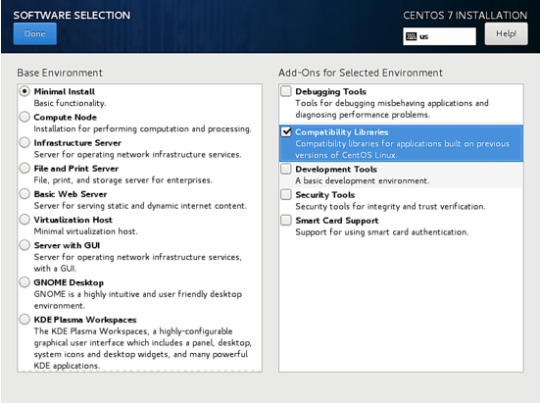
In the next step, go to Software Selection menu. There, you will find a list of some predefined base environments for your system. You can choose to install a graphical desktop environment, such as Gnome, KDE Plasma or Creative Workstation, or you can choose to install a custom server installation, such as Web server, Compute Node, Virtualization host, Infrastructure server, Server with a graphical interface or File and Print Server.
The most suitable environment for a server is the Minimal Install option because it is the most flexible and has a small disk footprint. Select Minimal Install base environment, select Compatibility Libraries add-ons from the left pane and hit on the Done button to finish this setting and return to main menu.
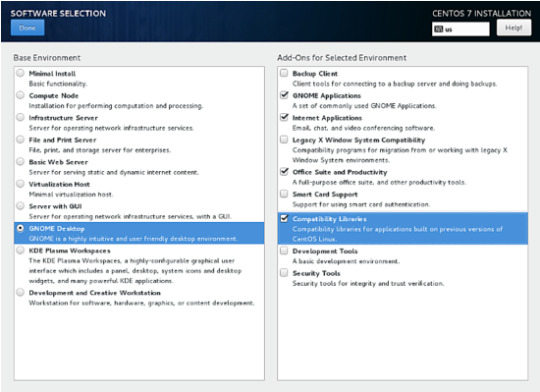
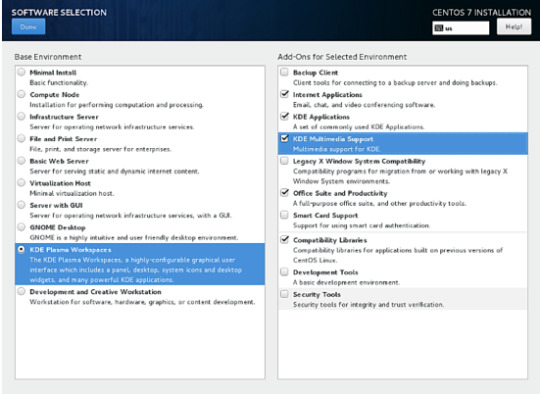
In case you want to install a full Gnome or KDE Desktop environment, select the proper environments as shown in the below screenshots and hit on Done button. However, you cannot choose to install more the one environment per installation.
Next, go to the Installation Source menu and select Auto-detected installation media as default. You also have the options to perform the installation from other network locations such as HTTP, HTTPS, FTP or NFS server or add additional repositories. When you finish, hit Done to return to the main menu.

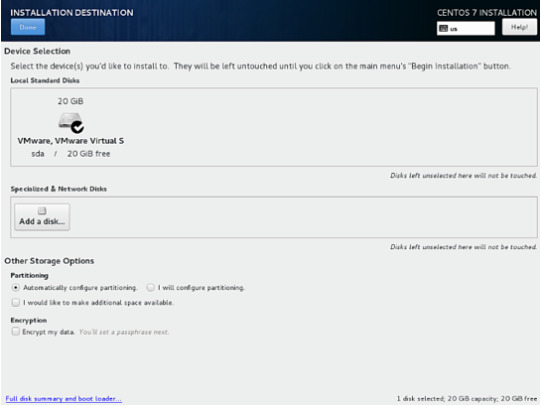
Next, hit on the Installation Destination menu to open storage partition settings. In Device Selection, check the local machine hard disk. Then, in Other Storage Options, check Automatically configure partitioning. This option ensures that the machine hard disk will be automatically partitioned with the /(root), /home and swap partitions. When you finish, hit the Done button to activate the machine drive partition layout and return to the main menu screen.
In the next installation screen, hit the KDUMP menu and disable KDUMP kernel crash mechanism in order to free system RAM. Hit on the Done button to apply this setting and return to the main menu.

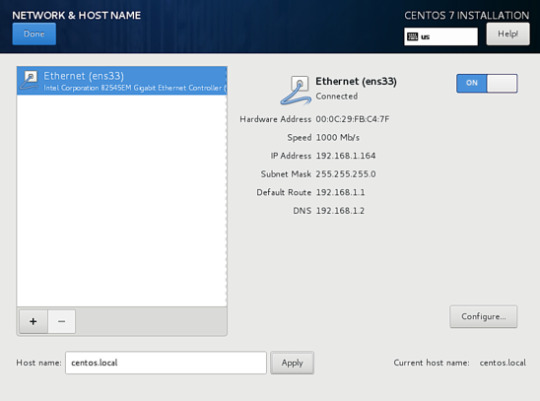
Next, hit the Network & Hostname menu and configure your machine FQDN hostname. Also activate and enable the network service by switching the Ethernet button from OFF to ON. You can manually configure the network interface in this step if that’s the case. When you finish, hit the Done button to return to the main installation menu.
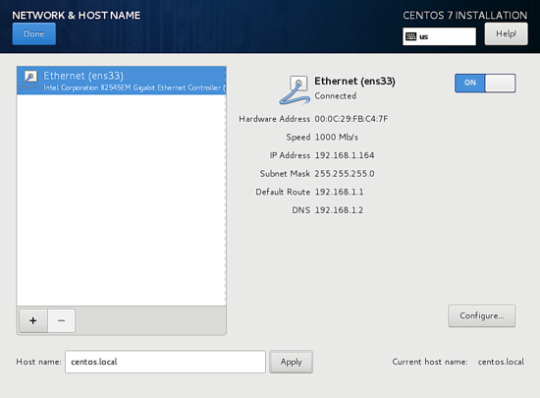
Next, hit the Network & Hostname menu and configure your machine FQDN hostname. Also activate and enable the network service by switching the Ethernet button from OFF to ON. You can manually configure the network interface in this step if that’s the case. When you finish, hit the Done button to return to the main installation menu.
Finally, before starting the installation process, make sure you review all settings you’ve made. When you finish, hit the Begin Installation button to start installing CentOS 7.

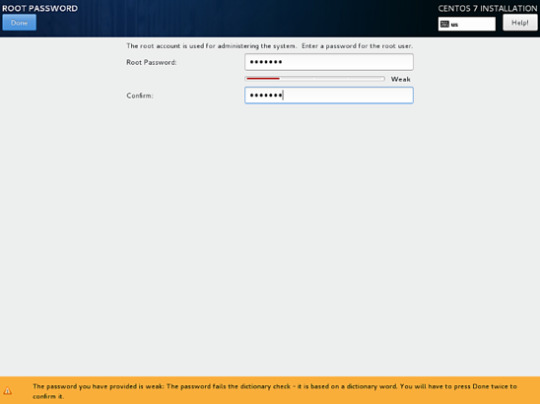
After the installer starts hit on the ROOT PASSWORD menu in Configuration screen and setup a strong password for the root account. When you finish, hit the Done button to return to user settings screen.

Next, hit the User Creation menu and add a new system account and a strong password for this account. Check Make this user administrator and Require a password to use the account options in order to grant this user root privileges. This avoids that you have to manually enter the password each time you log in to the system. When you finish setting up the user, hit on the Done button to return to the initial menu and wait for the installation process to complete.
After a few minutes, the installer will report that CentOS has been successfully installed on your machine. In order to use the system you just have to remove the installation media and reboot the machine.
After the installation process completes, hit on Reboot button and the machine will reboot. After the restart, log in to the CentOS console with the credentials configured while installing the system. Then issue the following command with root privileges to update the system.
That’s all! You’ve successfully installed the latest version of CentOS 7 on your machine.
1 note
·
View note
Text
Adversarial interoperability: reviving an elegant weapon from a more civilized age to slay today's monopolies

Today, Apple is one of the largest, most profitable companies on Earth, but in the early 2000s, the company was
fighting for its life
.
Microsoft's Windows operating system was ascendant
, and Microsoft leveraged its dominance to ensure that every Windows user relied on its Microsoft Office suite (Word, Excel, Powerpoint, etc). Apple users—
a small minority of computer users
—who wanted to exchange documents with the much larger world of Windows users were dependent on Microsoft's Office for the Macintosh operating system (
which worked inconsistently with Windows Office documents
, with unexpected behaviors like corrupting documents so they were no longer readable, or partially/incorrectly displaying parts of exchanged documents). Alternatively, Apple users could ask Windows users to export their Office documents to an "interoperable" file format like Rich Text Format (for text), or Comma-Separated Values (for spreadsheets). These, too, were inconsistent and error-prone, interpreted in different ways by different programs on both Mac and Windows systems.
Apple could have begged Microsoft to improve its Macintosh offerings, or they could have begged the company to standardize its flagship products at a standards body like OASIS or ISO. But Microsoft had little motive to do such a thing: its Office products were a tremendous competitive advantage, and despite the fact that Apple was too small to be a real threat, Microsoft had a well-deserved reputation for going to enormous lengths to snuff out potential competitors, including both Macintosh computers and computers running the GNU/Linux operating system.
Apple did not rely on Microsoft's goodwill and generosity: instead, it relied on reverse-engineering. After its 2002 "Switch" ad campaign—which begged potential Apple customers to ignore the "myths" about how hard it was to integrate Macs into Windows workflows—it intensified work on its iWork productivity suite, which launched in 2005, incorporating a word-processor (Pages), a spreadsheet (Numbers) and a presentation program (Keynote). These were feature-rich applications in their own right, with many innovations that leapfrogged the incumbent Microsoft tools, but this superiority would still not have been sufficient to ensure the adoption of iWork, because the world's greatest spreadsheets are of no use if everyone you need to work with can't open them.
What made iWork a success—and helped re-launch Apple—was the fact that Pages could open and save most Word files; Numbers could open and save most Excel files; and Keynote could open and save most PowerPoint presentations. Apple did not attain this compatibility through Microsoft's cooperation: it attained it despite Microsoft's noncooperation. Apple didn't just make an "interoperable" product that worked with an existing product in the market: they made an adversarially interoperable product whose compatibility was wrested from the incumbent, through diligent reverse-engineering and reimplementation. What's more, Apple committed to maintaining that interoperability, even though Microsoft continued to update its products in ways that temporarily undermined the ability of Apple customers to exchange documents with Microsoft customers, paying engineers to unbreak everything that Microsoft's maneuvers broke. Apple's persistence paid off: over time, Microsoft's customers became dependent on compatibility with Apple customers, and they would complain if Microsoft changed its Office products in ways that broke their cross-platform workflow.
Since Pages' launch, document interoperability has stabilized, with multiple parties entering the market, including Google's cloud-based Docs offerings, and the free/open alternatives from LibreOffice. The convergence on this standard was not undertaken with the blessing of the dominant player: rather, it came about despite Microsoft's opposition. Docs are not just interoperable, they're adversarially interoperable: each has its own file format, but each can read Microsoft's file format.
The document wars are just one of many key junctures in which adversarial interoperability made a dominant player vulnerable to new entrants:
Hayes modems
Usenet's alt.* hierarchy
Supercard's compatibility with Hypercard
Search engines' web-crawlers
Servers of every kind, which routinely impersonate PCs, printers, and other devices
Scratch the surface of most Big Tech giants and you'll find an adversarial interoperability story: Facebook grew by making a tool that let its users stay in touch with MySpace users; Google products from search to Docs and beyond depend on adversarial interoperability layers; Amazon's cloud is full of virtual machines pretending to be discrete CPUs, impersonating real computers so well that the programs running within them have no idea that they're trapped in the Matrix.
Adversarial interoperability converts market dominance from an unassailable asset to a liability. Once Facebook could give new users the ability to stay in touch with MySpace friends, then every message those Facebook users sent back to MySpace—with a footer advertising Facebook's superiority—became a recruiting tool for more Facebook users. MySpace served Facebook as a reservoir of conveniently organized potential users that could be easily reached with a compelling pitch about why they should switch.
Today, Facebook is posting 30-54% annual year-on-year revenue growth and boasts 2.3 billion users, many of whom are deeply unhappy with the service, but who are stuck within its confines because their friends are there (and vice-versa).
A company making billions and growing by double-digits with 2.3 billion unhappy customers should be every investor's white whale, but instead, Facebook and its associated businesses are known as "the kill zone" in investment circles.
Facebook's advantage is in "network effects": the idea that Facebook increases in value with every user who joins it (because more users increase the likelihood that the person you're looking for is on Facebook). But adversarial interoperability could allow new market entrants to arrogate those network effects to themselves, by allowing their users to remain in contact with Facebook friends even after they've left Facebook.
This kind of adversarial interoperability goes beyond the sort of thing envisioned by "data portability," which usually refers to tools that allow users to make a one-off export of all their data, which they can take with them to rival services. Data portability is important, but it is no substitute for the ability to have ongoing access to a service that you're in the process of migrating away from.
Big Tech platforms leverage both their users' behavioral data and the ability to lock their users into "walled gardens" to drive incredible growth and profits. The customers for these systems are treated as though they have entered into a negotiated contract with the companies, trading privacy for service, or vendor lock-in for some kind of subsidy or convenience. And when Big Tech lobbies against privacy regulations and anti-walled-garden measures like Right to Repair legislation, they say that their customers negotiated a deal in which they surrendered their personal information to be plundered and sold, or their freedom to buy service and parts on the open market.
But it's obvious that no such negotiation has taken place. Your browser invisibly and silently hemorrhages your personal information as you move about the web; you paid for your phone or printer and should have the right to decide whose ink or apps go into them.
Adversarial interoperability is the consumer's bargaining chip in these coercive "negotiations." More than a quarter of Internet users have installed ad-blockers, making it the biggest consumer revolt in human history. These users are making counteroffers: the platforms say, "We want all of your data in exchange for this service," and their users say, "How about none?" Now we have a negotiation!
Or think of the iPhone owners who patronize independent service centers instead of using Apple's service: Apple's opening bid is "You only ever get your stuff fixed from us, at a price we set," and the owners of Apple devices say, "Hard pass." Now it's up to Apple to make a counteroffer. We'll know it's a fair one if iPhone owners decide to patronize Apple's service centers.
This is what a competitive market looks like. In the absence of competitive offerings from rival firms, consumers make counteroffers by other means.
There is good reason to want to see a reinvigorated approach to competition in America, but it's important to remember that competition is enabled or constrained not just by mergers and acquisitions. Companies can use a whole package of laws to attain and maintain dominance, to the detriment of the public interest.
Today, consumers and toolsmiths confront a thicket of laws and rules that stand between them and technological self-determination. To change that, we need to reform the Computer Fraud and Abuse Act, Section 1201 of the Digital Millennium Copyright Act, , patent law, and other rules and laws. Adversarial interoperability is in the history of every tech giant that rules today, and if it was good enough for them in the past, it's good enough for the companies that will topple them in the future.
(Crossposted from EFF Deeplinks)
https://boingboing.net/2019/06/07/lightsabers-for-trustbusting.html
17 notes
·
View notes
Text
website buy cheap for free on-line Saints Row IV Re-Elected
Creator Deep Silver Saints Row IV Re-Elected cheats
8216 Vote size: 13178,9 MB purchase: Plague of Frogs Pack Action PlayStation 4. The best place to get cheats, codes, cheat codes, easter eggs, walkthrough, guide, FAQ, unlockables, achievements, and secrets for Saints Row 4 for Xbox 360. On this step you will download full Playstation 4 Saints Row IV: Re-Elected game ISO file. We will also patch the downloadable Saints Row IV: Re-Elected PS4 ISO file for you so that you can burn Playstation 4 ISO into a DVD and play on your Playstation 4 console.
Hack online latest version saints row iv re-electedd gat out of hell. 107 Facts YOU Should KNOW About VIDEO GAMES. S6 • E3 107 Saints Row IV Facts YOU Should Know. The Leaderboard - Duration: 17:41. The Leaderboard 322,945 views. Saints Row 4 Free Download for PC, FullGamesforPC. Find reviews, trailers, release dates, news, screenshots, walkthroughs, and more for Saints Row IV: Re-Elected & Gat Out of Hell here on GameSpot. Hack online latest version saints row iv re-electedd ps4. 4 in a row - Online Hack Cheats and Tips. Hack online latest version saints row iv re-electedd xbox one. Saints Row Gat out of Hell Overview. Saints Row Gat out of Hell Free Download for PC is a 2015 open world action-adventure video game developed by Volition and High Voltage Software and published by Deep Silver. It was released for Microsoft Windows, Linux, PlayStation 3, PlayStation 4, Xbox 360, and Xbox One.
Half Way Home Achievement in Saints Row IV: Re-Elected. Hack online latest version saints row iv re-electedrow iv re elected. Saints Row IV-RELOADED. In category Action. Now the larger-than-life insanity of the Saints series gets a new twist with a catastrophic alien invasion, and the aliens have transported the Saints to a bizarro-Steelport simulation. Escape the simulation that's trapped the Saints crew, or.
Hack online latest version saints row iv re-electedd cheats. Hi, thanks for the awesome trainers as usual is there a reason the Saints Row IV Update 8 Trainer +10 work for the latest steam patch for the game? I mean, I try to activate the trainer via f1 but it doesn't work however if I press the other F buttons they'll appear red but don't actually do anything.
Hack online latest version saints row iv re-electedd ps4 gameplay
Hack online latest version Saints Row IV Re-elected officials. Request New Router; Double Router Forwarding; How to Open a Port. If you want to leave ismiera a tip for writing this Saints Row IV guide you can do so. Home > Games > Saints Row IV STORES HACKING Puzzle 1 Puzzle 2 Puzzle 3 Puzzle 4 Puzzle 5 Puzzle 6 Puzzle 7 Puzzle 8 Puzzle 9 Puzzle 10. When you want to hack a store successfully you first have to get a small overview. Where could the line go, which tiles can be placed right away. Then you want to go from the END and the START and try to connect both. Avoid going one way only and try to get closer together from both sides. Below you will find all solutions for the 34 store hacks. Hack online latest version saints row iv re-electedd.
Saints Row 4: Re-Elected Mega Guide - Cheats, Secret Weapon. Saints Row IV: Re-Elected cheats & more for Xbox One (X1) Cheats Unlockables Hints Easter Eggs Glitches Guides Achievements Get the updated and latest Saints Row IV: Re-Elected cheats, unlockables, codes, hints, Easter eggs, glitches, tricks, tips, hacks, downloads, achievements, guides, FAQs, walkthroughs, and more for Xbox One (X1. Hack online latest version saints row iv re-electedd cheats ps4.
1 note
·
View note
Text
Linux Life Episode 51
Hello folks as I have managed to get myself a quiet moment it’s time to check in with the blog. As I said I will be a bit more sporadic with the posting here this is due to family situations.
So what have I being doing with Linux since the last episode. Well my Kingston 120GB SSD I was running Linux on decided to have issues and for all of the attempts to save it I had to swap it out and replace it with my Integral 120GB SSD.
Luckily because I don’t keep my home directory on the SSD but on a separate 1TB Seagate hard drive no data was really lost. So I had to re-install Namib Linux onto the new drive. This was a bit odd but I got it working.
The installation went smooth but upon restart GRUB would start and then pixelate the screen as the video didn’t initialise correctly. So I went in using mode 3 to just a text prompt but upon signing in this way MATE actually started which was odd but handy.
At first I could not update as Pamac would not download any of the required 538 updates from the base Namib. So I opened a terminal and tried to use pacman. First attempt using ‘pacman -Syu’ it just sat there after updating the main repositories as it failed to download just as Pamac had.
In the end the way I managed to get it working was to use the ‘pacman -Syyuu’ which forces the update. So finally I managed to get the system updated and working. I also managed to install the Nvidia drivers while I was there and all of the previous programs I was using which luckily was not many as I have been pretty quiet on Linux at the moment.
After installing Grub Customizer from the AUR I was able to put Grub into a mode that I knew would work with my ageing monitor. I really must get a new one although this works it’s an old Dell 19 inch monitor with a max resolution of 1280x800 so it really is showing its age. It works fine however and there is no pixel damage so I really can’t complain.
So within an hour I was back up and running and even managed to get my desktop back including my Cairo Dock at the bottom of the screen with all its icons restored and reworking including the Vulkan drivers and DXVK to get games working through Lutris.
However I have not really been playing games lately but it is nice to have that capability should I start using it.
I have however been messing around with stuff. I was playing with the Previous emulator. If you remember I discussed this NeXT emulator before. Well I managed to get a few programs installed using ISOs of the Peanuts Archive including a few games and a few applications.
I have also been messing around with DosBOX and I decided to have a bit of fun playing with some old programming stuff to see if I can remember any of it. I honestly can’t but I installed Borland Turbo Pascal 6.0 for DOS and Borland Turbo C 3.0 for DOS and I was playing with them.
I vaguely managed to get a basic “Hello World” type program that cleared the screen and then waited for a key press to exit but it took me far longer than it should have as I have totally forgotten how to program Pascal and C++ and to begin with could not even remember the keywords.
This could be because the last time I actually did any programming in DOS has to be more than 25 years ago. However I did have fun playing with them and although it won’t lead to anything serious. Trust me I don’t desire to become a programmer as I just don’t have the patience, it is fun to mess around and do small things with.
I did create their own dosbox.conf files so they auto-start in DosBOX from a launcher and now they sit on my Cairo Dock bar along with everything else. I’m sure in time I will kill them off but for now it keeps me vaguely amused in this tricky time.
So that’s what has been happening in my little Linux world so until next episode. Take care.
#linux life#namib linux#linux arch#DOS#Turbo Pascal#Turbo C++#NeXT systems#Previous emulator#waffle#still here
5 notes
·
View notes
Text
MP3 Splitter,MP3 Joiner,Audio Recorder,MP3 Recorder,MP3 Converter,MP3 WAV WMA Converter
MP3 Splitter is an easy and efficient but FREE MP3 Splitter Joiner. As an all-spherical media cutting tool, TunesKit MP3 Cutter can not solely trim MP3 audio information into small sections with lossless quality, but additionally merge and edit the components of the MP3 files in addition to videos flexibly. Once trimmed, it can save you the cuts to any widespread format and cellular device corresponding to MP4, AVI, MPG, MPEG, 3GP, MKV, WMV, ASF, VRO, MP3, AAC, AC3, OGG, APE, Apple iPhone, Samsung Galaxy, game consoles, good TELEVISION, and so forth. The application also works with DVD and CD discs permitting you to easily rip each DVD and audio CDs. If needed, it's also possible to convert any DVD or CD to ISO Regardless that this is a file converter, it affords some hidden options, akin to the ability to join video or audio information. The appliance additionally gives a robust rename capability as well as the flexibility to mix audio and video recordsdata. If you're on the lookout for a lossless MP3 cutter that can protect unique high quality while slicing the audio, http://www.mergemp3.com mp3DirectCut could be your excellent selection. As a free and extensive audio editor and recorder for encoded MP3, this good device can directly cut up or crop the MP3 observe with out re-encoding the file. The built-in audio recorder and editor of mp3DirectCut additionally help you document MP3 songs, change volume on MP3, and extra. mp3splt works effectively. How properly will depend on what it's important to begin with and what you expect for outcomes. More inputs = more outputs. If you realize the number of songs contained in the large mp3 files, this helps to let you know the variety of output files is correct. You MUST have silence sections between your songs in the giant mp3 file. The important thing for mp3splt is to find the right worth for "th". If "th" is too low, you'll have too many outputs, so all your songs are fragmented. If too excessive, your songs won't be split, and you might may have more than 1 song per cut up. Let's assume you may have a big file and nothing else: eg no index for titles or occasions. Do you want to cut MP3 and different audio ? Do you need to merge MP3 songs ? Then this free utility is for you. It may even split MP3 in parts or by time, It will possibly edit MP3 recordsdata and exhibits their waveform and may combine MP3 or record MP3 recordsdata from varied sources. Easy MP3 Cutter Joiner Editor handles also other codecs akin to FLAC,M4A,WAV,AAC,OPUS,OGG,MP4,AVI,WMA,WMV e.t.c. With it you can rip CDs, apply audio results similar to fade in,fade out, tempo, noise reduction, normalize and extra. Free MP3 Cutter Joiner is divided into two consumer modes. The primary mode lets you cut up MP3 recordsdata into sections with up to 1 millisecond accuracy, and the second mode lets you select individual tracks or music libraries to hitch in a selected order. Joining music information may be convenient whenever you want to upload them to your YouTube account, blog or Tumblr page.
Audacity can be a highly regarded MP3 merger which can run on Windows, Mac and Linux. You should utilize it to separate any audio into as many items as you need, or you too can merge as many MP3 information as you want with Audacity. It also has other video enhancing features like audio filters and results which will help you to deal with music recordsdata which can be problematic in some way. Moreover, Audacity is a broadly-used open-source audio enhancing and recording program. The overall idea was about registering music on blockchain for attribution to the respective music creators. To showcase this, we used a easy flow of creating mashups by merging audio (mp3) recordsdata utilizing this program, uploading the mashed-up files to a cloud primarily based storage (we used Azure blob storage in this case) after which lastly creating assets on a BigchainDB primarily based blockchain, having links of the respective mashup information. If you are wondering tips on how to be a part of MP3 files totally free, then you definitely would get all the assets you need on this guide. There are various situations it's possible you'll run into if you would need a very good MP3 joining software. It's possible you'll need to merge an inventory of songs or sound files and turn them into a single observe. Chances are you'll wish to come up with certain results within the playlist so the tracks or songs don't simply randomly or abruptly cease and the next file begins enjoying. You would possibly wish to do this for fun or you'll have some professional wants. No matter what you want to do and why, you will have a great solution to hitch MP3s. There are lots of conditions once you want a good MP3 joiner. For example, you could want to merge a listing of MP3 songs or sound information and switch them right into a single track, you might want to break up and be part of a portion of an MP3 file to create a ringtone in your good phone, and many others. For no matter purposes, you'll want a superb resolution to hitch MP3 information.

1 note
·
View note
Text
In this blog post, we shall show you how to upload an OS installation ISO file to a Storage Domain in oVirt / RHEV Virtualization environment. This is a key requirement if you’re planning to perform either manual or automated installations of virtual machines. This is an alternative to using a network server, such as HTTP or FTP, to share installation media files. DVD ISO files can sit on network server, while boot ISO being uploaded to a Storage domain. In oVirt / RHEV terms, storage domain is defined as a repository disk images used by virtual machines for system boot disks, data storage, or as installation media. There are three types of storage domains: Data storage domain ISO storage domain Export storage domain As of recent oVirt releases, only data domains are needed. Although export and iso domains are available, they have been deprecated. In this post, we shall upload an ISO image to ISO or Data domain. Then see how to boot from ISO for actual operating system installation. 1. Configure Storage domain on oVirt / RHEV A configured storage domain is requirement before ISO uploads. Any of these storage technologies can be used as storage domain backend: • Gluster Storage native client (GlusterFS) • Fiber Channel Protocol (FCP) • Internet Small Computer System Interface (iSCSI) • Network File System (NFS) • Local storage attached directly to a virtualization host. We had done an article on using NFS as a backend storage. Refer to it using link shared. Add NFS Data, ISO and Export Storage Domain to oVirt / RHEV 2. Download ISO image With Storage domains configured, we can download ISO image for the operating system we would like to install. In this example, any Linux ISO file will suffice. We’ll use Alpine Linux as target distribution to be installed. Visit OS ISO downloads page and get the latest release image in the machine used to access the Administration Portal. 3. Upload ISO ISO Image to oVirt / RHEV Storage Domain Login to Administration Portal From the Portal, navigate to Storage > Storage Domains in the menu: Select Disks > Upload Click “Start” on Upload drop-down list to initiate file upload. Click “Chose File” button to access local filesystem Select ISO file to upload from the directory you saved the file. The Alias and Description fields will default to the name of the ISO file. You can modify accordingly. There should be successful access to portal before upload. There should be a successful connection to the ovirt-imageio-proxy before being able to upload. Use the “Test Connection“ button to test the connection. If you get a green success box, this indicates upload will succeed. If an orange warning box is returned by the Test Connection button, click the ovirt-engine certificate link. Check the box next to Trust this CA to identify websites. Click OK when done to trust CA. Image upload progress should now start. Successful upload look – notice OK in status. 4. Creating Virtual Machine from the uploaded ISO image At Virtual Machine creation time, an ISO disk image in the data storage domain can be attached to the virtual machine as if was inserted into a CD/DVD drive. To create a new Virtual machine, navigate to Compute → Virtual Machines→ New in the menu. Provide VM parameters under General section – OS, Instance type(can be custom), VM Name and Network to assign the virtual machine. For boot disk select “Create” to create a new one. Input boot disk size (GiB) in gibibytes, and optionally Alias(usually autogenerated from disk name). You can as well customize other settings relating to virtual disk. Created disk image is stored in the Storage Domain and the virtual machine will boot from that stored image. Click on “Show Advanced Options“ Under the Boot Options section, we’ll set second boot device and attach the ISO. Select
“CD-ROM” as second boot device, and tick “Attach CD” checkbox, then select ISO image to boot from from the drop-down field to the right. In summary, We’ll create a new virtual machine according to the following requirements: Cluster: Default Template: Blank | (0) Operating System: Linux Instance Type: Small Optimized for: Server Name: Alpine-Linux Instance Images: Attach the Alpine Linux disk nic1: ovirtmgmt/ovirtmgmt Once VM skeleton is created, the instance is in powered off state. We can change the VM console access in Console menu section. VNC / noVNC console and invocation is good for web based installation. It doesn’t need any client installation to access VM console. Start the Virtual Machine to begin normal Linux OS installation. The Virtual Machine created can be removed by shutting it down gracefully, then right-click the virtual machine and select remove from the context menu. You then click OK in the confirmation dialog box to complete removal of the virtual machine. We hope this article was of great succour while trying to figure our how ISO image can be uploaded and used on oVirt / RHEV Virtualization platform.
0 notes