#Ssh tunnel mysql
Explore tagged Tumblr posts
Visit Tumblr Blog
Explore Tumblr blogs with no restrictions, modern design and the best experience.
Last Seen Tumblr Blogs


Fun Fact
Average visit duration of Tumblr.com is 10 mins and 25 secs.
Text
Ssh tunnel mysql

#Ssh tunnel mysql how to
Your SSH tunnel is active! Make sure not to shut down Putty while you should use the tunnel. Start up your tunnel by clicking on "Open". Go back to the Sessions (the same view as the first image in this guide) in the left menu and click "Save".Ħ. Then click "Add" button (highlighted in the image above).ĥ. In the "Destination", enter the host name of the database server followed by :3306Ĥ. Start by typing 3306 in the "Source port". In the left menu, navigate now to Connection> SSH> Tunnelsģ. You can choose the "real name" when you set up the SSH account to avoid confusion.Ģ. In the "Host Name" should read and in "Saved Sessions" choose a name for the connection. Now, when your SSH account and your SSH client is ready, perform the following steps to create a SSH tunnel:ġ. There are plenty of free tools you can find in the internet.
#Ssh tunnel mysql how to
If you have not done it yet, check THIS LINK for a guide that describes how to do this.ī) SSH client: If you shouldn't have a SSH client yet, then please get one. The solution to this is to use their SSH account with us to create a tunnel to send their traffic through and thus be able to make the connection from an external location.īefore, you can start you need to make sure your tools are ready:Ī) SSH account: this guide assumes that you have already set up an SSH account. The negative impact it will bring to our customers is that (but on) can not connect to their databases via external software (eg MySQL Workbench) which is troublesome for many who prefer to work on these instead of via our web-based tools (such as phpMyAdmin). Due to security considerations we do not allow connections to our normal MySQL server from outside our network.
0 notes
Text
Mysql ssh tunnel

#Mysql ssh tunnel how to
#Mysql ssh tunnel software
#Mysql ssh tunnel Pc
In order for our containerized phpmyadmin to be able to access a tunneled mysql we want tunnel containers to be on the same exact network as phpmyadmin. For those use-cases ssh-tunnels are there as a possible solution. Creating an SSH tunnel from the local machine to the server is a more secure option. However for remote mysql server we do not want to expose mysql port for very valid security reasons. You will see your new connection on the left:ĥ. Configuring the MySQL server to allow remote connections is one approach, but this needs administration access and may pose security problems. Once done, press Ok to save the connection settings. An SSH configuration file that you set as a default using the MySQL Shell configuration option ssh.configFile. Enter 127.0.0.1 to the Host and 3307 (which is used to create a ssh tunnel) for Port. Host Name/IP address: your server host nameĤ. When you set up an SSH tunnel, MySQL Shell selects an SSH configuration file in the following order of priority: An SSH configuration file that you specify as a connection option. From what Ive seen, Google Data Studio does. Then, navigate to the SSH tab, check the box Use SSH tunnel and fill out the fields as shown below: Most of the MySQL instances are protected by a SSH Tunnel, allowing users to connect to it only from localhost. Unfortunately I cant find a possibility to connect via MySQL through a SSH tunnel. Open your Navicat application > Connection > General tab and fill out the fields as follows:ģ. currently I use HeidiSQL over RDM for the connection via MySQL. Contact our hosting support via live chat or via the ticket system in order to enable SSH access for your account.Ģ.
#Mysql ssh tunnel software
To connect to your MySQL database with Navicat software you should do the following:ġ. You can use this command to create SSH connection to your server. In most Linux systems, there is already an SSH client present. You need to have SSH access from client to remote server for this purpose. Here are the steps to connect to MySQL server via SSH tunneling.
#Mysql ssh tunnel how to
This could be useful in that it allows a remote MySQL host to only run with a secure port and a local client could connect to a local port to access it. How to Connect to MySQL Server via SSH Tunnel.
#Mysql ssh tunnel Pc
Remote MySQL connection is disabled on our shared servers due to security reasons, but you can easily setup SSH tunnel between your PC and our server using SSH-tunneling with the MySQL port (3306) forwarding. A couple of years ago, MySQL Connector/Net shipped with a feature that allowed the connector to automatically create a SSH tunnel to a remote MySQL host. How to connect to database using NaviCat MySQL client
0 notes
Text
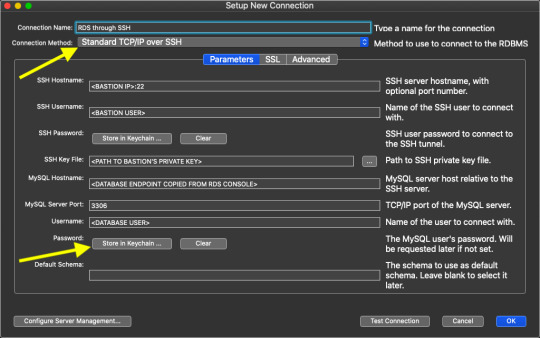
Connect to a Private Amazon RDS MySQL Database from MySQL Workbench (through a Bastion Host)
Connect to a Private Amazon RDS MySQL Database from MySQL Workbench (through a Bastion Host)
MySQL Workbench has an in-built ability to connect to databases via an SSH tunnel. This feature can be used to connect to private RDS databases by establishing an SSH tunnel through the bastion host. To create a connection, enter values in the new connection wizard as shown below:
View On WordPress
0 notes
Text
Phpmyadmin nginx

#Phpmyadmin nginx how to#
#Phpmyadmin nginx install#
However, because you are using Nginx as a web server you shouldn’t choose either of these options. phpMyAdmin can automatically make a number of configuration changes to ensure that it works correctly with either of these web servers upon installation.
#Phpmyadmin nginx install#
Now you can install phpMyAdmin by running the following command:ĭuring the installation process, you will be prompted to choose a web server (either Apache or Lighttpd) to configure. You can install phpMyAdmin by using APT to download the phpmyadmin package from the default Ubuntu repositories.īegin by updating the server’s package index: Once you have these prerequisites in place, you can begin following Step 1 of this guide. Warning: If you don’t have an SSL/TLS certificate installed on the server and you still want to proceed, please consider enforcing access via SSH Tunnels as explained in Step 5 of this guide. If you do not have an existing domain configured with a valid certificate, follow this guide on securing Nginx with Let’s Encrypt on Ubuntu 20.04 to set this up.
#Phpmyadmin nginx how to#
To install and configure these components, follow our guide on How To Install Linux, Nginx, MySQL, PHP (LEMP stack) on Ubuntu 20.04.Īdditionally, because phpMyAdmin handles authentication using MySQL credentials, we strongly recommend that you install an SSL/TLS certificate to enable encrypted traffic between server and client. A LEMP stack (Linux, Nginx, MySQL, and PHP) installed on your Ubuntu 20.04 server.To set this up, follow our initial server setup guide for Ubuntu 20.04. This server should have a non-root user with administrative privileges and a firewall configured with ufw. In order to complete this guide, you will need: It will also explain each measure in detail so that you can make informed decisions and protect your system. In addition to installing the application, this tutorial will go over several measures you can take to harden your phpMyAdmin installation’s security. If you install and configure phpMyAdmin without taking the proper steps to secure it from malicious actors, you run the risk of your data being lost or stolen. Combined with the fact that it’s a widely-deployed PHP application, this means that phpMyAdmin is frequently targeted for attack. Note: phpMyAdmin runs on a database server, handles database credentials, and allows users to execute SQL statements on the database.
0 notes
Text
Psequel alternative

#Psequel alternative how to
#Psequel alternative for mac
#Psequel alternative update
#Psequel alternative pro
We response almost instantly to the bug reports, feature requests. Perhaps the best thing about being a user of TablePlus is having access to a really quick support. It has everything you need for a PostgreSQL GUI Tool. TablePlus is a modern, native tool with an elegant UI that allows you to simultaneously manage multiple databases such as MySQL, PostgreSQL, SQLite, Microsoft SQL Server and more. Then TablePlus is the app that you’re looking for.
#Psequel alternative how to
You don’t need to be a tool expert to figure out how to use it.
#Psequel alternative for mac
Sequel : Postgresql Gui Tool For Mac Download Has a well-thought design which works as you expected. You can be able to connect, create, update, delete, import, export your database and its data in a very fast and secure way. An app that can be able to get up and run in less than half a second or deal with heavy operations with a couple of million rows without freezing. Was built native to deliver the highest performance. You will probably need a PostgreSQL client that. Moving on with an alternative GUI tool for PostgreSQL It’s time to try something new and keep up with the latest changes.
#Psequel alternative update
In this fast-changing world where everything can be outdated easily, An app without speedy development and a frequent update schedule will never be able to deliver the best experience.įor most people, Psequel is no longer an available GUI for PostgreSQL. It’s also closed source and the developer had stated there were no plans to open source it before disappearing. Although no official statement has been issued, the development of PSequel had stopped and its has been filled with tons of unanswered questions, bug reports, and feature requests. That’s just great! Until PSequel died The latest version of PSequel which is V1.5.3 was released on. It gets SSH tunneling right while most of the others failed to do so. You can be able to do anything with your PostgreSQL database, creating, connecting, updating, deleting, you name it. The UI is simple and elegant, just somewhat similar to Sequel Pro. It was written from scratch in Swift 2 thus it’s really neat and clean.
#Psequel alternative pro
The main goal was just to bring the same experience of working with Sequel Pro from MySQL to PostgreSQL when Sequel Pro’s support for PostgreSQL never seems to happen.Īnd PSequel did a great job being a GUI client for Postgres. Got inspired by the simplicity and elegance of Sequel Pro, the developer behind PSequel wanted to build a PostgreSQL equivalent of it. Psequel was a great PostgreSQL GUI client. How do I support the development of PSequel? If you like PSequel, please report bugs and/or. If you don't have a Github account, you could report bugs. Please include your macOS, PostgreSQL and PSequel versions when reporting a bug. If you are reporting multiple bugs or suggesting multiple features, please create separate issues for each bug/feature. How do I report bugs or suggest new features? Please try not to create duplicate issues. If you think a feature is important, please let me know and I'll adjust its priority based on its popularity. My plan to implement most features in Sequel Pro. What's the current status of PSequel? PSequel is still in its early stage. Why macOS 10.10+ only? I am developing PSequel in my spare time.īy supporting macOS 10.10+ only, I can keep the codebase simpler and save time by not testing it in older versions of macOS. Is PSequel a forked version of Sequel Pro? No, PSequel is written from scratch in Swift 2, although PSequel's UI is highly inspired by Sequel Pro. Is PSequel open source? There is no plan to open source it at this moment. I just dislike Java desktop apps personally. I am a Java developer myself and I like JVM a lot. In the good old MySQL world, my favorite client is, but its support for PostgreSQL doesn't seem to be happening. However, they are either web-based, Java-based. However, I found its UI is clumsy and complicated. FAQ Why yet another PostgreSQL GUI client? Why not just pgAdmin? Well, pgAdmin is great for its feature-richness.
Sequel : Postgresql Gui Tool For Mac Download.
0 notes
Text
Postgres app or postgres

#POSTGRES APP OR POSTGRES INSTALL#
Payment will be charged to your iTunes Account at confirmation of purchase. Any unused portion of a free trial period, if offered, will be forfeited when the user purchases a subscription to that publication, where applicable. Your Account will be charged for renewal (based on your selected plan) within 24-hours prior to the end of the current period. Subscriptions auto-renew within 24 hours of the expiration date unless auto-renewal is turned off in the iTunes account settings. Premium is available as either a Lifetime Purchase or through a Subscription with Monthly and Yearly options. SQLPro requires a Premium upgrade in order to interact with database result sets. It is a client tool for working with existing local or remote PostgreSQL servers. PgAdmin is graphical user interface administration tool for PostgreSQL.
#POSTGRES APP OR POSTGRES INSTALL#
It sets up a PostgreSQL database server on your computer when you install it. It will not work with other database servers such as MSSQL, MySQL or Oracle. Postgres.app is a full-featured PostgreSQL installation packaged as a standard Mac app. SQLPro for Postgres works with PostgreSQL database servers. + SSH Tunnelling (password authentication only). + Dark & Light themes which can be switched manually or automatically adjusted by your devices brightness. + Quick access to tables, columns and more. + Support for executing multiple queries at once. + Tabbed based interface for an optimal user experience (iPad). SQLPro for Postgres is a lightweight but powerful PostgreSQL database client, which allows quick and simple access to Postgres Servers including cloud services such as Amazon RDS, Microsoft Azure, Heroku Digital Ocean.
0 notes
Text
Psequel alternative

#Psequel alternative how to#
#Psequel alternative update#
#Psequel alternative pro#
Easier access to files, features, and the operating system.The window-based interface makes it much easier to manage your PostgreSQL data.You can remotely access and navigate another database server.Offers great visualization to help you interpret your data.Shortcut keys make it easier to use, and much easier to learn for new users.Now that we understand the issues users face with the CLI, let’s take a look at the advantages of using a PostgreSQL GUI: I believe anyone who comes into programming after 2010 will tell you GUI tools increase their productivity over a CLI solution. Many still prefer CLIs over GUIs, but this set is ever so shrinking. It is difficult to browse databases and tables, check indexes, and monitor databases through the console.Console display may not be something of your liking, and it only gives very little information at a time.It requires a big learning curve to get the best out of the DBMS.The traditional method to work with databases is using the command-line interface (CLI) tool, however, this interface presents a number of issues: PostgreSQL is the fourth most popular database management system in the world, and heavily used in all sizes of applications from small to large. In this post, we discuss the top 6 GUI tools for administering your PostgreSQL deployments.
#Psequel alternative update#
We listen to all of our users’ feedback, put it into consideration and finally deliver a new update every week.PostgreSQL graphical user interface (GUI) tools help open source database users to manage, manipulate, and visualize their data. We response almost instantly to the bug reports, feature requests. Perhaps the best thing about being a user of TablePlus is having access to a really quick support. It has everything you need for a PostgreSQL GUI Tool. TablePlus is a modern, native tool with an elegant UI that allows you to simultaneously manage multiple databases such as MySQL, PostgreSQL, SQLite, Microsoft SQL Server and more. Then TablePlus is the app that you’re looking for.
#Psequel alternative how to#
You don’t need to be a tool expert to figure out how to use it. Has a well-thought design which works as you expected.You can be able to connect, create, update, delete, import, export… your database and its data in a very fast and secure way. An app that can be able to get up and run in less than half a second or deal with heavy operations with a couple of million rows without freezing. Was built native to deliver the highest performance.You will probably need a PostgreSQL client that: It’s time to try something new and keep up with the latest changes. Moving on with an alternative GUI tool for PostgreSQL For most people, Psequel is no longer an available GUI for PostgreSQL. In this fast-changing world where everything can be outdated easily, An app without speedy development and a frequent update schedule will never be able to deliver the best experience. It’s also closed source and the developer had stated there were no plans to open source it before disappearing. Īlthough no official statement has been issued, the development of PSequel had stopped and its issue tracker has been filled with tons of unanswered questions, bug reports, and feature requests. The latest version of PSequel which is V1.5.3 was released on. It gets SSH tunneling right while most of the others failed to do so. You can be able to do anything with your PostgreSQL database, creating, connecting, updating, deleting…, you name it. The UI is simple and elegant, just somewhat similar to Sequel Pro. It was written from scratch in Swift 2 thus it’s really neat and clean.
#Psequel alternative pro#
The main goal was just to bring the same experience of working with Sequel Pro from MySQL to PostgreSQL when Sequel Pro’s support for PostgreSQL never seems to happen.Īnd PSequel did a great job being a GUI client for Postgres. Got inspired by the simplicity and elegance of Sequel Pro, the developer behind PSequel wanted to build a PostgreSQL equivalent of it. Psequel was a great PostgreSQL GUI client.
0 notes
Text
Sqlpro studio mac

#Sqlpro studio mac for mac#
#Sqlpro studio mac update#
#Sqlpro studio mac code#
#Sqlpro studio mac license#
SQLPro Studio offers you the possibility to see the database structure, to run queries on multiple tables, to manage the table content or design, and much more. As a result, you get to switch between the different panels and quickly analyze the data. Versatile database management solution that can be used to compare query resultsīesides the fact that SQLPro Studio can connect to multiple types of databases, you get to use its capabilities to run custom queries and organize the results into tabs.
#Sqlpro studio mac update#
In addition, SQLPro Studio can also help you update table contents, or even design new tables. It supports databases such as MySQL, Postgres, Microsoft SQL Server, SQLite, Oracle and. SQLPro Studio integrates auto-complete capabilities, syntax highlighting support, and the possibility to work with the query results just like you would do in a spreadsheet. SQLPro Studio is a fully native database client for macOS macOS and iOS. Note that within the SQLPro Studio main window you get to open multiple views and query panel: the app will keep everything organized via tabs. Once you establish a connection, SQLPro Studio offers you the possibility to see the database structure and decide to configure new queries. Create custom database queries and see results for multiple tables at the same time What’s more, SQLPro Studio can be used with cloud services, such as Amazon, Microsoft Azure, or Heroku. Worth mentioning is that, in the case of certain database types, SQLPro Studio can also be configured to route the traffic through an SSH tunnel, which means that you have the possibility to keep the data exchange private. To help you access your databases without wasting time with the credentials on each occasion, SQLPro Studio comes with a connection manager that enables you to save database profiles for later use.ĭepending on the database type, you need to provide the host or server name, the authentication method, the login credentials, the server port, the SID or Service name, the timezone, and so on. Configure and establish database connections via the built-in manager The utility allows you to connect to MySQL, MSSQL, Oracle, and Postgres databases and can be used to run custom queries on multiple tables.
#Sqlpro studio mac license#
Once your license is redeemed, all sales are final.SQLPro Studio offers you the possibility to work with multiple database types via the same user interface.
Unredeemed licenses can be returned for store credit within 30 days of purchase.
Have questions on how digital purchases work? Learn more here.
#Sqlpro studio mac code#
Redemption deadline: redeem your code within 30 days of purchase.
100% native Mac app outperforms any of the other Java based database management interfaces Execute multiple queries & have the results for each displayed at the same time, including any errors and messages For working with cloud providers such as Amazon relational database service, Microsoft Azure or Heroku Most basic to advanced database needs are easily accessible Table creation, custom queries, auto-complete, syntax highlighting, & more Supports MySQL (and MariaDB), Postgres/PostgreSQL, Redshift, Microsoft SQL Server (2005 and above), Oracle (8i and above), SQLite, & SnowflakeDB SQLPro includes all of the basic features someone working with databases would expect, along with many advanced features that place SQLPro ahead of the competition. It allows users to connect to multiple databases platforms including MySQL, PostgreSQL, Microsoft SQL Server, Oracle, and SQLite. SQLPro Studio is a multi-platform database client. Need to use several database managers at once? Say no more. SQLPro Studio is a compact, lightweight, and feature-limited application that you can.
#Sqlpro studio mac for mac#
Thanks to a new AWT deal, you can get a lifetime subscription for only US$175.99. Download SQLPro Studio 2022 for Mac full version software setup free. SQLPro for MSSQL is a native Mac application with significant performance and a large feature-set. SQLPro Studio is the premium database manager tool for Postgres, MySQL, Microsoft Management Studio, and Oracle databases.
0 notes
Text
Navicat for sql server 12

NAVICAT FOR SQL SERVER 12 FOR MAC
NAVICAT FOR SQL SERVER 12 CRACKED
NAVICAT FOR SQL SERVER 12 SERIAL KEY
NAVICAT FOR SQL SERVER 12 FULL VERSION
NAVICAT FOR SQL SERVER 12 FULL VERSION
queries, and virtual groups with our Navicat Premium Full Version Cloud service so that you can access them in real-time and share them with your colleagues anytime, anywhere. Download navicat premium 12 full crack Archives - SoftPediaHub - BANDOL T2 36 m2 in Villa PRIVATE POOL GARDEN. Furthermore, Navicat Premium combines all Navicat variations in an final model and might join MySQL, Oracle and. Navicat Premium Crack is an all-in-one database admin and migration instrument for MySQL, SQL Server, Oracle and PostgreSQL. Jayasurya Kannada Movie Mp3 Songs freeload Wintrack Full Version. Sau ?o, hay lam theo cac b?c h?ng d?n sau ?ay. Tuy nhien, hay l?u y ?n h?i?u hanh may tinh ?c s? d?ng ?a ra nh?ng l?a ch?n t?i xu?ng chinh xac nh?t. H?ng d?n cac b?c cai ?t Navicat Premium Navicat Premium r?t d? cai ?t va quy trinh nay s? m?t ch?a ?n vai phut ? hoan thanh. Navicat Premium 12 1 24 freeload.Navicat Premium 12 Crack + Serial.ĭownload Navicat Premium full crack ver 2022 T?I ?AY 3. Windows macOS Linux Windows Navicat Premium 16 (location 1) Direct Download (64 bit) (location 2) Direct Download (64 bit) (location 3) Download with Support (64 bit) Looking for 32 bit?. Navicat | Download Navicat Premium 14-day trial versions for Windows, macOS and Linux Download Trial We offer a 14-day fully functional FREE trial of Navicat. Navicat Premium Full Crack + Keygen - Blogger. Run the setup and install the software on your PC. Download the free and full version of the Online Gmail Hacker Pro Tool from the given link.
NAVICAT FOR SQL SERVER 12 SERIAL KEY
Download Navicat Premium Crack 12 Full Version incl Serial Key from the link given below: Navicat Premium 10 Serial Keys. Navicat Premium 12.0.10 Crack is here now!. Navicat Premium Serial + Registration Key freeload.It allows you to establish secure SSH sessions through SSH Tunneling, ensuring strong authentication and secure encryption between two hosts. Navicat Premium 15.0.17 Crack Keygen Full Version freeload. Navicat For Postgresql Crack - bestzload. Spark 1 1 - email client for apple devices. All you want to do is: select a data source and a target output format, then submit migration! So download Navicat Premium Crack mac and windows free. This new Navicat Premium 12.1.27 Crack full license keys database migration tool provides a friendly step-by-step Wizard-GUI.
NAVICAT FOR SQL SERVER 12 CRACKED
Navicat Premium Cracked Full Version freeload. The latest features of Navicat premium enable you to work on 6 databases at a single time to complete your tasks within the shorter period of time. Navicat crack will help you out in providing a rapid and tranquil access to all of your databases simultaneously. Microsoft Windows 10 Version 21H2 June 2022 MSDN x86/圆4 ? 10 ? 13:57 Internet Download Manager (IDM) 6.41 Build 2 + New Crack. Navicat Premium Keygen Download is compatible with cloud databases like. Navicat Premium Crack freeload is a database optimization tool that allows you to simultaneously connect to MySQL, MariaDB, box server, oracle, PostgreSQL, and SQLite databases from a single utility. After the installation is complete, close the application. Extract the downloaded folder and install the software as per instructions in “readme” text file. How To Activate Bandicam 3.3 Full Version With Crack Registration Key Free: Download offline installer setup of Bandicam full version + Crack Keygen from given below link.
Navicat freeload Full Version - CATALOG powered by Doodlekit.
NAVICAT FOR SQL SERVER 12 FOR MAC
Navicat Premium Essentials 16 Crack for Mac freeload.Navicat Premium Crack With Serial Key Full Version.Download navicat premium 12 full crack Archives - SoftPediaHub.CBS News - Breaking news, 24/7 live streaming news & top stories.Navicat Premium 12 1 24 freeload.Navicat Premium 12 Crack + Serial.Navicat Premium Full Crack + Keygen - Blogger.Navicat For Postgresql Crack - bestzload.Navicat Premium Cracked Full Version freeload.
0 notes
Text
Launch phpmyadmin ubuntu

#Launch phpmyadmin ubuntu install#
#Launch phpmyadmin ubuntu password#
Step 2: Make Installation Package Executable.
#Launch phpmyadmin ubuntu install#
How to Install XAMPP on Ubuntu 18.04 Step 1: Download Installation Package. DO NOT ALLOW REMOTE ROOT LOGINS! Instead phpmyadmin can be configured to use ∼ookie Auth to limit what user can access the system. PhpMyAdmin lacks strong bruteforce protection, so you must use a long randomly generated password. Uninstall or Remove phpmyadmin, apache2, PHP, MariaDB from Linux (Ubuntu) Server via terminal REMOVE phpmyadmin. There you should see the login screen.Ĥ Useful Tips to Secure PhpMyAdmin Login Interface Change Default PhpMyAdmin Login URL. Finally, we can open phpMyAdmin utility by entering in your servers IP address in a browsers address bar with the addition /phpmyadmin string like so 127.0. How do I know if phpMyAdmin is working?Ĭheck if phpMyAdmin is Working. Your phpMyAdmin files are located in the /usr/share/phpmyadmin/ directory.
#Launch phpmyadmin ubuntu password#
Your username and password are located in /etc/phpmyadmin/config-db.php. Is there any way to get the username also? root should be your username. It means you have forgotten your root password, then read this post : /questions/10070401/ kmas. How do I find my phpMyAdmin username and password? php file into a text editor where you can then look for the section titled MySQL Database Password. You will then want to right-click the file and select View/Edit from the menu that opens. This should take you to the phpMyAdmin login page. Open a web browser, then type into the address bar and press ? Enter. Lanch xampp-control.exe ( you will find it under XAMPP folder ) Start Apache and MySql. So, go to the drive where you install the XAMPP server. Within this file, find the block below: Save the file and restart the Apache server using the XAMPP control panel.įirst you need to start XAMPP. conf file in your XAMPP installation directory (usually, C:xampp). To enable remote access to phpMyAdmin from other hosts, follow these steps: Edit the apache/conf/extra/httpd-xampp. How do I access phpMyAdmin from another computer? All we need to do now is to log into MySQL and set the password. Next we need to start MySQL in safe mode that is to say, we will start MySQL but skip the user privileges table. How do I find my phpMyAdmin username and password Ubuntu?Ģ Answers Stop MySQL. Try now typing localhost/xampp then it should show Welcome to XAMPP for Windows!Dec 11, 2014. I solved this problem by changing the proxy of my firefox browser, go to menu tools-Option find tab Network, click button settings. Xampp Not Found The requested URL /phpmyadmin/ was not found on this server. Enter the table name, number of columns, and click on Go. How to work with phpMyAdmin? Click on New (1) to create a database and enter the database name in Create database (2) field and then click on Create (3) button. How to Install your own PhpMyAdmin Visit the PhpMyAdmin website and download a version equal to or higher than 4.8. If youre using command line, then connect over SSH. Although in fact if youre using PHPMyAdmin theres a Privileges section that you can use rather than running an SQL query. To do this through PHPMyAdmin, select any database and then click on SQL tab in the main window. How do I give PhpMyAdmin permission to Ubuntu? For list of file installed use this dpkg listfiles. Get the name of the package with dpkg list | grep phpmyadmin. How do I know if PhpMyAdmin is installed on Linux? Log in to phpMyAdmin by using the following credentials: Username: root. How do I access phpMyAdmin?Īccess the phpMyAdmin console through the secure SSH tunnel you created, by browsing to. Once you have logged in you should be able to manage all the MySQL databases from your browser. To launch phpMyAdmin, visit the URL: and log in with your MySQL root username and password. How do I open phpMyAdmin in terminal?Īccess the phpMyAdmin console through the secure SSH tunnel you created, by browsing to. Then select Apache 2 for the webserver you wish to configure. If no users have been setup, use admin with no password to login. You should be able to login using any users youve setup in MySQL. Once phpMyAdmin is installed point your browser to to start using it. What is the latest version of phpMyAdmin?.How do I know if phpMyAdmin is working?.How do I find my phpMyAdmin username and password?.How do I access phpMyAdmin from another computer?.How do I find my phpMyAdmin username and password Ubuntu?.How do I give PhpMyAdmin permission to Ubuntu?.How do I know if PhpMyAdmin is installed on Linux?.
0 notes
Text
The MySQL Workbench is a visual database design tool is used by database managers for development, administration, and data modeling for the MySQL database. Furthermore, it supports database design through an EER diagram which in turn generates SQL scripts. It succeeds the DBDesigner 4 from fabFORCE.net as well as replacing the previous MySQL GUI Tools Bundle package. MySQL Workbench offers the following features: Wizard driven action items Supports custom plugins Schema object browsing, inspection, and search Database Connection & Instance Management Supports MySQL Enterprise features (Audit Log, Firewall, and Enterprise Backup) Fully scriptable with Python and Lua It has the MSAA (Windows Accessibility API) compliant SQL syntax highlighter and statement parser Visual EXPLAIN Supports SSH connection tunneling Reverse engineering from SQL Scripts and live database as well as forward engineering to SQL Scripts and live database Data modeling using ER diagramming, Drag’n’Drop visual modeling, Schema synchronization e.t.c Unicode support Performance monitoring through Performance Schema metrics, Query statistics, MySQL instance dashboard e.t.c Supports database migration to any ODBC compliant database It provides a native support to Microsoft SQL Server, PostgreSQL, SQL Anywhere, SQLite, and Sybase ASE By the end of this guide, you should be able to install and use Mysql Workbench on Fedora 36/35/34/33/32. Before we begin on the installation, ensure that all the packages on Fedora are updated to their latest stable versions. sudo dnf update Install MySQL MySQL 8.0 using the dedicated guide below. How To Install MySQL 8.0 on Fedora #1) Install Mysql Workbench on Fedora 36/35/34/33/32 There are two methods you can use to install Mysql Workbench on Fedora 36/35/34/33/32 namely: Using the YUM repository. Using snap Method 1: Install Mysql Workbench on Fedora 36/35/34/33/32 using the YUM repository. Use the below steps to install MySQL Workbench on Fedora 36/35/34/33/32 using the YUM repository: Step 1: Download the official MySQL Yum Repository Before we install MySQL Workbench on Fedora 36/35/34/33/32 we need to add the MySQL Yum repository to our system. This is achieved by visiting the official MySQL downloads page and downloading the MySQL community RPM package. On the page, there are several packages for Fedora systems, download one that suits your system. ##For Fedora 32 wget sudo dnf -y install https://dev.mysql.com/get/mysql80-community-release-fc32-1.noarch.rpm ##For Fedora 33 wget https://dev.mysql.com/get/mysql80-community-release-fc33-2.noarch.rpm ##For Fedora 34 wget https://dev.mysql.com/get/mysql80-community-release-fc34-2.noarch.rpm ##For Fedora 35 wget https://dev.mysql.com/get/mysql80-community-release-fc35-1.noarch.rpm Once the download is complete, install the package using the command: sudo rpm -Uvh mysql80-community-release-* Sample Output: warning: mysql80-community-release-fc34-2.noarch.rpm: Header V3 DSA/SHA256 Signature, key ID 5072e1f5: NOKEY Verifying... ################################# [100%] Preparing... ################################# [100%] Updating / installing... 1:mysql80-community-release-fc34-2 ################################# [100%] Step 2: Install the MySQL Workbench on Fedora Once the repository has been installed, we will proceed and install the MySQL Workbench using the single command below: sudo yum install mysql-workbench Sample Output: Dependencies resolved. ================================================================================ Package Arch Version Repository Size ================================================================================ Installing: mysql-workbench-community x86_64 8.0.27-1.fc34 mysql-tools-community 37 M Installing dependencies: pcre-cpp x86_64 8.44-3.fc34.1 fedora 26 k
proj x86_64 7.2.1-2.fc34 fedora 2.6 M Installing weak dependencies: proj-data-at noarch 7.2.1-2.fc34 fedora 2.1 M proj-data-au noarch 7.2.1-2.fc34 fedora 117 M proj-data-be noarch 7.2.1-2.fc34 fedora 726 k proj-data-br noarch 7.2.1-2.fc34 fedora 1.0 M proj-data-ca noarch 7.2.1-2.fc34 fedora 93 M proj-data-ch noarch 7.2.1-2.fc34 fedora 1.5 M proj-data-de noarch 7.2.1-2.fc34 fedora 72 M proj-data-dk noarch 7.2.1-2.fc34 fedora 9.7 M proj-data-es noarch 7.2.1-2.fc34 fedora 1.0 M proj-data-eur noarch 7.2.1-2.fc34 fedora 1.0 M proj-data-fi noarch 7.2.1-2.fc34 fedora 90 k proj-data-fo noarch 7.2.1-2.fc34 fedora 9.2 k proj-data-fr noarch 7.2.1-2.fc34 fedora 1.2 M proj-data-is noarch 7.2.1-2.fc34 fedora 5.3 M proj-data-jp noarch 7.2.1-2.fc34 fedora 401 k proj-data-nc noarch 7.2.1-2.fc34 fedora 1.1 M proj-data-nl noarch 7.2.1-2.fc34 fedora 1.1 M proj-data-nz noarch 7.2.1-2.fc34 fedora 13 M proj-data-pt noarch 7.2.1-2.fc34 fedora 432 k proj-data-se noarch 7.2.1-2.fc34 fedora 2.2 M proj-data-sk noarch 7.2.1-2.fc34 fedora 1.2 M proj-data-uk noarch 7.2.1-2.fc34 fedora 4.7 M proj-data-us noarch 7.2.1-2.fc34 fedora 223 M Transaction Summary ================================================================================ Install 26 Packages Total download size: 593 M Installed size: 766 M Is this ok [y/N]: y Method 2: Install Mysql Workbench on Fedora 36/35/34/33/32 using Snap. This is yet another method you can use to install MySQL workbench on your Fedora system. But before we do the installation, ensure that snap is installed on Fedora. sudo dnf install snapd Star and enable snap on Fedora sudo systemctl enable --now snapd.socket Enable classic snap support. sudo ln -s /var/lib/snapd/snap /snap Now install the MySQL Workbench Community using snap as below; $ sudo snap install mysql-workbench-community mysql-workbench-community 8.0.25 from Tonin Bolzan (tonybolzan) installed #2) Use Mysql Workbench on Fedora 36/35/34/33/32 After a successful installation of MySQL Workbench launch it from the terminal as below. $ mysql-workbench Alternatively use the App Menu as below: MySQL Workbench will start as below: Connect to your database instance, you can choose to connect to the local instance on your machine or another instance by clicking +. Fill in the required information. Provide a password for the local instance connection. On successful authentication, you will see this admin dashboard. Check the connected database server status: Manage users and privileges as below. Assid from the administration, you can switch to the schemas tab. Here, you can view available databases, create tables, import data into them e.t.c. You can also create a new schema to the connected database as below. That is it for now! We have just covered a few tips on how to get started with Mysql Workbench on Fedora 36/35/34/33/32. There are many more management activities you can do to a database with MySQL Workbench. I hope this guide was helpful.
0 notes
Text
Download Navicat crack (serial key) latest version FCX;

💾 ►►► DOWNLOAD FILE 🔥🔥🔥 This application has the ability to quickly run the SQL script or create diagrams as well as edit tables. Moreover , it offers a very straightforward interface that lets you create reports about the data very quickly and conveniently. Using the right tools you can modify , create, and design database objects. In addition, the program also comes with database models and designs that you can integrate into your database development process and enhance the quality of your database design. Not impressed yet, then look fantastic tools. If you are not satisfied with it, You can download ScriptCase Full Version which is also a powerful database handler. Navicat Premium Navicat Premium Serial Key Mac visualizes your data in a way that makes it easier for you to figure out any irregularities that may exist in your data. It works well with Windows, Linux, and Apple operating systems so you will not need to purchase different software for your different operating systems. When connecting to the database, this application will take you through several steps of authentication which makes sure that your data stays safe from unauthorized access. Navicat Premium Key cloud allows you to update your work efficiently and handles most of the work for you so that you can divert full attention to the task you are performing instead of worrying about the other details. It has an efficient and professional management environment that allows users to increase productivity easily. Can back up their management data to prevent future data loss. Can use the right tools to create, modify , and design database objects. Has a simple installation and an intuitive user interface that makes it easy for the user to use. Navicat Registration Key provides fast and accurate functioning. Navicat Premium free download full version with crack can schedule and perform automated operations at the optimal time. Set up automation for repeatable deployment processes , such as database backups and script execution at specific times or dates. Sync your connection settings, models , queries, and virtual groups to our Navicat Cloud service so that you can access them in real time and share them with your colleagues anytime, anywhere. Establish a secure connection through SSH tunnel and SSL to ensure that each connection is safe, stable, and reliable. Fix all minor Bugs and improve many features. When You are setting a scheduling error occurs they fix this error. When you set the Location path queries Cannot be displayed. MySQL Incording issue is fixed. All Bugs fixed. Data show in the chart data source. Hard Disk Space: MB of free space required. Processor: Intel Dual Core processor or later. Serial Key:.
1 note
·
View note
Text
HTB - Horizontall (Part 2)
Continued from Part I --> https://pillothecat-hacks.tumblr.com/post/672411290205093888/htb-horizontall-part-1
Find the user flag
Find the user flag in home/developer/user.txt

------------------------
Privilege Escalation
Next, we’ll need to upgrade our privilege to root shell to obtain the root flag.
Let’s start off by looking for additional vulnerabilities from our new shell.
After much search for any files with open permissions, command executions, and network connections, we’ll notice additional open ports with programs running on them.
--> netstat -antup
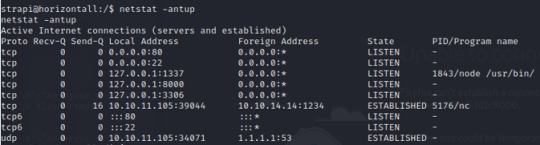
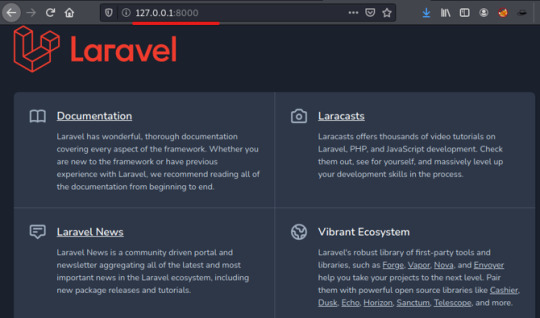
After curling a few of the ports on the victim’s local host, we’ll find that port 1337 is running mysql and port 8000 is utilizing a Laravel v8 php framework.
From searching exploits for Laravel v8, we can find another remote code execution script CVE: 2021-3129.
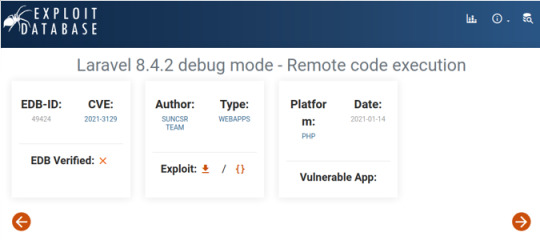
------------------------
SSH keygen and login
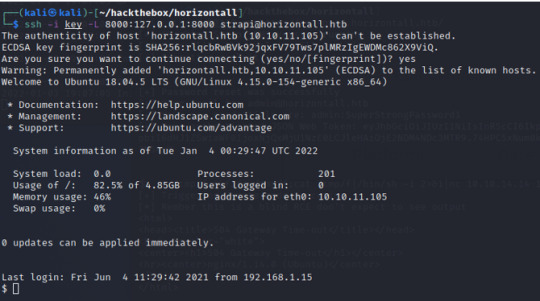
For the exploit found in the previous step to work, we’ll need to port forward 8000. As seen from netstat enumeration, we’ll need to connect to the victim’s loopback address by first “ssh”ing into the system.
In order to achieve this, first create an ssh-keygen from our local machine.
--> ssh-keygen *from Kali
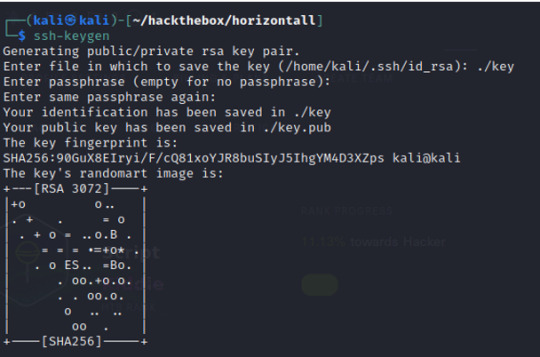

Then copy the key into the victim’s machine; the key is saved in ~/.ssh/authorized_keys
--> echo ssh-rsa AAAAB3NzaC1yc2EAAAADAQABAAABgQDbjR2N81pTJ31fRwPBIrwn/g5JglLgJFcfrK/2QzJ/xwgJrVP/PybeYpXkZTpS5pFMs2b8B5jOgNpMEM2Q3hEjaHrqvzfj1MGcqLhXnw8ohUHQqXkF33XxFsz/S8h99m3A/dJcgn6QhnU2OyEDKs/2SqJNsIgs0PfRXGp+GlD8vHPakKTulwBAmjBJLsZGJA1z4ALnSVLVqgzUFb9ZdldrAXTLJVD8GZym5u5vwHOhyJAR21Z+6Ht4mGzqzIL17hxrR6eHi+/4qHzsev/f2FypJie/g0Gzw+hoNkuHAqHaBZkjQ+KyumlBkfEGDJoeqMvGsA5jtxguzoB/gkih/vnH9LBIsHqW+h/ORfsYGDtM1UllmISDBndeDeLL4iH596P3cqpxGCQZW/dtOGxDhg/YNssbj1zvxgCF8euz4h96xiFw9KvNNommcjXjTox8lij8xyf0usDK7KvDxLzBWq0tBQtInX/EPl0BhDXPenc8bM4UddFSFllN8dNLqiJSjgk= kali@kali > ~/.ssh/authorized_keys *from Horizontall machine
** Note that the path /usr/lib/openssh/ssh-keysign was listed when we checked for files with open permissions, and thus indicated that we are able to create a key in our victim’s machine

Now back in our Kali, we can ssh into the victim’s machine with our key that we’ve generated and forward the port.
For more information on the syntax --> https://linuxize.com/post/how-to-setup-ssh-tunneling/
Let’s check and confirm to see if the port has been forwarded by viewing it from the browser (with the loopback IP, since we are now on the localhost)
From a new terminal in Kali, we can now execute the RCE (CVE2021-3129). Exploit can be found and downloaded from here
--> https://github.com/nth347/CVE-2021-3129_exploit
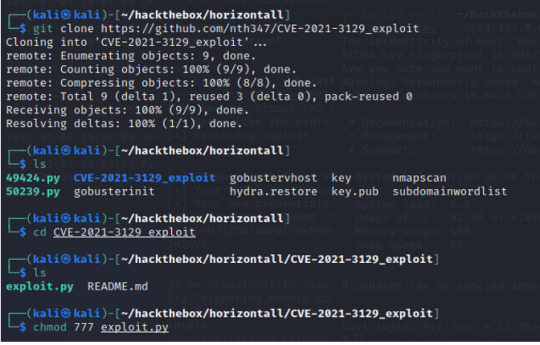
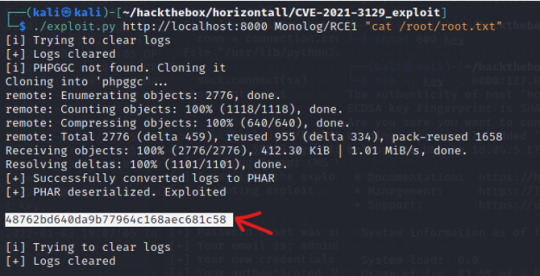
Upon executing the script we receive the following message for the proper syntax.

The output states that we can use Monolog/RCE1 as the <CHAIN> . As for the <CMD>, since we are looking for the root flag, we can direct our command to “cat /root/root.txt” to retrieve the root flag!
0 notes
Text
Create Local Mysql Database Mac

Create Mysql Database On Local Machine
Create Local Mysql Database Macro
Create Local Mysql Database Macros
Create Local Mysql Database Mac Os
Whether you are a seasoned PHP / MySQL developer, or a beginner, it really helps to have a local development environment. This allows you to test your code as you develop your web application before publishing it 'live' to the Internet.
Choose a remote MySQL connection method. You can use either of the following methods to access your MySQL databases remotely: SSH tunnel: This is the more secure method. You set up an SSH tunnel that forwards a port on your local computer to the remote MySQL server.
Mysql -u root -p'root' -h 127.0.0.1 -P 3306 -D local no space after -p as specified in the documentation It will take you to the mysql console directly by switching to the mentioned database. In this quickstart, you connect to an Azure Database for MySQL by using Node.js. You then use SQL statements to query, insert, update, and delete data in the database from Mac, Ubuntu Linux, and Windows platforms. This topic assumes that you're familiar with developing using Node.js, but you're new to working with Azure Database for MySQL.
The following power tip will guide you through setting up a PHP, Apache, and MySQL development environment on your local Windows system. We'll also take a look at the UEStudio features that can make your PHP / MySQL development easier.
Please keep in mind that PHP, Apache, and MySQL are software provided by third party entities. Therefore we (IDM) cannot provide technical support for the installation of these on your system.
Step 1. Download the installation files
In days past, you would have had to download Apache server, PHP, and MySQL all separately. However, there are now solutions which include these components bundled together and pre-configured to run 'out of the box' on a Windows system. We recommend using WampServer, which provides the basics for setting up your local Apache / PHP / MySQL environment on Windows.
If you do not wish to use an 'all-in-one' solution, you will need to download and install the Windows installers for each of the below components:
Apache, the web server software.
PHP, the general purpose scripting language that runs on Apache.
MySQL, the database server software that works hand-in-hand with PHP and Apache.
Step 2: Install everything and make sure it works
For the purposes of this power tip, we are assuming that you've chosen to install WampServer. To install it, simply double-click the setup file and follow the prompts.
You can confirm that everything has installed properly by pointing your browser to http://localhost/ while Wamp is running. If you see the WampServer 'welcome' page, you know everything is installed and running properly. You can also verify this by checking the Wamp icon in the system tray – if the icon is green, then everything is up and running.
Note: You may need to download and install the dependencies described in this community forum post in order for WampServer to run properly on your system.

Step 3: Set up MySQL
Since Wamp installs MySQL, all you need to do is set up a user and a database. Click the Wamp icon in the system tray, then go to MySQL » MySQL console. If the console prompts you for a password, just hit Enter.
Create a MySQL database
Now you need to create a new MySQL database. You can do this by issuing the following command in the console:
Make sure to include the semi-colon at the end of the command! The console should give a 'query ok' response.
You can verify that the databases have been created by using the 'Show databases' command. If you type, 'Show databases;' and hit enter, you should see something similar to:
Create a Table
For the purposes of this power tip, we will create a table called 'names' that includes the following fields: key, first, last. Create this table in our 'uestudio_test' database by using the following commands:
USE uestudio_test;
...then:
CREATE TABLE names (id INT NOT NULL AUTO_INCREMENT, first VARCHAR(48), last VARCHAR(48), PRIMARY KEY(id));
We won't cover the syntax of these commands in the scope of this power tip.
You can see the structure of the table and confirm it was created correctly by typing:
You should see something similar to:
Now, we need to insert some sample data into our table. For example, if we want to create an entry to insert the name 'John' (first) 'Smith' (last) into the table 'names', we would do so using the following command:
INSERT INTO names (first, last) VALUES ('John', 'Smith');
You can insert additional data by modifying the VALUES. Because you created the column id as an auto increment, you don't need to specify a value for this field.
To display all the data in the table, simply type:
Because we inserted a few other names into our table, this query produced the following results:
Create a user
It's never a good idea to use the 'root' user in MySQL to interact with your databases. Create a new user and assign it to your database in the MySQL console by issuing the following command:
GRANT ALL PRIVILEGES on uestudio_test.* to 'SomeUser'@'localhost' IDENTIFIED BY 'SomePassword';
Obviously you will want to modify the user name and password in the above to suit your preferences. You should see the console spit out:
Step 5. UEStudio and PHP/MySQL
PHP Support
UEStudio has built in PHP support which allows you to run scripts, check syntax, and more. To configure PHP support, click the Coding tab then open the PHP drop down. Click the last item here to set the location of the PHP executable.
Click the Browse button to browse to and select the folder containing the PHP executable, which in a default Wamp installation would be:
C:wamp64binphpphp7.1.9
Create Mysql Database On Local Machine
Of course this folder path may vary based upon what version of PHP you have installed and running.
After you've set the PHP executable's parent folder, you can use the PHP options in the Coding tab. Simply open a PHP file then click on any of the options from the PHP icon.
UEStudio offers additional options that make developing PHP scripts easier, but before we demonstrate those options we will create a sample PHP script that we can work with.
Learning to code PHP is not within the scope of this power tip, so we won't go into great detail about the script below. This script is simply provided as an example.
The script below will connect to the 'uestudio_test' database running on localhost. This is the database we created earlier. The script connects, then retrieves all the data from the 'names' table and output the results in an HTML table.
If you used different values for the variables, you would need to change them for the script to work according to your environment.
Create and save this script with any file name and a .php extension, like 'mysql_test.php,' in the www directory, which is the same location as the phpinfo.php script from above. If you click on Run script in the PHP drop down, you'll see the output of the script in the output window.
You can try the other commands available in the PHP drop down.
Create Local Mysql Database Macro
To see the contents of the script in the web browser, type http://localhost/mysql_test.php in your browser. You should see something similar to:
1JohnSmith2BobWhite3MikeJones
Create a Project
You don't have to create a project to develop using PHP/MySQL in UEStudio, but there are added benefits to creating a project. If the files you are editing are part of a project, then UEStudio's IntelliTips will parse the PHP script, which provides you a visual representation of classes, functions, etc. in the Classviewer, and provides some context-aware auto-complete when typing source code.
To create a project, click on New project in the Project tab. Name and save the project file. The 'Project settings' dialog will open, and you can add the 'mysql_test.php' to the project by clicking + Active file.
To view the parsed representation of the file, click on the Tags tab at the bottom of the Workspace manager. If the Workspace manager is not open, you can open it by checking Workspace manager in the Layout tab. Using the mysql_test.php file you created in this tutorial, you should see something similar to the below parsed representation:
By adding your source files to a project, you can also access IntelliTips functionality in the Project tab, like Find symbol definition, Display functions, etc.
For a single file like in this example, there really isn't much advantage for this. However, if you are using an object-oriented style of PHP programming, and your project includes many files, you would see something that looks more like:
As you can see, with a large project, this feature can be very helpful.
Link local to remote
If your local development environment is intended to 'mirror' your live site, you can link a local folder to a remote folder. This will allow you to sync or upload / download files between the local and remote folder in a single click. Learn more about linking local folders to remote folders.
The package is located inside a disk image (.dmg) file that you first need to mount by double-clicking its icon in the Finder. It should then mount the image and display its contents.
Before proceeding with the installation, be sure to stop all running MySQL server instances by using either the MySQL Manager Application (on macOS Server), the preference pane, or mysqladmin shutdown on the command line.
To install MySQL using the package installer:
Download the disk image (.dmg) file (the community version is available here) that contains the MySQL package installer. Double-click the file to mount the disk image and see its contents.
Figure 2.1 MySQL Package Installer: DMG Contents
Double-click the MySQL installer package from the disk. It is named according to the version of MySQL you have downloaded. For example, for MySQL server 5.7.35 it might be named mysql-5.7.35-osx-10.13-x86_64.pkg.
The initial wizard introduction screen references the MySQL server version to install. Click to begin the installation.
Figure 2.2 MySQL Package Installer Wizard: Introduction
The MySQL community edition shows a copy of the relevant GNU General Public License. Click and then to continue.
From the Installation Type page you can either click to execute the installation wizard using all defaults, click to alter which components to install (MySQL server, Preference Pane, Launchd Support -- all enabled by default).
Although the option is visible, the installation location cannot be changed.
Figure 2.3 MySQL Package Installer Wizard: Installation Type
Figure 2.4 MySQL Package Installer Wizard: Customize
Click to begin the installation process.
After a successful installation, the installer displays a window with your temporary root password. This cannot be recovered so you must save this password for the initial login to MySQL. For example:
Figure 2.5 MySQL Package Installer Wizard: Temporary Root Password
MySQL expires this temporary root password after the initial login and requires you to create a new password.
Summary is the final step and references a successful and complete MySQL Server installation. the wizard.
Figure 2.6 MySQL Package Installer Wizard: Summary
MySQL server is now installed, but it is not loaded (or started) by default. Use either launchctl from the command line, or start MySQL by clicking 'Start' using the MySQL preference pane. For additional information, see Chapter 3, Installing a MySQL Launch Daemon, and Chapter 4, Installing and Using the MySQL Preference Pane. Use the MySQL Preference Pane or launchd to configure MySQL to automatically start at bootup.
When installing using the package installer, the files are installed into a directory within /usr/local matching the name of the installation version and platform. For example, the installer file mysql-5.7.35-osx10.13-x86_64.dmg installs MySQL into /usr/local/mysql-5.7.35-osx10.13-x86_64/ . The following table shows the layout of the installation directory.
Table 2.1 MySQL Installation Layout on macOS
Create Local Mysql Database Macros
DirectoryContents of Directorybinmysqld server, client and utility programsdataLog files, databasesdocsHelper documents, like the Release Notes and build informationincludeInclude (header) fileslibLibrariesmanUnix manual pagesmysql-testMySQL test suiteshareMiscellaneous support files, including error messages, sample configuration files, SQL for database installationsupport-filesScripts and sample configuration files/tmp/mysql.sockLocation of the MySQL Unix socket
Create Local Mysql Database Mac Os
During the package installer process, a symbolic link from /usr/local/mysql to the version/platform specific directory created during installation is created automatically.
0 notes
Text
Dbeaver Mysql Client

DBeaver Overview
DBeaver is a free, open source multiplatform database management tool and SQL client for developers and database administrators. DBeaver can be used to access any database or cloud application that has an ODBC or JDBC driver, such as Oracle, SQL Server, MySQl, Salesforce, or MailChimp. Devart DBeaver provides you with the most important features you'd need when working with a database in a GUI tool, such as:
SQL queries execution
Metadata browsing and editing
SQL scripts management
Data export/import
Data backup
DDL generation
ER diagrams rendering
Test data generation
BLOB/CLOB support
Database objects browsing
Scrollable resultsets
The tool comes in two editions — Community and Enterprise. Enterprise Edition supports NoSQL databases, such as MongoDB or Cassandra, persistent query manager database, SSH tunneling, vector graphics (SVG) and a few other enterprise-level features. Note though that you can access a MongoDB database from DBeaver Community Edition using the respective Devart ODBC driver. For the purposes of this guide, we'll use the Community Edition of DBeaver to retrieve data from Oracle via the Open Database Connectivity driver.
Creating an ODBC Data Source to Use Oracle Data in DBeaver
Click the Start menu and select Control Panel.
Select Administrative Tools, then click ODBC Data Sources.
Click on the System DSN tab if you want to set up a DSN name for all users of the system or select User DSN to configure DSN only for your account.
Click the Add button and double-click Devart ODBC Driver for Oracle in the list.
Give a name to your data source and set up the connection parameters.
Click the Test Connection button to verify that you have properly configured the DSN.
When using ODBC driver for Oracle with DBeaver, SQL_WVARCHAR data types may be displayed incorrectly in DBeaver. To prevent this, you need to set the string data types to Ansi either in the Advanced Settings tab of the driver configuration dialog or directly in the connection string (String Types=Ansi) — all string types will be returned as SQL_CHAR, SQL_VARCHAR and SQL_LONGVARCHAR.
Connecting to Oracle Data from DBeaver via ODBC Driver for Oracle
Follow the steps below to establish a connection to Oracle in DBeaver.
DBeaver SQL Client for OpenEdge. Progress does not have a SQL Client like Microsoft has SQL Server Management Studio or MySQL has Workbench. DBeaver is an excellent SQL Client for OpenEdge using JDBC. This article discusses how to configure DBeaver to connect to OpenEdge using JDBC and execute SQL statements. Install DBeaver. DBeaver is a free, universal SQL client that can connect to numerous types of databases—one of which is MySQL. I want to show you how to install and use DBeaver to connect to your remote MySQL server. First copy mysql.exe and mysqldump.exe into the dbeaver folder. Or you change the Local Client the location in the c0onnection wizard. Improve this answer. Follow edited Sep 7 '20 at 16:54. Answered Sep 7 '20 at 16:36. 19.1k 4 4 gold badges 19 19 silver badges 34 34 bronze badges.
In the Database menu, select New Database Connection.
In the Connect to database wizard, select ODBC and click Next.
Enter the previously configured DSN in the Database/Schema field.
Click Test Connection. If everything goes well, you'll see the Success message.
This article shows how to connect to MySQL data with wizards in DBeaver and browse data in the DBeaver GUI. Create a JDBC Data Source for MySQL Data. Follow the steps below to load the driver JAR in DBeaver. Open the DBeaver application and, in the Databases menu, select the Driver Manager option. Click New to open the Create New Driver form.
Serge-rider commented on Feb 28, 2017 Some MySQL UI clients may have builtin mysqldump, mysqlrestore, mysql.exe + set of libraries of some particular MySQL client version. But DBeaver definitely not one of such clients. On Windows you can install MySQL Workbench (it includes all command line tools).
Viewing Oracle Database Objects and Querying Data
Dbeaver Mysql Client_plugin_auth Is Required
You can expand out the database structure in DBeaver's Database Navigator to visualize all the tables in Oracle database. To view and edit the data in a table, you need to right-click on the target table name and select View data.The content of the table will be displayed in the main workspace.

Dbeaver Mysql Native Client
If you want to write a custom SQL query that will include only the necessary columns from the table, you can select New SQL Editor in the SQL Editor main menu. Create your query and run it by clicking Execute SQL Statement to view the results in the same window.
Dbeaver Mysql Client Download
© 2015-2021 Devart. All Rights Reserved.Request SupportODBC ForumProvide Feedback
0 notes
Text
MySQL Connector/NET 8.0.24 has been released
Dear MySQL users, MySQL Connector/NET 8.0.24 is the latest General Availability releaseof the MySQL Connector/NET 8.0 series. This version supports .NET 5.0and the X DevAPI, which enables application developers to write codethat combines the strengths of the relational and document modelsusing a modern, NoSQL-like syntax that does not assume previousexperience writing traditional SQL. To learn more about how to write applications using the X DevAPI, see http://dev.mysql.com/doc/x-devapi-userguide/en/ For more information about how the X DevAPI is implemented inConnector/NET, see http://dev.mysql.com/doc/dev/connector-net NuGet packages provide functionality at a project level. To get thefull set of features available in Connector/NET such as availabilityin the GAC, integration with Visual Studio’s Entity Framework Designerand integration with MySQL for Visual Studio, installation through theMySQL Installer or the stand-alone MSI is required. Please note that the X DevAPI requires at least MySQL Server version8.0 or higher with the X Plugin enabled. For general documentationabout how to get started using MySQL as a document store, see http://dev.mysql.com/doc/refman/8.0/en/document-store.html To download MySQL Connector/NET 8.0.24, see http://dev.mysql.com/downloads/connector/net/ Installation instructions can be found at https://dev.mysql.com/doc/connector-net/en/connector-net-installation.html Changes in MySQL Connector/NET 8.0.24 (2021-04-20, GeneralAvailability) Functionality Added or Changed * The IgnorePrepare connection-string option was deprecated in the Connector/NET 8.0.23 release and removed in the Connector/NET 8.0.24 release. The removed option instructed Connector/NET to ignore all calls to MySqlCommand.Prepare() that were made using the classic MySQL protocol. (Bug #31872906) * Improved server disconnection handling of X Protocol connections now creates a log entry and returns an error message, as needed, after Connector/NET receives a connection-close notice from the server. Connector/NET detects three new types of warning notices. Connection idle notice. This notice applies to a server connection that remains idle for longer than the relevant timeout setting. Connector/NET closes the connection when it receives the notice in an active session or while a new session is being created. An attempt to use the invalid session returns the “Connection closed. Reason: connection idle too long” error message. Server shutdown notice. If a connection-close notice is received in a session as a result of a server shutdown, Connector/NET terminates the session with the “Connection closed. Reason: server shutdown” error message. All other sessions that are connected to the same endpoint are removed from the pool, if connection pooling is used. Connection killed notice. If the connection being killed from another client session, Connector/NET closes the connection when it receives the notice in an active session or while a new session is being created. An attempt to use the invalid session returns the “Connection closed. Reason: connection killed by a different session” error message. * If a classic MySQL protocol connection experiences a server timeout, Connector/NET now reports more precise disconnection information to affected .NET applications when the server provides improved error messages. * Previously, Connector/NET added client support for the MySQL Enterprise Edition SASL LDAP authentication plugin with SCRAM-SHA-1 and SCRAM-SHA-256 as authentication methods. Connector/NET now also supports GSSAPI/Kerberos as an alternative authentication method for classic MySQL protocol connections. SASL-based LDAP authentication does not apply to clients running macOS. * The SSH Tunneling (port forwarding) feature, which was added to support MySQL products in making secure connections on Windows, is no longer needed by other products. Now, using an alternative such as OCI or SSH.NET to create a tunnel is preferred. The related connection options (SshHostName, SshKeyFile, SshPassPhrase, SshPassword, SshPort, and SshUserName) are no longer valid when making Connector/NET connections, starting with this release. Bugs Fixed * Pound symbols in JSON columns were interpreted improperly when using accent-sensitive collation. (Bug #32429236) * Several data types could not be mapped by running Scaffold-DbContext on valid MySQL tables. This fix upgrades Microsoft Entity Framework libraries to the latest and also adds all previously excluded mappings to the EFCore and EFCore5 projects. (Bug #32424742, Bug #102381) * Constructing a regular expression for each read diminished the performance of Connector/NET. This fix limits the construction to one instance, which now is reused. (Bug #32386454, Bug #101714) * A data table declared using valid database.table syntax within an Entity Framework model could have extra database names in the generated query (for example, database.database.table). (Bug #32358174, Bug #101236) * Incomplete GUID mapping in the Entity Framework Core implementation caused an error when the Contains method was used to filter records. (Bug #32173133, Bug #93398) * Additional error codes now prevent unexpected exceptions after a query. Thanks to Stanislav Revin for the patch. (Bug #32150115, Bug #101592) * An exception was thrown if any CHAR(36) columns containing a NULL value were referenced in a query. New validation now checks for NULL values when the MySqlDbType member is Guid. (Bug #32049837, Bug #101252) On Behalf of Oracle/MySQL Engineering Team,Tvarita Jain https://insidemysql.com/mysql-connector-net-8-0-24/
0 notes