#ssh-keygen
Explore tagged Tumblr posts
Visit Tumblr Blog
Explore Tumblr blogs with no restrictions, modern design and the best experience.
Last Seen Tumblr Blogs


Fun Fact
Women make up for the other 50% of Tumblr’s audience.
Photo

(via SSH sécurisé sans mot de passe : Guide complet)
#ssh sécurisé sans mot de passe#SSH sécurisé#configuration SSH#utilitaire ssh-keygen#connexion SSH sans mot de passe
0 notes
Text
helped a friend with docker tonight and found out that windows now has ssh and ssh-keygen, but mysteriously lacks ssh-copy-id? wtf?
2 notes
·
View notes
Quote
秘密鍵の生成には、おとなしく ssh-keygen を使いましょう。 暗号論的に安全ではない疑似乱数を使って作成されたSSH鍵は非常に危険です。 そのようなSSH鍵では、公開鍵から秘密鍵を計算できることを実際に確かめてみました。
鍵生成には暗号論的に安全な乱数を使おう
5 notes
·
View notes
Text
ssh-keygen -i -f ssh2.pub > openssh.pub
0 notes
Text
Linux CLI 40 🐧 rsync command
New Post has been published on https://tuts.kandz.me/linux-cli-40-%f0%9f%90%a7-rsync-command/
Linux CLI 40 🐧 rsync command

youtube
a - rsync command rsync is a powerful command used to transfer files over network It can copy files between local and remote systems and synchronize directories. It supports various options to control the transfer process common options: a → archive mode, preserves permissions, timestamps etc v → verbose mode z → compress data during the transfer P → show progress and where possible supports pausing and resuming e → specifies an alternative remote shell to use (-e ssh) Syntax: rsync [options] [src] [user@]host:targ rsync [options] [user@]host:src [targ] b - rsync examples rsync -av /home/kr/cli /home/kr/clibkp → local copy rsync -avz [email protected]:/home/kr/cli /home/kr/clibkp → copies everything from remote to local machine rsync -av --delete /home/kr/cli [email protected]:/home/kr/cli → syncronise directories and delete files in destination if not exists in source rsync -avzP /home/kr/cli [email protected]:/home/kr/cli → pause with Ctrl+c and resume with the same command if you frequently use rsync between two machine, use SSH key based authentication ssh-keygen -t rsa -b 4096 -C "[email protected]" → generates a key pair ssh-copy-id user@remote_host → copies the public key to remote machine you can use rsync now without asking for password all the time
0 notes
Text
Debian 12 initial server setup on a VPS/Cloud server

After deploying your Debian 12 server on your cloud provider, here are some extra steps you should take to secure your Debian 12 server. Here are some VPS providers we recommend. https://youtu.be/bHAavM_019o The video above follows the steps on this page , to set up a Debian 12 server from Vultr Cloud. Get $300 Credit from Vultr Cloud
Prerequisites
- Deploy a Debian 12 server. - On Windows, download and install Git. You'll use Git Bash to log into your server and carry out these steps. - On Mac or Linux, use your terminal to follow along.
1 SSH into server
Open Git Bash on Windows. Open Terminal on Mac/ Linux. SSH into your new server using the details provided by your cloud provider. Enter the correct user and IP, then enter your password. ssh root@my-server-ip After logging in successfully, update the server and install certain useful apps (they are probably already installed). apt update && apt upgrade -y apt install vim curl wget sudo htop -y
2 Create admin user
Using the root user is not recommended, you should create a new sudo user on Debian. In the commands below, Change the username as needed. adduser yournewuser #After the above user is created, add him to the sudo group usermod -aG sudo yournewuser After creating the user and adding them to the sudoers group, test it. Open a new terminal window, log in and try to update the server. if you are requested for a password, enter your user's password. If the command runs successfully, then your admin user is set and ready. sudo apt update && sudo apt upgrade -y
3 Set up SSH Key authentication for your new user
Logging in with an SSH key is favored over using a password. Step 1: generate SSH key This step is done on your local computer (not on the server). You can change details for the folder name and ssh key name as you see fit. # Create a directory for your key mkdir -p ~/.ssh/mykeys # Generate the keys ssh-keygen -t ed25519 -f ~/.ssh/mykeys/my-ssh-key1 Note that next time if you create another key, you must give it a different name, eg my-ssh-key2. Now that you have your private and public key generated, let's add them to your server. Step 2: copy public key to your server This step is still on your local computer. Run the following. Replace all the details as needed. You will need to enter the user's password. # ssh-copy-id -i ~/path-to-public-key user@host ssh-copy-id -i ~/.ssh/mykeys/my-ssh-key1.pub yournewuser@your-server-ip If you experience any errors in this part, leave a comment below. Step 3: log in with the SSH key Test that your new admin user can log into your Debian 12 server. Replace the details as needed. ssh yournewuser@server_ip -i ~/.ssh/path-to-private-key Step 4: Disable root user login and Password Authentication The Root user should not be able to SSH into the server, and only key based authentication should be used. echo -e "PermitRootLogin nonPasswordAuthentication no" | sudo tee /etc/ssh/sshd_config.d/mycustom.conf > /dev/null && sudo systemctl restart ssh To explain the above command, we are creating our custom ssh config file (mycustom.conf) inside /etc/ssh/sshd_config.d/ . Then in it, we are adding the rules to disable password authentication and root login. And finally restarting the ssh server. Certain cloud providers also create a config file in the /etc/ssh/sshd_config.d/ directory, check if there are other files in there, confirm the content and delete or move the configs to your custom ssh config file. If you are on Vultr cloud or Hetzner or DigitalOcean run this to disable the 50-cloud-init.conf ssh config file: sudo mv /etc/ssh/sshd_config.d/50-cloud-init.conf /etc/ssh/sshd_config.d/50-cloud-init Test it by opening a new terminal, then try logging in as root and also try logging in the new user via a password. If it all fails, you are good to go.
4 Firewall setup - UFW
UFW is an easier interface for managing your Firewall rules on Debian and Ubuntu, Install UFW, activate it, enable default rules and enable various services #Install UFW sudo apt install ufw #Enable it. Type y to accept when prompted sudo ufw enable #Allow SSH HTTP and HTTPS access sudo ufw allow ssh && sudo ufw allow http && sudo ufw allow https If you want to allow a specific port, you can do: sudo ufw allow 7000 sudo ufw allow 7000/tcp #To delete the rule above sudo ufw delete allow 7000 To learn more about UFW, feel free to search online. Here's a quick UFW tutorial that might help get you to understand how to perform certain tasks.
5 Change SSH Port
Before changing the port, ensure you add your intended SSH port to the firewall. Assuming your new SSH port is 7020, allow it on the firewall: sudo ufw allow 7020/tcp To change the SSH port, we'll append the Port number to the custom ssh config file we created above in Step 4 of the SSH key authentication setup. echo "Port 7020" | sudo tee -a /etc/ssh/sshd_config.d/mycustom.conf > /dev/null && sudo systemctl restart ssh In a new terminal/Git Bash window, try to log in with the new port as follows: ssh yournewuser@your-server-ip -i ~/.ssh/mykeys/my-ssh-key1 -p 7020 #ssh user@server_ip -i ~/.ssh/path-to-private-key -p 7020 If you are able to log in, then that’s perfect. Your server's SSH port has been changed successfully.
6 Create a swap file
Feel free to edit this as much as you need to. The provided command will create a swap file of 2G. You can also change all instances of the name, debianswapfile to any other name you prefer. sudo fallocate -l 2G /debianswapfile ; sudo chmod 600 /debianswapfile ; sudo mkswap /debianswapfile && sudo swapon /debianswapfile ; sudo sed -i '$a/debianswapfile swap swap defaults 0 0' /etc/fstab
7 Change Server Hostname (Optional)
If your server will also be running a mail server, then this step is important, if not you can skip it. Change your mail server to a fully qualified domain and add the name to your etc/hosts file #Replace subdomain.example.com with your hostname sudo hostnamectl set-hostname subdomain.example.com #Edit etc/hosts with your hostname and IP. replace 192.168.1.10 with your IP echo "192.168.1.10 subdomain.example.com subdomain" | sudo tee -a /etc/hosts > /dev/null
8 Setup Automatic Updates
You can set up Unattended Upgrades #Install unattended upgrades sudo apt install unattended-upgrades apt-listchanges -y # Enable unattended upgrades sudo dpkg-reconfigure --priority=low unattended-upgrades # Edit the unattended upgrades file sudo vi /etc/apt/apt.conf.d/50unattended-upgrades In the open file, uncomment the types of updates you want to be updated , for example you can make it look like this : Unattended-Upgrade::Origins-Pattern { ......... "origin=Debian,codename=${distro_codename}-updates"; "origin=Debian,codename=${distro_codename}-proposed-updates"; "origin=Debian,codename=${distro_codename},label=Debian"; "origin=Debian,codename=${distro_codename},label=Debian-Security"; "origin=Debian,codename=${distro_codename}-security,label=Debian-Security"; .......... }; Restart and dry run unattended upgrades sudo systemctl restart unattended-upgrades.service sudo unattended-upgrades --dry-run --debug auto-update 3rd party repositories The format for Debian repo updates in the etc/apt/apt.conf.d/50unattended-upgrades file is as follows "origin=Debian,codename=${distro_codename},label=Debian"; So to update third party repos you need to figure out details for the repo as follows # See the list of all repos ls -l /var/lib/apt/lists/ # Then check details for a specific repo( eg apt.hestiacp.com_dists_bookworm_InRelease) sudo cat /var/lib/apt/lists/apt.hestiacp.com_dists_bookworm_InRelease # Just the upper part is what interests us eg : Origin: apt.hestiacp.com Label: apt repository Suite: bookworm Codename: bookworm NotAutomatic: no ButAutomaticUpgrades: no Components: main # Then replace these details in "origin=Debian,codename=${distro_codename},label=Debian"; # And add the new line in etc/apt/apt.conf.d/50unattended-upgrades "origin=apt.hestiacp.com,codename=${distro_codename},label=apt repository"; There you go. This should cover Debian 12 initial server set up on any VPS or cloud server in a production environment. Additional steps you should look into: - Install and set up Fail2ban - Install and set up crowdsec - Enable your app or website on Cloudflare - Enabling your Cloud provider's firewall, if they have one.
Bonus commands
Delete a user sudo deluser yournewuser sudo deluser --remove-home yournewuser Read the full article
0 notes
Quote
あのキラキラの正体 randomartって言う テキストベースのフィンガープリントだと人間が誤って確認するリスクがあるから、視覚的な差分が取りやすいようにAAとして可視化している
ssh-keygenしたときに出るあのキラキラの正体
1 note
·
View note
Text
SNOWFLAKE SSH

Title: Beyond the Web: Secure SSH Access to Your Snowflake Data Warehouse
Introduction
Snowflake’s cloud-based data warehousing solution offers a convenient web interface for management and queries — but sometimes, you need more profound control and flexibility. That’s where SSH (Secure Shell) comes in. In this blog post, we’ll explore the benefits of SSH access to Snowflake, how to set it up, and some common scenarios where it shines.
What is SSH?
A brief explanation of SSH as a secure network protocol that allows encrypted command-line access and file transfers to remote machines.
Why Use SSH with Snowflake?
Advanced Data Loading and Transformations: SSH lets you run complex shell scripts or tools on your local system to clean, transform, or load data directly into Snowflake.
Automation: To interact with Snowflake and orchestrate tasks (ETL pipelines, scheduled jobs) using your preferred scripting languages.
Enhanced Security: Key-based authentication with SSH can add an extra layer of security compared to solely relying on Snowflake’s web interface.
Troubleshooting: Connect directly to the Snowflake environment for in-depth debugging and problem resolution.
Setting Up SSH Access to Snowflake
Key-pair Generation: Use tools like ssh-keygen to create a secure public/private key pair.
Upload Your Public Key: Add your public key to your Snowflake user profile for authentication. (Snowflake’s documentation has detailed instructions)
Choosing an SSH Client: Popular options include the built-in command-line tools on Linux/macOS (Terminal) or dedicated clients like PuTTY (Windows).
Connecting: Connect to Snowflake using your SSH client and provide your Snowflake username, hostname, and private key.
Common Use Cases
Secure File Transfers: To move data files in and out of Snowflake, use tools like scp or sftp over the established SSH connection.
Managing Snowflake Objects: Connect to the SnowSQL CLI via SSH to perform advanced administration tasks (creating users, roles, warehouses, etc.)
Custom Tooling: Develop your scripts and tools in your favorite languages (Python, etc.) to automate interactions with Snowflake using the client libraries it provides.
Security Considerations
Enforce Key-Based Authentication: Always use key-based authentication instead of passwords with SSH.
Rotate Keys Regularly: Establish a schedule for rotating your SSH key pairs to maintain strong security.
Least Privilege: Grant specific Snowflake user permissions for the SSH connection, matching only the required actions.
Conclusion
Mastering SSH access to Snowflake opens up a new level of power and flexibility when interacting with your data warehouse. Whether you’re automating processes, performing intricate data manipulations, or prefer working in a command-line environment, SSH is invaluable for every Snowflake power user’s toolkit.
youtube
You can find more information about Snowflake in this Snowflake
Conclusion:
Unogeeks is the No.1 IT Training Institute for SAP Training. Anyone Disagree? Please drop in a comment
You can check out our other latest blogs on Snowflake here – Snowflake Blogs
You can check out our Best In Class Snowflake Details here – Snowflake Training
Follow & Connect with us:
———————————-
For Training inquiries:
Call/Whatsapp: +91 73960 33555
Mail us at: [email protected]
Our Website ➜ https://unogeeks.com
Follow us:
Instagram: https://www.instagram.com/unogeeks
Facebook: https://www.facebook.com/UnogeeksSoftwareTrainingInstitute
Twitter: https://twitter.com/unogeeks
0 notes
Text
Installing Hadoop on Ubuntu

Certainly! Let’s present the Hadoop installation process on Ubuntu uniquely and engagingly, suitable for an informative yet reader-friendly course email.
Subject: 🚀 Embark on Your Big Data Journey: Install Hadoop on Ubuntu Easily!
👋 Hello Data Enthusiasts!
Are you ready to dive into the world of Big Data with Hadoop? Here’s a straightforward guide to getting Hadoop up and running on your Ubuntu system. Perfect for beginners and experts alike!
🔧 Getting Started: Prep Your System
Freshen Up Ubuntu: sudo apt update && sudo apt upgrade
Java Installation: sudo apt install default-JDK
Java Check: Ensure it’s installed with the Java -version
👤 Create a Dedicated Hadoop User
A simple command: sudo adduser hadoop
🔑 SSH Setup: Key to Connectivity
Install SSH: sudo apt install ssh
For Hadoop User:
Switch user: su — Hadoop
Generate SSH Key: ssh-keygen -t rsa -P “
Authorize Key: cat ~/.ssh/id_rsa.pub >> ~/.ssh/authorized_keys
📥 Download Hadoop: Grab the Latest Version
Use wget with the link from the official Hadoop website.
📦 Unpack Hadoop
Unzip it: tar -xzf Hadoop-3.x.x.tar.gz
🌐 Environment Setup: Pointing in the Right Direction
Edit .bashrc: nano ~/.bashrc
Add Hadoop paths (adjust with your Hadoop version):
bashCopy code
export HADOOP_HOME=/home/Hadoop/Hadoop-3.x.x export PATH=$PATH:$HADOOP_HOME/bin:$HADOOP_HOME/sbin
Activate changes: source ~/.bashrc
⚙️ Hadoop Configuration: The Blueprint
Edit key files in $HADOOP_HOME/etc/hadoop/:
core-site.xml, hdfs-site.xml, mapred-site.xml, yarn-site.xml
🎬 Initialize and Launch
Format Hadoop FileSystem: hdfs name node -format
Start the engines: start-dfs. Sh and start-yarn. sh
👀 See Hadoop in Action!
Access Hadoop’s ResourceManager and NameNode via your browser.
🛠️ Tips & Tricks
Check firewall settings.
Log files in $HADOOP_HOME/logs/ are your best friends for any hiccups.
🚀 Your Big Data Adventure Awaits!
With these steps, you’re all set to explore the vast universe of Big Data with Hadoop on your Ubuntu machine.
Happy Data Crunching!
Your [Your Course/Team Name]
Note: Ensure the technical steps are accurate and up-to-date for the course email. Personalize the email with course-specific details and offer support for installation issues. To maintain the email’s integrity and prevent it from being flagged as spam, avoid overusing hyperlinks and ensure it’s sent from a recognized, reputable email address.
Hadoop Training Demo Day 1 Video:
youtube
You can find more information about Hadoop Training in this Hadoop Docs Link
Conclusion:
Unogeeks is the №1 IT Training Institute for Hadoop Training. Anyone Disagree? Please drop in a comment
You can check out our other latest blogs on Hadoop Training here — Hadoop Blogs
Please check out our Best In Class Hadoop Training Details here — Hadoop Training
S.W.ORG
— — — — — — — — — — — -
For Training inquiries:
Call/Whatsapp: +91 73960 33555
Mail us at: [email protected]
Our Website ➜ https://unogeeks.com
Follow us:
Instagram: https://www.instagram.com/unogeeks
Facebook: https://www.facebook.com/UnogeeksSoftwareTrainingInstitute
Twitter: https://twitter.com/unogeeks
#unogeeks #training #ittraining #unogeekstraining
0 notes
Text
NEW KEYGEN CHURCH!!!
CUR1E# > ssh shakerville Connecting to house audio network... Connected.
Enter Username: CUR1E Password:
ACCESS GRANTED.
shakerville> enable aux_bass Working... Enabled. Waiting for generators to come up to speed... shakerville> Set-Audio-Playback Whole_House Working.... This is not advisable. YOU HAVE BEEN WARNED. Generators are up to spin, additional bass canons ARMED AND READY. shakerville> Play-Audio -source 'https://www.youtube.com/watch?v=Q0KCiS2x0go' -volume 9 -override_warning $true Working... Lockdown alarms are sounding! Gennies spinning to full honk.
Starting in 600 seconds.......
. / | \ - / | \ - . ok, here we go! Playback Started.
0 notes
Text
【Raspberry Pi】パスワードなしでSSHログインする方法
Raspberry Pi はモニタレスとしての運用する際、SSH で頻繁にアクセスする必要があります。しかし、毎回パスワードを入力するのは面倒です。この記事は、鍵認証を使ってパスワードなしで SSH ログインする設定方法をご説明します。 Raspberry Pi上での設定 .sshディレクトリの作成 Raspberry Pi上で以下のコマンドを実行します(ディレクトリが存在しない場合のみ) mkdir ~/.ssh chmod 700 ~/.ssh authorized_keysファイルの作成 touch ~/.ssh/authorized_keys chmod 600 ~/.ssh/authorized_keys 公開鍵の作成と転送 自分のPCで公開鍵を生成 ログインコマンドを打つ側のPCで以下のコマンドを実行します。 ssh-keygen -t…

View On WordPress
0 notes
Text
Online Secure Shell Client: All You Need to Find Out About Securely Accessing Your Servers

Secure shell (SSH) is a procedure that makes it possible for safe and secure communication in between two on-line devices by encrypting the information broadcast coming from one point to the various other. Accessing your servers online may appear like an overwhelming task, yet SSH produces it much more safe than ever. By utilizing SSH, you can set up a secure link with your web server from another location.
All Concerning Online Secure Shell (SSH) Client
This post intends to deal with everything you need to have to find out about online SSH and exactly how it can aid you access your web servers safely.
What is actually SSH, as well as exactly how does it function?
Secure shell protocol is a system protocol made use of to access remote units securely. An SSH client links to an SSH server, which has an SSH daemon that listens to asks for coming from the clients for validated login sessions or remote control command completion. SSH client secures all relevant information delivered between the client as well as the server, featuring security passwords and commands, which protects against eavesdropping, IP spoofing, as well as various other sorts of system attacks.
Exactly how to connect to Remote Servers utilizing SSH?
To link to a remote control server making use of SSH, you to begin with need to have to possess an SSH client put in on your local computer system. There are actually numerous SSH clients on call for different operating bodies, consisting of Microsoft window, macOS, and also Linux. Once you possess an online SSH client set up, you can easily connect to your distant web server utilizing an SSH connection chain that includes the server's internet protocol deal with, the SSH web server's port variety, as well as the SSH protocol model.
Exactly How to Safely Transactions Reports along with SSH?
youtube
In addition to visiting from another location, SSH can also be made use of for secure report transactions between local area and also remote units. The Secure Copy (SCP) protocol is actually a built-in data transmission system in SSH that enables you to duplicate files tightly in between pair of networked units. You may use SCP to move files by functioning a command like "scp filename user@remoteserver:/path/to/destination" on your neighborhood personal computer. This order duplicates the data called "filename" to the distant server in the listing "/ path/to/destination.".
Exactly how to create and also take care of SSH Keys?
SSH keys are actually a pair of cryptographic tricks utilized for authentication and shield of encryption of SSH links. The secrets contain a private key that you hold on your local tool as well as a public secret that you publish to the remote control SSH web server. To generate SSH tricks, you may utilize the ssh-keygen order in your command-line terminal. After producing the tricks, you need to post everyone secret to the remote SSH web server. You can handle your SSH keys utilizing the ssh-agent energy, which securely shops your exclusive secrets as well as enables you to utilize all of them without needing to enter your passphrase each time.
How to make use of SSH to Develop a VPN link?
Secure shell port sending could be used to make a Virtual Private Network (VPN) connection between pair of networked gadgets. The procedure includes specifying the neighborhood and also distant ends of a tunnel, where network website traffic is actually encrypted as well as sent out firmly in between all of them. SSH VPN hookups work when you need to have to gain access to sources on a remote network safely, like when accessing data kept on a remote control server.
Conclusion
As additional services and organizations depend on electronic resources and distant teams, safe access to web servers ends up being a necessity of their regular procedures. Making use of SSH, you can develop a safe and secure link with your servers remotely, and gain access to all of them firmly from anywhere. This blog has dealt with everything you require to understand about online SSH, from what it is just how it works, to how to safely and securely transfer documents as well as create VPN hookups. With the right resources as well as understanding, you can use SSH to stay safe and effective, regardless of where you are.
0 notes
Text
PuTTYgen and Key-Based Authentication: A Secure Approach to Remote Server Access
In the realm of secure remote server access, key-based authentication has emerged as a superior alternative to traditional password-based methods.
PuTTYgen, a crucial component of the PuTTY suite, plays a vital role in generating and managing SSH key pairs, enabling users to leverage the power of key-based authentication.
In this article, we explore the benefits of key-based authentication, walk through the process of using PuTTYgen to generate SSH keys, and demonstrate how this approach enhances security and efficiency in remote server access.

Understanding Key-Based Authentication
Key-based authentication, facilitated by PuTTYgen, offers a secure method of verifying users without passwords. It uses cryptographic pairs of public and private keys, generated by PuTTYgen, to authenticate access to remote systems.
The public key is stored on the server, while the private key remains on the user's local machine. This approach enhances security, eliminates password complexities, and allows for seamless automation and scripting.
Embracing key-based authentication with PuTTYgen ensures a safer and more efficient method for accessing remote servers.
Exploring PuTTYgen and Its Features
PuTTYgen is a user-friendly tool within the PuTTY suite that enables users to generate and manage SSH key pairs for secure authentication. It offers a graphical interface that simplifies the process of generating cryptographic keys.
Users can choose from different key types, and lengths, and add passphrase protection for enhanced security.
PuTTYgen's key generation capabilities empower users to create both public and private keys, ensuring a secure foundation for remote server access.
Generating SSH Key Pairs with PuTTYgen
Generating SSH key pairs with PuTTYgen is a straightforward process. First, open PuTTYgen and select the desired key type and length.
Click "Generate," and the tool will create the public and private keys. Save both keys securely, and optionally, add a passphrase for additional protection.
The public key is copied to the remote server, while the private key remains on the local machine. This key pair enables secure and passwordless authentication when accessing remote systems.
Importance of Securely Storing Private Keys
Securely storing private keys is crucial for preventing unauthorized access to remote systems. PuTTYgen offers password protection and encryption options to safeguard sensitive key material.
Password protection adds an extra layer of security, while encryption ensures the key file remains confidential and unreadable to unauthorized individuals.
By utilizing these features, PuTTYgen users can minimize the risk of unauthorized access and protect their private keys from potential data breaches.
Configuring Key-Based Authentication on Servers
Configuring key-based authentication on remote servers involves the following steps:
Generate SSH Key Pair: Use PuTTYgen to generate an SSH key pair (public and private keys) on your local machine.
Copy Public Key to Server: Copy the contents of the public key (usually found in a file named "id_rsa.pub") to the server's ~/.ssh/authorized_keys file. If the file doesn't exist, create it.
Set Appropriate Permissions: Ensure the correct permissions are set for the ~/.ssh directory (700) and the authorized_keys file (600) on the server. This restricts access to the authorized keys.
Configure SSH Settings: Edit the SSH server configuration file (/etc/ssh/sshd_config) on the server. Set the "PasswordAuthentication" option to "no" to disable password-based logins.
Restart SSH Service: Restart the SSH service on the server to apply the changes.
With key-based authentication configured, you can now access the server securely and passwordlessly.
When you attempt to log in, the server will challenge your local machine to provide the private key's signature, verifying your identity.
If the signature matches the public key on the server, you will be granted access without the need for a password. This method enhances security and streamlines the login process for remote server access.
Key Revocation and Renewal
Key revocation and renewal are crucial security measures to maintain the integrity of SSH communication. If a private key is compromised or if there are personnel changes, it's essential to revoke and renew SSH keys promptly. PuTTYgen simplifies this process:
Key Revocation: If a private key is compromised or no longer needed, it can be revoked. Remove the corresponding public key from the server's ~/.ssh/authorized_keys file. Revoking the key ensures that even if the private key falls into the wrong hands, it cannot be used for unauthorized access.
Key Renewal: To renew an SSH key, generate a new key pair with PuTTYgen on the local machine. Follow the same process as initial key generation. Once the new key pair is created, copy the public key to the server's ~/.ssh/authorized_keys file. Users can then securely access the server using the new key, ensuring continuous secure communication.
By revoking compromised keys and renewing with new key pairs generated by PuTTYgen, users can maintain a strong security posture and safeguard against potential unauthorized access or data breaches. Regularly updating SSH keys is a best practice to reinforce the security of remote server access.
Conclusion:
PuTTYgen streamlines SSH key generation and management, providing users with a secure and effective way to authenticate remote server access.
Embracing key-based authentication enhances security, reduces password vulnerabilities, and fosters smoother connections.
With PuTTYgen's intuitive interface and powerful features, users can bolster their cybersecurity posture, ensuring peace of mind when accessing remote servers.
0 notes
Text
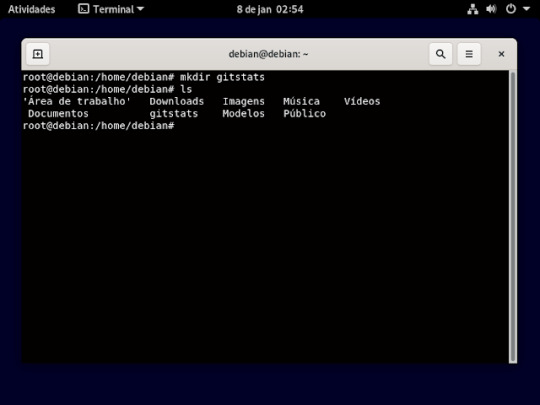
Gitstats
Como fazer?
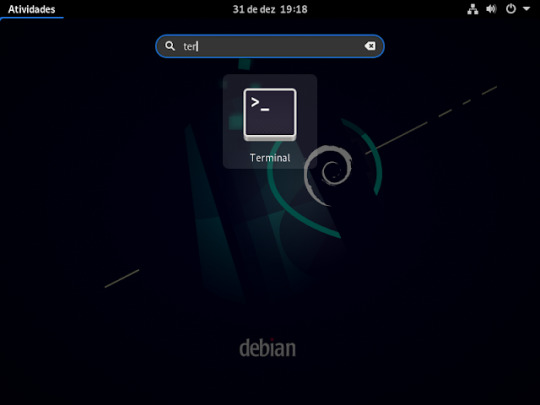
1° passo : abrir a sua maquina virtual Linux, no caso irei utilizar a distribuição Debian, depois que logar. no seu Debian ira abri o terminal ira clicar em atividades e ira digitar terminal, dai e só aperta o enter no que já está selecionado .como mostra a imagem abaixo.
2° passo: ira vira um usuário root, usando o comando su, e aperte o enter do teclado e pedira para digitar senha de root que foi a primeira senha que pede pra criar na instalação do Debian

3° passo: instalar o ssh usando o comando apt install openssh-server, e ai aperte o enter no seu teclado, feito isso ira pergunta se você quer mesmo instalar aperte a letra s do seu teclado e pressione o botão enter

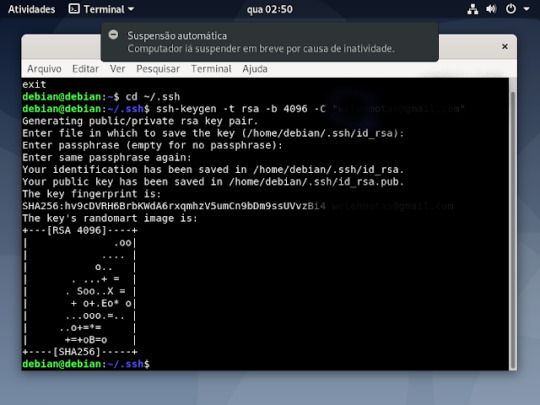
4° passo: feito a instalação , agora iremos criar a chave ssh, primeiro se tiver como root , vai sair usando o comando exit e aperte o enter, como ilustrado na imagem

5° passo: feito isso você ira entra na pasta do ssh usando o comando cd ~/ .ssh como mostra a imagem

6° passo :dentro da pasta você ira criar sua chave usando o comando ssh-keygen -t rsa -b 4096 -c "o seu email cadastado no github"

7° passo: ira perguntar aonde ira salvar a chave, n caso é só aperte o enter

8° passo: pedira para criar uma senha (opcional) no caso não criarei a senha então só aperta o enter do teclado

9° passo: pedira para repetir caso você tenha criado uma senha , caso só irei pressionar o enter

10° passo: sua chave foi criada, ficara assim como ilustrado na imagem
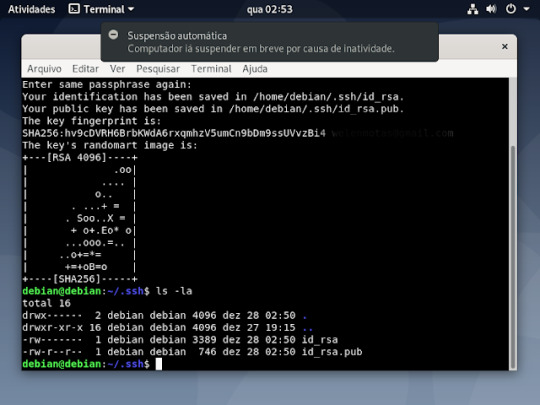
11° passo: se quiser tem certeza se foi criado mesmo, como já está na pasta digite um ls -la, que mostrará os arquivos criados
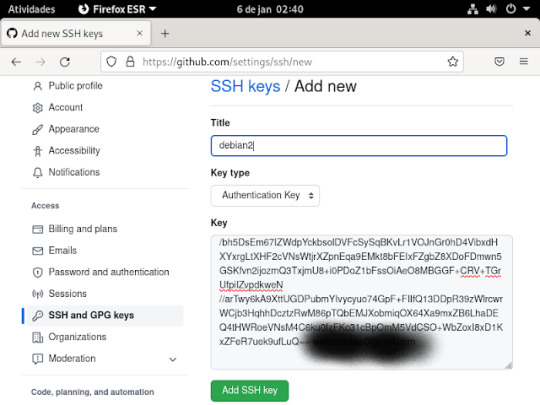
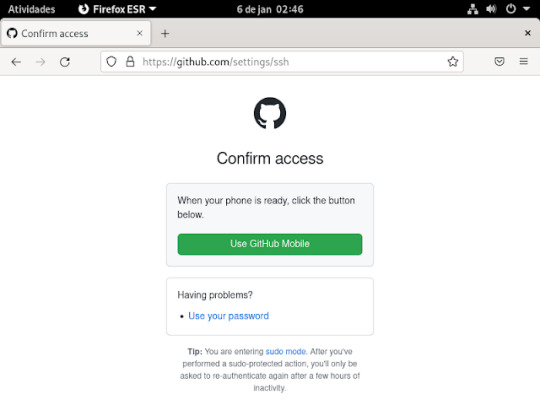
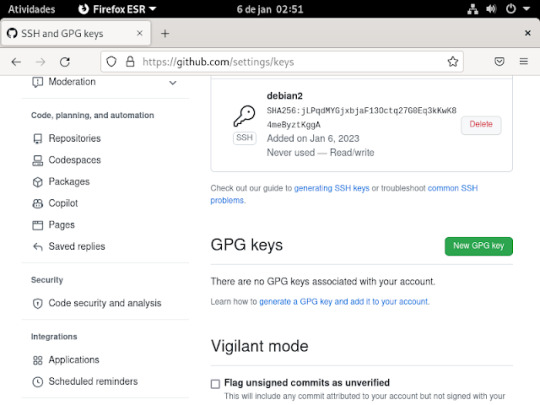
12° passo: feito tudo isso agora é colocar a chave ssh no seu GitHub, para fazer isso , você ira abrir o seu GitHub, dentro do seu git clicar aonde tem sua foto na parte superior do seu git e vai ate a opção settings , dentro dessa opção clica no ssh and gpg key, vai aperta o botão verde que tá escrito new ssh key

13° passo: é preencher essas informações que estão sendo pedidas, No title você digita o nome que você quiser dar a sua chave, no key é aonde você ira jogar a sua chave ssh que você criou, no terminal entro da pasta aonde esta salvo o id_rsa.pub e ai ou você abre o arquivo usando nano , ficaria nano id_rsa.pub e apertr do enter no teclado, dai coloca a chave no git
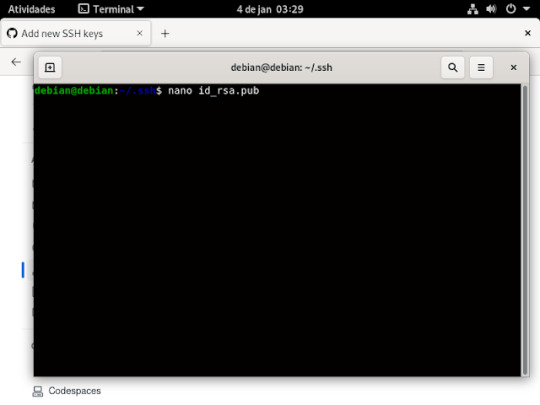
Ai quando for abrir no nano ficara assim.
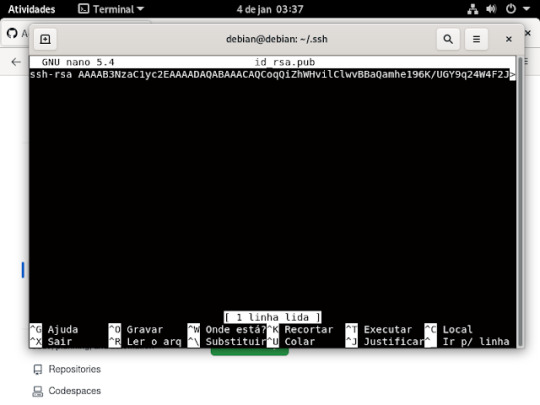
ou usando o comando cat, basta escrever no seu terminal , cat id_rsa.pub, se não quiser digitar tudo usa o tab do teclado que ele completa pra você .
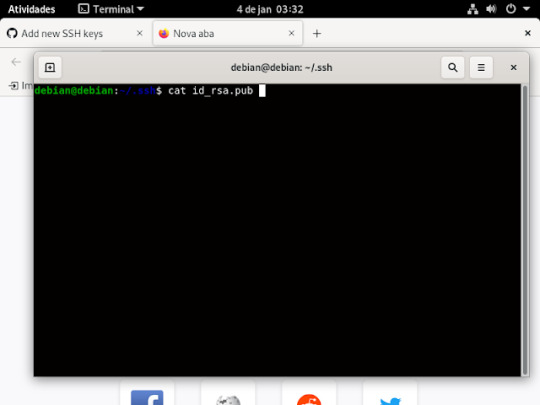
e quando for usar o comando cat abrira assim.
14° passo: A chave que ira aparecer nesse arquivo, você vai colar dentro da caixa aonde está escrito key, se estiver tudo certo clica em add ssh key .como mostra a imagem abaixo;
15° passo: irá pedir para logar. para confirma o que criou , basta usar o celular ou o login e senha e tá pronto o ssh no git
Ai ira ficar assim.
16° passo: Agora criaremos o token, para fazermos isso , precisa clicar em developer settings, como mostra a imagem

17° passo: nessas opções da imagem abaixo ira clicar na opção token (classic)

18° passo: dentro dessa opção aparecera assim, e você ira clicar na opção generate new token, e aparecera opções

19° passo: nessa opções irei escolher a segunda opção generate new token (classic)

20° passo: Aonde está escrito note e o nome que você quiser colocar no seu token, o e abaixo dele e depois de quantos dias ira expirar seu token, nas outras imagens precisa marcas essas caixinhas que estão marcada nas imagens as que não estão marcadas não precisa marca, depois é só clicar na opção generate token para criar ele e aparecera desta maneira que aparece na ultima imagem


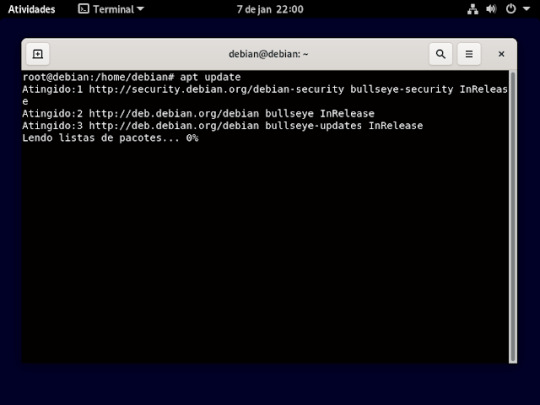
21° passo: ira fazer um update na sua maquina para isso , digitara o comando apt update, como mostra na imagem.
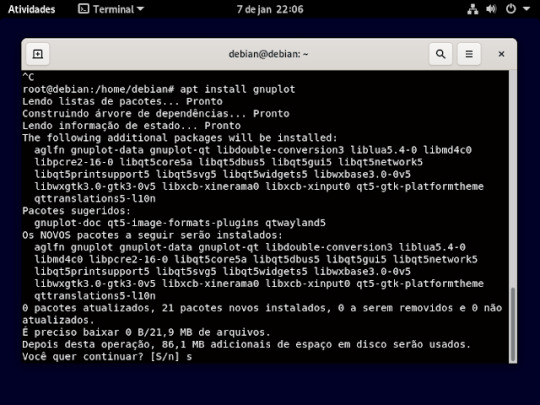
22° passo: agora iremos instalar o gnuplot , usando o comando apt install gnuplot, e vai perguntar se quer mesmo instala e só aperta a letra s e o enter do teclado como mostra imagem
23° passo: Agora instalar o git, usando o comando apt install git e vai perguntar se quer mesmo instala e só aperta a letra s e o enter do teclado

24° passo: Agora instalar o git, usando o comando apt install Python e vai perguntar se quer mesmo instala e só aperta a letra s e o enter do teclado

25° passo: nesse passo você ira ter que criar uma pasta aonde será armazenada, as pasta que for clona, usando o comando mkdir. é só escrever no terminal mkdir e o nome da pasta que vai criar e aperta o enter do teclado, como mostra a imagem abaixo.

se quiser ver se pasta foi criar use o comando ls, esse comando vai lista as pasta que tem dentro do diretório.
26° passo: é utilizar esse comando exatamente como tá escrito na imagem abaixo.

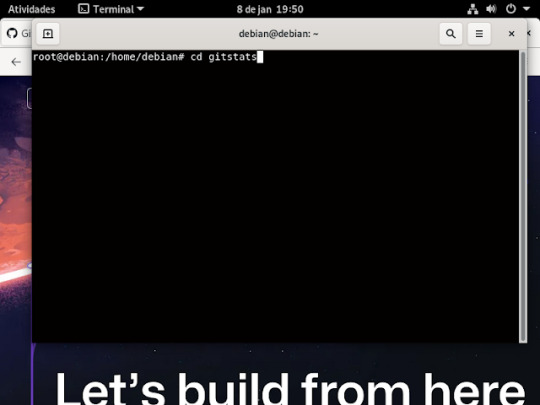
27° passo: depois de executa esse comando anterior , agora iremos entra na pasta que criamos do gitstats usando o comando cd como mostra a imagem.
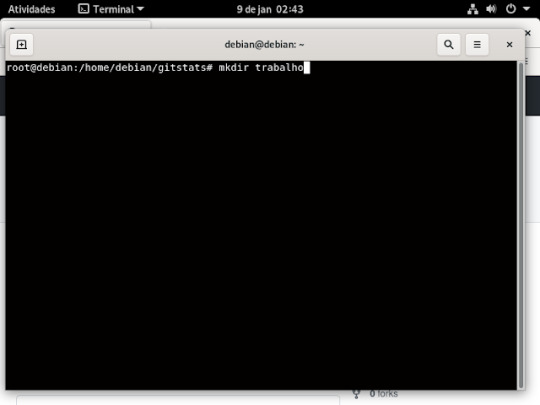
28° passo: dentro da pasta gitstats, irá criar uma outra pasta aonde vai armazena o for captura do GitHub, como mostra a imagem
29° passo: depois que criou você ira entra na pasta, usando o comando cd

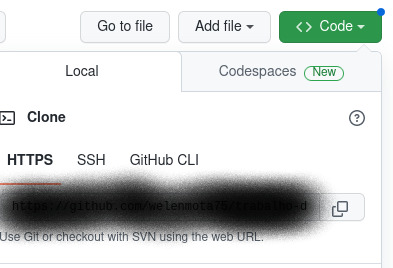
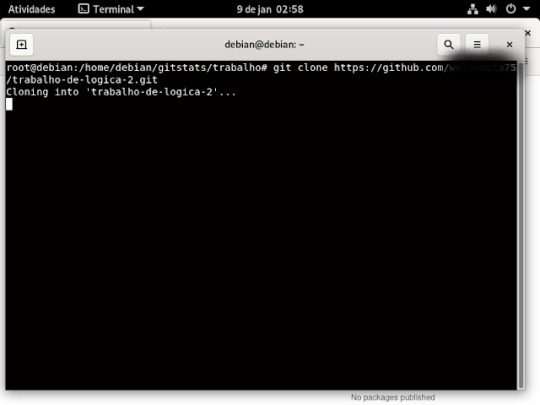
30° passo: dentro do seu GitHub ira no repositório que você quer clonar e ira copiar o link fica no botão verde escrito code clica em cima dele e aparecera assim como mostra a imagem baixo.
31° passo: o link que ira aparecer aonde está na imagem anterior o que ira copiar e no terminal você ira digitar assim:
32° passo: você ira voltar a pasta gitstats , digitando assim, no terminal, apertando o enter do teclado

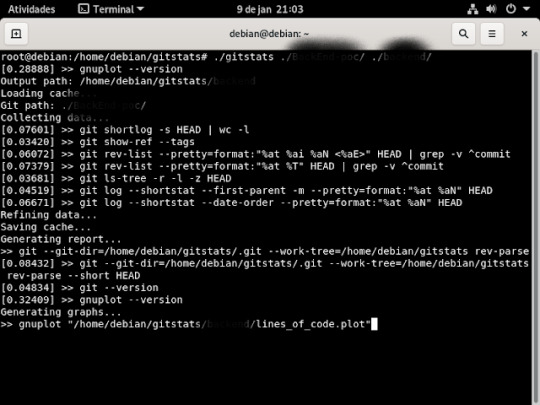
33° passo: dentro da pasta gitstats , ira digitar esse comando "./gitstats ./nome da pasta que você vai clona/ . /o nome da pasta que você criou no seu debian/ , aperte o enter do teclado e tá pronto
Bom é isso ,se quiser clona outro repositório basta seguir o que fizemos que vai funcionar .....
0 notes
Text
... doesn't everyone? And I mean at least if you use Github (pretty unavoidable at least sometimes even if not your main thing), if you want to push and not just pull, you have to do ssh.
Also I think that might be true of every git repo? On the CLI or in an IDE doing a classic form-based login is really hard/annoying, and of course HTTP auth isn't strong enough. So unless you were doing TLS client certs and mutual auth, SSH is the way to go if you want to push... I guess maybe some providers might have "token" type things that you gen on the site and could pass through the https? Like what API accesses usually do. Frankly seems worse/harder than just using SSH
Anyway it's just
cd ~/.ssh ssh-keygen -t ed25519 -a 100 -f codeberg_git -C "[email protected]"
Copy and paste 'codeberg_git.pub' contents into the web form. If it is say, an internal company (or personal) self hosted where you already have SSH access, second part is just:
ssh-copy-id -i codeberg_git.pub username@gitserver (wouldn't be named codeberg in that case ofc)
Just remember that .pub is the one that leaves the machine you are generating the key on.
sure I know my stuff, it didn't just take me an whole hour just to create a new ssh key for git. nuh huh, we're professionals over here.
#though IDK how it works if you use the GH desktop client thing#that's probably doing stupid OAUTH shit or whatever#RIP if you have to use RSA or something#ed25519 is so much better
41 notes
·
View notes
Text
Linux CLI 33 🐧 ssh command
New Post has been published on https://tuts.kandz.me/linux-cli-33-%f0%9f%90%a7-ssh-command/
Linux CLI 33 🐧 ssh command

youtube
a - ssh command ssh (Secure Shell) is a command that connects to a remote server It is secure and it does not share your password. You can log into a Linux or Unix system and execute commands on it. ssh user@hostname → user is the username from the remote system. instead of hostname you can also use an IP address install ssh Server and client RedHat based → sudo yum install openssh-clients openssh-server or sudo dnf install openssh-clients openssh-server Debian/Ubuntu → sudo apt install openssh-client openssh-server b - ssh login with SSH Key Pair You can login to a remote system without password use. You have to create an SSH key pair. Follow the instructions ssh-keygen -t rsa → creates the key pair Press enter when prompted for a file name and location, leaving the defaults as is (just hit enter) → Enter a passphrase when prompted (this will be used to encrypt your private key). You will then be prompted to confirm the passphrase. → Press enter again to continue. Copy the contents of the `id_rsa.pub` file (your public key) to a server you want to access. cat ~/.ssh/id_rsa.pub | ssh user@hostname "mkdir -p .ssh && chmod 700 .ssh && cat .ssh/authorized_keys" replace user with your user and hostname with the remote system hostname/IP address
0 notes