#Stop Microphone From Auto Adjusting on Windows 10
Explore tagged Tumblr posts
Visit Tumblr Blog
Explore Tumblr blogs with no restrictions, modern design and the best experience.
Last Seen Tumblr Blogs


Fun Fact
Women make up for the other 50% of Tumblr’s audience.
Photo

How to Stop Microphone From Auto Adjusting on Windows 10 Windows 10 is a robust OS but often people face auto adjustment issues with the microphone. Most of the users are complaining that the microphone levels automatically increase and decrease without any apparent trigger.
0 notes
Text
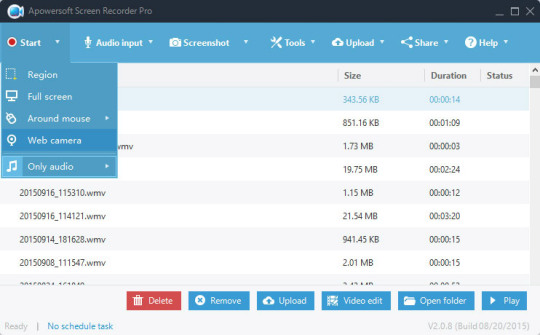
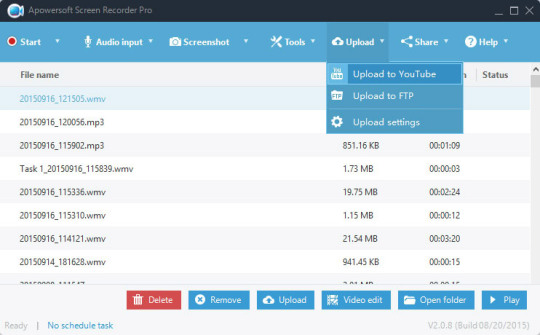
Apowersoft Free Screen Recorder Windows 10

Parents will always worry about what their children watch on the internet through their computers. Most teenagers are sneaky and could continuously watch harmful content without their parents' knowledge, which later affects their behavior due to psychological disturbances. However, there is a way to turn around such scenarios or problems to benefit such adolescents by redirecting their paths in life through screen recording with the free screen capture software.
Apowersoft online, free Screen Recorder Windows 10
Apowersoft Free Online Audio Recorder
Apowersoft Screen Recorder Pro Free
Apowersoft Download
DownloadApowersoft Screen Recorder Apps for PCWindows 7,8,10,XP.Apowersoft Screen Recorder is a free app that enables you to record screen activities without any hassles and save as HD videos. Aside from recording screen, it can also record audio from mic and synchronize with screencast videos. Screencast-O-Matic, Open Broadcaster Software, Debut Video Capture, ShareX, and Apowersoft may be the best free screen capture software that your kids need to screen record important clips. However, DemoCreator is the ultimate best screen capture software for Windows 10 in 2020 because it screen records fast-paced games as well, provides a full.
PC screen recording is quite entertaining because your children and family members can record presentations and educational videos that they can watch later to correct their behavior, and share with you as soon as you live work, as well as age mates. Similarly, you may run into a non-downloadable motivational clip while away for business or seminar and record it to share with them, to inspire them to do better in life. To achieve this, you need the best screen capture software for Windows 10 in 2020. There are multiple such tools including Camtasia and Movavi. Unfortunately, these are costly and unfavorable for purchase during tough financial times. This article will inform you of the best free screen capture software, which does not require spending and that you can acquire at any moment.
1. Free Cam
This is one of the best free screen capture software that you will find quite helpful when it comes to recording your screen. The software is quite easy to download, and the developers will not ask you to provide any irrelevant details to reach the download link. The interface is also quite intuitive, and you will find all the features very easily accessible.
As soon as you open the app, a dialogue box will appear up providing you with the option of New Recording or Browse to open an old recording for some tweaks. When you click New Recording, it will give you a screen selector that you can drag according to the area that you want to capture.
You will also get to set the screen resolution, and you can record up to 1080p. The video quality that you will get will be crisp, and you will also get to set the keyboard shortcuts to start/stop the recording. The software will also allow you to record the cursor movements along with the clicks.
Features
There will be no watermarks or ads throughout the recording.
The video recording will not have any time limit.
The system rounds and mic input will be recorded.
The video quality will go all the way up to full HD.
You can export video to your storage or upload it to YouTube right from the interface.
Also gives you the option to reduce background noise.
There is also a long list of audio effects to choose from.
2. Screencast-O-Matic
Screencast-O-Matic is one of the most reliable free screen capture software since it allows people to speed up their footage. It also comes with a built-in video editor, which enables you to modify recordings to make them more attractive and entertaining. Editing features like the addition of music are great options where the video's audio has no use. Similarly, incorporating blurs in the clips ensure that you help viewers focus and understand the most important aspects. Most professionals or entertainment fans prefer using this tool because it further allows users to share videos on YouTube, without necessarily downloading it.
Pros
It is compatible with Mac and Windows computers
It has varieties of editing options, such as adding images, blurs, titles, and music
It compresses clips to desired sizes
It stores the clips in a range of formats
It exports screen capture to various cloud platforms like Google Drive and sites like YouTube quickly.
It does a webcam recording too.
Cons
It limits your screen recording time to a maximum of 15 minutes
The quality of the video captured is always lower.
The free version puts a watermark on your captured videos
The free version does not allow adjustment of the higher and lower quality recording
3. OBS Studio
This powerful and free video capture software makes screencasting intuitive and so it is among the most reliable tools for Windows 10. Open Broadcaster Software has a clean and easy to read interface that enables the addition of images and sources, specific windows and capture cards, among other items. It also has interesting features like real-time audio and video mixing. The easy to use audio mixer ensures that you can exclude noises through suppression. Additionally, it allows streaming to websites like Facebook Live, YouTube Live, Hitbox, and Twitch. When screen capturing, the software allows you to select your monitor's resolution.
Pros
It is an open-source and free cross-platform
It allows users to do real-time video streaming from majorities of the streaming video platforms
It enhances functionality through over 20 plugins
It supports multiple filters
It gives users the freedom to video record, without time limitations, making it perfect for long-time recording
It syncs webcam
Cons
It is dysfunctional in Windows XP
It is impossible to link the audio file as a source.
It is not suitable for beginners since it requires some technical knowledge
It is slow and the streaming quality is quite disappointing.
It can drop out if the internet becomes weak.
4. Debut Video Capture
Debut Video Capture is among the best free screen capture software that allows you to record all Windows 10 happenings. It has the ability to capture microphone sound, allowing you to make demonstration clips without audio recording. Despite having an odd interface, it is user friendly as the elements are well labelled so that new users can navigate them easily. This tool gives you unlimited recording time and does not apply watermarks to your clips. Additionally, it provides Windows screen recording options; you can use the entire virtual desktop, draw a rectangle of the recording area, or select under the cursor.
Pros
It is compatible with several formats like LLV, MP4, MOV, WMV, and 3GP
It gives users unlimited recording time
It is effective in security systems since it also records from external cameras
It enables users to schedule their recording
The quality of the clips remains intact having not been compromised
It is customizable and easy to work with
Cons
It does not edit recording due to lack of editing features
It cannot upload clips to platforms like YouTube for sharing
The interface appears outdates, making it unattractive
It is a slow software considering that uploading videos take a while
5. ShareX
Professionals consider ShareX as one of the best screen capture software for Windows because it is a small-installation based program, making it a lightweight. Therefore, this open-source free screen capture software frees the space in your PC, enabling you to use it constructively with other matters. It has multiple capture modes feature that diversify how you quickly take screenshots of any region, window or the entire screen. Additionally, it records your screen in two forms, GIF and video. With the built-in image editor, you can make your screenshots interesting before using the automatic upload feature to upload them online instantly.
Pros
It comes with editing tools
It does video recording in high-quality
All features, which are useful and important, are freely available
It allows you to record screen video and audio and take screenshots on more than one monitor.
It perfectly facilitates quick sharing of videos, GIFs, and screenshots through the auto-upload feature, which uploads them to your server
It allows customization of the shortcut key to bind your command
Cons
It is impossible for Instagram users to sync it with the site.
The Customization of the recording settings is quite cumbersome.
It is complicated and thus not recommended for beginners
6. Apowersoft
Apowersoft, a free screen capture software, allows you to capture your Windows 10 screen without challenges. To begin with, it does not need the installation of computer software since it is a web-based free video capture software. It has a cheerful and clear interface that is quite easy to understand, making it appropriate for beginners and learning children. Due to its multiple capabilities and tools, this software offers numerous editing and capturing features, such as timed video screen recording. The ability to share the screen in Facebook and Twitter posts and also email image files helps users in sharing crucial entertaining content.
Pros
It does not have recording time limitations
It supports webcam as well as screen video recording
There are multiple video exporting options
It allows usage of FHD and HD output formats
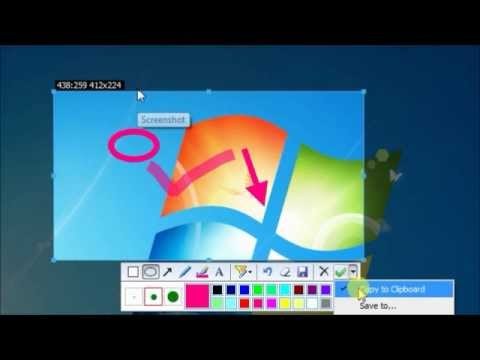
It handles full image editing. You can include shapes, arrows, and text, apply effects such as pixelate, sharpen and blur, and rotate, resize, crop, and add borders.
It allows users to share screen recordings in Facebook and Twitter, and email attached image file
Cons
It demands a very stable internet connection
It is not beneficial to game players since it is not appropriate for game recording
It cannot capture on a secondary monitor
7. CamStudio
If you are looking for a free screen capture software windows 10 that can provide you with the basic functionality and you don't have to dig in the features to find something, CamStudio can be one of the choices that you can make. It's not very bulky software, and you can install it with some very simple steps.
The software is also quite needed by the users who aren't going to edit their videos intensely. Like some previous ones on this list, CamStudio is also an opensource application, and you will get all the features free.
As you will open the application, the dialogue box will show you all the options right up front. If you are looking for a screen recorder that can also provide editing capabilities, this one is not for you.
There is one thing that you need to take care of, and it's that before the setup file is downloaded, it will ask you for some surveys, you should deny everything as it may download some malware on your system.
Features
The videos that you are created will primarily be in AVI format. However, later you can convert them into SWF.
This software will allow you to record screen-in-screen video.
The files/videos that you will render using CamStudio can be saved in small sizes.
You will also get to set a custom cursor/pointer, and it will be very helpful in recording tutorials.
The animation/transition effects are present but are very limited.
You will also get to record your audio.
8. ScreenRec
The screen recording can't get simpler than this. The interface that ScreenRec is offering you will be very intuitive, and you will get to understand all of it without any problem easily. It is also free software, and you will not need to pay a single penny to access all the features.
There will be no ads or restricted access, and you will get to record the screen quite easily. If you are looking for a recorder for your professional needs, i.e., to host business meetings, this one offers that functionality as well. You should note one thing that ScreenRec doesn't offer you any editing tools whatsoever.
The recorder will also allow you to add separate audio input so that you can add crisp voice-overs for the tutorial or presentation that you are recording. ScreenRec will be available for all the operating systems, including Linux. Apart from not providing any editing tools, you will also not be able to record your webcam footage.
Apowersoft online, free Screen Recorder Windows 10
Features
The video that will be recorded will be in full HD, providing you with all the details intact.
You will also be able to take the screenshots and annotate them to clear what you are saying.
The format will be MP4, and it will allow you to play the footage on any device.
System sounds will also be recorded along with the mic.
The application will also allow you to share the video with your team by creating a link. You will also get 2GB of cloud storage included.
The recorder is free, and you will also not get any ads using any feature.
9. Ezvid
It is also one of the applications that come with a very user-friendly interface, and all the features are easily accessible. If you are wondering if it’s supported on your operating system, we are sorry to disappoint you, but it’s supported only on Windows. The features that are offered here will allow you to record & upload videos in no time, and it’s the reason that Ezvid is quite popular among gamers and YouTube creators.
The feature set this application has to offer will allow you to draw while you are recording. It will be a very helpful feature for all the teachers out there.
The final video will be exported in the WMV format, which will be a bit bulkier, but you will get to maintain the original quality that you have recorded. Before you ask, yes, this one is also absolutely free, and you will not need to spend a single penny to access all the features.
Features
The video can be captured up to 1080p.
The interface is designed in a very sleek design that you will be able to understand quite easily.
The application also includes a wide range of audio tracks.
You can increase or decrease the speed of the recorded footage.
The editor will also allow you to add videos & pictures from your device to the recorded video.
There will be no watermark or ads, and you will also get to record the webcam footage.
From the above analysis of the 5 best screen capture software for Windows, the most basic similarities are that they are all free for use and need a reliable internet connection for full functionality. So, you do not have to spend money to use them so long as you have good internet. Four of the 5 free video capture software, namely Screencast-O-Matic, OBS, Debut Video Capture, and Apowersoft, sync webcam and screen recording allowing users to make webcam recordings as well. However, they lack recommendable built-in editors and limit users' recording time, making them unsuitable for game recording and professional use by teachers and office personnel. Eventually, the only best free screen capture software that you should consider is Wondershare DemoCreator.
DemoCreator Highlights Introduction
Apowersoft Free Online Audio Recorder
DemoCreator Software is considered the best screen capture software for Windows 10 in 2020 because it is designed to record any desktop activities, including motivational and educational videos, and presentations. Once it captures that media content it saves the videos in various formats, making them suitable for playback in multiple players.
DemoCreator stands out because it is suitable for professionals and beginners and comes with pleasant beneficial features. The most interesting feature is the powerful built-in editor that helps with the manipulation of recordings to makes them attractive. The editing tools include changeable cursor effects that allow adjustment of cursor size, shape, and color. The annotations enable the addition of multiple elements such as texts. With the tutorial features, you can draw circles or use arrows to explain your recording content.
Recording simultaneously through 2 devices, the webcam, and the camera, is also interesting. You can also perfectly record fast-paced games using this free video capture software, due to 15-120 FPS in Windows and up to 60FPS when using Mac. Using the picture in picture feature, you can include a second video or image, such as a gaming facecam, to your footage. DemoCreator further gives you the option to record part or all of the screen. You may also export your recording to multiple formats such that sharing on social media and with friends will not be a problem.
To enjoy all the above features unlimitedly, DemoCreator will cost some money. However, this should not discourage you because the price is pocket friendly and gives you access to all corners of the software, as well as the privilege of acquiring a non-watermarked clip. These features are very important for screen recording as well as office use. Generally, getting DemoCreator will benefit you both at home and at work.
Conclusion
Apowersoft Screen Recorder Pro Free
Screencast-O-Matic, Open Broadcaster Software, Debut Video Capture, ShareX, and Apowersoft may be the best free screen capture software that your kids need to screen record important clips. However, DemoCreator is the ultimate best screen capture software for Windows 10 in 2020 because it screen records fast-paced games as well, provides a full editing suite, allows webcam recording that enables you to use the picture in picture feature effectively, and exports in multiple formats to facilitate sharing. The small price that you pay for it will hardly bother you as soon as you begin using DemoCreator at home and work.
Apowersoft Free Screen Recorder is a robust application for users to record the screen of their Windows PC. You can choose the audio input (system audio and microphone audio), take simple screenshots, and annotate, add lines and arrows, and more. Users can then save and upload the recordings via FTP or YouTube and share on favourite social media portals.
How useful is this software?
Click on a star to rate it!
Average rating 4.7 / 5. Vote count: 27
No votes so far! Be the first to rate this post.
Version3.2.1Operating System SupportWindows 98, Windows 8, Windows 2012, Windows 2000, Windows 2008, Windows 7, Windows XP, Windows 2003, Windows 10, Windows VistaCurrent LanguageEnglishAvailable LanguagesEnglish, French, Polish, Chinese, Italian, Japanese, German, SpanishLicenseFreeDateFriday, April 20th 2018DeveloperApowersoftDeveloper URLhttps://www.apowersoft.com
Apowersoft Free Screen Recorder has a basic screenshot capture function and also has advanced features with different recording options as well as a task scheduler, which allows users to take scheduled screen recordings.
Key features include:
Incredibly simple screen recording.
Record the whole screen or custom region.
Apowersoft Download
Multiple audio mode support.
Screen recording share support.
No limit on record time.
Allows webcam recordings.
Record picture-in-picture.
Apowersoft Free Screen Recorder can be used for a range of scenarios on your Windows PC. You can record a wide variety of content and use built-in editing tools to create video streams, tutorials and demonstrations, live chats, and more. You can also export saved videos in a range of formats to suit your needs, including MP4, WMV, FLV, MPEG, VOB, ASF and GIF.
Even though it’s simple to use, ApowerSoft Free Screen Recorder does much more than just record your PC screen. It supports webcam recordings, and even allows the capture of audio alongside your video recordings. This means you have the ability to create facecam or picture-in-picture to take your videos to the next level.
Overall, Apowersoft Free Screen Recorder is a great screen recording tool that is simple to use and has a couple of useful features such as the screenshot capture tool and the ability to choose the audio input. The application has a really easy to use interface and even novice users will be able to get to grips with the layout and functions.
Unlock more powerful screen recording features with Apowersoft Screen Recorder Pro.
Find out how to add facecam to videos using Windows PC.
4.7
1 note
·
View note
Text
Webdrive cracked torrent

#Webdrive cracked torrent full version
#Webdrive cracked torrent license key
#Webdrive cracked torrent activation key
#Webdrive cracked torrent full
Backup Utility – WebDrive includes a simple backup utility so that you can easily back up your PC files to an offsite server.This prevents users from accidentally overwriting another user’s changes. File locking – when used with WebDAV servers.You can control the amount of disk space used for the cache, and whether to cache files, directory listings, or both. File Caching – WebDrive caches both file and directory listings for quick access.Secure passwords – WebDrive uses S/KEY Password Encryption – Use MD4 & MD5 password encryption for supported FTP servers.FTP resume interrupted download – if the connection has been lost during a file transfer, WebDrive can resume from the point where their connection was lost, rather than restarting from the beginning.Simple for the Novice, Powerful for the Super-User.WebDrive’s cost-effective multi-seat licensing allows easy standardization of your file transfer software, rather than having users download a variety of applications that your IT team has to support. Since users already know the WebDrive interface, you reduce the training time often associated with implementing new applications.
#Webdrive cracked torrent license key
WebDrive Enterprise License Key Features: The software enables you to map a drive letter to an FTP, SSL, or WebDAV server, as well as create a shortcut to your cloud account hosted by Google Drive, Amazon S3, or Dropbox. WebDrive is an intuitive software that facilitates quick access from your computer to a remote or cloud drive. The software enables you to map a power letter to an FTP, SSL, or WebDAV server, as well as create a shortcut to your cloud account hosted by means of google power, Amazon s3, or Dropbox.
Download, Newest Version From PcCrackWorld.WebDrive Enterprise Download is an intuitive software that facilitates a short get right of entry to from your computer to a faraway or cloud drive.
#Webdrive cracked torrent full
How To Patch, Activated & Crack EaseUS RecExperts Pro Full Version?
Updates: official site does not provide any info about changes in this version.
What’s New In EaseUS RecExperts Pro 2.9.5 Cracked?
#Webdrive cracked torrent full version
Set the frame rate of recorded footage as you want and save it to 10+ formats, including MP4, MOV, AVI, MP3, PNG, etc.ĮaseUS RecExperts Full Version freeload Crack You can also add custom intro and outro to it. Trim the length of recording or adjust its volume as per your needs. You can also take screenshot while recording. Use it as a screenshot tool to take snapshots from your PC or Mac screen. Or auto split recording to multiple files for later use. You can even schedule multiple tasks as you want.Īuto stop recording when it reaches a set time, duration or file size. Set a time to start or stop a recording automatically. Videos that include a speaker are more engaging! Capture your face via Web Camera while you are recording the screen.ĭirectly capture any video, website, software or desktop and save it as GIF for entertainment, business, tutorial, etc. You can also extract the audio from the recorded video file or during the recording. Record sound from your computer or/and microphone. You can even record multiple screens simultaneously. Record screen with internal audio and your voice Record Zoom meetings, YouTube videos, tutorials, games, etc.
#Webdrive cracked torrent activation key
You May Also Like To Download: EaseUS Todo Backup Crack EaseUS RecExperts Pro Free Activation Key Features:Ĭapture video, audio, webcam, or image for any occasion The capture can be enhanced with lines, arrows, images, and text, so it can be used as guides, instructions, or even for educational purposes. EaseUS RecExperts Pro Crack is a tool designed to provide you with a simple and straightforward way to capture your full desktop, a specific window or area as well as your webcam.
0 notes
Text
Mp3 normalizer wondershare

#Mp3 normalizer wondershare for mac
RecorderRecord computer sounds from streaming media and microphone at the same time and output into multiple audio formats. Many effects, such as fade in/out, speed adjustment, music mixing, are available. The output format and quality can be set, too.ĬD BurnerBurn multiple music files into CD, DVD and also make APE or BIN image file.Ĭompatible with: Windows 10 / 8.1 / 8 / 7 / Vista / XP (32bit/64bit)ĬutterArbitrarily cut and clip audios in diffrent formats. JoinerMerge music files into one regardless the original file formats. Recorder Record computer sounds from streaming media and microphone at the same time and output into multiple audio formats. It can also convert the video format into MP3. With this application we can change the key, volume, speed of the audio track, etc. The versatile online tool offers a suite of editing features, from. Video2edit online video tool is a one-stop solution for all your audio and video editing needs. As an output, you will have a new MP3 file with an adjusted volume level and applied.
#Mp3 normalizer wondershare for mac
Select Options, then Filename Display, and then Show File Only. Method 1: Normalize Audio Online Method 2: Normalize Audio with Wondershare Filmora's Auto Normalization Method 3: Normalize Audio with Audacity Method 1: Normalize Audio Online. Mp3gain For Mac INPUT FORMATS MP3 Normalizer accepts.mp3 and.wav files. After the installation of MP3 gain on your device open it. They also ensure the original quality after the sound normalization process. It has been designed for music lovers who want to have full control over their MP3, MIDI and KAR files. MP3Gain is an audio normalizing tool that analyses and adjusts the volumes of mp3 files so that they all have the same volume. This program has functions of audio editor, assembler, splitter, converter and voice eliminator. Many effects, such as fade in/out, speed adjustment, music mixing and volume adjustment, are available.ĬonverterConvert music files between all audio formats, including MP3, M4A, ACC, OGG, AAC, FLAC and the others. Kanto Audio Mix, complete editor with volume normalizer function. Professional Audio Editor – Renee Audio ToolsĬutterArbitrarily cut and clip audios in MP3, ACC, FLAC and APE formats.
0 notes
Text
Quickly record your screen activity, create compelling video tutorials and presentations with this intuitive and easy-to-use app. CamStudio Portable is a tool that allows you to record SWF or AVI video from your computer screen. The program has a simple and easy-to-use interface. From the toolbar, you can start, pause or stop recording, toggle the view (normal, compact, buttons), the display of the on-screen annotation dialog, and the recording mode (to AVI or SWF). From the main menu, you can select which region you want to record (manually selected, region, window, or full screen), use screen and video annotations, as well as add effects (system timestamp, Xnote timestamp, title, mark of water) . In Video Options you can select the compressor, adjust the quality and the time span. The Cursor Options will allow you to hide or show the cursor, highlight it, and enable visual feedback from the click. Audio options can be configured for microphone, speakers, and also for audio and video sync. Additionally, you can convert AVI to SWF, disable audio recordings, set auto pan speed, assign keyboard shortcuts, as well as configure CamStudio Portable to automatically stop recording and delete the intermediate AVI file upon completion, prompting you to change the Output video file name and play AVI file after task is completed. Release year: 2021 Version: 2.7.4 System: Windows® XP / Vista / 7/8 / 8.1 / 10 Interface language: Multilanguage- English included File size: 15.86 MB Format: Rar Execute as an administrator: There's no need
0 notes
Link
#ScreenHunterActivationKey#ScreenHunterCrack#ScreenHunterFreeDownload#ScreenHunterKeygen#ScreenHunterLicenseKey#ScreenHunterPatch#ScreenHunterProductKey#ScreenHunterSerialKey#ScreenHunterSerialNumber#ScreenHunterWithCrack
0 notes
Text
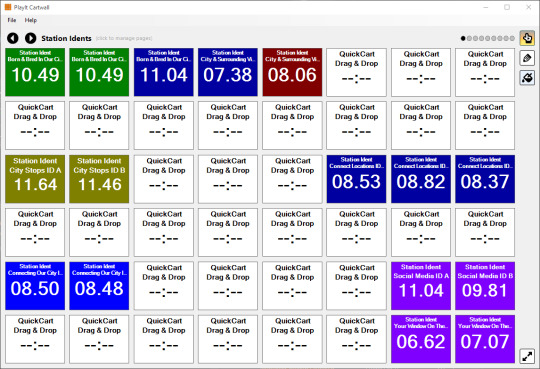
Cartwall Software Free
Cartwall Software Free Online
Cartwall Software Free Version
Dvd Player Software Free
Cartwall Software Free Rating: 3,0/5 7770 reviews Many automation programs are great at playing hours of endless music, jingles and commercials - they follow a running order and even handle music-ducking for sweepers and voice-tracks.Most, however, are not very good at handling spontaneous elements such as sound effects, DJ drops etc. Cartwall Software Free. Here Are the Things You Will Need 1. You need to call in using a soft phone such as. You need ( will open in a new tab), a software that mixes audio sources together (such as your microphone and an audio clip) into one audio stream that can be sent out to your TalkShoe show.
Cartwall Software Free Trial Dvd Player Software Free Radiocube www.radiocube.com is a completely new Multimedia Audio software for windows.The network capable Audio-pass-system Radiocube is in different versions available. Sampler is a music app that allows sound sample playback. The free version of Sampler includes the following features: - 12 sound pads, with adjustable pitch settings - Two octave keyboard - 30 sound samples - Pitch bend and volume modulation - Multi-touch pads and keys - Wav import - Dual mode, that allows both pads and keys - Three modulation modes; touch, latch, and buttons - Key bindings.
Imagine being able to instantly play a jingle, sound effect, news-clip or music track at the touch of a button (or finger)…
DAC Cartwall is an easy-to-use jingle player that offers multiple pages of instant audio buttons ready for quick playback or loading into a dedicated player. It can read from a variety of tag formats allowing for easy integration with an existing automation system.
Although DAC works best when used on a touchscreen, navigation can be accomplished via mouse as well as F1/F2/F3 to start/stop the playback decks. Remote-start via joystick is also possible.
DAC offers lightning-fast navigation of jingle pages and instant audio playback: 56 buttons per page, 10 pages per “Set” and an unlimited number of Sets allow for near-instant audio load+playback of 1000s of jingles/clips. Items can be loaded into 1 of 3 “Decks” or your can enable the “Instant” mode to touch ‘n’ play instantly.
It’s a great way to allow your presenters flexibility in playing their own audio/tracks (perhaps from a USB stick) without “upsetting” your existing playout system.
You can have as many cart pages (or “Sets”) as you need – Station IDs, Liners, Promos, Jock Drops and even Sound Effects or News Clips. DAC is in use at thousands of places – including college/university stations, community radio, theatres, stadiums playing everything from news inserts, quiz/sport/theatre sound-effects to jingles on a major-market breakfast show.
Features
GUI can be skinned using MSStyles… No more “battleship grey” – click here for some examples Download a selection of usable skin files here
10 pages per Cart Set
56 Instant Audio Buttons per page
3 Playback Decks for loading audio plus an “instant” player
Assign the players to any sound device
Works with any USB audio mixers such as Behringer DX2000, D&R Airmate etc
Touch-screen friendly for quick-fire use
Database Browser with extensive library search/sort and on-screen keyboard
Auto-Segue based on audio threshold – allowing smooth sequence of playback decks
Intro Countdown on Playback Decks
Re-sizable window allows for most screen resolutions
VU Meters
Ducking Mode – Decks can duck while the Instant Playing is playing – Ideal for playing news clips/liners over a talk-bed
Built-in Recorder/Editor for off-air production or telephone recording
Administrator Login option to prevent presenters from tampering with the settings/jingle sets
Can maintain a log of all played audio to a text file
Drag ‘n’ drop files from Windows to a button/Player
Plays APE, FLAC, MP3 and WAV audio files
APE/ID3 and CartChunk Artist/Title support
Clone Button feature for easily duplicating button colours on a large Set
Remote-Starts via analogue/USB joystick – start the 3 players from your mixer. Pulse or continuous logic supported Click here for a wiring diagram The Velleman K8055N USB interface is also supported
Remote-Control via RS232 strings
Remote-Control via UDP – control DAC from a playout system, remote-computer, smartphone or even your own RaspberryPi GUI (eg: guest/remote presenter).
Sends UDP commands to control split-playout (such as AdSplits) and other hardware
D&R Aircast Radio Automation Software.
Aircast is a light-weight, full-featured radio automation system for Microsoft Windows. It is targeted at small and medium-sized stations and for both terrestrial and Internet-based broadcast. It offers features often only found in some high priced, high-end professional packages. AIRCAST was designed to be as flexible and customizable as possible. It works with standard PC hardware, supports virtually any soundcard and offers an unbelieveable smooth integration with our AIRENCE mixers. You could see it as the ideal solution if you're looking into upgrading your studio with a decent digital radio automation system perfectly matched with D&R's AIRENCE broadcast mixers. Integration with other D&R mixers is of course possible and we are working to get this as easy as with the AIRENCE mixers with its integrated AIRCAST control section. AIRCAST is also very scalable - it can be embedded into a complex networked studio environment (optional net work upgrade is necessary) or even run from a USB stick on your laptop when you're on the road.
PLAYOUT SYSTEM
Playlist with Live Assist and Automation mode. The playlist contains all audio files that are going to be broadcasted during your show. The files can be played manually (live assist mode) or automatically (automation mode). You can toggle between these modes at any time.
SPECIAL PLAYLIST ITEMS
In addition to ordinary audio files, AIRCAST supports a number of special items that can be added to the playlist, e.g. Internet streams (for re-broadcasting), dummy items (non-playable items that can contain texts, notes etc.) and containers (virtual items that contain an arbitrary number of other items useful for advertisement breaks that consist of multiple spots).
LIVE FEEDS
Rebroadcast any line-in audio signal using the virtual Live Feed playlist elements.
CARTWALL WITH UNLIMITED SLOTS
The Cartwall can be used to play short jingles or other audio elements. The number of players/slots is technically unlimited. Cart sets/pages can be saved as favorites for quick access.
CONVENIENT PLAY-OUT AUTOMATION
AIRCAST offers numerous features that makes the presenters life easy, helping him or her to produce a perfect show. For example, fixed times are supported in Automation mode, so items can be started automatically at given times. The anticipated starting times of all items are calculated and displayed continuously for perfect back-timing. During the intro/ramp of a song, a large countdown is displayed.
EVENTS
Using the Event Scheduler, you can execute ary actions at scheduled times, e.g. insert news items or load the playlist for the next hour from an AIRCAST data base (DB). This makes it very easy to set up a 24/7 automated program.
VOICE TRACKING
Use the integrated Voice Track Recorder to record new voice tracks directly from the playout GUI and add them to the current playlist.
AUDIO ENGINE
AIRCAST utilizes the BASS Audio Library for playback, which is known for its stability and flexibility and its excellent support for inexpensive standard PC hardware.
SUPPORTED FILE FORMATS
MP3, MP2, MP1, OGG, WAV, and AIFF file formats. Additional formats can be added through free BASS add-ons.
DIRECT SOUND OUTPUT
AIRCAST works with any DirectSound compatible sound card.
REMOTE CONTROL
When integrating an automation software into a studio environment, you often want the software to communicate with your existing hardware, e.g. for fader-start/hot-start on your broadcast mixer, so the audio starts playing as you move a fader or press a button on your console. AIRCAST offers a number of remote control interfaces that make this possible.
ANALOG BROADCAST MIXERS
Analog broadcast mixers often feature faderstart/hot-start contact closures. AIRCAST offers support for two different kinds of hardware IOWarrior and joysticks/gamepads that can be used to build custom interfaces that connect to these remote start ports.The IOWarrior device can also be used to control external hardware from the software.
MIDI
AIRCAST can also be remote-controlled by MIDI devices. You can assign arbitrary actions to any MIDI IN message, and also send MIDI OUT messages from a script.
OTHER REMOTE CONTROL MECHANISMS
Beside the interfaces mentioned above,AIRCAST supports remote control through customizable hotkeys and Window Messages from a third-party software. Of course, you can also use the mouse most GUI objects are even optimized for touchscreen use.
WASAPI and ASIO SUPPORT
In addition to DirectSound, WASAPI or ASIO can be used for low-latency audio playback and recording.
MULTICHANNEL SOUND CARDS
The stereo outputs of multichannel sound cards (even cheap onboard 5.1 cards) can be used separately for the players.
MULTICHANNEL AUDIO FILES
Playback for multichannel (4.0, 5.7, 7.1 etc.) audio files is supported for DirectSound, WASAPI and ASIO.
INTERNET STREAMING
AIRCAST includes a built in streaming encoder that broadcasts the audio output of the players and/or a signal recorded from a soundcard input to any Shoutcast or Icecast compatible streaming server. Direct broadcast to the streaming server is supported even for PCs or servers that have no built-in audio hardware. You can broadcast the signal to multiple servers simultaneously, and use the Aircheck function to create audio files of the streamed signal (supported audio file formats subject to available codecs.)
EXTERNAL DSP PLUG IN
In addition to the built-in effects, external sound processing plugins (in VST or Winamp DSP format) can be used in the encoder.
DATABASE/SCHEDULING
AIRCAST is an SQL-based database backend for managing your audio library and music schedules. Setting up an AIRCAST database is optional you can just load your playlist from the file systems but AIRCAST is much less powerful without it.
LOCAL AIRCAST DATABASE INSTALLATIONS
For standalone installations on a single PC, the AIRCAST database can use SQLite as thebackend all data is stored in a single file on For example, you can click/touch a cart player in order to start or stop it. (This feature can be turned off if you do not use a touchscreen.)
GRAPHICAL CUE EDITOR
The graphical Cue Editor allows you to edit the cue markers (ramp, fade out, etc.) of any item quickly based on a waveform image of the audio. Cue markers can be saved to file tags (selected file formats only) or metadata XML files for later use.
MIX EDITOR
Using the Mix Editor, you can easily set up segues between audio items using a multichannel waveform view. The Mix Editor supports volume envelopes for voice tracking, and is available in both the play-out module and the AIRCAST DB management application.
MIXDOWN
The mix-down function allows you to create a single audio file of a sequence of audio files, including tracks recorded in the Voice Track Recorder, based the segues defined in the Mix Editor or Cue Editor, accurate to the sample.
LOGGING AND DOCUMENTATION
You can create log files of all played items in any customizable format. Logs can also be sent to an HTTP or SQL server in realtime. For example to display the last few songs on your website. If you re running a Shoutcast or Icecast server, AIRCAST can update the title on the server, even if you do not use AIRCASTs internal encoder.
FULLY CUSTOMIZABLE GUI
The appearance of all elements in the playout window, and also their size and position in the main window, can be customized through skin and layout files. The integrated Layout Designer helps you to move the objects around.
LICENSES
The software is licensed on a per-workstation basis. You need to buy a separate license on a dongle for each PC you wish to install the software on
SUMMARY
We hope this brief overview has given you a good insight into the potential of this new AIRCAST radio automation software. If you require further information please do not hesitate to contact us ,we will be pleased to assist you.
DEMO SOFTWARE
A trail version of the software can be found here
HIGHLIGHTS
Powerful, rock-solid play-out system.
Highly customized GUI with a clean and easy to use interface.
Excellent support for standard PC and audio hardware, works over USB or with any DirectSound, WASAPI or ASIO compliant sound card.
Various remote control mechanisms for fader start etc.,
SQL-based audio database with built-in music scheduling optional.
On-the-fly voice track recording.
Built-in Internet streaming encoder with support for external sound processing plugins.
And much more
DIRECT ACCESS AND INTEGRATION WITH OUR CONSOLES ARENCE
- 24 Control Switches encoder - ON (USB channels only) - CUE (USB channels only) - FADERSTART (USB channels only) AIRLAB-DT - Faderstarts - 24 Control Switches encoder (If Control module is present ) AIRLITE - 16 Control Switches - ON - CUE - FADERSTART - SOURCE SELECT - ON-AIR1/2 - CUE RESET - …. And much more…
Sales Options/Add Ons
1. AIRCAST-6-STD is the basic software for standalone applications including Voice Track for LAN. Only € 625,-- 2. AIRCAST-6-STD-DB is the basic software for standalone applications, but now with an added Database server application, so the optional Management Voice Track option can now log on from another location (WAN). Only € 775,-- 3. AIRCAST-6-VT Management License Voice Track For additional workstations that require AircastDB access, e.g. office or production PCs, we offer management VT licenses, with voice tracking support for a LAN. This works for AIRCAST-6-STD.
Cartwall Software Free Online
(If you want to use the Management VT from home (WAN) you need as basic package AIRCAST-6-STD-DB).
Cartwall Software Free Version
Only € 260,--
Dvd Player Software Free
0 notes
Text
Apowersoft Screen Recorder Tutorial

Print Screen has its own dedicated keyboard button on most Windows computers, but what about when a still image doesn’t cut it? After all, it would be really hard to make a tutorial, stream a game, or film a lesson if you couldn’t capture a screen recording.
New version of Apowersoft Free Online Screen Recorder is released recently with totally new interface. ApowerREC is a free screen recorder for iOS users. You can use it to capture games, streaming videos, video chats and other screen activities on your iPhone/iPad, and you can also do app training or make tutorials with it. ApowerREC Features:. Record iOS full screen without any limitations or watermarks.
Using an external camera is clunky and difficult, so instead, we have compiled a list of built-in methods and available third-party software that will do the trick instead. It may not be as simple as pressing “prt sc”, but these tools are more than capable of doing the job.
Are you on a Mac? Also read: How to Record Screen on Mac
Quick Summary
Method 1: Windows Built-In Screen Recorder (through the XBOX app)
Windows 10 has a built-in screen recorder you can use without installing anything extra. However, it’s only available if you have a graphics card with Intel Quick Sync H.260 (2011 models or later), Nvidia NVENC (2012 models or later), or AMD VCE (2012 models or later except Oland), so if you’re having trouble, make sure your computer is up to spec.
For those who do have the proper hardware, here’s how to do it. Now, this feature is meant for gamers, but it can be used with any screen material.
First, press the WINDOWS and G keys. Then, in the pop up choose “Yes, this is a game”. From there, recording is simple. You can use the red button on the bar to start and stop a recording, or use the settings menu to set an automatic cut off time for your recording.
Once you’re done, the file will be saved as an MP4 in your VideosCaptures folder. For more information on using the Game Bar for screen recording, you can check out this youtube video:
https://youtu.be/OfPbr1mRDuoVideo can’t be loaded because JavaScript is disabled: WINDOWS 10 Screen Recorder (https://youtu.be/OfPbr1mRDuo)
Method 2: Using Microsoft Powerpoint
Happen to have Office PowerPoint on your computer? Then you can use the program to create screencasts, not just presentations.
Normally, this will embed the screen recording on a slide, but you can also choose to save it as a file. Here’s how to do it.
First, open Microsoft PowerPoint. Then choose the Insert tab and ScreenRecording.
Next, choose which part of your screen you want to record with the SelectArea tool. If you’re using Office 2016 or later, you can also use the hotkey WINDOWS + SHIFT + A. Click and drag the cross hairs to select your recording area. If you do not want to record audio, press WINDOWS + SHIFT + U to toggle it.
Once you’re ready, press the Record button.
The small control panel will disappear unless pinned, but you can make it reappear by moving your mouse to the top edge of the screen.
After you’re done, press the Record button again. The video will be automatically embedded in your slide, and you can choose FILE > SAVEAS to save your presentation. If you only want to save the video, choose FILE > SAVEMEDIAAS and then choose the destination folder and video name.
Note: If you are using PowerPoint 2013, you’ll need to follow some special instructions for recording and saving your video. You can find the official tutorial here.
Method 3: OBS Studio
If you’re not a fan of PowerPoint or want a dedicated tool for regular screen recording, OBS Studio is a great video recording software. It’s open source, doesn’t watermark or place time limits on your content, and offers many powerful editing features as well. It also supports live streaming at 60FPS and is a popular choice for this as well.
Before you get started, you’ll need to download OBS Studio from their website here. Since this is a very full-featured program, you’re going to want to run through some basic setup and settings before you get started.
This means you should check out all the settings such as enable/disable automatic recording, streaming setup, bitrate, audio sampling rate, hotkeys, and file naming format among others. What you choose for these will depend on where you plan to show your videos and the capabilities of your computer.
Alternatively, OBS studio does offer an auto-setup wizard that can choose some things for you.
After all the setup, you can get started with a basic screen capture. First, put OBS in “Studio Mode” so that the left side says ‘preview’ and the right side says ‘live’.
To set up a screen capture, choose Sources > + > WindowCapture > CreateNew. In the drop down list that appears, choose the window you want to record.
This should place your window in the ‘preview’ panel. If it looks the way you want it to, click transition in the center of the screen. If it doesn’t, drag the red corners until the preview is adjusted to the size you would like.
Then, click Start Recording and StopRecording to create your video. By default, these are saved as flv files in the user/videos folder, but you can alter this path and save type in the settings.
OBS Studio is a very powerful software, and perhaps one of the best free programs for creating screen recordings or streaming. Its features extend far beyond the simple setup shown here. Unfortunately, it doesn’t come with a lot of tutorial materials so you’re going to need to find most of your resources from the online community. Streamers may find that a good place to start is this tutorial from Youtube.
https://www.youtube.com/watch?v=DTk99mHDX_IVideo can’t be loaded because JavaScript is disabled: How to Use OBS Studio (Beginners Guide) (https://www.youtube.com/watch?v=DTk99mHDX_I)

Method 4: FlashBack Express / FlashBack Pro
If you’re looking for a dedicated software that can do both the recording and the editing, FlashBack might be a good choice. You can use their free version just for doing basic captures, but the paid option will allow you to make use of editing tools, save in a variety of formats, and add special content to your videos. It’s also one of the best screen recording software we’ve reviewed.
Here’s how to get started with FlashBack. First, download FlashBack from their site (choose “Express” if you want to start for free).
This will download an exe file. If this makes you uncomfortable, consider a different software. Next, click through the installation process.
When you reach this startup screen, choose “Record Your Screen”.
You’ll then have the option to change some settings for your recording, such as the audio source and capture size.
You can also decide whether to capture a window, a region, or the entire screen. If you select region, you’ll see some red cross hairs that you can drag to create a selection.
Then, press “Record” and do everything you need to. While recording, you should see a small bar on the bottom with “pause” and “stop” buttons. This bar can be hidden or shown at will.
Once you’re done, you’ll be asked to either review, discard, or save your recording. In Express, you will see a limited editor that will allow you to trim and crop the video as needed. Pro users will have a more full-featured video editor.
When you’re done editing, you can use the “Save” feature to save your video in a program-specific format. Or, you can use the export feature to save it as a normal file.
There are quite a few options, such as WMV, AVI, and MPEG4. Additionally, you can choose to export directly to YouTube instead by going to File > Share.
FlashBack Express is a simple solution with a lot of potential for screen recording and editing. It’s very easy to get started, and if you want to get more out of it you can buy a pro license just once (there’s no monthly subscription).
Method 5: APowerSoft Online Screen Recorder
If you prefer a web-based solution, APowerSoft offers an online recorder. The name though, appears to be a bit misleading – when attempting to try the software, we found that it does ask you to download a small package. However, the functionality comes completely from the website.
To use this tool, you’ll need to go the APowerSoft Screen Recorder website. Then, just click the “Start Recording” button in the middle of the screen.
Agree to any prompts that appear, such as “Open APowerSoft Online Launcher”. If you choose not to create an account, you’ll also see the following warning before you get started:
Creating an account is simple enough if you want to remove the watermark, but you can get started without one. Just click the “x” in the top right and you’ll see a new recording window appear. From here, you can resize your capture zone, move it around, or adjust special settings such as hide/show the toolbar, hotkeys, and etc.
To start and stop recording, just press the red button. When you’re done, you’ll be shown your video clip.
You can use the save icon to save your screencast as a video file or as a GIF, or use the share icon to upload it to YouTube, Vimeo, Drive, or Dropbox.
APowerSoft is a very lightweight program. It does give you some flexibility – for example, you can capture audio from the system, microphone, both or neither – but it is limited as far as editing capabilities unless you buy the paid version. You’d need to use a separate program on your computer if you plan to do any kind of edits. On the other hand, the tool is very quick to use and could be great in a pinch or if you don’t need to make any fancy changes before sharing them.
Alternative Methods
YouTube Live Streaming
If you have a YouTube channel, you can take advantage of the YouTube Creator Studio to film a screen recording. This requires using the live stream feature, so it’s not a great fit for everyone, but it could work out in some cases. To get started with using YouTube for screencasting, check out this tutorial.
Filmora Scrn
Filmora Scrn is a dedicated screen recording software made by Wondershare. It offers dual camera recording (screen and webcam), plenty of export options, and editing tools. Some people prefer it because the interface is a lot cleaner than some competing applications, but as this isn’t a free software, it’s not quite as accessible as some of the other methods listed here. However, if you’re interested in an easy-to-use and specialized screen recording software, you can check out Filmora here. We’ve also reviewed Filmora with more details.
Camtasia
Unlike many of the more specialized programs, Camtasia is a full-featured video editor first and a screen recording software second. It offers the most editing and production capabilities, which makes it a great choice if you want to do more than just record your screen or plan to produce several kinds of videos. The interface is very clean and easy to use. You can check out our full review of Camtasia here.
Snagit
Snagit is a program made by TechSmith, the same company that makes Camtasia. However, Snagit is not an all-in-one tool, and instead is only meant for screen recording. It offers some interesting features such as a magic selection tool that can automatically detect areas to record as well as an editing panel that will let you annotate your final videos. You can learn more about it here or read our detailed Snagit review here. Note: Snagit is a paid software.
Apowersoft Online Screen Capture
CamStudio
CamStudio is a free software, but it’s an older and less well supported software compared to some alternatives. The program is maintained primarily by one individual and definitely has a few bugs that are still being worked out, but if you’re interested in trying it’s worth giving a shot. CamStudio may not be as “shiny” as some alternatives, but it is free and available here should you be interested in it.

Conclusion
Apowersoft Free Online Screen Recorder
Whether you’re making videos for a small classroom, thousands of subscribers, or for your own enjoyment, learning how to record screen on Windows 10 can make a huge difference. Depending on what features are important to you, there’s a variety of options that can meet your needs and no reason why you shouldn’t succeed in making a great video.
0 notes
Text
How to Stop Microphone From Auto Adjusting on Windows 10
Windows 10 is a robust OS but often people face auto adjustment issues with the microphone. Most of the users are complaining that the microphone levels automatically increase and decrease without any apparent trigger. If you are one of them, then follow the steps mentioned below to stop the microphone from doing that.
Here’s How to Stop Microphone Auto Adjusting on Windows 10
• Stop Skype from auto adjusting the microphone
1. Go to Skype UWP.
2. Press on the action option.
3. This option is located on the upper left-hand side of the display.
4. Press on the action option.
5. This option resembles a three dot symbol.
6. After that, by going to the pop-up menu, press on the Settings tab.
7. In case you are using Skype on your Windows PC, then start using the ribbon bar.
8. This ribbon bar is located at the upper side of the screen.
9. Press on the Tools option.
10. Then, click on the Options button.
11. After opening the Settings option, choose the Audio and Video option,
12. This option is located on the vertical menu list, which is given on the left-hand side.
13. In the Audio and Video option, go to the Microphone column.
14. Unselect the checkbox linked with Automatically adjust microphone settings.
• Stop Steam from auto adjusting the microphone
1. Go to the steam client,
2. Sign in to the account.
3. Press on the Friends and Chat symbol.
4. This symbol is located in the end right-hand side of the display.
5. Press on the gear symbol given in the upper right-hand side of the display.
6. You have to follow this step to open the Settings tab.
7. After going to the Friends List Settings, press on the Voice option.
8. This option is located on the left-hand side of the screen.
9. Go to the right-hand side panel.
10. Go down to the end of the display.
11. Press on the Show Advanced Settings option.
12. Turn off the option linked with the Automatic volume or gain control,
13. It is located in the Advanced Settings menu of the Voice option.
14. Start restarting the Steam.
15. Check in case you are still getting the Microphone auto adjusting issue on Windows 10.
• Stop Apps From Having Control of the Microphone
1. Click on the Windows and R keys together.
2. The Run prompt box gets open on the screen.
3. Enter “mmsys.cpl” in the given box.
4. Click on the Enter option.
5. It will launch a Sound menu.
6. Choose the recording option.
7. This option is located on the menu bar.
8. Choose the microphone.
9. Press on the Properties option.
10. Choose the Advanced option.
11. This option is located on the Properties window.
12. Click on the Exclusive Mode column.
13. Unselect the box linked with the “Allow applications to take exclusive control of this device.”
14. Press on the Apply option for saving the changes.
15. Start restarting the system.
16. Check whether this issue is solved or not.
Davis Johnson is a Microsoft Office expert and has been working in the technical industry since 2002. As a technical expert, Davis has written technical blogs, manuals, white papers, and reviews for many websites such as office.com/setup.
Source: https://offiice-setup-usa.com/how-to-stop-microphone-from-auto-adjusting-on-windows-10/
0 notes
Text
JLab Audio Epic Air ANC Review: Impressive Battery Life Despite Active Noise-Cancelling
JLab Audio Epic Air ANC
8.50 / 10
Read Reviews
Read More Reviews
Read More Reviews
Read More Reviews
Read More Reviews
Read More Reviews
Read More Reviews
Read More Reviews


See on amazon
The Epic Air ANC in-ear headphones sport an impressive battery life of up to 12+ hours per charge. Advanced features include active noise-cancelling, transparency (Be Aware) mode, wear detect sensors, and a superior app that lets you customize EQ and touch controls settings, among other things. Android users will miss APTX audio codecs, but AAC codecs are included. JLab Audio's C3 ambient noise reduction didn't convince us. At $99, these ANC TWS headphones are a great deal.
Specifications
Brand: JLab Audio
Battery Life: 12+ hours per charge, 48+ hours total
Noise Cancellation: ANC and C3 for voice calls
Mono Listening: Optional, stereo voice calls available
Bluetooth : Yes, 5.0 with A2DP, AVRCP, and HFP support
Pros
Amazing battery life
Cloud Foam and extra long eartips included
Integrated charging cable and Qi wireless charging
IP55 water resistant
Sustainable packaging
Cons
No APTX audio codecs
C3 noise reduction challenged by average background noise
Built-in charging cable not serviceable in case it breaks
Buy This Product
JLab Audio Epic Air ANC amazon
Shop
// Bottom var galleryThumbs1 = new Swiper('.gallery-thumbs-1', { spaceBetween: 10, slidesPerView: 10, freeMode: true, watchSlidesVisibility: true, watchSlidesProgress: true, centerInsufficientSlides: true, allowTouchMove: false, preventClicks: false, breakpoints: { 1024: { slidesPerView: 6, } }, }); // Top var galleryTop1 = new Swiper('.gallery-top-1', { spaceBetween: 10, allowTouchMove: false, loop: true, preventClicks: false, breakpoints: { 1024: { allowTouchMove: true, } }, navigation: { nextEl: '.swiper-button-next', prevEl: '.swiper-button-prev', }, thumbs: { swiper: galleryThumbs1 } });
In a sea of TWS earphones, JLab Audio's Epic Air ANC stand out with killer battery life, a complete package of advanced features, and a fair price. But are they the right choice for your needs? We'll help you decide.
What's in the Box
JLab Audio's Epic Air ANC earphones ship in a unique charging case that features an integrated USB charging cable and a floppy magnetic lid that comes off and pops back on easily. You'll also get a total of six pairs of ear tips: three sets of silicone gel tips, two extra-long tips, and one pair of Cloud Foam tips. You'll find a neat quick start guide tucked into a pocket at the underside of the box's lid.
We appreciate the all paper and cardboard packaging. The only two pieces of plastic we spotted were the tiny stickers covering the earbud charging pins; they preserve battery life until the product is in your hands. The box is not as fancy and compact as others we've seen, but we're impressed with the resourceful and sustainable design.
JLab Audio Epic Air ANC Specifications

The Epic Air ANC come with quite a few bells and whistles.
Design: in-ear headphones
Color: black
Drivers: 8 mm dynamic, neodymium magnets
Frequency Response: 20 Hz to 20 kHz
Audio Codecs: SBC, AAC
Chipset: JLab Audio wouldn't share the chipset
Microphone
type: 3 MEMS in each earbud, C3 (crystal clear clarity) voice pickup
sensitivity: -40dB ±3dB
Connectivity
Earbuds: Bluetooth 5.0
Charging case: built-in USB cable and Qi wireless charging
Bluetooth Profiles: A2DP, AVRCP, HFP
Operating range: 30 feet (10 m)
Weight
Earbuds: 0.25 oz (7 g) x 2
Charging case: 2.01 oz (57 g)
Battery Life
Playtime per charge: up to 12+ hours per charge
Playtime with charging case: up to 32+ hours on top (48+ hours total)
Charging time
Earbuds: 3 hours
Case: 3 hours
Quick Charge: 15 minutes for one hour of playtime
Water resistance: IP55
Bonus: 3 months free Tidal with purchase
Price: $99 on Amazon
How to Pair the Epic Air ANC With Bluetooth Devices
After you first take the Epic Air ANC out of the charging case, remove and discard the stickers covering the charging pins.
The first time you pair the Epic Air ANC with a device, take them out of the case, then press and hold the JLab logo on each earbud for three seconds or more, until the LED on one of them starts blinking in blue and white. Now start the Bluetooth pairing process on your device. Only one earphone will pair, but you can connect each one independently.
To pair them with a second device, we turned off the Bluetooth on the first device before removing the earbuds from the case. This time, they went into pairing mode automatically. Note that you can only connect them to one device at a time.
Pairing devices was a breeze. Likewise, pairing each earphone independently worked just fine. It's not possible, however, to pair one earphone with your phone, while the other is connected to your computer or vice versa.
How to Control the Epic Air ANC Earphones
The Epic Air ANC features a single capacitive sensor on each earbud. You can customize multiple settings, including the touch controls, using the mobile app. Let's look at the default setup first.
Epic Air ANC Default Touch Controls

You can control the volume with a single tap on the left (down) or right (up) earbud. A double-tap on the right earbud will trigger play / pause, while the left controls your phone's smart assistant. To switch ANC modes, press and hold the left earbud for one second. To jump to the next track, press and hold the right earbud for one second. You can change the EQ settings with a triple-tap on either earbud.
You can answer a call with a single tap and hang up with a double-tap on either earbud. To reject a call, double-tap either earbud. When you touch and hold both touch sensors simultaneously for three or more seconds, you can switch between movie and music mode.
To turn the earphones off, either place them back in the charging case or turn off your device's Bluetooth connection; the Epic Air will turn off after three minutes without an active connection.
JLab Epic Air ANC App Customization Options
Did you miss the option to jump back a track? You can customize the earbud's touch controls using the JLab Epic Air ANC app (Android, iOS). That's not all, but before you can use the app, you have to connect your earbuds to your phone. If it's your first time running the app, it might prompt you to install a firmware update, which we recommend doing.
At first glance, the app shows you the battery status of each earbud. Expand the Noise Cancelling/Be Aware tab to adjust how much noise you want the microphones to suppress or pass through. We thought the default Be Aware setting was way too loud, so we dropped it by about 15%.
Image Gallery (2 Images)
Expand
Expand
Close
Image 1 of 2
Image 2 of 2
window['gallery_1'] = new Swiper('#swipper-1', { direction: 'horizontal', spaceBetween: 20, slidesPerView: 1, centeredSlides: true, preventClicks: false, observer: true, observeParents: true, loop: false, keyboard: { enabled: true }, // If we need pagination pagination: { el: '.swiper-pagination', }, navigation: { nextEl: '.swiper-button-next', prevEl: '.swiper-button-prev', }, }); var images = document.getElementsByClassName("gallery-1-images"); for (var i = 0; i < images.length; i++) { images[i].addEventListener('click', function (event) { var swiperDiv = document.getElementById('gallery-modal-1'); var imagesArray = document.getElementsByClassName("gallery-1-images"); index = Array.prototype.indexOf.call(imagesArray, this); window['gallery_1'].slideTo(index, false, false) swiperDiv.style.display = 'block'; document.body.style.overflow = 'hidden' }); } function closeGallery(element){ element.parentNode.style.display = 'none'; document.body.style.overflow = "initial"; }
Under Equalizer, you can adjust four different EQ settings. Should you mess up, you can always press Reset to go back to default settings. These EQ settings are independent of the Music / Movie mode.
Jump to Customize Controls to change what tapping the touch sensor does. We changed up the double- and triple-tap settings.
Image Gallery (2 Images)
Expand
Expand
Close
Image 1 of 2
Image 2 of 2
window['gallery_2'] = new Swiper('#swipper-2', { direction: 'horizontal', spaceBetween: 20, slidesPerView: 1, centeredSlides: true, preventClicks: false, observer: true, observeParents: true, loop: false, keyboard: { enabled: true }, // If we need pagination pagination: { el: '.swiper-pagination', }, navigation: { nextEl: '.swiper-button-next', prevEl: '.swiper-button-prev', }, }); var images = document.getElementsByClassName("gallery-2-images"); for (var i = 0; i < images.length; i++) { images[i].addEventListener('click', function (event) { var swiperDiv = document.getElementById('gallery-modal-2'); var imagesArray = document.getElementsByClassName("gallery-2-images"); index = Array.prototype.indexOf.call(imagesArray, this); window['gallery_2'].slideTo(index, false, false) swiperDiv.style.display = 'block'; document.body.style.overflow = 'hidden' }); } function closeGallery(element){ element.parentNode.style.display = 'none'; document.body.style.overflow = "initial"; }
Finally, you can toggle the Auto Play / Pause sensors. When you take out one earbud, playback will stop and resume when you put the earbud back into your ears. Depending on how you use the earbuds, this could be preferable to the Be Aware mode or annoying if you don't want to interrupt playback.
youtube
Sound and Call Quality
To test the sound of the Epic Air ANC, we used AudioCheck's Ultimate Earphones Test. You can try this with a reference pair of earphones or with new drivers to make sure everything is wired and working correctly.
While we did hear some parasitic buzz at low bass levels, we didn't notice this while listening to bass-heavy music, like Vince Staples "BagBak" or Queen's "Another One Bites the Dust". Overall, the test didn't reveal any issues with our Epic Air ANC review unit.
Listening to Music
Out of the box, the sound was fine, but it didn't blow us away. Compared to other earphones, like the recently reviewed PaMu Quiet, the Epic Air ANC sounded flatter. Prominent vocals, like those found on "Dakota" by the Stereophonics or "Titanium" by David Guetta, buzzed uncomfortably.
But let's not get ahead of ourselves. The Epic Air ANC are earphones with 8mm dynamic, neodymium magnets for drivers. They lack APTX audio codecs, which are superior to AAC. They're built to sound good, which they actually do, even to an Android user like ourselves.
You can compensate for weaknesses in the hardware by adjusting the EQ settings in the JLab Epic Air ANC app, which lets you bring down the treble, emphasize the bass, or vice versa. This might even yield a subjectively better sound than poorly tuned earphones that don't let you customize EQ settings. The superior app redeems the Epic Air ANC in our ears.
Gaming and Entertainment
If you experience any delay, aka latency, in Bluetooth audio while playing a game or watching a video, try switching to the Movie mode. It shortens the Bluetooth signal to create a stronger connection and achieve low latency. This should prevent that slightly annoying shift between what you see and what you hear.
Audio / Voice Calls
The Epic Air ANC feature C3 (crystal clear voice) calling technology, where an omnidirectional microphone picks up and eliminates surrounding noise, while a targeted microphone isolates your voice.
In theory, this should be more effective than a solution that uses only a single microphone and algorithms to extract the voice, like Qualcomm's cVc (clear voice capture) technology. In practice, the C3 microphones don't seem to be tuned well enough, leading to audible background noise and distortion during voice calls.
We used The Test Call to compare the sound quality of Padmate's PaMu Quiet and Sennheiser's PXC 500-II with JLab Audio's Epic Air ANC. The Sennheiser over-ear headphones produced the best call quality and background noise suppression. Both in-ear headphones had problems, though the call quality and noise reduction was slightly better with the PaMu Quiet, which feature Qualcomm's cVc 8.0 technology. Like the Epic Air ANC, Sennheiser uses triple MEMS microphones in its PXC 500-II headphones.
Active Noise Cancelling and Be Aware Mode
The Cloud Foam ear tips provide excellent passive noise isolation, which makes all the difference.
The active noise-cancellation, on the other hand, was only mildly impressive. While it does cut out noise, it also injects audible white noise to achieve that. Our reference model, the PaMu Quiet, had poor passive noise isolation with its default tips, but their ANC beat the JLab Air ANC hands-down, without the white noise pollution.
youtube
What we loved about the Epic Air ANC earphones was their extra loud Be Aware mode. It amplifies sounds in your surroundings and works a bit like a hearing aid. But you can adjust the intensity in the app and bring it down to a level you find comfortable. The same is true for the ANC, but we're not quite sure why anyone would want to lower that.
Battery Life and Charging
Battery life surpassed our expectations. It's not just amazing on paper, we also found that it's better than advertised. With ANC enabled, our Epic Air ANC ran for almost nine hours before needing to charge. With ANC turned off, they easily achieved more than 12 hours of playtime. Your mileage will vary, depending on volume and feature usage.
The battery life is almost as good as the Creative Outlier Gold's 14 hours per charge. But when you add the charging case, which brings the battery life to 48 hours total, JLab Audio's Epic Air ANC beat Creative's flagship TWS earphones by nine hours. When you do need to top up the batteries, a 15-minute quick charge will give you one hour of playtime.
Charging the Epic Air ANC couldn't be more convenient. The case comes with a built-in USB charging cable. While that means you can't forget your charging cable, it could also mean you're doomed when the cable breaks. Fortunately, you can always fall back on Qi wireless charging.
One neat feature that preserves battery life is the wear detect sensor. When you take out one of the earphones, your playback will pause, until you put the earphone back in. If you prefer, you can disable the auto play / pause sensors in the app, but why would you?
Our JLab Audio Epic Air ANC Verdict
youtube
They're not perfect, but the Epic Air ANC are pretty damn close. They come with passable ANC, a solid Be Aware (aka pass-through) mode, they're sweat and water-resistant, you can fully customize the touch controls, tweak up to four EQ settings, the wear detect sensor preserves battery life, and the battery life is amazing.
You'll be disappointed if you look for high-end level sound, call, or ANC quality. But the overall impressive set of features, as well as the suprior app make up for any shortcomings on that end. And keep in mind that at $99 the Epic Air ANC are a steal.
If you're looking for a cheaper alternative with comparable battery life and better sound and call quality, and if you don't need to have ANC, have a look at our recent Creative Outlier Air V2 review.
JLab Audio Epic Air ANC Review: Impressive Battery Life Despite Active Noise-Cancelling published first on http://droneseco.tumblr.com/
0 notes
Text
DESCRIPTION: EaseUS RecExperts Portable is a tool designed to give you a simple and straightforward way to capture your entire desktop, a specific window or area, as well as your webcam. The screenshot can be enhanced with lines, arrows, images, and text, so it can be used for guidance, instruction, or even educational purposes. Capture video, audio, webcam or image for any occasion Record Zoom meetings, YouTube videos, tutorials, games, etc. Record screen with internal audio and your voice Record anywhere or a full screen depending on your needs. You can even record multiple screens simultaneously. record any audio Record sound from your computer and/or microphone. You can also extract the audio from the recorded video file or during recording. Capture webcam Videos that include a speaker are more engaging! Capture your face via webcam while you are recording screen. Capture to a GIF Directly capture any video, website, software, or desktop and save it as a GIF for entertainment, business, tutorials, etc. schedule recording Set a time to start or stop a recording automatically. You can even schedule multiple tasks as you like. Auto stop and auto split Automatically stops recording when it reaches a set time, duration, or file size. Or automatically split the recording into multiple files for later use. Create screenshots Use it as a screenshot tool to take snapshots of your PC or Mac screen. You can also take a screenshot while recording. edit recording Trim the length of the recording or adjust its volume according to your needs. You can also add a custom intro and ending to it. Flexible output configurations Set the frame rate of recorded images as you like and save them in more than 10 formats, including MP4, MOV, AVI, MP3, PNG, etc. Release year: 2021 Version: 2.8.1 System: Windows® XP/Vista/7/8/8.1/10 interface language: English File size: 56.5MB Format: rare Execute as an administrator: There's no need
0 notes
Text
Windows 10 Insider Preview Build 18999 released

Windows 10 Insider Preview Build 18999 released. Your Phone app – unveiling Calls, now even more ways to stay connected to what matters We first announced the Calls feature at the Samsung Unpacked event in August, and you saw a live demo at last week’s Surface event. Today, we’re excited to unveil the Calls feature to the Windows Insider community. Check out this early preview and let us know what you think. No need to dig for your Android phone to answer your personal or work calls. You can now stay connected by simply answering (or not) your phone calls on your PC. Tap into your PC’s speakers, microphone, and large screen for a richer calling experience. With the Calls feature you can: Answer incoming phone calls on your PC.Initiate phone calls from your PC using in-app dialer or contact list.Decline incoming phone calls on your PC with custom text or send directly to your phone’s voicemail.Access your recent call history on your PC. Clicking on a specific call will auto populate the number within the dialer screen.Seamlessly transfer calls between your PC and phone. Calls requirements: Android Phones 7.0 or higherWindows 10 PC with Bluetooth radioRequires 19H1build or newerRequires minimum Windows 10 build 18362.356 Known issue: In certain instances, Calls feature may require you to pair your mobile phone & PC again. If you have previously paired your devices, unpair your devices and go through the Calls set up flow again. This feature will gradually roll out to Insiders on 19H1 builds or newer, so it may take a few days to be available inside the Your Phone app. We value your feedback, so give it a try and let us know what you think. You can report any issues under the Your Phone > Settings > Send feedback. Update on the ability to move & resize Cortana’s window We first started rolling out this change with Build 18975, and wanted to share that as of today’s build, this work is now available for all Insiders. Please note that we’re still in the process of expanding language/region support of the new Cortana app, and Insiders outside of English (United States) will see a message when launching Cortana saying “Cortana isn’t available.” We’ll update you when the availability increases.
General changes, improvements, and fixes
We fixed an issue resulting in some Insiders seeing error 0x8007023e when installing updates.We fixed an issue where, after successfully updating to Build 18995, the Windows Update Settings page might show the same build still needs to install. After installing Build 18999, you won’t see this issue on future flights.We fixed an issue resulting in the Optional Features page in Settings crashing for some Insiders.We fixed an issue where some Insiders were finding that Settings doesn’t launch from the button in Start, isn’t listed in the All apps list, or as a search result. If you are impacted, pressing WIN+R and inputting “ms-settings:” (without the quotes) will launch Settings if you need it.We fixed a deadlock in the Network and Sharing Center Control Panel, that could result in it not loading.We fixed an issue where if Cortana had been moved from the default position, then it wouldn’t be visible when you tried to launch it via the WIN+C keyboard shortcut.We fixed an issue where when on battery saver SearchFilterHost.exe might use an unexpectedly high volume of CPU.We fixed an issue where search would crash if a Start Menu layout including a folder had been applied via group policy.We fixed an issue impacted VPN connection reliability.We fixed an issue in Narrator which caused Chrome to become unstable when navigating web contents.In Narrator braille, group header contextual elements are now represented with a “grp” abbreviation instead of “group.”Narrator would not show the text being spoken when returning to the same edit field in braille just after navigating back from an element that did not support a standard text control.Magnifier now remembers its window position after close and will reopen in that same location next time.We fixed an issue where the text cursor indicator did not adjust to show in the correct location after content was scrolled.We fixed an issue in the Search bar in either Control Panel or File Explorer where the box becomes grey and prevents input.We fixed an issue where devices configured for dual scan (WSUS and Windows Update) for updates may not have been offered new builds in the Fast ring.We fixed an issue where some devices configured to Use HDR may have experienced a bluish tint on their HDR displays after using Night Light.We fixed an issue where certain 2D apps (like Feedback Hub, Microsoft Store, 3D Viewer) were incorrectly being treated as having protected content within Windows Mixed Reality and were blocking their content from being recorded.We fixed an issue where, when capturing a repro video while filing a bug via Feedback Hub in Windows Mixed Reality, you couldn’t select Stop video. We fixed the issue causing theme packs downloaded from the Microsoft Store to fail to apply.
Known issues
There has been an issue with older versions of anti-cheat software used with games where after updating to the latest 19H1 Insider Preview builds may cause PCs to experience crashes. We are working with partners on getting their software updated with a fix, and most games have released patches to prevent PCs from experiencing this issue. To minimize the chance of running into this issue, please make sure you are running the latest version of your games before attempting to update the operating system. We are also working with anti-cheat and game developers to resolve similar issues that may arise with the 20H1 Insider Preview builds and will work to minimize the likelihood of these issues in the future. Read the full article
0 notes
Text
Xomprehwnsicd list of things I hate about this samsing galaxy j7
1. The autocorrect is garbage. I’m going to make this point by not stopping to fix any typos. Iphone fixes your typos automatically. And while I SHOUKD appreciate that this phone is giving me some agency in what I type, I really DON’T have time for this ssjot
2. The power button is on the side, right where I’m ised to putting my thumb to ducking hold it
3. The speaker is on the back????? Fucking why??? Wouldn’t it be awesome if the Dolby speakers at tje movie theatre were facong the wall??? Man that’s such a good design
4. The little buttons next to the home key. Fuck those. Sometimes I need to put mt thumb on the phone to bapance ot (such as lying in bed so it doesn’t fall on mt gotdamn face) and I end up nitro mg n.a. l
5. No mute button for when I need to immediately silence whatever prom I’m listening to
5. Can’t control volume ibtol you get past the lockscreen
6. This is specific to thw Galaxy J7 (Samsung’s shit-tier phone apparently), but it doesn’t have an ‘auto-adjust brightness’ for when I go outside, so I literally need to navigaye the to the screwn brightness setring from muscle memory because I camt see the ducking screen to turn on ‘outside mode’
7. Can’t merely un-select an alarm time, if you chose the wrong one, you have to delete the alarm and re-enter it
8. Garbage microphone ducking spells out ‘dot dot dot’ and ‘quote’ half the time when using talk-to-text
9. Also this might be a J7 tho bcc but I camt record audio for shit. Like I know it’s a phone and it’s not ideal for recording audio but come.the fuck on
10. Duck literappt every single google app or functiom on this rhing, and I mean ir, i know you jabe all my info and you KNOW every place I took a dumo today so comw on and fight me, honestly, let’s just DO this
11. Some times it jusy…….. makes this noise??? Over amd over again?? Like I’m clicking something, but I’m not
11. One rime it downloaded an app and filled every single open space on my home screen with that same app, like literally 50 of thw same app icons
12. Imnsure I’ll think of more
Oh ywah here we go,
12. It makes the little notification noise and then I look at it amd there’s nothing on the screen. I guess it’s notificyong me on that little pull-down window? Don’t make a noise unless it’s a fucjin text or something right there om the screen, stop being so dramatic. Maybe I caj turn this off but like seriously it makes so many noises and I dont know what it wants from me, I bought a phone not a gordamn giga pet
69 notes
·
View notes
Text
GoPro Fusion Review
New Post has been published on http://secondcovers.com/gopro-fusion-review/
GoPro Fusion Review
(adsbygoogle = window.adsbygoogle || []).push();
GoPro has long been a dominant player in the action camera space, but of late, the company has been struggling with poor sales and has also dropped out of the drone market. VR is a new vertical for GoPro, and it’s betting big on the Fusion, its new 360-degree camera. The Fusion went on sale internationally late last year, and although GoPro is yet to make it available via retail channels in India like its other cameras, you can get a unit shipped here. Priced at $700 (roughly Rs. 44,600), which doesn’t include the cost of shipping, is the Go Pro Fusion worth the steep price? Find out in our review.
youtube
GoPro Fusion design and build quality
The design of the Fusion is quite different from what we’re using to seeing with the company’s Hero line of cameras. For starters, it’s a bigger than the typical rectangular GoPro Hero models, and is heavier. The entire body has a rubberised finish so it should be able to handle minor falls. It’s also waterproof up to 4.88m (16 feet). There is an 18-megapixel sensor with a fish-eye lens on both the front and the back of the Fusion for capturing 360-degree footage. These lenses bulge outwards and don’t have any scratch protection so you’ll need to be very careful while handling the camera. GoPro ships a carry case with the Fusion for this very reason.
There’s a small backlit display on the front which shows you the current shooting mode, battery level, number of remaining shots, and other details. It isn’t a touchscreen, which is a bit of a step back from the Hero6. This means you’ll have to navigate the menus with the Mode and Shutter buttons on the camera, like you do with the Hero Session series of cameras. There are red status LEDs on the front and back to tell you whether the camera is recording or capturing an image. There’s a bracket at the bottom with mounting fingers that can be used to attach the Fusion to any GoPro mount, but this is removable so you can keep the Fusion standing upright on its own.
The GoPro Fusion gets a much bigger battery than the Hero6, at 2620mAh, and it slots in from the right. There are microSD card slots on either side of the battery, and both need to be occupied in order for the Fusion to work. The reason for this is that footage captured by the two sensors is saved separately on the individual cards. It’s only when you copy the footage to your phone or PC and use GoPro’s software, that 360-degree images and videos are actually stitched together. Naturally, this does take a toll on the device you’re rendering on, but we’ll get to that in a little bit. GoPro recommends Class 10 or higher cards, and the maximum capacity it can support is 128GB (per slot).
There’s another smaller flap on the left of the camera which protects the USB Type-C port. Finally, there are three microphones on the top, and a speaker grille at the back. Just like any other GoPro camera, the Fusion feels premium and well-crafted. Its size makes it quite conspicuous but is still manageable when mounted on a bike helmet, for example.
The Fusion ships with a good starter kit. In the box, you’ll find two adhesive mounts, a Type-C cable, a pouch for the camera, and a multi-purpose handle called the Fusion Grip. The latter can be used as a tripod or selfie stick, and its telescopic arm can extend to give you more flexibility. The build quality and finish of the Fusion Grip are great. It feels sturdy and well made, even though it’s mostly plastic.
GoPro Fusion performance and battery life
In order to test the Fusion, GoPro sent us two 32GB Lexar microSD UHS-II cards for this review. Its best to use two cards with identical capacities in the Fusion since if one of them fills up before the other, you won’t be able to record more footage. This also poses another potential issue – if one of the cards gets corrupted for any reason, you’ll only have one half your camera footage. Ideally, we would have liked to have some in-built storage, especially considering the cost here.
The menu system will be familiar to navigate if you’ve used any recent GoPro camera. You can use the Mode button to cycle through shooting modes, and the Shutter button to start capturing. In video mode, you can shoot spherical vidoes at up to 5.2K (4992×2496) at 30fps, or 3K (3000×1504) at 60fps. In photo mode, you can choose between the auto, burst, and night photo settings. With the latter, you can adjust the shutter speed and field of view. In most shooting modes, you can enable a feature called Protune which lets you manually set the ISO and exposure compensation values if you need more control over the lighting.
The Fusion works just like any other GoPro. You can sync it with the GoPro app on Android or iOS over Wi-Fi as well as Bluetooth to see live video from the camera, just like a viewfinder. You can also change settings such as the GPS status and screen brightness. You can use voice controls, check the free space on the card, and update the firmware of the camera as well. However, the list of mobile devices that support Fusion is limited. For iOS, you’ll need an iPhone 6s or newer, and only some recent iPad models are supported. For Android, support is a bit bleak at the moment as there are only a handful of flagship-class devices that can work with the Fusion. You can see the full list of supported devices on GoPro’s website.
We tested the Fusion with a Google Pixel 2 XL as well as an iPhone 6s Plus for this review. While the Pixel 2 XL managed to render the live feed and stitched 360-degree video without heating up too much, the older iPhone 6s Plus struggled to keep up, and this caused it to heat up very quickly. Speaking of heat, the Fusion itself gets warm even when it’s idle and heats up a lot when shooting videos or timelapses. 360-degree images can be shared only to Facebook, whereas videos can be trimmed for YouTube (up to 90 seconds) or Facebook (up to 30 seconds). You can also capture a 360-degree still frame from the video and share it. Images and video downloaded from the camera reside within the GoPro app so there’s no way to access them through your phone’s gallery or share them through other means.
If you want to extract the 360-degree image and video files, you’ll have to use the desktop app called Fusion Studio. The software is available for Windows and macOS, but it needs a lot of work. On Windows 10, the program would simply refuse to detect the camera despite multiple attempts, and we initially had the same problem on a Mac as well, although being persistent eventually paid off. A workaround for this is to manually copy the files from the microSD cards to your PC and then import them into Fusion Studio. This is a bit of a hassle but at least it works. After doing this, you’re in for a long wait while the software generates a preview by combining the footage from both microSD cards.
Once processed, you’ll see all your clips in the left pane, and various options to render them on the right pane. Longer videos are saved as multiple clips of seven minutes each on the cards, but when you view them in Fusion Studio, they shows up as a single large video clip. Once selected, you can trim the video, adjust the yaw, pitch and roll, and tweak the colour properties. You can even try to stabilise video if you need to before rendering the final output. At this stage, you can choose the type of codec (H.264, CineForm ‘422 High’ or ProRes 422), resolution, and audio format (stereo, 360 audio) you want.
Overcapture on iOS lets you crop standard-aspect videos out of 360-degree footage for easier sharing
Shop On SecondCovers
The Fusion has one more cool trick up its sleeve, and that’s the Overcapture feature. Currently only available in the Fusion Studio desktop app and on iOS, it lets you create standard-aspect videos from your spherical footage. You can chose from multiple aspect ratios including 16:9, 4:3, and square, and even set the type of projection to Little Planet or Fisheye for some very interesting effects.
Rendering a regular 16:9 video clip using Overcapture is quick, but if you wish to render a 360-degree clip, your wait time depends on how powerful your PC or device is. On our mid-2015 iMac with a Core i5 CPU and 16GB of RAM, a five-minute 360-degree clip being rendered to 4K (from 5.2K) took more than an hour. Our iMac might not have the latest specs, but this is still an impractically long time.
On a Windows 10 laptop with an 8th Gen Core i7 CPU, rendering previews was quicker but exporting the same five-minute file with the same settings as on the Mac, took about 45 minutes. Fusion Studio is also extremely glitchy and unpredictable. It hung a bunch of times when trying to watch footage, and scrubbing through the timeline wasn’t very responsive in longer clips. The program often stopped responding, and we had to force-quit it on the Mac.
Processed images look good, and stitch lines weren’t visible for the most part. Objects that are placed too close to the camera appear a bit warped when stitched, but as long as you have the camera away from you or your subject, you should be fine. When using the Fusion Grip, most of the pole is invisible because it’s right below the two lenses, so it looks like your hand grasping a handle that isn’t attached to anything.
Image quality is good in daylight, and the Fusion manages to meter scenes well. Colours are also nicely saturated. Under direct sunlight, a portion of the sky can appear a bit burnt out but everything else is very legible. In low light, there is a bit of visible noise but overall, the level of detail is still quite good. The burst and timelapse modes work just as they do with other GoPro cameras.
Video quality is also excellent during the day, and stitching is handled well. In low light, details take a bit of a hit but quality is still decent. Video can be played using the Fusion VR player app, or if you’re on Windows 10, the default video player now supports 360-degree video playback as well. Do keep in mind that if you have the Fusion mounted on a helmet, the area around the helmet will appear a bit warped since it’s too close to the lenses, but everything else is rendered well. Video is smooth and you can add more stabilisation in post-production.
Stitching videos is resource-intensive on the device you’re using. Again, our Pixel 2 XL didn’t get too hot, and a seven-minute video took about 16 minutes to process. However, the iPhone 6s Plus often failed to import videos longer than two minutes, and would get very hot.
Stills and videos are saved in the JPEG and MP4 formats respectively, and you even have the option to shoot in RAW, though this does increase the time taken to save shots. 360-degree footage eats through your storage space pretty quickly. We filled up our 32GB cards with a mix of photos, burst shots, and a some 5.2K footage totalling to about 50 minutes. A seven-minute clip shot at 5.2K resolution typical comes to about 2.8GB in size per lens.
We encountered a few bugs in the current firmware of the the Fusion. For example, the red status light in the front would stay on when the Fusion was powered off, and at times, random conversations would trigger voice commands, causing the device to switch modes or start recording.
Despite its large battery, we managed to get only about an hour worth of continuous usage when recording at the highest resolution. This was with Wi-Fi on but GPS and Protune turned off. Charging the Fusion takes about three-and-a-half hours using a standard wall adapter. Like with other GoPros, even having the camera on but idle for a while will cause a noticeable dip in the battery life. Thankfully, the Fusion turns itself off after seven minutes of inactivity.
Verdict The GoPro Fusion is the company’s first attempt at a 360-degree camera, and while it does capture very good footage, it’s not the easiest camera to live with. First, there’s the need for two microSD cards at all times. Then there’s the software, which has a long way to go, especially the Fusion Studio desktop app. Let’s not forget, you’ll be needing a powerful desktop and smartphone if you want to work with the footage that this camera captures. App support on Android is limited to a handful of flagship phones right now, and Overcapture, which is a crucial feature, is yet to make it to Android.
At the time of this review, the Fusion can only be purchased officially in India by getting it shipped directly through GoPro’s website. This means you’re paying $700, plus shipping (which is either $80 or $130 depending on what you choose) which works out to about Rs. 50,000. This puts it in the same ballpark as other 4K 360-degree cameras such as the Ricoh Theta V and the Nikon KeyMission 360. GoPro tells us that it does plan on selling it through local online and offline channels, but for now, this is the only way to get your hands on one.
Right now, the Fusion is too expensive for what feels like an unfinished product. The hardware is solid but the software has a lot of catching up to do. It would make sense to wait a bit and see how things improve with software updates over the coming months, or whether GoPro has a follow-up version of the Fusion planned for 2018.
Price (MRP): $700 (roughy Rs. 44,700) + shipping
Pros
High-quality 360-degree footage
Rugged and waterproof
Bundled Fusion Grip is handy
Overcapture works well
Cons
Fusion Studio software is glitchy
No built-in storage
Android support is bleak (for now)
Expensive
Processing 360 video can be cumbersome
Ratings (Out of 5)
Design: 3.5
Performance: 3
Value for money: 3
Overall: 3
(adsbygoogle = window.adsbygoogle || []).push();
0 notes
Text
2016 Hyundai Veloster Rally Edition
New Post has been published on http://auto.tintoantap.com/2016-hyundai-veloster-rally-edition/
2016 Hyundai Veloster Rally Edition
The Hyundai Veloster is a coupé first produced in 2011 by Hyundai, with sales beginning in South Korea on March 10, 2011 and in North America since the fall of 2011. In South Korea, it is marketed under Hyundai’s Premium Youth Lab sub-brand, which is targeted for the young generation of drivers. 2016 Hyundai Veloster is in its first generation.
With its tuner-inspired performance features and innovative tech this limited-production edition is ready for anything. Fitted with genuine RAYS® 18-inch lightweight alloys and covered in stunning Matte Blue paint—it’s good to go and so are you.
What’s the world’s favorite color? Well, with the sky above and over 70 percent of the planet covered in water, it’s got to be blue. And Veloster Rally’s exclusive Matte Blue finish takes blue to new heights. Some cars shine. This one glows.
The turbocharged 1.6L GDI engine and a 6-speed manual transmission give it power while the genuine RAYS® 18-inch alloys shod with all-season performance rubber and suspension upgrades give it grip. The Veloster Rally Edition was designed to attract an audience and make every turn a standout performance.
In a striking bit of design magic the Veloster Rally combines a sleek dynamic exterior with class-leading interior space and offers an ingenious hidden third door that makes access easy.
Slide into race-inspired leather front seats with blue accents that set the tone for driving performance. The focal point of the interior is a standard 7-inch touchscreen that acts as your tech command center. Plus, you’ll find unique Veloster Rally Edition emblems on the floor mats and rear hatch.
Newly designed seats for the Turbo and Rally Edition feature larger bolsters with Turbo embossing. Contrast stitching for the Turbo and Rally Edition accent the seats, head rests, door armrests, center armrest and steering wheel. All-new black seats with yellow inserts and yellow accent stitching are available on non-turbo Velosters depending on the exterior color selected.
An available navigation system offers Siri® integration for iPhone® users, a touchscreen with menu swipe functions and user-customizable folders for your favorite functions. Downloadable and pre-installed apps are supported. Advanced voice recognition uses simplified commands and offers better feedback for users via an enhanced microphone. You’ll also enjoy SiriusXM* radio programming plus SiriusXM Travel Link® and NavTraffic.
Get access to information and entertainment via a standard multimedia LCD touchscreen that measures 7 inches. There’s an available 115-volt outlet for power, plus additional inputs that let you connect a video or flash drive. So go ahead,
Blue Link® provides additional safety, security and connected convenience for your Hyundai. Access the suite of features with your smartphone, smartwatch, a web application, or the in-car system to find that next latte, lock your car from inside the stadium, stay informed on vehicle health, or call for help. In the event of an accident, it can send an automatic collision notification and request assistance. Even securely and remotely start your car and set the climate control to cool the interior on sweltering days or heat the interior and defrost the windshield on cold mornings.download your favorite images and create slideshows of your latest adventure in real time. And the fun doesn’t stop when Veloster does. You and your friends can watch video of the pre-game tailgate or after-show party, and even play a gaming console in the comfort of your own mobile media room.
When you’re carrying its high-tech key, Veloster will recognize you and unlock the vehicle with the push of a button on the driver’s door. Once in the driver seat, one touch of the push button start brings the Gasoline Direct Injection (GDI) engine to life.
2016 Hyundai Veloster Rally Edition PRICING/PACKAGES
PRICING
Starting MSRP (manual transmission) : $18,000
Starting MSRP (EcoShift® Dual Clutch Transmission) : $19,100
2016 Hyundai Veloster Rally Edition EPA MILEAGE ESTIMATES*/FUEL CAPACITY
EPA Mileage Estimates/Fuel Capacity
City/Highway/Combined (manual transmission) : 27 / 35 / 30
City/Highway/Combined (EcoShift® Dual Clutch Transmission) : 28 / 36 / 31
Fuel tank capacity (gal.) : 13.2
2016 Hyundai Veloster Rally Edition MECHANICAL
Engine
Type : Inline 4-cylinder
Displacement (liters) : 1.6
Horsepower @ RPM : 132 @ 6300
Torque @ RPM : 120 @ 4850
Compression ratio : 11.0:1
Valve train : DOHC 16-valve with D-CVVT
Fuel system: Gasoline Direct Injection (GDI) : Standard
Drivetrain
Front Wheel Drive (FWD) : Standard
6-speed manual transmission : Standard
6-speed EcoShift® Dual Clutch Transmission (DCT) : Optional
Final drive ratio (M/T / DCT) : 4.267 / 4.938
Upshift indicator (M/T) : Standard
Active ECO System (DCT) : Optional
Body / Suspension / Chassis
Body construction: Unibody : Standard
Power rack-and-pinion steering : Standard
Motor-Driven Power Steering (MDPS) : Standard
Turning diameter, curb-to-curb (ft.) : 34.12
4-wheel disc brakes : Standard
17-inch alloy wheels with P215/45R17 tires : Standard
18-inch alloy wheels with painted inserts and P225/40R18 tires : Optional
2016 Hyundai Veloster Rally Edition EXTERIOR DIMENSIONS
Exterior Dimensions
Wheelbase (in.) : 104.3
Length (in.) : 166.1
Width (in.) : 70.5
Height (in.) : 55.1
Wheels
Track (in., front/rear) 17-inch wheels : 61.5 / 62.0
Track (in., front/rear) 18-inch wheels : 60.9 / 61.4
Weight
Curb weight (lbs., M/T) : 2,679-2,778
Curb weight (lbs., DCT) : 2,756-2,855
2016 Hyundai Veloster Rally Edition INTERIOR DIMENSIONS
Interior Dimensions
Head room (in., front/rear) : 39.0 / 35.3
Head room (in., front/rear) (with panoramic sunroof) : 37.2 / 35.3
Leg room (in., front/rear) : 43.9 / 31.7
Shoulder room (in., front/rear) : 55.6 / 54.0
Hip room (in., front/rear) : 53.2 / 52.6
Interior Volume
Passenger volume (cu. ft.) : 89.8
Cargo volume (cu. ft.) : 15.5
Cargo volume (cu. ft.) (rear seats down) : 34.7
Total interior volume (cu. ft.) : 105.3
2016 Hyundai Veloster Rally Edition SAFETY FEATURES
Safety Features
Driver’s blind spot mirror : Standard
Rearview camera : Standard
Rear parking sensors : Optional
Vehicle Stability Management (VSM) system : Standard
Electronic Stability Control (ESC) : Standard
Traction Control System (TCS) : Standard
Anti-lock Braking System (ABS) : Standard
Electronic Brake-force Distribution (EBD) : Standard
Brake Assist (BA) : Standard
Advanced dual front airbags (SRS) with Occupant Classification System (OCS) : Standard
Driver and front passenger side-impact airbags (SRS) : Standard
Side-curtain airbags (SRS) (front and rear passengers) : Standard
Tire Pressure Monitoring System (TPMS) : Standard
Energy-absorbing steering column : Standard
Rear LATCH (Lower Anchors and Tethers for CHildren) : Standard
Power window lock-out button : Standard
Front and rear crumple zones : Standard
Daytime Running Lights (DRL) : Standard
Remote keyless entry system with alarm : Standard
2016 Hyundai Veloster Rally Edition EXTERIOR FEATURES
Exterior Features
Dual fold-away heated power bodycolor side mirrors : Standard
Center High-Mount Stop Light (CHMSL) : Standard
Bodycolor door handles : Standard
Bodycolor grille with black intake grille : Standard
Chrome grille surround with Piano Black highlights : Optional
Dual centered chrome-tipped exhaust : Standard
Variable intermittent windshield wipers/washer : Standard
Rear window wiper/washer : Standard
Shark-fin antenna : Standard
Headlights with LED accents : Standard
Automatic headlights : Optional
Daytime Running Lights (DRL) : Standard
Front fog lights : Optional
Proximity Key entry with push button start : Optional
2016 Hyundai Veloster Rally Edition INTERIOR FEATURES
Interior Features
Panoramic tilt-and-slide sunroof : Optional
Proximity Key entry with push button start : Optional
Air conditioning : Standard
Automatic temperature control : Optional
Power front and rear passenger side windows : Standard
Power windows with driver’s auto-down : Optional
Power door locks : Standard
6-way adjustable driver seat : Standard
Premium cloth seating : Standard
Premium leatherette/cloth seating : Optional
60/40 split fold-down rear seatback : Standard
Dual illuminated vanity mirrors : Standard
Metal paint accents : Standard
Piano Black interior accents : Optional
Leather-wrapped steering wheel and shift knob : Optional
Tilt-and-telescopic steering wheel : Standard
Steering-wheel-mounted audio, Bluetooth® and cruise controls : Standard
Steering-wheel-mounted paddle shifters : Optional
Bluetooth® hands-free phone system : Standard
Blue Link® Connected Care 1-Year Complimentary Trial (enrollment required) : Optional
Auto-dimming rearview mirror with HomeLink® and compass : Accessory
AM/FM/SiriusXM/CD/MP3 audio system with 6 speakers : Standard
450-watt Dimension® AM/FM/SiriusXM/CD/MP3 premium audio system with 8 speakers and external amplifer and subwoofer : Optional
7-inch high-resolution LCD touchscreen with rearview camera : Standard
Navigation system with 7-inch high-resolution touchscreen display and 90-day trial of NavTraffic (deletes CD player) : Optional
HD Radio™ technology : Optional
Apple Siri® integration : Optional
Complimentary SiriusXM activation and 3-month trial subscription : Standard
SiriusXM Travel Link : Optional
Smartphone/USB and auxiliary input jacks : Standard
Trip computer with custom settings : Standard
2016 Hyundai Veloster Rally Edition WARRANTY
10-Year/100,000-Mile : Powertrain Warranty
Covers repair or replacement of powertrain components (i.e., selected engine and transmission/transaxle components), originally manufactured or installed by Hyundai that are defective in material or factory workmanship, under normal use and maintenance. Coverage applies to original owner only, effective with 2004 model year and newer model-year vehicles. On 1999-2003 model years, coverage applies to original owner and immediate family members (i.e., wife, husband, daughter, son, stepdaughter, stepson). Second and/or subsequent owners have powertrain components coverage under the 5-Year/60,000-Mile New Vehicle Limited Warranty. Excludes coverage for vehicles in commercial use (e.g., taxi, route delivery, delivery service, rental, etc.).
5-Year/60,000-Mile : New Vehicle Limited Waranty
Covers repair or replacement of any component manufactured or originally installed by Hyundai that is defective in material or factory workmanship, under normal use and maintenance.
The following components are covered for time and mileage limits indicated:
Radio and audio systems (i.e., radio, compact disc player, DVD player, navigation system and Bluetooth®): for MY 15 and prior, 3 years/36,000 miles—Equus: 5 years/60,000 miles
Radio and audio systems (i.e., radio, compact disc player, DVD player, navigation system and Bluetooth®): for MY 16, 5 years/60,000 miles for all models
Paint: 3 years/36,000 miles
Battery: for MY 15 and prior, 3 years/unlimited miles (100% covered 2 years/unlimited miles; after 2 years and within 3 years, 25% cost of battery and 100% labor cost covered)
Battery: for MY 16, 3 years/36,000 miles (no proration)
Air conditioner refrigerant charge: 1 year/unlimited miles
Adjustments: 1 year/12,000 miles
Wear items: 1 year/12,000 miles (e.g., belts, brake pads and linings, clutch linings, filters, wiper blades, bulbs and fuses)
7-Years/Unlimited Miles : Anti-Perforation Warranty
Covers 7 years/unlimited miles starting with 2005 model year (previously 5 years/100,000 miles for 2004 and prior model years).
Covers perforation (rust hole through the body panel from inside to outside) corrosion of original Hyundai body sheet metal due to defects in material or factory workmanship, under normal use and maintenance.
Excludes surface corrosion.
5-Year/Unlimited Miles : 24-Hour Roadside Assistance
Effective from the date the vehicle is delivered to the first retail buyer, or otherwise put into service (in-service date), whichever is earlier.
When you call 1-800-243-7766 for Roadside Assistance, please provide the following:
Your Name
Vehicle Identification Number (VIN) – located on the driver’s side dashboard
Vehicle Mileage
Vehicle Location
Description of Your Vehicle’s Problem
BUILD 2016 Hyundai Veloster Rally Edition IN YOUR AREA
0 notes
Text
Windows 10 Insider Preview Build 18298 general changes, improvements, and fixes

Windows 10 Insider Preview Build 18298. General changes, improvements, and fixes We fixed a merge conflict resulting in the Dynamic Lock settings being missing from Sign-in Settings. We fixed an issue resulting in Insiders seeing green screens with error System Service Exception in win32kbase.sys when interacting with certain games and apps in the last two flights. The update block for a small number of PCs using Nuvoton (NTC) TPM chips with a specific firmware version (1.3.0.1), due to a bug causing issues with Windows Hello face/biometric/pin login not working, has been removed as this build contains a fix for that issue. If you’ve turned off transparency effects, that preference will now also be reflected on the sign-in screen. We fixed an issue resulting in Settings crashing for some Insiders when clicking “Check for Updates”. We fixed an issue resulting in Settings crashing for some Insiders when going to Settings > Update & Security > Recovery. We fixed an issue resulting in night light settings not working and getting stuck in the last few flights. We fixed an issue resulting in an unexpected amount of space between the categories and subcategories in Settings in recent flights. We fixed an issue where the folder size wasn’t calculated correctly in File Explorer’s Properties dialog when there was a path that was longer than MAX_PATH involved. We fixed an issue resulting in menu flyouts appearing blank when using the Arabic display language. We fixed an issue where when inking on a PDF in Microsoft Edge, if you erased some ink quickly after starting the inking session, then added more ink, upon saving the PDF not all ink may be saved. We fixed an issue where the handwriting panel might crash when using your pen to input into win32 apps in recent builds. We fixed an issue resulting in not being able to type into certain tables using the Vietnamese Telex keyboard. We’ve made some adjustments when text scaling is enabled to emphasize the icon in the Action Center quick actions so that the text doesn’t overlap. We’ve made some improvements so that if theme truncation is detected, we will now handle this more gracefully and not result in unexpectedly thick borders around your windows. We’ve made some improvements to reduce the number of times where you might see the error “Windows can’t find one of the files in this theme. Do you still want to save the theme?” appear. We’re updating the timeout period when dictating (WIN+H) to be from 5 seconds to 10 seconds, to give you a bit more time to think about what you want to say. If you’d like to stop the dictation before then, just say “Stop dictating” or press WIN+H (same as in previous builds). We fixed an issue on the touch keyboard resulting in some letters unexpectedly being black instead of white in dark theme. We fixed an issue where the “…” menu in clipboard history (WIN+V) was clipped in recent builds. We fixed an issue where when displaying the name of a known file type (one registered under HKCR\) File Explorer would display an empty string for the file name in some cases. Now, if a file name is not available, File Explorer will always show the extension name, even if Show File Name Extensions is turned off. We’ve updated the microphone and camera privacy settings pages to provide information on which apps are currently using the microphone and camera and the date/time apps last accessed your microphone and camera. We fixed an issue where Magnifier would not start automatically even when “start after sign-in setting” for Magnifier was enabled if Narrator was not set to auto start after sign-in. We fixed an issue where Magnifier did not work with Touch when Centered mouse mode was enabled. We fixed an issue where Narrator sometimes would not start after completing Out of Box Experience (OOBE). We fixed the issue causing Narrator to start unexpectedly. We also made it easier to turn off Narrator when it was launched unintentionally. We fixed an issue where Narrator scan mode did not turn off automatically when you focused the address bar in Microsoft Edge. We fixed an issue where Narrator heading navigation was skipping some headings in Chrome. We fixed an issue where Narrator read page loaded notification multiple times in Chrome. We fixed an issue where Narrator did not read Edit box placeholder text in Chrome. We fixed an issue that caused the settings page to crash after changing the account password or PIN. Known issues The hyperlink colors need to be refined in Dark Mode in Sticky Notes if the Insights are enabled. Settings crashes when clicking on the “View storage usage on other drives” option under System > Storage. The Windows Security app may show an unknown status for the Virus & threat protection area, or not refresh properly. This may occur after upgrade, restart, or settings changes. Delete previous version of Windows in Configure Storage Sense is not selectable. Settings will crash when opening Speech Settings. The cmimanageworker.exe process may hang, causing system slowness or higher than normal CPU usage. This can be bypassed by rebooting the machine if it occurs. Launching games that use BattlEye anti-cheat will trigger a bug check (green screen) – we’re investigating. USB printers may appear twice in the Devices and Printers under Control Panel. Reinstalling the printer will resolve the issue. Known issues for Developers If you install any of the recent builds from the Fast ring and switch to the Slow ring, optional content such as enabling developer mode will fail. You will have to remain in the Fast ring to add/install/enable optional content. This is because optional content will only install on builds approved for specific rings. Read the full article
0 notes