#Sunlight requirement for this variety is direct sunlight of 4-5 hours with partial shade. Too much light may fade some variegated cordyline
Text
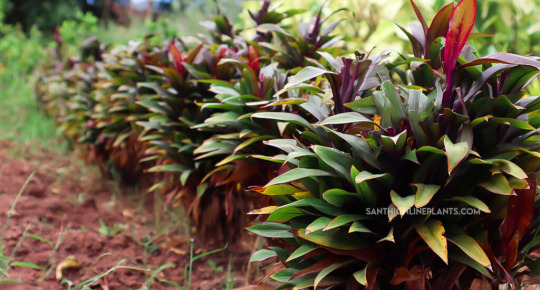
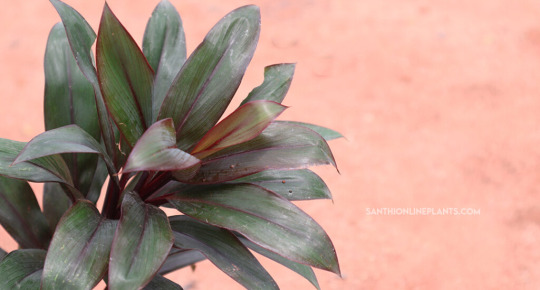
Cordyline fruticosa
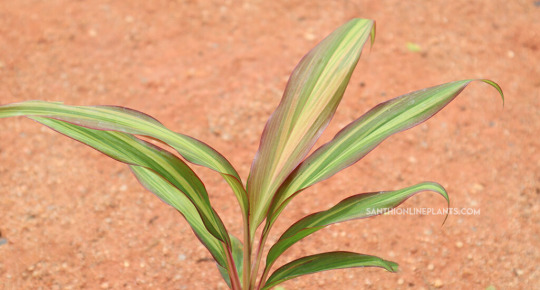
The Cordyline fruticosa plants are most beautiful eye-catching evergreen perennial plants with broad leaves. Plant foliage varies in different colors such as red, pink, yellow, white & other streaks.
Good Luck plant
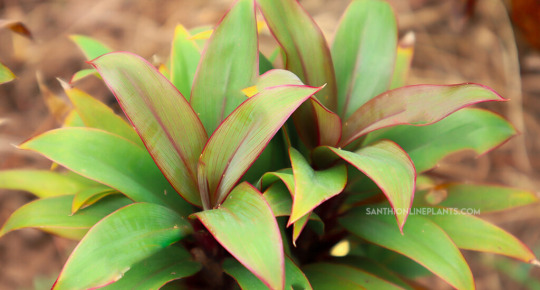
These cordyline fruticosa plants are commonly called Hawaiian ti plant, good luck plant, ti plant, palm lily, cabbage palm, and miracle plant belonging to Asparagaceae. This plant is often believed to bring good luck to the home.
Hawaiian ti plant
This cordyline plant variety prized & beloved especially for its colorful, long-lasting foliage with attractive stripes. The name Hawaiian ti plant name due to the reason that this croton plant believed to bring positiveness, creation, and blessing during those times in Hawaiian culture.
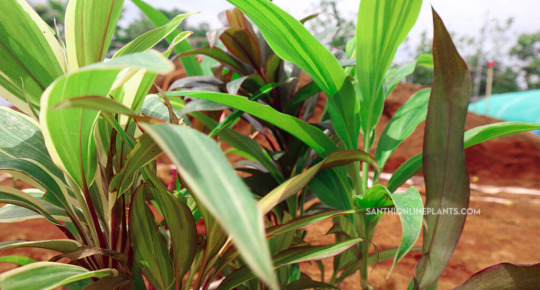
Ti- plant Varieties
This croton plant variety range from about 100+ plants. Among those the most popular varieties such as Cordyline congesta, cordyline rumba, cordyline kiwi, black magic, australis purpurea, Lemon-lime, miss andrea, red Ruby, celestial queen, & Hybrid ti.
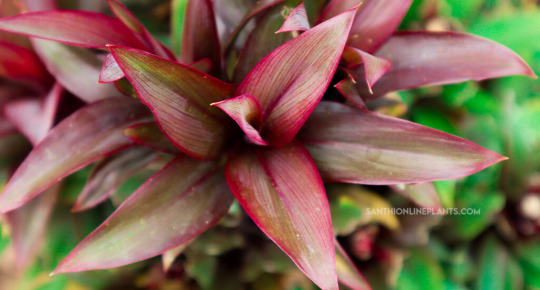
Cordyline congesta
This croton plant variety has attractive dark-colored foliage with smooth, glossy broad leaves. It is fast growing plant with a woody stem.
Benefits
The placement of ti -plant croton plant is believed to bring good luck, peace and positivity to home.
Cordyline Ti plants are pests & diseases resistant plants.
The most beautiful feature of this plant is the colorful foliage & air-purifier.
Cordyline fruticosa-ti plant crotons
Blog Completed By: Santhionlineplants
#t is fast growing plant with a woody stem.#ti plant congesta#Cordyline rumba#The most attractive ornamental plant grows like dracaena plants with wide long leaves. The foliage color seems to be dark green with pink s#croton plant#Andrea#This Hawaiian ti plant has a wide range of creamy yellow stripes which make the environment look eye-catching. This ti plant placement can#hawaiian ti plant#Care & Maintenance#Soil#This cordyline ti plant loves to grow in a wide range of fertile soil preferably acidic pH. Soil may be sandy loam#clay#or coco peat potting mix.#soil#Watering#This good luck plant requires regular intervals of watering during the summer season. Minimize watering the cordyline plants during the win#watering for ti plant#Sunlight#Sunlight requirement for this variety is direct sunlight of 4-5 hours with partial shade. Too much light may fade some variegated cordyline#sunlight#Propagation#This croton variety propagated through the methods such as Tip cuttings#Stem cuttings & Air-layering.#Tip Cuttings#From mature plants take the tip cuttings. Take tip cuttings from 3-4 cm of the plant. And plant the cutting in potting mix or soil.#Stem Cuttings#Take 3-4’ cuttings from the matured plant just below the node of the plant and place the plant in the prepared potting mix.#stem cuttings#Placement#The placement of this plant in both indoor & outdoor environments.
0 notes
Text
Discover the Five Most Beautiful Flowers and How to Cultivate Them for Your Garden
If you’ve ever dreamed of transforming your garden into a vibrant paradise, you’re in for a treat. Imagine stepping outside and being greeted by the most beautiful flowers, each one more breathtaking than the last. It’s not just a dream—it’s a possibility with the right knowledge and care. In this guide, we’ll explore five of the most beautiful flowers and share expert tips on how to cultivate them in your garden. Let’s dive in and get started!

Picture this: a garden that’s alive with color, where every flower is a masterpiece. The secret to achieving this vibrant vision is knowing which flowers to grow and how to care for them. In this article, we’ll explore five of the most beautiful flowers that can turn any garden into a blooming paradise. From classic roses to cheerful sunflowers, these flowers will add beauty and charm to your outdoor space. Ready to get started? Let’s dive into the world of beautiful blooms!
1. Roses: The Classic Beauty
Roses are often hailed as the quintessential garden flower. Their timeless beauty and variety of colors make them a favorite among gardeners. Whether you prefer classic reds or delicate pastels, roses can bring a touch of elegance to any garden.
Care Tips:
Sunlight: Roses thrive in full sun. Aim for at least 6 hours of direct sunlight each day.
Soil: They need well-drained soil enriched with organic matter. Mixing in compost can provide essential nutrients.
Watering: Water deeply but infrequently. Avoid wetting the leaves to reduce the risk of fungal diseases.
Pruning: Prune roses in early spring to remove dead or diseased wood and to encourage healthy growth.
2. Orchids: The Exotic Wonders
Orchids are known for their stunning, intricate blooms and exotic appeal. While they’re often associated with indoor cultivation, many orchid varieties can thrive outdoors in suitable climates.
Care Tips:
Light: Orchids prefer bright, indirect light. Too much direct sunlight can harm their delicate leaves.
Humidity: High humidity is key for orchids. Consider using a humidity tray or misting the plants to maintain moisture levels.
Watering: Allow the top inch of soil to dry out before watering again. Ensure good drainage to prevent root rot.
Temperature: Orchids generally prefer temperatures between 60-75°F (15-24°C). Keep them away from temperature extremes.
3. Tulips: The Vibrant Showstoppers
Tulips are famous for their vibrant colors and elegant shapes. They’re a popular choice for spring gardens and can create a spectacular display when planted in groups.
Care Tips:
Planting: Plant tulip bulbs in the fall, about 6-8 inches deep. They need a cold period to bloom properly.
Sunlight: Tulips thrive in full sun but can also tolerate partial shade.
Soil: Ensure well-drained soil to prevent waterlogging. Tulips don’t like sitting in wet soil.
Watering: Water the bulbs after planting and keep the soil moist but not soggy until they start to grow.
4. Peonies: The Luxurious Blooms
Peonies are renowned for their large, fragrant flowers and lush foliage. They add a touch of luxury to any garden with their stunning blooms and rich colors.
Care Tips:
Sunlight: Peonies do best in full sun but can also grow in partial shade.
Soil: They need well-drained, fertile soil. Adding compost or aged manure can improve soil quality.
Watering: Keep the soil consistently moist but not waterlogged. Peonies appreciate regular watering during dry spells.
Support: Taller varieties may need staking to keep their large blooms from flopping over.
5. Sunflowers: The Cheerful Giants
Sunflowers are the epitome of joy with their bright yellow petals and towering stems. They’re perfect for adding height and a splash of sunshine to your garden.
Care Tips:
Sunlight: Sunflowers require full sun, so plant them where they’ll get at least 6-8 hours of direct sunlight each day.
Soil: They prefer well-drained soil with plenty of organic matter. Adding compost can enhance soil fertility.
Watering: Water regularly, especially during dry periods. Sunflowers need consistent moisture to support their growth.
Space: Allow plenty of space between plants as they can grow quite large and need room to spread out.
Choosing the Right Location for Your Flowers
The location you choose for your flowers can significantly impact their growth and health. Consider factors like sunlight, soil type, and space requirements when planning your flower beds. For example, roses and sunflowers need plenty of sunlight, while orchids and peonies can tolerate partial shade.
Soil Preparation and Fertilization
Healthy soil is the foundation for beautiful flowers. Prepare your soil by incorporating organic matter such as compost. This improves soil structure, fertility, and drainage. Regularly fertilize your flowers according to their specific needs to ensure they get the nutrients required for vibrant blooms.
Watering Needs and Techniques
Proper watering is crucial for flower health. Most flowers benefit from deep, infrequent watering, which encourages strong root growth. Adjust your watering routine based on weather conditions and the specific needs of each flower type. Be mindful not to overwater, as this can lead to root rot.
Pruning and Maintenance Tips
Pruning helps maintain the shape and health of your flowers. Remove dead or diseased parts regularly to prevent the spread of diseases. Deadheading, or removing spent blooms, encourages new growth and prolongs the flowering period.
Dealing with Common Pests and Diseases
Flowers can attract pests and diseases that may affect their appearance and health. Keep an eye out for common issues like aphids on roses or fungal infections on orchids. Address problems promptly with appropriate treatments to keep your flowers looking their best.
Seasonal Care for Optimal Growth
Each flower type has specific seasonal needs. For example, tulips need to be planted in the fall, while sunflowers should be planted in the spring. Adjust your care routine according to the season and the specific requirements of your flowers.
Designing a Stunning Flower Bed
Creating a beautiful flower bed involves choosing complementary colors and arranging flowers to create visual interest. Mix different flower types and heights to add depth and dimension to your garden. Consider adding elements like mulch or decorative stones to enhance the overall look.
The Joys of Growing Beautiful Flowers
Growing beautiful flowers is not just about enhancing your garden's appearance; it’s also about the joy and satisfaction that comes from nurturing something and watching it flourish. Flowers can bring a sense of peace and accomplishment, making your gardening efforts truly rewarding.
Conclusion
Creating a garden filled with the most beautiful flowers is within your reach. By understanding the needs of each flower and providing the right care, you can enjoy a vibrant and flourishing garden. From classic roses to cheerful sunflowers, these stunning blooms will add color and charm to your outdoor space. So, roll up your sleeves and start planting—your dream garden is just a few steps away!
0 notes
Text
Does Bok Choy Need Full Sun?

Does Bok Choy Need Full Sun?

How To Grow

Fertilizer

Shop Seeds

Shop Fertilizer
Bok choy is a nutrient-rich vegetable that is gaining more and more popularity in both home gardens and commercial farms.
This leafy green is relatively easy to grow, but one of the most frequent questions asked by gardeners is whether bok choy needs full sun or not.
In this article, we'll discuss what kind of light conditions are necessary for successful bok choy growth, as well as how you can best optimize your garden for maximum yields.

Bok Choy Menu
What is Bok Choy?
Bok choy, also known as Chinese cabbage, is a leafy vegetable that is commonly used in Asian cuisine. It has thick, crunchy stems and tender, dark green leaves.
Bok choy is a member of the Brassica family of vegetables, which also includes broccoli, kale, and cauliflower.
One of the great things about bok choy is that it is relatively easy to grow, making it a popular choice for home gardeners.
As an organic gardener, I appreciate the fact that bok choy can be grown without the use of harmful pesticides or chemical fertilizers.
By using organic methods such as composting and crop rotation, I can ensure that my bok choy is both healthy and sustainable.
In addition to being easy to grow, bok choy is also very nutritious. It is a good source of vitamins A, C, and K, as well as calcium and iron. Bok choy is also low in calories and high in fiber, making it a great addition to any healthy diet.
When it comes to cooking with bok choy, there are many different ways to prepare it. It can be sautéed, stir-fried, steamed, or even grilled.
Bok choy is a versatile vegetable that can be used in a variety of dishes, from soups and stews to salads and sandwiches.
Overall, bok choy is a great choice for any home gardener looking to add some nutritious and delicious vegetables to their garden.
As an organic gardener, I highly recommend giving bok choy a try and experimenting with different ways to prepare it. Your taste buds (and your body) will thank you!

Create a One-of-a-Kind Garden with Our Range of Artistic Seeds
Sunlight Requirements for Bok Choy
As an organic gardener, I've had a lot of experience with growing bok choy.
One of the most important things to consider when growing this leafy vegetable is the amount of sunlight it needs.
Bok choy is a cool-season crop that thrives in temperatures between 50-70°F. When it comes to sunlight, bok choy needs at least 4-5 hours of direct sunlight per day, but can also tolerate partial shade.
However, if it doesn't get enough sunlight, the plant may become leggy and produce smaller leaves.
On the other hand, if it receives too much direct sunlight, the leaves may become bitter and tough.
So, how can you ensure that your bok choy plants are getting the right amount of sunlight?
One way is to monitor the area where you plan to grow your bok choy.
Make sure that it is a spot that receives at least 4-5 hours of direct sunlight per day.
If it doesn't, consider planting in a different location or providing shade for the plant during the hottest part of the day.
Another solution is to plant bok choy during the cooler months when there is less intense sunlight. This will help to prevent the leaves from becoming bitter and tough while still allowing the plant to receive enough sunlight to grow.

Transform Your Garden into a Masterpiece with Artistic Design & Rare Tomatoes
Factors that Affect Bok Choy's Sunlight Needs
Bok choy is a leafy green vegetable that is popular in many Asian cuisines.
As a cool-season crop, it requires a specific set of conditions to thrive.
One of the most critical factors that affect its growth is sunlight.
Season: Bok choy is a cool-season crop that prefers moderate temperatures between 60°F to 70°F.
It can tolerate partial shade during the hot summer months, but full sun exposure is needed in the cooler seasons.
Planting bok choy in the right season and providing the appropriate amount of sunlight is crucial to its growth.
Location: The location of your garden bed plays a significant role in determining the amount of sunlight that your bok choy plants receive.
If your garden bed is situated in an area that receives partial shade, you may need to relocate your plants or adjust your planting time to ensure that they get enough sunlight.
Soil quality: Bok choy thrives in soil that is rich in organic matter and well-draining.
Soil that is too compacted or lacking in nutrients can stunt the growth of your plants, making them more susceptible to damage from pests and diseases.
Organic gardening practices like composting and using natural fertilizers can help improve soil quality and promote healthy plant growth.
Watering: Over or under watering your bok choy plants can affect their ability to absorb sunlight.
Over-watering can lead to waterlogged soil and root rot, while under-watering can cause leaves to wilt and dry out.
Proper watering techniques, such as watering deeply and infrequently, can help maintain soil moisture levels and promote healthy plant growth.
Organic gardening practices can help ensure that your bok choy plants receive the optimal sunlight and growing conditions they need to thrive.
By maintaining healthy soil, providing adequate water and nutrients, and planting in the right season and location, you can enjoy a bountiful harvest of this delicious and nutritious leafy green.
Bok Choy needs full sun, a few hours per day
For it to grow in abundance and thrive on its way.
Its crop is the best when it gets more heat,
But be aware not to let it burn or bleat.
The leaves should be crisp and bountiful too,
Lovely shades of green with some dapples of blue.
A pot is often enough for the plant to develop,
But vigilance may be needed when temperatures start to envelop.
With proper attention and full sun's range,
This vegetable will give you a delightful exchange.
Chappy The Gardener
See the amazing results for yourself!
Tips for Growing Bok Choy in Different Light Conditions
Growing bok choy can be a rewarding experience, but it's important to know how to properly care for it, especially when it comes to sunlight requirements.
Here are some tips for growing bok choy in different light conditions:
Full Sun: If you have a sunny spot in your garden, bok choy can thrive in full sun.
However, in hotter climates, it's important to provide some shade during the hottest parts of the day to prevent the plants from becoming stressed.
Partial Sun: Bok choy can also grow well in partial sun, which is defined as receiving at least four hours of direct sunlight per day.
In this case, it's important to make sure the plants are getting enough light, so avoid planting them near taller plants that may cast too much shade.
Indoor Growing: If you live in a climate with harsh winters or limited outdoor space, bok choy can also be grown indoors with the help of grow lights.
Place the lights about six inches above the plants and keep them on for at least eight hours per day.
Seedlings: When starting bok choy from seed, it's important to give them plenty of light to help them germinate and grow.
This can be accomplished with a grow light or by placing the seedlings in a bright, sunny spot.
Soil Quality: Bok choy grows best in soil that is rich in organic matter and well-draining.
Be sure to amend the soil with compost or other organic materials before planting.
Watering: No matter what light conditions you are growing bok choy in, it's important to keep the soil consistently moist but not waterlogged.
This can be accomplished by watering deeply once or twice a week, depending on the weather conditions.
By following these tips, you can successfully grow bok choy in a variety of light conditions and enjoy the delicious, nutrient-packed greens all season long.
And don't forget, organic gardening practices like using compost and avoiding chemical fertilizers can help promote healthy plant growth while also protecting the environment.

Compost
Manure

Liquid Fertilizer
In conclusion, the answer to whether or not bok choy needs full sun is dependent on a few factors.
First, you should consider your climate and how much direct sunlight it receives throughout the day.
Second, you should consider the variety of bok choy that you are growing as some varieties may prefer more shade than others.
Third, if you want to maximize your harvest, try planting in an area that receives both partial sun and partial shade.
Click To Grow

Organic Seeds
Shop Fertilizer

Shop
Helps Us Grow - Share If You Like
Facebook
Twitter
LinkedIn
Pinterest
Reddit
WhatsApp
Read the full article
0 notes
Photo


How to grow a beautiful flower garden
A quick guide to planting flowers guides you on how to plant a beautiful flower garden, including plant purchase and soil preparation, and provides preparations and skills before planting and planting flowers. Learn how to build a beautiful physical store for annual and perennial flowers, especially suitable for beginners.
It's best to grow flowers when there is no extreme heat or sunshine. Under cloudy conditions, if the weather forecasts rain, it is ideal. Most floral plants should be planted after the last frost date in your area. Flowering in spring is the most popular time, but perennials can also be planted in early autumn in the north and late autumn in the south.
Perennials can dazzle people from spring to autumn, and annual plants can almost instantly improve rapid flowering. You can also start with seeds, or purchase transplanted plants in a physical store, but once you have purchased your plants, there are some basic steps to make your flowers have a perfect start in your yard.
"The earth laughs in the flowers". By planting flowers and plants, your home or physical store will become a joyous and bright place-this is the way for beautiful nature to express its happiness. Follow these steps to make your favorite place happy because of flowers.
1.The right plant, the right planting place
Pick your place. Although flowers are usually very easy to grow, they are not easy to grow. Do you choose plants that love the sun, shade, or both? The first step is to arrange your plants in a place where they can get their favorite sunlight (plants that love the sun should be outdoors, and plants that need shade should be placed in a sheltered place).
Some flowers are difficult to grow in places with too much sun or too much shade. Learn more about what kind of sunlight is best for your flowers. If you want to plant a special plant, understand the plant's sun exposure preferences, and choose your plot accordingly. You will most likely eventually want to pick an area with more or less sun than your original plot.
Full sunlight usually refers to direct exposure to the sun for more than 8 hours a day, which is not necessarily continuous. However, partial shade usually means 5-7 hours of sun per day. The definition of shade is not the same, the key lies in how deep shade is. For example, mottled shade gives more light than deep shade.
(How much effort are you willing to put in--then find a suitable plant, and you will have greater success in annual and perennial plants.)
2.Have the best soil
Flowers are the same as most plants. Good soil is needed to grow healthy plants. Whether you are planting flowers in pots or gardens, good soil is essential. Find the best-potted flower culture medium for the flowers you plant, and then try to find the best location or potted flower combination for your flowers.
Whether you are planting perennials or annual plants, preparing the soil environment in advance will help your plants thrive. Annual plants are likely to be less picky about everyday life because they only exist for a year or so. However, the better the plant growth conditions, the better the plant performance.
Under normal circumstances, most flowering plants grow best in a soil environment that is loose, well-drained, and rich in organic matter.
1. You don't need to dig a very large area to plant flowers, but you should dig enough soil. You can also add some compost to improve the soil structure. Dig the soil layer to a depth of at least 3-5 inches.
2. Avoid excavating or processing the soil layer when the soil environment is wet and damp to avoid compaction.
3. The roots of plants must have a certain space between the soil layer particles before plants can grow.
4. One way to test whether the soil can work is to dig a small sample of the soil in a smaller hole. Then squeeze it into a ball, and finally throw the soil on a hard surface, such as a rock or a sidewalk. If the soil is kept together, it means that the soil is too wet for planting, but if the soil is broken, it can be planted.
5. Organic chicken manure fertilizer is milled and composted to give plants a balanced supply of fertilizer. Especially suitable for covering and retaining moisture!
6. It should not be too sandy, not too sticky, and there must be sufficient organic compounds to make it drain well and attract the roots of the plants-the key to the smooth planting of flowers, just like planting vegetables.
(You can also add some 10% slow-release all-around balanced granular fertilizer to the soil before planting.)
3.Choosing Your Flowers
Selecting the right plants for your flower garden is often a matter of preference, but with so many species and varieties available it can be mind-boggling.
1. Seeds or plants? Both annuals and perennials can be sown from seed directly in the garden, but it will take a while for them to sprout, develop and bloom -- several weeks for annuals, up to a year for perennials. That's why many gardeners start seeds indoors weeks before it's warm enough to plant them outside. Or you can buy plants already sprouted. It's better to buy plants that aren't in bloom yet, though; you want them to do their blooming in your garden, not in the greenhouse.
2. Consider the following when designing a garden: hardiness, color, fragrance, height, time of bloom and size of plant. Do you want to attract hummingbirds, butterflies or songbirds? Or are you trying to create a work of beauty just for you?
3. Look for short, stocky plants with few flowers and healthy, disease-free foliage. Avoid plants that are spindly, discolored or wilted.
Pay attention to the sun exposure guidelines for specific varieties of flowers. While the plants available from your local garden center are suitable for your climate, be sure that you select new plants that will thrive in the amount of sunlight that your garden bed receives.
4. Read the tag for the watering requirements for the flowers. Some need water often, while others require it only infrequently. If you are getting multiple different species of flower, try to choose ones with similar watering requirements.
Of concern is the cost of labor. The price for annual plants to bloom all seasons is that they must be watered and fertilized regularly. This is due to a large amount of water, nutrients, and sunlight required to bloom all these flowers throughout the season.
You may also need to remove the head-cut off the dry petals to encourage the plant to bloom more. Perennials are not completely carefree-depending on the species and your climate and soil, they must also be partially watered and fertilized, but they don't have as much attention as annual plants. Usually, the perennials that require the least maintenance are native plants.
Flower horticulture can be a joy; it can also be confusing. There are tens of thousands of plants to choose from so that there are more ways to combine them. Rome wasn't built in a day. Start small and don't worry about making mistakes. Next year you can move, remove, or dig out things that are not useful this year, and you can embrace things that are well done at will. You can find a garden design style and plants that make you happy, and discovering what it is will be unexpected happiness.
Botanical #Herb #Vegetable #Orchard #Urban #Flower #Guide #Tips #Best #garden
Author: Ms.Geneva
Link: https://www.thumbgarden.com/how-to-grow-a-beautiful-flower-garden/
Source: ThumbGarden
The copyright belongs to the author. For commercial reprints, please contact the author for authorization, and for non-commercial reprints, please indicate the source.
#herb seeds#herb garden#vegetable garden#vegetables#orchard#urban#flowers#guide garden#tips garden#best#thumbgarden#gardening#garden
1 note
·
View note
Text
Essential Tips for Starting a Balcony Vegetable Garden
Essential Tips for Starting a Balcony Vegetable Garden
No winter last-places forever; no spring bounces its turn. There is a sweetness in life-time that does not fade. Winter, it’s time for residence. January and February are such a good time to plan your balcony vegetable garden-variety. Oscar Wilde once said, “Wisdom comes with winters.
” The preparation of our neighbourhood of growth, but most importantly, the preparation of our recollections is the key to a successful and worthwhile vegetable season. Read the rules and regulations for your construct if you live in a rental property. How much extra value can your balcony/ patio take? The weight of the pans full of clay plus ocean and last but not least the plant itself. You can be utilized lightweight receptacles made of plastic, fiberglass or dust culture bags are combined with lightweight mixtures.
If your balcony can brave ponderous onus, can you perform fostered wooden berths use to use your infinite more effectively. 2. Calculate the time you have Maintenance is important, even in a small garden.
There is only one simple rule: if you is not have time, you should low-maintenance vegetables develop. Tomato, loot, herbs, nuts, zucchini, cucumber.
.. But even they still need to be careful. Even if your balcony is large, I still recommend starting small-scale and gradual. You can always buy and flower more, but if you start slowly you can get a feeling of what works and what is not before making an investment/ commitment too large.
3. Draw up a plan before you start. Do not just buy veggies that are ready to plant, unless you want to deplete a fortune. Buy seeds or ask for friends or gardeners in your community. Try to find sales cups or shape your own container.
The only thing you have to spend good coin on, is potting clay of good quality. Regular “dirty” and cheap moor is not sterile and campaigns diseases and difficulties. A balcony vegetable garden with a few cases containers is maybe not very expensive, but it also depends entirely on what you want there.
It is therefore better to take your time to avoid out of budget. 4.
Choose the right floras for your balcony. Do not waste time and duration on seeds which is not going to flourish. Now are the three single most important factor: how much sunlight, gust and how hot your balcony is going to be. And of course, choose the privilege vegetables for the season. The most important issue is the amount of sunlight.
Determine the exact amount of sunlight that receive your balcony during the growing season. Keep in imagination that most vegetables require at least 6 to 8 hours of sun per day. Does your balcony face south and receive direct sunlight all day long? If so, you have the ideal balcony to grow veggies( like mine ). Numerous heydays, and most veggies, if it is well watered, will like it.
If your balcony examines to the north or the most of the day is shaded by other structures, you should looking for herbs or veggies that they are able stretch in partial shade.
There are also vegetables that elevate more sunlight, but can grow in the subtlety – it will grow more slowly. Meanwhile, the darknes get no direct sunbathe or manifested light-colored during the day. This is simply not a good target to grow vegetables. Most plants need light to grow.
But I have people’s success floors with lily-white asparagus, chicory, ripens, microgreens, wheatgrass learn … Is your balcony or terrace breezy? Watch out for extreme conditions.
The higher “youre ever”, the more wind you are likely to have, and red-hot drying hurricanes can dry out your seeds abruptly. Build a trellis or cable mesh which can block the prevailing wind while it helps to climb vineyards. If the wind bakes up, you really stay on the water.
There are ways to create windbreaks to protect fragile flowers by larger bushes that are wind accept is to plant before the softer. You are also welcome to use plants that do not like gale, plaza in low containers near the storey to give them more protection.
How sizzling is your balcony? Balconies and ceilings in urban areas can get hot at night in summer. Not all seeds thrive in extreme heat, e.g. Lettuce, hence, it would be advisable to make this into account when planning.
I achieved success in the summer with loot under a raised bed of other vegetables! It is also important to cover the grind to retain water. If done properly, the membrane shortens the time required for irrigating, weeding and pest authority. Overall, it came better, healthier arising in fruits, vegetables and flowers. 5.
You need a proposal in advance. Prepare pre-layout according to the size and contour of your balcony. A big representation on paper is enough to give you an account of the opportunities that you have in your gap. Arrange beds and largest receptacles around the outside to determine space and disperse heavines evenly.
Balconies are usually microclimates, which differs greatly from the environment on the ground.
There may even be different microclimates on a small balcony. If an locality is shady, it can be one climate, if another area is exposed to the wind, it a different atmosphere. So opt which vegetables to develop, is the key to a successful harvest. Vegetables that blush from a bud, such as cucumbers, tomatoes, peppers and squash, does not like disreputable neighborhoods. Plant it in full solar areas that get the most direct sunlight per day.
Root veggies such as beets, carrots and potatoes can also grow in partial shade with less direct sunlight, but appreciate at least half a daytime full of sun. Leaf vegetables such as leaves, spinach and lettuce is the most tolerant vegetable growing in the shadow. If you keep these seeds in the color as the season progresses, it will last longer. 6. Healthy soil is the key Healthy soil is the key to growing strong, dynamic weeds which resists pests and diseases and displays abundantly.
Soil is living and consists of many constituents, including mineral specks, liquid, organic matter, breath and microorganisms.
The symmetry between these personas is what needs to be maintained for a healthful garden-variety. Like all living thing, soil is required to be fed become a nourishing environment offer to grow your vegetables. Do not feed it with cheap chemical fertilizers. Long before the brand-new proliferating season began, I evacuated the bowls from last-place season, sifted through the clay and the root system, remove all hidden insects, grass or debris.
Baked the grunge in the sunlight are responsible for ensuring that weed seeds, insect eggs and pathogens then destroyed. And the most important thing is that you return the nutrient material in your soil. I have Bokashi compost used to form fertilizer from organic kitchen garbage. I even included flower debris to Bokashi. The round of life is complete

The mixed compost too helps to kill the pests and weeds.
Cover it or wrap it, keep it coming incubated for a few weeks. 7. Indoor sowing& Use mini greenhouse to sow early With cold weather in Germany is it also necessary to to harvest in early July to harvest in early July. If you have a greenhouse, you can some types of vegetables point of February, mid-March, sown: carrots, pakchoi, some herbs ..
. If the nighttime temperature are greater than 10 deg C, seed can be sown outside. That room you can have more collect than usual. 8. Polyculture is the healthy route of vegetable garden.
If you have different or more cultivates of different embeds grown in the same environment, you produce greater provides and less office. All embeds will wonderfully promote the development of the other and also protect one another from pests if they pick the companion carefully. It can be overwhelming at first, therefore, we need to have a good plan before we start planting.
I disseminate carrots with immediate radishes together in a berthed. Carrot seed makes forever to bud, while radishes merely take a month to harvest, and you can grind through it, which then thrives the opening for the roots.
Or enormous seed like turnip. Although it starts small-time, it gets highly thick. Intermediate door and intermediate door, weed fast pastures such as radishes, projectile or lettuce. By the time the prime bushes originate in their expanse, you will have gathered all your crops. 9.
Change crops every year As harvests yearly embed in different grimes, forecloses nutrient reduction and the cycles of besets and illness are interrupted, so that the garden-variety soil remains healthy. Meanwhile, monoculture is against any form of traditional harvests and cultivation of meat. They replant the same harvests in the same field, without any other kind of flowers. It is the basis of large-scale farm organizations who have been trying to control our nutrient resources for decades. I follow the three-year rule for all vegetables.
Members of the same plant family should not be more than formerly every 3 or four years seeded in the same soil.
Broccoli, for example, shall not be required to be be germinated after green, since they are both members of the clam lineage. That’s it for today! See you in other horticulture vlog :).
Read More: 10 Things I Wish I’d Known Before Starting a New Vegetable Garden
from https://ift.tt/3qgQ85U
0 notes
Text
Mushroom cultivation at home
Amateur mushroom cultivation we recommend starting with oyster mushrooms. This delicious mushroom is the best adapted to cultivation at home. He has a number of valuable qualities: unpretentious and early appearance of fruit, from planting to first harvest is 30-40 days; high yielding - 1m2 can be removed up to 10 kg of mushrooms per month. Oyster mushrooms the easiest and least expensive in the artificial cultivation. They grow luxuriantly on all kinds of solid wood, wood by-products (sawdust, paper, straw of cereals, stalks and cobs of corn to dry the crushed fibers of sugar cane, coffee residues (shell, husk, stems and leaves of coffee), the husk of seeds of cotton, sunflower husk and other materials, too numerous to mention.
In nature, the oyster mushroom is widely distributed and she can often be seen in autumn on weakened and dead trees, stumps, Valere. She loves cool weather, not even afraid of the frost, its fruit bodies are not afraid of frosts to -5C.
To grow oyster began relatively recently, in the beginning of our century. First used extensively, the method of cultivation of mushroom. Logs of deciduous trees were cut into blocks, drilled holes in them and put the pieces of the pileus and later the mycelium. Of these artificially infested bars in forest clearings arranged mushroom plantation. That is growing so mushroom are on the path of imitation of nature, i.e. cultivated oyster mushroom on stumps and logs. The extensive method is suitable for those lovers who have a wood burning wood has little time to care for mushrooms.
But we will not discuss in detail this method of growing oyster mushrooms, because he has a lot of disadvantages: complete dependence on the vagaries of the weather, overgrown lasts 2 - 3 months, a very low yield. Those who do not like to sit and wait when you can harvest, there is a simple way to produce mushrooms regardless of climatic factors and even the time of year. For growing oyster mushrooms at home, we recommend that the substrate is to use a straw cereals (wheat, rye, barley) or a husk of sunflower. The processing of these substrates is somewhat different, so we will consider them separately, but ANY SUBSTRATE MUST BE DRY, CLEAN, WITHOUT IMPURITIES, ODORS AND MOLD.
Straw of cereals in this respect, the most common raw material for oyster mushrooms. The degree of reduction of yield of oyster mushroom substrates of straw of various cereal crops are the following: wheat, rye, barley, oats. The straw should be broad, porous, moist and not infected. Straw require grinding, and better conditioning, but on the whole it produces good yields. Characteristics of substrates made of straw cereal crops that, depending on the species, cultivar, maturity, method of storage, different is the water saturation. If, for example, from wheat straw is sufficient for 40 minutes of soaking in cold water, for straw this year, especially recently, after collection, may require a day or more treatment chemical substances or mechanisms for the partial destruction of the wax layer. Similar fluctuations are typical for batches of straw with different fields, different methods of storing, crushed and not crushed, stahovanie or briquetted. Therefore, it is desirable to take the straw from the same manufacturer, if it is not possible to stock up in normal annual demand. If the straw is fresh and with a thick waxy coating, it requires more soaking up to 12 hours.
At home widespread hydrothermal treatment (water treatment).
Take a container (a pot, a barrel) a large amount, tamp it in the straw. The substrate is compacted tightly, but not excessively, pour water (preferably warm) and heated to bring to a temperature of 65-70C (straw not to cook!). Be kept at this temperature for 3 hours, drain the water, cooling to 20-25C. The substrate can be spread on any surface, the main objective is to remove excess water, suitable for bath or table, under which two legs, put bars to form an angle of inclination.
When the temperature of the substrate is decreased to + 20-25C, proceed to landing. While the substrate cools down (15-30 minutes), You have time to prepare the site, which will host inoculation (it must be as pure as possible), a plastic bag and seed mycelium. Plastic bags are used a wide variety of sizes. It is not recommended to use bags wider than 50 cm.
On the bottom of the package pour the substrate, tamp well, put a layer of mycelium, etc. until you complete the whole package. Free of cavities, the film should not be. The rate of planting of mycelium of oyster mushrooms 3-5% by weight of the finished substrate.
Sunflower husk, despite the apparent adaptability and the lack of necessary grinding is a complex substrate. Every party with a different processing plants must be inspected for the presence of residues of the kernel. If the amount is in the range of 3-5% by weight - this is normal and helps to increase the yield of mushrooms during the processing. Unlike straw, husk, use fresh, since prolonged storage it is heavily infected and becomes unsuitable for cultivation.
The negative is that in the summer due to the strong heating inside the blocks, the mycelium dies and work on this raw material only from October to may. Special relationships require the selection of the method of heat treatment, the application rates of planting material, temperature of incubation, the ratio of diameter and height of bags.
Husk is recommended for the shortest period of time to bring to a temperature of 90 ° C, stand 1-2 hours, drain, rinse with cold water, allow to drain 15 to 30 minutes and produce inoculation.
Remember the following rules.
1. Try to disperse the mycelium throughout the area so that 80% was closer to the walls of the package and 20% in the middle.
2. The more layers in Your bag (at least 12), the faster the substrate overgrown with mycelium.
3. Ramming ending, leave room for a drawstring.
4. Utrambovyvaya substrate with maximum effort.
5. Perforation of the package is done in the form of holes (10-20 per bag), parts or sections (4X4 7-8 cm).
6. Package filled with substrate and mycelium is called a “block”.
7. Put the blocks in a dark place with the temperature +20C, the excess moisture may drain through the cut corners of the package.
8. The air temperature is above +24C may lead to the death of the mycelium, because the inside of the substrate rises to 30-35C.
9. In 2-3 days you will notice around the grains of the mycelium arises a white halo of thin white threads - hyphae of the fungus.
10. If everything was done correctly, after 14-16 days, Your unit will be fully utilized by the mycelium and will have a kind of white solid block. If you have a small number of infected competing moldy places, oyster mushrooms will fruit, but the final yield will be reduced.
11. Shift the unit into place fruiting - it should be light, cool, hidden from direct sunlight place (basement, barn, North side shaded by trees).
12. Even after 10 days you will notice how near the holes appear bumps is primordia (future ovaries fungi).
13. Throughout the period before the advent of primordial, all care is to maintain the required temperature and humidity, regular spraying of the unit.
14. A few days of primordial adults grow mushrooms, and the higher the temperature, the faster the development. But the quality of fruiting bodies at an elevated temperature worse.
15. During the growth of mushrooms are very sensitive to dry air and insufficient ventilation. Failure to comply with the conditions of cultivation may lead to reduction of crops and the appearance of small mushrooms light in colour, the development of a deformed mushroom, the death of germs.
16. Mushrooms love humidity, but they do not fish in the water do not live. Directly beginnings of mushrooms to water should not be, it can lead to their death.
17. When the mushroom caps on top of the splice aligned edges, it is time to harvest. Fungi disrupt aggregates.
18. Using this method, and a little experimenting, You will not only provide your home with valuable, nutritious and delicious product, but also learn to harvest in advance of the scheduled date.
19. You cannot use the methods homemade Amateur cultivation for industrial cultivation of mushrooms.
0 notes
Photo

HOW TO GROW A POMEGRANATE TREE IN A POT
Learn how to grow pomegranate tree in a pot. If you’ve grown citrus in the pot, growing pomegranates in containers can not be difficult for you. Moreover, pomegranate is more cold hardy and easy to grow.
Pomegranate tree if grown under optimal conditions, live up to 200 years. It is native to Middle East (Iran) and South Asia. It is a shrub or small tree that might grow up to 6 m (20 ft) but usually reduced to 2 m.
USDA Hardiness Zones — 9b – 11, *can be grown below zone 9 in containers
Difficulty — Easy
Soil pH — Neutral
Appearance
The exotic container plant is adorned with five to eight centimeters long lance-shaped leaves that are shiny and bronze in color from the bud, which later turn green.
Pomegranate flowers are delicate, bell-shaped and show up in the wild bright red. Its flowers are up to 3 centimeters wide. Ornamental varieties can have flowers in pink, cream, and even white.
In addition to the decorative foliage and flowers, it is mainly the fruits that make the pomegranate tree so desirable. They have the size of apples and a yellow-brown to a reddish-brown shell. The juicy, red pulp inside the fruit enveloping the countless seeds that taste aromatic and sweet.
Dwarf Pomegranate Varieties
Fruiting Varieties
‘Nana’ – The most interesting variety of the pomegranates trees is the dwarf variety ‘Nana’. It grows compact, floriferous and is considered robust and cold hardy, it grows in USDA Zones 7 to 11. As a container plant, it grows up to only about 1 m tall, forms orange to garnet red flowers that produce small fruits with viable seeds.
‘Provence’ – When most of the pomegranate varieties are not much cold hardy, provence is one you can look at. It can tolerate temperature down to 5 F (-15 C) and can be grown in cold climate.
‘State fair’ – State fair is manageable variety for containers. It grows up to 1 . 5 m tall and grown in USDA Zones 7 to 11.
Ornamental Varieties
‘Flore Pleno’ – It is a fruitless variety of pomegranate, the name translates as “double flower”. In summer, it produces countless beautiful orange-red flowers.
Punica granatum ‘Madame Legrelle’ – A well-known ornamental variety. A special thing about this variety of pomegranate is its extraordinary, dense double flowers that come in shiny orange to salmon colors with a white border.
Pomegranate is a manageable plant, you can also try large varieties.
Propagation and Growing Pomegranates in Containers
Pomegranate plants can be propagated by cuttings or by seeds in spring to summer when the temperature remains in the range of 68 F (20 C) but it is better to buy a 2 – 3 year old plant from nursery or online. This way you don’t have to wait long for fruits.
Propagation by seeds
Buy as ripe pomegranate as possible. Separate and clean seeds from the pulp by rubbing them with paper towel, let them dry up for a few days before sowing.
Plant the seeds no more than ¼ inches deep in light seed-starting mix. Place the pots in a bright location, optionally inside a plastic bag or greenhouse that maintains a temperature around 68 F (20 C). Always keep the soil moist. Seeds will germinate within 1 – 6 weeks depending more on the variety and climate.
Propagation by cuttings
Take several 8 to 10 inch-long cuttings. Plant the cutting in a well-drained potting mix. It roots easily and quickly at the ambient temperature of 20 degrees Celsius and high humidity.
*If you’re living in tropics, growing pomegranates is extremely easy for you, you can grow pomegranate in any season except peak summer. All other growing requirements given below are similar.
Choosing a pot
Pot should be appropriate to the size of a plant, increase the pot size by repotting as your plant grow. Also, care about to have sufficient holes in the base of pot you’re using for proper drainage.
Requirements for Growing Pomegranates in Pots
If you’ve grown citrus in a pot, growing pomegranates in a pot can not be difficult for you. Moreover, pomegranate is more cold hardy and easy to grow. It requires a lot of water and fertilizer. It is also frost sensitive but after all of this care, it rewards you with iron rich, fresh juicy fruits.
Location
Choose the sunniest location to keep your pomegranate plant happy and healthy. The more sun it will receive, the more it will fruit. However, it also thrives in partial shade but it makes the plant to bloom and fruit lesser. It is also possible to cultivate pomegranate tree near a windowsill if it receives full sun.
Soil
Soil should be loamy, rich in organic content, loose and permeable.
Watering
In the growing period, its water requirement is medium to high. Therefore, it should be watered regularly and deeply. Soil must be kept moist but not wet or waterlogged.
In the winter watering should be reduced.
Pomegranate Tree Care
Fertilizer
During the growing season pomegranate tree is fertilized regularly, fertilize after every two weeks using half strength liquid 8-8-8 fertilizer according to the manufacturer’s instructions.
Pomegranate tree in pot often becomes zinc deficient, which is indicated by yellowing leaves. To overcome this, you can spray diluted zinc solution on foliage.
Application of compost or manure is also beneficial. Take care not to over-fertilize it as it can cause the tree to produce lots of foliage and comparatively fewer flowers.
Overwintering Pomegranate
Overwintering pomegranate is similar to citrus. It is a deciduous tree that worships the sun. Most of its species are sensitive to frost. But too low temperatures, the plant has developed a protective mechanism.
It sheds its leaves and become dormant below freezing temperature. There are only a few pomegranate tree varieties that survive really freezing temperatures with more than -10 C without damage.
If the pomegranate is cultivated in a pot in a cold climate below USDA Zone 9, it is important to prune it in the fall. The best place to keep pomegranate plant in winter is the garage or basement that remains warm. Temperature while keeping it indoors should not fall below 37 F (3 C). However, the optimum low temperature for most of the pomegranate varieties is 7 C (45 F).
If you’re able to keep your pomegranate tree in temperature around 55 F (15 C) indoors and allow it to take at least 4 hours of sunlight, it will not shed its leaves and go dormant. During the period of dormancy, the pomegranate hardly needs fertilizer or water. However, the plant in winter should not dry out completely.
In spring, bring back the plant to a warm and bright place so that it’ll gradually acclimate the climate. A window that is oriented to South is good. Just when the plant shows the first sign of growth and forms a few fully developed leaves, you can again start to fertilize it and give more water. Once the temperature comes in the range of 7 C (45 F) place it outside.
Pruning
Pruning is necessary to give and maintain the desired shape of your pomegranate tree and encourage flowering and fruiting. Pruning it best done after all danger of frost has passed when the tree is about to start growing.
Prune off weak, dead and undesirable branches to direct tree’s energy to right part and shorten long branches to encourage flowering.
Repotting
Repot your pomegranate tree when it becomes slightly root bound. The right time to repot is when there are no flowers or fruits on the plant, especially when it start its growth in the beginning of growing season.
Diseases, pests, and other problems
The pomegranate tree is not very vulnerable when it comes to pests and diseases. It is mostly attacked by fruitflies, whiteflies and pomegranate butterflies.
Fruit crack is one problem that is common in all pomegranate varieties. It occurs due to fluctuation or lack of moisture in a substrate at the time of fruiting.
Harvesting
If pomegranate is grown from seeds fruits will begin to form in the third year.
Generally, the fruit will ripen in three to six months after the appearance of flowers.
Harvest pomegranate when the crust of the fruit is an intense red color. Simply cut the fruit’s stem using sharp pruning shear or knife.
85 notes
·
View notes
Text
Is it possible to grow vegetables in easy way?
The following content details about gardening ideas and Plant Growing Tips for Beginners.
Introduction to Gardening:- Most of the people dream about growing vegetables, flowers and fruits on their own especially in places like backyards, patios, balconies, pots, containers and roofs / terrace. Gardening is not only provides physical activity but also mental peace. However, you can spend some time growing plants indoors and relive from daily stress, this can also provide fresh home grown vegetables, flowers and fruits without spending money to buy these. Gardening is easy if you follow some management practices. So let us discuss how we can start a garden. First and foremost, you should decide about plants that you are planning to grow in the garden then accordingly your garden should be designed.
Gardening Ideas and Tips #1 – How to Select the Place:- Proper site selection is very important as most of the vegetables crops, fruit crops and flower crops require 7 to 8 hours sunlight though some can be grown under partial shade. You must choose a place which gets the exposure of sunlight. The selected spot should be convenient for watering and caring the plants.
edible mushroom growing kit
https://www.justhomegardening.com/8-best-edible-mushroom-growing-kit-plus-growth-tips-for-beginners
Gardening Ideas and Tips #2 – Garden Layout:- Garden layout should be based on the plot size and type of plants grown. The selected layout should have at least 8 hours of sunlight. Observe the wind patterns when you design your garden. Leave comfortable space for walking and caring your plants. In case of vine vegetables (cucumber, squash and any type gourd vegetables) and flowers (creeping roses or jasmines) or even fruits (like water melon), they layout must allow enough space to creep the vine and there should good space for supporting these vines without disturbing other plants. When you design your garden, keep in mind that the sowing distance and make sure the soil will drain out quickly in case of heavy rains. Waterlogging may cause root rot. If you plan to go for drip watering, this should also keep in mind to fix the drip lines at plant bases. Proper fencing (wooden or steel) around the garden should planned .If you are planning to grow in apartment balconies or indoors, terrace/roof (where we assume enough sun light is present in day time), you can get some kind of raised beds or containers even big pots for planting the trees. Based on the area, you can select these containers. Don’t plant tall growing plants in wind direction as it may damage the plant and crop.
Gardening Ideas and Tips #3 – Gardening Tools Required: Well, when you are into gardening, you must have basic tools for maintaining the plants and soil. The following are some of the important gardening tools required for beginners. Keep these tools handy to start a garden.
• Gloves
• Hand Trowel
• Spade
• Rake
• Hoe
• Loppers (Cutting tool especially for pruning purpose)
• Long hose with adjustable nozzle & rain wand
• Wheelbarrow (compost puller)
Gardening Ideas and Tips #4 – Preparation of Soil:- Type of soil plays major roles in home gardening. We all know the soil around houses is not that fertile and is not ideal for home gardening. Unless the soil is heavily compacted, do not till the soil deeply as deep tilling promotes the weed germination already present deeper layers and lowers the moisture holding capacity of the soil in arid climatic conditions. Irrigate/water the area 2 or 3 times each day over a two- to three-week period to encourage dormant weed seed germination. After 2 to 3 weeks, when this second crop of weeds is up, mow the new weeds off (remove) at ground level. Next, supplement (add) well-decomposed organic matter like cow dung to the soil. Even you can buy garden compost in fertilizer shops or seed shops or in nurseries and add to the soil. Always make sure to keep the garden with moisture conditions at plant base. Now the fertile soil is ready for sowing the seeds. In case of balcony growing, you directly put the garden compost in the container.
forest origins pink oyster
https://www.justhomegardening.com/8-best-edible-mushroom-growing-kit-plus-growth-tips-for-beginners
Gardening Ideas and Tips #5 – Seed Sowing:- If you are a beginner in gardening, it is preferred to grow row flowers, vegetables and herbs from easy to grow seeds. This way initially, you don’t get disappointed and you feel happy when you pick the vegetables in short period of time. Make sure the seed bed has enough moisture for germinating the seeds. Light watering should be given to seed bed before sowing the seeds. You can grow other type’s plants as well once you are little experienced with basic gardening. Each plant seed is different in terms of method of planting and germination and growing. Always buy the disease free, and high vigour seeds for good germination and quality produce. There are thousands of varieties of seeds available in the market. Hybrid and high yielding should be right choice of selection of seeds. Read the instructions carefully on the pack for seed sowing. Avoid buying too old stock and once you grow them on your own you can retain good yielding seeds for future plantation as well. In case of small seeds, care should be taken well enough to make them to germinate properly. Small plant seeds must be sown very evenly over the surface of the compost. Fine seeds must not be covered with compost as they may not germinate at all. Seeds should be mixed with fine sand for an even sowing. Do not use force to water after sowing otherwise seeds may come out so light and evenly distributed watering should be done. Small plant seeds are generally photo-sensitive and most of seeds require light to germinate. However some of the seeds may require shade and darkness. So it is very important to read the sowing instructions on the seed packet.
Gardening Ideas and Tips #6 – Watering/ Irrigation:- Frequency of watering depends on soil moisture holding capacity, plant age, and climate. Watering should be done frequently when seeds are germinated and started growing (seedlings). Thumb rule is that soil should have unique moisture conditions. Care should be taken to avoid overwatering and plants should not go through water stress in summer or drought periods.
Gardening Ideas and Tips #7 – Climatic Conditions:- You must select to grow the plants according to the seasons in your garden and the local climatic conditions. Some plants are suitable to grow in cold / winter conditions whereas some are suitable for rainy and summer seasons.
Gardening Ideas and Tips #8 – Plant Care Instructions:- This is one of the major tasks in home gardening. All plants need some attention throughout their growth period. The following are some of the tasks need to be performed as part of plant care.
• Weeding
• Mulching
• Manures/Fertilizers
• Pruning
• Training
• Irrigation
• Pests and Disease control
What are weeds? Well they are the plants grown on their own in your gardening by competing with main plants. Mostly these are grown from previous crop seeds/ birds. They should be removed as soon as possible. They compete with manures/nutrients/water with other plants. Weed problem is very less in case of container or pot and terrace gardening. Though there are many ways of removing weeds, we prefer to remove by hand. There are herbicides and other mechanical ways to remove weeds. If you are planning to grow organically, use hand method to remove any weeds from your garden.
Mulching is another way of controlling weeds or weed growth at plant base. Mulch material like dry grass or dry leaves can be used at plant base so that it can protect the plant from moisture loss and control weeds. Eventually, this dry grass can decompose and works as good organic manure at plant base.
You can use well-decomposed farm yard manure (FMY) and NPK fertilizers for based on soil type. When you buy garden compost, you no need to worry about fertility of the soil.
best mushroom growing kit for beginners
https://www.justhomegardening.com/8-best-edible-mushroom-growing-kit-plus-growth-tips-for-beginners
Pruning (cutting the branches) is an activity some plants need at different stages to give a good shape and prevent the spreading branches unevenly. Each tree has different timings for pruning the trees. Mostly tall growing and highly branched plants require this.
Training needs to be carried out by supporting tall growing plants and vines. To establish a better frame work of your garden, bamboo sticks or any kind other poles needs to be used in your back yard gardening. You can do this in containers/balcony/roof/terrace or pot gardening as well.
Timely irrigation is very important so that you never allow seedlings or plants to dry out. Monitor the soil moisture constantly to see whether the plants need any watering.
Pests and diseases are to be controlled for better produce and good yield. Use organic fertilizers like neem cake and other bio-fertilizers to control the pests and diseases in home garden. You can avoid most of the seed borne and soil borne diseases by buying disease resistant quality seeds. Usually, common disease is called “Dampening Off” is found in your home garden. This is basically caused by fungus that attacks the plants. Make sure the seedlings have good air circulation as well as making sure you don’t over-water the plants.
0 notes
Last Seen Blogs

pspagar
Untitled

qorekgus
제목 없음

circusbabyplush
No one ever leaves Hurricane.

lajuangallery
LA JUAN GALLERY

kanewithacamera
Kane with a Camera