#Tasmota
Explore tagged Tumblr posts
Visit Tumblr Blog
Explore Tumblr blogs with no restrictions, modern design and the best experience.
Last Seen Tumblr Blogs


Fun Fact
28.6 is the average number of monthly visits per US mobile user.
Text
Der erste Blog Eintrag
Vorbereitung des Blog Smart-Home-Base
Das wird es hier geben:
Io-Broker Grafana Tasmota Shelly ESP Raspberry Pi 3D-Druck LED Technik
1 note
·
View note
Photo

DIY Open-Source Home https://shores.dev/diy-open-source-home-automation-systems/?utm_source=tumblr&utm_medium=social&utm_campaign=ReviveOldPost
#Alexa#Automation#DIY#Domoticz#Gladys#Homekit#IOT#KNX#lighting#lightingcontrol#opensource#OpenHAB#tasmota
0 notes
Note
Asking all the questions from your ask game
-pi <3
hi little pi! I'll give you 12, 13 and 21. The other ones that i havent answered aren't particularly interesting
12. IRL navigation
I mostly use a combination of Organic Maps and the NS app (which just calls the 9292 api i think, but no ads), deferring to google maps and Gaia GPS for specific use cases. Im mostly just really glad I dont have to use google maps for transit here
13. notes and/or to-do
I used to pay for Todoist, really like their product. But I don't use it all that much anymore. I have Obsidian on both my laptop and phone, but no sync.
21. home automation
I have a few smart plugs That I flashed with Tasmota and I control them with OpenHAB because homeassistant is a little bitch that won't run on my less-than-performant hardware and doesn't handle running on a vps at all. Maybe I'll switch to HA if i find a winning lottery ticket in the street one day
0 notes
Text
Tasmota: Open-source firmware for ESP devices
https://tasmota.github.io/docs/
0 notes
Text
PWM frequency in Shelly RGBW2 controller
I received an interesting email from a reader of my post: https://teardownit.com/posts/shelly-rgbw2-controller-and-shelly-duo-rgbw-bulb-dangerous-light-pulsations
===== After having some bloody eyes and reading your article I decided to change the firmware on shelly rgbw2 with ESPHome so I can modify the pwm freq to 1500 Hz like you recommended. Don't know if placebo or not but I feel better :) .
I can test only with camera from phone with shutter speed at 1/1500 and no flicker (and sub multiples like 1/500). With PWM freq at 600 Hz I could see flicker on camera at anything above 1/600.
Don't know if this is the same you have tested but I was curious if you can test with a modified Shelly with ESPHome to be able to put higher frequency. I also don't know if there is a limit on the maximum frequency (the shelly or the COB LED strip it's dimming ) it will work and if is there any benefit in increasing any further.
Thank you for publishing this extensive tests online. Ciprian =====
Great news!
I was very interested and read the ESPHome firmware description. https://esphome.io/components/output/esp8266_pwm.html Perfect!
I have not previously used ESPHome, but I have been actively using Tasmota for a long time. In this firmware I also found PWM frequency adjustment: https://tasmota.github.io/docs/Commands/#pwmfrequency
Let's do the tests!
The measurement scheme is simple.


1. Old Shelly native firmware.
I found a new old Shelly RGBW2 controller with 2021 firmware in my stock.

Measurements are taken at 25% brightness. The PWM controller is running at 600 Hz.

2. New Shelly native firmware (20230913-131259/v1.14.0-gcb84623).
The PWM controller operates at 1000 Hz for a brightness of 25%.

3. Tasmota firmware.
Firmware installation is easily done without wires and additional devices using OTA. Manual: https://github.com/arendst/mgos-to-tasmota
However, I couldn't use this script and found many errors mentioned for this device.
The solution is found right here: https://github.com/yaourdt/mgos-to-tasmota/issues/102
This is my successful script:
RGBW2 must be set to Color mode. You do not need to do anything if the device is already in this mode.
The firmware needs to be downloaded from this link: http://deviceIP/ota?url=http://dl.nekohell.eu/mg2tasmota-ShellyRGBW2c.zip
Once the WiFi network is configured, you need to use two commands through the Tasmota console (changes will be saved after rebooting or shutting down the device): SetOption68 1 // The device will switch to 4-channel white mode (if you need it)PWMFrequency 2000 // PWM frequency will increase to 2000 Hz
Configuration for Tasmota and additional information: https://tasmota.github.io/docs/devices/Shelly-RGBW2/

I set the PWM frequency by a multiple margin (I was just curious). 4000 Hz.

The optical measuring tool showed an incomprehensible picture for me. But this phenomenon is outside the scope of this post, and I will deal with it later.

Conclusions.
The Shelly device manufacturer can change and does change the PWM frequency in their firmware. I really don't understand their answer about not being able/unwilling to change the PWM frequency to a safe level.
I am very grateful to Ciprian for the excellent advice. Thank you, Ciprian!
0 notes

Photo
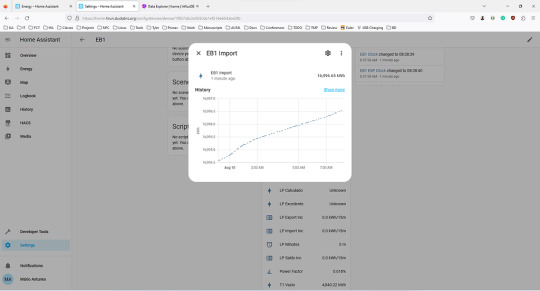
Energy dashboard missing some bars Recently I acquired a sensor for the electricity meter. The sensor page is in PT, but is a tasmota that was adjusted to the meters used in Portugal. It is connected through MQTT and I have the values in Home Assistant and the database: However, the energy dashboard has a strange behaviour: There are mentions of similar issues, but all appear to fix themselves after one update or by changing the browser. HomeAssistant is being deployed in an RPI4 with the following docker-compose: version: '3' services: homeassistant: container_name: homeassistant image: "ghcr.io/home-assistant/home-assistant:stable" restart: unless-stopped environment: - TZ=Europe/Lisbon volumes: - ./config/:/config - /etc/localtime:/etc/localtime:ro privileged: true network_mode: host depends_on: - mosquitto - mariadb - influxdb mosquitto: image: eclipse-mosquitto container_name: mosquitto volumes: - ./mosquitto:/mosquitto restart: unless-stopped network_mode: host mariadb: container_name: mariadb image: mariadb restart: unless-stopped ports: - "13306:3306/tcp" # So we can access the WebUI environment: - TZ=Europe/Lisbon - MYSQL_ROOT_PASSWORD=${MYSQL_ROOT_PASSWORD} - MYSQL_DATABASE=${MYSQL_HA_DATABASE} - MYSQL_USER=${MYSQL_HA_USER} - MYSQL_PASSWORD=${MYSQL_HA_PASSWORD} volumes: - ./mariadb/data:/var/lib/mysql - ./mariadb/config/:/etc/mysql/conf.d influxdb: container_name: influxdb image: influxdb restart: unless-stopped ports: - "8086:8086/tcp" # So we can access the WebUI environment: - TZ=Europe/Lisbon - DOCKER_INFLUXDB_INIT_MODE=setup - DOCKER_INFLUXDB_INIT_USERNAME=${INFLUXDB_USER} - DOCKER_INFLUXDB_INIT_PASSWORD=${INFLUXDB_PASSWORD} - DOCKER_INFLUXDB_INIT_ORG=${INFLUXDB_ORG} - DOCKER_INFLUXDB_INIT_BUCKET=${INFLUXDB_BUCKET} volumes: - ./influxdb/data:/var/lib/influxdb2 - ./influxdb/config/:/etc/influxdb2 ulimits: nofile: soft: 32768 hard: 32768 And the configuration file for home assistant is the following: # Loads default set of integrations. Do not remove. default_config: # Text to speech tts: - platform: google_translate automation: !include automations.yaml script: !include scripts.yaml scene: !include scenes.yaml http: use_x_forwarded_for: true trusted_proxies: - 127.0.0.1 - ::1 - 192.168.1.0/24 recorder: db_url: !secret mariadb purge_keep_days: 10 # default history: influxdb: api_version: 2 ssl: false host: 127.0.0.1 port: 8086 token: !secret influxdb_token organization: !secret influx_org bucket: homeassistant tags: source: HomeAssistant tags_attributes: - friendly_name default_measurement: units ignore_attributes: - icon exclude: # Customise to fit your needs entities: - zone.home domains: - persistent_notification - person Since the sensor values are in the database, I don’t think the issue is in the deployment. I also have no errors in the logs, nor issues in the statistics dev menu. Any idea? 2 posts - 2 participants Read full topic https://community.home-assistant.io/t/energy-dashboard-missing-some-bars/601366
0 notes
Photo

2 notes
·
View notes
Text
Configurer l'IP et le NTP sur ESP8266/32 Firmware Tasmota
Configurer l'IP et le NTP sur ESP8266/32 Firmware Tasmota #Tasmota #ESP8266 #ESP32 #Electronique #Hiteafr
Hey les techies ! J’espère que vous passez de bonnes vacances malgré la situation… Pour ma part je bricole sur Raspberry et ESP histoire de me créer un petit système domotique full DIY. D’ailleurs je vous ferais sûrement quelles articles/vidéos à ce sujet (Raspberry PI, Domoticz, MotionEye, ESP8266 et ESP32 avec firmware Tasmota) dites-le dans les commentaires si cela vous intéresse ! Les…

View On WordPress
0 notes
Photo

Ein persönlicher Hackingday ist offiziell gestartet... #tasmota #ohnechinacloud Bin sehr gespannt, ob ich das hinbekomme, oder nen Satz neue Steckdosen brauche 🤣 https://www.instagram.com/p/CR0ulwBrwx6/?utm_medium=tumblr
0 notes
Photo

Did you flash Sonoff in Tasmota? More 👉 @aelmaker 🙋 #diyhome #diytutorial #iotdevices #iotsolutions #diyelectronics #tagify_app #embeddedsystem #diycrafts #diyproject #iot #diyprojects #electronics #sonoff #tasmota (New Mexico) https://www.instagram.com/p/CRORdzZrT-3/?utm_medium=tumblr
#diyhome#diytutorial#iotdevices#iotsolutions#diyelectronics#tagify_app#embeddedsystem#diycrafts#diyproject#iot#diyprojects#electronics#sonoff#tasmota
0 notes
Photo

DIY Open-Source Home https://shores.dev/diy-open-source-home-automation-systems/?utm_source=tumblr&utm_medium=social&utm_campaign=ReviveOldPost
#Alexa#Automation#DIY#Domoticz#Gladys#Homekit#IOT#KNX#lighting#lightingcontrol#opensource#OpenHAB#tasmota
0 notes
Text
HomeAutomation reflash plugs to Tasmota
I wrote this post explaining why you might want to reflash your plugs. Now lets see how you do it.
I purchased a set of generic plugs that work with the Smart-Life app : https://amzn.to/2WNxYLV

The first step is to make a plug reflasher.
For this, I used a Raspberry Pi 3 Model B V1.2 with Image : 2020-08-20-raspios-buster-armhf-full.img
Connect a network cable (or do this via console on device not on SSH) Turn off WIFI by clicking on wifi symbol and disabling WIFI
git clone https://github.com/ct-Open-Source/tuya-convert cd tuya-convert
Now we install the bits of software it needs with ./install_prereq.sh
And start the reflasher : ./start_flash.sh
It is handy to open another window and see the log files cd tuya-convert tail -f scripts/*.log
Answer the questions to say you are sure you know what you are doing.
To put a plug in the right mode to flash it you normally press the on/off button for about 10 seconds. When plug is detected pick ‘flash with Tasmota.bin’ Wait 30-40 seconds for plug to be flashed. When it is finished it will say ‘Do you want to flash another device’
Connect to the new Wifi device form your phone. Tasmota-1234 Enter your Wifi name and password in the top two boxes (AP1 SSID and Password) Click save
Find the new plug on your wifi. I do this by going to my router and looking at the ‘client list’. It will be called tasmota-1234 or will be the one that has the shortest DHCP lease time (30 seconds or so). When you have its IP address, go to that address in your browser.
Click configure Module and pick a plug type. If you cannot find anything lcose, go for ‘Generic (18)’. For the plugs I have, I found ‘GoSund SP1 v23 (55)’ works fine. Click save and then Main menu.
Click Configuration and MQTT. This is how you will link it to Home-Assistant. For Host, enter the IP address of your control server. Te IP address stays as ‘1883’. For Client, give it a name like ‘Plug-01’. User and Password are for the MQTT user in Home-Assistant. You should already know this as you set it up (see earlier post on MQTT). For Topic – Give it a unique name. I didn’t change this at the start and found multiple plugs going on and off each time I clicked on one in Home-Assistant. Leave the ‘full topic’ as it is and click SAVE and Main menu.
Click on Configuration and ‘Other’ and set a web admin password. You will need this to get back to this screen. (when you try the login user will be ‘admin’ and the password will be what you set here). Give it a friendly name like Plug-01 and put a tick in the box that says ‘template’
The firmware version will be 8.1.0.2 (this is what currently comes with the tuya-convert program. Click on ‘Firmware-Upgrade’ to get to V9.2.x Replace the download path with : http://ota.tasmota.com/tasmota/release/tasmota-sensors.bin And click upgrade. Do not click on ‘Main menu’ – just wait. The plug will go off the network for about 2 minutes while it downloads and upgrades. If this restarts and still have 8.1.0.2 as the version, try downloading the file and upgrading using the other option on the same page to upload a file.
0 notes
Photo

Installatie van inbouw dimmers. Uitleg: kastje heeft Wifi, komt achter de schakelaar en heeft software zodat het aan te sturen is via een app of domotica, bijvoorbeeld automatisch. Schakelaar komt er weer voor en de argeloze gebruiker (lees WAF) merkt er niets van. En dat dankzij de crowd, welke de software schrijft. #tasmota #wallswitch #walldimmer #tuyaconvert #ecozonnewoning #tuya #esp #esp8266 #domotica https://www.instagram.com/p/CAIGjRkHEE3/?igshid=ukvqbnu8kiep
0 notes
Photo
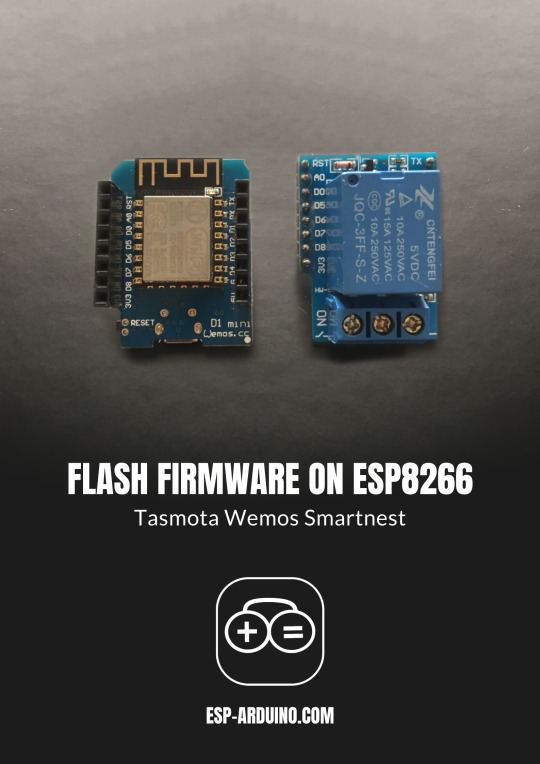
Use ESP remotely by integrating Tasmota to Smartnest.
1 note
·
View note
Photo

Developed a #wifismartswitch @Pinctechnology to make home #smarthome & more connected. Now available on #Amazon, #Flipkart, #clubfactory & on https://pinctechnology.com/product Can load #tasmota, #espos, #blynk. Also supports #alexa, #googlehome, #ifttt. Available at ₹ 649 only https://www.instagram.com/p/B_UgFMLgKb7/?igshid=1wlhpg89694nv
0 notes