#OpenHAB
Explore tagged Tumblr posts
Visit Tumblr Blog
Explore Tumblr blogs with no restrictions, modern design and the best experience.
Last Seen Tumblr Blogs


Fun Fact
Tumblr Inc. is using 66 technologies for its website.
Text
OpenHAB auf QNAP installieren (Schritt-für-Schritt-Anleitung)
In diesem Beitrag zeige ich euch, wie ihr über die Container Station die aktuellste Version von OpenHAB auf einer QNAP NAS installieren könnt. Die Installation ist dank des vom Herausgeber vorkonfigurierten Docker-Images innerhalb von wenigen Minuten erledigt. Screenshots und eine strukturierte Schritt-für-Schritt-Anleitung helfen euch bei der Durchführung...[Weiterlesen]
0 notes
Photo

DIY Open-Source Home https://shores.dev/diy-open-source-home-automation-systems/?utm_source=tumblr&utm_medium=social&utm_campaign=ReviveOldPost
#Alexa#Automation#DIY#Domoticz#Gladys#Homekit#IOT#KNX#lighting#lightingcontrol#opensource#OpenHAB#tasmota
0 notes
Text


LEGO domotics with Pybricks and a Rasbperry Pi Pico W
0 notes
Text
So did the plugin manage bluetooth by addressing the hardware directly instead of going through the bluetooth service, so the service was interfering with the plugin by using the device??
because that's the only explanation for that behavior that makes any sense to my very, very tired brain rn and that would be seriously weird
apparently the recommended way to install home assistant os is through ubuntu.
I feel a bit dirty now
38 notes
·
View notes
Text
Shelly 1PM Gen4 erklärt: Installation, Integration und Vergleich mit älteren Versionen

Mit dem Shelly 1PM Gen4 hat Shelly die nächste Generation seines kompakten WLAN-Schalters mit Leistungsmessung veröffentlicht. Wer meinen Blog kennt, wei��: Die Vorgängermodelle der Gen2- und Gen3-Reihe habe ich bereits ausführlich vorgestellt und ihre Stärken im Smart-Home-Alltag analysiert. https://youtu.be/uh5eLj0Re7w In diesem Beitrag konzentriere ich mich auf die wirklich neuen Funktionen der Gen4-Version, zeige dir, wie sich das Gerät in bestehende Smarthome-Umgebungen integrieren lässt und worin die konkreten Unterschiede zu den älteren Generationen liegen. Du erfährst, ob sich ein Umstieg lohnt – oder ob der Griff zum Vorgängermodell weiterhin ausreicht.
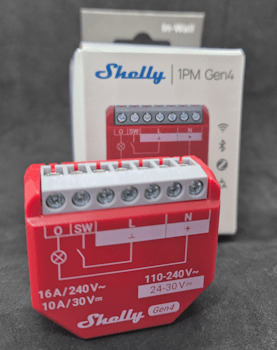
Shelly 1PM Gen4 - Vorderseite
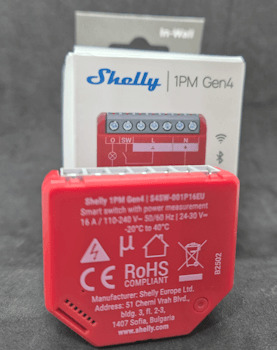
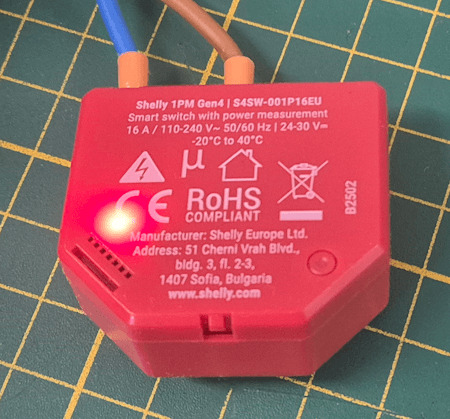
Shelly 1PM Gen4 - Rückseite
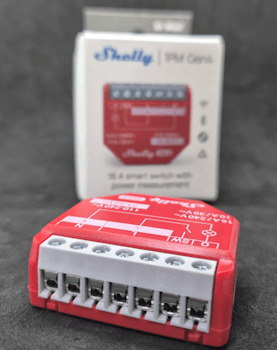
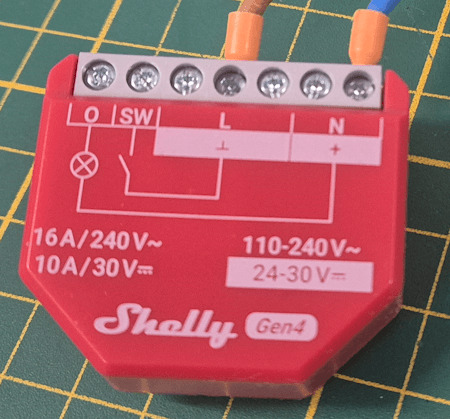
Shelly 1PM Gen4 - Klemmen
Technische Daten des Shelly 1PM Gen4
Der Shelly 1PM Gen4 ist ein kompakter WLAN-Schalter mit integrierter Leistungsmessung, der sich ideal zur Überwachung und Steuerung einzelner Verbraucher eignet. Im Vergleich zu seinen Vorgängern punktet er vor allem durch die Unterstützung moderner Smart-Home-Protokolle wie Matter und ZigBee, Bluetooth 5.0 zur schnellen Einrichtung sowie einen neuen, leistungsstarken ESP-Shelly-C68F Mikrocontroller. Hier die wichtigsten technischen Daten im Überblick: MerkmalShelly 1PM Gen4Betriebsspannung110–240 V AC / 24–30 V DCMax. Schaltleistung16 A (bei 240 V AC)LeistungsmessungJa, integriertWLAN-Standard802.11 b/g/n (2,4 GHz)BluetoothJa, für schnelle EinrichtungProzessor8 MB Flash, ESP-Shelly Chip (basierend auf ESP32)MQTT-UnterstützungJaCloud-AnbindungShelly Cloud, Shelly Smart ControlLokale APIJa (REST, MQTT, CoAP)SchutzartIP20 (nicht für Außenbereich geeignet)Abmessungen39 x 36 x 17 mmMontageUnterputz, z. B. in einer Schalterdose 💡 Hinweis: Der Shelly 1PM Gen4 ist wie gewohnt offen programmierbar und eignet sich daher ideal für die Nutzung mit Home Assistant, Node-RED, OpenHAB oder eigenen IoT-Projekten.
Einrichtung des Shelly 1PM Gen4 via Matter in Google Home
Die Einrichtung des Shelly 1PM Gen4 über Matter in Google Home ist erfreulich unkompliziert. Sobald das Gerät mit Strom versorgt wird, erkennt die Google Home App den Shelly automatisch und bietet direkt die Möglichkeit zur Kopplung. Für den Verbindungsaufbau wird zusätzlich der Matter-QR-Code benötigt, der dem Gerät auf einem kleinen beiliegenden Zettel beiliegt. Alternativ kann auch der aufgedruckte Setup-Code manuell eingegeben werden.

In den folgenden Schritten zeige ich dir anhand von Screenshots, wie du den Shelly 1PM Gen4 innerhalb weniger Minuten erfolgreich in Google Home integrierst. Wenn der Shelly 1PM Gen4 zum ersten Mal eingerichtet wird, erkennt die Google Home App das Gerät in der Regel automatisch über Matter via Bluetooth. Sollte das nicht der Fall sein – oder möchtest du den Prozess manuell starten –, dann gehst du wie folgt vor: 👉 Öffne die Google Home App und tippe unten rechts auf die Schaltfläche „+ Hinzufügen“.


Nach dem Tippen auf „+ Hinzufügen“ öffnet sich die Seite mit dem Titel „Gerät auswählen“. Hier findest du verschiedene Methoden, wie du ein neues Gerät mit Google Home verbinden kannst. 👉 Wähle die Option „Matter-kompatibles Gerät“ aus. 💡 Tipp: Die weiteren Optionen wie „Google Nest oder Partnergerät“ oder „Funktioniert mit Google Home“ sind für klassische Geräteintegration gedacht – für Shelly 1PM Gen4 mit Matter brauchst du explizit die Matter-Auswahl. Im nächsten Schritt wirst du aufgefordert, den Matter-QR-Code deines Geräts zu scannen. Diesen findest du auf einem kleinen Zettel, der dem Shelly 1PM Gen4 beiliegt. 👉 Halte den QR-Code vor die Kamera deines Smartphones, um die Einrichtung fortzusetzen.

🛑 Wichtiger Hinweis zum QR-/Setup-Code Der Matter-QR-Code, der dem Shelly 1PM Gen4 beiliegt, ist zwingend erforderlich für die Einrichtung mit Google Home. Ein entsprechender alphanumerischer Setup-Code (wie er bei vielen Matter-Geräten üblich ist) ist weder am Gerät selbst noch im Webinterface zu finden. Ich empfehle daher, den beiliegenden Zettel sofort abzufotografieren und sicher abzulegen. Zusätzlich habe ich ein Support-Ticket bei Shelly eingereicht, um zu klären, ob der Setup-Code ggf. auch digital abrufbar ist oder nachträglich erzeugt werden kann. 🔐 Tipp: Wer den Code verliert, kann das Gerät nicht erneut per Matter einrichten – eine Sicherung ist daher sehr zu empfehlen!

Nachdem du den QR-Code erfolgreich gescannt hast, startet die eigentliche Kopplung des Geräts. Dabei wird der Shelly 1PM Gen4 mit deinem Google-Konto verknüpft. 👉 Bestätige die Verbindung und folge den Anweisungen auf dem Bildschirm. Google Home baut nun eine sichere Verbindung zum Gerät auf – dieser Vorgang kann ein paar Sekunden dauern. In diesem Schritt bereitet Google Home die Einrichtung deines Shelly 1PM Gen4 vor. Dabei wird automatisch versucht, das Gerät mit dem WLAN zu verbinden, das auf deinem Smartphone oder Tablet aktiv ist. 👉 Wichtig: Der Shelly 1PM Gen4 unterstützt ausschließlich 2,4 GHz WLAN-Netzwerke – 5 GHz wird nicht erkannt.

💡 Tipp: Stelle sicher, dass dein Smartphone aktuell mit einem 2,4 GHz WLAN verbunden ist. Dual-Band-Router bündeln beide Frequenzen oft unter einem Namen – in dem Fall hilft es, das 5 GHz-Netz temporär zu deaktivieren oder ein eigenes 2,4 GHz-Netzwerk zu wählen.


Nach der WLAN-Verbindung erfolgt die automatische Einrichtung des Shelly 1PM Gen4. Dabei: - wird das Gerät final mit deinem Google-Konto verknüpft, - relevante Matter-Daten werden gespeichert, - und das Gerät wird ins Google Home-System eingebunden. 👉 Dieser Vorgang läuft vollständig automatisiert ab und dauerte in meinem Fall weniger als eine Minute. 💡 Hinweis: In dieser Phase solltest du die Google Home App nicht schließen und dein Smartphone möglichst in der Nähe des Geräts behalten. Fast geschafft! Im vorletzten Schritt der Einrichtung wirst du gefragt, in welchem Raum sich dein Shelly 1PM Gen4 befindet. Diese Angabe hilft dabei, das Gerät später in der Google Home App übersichtlich anzuzeigen und bequem per Sprachbefehl zu steuern. 👉 In meinem Fall befindet sich das Gerät im Keller, genauer gesagt in meinem Büro im Keller – deshalb habe ich hier den Raum „Keller“ ausgewählt. 💡 Tipp: Du kannst in diesem Schritt auch einen neuen Raum definieren, z. B. „Werkstatt“ oder „Technikraum“. Das ist besonders praktisch, wenn du mehrere Shellys an verschiedenen Orten nutzt.


Im letzten Schritt der Einrichtung vergibst du einen Namen für deinen Shelly 1PM Gen4. Dieser Name wird in der Google Home App angezeigt und kann auch für die Sprachsteuerung über den Google Assistant verwendet werden. 👉 Du kannst hier einen beliebigen Namen wählen, z. B. „Kaffeemaschine“, „Waschmaschine“ oder einfach „Shelly Keller“ – je nachdem, was du steuerst. 🖼️ Screenshot: Namensvergabe für das Gerät in der Google Home App 💡 Tipp: Wähle einen Namen, der sich gut per Sprache aussprechen lässt – so kannst du später mit Befehlen wie „Hey Google, schalte die Kaffeemaschine ein“ arbeiten. ✅ Nach diesem Schritt ist die Einrichtung abgeschlossen und dein Shelly 1PM Gen4 ist vollständig in Google Home integriert! Sobald dein Shelly 1PM Gen4 erfolgreich über Matter eingerichtet wurde, erscheint das Gerät als Kachel in der Google Home App. 👉 Über diese Kachel kannst du den Verbraucher ganz einfach ein- oder ausschalten. Der aktuelle Zustand wird dabei sowohl durch die Farbe der Kachel als auch durch den Status-Text deutlich dargestellt – beispielsweise „Ein“ oder „Aus“. 💡 Das sorgt nicht nur für eine intuitive Bedienung, sondern ermöglicht auch eine schnelle Statuskontrolle direkt auf einen Blick.


Shelly 1PM im Generationenvergleich: Gen2 vs. Gen3 vs. Gen4
Mit dem Shelly 1PM Gen4 bringt Shelly nicht nur Matter-Integration, sondern auch einen neuen, leistungsstärkeren Chip auf Basis des ESP32.

Shelly Geräte der Generation 2 bis 4 Die folgende Tabelle zeigt die wichtigsten Unterschiede zu Gen2 und Gen3: MerkmalShelly 1PM Gen2Shelly 1PM Gen3Shelly 1PM Gen4Versorgungsspannung110–240 V AC 24–30 V DC110–240 V AC 24–30 V DC110–240 V AC 24–30 V DCMax. Schaltstrom (AC)16 A16 A16 AMax. Schaltstrom (DC)10 A10 A10 AMax. Schaltspannung (AC/DC)240 V AC / 30 V DC240 V AC / 30 V DC240 V AC / 30 V DCLeistungsmessung✅ Ja✅ Ja✅ JaTemperatursensor intern✅ Ja✅ Ja✅ JaMQTT-Unterstützung✅ Ja✅ Ja✅ JaMatter-Unterstützung❌ Nein❌ Nein✅ JaBluetooth (BLE)✅ BLE 4.2✅ BLE 4.2✅ BLE 5.0WLAN-Protokoll802.11 b/g/n802.11 b/g/n802.11 b/g/nWi-Fi Reichweite (Innen)bis zu 30 mbis zu 30 mbis zu 30 mMCU / ProzessorESP32-U4WDHESP-Shelly-C38FESP-Shelly-C68FFlash-Speicher4 MB8 MB8 MBStromverbrauch< 1.2 W< 1.2 W< 1.2 WMaße (BxHxT)42 × 37 × 16 mm42 × 37 × 16 mm42 × 37 × 16 mmWebhooks / Scripting✅ Ja (mJs)✅ Ja✅ JaCoAP-Unterstützung❌ Nein✅ Ja✅ JaPlanung / Zeitsteuerung20 Pläne20 Pläne20 PläneKompatibilitätAlexa, Google Home, HA, ioBroker etc.wie Gen2wie Gen2 + Matter + ZigBeeMontageartUnterputz / WanddoseUnterputz / WanddoseUnterputz / WanddoseFarbe GehäuseRotRotRotFarbe KlemmeBlauSchwarzGrau 💡 Fazit: Der ESP-Shelly-C68F im Gen4 bietet mehr Rechenleistung und bessere Konnektivität (z. B. BLE 5.0), was zusammen mit der Matter-Unterstützung den Shelly 1PM Gen4 zu einer der derzeit modernsten Schaltl��sungen für Smart Homes macht. Read the full article
0 notes
Text
Effective Updates for Smart Home Control Using Remote Raspberry Pi
Overview of Raspberry Pi and Smart Home Management
Smart houses are becoming a necessary component of daily living in today's technologically advanced society. Smart homes provide efficiency, security, and ease of use by enabling remote control of many devices. The Raspberry Pi, a small and potent computer that easily interfaces with a wide range of home automation devices, is one of the most adaptable tools for creating a smart home. The ability to remotely update Raspberry Pi is becoming increasingly important as smart home technology develops in order to preserve functionality and keep systems current.
Raspberry Pi's Function in Smart Home Automation
Raspberry Pi serves as the brain of many smart home systems. It can control everything from lighting and heating to security systems and entertainment devices. By running software like Home Assistant or OpenHAB, Raspberry Pi can coordinate various connected devices, making it the central hub for a smart home.
With Raspberry Pi, users can customize their automation systems, create triggers, and even set up voice commands. The key benefit of using Raspberry Pi for smart home control is its adaptability—it's easy to expand the system as new devices are added. Additionally, how to update raspberry pi remotely allows the system to remain relevant and capable of managing new technologies as they become available.
How to Update Raspberry Pi Remotely for Seamless Integration
One of the key aspects of Raspberry Pi's functionality in a smart home is the ability to update it remotely. This process, known as how to update Raspberry Pi remotely, is crucial for ensuring that your smart home remains secure and up to date with the latest features. Remote updates can be done through SSH (Secure Shell) or using software like Ansible for automation.
By connecting Raspberry Pi to the internet, users can easily deploy firmware and software updates from any location. This allows for faster problem-solving and continuous improvement of the smart home system. For example, you might need to update the firmware of a smart lock system or install the latest security camera updates, both of which can be done remotely through Raspberry Pi. This remote management ensures devices work efficiently and securely without manual intervention.
Smart Lock Systems: Enhancing Security with Remote Management
Smart lock systems are a critical component of modern home security. With the ability to lock or unlock doors remotely, these systems offer unprecedented convenience. Raspberry Pi can be used to manage these locks, allowing users to set schedules, grant temporary access, and monitor activity logs.
The ability to perform remote updates on these systems through Raspberry Pi ensures they remain secure and responsive. For instance, firmware updates can patch security vulnerabilities, and new features can be added to improve user experience. By understanding how to update raspberry pi remotely, homeowners can keep their smart locks up to date with the latest security protocols, ensuring their home remains safe.
Smart Security Cameras: Maintaining Real-Time Monitoring
Smart security cameras offer real-time video feeds, motion detection, and even facial recognition. These devices are essential for maintaining home security. Raspberry Pi can integrate with various camera systems, allowing users to access live feeds, record footage, and set up motion-triggered alerts.
When it comes to maintaining these devices, how to update Raspberry Pi remotely becomes crucial. Camera software often requires regular updates to enhance image recognition, improve video compression, or add new features. Using Raspberry Pi as the central controller, homeowners can remotely update their cameras to ensure the system is always up-to-date, improving both functionality and security.
Smart Utility Meters: Efficient Energy and Water Consumption
Smart utility meters are changing the way homeowners manage their energy and water consumption. By providing real-time data on usage, these devices help homeowners optimize their consumption and reduce waste. Raspberry Pi can serve as the interface for managing and monitoring these meters, offering insights into usage patterns.
With the ability to remotely update Raspberry Pi, users can ensure their utility meters continue to operate at peak efficiency. How to update Raspberry Pi remotely ensures that utility meters receive necessary firmware updates, improve data accuracy, and integrate with other smart home systems. For example, updates can allow the system to send notifications when usage exceeds set thresholds or automatically adjust heating or cooling settings to conserve energy.
Smart Alert Systems: Improving Safety with Remote Updates
Smart alert systems are crucial for maintaining a safe home environment. These systems use sensors to detect issues like smoke, carbon monoxide, or water leaks and send alerts to homeowners in real time. By integrating these systems with Raspberry Pi, users can manage all their alerts from a single interface.
The ability to update these systems remotely is essential for improving their effectiveness, how to update raspberry pi remotely allows users to upgrade their alert systems with the latest software to enhance detection capabilities, integrate with new smart devices, or fix bugs. For instance, an update might improve the sensitivity of a smoke detector or enable new notification features, enhancing overall safety.
The Future of Remote Raspberry Pi Updates in Smart Homes
As the world of smart homes continues to evolve, remote updates for Raspberry Pi will play an even more critical role in maintaining and improving these systems. Future innovations such as AI-powered home automation, energy-efficient smart grids, and more integrated IoT devices will require continuous updates.
Learning how to update Raspberry Pi remotely will be essential for homeowners who want to stay at the forefront of smart home technology. Remote updates will ensure that smart homes can adapt to emerging technologies, security standards, and user needs without the need for manual intervention. The flexibility and efficiency offered by remote Raspberry Pi updates will shape the future of home automation, providing seamless integration, enhanced security, and greater user control.
To sum up, knowing how to remotely update a Raspberry Pi is an effective way to maintain and enhance a smart home. The Raspberry Pi acts as a central hub for managing a variety of gadgets, including alert systems, utility meters, smart locks, and cameras. These systems are kept secure, operational, and adaptable to new requirements by remote upgrades. The ability to remotely update Raspberry Pi will be crucial for optimizing efficiency and staying ahead of new trends as smart home technology develops.
For more details click the link below
0 notes
Text
deCONZ 2.27.6
Versie 2.27.6 van deCONZ is uitgekomen. DeCONZ is een Zigbee-gateway ontwikkeld door Dresden Elektronik. Met deze gateway is het mogelijk om Zigbee-apparaten van verschillende fabrikanten aan te sturen door middel van de Phoscon-webapp. De deCONZ-gateway is los te gebruiken, maar ook in combinatie met verschillende domotica-applicaties zoals Home Assistant, Domoticz en openHAB. De software kan alleen gebruikt worden in combinatie met een ConBee-usb-stick of een RaspBee Shield voor de Raspberry Pi. Meer informatie over deCONZ kan op ons forum worden gevonden. De changelog sinds versie 2.26.3 kan hieronder worden gevonden. http://dlvr.it/TB6lJM
0 notes
Text
Building a Smart Home with DIY Embedded System Projects
A smart home is a futuristic concept that is becoming increasingly popular among homeowners. It involves the use of technology to automate and control various aspects of a home, such as lighting, security, temperature, and entertainment. While there are many smart home systems on the market, building your own smart home with DIY embedded system projects can be a fun and cost-effective way to create a personalized and efficient living space.
To get started, it is essential to have a basic understanding of embedded systems. An embedded system is a computer system that is designed to perform a specific task or control a specific device. It is often a combination of hardware and software that is programmed to perform a specific function. In the case of a smart home, the embedded system will be responsible for controlling and automating various devices.
The first step in building a smart home is to identify the areas of your home that you want to automate. This could include lighting, security cameras, door locks, thermostats, and entertainment systems. Once you have a clear idea of what you want to control, you can start researching the different components and technology needed for each project.
One of the most popular DIY embedded system projects for a smart home is creating a home automation hub. This is a central system that connects and controls all the devices in your home. There are many open-source software options available, such as Home Assistant and OpenHAB, that can be installed on a Raspberry Pi or other microcontroller to act as the hub. These software programs allow you to connect and control devices from different manufacturers, creating a unified system.
For lighting, you can opt for smart switches or smart bulbs that can be controlled through a smartphone app or voice commands. Smart switches are relatively easy to install, while smart bulbs require a bit more work as they need to be replaced in existing light fixtures. You can also add motion sensors to turn on lights automatically when you enter a room.
Security is another crucial aspect of a smart home. You can use a variety of sensors, such as door and window sensors, motion sensors, and cameras, to create a comprehensive security system. These devices can be connected to your home automation hub, allowing you to monitor and control them remotely. You can also set up alerts to notify you of any unusual activity.
Controlling the temperature in your home is another area where DIY embedded system projects can be beneficial. You can install a smart thermostat that can be controlled through a smartphone app or programmed to adjust the temperature based on your daily routine. This can help reduce energy consumption and save money on utility bills.
Entertainment systems can also be integrated into a smart home using embedded systems. You can use a Raspberry Pi or other microcontroller to create a media server that stores and streams your music and video collection to different devices in your home. You can also add voice control using Amazon's Alexa or Google Assistant to play music or videos on demand.
Overall, building a smart home with DIY embedded system projects allows you to customize and control various aspects of your home according to your specific needs and preferences. It also gives you the satisfaction of creating something unique and functional. However, it is essential to have a basic understanding of coding and electronics before embarking on such a project. With the right research and planning, you can create a smart home that not only makes your life easier but also adds value to your property.
0 notes
Text
How do I start my home automation project with iot at low cost?
Take into account the following steps to start an inexpensive IoT home automation project. First, establish your objectives. List the appliances and processes, such lighting, thermostats, or security cameras, that you wish to automate. Choose open-source solutions with flexibility and device interoperability, such as Home Assistant or OpenHAB.
Next, choose IoT devices from embedded that are being classified as automotive embedded or electric vehicles embedded affordable and compatible with your preferred platform. Affordable smart switches and sensors are offered by companies like Sonoff and Shelly. For device communication, use well accepted protocols like MQTT to ensure easy integration.Repurpose current hardware: The controllers can be Raspberry Pi boards or old iPhones. Utilise cloud services that are free or inexpensive, such as Blynk or Cayenne, for remote access. Investigate do-it-yourself options for creating unique sensors or actuators using Arduino or ESP8266/ESP32 boards.
Use tutorials, forums, and internet tools to educate oneself. There is a wealth of knowledge available on IoT and home automation projects on websites like YouTube and GitHub. Engage the neighbourhood to resolve problems and learn more.Consider security when using strong passwords and frequently updating device firmware. As necessary, gradually extend your system while balancing usefulness and expense. With this strategy, you may create a personalised home automation system while keeping costs down and acquiring important IoT experience.
1 note
·
View note
Photo

DIY Open-Source Home https://shores.dev/diy-open-source-home-automation-systems/?utm_source=tumblr&utm_medium=social&utm_campaign=ReviveOldPost
#Alexa#Automation#DIY#Domoticz#Gladys#Homekit#IOT#KNX#lighting#lightingcontrol#opensource#OpenHAB#tasmota
0 notes
Note
Asking all the questions from your ask game
-pi <3
hi little pi! I'll give you 12, 13 and 21. The other ones that i havent answered aren't particularly interesting
12. IRL navigation
I mostly use a combination of Organic Maps and the NS app (which just calls the 9292 api i think, but no ads), deferring to google maps and Gaia GPS for specific use cases. Im mostly just really glad I dont have to use google maps for transit here
13. notes and/or to-do
I used to pay for Todoist, really like their product. But I don't use it all that much anymore. I have Obsidian on both my laptop and phone, but no sync.
21. home automation
I have a few smart plugs That I flashed with Tasmota and I control them with OpenHAB because homeassistant is a little bitch that won't run on my less-than-performant hardware and doesn't handle running on a vps at all. Maybe I'll switch to HA if i find a winning lottery ticket in the street one day
0 notes
Text
Home Automation

In my opinion, the concept of Home Automation started when God said ‘Let there be light’ and the light spread in the whole world.
Just like we do in our smart home with AI-enabled home automation or play or listen anything by giving voice command ( instruction).
Nowadays our life is more complex and comfortable than before because of this need to accomplish lots of tasks together.
For those tasks get support from gadgets. To manage and make it simple there are lots of gadgets but on other hand manage those gadgets also a big deal.
When talking about the modern era around 1950. Scientists were obsessed with this idea. Articles, science fiction stories, and science fairs were full of this concept.
For sure there was a robot also present as a home assistant, obey commands and follow instructions.
According to Wikipedia home automation started in the early 1900 when electricity distribution started.
It started in the form of home appliances like washing machines, dishwashers, etc.
The first general-purpose home automation was X10. Communicate over the distribution power lines network technology.
#Alexa#automation#boschhome#cctv#conbee#connectedhome#control#diyproject#googlehome#hausautomatisierung#home#homeassistant#homeautomation#homesecurity#hometheatre#hubitat#interiordesign#iot#lightingcontrol#openhab#raspberrypi#security#smartdevices#smarthome#smarthomeautomation#smarthometech#smarthometechnology#smarthouse#smartlighting#smartliving
0 notes
Text
My Sonoff integration
What is a ‘Sonoff’? In the context of this article, I am talking about the cheap power switch that can be remotely Switch On and Off (S On OFF) by multiple methods.

Out of the box they are adequately supported by their native mobile app. Many like le decide to go that extra mile and flash them with tasmota firmware and enjoy increased integration afforded at the demise of the original native app support.
I have recently adjusted my Sonoff integration model as I initially used my home controller of choice OpenHab to connect using MQTT (the IoT protocol) and for Amazon echo’s Alexa to send all the commands and requests to OpenHab to enact. As OpenHab has a mobile app and a web browser GUI that meant that OpenHab was the single way to connect and operate the Sonoff devices.
That old proverb advising not to put all your eggs in one basket comes to mind.
After a few outages that left family members having to get to awkward to reach Sonoff switches to press the little manual button on the top to switch a device on or off manually occurred I had a little rethink.
I split the remote operation into three categories:
1. Manual – achieved using the button on top of the Sonoff. No change required
2. Automated – performed mainly using OpenHab, the trigger can be another event occurring or at a specific time or interval.
3. Interactive – Although there is a mobile app and a web browser through OpenHab, most of the family prefer to use Alexa for interactive commands. There is also a web GUI built into the Sonoff too that I use during troubleshooting to see why something isn’t working, and to identify the system or component at fault.
So the main change I needed to do is to allow Amazon Echo Alexa to have a direct interaction with the Sonoff, this is easily achieved as the tasmota firmware provides for hue emulation, when this is enabled a ‘Friendly name’ can be provided that is used when asking Alexa to turn something on or off. In this way I have multiple ways of getting to a device and I am not reliant on OpenHab or its server functioning.
I thought I would share my experience with these common items for others to ponder and comment on.
Ciao
Paul
0 notes
Photo

Home Automation Platforms So, I been researching a lot of different OPEN -SOURCE home automation systems and found few great ones openHAB - https://www.openhab.org/ Home Assistant - https://www.home-assistant.io/ PiDome - https://pidome.org/ Other non-open source are Hubitat - https://hubitat.com/ ActionTiles - https://www.actiontiles.com/ In all honesty I just checked all the popular ones and decided I will try Home Assistant in a VIRTUAL MACHINE it appears to support all hardware I own. Thanks to the power of sharing. Shout to Owen who got me thinking about other choices. #opensource #openhab #pidome #samsung #samsungsmartthings #smartthings #actiontiles #homeassistant #github #reddit #hubitat #homeautomation #smarthome #alexa #amazon #technology #tech #amazonalexa #google #amazonecho #googlehome #echodot #technology #smartdevices #smarthomeliving #iot #smarthometechnology #Toronto #Mississauga #NorthYork #kunstentech (at Toronto, Ontario) https://www.instagram.com/p/CAlB3ufhWe0/?igshid=sjdk1k9x4eba
#opensource#openhab#pidome#samsung#samsungsmartthings#smartthings#actiontiles#homeassistant#github#reddit#hubitat#homeautomation#smarthome#alexa#amazon#technology#tech#amazonalexa#google#amazonecho#googlehome#echodot#smartdevices#smarthomeliving#iot#smarthometechnology#toronto#mississauga#northyork#kunstentech
0 notes
Text
deCONZ 2.22.2
Versie 2.22.2 van deCONZ is uitgekomen. DeCONZ is een Zigbee-gateway ontwikkeld door Dresden Elektronik. Met deze gateway is het mogelijk om Zigbee-apparaten van verschillende fabrikanten aan te sturen door middel van de Phoscon-webapp. De deCONZ-gateway is los te gebruiken, maar ook in combinatie met verschillende domotica-applicaties zoals Home Assistant, Domoticz en openHAB. De software kan alleen gebruikt worden in combinatie met een ConBee-usb-stick of een RaspBee Shield voor de Raspberry Pi. Meer informatie over deCONZ kan op ons forum worden gevonden. De changelog voor deze uitgave kan hieronder worden gevonden. Device Support http://dlvr.it/SrFdvp
0 notes
Text
Stefan Porteck's private smart home: openHAB combines individual components
Stefan Porteck’s private smart home: openHAB combines individual components

[ad_1] I was actually not interested in a smart home. After all, I automated almost everything that could be automated.
Initially, I was hardly interested in the topic of smart homes. It listened to the rather boring name of home automation, required flush-mounted wiring and the scene discussed bidirectional protocols – by electrical engineers for electrical engineers, but certainly…
View On WordPress
0 notes