#The notes function on the sidebar in Google Docs
Explore tagged Tumblr posts
Visit Tumblr Blog
Explore Tumblr blogs with no restrictions, modern design and the best experience.
Last Seen Tumblr Blogs


Fun Fact
1,644 Tumblr posts in 1 second.
Text
Because I like organizing things, here's the cache where I keep track of what I've read/watched ^^

Does anyone else organize their entertainment like this?
I find that, since I have a pretty quick reading speed, I'll lose track of what I've read or watched if I don't do things like this to remember.
Maybe this is excessive, but I have to admit that it's satisfying to see the "Completed" sections grow.
Feel free to see this as my list of recommendations, too, if you're looking for any.
**I made the amazing mistake of posting this to an Alien Stage community rather than my personal blog earlier today, so that's a little embarrassing ^^
#All stories have Endings#I'm a Very organized person#The program I'm using is OneNote btw#I live in OneNote#I'm someone who absolutely must write down everything#And OneNote satisfies that need#I'm a writer too so this compulsion to organize actually stems from something#And that something is my early years of writing when I would write notes Everywhere#The margins of any notebook on hand#The notes function on the sidebar in Google Docs#Many random Google Docs with ambiguous names#A semi-dedicated notebook that had information from all my different stories thrown together in a big mess#One day I decided I couldn't live like that anymore and I spent a week migrating everything to Onenote#And then I just never left
1 note
·
View note
Text

TENSHI, a free to use Google docs template! I like using them for funsies and decided to learn how to make my own so I could have exactly what I wanted. This doc is not very mobile friendly, uses a bunch of drawings and images, but otherwise is pretty neat I think so figured I'd share it!
Editing notes: - Please utilize the replace image and edit drawing functions! A lot of the structure depends on the image sizes. - There's a few drawings you'll need to double click to edit. The text box on the first page on the right, the tenshi logo, the Wikipedia-like sidebar, and the 'controls' for the music player section. - Since the tenshi logo is just a drawing you can straight up replace it or remove it if you want, that box is a set size so it won't ruin anything. - Please keep my credits intact! You can change color and font and whatever, just so long as the name and link stay :3
If anyone ends up using this I'd love to see what you do!
#google docs template#docs template#google doc template#rp resources#rp template#roleplay template#character template#character sheet#roleplay#mine
722 notes
·
View notes
Text
Organizational Writing Methods for Messy Minds

Long-time Wrimo and soon-to-be published author Anna-Maria Ninnas is a Project Manager with a talent for organizing chaos into coherence. She has been test-driving software to find novel solutions for myriad rampant writerly woes and has put together this comprehensive overview to share some of her best technology-based tips with the community!
Sometimes, you need to put your creativity inside a box.
This couldn’t be more true for writers with a messy mind. The limitless possibilities of a blank page makes me freeze up. However, tell me to create a story out of the magnets on my fridge or using only Cards Against Humanity, and suddenly the limitations of these microcosms give me both a starting point and some rules to activate the brain’s problem-solving function. It takes a shelf to organize your stuff, and the same goes to your writing.
Which is why I love using digital tools and story progression ‘rules’ to find the right crooked mile to weaponize my hyper brain. Today, I’d like to share some of my tricks and digital workspaces with you.
For me, taming my buzzing brain always starts with Trello. I can just move the cards around, like I’m solving a puzzle, which is extremely satisfying and fun. By gamifying the untangling process, I find myself super focused with a visual aid for problem solving. It’s amazing for non-linear thinkers.
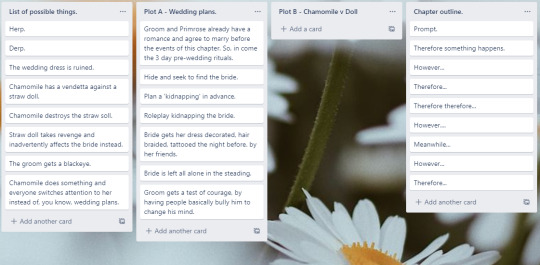
Here we have Chapter 6 of my current manuscript, Chamomile. I began the first draft by dumping everything that happens or could happen in this chapter. Just go crazy! If you have more than one subplot going on, you'll love this. For me, Plot A is my young character Chamomile being at war with a vengeful straw doll. Plot B, the village is celebrating a wedding. Later I will ‘braid’ these two plots together, to have the paranormal events of Plot A ruin Plot B by all means possible.
When figuring out the flow, one of my favorite techniques is Therefore/However. It helps to figure the logic and flow of events step-by-step, ensure that consequence always follows, and dictate tension! Sometimes I’ll break the rule with more than one ‘therefore’ consequence, or a ��meanwhile’ when intertwining a secondary subplot. Keep it as simple as cause-and-effect if you’re still trying to figure out how something could happen and why. Eventually, you’ll have an outline that might or might not look like mine:

You can utilize colored labels for characters, section breaks, or even a green-yellow-red system for every card to track your passive, urgent and action voice.
But let’s say you’re editing or on a #JustFinishIt marathon. Well, your Google account already has all the tools to tame your focus in a single window.
Opening your blessed auto-saving Google Doc, by default you should find the holy trinity of organizing — Calendar, Keep, and Tasks.

I love Keep for its simplicity. If I’m on the go and come up with the perfect line, find inspiration or remember a loophole to edit later, I whip out my phone, save, move on. I use labels only to separate my novels, occasional hashtags.
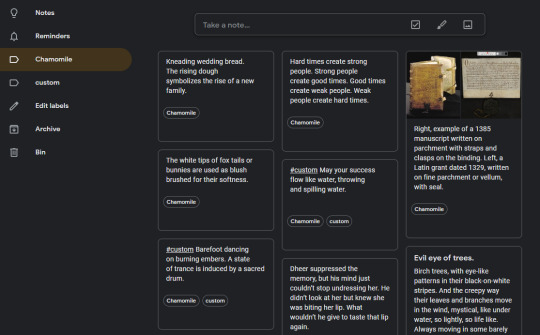
The beauty of it is that you can use Keep while you’re in Docs. Since you’re guaranteed to get distracted, why not use it to your advantage by choosing what you’re distracted by — like scrolling your own notes in the sidebar instead of Pinterest! Scrolling social media is addicting because with so little movement we get infinite information, barely losing any calories — your brain loves the efficiency. Get addicted to your novel instead!
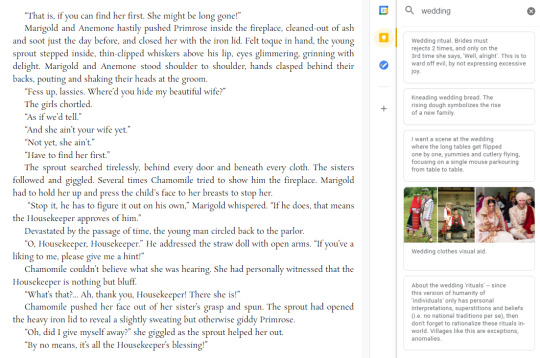
The search tool is not the only benefit. You can cut-and-paste entire sections that ‘don’t work’, but you like and might adapt elsewhere. Slap them there for safekeeping. You can write down a plot bunny, a topic to research, an important reference to keep in mind for Chapter 23, a new idea or editorial notes. Multitasking is a breeze. Pin the notes you find most relevant right now to the top. Notes you create while in the Doc automatically tags it as ‘related’, so later in Keep you can filter notes related only to that one chapter — which is why I separate my chapters doc-by-doc!
Google Tasks are amazing for editing. You can make the checklist as you re-read after a break, a list for each chapter, so you can later go back and — oh yes — tick the boxes off one by one, knowing exactly what you’re doing, to fix loopholes and add missing elements.
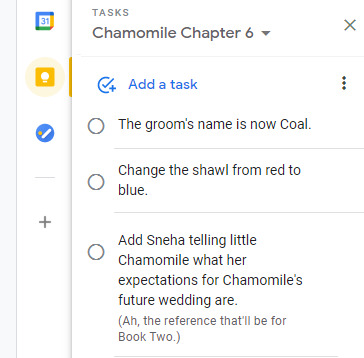
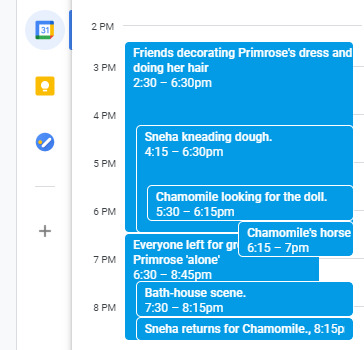
Last but not least is the simple genius of Calendar. If you have multiple plotlines, characters, or maybe even time-travel involved, then the overlapping schedules of Google Calendar—which, yes, you can drag and reorder—is gorgeous. Now, because all these methods are pick-and-choose on a need-to-untangle basis, I wasn’t using it in this chapter much. However, it did come to help when I was trying to figure out the time window just before Chamomile gets into trouble—again—when it was time to leave the bride home alone as a test of patience, to justify how she ended up babysitting instead. (Because you had to go into the storeroom in your wedding dress, Primrose, and now you have to wash the dress. What a convoluted way to break your ankle tonight before your wedding.)
And this is just a recent, as-I-do-it example of some ways I handle my comprehension of my own story! Would you have adapted these tools differently? While it may look over-complicated to some, for me it’s the only way I can tame my head when 'sit down and write' sounds impossible, and I know I’m not alone.
There are many free and subscription apps you can use to organize your writing. Try them, make use of tech! Find your carton ‘box’ that’ll unleash your creativity and help you build forts. Once you discover how that beautiful mind of yours expresses itself and find an analogous method to translate it, trust me, your craft will bloom.

Anna-Maria Ninnas studies anthropology and contemplates humanity through the lens of fiction. A project manager by vocation but extremely unorganized by nature, Anna-Maria tries to hack the art of writing with all sorts of cheats, methods and problem-solving techniques. You can read Anna-Maria’s tips for all the other chaotic creative minds on Medium. The novel Chamomile is coming out April 2022 no matter how messy or unfinished it is! Top photo by Ross Sneddon on Unsplash
#nanowrimo#writing#amwriting#writing tips#organization#writing tools#writing apps#by nano guest#anna-maria ninnas#writing resources#writer's life
316 notes
·
View notes
Note
14 and/or 22 for the weird writer asks meme! <3
14. Do you lend your books to people? Are people scared to borrow books from you? Do you know exactly where all your “lost” books are and which specific friend from school you haven’t seen in twelve years still possesses them? Will you ever get them back? I do lend my books to people! I do it much more infrequently now that 1) most of my friends are online and 2) I usually buy ebooks instead of physical books. I used to enthusiastically drop books in people's laps because I love to share the things I'm excited about, and yeah, I had a list of all the people I gave my books to when it became hard to keep all the loans straight in my head.
I like to think I have a healthy relationship with physical books. I've never truly venerated the book as an object (yeah, I'm an amateur bookbinder, but appreciation is not the same as worship), and working in publishing put the final nail in the coffin of my being precious about paper and ink. After all, you put all your efforts in the words themselves, and holding the bound object is just the last part of a long process. With all the due exceptions, as long as they're not out of print or ridiculously expensive, books can be replaced. The story is what's important, the reader is what's important; I'd rather never see a beloved book again than keeping a friend to enjoy a story I love.
22. How organized are you with your writing? Describe to me your organization method, if it exists. What tools do you use? Notebooks? Binders? Apps? The Cloud?
(this got long so it's under a cut!)
Story ideas usually live in the hivemind, aka discord chats or servers. Once an idea develops and starts to turn into a proper outline, I create a channel for it in my private discord server where I can chuck ideas on my phone when I wake up at 2 am. Once the fic is done, I move the channel into the graveyard.
This is what the graveyard looks like btw (not all of it):
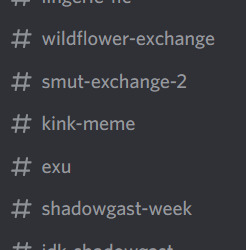
(If you're wandering what is essek-thoughts, I was too, so I checked: they're notes on a better man than me. idk-shadowgast is the early stages of all this science i don't understand)
I keep using discord even when I start working on the fic properly in Google Docs; all the random thoughts I have when I don't have access to GDocs go there, as well as most of the darlings I kill while editing. (I also download copies of my docs in my hard drive very often, because 1) I was born in the '90s and I don't trust the cloud 2) you never know when you'll need to go back in time and search through an old version of your work.)
I usually break down the fic into scenes and/or chapters, depending on its length; I use various headings to make an organised outline in the sidebar. I've also started using the summary function to write notes to myself (future developments, changes I need to track, the tags that I add as I go, things I need to remember to say in the A/N and so on).
This is what my outline for the emergency contact au looks like right now:

It's not very detailed because the structure is very straightforward and the chapters are short, but I would usually have nesting headlines so I can keep track of scenes I need to go back to, flashbacks and so on. The days of the week are a necessity because I often have to refer to something that happened "three days ago" and I wouldn't remember when that would have been. I also need to remember that offices are usually closed on a Sunday, and so on.
I also often leave comments to myself and/or my betas throughout to highlight the parts that need attention. And this is it, I think? It might sound convoluted but it's actually a very straightforward process that keeps me from messing up and forgetting ideas.
6 notes
·
View notes
Text
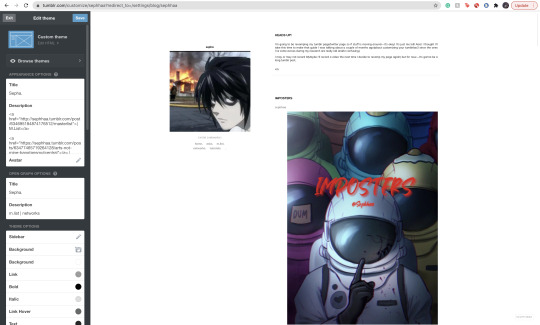
How To Customize Your Tumblr Blog!
Alright! Here is the long-awaited blog post I’ve been meaning to make for a long time now. When I was trying to customize my tumblr blog, I found it extremely difficult(especially because the first time I got on tumblr I didn’t customize my own page at all) So hopefully, this will help you try to create a masterlist, how to navigate features and implement a theme for your blog! Also I hope this can answer some questions people have if they’ve come to an error when creating your blog.
I’ll also be making a AO3 guide(mainly how to customize your writing on the HTML page on ao3) so if you’re looking for that go here.
I’ll also be making a potential youtube video for these two guides. Since I don’t have a lot of time today, I’ll be making a video on these two guides the next time I decide to revamp my blog and I’ll be sure to link those.
Alright! Let’s start!

Alright! So starting in your homepage we’d be focusing on choosing, implementing and setting up a theme for your blog.
But before we do that, I highly—HIGHLY suggest you go through your blog and delete the clutter on your page. By clutter I mean—reblogs. Or at least delete MOST of them. Reason being—if you are a fic writer(like myself) and you publish your stories on your tumblr blog, your masterlist etc; and you want to link your chapters on your masterlist or you want to locate your masterlist(the original post NOT the reblog) it’s hard to do that with all the reblogs cluttering your page. This is crucial for later when we create our masterlist. If you are a fic writer and you’ve been uploading your chapters and you already have a masterlist—locate them, copy their link addresses(which I will teach you how to get copy link addresses in this guide) and paste them on a google doc or a notes of some sort. It’d save you so much time later when creating/revamping your masterlist.
If you absolutely refuse to de-clutter your blog and/or you’ve never published on tumblr but you plan to so you don’t necessarily need to scroll so much to find your original masterlist post/story post/chapters etc; then ignore this step.
But if you are a fic writer or writer in general and you have a masterlist and/or story posts/chapters published on your tumblr blog—go ahead and scroll to find those original posts(NOT the reblog) and get their copy link addresses and paste those links in a separate google doc, notes etc. You can refer to this doc/notes when creating/revamping your masterlist/story post without having to delete any of your reblogs. I must warn you tho, it WILL take you a lot of time. Especially if you reblog A LOT. Happy scrolling!

TUMBLR THEME:
Okay—moving on—THEME! Alright so you need to find a theme for your blog. What is a theme?
A theme is a decorative set up for your blog.
But before you go looking for/implementing a theme, here is some things you need to know:
1- Many of these themes are made by fellow tumblr creators who have spent SO MUCH time creating the codes for these themes. In saying that, when you do select a theme by a creator, READ THEIR RULES! It’s very important that we’re following the rules that these creators put for some of these themes.
2 - The general rules for themes if you plan on using one:
*Do not change/steal the themes and/or use them as a base to implement a different theme.
3 - If you want to change something, look at the rules and see what you are allowed to change and what you’re not allowed to change. If its not listed, reach out to the creator to see if making these changes are okay. Generally, these creators are good at listing their rules and/or do’s/don’ts for their themes.
4 - Reblog the theme you chose! Not only does this let the creator know you’re using their theme, it also lets other people check out their page in search of themes.
Now that’s out the way—I’m going to list a couple of theme pages I frequent:
· https://maziekeen.tumblr.com/
· https://glenthemes.tumblr.com/
· https://raiidens.tumblr.com/
· https://amboise.tumblr.com/
· https://kosmique.tumblr.com/tagged/t:recs
· https://magnusthemes.tumblr.com/
· https://seyche.tumblr.com/tagged/%26themes
· https://egg.design/tagged/egg%20theme
· https://lemonfawn.tumblr.com/
· https://yeolithm.com/portfolio
· https://xuethms.tumblr.com/tagged/codes-by-xue
· https://warugaki-themes.tumblr.com/tagged/warutemas
· https://www.floralcodes.com/page/2
If you find that you don’t like any of the themes I’ve listed here, you could always search on tumblr, “tumblr themes” and a whole list of pages come up.
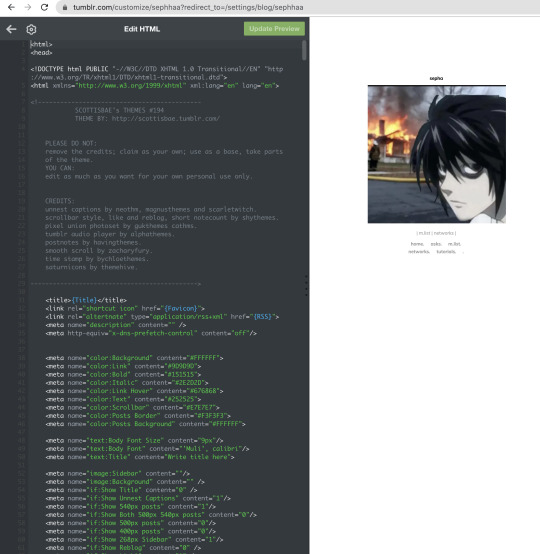
Once you’ve found your theme, let’s head on over to “Edit Theme.”

Once you’ve located “Edit Theme” in your settings, click on it and it’d open up to a new tab where you’d be implementing your new theme.

Today I’ll be using a theme from @maziekeen !

Once you have opened your “Edit Theme” page, you’d see that theres a bunch of functions to your right. This is where we will be implementing our new theme, specifically this bar:

Now, you’re going to click, “Edit HTML,” this will open a window that will look like this:
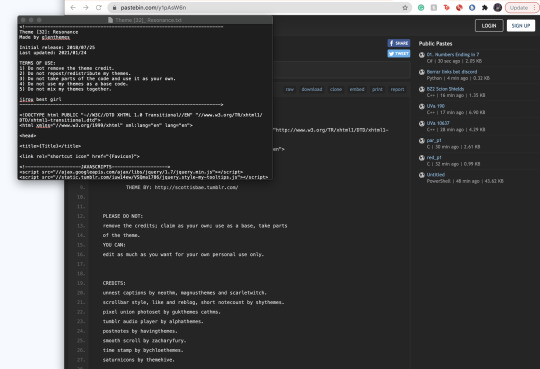
It will open up a window with a bunch of coding, here we will be deleting that code to replace it with a new code that is our new theme. To quickly delete this old code you’d press down on keys:
SHIFT+CMD+A(MAC)
SHIFT+ALT+A(Windows)
This will select all the code:
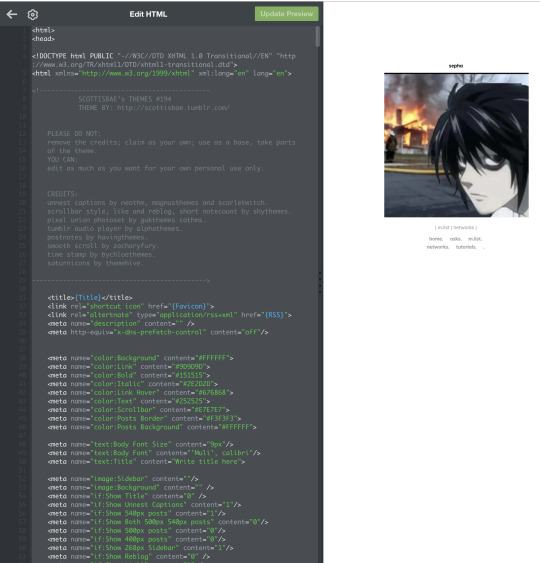
Now as you can see, all of that code is highlighted. You’re going to go ahead and delete it by clicking:
delete(MAC)
or
backspace(Windows)
Once all of it is empty we’re going to head on over to our new code theme.

On your creators theme page(or the theme post, whichever is fine) Many creators have different verbiage for getting codes. Sometimes it’d say, “CODE”, “GET CODE”, “Download,” etc. Either way,(and in my case) you’d click “Get Code,” which will redirect you to a website to download the code.
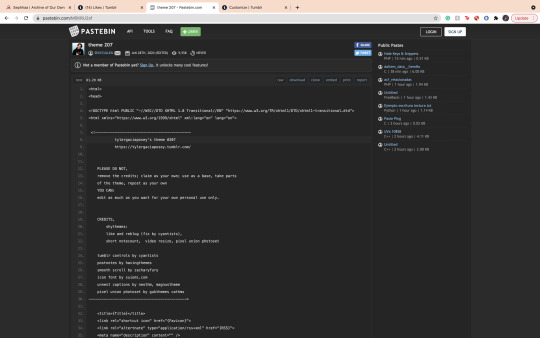
Many creators use Pastebin as a way to paste these VERY long codes. If there’s an option, you’re going to find and click “download.” If you can’t find a download option, it’s likely that you have to click “RAW” to download the code. In my case, the download option is available for me so it’d just click download and it’d open in a separate document. I find that if you download on raw, it will open to a new tab with a long list of code. Either one is fine.
I also want to mention that—some themes you might come across are priced. VERY affordable and if you have some money to spare, def buy a theme and support the creator!
Once you’ve downloaded your theme’s code it will open in a separate doc(or open in a separate tab) with a long list of code. Here you will select all the code:
SHIFT+CMD+A(MAC)
SHIFT+ALT+A(Windows)
This will select all the code, copy the code:
CMD+C(MAC)
ALT+C(Windows)
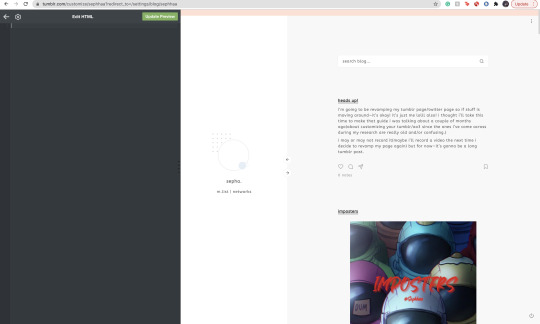
Go back to your Edit Theme page. You’re going to go ahead and paste your new code onto the empty HTML space:

Now with your new code, you will click on “Update Preview” Once it loads, your entire page will change to that new theme’s layout:
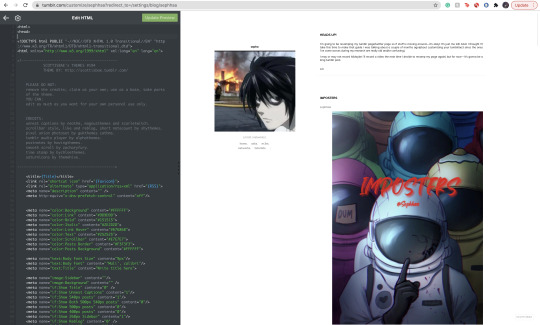
Now click save!
Alright! Now, let’s say you don’t really like the colors, or you want your profile icon to appear on said theme layout(sometimes your avatar icon won’t appear at all or you won’t have that option. If you want that option it’s likely you’re going to have to search for another theme where it’s obvious you can put your profile picture in one of the icons.) You’re going to go to the sidebar, scroll until you see all of these functions:

Here on the sidebar you can change the colors to your theme! You can also change the theme’s background, and in this case(photo icon) in the sidebar feature. You can also scroll down a bit where it says “links” and add names and links to things people can click on.

That’s all for adding your theme!!

COPY ADDRESS LINK:
Now, here is where de-cluttering your blog comes in handy. Here, we’re going to locate our chapters, story post, masterlist etc(if you publish all your written posts on your tumblr) or if you’ve already published all of your story posts/chapters onto your masterlist here on Tumblr then we need to locate the original master post.
The reason we need to locate the original master post is so that when people/readers click your masterlist—it won’t be a reblogged version of it with a bunch of writing you have previously posted on that reblog. The original, 9 times out of 10 looks a lot more organized etc.
Once you have located your masterlist—go on ahead and follow these steps:
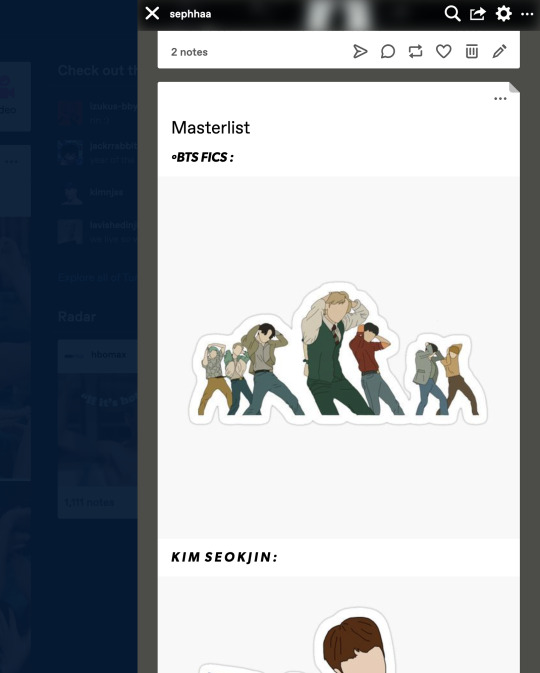
*Hover your mouse on the very top, right hand corner of your masterlist.
*A flap animation is going to appear(like the above photo)
*Once it appears, right click it
*A little window will appear, it’d look like this:
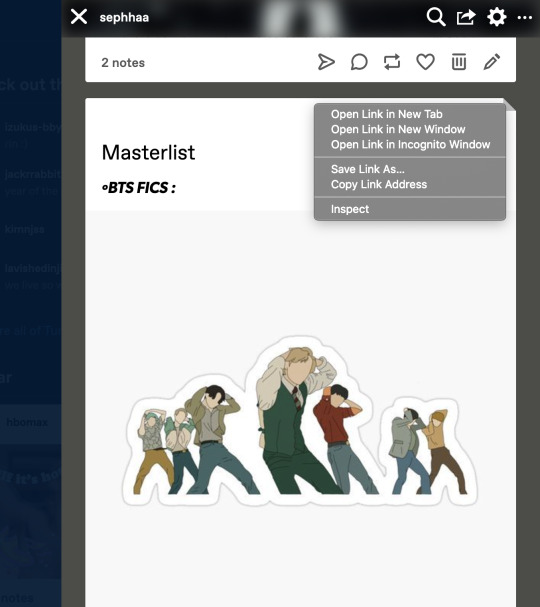
Here you’re going to click, “Copy Link Address.”
Once you have copied the link address you can place this link on your Edit Theme bio so people can click your link to your Masterlist. You can also use this to copy link addresses for all your chapters/story posts when you’re trying to link your chapters within your masterlist. I’ll explain how to do that later in this guide.

MASTERLIST:
Okay! Moving on to creating/revamping your masterlist!
If you already have a masterlist then completely ignore this step and go on over to how to put your masterlist on your bio/any errors you might have come across when trying to put your masterlist on your bio.
You’re going to go to your homepage and create a new post:
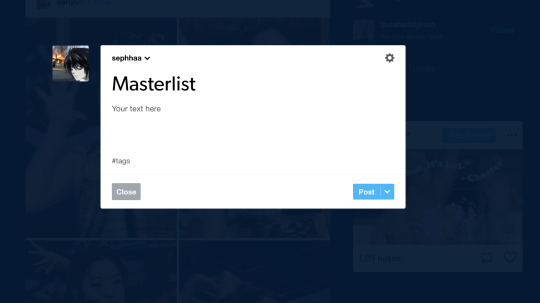
Here you’re going to title your masterlist, add images etc. Here are some features I find that a lot of people don’t know about/where to locate these features:

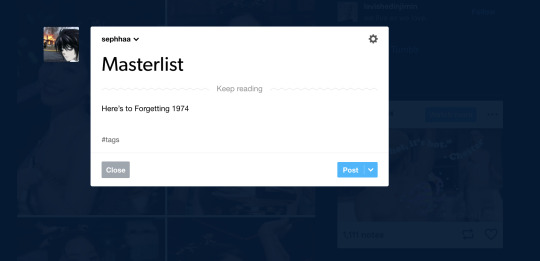
The, “Keep Reading” feature is a feature I find more than often a lot of people don’t know how to locate/add to their posts. The read more option is especially great if you have a really long chapter or a long post(such as this one) It’s especially helpful if you have a very long masterlist. I’m going to use my masterlist as a example to add the read more feature:

On your masterlist post, you can add the “Keep reading” feature by simply clicking the little three dots icon:

By clicking it—it immediately creates a page break saying, “Keep reading”

Another feature I find people not knowing how to do is linking their stories(story posts) on their masterlist. Here’s how to do it:

Here’s my fic, “Here’s to Forgetting 1974″ and I’m trying to add it to my masterlist. We’re going to copy the address link on this post(make sure if you’re going to add a story to your masterlist that it is the original post) once we have the link let’s go back to our Masterlist:
First we need to set up a title or some sort of text for this feature to work. I simply just titled, “Here’s to Forgetting 1974″ as my text. You’re going to highlight your title—immediately, a set of features will appear:
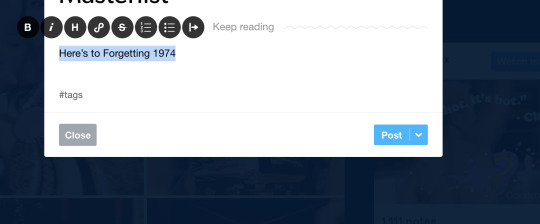
Here we’re going to click on this icon:

This will open to a smaller window to paste a link in:
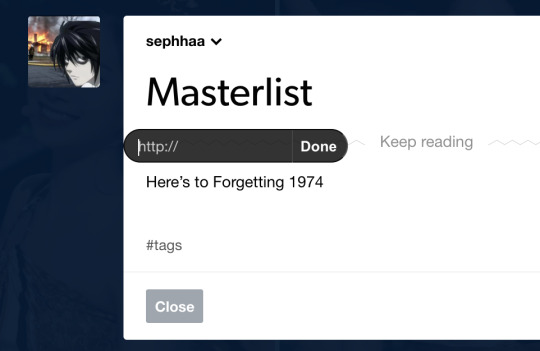
Here we will paste our copy link address from our story post onto this small window link. Once you’ve done that, click “Done.”

Immediately your title is underlined and if you hover your mouse over it and/or click it, it’d redirect you to your story from your masterlist post.
This process is similar if you want to link your chapters onto your story posts.

Here’s my story, “The Case of 1979″ and lets say I published a new chapter for this fic and I want to put the chapter link onto my story post.
*Go copy the copy address link of your new chapter
*Locate your story post:

Let’s say I’m adding a surprise chapter 12(lol)
Type your text, “Chapter 1.” “1, 2, 3″ any type of text. Here I’m just going to title my text, “Chapter 12,”:

And follow the same steps as before:
*Highlight the text
*Click on the link icon
*Paste the copy link address of your published chapter onto the https:// window
*Click done
Once you do that, hover your mouse above the chapter text/click it and it’d redirect you to the chapter from your story post.

Now that your masterlist is set up, here is the very long, and complicated process of adding your masterlist(or any link in general) to your bio.
Head on over to the “Edit Theme,” page.
Here, we will be paying extra attention to the “Description” bar.

Now, there is a bit of coding you’d have to do here and how you write the code MATTERS:
The coding is:
<a href=“
that is:
<a SPACE href= QUOTATION MARK ( “ )
Now. You cannot—CANNOT copy and paste this code in/copy and paste your links on your bio(in case you want to go ahead and copy everything in your bio and save it on a separate doc to save for later) I love copy and paste—less time consuming etc—but unfortunately, the description bar DOES NOT like it so we gotta deal with it lol.
Now you’re going to go ahead and locate your original masterlist post, copy the address link and start setting up the format:
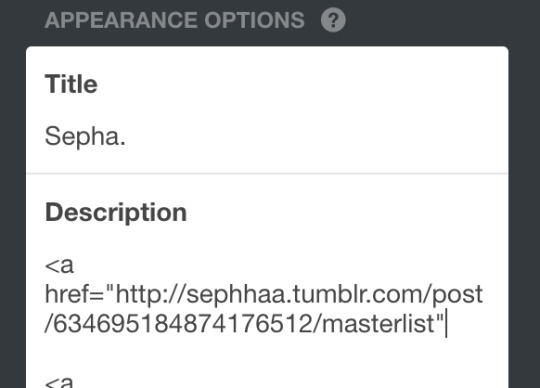
After you have pasted your link and ended it with a quotation mark( “ ) at the end. We need to set up some kind of text so that the entire link doesn’t show up on your bio. I’ll title my text: “ | M.List. | ” You can write any title, as long as its within this coding:
</a> (Beginning)
</a> (End)
</a> TEXT </a>
(of course, all together, no spaces. For the sake of this example I just want to separate the text from the code so you can clearly see what you’d have to do.)
You’re going to put your text in between this coding:

Your link should look like this and it’d appear like this on your theme layout:

You should be able to click these links even in the theme layout.
And that’s how you set up your links in your bio!

Here is a common problem that happens when you add links to your bio. Let’s say you go ahead, go to settings and decide to change your “Edit Appearance,” to your blog:

Alright, you change your page’s coloring, the background, your profile picture—cool! Not so cool for your links!
Almost immediately, you’d find that your links will cease to work if you change your profile’s appearance. Why? because when you change it, your links are in that bio where the coloring is—those links are also being changed since they’re there.
You’d need to go back to, “Edit Theme” go to the description bar and TYPE out your entire code/text again. You can just copy and paste your copy address link of your masterlist but you’d have to type out the coding and text all over again.
And you’d have to do this every time you decide to change your Tumblr blog’s appearance.
Alright! That is all for this guide! I hope you’ve found this useful! I’ll be uploading an ao3 guide under my “guides” link on my bio where I’ll share how to navigate ao3 and all it’s weird functions. I’ll also teach you guys how to customize your writing(indenting, images, fonts(bold, underlined etc) on the HTML format in the case you don’t like the the other writing format that ao3 has to offer(it’s real ugly lowkey lol) also I’ll be providing some tips and tricks to make posting your ao3 chapters on HTML more simpler.
If you’re interested in me or my stories, I write both BTS content and Anime content( Currently it’s Voltron but I do plan on writing a fic for Death Note and Inyuasha(cuz there isn’t enough Sango and Miroku content and that’s a CRIME) follow me and give my stories a read!
Until my next guide!
7 notes
·
View notes
Text
Remove Text Boxes In Word For Mac

How To Remove Text Boxes In A Word Document
How To Remove A Text Box In Word For Mac
How To Remove Text Boxes In Word
Editing Text in PDF Documents. • The Embed check box allows you to quickly remove embedding from any embedded. On Windows, choose Fit Text to Selection from the context menu; on Mac OS, choose Tools > Touchup > Fit Text to Selection. Type in the new text. The new text will stretch or condense to fit the area of the originally. When you release the mouse button, your insertion point is inside the text box. Type the text that you want to appear on the graphic. NOTE: The text box may have a solid background and border. To change these settings, follow these steps: On the Format menu, click Text Box, and then click the Colors and Lines tab. Mar 01, 2018 Remove the black text box. If you want to get ride of the black border around your text, you can do so by following these steps: Click your text box. Click the Format tab. Click Shape Outline; Click the white box in the Shape Outline drop-down menu. Click a blank place on the Word document. 5 PowerTips for Deleting Text Mac Tip #388, 10 June 2009. In this comment box the Cmd-Delete doesn’t work and it also doesn’t work in Google Docs. However gaining the whole word delete is a huge bonus for me. Comments are closed. Recent Posts.
When you type text in Microsoft Word, you have options for making it look a particular way on the page (such as changing the page margins), but those options are somewhat limited. Text boxes expand your formatting repertoire, offering additional control and flexibility for how your text appears. You can place a text box anywhere within a document and format it with different colors and fonts. This feature is especially helpful for creating a blockquote or a sidebar. Here's everything you need to know about creating and customizing text boxes in Word.
This article applies to Word 2019, Word 2016, Word 2013, and Word for Office 365. How to turn a picture into text in word.
Insert a Text Box in Word
Start by opening the document you want to add a text box to. Then follow the steps below.
On the ribbon, select Insert.
In the Text group, select Text Box. Choose a text box template.
The new text box appears in the middle of your text, and the Shape Format tab is automatically selected.
Click and drag the box to the position you want. To resize the text box, click and drag the circles around the edge. To resize, click and drag the circular arrow at the top of the box.
Place your cursor inside the text box and type the information you want to appear there.
Customize a Text Box
Once you've created your text box, you can customize it in a number of ways.
To bring up options, place your cursor inside the box and right-click. Choose an option and follow the screen prompts from there to add a border, change the style, or adjust the way the box interacts with the other text on the page.
Alternatively, use the controls on the Shape Format tab.
To go directly to the Layout Options menu, select the box, then select the Layout Options icon (it looks like a horseshoe) to the right of the box.
You can change the text, make more adjustments, or move the box to another location at any time. To delete a text box, select its border, then press Delete on your keyboard.
Related Articles
1 Justify Text in Word for Columns in Checklist Style
2 Work With Check Boxes in Word
3 Remove All of the Metadata From Excel Spreadsheets
4 Remove a Footer Only on OpenOffice
Remove a check box from a Microsoft Word document in a few simple steps. Before undertaking this process, you should first understand how to add the check box. Users typically insert check boxes into a Word document when creating a checklist or when attempting to give an ordinary bulleted list a fancier look.
Inserting
To add a check box to your Word document, click on the arrow on the right side of the “Bullets” button located on the “Home” tab of the user interface window. Next, select “Define New Bullet,” then “Symbol” from the resulting window. Locate the check box you want to use from the list of symbols, click “OK,” and then “OK” again on the initial window. This process inserts the check box into your document and will create a new check box each time you press “Enter” to create a new line of text.
Removing Boxes
Remove a check box from your Word document by highlighting the line from which you want to remove the box or by placing the cursor somewhere on the line that contains the box. If you want to remove multiple check boxes, highlight all of the lines you want to change. Click on the arrow on the right side of the “Bullets” button. From the next window, select the “None” option in the “Bullet Library” section. With the check box removed, you can proceed to work on the document with the settings that were in place before you undertook the editing process.
Convert Scanned PDF to Word Using iSkysoft PDF Converter In order to lighten the heavy burden of the work, a PDF Converter should be used to convert the scanned PDF files to editable Word files. There is an effective one called iSkysoft PDF Converter Pro for Mac (or PDF Converter Pro for Windows ) which comes readily to mind. Choose 'Black & White' to scan in an object in Grayscale (256 or Thousands of grays). Choose 'Text' to scan in text documents. The 'Resolution:' pop-up menu lets you select the dpi (dots per inch) of your scanned imaged. Typically, 300 dpi is all that you need. Too high of a resolution can result in printing performance issues. Before the steps, make sure you Mac camera function properly. Steps to Scan a Document into Word on Mac. Open and run your mac. Go to the webpage of CisdemOCRWizard, download the free trial and install on your mac. It is safe to use this tool, don’t worry. How to scan for readable text on mac.
Electronic Checklist
Typically, Word documents that contain check boxes are intended for use in printed form, such as for a questionnaire or test, which is checked off with a pen or pencil. You can also create a checklist that is checked off electronically within a Word document. Because this involves creating table with two columns and however many rows your checklist requires, removing the check box is done by deleting the table’s left column. Removing the check boxes in this type of checklist does not remove the table.
Considerations
Although most check boxes are square or rectangular in shape, you can add check boxes of different shapes and sizes to your Microsoft Word document. Select the shape you want to use from the “Symbol” list to give your checklist a different look. Remove these check boxes using the same method used to delete traditionally-shaped check boxes. As you adjust the text size in your document, the check box sizes are adjusted accordingly.
About the Author
How To Remove Text Boxes In A Word Document
Lou Martin has been writing professionally since 1992. His work has appeared in the 'Los Angeles Times,' the 'Long Beach Press-Telegram' and the 'Deseret Morning News.' Martin holds a Bachelor of Science in history and communication.
Photo Credits
Hemera Technologies/AbleStock.com/Getty Images
Cite this Article
Choose Citation Style
Martin, Lou. 'Removing Check Boxes in Word.' Small Business - Chron.com, http://smallbusiness.chron.com/removing-check-boxes-word-38381.html. Accessed 07 September 2019.
Martin, Lou. (n.d.). Removing Check Boxes in Word. Small Business - Chron.com. Retrieved from http://smallbusiness.chron.com/removing-check-boxes-word-38381.html
How To Remove A Text Box In Word For Mac
Martin, Lou. 'Removing Check Boxes in Word' accessed September 07, 2019. http://smallbusiness.chron.com/removing-check-boxes-word-38381.html
How To Remove Text Boxes In Word
Note: Depending on which text editor you're pasting into, you might have to add the italics to the site name.
0 notes
Text
4 Keys To Excel At List Developing
Conclusion: Fall shipping is a high-profit, reduced-cost company with unlimited potential, that can be run successfully from home. Drop transport is one of greatest company improvements at any time. With reliable drop shippers, your little home business is prepared to promote brand-name goods globally just like the big guys. 2) Sidebar - This is the most typical area on your blog to place an choose-in type. Note that it is very best to location your opt-in form over the fold, that is - exactly where it can be noticed by web site visitors without getting to scroll down. Don't just throw together any old product and think that it will encourage your list associates or website guests to buy your recommended item. The incentive has to be associated to the item. If you are recommending a item on fast gardening techniques you can provide your GSA SER Project an incentive item that lists the best locations to buy high high quality seeds online. Just make a web site for your products and a blog and you will see the variations. I know a Multilevel marketing agent who received provided a major job in a leading company just because of his website. So never take these things lightly as they may bring you 1000's of clients. We currently know it's a challenging task attempting to choose gifts for a child. But what happens when you display up to a party with a present that's the incorrect dimension or the exact same gift as an additional guest? Make it easy for your child's birthday celebration guests, and reduce down on incorrect sizes and double presents by making and sharing a wish list. No more grabbing the most popular item, celebration goers can look correct at the birthday wish list to determine what your child wants. Best of all, you don't have to be concerned about standing in return traces to change double presents or measurements. We already know it's a daunting job attempting to choose gifts for a kid. But what happens when you show up to a party with a gift that's the wrong dimension or the same present as another visitor? Make it easy for your kid's birthday party guests, and reduce down on incorrect sizes and double gifts by creating and sharing a wish list. No more grabbing the most well-liked item, celebration goers can appear right at the birthday wish list to identify what your kid desires. Very best of all, you don't have to be concerned about standing in return lines to change double presents or measurements. One way to make money using discussion boards is to put a link to your opt in page in your signature link. Your signature link is just a link that you put at the bottom of each post you make. The concept powering this is that individuals will click on your link after they study a believed provoking publish you made on the forum. Participation in the forum is completely critical if you want this to function. You can't just go about posting stuff like "I agree" or "Me as well" if you want people to join your list. You also have to stick around for a whilst. You gained't get very great results if you only remain a member of the discussion board for a month. No one will have experienced a opportunity to get to know you. Make the process easy for the purchaser to hire you. Don't just connect sample documents which the buyer has to obtain and GSA SER Project open up every 1. This process is so sluggish. Instead edit related samples into one doc for the purchaser and highlight why it's relevant to their short. Keep in mind to title the file attachment so that it is simple for the purchaser to keep monitor of. For example: T_Nuttall_sample. Don't refer the buyer back to your portfolio. As a buyer I discover this so annoying and others must as well. You want to make it simple for the purchaser to choose you. Everyone concerned in Web Advertising knows that link building is an essential component of achievement. There are many link building tools accessible on the market, and the list will carry on to develop as lengthy as incoming links are so important to the life blood of an online presence. You can develop the links to your web site yourself, use link building software or outsource the whole occupation. Spam is also a common way to get people to a "poisoned" internet website, referred to as a Generate-By-Obtain web site. A Drive-By-Download website immediately begins putting in its malicious software program like viruses, Trojans, and worms as quickly as you go to the GSA verified list website. You don't have to click on anything on the site for the download to automatically start. Tool 1: If you are operating a Mlm business, you gained't have ads on television or in newspapers. So, a web site is very important to have if you want to operate a effective Multilevel marketing business. When individuals hear about your products, they Google them and if they don't find your products listed there you will lose your reputation. You ought to have top writers remark about your products which will increase the confidence of the individuals.
0 notes
Text
Working From Home? Here's How to Setup Offline Mode in Google Docs
New Post has been published on https://bestedevices.com/working-from-home-heres-how-to-setup-offline-mode-in-google-docs.html
Working From Home? Here's How to Setup Offline Mode in Google Docs

Many users use Google Docs to save their working documents, receipts, and articles. If you are one of them and work from home, you cannot miss the practical offline function. This can save you a lot of time and affect your productivity, especially if you have an inconsistent internet connection. In this article, we'll take a quick look at it How to set up offline mode in Google Docs.
Set up offline mode in Google Docs
Google Docs offline mode allows you to view and edit documents without the internet so you don’t have to wait all the time to finish your work. Once the connection is restored, all progress will be synced to your account. This makes it useful for people who generally experience internet interruptions, especially when working from home.
You can set up offline mode on both your PC and your smartphone. But how? Check the instructions below.
On the PC
1) To set up Google Docs offline, you’ll need to go to chrome Browser installed on your PC. If you don't, download the installer and follow the instructions. We tried to activate it on the new Chromium Edge, but it didn't work for some reason.
2) Download Chrome after installing Chrome Google Docs offline extension from the Chrome Web Store. If already installed, make sure it is checked on the Extensions tab.
Download the Google Docs offline extension
3) Visit Google Docs Now. If you haven't already, sign in to your account and tap the three horizontal lines in the top left to open the sidebar. Click on that the settings.


4) Activate the switch next to it here Offline.
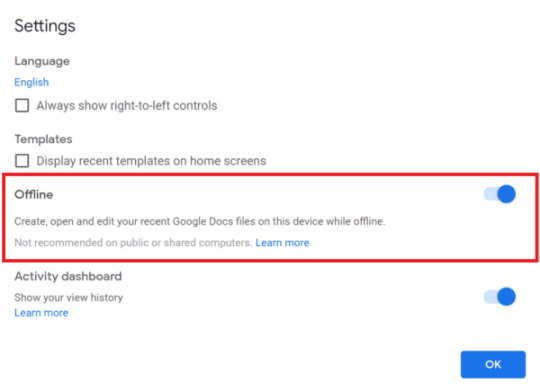
Once you've done this, you can continue to edit and save your documents even if the Internet goes down. Google also automatically saves the most recent files you've worked on for offline access. Older files, on the other hand, can be downloaded manually via Make available offline under the Files option. These files can later be identified by a small gray mark under their names.
Note that this will also enable offline mode for all other Google Drive applications, including sheets and slides.
On the phone
1) To work offline with Docs on your smartphone, you need to download the Google Docs app from the Play Store or App Store. You must also download the relevant applications from Google for sheets and foils.
Android iOS
2) After downloading, open the app and click Hamburger menu in the upper left corner.
3) Tap on the settings and press the switch next to "Make current files available online. ”
Then the documents that you use frequently to save an offline copy on your device are automatically determined. If you want to save a specific file, tap on the More icon and activate the "Available offline" option.
Wrap up
This was about how you can set up offline mode in Google Docs to save important documents on your device for seamless access, even without an active internet connection.
I've been using it for a while now, as it makes it easier to work safely with fluctuating internet, especially when traveling. Anyway, let me know your experience in the comments section below.
Read also – How to use the voice input feature in Google Docs
0 notes
Text
Following up on my post yesterday re: to do lists / task apps -
Todoist
Tried it - ironically, the first thing I did was to start a complaints list which are:
No way to copy a task. Templates are a premium feature
Labels and filters are premium features.
The navigation menu on the left side has a large margin on the left side - why so much white space?
So that’s going to be a no.
Google Tasks
I started trying Google Tasks again (I’ve been mostly using it as an ongoing list and not a task list) and now I remember why I don’t really like it. On the Gmail portlet / sidebar, there’s no way to collapse tasks that have subtasks so you just have a super long task list that you have to scroll through. Ugh.
What am I looking for?
Easy way to import / export tasks (given my tendency to try and abandon things, this is a must) and back up.
Search easily through current and completed tasks.
Ability to copy / paste tasks and subtasks (or have templates)
Collapsible view, filter by tags
I’m this close to either using Google Docs to keep a task list - even though it doesn’t have a collapsible view or tags function, it’s dead easy to copy / paste. Manual, yes, but easy. The only thing it’s missing is the ability to check off completed tasks (you’d have to use some other symbol to note that).
Or maybe I’ll go back to using Todotxt.net and TodoTxtMac - bare bones but totally useable right off the bat. Don’t have to worry about a laggy interface either. No way to add notes/comments. No subtasks but I could probably design a work around.
0 notes
Text
Important Tips and Tricks of Google Spreadsheet
SUMMARY
Google Sheet is one of the amazing tools which is being implemented in their work for many of the users. It can be created and also can be edited directly into the web browser no special software is being required to do this process. One or more than one user can work on the same sheet simultaneously you can even see the changes made by your colleague instantly and all the changes you guys make will save automatically.

Picture Courtesy:- Infiflex
Hence we can say that as using Google sheets is being saves a lot of time as well as your company’s time. To make sure you get the right tools so below you will find some tips and tricks by which you can maximize your results in Google Sheets.
Freezing columns and rows
Freezing rows and columns does really help you out ? When you are working with a huge amount of data it’s quite possible to mismatch or lost data. This is only possible when you don’t know the name of each rows and columns. This tool can definitely help you out by solving this problem. In this tool you can freeze up rows and columns up to 10 numbers in any particular sheets in Google spreadsheets.
Go to the View menu.
Then, select the option to Freeze rows or Freeze columns.
Select any one of the options. When you scroll down, you’ll notice the frozen row(s) or column(s).
Conditional and alternative formatting
Conditional formatting.
Conditional formatting can help you, to see the evolution of KPIs, cashflow, etc. Cells, rows, or columns can be formatted to change its text or background color if they are able to meet certain conditions. For instance, if they contain a certain word or a number.
On your computer, just open a spreadsheet in Google Sheets.
Then select the cells you want to apply format rules to.
Click Format Conditional formatting. A toolbar will automatically open to the right.
Create a rule.
Single color: Under “Format cells if,” choose the condition which you want to trigger the rule. Under “Formatting style, just choose what the cell will look like when conditions are met.
Color scale: Under “Preview,” select the color scale. Then, you have to choose a minimum and maximum value, and also an optional midpoint value. After that click on the Down arrow to choose the value category.
Click Done.
Alternative formatting
Alternative formatting is a function that helps you, to make a color format template, quickly. First, click the Format option from the menu at the top and then click Alternative formatting. Once you click on it, you will see a below screen with a few options available for you.
From here, select the range which you will need to work on. There will be alternate rows filled with the specified color that you’ve chosen and changing the color itself so much easy as clicking on the icon.
Add-ons
Add-ons built by the developers runs inside Google Sheets, Docs, and Forms. The Google platform let you add menu items and sidebars,and also can edit files programmatically, and tie into over a dozen Google services without even spinning up a server. This function integrates flawlessly into Google Sheets and extend its functionality. If you are using Google Sheets, then click on the option add-ons, and then search for companies. The Sheets Add-ons store provides more than 250 add-ons. With these Add-ons you can also connect spreadsheets, import your data from a lot of sources, do mailings etc.
Use of templates
While a lot of businesses may not use templates much in their G Suite, it is actually a necessary feature for them. However, it costs a lot of time to have to recreate a report or newsletter layout whenever you start a new one. Google offers many time-saving templates that’ll help you out to get using the documents, rather than struggling with putting them together in the first place.
Open a Google Docs, Sheets, Slides, or Forms home screen.
Click a template to open it.
To see many more options, click template gallery.
When you are in a file then you can add templates also. Click File > New > From template.
Add comments and notes and the difference between them
Google Sheets has recently updated its facilities by cell commenting ability which include an amazing option of inserting a “Note” or a “Comment.” The differences between the two are not obvious.
You can use the Note function to leave a simple note in the cell just like you would with Excel’s comment function. In Note, you can simply add information about the cell. Notes can be very much helpful. Often, users will overlook notes and only notice information that is typed into cells, so use them only when called for. If one user is creating and viewing a spreadsheet then Notes are generally enough.
0 notes
Link
IPTV Links Extractor Tool
Best tool for extracting links from text you can extract links regardless of the link format, whether it is an extension of m3u, m3u8, or even ts, or any other link. You can extract it easily with just one click.
How this tool works
Step 1 : you need to click on clear to remove default text . Step 2 : past your own text contain iptv links or streaming links . Step 3 : just click on extract button and get your link . This tool can count links found on your own text. #sidebar-wrapper { display: none !important; } #main-wrapper { max-width: 98%!important; width :98%!important; .post { width:98%} #.blog-pager, .post-footer .author, .feed-links, .footer-outer { display:none !important;} @import url(https://ift.tt/1renmOV); *, *::before, *::after { box-sizing: border-box; } body { margin: 30px; background-color: #f0f0f0; } /*.container, .backdrop, textarea { }*/ textarea { width :100%; display: block; z-index: 2; margin: 0; border: 2px solid #74637f; border-radius: 0; color: #444; background-color: transparent; overflow: auto; transition: transform 1s; resize: none; position:center; border-radius: 5px; }
Instructions Clear Parse
Paste or insert text with links (e.g. http://www.google.com ) Why? I like to keep a lot of notes using Simplenote, Evernote and Google Docs. I wanted a quick way to pull out all the links I dumped into these files for other uses For example: Say for example you have a few paragraphs of notes about all your latest metrics and how amazing social is. In addition you have a few links to sites as examples like http://twitter.com http://facebook.com https://ift.tt/nAnZ67 Note Parse extracts the links allowing for your to easily click, copy/paste and even dump as a json object with type (Image/BMP,Image/PNG,Image/GIF, Image/JPG, URL) Click the Parse Button or Replace Copy and Try again!
function cls(id){ document.getElementById(id).value = ""; document.getElementById('click').innerHTML = ""; document.getElementById('info').innerHTML = ""; document.getElementById('dump').innerHTML = ""; } function instructions(id){ var copy = "Paste or insert text with links (e.g. http://www.google.com )"; copy+="\n\nWhy? I like to keep a lot of notes using Simplenote, Evernote and Google Docs. I wanted a quick way to pull out all the links I dumped into these files for other uses"; copy+="\n\nFor example:"; copy+= "\nSay for example you have a few paragraphs of notes about all your latest metrics and how amazing social is."; copy+= "\nIn addition you have a few links to sites as examples like"; copy+= "\n\nhttp://twitter.com"; copy+= "\nhttp://facebook.com"; copy+= "\nhttp://www.pinterest.com"; copy+= "\n\nNote Parse extracts the links allowing for your to easily click, copy/paste and even dump as a json object with type (Image/BMP,Image/PNG,Image/GIF, Image/JPG, URL)"; copy+= "\n\nClick the Parse Button or Replace Copy and Try again!"; document.getElementById(id).value = copy; } function parse(){ var block = $('#block').val(); var urls = []; //JSON var allUrls = new Array(); //Just URLS var uniqueUrls = new Array(); //Unique URLs - Not dups var diffUrls = new Array(); // var geturl = new RegExp( // "(^|[ \t\r\n])((ftp|http|https|gopher|mailto|news|nntp|telnet|wais|file|prospero|aim|webcal):(([A-Za-z0-9$_.+!*(),;/?:@&~=-])|%[A-Fa-f0-9]{2}){2,}(#([a-zA-Z0-9][a-zA-Z0-9$_.+!*(),;/?:@&~=%-]*))?([A-Za-z0-9$_+!*();/?:~-]))" // ,"g" // ); //simplier concept? var geturl = /(^|\s)((https?:\/\/)?[\w-]+(\.[\w-]+)+\.?(:\d+)?(\/\S*)?)/gi; var allCleanLinks = ""; var uniqueCleanLinks = ""; var clickLinks = ""; var diffCleanLink = ""; linkDump = block.match(geturl); if(linkDump!=null){ for (var i = 0; i < linkDump.length; i++) { var cleanLink = linkDump[i].replace(/(\r\n|\n|\r|\s)/gm,""); if(linkDump[i].toLowerCase().lastIndexOf(".png")>=0){ ftype = "Image/PNG"; }else if(linkDump[i].toLowerCase().lastIndexOf(".gif")>=0){ ftype = "Image/GIF"; }else if(linkDump[i].toLowerCase().lastIndexOf(".jpg")>=0){ ftype = "Image/JPG"; }else if(linkDump[i].toLowerCase().lastIndexOf(".jpeg")>=0){ ftype = "Image/JPG"; }else if(linkDump[i].toLowerCase().lastIndexOf(".tif")>=0){ ftype = "Image/TIF"; }else if(linkDump[i].toLowerCase().lastIndexOf(".tiff")>=0){ ftype = "Image/TIF"; }else if(linkDump[i].toLowerCase().lastIndexOf(".raw")>=0){ ftype = "Image/RAW"; }else if(linkDump[i].toLowerCase().lastIndexOf(".svg")>=0){ ftype = "Image/SVG"; }else if(linkDump[i].toLowerCase().lastIndexOf(".m4v")>=0){ ftype = "Video/M4V"; }else if(linkDump[i].toLowerCase().lastIndexOf(".avi")>=0){ ftype = "Video/AVI"; }else if(linkDump[i].toLowerCase().lastIndexOf(".mpg")>=0){ ftype = "Video/MPG"; }else if(linkDump[i].toLowerCase().lastIndexOf(".mp4")>=0){ ftype = "Video/MP4"; }else{ ftype = "URL"; } //parse email? allUrls.push(cleanLink); if(uniqueUrls.indexOf(cleanLink.toString()) == -1){ urls.push({"type":ftype , "source":cleanLink}); uniqueUrls.push(cleanLink); }else{ diffUrls.push(cleanLink); } } //sort to make pretty output allUrls.sort(); uniqueUrls.sort(); diffUrls.sort(); //Parse UniqueURLs into Pretty Output $.each( uniqueUrls, function( i, link ) { uniqueCleanLinks+=link+"\n"; clickLinks+="<a href="%22+link+%22">"+link+"</a>\n"; }); //Parse allUrls into Pretty Output $.each( allUrls, function( i, link ) { allCleanLinks+=link+"\n"; }); //Parse diffUrls into Pretty Output $.each( diffUrls, function( i, link ) { diffCleanLink+=link+"\n"; }); if(linkDump!=""){ //If you want to output copy -> Adjust other $("#click").html(... to $("#click").append( //$("#info").html("Copy: <pre>"+block+"<br>Links: <pre>"+printLinks+""); //withcopy if(linkDump.length!=uniqueUrls.length){ $("#click").html("<div> <h4> Links - <span>Total: <span class="badge badge-info">"+linkDump.length+"</span> Unique: <span class="badge badge-inverse">"+uniqueUrls.length+"</span></span><h4> </h4> </h4> </div> "); }else{ $("#click").html("<div> <h4> Links - <span>Total: <span class="badge badge-info">"+linkDump.length+"</span><h4> </h4></span> </h4> </div> "); } $("#click").append("<div> <pre>"+clickLinks+"</pre> </div> "); //ALL $("#info").html("<div> <h4> All Links- <span>Total: <span class="badge badge-info">"+allUrls.length+"</span><h4> <textarea rows="10">"+allCleanLinks+"</textarea> </h4></span> </h4> </div> "); if(linkDump.length!=uniqueUrls.length){ $("#info").append("<div> <h4> Unique Links- <span>Total: <span class="badge badge-inverse">"+uniqueUrls.length+"</span><h4> <textarea rows="10">"+uniqueCleanLinks+"</textarea> </h4></span> </h4> </div> "); $("#info").append("<div> <h4> Diff Links- <span>Total: <span class="badge badge-important">"+diffUrls.length+"</span><h4> <textarea rows="10">"+diffCleanLink+"</textarea> </h4></span> </h4> </div> "); } $("#dump").html("JSON (Unique) <br><pre>"+JSON.stringify(urls, undefined, 2)+""); //No Dups } }else{ $("#info").html("No Links Found"); } } </pre></pre></pre> https://ift.tt/eA8V8J IPTV
0 notes
Text
Icelander - Accessible Business Portfolio & WooCommerce WordPress Theme
New Post has been published on https://intramate.com/wordpress-themes/icelander-accessible-business-portfolio-woocommerce-wordpress-theme/
Icelander - Accessible Business Portfolio & WooCommerce WordPress Theme
LIVE PREVIEWGet it now for only $60
I C E L A N D E R is 100% GPL licensed accessibility-ready WordPress theme ideal for presenting your business portfolio in modern and unique style. Beautiful WooCommerce plugin integration also ensures the most pleasurable experience for your e-shop site customers.
ABOUT THE THEME, SHORTLY
There is nothing more important than your content. And it deserves a beautiful display! Icelander makes your website content more readable and presents it in a slick, modern style. The theme looks beautiful out of the box and we’ve put everything you need at your fingertips to ensure you get a beautiful website quickly and easily with no coding required. It’s just impossible to create beautiful websites easier
If you want a fast loading, accessible, SEO and mobile devices optimized theme, then have a look at the demo and see for yourself why Icelander is the WordPress theme you have been looking for!
Theme demo: https://themedemos.webmandesign.eu/icelander
Video preview: https://vimeo.com/webmandesigneu/icelander
Documentation: https://webmandesign.github.io/docs/icelander
Support center: https://support.webmandesign.eu
Video tutorials: https://vimeo.com/album/4647015
THEME FEATURES
Everybody is happy with Icelander: your website visitors, your website users and editors, and also your website admins and developers. Here is why:
Accessibility & Inclusivity
Fully accessibility ready WordPress theme
Passes WCAG 2.1 level AA and Section 508 accessibility requirements
Disabilities friendly, barrierless
Keyboard and screen reader friendly
User friendly
With proper headings structure (including the demo content)
With sufficient color contrast
Readability optimized content area and typography
Responsive, adapts to any device
Multilingual support with RTL language support
Content & Layout
Readability-focused and mobile-first approach to displaying your site content
Unique page intro header with special style on front page (with video support)
Control display of any sidebar and widgetized area with via sidebar management plugin
True WYSIWYG experience with dedicated editor stylesheet
Custom styles with post editor “Formats” dropdown button
Custom useful page templates
Special “List child pages” template
Page excerpt support
Automatic table of contents generation for parted (paginated) posts and pages
Demo Content
True one-click full demo content installation
Theme starter content for small websites
Many pre-designed Beaver Builder page builder row templates
Portfolio
2 different projects list styles: standard and unique blurred overlay
Amazing project layouts with support for page builders
Automatic taxonomy filter generated on project archive pages
Dedicated “traditional” project layout template
Complete control over the project display
Individual sidebar display control (compatible with any sidebar management plugin)
Shop
100% WooCommerce compatible with impressive shop pages design
Checkout guide
Conversion rate optimized design
Beautiful product layouts
Blog
3 different creative blog styles: masonry, list and minimal
Option to set up featured image size for masonry blog style
Readability optimized
Beautiful, unique post layouts
Support for page builders also in posts
Complete control over the post display
No confusing post formats
Individual sidebar display control (compatible with any sidebar management plugin)
Customization
Fast real-time preview of theme options change
WordPress video header support
Sticky header
Custom site width setup
Footer overlay image
Fullwidth or boxed layout (for whole site, and also for header and footer)
Integrated directly into WordPress customizer with option pointers and partial refresh
Language Support
Localization ready to create your website in your language
Compatible with Polylang and WPML plugins to create multi-lingual websites
Loco Translate plugin compatible
Right-to-left (RTL) languages compatible
Translated into Slovak language out of the box
Plugins
Full WooCommerce compatibility
Beaver Builder drag & drop page builder compatible (the theme demo website was created with free version of the plugin )
Beaver Themer fully compatible for creating custom header and footer designs, archive pages, error 404 page layouts and others
Compatibility with Elementor Theme Builder
Use any slider plugin
Compatible with any form plugin
Full integration with Jetpack, WP Subtitle, Advanced Custom Fields, Widget CSS Classes and WebMan Amplifier plugin
Plugin-friendly code ensures wide compatible with any decently coded plugin
Any page builder compatible theme: Elementor, Page Builder by SiteOrigin, Visual Composer,…
Updates, Documentation & Support
Dedicated WordPress dashboard “Welcome” page for theme introduction
Extensive documentation with unique “Anatomy” section for fast reference
Narrated video tutorials
Free theme updates
Friendly, timely and helpful support
…others
2 menus in header (“Primary” and “Secondary” one)
Unique “Recent posts” widget date display
Unique custom “Text” widget enhancements (a featured image and an icon)
Bloat-free WordPress theme with no lock-in effect
Easy to use
Built-in simple megamenu functionality
Integrated child theme generator
Search engine optimized (SEO)
Speed optimized code – with honest performance grade of 97, without using any CDN and caching plugin!
Secure, semantic, extensible and developer-friendly code
100% GPL licensed
WE MAKE CUSTOMERS SMILE
Don’t take our words for that. We have a lot of positive feedback from our happy customers. That’s why we are rated as ★★★★★ (5-stars) WordPress themes author. Here is what our customers are saying about us and our products:
★★★★★ from globalser:
Having worked with famous templates like Avada, Salient, Flatsome and others, at first I was skeptical. But I found very easy to work with the Beaver Builder, and the thing I liked most was Oliver’s support. He has a lot of knowledge about accessibility and is very helpful. I could only choose 1 main reason for this review from dropdown, sadly, because other then the fantastic support I would choose also: Documentation Quality, Code Quality, Design, Customizability.
★★★★★ from smamer_nm:
It’s hard to select just one reason. The Customer Support is also the best, just like other elements like the theme’s Customizability or Flexibility. Great job!!!
★★★★★ from lomw527:
This theme is very well designed and modern looking. I am amazed about the customer support service provided. It is the best written electronic support that I’ve ever encountered throughout years of electronic purchases. I can conclude that WebMan Design is truly committed to give the best user experience.
★★★★★ from kronomia:
A well-coded perfectly validated WordPress theme that is fully accessible and nicely designed.
★★★★★ from junejonet:
Very lightweight and fast to install. Great customer service. Everything works. Awesome flexible design. No problem when installing any other plugins. Detailed documentation. Highly recommended. So good, that I’m looking at buying your other themes!
★★★★★ from sep0088:
More than an amazing, flexible theme, it’s the best support!
THEME SUPPORT
Please check the theme documentation (user manual) before submitting any support ticket. In case you can’t find the answer in theme documentation, feel free to to ask (or search for the answer) at the dedicated support center.
Documentation: https://webmandesign.eu/manual/icelander
Video Tutorials: https://vimeo.com/album/4647015
Support center: https://support.webmandesign.eu
THEME UPDATES
Please see the changelog.md file inside the theme folder for more info on theme update changes.
Version 1.5.4:
Fix: Call To Action page builder module throwing PHP error
Version 1.5.3:
Update: Adding nofollow attribute to default site info links
Update: Theme options info
Update: Localization
Fix: Removing post excerpt wrapper when excerpt is empty
Version 1.5.2:
Add: Adding WhatsApp and Google social icon
Update: Implementing WordPress 5.2 code updates
Fix: Preventing PHP error after theme activation*
Version 1.5.1:
Update: Removing obsolete code
Update: Code notes, formatting and version numbers
Fix: Elementor Theme Builder compatibility
Fix: “Continue reading” broken HTML for posts with more tag
Version 1.5.0:
Add: Elementor Pro Theme Builder compatibility
Add: Theme options to edit home page intro overlay colors and opacity
Update: Custom typography info in theme options
Update: Styles
Update: Welcome page and notice
Update: Improving Beaver Themer compatibility
Update: Updating info about demo require plugins
Update: Improving CSS variables functionality for browsers with no support
Update: Navigation accessibility and touch screen functionality
Update: Improving accessibility skip links
Update: Improving intro image accessibility
Update: Updating excerpts display
Update: Improving Recent Posts widget enhancement
Update: Improving code
Update: Improving security
Update: Localization
WHO IS WebMan Design?
Hi, I’m Oliver. A passionate developer striving for simplicity and doing things right in my products at WebManDesign.eu. I build both free and paid WordPress themes and plugins which are used by thousands of happy customers around the world.
Thank you for your interest in Icelander accessible WordPress theme!
My portfolio: https://www.webmandesign.eu/
My Facebook page: https://www.facebook.com/webmandesigneu/
My Twitter: https://www.twitter.com/webmandesigneu/
LIVE PREVIEWGet it now for only $60
0 notes
Text
Top 10 Free Resources For Learning React.js
The frontend ecosystem is dominated by React.js. It’s one of the fastest rising JavaScript frameworks on the web with no signs of slowing down, and there’s plenty of job opportunities for a skilled React developer.
But this library comes with a steep learning curve which can take weeks or months to understand. The best way to learn is to practice building stuff, but these free guides can help you learn a bit quicker and offer some structure to your React practice sessions.
Your Designer Toolbox Unlimited Downloads: 500,000+ Web Templates, Icon Sets, Themes & Design Assets
DOWNLOAD NOW
Egghead
The Egghead website has tons of courses on many different JS libraries. Some of these courses have a mix of free and premium videos, but many are totally free which is great for newbie developers.
I recommend their React Fundamentals course which is free and spans 60 minutes over a few dozen videos. It’s definitely an intro course, but it’ll cover a lot of crucial subjects that you’ll have to learn to pick up React.
Egghead video quality is also exquisite so this is definitely a site to bookmark for other courses too.
React JS Crash Course (YouTube)
There are dozens of React.js video tutorials on YouTube so it’s tough knowing where to start. This React Crash Course video covers all the basics including MVC architecture and the very foundational structure of React.js applications.
This video is just over 1 hour long and it’s certainly not a complete guide, but I think it’s a solid introduction to the library if you have no prior experience and little-to-no idea what React even does.
FB React Docs
If you go searching for free React resources you’ll undoubtedly stumble onto the Facebook documentation.
These docs can be terse and difficult to work through initially, but the quality is great and the writing is aimed towards people who don’t know much (or anything) about React development.
I specifically recommend this tutorial. It’s a true guided tutorial rather than a documentation overview, but you should try reading through both since there’s a lot of knowledge you need to absorb.
To-Do App With React
All the tutorials on Scotch.io are phenomenal. The writing, the results, and the actual code quality equates to the best self-taught guides you’ll find online.
Out of all their guides I specifically recommend their simple to-do app since it guides you through a typical workflow and teaches common practices for building webapps.
But the Scotch React category has dozens of similar tutorials you can pick up and work through. Many of them target intermediate-level developers so as a complete newbie you may struggle. But Scotch gets into so much detail that it’s easily one of the best blogs to revisit for future lessons.
React Enlightenment
The open source React Enlightenment guide is one of the better sites to use throughout your journey. It’s terse but straight to the point. And since it’s open source the whole thing is free to read online or download locally.
Every page of this guide is hosted for free on GitHub and it covers a lot of best practices for new developers. You’ll learn about ES6 and JSX/templating along with basic DOM manipulation and components.
Just note this guide does not hold your hand or wait for you to keep up. You’ll need to do a lot of Googling to answer questions you have along the way. But this guide can take you pretty far and it’s frequently updated with new information.
TutsPlus React Tutorials
Every tutorial I find on the TutsPlus site is phenomenal. They publish incredibly detailed content solving very specific problems, and most of the time you can follow these guides in a step-by-step fashion which is handy for beginners.
The TutsPlus React category has dozens of tutorials ranging from the complete basics to more advanced app dev guides. For a newbie I recommend Getting Started With React. It offers a solid introduction to all the tooling & workflows that come along with a React.js environment.
React.js for Beginners (YouTube)
One other YouTube video tutorial I like is this one by Dev Tigris. It’s a complete guide for beginners and the teaching style is very clear.
This vid is only one hour long but it should get you comfortable with the basics of React. This video won’t make you fully independent or able to craft detailed apps from scratch. But you will walk away knowing how React functions and thinking in a more React-oriented manner.
Tip: check the related videos you see in the sidebar of this video. Many of those are also great and well worth your time.
React Fundamentals
The React Training site is yet another half-free and half-premium resource for learning React. And if you have time to go through the free content you’ll be pleasantly surprised.
This works like an online course series where you can study topics along with other students, and the best free course is React Fundamentals.
All the course material spans a total of 4+ hours long with a master list of 48 different lessons. The course gets updated frequently with new React techniques and best practices so it’s worth checking back every so often.
Codementor React Tutorials
The idea behind Codementor is pretty simple. You pair up with a digital mentor who helps you work through different projects and libraries. But these sessions usually cost money, so to help beginners without a budget, Codementor shares free written tutorials on their blog.
You can browse through all their React tuts and pick through any topics that interest you. Some cover basic React setup guides, others cover React Native for mobile apps, and others cover wacky ideas like a React Pokédex app.
It’s good to have a little background in React before following these tutorials. They get into so much detail that it can be hard for complete newbies, but I guarantee you’ll improve your skills just by following some of these guides.
Curated React/Redux Links
Lastly, I have to include this massive React.js links list because it really is the ultimate place to find React.js learning resources.
Developer Mark Erikson curated this huge list of tutorials & guides organized by skill level and subject matter. You’ll find plenty of beginner guides on React, ES6 and JS app design patterns.
Keep this bookmarked for later reference because as your skills improve you’ll find a lot of value in some of the more advanced tutorials.
These free resources are just my personal recommendations but the React community is constantly changing and awesome new tutorials are published every year. Take a look through these links to see if any can help you get started, but if you’re looking for more alternatives definitely hit Google and see what else you can find.
from Web Designing https://1stwebdesigner.com/learn-react-js/
0 notes
Text
Top 10 Free Resources For Learning React.js
The frontend ecosystem is dominated by React.js. It’s one of the fastest rising JavaScript frameworks on the web with no signs of slowing down, and there’s plenty of job opportunities for a skilled React developer.
But this library comes with a steep learning curve which can take weeks or months to understand. The best way to learn is to practice building stuff, but these free guides can help you learn a bit quicker and offer some structure to your React practice sessions.
Your Designer Toolbox Unlimited Downloads: 500,000+ Web Templates, Icon Sets, Themes & Design Assets
DOWNLOAD NOW
Egghead
The Egghead website has tons of courses on many different JS libraries. Some of these courses have a mix of free and premium videos, but many are totally free which is great for newbie developers.
I recommend their React Fundamentals course which is free and spans 60 minutes over a few dozen videos. It’s definitely an intro course, but it’ll cover a lot of crucial subjects that you’ll have to learn to pick up React.
Egghead video quality is also exquisite so this is definitely a site to bookmark for other courses too.
React JS Crash Course (YouTube)
There are dozens of React.js video tutorials on YouTube so it’s tough knowing where to start. This React Crash Course video covers all the basics including MVC architecture and the very foundational structure of React.js applications.
This video is just over 1 hour long and it’s certainly not a complete guide, but I think it’s a solid introduction to the library if you have no prior experience and little-to-no idea what React even does.
FB React Docs
If you go searching for free React resources you’ll undoubtedly stumble onto the Facebook documentation.
These docs can be terse and difficult to work through initially, but the quality is great and the writing is aimed towards people who don’t know much (or anything) about React development.
I specifically recommend this tutorial. It’s a true guided tutorial rather than a documentation overview, but you should try reading through both since there’s a lot of knowledge you need to absorb.
To-Do App With React
All the tutorials on Scotch.io are phenomenal. The writing, the results, and the actual code quality equates to the best self-taught guides you’ll find online.
Out of all their guides I specifically recommend their simple to-do app since it guides you through a typical workflow and teaches common practices for building webapps.
But the Scotch React category has dozens of similar tutorials you can pick up and work through. Many of them target intermediate-level developers so as a complete newbie you may struggle. But Scotch gets into so much detail that it’s easily one of the best blogs to revisit for future lessons.
React Enlightenment
The open source React Enlightenment guide is one of the better sites to use throughout your journey. It’s terse but straight to the point. And since it’s open source the whole thing is free to read online or download locally.
Every page of this guide is hosted for free on GitHub and it covers a lot of best practices for new developers. You’ll learn about ES6 and JSX/templating along with basic DOM manipulation and components.
Just note this guide does not hold your hand or wait for you to keep up. You’ll need to do a lot of Googling to answer questions you have along the way. But this guide can take you pretty far and it’s frequently updated with new information.
TutsPlus React Tutorials
Every tutorial I find on the TutsPlus site is phenomenal. They publish incredibly detailed content solving very specific problems, and most of the time you can follow these guides in a step-by-step fashion which is handy for beginners.
The TutsPlus React category has dozens of tutorials ranging from the complete basics to more advanced app dev guides. For a newbie I recommend Getting Started With React. It offers a solid introduction to all the tooling & workflows that come along with a React.js environment.
React.js for Beginners (YouTube)
One other YouTube video tutorial I like is this one by Dev Tigris. It’s a complete guide for beginners and the teaching style is very clear.
This vid is only one hour long but it should get you comfortable with the basics of React. This video won’t make you fully independent or able to craft detailed apps from scratch. But you will walk away knowing how React functions and thinking in a more React-oriented manner.
Tip: check the related videos you see in the sidebar of this video. Many of those are also great and well worth your time.
React Fundamentals
The React Training site is yet another half-free and half-premium resource for learning React. And if you have time to go through the free content you’ll be pleasantly surprised.
This works like an online course series where you can study topics along with other students, and the best free course is React Fundamentals.
All the course material spans a total of 4+ hours long with a master list of 48 different lessons. The course gets updated frequently with new React techniques and best practices so it’s worth checking back every so often.
Codementor React Tutorials
The idea behind Codementor is pretty simple. You pair up with a digital mentor who helps you work through different projects and libraries. But these sessions usually cost money, so to help beginners without a budget, Codementor shares free written tutorials on their blog.
You can browse through all their React tuts and pick through any topics that interest you. Some cover basic React setup guides, others cover React Native for mobile apps, and others cover wacky ideas like a React Pokédex app.
It’s good to have a little background in React before following these tutorials. They get into so much detail that it can be hard for complete newbies, but I guarantee you’ll improve your skills just by following some of these guides.
Curated React/Redux Links
Lastly, I have to include this massive React.js links list because it really is the ultimate place to find React.js learning resources.
Developer Mark Erikson curated this huge list of tutorials & guides organized by skill level and subject matter. You’ll find plenty of beginner guides on React, ES6 and JS app design patterns.
Keep this bookmarked for later reference because as your skills improve you’ll find a lot of value in some of the more advanced tutorials.
These free resources are just my personal recommendations but the React community is constantly changing and awesome new tutorials are published every year. Take a look through these links to see if any can help you get started, but if you’re looking for more alternatives definitely hit Google and see what else you can find.
from 1stWebDesigner https://ift.tt/2qI0Wim
Top 10 Free Resources For Learning React.js is courtesy of The Simply PSD Blog
from https://ift.tt/2YlCH7i
0 notes
Text
AdForest - Classified Ads WordPress Theme
https://opix.pk/blog/adforest-classified-ads-wordpress-theme/ AdForest - Classified Ads WordPress Theme https://opix.pk/blog/adforest-classified-ads-wordpress-theme/ Opix.pk LIVE PREVIEWBUY FOR $49 Classified Ads WordPress Theme – Adforest AdForest is one of the leading and the best Premium Classified Ads WordPress theme with outstanding front-end UI. Get ad posting WordPress theme with different color options and with awesome Wp functionality. Google map is also integrated in WordPress ads theme. Our WordPress classifieds theme usability and overall user-experience is according to modern Era. If you want your classified business stand out from the crowd AdForest is the one stop solution to start and make it easy to sell your products online. Demo Login Credentials Email: [email protected] Password: demo123 AdForest is a Premium Classified WordPress Theme, super flexible, Multiple Reusable sections with a lot of possibilities and has a fully responsive design. We Built it with HTML5 , CSS3 and Latest bootstrap 3.7 and Latest JQuery 3.1 . We Build a Complete Classifieds Solution according to all kind of ad posting requirements. We carefully handcrafted this theme with a strong focus on typography, usability and overall user-experience. It’s very quick to setup and easy to customize. Our Theme comes up with Extensive Documentation to guide you and set up your components correctly. Last but not Least, AdForest is designed with respect to adopting any kind of classified business in the world. Here are some exceptional Features: Features: Rating & Reviews on ads Advance Search Added Multi Currency front end Added Complete New look Multiple new Home Pages added Advanced Google map integration Radius Search Added 3 type of Ad Search Pages added New header Styles added Translation for famous Languages added New User Registration verification added Images Re ordering added Category Based Featured ads feature added Simple ad expiry added Compatible with 100+ social media ad share Ajax Drag and Drop Image Up loader Bad Word Filter Google Map Locations Unlimited Custom Fields Safty Tips and Tricks Featured Ads AD Expiry Limits Free and Paid Package Admin control Auto/Manuel AD Approval Currency Change from Back end AD Related Taxonomies Woo Commerce Payment Option Two Type of Layouts Different Sidebar Widgets Advertisement Spots Mode Of Communication Messaging System Hidden Phone Number Google Map Location Contact Form 7 Built in Coming Soon Theme Related Ads Sticky Sidebar advertisement Ad Status ( Sold, Expired etc) Widget Ready Search Drag & Drop Taxonomies Base Search Price Based Search AD Type Based Search Biding System Seller Public Profile Seller Rating Location Based Search Featured Ads Based Search Title Based Search Side bar Widgets category Based Search (Up to 4 level) Warranty Based Search Advertisement Within Search Result Mail Chimp 1 Click Demo Imp. Lang.Translation ready Redux Framework Visual Composer – Page Builder for WordPress Latest Bootstrap 3.7 Latest JQuery 3.1 HTML5 & CSS3 Truly Responsive Font Awesome Included Classified Icons Included Clean and Creative Design Clean Code Easy to Customize Completely Reusable Section Targeted Ad Spots Smart and creative Category Grid Multiple Listing Style Cross Browser Compatible Multiple Blog Pages 2 type of single ad page Complete User Dashboard User Profile Pages Login and Register Models 404 and Contact Us Page SEO Optimized Well Managed Documentation Advance Search Sidebar NOTE: Kindly update your theme to Modern version as soon as possible if you are using classic version as Classic version will not be supported in future. We are using Woo Commerce for package system in AdForest. we are not using it for shopping products. Note:We are not providing support for any kind of adult website. If you want to buy than you can proceed but do not expect support for illegal or Adult Websites. Attention: Google maps Service has updated his policy. Please read details over here Adforest Update History Change log / Updates: v 3.5.0 ——December 29th, 2018 1). Add 4 New Demo. PetForest, TechForest, MatchForest and Landing Page. 2). Fix css issue on old demos. 3). Fix Categories based date field issue. 4). Fix bidding on/off issue while editing the ad. 5). Update required plugins. Change log / Updates: v 3.4.8 ——December 1st, 2018 1). Update WPBakery for latest WordPress version 5.0 2). Fix css issues. 3). Fix woo-commerce gallery images issue Change log / Updates: v 3.4.7 ——November 23rd, 2018 1). Fix Price Required Issues. 2). Fix css issues. 3). Containner for wpbackery default elements. http://documentation.scriptsbundle.com/docs/adforest-wordpress-theme/#7129 4). On Search Page new option add for Grid/List View. Change log / Updates: v 3.4.6 ——November 15th, 2018 1). RTL css issue fixed. Change log / Updates: v 3.4.5 ——October 27th, 2018 1). Fix css and some other small issue. 2). Update woo-commerce templates. Change log / Updates: v 3.4.4 ——October 19th, 2018 1). Fix Css Issue. 2). Fix Slider issues. Change log / Updates: v 3.4.3 ——October 16th, 2018 Version 3.4.3 1). Fix Bump Ad addition issue. 2). Fix translation issues. 3). Update library for featured ads loop. 4). Added option to show phone number to login users only. 5). Fix css issue. Change log / Updates: v 3.4.2 ——September 15th, 2018 1). Update Plugins. 2). Fix menu issue on mobile. 3). Fix shop page css issue Change log / Updates: v 3.4.1 ——September 4th, 2018 1). CSS and some other bug fixes. Change log / Updates: v 3.4.0 ——August 31st, 2018 1). 2 New Home Pages. 2). New ad details page. 3). New public profile design along with contact form. 4). All seller/buyer page. 5). 2 new grid styles added. 6). Date and URL added in category based custom feilds. 7). Small css bug fixes. Change log / Updates: v 3.3.1 ——August 1st, 2018 1). Woo-Commerce Shop Issues Fixed 2). Fix issue over https:// Leaflet Map. A open source JavaScript library. (google maps alternative) Change log / Updates: v 3.3.0 ——July 20th, 2018 1). Woo-Commerce Shop Added 2). Leaflet Map Added. A open source JavaScript library. (google maps alternative) 3). Added New shortcode of Woo-Commerce for homepage. 4). Fix small css issues. 5). Update Plugins. Change log / Updates: v 3.2.9 ——June 30th, 2018 1- Update the plugins to latest versions. 2- Start price slider from 0 instaead of 1. 3- Fix small css and jQuery issues. 4- Remove multi currency dropdown in widgets when we have only 1 currency. 5- Categories based template issue fixed. Change log / Updates: v 3.2.8 ——June 7th, 2018 1- Update Woocommerce template. 2- Fix Google location auto submit on ad post. 3- Fix Term and Conditions On Check Out Page. 4- Fix Featured ads slider on Radiuos Search. 5- Fix Css issues. Change log / Updates: v 3.2.6 ——May 23rd, 2018 1- Dropzone js issue fixed. Change log / Updates: v 3.2.5 ——May 22nd, 2018 1- General Data Protection Regulation (GDPR) Compliance 2- Delete profile button option to delete account. (Admin has option to allow or not). 3- Small issue fixes. Change log / Updates: v 3.2.4 ——May 6, 2018 1- Featured ad slider on category(taxonomy) pages. 2- Featured grid layout added for featured ads slider. 3- Title limit for grid ads layout. 4- Breadcrumb image can be changeable. 5- Added more images limit for an ad. 6- Fixed small CSS issues. Change log / Updates: v 3.2.3 ——April 24, 2018 1- Radius search avail on all 3 search layout; prior to this only available in map search layout. 2- Feature and bump option also available on "My ads" under user profile. 3- User reviews count issue has been resolved. 4- Small CSS issue has been resolved. Change log / Updates: v 3.2.2 ——April 13, 2018 1- Bid can be deleted from admin panel by admin. 2- User rating issue resolved. Change log / Updates: v 3.2.1 ——April 11, 2018 1- WP all import add-on added. 2- Default currency selected option. 3- Search with currency fixed. 4- Empty query string not display as search tags. 5- Option in search side bar to open widget by default. 6- Sub-categories option to display in sidebar search option. 7- Search map focused on change location in search with map option. Change log / Updates: v 3.2.0 ——March 21, 2018 1- Updated bidding module. 2- Count down timer added on ad details page and list and grid view. 3- Top bidder on ad ad details page. 4- Bidding close after count down timer end. 5- Compatible with latest PHP version 7.2.3. Change log / Updates: v 3.1.9 ——March 15, 2018Updates 1- Compatible with latest php 7.2.3 ( speed improved ). 2- Updated WPBakery Page Builder. 3- Redirect back to action after logged in. 4- Fix images re-ordering issue on mobile devices. 5- Fixed YouTube icon in footer. Change log / Updates: v 3.1.8 ——March 04, 2018Updates Changelogs; 1- RTL CSS Fixes. 2- JS issues resolved. Change log / Updates: v 3.1.7 ——February 25, 2018Updates Changelogs; 1- Get current location in map while ad posting. 2- Speed control of feature ad slider from theme options and also enable loop. 3- Small CSS fixes. Change log / Updates: v 3.1.6 ——February 22, 2018Updates Changelogs; 1- Package order history added in profile. 2- Delete user rating from admin panel by editing the user. 3- Floating value in bidding. 4- Tabs short code issue with list style resolved. 5- Radius search sync with query. 6- Increase ads limit in short codes. 7- Unlimited ads in packages. 8- Auto package order approve option in theme options. Change log / Updates: v 3.1.5 ——February 14, 2018Updates 1- Rating & reviews on ads. (New Feature) 2- updated woo-commerce templates. 3- Expired and Sold out image position fixed. 4- Header black logo link fixed in mobile view. 5- Featured ads slide automatically for more user attraction. 6- Mail_to functionality in contact us page on email(s). 7- Fixed widgets style in ad details page. 8- Price in floating allowed. Change log / Updates: v 3.1.4 ——January 31, 2018Updates 1- Minimum dimension of image mode. 2- Custom location in shortcodes. 3- Change price type order and also add new price type. 4- Small CSS and JS fixes. Change log / Updates: v 3.1.3 ——January 13, 2018Updates 1- Fixed Css Issues Change log / Updates: v 3.1.2 ——January 09, 2018Updates 1- Fixed Css Issues 2- Update Translations Change log / Updates: v 3.1.1 ——January 04, 2018Updates 1- Fix issue From Version 3.1.0 Change log / Updates: v 3.1.0 ——January 03, 2018Updates 1- Phone no. versification by twilio. 2- Bump up ads. 3- Social profiles on user public profile. 4- Map scrolling on mobile phones. 5- Changeable custom locations labels. Change log / Updates: v 3.0.8 ——December 15, 2017Updates 1)- Added Custom location; Country -> State -> City -> Town Change log / Updates: v 3.0.7 ——December 14th, 2017Updates/Fixes 1)- Sticky menu blink issue fixed. 2)- Added author column in ads in admin back-end. 3)- Footer app link corrected. 4)- Breadcrumb issue fixed. 5)- Fixed small CSS issues. 6)- Updated plugins. Change log / Updates: v 3.0.6 ——December 2nd, 2017Updates/Fixes 1)- Update plugins. 2)- Fixed css issue on red color theme. Change log / Updates: v 3.0.5 ——November 25th, 2017Updates/Fixes 1)- Added Overlapping Marker Spiderfier for Google map 2)- Fixed small issues Change log / Updates: v 3.0.4 ——November 17th, 2017Updates/Fixes 1)- Fix Term Taxonomy Issue With WordPress 4.9 2)- Responsive issue fix Change log / Updates: v 3.0.3 ——November 17th, 2017Updates/Fixes 1)- Make Compatible With WordPress 4.9 2)- Update visual composer Change log / Updates: v 3.0.2 ——November 15th, 2017Updates/Fixes 1)- Improve Security 2)- Fix fonts issue for https:// 3)- Small CSS Fixes Change log / Updates: v 3.0.1 ——November 11th, 2017Updates/Fixes 1- Some important fixes. Change log / Updates: v 3.0.0 ——November 10th, 2017New Features 1- Advance Search Added 2- Multi Currency front end Added 3- Complete New look 4- Multiple new Home Pages added 5- Advanced Google map integration 6- Radius Search Added 7- 3 type of Ad Search Pages added 8- New header Styles added 9- Translation for famous Languages added 10- New User Registration verification added 11- Images Re ordering added 12- Category Based Featured ads feature added 13- Simple ad expiry added 14- Compatible with 100+ social media ad share Change log / Updates: v 2.5.7 ——October 26th, 2017Important 1- Ad Post Bug Fix Change log / Updates: v 2.5.6 ——October 23rd, 2017 Change logs 2.5.6: 1- Update Visual Composer 2- Update woo-commerce and templates. Change log / Updates: v 2.5.5 ——September 16th, 2017 Change logs 2.5.5: 1- Ad sort by price on search. 2- Add local address option in ads. 3- Fixed small JS issue. Change log / Updates: v 2.5.4 ——August 19th, 2017 1- Fixed map issue. 2- Reset password fixed. 3- Category based templates fixes. 4- YouTube video update issue fixed. 5- Drop zone translation issue fixed. Change log / Updates: v 2.5.3 ——August 12th, 2017 1- Make ad featured while posting/updating ad. 2- 0.00 price fixed. Change log / Updates: v 2.5.2 ——August 11th, 2017 1- Ad video in popup. 2- Small CSS fixes. Change log / Updates: v 2.5.1 ——August 10th, 2017 1- Password reset with link via email. 2- Email on Ad approval. 3- Email on new user registration. 4- Updated social login features; user will register if not a member on social login. 5- Small CSS fixes. Change log / Updates: v 2.5.0 ——July 28th, 2017 1- Check boxes added in category based custom templates. 2- Select user map while posting ad by using Google maps. 3- Video icon on show on ads if ad has video. 4- updated required plugins. Change log / Updates: v 2.4.7 ——July 15th, 2017 1- Visual Composer Updated 2- Code Optimization Change log / Updates: v 2.4.6 ——July 12th, 2017 1- No price will be hidden instead of 0.00 2- Profile image size increased up to 2MB 3- Hide some variables when woo-commerce is no using on profile. 4- Fixed typo. Change log / Updates: v 2.4.5 — June 17th, 2017 1- Fix sub categories template. Change log / Updates: v 2.4.4 — June 16th, 2017 1- Category based templates up to 4 level. 2- Currency position for packages. 3- Category short codes with option to point it on search page or category page. 4- Price type ( Fixed, Negotiable) Change log / Updates: v 2.4.3 — June 10th, 2017 1- Some issues fixes. 2- Update pre-packed plugins. Fixes : v 2.4.2 — June 6th, 2017 1- Some bug fixes. Change log / Updates: v 2.4.1 — June 4th, 2017 1- Updated footer file. Change log / Updates: v 2.4.0 — June 2nd, 2017 1- Added Price option for right, left, thousand separator, decimals and decimal separator. 2- Added new category style with it sub-category. (Category Classic) 3- Add JS and CSS option in header as well. 4- Order by for ads short-code (Latest, Oldest, Random) 5- Category based template search updated. Change log / Updates: v 2.3.0 — May 25th, 2017 1- Custom category based search (Video: https://goo.gl/pN35le) 2- Ad author select the bidding option from front end if admin allowed. 3- fa icons in menu fixed. Change log / Updates: v 2.2.0 — May 20th, 2017 1- Bidding System 2- Admin can change the ownership of an AD. 3- Phone number required option from back-end. 4- New bid email template added. 5- POT file updated. Updates: v 2.1.1 — May 13th, 2017 1- Updated POT file. 2- Fixed some CSS issues. 3- Some Structure Changes. Updates: v 2.1.0 — May 11th, 2017 1- Seller Rating ( user can give rating to each other ) 2- User badges from Admin. 3- Pretty popup for AD full images. 4- User Public profile. 5- Latitude and Longitude ON/OFF from back end. 6- Email template added for new rating. Updates: v 2.0.0 — May 06th, 2017 1- Category based templates for ad posting. 2- Pin point map by using latitude and longitude. 3- Ad post button changeable text from admin. Knowledge Base For Category Based Form Fields Updates: v 1.5.0 — April 29th, 2017 1- Add email templates for emails. 2 - Small CSS fixes.. Updates: v 1.4.2 — April 27th, 2017 1- Fixed Currency symbol on RTL single ad page. 2 -Sticky Ad text and icon changeable from admin panel 3- Small CSS fixes. Updates: v 1.4.1 — April 22nd, 2017 1- Fix carousel slider issue. 2- Small CSS fixes. Updates: v 1.4.0 — April 21st, 2017 1- Ajax Notification for messages with complete admin settings. 2- Fixed font issue for https. 3- Updated core plugins. 4- Small CSS fixes. Updates: v 1.3.1 — April 17th, 2017 1- Add Link to Ad Images. 2- Fix Translation Strings. 3- Fix some css. Updates: v 1.3.0 — April 16th, 2017 1- Remove some design sections. Updates: v 1.2.1 — April 11th, 2017 1- Sent & received offers under messages tab. 2- Fixed Images upload extension on mobile phones. 3- minor css fixes. Updates: v 1.2-——- April 8th, 2017 1- Add pre-packed watermark plugin for watermark on ads images. 2- Admin can change user default picture on profile from back-end. Updates: v 1.1.1 — April 7th, 2017 1- Updated visual composer from 5.1 to 5.1.1 2- Fixed issue in ad share on social media. 3- Fixed google map on ad details page. Updates: v 1.1.0 — April 6th, 2017 1- User can see their pending ads now. 2- Some string were not translatable, fixed it. 3- Woo commerce CSS fixed in select2. 4- YouTube error fixed. Updates: v 1.0.1 — April 2nd, 2017 1.Added YouTube video option for AD. 2.Add price text fields with price slider on search ads 3.Fixed small issues. Updates: v 1.0 — March 28th, 2017 1. Email Notification On Ad Posting Source
0 notes
Text
Sparkle - Outstanding Magazine theme for WordPress
New Post has been published on https://click.atak.co/sparkle-outstanding-magazine-theme-for-wordpress/
Sparkle - Outstanding Magazine theme for WordPress
Sparkle – Outstanding Magazine WordPress theme (Latest version: v2.2 – Jun 7 2018 – Fixed backend UI issue, What’s new in this version, please see change log at the end for more information.)
Never-ending page has been added since v1.0.4 – check it out!
Fully Responsive layout, outstanding design, Sparkle is based on Underscores (_s) and Bootstrap Framework with built-in flexibility. Suitable for Gamers, News, Magazine, Ad, Review and blogging websites.
Sparkle does support translating to Multi-Language with WPML, selling online with Woocommerce. It?s also compatible to bbPress in case you need a forum.
SEO (Search Engine Optimization) has been made a priority when building the theme.
if you like this theme, please dont forget to rate it , that will help us a lot on improving the theme also to the support
Screencast tutorials on Youtube
Showcase:
Elefante Grafico
Dekazeta
projectnursery
https://www.tricktraining.com.au
http://designerhype.com/
Here are some of main features:
Please contact us before rating us 1 star as we can always sort out issues to your full satisfaction.
Customer reviews
All Features: Updating.
Requirements:
-WordPress 3.9 (and higher) -PHP 5.3+
We highly recommend buyers to use Cpanel hosting for best performance and stability with WordPress.
Note: Images/Photos in live preview are not included in the package for sale, they are just for demonstration only.
Changelog
= v2.2 – Jun 7 2018
= v2.2 – Jun 7 2018 – Bugfixes – WordPress 4.9+ ready – Woocommerce 3.4+ ready -Update Visual composer
= v2.1.0 - Jun 19 2017 - Bug fixes for Post block widget - Minor bug fixes - Update Visual Composer - Update Shortcode Generator - Templated changed + includes/templates/func-post-list.php
= v2.0.9 - Mar 06 2017 - Bug fixes
= v2.0.8 - Feb 06 2017 - Fixed Minor css issue - Option to hide global search button in Site Search box type - Fixed ssl issue with twitter widget. - Fixed bbPress lightbox issue. - Updated localized strings. - Updated plugins. - Updated Google Fonts - Minor bug fixes.
= v2.0.7 - Oct 21 2016 - Fixed backend UI issue = v2.0.6 - Oct 19 2016 - Update framework. - Updated plugins. - Removed deprecated functions. - Updated urls - Updated localized strings. - Minor bug fixes
= v2.0.5 - Aug 31 2016 ************************************ - Update post list template - Fix thumbnail size issue. - Redefined default thumbnail size - Rearrange share buttons - Update facebook share count api - Removed deprecated plugins and function - Update Font awesome 4.6.31
= v2.0.4 - Apr 21 2016 - Improved framework - Removed outdated jquery event and deprecated expression - Fixed Minor css bug - Updated Shortcode Generator (v1.0.7.3) - Updated Sidebar Generator (v1.0.3) - Updated Post View Tracker (v1.0.3.3) - Hidden ability to use background image or regular image for post thumbnails - default: regular images ( To switch to background image, please ask us on dedicated support forum for help ) - File Changed: + framework/admin/assets/js/admin-smart-widget.js + framework/admin/assets/js/admin-smart-widget.min.js + framework/admin/assets/js/admin-widget-script.js + framework/admin/assets/js/admin-widget-script.min.js + framework/admin/assets/js/yeahthemes.js + framework/admin/assets/js/yeahthemes.min.js + framework/extended/class.tgm-plugin-activation.php + includes/templates/func-post-list.php + includes/templates/megamenu-ajax.php + includes/templates/megamenu-regular.php + includes/templates/megamenu-ymal.php + js/yt.custom.js + js/yt.custom.min.js + content-classic.php + content-audio.php + content-gallery.php + content-hero-post.php + content-image.php + content-link.php + content-quote.php + content-single.php + content-video.php + content.php + style.css + misc.
= v2.0.3 - Apr 17 2016 ************************************ - Fixed minor bugs. - Improved hero brick ux. - Fixed minor css bug. - Updated Visual Composer Plugin. - Removed deprecated function. - Fixed localizable string issue. - Compatible to WP 4.5.
= v2.0.2 - April 10 2016 ************************************ - Fixed minor bugs - Fixed Login area issue. - Fixed css bug - Added Lazy load support for You might also like area. - Updated Visual Composer Plugin
= v2.0.1 - feb 12 2016 ************************************ - Fixed Top menu css issue. - Fixed WPML compat bug. - Updated Languague files - Fix minor css bug.
= v2.0.0 - feb 10 2016 - Big Update ************************************ - Fixed Minor Bugs - Removed Query Post metabox (not necessary) - Moved Hero Banner Settings to Theme Options. - Improved Hero Banner, doesn't require standard size for thumbnails anymore. - Added New features and layout for hero banner. + New three layouts + 4 Hero brick gap sizes + Shuffle posts feature - Post list module for Visual Composer including horizontal posts block, supports infinite scroll. - Added Classic blog style. - Optimized Google pagespeed. - Removed Site icons and link to default WordPress site identity in customizer. - Back to nativeness. - Improved host compatibility. - Rewrote Custom CSS method. - Improved UX for touchscreen. - Improved thumbnail structure. - Rewrite/Rearrange templates. - Easier customizing. - still updating... - Improved category accent color - Updated Google fonts - Updated Visual composer - Updated Documentation
= v1.0.5.2 – Oct 5 2015
- Fixed Minor Bugs - Improved Jetpack compatibility - Added support for asynchronous JavaScript plugin - Changed default posts navigation for archive page - Removed Support for Visual Composer
= v1.0.5.1 – Jul 10 2015
************************************ - Update Visual Composer 4.6 (contains fix for XSS vulnerability in the prettyPhoto ) - Update Shortcode Generator 1.0.7.1 - Update Simple Post View Plugin 1.0.3.2 - Improved infinite scroll compatibility for Jetpack
= v1.0.5.0 – Jun 15 2015
************************************ - fixed scrolling issue for tabs shortcode/visual composer <strong>= v1.0.4.9 - Apr 25 2015</strong> <pre> ************************************ - added WooCommerce Quantity Increment to recommended plugins - FIXED XSS vulnerability - Improved Mobile Menu - Improved Jetpack Infinite Scroll Compatibility </pre> <strong>= v1.0.4.8 - Mar 11 2015</strong> <pre> * Updated: - Added time period 60 days and 90 days for post list widget - Fixed sub menu list for sticky megamenu - Fixed Social sharing counter issue </pre> <strong>= v1.0.4.7 - Mar 10 2015</strong> <pre> * Updated: - Fixed Minor bugs - Improved performance and appearance for mobile devices - Fixed sticky issue on mobile menu </pre> <strong>= v1.0.4.6 - Mar 6 2015</strong> <pre> * Updated: - Fixed Changing logo issue - Fixed Minor bugs - Updated documentation </pre> <strong>= v1.0.4.5 - Mar 2 2015</strong> <pre> * Updated: - Fixed Wrong template for default meta description and author info description - Fixed Google font subsets issue </pre> <strong>= v1.0.4.4 - Mar 1 2015</strong> <pre> * Updated: - Megamenu bugs - Fixed changing font issue in v1.0.4.3 - Fixed Ads 125 widget bugs - Fixed Post duplication issue - Fixed Pinterest undefined issue - Added Autoptimize plugin compatibility - Allow users to overwrite via templates includes/templates - Improved mobile menu - Improved performance in backend side - Improved Ads 125 widget with sortable blocks - Updated Language files - Updated Core - Update Plugins - Update Demo data - Update docs * Files changed: - framework - includes - language - / </pre> <strong>= v1.0.4.3 - Dec 6 2014</strong> <pre> * Fixed: - Filter by tag issue for Main Loop - invalid markup - Css issues - Minor bugs - Google Microdata missing fields * Improved: - Improve performance in backend side - Clean code - Select tags and categories using autocomplete field in widgets, theme options, metabox * Updated: - Language files - Core - YT Shortcode Generator - Visual Composer Plugin * Files changed: - framework - includes - language - / </pre> <strong>= v1.0.4.2 - September 5 2014</strong> <pre> * Fixed: - Datetime issue on megamenu - Broken image when pin a single post with pinterest sharing button. - Layout overlapping on Touch screen - Boxed-layout issue on Large screen size - Minor bugs - Hero Banner issue - Pinterest sharing button issue - Css issues - Minor bugs - Gallery Post format issue * Improved: - Performance - Clean code * Updated: - Language files - Core - Visual Composer Plugin v4.3.3 - Remove loading spinner for no effect with Hero Banner - Schema Microdata - yt-shortcode-generator.1.0.4 - yt-simple-post-views-tracker.1.0.1 * Files changed: - framework - includes </pre> <strong>= v1.0.4.1 - August 9 2014</strong> <pre>Minor Update</pre> <strong>= v1.0.4 - August 8 2014</strong> <pre> * Fixed: - You might also like messed up layout on small screen - Single Page/post title font size was not effected by Theme Options - Oembed for youtube playlist. - Reponsiveness on megamenu regular request. - Content background pattern issue - Incompatibility between Smart widget and Jetpack Widget Visibility (aka WordPress Failure Notice when trying to save "Smart Tabby Widget" ) - Data not save on Ad Space 125 when using code field. - 'All' link issue for megamenu * Improved: - Performance - Ajax Handler - Ad Space 125 admin ui - Direction nav ui - Button hover/active state - Animation - UI/UX * Added: - Jetpack Photon Compatibility for various image sizes - Ajax search for Modal search - Infinite scroll feature for post thumbnail widget - Ad space between posts from Ajax Post widget amd Post thumnmail widget - Ad space before single post content - Default bg color for Light header. - Review info on every post - Post format icon for post thumbnail widget - Options to show/hide main sidebar/sub sidebar on small screen sizes. - Border for two column layout - Visual Composer compatibility - Option to replace default media gallery with flexslider * Updated: - yt-shortcode-generator v1.0.3 - Reverted to the default params (user settings) for the_time, get_the_time, the_date, get_the_date - Allow embedding shortcode to ads positions - No effect to hero banner - Hooks for Single post - Upload button for live blog post. - Ajax tag search for metabox. - Mobile_Detect class - Google Webfonts - Bootstrap 3.2.0 - Removed yt_site_social_sharing_post() and replace with yt_site_social_sharing_buttons() * Files changed: - framework - includes - content.php - content-single.php - style.css - css </pre> <strong>= v1.0.3 - June 10 2014</strong> <pre> * Fixed: - Minor bugs - Responsiveness on iPad - Touchless on touch devices (Main menu and mobile menu) - Pagination issue for Home page when we use Custom Posts query and set the page as Front page. * Improved: - Performance - Ajax Response time * Added: - Ability to split excerpt automatically - Usual loading method for News megamenu * Updated: - Localized strings - Language - Documentation * Files changed: - framework/admin/includes/yt-function-options.php - framework/yt-admin-hooks.php - framework/yt-admin-init.php - framework/widgets/widget-mailchimp.php - includes/theme-interface.php - includes/theme-functions.php - includes/theme-hooks.php - includes/theme-scripts.php - includes/theme-config.php - includes/theme-options.php - includes/theme-general-functions.php - includes/widgets/widget-ajax-posts-by-category.php - content.php - js/yt-custom - style.css - languages </pre> <strong>= v1.0.2 - June 4 2014</strong> <pre> * Fixed: - Scroll fix menu - CSS transform issue on safari on windows - Minor bugs * Improved: - Performance * Files changed: - framework/admin/includes/yt-options-settings.api.php - includes/theme-interface.php - js/yt-custom - style.css * Updated: - documentation <pre> <strong>= v1.0.1 - June 1 2014</strong> <pre> * Fixed: - Responsive issue with Boxed-layout & Large display - Countdown issue - Minor bugs * Improved: - Loading speed - Woocommerce style * Added: - Support for WP-Review - Support touch for main menu on Android - Author meta info in Author page and Single post - Increase level of sub-menu for Main navigation * Updated: - Shortcode generator v1.0.2 * Files changed: - framework/admin/includes/yt-functions-field-types.php - framework/admin/includes/yt-functions.php - includes/theme-config.php - includes/theme-styling.php - includes/theme-interface.php - includes/theme-options.php - includes/theme-general-functions.php - includes/theme-functions.php - includes/theme-hooks.php - css/woocommerce - css/woocommerce-smallscreen - js/yt.custom - style.css - 404 - documentation </pre> <strong>= v1.0 - May 30 2014</strong> <pre> * First release! </pre></pre></pre>
BUY From ENVATO Marketplace
#ajax#block#brick#clean#customizable#forum#infinite scroll#liveblog#Magazine#mashable#mega menu#news#outstanding#Shop#sparkle#theme#three columns#widgetized#wordpress
0 notes