#Throttle Cable Brackets
Explore tagged Tumblr posts
Visit Tumblr Blog
Explore Tumblr blogs with no restrictions, modern design and the best experience.
Last Seen Tumblr Blogs


Fun Fact
Hackers stole 65M passwords from Tumblr in 2013.
Text
Twisting the throttle is one of the best parts of riding a motorbike, but you must take care of your throttle and throttle cables just as you do with any other moving element on the bike.
Don't worry; taking care of your biker's noisy stick and other components isn't that hard. In this post, We’ll describe how to examine and maintain your throttle and how to change the cables if, for example, they’re worn out or too short for that new handlebar you’re installing.
0 notes

Text
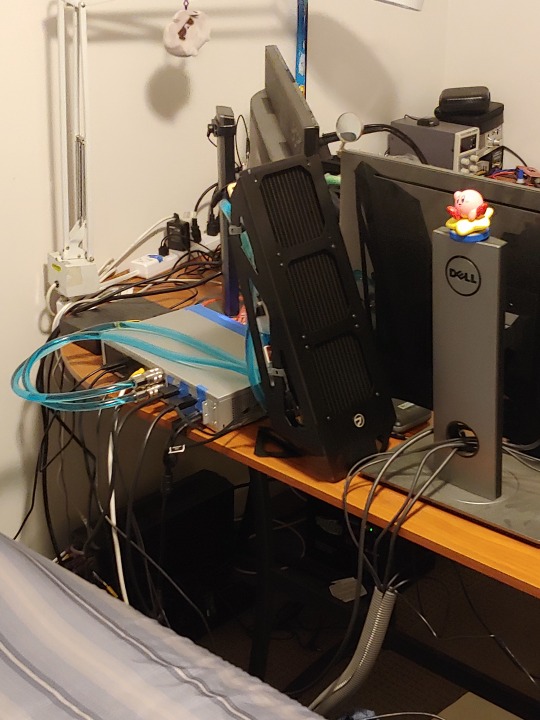
My PC Has Seen Some Shit
I build my computer during the lockdowns, and like many others, was doing some wacky shit just because.
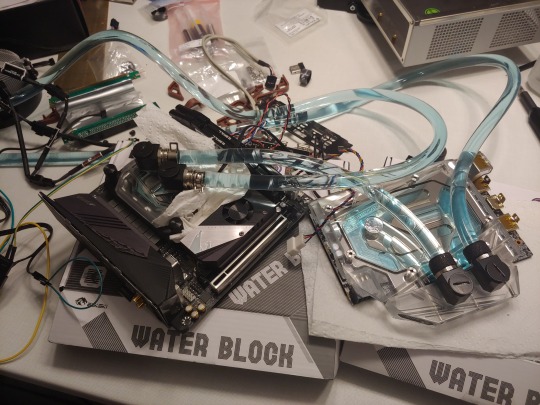
I decided I was going to build a small form factor (SSF) PC, but I wasnt satisfied with simply jaming all the parts AND cooling into a relatively small case, I wanted to cram all the bits into the smallest volume I could manage, and utilize an external radiator to cool it all. Thus, the abomination:
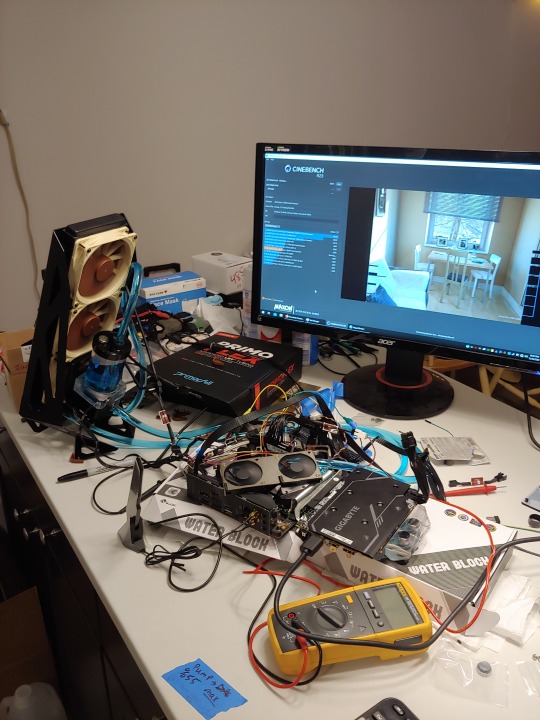
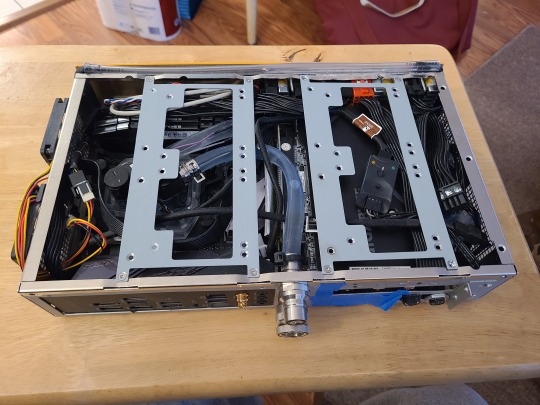
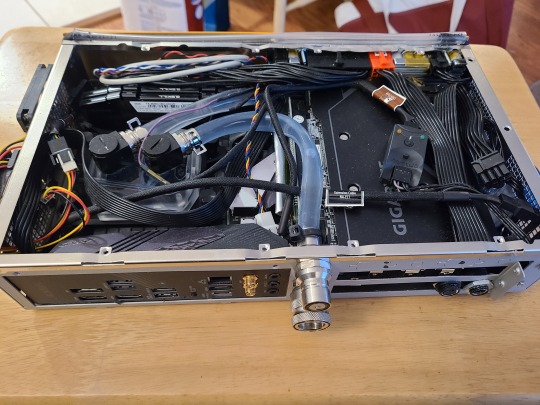
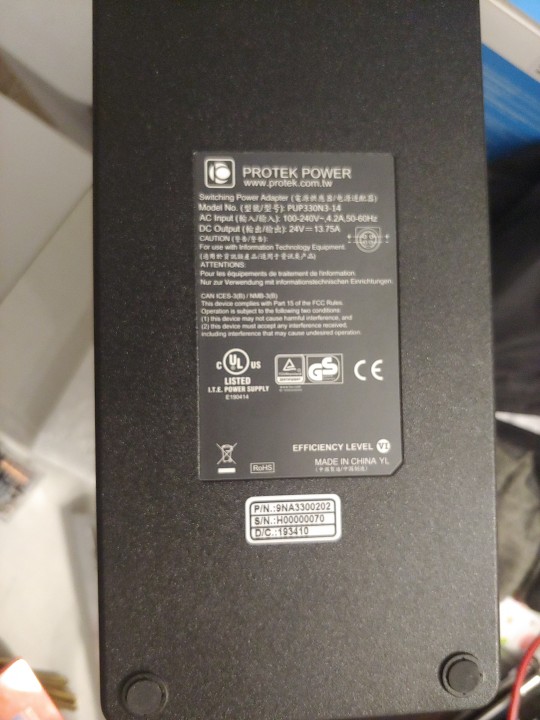
(I may or may not have "borrowed" the kitchen countertop for a full week, my roomate took it in stride.) At the time, it was decent hardware, if intentionally limited. Ryzen 5 5600 CPU, RTX 2070 GPU, and a special power supply combination - HDPLEX 400W DC-DC power converter/ATX power supply internal to the case, and a 380-watt external power brick. I had to hunt for a very specific GPU, that was both small enough to fit in the chassis I picked out, and also efficient enough to fit in the 380W power budget:
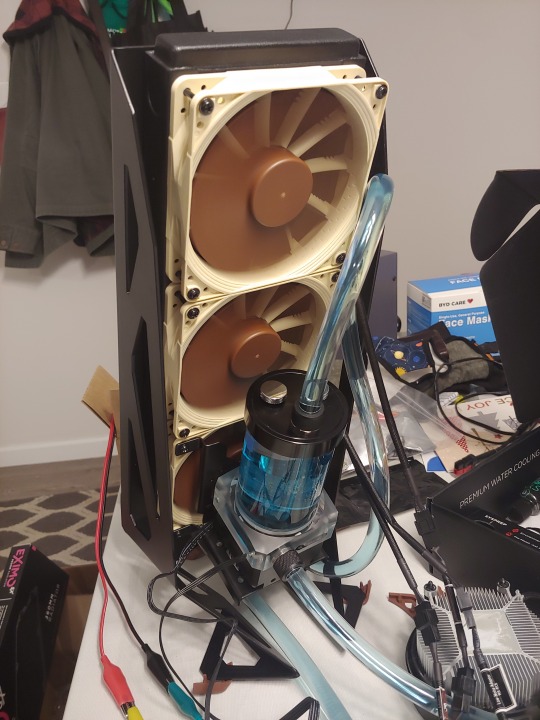
and also some dope-ass no-drip quick-disconnect fittings for the water loop:
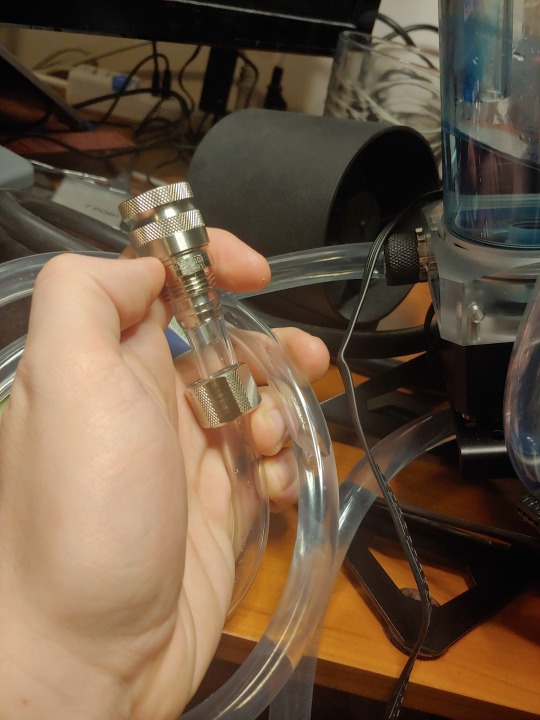
Those, plus a panel mount connector on the chassis for the pump and fan cables on the cooling tower, means I could easily dissasemble the pc into 3 parts - power brick, pc, and tower, to easily move it if needed.
I am still really proud of what I accomplished in terms of fitting everything into such a small chassis, if I had a 3D printer I could have made a couple brackets and covers to fill the holes that are covered in painter's tape, and had something looking real nice, but in the end I decided it was too much work to upkeep, the quick-connect ports on the back restricted water flow too much, and caused a lot of noise in the flow, like an air pocket that never went away with time. That and the blue coloring I added (actual cooling liquid coloring, NOT FOOD DYE) almost immediately cooked out of the water and deposited in the water block fins, and on the inside walls of the tubes, making it look a bit ugly tbh.
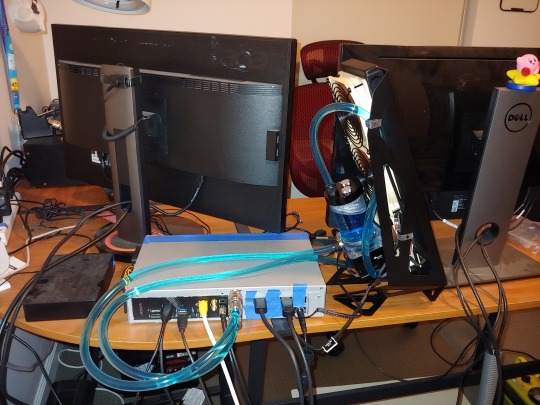
In 2023, I took the complete OPPOSITE approach and rebuilt the computer on an open-frame chassis, and hung it on the wall behind my monitor at my new place:
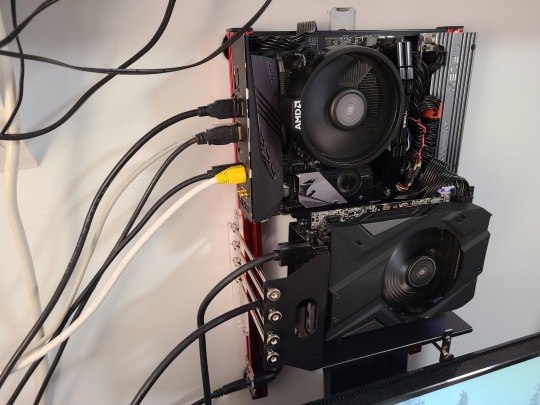
My desire had shifted from "unassuming box with neat internals" to "pussy out". Since all the components are now exposed to naked air, i was able to adjust fan curves so that they only turned on under extreme load. The GPU fan doesnt even spin until I boot up a game! I initially used the stock CPU cooler, but it didn't work well enough to keep the fan at low RPM, so I upgraded to a Noctua low profile cooler with a way better configuration that cools the cpu and board components really well.
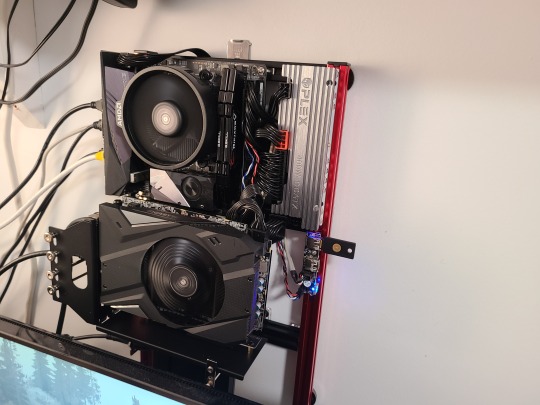
The end result is a super quiet PC that is damn near silent until I boot up a game, and even then, the loudest thing is a battle between the GPU fan and the coil whine from that same GPU!
60% duty cycle on the GPU fan was about the minimum I can spin it to keep the temperature below throttling point at 100% utilisation, and I'm totally happy with that! The CPU fan spins all the time, but it's a noctua so I can't even hear it at idle, and at 100% CPU use, it's only up to maybe 50% speed, which is still damn quiet.
This is how my computer has been configured ever since, and I am proud for sure! It's a fun PC to look at visually, and it's got an interesting history to talk about (to me at least!)
2 notes
·
View notes
Text
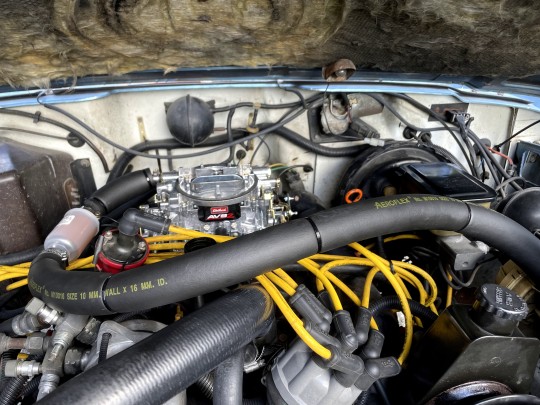
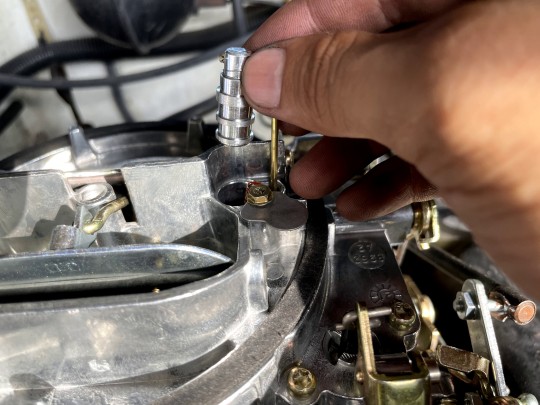
Carburetor Upgrade2
ワゴニアのキャブレターをホーリー2バレル 500CFMからエーデルブロック4バレル AVS2 650CFMに交換
パフォーマーシリーズの600CFMと迷ったがミーハーなので新しいAVS2という環状(アニュラ)ブースターのモデルに(昔のサンダーシリーズ)
インテークは純正2BBLのまま交換せず、チョークはエレクトリックチョーク
マニュアルチョークを勧める人がいるが暖気中アクセル踏み続ける必要があるので結構面倒である。電気��はファストアイドルが作動し踏み続けている必要はないので絶対に楽である ちなみにエーデルブロックは同じCFMでもマニュアルチョークの方が4%濃いセッティングとなっている
500CFMがジャストサイズな気もするが将来的にエンジン弄る予定のため650CFMをチョイス
ホーリー2BBLのインプレ
純正のモータークラフトと比較してトルクが増した。立ち上がりの加速が良くなりアクセルの踏む量が減り乗り易くなった。油面限界まで下げてメインジェット69番でクーラー使用、省燃費走行気にせずアクセル踏み込んで平均燃費4.9km/L
今のランクルと変わらないんじゃないか?
あとはレーシングキャブレターなだけあってセッティングが結構シビア
快晴の時にバッチリ合わすと雨の時にフィーリングが気になってしまう時がある
普通に乗れるけどバタつくまでは行かないどこかシルキーさに欠けるような回転の粒が揃わないような微妙な感覚を覚える時がある

リンケージ周り アクセル&キックダウン
キックダウンのリンケージは樹脂ナットとか緩み止めの処置しないと秒で緩む走行中急にめちゃくちゃな変速とでかいショックしはじめてATが壊れたかと思ったらリンケージが外れていただけだった

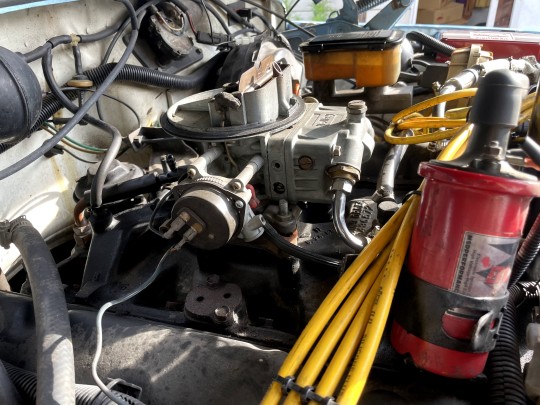
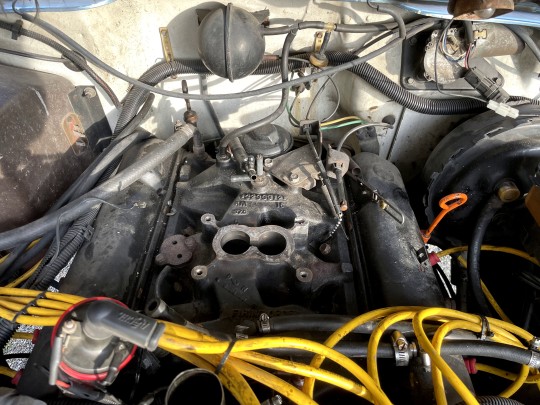
2バレル インテーク
5,900ccに対してこんだけで間に合うのってぐらいに小さい給気口
実は今回の主な目的はPCVバルブとラインの交換だった
ホースがひび割れてエアー吸いを起こしてエンジン不調を起こしたと予想
どうせキャブレター外すならついでにキャブレター交換するかって次第


うーん、マンダム
4バレルキャブレターの取り付け行は下記の様なアダプターを使って
本来は4バレルインテークに2バレルキャブレターを取り付けるものを裏返し��使用
Mr. Gasket - 1933MRG Carburetor Adapter Kit 2Bbl To 4Bbl
https://www.summitracing.com/parts/mrg-1933
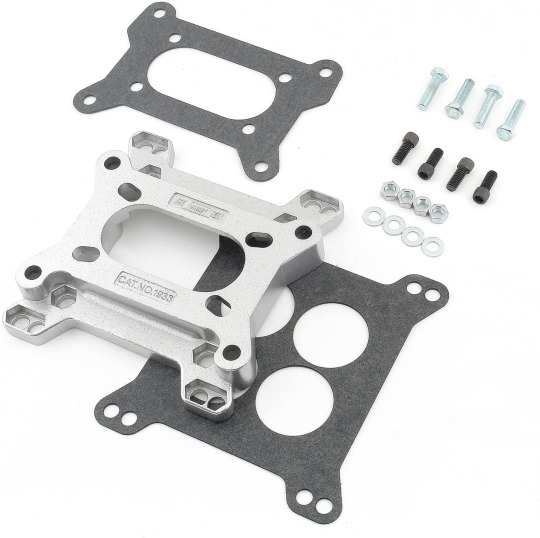
パッキンニスを塗布
何故か取り付け時のこれ以降の写真を紛失

取り付け完了
燃料ラインもついでに全線引き直しパーコレーション対策に断熱材巻きつけ
燃料ラインはキャブ直近のところの曲がりがきついのでやり直しが必要かな

ステップスプリングをとりあえず最強の交換やつに交換

フューエルライン買ったがコイルが邪魔で取り付ける事ができなかった
ミツバタイプの電磁ポンプなので燃圧が問題になることはないだろう

適当にミクスチャー合わせて乗ってみた感じだと少し濃い
だけどすごく良い
ホーリーに換装した時もアクセル踏む量減ったと感じたが更に踏まなくて良くなった
結構急な坂道をパーシャルでぐんぐん登っていくし踏み込んだ時の加速も良い!!!
アクセルのつき、スロットルレスポンスはホーリーの方が良いけどこの車にはおおらかな方があっているので気にならず
同じリターンスプリング使っているのだがアクセルペダルがめちゃくちゃ軽くなった 体感1/5以下
微調整しにくい感あるけど長い距離乗ると楽さ加減が違うだろう ホーリーは結構重くて長時間運転は右脚が疲れた
始動性はホーリーと変わらないかな どっちもセル一発
ただ再始動性は全然違う ホーリーは30分ぐらい置いてから再始動するとパーコレーション気味でコツが必要だったがエーデルブロックはキーを捻るだけでOK
パーコレーション対策となんちゃってハイライズで2.5cm(1インチ)ぐらいのクソ分厚いフェノール製のスペーサー入れていたのだが
あとはファストアイドルの調整が正面からできて開度もだいたい分かるから楽ちん
冷間時でないと調整できないのでホーリーは1週間ほどかかったがエーデルブロックなら3日程度で好みの回転に合わせれそうだ→2日(2回)で好みのところに持っていけた
ワゴニアのキャブレター交換 2バレルホーリー or アダプター使って4バレルエーデルブロックどっちがいいかって聞かれたらエーデルブロックかな
ホーリーの4バレルつけていないので一概にエーデルブロックとは言えないが
セッティングの仕方もチャートを用いて1ステージダウン or リッチしていく独特のものだが初心者にはセッティングしやすいかもしれない
それにボルトオンなのでDIYでやる人にも難易度はかなり低め
ただなんとなくでもキャブレターの調整できないと無理
燃費は計測中 AVG5km���えを期待
購入品
Edelbrock 1906 - Edelbrock AVS2 Series Carburetors
Edelbrock 1948 - Edelbrock AVS2 Series Carburetor Calibration Kits
Edelbrock 8031 - Edelbrock Throttle Cable Brackets
Mr. Gasket 1933 - Mr. Gasket Carburetor Adapter Kits
燃料ホース:ID9.5mm & ID7.9mm(5/16)
ホース接続ジョイント:10mm←→8mm
3 notes
·
View notes
Note
Ah, duct tape - truly the jack of all trades but master of none. I literally used it to make a pair of flip flops once. Were they the height of fashion? No. Did they keep my friend from having to walk barefoot over hot asphalt to get back to the house after someone stole her bag at the pool? You bet they did!
oh i’ve done that too!! it’s SO useful. once at a soccer tournament someone stole one of my keeper gloves and all i had left were my super old ones, and the palm was busted out in one of them, so i used duct tape to make a new palm for the replacement. not the best grip-wise, but functional, and a couple of layers of duct tape were surprisingly good padding. also when i used to do longer motorcycle races i always carried it with me, half for mechanical issues-- once the bracket at the end of the throttle cable broke off and i made a new one out of tape; once i had to tow someone a few miles out of the woods and we didn’t have a tow line but we did have duct tape and made a line out of that-- and half for medical everything. i’d slap it over the bandaids i used when i got blisters on my hands, or if i just didn’t have enough bandaids in general, or if i needed a quick and dirty splint. it’s so fucking useful.
9 notes
·
View notes
Text
Chapter 20: A Freedom Ride
I set up a ride for 9/11 as a remembrance ride to the tragedy of September 11th and to honor those who were lost that day and the days following in the hunt for the criminals responsible. We called it the freedom ride.
I set up the event, so I rode way up in front of the pack of motorcycles that cruised Southern California that day.
We had about a hundred motorcycles leaving Imperial Beach heading up Interstate 5 as we got a few miles past the exit. The pack was moving fast and speeding up, and then, all of a sudden in the center lane was a mattress tumbling off the back of a truck, and the entire pack of a hundred motorcycles scattered across the highway avoiding god’s mattress at 80 miles an hour.
Somehow, I don't know how, but the entire pack made it out unscathed. We continued on the highway and got off at Pacific beach, and I needed food and a beer at the first stop.
It was a poker run which has five stops, and you draw a card at each stop to try for the best poker hand. We hang out there for around 40 minutes.
We get back on the road with a few more bikes joining the pack we were possibly a hundred and fifty strong at this point flying up the coast toward the next stop.
Oceanside, California, Moreland choppers, this place is an old school chopper shop located here since the sixties and run by very cool people.
Draw cards, have a beer and get on the road.
We are making our way into northern San Diego to a little bar in the middle of the mountains and the hills; I think it's called The Hideout.
So I hang out there smoking and joking in general; good times and I meet up with one of the Southern California motorcycle clubs. They are meeting us on the road.
They knew about the 9/11 freedom ride and wanted to pay respect to the military and the sacrifices made for their freedom – freedom to ride in a club and do all the things we take for granted.
These are major bikers so they ride way up front and I am following now. It’s biker protocol.
We are riding from the mountains in northern San Diego toward El Cajon to meet at the last bar.
These are some steep and Squirrely passages up and down the mountain; you know, real curvy.
The main club dude is on a real old-school FXR, and he's flying, a natural born rider; really good, freaking fast, it was awesome.
I was catching up, and he saw me, so he waves me up to the front right next to him, and he starts going faster.
He's going faster and I just try to keep up on these crazy curves with cliffs on both sides. He is moving out on a curve. I try to stay with it and slide sideways and hit one of those raised reflectors in the middle of the road and my back tire jumps a bit and then catches. I am high sided and flipping crashing across the road.
I flipped a couple of times and came to a screeching halt fifty yards to the end of the curve with my motorcycle.
Some blood running down my head, my helmets all scraped; my leather jacket has some new holes. The right-hand handlebar has hit so hard that it sticks into the gas tank and gas is pouring out on the highway. The license plate bracket is ripped off, the throttle cable is torn and a few other minor things, scrapes all up-and-down. It's pretty beat up and I'm pretty beat up.
The Pack of motorcycles catches up and come to a stop along the highway and a few of the guys roll my bike off the road and immediately start fixing it back up. They wave the rest of the pack past to meet us at the bar. No worries.
They finished fixing the motorcycle, shoving a couple of bandanas into the gas tank and crank it up. It starts.
I am sitting on the ground 20 yards away with my back against rock looking down the cliff that I barely missed going over.
The biker boss comes over and kicks me in the foot and says “Your bike is running, let’s go.”
I grabbed my helmet put it on and slowly get up. My right arm doesn't seem to be working very well, I keep moving, get on the motorcycle and we start riding. We speed up to about the same speed as before.
Twenty miles later, we are at the bar, and the boss says, “you, you and you with me, we are going to ride through the bar.” He owns the bar, so no big deal for him. For us, we feel like we are in one of those movies from the sixties. One of those “Glory Stompers Movies.” We roll into the bar. It’s going nuts.
My arm is not working too good and I run into one of the pool tables and then bounce toward the door and jump my bike off the curb into the street. Everyone thinks I did it on purpose, and they are yelling big time. It was very cool, but I’m just thinking how lucky it was that I didn’t fall over.
I walk into the bar and ask for 5 shots of Jack. I gotta numb this arm up; its throbbing and getting more painful. I swig them all down.
This big biker dude, like 300lbs of “Hammer” and also a Vietnam medic says, “Hey Caveman, what the Hell’s wrong with your arm? Take off your jacket and let’s see what’s up.” I take it off, and he looks at it I says, “Holy fuck, your arm is dislocated. Get back there on the pool table; I’ll put it back in.”
I go back, lay on the pool table and sure enough the medic starts cranking on my arm and then – bam, a loud pop noise and its back in socket. It was loud enough that a few people stopped partying and looked over.
I sit up and start moving my arm around saying, “Man this feels good now, give me some more shots.”
The big boss comes over and says, “Holy shit you just road from the accident up the mountain with a dislocated arm.”
I just replied, “Yup, you kicked me in my broken foot and told me, Lets go.” He shook his head and said, “I don't know what to think about you SEAL team guys, but HELL YEAH.”
He gave me a cool biker poster later that day that says something about being “A hell of a man and a friend till the end.” Very cool ride, very cool day.
1 note
·
View note
Text

🚨MOBILE MECHANIC🚨
☎️ 859-797-2233 ☎️
🔵 OPEN 24/7 🔵
Servicing Kentucky Lexington,Frankfort,Georgetown, Louisville, Paris, Sadieville, Richmond, Cynthiana, Brea, Lawrenceburg, & more
Brakes, water pump, alternator, wheel bearings, semi truck and trailers, emergency roadside repair, diesel repair on site repair,
Servicing Kentucky Lexington,Frankfort,Georgetown, Louisville, Paris, Sadieville, Richmond, Cynthiana, Brea, Lawrenceburg, & more
Brakes, water pump, alternator, wheel bearings, semi truck and trailers, emergency roadside repair, diesel repair on site repair, heavy equipment, tune up, cars, trucks, suv, mechanic that comes to me, mobile mechanic.
#mobilemechanic #859-797-2233 #kentucky #wecometoyou #cometoyoumechaic #wecometoyouanddoitall #servicingkentucky #open24/7 #lexingtonky #diesel #autorepair #carrepair #HireRush
Mobile Mechanic
mobile mechanic
Mobile Mechanic Lexington Kentucky
Mobile Mechanic Louisville Kentucky
Brakes
Rotors
Calipers
Brake lines
Master cylinder
Tensioner pulley
Serpentine belt
Timing belt
Timing chains
Valve cover gasket
Spark plugs
O2 sensors
Motor mounts
Shocks
Struts
Hub bearings
Tie rods
Ball joints
Upper Lower control arms
Sway bar & linkage
Alternators
Starters
Electrical issues
Radiators
Radiator hoses
Water pumps
Fuel pumps
AC compressors
AC Condenser
Expansion valve
Mufflers
Oil/water leaks
upgrades and custom work
Even Engines and Transmissions swaps
24-7 Emergency Repairs
Roadside Assistances
Auto Repair
#Mobile Car Repair Service
#Mobile Auto Repair Service
#Mobile Car Repairs
#Mobile Auto Repairs
#Mobile Car Repair
#Mobile Auto Repair
#Mobile Auto Mechanic
#Mobile Car Mechanic
#Auto Mechanic That Comes to You
#Auto Repair Shop
#Brakes and Traction Control
#Parking Brake Cable Replacement
#Parking Brake Switch Replacement
#Brake Master Cylinder Replacement
#Brake Safety Inspection
#Check Brake Fluid Level
#Brake Caliper Replacement
#Bleed Brakes
#Brake Fluid Flush
#Brake Booster Unit Replacement
#Brake Pads Replacement
#Brake Drum Replacement
#Brake Shoes Replacement
#Brake Pedal Linkage Lubrication
#Brake Adjustment
#Brake Rotor Replacement
#Brake Line Replacement
#Diagnostic
#Check Engine Light
#Car Won't Start
#Car Running Rough
#Fluids Are Leaking
#Warning Light
#Diagnostic
#Used Car Inspection
#Engine, Cooling, Exhaust
#Front Pipe Replacement
#Fan Shroud Assembly Replacement
#Idle Control Valve Replacement
#Fan Shroud Replacement
#Distributor Replacement
#EGR Valve Replacement
#Ignition Wire Set Replacement
#Cooling System Drain and Fill
#Oil Pan Gasket Replacement
#Intake Manifold Gasket Replacement
#Intake Camshaft Position Sensor Replacement
#Freeze Plug Replacement
#Exhaust Manifold Gasket Replacement
#Exhaust Camshaft Position Sensor Replacement
#Tail Pipe Replacement
#Carburetor Replacement
#Exhaust System Replacement
#Manual Transmission Oil Level Check
#Check Engine Oil Level
#Engine Oil and Filter Change
#Engine Mount Replacement
#Engine Coolant Temperature Sensor Replacement
#Engine Oil Pressure Sensor Switch Replacement
#Expansion Tank Replacement
#Harmonic Balancer Replacement
#Serpentine Belt Replacement
#Drive Belt Replacement
#Drive Belt Tensioner Replacement
#Distributor Cap Replacement
#Cooling Fan Replacement
#Radiator Replacement
#Radiator Fan Motor Replacement
#Radiator Hose Replacement
#Thermostat Replacement
#Engine Tune-up
#Water Pump Replacement
#Valve Cover Gasket Replacement
#Timing Belt Replacement
#Emissions Failure Repair
#Crankshaft Position Sensor Replacement
#Coolant Drain and Fill
#Catalytic Converter Replacement
#Camshaft Position Sensor Replacement Intake and Exhaust
#External Vehicle Parts
#Antenna Mast Replacement
#Mirror Glass Replacement
#Door Lock Replacement
#Headlight Door Replacement
#Header Panel Replacement
#License Plate Bracket Replacement
#Emblem Replacement
#Metal License Plate Bracket Replacement
#Trunk Strut Replacement
#Grille Insert Replacement
#Engine Splash Shield Replacement
#Fuel Tank Cap Replacement
#Hood Strut Replacement
#Splash Guard Backing Plate Replacement
#Rear Lift Gate Locking Mechanism
#Rear Distance Sensor Replacement
#Door Weather Stripping Replacement
#Power Seat Switch Replacement
#Energy Absorber Replacement
#Heating and Air Conditioning
#Blower Motor Resistor Replacement
#Heater Core Replacement
#Cabin Air Filter Replacement
#Heater and A/C Blower Motor
#A/C Recharge
#A/C Compressor Replacement
#A/C Condenser Replacement
#Defroster Grid Repair
#A/C Line or Hose Replacement
#Heater Core Hoses Replacement
#HVAC Electronic Control Module Replacement
#HVAC Blower Motor Resistor Replacement
#HVAC Blower Motor Replacement
#HVAC Blend Door Actuator Replacement
#A/C Evacuate and Recharge
#Lighting and Horns
#Turn Signal Switch Replacement
#Turn Signal Bulb Replacement
#Brake Light Bulb Replacement
#Headlight Bulb Replacement
#Fog Light Assembly Replacement
#Corner Light Bulb Replacement
#Side Marker Light Assembly Replacement
#Turn Signal Light Assembly Replacement
#Headlight Assembly Replacement
#Park Light Assembly Replacement
#Headlight Cover
#Tail Light Bulb Replacement
#Tail Light Assembly Replacement
#Brake Light Switch Replacement
#Headlight Switch
#Maintenance
#Fuse Replacement
#Tire Rotation
#Scheduled Maintenance - 30K, 60K, 90K, etc.
#Powertrain
#Throttle Body Replacement
#Throttle Position Sensor Replacement
#Oxygen Sensor Replacement
#Fuel Injector Replacement
#Fuel Filter Replacement
#Air Filter Replacement
#Mass Airflow Sensor/Meter Replacement
#Fuel Pressure Regulator Replacement
#Ignition Coil Replacement
#Spark Plugs Replacement
#Starting and Charging
#Ignition Switch Replacement
#Battery Replacement
#Battery Cable Replacement
#Battery Cable Terminal End Service
#Alternator Belt Replacement
#Alternator Replacement
#Starter Replacement
#Steering and Suspension
#Power Steering Hose Replacement
#Power Steering Fluid Drain and Fill
#Outer Tie Rod End Replacement
#Power Steering Pump Replacement
#Wheel Hub Assembly Replacement
#suspension-control-arm-replacement
#Check Tire Pressure
#Check Power Steering Fluid
#Power Steering Fluid Replacement
#Wheel Bearing Replacement
#ABS Control Unit Replacement
#Wheel Cylinder Replacement
#Ball Joint Replacement
#Shock Absorber Replacement
#Strut Assembly Replacement
#Transmission and Drivetrain
#Axle Assembly Replacement
#CV Joint Boot Replacement
#CV Joint Replacement
#CV Axle Assembly Replacement
#Driveshaft Replacement
#Transfer Case Fluid Replacement
#Transmission Fluid Change
#Windows and Glass
#Window Regulator with Motor Replacement
#Window Belt Strip Replacement
#Power Window Switch Replacement
#Wiper and Washer System
#Windshield Wiper Motor Replacement
#Windshield Wiper Blades Replacement
#Washer Pump Replacement
1 note
·
View note
Text
A lot of us can remember those key moments that hooked us into the scene. Yeah some of you were born into it, and it’s always been a family affair. But there are still those moments. Maybe when dad finally hit the ignition, after what seemed like an eternity of silence in the garage… and the roar shocked your heart, shook the walls, and brought neighbors out. For others, it may have been a glimpse out the back window of mom’s minivan, where some tuner absolutely ripped it off a light or through a tunnel.
See, in those days when we were younger, we were intrigued & amazed when we saw something different. We didn’t scrutinize it or criticize it… we just absorbed it & delighted in it. We need to hold onto that. Because it wasn’t like like today, where keyboard-punching weenies take joy, rather than make joy. We all see it, and it’s submitting our scene to limitations that are polar opposite of what it was built on. Cameron Dawkins, owner of this Genesis Coupe, read all the comments, and fought back with the same attitude as our hot-rodding ancestors… Get out of here, kid. You got no future.
Cameron’s Genesis started much like any enthusiast noob; short ram, plasti-dip, and long nights on eBay. Sound familiar? And much like anything in Florida, the Genesis motor got too hot too fast and melted. Still under warranty, he got the engine replaced. But not another year later, Dawkins was having fun in true import fashion, when again he fried the block.
At this point, he saw three options: 1) F*ck the lemons and bail. 2) Replace the motor yet again. 3) Swap the motor with something hot.
Sure – the LS swap is more common than a teenager texting. But keep in mind… it’s only common within a minority group of people. Meaning – you and all your dweeby friends know about it… but it’s not common-talk amongst your sister and her friends, or your mom & her book club, or your neighbors and their yard sale customers. Get it?
Nevertheless – Cameron took a lot of shit from all different corners of the car scene. He got the KDM community asking, “Why you put LS in Geny Coupe?!”
And the rest of the scene asking, “Why you mod Hyundai so much?”
He’s in the grey area. Not import enough for the import crowd. And not powerful enough for the power thirsty. There’s a point of maturity/clarity we can reach in circumstances like this. Where we’re not affected by anything or anyone. Cameron hit that point 2 years ago when he decided to swap the LS1.
Much like anyone’s first big swap, it was no cake walk: and Cameron was learning as he went. With the Fuel Tech management system, he needed to get rid of his sweet drive-by-cable and find a drive-by-wire throttle body.
Using a Corvette throttle body fulfilled the requirements, but then Dawkins ran into the next issue of needing an adapter to make that work.
The Enjuku swap kit wasn’t working well with the clutch master. Through community support he found that he needed a clutch master adapter.
Additionally, Cameron was having issues with the shifter relocation for the T56 transmission, forums revealed he needed to notch and grind the shifter plate.
And here was that time when his main engine fuse box caught fire, because the headers were too close.
Little bumps can add up quick & can discourage a build. But when Cameron lost his own motivation, by George he found it in others. See – turns out he wasn’t alone. As Babe Ruth apparently said, “The loudest boos come from the cheapest seats.” But since Cameron was able to separate himself from the noise, behold he found a few people from various corners of the scene were willing to lend hands. LS guys who just wanted to help him release the eagles from under his Korean hood. Genesis guys who wanted to see success & smiles. Much respect to these little lights that shine amongst us.
As for its current state, Cameron loves all the different reactions he gets. It’s hard not to smirk at the color shifting paint job. The Art In Motion MA5 wheels chop through your vision under the sun. Every exaggerated curve on this thing makes your eyes dance. And that surprise growl of that LS1 V8 is just salt on the glass. You can hate if that’s your thing. You can put this guy’s car down, just to build your own ego up. But you got no future kid.
—–Click play to watch the video feature, hear more about the car and the a couple pulls.—–
youtube
For more on Cameron’s build, check out his instagram @ls1_bk1.
MUSCLE
Ls1 swap
T56 transmission
Custom wiring harness
853 heads
PAC 1518 springs
LS6 intake manifold
BTR Stage-3 231/242 turbo cam
Corvette crank pulley
Fuel Tech touch-screen engine management
Drive-by-wire throttle body
Corvette throttle body spacer
GTO pedal assembly
Mishimoto radiator
SPAL custom twin fan radiator shroud
Houser headers
Ls1 engine mounts
T56 Transmission mount
Canton oil pan
Oil filter relocation
1-piece aluminum driveshaft
Shifter extension
Hurst short shifter
GTO shifter cup
Custom cold air intake
Injen exhaust
S&S custom test pipes
S&S custom downpipes
resonator delete
FOOTWORK
APR extended wheel studs
Brembo brakes
EBC slotted rotors
Hawk pads
Stainless steel brake lines
Art in Motion MA5 wheels (18×11 -20 front & 18×12.5 -40 rear)
Michelin Pilot Super Sports (225/25/18 front & 235/30/18 rear)
Air Lift performance struts 3p management
ISR front control arms
Godspeed rear control arms
UNIFORM
Underbody led lighting
Alpha Pigments tsunami super flake
Custom head lights
Carbon fiber eye lids
VIS Racing carbon fiber hood
NRG carbon fiber canards
Ark cfx carbon fiber trunk
Ark cfx carbon fiber grille
Ark solus widebody kit
Street Faction chassis mount wing
Street Faction rear bash bar
Hyper G rear bumper
BK2 tail lights with Audi mod
Polyurethane Hannah bumper
APR front carbon fiber splitter
Zakustech louvers
Takata drift harnesses
Spec-D tail lights
Aero Wolf endplates
GUTS
Sparco brackets, rails, sliders
Section harness – bar powder coated & matched to wheels
Bride low max seats
Grip Royal steering wheel
NRG 3.0 quick release
NRG short hub adapter
Grip Royal rotator spacer
We Are Likewise shifter extension & knob
Text & Photos by Jesuel Rivera
You Got No Future Kid: LS1 Genesis Coupe A lot of us can remember those key moments that hooked us into the scene. Yeah some of you were born into it, and it’s always been a family affair.
1 note
·
View note
Text
season release & demographics
Alright, I’ve gotten several asks about the speed of the upcoming season releases for DW/Netflix. Most asks amount to roughly
are they releasing that fast because they want it over, or because more stuff is coming?
...with at least two asks attempting to make sideways snarky comments about the revelation of a canonically gay character.
Behind the cut: some stats on how DW groups and broadcasts its series, some data-based theories on VLD’s scheduling, who the ‘real’ audience demographic is, and some speculation about show timing independent of VLD itself.
how DW groups and broadcasts its series
First thing I should note is that dropping a chunk of episodes at once onto Netflix is relatively new for DW, compared to their years of traditional weekly syndicated format on Nick, CN, etc. (You can find a list of all past and present television productions here.) Starting around 2014, their Netflix/DW works were mostly the usual children’s fare -- episodic shows made for syndication.
Two shows changed this game: VLD and Trollhunters, both premiering in 2016. Each contain one continuous arc, requiring viewing in order, from the start. Unfortunately that means the only real comparison is Trollhunters, which had a 12-month gap between S1 and S2, and a 5-month gap from S2 to S3. Just before the final season broadcast, DW announced two sequels, which brings TH’s total ep count to 78. Remember that timing; it’ll be important in a bit.
Looking across even the episodic younger-set stories, it does seem like releases try to stick to a general pattern, give or take a month. Across 8 multi-season shows, here’s the breakdown of cours (because you know I had to throw a visual in somewhere). A single cour is 11-14 episodes, 5-7 eps is a half-cour, with 26 being a double-cour. (One series released a 16-ep season, which I counted as a single cour.)

I point this out just to make clear that half-cour drops are actually rather common, comparatively. Out of 31 episodes, 11 were half-cour. As for the length between seasons, the mode (most common) is 7 mos.

some theories on VLD’s scheduling
Now let’s look at the gaps between VLD’s seasons: 7, 7, 2, 5, 3, 2 (counting the upcoming release for S7). If we merge the half-cour seasons for comparison (so we’re dealing with consistent 13-episode seasons again), then we’ll posit the broadcast date would’ve been the date the 2nd half of the season aired. In other words, had we gotten the original S3 (now S3/S4) season as one, it would’ve aired on S4′s broadcast date, as one solid chunk.
With the consistent pattern of S1 through S3′s data, that’s a 7-month break between seasons. Assuming that this would’ve originally been set as the scheduled dates, let’s compare those dates to the actual broadcast dates.
scheduled Jun 2016 ==> aired Jun 2016
scheduled Jan 2017 ==> aired Jan 2017
scheduled Aug 2017 ==> aired Aug + Oct 2017
scheduled Mar 2018 ==> aired Mar + Jun 2018
scheduled Oct 2018 ==> aired Aug 2018
scheduled May 2019 ==> aired ???
Yes, I’m aware DW spun the split-seasons as getting more episodes, sooner. It’s the reverse. We should’ve gotten all of S3 in August, but S3 was completed 2 months late. Same for S4, which we should’ve gotten in March, but compared to the original schedule, S4 was 3 months late. S7 (the original S5) is the first time we’re getting anything ahead of schedule, 2 months earlier.
If we go by the usual pattern of 7 mos gaps -- and counting from the actual broadcast date of Aug 2018, that would put the concluding 13-ep drop at May 2019. However, at least two other series have dropped their final seasons with a much smaller gap: from 8 down to 3, 12 down to 5.
Which means that dropping S8 (the original S6) in December would be a gap of 4 months from S7′s broadcast, or alternately, a 2 month gap from the original schedule. That’s pretty dramatic, compared to half the time, which would’ve put us at March of 2019.
why the last season comes so fast
When Dawn of the Croods dropped its final season, it came with the announcement that this would be its last. When Trollhunters dropped its final season, it simultaneously announced that two sequels were in the works. And check this out, with hat-tip to @ptw30 for the sharp eyes:

Voltron’s got a film in development, and it’s under the aegis of the Dreamworks Animation team. (Oddly, that ‘S’ notation comes with a note saying the film will combine live-action with animation. I have no idea whether that means rotoscoping or actual live-action with lots of CGI.)
My guess is that on, around, or shortly after the final season of VLD drops, we’ll get an announcement about the upcoming film that will attempt to build on the series. That’s a matter of timing, though, so it’s just my guess (and things can change).
the ‘real’ audience demographic
When asks make comments about VLD being unsatisfactory to the ‘primary demographic’ (and doubly so now that we’re talking about a canonically gay character, cue asshat-sounding commentary about gay hookups)... the assumption is almost always that the primary demographic is men. Probably men aged 18-30.
Wrong. It’s women. Specifically women between 25 to over 50.
But since this is supposedly a for-kids show, let’s start with appealing to families. There are 73.7 million children under 18, and 69% of them are in two-family households. 23% of those children live in single-mother households. (The largest growing family demographic is gay families. Go ahead, explain to me why a kid watching television shouldn’t see a role model in a relationship like their parents have.)
Guess who does the majority of the buying choices for families? Women.
A few facts about women as a market, in the US: the estimated purchasing power of US women ranges from $5 trillion to $15 trillion annually. Women control more than 60% of all personal wealth in the U.S., and 75% are the primary shoppers for their families. Women are buying 66% of all tech purchases, 65% of all car purchases, 89% of all bank accounts opened, 93% of all food purchased, and 92% of all vacation expenditures.
Oh, and while I’m at it:
45% of all gamers are women.
Women over 55 spend more time gaming online than men aged 15-24.
Also, millennial women (roughly early 20s to mid 30s) have 3.4 social media accounts on average, compared to 2.6 for GenX women; 61% of them are online and sharing content at least once a day. However, Gen-X women spend more time onine (7+ hrs/week) than Millennial women (6hrs/week). And then there’s Boomer women --- of the age to have seen Voltron when it first aired --- with a market share of $19 trillion. They tend to spend, on average, 250% more than any other bracket -- which is pretty phenomenal buying power when you consider that every fifth adult in the US is a woman over 50.
A show pays for itself with merchandise and toys --- and if you can swing the women’s market, you’ve got it made, ‘cause they’re ones doing the buying. That means appealing to mothers who make the vast majority of their household’s purchases, or women up to and including the over-50 gamer pop-culture-savvy women with spare income (who are also the fasting growing online demographic, while we’re at it).
So, miss me with that 'primary demographic’ crap. If it doesn’t appeal to boys but appeals to women 25-50+, it’ll do fine. The reverse --- of appealing to boys but not to women --- is a visual media that’ll be lucky to break even. DW hasn’t made it this far by alienating the ones who are making the purchases. If they realized that Shiro appeals most to women aged 25 to 50+ (which he does; he’s that age bracket’s favorite character) then you damn well better believe they’re going to keep him front and center.
why else dreamworks might be wrapping up
There are other factors in play. In 2013, DW partnered with Netflix for the first time, and since then it’s produced 16 series for Netflix. Only two series were exempt, one broadcast in France, the other on Amazon video.
Of the 9 series currently in pre-production, 4 will be on Netflix (She-Ra, 3 Below, Wizards, and Fast & Furious). The remainder are broken up between Amazon, cable TV, Universal, and two most recent that don’t even have homes, yet. Dreamworks is moving out of Netflix, excepting the pre-existing contracts they can’t quite break.
This is the result of net neutrality, to be perfectly blunt.
Check out who owns whom, here. (Larger version at recode.net.)

Comcast owns Dreamworks, and a 30% stake in Hulu -- of which Netflix is a direct competitor. I’m on AT&T and already noticing throttling happening for Netflix, and at some points for Tumblr (Verizon-owned). Scuttlebutt says DW is going to be pushed into moving its content onto Hulu, to support its parent company’s business agenda.
*** ETA: there is no good business reason (at this time) for DW to switch to Hulu. Netflix’s market share is easily ten times the size of Hulu, and switching will cut DW’s products off from a significant number of viewers. ***
That means DW is probably being strongly encouraged to wrap up its Netflix contracts and start shifting to Comcast-owned or controlled markets. And that has nothing to do with VLD itself, or even how popular (or not) that it’s been on Netflix. It’s a command coming down from on high, and now that we’ve lost net neutrality, there'll be less and less gain from sticking with Netflix.
63 notes
·
View notes
Text
Bill Bugaj's Vincent Black Shadow Replica

Bill Bugaj's Vincent Black Shadow Replica
As Told By Stephen Bugaj Edited by Mark@mjmpublishing

Vincent Van G-O! Stephen Bugaj Just south of Chestertown, Maryland, is a small motorcycle shop that goes by the name of Full Throttle Powersports. By all appearances, it seems to be your average, nondescript motorcycle repair shop, and is easily overlooked if you are not paying particular attention. However, appearances, as they say, can be deceiving, and in this case, the adage is particularly fitting. What distinguishes Full Throttle Powersports from all others of its nature is its owner and operator, Bill Bugaj. Better known as “the Doctor” by his customers, Bill has an incredible knack for fixing motorcycles. Not only fixing, but making them run faster, smoother, and more efficiently. As most of you have figured out by now, Bill also happens to be my brother. My youngest brother in fact. But it’s not just a matter of fraternal and familial pride that I’ve written this article. It also just so happens that I am a motorcycle aficionado with a particular love for the great bikes of yesteryear. I’m enthralled by what I call engineering marvels or works of considerable creativity. Bill shares that love of old bikes but unlike me, he has decided to do something about it. More specifically, Bill has combined his extensive historical knowledge, incredible technical expertise, and keen attention to detail with his creativity to bring one of these classic motorcycles back to life. What better bike to resurrect than the legendary Vincent Black Shadow...? This project took Bill about nine months to complete. It is NEITHER a restoration nor a custom, rather it is an amalgam of the old and the new that fused reproduction Vincent parts onto a Yamaha frame and drive train. A “cus-toration” if you will indulge me. Other parts from other models were selected and used based on achieving as authentic an appearance as possible, many of which required Bill to modify, adapt or forge in his shop. More about this later. Moreover, a totally restored Vincent Black Shadow would be something that I would hide in the deepest recesses of my home in an airtight cabinet under 24 hour lock and key. Yet this bike is meant to be ridden rather than hidden.


In a nutshell, Bill began with a 1982 Yamaha Virago frame and engine. He then searched the Internet to obtain a number of replica Vincent parts to include the headlight, decals, seat emblem and” Miller” type tail light tail light assembly.


Bill chose to use the front forks and triple trees from an XV 920R rather than a Vincent repo “girder” fork because he felt it was more substantial and safer to ride. The front wheel came from a 1981 Kawasaki KZ 1000 and is capped with a VEE classic rib 3.25 X 19” front tire. According to Bill, the most difficult part of the project was the rear wheel. The stock 920 XV came with cast alloy wheels. He had to find a rear hub that he could machine an adapter to fit an 18” aluminum rim. He also had to design his own spokes. Regarding this item, Bill found a great wheel company that custom-made them out of 309 stainless steel to his specifications. The rear tire is a Dunlop K70 4.00 X 18”.

Bill found a 1980 Yamaha XS 400 gas tank but re-constructed the mounting brackets for a closer resemblance to that of the Vincent. Bullet mufflers were from a Royal Enfield but the baffles were also modified for a more authentic sound. The stainless fenders were taken from a ’69 Norton Commando and modified to fit. The handlebars are aftermarket drag bars.


The seat is a reproduction seat for a 60's era Jawa 250. Bill made a custom seat frame to fit the Yamaha and was able to adjust the seat height to 32.5 “ similar to the Black Shadow. The fender braces, seat struts, assorted spacers, brackets, wiring harness, throttle and choke cables, were fabricated from scratch in his shop. Bill is especially proud of the fact that he did the welding, brazing, drilling, machining, painting and assembling BY HAND.

The engine specifications I’ve located for the Black Shadow are as follows: 50 degree V-Twin OHV; 998 cubic centimeters; 84 mm bore x 90mm stroke; comprehension ratio - 7.3:1; produces 55 HP and a top speed of 125 MPH “depending on conditions”. In comparison, Bill’s bike is powered by a stock four-stroke XV 920I Virago engine with the following specs: 75 degree V-Twin OHV; 920 cubic centimeters; 92.0mm bore x 69.2mm stroke; compression ration - 8.3:1; capable of cranking out 65 horsepower at 6500 RPM with a reported top end of 108 MPH. However, Bill replaced the aluminum camshaft bushings with ball bearings, and did some re-jetting to the stock carburetors. For the record (and OFF the record!) Bill stated that he has ridden this bike at 125 MPH on several occasions, matching the speed achieved by the Black Shadow. Along with the front forks, the exhaust system is a major difference between both bikes. To best match appearances, Bill used a stock front cylinder head pipe from an '86 Yamaha XV 1000 for its much more rounded profile. He retained the rear cylinder head pipe and but fabricated a 2 into 1 collector. Then he also fabricated a special exhaust hanger bracket so that everything could be mounted. Bill ended up with an exhaust system that is not only full custom, but really works to help achieve the overall appearance. And it sounds good.


The cosmetic work and painting was done by Jay White, a friend and customer of Bills. After this final step, it was difficult for me to distinguish Bill’s cus-toration from an original Vincent. I’ll let you judge the resemblance for yourself.


By the way, Bill is currently working on another and similar project. Even hear of a Vindian? Stay tuned... Readers who have an interest in this project are also advised to check out the Blog called the Vincent Project. For technical information regarding its construction, contact Bill at [email protected] Or stop by his shop and see the bike in person. While you’re there you can schedule your ride’s maintenance or repairs.

Read the full article
1 note
·
View note
Text
Optimize Your Ride with Maven Performance Products' Throttle Cable Bracket Elbow

Introduction: When it comes to fine-tuning the performance of your vehicle, every detail matters. One often-overlooked component that plays a crucial role in your vehicle's throttle control system is the Throttle Cable Bracket Elbow. At Maven Performance Products, we understand the importance of precision and efficiency, which is why we've designed the perfect solution to enhance your throttle response and overall driving experience.
The Throttle Cable Bracket Elbow: What Is It? The throttle cable bracket elbow is a small yet vital component that connects your throttle cable to the bracket. It serves as a pivotal point in the throttle control system, allowing for smooth and precise control of the throttle valve in your engine. While it may seem like a minor part, its impact on your vehicle's performance cannot be underestimated.
Why Choose Maven Performance Products? Maven Performance Products is a brand known for its commitment to quality, innovation, and performance. Our Throttle Cable Bracket Elbow is no exception. Here's why it's the best choice for your vehicle:
Precision Engineering: Our Throttle Cable Bracket Elbow is meticulously engineered for a perfect fit and optimal functionality. It ensures that your throttle cable operates smoothly, eliminating any unwanted slack or play in the system.
Enhanced Throttle Response: By reducing cable friction and ensuring a precise connection, our bracket elbow improves throttle response. You'll notice a more immediate and controlled acceleration, making your driving experience more enjoyable.
Durable Construction: We use high-quality materials to ensure the longevity of our products. Our bracket elbow is built to withstand the rigors of daily driving and harsh weather conditions.
Easy Installation: Installing our Throttle Cable Bracket Elbow is a straightforward process. You don't need advanced mechanical skills or specialized tools to enjoy the benefits it offers.
Compatibility: Our bracket elbow is designed to fit a wide range of vehicle makes and models. Whether you drive a performance car, a classic, or a daily driver, we have a solution for you.
Upgrade Your Throttle Control Today Don't underestimate the impact of a small component like the Throttle Cable Bracket Elbow on your vehicle's performance. At Maven Performance Products, we're dedicated to helping you achieve the best driving experience possible. Our bracket elbow is a cost-effective and easy-to-install upgrade that can make a significant difference in how your vehicle responds to your commands.
Conclusion: When it comes to optimizing your vehicle's throttle control system, Maven Performance Products' Throttle Cable Bracket Elbow is the ultimate choice. Experience enhanced throttle response, improved control, and peace of mind knowing you've invested in a quality product from a trusted brand. Upgrade your ride with Maven and feel the difference today.
0 notes
Photo
#Parts for #Sale #honda #bseries #dseries 1- B series throttle body 50dhs / 12$ 2- B series clutch cylinder 50dhs / 12$ 3- D series brake cylinder 50dhs / 12$ 4- Ek center console 50dhs / 12$ 5- Ek Cable 50dhs / 12$ 6- Ek B series water hose and switch bracket holder 50dhs / 12$ 7- eg sun visor 1piece 2$ 8- Fd sun visor 1piece 2$ Take All For 40$ or 150dhs (at Abu Dhabi, United Arab Emirates) https://www.instagram.com/p/Ckm7oZbvtZy/?igshid=NGJjMDIxMWI=
0 notes
Text
R750 rad electric bike

#R750 rad electric bike free
The Battery is not warranted from damage resulting from use of an improper charger, improper maintenance or other such misuse, normal wear or water damage.For the avoidance of doubt, eBike Generation will not be liable and/or responsible for any damage, failure or loss caused by any unauthorized service or use of unauthorized parts.Any damage or defects to Covered Components resulting from failure to follow instructions in the ebike owner’s manual, acts of God, accident, misuse, neglect, abuse, commercial use, alterations, modification, improper assembly, installation of parts or accessories not originally intended or compatible with the ebike as sold, operator error, water damage, stunt riding, or improper follow-up maintenance.Consumables or normal wear and tear parts (such as tires, tubes, brake pads, cables and housing, grips, chain, spokes).Normal wear and tear of any Covered Component.
#R750 rad electric bike free
The Covered Components are warranted to be free of defects in materials and/or workmanship during the Warranty Period.The Battery warranty does not include damage from use of improper charger, improper maintenance or other such misuse, normal wear or water damage.The Warranty is limited to the replacement of bicycle components including the lithium ion battery (the “ Battery”), frame, forks, stem, handlebar, headset, seat post, saddle, brakes, lights, bottom bracket, crankset, pedals, rims, wheel hub, freewheel, cassette, derailleur, shifter, motor, throttle, controller, wiring harness, LCD display, kickstand, and the reflector (each a “ Covered Component”).The Warranty Period begins the day after the manufacturer’s warranty expires and shall end immediately upon any sale or transfer of the ebike to another person, and under no circumstances shall the Extended Warranty apply to any subsequent owner or other transferee of the ebike. Only the original owner of the ebike is covered by this Extended Warranty.The rights and claims arising from this Extended Warranty are in addition to your statutory rights.All ebikes sold by eBike Generation, are eligible for our extended warranty that protects against all manufacturing defects in material or workmanship for one or two years after the date of the original manufacturer’s warranty (the “Extended Warranty Period”), depending on which extended warranty (one year or two years is purchased) in accordance with the following terms:
0 notes
Text
EKWB-Supremacy Classic RGB - Nickel + Plexi Waterblock Review

EKWB's Supremacy CPU blocks have been a favorite of may water cooling enthusiasts and overclockers. With the launch of the Quantum line of products, EKWB also launched their Classic Line. The Classic line retains a familiar look of EK blocks of the past with minor aesthetic updates. The updates include an RGB LED strip under an aluminum cover on the water block. The Supremacy Classic still uses the jet-plate style cooling engine of previous blocks and has been updated for easier maintenance. Packaging With cost-conscious consumers in mind, EKWB chose a plain cardboard box for the Supremacy Classic. There's no flash or flair here, just straight down to business. A small line art drawing of the block is on top while the socket compatibility is now listed on the side of the box.

Inside, you'll find the installation kit in the first compartment, the water block and thermal paste below that, and underneath the last bit of foam is the rubber gasket and EK's back plate. This review will cover the Intel block and the installation kit reflects as much. Included in the kit are standoffs for both desktop and HEDT (x99/X299), plastic washers to electrically isolate the stand-offs from the motherboard, tension spring, caps, two replacement jet plates, and a hex key used to tear down the block for cleaning and maintenance.

Technical specifications: - RGB cable length: 30cm - RGB connector classic 4-pin (12+ R G B) CPU socket compatibility: - Intel LGA-1150/1151/1155/1156 - Intel LGA-2011(-3) - Intel LGA-2066

Enclosed: - EK-Supremacy Classic RGB CPU block A Closer Look At The EK-Supremacy Classic RGB The Supremacy Classic has the looks of the older EK water blocks. However, there are subtle differences. There are no designs in the plexi that adorned the past blocks but there is an aluminum cover over the lower edge of the block. This cover hides the RGB LED strip. EK has made it so you can remove the aluminum cover and replace the RGB strip with one of your own choosing if you so desire.

The water block uses standard G1/4 ports for fittings. Each port is marked in and out. The inlet for the block is designed so the coolant hits the jet plate and is forced across the fins on the way to the exit.

What is a water block without RGB? The Supremacy is compatible with all the motherboards using a 4-pin (12+GRB) connection. The pigtail for the water block is about a foot long and should give you plenty of room to run to the RGB headers on the motherboard and if not there are 3rd party extensions that can be used.

Flipping the water block over, you'll be presented with a large yellow caution sticker advising you to remove it before installing the water block. Under the sticker is the cold plate for the water block. The cold plate is nickel plated copper. The finish on the block is like a mirror. No machining marks were visible and the reflection of the screwdriver below is dang near perfect. EK made the Supremacy Classic easy to tear down and clean. Simply remove the four hex screws on the bottom of the water block and pull apart. EK also included a hex key to do so. The water block consists of essentially four parts; the acrylic top, cold plate, jet plate, and mounting bracket. One of the problems I've had with other blocks is getting the o-ring back in place and having it stay while re-assembling. The o-ring for the Supremacy Classic can either sit on the cold plate or can sit in the groove in the acrylic top. During re-assembly, there was no movement of the o-ring.

The jet plate works in conjunction with the fins on the cold plate to force the water across them in order to transfer heat. The fins are machined into the block in order to increase surface area.

One of the differences with the Supremacy Classic and older EKWB blocks is the plastic mount for the jet plate is no longer removable which makes assembly a bit easier. The Jet plate can only go back on one way.

All that's left is to put the cold plate back on. Before screwing the parts together, it's a good idea to check and make sure the o-ring isn't pinched.

Installation Unlike the previous budget water block, the Supremacy MX, you will not have to remove the stock Intel back plate in order to Install the Supremacy Classic on the Intel 11xx platform. You will, however, need to install the rubber gasket between the motherboard and the EKWB back plate. This will electrically isolate the back plate from any pins protruding from the motherboard. Make sure to line up the 3 holes in the back plate with the screws from the Intel socket.

Next up, you'll flip the motherboard over and install a washer on each of the longer standoffs and screw them into the back plate. The plastic washers act to protect the motherboard's traces. This will need to be done four times. If you're installing the Supremacy Classic on the HEDT platform, you will not need to use the included EKWB back plate. The shorter standoffs will screw into the stock Intel CPU brackets.

Once the standoffs are installed, you'll need to add a dab of thermal paste to the top of the CPU and set the block on top. I tend to use a small drop in the center of the CPU and then allow the water block to spread the paste as it is tightened. Then you'll take the four springs and place them on the standoffs with the ears of the water block below the springs. Finally, you'll take the caps and screw them down on the standoffs. Tighten them until they stop. Be sure to tighten in a criss-cross pattern to ensure even thermal paste spread.

Test System and Results Test System: Component Product Name Provided By Processor Intel Core i7-8700K (Retail) reviewer Motherboard Gigabyte GA-Z370-Gaming 7 Gigabyte Memory G.Skill SniperX 2x8GB @ 3400MHz 16-16-16-36 (XMP) G.Skill Drive Samsung 240 EVO 256GB SSD, Crucial MX500 1 TB SATA III SSD reviewer Video Card Nvidia RTX 2080 Founders Edition Nvidia Radiator(s) EKWB EK-Coolstream PE 360 EKWB Pump EKWB EK-XRES 140 SPC PWM Classic EKWB Fans EKWB EK-Vardar F4-120ER EKWB Fittings Bitspower 7/16 ID, 5/8 OD compression Titan Rig Tubing XSPC FLX Clear UV 7/16 ID, 5/8 OD Titan Rig Thermal Compound Noctua NT-H1 Noctua Case DimasTech EasyXL DimasTech Power Supply Cooler Master Silent Pro M2 1500W Cooler Master Operating System Windows 10 x64 Pro with latest patches and updates The test was conducted on a DimasTech EasyXL open-air test-bench. For this review, I ran two sets of tests. The Stock test was run with the CPU set to the stock settings in the BIOS. The radiator fans and pump were set to the normal setting in the Arous BIOS. This allows the fans and pump to spin up and down based on temperature. The stock temperature curves in the BIOS were used. I chose to do this for the stock test to mimic a low noise set up. I wanted to fans and pump to be quiet with at the same time get good cooling performance. The Overclock test was done with custom settings. I set the voltage for the CPU at 1.249v for Vcore and set the multiplier on all cores at 48. The pump and radiator fans were set to full speed in the BIOS settings. The EKWB radiator had just been cleaned using Mayhem's Blitz kit. The loop was filled with fresh distilled water (no additives) and was run without load until most of the air worked its way back to the reservoir. To monitor loop temperature, I used two XSPC inline temperature sensors. During the test, I waited for the coolant temperatures to stabilize (about 30 minutes). From there the statistics were cleared and another 15 minutes were put on the clock before the last minute average. Coolant temperatures were taken at the same time as the CPU temperatures. Temperatures are averaged (last minute) from individual core temperature results monitored by AIDA64 after 15 minutes using the default CPU, and Cache simultaneous load. AIDA64 is able to use the latest instructions including AVX and AVX2, etc unlike other older CPU load tests so it is also a lot more “future proof” as more software start to utilize it. PU-only load average is used to simulate worst case scenario load levels similar to Intel Burn Test or OCCT. Please keep in mind that this test is brutal and not even close to real-world load (especially not that constant for that amount of time). Results marked “100″ and in red means, the thermal limit was reached and the CPU throttled, even for just but a second. This includes results where even just the first core reached the limit and even if it briefly happened. It is marked as 100 in red in the review if it happens three times. Three runs are conducted per cooler and a fourth run is done after a remounting to verify. Last minute average is taken instead of peak because it represents the averaged behavior of the thermal performance instead of worst-case scenario or a snapshot. Temperature delta results are used to account for variance in the cooling system. Room temperature is set at 19°C. With the Intel i7-8700k using the motherboard defaults and the fans and pump set to "normal" in the Aorus BIOS settings, there a few degrees of difference between the Supremacy Classic and EKWB's previous generation "budget" waterblock; the Supremacy MX. However, when we pour a bit more heat into the system by using the FPU test, the gap between the block widens a bit. The delta temperatures confirm that there is a slight difference when running the Aida64 stability test stressing CPU, Cache, and FPU. But as more heat is applied, the Supremacy Classic is the clear victor.

For the Overclocking tests, I set the fan and pump speeds to the "full speed" setting in the BIOS and set the CPU multiplier at 48 on all cores. After a bit of tweaking, I got the CPU to run stable at 4893 MHz with a Vcore of 1.249. Any less voltage and the system would crash the test or blue screen. As the frequency went up so did the temperatures as expected. We see a similar pattern with the new EKWB block besting the old, again, as expected. The Supremacy Classic extends its lead even more which leads me to believe, that I can still get this CPU even further and maybe crack 5 GHz with my retail sample.

Conclusion EKWB recently released their Quantum line of products which included the Vector CPU water blocks. These are aimed more towards the enthusiast water cooling level. The EKWB Classic line is aimed at being budget-friendly and aims to bring back some of the "classic" EK look while still offering good performance. I think on the aesthetic side of the block EKWB has done a great job. The Supremacy classic forgoes any flash except for a single RGB strip and instead takes the stance of "walk softly and carry a big stick".

On the performance side of things, I am so far, impressed with the Supremacy Classic. A few of my other water blocks are in use on other projects at the moment and the Velocity waterblock review is coming up shortly. Time will tell how well the block does against other water blocks on the market. In my testing, the waterblock actually kept temperatures lower than I was expecting especially during the FPU torture test. Honestly, I expected the performance to be closer to the Supremacy MX. Not once did I have an issue where the CPU throttled in either the stock or overclocking tests. Overall, I think the Supremacy Classic RGB is a pretty decent value at $70.00. It brings features such as a machined acrylic top and RGB lighting that consumers have been asking for at a lower price point than the top tier offerings from EK. Read the full article
1 note
·
View note
Text
Website : https://www.fastmanefi.com/
Phone : +1 209-247-6497
We sell and support Holley, FAST, and all the accessories, such as fuel injectors, fuel systems, sensors, etc. If it’s EFI we can provide it. But we are known to provide the best technical support to our customers. We answer the phone! It’s our image and our heritage.
Business mail : [email protected]
Owner name : Richard Nedbal
Facebook : https://www.facebook.com/fastmanefi/
Keywords: throttle body position sensor air intake temperature sensor throttle body fuel injection throttle body fuel injection ls standalone harness water methanol injection kit water methanol injection kit aem x series wideband tuned port injection high pressure fuel line fuel surge tank idle air control valve. 705 chevy big block sbc fuel injection efi conversion kit ls cathedral port intake 92mm throttle body wideband o2 sensor kit aftermarket fuel injection ls standalone ecu chevy 350 fuel injection kit aem air fuel gauge fuel injector kit for chevy 350 fuel pressure regulator with gauge fuel injection systems wide band o2 sensor kit chevy 350 fuel injection kit fuel injector kit for chevy 350 aem x series wideband hpt jeep mopar 4.2l mpi conversion kit instructions fuel injection throttle body fuel injection kit for chevy 350 fuel injection kit 350 chevy 100 micron fuel filter fuel injection kit 350 chevy sbc efi kit fuel injection throttle body stand alone ls harness 4l60e controller stand alone fuel injection kit 350 chevy fuel injection kit for chevy 350 350 tbi throttle body diagram ls fuel injection small block chevy fuel injection big block chevy fuel injection chevy 350 efi kit chevy 350 fuel injection conversion kit fuel injection conversion kit for chevy 350 fuel injected small block chevy efi fuel system small block chevy fuel injection ls3 coil packs aem water methanol kit bbc fuel injection throttle body injected fuel injected small block chevy efi for chevy 350 big block chevy fuel injection ls swap fuel line kit big block chevy fuel injection chevy 350 efi kit ls swap wiring harness plug and play efi fuel pressure regulator bbc fuel injection small engine efi kit chevy 350 fuel injection high performance fuel injectors efi throttle body multi port fuel injection sbc efi intake multi port fuel injection idle air control motor efi kit chevy 350 ls 102mm throttle body fuel filter 100 micron fuel injection kits for old cars fuel injection kits plug and play wiring harness for ls swap aluminum intake manifold motorcycle fuel injection conversion kit fuel injection conversion blow through carb hat fuel injection conversion kit carb efi conversion kit sbc fuel injection kit 350 fuel injection kit carb to efi conversion kit high pressure electric fuel pump tune port injection ls efi kit ls1 fuel injection ls1 fuel injection fuel injection conversion kit chevy 350 electronic fuel injection system water meth injection kit fuel injector parts performance fuel injection systems best small block chevy fuel injection kits inline fuel pump efi fuel injection conversion kit ls throttle cable bracket sbc fuel injection kit ls swap stand alone harness efi inline fuel pump bosch lsu 4.9 wideband oxygen sensor 200 on the dash 92mm ls throttle body efi carburetor kit heat resistant wire loom ls standalone wiring harness intake manifold for ls1 92 mm throttle body intake manifold for ls1 stand alone ls harness and ecu fuel injection specialties holly sniper efi kit holly sniper efi kit 90mm ls throttle body fuel injection for small block chevy holly sniper efi kit high pressure fuel hose efi for small block chevy holly sniper efi kit ls fuel injection kit holly sniper efi kit efi for small block chevy aem wideband x series
#terminator x max 24x#big block chevy fuel injection kit#small block chevy fuel injection kits#stand alone fuel injection#454 fuel injection conversion kit#chevy 350 fuel injection conversion kit for sale#fuel injected 350 small block#accel fuel injectors#best fuel injection for big block chevy#350 small block fuel injection#parts of a throttle body
1 note
·
View note
Photo

[30%-OFF!] $26.76 BMW Motorcycle Airhead throttle side clutch side 1975-78 w throttle cables Motorcycle Brackets, Motorcycle Gear Accessories, Motorbike Mount CLICK HERE for details.
0 notes