#Tplink Setup
Explore tagged Tumblr posts
Visit Tumblr Blog
Explore Tumblr blogs with no restrictions, modern design and the best experience.
Last Seen Tumblr Blogs


Fun Fact
There were a total of 171.5 billion posts on Tumblr in 2019.
Text
How to Set Up TP-Link Deco XE75 Pro Step-by-Step
The TP Link XE75 Pro setup is among the greatest choices available if you want to update your home Wi-Fi to one that can easily support an increasing number of devices. Here is a summary of my recent installation of the 3-pack XE75 Pro mesh system, including what to expect and how the setup went.
Unpacking and Initial things
Each item fits in with most rooms because it is simple, sleek, and cylindrical. Power adapters and an Ethernet connection are included in the tidy packing. The setup instructions are simple, and the build quality is excellent.
Procedure for Setup
Even if you are not tech-savvy, the TP-Link Deco app (available on iOS and Android) makes the setup process very easy. The app immediately recognized the Deco through Bluetooth after the first unit was plugged in and connected to the modem. After creating a network name and password and designating it as the primary node, the rest was essentially automated.
It was even simpler to add the other two nodes. The software locates them in a matter of seconds when you plug them in. For optimal signal coverage, the system automatically optimizes the connections between the units.
Performance
Wi-Fi 6E, which adds the 6 GHz band for cleaner, quicker traffic, is supported by the Deco XE75 Pro. Significant speed increases were noticeable to me, particularly on more recent devices. Across several devices, 4K video streaming, video calls, and gaming all functioned flawlessly without any lag or buffering.
Important things
Additionally, it has TP-Link HomeShield for security and parental controls, as well as an integrated 2.5 Gbps connector for fast wired connections. With the software, you can even establish guest networks or prioritize traffic.
No technological expertise was needed, and setup took less than 20 minutes. If you're sick of slow Wi-Fi or dead zones, the Deco XE75 Pro is a great improvement. It is a top-tier mesh system with a user-friendly setup, future-ready capabilities, and rock-solid performance.
For further details visit our webpage.
#tp link xe75 pro setup#how to optimize deco xe75 mesh network#optimize deco xe75 mesh network#tplink deco setup#setup tplink deco#how to setup tplink deco
0 notes
Text
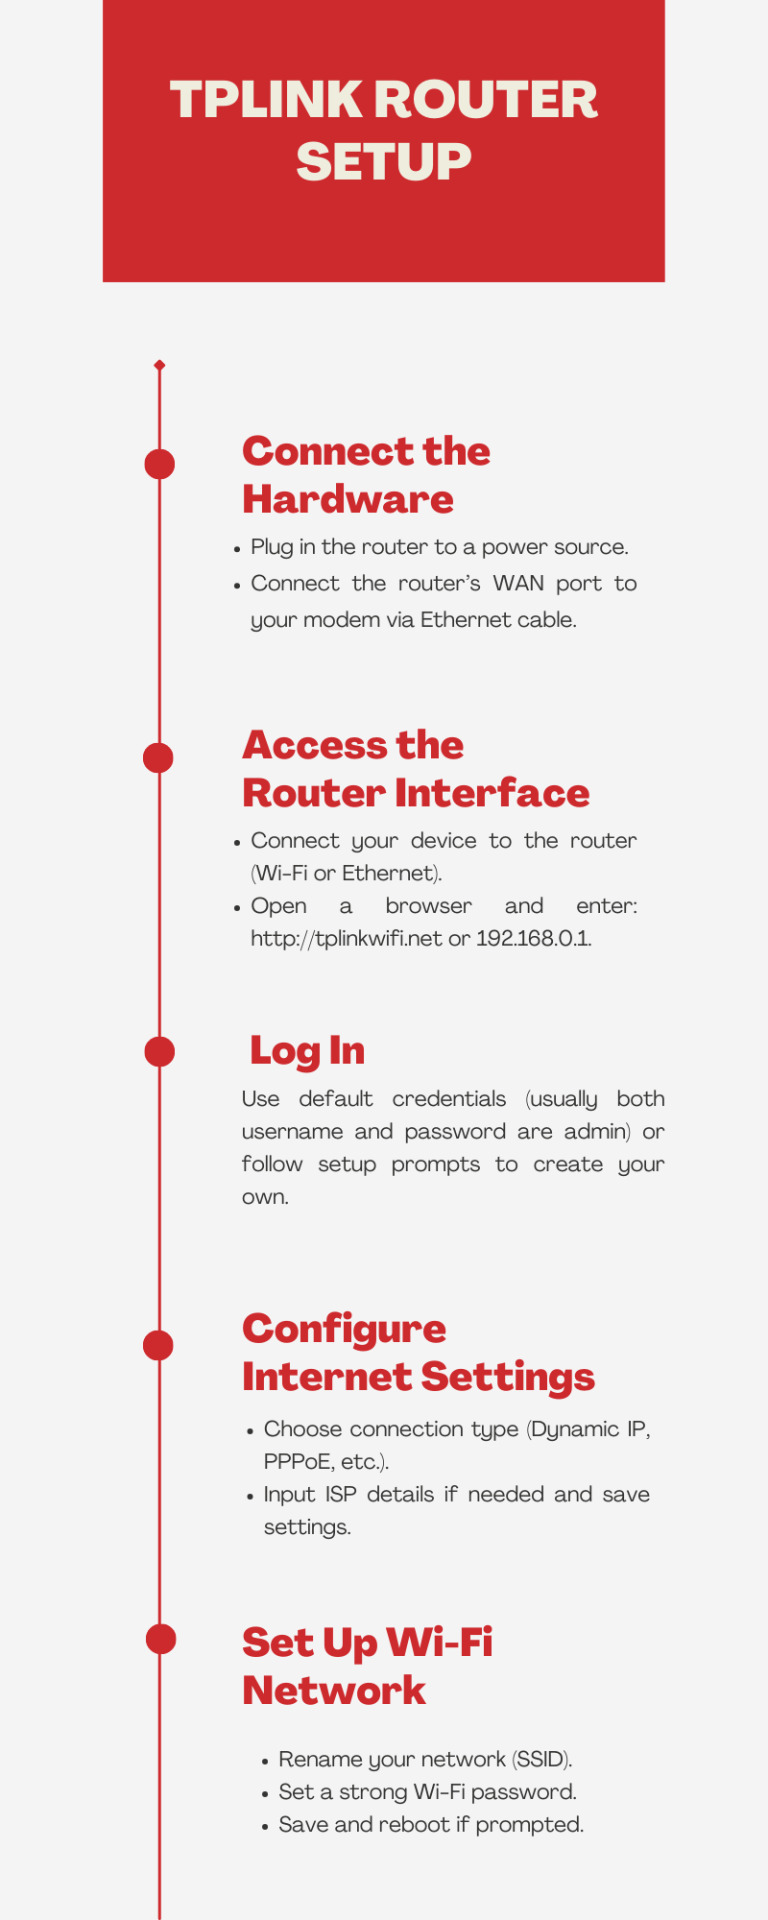
Tplink Router Setup
To perform the tplink router setup, connect the router to your modem and power. Connect your computer or phone to the TP-Link WiFi network and open a web browser. Enter the default IP address (usually 192.168.0.1 or 192.168.1.1) and follow the setup wizard to configure your network.
0 notes
Text

You can reset tplink extender via the app, first, open the Tether app on your phone. Then, log into your account by entering the valid admin credentials. Once logged in, visit the Home Dashboard and follow the on-screen guidelines as shown on the screen to complete the process. For more info, drop us a line!
0 notes
Video
youtube
TP-Link EC220-G5 AC1200 Wireless Dual Band Gigabit Router Setup
0 notes
Video
youtube
How to Set Up a TP-Link Kasa Smart Bulb 💡📱Step-by-Step App Setup
0 notes
Text
How To Setup Your TPlink Archer AXE75? Easy Tips & Tricks!
To optimize the TPlink Archer AXE75, follow the setup process by powering on your router, opening a web browser, and entering 192.168.110.1 to access router configuration and network parameters. Suppose you are still in a dilemma about how to set up TP-Link Archer AXE75, it will be the best option to get in touch with our technicians who will help you know the whole setup process!
0 notes
Text
If you are willing to access the TP-Link Extender Setup Page, all you need to do is open a web browser on your desktop and then enter either your extender’s web address- tplinkrepeater.net or IP address-192.168.0.254 in the address bar. Afterward, type the login credentials. In case you have to face any difficulty while accessing the setup page of your extender, it is better for you to give us a call!
0 notes
Text
Quick Guide For TP-Link Extender Setup
TP-Link extender Setup is hassle-free. Plug it into a power source, within the range of your existing Wi-Fi network. Access the extender's web interface via a device to configure your network settings, and follow the easy step-by-step instructions. Enjoy extended Wi-Fi coverage throughout your home.
0 notes
Text
a list of fun things about my fuckass pc
-duct tape was applied to the inside of the case at some point during the building process and I still don't know why
-I'm pretty sure my gpu is from the scp foundation

-Because my old monitor uses a different kind of cable than my gpu, I have to use an old TV set as a monitor. This does come with some advantages, mainly the fact it's funny and has built in speakers, it also has a kinda poor resolution when close up, it genuinely hurts my eyes to use in in the dark, and I need to use a TV remote to turn it on or off (also it retains its ability to search for channels and doing so will result in me needing to unplug the monitor)
-Just before I woke up this morning, the gpu decided to just straight up stop working because it "required further installation" while both the computer was shut down and the power was off so I'm pretty sure it's sentient, but restarting the computer fixed it so it's probably fine
-the wifi antenna that came with one of the parts, either the case or the motherboard iirc, just straight up does not work (that or we couldn't get it to work) but using the shitty tplink USB thing I got like four years ago does.
-speaking of the wifi, I get a better connection if i put my antenna on the ground just outside my closet. I dont even know for this one.
-when we started it up for the first time it just didn't turn on except for the fans on the liquid cooler system. I dont know how this issue got fixed, as far as I understand it basically just started working completely fine after like a day
-it has about nine fans total and yet the only times it made any significant noise are when I boot it up and when I tried running rain world while my gpu was up to funny buisness. (Also this might be completely normal but also the fans in the case need a SATA cable, which I was under the impression was for like hard drives but maybe not)
-the current setup for sound is a device that plugs into a USB then I put my earbuds into the headphone jack on it, as opposed to using the headphone jack on the computer. Probably normal but convoluted.
There's probably more but this is everything I could think of atm
3 notes
·
View notes
Text
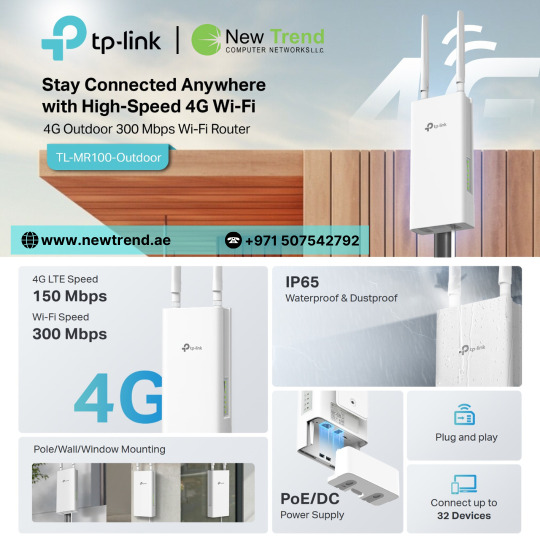
Experience seamless 4G LTE connectivity with the TL-MR100-OUTDOOR – built for reliable performance in harsh outdoor environments. Ideal for remote areas, this rugged router ensures stable internet with weatherproof design, powerful antennas, and plug-and-play setup. Stay connected anywhere, anytime with TP-Link’s trusted outdoor networking solution.
For more information, Visit:https://newtrend.ae/product-category/tplink/ Live chat: +971 507542792
#TPLINK#OutdoorRouter#4GLTE#RuggedConnectivity#RemoteAccess#WeatherproofWiFi#StayConnected#NetworkingSolutions#InternetAnywhere#NewTrendTech
0 notes
Text
Troubleshooting Tplink Extender Setup: Common Issues and Solutions
The Tplink extender setup can be easily performed using the WPS button method. For that, you need to locate the button first on your device and press it using a small pointed object. Simultaneously, press the WPS button on the router within 2 minutes. When the LED indicator turns on, release it. For more info, approach us!
0 notes
Video
youtube
TP link BE230 3 6Gbps New Launching WIFI 7 Router setup
0 notes
Text
The Tplink router setup can be easily performed using the Tether app. Proceeding with the app, firstly download the recent version of the app on your smartphone. Now, a login page prompts, enter your login credentials. Further, configure the Settings accordingly from the quick setup wizard of the router. If you get stuck, let us know!
0 notes
Text
🌐 TP-Link: Smart Connectivity Revolution
Revolutionize your connectivity with TP-Link's comprehensive networking solutions. From business to home office, discover the perfect setup for your needs.
#NetworkingSolutions #TechReview #SmartHome #BusinessTech
Like, Share, Follow! Go to: https://go.aowork2live.com/TPLink
youtube
#youtube#aowork2live#business#marketing#aowork2live insider#blog#networking equipment#home security#business security#mesh wifi#wifi#router
0 notes
Text
Professional guide to the TP-link cpe540 setup!
For an easy TP-Link CPE540 Setup process, open the web browser and type the 192.168.0.254 IP address in the browser bar. Now, enter your admin credentials and you will reach the setup wizard. To configure the other settings, go to the Basic & Advanced settings. For more information, approach us!
0 notes
Text
can you put a vpn on a tplink router
🔒🌍✨ Get 3 Months FREE VPN - Secure & Private Internet Access Worldwide! Click Here ✨🌍🔒
can you put a vpn on a tplink router
VPN setup on TP-Link router
Setting up a VPN on your TP-Link router can enhance your online security and privacy, allowing you to browse the internet anonymously and securely. Follow these steps to configure your TP-Link router with a VPN:
Choose a VPN Provider: Start by selecting a VPN provider that offers router support. Make sure the provider offers detailed instructions for setting up their service on TP-Link routers.
Gather Required Information: Before proceeding, gather the necessary information from your VPN provider, including the server address, username, password, and any encryption settings.
Access Router Settings: Open a web browser on a device connected to your TP-Link router and enter the router's IP address in the address bar. Log in to the router's admin panel using your username and password.
Navigate to VPN Settings: Once logged in, locate the VPN settings section within your router's configuration interface. This may vary depending on the router model, but it's typically found under the "Advanced" or "Security" tab.
Enter VPN Configuration Details: Enter the VPN configuration details provided by your VPN provider into the appropriate fields. This usually includes the server address, username, password, and any additional settings required by your VPN service.
Apply Settings and Reboot Router: After entering the VPN configuration details, apply the settings and reboot your TP-Link router to activate the VPN connection.
Test the VPN Connection: Once the router has rebooted, test the VPN connection to ensure it's working correctly. You can do this by visiting a website that displays your IP address and verifying that it matches the IP address provided by your VPN provider.
Optional: Configure Additional Settings: Depending on your preferences and the features offered by your VPN provider, you may want to explore and configure additional settings such as split tunneling, port forwarding, or DNS settings.
By following these steps, you can easily set up a VPN on your TP-Link router and enjoy the benefits of enhanced online security and privacy for all devices connected to your home network.
TP-Link router VPN configuration
Title: Simplifying Your Online Security: A Guide to TP-Link Router VPN Configuration
In an era where online privacy and security are of paramount importance, setting up a Virtual Private Network (VPN) on your TP-Link router can provide an additional layer of protection for your internet connection. By encrypting your internet traffic and masking your IP address, a VPN ensures that your online activities remain private and secure from prying eyes, whether you're browsing the web, streaming content, or accessing sensitive information.
Configuring a VPN on your TP-Link router is a straightforward process that can be completed in just a few steps. Here's a simple guide to help you get started:
Choose a VPN Service: Before you begin, you'll need to subscribe to a reputable VPN service provider. Make sure to choose a service that offers compatibility with TP-Link routers and provides robust security features.
Access Router Settings: Using a web browser on a device connected to your TP-Link router, access the router's admin panel by entering the router's IP address (typically 192.168.0.1 or 192.168.1.1) into the address bar.
Login and Navigate to VPN Settings: Enter your router's username and password to access the admin panel. Once logged in, navigate to the VPN section in the router settings menu.
Enter VPN Configuration Details: Here, you'll need to enter the configuration details provided by your VPN service provider. This usually includes the VPN server address, VPN protocol (such as OpenVPN or PPTP), and your VPN username and password.
Save Settings and Connect: After entering the VPN configuration details, save the settings and initiate the connection. Your TP-Link router will now establish a secure VPN connection, encrypting all internet traffic passing through it.
Verify Connection: Once connected, verify that your VPN connection is active by checking your IP address using an online tool or the settings in your router's admin panel.
By following these steps, you can enhance your online security and privacy by configuring a VPN on your TP-Link router. Enjoy the peace of mind knowing that your internet connection is encrypted and your data is safe from prying eyes.
Installing VPN on TP-Link router
When it comes to ensuring your online privacy and security, installing a VPN on your TP-Link router can be a great solution. A VPN, or Virtual Private Network, encrypts your internet connection and routes it through a remote server, making it difficult for anyone to track your online activities. By setting up a VPN directly on your router, you can protect all the devices connected to your network, including smartphones, laptops, smart TVs, and more.
To install a VPN on your TP-Link router, you first need to choose a VPN service provider that supports router configurations. Once you have signed up for a VPN service, follow the provider's instructions to configure your TP-Link router. Typically, this involves accessing your router's settings through a web browser, entering the VPN connection details provided by your provider, and saving the settings.
After successfully setting up the VPN on your TP-Link router, all the devices connected to your network will automatically benefit from the VPN protection. This means that your internet traffic will be encrypted, your IP address will be hidden, and your online activities will be secure from prying eyes.
Installing a VPN on your TP-Link router is a straightforward process that can significantly enhance your online security and privacy. By taking this simple step, you can enjoy a safer and more private internet browsing experience for all your connected devices.
TP-Link router VPN compatibility
When it comes to ensuring online privacy and security, using a Virtual Private Network (VPN) is a popular choice among users. VPNs encrypt the internet connection, providing anonymity and protection from potential cyber threats. However, not all routers are compatible with VPN services, which is why it's essential to choose a router that supports VPN setups.
TP-Link routers are known for their reliability and performance, but not all models are VPN-compatible. It's crucial to verify if a TP-Link router supports VPN services before purchasing one.
Some TP-Link routers come with built-in VPN capabilities, allowing users to easily set up and configure VPN connections. These routers offer various VPN protocols, such as PPTP, L2TP, and OpenVPN, making it convenient for users to choose one that best fits their needs.
For routers that do not have built-in VPN support, users can still utilize VPN services by manually configuring the connection settings on the router. This process may vary depending on the router model and the VPN service provider, so it's essential to follow specific instructions provided by both parties.
By using a VPN-compatible TP-Link router, users can secure their internet traffic and protect their online activities from prying eyes. Whether for personal privacy or business security, having a VPN-enabled router adds an extra layer of protection to any network.
Overall, ensuring VPN compatibility when selecting a TP-Link router is crucial for those looking to enhance their online security and privacy effortlessly.
VPN client for TP-Link router
A VPN client for TP-Link routers can enhance your online security and privacy by encrypting your internet connection. With the increasing importance of protecting personal data online, using a VPN client on your TP-Link router is a smart choice.
Setting up a VPN client on a TP-Link router enables all devices connected to the network to benefit from the encrypted connection without needing to install a separate VPN app on each device. This means that your smart TV, gaming console, and even smart home devices can all enjoy the added security and privacy that a VPN provides.
There are various VPN services that offer support for TP-Link routers, making it easy to find one that suits your needs. Once you have chosen a VPN service provider, you can follow the step-by-step instructions provided by the service to set up the VPN client on your TP-Link router.
By using a VPN client on your TP-Link router, you can also bypass geo-restrictions and access content that may be blocked in your region. Additionally, a VPN can help prevent your Internet Service Provider from tracking your online activities and browsing history.
Overall, adding a VPN client to your TP-Link router is a practical way to enhance your online security, privacy, and freedom while ensuring that all devices connected to your network benefit from the added layer of protection.
0 notes