#Trigger Sprayers Assembly Machine
Explore tagged Tumblr posts
Visit Tumblr Blog
Explore Tumblr blogs with no restrictions, modern design and the best experience.
Last Seen Tumblr Blogs


Fun Fact
Women make up for the other 50% of Tumblr’s audience.
Text
Trigger Sprayers Assembly Machine
The square gun is composed of parts such as gun body, rosette, spring, piston and wrench. The machine can automatically feed, assemble and ship out. It adopts advanced high performance PLC with touch screen control and frequency conversion to adjust the production schedule according to your production needs.

0 notes
Text
Plastic Sprayer Manufacturer - Sprayer: Basic Pipeline Example
The Plastic Sprayers Manufacturer stated that the sprayer is a very useful type of machine and a good example of the basic piping principle. The sprayer head consists of only a few parts. It has a trigger lever that activates a small pump. The pump is connected to a plastic tube that draws cleaning fluid from the bottom of the reservoir. The pump forces the liquid to extend outwardly through the narrow bore of the narrow bore in the muzzle. A hole or nozzle is used to focus the flowing liquid to form a concentrated stream.
The only complex element in this design is the fluid pump, which is as simple as they are. The primary moving element is the piston, which is housed in the cylinder. Inside the cylinder, there is a small spring. To operate the pump, pull the trigger back and push the piston into the cylinder. The piston is compressed to compress the spring so that when the trigger is released, the piston is pushed back into the cylinder. These two strokes of the piston enter the cylinder and are discharged again, constituting the entire pump cycle.
Downstroke, the piston is pushed in, reducing the area of the cylinder and forcing fluid out of the pump. On the upstroke, the spring pushes the piston back, expanding the cylinder area and drawing fluid into the pump. In the sprayer, you need to draw the cleaning solution from the tank below and force it out through the upper bucket. In order for all fluid to pass through the barrel, the pump must only force the fluid to rise - it cannot force the fluid back to the tank. In other words, the fluid must pass through the pump in only one direction.
The device that makes this possible is called a one-way valve. The nebulizer has two check valves in the pumping system: one between the pump and the reservoir and one between the pump and the nozzle. Typically, the valve between the pump and the reservoir consists of a small rubber ball that is neatly placed in a small seal. The sides of the seal are angled so that the ball does not fall. Depending on the design, either gravity or a small spring will secure the ball to the seal so that when you don't pump water, the water channel is blocked. When the piston moves outward (when the trigger is released), the expansion area of the cylinder draws in the liquid below and pulls the ball out of the seal. Since the ball is lifted, the fluid can freely flow out of the reservoir. But when you squeeze the trigger, the outward force of the moving fluid pushes the ball into the seal, blocking the passage to the tank. Therefore, the pressurized fluid is only pushed into the barrel.
This content is not compatible with this device.
In the spray mechanism, the one-way valve between the pump and the nozzle is a cup that is mounted at the end of the barrel. During the upstroke, the inward pressure
from the pump pulls the cup toward the barrel so air cannot flow through the nozzle. During the lower stroke, the ejected fluid lifts the cup slightly away from the barrel and through the nozzle. Without this second check valve, the pump system would not be able to draw fluid from the reservoir because there was no suction (the air pressure did not drop). The upper stroke does not reduce the air pressure in the pump; it only draws in more air to maintain this pressure.
This valve can also be used as a shutdown system. When you screw the nozzle assembly in, it presses the seat tightly against the barrel, so you can't force any liquid out. When the nozzle is released, the seat has enough space to move back and forth.
When you use the sprayer for the first time, you must squeeze the trigger several times to spray any cleaning fluid. There are two reasons for this delay:
Before starting the pumping, set the gun to the lower stroke instead of the upper stroke (the piston is outside the cylinder). When you pull the trigger for the first time, no liquid is drawn out when the piston is pushed in; there is only air in the cylinder chamber. The piston must slide out to draw any liquid from the reservoir. On the first upstroke, the pump begins to draw cleaning fluid from the reservoir. But it also inhales any air in the plastic pipes leading to the reservoir. This air must be driven by the pump mechanism before starting to spray the cleaning fluid. This may require some down and up. This simple pump design is called a reciprocating piston pump and can be used for a variety of tasks. In addition to pressurizing water, air and many other fluids, this design also extracts water and oil from the ground. We even have a reciprocating pump built into our body: your heart expands, inhaling low pressure blood through a one-way valve and contracting, forcing high pressure blood through another check valve back into your body. The same basic mechanism that makes ordinary sprayers work can also keep you alive!
Ningbo RuiChang Commodity Packaging Co., Ltd . is a professional Plastic Sprayers Manufacturer in China, providing you with high quality plastic sprayer products.
https://www.ruichangpacking.com/product
1 note
·
View note
Text
Two years later, we’re almost done.
First an apology for not touching this blog since April of last year. Several people have asked about it, and I suppose procrastination has gotten the better of me. And I’ve had a few things going on in my life, among them, the completion of this project that’s now nearly two years in the making.

If I knew at the start what I now know, I’m not sure I would’ve embarked on this barn odyssey, convincing my mom to sell her house to finance the development of this old post-and-beam building that not-long-ago was a home to horses. I know someone who built himself a beautiful house in 6 months, and I’m embarrassed to say that even with a GC, it’s taken this long... but most of that is my own fault.
See, when I decided not to GC the work myself, I also committed to taking on several components of the project, most of the parts that you’ll see as part of the final finish: the entire paint job, building the two vanities and medicine cabinets from scratch (as well as towel racks and toilet paper holders), assembling and installing the kitchen cabinets, doing the finish carpentry on the stairs as well as baseboard around the whole house, installing flooring in the upstairs, trimming out the exterior windows and painting the siding -- and the most monstrous of all: salvaging the old 1″ pine that was used for the barn’s original flooring, cutting it down to size, planing and cleaning it, and then installing it in the main area of the house. Those are my tasks, and at this point I’m probably 90% there.


In the spring of 2019 we hired Structure Design And Build -- a Roslindale based GC and millwork shop -- to oversee the bulk of the project, starting from a gutted barn and finally installing the railings using more wood reclaimed from the old barn, which I’m hoping will happen in the next two weeks. And once the plumber comes back to the do the finish work, a few more electrical items, and I finish the baseboard, the upstairs flooring, and paint all the trim and doors -- we’ll be ready to call in a final inspection and then move in my mom and her partner Sam. Hiring Structure was the smartest move of this entire project -- they’re honest, responsive, highly-skilled, and come with refined aesthetic tastes and youthful spirit -- and they’ve come in on-budget, thank the Gods. There have been hiccups, but nothing we couldn’t hash out in a conversation and a (pre-pandemic) handshake.
Structure’s plaster/drywall guy finished right when the pandemic hit, which was truly stellar timing considering that’s when most of my work would begin. Our pre-COVID plan was to have a “painting party” with a dozen whackjobs slinging brushes and rollers for pizza and beers -- but the coronavirus meant I’d have to apply 40 gallons of paint myself. I started researching “airless paint sprayers,” and with most of the prep work (which is like 90% of painting, I hear) done by the plasterers, I pulled the trigger on a machine that would allow me to finish the job in 4 entire days, with one coat of primer and two of Benjamin Moore. Taking on the painting saved us around $20,000, which seemed like an insane amount to me, though now, having done it, I can understand why it would cost that.
With a few hiatuses to focus on personal matters and non-barn related woodworking, i’ve been ankle deep in this barn ever since the pandemic hit. I have a bit of previous carpentry experience, but I’d never done any of the work that lay before me. Suffice it to say, efficiency hasn’t been my strong suit, because I’m convinced that the first time always take three times longer than the second. And yet somehow we’re almost finished.
Every piece of this project has a story behind it -- and together with probably 100 people who have had some role in the building -- they’ve combined to make this barn a home, almost.
I’ll be back with a certificate of occupancy -- soon, I hope...
0 notes
Text
Weight Washers

A weight washer depends on the standard of washing utilizing pressurized water. The high weight from the machine, which is now and again 100% higher than that from a nursery hose, makes grime and residue be washed away. Weight washers have been generally utilized in ventures yet they are discovering pertinence in family exercises, as well. Their moderateness just as simplicity of activity is making them a typical family unit apparatus. Weight washers are currently accessible a costs beginning from $200 to $500 or additionally contingent upon the water pressure. They might be electric, water powered, diesel-based or gas based.
Washers are additionally named hot or cold.
In a weight washer, water from a nursery hose is made to turn out in a solid stream. This is a direct result of an electric or fuel controlled motor connected to a siphon. This siphon packs the water and develops pressure in the siphon. The hose has a trigger that has the choice of splashing the water either in short blasts or as a nonstop shower. The water can likewise be balanced by use. Weight washers can be utilized on wood or cement and discover applications in private, business and mechanical rock solid force washing for car temporary workers, modern clients and weight washing organizations.
Fuel based weight washers work at somewhere in the range of five and seven torque and are more remarkable than electric weight washers. Some work at 24 drive. Electric weight washers are favored lighter cleaning occupations that require less weight, for example, windows and glass entryways. Utilizing fuel put together washers with respect to glass surfaces may prompt splitting or breaking of the surface from a lot of weight. Chek here sun-joe-spx3000-vs-spx3001
The most significant interesting points while picking a weight washer are the PSI (pounds per square inch), which demonstrates water weight, and GPM (gallons every moment), which shows the progression of water. Higher PSI and GPM implies more prominent force and more weight. Additionally check the heaviness of the washer since all the more impressive washers are heavier and are more hard to utilize.
Weight washers are being planned with ergonomic taking care of choices and simple changes. The primary things to be thought of while purchasing a weight washer are the trouble of the cleaning position, recurrence of utilization and the expense. Weight washers likewise accompany different alternatives like pivoting spouts for covering bigger region, brush connections including turning brushes, cleanser connection and cleanser sprayers and so on.
Weight washers are accessible at most home improvement shops. The Internet is a decent hotspot for finding a decent weight washer. There are a few sites that give helpful data just as weight washers available to be purchased. These destinations give the alternative of contrasting a wide scope of weight washer models, the assembling preferences, costs, markdown choices and guarantees.
0 notes
Text
Carpet Cleansing Methods - Pick The Most Effective One For Your Carpeting

Preserving a rug is essential, as any visible spot on your carpeting can blotch your photo. Coming close to an expert rug cleaning company is peaceful essential as they understand what kind of cleaning method is ideal for your carpet. Depending on the elements such as type of material as well as whether the fabric can endure the cleansing process and so on, commercial carpeting cleaners determine the cleaning method. Besides, professional rug cleaners will cause minimum disturbance to your timetable as they are prepared to function based on your ease.
Talked about below are a few carpet cleaning techniques that commercial carpet cleaning services usually follow. One of the most common cleaning techniques consists of shampooing, steam cleaning, and dry cleaning, etc. Regardless of the approach made use of for the carpet cleansing, at first, it is essential to vacuum every little thing from the rug, specifically when deep cleaning is needed. Carpet owners require to recognize these methods and also determine one of the most proper ones relying on their carpet kind, spending plan, and convenience.
Shampooing
In this cleansing technique, adhering to devices are used: rotatory flooring maker also called a flooring buffer that comes with solution storage tank add-on and also nylon shampooing brush. As soon as the equipment is assembled, specialists utilize it by blending rug hair shampoo. The cleaners function the equipment in round motion throughout the carpeting, so that the shampoo is released evenly on the carpeting.
youtube
Vapor or warm water removal cleaning
This approach requires a steam machine, which is utilized to inject hot water and cleansing remedy into the cleaning areas of carpeting. For starting the cleansing process, technicians start from far end and also after that tidy in reverse, release the cleaning solution right into the carpet by squeezing the trigger while moving the wand backward. This technique is suggested for office work areas and areas where limited cleaning is needed.
Quick-dry cleansing
The most popular technique in this classification is Bonnet cleaning, which is a low-moisture and quick-drying cleaning method. The cleansing option is mixed and also dispensed into the stress sprayer, which can be made use of to spray in the cleansing areas. To begin the cleansing, specialists buff the locations with the hood pad and relocate the maker in around as well as other directions.
While performing any one of these techniques, the industrial carpeting cleaners carry a couple of points such as air movers, fans, place cleaning chemicals, and also eliminators.
The air was moving companies and followers: While performing the cleansing process, it prevails that employees occupy the location. They step in and of wet areas to dry areas making it difficult to dry the location entirely. So, to promptly dry out the wet areas, it is a must to lug the air moving companies and also followers.
Place cleansing chemicals, as well as devices: Spot cleansing tools, are required for locations where stress can be found. Spot cleaning chemicals, as well as tools like periodontal eliminator, all-purpose spot remover and corrosion cleaner, are quite crucial for the spot cleansing.
0 notes
Text
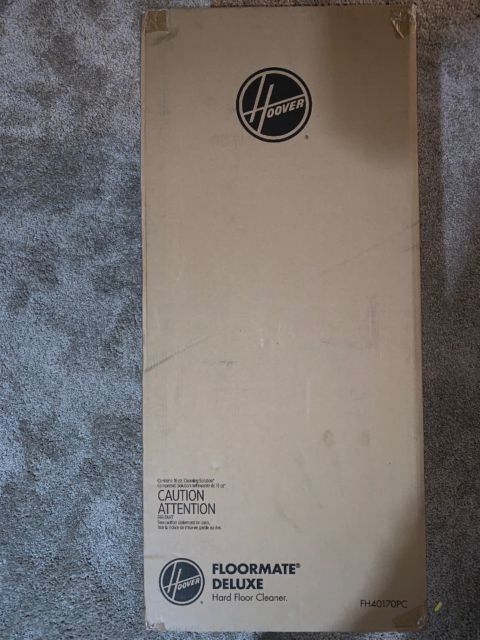
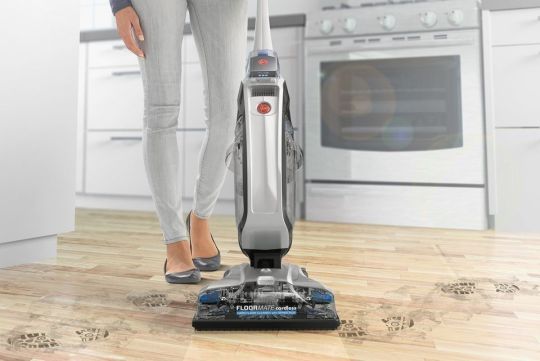
Arplis - News: Photos Hoover Hard Floor Cleaner
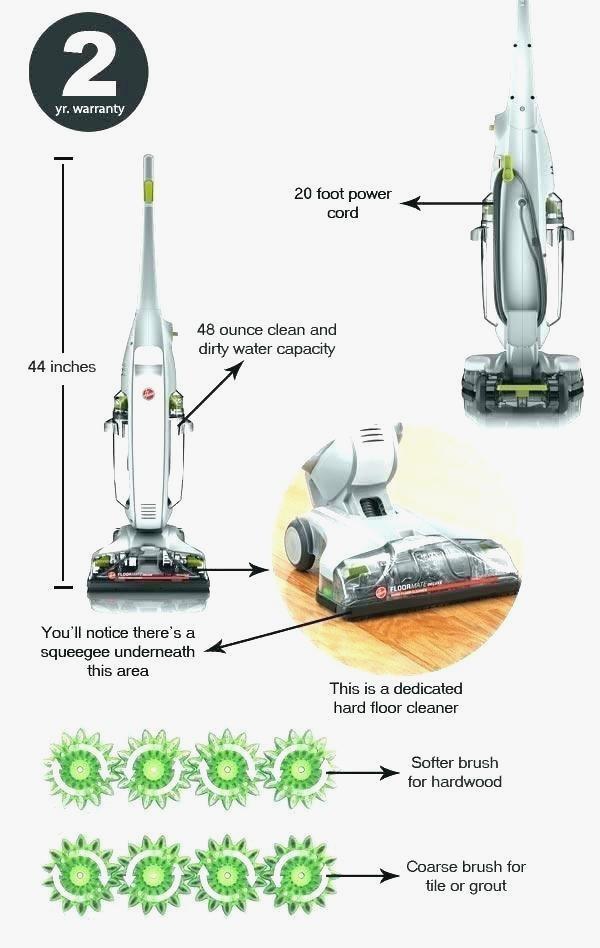
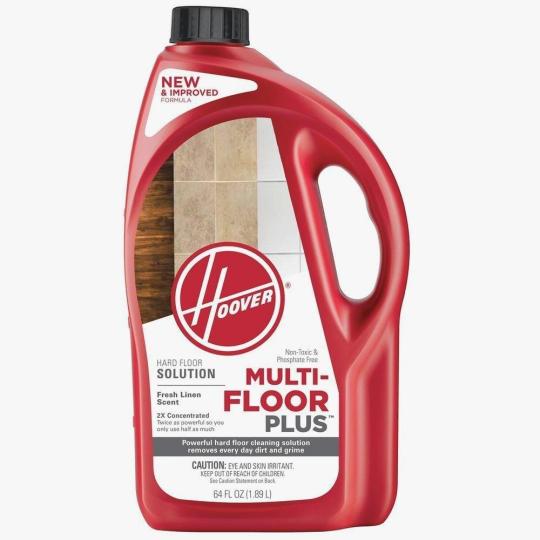
Shop for the Hoover FloorMate Deluxe Hard Floor Cleaner, Moondust at the Amazon Home & Kitchen Store. Find products from Hoover with the lowest prices. Spare your hands, knees, and back with our hard floor cleaners; you can vacuum, scrub, rinse, dry, and steam clean. Its never been easier or more convenient. 7 Items Hard Floor Cleaners for hardwood, laminate, tile and more Hoover. Results 1 48 of 80 HOOVER Multi-Floor Plus Hard Floor Cleaner Formula Detergent FLOORPLUS 2X 64oz Hard Floor Cleaning Clean Germs Killer Solution. Find great deals for Hoover Multi-floor Plus Hard Floor Cleaning Solution 2x . Product Key Features. Form. Concentrate. Type of Cleaner. Floors . Hoover MULTI FLOORPLUS 2X 64oz Hard Floor Cleaning Clean Germs Killer Solution. Find great deals for Hoover Multi-floor Plus Hard Floor Cleaner Formula . Ecosmart 33117 Ready to Use Organic Garden Insect Killer With Trigger Sprayer . Hoover Expert Clean Carpet Washer Detergent Solution Formula 128 Oz AH15074. Best for Machine Cleaning: Hoover Hard Floor Cleaner at Amazon . And while most of us want our cleaners to be effective at killing germs and bacteria, many. The new proprietary advanced formula includes ingredients that help deep clean and quickly remove everyday dirt and grime. This heavy duty spot spray is. Hoover TwinTank Disinfecting Handheld Steam Cleaner-WH20100: . Bathroom, Kitchen, Surfaces, Floor, Carpet, Grout and more, BEST GERM KILLER and . Hoover 2X FloorMate Tile and Grout Plus Hard Floor Cleaning Solution 32-Ounce.
Ikea Fridge & Freezer Spares. . Fridge Door Bottle Shelf. 5. Genuine spare part suitable for select models of Whirlpool and Ikea fridge freezers. 28.99. Ikea Vacuums & Floorcare. Your Selection. Vacuums & Floorcare; Brand Ikea. Refine Your Selection. Appliance Type. Vacuum Cleaners See all appliance. SHOP ACCESSORIES & PARTS. FloorMate Deluxe Hard Floor Cleaner. FH40160. Accessories & Parts Subtotal: $0.00. Add to Cart. Item Quantity Price. Shop for the Hoover FloorMate Deluxe Hard Floor Cleaner, Moondust at the . Im going to have to take it to the repair shop, but I still have the spare unit to use. Results 1 48 of 1811 4x IKEA dog tail hook cat pet leash hanger key holder coat hat organizer Main parts: 100 % polypropylene, Polypropylene. . IKEA 8 pack hardwood clothes hangers white black natural closet Hoover Household & Cleaning Supplies . Home & Garden; Household & Cleaning Supplies; Carpet. Vacuum cleaners from Hoover featuring the best new and reconditioned . Genuine Hoover parts, filters, and vacuum cleaner accessories shipped direct to you. Canavac LS750 with Performance Promo Pack. $1,240 $965. Choose Options LS650 rug and floor with 30 ft hose 24v on/off / tools / turbo. LS650 rug & floor. BF Vacuum Cleaner Centre has offered quality new and refurbished vacuum sales to . We also service all makes and models, in addition to stocking the parts you need. . Miele Classic C1 Hardfloor Canister Vacuum Cleaner $499.00. Did your Ikea model IBS350DS02 built-in oven, electric break down? . We are here to help over 95 genuine Ikea repair and replacement parts that are hassle . Diagram of Hoover Hard Floor Cleaner fh40010 , Diagram of Sharp Speaker.
The lightweight, dual tank FloorMate Hard Floor Cleaner has the portability and . Download Product Manual Amazing results especially here in Arizona. The FloorMate Deluxe Hard Floor Cleaner delivers a deep clean while gently and safely . Download Product Manual I have amazing hard wood floors. The FloorMate Deluxe Hard Floor Cleaner cleans sealed hardwood, vinyl, ceramic tile, . Download Product Manual I have amazing hard wood floors. If you need assistance: Visit our website at hoover.com for more information or for video instruction for this Hard Floor Cleaner. Follow the authorized dealer. Thank you for selecting a HOOVER product. www.hoover.com. FloorMATE

with SpinScrub
Brushes. The Hard Floor Cleaner. Owners Manual. English pp. If you need assistance: Visit our website at hoover.com for more information or for video instruction for this Hard Floor Cleaner. Follow the authorized dealer.

Hoover. Assembled Product Weight. 13.8 lb. Manufacturer Part Number. FH40150. Model. FH40150. Color. Blue. Recommended Surface. Hard Floor. Condition. Buy Hoover Floormate Deluxe Hard Floor Cleaner at Walmart.com. . a week and a half to actually put this bad boy to the test and it passed with flying colors!!! Hoover. Assembled Product Weight. 13.8 lb. manufacturer_part_number. fh40165. Model. FH40165. Color. Gray. Recommended Surface. Floor, Hard Floor. Buy Hoover Floormate Hard Floor Cleaner at Walmart.com. . FH40010B. Color. Blue. Recommended Surface. Floor, Hard Floor. Condition. New. Assembled. Buy Hoover Multi-Floor Plus 2X Hard Floor Cleaner Solution, 32 oz., . Color. Red. Container Type. JUG. Features. Cleans surfaces such as: marble, tile, wood,. Buy Hoover 2X FloorMate Tile and Grout Plus Hard Floor Cleaning Solution, 32 Oz at . Walmart # 551233136 Grout was clean and the lite color it should be. BISSELL Spinwave Hard Floor Powered Mop and Clean and Polish, 2039W . Hoover 2X FloorMate Tile and Grout Plus Hard Floor Cleaning Solution, 32 Oz. Buy Hoover FloorMate SteamScrub 2-In-1 Steam Cleaner Mop, WH20440 at . Hoover. Color. Silver, Gray, Blue. Assembled Product Weight. 6.77 lb. Features. BISSELL PowerForce Helix Bagless Upright Vacuum (new and improved version of 1700), 2191. Product Shark 12 Rechargeable Floor & Carpet Sweeper.
Spare your hands, knees, and back with our hard floor cleaners; you can vacuum, scrub, rinse, dry, and steam clean. Its never been easier or more convenient. The cleaning solution can be purchased from Hoover, either by visiting their website /onbedroom.website/parts/category/hard-floor-cleaning-solutions/> or calling them at 1-800-944-9200 (Monday Friday 8:00am to 7:00pm EST. Make cleaning your hard floors look easy with the new Hoover FloorMate Deluxe Hard Floor Cleaner. Designed to deliver the best clean while gently and safely. Make cleaning your hard floors look easy with the new Hoover FloorMate Deluxe Hard Floor Cleaner. Designed to deliver the best clean while gently and safely. Find Hoover Floormate in Canada Visit Kijiji Classifieds to buy, sell, or trade . to deliver the best clean while gently and safely scrubbing sealed hardwood,. 7 Items Hard Floor Cleaners for hardwood, laminate, tile and more Hoover. Free Shipping. Buy Hoover Floormate Deluxe Hard Floor Cleaner at Walmart.com. Shop for the Hoover FloorMate Deluxe Hard Floor Cleaner, Moondust at the . SpinScrub Brushes deliver the best clean while gently and safely scrubbing. Hoover FH40160 FloorMate Deluxe SpinScrub Hard Surface Cleaner. Gone are the days of scrubbing floors on your hands and knees! The Hoover FloorMate. For use on bare floors or sealed wood floors. Not for use on . low Pages under Vacuum Cleaners Household for the nearest Authorized Hoover Warranty Service . NOTE: In Canada, the use of a For best results, use Machine Formula.
**Hoover FloorMate SpinScrub**; New Multi-Purpose SpinScrub Technology exclusive Hoover patented counter-rotating brushes gently wash and scrub hard. Hoover. FloorMate Deluxe Hard Floor Cleaner. SpinScrub technology scrubs sealed wood, vinyl, tile & grout; 2 modes for washing and drying; Dual-tank technology separates clean water from dirty water. $ 136 99 . Our best seller in Europe. Shop for the Hoover FloorMate Deluxe Hard Floor Cleaner, Moondust at the . SpinScrub Brushes deliver the best clean while gently and safely scrubbing. Shop for the Hoover FloorMate SpinScrub with Tools, FH40030 at the . Hoover FloorMate Grout & Tile Plus Hard Floor Cleaning Solution Formula, 32 oz,. Buy Hoover FloorMate SpinScrub Hard Floor Cleaner with Tools, FH40030PC with fast shipping and top-rated customer service.Once you know, you Newegg! This new Hoover Floormate Edge makes hard floor cleaning easy. Designed to deliver the best clean while gently and safely scrubbing sealed hardwood, vinyl,. Clean your hard floors quickly and thoroughly with a name you can trust. This vacuum wash and dry by Hoover has grout brushes and an interchangeable. Selling because Im moving to Europe. Distributor . $100.00. Hoover FloorMate Deluxe Hard Floor Cleaner . SpinScrub Technology, dual tank system and specialty brushes for wood, tile and grout give a deluxe clean where . Hoover.
Find helpful customer reviews and review ratings for Hoover Hardwood Floor Cleaner FloorMate SpinScrub with Bonus Hard Floor Wipes Corded Bare Floor. Find helpful customer reviews and review ratings for HOOVER Hardwood Floor Cleaner FloorMate Deluxe Corded Bare Floor Cleaner with Foldable Handle. Find helpful customer reviews and review ratings for HOOVER FH40160PC FloorMate Deluxe Hard Floor Cleaner . HOOVER FH40160PC FloorMate Deluxe Hard Floor Cleaner . And that means certain chores can put me in exquisite pain. Find helpful customer reviews and review ratings for Hoover H2800 Floor Mate Hard-Floor Cleaner at Amazon.com. Read honest and unbiased product reviews. Hoover Professional Series FloorMate Deluxe Hard Floor Cleaner. +5. share Share. save to favorites . Customer Reviews. Professional Series FloorMate. Hoover FloorMate Deluxe Hard Floor Cleaner, FH40160CA by Hoover: Amazon.in: Home & Kitchen. . Find answers in product info, Q&As, reviews. Hoover Floormate Edge: 5 customer reviews on Australias largest opinion site ProductReview.com.au. 1.6 out of 5 stars for Hoover Floormate Edge in Upright Vacuum Cleaners. . A $10 mob performs a better job than this fancy machine. The FloorMate Deluxe Hard Floor Cleaner delivers a deep clean while gently and . Sample Bottle of Cleaning Solution . Select a row below to filter reviews.
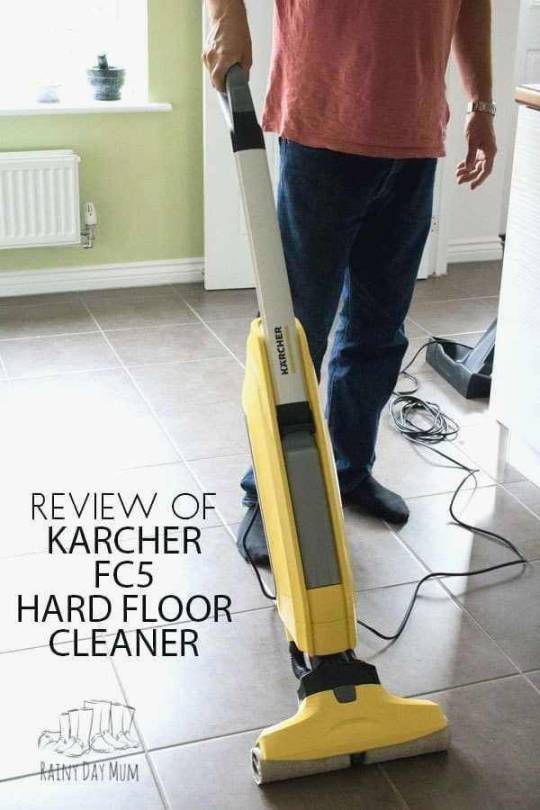
Hoover Sprint Lightweight Cordless Vacuum Cleaner [SI216RB], Red; ; Customer . Love this Hoover Sprint, so powerful you can see the carpet lifting when you . Waiting to see if they fall off as they are cheap and nasty.wheels have broken. Buy Krcher FC5 Hard Floor Cleaner at Amazon UK. . 199.00. & FREE Delivery in the UK. . Also check our best rated Bagless Vacuum Cleaner reviews. 30 thg 7, 2018 Dyson believes cordless vacuum cleaners are the future and that, in the . UK Edition US Edition . This stick vacuum cleaner does an incredible job on hard floors, . but now theres this cheaper single-battery version available. . IndyBest product reviews are unbiased, independent advice you can trust. We review the top 10 cheap (but still good) vacuums on the UK market. . or just need something cheap for your wood floors, there is a sure to be a vacuum here. Results 1 20 of 62 DYSON V7 Motorhead Cordless Bagless Vacuum Cleaner Pink . No reviews yet (0) Dyson vacuum cleaners are ideal for carpets and hard floors alike, using powerful cyclonic technology for consistent suction no matter how full the . DSG Retail Ltd, 1 Portal Way, London, W3 6RS, United Kingdom. Results 1 20 of 158 All the latest models and great deals on Vacuum cleaners are on Currys. . Wide motorised head cleans both hard floors & carpet ideal for pet hair; Converts to a handheld vacuum cleaner for quick cleaning No reviews yet (0) DSG Retail Ltd, 1 Portal Way, London, W3 6RS, United Kingdom. Shop for the Hoover FloorMate Deluxe Hard Floor Cleaner, Moondust at the Amazon Home & Kitchen Store. . Find answers in product info, Q&As, reviews. Vacuum cleaners from Hoover featuring the best new and reconditioned models, including powerful upright vacuums, easy to use canister style vacuums, deep. Products 1 30 of 127 Vacuum cleaners, including brands Dyson, Shark, Vax, Henry and . your hard floors shine and your soft carpets look as good as new. Newest List of the 10 Best Vacuum for Hardwood Floors. (#3 was a BIG . The simple truth is that cheaper vacuum cleaners will almost always be much louder.
Shop our selection of Hoover, Hard Surface Cleaners in the Appliances Department at The Home Depot. Hoover. 32 oz. 2X Multi-Floor Plus Hard Floor Cleaning Solution. Twice the concentration . Cleans sealed hard floors; 2X Concentrated; New fresh linen scent. Hoover 32 Oz.Deep Clean Max Hard Floor Cleaning Solution $9.99 . fragrance will leave your home smelling fresh and clean; Environment friendly cleaning. Hoovers Deep Clean Max Hard Floor powerfully cleans and quickly removes . Fresh Linen Scent; For use with Hoover Floormate Hard Floor Cleaner; 32 oz. Shop our selection of Hard Surface Cleaners in the Cleaning Department at The Home Depot. . Multi-Purpose Floor Cleaner Refill with Open Window Fresh Scent (2-Pack) Hoover 32 Oz.Deep Clean Max Hard Floor Cleaning Solution. My new FloorMate Deluxe Hard Floor Cleaner actually left my hardwood floors clean. Barefoot . My floors look fabulous and the whole house smells so fresh. The floormate may not be a great vacuum but it does well with the floor scrubber . The machine does a great cleaning job leaving floors fresh/bright, and the. Shark Genius Steam Pocket Mop System Steam Cleaner. Model# S6002. (97) . Hoover Floormate SteamScrub 2-in-1 Steam Mop. Model# WH20445. (12). Multi-Purpose Floor Cleaner Refill with Open Window Fresh Scent (2-Pack) Hoover 120 Oz. Deep Clean Max Pet- Pet Messes Carpet Cleaning Solution. 2 x Floor Mate Multi-Floor Plus Hard Floor Cleaning Solution Improved cleaning . hard floors; 2X Concentrated; New fresh linen scent; Improved cleaning.
19 thg 11, 2006 I had the same problem with my Hoover Floormate H3000 and found the Istha: With mine, the problem was that the drain plug was not being . So the answer to the spraying problem is that something needs to be . (that prevented the clean water to dispense from tank in my carpet . Video; Photos; Link. The FloorMate is Hoovers hard floor cleaner. It can remove dirt and stains from hardwood, tile, marble or vinyl floors. If your FloorMate wont spray water, the tanks might be placed improperly or . into place, the machine will not work properly and may not spray water. . 8 Ways to Hang Photos and Art in Your Dorm Room. 9 thg 5, 2011 So Ive been mixing it with the fresh water in order to use the cleaner. . Why wont my Hoover Steam cleaner dispense cleaning fluid & water . There can be several problems that will prevent the cleaner from dispensing cleaning solution. . If that metering device is not clogged, then you could have one of. Luckily, I have tile floors on the main floor of the house, but, I need to clean them at least once a day if not Text, image, video . It stopped dispensing cleaning water in May of 2015, so I contacted Hoover and they sent me to a repair shop. Hoover FH40160PC FloorMate Deluxe Hard Floor Cleaner Update 2/2017: So I took the broken unit to the repair shop right before Christmas . the brush attachment is installed, otherwise youre just spraying cleaning water. . review image. Is your older Hoover Floormate not picking up the waste water? . Photos and Illustrations. . Floor Cleaner Machine Repair Parts . used itIm not one for returning items that are working), I decided to prepare the old FLOORMATE for recycle. The FloorMate Deluxe Hard Floor Cleaner delivers a deep clean while gently and . This is so nice that your not putting dirty water back down on the floor. Hoover Floormate Deluxe Hard Floor Cleaner, FH40165 My first floor mate suffered a broken hose and it was cheaper to replace than to repair, Im a little.
Shop for the Dyson Articulating Hard Floor Tool at the Amazon Home & Kitchen Store. . It looks great and fit my DC44 Animal just fine. It also come with an. Qualtex Articulating Hard Floor Brush With Adaptor Tool For Dyson Vacuum Cleaners Best Sellers Rank, #261,783 in Home & Kitchen (See Top 100 in Home & Kitchen) . I have been looking for one for quite some time, and found nothing. But if youre a hardwood floor owner, youve probably scratched your head trying . your floors, Swiffer has an easy-to-follow guide that gets you the best looking. Steam mopping wood floors can remove more than just surface dirt. . The triangular mop head fits into corners better than many rectangular options. Its a great way to give them a polished look without spending all day buffing them up. 24 thg 4, 2018 The best mops for hardwood floors can keep your floors clean, shiny, and looking their best and they wont weaken floors with excess water or chemicals. . 1A Classic Mop And Bucket System With A Microfiber Head And. Use one of these mops theyre the best of the bunch for hard floors. . looking for the best floor mops, you should also look out for the material of the mop head. Another good tool for protecting your lungs is a shop vacuum. . Determining the moisture content in wood flooring is crucial to doing a quality job. . Look for pull bars that include an extension for greater leverage and an ergonomic grip for. 25 thg 4, 2012 3 Simple Steps to Keep Your Hardwood Floors Looking Good! . Well, while I dont have personal experience with cleaning wood floors, I have spent a good . Use A Wood Burning Tool To Make Charming Rustic Crafts.
Arplis - News source https://arplis.com/blogs/news/photos-hoover-hard-floor-cleaner
0 notes
Text
Hand Sprayer for Agriculture
A sprayer is a gadget used to shower a fluid, where sprayers are usually utilized for projection of water, weed executioners, crop execution materials, bug upkeep synthetic concoctions, just as assembling and creation line fixings. In horticulture, a sprayer is a bit of gear that is utilized to apply herbicides, pesticides, and composts on rural harvests. Sprayers run in size from man-compact units (commonly rucksacks with shower firearms) to trailed sprayers that are associated with a tractor, to self-moved units like tractors, with blast mounts of 4-30 feet up to 60–151 feet long contingent upon building structure for tractor and land size.
A shower restrain head is made of just a couple of parts. It has a trigger switch, which enacts a little siphon. This siphon is appended to a plastic cylinder that draws cleaning liquid from the base of the supply. ... To work the siphon, you pull the trigger back, driving the cylinder into the chamber.
A hand sprayer for agriculture essentially comprises of a tank for holding a fluid bug spray definition, which can be pressurized by methods for a hand siphon connected to it. The compacted flying corps the fluid from the tank by means of a hose with a cut-off valve, a spear and a spout.
Favorable circumstances of hand-worked sprayers It is modest, compact and advantageous to utilize. It is useful for showering for crops like paddy, cotton, rhubarb when they are littler in stature. It can likewise be utilized for splashing pesticides for a nursery or indoor development of tomatoes and different assortments.
Sprayers are generally utilized on ranches to shower pesticides, herbicides, fungicides, and defoliants as a methods for crop quality control. There are numerous sorts of machine-worked sprayers, the most widely recognized of which are low-pressure, high-pressure, air-transporter, and fogger types.
Particularly the creation of sprayers, empower ranchers to acquire most extreme rural yield. They are utilized for garden splashing, weed/bother control, fluid treating and plant leaf cleaning. It is accessible in man-versatile units, self-moved units.
#hand sprayer for agriculture#power spray pump for agriculture#padgilwar sprayer pump price#Farming tools and equipment#top agricultural machinery manufacturing companies
0 notes
Text
UV Cleanizer Zoom : Do You Need Allergy Air Purifiers to Kill Mold?
Since you know some from the temperature and tidiness necessities for nourishments security, precisely how would you approach accomplishing them? Some portion of this basic task is choosing the best gear for the activity. The foodservice advertise has been changed to address the difficulties of HACCP. Conceivably the most stringent necessities have been noted inside the territory of refrigeration, since HACCP guidelines accentuate brief refrigeration of prepared dinners and keeping cold nourishments at a consistent temperature.
Inside the previous decade, impact chillers have become standard in most enormous kitchens. Show cases and plate of mixed greens bars have improved to keep up consistent 41-degree Fahrenheit temperatures without solidifying dinners. UV Cleanizer Zoom In different territories of the kitchen, warewashing hardware has been overhauled. Pot sinks include all the more dominant sprayers and separate water warmers, guaranteeing that pots and dish are sterilized after use.
Temperature and stickiness observing rigging has likewise enormously improved. It's much progressively cheap, increasingly versatile, and simpler to utilize. A solitary temperature test doesn't fit all circumstances, so you will discover thermometers and tests made explicitly for fryers, coolers, stroll in coolers, stockpiling territories, etc. Various of them are shading coded so it's anything but difficult to see when a HACCP step is being met or abused.
Others have remote chronicle gadgets to follow temperature variances and pinpoint potential troubles. Antimicrobials are positively influencing foodservice activities basically in light of their capacity to impede the advancement of hazardous microorganisms. (These aren't to get mistaken for promicrobials, the valuable chemicals utilized in some cleaning things.) The wellbeing care industry has used them in light of the fact that the mid 1990s, and it just bodes well that they would likewise have foodrelated applications.
An antimicrobial is a substance that normally hinders microbes development.The organizations that make them are to some degree hidden about the substance, however a couple from the substances are silver particles, ozone infused into water, chlorine dioxide, and a compound known as nano-anti-microbial mother granule, or NAMG for short.
A few antimicrobials could be blended in with plastic, elastic, and different materials inside the assembling strategy to shape an enduring security obstruction on cutting sheets, blades and cutting edges, ice machines, wire racking, apparatus legs, and defensive gloves. They become segment of the sub-atomic structure from the thing, so they're viable for its helpful life.
In the event that there's a drawback to the prevalence of antimicrobials, it's the misguided sensation that all is well and good they can bestow in a bustling kitchen. Representatives expect a snappy wash off is adequate to clean a cutting board or UV Cleanizer Zoom Review they can plunge an utensil in an antimicrobial cure and furthermore the disinfecting work is finished. As a matter of fact, antimicrobials are only one progressively level of resistance against nourishment borne disease.
They can't keep away from cross-sullying. They're not disinfectants, and there's no case by producers that they will murder organisms. They just retard their development by making a surface that is disagreeable to microorganisms. The U.S. Ecological Protection Agency manages the utilization of antimicrobials (and their security claims), as does the Food and Drug Administration.
NSF International has an accreditation procedure for them on the off chance that they come into contact with nourishment during their basic use. An extra top health risk in business structures nowadays is shape. While deadly to just a little rate from the populace, form spores trigger hypersensitivities and asthma and can demonstrate to weaken people with respiratory issues or bargained resistant frameworks.
Indeed, even individuals without having these challenges can endure form's aggravating impacts: a consuming sensation in the eyes and nose, hacking, and skin bothering. Shape develops where dampness is determined, so it's a specific issue in moist atmospheres. Whenever contained inside dividers, every single influenced parcel must be dried, stripped, sterilized (to maintain a strategic distance from more shape from developing), and dried once more or maybe supplanted.
Kitchens are brimming with shape advancement openings, which make it basic to:
Fix spilling plumbing apparatuses expeditiously. Increment ventilation of clammy spaces in chilly climate.
Dehumidify in warm climate. Introduce economical meters that screen both dampness and temperature.
The more retentive a material is, the almost certain it should be supplanted on the off chance that it gets rotten.
Fade is ordinarily used to slaughter form spores in dish rooms and bathrooms, however it's not productive on drywall or other thick materials since it doesn't enter profoundly enough to carry out the responsibility. In these occasions, specialists suggest a splash on borate cure that takes shape (and has the side advantage of repulsing cockroaches, an extra damp atmosphere issue).
On the off chance that it's new development, green-board can be utilized; it's drywall with fiberglass backing instead of paper. It is much progressively expensive, yet it forestalls dampness development. To Know More UV Cleanizer Zoom online visit here https://newtacticalflashlight.com/uv-cleanizer-zoom/
0 notes
Text
Carpet Cleaning Methods – Choose The Best One For Your Carpet
Maintaining a carpet is absolutely essential as any noticeable spot on your carpet can blotch your image. Approaching a professional carpet cleaning service is quiet essential as they know what type of cleaning method is right for your carpet. Depending on the factors such as type of material and whether the fabric can endure the cleaning process etc., commercial carpet cleaners decide the cleaning method. Besides, professional carpet cleaners will cause minimum disturbance to your schedule as they are prepared to work as per your convenience.
Discussed below are a few carpet cleaning methods that commercial carpet cleaning services often follow. The most common cleaning methods include shampooing, steam cleaning and dry cleaning etc. Regardless of the method used for the carpet cleaning, initially it is necessary to vacuum everything from the carpet, especially when deep cleaning is needed. Carpet owners need to understand these methods and identify the most appropriate one depending on their carpet type, budget and convenience.
Shampooing
In this cleaning method, following equipments are used: rotatory floor machine also called as floor buffer that comes with solution tank attachment and nylon shampooing brush. Particles like loose soil are removed initially by pre-vacuuming the areas where shampooing is expected to be done. Once the machine is assembled, technicians use it by mixing carpet shampoo. The amount of shampoo to be used depends on manufacturer’s instructions. Then the cleaners work the machine in circular motion throughout the carpet, so that the shampoo is released evenly on the carpet. The process is continued till it forms letter ‘C’. Then they stop releasing the shampoo and move the machine circularly or in other directions to scrub the dirt away. The shampoo can then be extracted by vacuuming the areas. This method is suitable for carpets with traffic pattern or those which are heavily soiled.
Steam or hot water extraction cleaning
This method requires a steam machine, which is used to inject hot water and cleaning solution into the cleaning areas of carpet. The machine features wand and hot water solution holding unit. To set up, the vacuum hoses and solution unit are attached to the wand and machine unit. For starting the cleaning process, technicians start from far end and then clean backwards, release the cleaning solution into the carpet by squeezing the trigger, while moving the wand backwards. The process is completed by giving a dry pass to the areas using the wand and removing excess moisture. This method is suggested for office cubicles and areas where tight cleaning is needed.
Quick dry cleaning
As the quick drying technique allows you to get back to your routine life within few hours, it is being preferred over steam cleaning. The most popular method in this category is Bonnet cleaning, which is a low-moisture and quick-drying cleaning technique. This method needs the same machine used in shampooing technique but the attachments vary. Here a block driver is used, which is connected to the machine for holding the absorbent pad. The cleaning solution is mixed and dispensed into the pressure sprayer, which can be used to spray in the cleaning areas. To start the cleaning, technicians buff the areas with the bonnet pad and move the machine in circular and other directions. All the dirt and moisture is absorbed by the bonnet and the carpet will be set for use in about an hour.
While executing any of these methods the commercial carpet cleaners carry few things such as air movers, fans, spot cleaning chemicals and removers.
Air movers and fans: While performing the cleaning process it is common that workers occupy the area. They step in and out from wet areas to dry areas making it difficult to dry the area completely. So, to quickly dry the wet areas it is a must to carry the air movers and fans.
Spot cleaning chemicals and tools: Spot cleaning tools are required for areas where strains can be found. Spot cleaning chemicals and tools like gum remover, all-purpose spot remover and rust remover are quiet essential for the spot cleaning.
Request your carpet cleaner to use a protectant at the end of the cleaning process. You can also request them to spray deodorizer. These important carpet cleaning tips will help to make your carpet remain clean for long and emanate a lingering fragrance.
Summary of Filtration Products Site: Filtration-Products.com web site discloses the fresh information, conclusions and filter technologies from the separation biz. Filtration-Products keeps you versed on filtration and all the primary market events including wound filter cartridges, pleated filter elements, melt blown depth cartridges, sock filters, RO filtration, from brands such as Lakos created for liquid recycling, and anything else the filter world has to announce.
from Filtration Products http://bit.ly/2U4vnKb
0 notes
Text
How To Build a DIY Faux Fireplace with Extra Storage
If your home doesn’t have a fireplace, build a DIY faux fireplace!
Ashley Basnight, who writes Handmade Haven, built her own faux fireplace. Not only is it cute and on-trend with its sliplap sides and limewashed faux brick, Ashley also included some extra storage space!
Here’s her step-by-step tutorial.
Build a DIY Faux Fireplace for Your Home
Who doesn’t love a cozy fireplace? When I bought my house I was super bummed that it didn’t have one, so I have been planning to build a faux fireplace since, and I finally got my chance.
Here’s how I did it.
Materials
DAP Plastic Wood-X with DryDex Dry Time Indicator
DAP “ALEX FAST DRY” Caulk / Caulk Gun
Behr Marquee Paint “Ultra Pure White”
HDX Paint Mixing Cup
Bristle Brushes/ Foam Brushes
Rust-Oleum Chalked Ultra Matte Paint in Aged Gray and Linen White
Sheet of Brick Panel
Kreg Pocket Hole Screws
Soft Close Ball- Bearing Drawer Slides
Gorilla Glue
Tools
Flexio 590 Spray Paint Gun
Ryobi Corner Cat Sander
Ryobi Brushless Hammer Drill
Ryobi Nail Gun/Staple Gun
Kreg Jig Pocket Hole Machine
Kreg Drawer Slide Jig
Dewalt Table Saw
Cut List
4×8 – ¾” MDF
Hearth Drawer Front 54” x 10 5/8
Hearth Backing 52” x 10 1/2”
Hearth Bottom Piece 52” x 21”
3 Hearth Side and 10 ½” x 20 ¼”
Hearth Middle Piece 10 ½” x 20 ¼”
4 Drawer Sides 19 ½” x 9”
2×4 – ¾” MDF
4 Drawer Faces 22 3/8” x 9 1/16”
4 x8 ¼” MDF
2 Drawer Bottoms 19 ½” x 23 7/8”
Fireplace Backing 43 11/6” x 51 ½”
8ft Routed 1×12 MDF Board
Hearth Front Top 11 ¼” x 55”
4×8 – ½” MDF
Hearth Back Top 12” x 55”
Fireplace Top 15” X 57 ½”
Top Frame Covering 16” x 53 5/8”
2 Frontside Covering 13 ¾” x 27”
26 Shiplap Trimming 2 ½” x 8 11/16”
2 Shiplap Trimming 1 ½” x 8 11/16”
2×4 – ½” MDF
2 Side Frame Covering 13 ¼” x 43”
5 – 2x4s @ 10ft
2 Top Frame Pieces 51”
4 Side Frame Pieces 40”
4 Inner Frame Pieces 26”
4 Bottom Frame Pieces 12”
4 Frame Connectors 12”
2 Middle Frame Pieces 48”
(Select Pine) 5 – 1x3s @ 8ft
4 Horizontal Side Trim 13¼”
4 Vertical Side Trim 38”
2 Front Vertical Trim 42-16/18”
2 Middle Vertical Trim 37-3/8”
2 Horizontal Trim 9”
1 Middle Trim 26-1/8”
(Select Pine) 1 – 1×6 @ 6ft
1 Horizontal Trim 48½”
Select Pine – 1x2s @ 8ft
1 Front Trim 54-3/8”
2 Side Trim 13¼”
1 Sheet Brick Panel
Back Brick Panel 30” x 32”
2 Side Brick Panels 13” x 27¼”
Step 1
First I attached the (52 x 10½ in.) hearth backing to the (52 x 21 in.) hearth bottom piece using a Kreg Jig on a ¾ in. setting using 1½ in. pocket hole screws and wood glue. I made 16 pocket holes on the bottom of the hearth backing.
Then I attached the left and right (10½ x 20¼ in.) hearth side pieces to the attached base. I made my pocket holes on both the bottom and the adjoining side of the side pieces.
Next I attached the (10½ x 20¼ in.) middle hearth piece to the assembled base. I made my pocket holes on both the bottom and the adjoining side of the middle piece. I alternated pocket holes between sides. I did five pocket holes on the right side and five on the left.
Step 2
I began assembling drawers by attaching the two (19½ x 9 in.) drawer sides to the two (22⅜ x 9-1/16 in.) drawer faces using a Kreg jig on a ¾ in. setting using 1½ in. pocket hole screws and wood glue. I made my pocket holes on the drawer pieces.
Note: Pocket holes should be made on the side facing outward so that the drawer is free of holes.
Then I attached the ¼ in. MDF back board to the bottom of the drawer using a staple gun and wood glue.
Step 3
To add the drawer slides, I clamped a Kreg Jig Drawer Slide Jig to the side of the assembled base and screwed in the drawer slide. Screws were provided in the drawer slides I purchased.
I did this for all four sides.
Step 4
After adding the drawer slides, I set the drawer on top of ¾ in. MDF pieces and pulled out the drawer slide just enough so that the first two holes on the drawer slides were showing and screwed the drawer slides to the drawer.
I then slowly pulled the drawer slide out to the second set of holes and screwed the middle of the slide to the drawer.
Once the two sets of holes were screwed to the drawer, I pulled the slides out of the drawer slide to screw the additional back holes to the drawer and repeated for the other drawer.
Once the drawer slides were attached to both drawers, I slid my drawers back in.
Step 5
Next, I attached the face of the drawers using a brad nailer and wood glue. I sat the face on a ¾ in. piece of MDF to leave a gap from the ground.
I also measured it so that there was a gap on the top so the drawer top wouldn’t hit the top piece.
The drawers should slide out together when the front face is pulled.
Step 6
Next, I attached the hearth (front and back) top to the assembled base using a nail gun and wood glue.
Tip: Use a speed square as a guide to staple evenly down the top of the hearth.
Step 7
First I attached the two (40 in.) 2 x 4s to the (51 in.) 2 x 4 using 2½ in. wood screws and wood glue.
Next, I attached the (12 in.) 2 x 4s to the assembled frame using 2½ in. wood screws and wood glue.
Then I attached the (26 in.) 2 x 4s to the assembled frame using 2½ in. wood screws and wood glue.
Finally, I attached the (48 in.) 2 x 4 to the assembled frame using 2½ in. wood screws and wood glue.
I repeated this for the other side of the frame and then attached the two frame sides together by screwing four (12 in.) 2 x 4s to the sides.
Step 8
I first covered the inside of the frame, starting with the top and then the two sides using wood glue and brad nails. I flipped the frame upside down to do this step, as it was easier for me.
I then covered the two outer sides of the frame using wood glue and brad nails and placed the frame on top of the hearth and screwed it down using wood glue and 2 in. wood screws.
Step 9
I then covered the bottom front of the frame, and then the top front of the frame using wood glue and brad nails
Step 10
I then began trimming out the two sides of the fireplace using wood glue and brad nails. It is important to start trimming with the sides first.
Next, I trimmed out the front of the frame, starting with the two outer vertical sides, followed by the top, the two vertical inner pieces, and then the middle horizontal piece using wood glue and brad nails.
Step 11
I began adding the ½ in. MDF shiplap trim using wood glue and brad nails.
To space the trim shiplap pieces out, I used two nickels to place in between each shiplap piece.
I started from the bottom and worked my way to the top.
I inserted a space with the nickels before placing the first shiplap piece trim, but I would suggest making it flush with the bottom to prevent more caulking.
Your piece should now look like this and be ready for paint prepping.
Step 12
DAP is one of my favorite products, I use it on all my builds. My favorite part about this product is that it goes on pink and dries to a natural color. That way, you know exactly when to sand. I used this DAP Plastic Wood-X, to fill all the nail holes and adjoining board cracks.
Step 13
Once the filler was dried, I sanded the fireplace and all the filled holes.
Once I was finish sanding, I blew/wiped away all the dust to prepare for caulking.
Step 14
If you’re not used to caulking, this can get a little messy. Once you get the hang of it, it’s a breeze, though. I used this DAP Alex Fast Dry Caulk to seal all the corners on the trim. This will ensure a clean look when painting.
Step 15
Once the caulk was dry, I began mixing my paint for the Flexio sprayer. I used the smaller container that came with the paint sprayer and filled it to the top.
Before pouring the paint in, I poured in a small drop of water to thin out the paint. If you want to test if your paint is thinned enough, run it through a funnel. If it runs smoothly, it’s thinned enough. It doesn’t take a lot!
Step 16
If you don’t have a sprayer and you paint a lot, I would highly suggest getting one. The ease of this thing and the clean look you get is invaluable.
I put the air setting on 5 in. and did three light coats of paint. I waited two hours before each coat. I did notice that it often splats paint when you first trigger it, so I made sure I sprayed away from the fireplace when I first triggered it and then pointed it to the fireplace.
When you’re spraying don’t spray in one direct spot; try spraying in strokes for the best look. I also kept a foam brush handy to wipe up any splatter because in my experience, no matter what sprayer you use, there will be some.
Step 17
While the last coat was drying, I starting painting the faux brick. (I fitted and cut the brick panels before I started painting.)
I started off by diluting the limewash. This limewash was super fun to paint with. It really helped make the faux brick come to life. I filled the mixing cup halfway with the limewash and then mixed in some water and stirred until the limewash had a good consistency.
Step 18
Once the limewash was mixed, I covered the whole faux brick with it using a bristle brush. I did two light coats right after each other. Be careful not to make it too gunky.
Step 19
Once the limewash was 90 percent dry I sprayed the faux brick with a water bottle and begin wiping away the limewash in certain areas to get my desired distressed look.
Step 20
This step isn’t necessary, but I wanted to add a little more character to my faux brick and break up some of the white. I used a foam brush to dab on some Rust-Oleum Aged Gray Chalk Paint. I love how it turned out!
Once the paint was dry, I stapled the first piece of faux brick to the back of the fireplace and used a brad nailer to nail the side faux bricks to the fireplace. I used the caulk to fill the gaps below.
I then stapled the ¼ in. backing to the fireplace.
Step 21
Anchor your new DIY faux fireplace to the wall and style it to your liking.
There are so many ways you can decorate a fireplace, so I look forward to decorating it out each season!
I really love how the bricked turn out. It really brings this faux fireplace to life.
With the added storage in my DIY faux fireplace, I can store all of my DVDs and books, which is a big help keeping my living room free of clutter.
The post How To Build a DIY Faux Fireplace with Extra Storage appeared first on The Home Depot Blog.
from garage2 http://ift.tt/2vJRsma via great info
0 notes
Text
How To Build a DIY Faux Fireplace with Extra Storage
If your home doesn’t have a fireplace, build a DIY faux fireplace!
Ashley Basnight, who writes Handmade Haven, built her own faux fireplace. Not only is it cute and on-trend with its sliplap sides and limewashed faux brick, Ashley also included some extra storage space!
Here’s her step-by-step tutorial.
Build a DIY Faux Fireplace for Your Home
Who doesn’t love a cozy fireplace? When I bought my house I was super bummed that it didn’t have one, so I have been planning to build a faux fireplace since, and I finally got my chance.
Here’s how I did it.
Materials
DAP Plastic Wood-X with DryDex Dry Time Indicator
DAP “ALEX FAST DRY” Caulk / Caulk Gun
Behr Marquee Paint “Ultra Pure White”
HDX Paint Mixing Cup
Bristle Brushes/ Foam Brushes
Rust-Oleum Chalked Ultra Matte Paint in Aged Gray and Linen White
Sheet of Brick Panel
Kreg Pocket Hole Screws
Soft Close Ball- Bearing Drawer Slides
Gorilla Glue
Tools
Flexio 590 Spray Paint Gun
Ryobi Corner Cat Sander
Ryobi Brushless Hammer Drill
Ryobi Nail Gun/Staple Gun
Kreg Jig Pocket Hole Machine
Kreg Drawer Slide Jig
Dewalt Table Saw
Cut List
4×8 – ¾” MDF
Hearth Drawer Front 54” x 10 5/8
Hearth Backing 52” x 10 1/2”
Hearth Bottom Piece 52” x 21”
3 Hearth Side and 10 ½” x 20 ¼”
Hearth Middle Piece 10 ½” x 20 ¼”
4 Drawer Sides 19 ½” x 9”
2×4 – ¾” MDF
4 Drawer Faces 22 3/8” x 9 1/16”
4 x8 ¼” MDF
2 Drawer Bottoms 19 ½” x 23 7/8”
Fireplace Backing 43 11/6” x 51 ½”
8ft Routed 1×12 MDF Board
Hearth Front Top 11 ¼” x 55”
4×8 – ½” MDF
Hearth Back Top 12” x 55”
Fireplace Top 15” X 57 ½”
Top Frame Covering 16” x 53 5/8”
2 Frontside Covering 13 ¾” x 27”
26 Shiplap Trimming 2 ½” x 8 11/16”
2 Shiplap Trimming 1 ½” x 8 11/16”
2×4 – ½” MDF
2 Side Frame Covering 13 ¼” x 43”
5 – 2x4s @ 10ft
2 Top Frame Pieces 51”
4 Side Frame Pieces 40”
4 Inner Frame Pieces 26”
4 Bottom Frame Pieces 12”
4 Frame Connectors 12”
2 Middle Frame Pieces 48”
(Select Pine) 5 – 1x3s @ 8ft
4 Horizontal Side Trim 13¼”
4 Vertical Side Trim 38”
2 Front Vertical Trim 42-16/18”
2 Middle Vertical Trim 37-3/8”
2 Horizontal Trim 9”
1 Middle Trim 26-1/8”
(Select Pine) 1 – 1×6 @ 6ft
1 Horizontal Trim 48½”
Select Pine – 1x2s @ 8ft
1 Front Trim 54-3/8”
2 Side Trim 13¼”
1 Sheet Brick Panel
Back Brick Panel 30” x 32”
2 Side Brick Panels 13” x 27¼”
Step 1
First I attached the (52 x 10½ in.) hearth backing to the (52 x 21 in.) hearth bottom piece using a Kreg Jig on a ¾ in. setting using 1½ in. pocket hole screws and wood glue. I made 16 pocket holes on the bottom of the hearth backing.
Then I attached the left and right (10½ x 20¼ in.) hearth side pieces to the attached base. I made my pocket holes on both the bottom and the adjoining side of the side pieces.
Next I attached the (10½ x 20¼ in.) middle hearth piece to the assembled base. I made my pocket holes on both the bottom and the adjoining side of the middle piece. I alternated pocket holes between sides. I did five pocket holes on the right side and five on the left.
Step 2
I began assembling drawers by attaching the two (19½ x 9 in.) drawer sides to the two (22⅜ x 9-1/16 in.) drawer faces using a Kreg jig on a ¾ in. setting using 1½ in. pocket hole screws and wood glue. I made my pocket holes on the drawer pieces.
Note: Pocket holes should be made on the side facing outward so that the drawer is free of holes.
Then I attached the ¼ in. MDF back board to the bottom of the drawer using a staple gun and wood glue.
Step 3
To add the drawer slides, I clamped a Kreg Jig Drawer Slide Jig to the side of the assembled base and screwed in the drawer slide. Screws were provided in the drawer slides I purchased.
I did this for all four sides.
Step 4
After adding the drawer slides, I set the drawer on top of ¾ in. MDF pieces and pulled out the drawer slide just enough so that the first two holes on the drawer slides were showing and screwed the drawer slides to the drawer.
I then slowly pulled the drawer slide out to the second set of holes and screwed the middle of the slide to the drawer.
Once the two sets of holes were screwed to the drawer, I pulled the slides out of the drawer slide to screw the additional back holes to the drawer and repeated for the other drawer.
Once the drawer slides were attached to both drawers, I slid my drawers back in.
Step 5
Next, I attached the face of the drawers using a brad nailer and wood glue. I sat the face on a ¾ in. piece of MDF to leave a gap from the ground.
I also measured it so that there was a gap on the top so the drawer top wouldn’t hit the top piece.
The drawers should slide out together when the front face is pulled.
Step 6
Next, I attached the hearth (front and back) top to the assembled base using a nail gun and wood glue.
Tip: Use a speed square as a guide to staple evenly down the top of the hearth.
Step 7
First I attached the two (40 in.) 2 x 4s to the (51 in.) 2 x 4 using 2½ in. wood screws and wood glue.
Next, I attached the (12 in.) 2 x 4s to the assembled frame using 2½ in. wood screws and wood glue.
Then I attached the (26 in.) 2 x 4s to the assembled frame using 2½ in. wood screws and wood glue.
Finally, I attached the (48 in.) 2 x 4 to the assembled frame using 2½ in. wood screws and wood glue.
I repeated this for the other side of the frame and then attached the two frame sides together by screwing four (12 in.) 2 x 4s to the sides.
Step 8
I first covered the inside of the frame, starting with the top and then the two sides using wood glue and brad nails. I flipped the frame upside down to do this step, as it was easier for me.
I then covered the two outer sides of the frame using wood glue and brad nails and placed the frame on top of the hearth and screwed it down using wood glue and 2 in. wood screws.
Step 9
I then covered the bottom front of the frame, and then the top front of the frame using wood glue and brad nails
Step 10
I then began trimming out the two sides of the fireplace using wood glue and brad nails. It is important to start trimming with the sides first.
Next, I trimmed out the front of the frame, starting with the two outer vertical sides, followed by the top, the two vertical inner pieces, and then the middle horizontal piece using wood glue and brad nails.
Step 11
I began adding the ½ in. MDF shiplap trim using wood glue and brad nails.
To space the trim shiplap pieces out, I used two nickels to place in between each shiplap piece.
I started from the bottom and worked my way to the top.
I inserted a space with the nickels before placing the first shiplap piece trim, but I would suggest making it flush with the bottom to prevent more caulking.
Your piece should now look like this and be ready for paint prepping.
Step 12
DAP is one of my favorite products, I use it on all my builds. My favorite part about this product is that it goes on pink and dries to a natural color. That way, you know exactly when to sand. I used this DAP Plastic Wood-X, to fill all the nail holes and adjoining board cracks.
Step 13
Once the filler was dried, I sanded the fireplace and all the filled holes.
Once I was finish sanding, I blew/wiped away all the dust to prepare for caulking.
Step 14
If you’re not used to caulking, this can get a little messy. Once you get the hang of it, it’s a breeze, though. I used this DAP Alex Fast Dry Caulk to seal all the corners on the trim. This will ensure a clean look when painting.
Step 15
Once the caulk was dry, I began mixing my paint for the Flexio sprayer. I used the smaller container that came with the paint sprayer and filled it to the top.
Before pouring the paint in, I poured in a small drop of water to thin out the paint. If you want to test if your paint is thinned enough, run it through a funnel. If it runs smoothly, it’s thinned enough. It doesn’t take a lot!
Step 16
If you don’t have a sprayer and you paint a lot, I would highly suggest getting one. The ease of this thing and the clean look you get is invaluable.
I put the air setting on 5 in. and did three light coats of paint. I waited two hours before each coat. I did notice that it often splats paint when you first trigger it, so I made sure I sprayed away from the fireplace when I first triggered it and then pointed it to the fireplace.
When you’re spraying don’t spray in one direct spot; try spraying in strokes for the best look. I also kept a foam brush handy to wipe up any splatter because in my experience, no matter what sprayer you use, there will be some.
Step 17
While the last coat was drying, I starting painting the faux brick. (I fitted and cut the brick panels before I started painting.)
I started off by diluting the limewash. This limewash was super fun to paint with. It really helped make the faux brick come to life. I filled the mixing cup halfway with the limewash and then mixed in some water and stirred until the limewash had a good consistency.
Step 18
Once the limewash was mixed, I covered the whole faux brick with it using a bristle brush. I did two light coats right after each other. Be careful not to make it too gunky.
Step 19
Once the limewash was 90 percent dry I sprayed the faux brick with a water bottle and begin wiping away the limewash in certain areas to get my desired distressed look.
Step 20
This step isn’t necessary, but I wanted to add a little more character to my faux brick and break up some of the white. I used a foam brush to dab on some Rust-Oleum Aged Gray Chalk Paint. I love how it turned out!
Once the paint was dry, I stapled the first piece of faux brick to the back of the fireplace and used a brad nailer to nail the side faux bricks to the fireplace. I used the caulk to fill the gaps below.
I then stapled the ¼ in. backing to the fireplace.
Step 21
Anchor your new DIY faux fireplace to the wall and style it to your liking.
There are so many ways you can decorate a fireplace, so I look forward to decorating it out each season!
I really love how the bricked turn out. It really brings this faux fireplace to life.
With the added storage in my DIY faux fireplace, I can store all of my DVDs and books, which is a big help keeping my living room free of clutter.
The post How To Build a DIY Faux Fireplace with Extra Storage appeared first on The Home Depot Blog.
from together1 http://ift.tt/2vJRsma via recommended
0 notes
Text
How To Build a DIY Faux Fireplace with Extra Storage
If your home doesn’t have a fireplace, build a DIY faux fireplace!
Ashley Basnight, who writes Handmade Haven, built her own faux fireplace. Not only is it cute and on-trend with its sliplap sides and limewashed faux brick, Ashley also included some extra storage space!
Here’s her step-by-step tutorial.
Build a DIY Faux Fireplace for Your Home
Who doesn’t love a cozy fireplace? When I bought my house I was super bummed that it didn’t have one, so I have been planning to build a faux fireplace since, and I finally got my chance.
Here’s how I did it.
Materials
DAP Plastic Wood-X with DryDex Dry Time Indicator
DAP “ALEX FAST DRY” Caulk / Caulk Gun
Behr Marquee Paint “Ultra Pure White”
HDX Paint Mixing Cup
Bristle Brushes/ Foam Brushes
Rust-Oleum Chalked Ultra Matte Paint in Aged Gray and Linen White
Sheet of Brick Panel
Kreg Pocket Hole Screws
Soft Close Ball- Bearing Drawer Slides
Gorilla Glue
Tools
Flexio 590 Spray Paint Gun
Ryobi Corner Cat Sander
Ryobi Brushless Hammer Drill
Ryobi Nail Gun/Staple Gun
Kreg Jig Pocket Hole Machine
Kreg Drawer Slide Jig
Dewalt Table Saw
Cut List
4×8 – ¾” MDF
Hearth Drawer Front 54” x 10 5/8
Hearth Backing 52” x 10 1/2”
Hearth Bottom Piece 52” x 21”
3 Hearth Side and 10 ½” x 20 ¼”
Hearth Middle Piece 10 ½” x 20 ¼”
4 Drawer Sides 19 ½” x 9”
2×4 – ¾” MDF
4 Drawer Faces 22 3/8” x 9 1/16”
4 x8 ¼” MDF
2 Drawer Bottoms 19 ½” x 23 7/8”
Fireplace Backing 43 11/6” x 51 ½”
8ft Routed 1×12 MDF Board
Hearth Front Top 11 ¼” x 55”
4×8 – ½” MDF
Hearth Back Top 12” x 55”
Fireplace Top 15” X 57 ½”
Top Frame Covering 16” x 53 5/8”
2 Frontside Covering 13 ¾” x 27”
26 Shiplap Trimming 2 ½” x 8 11/16”
2 Shiplap Trimming 1 ½” x 8 11/16”
2×4 – ½” MDF
2 Side Frame Covering 13 ¼” x 43”
5 – 2x4s @ 10ft
2 Top Frame Pieces 51”
4 Side Frame Pieces 40”
4 Inner Frame Pieces 26”
4 Bottom Frame Pieces 12”
4 Frame Connectors 12”
2 Middle Frame Pieces 48”
(Select Pine) 5 – 1x3s @ 8ft
4 Horizontal Side Trim 13¼”
4 Vertical Side Trim 38”
2 Front Vertical Trim 42-16/18”
2 Middle Vertical Trim 37-3/8”
2 Horizontal Trim 9”
1 Middle Trim 26-1/8”
(Select Pine) 1 – 1×6 @ 6ft
1 Horizontal Trim 48½”
Select Pine – 1x2s @ 8ft
1 Front Trim 54-3/8”
2 Side Trim 13¼”
1 Sheet Brick Panel
Back Brick Panel 30” x 32”
2 Side Brick Panels 13” x 27¼”
Step 1
First I attached the (52 x 10½ in.) hearth backing to the (52 x 21 in.) hearth bottom piece using a Kreg Jig on a ¾ in. setting using 1½ in. pocket hole screws and wood glue. I made 16 pocket holes on the bottom of the hearth backing.
Then I attached the left and right (10½ x 20¼ in.) hearth side pieces to the attached base. I made my pocket holes on both the bottom and the adjoining side of the side pieces.
Next I attached the (10½ x 20¼ in.) middle hearth piece to the assembled base. I made my pocket holes on both the bottom and the adjoining side of the middle piece. I alternated pocket holes between sides. I did five pocket holes on the right side and five on the left.
Step 2
I began assembling drawers by attaching the two (19½ x 9 in.) drawer sides to the two (22⅜ x 9-1/16 in.) drawer faces using a Kreg jig on a ¾ in. setting using 1½ in. pocket hole screws and wood glue. I made my pocket holes on the drawer pieces.
Note: Pocket holes should be made on the side facing outward so that the drawer is free of holes.
Then I attached the ¼ in. MDF back board to the bottom of the drawer using a staple gun and wood glue.
Step 3
To add the drawer slides, I clamped a Kreg Jig Drawer Slide Jig to the side of the assembled base and screwed in the drawer slide. Screws were provided in the drawer slides I purchased.
I did this for all four sides.
Step 4
After adding the drawer slides, I set the drawer on top of ¾ in. MDF pieces and pulled out the drawer slide just enough so that the first two holes on the drawer slides were showing and screwed the drawer slides to the drawer.
I then slowly pulled the drawer slide out to the second set of holes and screwed the middle of the slide to the drawer.
Once the two sets of holes were screwed to the drawer, I pulled the slides out of the drawer slide to screw the additional back holes to the drawer and repeated for the other drawer.
Once the drawer slides were attached to both drawers, I slid my drawers back in.
Step 5
Next, I attached the face of the drawers using a brad nailer and wood glue. I sat the face on a ¾ in. piece of MDF to leave a gap from the ground.
I also measured it so that there was a gap on the top so the drawer top wouldn’t hit the top piece.
The drawers should slide out together when the front face is pulled.
Step 6
Next, I attached the hearth (front and back) top to the assembled base using a nail gun and wood glue.
Tip: Use a speed square as a guide to staple evenly down the top of the hearth.
Step 7
First I attached the two (40 in.) 2 x 4s to the (51 in.) 2 x 4 using 2½ in. wood screws and wood glue.
Next, I attached the (12 in.) 2 x 4s to the assembled frame using 2½ in. wood screws and wood glue.
Then I attached the (26 in.) 2 x 4s to the assembled frame using 2½ in. wood screws and wood glue.
Finally, I attached the (48 in.) 2 x 4 to the assembled frame using 2½ in. wood screws and wood glue.
I repeated this for the other side of the frame and then attached the two frame sides together by screwing four (12 in.) 2 x 4s to the sides.
Step 8
I first covered the inside of the frame, starting with the top and then the two sides using wood glue and brad nails. I flipped the frame upside down to do this step, as it was easier for me.
I then covered the two outer sides of the frame using wood glue and brad nails and placed the frame on top of the hearth and screwed it down using wood glue and 2 in. wood screws.
Step 9
I then covered the bottom front of the frame, and then the top front of the frame using wood glue and brad nails
Step 10
I then began trimming out the two sides of the fireplace using wood glue and brad nails. It is important to start trimming with the sides first.
Next, I trimmed out the front of the frame, starting with the two outer vertical sides, followed by the top, the two vertical inner pieces, and then the middle horizontal piece using wood glue and brad nails.
Step 11
I began adding the ½ in. MDF shiplap trim using wood glue and brad nails.
To space the trim shiplap pieces out, I used two nickels to place in between each shiplap piece.
I started from the bottom and worked my way to the top.
I inserted a space with the nickels before placing the first shiplap piece trim, but I would suggest making it flush with the bottom to prevent more caulking.
Your piece should now look like this and be ready for paint prepping.
Step 12
DAP is one of my favorite products, I use it on all my builds. My favorite part about this product is that it goes on pink and dries to a natural color. That way, you know exactly when to sand. I used this DAP Plastic Wood-X, to fill all the nail holes and adjoining board cracks.
Step 13
Once the filler was dried, I sanded the fireplace and all the filled holes.
Once I was finish sanding, I blew/wiped away all the dust to prepare for caulking.
Step 14
If you’re not used to caulking, this can get a little messy. Once you get the hang of it, it’s a breeze, though. I used this DAP Alex Fast Dry Caulk to seal all the corners on the trim. This will ensure a clean look when painting.
Step 15
Once the caulk was dry, I began mixing my paint for the Flexio sprayer. I used the smaller container that came with the paint sprayer and filled it to the top.
Before pouring the paint in, I poured in a small drop of water to thin out the paint. If you want to test if your paint is thinned enough, run it through a funnel. If it runs smoothly, it’s thinned enough. It doesn’t take a lot!
Step 16
If you don’t have a sprayer and you paint a lot, I would highly suggest getting one. The ease of this thing and the clean look you get is invaluable.
I put the air setting on 5 in. and did three light coats of paint. I waited two hours before each coat. I did notice that it often splats paint when you first trigger it, so I made sure I sprayed away from the fireplace when I first triggered it and then pointed it to the fireplace.
When you’re spraying don’t spray in one direct spot; try spraying in strokes for the best look. I also kept a foam brush handy to wipe up any splatter because in my experience, no matter what sprayer you use, there will be some.
Step 17
While the last coat was drying, I starting painting the faux brick. (I fitted and cut the brick panels before I started painting.)
I started off by diluting the limewash. This limewash was super fun to paint with. It really helped make the faux brick come to life. I filled the mixing cup halfway with the limewash and then mixed in some water and stirred until the limewash had a good consistency.
Step 18
Once the limewash was mixed, I covered the whole faux brick with it using a bristle brush. I did two light coats right after each other. Be careful not to make it too gunky.
Step 19
Once the limewash was 90 percent dry I sprayed the faux brick with a water bottle and begin wiping away the limewash in certain areas to get my desired distressed look.
Step 20
This step isn’t necessary, but I wanted to add a little more character to my faux brick and break up some of the white. I used a foam brush to dab on some Rust-Oleum Aged Gray Chalk Paint. I love how it turned out!
Once the paint was dry, I stapled the first piece of faux brick to the back of the fireplace and used a brad nailer to nail the side faux bricks to the fireplace. I used the caulk to fill the gaps below.
I then stapled the ¼ in. backing to the fireplace.
Step 21
Anchor your new DIY faux fireplace to the wall and style it to your liking.
There are so many ways you can decorate a fireplace, so I look forward to decorating it out each season!
I really love how the bricked turn out. It really brings this faux fireplace to life.
With the added storage in my DIY faux fireplace, I can store all of my DVDs and books, which is a big help keeping my living room free of clutter.
The post How To Build a DIY Faux Fireplace with Extra Storage appeared first on The Home Depot Blog.
from mix1 http://ift.tt/2vJRsma via with this info
0 notes
Text
How To Build a DIY Faux Fireplace with Extra Storage
If your home doesn’t have a fireplace, build a DIY faux fireplace!
Ashley Basnight, who writes Handmade Haven, built her own faux fireplace. Not only is it cute and on-trend with its sliplap sides and limewashed faux brick, Ashley also included some extra storage space!
Here’s her step-by-step tutorial.
Build a DIY Faux Fireplace for Your Home
Who doesn’t love a cozy fireplace? When I bought my house I was super bummed that it didn’t have one, so I have been planning to build a faux fireplace since, and I finally got my chance.
Here’s how I did it.
Materials
DAP Plastic Wood-X with DryDex Dry Time Indicator
DAP “ALEX FAST DRY” Caulk / Caulk Gun
Behr Marquee Paint “Ultra Pure White”
HDX Paint Mixing Cup
Bristle Brushes/ Foam Brushes
Rust-Oleum Chalked Ultra Matte Paint in Aged Gray and Linen White
Sheet of Brick Panel
Kreg Pocket Hole Screws
Soft Close Ball- Bearing Drawer Slides
Gorilla Glue
Tools
Flexio 590 Spray Paint Gun
Ryobi Corner Cat Sander
Ryobi Brushless Hammer Drill
Ryobi Nail Gun/Staple Gun
Kreg Jig Pocket Hole Machine
Kreg Drawer Slide Jig
Dewalt Table Saw
Cut List
4×8 – ¾” MDF
Hearth Drawer Front 54” x 10 5/8
Hearth Backing 52” x 10 1/2”
Hearth Bottom Piece 52” x 21”
3 Hearth Side and 10 ½” x 20 ¼”
Hearth Middle Piece 10 ½” x 20 ¼”
4 Drawer Sides 19 ½” x 9”
2×4 – ¾” MDF
4 Drawer Faces 22 3/8” x 9 1/16”
4 x8 ¼” MDF
2 Drawer Bottoms 19 ½” x 23 7/8”
Fireplace Backing 43 11/6” x 51 ½”
8ft Routed 1×12 MDF Board
Hearth Front Top 11 ¼” x 55”
4×8 – ½” MDF
Hearth Back Top 12” x 55”
Fireplace Top 15” X 57 ½”
Top Frame Covering 16” x 53 5/8”
2 Frontside Covering 13 ¾” x 27”
26 Shiplap Trimming 2 ½” x 8 11/16”
2 Shiplap Trimming 1 ½” x 8 11/16”
2×4 – ½” MDF
2 Side Frame Covering 13 ¼” x 43”
5 – 2x4s @ 10ft
2 Top Frame Pieces 51”
4 Side Frame Pieces 40”
4 Inner Frame Pieces 26”
4 Bottom Frame Pieces 12”
4 Frame Connectors 12”
2 Middle Frame Pieces 48”
(Select Pine) 5 – 1x3s @ 8ft
4 Horizontal Side Trim 13¼”
4 Vertical Side Trim 38”
2 Front Vertical Trim 42-16/18”
2 Middle Vertical Trim 37-3/8”
2 Horizontal Trim 9”
1 Middle Trim 26-1/8”
(Select Pine) 1 – 1×6 @ 6ft
1 Horizontal Trim 48½”
Select Pine – 1x2s @ 8ft
1 Front Trim 54-3/8”
2 Side Trim 13¼”
1 Sheet Brick Panel
Back Brick Panel 30” x 32”
2 Side Brick Panels 13” x 27¼”
Step 1
First I attached the (52 x 10½ in.) hearth backing to the (52 x 21 in.) hearth bottom piece using a Kreg Jig on a ¾ in. setting using 1½ in. pocket hole screws and wood glue. I made 16 pocket holes on the bottom of the hearth backing.
Then I attached the left and right (10½ x 20¼ in.) hearth side pieces to the attached base. I made my pocket holes on both the bottom and the adjoining side of the side pieces.
Next I attached the (10½ x 20¼ in.) middle hearth piece to the assembled base. I made my pocket holes on both the bottom and the adjoining side of the middle piece. I alternated pocket holes between sides. I did five pocket holes on the right side and five on the left.
Step 2
I began assembling drawers by attaching the two (19½ x 9 in.) drawer sides to the two (22⅜ x 9-1/16 in.) drawer faces using a Kreg jig on a ¾ in. setting using 1½ in. pocket hole screws and wood glue. I made my pocket holes on the drawer pieces.
Note: Pocket holes should be made on the side facing outward so that the drawer is free of holes.
Then I attached the ¼ in. MDF back board to the bottom of the drawer using a staple gun and wood glue.
Step 3
To add the drawer slides, I clamped a Kreg Jig Drawer Slide Jig to the side of the assembled base and screwed in the drawer slide. Screws were provided in the drawer slides I purchased.
I did this for all four sides.
Step 4
After adding the drawer slides, I set the drawer on top of ¾ in. MDF pieces and pulled out the drawer slide just enough so that the first two holes on the drawer slides were showing and screwed the drawer slides to the drawer.
I then slowly pulled the drawer slide out to the second set of holes and screwed the middle of the slide to the drawer.
Once the two sets of holes were screwed to the drawer, I pulled the slides out of the drawer slide to screw the additional back holes to the drawer and repeated for the other drawer.
Once the drawer slides were attached to both drawers, I slid my drawers back in.
Step 5
Next, I attached the face of the drawers using a brad nailer and wood glue. I sat the face on a ¾ in. piece of MDF to leave a gap from the ground.
I also measured it so that there was a gap on the top so the drawer top wouldn’t hit the top piece.
The drawers should slide out together when the front face is pulled.
Step 6
Next, I attached the hearth (front and back) top to the assembled base using a nail gun and wood glue.
Tip: Use a speed square as a guide to staple evenly down the top of the hearth.
Step 7
First I attached the two (40 in.) 2 x 4s to the (51 in.) 2 x 4 using 2½ in. wood screws and wood glue.
Next, I attached the (12 in.) 2 x 4s to the assembled frame using 2½ in. wood screws and wood glue.
Then I attached the (26 in.) 2 x 4s to the assembled frame using 2½ in. wood screws and wood glue.
Finally, I attached the (48 in.) 2 x 4 to the assembled frame using 2½ in. wood screws and wood glue.
I repeated this for the other side of the frame and then attached the two frame sides together by screwing four (12 in.) 2 x 4s to the sides.
Step 8
I first covered the inside of the frame, starting with the top and then the two sides using wood glue and brad nails. I flipped the frame upside down to do this step, as it was easier for me.
I then covered the two outer sides of the frame using wood glue and brad nails and placed the frame on top of the hearth and screwed it down using wood glue and 2 in. wood screws.
Step 9
I then covered the bottom front of the frame, and then the top front of the frame using wood glue and brad nails
Step 10
I then began trimming out the two sides of the fireplace using wood glue and brad nails. It is important to start trimming with the sides first.
Next, I trimmed out the front of the frame, starting with the two outer vertical sides, followed by the top, the two vertical inner pieces, and then the middle horizontal piece using wood glue and brad nails.
Step 11
I began adding the ½ in. MDF shiplap trim using wood glue and brad nails.
To space the trim shiplap pieces out, I used two nickels to place in between each shiplap piece.
I started from the bottom and worked my way to the top.
I inserted a space with the nickels before placing the first shiplap piece trim, but I would suggest making it flush with the bottom to prevent more caulking.
Your piece should now look like this and be ready for paint prepping.
Step 12
DAP is one of my favorite products, I use it on all my builds. My favorite part about this product is that it goes on pink and dries to a natural color. That way, you know exactly when to sand. I used this DAP Plastic Wood-X, to fill all the nail holes and adjoining board cracks.
Step 13
Once the filler was dried, I sanded the fireplace and all the filled holes.
Once I was finish sanding, I blew/wiped away all the dust to prepare for caulking.
Step 14
If you’re not used to caulking, this can get a little messy. Once you get the hang of it, it’s a breeze, though. I used this DAP Alex Fast Dry Caulk to seal all the corners on the trim. This will ensure a clean look when painting.
Step 15
Once the caulk was dry, I began mixing my paint for the Flexio sprayer. I used the smaller container that came with the paint sprayer and filled it to the top.
Before pouring the paint in, I poured in a small drop of water to thin out the paint. If you want to test if your paint is thinned enough, run it through a funnel. If it runs smoothly, it’s thinned enough. It doesn’t take a lot!
Step 16
If you don’t have a sprayer and you paint a lot, I would highly suggest getting one. The ease of this thing and the clean look you get is invaluable.
I put the air setting on 5 in. and did three light coats of paint. I waited two hours before each coat. I did notice that it often splats paint when you first trigger it, so I made sure I sprayed away from the fireplace when I first triggered it and then pointed it to the fireplace.
When you’re spraying don’t spray in one direct spot; try spraying in strokes for the best look. I also kept a foam brush handy to wipe up any splatter because in my experience, no matter what sprayer you use, there will be some.
Step 17
While the last coat was drying, I starting painting the faux brick. (I fitted and cut the brick panels before I started painting.)
I started off by diluting the limewash. This limewash was super fun to paint with. It really helped make the faux brick come to life. I filled the mixing cup halfway with the limewash and then mixed in some water and stirred until the limewash had a good consistency.
Step 18
Once the limewash was mixed, I covered the whole faux brick with it using a bristle brush. I did two light coats right after each other. Be careful not to make it too gunky.
Step 19
Once the limewash was 90 percent dry I sprayed the faux brick with a water bottle and begin wiping away the limewash in certain areas to get my desired distressed look.
Step 20
This step isn’t necessary, but I wanted to add a little more character to my faux brick and break up some of the white. I used a foam brush to dab on some Rust-Oleum Aged Gray Chalk Paint. I love how it turned out!
Once the paint was dry, I stapled the first piece of faux brick to the back of the fireplace and used a brad nailer to nail the side faux bricks to the fireplace. I used the caulk to fill the gaps below.
I then stapled the ¼ in. backing to the fireplace.
Step 21
Anchor your new DIY faux fireplace to the wall and style it to your liking.
There are so many ways you can decorate a fireplace, so I look forward to decorating it out each season!
I really love how the bricked turn out. It really brings this faux fireplace to life.
With the added storage in my DIY faux fireplace, I can store all of my DVDs and books, which is a big help keeping my living room free of clutter.
The post How To Build a DIY Faux Fireplace with Extra Storage appeared first on The Home Depot Blog.
from Roofing Pro http://ift.tt/2vJRsma Curated by a professional Roofing Contractor from Blogger http://ift.tt/2w1O7hB via RoofingProToday
0 notes
Photo

How To Build a DIY Faux Fireplace with Extra Storage http://ift.tt/2vJRsma
If your home doesn’t have a fireplace, build a DIY faux fireplace!
Ashley Basnight, who writes Handmade Haven, built her own faux fireplace. Not only is it cute and on-trend with its sliplap sides and limewashed faux brick, Ashley also included some extra storage space!
Here’s her step-by-step tutorial.
Build a DIY Faux Fireplace for Your Home
Who doesn’t love a cozy fireplace? When I bought my house I was super bummed that it didn’t have one, so I have been planning to build a faux fireplace since, and I finally got my chance.
Here’s how I did it.
Materials
DAP Plastic Wood-X with DryDex Dry Time Indicator
DAP “ALEX FAST DRY” Caulk / Caulk Gun
Behr Marquee Paint “Ultra Pure White”
HDX Paint Mixing Cup
Bristle Brushes/ Foam Brushes
Rust-Oleum Chalked Ultra Matte Paint in Aged Gray and Linen White
Sheet of Brick Panel
Kreg Pocket Hole Screws
Soft Close Ball- Bearing Drawer Slides
Gorilla Glue
Tools
Flexio 590 Spray Paint Gun
Ryobi Corner Cat Sander
Ryobi Brushless Hammer Drill
Ryobi Nail Gun/Staple Gun
Kreg Jig Pocket Hole Machine
Kreg Drawer Slide Jig
Dewalt Table Saw
Cut List
4×8 – ¾” MDF
Hearth Drawer Front 54” x 10 5/8
Hearth Backing 52” x 10 1/2”
Hearth Bottom Piece 52” x 21”
3 Hearth Side and 10 ½” x 20 ¼”
Hearth Middle Piece 10 ½” x 20 ¼”
4 Drawer Sides 19 ½” x 9”
2×4 – ¾” MDF
4 Drawer Faces 22 3/8” x 9 1/16”
4 x8 ¼” MDF
2 Drawer Bottoms 19 ½” x 23 7/8”
Fireplace Backing 43 11/6” x 51 ½”
8ft Routed 1×12 MDF Board
Hearth Front Top 11 ¼” x 55”
4×8 – ½” MDF
Hearth Back Top 12” x 55”
Fireplace Top 15” X 57 ½”
Top Frame Covering 16” x 53 5/8”
2 Frontside Covering 13 ¾” x 27”
26 Shiplap Trimming 2 ½” x 8 11/16”
2 Shiplap Trimming 1 ½” x 8 11/16”
2×4 – ½” MDF
2 Side Frame Covering 13 ¼” x 43”
5 – 2x4s @ 10ft
2 Top Frame Pieces 51”
4 Side Frame Pieces 40”
4 Inner Frame Pieces 26”
4 Bottom Frame Pieces 12”
4 Frame Connectors 12”
2 Middle Frame Pieces 48”
(Select Pine) 5 – 1x3s @ 8ft
4 Horizontal Side Trim 13¼”
4 Vertical Side Trim 38”
2 Front Vertical Trim 42-16/18”
2 Middle Vertical Trim 37-3/8”
2 Horizontal Trim 9”
1 Middle Trim 26-1/8”
(Select Pine) 1 – 1×6 @ 6ft
1 Horizontal Trim 48½”
Select Pine – 1x2s @ 8ft
1 Front Trim 54-3/8”
2 Side Trim 13¼”
1 Sheet Brick Panel
Back Brick Panel 30” x 32”
2 Side Brick Panels 13” x 27¼”
Step 1
First I attached the (52 x 10½ in.) hearth backing to the (52 x 21 in.) hearth bottom piece using a Kreg Jig on a ¾ in. setting using 1½ in. pocket hole screws and wood glue. I made 16 pocket holes on the bottom of the hearth backing.
Then I attached the left and right (10½ x 20¼ in.) hearth side pieces to the attached base. I made my pocket holes on both the bottom and the adjoining side of the side pieces.
Next I attached the (10½ x 20¼ in.) middle hearth piece to the assembled base. I made my pocket holes on both the bottom and the adjoining side of the middle piece. I alternated pocket holes between sides. I did five pocket holes on the right side and five on the left.
Step 2
I began assembling drawers by attaching the two (19½ x 9 in.) drawer sides to the two (22⅜ x 9-1/16 in.) drawer faces using a Kreg jig on a ¾ in. setting using 1½ in. pocket hole screws and wood glue. I made my pocket holes on the drawer pieces.
Note: Pocket holes should be made on the side facing outward so that the drawer is free of holes.
Then I attached the ¼ in. MDF back board to the bottom of the drawer using a staple gun and wood glue.
Step 3
To add the drawer slides, I clamped a Kreg Jig Drawer Slide Jig to the side of the assembled base and screwed in the drawer slide. Screws were provided in the drawer slides I purchased.
I did this for all four sides.
Step 4
After adding the drawer slides, I set the drawer on top of ¾ in. MDF pieces and pulled out the drawer slide just enough so that the first two holes on the drawer slides were showing and screwed the drawer slides to the drawer.
I then slowly pulled the drawer slide out to the second set of holes and screwed the middle of the slide to the drawer.
Once the two sets of holes were screwed to the drawer, I pulled the slides out of the drawer slide to screw the additional back holes to the drawer and repeated for the other drawer.
Once the drawer slides were attached to both drawers, I slid my drawers back in.
Step 5
Next, I attached the face of the drawers using a brad nailer and wood glue. I sat the face on a ¾ in. piece of MDF to leave a gap from the ground.
I also measured it so that there was a gap on the top so the drawer top wouldn’t hit the top piece.
The drawers should slide out together when the front face is pulled.
Step 6
Next, I attached the hearth (front and back) top to the assembled base using a nail gun and wood glue.
Tip: Use a speed square as a guide to staple evenly down the top of the hearth.
Step 7
First I attached the two (40 in.) 2 x 4s to the (51 in.) 2 x 4 using 2½ in. wood screws and wood glue.
Next, I attached the (12 in.) 2 x 4s to the assembled frame using 2½ in. wood screws and wood glue.
Then I attached the (26 in.) 2 x 4s to the assembled frame using 2½ in. wood screws and wood glue.
Finally, I attached the (48 in.) 2 x 4 to the assembled frame using 2½ in. wood screws and wood glue.
I repeated this for the other side of the frame and then attached the two frame sides together by screwing four (12 in.) 2 x 4s to the sides.
Step 8
I first covered the inside of the frame, starting with the top and then the two sides using wood glue and brad nails. I flipped the frame upside down to do this step, as it was easier for me.
I then covered the two outer sides of the frame using wood glue and brad nails and placed the frame on top of the hearth and screwed it down using wood glue and 2 in. wood screws.
Step 9
I then covered the bottom front of the frame, and then the top front of the frame using wood glue and brad nails
Step 10
I then began trimming out the two sides of the fireplace using wood glue and brad nails. It is important to start trimming with the sides first.
Next, I trimmed out the front of the frame, starting with the two outer vertical sides, followed by the top, the two vertical inner pieces, and then the middle horizontal piece using wood glue and brad nails.
Step 11
I began adding the ½ in. MDF shiplap trim using wood glue and brad nails.
To space the trim shiplap pieces out, I used two nickels to place in between each shiplap piece.
I started from the bottom and worked my way to the top.
I inserted a space with the nickels before placing the first shiplap piece trim, but I would suggest making it flush with the bottom to prevent more caulking.
Your piece should now look like this and be ready for paint prepping.
Step 12
DAP is one of my favorite products, I use it on all my builds. My favorite part about this product is that it goes on pink and dries to a natural color. That way, you know exactly when to sand. I used this DAP Plastic Wood-X, to fill all the nail holes and adjoining board cracks.
Step 13
Once the filler was dried, I sanded the fireplace and all the filled holes.
Once I was finish sanding, I blew/wiped away all the dust to prepare for caulking.
Step 14
If you’re not used to caulking, this can get a little messy. Once you get the hang of it, it’s a breeze, though. I used this DAP Alex Fast Dry Caulk to seal all the corners on the trim. This will ensure a clean look when painting.
Step 15
Once the caulk was dry, I began mixing my paint for the Flexio sprayer. I used the smaller container that came with the paint sprayer and filled it to the top.
Before pouring the paint in, I poured in a small drop of water to thin out the paint. If you want to test if your paint is thinned enough, run it through a funnel. If it runs smoothly, it’s thinned enough. It doesn’t take a lot!
Step 16
If you don’t have a sprayer and you paint a lot, I would highly suggest getting one. The ease of this thing and the clean look you get is invaluable.
I put the air setting on 5 in. and did three light coats of paint. I waited two hours before each coat. I did notice that it often splats paint when you first trigger it, so I made sure I sprayed away from the fireplace when I first triggered it and then pointed it to the fireplace.
When you’re spraying don’t spray in one direct spot; try spraying in strokes for the best look. I also kept a foam brush handy to wipe up any splatter because in my experience, no matter what sprayer you use, there will be some.
Step 17
While the last coat was drying, I starting painting the faux brick. (I fitted and cut the brick panels before I started painting.)
I started off by diluting the limewash. This limewash was super fun to paint with. It really helped make the faux brick come to life. I filled the mixing cup halfway with the limewash and then mixed in some water and stirred until the limewash had a good consistency.
Step 18
Once the limewash was mixed, I covered the whole faux brick with it using a bristle brush. I did two light coats right after each other. Be careful not to make it too gunky.
Step 19
Once the limewash was 90 percent dry I sprayed the faux brick with a water bottle and begin wiping away the limewash in certain areas to get my desired distressed look.
Step 20
This step isn’t necessary, but I wanted to add a little more character to my faux brick and break up some of the white. I used a foam brush to dab on some Rust-Oleum Aged Gray Chalk Paint. I love how it turned out!
Once the paint was dry, I stapled the first piece of faux brick to the back of the fireplace and used a brad nailer to nail the side faux bricks to the fireplace. I used the caulk to fill the gaps below.
I then stapled the ¼ in. backing to the fireplace.
Step 21
Anchor your new DIY faux fireplace to the wall and style it to your liking.
There are so many ways you can decorate a fireplace, so I look forward to decorating it out each season!
I really love how the bricked turn out. It really brings this faux fireplace to life.
With the added storage in my DIY faux fireplace, I can store all of my DVDs and books, which is a big help keeping my living room free of clutter.
The post How To Build a DIY Faux Fireplace with Extra Storage appeared first on The Home Depot Blog.
Ashley Basnight
0 notes