#Use DHCP Feature on a Router
Explore tagged Tumblr posts
Visit Tumblr Blog
Explore Tumblr blogs with no restrictions, modern design and the best experience.
Last Seen Tumblr Blogs


Fun Fact
Celebrities use Tumblr as well.
Text
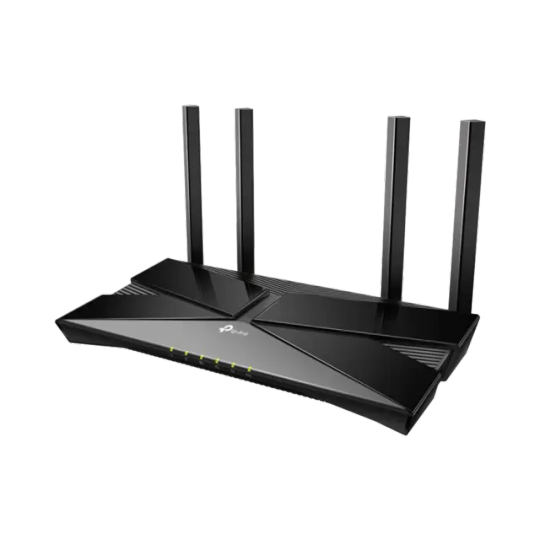
How To Set Up The GL.iNet GL-AXT1800 Router
It is a compact yet powerful travel router to offer high speed and secure internet connectivity. With the help of WiFi 6 technology the robust security feature and VPN support is an excellent choice for the travellers, remote workers and tech enthusiasts. This guide will walk you through the configuration process to get the best performance from your GL-AXT1800 router.
Unboxing And Hardware Overview
When you first get GL.iNet GL-AXT1800 router, ensures that your package include
GL-AXT1800 router
Ethernet cable
Power adaptor
User manual
GL.iNet GL-AXT1800 Setup Key Features
Provide speed up to 1200 Mbps 5GHz and 600 Mbps on 2.4GHz.
Support 1.2GHz quad core processor for the fast performance.
It built in the VPN support for wire guard and open VPN.
Adguard home to block ads and tracking scripts.
Multiple connection options such as WAN, LAN or USB 3.0 port
Manual Setup
Follow below few simple steps
Power On Your Router
Plug the power adaptor into the router and connect it with the power outlet.
After that wait for the router to boot up.
The LED light indicates that the device is now powered on and ready.
Connect To The Router
Use ethernet cable to attach the router WAN port to the modem or existing network.
Access Or Go To Admin Panel
Open the web browser and type 192.168.8.1 in the address bar. Login by entering the default credentials which are written on the router package. Consider all the setup process instructions to change the WiFi SSID, password and admin credentials for the security purposes.
Configuring Internet Connection
The GL.iNet GL-AXT1800 Router supports various internet connection methods.
Wired Connection:
If you are using a wired connection, go to the network settings and then tap on the internet. After that, verify DHCP mode is enabled.
WiFi Repeater Mode:
If you want to extend an existing WiFi network:
In the admin panel go to the repeater settings.
Now, scan for the available WiFi networks and pick up the desired one.
Enter WiFi password and save all settings.
Connect Modem Or Smartphone
Just connect the USB modem or the smartphone via the USB 3.0 port.
Select the connection mode in the admin panel and consider all the prompts.
Setup VPN For Secure Browsing
Using Wire-Guard VPN
Go to VPN and then tap the wire guard client.
Now, upload or manually enter the wire guard VPN configuration.
Enable the VPN and check connection status.
Using Open VPN
Navigate to VPN and OpenVPN client.
After that upload the open VPN configuration file which is provided by the VPN provider.
Later, connect and verify your IP address for successful connection.
With AdGuard Home Enhanced Security
It is a powerful tool for blocking ads and tracking.
To enable this, go to the navigation and click on AdGuard home. After that, enable the services and customize settings. Further, add a filter list to enhance blocking effectiveness.
Additional Features & Customization
Guest WiFi:- It creates a separate WiFi network for the visitors with restricted access.
Custom DNS Server: Uses cloudflare, google or a custom DNS provider for the faster and more protective browsing.
After the router GL iNet GL AXT1800 setup if you are facing any issue then try the below troubleshooting tips to fix the issue such as AX1800 router not working properly.
Solution Tips
Check/Identify All Cable Connections
Must verify that all the cables must be perfectly plugged in.
Look Up For Overheating
If your router gets hot then move it to the well ventilated area to cool it down.
Use Different Power Source
Try to use a different USB-C power adapter
Power Cycle Router
Press the router power button to turn it off. Now, take out the router power plug from the specified working socket. After that, wait for at least 2 minutes and put the router plug back in the socket. At the end, press router power to turn it on.
After trying the apart basic router troubleshooting tips if you fail to fix an issue. Then don’t be worried just try the below advanced troubleshooting tips steps.
Update Router Software/Firmware
Early go to the router admin panel.
After that, tap on settings and then hit on firmware.
Further, update the latest version.
Alternatively, install the firmware from the GL.iNet website and open it manually.
Reset Router From Factory Default
Early, look for the reset button on your router.
After that, take a paper pin and insert it in the router reset button.
Now, all LEDs of the GL.iNet GL-AXT1800 router are completely turned off.
Hence, your router is reset now.
Note: After resetting all default settings, do the GL.iNet GL-AXT1800 setup and installation process again.
Therefore, after the entire study or information of this article you can do the setup of your router with the modem. After router installation if you face any issue then also fix it easily by trying the apart troubleshooting tips.
0 notes
Text
Data confidentiality entails allowing authorized users to access particular data while preventing unauthorized access to data by intruders. When access eavesdrops on particular data, the principle of confidentiality will not hold. In networks, encryption is the principal technique for maintaining data confidentiality. This process is achieved using encryption algorithms that are used to generate keys for encrypting and decrypting data. Technical security controls are used to provide control mechanisms within systems to mitigate potential security risks that may affect the network. Technical security controls are made of three components: detective, corrective and preventive, which all work to mitigate risks within a system. Switch(config)#line vty 0 15 Switch(config-line)#password admin Switch(config-line)# login Switch(config-line)#exit Switch(config)#line console 0 Switch(config-line)#password adminpass Switch(config-line)#login Switch(config-line)#exit routerOne(config)# login block-for 600 attempts 3 within routerOne(config)#login on-failure log every 2 In the first step, I will access the router through the web interface. This will allow me to configure encryption using the WPA2 or the pre-shared key. This will ensure that anyone who has all devices must provide this key before joining the network. I will also configure the number of addresses to a defined number as well as allow the DHCP server to provide dynamic addresses based on certain main addresses. After doing these configurations, I will also enable no broadcast of the SSID and save the configurations, and exit the router. The access list will permit traffic from the outside network to reach the inside network through port 80. - TACACS uses TCP protocol which is more reliable than User Data Protocol used by RADIUS. - RADIUS only encrypts the password section of an access-request packet. On the other hand, the TACACS+ encrypt the entire message thus offering better security. - RADIUS offers a better extension for IPSec compared to TACACS+ which does not. - RADIUS is well developed compared to TACACS but is not very well developed. There are three IKE policy choices message encryption, message integrity hash algorithm and peer authentication method. The policies are satisfied by various encryption methods that are dependent on several factors such as the type of hardware in place. The key length available when using an encryption algorithm allows the definition of key length used in terms of bits. When it comes to choosing a message encryption algorithm, 3des is the strongest when compared to DES. The sha encryption offers a better encryption type as compared to md5 when it comes to the message integrity algorithm. For the peer authentication method, the rsa-sig offers stronger encryption. An intrusion detection system has powerful features that provide notification when an attack occurs. On the other hand, a detective prevention system only uses limited functions to thwart attacks from taking place. The detection system is also limited because it relies on copies of network packets, which must be received from another switch. This makes sensors operating in intrusion mode to be said as running in promiscuous mode. Compared to a detection system, intrusion prevention is more robust and has better features because it operates in inline mode where it checks as packets flow in teatime. Therefore, it can prevent traffic from entering a given network in real time. Read the full article
0 notes
Photo

TP-Link Deco E4 AC1200 Home Mesh Wi-Fi System - 3 Pack FEATURES: Deco uses a system of units to achieve seamless whole-home Wi-Fi coverage — eliminate weak signal areas once and for all! With advanced Deco Mesh Technology, units work together to form a unified network with a single network name. Devices automatically switch between Decos as you move through your home for the fastest possible speeds. A Deco E4 two-pack delivers Wi-Fi to an area of up to 2,800 square feet (EU version). And if that’s not enough, simply add more Decos to the network anytime to increase coverage. Deco E4 provides fast and stable connections with speeds of up to 1167 Mbps and works with major internet service provider (ISP) and modem. Deco can handle traffic from even the busiest of networks, providing lag-free connections for up to 100 devices. Parental Controls limits online time and block inappropriate websites according to unique profiles created for each family member. Setup is easier than ever with the Deco app there to walk you through every step. For Deco E4(3-Pack) 's Info, Please check here. WIRELESS Standards Wi-Fi 5 IEEE 802.11ac/n/a 5 GHz IEEE 802.11n/b/g 2.4 GHz WiFi Speeds AC1200 5 GHz: 867 Mbps (802.11ac) 2.4 GHz: 300 Mbps (802.11n) WiFi Range 3-4 Bedroom Houses (3-pack) TP-Link Mesh Technology Optional Ethernet backhaul work together to link Deco units to provide seamless coverage 2× Antennas (Internal) Multiple antennas form a signal-boosting array to cover more directions and large areas Beamforming Concentrates wireless signal strength towards clients to expand WiFi range WiFi Capacity Medium Dual-Band Distribute devices to different bands for optimal performance MU-MIMO Simultaneously communicates with multiple MU-MIMO clients Working Modes Router Mode Access Point Mode HARDWARE Ethernet Ports 2× 10/100 Mbps Ports *Per Deco Unit Supports WAN/LAN auto-sensing Buttons Reset Button SECURITY WiFi Encryption WPA-Personal WPA2-Personal Network Security SPI Firewall Access Control Guest Network 1× 5 GHz Guest Network 1× 2.4 GHz Guest Network SOFTWARE Protocols IPv4 IPv6 Parental Controls URL Filtering Time Controls WAN Types Dynamic IP Static IP PPPoE PPTP L2TP Quality of Service QoS by Device Cloud Service OTA Firmware Upgrade TP-Link ID DDNS NAT Forwarding Port Forwarding UPnP IPTV IGMP Proxy IGMP Snooping Bridge Tag VLAN DHCP Address Reservation DHCP Client List Server DDNS TP-Link Management Deco App TEST DATA WiFi Transmission Power CE:
#RANGE_EXTENDER#ROUTER#COMPUTERS#NETWORKING#AC1200#DECO_M3W#HOME_WIFI#MESH_WIFI#NET_TL_DECO_E4_3PK#TP_LINK
0 notes
Text
10 Best Network Monitoring Tools (June 2024)
New Post has been published on https://thedigitalinsider.com/10-best-network-monitoring-tools-june-2024/
10 Best Network Monitoring Tools (June 2024)
Effective network monitoring is crucial for maintaining the performance and reliability of today’s complex IT environments. With the right tools, network administrators can proactively identify and resolve issues before they impact end-users. In this blog post, we’ll explore some of the best network monitoring solutions available, including both cloud-based platforms and open-source options.
Auvik is a cloud-based network monitoring and management platform designed to give IT teams full visibility and control over their networks. It automates many complex and time-consuming network management tasks, allowing administrators to work more efficiently. By providing real-time network mapping, detailed device information, and intelligent alerts, Auvik enables IT professionals to proactively monitor network health and quickly troubleshoot issues.
One of Auvik’s standout capabilities is its ability to automatically discover and inventory all devices on the network within minutes of deployment. It creates dynamic, interactive topology maps that visualize physical and logical connections between devices. Auvik also provides in-depth traffic analysis to easily identify who is on the network, what they are doing, and where their traffic is going. With features like automated config backups and an intuitive dashboard to access key network data from anywhere, Auvik is a comprehensive tool to streamline network management.
Key features of Auvik include:
Automated network discovery and inventory that provides a complete view of all network devices
Dynamic network mapping to visualize physical and logical network topology
Intelligent network traffic analysis to monitor bandwidth usage and identify traffic patterns
Automated configuration backups and easy restore to quickly recover from network issues
Extensive integrations with popular IT platforms and a powerful API to build custom workflows
Visit Auvik →
SolarWinds is a leading provider of powerful and affordable IT management software. Their flagship product for network monitoring is called Network Performance Monitor (NPM). NPM is designed to provide comprehensive network monitoring capabilities that allow IT professionals to quickly detect, diagnose, and resolve network performance issues and outages.
SolarWinds NPM can automatically discover network devices and start monitoring them within hours of deployment. It provides real-time visibility into the health and performance of routers, switches, firewalls, load balancers, wireless access points, and any other SNMP-enabled devices. NPM uses a web-based interface with customizable dashboards, views, and charts to present critical performance metrics at a glance. It also includes advanced alerting capabilities to notify administrators of issues before they impact end-users.
In addition to NPM, SolarWinds offers several other tools that extend its network monitoring capabilities. NetFlow Traffic Analyzer provides detailed visibility into bandwidth usage by application, protocol, and IP address group. Network Configuration Manager automates network configuration and change management. IP Address Manager streamlines IP address management with integrated DHCP and DNS servers. Taken together, these tools provide a comprehensive and scalable network monitoring solution.
Key features of SolarWinds network monitoring tools include:
Automated network discovery and mapping to quickly inventory devices and visualize topology
Customizable dashboards, views, and reports to present key performance metrics and health data
Over 1200 pre-built templates for monitoring Cisco, HP, Dell, Juniper, and other network device vendors
Advanced alerting with dynamic baseline thresholds and dependencies to reduce false alarms
PerfStack performance analysis dashboard for easy cross-stack data correlation and root cause identification
Visit SolarWinds →
LogicMonitor
LogicMonitor is a SaaS-based infrastructure monitoring platform that provides unified visibility into complex and hybrid IT environments. It offers comprehensive monitoring capabilities across networks, servers, cloud resources, applications, and more. By collecting metrics, logs, and traces through an agentless collector architecture, LogicMonitor delivers real-time insights into the health and performance of the entire technology stack.
One of LogicMonitor’s key strengths is its ability to automatically discover and monitor devices within minutes of deployment. It creates dynamic topology maps to visualize relationships between critical resources. LogicMonitor also leverages AI and machine learning for advanced capabilities like anomaly detection, forecasting, and intelligent alerting. With customizable dashboards, pre-configured alert thresholds, and extensive integrations, LogicMonitor optimizes digital experiences while consolidating tools and reducing operational overhead.
Key features of LogicMonitor include:
Automated discovery and monitoring of devices, cloud resources, and applications
Dynamic topology mapping to visualize relationships and dependencies
AI-driven insights for anomaly detection, forecasting, and smart alerting
Customizable dashboards and reporting for tailored views of key metrics
Extensive integrations with 2000+ technologies and open API for custom data sources
Visit LogicMonitor →
Nagios
Nagios is a powerful open-source IT infrastructure monitoring tool that enables organizations to identify and resolve problems before they impact critical business processes. Originally developed under the name NetSaint in 1999, Nagios has evolved to become one of the most widely used monitoring platforms, with thousands of projects and plugins extending its core functionality. Nagios runs natively on Linux and other Unix-like systems but can also be deployed on Windows using virtualization.
At its core, Nagios is designed to monitor hosts, services, and network devices. It uses a server-client architecture where plugins run on remote hosts to collect data and send it back to the Nagios server for processing. When issues are detected, Nagios can send alerts via email, SMS, or other notification channels to IT staff, allowing them to quickly respond to outages or performance problems. Nagios also provides a web-based interface for viewing monitoring status, generating reports, and managing configuration.
Beyond its core monitoring engine, the Nagios ecosystem includes several other tools to extend its capabilities. Nagios XI provides an enterprise-grade web interface, advanced visualizations, and features like capacity planning and audit logging. Nagios Fusion allows centralized viewing of multiple Nagios instances. Nagios Log Server enables log monitoring and analysis, while Nagios Network Analyzer provides NetFlow-based traffic analysis.
Key features of Nagios include:
Comprehensive monitoring of IT infrastructure components including servers, network devices, applications, and services
Flexible, plugin-based architecture that allows monitoring of virtually any resource
Centralized view of monitoring status via web interface with user-specific views and dashboards
Proactive alerting via multiple channels to ensure rapid response to issues
Extensible ecosystem with add-ons for log monitoring, network analysis, configuration management, and more
Visit Nagios →
Zabbix
Zabbix is a mature and feature-rich open-source network monitoring solution designed for monitoring the availability and performance of IT infrastructure components including servers, network devices, virtual machines and cloud services. It provides a centralized monitoring system that enables real-time monitoring of thousands of metrics collected from servers, network devices and applications.
One of Zabbix’s key strengths is its flexibility and extensibility. It can monitor a wide range of devices and systems using multiple methods including Zabbix agent, SNMP, IPMI, JMX and custom checks. Zabbix also provides powerful data visualization capabilities including custom graphs, network maps, dashboards and reports. With features like anomaly detection, predictive analytics and auto-discovery of devices, Zabbix helps IT teams proactively monitor their infrastructure and quickly troubleshoot issues.
Key features of Zabbix include:
Distributed monitoring with support for remote Zabbix proxies for monitoring across multiple locations
Agentless monitoring using multiple protocols including SNMP, IPMI, JMX, SSH and Telnet
Powerful data visualization with custom graphs, network maps, dashboards and slideshows
Flexible alerting with customizable escalation scenarios and multiple notification channels
Auto-discovery for automatic registration of new devices and application of appropriate monitoring templates
Visit Zabbix →
Datadog is a comprehensive cloud-based monitoring and analytics platform designed to provide real-time visibility into modern IT environments. It enables organizations to monitor their entire infrastructure, including servers, databases, applications, network devices, and cloud services. By collecting, searching, and analyzing metrics, traces, and logs across fully distributed architectures, Datadog empowers IT teams to proactively detect and resolve performance issues before they impact end-users.
Datadog supports over 600 technologies and services out-of-the-box. This allows seamless data collection from various sources, providing a holistic view of the IT ecosystem. Datadog also offers customizable dashboards, intelligent alerts, and collaboration features, enabling teams to efficiently monitor, troubleshoot, and optimize their systems. With its scalable architecture and flexible deployment options, Datadog caters to businesses of all sizes, from startups to large enterprises.
Key features of Datadog include:
Real-time monitoring of servers, containers, databases, and cloud services, with auto-discovery and detailed performance metrics
End-to-end tracing of requests across distributed systems, identifying bottlenecks and optimizing application performance
Centralized log collection, indexing, and analysis, with powerful search and filtering capabilities
Visibility into network traffic, analyzing communication between services, containers, and cloud environments
Customizable dashboards for visualizing key metrics in real-time
Visit Datadog →
AdRem NetCrunch is a comprehensive network monitoring and management solution designed to provide real-time visibility into IT infrastructure. It offers a wide range of features to streamline network monitoring, including auto-discovery of devices, performance monitoring, customizable dashboards, and an intuitive alerting system. NetCrunch runs on Windows and provides an agentless approach to monitoring, making it easy to deploy and scale.
NetCrunch automatically discovers and maps network devices, creating a dynamic, interactive network atlas. This allows IT teams to visualize their network topology, identify dependencies, and quickly locate the root cause of issues. NetCrunch supports monitoring of various devices and systems, including servers, network devices, applications, virtual environments, and cloud services.
Key features of AdRem NetCrunch:
Agentless monitoring using protocols like SNMP, WMI, and SSH
Automatic network discovery and interactive topology mapping
Customizable dashboards and alerts for tailored network insights
Supports monitoring of servers, network devices, VMs, and cloud services
Extensive reporting and integration with IT management platforms
Visit NetCrunch →
Observium is an open-source network monitoring and management platform that offers auto-discovery capabilities to automatically detect and monitor devices on the network, including servers, switches, routers, and more. Observium supports a wide range of device types and operating systems, such as Cisco, Windows, Linux, HP, Juniper, Dell, and others.
Observium boasts a user-friendly web interface, which presents network data through customizable dashboards, graphs, and reports. It collects data using SNMP and stores it using RRD (Round-Robin Database), enabling efficient storage and retrieval of historical performance metrics. Observium also provides alerting features to notify administrators of potential issues or performance degradations.
Key features of Observium:
Automatic discovery of network devices for easy setup and monitoring
Support for a wide range of device types and operating systems
Customizable dashboards and graphs for data visualization
Alerting system to notify administrators of potential issues
Scalable architecture to monitor large and complex network environments
Visit Observium →
Domotz is a comprehensive cloud-based network monitoring and management software designed for MSPs, IT professionals, and enterprises. It provides real-time visibility and control over IT infrastructure, enabling users to work more efficiently, increase productivity, and resolve issues faster. Domotz offers a user-friendly interface and automated features such as network discovery, topology mapping, and device inventory.
Domotz can monitor a wide range of devices, including servers, workstations, printers, routers, switches, firewalls, and IoT devices, regardless of the manufacturer. It supports various monitoring protocols like SNMP, WMI, and SSH. Domotz also provides secure remote access to devices for troubleshooting, as well as network configuration management with backup and restore capabilities.
Key features of Domotz:
Automated network discovery, inventory, and topology mapping
Supports monitoring of diverse devices across multiple sites and networks
Secure remote access for troubleshooting and issue resolution
Network configuration management with backup, restore and change alerts
Intuitive web-based interface with customizable dashboards and reporting
Visit Domotz →
AKIPS
AKIPS is a powerful and scalable network monitoring software designed to provide comprehensive visibility into large enterprise network infrastructures. It offers a fully-featured, fast, and cost-effective solution for monitoring network performance, enabling network engineers to proactively identify and resolve issues before they impact business operations. AKIPS can monitor over one million interfaces and 500,000 flows per second from a single server, making it one of the most scalable network monitoring tools on the market.
One of the standout features of AKIPS is its ability to provide real-time insights and historical data down to one-minute granularity for up to three years. This allows network administrators to quickly identify the root cause of issues and make informed decisions. AKIPS also offers automated device discovery, adaptive polling, syslog and SNMP trap management, NetFlow analysis, and configuration management capabilities, providing a comprehensive toolkit for network monitoring and management.
Key one-line features of AKIPS:
Scalable architecture monitoring over 1 million interfaces from a single server
Real-time insights and 3 years of historical data at 1-minute granularity
Automated network discovery and adaptive polling optimizing SNMP traffic
Advanced syslog, SNMP trap management and alerting for proactive issue detection
NetFlow analysis with up to 500k flows/sec and configuration management tools
Visit AKIPS →
The Bottom Line
Choosing the right network monitoring tool is essential for keeping your IT infrastructure running smoothly. Whether you opt for a comprehensive cloud-based platform, a flexible open-source solution, or a combination of tools, having real-time visibility into your network’s performance is crucial. Consider your organization’s specific needs, budget, and existing IT ecosystem when selecting a monitoring solution. By implementing the right tool or combination of tools, you can proactively identify and resolve issues, optimize network performance, and ensure a seamless experience for your end-users.
#000#2024#agent#ai#alerts#Analysis#Analytics#API#applications#approach#architecture#audit#auvik#backup#backups#Best Of#Blog#box#Business#change#change management#charts#Cisco#Cloud#cloud services#Collaboration#communication#comprehensive#Containers#dashboard
0 notes
Text
can i install vpn on ps4
🔒🌍✨ Get 3 Months FREE VPN - Secure & Private Internet Access Worldwide! Click Here ✨🌍🔒
can i install vpn on ps4
VPN setup on PS4
Setting up a VPN on your PS4 can provide you with added security, anonymity, and the ability to access region-locked content. Whether you want to enhance your gaming experience or simply protect your online privacy, configuring a VPN on your PS4 is a straightforward process that can be achieved in a few simple steps.
To begin, you'll need to choose a reputable VPN service that is compatible with gaming consoles such as the PS4. Once you've selected a VPN provider, create an account and follow their specific instructions for setting up the service on a router. This is necessary as the PS4 itself does not have native VPN support.
After configuring the VPN on your router, connect your PS4 to the router either via Wi-Fi or an Ethernet cable. Access the network settings on your PS4, and select the option to set up a new internet connection. Choose the 'Use a LAN Cable' option if you are using an Ethernet connection, or select Wi-Fi if connecting wirelessly.
When prompted for the IP address settings, choose 'Automatic' and then select 'Do Not Specify' for the DHCP Host Name. For the DNS settings, choose 'Manual' and enter the DNS server provided by your VPN service. Complete the setup process by saving the settings, and your PS4 will now be connected to the internet through the VPN.
By setting up a VPN on your PS4, you can enjoy enhanced security, privacy, and access to geo-restricted content while gaming online. Take the necessary steps to configure a VPN on your PS4 today and experience the benefits it has to offer.
PS4 VPN compatibility
PlayStation 4 (PS4) is a popular gaming console for both casual and hardcore gamers worldwide. With the growing concern for online privacy and security, many PS4 users are seeking ways to enhance their gaming experience while maintaining their anonymity. One such solution that users are turning to is VPN (Virtual Private Network) compatibility for PS4.
Using a VPN on your PS4 can offer numerous benefits, including improved online gaming performance, access to region-locked games and content, and increased security against potential cyber threats. By connecting your PS4 to a VPN server, you can mask your real IP address and encrypt your internet connection, making it difficult for hackers or third parties to track your online activities.
Setting up a VPN on your PS4 is relatively straightforward, as many VPN providers offer dedicated apps or step-by-step guides on how to configure your console. By subscribing to a trusted VPN service, you can choose from a variety of servers located around the world to optimize your gaming experience by reducing lag and ping times.
However, it is essential to choose a VPN provider that offers fast connection speeds, stable servers, and robust security features to ensure a smooth gaming experience on your PS4. Additionally, it is crucial to understand the terms of service and any potential limitations when using a VPN for gaming to avoid any conflicts with the PS4 network policies.
In conclusion, VPN compatibility for PS4 can be a valuable tool for enhancing your gaming experience while prioritizing privacy and security. By utilizing a VPN on your PS4, you can enjoy a more secure and versatile gaming environment with access to global content and protection against online threats.
Installing VPN client on PS4
Installing a VPN client on your PS4 can enhance your gaming experience by providing added security, privacy, and access to region-restricted content. While the PlayStation 4 doesn't natively support VPNs, you can still configure a VPN connection through your router. Here's how to do it:
Choose a VPN Provider: Begin by selecting a reputable VPN provider that offers support for routers. Ensure they have servers in locations where you want to access content.
Configure Your Router: Access your router's settings by typing its IP address into your web browser. Look for the option to set up a VPN connection. The process varies depending on your router's make and model, but most routers support VPN configurations. Follow your VPN provider's instructions for setting up a VPN connection on your specific router.
Obtain VPN Credentials: Your VPN provider will supply you with the necessary credentials, including a server address, username, and password. Input this information into your router's VPN settings.
Connect Your PS4 to the VPN: Once your router is configured with the VPN settings, your entire network—including your PS4—will be routed through the VPN connection. To ensure your PS4 is connected to the VPN, check your router's settings or use a website like whatismyip.com to confirm your IP address reflects the VPN server location.
Test Your Connection: Launch your favorite games or streaming services on your PS4 to verify that the VPN connection is working correctly. You should notice improved privacy, security, and access to geo-blocked content.
By installing a VPN client on your PS4 via your router, you can enjoy a more secure and versatile gaming experience. Remember to choose a reliable VPN provider and follow the setup instructions carefully to ensure smooth operation.
VPN configuration for PS4
Setting up a VPN (Virtual Private Network) on your PS4 can enhance your gaming experience by providing better security, privacy, and access to geo-restricted content. With a VPN, you can protect your sensitive information, such as your IP address, from potential hackers and cyber threats while also bypassing regional restrictions imposed by gaming developers.
To configure a VPN on your PS4, you have a few options. One method is to configure the VPN connection directly on your router, which then covers all devices connected to it, including your PS4. Alternatively, you can configure the VPN on your computer and share its network connection with your PS4. Finally, some VPN providers offer dedicated apps for consoles, making the setup process straightforward.
Before you begin the configuration process, you must subscribe to a reliable VPN service that offers fast speeds and a wide network of servers. Once you have selected a VPN provider, follow their specific instructions for configuring the VPN on your PS4. Typically, this involves installing the VPN app, logging in with your credentials, selecting a server location, and connecting to the VPN.
After setting up the VPN on your PS4, you can enjoy a range of benefits such as reduced lag, protection against DDoS attacks, and the ability to access games and content from different regions. Remember to choose a VPN provider with strong encryption protocols and a strict no-logs policy to ensure your privacy and security while gaming on your PS4.
Setting up VPN on PlayStation 4
Setting up a Virtual Private Network (VPN) on your PlayStation 4 (PS4) can enhance your gaming experience by providing security, privacy, and access to region-restricted content. While the PS4 doesn't have built-in VPN support like some other devices, you can still configure it to use a VPN by following these steps.
Choose a VPN Provider: First, select a VPN provider that offers support for gaming consoles and has servers in locations you want to access. Look for providers with easy-to-use setup guides and reliable performance.
Sign Up and Install: Sign up for a VPN subscription and follow the provider's instructions to install the VPN on your router. Most VPN services offer router-compatible software or firmware that you can install to secure your entire network, including your PS4.
Configure Router Settings: Access your router's settings through a web browser and log in using the administrator credentials. Navigate to the VPN settings section and enter the credentials provided by your VPN provider. Follow the specific instructions provided by your VPN service to complete the setup process.
Connect Your PS4: Once the VPN is configured on your router, ensure that your PS4 is connected to the same network. You can do this either via Wi-Fi or Ethernet cable.
Test the Connection: Turn on your PS4 and navigate to the network settings. Test the internet connection to ensure that your PS4 is now connected through the VPN. You may also want to check your IP address to confirm that it reflects the location of the VPN server you selected.
Enjoy Secure Gaming: With the VPN set up on your PS4, you can now enjoy gaming with added security and privacy. Additionally, you can bypass geo-restrictions to access content from different regions, expanding your gaming library and online experience.
By following these steps, you can easily set up a VPN on your PlayStation 4 and enjoy a safer, more versatile gaming experience. Remember to choose a reputable VPN provider and regularly update your router's firmware for optimal performance and security.
0 notes
Text
does ddwrt with vpn be set udp tcp
🔒🌍✨ Get 3 Months FREE VPN - Secure & Private Internet Access Worldwide! Click Here ✨🌍🔒
does ddwrt with vpn be set udp tcp
DD-WRT VPN UDP configuration
Title: Configuring DD-WRT VPN for UDP: A Step-by-Step Guide
DD-WRT is a popular third-party firmware for routers that unlocks advanced features and customization options. One of its most sought-after features is the ability to configure VPN connections, providing users with enhanced privacy and security. When setting up a VPN on DD-WRT, choosing the right protocol is crucial. UDP (User Datagram Protocol) is often preferred for its speed and efficiency in VPN connections. Here's a step-by-step guide to configuring DD-WRT VPN for UDP:
Choose a VPN Provider: First, select a VPN provider that supports UDP connections. Ensure that they offer compatible configurations and reliable service.
Access DD-WRT Router Settings: Log in to your DD-WRT router's web interface using a web browser. Navigate to the "Setup" tab and then to "Basic Setup."
Configure VPN Settings: Scroll down to the "Network Address Server Settings (DHCP)" section. Underneath, you'll find the "Gateway (PPTP Server)" and "Gateway (PPTP Client)" options. Enter the VPN server address provided by your VPN provider.
Select UDP Protocol: Locate the "Connection Type" dropdown menu and choose "PPTP" from the list. Then, select "UDP" as the preferred protocol.
Enter VPN Credentials: Input your VPN username and password in the respective fields. These credentials are provided by your VPN provider upon subscription.
Apply Settings: After entering all necessary information, scroll down and click on the "Apply Settings" button to save your configurations.
Restart Router: To ensure that the changes take effect, restart your DD-WRT router.
Test Connection: Once the router has restarted, navigate to the "Status" tab and then to "WAN." Check if the connection status indicates that the VPN is connected successfully.
By following these steps, you can effectively configure DD-WRT VPN for UDP, enjoying improved security and privacy for your internet activities. Remember to regularly update your router's firmware and VPN configurations for optimal performance and security.
DD-WRT VPN TCP setup
DD-WRT is a popular open-source firmware that can be installed on many wireless routers to enhance their functionality. One of the key features of DD-WRT is the ability to set up a Virtual Private Network (VPN) connection using TCP protocol, which can help increase security and privacy while browsing the internet.
Setting up a VPN on DD-WRT using TCP protocol involves a few steps. First, you need to access your router's web interface and navigate to the VPN tab. From there, you can choose the OpenVPN client option and enter the necessary configuration details provided by your VPN service provider. Make sure to select TCP as the protocol and input the server address, port, and any authentication details required.
After entering the configuration information, save the settings and then click on the Start Now button to establish the VPN connection. Once the connection is successfully established, all internet traffic from devices connected to the DD-WRT router will be encrypted and routed through the VPN server using TCP protocol.
Using TCP for VPN connections in DD-WRT can offer more reliable performance and better compatibility with networks that may block UDP traffic. However, it is essential to consider the potential trade-off between speed and reliability when choosing between TCP and UDP protocols for your VPN setup.
Overall, setting up a VPN connection using TCP protocol on DD-WRT can enhance your online security and privacy, making it a valuable feature for those looking to secure their internet connections.
UDP vs TCP for DD-WRT VPN
When setting up a VPN on a DD-WRT router, one important consideration is choosing between UDP (User Datagram Protocol) and TCP (Transmission Control Protocol) as the communication protocol. Both UDP and TCP have their own advantages and limitations, so it's crucial to understand how each protocol works to make an informed decision based on your specific needs.
UDP is known for its speed and efficiency due to its connectionless nature. It does not require the same level of handshaking as TCP, which can result in faster transmission speeds. UDP is ideal for real-time applications that require low latency, such as online gaming or streaming. However, UDP does not have built-in error checking and correction, which means that data packets may be lost or arrive out of order.
On the other hand, TCP is a reliable protocol that ensures data integrity through error checking and retransmission of lost packets. While TCP may be slightly slower than UDP due to the additional overhead it carries, it is better suited for applications that require accurate and complete data transmission, such as file sharing or web browsing.
When choosing between UDP and TCP for a DD-WRT VPN, consider the type of activities you will be using the VPN for. If speed and real-time performance are key factors, UDP may be the better choice. However, if data accuracy and reliability are more important, TCP would be the preferred option.
Ultimately, the decision between UDP and TCP for a DD-WRT VPN will depend on your specific needs and priorities. By understanding the differences between these two protocols, you can make an informed choice that ensures optimal performance and security for your VPN connection.
DD-WRT VPN protocol options
DD-WRT is a popular open-source firmware that can enhance the capabilities of routers. One of the key features of DD-WRT is the ability to configure VPN protocols for secure internet connectivity. VPN protocols are essential for establishing a secure and encrypted connection between your device and the VPN server. DD-WRT offers several VPN protocol options to choose from, each with its own strengths and weaknesses.
One of the most commonly used VPN protocols supported by DD-WRT is OpenVPN. OpenVPN is known for its strong security features and reliable performance. It is highly customizable and supports a variety of encryption algorithms, making it a popular choice for users who prioritize security.
Another VPN protocol option available on DD-WRT is PPTP (Point-to-Point Tunneling Protocol). PPTP is easy to set up and offers fast connection speeds, but it is considered less secure than other protocols due to potential vulnerabilities.
L2TP/IPsec (Layer 2 Tunneling Protocol/Internet Protocol Security) is another VPN protocol supported by DD-WRT. L2TP/IPsec provides strong encryption and is generally considered more secure than PPTP. It can be a good option for users who prioritize security and performance.
In addition to these protocols, DD-WRT also supports SSTP (Secure Socket Tunneling Protocol) and IKEv2 (Internet Key Exchange version 2) for VPN connections. These protocols offer strong security features and are suitable for users who require high levels of encryption.
Overall, DD-WRT provides users with a range of VPN protocol options to suit their specific needs for security, performance, and ease of configuration. It is important to carefully consider your requirements and choose the most suitable VPN protocol when setting up a VPN connection on DD-WRT.
Optimizing DD-WRT VPN for UDP and TCP
Title: Optimizing DD-WRT VPN for UDP and TCP: A Comprehensive Guide
DD-WRT, a Linux-based firmware for wireless routers and access points, offers robust features for optimizing Virtual Private Network (VPN) connections. When it comes to VPN protocols, users often face the dilemma of choosing between User Datagram Protocol (UDP) and Transmission Control Protocol (TCP). Each has its advantages and choosing the right one can significantly impact VPN performance.
UDP is preferred for its speed and efficiency in transmitting data packets without the overhead of error correction and acknowledgment. However, UDP can be less reliable in congested networks or over long distances. On the other hand, TCP ensures reliable delivery by retransmitting lost packets and maintaining packet order but may suffer from slower speeds due to its error-checking mechanisms.
To optimize DD-WRT VPN for UDP and TCP, several key considerations come into play:
Network Conditions: Assess the network environment to determine the most suitable protocol. UDP is ideal for high-speed connections with minimal latency, while TCP is better suited for unstable or congested networks.
VPN Server Configuration: Configure the VPN server to support both UDP and TCP connections. This allows users to switch between protocols based on their preferences or network conditions.
MTU Settings: Adjust the Maximum Transmission Unit (MTU) settings on DD-WRT to optimize packet size for efficient transmission. Experiment with different MTU values to find the optimal balance between speed and reliability for both UDP and TCP.
Port Forwarding: Set up port forwarding on the router to ensure that VPN traffic is properly directed to the VPN server. This helps improve connectivity and reduces the likelihood of packet loss or delays.
Encryption and Authentication: Choose appropriate encryption and authentication settings for both UDP and TCP connections. Balancing security with performance is crucial for optimizing VPN performance.
By carefully configuring DD-WRT VPN settings for both UDP and TCP protocols, users can achieve an optimal balance between speed, reliability, and security for their VPN connections. Experimentation and fine-tuning may be necessary to find the ideal configuration for specific network environments and usage scenarios.
0 notes
Text
Common Problems with Vizio 40-Inch TVs and How to Fix Them

Vizio Smart 4k TVs are known for their affordable range and high-quality picture. With features like SmartCast and integration with voice assistants, these TVs offer a seamless viewing experience. However, like any electronic device, Vizio 40 Inch TVs may encounter issues from time to time. In this comprehensive guide, we'll address common Vizio TV problems and provide troubleshooting steps to help you get your TV back to its optimal performance.
1. The TV Turns On, Then Right Back Off
Solution:
- Press the menu key on your VIZIO remote.
- Choose System.
- Turn the Power Mode setting to Eco Mode.
- If that doesn't work, try turning the CEC setting to OFF in the System menu.
- Ensure the power cord is securely plugged into the wall outlet.
- If all else fails, consider factory resetting your TV:
- Press the menu key on your VIZIO remote.
- Choose System.
- Select Reset & Admin.
- Select Reset to Factory Settings. Note that you'll need to set up your TV again after this.
2. Vizio TV Screen Is Flickering
Solution:
- Remove all connected cables from both the TV and connecting devices, wait for about 30 seconds, and reconnect them.
- In the menu, turn off settings like Ambient Lighting, Backlight Control, and Advanced Adaptive Luma.
- If flickering persists:
- Power off the TV.
- Unplug the power cord.
- Press and hold the power button on the TV for 30 seconds.
- Plug the TV back in and power it on.
- Consider a factory reset if needed.
3. TV Shows Pictures but No Sound
Solution:
- Ensure the TV volume is above zero.
- Check if the TV is muted.
- Confirm that device cables are securely connected.
- Disconnect and reconnect HDMI cables.
- Turn TV speakers ON in the Audio settings.
- If issues persist, consider professional assistance.
4. The Menu Is Not Working
Solution:
- Power cycle the TV by unplugging it and trying again.
- Perform a factory reset:
- Use the buttons on the TV to do this:
- Press and hold the Volume Down and Input buttons on the TV.
- Follow on-screen prompts for a reset.
5. The TV Turns On but Doesn’t Show Pictures
Solution:
- Press the power button on your remote and wait.
- Check if the TV power indicator light is on.
- Press the menu button on the remote; if the menu appears, the TV is working. Ensure the correct input channel.
- Check all cable connections.
6. Black Screen of Death
Solution:
- Check power connections.
- Perform a power cycle (as mentioned in #2).
- Conduct a flashlight test; if you see an image, it may be a hardware issue.
- Listen for sound; if you hear it, the hardware may need replacing. Contact a professional.
7. SmartCast Won't Load
Solution:
- Ensure a stable internet connection.
- Switch to HDMI 1 and wait for programming to load.
- Perform a Soft Power Cycle in the System menu.
- If SmartCast still doesn't load, consider a factory reset.
8. Vizio TV Won’t Connect to Wi-Fi
Solution:
- Confirm a stable internet connection on another device.
- Turn DHCP settings to ON in the Network settings.
- Power cycle all devices, including the router and modem.
- Reset your TV to factory settings and reconfigure the network connection.
- Try a wired Ethernet connection if Wi-Fi doesn't work.
9. TV Won't Turn On with the Remote
Solution:
- Remove any obstacles from the front of the TV.
- Insert new remote batteries.
- Power cycle the remote by removing batteries, pressing all buttons, reinserting batteries, and checking if it works.
- Try a different Vizio TV remote.
- If the remote works, power cycle the TV as mentioned earlier.
10. TV Won't Stay Off
Solution:
- Ensure the power button on the remote isn't stuck.
- Turn off CEC (Consumer Electronics Control) in the System settings.
- Power cycle the TV by unplugging, holding the power button for five seconds, and plugging it back in.
Conclusion
Vizio TVs offer an excellent viewing experience, but problems can arise. Following these troubleshooting steps can help you resolve common issues. If all else fails, consider reaching out to customer support for further assistance. Enjoy your uninterrupted TV viewing!
0 notes
Text
Understanding Winbox: A Comprehensive Guide
Winbox is a powerful and user-friendly graphical interface used to configure and manage MikroTik routers. With its intuitive design and extensive features, it has become an indispensable tool for network administrators and enthusiasts. In this guide, we will delve into the fundamental aspects of winbox, highlighting its key features, installation process, and basic usage.

Key Features:
Winbox offers a plethora of features that make managing MikroTik routers a breeze. Some of its notable features include:
Graphical Interface: Winbox provides a visual representation of your network setup, making it easier to understand and manage complex configurations.
Configuration Management: You can modify various settings of your MikroTik router, including network interfaces, firewall rules, DHCP server settings, and more.
Real-time Monitoring: Winbox allows you to monitor real-time statistics of your router, such as network traffic, CPU usage, memory utilization, and active connections.
Firmware Upgrades: You can easily upgrade your router's firmware to access new features and security updates.
Backup and Restore: Winbox enables you to create backups of your router's configuration and restore them if needed.
Secure Connection: The tool supports secure connections through SSH and SSL, ensuring that your data remains encrypted and protected.
Installation Process:
To get started with Winbox, follow these steps:
Download Winbox: Visit the official MikroTik website and navigate to the "Downloads" section. Find the Winbox download link and save the executable file to your computer.
Run Winbox: Double-click the downloaded file to launch Winbox. There is no need for installation; it runs as a standalone application.
Connect to Router: Upon launching Winbox, you will be presented with the "Connect to" field. Enter the IP address of your MikroTik router in this field.
Login: Enter your router's username and password in the respective fields. The default credentials are usually "admin" for both the username and password. It's advisable to change these credentials for security reasons.
Initial Configuration: Once logged in, you can begin configuring and managing your router using the intuitive interface.
Basic Usage:
Navigating Winbox is relatively simple due to its user-friendly design. Here's a brief overview of the basic usage:
Main Menu: The left side of the Winbox window displays the main menu, which provides access to various sections like Interfaces, IP, Firewall, Wireless, and more.
Toolbar: The top toolbar contains essential shortcuts for common tasks such as connecting to a router, disconnecting, and searching for routers on the network.
Quick Set: The "Quick Set" button offers a simplified way to configure basic settings like IP addresses, wireless networks, and DHCP servers.
Status and Statistics: The main window displays real-time statistics about the router, including resource usage, active connections, and interface details.
Configuration Tabs: When you select a menu item from the left panel, corresponding tabs with configuration options will appear on the right side. This is where you can make changes to your router's settings.
Saving Changes: After making configuration adjustments, remember to click the "Apply" button to save the changes to your router. You can also use the "OK" button to save and close the current configuration tab.
Disconnecting: Always disconnect from the router by clicking the "X" button in the top-right corner of the Winbox window or using the disconnect button in the toolbar. This ensures that your session is properly closed.
In conclusion, Winbox is an essential tool for efficiently managing MikroTik routers. Its intuitive graphical interface, diverse features, and real-time monitoring capabilities make it a go-to choice for network administrators and users looking to configure their routers with ease. By following the installation process and understanding the basics of its usage, you can harness the power of Winbox to streamline your network management tasks.
1 note
·
View note
Photo
TP-Link Archer AX20 AX1800 Dual Band Wifi 6 Router FEATURES: Dual-Band Wi-Fi 6: Equipped with the latest wireless technology, Wi-Fi 6, for faster speeds, greater capacity, and reduced network congestion Next-Gen 1.8Gbps Speeds: Enjoy smooth streaming, downloading, and gaming all without buffering with Wi-Fi speeds of 1.8Gbps Connect More Devices: Wi-Fi 6 technology communicates more data to more devices using revolutionary OFDMA technology while simultaneously reducing lag Quad-Core Processing: The 1.5GHz quad-core CPU ensures communications between your router and all connected devices are smooth Extensive Coverage: Beamforming, independent FEM, and four antennas combine to deliver focused reception to devices far away Increased Battery Life: Target Wake Time technology reduces your devices’ power consumption to extend their battery life USB Easy Sharing: A USB 2.0 Port enables easy file sharing within your network or building private Cloud Storage Easy Setup: Set up your router in minutes with the powerful TP-Link Tether App Backward Compatible: Supports all previous 802.11 standards and all Wi-Fi devices WIRELESS Standards Wi-Fi 6 IEEE 802.11ax/ac/n/a 5 GHz IEEE 802.11ax/n/b/g 2.4 GHz WiFi Speeds AX1800 5 GHz: 1201 Mbps (802.11ax) 2.4 GHz: 574 Mbps (802.11ax) WiFi Range 3 Bedroom Houses 4× Fixed High-Performance Antennas Multiple antennas form a signal-boosting array to cover more directions and large areas Beamforming Concentrates wireless signal strength towards clients to expand WiFi range High-Power FEM Improves transmission power to strengthen signal coverage WiFi Capacity High Dual-Band Allocate devices to different bands for optimal performance OFDMA Simultaneously communicates with multiple Wi-Fi 6 clients Airtime Fairness Improves network efficiency by limiting excessive occupation 4 Streams Connect your devices to more bandwidth Working Modes Router Mode Access Point Mode HARDWARE Processor 1.5 GHz Quad-Core CPU Ethernet Ports 1× Gigabit WAN Port 4× Gigabit LAN Ports USB Support 1× USB 2.0 Port Supported Partition Formats: NTFS, exFAT, HFS+, FAT32 Supported Functions: Apple Time Machine FTP Server Media Server Samba Server Buttons WPS/Wi-Fi Button Power On/Off Button LED On/Off Button Reset Button Power 12 V ⎓ 1.5 A SECURITY WiFi Encryption WPA WPA2 WPA3 WPA/WPA2-Enterprise (802.1x) Network Security SPI Firewall Access Control IP & MAC Binding Application Layer Gateway Guest Network 1× 5 GHz Guest Network 1× 2.4 GHz Guest Network VPN Server OpenVPN PPTP SOFTWARE Protocols IPv4 IPv6 Parental Controls URL Filtering Time Controls WAN Types Dynamic IP Static IP PPPoE PPTP L2TP Quality of Service QoS by Device Cloud Service Auto Firmware Upgrade OTA Firmware Upgrade TP-Link ID DDNS NAT Forwarding Port Forwarding Port Triggering DMZ UPnP IPTV IGMP Proxy IGMP Snooping Bridge Tag VLAN DHCP Address Reservation DHCP Client List Server DDNS TP-Link NO-IP DynDNS Management Tether App Webpage PHYSICAL Dimensions (W×D×H) 10.2 × 5.3 ×1.5 in (260.2 × 135.0 × 38.6 mm) Package Contents Wi-Fi Router Archer AX20 Power Adapter RJ45 Ethernet Cable Quick Installation Guide OTHER System Requirements Internet Explorer 11+, Firefox 12.0+, Chrome 20.0+, Safari 4.0+, or other JavaScript-enabled browser Cable or DSL Modem (if needed) Subscription with an internet service provider (for internet access) Certifications FCC, CE, RoHS Environment Operating Temperature: 0℃~40℃ (32℉ ~104℉) Storage Temperature: -40℃~70℃ (-40℉ ~158℉) Operating Humidity: 10%~90% non-condensing Storage Humidity: 5%~90% non-condensing TEST DATA WiFi Transmission Power CE:
0 notes
Text
Configure your network settings to use Google Public DNS
When you use Google Public DNS, you are changing the operator of your DNS "switchboard" from your ISP to Google Public DNS. In most cases, the Dynamic Host Configuration Protocol (DHCP) configures your system to use the IP addresses of your Internet Service Provider's domain name servers. You must explicitly change the DNS settings in your operating system or device to use the Google Public DNS IP addresses in order to use Google Public DNS. The method for changing your DNS settings differs depending on your operating system and version (Windows, Mac, Linux, or ChromeOS) or the device (computer, phone, or router). We provide general procedures that may not apply to your operating system or device; consult your vendor documentation for authoritative information.
Depending on your system, you may also be able to enable a new privacy-oriented feature known as DNS-over-TLS. This feature protects the privacy and security of DNS messages sent between your device and Google's DNS servers. Details on configuring this optional feature are provided in separate sections for each system.
Important:
Before you change your DNS settings to use Google Public DNS, be sure to write down the current server addresses or settings on a piece of paper. It is very important that you keep these numbers for backup purposes, in case you need to revert to them at any time.
We also recommend that you print this page, in the event that you encounter a problem and need to refer to these instructions.
Google Public DNS IP addresses
The Google Public DNS IP addresses (IPv4) are as follows:
8.8.8.8 8.8.4.4
To continue reading click here
For more detailed information, visit Swipe Blogs.
0 notes
Text
How to Use the DHCP Feature on a Router
Dynamic Host Configuration Protocol (DHCP) feature enables an individual to assign a different IP address to all the devices paired to their router network. This helps in resolving any network error issues while using two or more devices on the same network as every device is assigned with its own unique IP address. This allows an individual to access all of their devices at once and that too without facing any connection errors, so if you wish to activate this feature on your router, then follow the steps mentioned below.

Steps to Search Your Router Address on Windows
First, ensure that your PC is connected with the internet. If by any means, your computer system is not paired with the internet, then you will fail to find the address of your router. Use Ethernet cable if your router is unable to connect to your computer.
Now launch the Start menu by holding “Win” key from your keyboard, or you can simply select the Windows logo from the bottom left of your display screen.
Then choose the “Settings” option from the extreme left of your Start menu.
After that, choose the “Network & Internet” option from the Settings tab.
Now scroll down from the Network & Internet window and select the “View your network properties” option.
Then look for the “Default gateway” option. You will be able to view some numbers adjacent to this option. This number code is the address of your router which would be required to change the DHCP settings.
By following the steps mentioned above, an individual can easily find their IP address from their Windows computer. If you have a Mac system, then you can go through the steps mentioned below to find the address for your router to configure your DHCP settings.
Steps to Search Your Router Address on Mac
First, make sure that your Mac system is linked with an internet connection. It is necessary to make sure that your device is paired with an internet connection, as it would be impossible to find your router address if the internet connection won’t be enabled.
You can also choose to use an Ethernet cable to pair your router with your Mac to ensure the internet connection is stable at all times while you look for the address of your router.
Now launch the Apple menu by selecting the Apple logo from the extreme top-left of your display screen.
Then launch the “System Preferences” option from the Apple menu drop down menu.
After that choose the “Network” option from the popped up System Preferences panel.
Now select the “Advanced” option.
Then choose the “TCP/IP” option from the Advanced popped-up panel.
Now look for “Router” option. You will be able to observe some numbers adjacent to the Router option. This number is the address of your router, and it will come in handy to customize your DHCP settings.
By going through the steps mentioned above, users can easily find the address of their router by using a Mac device. Once you have access to the IP Address of your router, follow the steps mentioned below to customize your DHCP settings.
Steps to Enable Your Router’s DHCP Settings
Head to your systems web browser and launch it.
Now enter the address of your router. By doing so, you will be redirected to your routers home page.
Then enter your ID and password if prompted.
Generally, the router ID and password are available on the manual of the router; still, you can use the router name or model to look for the user name and password online.
If you have previously changed the password of your router, then enter that passcode or use the reset button on the router to bring it back to its factory settings.
After that head to your router’s settings page. Consider the fact that every router has a different appearance to their home page, so don’t be confused and simply search for the option named Router settings.
Now look for “DHCP settings” option. If you fail to observe any such title or option, then try to navigate to other options equivalent to it. You can also search for options like “Setup settings, Advanced settings or Local settings” to find the DHCP settings.
Once you find the DHCP settings panel, select the “Enable DHCP” option.
Then save your new settings by choosing the “Save” button. If your system pop-up a restart your system dialog, then select “OK” and restart your computer system to apply the new settings permanently.
Hopefully, users will now be able to customize their router’s DHCP settings and enjoy browsing the internet on multiple devices, without worrying about the connection error code.
Enne Garcia is a self-professed security expert; she has been making the people aware of the security threats. Her passion is to write about Cyber security, cryptography, malware, social engineering, internet and new media. She writes for Norton security products at norton.com/setup.
Source: https://quicksetupme.com/how-to-use-the-dhcp-feature-on-a-router/
0 notes
Text
does ipsec vpn require static ip addresses
🔒🌍✨ Get 3 Months FREE VPN - Secure & Private Internet Access Worldwide! Click Here ✨🌍🔒
does ipsec vpn require static ip addresses
IPSec VPN configuration without static IP
Configuring an IPSec VPN without a static IP address can be achieved through dynamic DNS services. When setting up an IPSec VPN, it is common practice to have static IP addresses for both ends to establish a secure connection. However, in situations where one or both ends have dynamic IP addresses that frequently change, using dynamic DNS can be a reliable solution.
Dynamic DNS, also known as DDNS, allows users to assign a fixed domain name to a dynamic IP address. This enables the devices to be easily reachable even when their IP addresses change. By configuring dynamic DNS on both VPN endpoints, users can establish a stable connection for their IPSec VPN.
To configure an IPSec VPN without static IP addresses using dynamic DNS, users need to sign up for a DDNS service provider and set up a hostname. This hostname will be used to identify the VPN endpoints instead of relying on static IP addresses. Each endpoint will update the DDNS service with its current IP address whenever it changes, ensuring that the hostname always points to the correct location.
By incorporating dynamic DNS into the IPSec VPN configuration, users can maintain a secure and reliable connection even when dealing with dynamic IP addresses. This method provides flexibility and convenience for users who do not have static IP addresses but still require a stable VPN connection for their communication needs.
Dynamic IP compatibility with IPSec VPN
Dynamic IP addresses can pose a challenge when configuring Internet Protocol Security (IPSec) Virtual Private Networks (VPNs). Unlike static IP addresses that remain constant, dynamic IP addresses are subject to change periodically, making it difficult to establish a persistent and secure VPN connection.
However, modern IPSec VPN solutions have evolved to support dynamic IP addresses, allowing for seamless connectivity even when the IP addresses are in flux. By utilizing technologies such as Dynamic DNS (DDNS) or IKEv2 Mobility and Multihoming Protocol (MOBIKE), IPSec VPNs can adapt to the changing IP addresses of dynamic connections.
Dynamic IP compatibility with IPSec VPNs ensures that remote users can securely access corporate networks, cloud services, or other resources without disruption, even if their IP addresses change. This flexibility is especially beneficial for mobile users or those in dynamic network environments.
To configure an IPSec VPN with dynamic IP compatibility, organizations can leverage VPN gateways or routers that support dynamic IP address negotiation protocols. By enabling features like DDNS updates or MOBIKE support, IT administrators can ensure that VPN tunnels remain stable and secure, regardless of the changing IP addresses.
In conclusion, dynamic IP compatibility with IPSec VPNs is essential for modern networking scenarios where IP addresses are not static. By leveraging the latest technologies and protocols, organizations can establish secure and reliable VPN connections that adapt to the dynamic nature of IP addressing, ensuring seamless connectivity for remote users.
Static IP requirement for IPSec VPN setup
Setting up an IPSec VPN (Internet Protocol Security Virtual Private Network) involves various configurations, including the consideration of whether to utilize static or dynamic IP addresses. While dynamic IPs might suffice for basic connectivity, employing a static IP address offers several advantages, particularly in terms of stability and security.
A static IP address remains constant, ensuring consistent communication between VPN endpoints. This stability is crucial for maintaining uninterrupted VPN connections, especially in scenarios where dynamic IPs might change frequently due to DHCP (Dynamic Host Configuration Protocol) leases. With a static IP, there's no risk of losing connectivity due to an IP address change, which could disrupt ongoing sessions or require constant reconfiguration.
Moreover, static IPs facilitate easier network management and troubleshooting. Administrators can create predefined access control lists and firewall rules based on known static IP addresses, enhancing network security by restricting access only to authorized devices. This level of control is essential for safeguarding sensitive data transmitted over the VPN, as it minimizes the risk of unauthorized access or intrusion attempts.
In addition to stability and security benefits, using static IPs simplifies the setup process for IPSec VPNs. Configuring VPN tunnels and encryption protocols becomes more straightforward when endpoints are assigned static IP addresses, eliminating the need to constantly update configurations to accommodate dynamic IP changes.
Overall, while dynamic IPs might offer some flexibility, the advantages of utilizing static IP addresses in IPSec VPN setups—including enhanced stability, security, and ease of management—make them the preferred choice for organizations prioritizing reliable and secure remote connectivity. By implementing static IP requirements, businesses can ensure seamless VPN operations while minimizing potential vulnerabilities in their network infrastructure.
Alternatives to static IP for IPSec VPN
In the world of networking and cybersecurity, setting up secure connections through IPSec VPNs is crucial for ensuring data privacy and integrity. Traditionally, static IP addresses have been used to establish such connections, but there are alternatives available that offer flexibility and enhanced security.
Dynamic DNS services provide a viable alternative to static IP addresses for IPSec VPNs. These services assign a domain name to a dynamic IP address, allowing for seamless remote access to VPNs without the need for a fixed IP. By updating the DNS records automatically whenever the IP address changes, dynamic DNS services offer a convenient solution for remote VPN connections.
Another alternative to static IP addresses for IPSec VPNs is the use of cloud-based VPN solutions. Cloud VPN services offer scalable and secure connectivity options without the constraints of static IP addresses. Users can easily provision VPN connections in the cloud and manage them effectively without the limitations of traditional IP addressing schemes.
Additionally, VPN protocols such as OpenVPN and WireGuard support dynamic IP addressing, making them suitable alternatives for IPSec VPNs. These protocols offer robust security features and efficient data encryption while supporting dynamic IP configurations for enhanced flexibility and ease of use.
In conclusion, while static IP addresses have been a standard choice for IPSec VPNs, there are alternative solutions available that offer greater flexibility, scalability, and security. By exploring dynamic DNS services, cloud-based VPN solutions, and modern VPN protocols, organizations can establish secure connections without relying on traditional static IP addressing methods.
Impact of dynamic IP on IPSec VPN connections
When it comes to securing network connections, IPSec VPNs are a popular choice for ensuring data confidentiality and integrity. However, the use of dynamic IP addresses can have a significant impact on the stability and reliability of IPSec VPN connections.
Dynamic IP addresses are temporary IP addresses that are assigned to devices by an Internet Service Provider (ISP). These addresses can change periodically, making it challenging for IPSec VPNs to maintain a consistent and secure connection.
One of the main challenges of using dynamic IP addresses with IPSec VPNs is the need for constant re-negotiation of security associations. Security associations establish the parameters for secure communication between devices, and when IP addresses change, these associations need to be updated to reflect the new addresses. This frequent re-negotiation can lead to interruptions in VPN connectivity and potential security vulnerabilities during the transition period.
Moreover, dynamic IP addresses can also pose challenges for network administrators in terms of monitoring and managing IPSec VPN connections. Tracking and logging activities of devices with dynamic IP addresses can be more complex compared to devices with static IP addresses.
To mitigate the impact of dynamic IP addresses on IPSec VPN connections, network administrators can consider implementing dynamic DNS services or using technologies such as NAT-T (Network Address Translation Traversal) to ensure smooth VPN operation despite changing IP addresses.
In conclusion, while dynamic IP addresses offer flexibility and cost-effectiveness, they can present challenges for maintaining stable and secure IPSec VPN connections. By understanding these challenges and implementing appropriate solutions, organizations can ensure reliable and secure communication over VPNs even in dynamic IP environments.
0 notes
Text
Www.ddwrt open vpn ipvanish

Using premiere community-vetted, open-source router firmwares such as DD-WRT & Tomato USB, this flash removes faulty manufacturer firmware and potential backdoors allowing those who prioritize privacy and security complete control of their online activity.Ī FlashRouter is an out-of-the-box VPN solution, allowing for the unique capability of integrating business-class security and privacy network-wide. 8) Enter the Gateway, User Name and Password. 7) Select your Connection Type (usually PPTP) and identify if the router will be using DHCP or not. 6) Your VPN service might need you to configure the Host Name, Domain Name, and Router IP details (Local IP Address and Subnet Mask). If you have any questions about this guide, please contact support. 5) Click on the Setup tab and then click on the Basic Setup sub-tab. FlashRouters upgrades, or ”flashes”, premium wireless routers to add VPN encryption as well as an array of business-class security and monitoring features. Check the VPN Connection Once your router has finished booting up, verify you are connected by going to the Status/OpenVPN tab and checking the State and/or going to our IPVanish Check IP page. Therefore add the following line to your additional config in the VPN section of your DD-WRT router: route-gateway dhcp. Looking to expand IPVanish VPN protection to your entire home network? Whether you’re connecting a game console, streaming device, or smart appliance, there is only one simple solution to secure them all - a VPN router from FlashRouters.ĭevice manufacturers frequently omit VPN integration into their devices for a variety of reasons. That means if you look at your VPN route (typing: route) you will see the LAN IP address of your modem-router as default gateway IP address. Why Do I Need a FlashRouter with IPVanish?
2 notes
·
View notes
Link
Having an open wireless network is a security risk as it may allow anyone close enough to your router (e.g., a neighbor or someone war driving) to access your network. To make your home wireless network more secure, consider the below suggestions.
Tip
The steps below require access to the router setup, and we also recommend configuring wireless security over a computer with a wired connection to the router if possible. For help entering the router setup, see: How to access a home network router setup or console.
Note
Because all routers are different we cannot provide specific steps for every router. Check your router's documentation for exact instructions.
Close the network
If you have never been prompted for a key, password, or passphrase when connecting to your wireless network, it is an unsecured network. In other words, if anyone is close enough to your router, they could connect to your network. To enable security, open your router setup screen and look for a Wireless Security section. The picture shown here is an example of a Linksys router set up in the Wireless Security section.
Select the wireless security method of either WEP, WPA, or WPA2 (we suggest WPA or WPA2, which is mentioned further down on this page). The, enter a passphrase to generate the keys. After enabling security on the router, any wireless device must have the key to connect to your network.
Change default password
Make sure the router password is not using the default password. If the default password is used, it can be easily guessed and give someone access to your router. With access to the router setup, a person could change your router settings, including viewing any security keys.
If available use WPA, not WEP
Many routers today offer two or three different security schemes: WEP, WPA, and WPA2. We recommend WPA or WPA2 security since it is more secure than WEP. However, for compatibility with some older devices, such as gaming consoles, TiVo, and other network devices, WEP may be the only security option possible to use. Using WEP is still better than no security at all.
Disable remote administration
When enabled, remote administration allows anyone close enough to your router to view or change your router settings. If you never plan on remotely administrating your network (e.g., wirelessly connecting to the router), we recommend disabling remote administration. With routers that support this option, it is often disabled through the Administration section.
When disabled, the router settings can still be changed using any computer that is directly connected to the router using a network cable.
Change the default SSID name
The SSID is the name that identifies your wireless router. By default, many routers use the name of the router as the default SSID. For example, Linksys routers use 'Linksys' as the SSID. Using a default SSID is a security risk, because it identifies the brand of the router. It would help an attacker find a way to exploit vulnerabilities in the device.
Tip
When naming the router, do not use your family's name or any other personally identifiable information. For example, if the SSID contains your family's last name, it can be identified by any neighbor that knows you.
Enable router firewall
Many routers also have a firewall that can be enabled. If available, we also suggest enabling this feature, as it helps add an extra layer of security to your network.
Disable SSID broadcast
To help make finding your wireless network easier, wireless routers broadcast your SSID, which means anyone looking for a wireless router could see your SSID. To help make it more difficult for someone to find your network when browsing for a wireless network, you can disable the SSID broadcast feature. However, when disabling the SSID broadcast, it requires you manually enter your router's unique SSID when connecting any new device to your network.
Enable wireless MAC filter
The wireless MAC filter feature only allows a wireless device to connect to your router if the MAC Address is entered into the filter list. Doing MAC filtering can make connecting new devices to your network more difficult, but improves the overall security of your wireless network.
Tip
A quick and easy way to set this up is to connect any wireless device you want on your network to your router before enabling the wireless MAC filter. After each device has connected, access the router setup and open the DHCP client table, often found in the Status or Local Network section. Each device that has connected to your router can be copied into a Notepad, then pasted into the wireless MAC filter section of the router Security section.
1 note
·
View note
Text
Using Mac Address Filtering To Secure Your Wi-Fi Network
With no password established anyone can get into your router and begin messing with the configuration. It is advised to choose a powerful codeword for safety. The deal with line is in depth but work is ongoing for IPv5 and 6. Recent times have seen a tremendous fall in the prices of computers. You will find homes which have more than one of P.C. If you find that you have more than one computer, know that you are in the same dilemma as hundreds of other people who want to set up house networks. For instance you could be in the study room and wish to retrieve a file that is stored in the computer in the bedroom. The most significant importance of network in the home is reducing internet cost by allowing the various computers in the house to share broadband connection. This means a network is only possible when there is more than one network in the house. The use of a network is when two people are using the computers in the house but they require to use the same printer resources.
Note** - I know you have a network printer and the second choice is network printer and it makes logical sense to choose that - but you have to trust me and not think for yourself on this one.
You will need a device that provides a DHCP service. This is normally included as a service in the Internet access router -- you will probably need to enable it as, by default, DHCP is often disabled.
This 192.168.0.1 IP is normally associated with high speed broadband routers. You will find corporations which benefit from this kind of IP as default IPs to their routers, Netgear together with D-Link, for example. For more information about that you should check just about any wireless modem instructions of those two manufacturers.
The first thing that you have to do is that you should boot up the host computer, the computer that has connection. After that, you can log in by using the Administrator or even Owner account. After that, click the "Start" on the button left and then select the "Control Panel".
NOTE: With these tools chances of identifying someone on your network increases, but will NOT prevent them from gaining access to your Network. Other tools exist than described in this article, but the goal is to show you the different type of tools and how to use them.
By now you should be receiving signals from your router already. Your next task is to make your network secured. Open a web browser. Click the url text box and type 192.168.1.1. If this does not direct you to the configuration page, change the url to 192.168.2.1.
After the re installation is complete, you can set up the security features; remember that this is a task you must set up yourself. As is always the case when handling routers, make sure that the instructions are followed step by step.
As I mentioned at the beginning of this article, the possibilities for this use are endless depending on your own individual needs, and I imagine that as technologies such as 3G and GPRS are improved, this ability will extend to your PDA device as well so that you can access your home PC on the move, that's if you are not carrying around a small PC and mini holographic projector in your top pocket by then!
2 notes
·
View notes
Photo

TP-Link Archer AX20 AX1800 Dual Band Wifi 6 Router FEATURES: Dual-Band Wi-Fi 6: Equipped with the latest wireless technology, Wi-Fi 6, for faster speeds, greater capacity, and reduced network congestion Next-Gen 1.8Gbps Speeds: Enjoy smooth streaming, downloading, and gaming all without buffering with Wi-Fi speeds of 1.8Gbps Connect More Devices: Wi-Fi 6 technology communicates more data to more devices using revolutionary OFDMA technology while simultaneously reducing lag Quad-Core Processing: The 1.5GHz quad-core CPU ensures communications between your router and all connected devices are smooth Extensive Coverage: Beamforming, independent FEM, and four antennas combine to deliver focused reception to devices far away Increased Battery Life: Target Wake Time technology reduces your devices’ power consumption to extend their battery life USB Easy Sharing: A USB 2.0 Port enables easy file sharing within your network or building private Cloud Storage Easy Setup: Set up your router in minutes with the powerful TP-Link Tether App Backward Compatible: Supports all previous 802.11 standards and all Wi-Fi devices WIRELESS Standards Wi-Fi 6 IEEE 802.11ax/ac/n/a 5 GHz IEEE 802.11ax/n/b/g 2.4 GHz WiFi Speeds AX1800 5 GHz: 1201 Mbps (802.11ax) 2.4 GHz: 574 Mbps (802.11ax) WiFi Range 3 Bedroom Houses 4× Fixed High-Performance Antennas Multiple antennas form a signal-boosting array to cover more directions and large areas Beamforming Concentrates wireless signal strength towards clients to expand WiFi range High-Power FEM Improves transmission power to strengthen signal coverage WiFi Capacity High Dual-Band Allocate devices to different bands for optimal performance OFDMA Simultaneously communicates with multiple Wi-Fi 6 clients Airtime Fairness Improves network efficiency by limiting excessive occupation 4 Streams Connect your devices to more bandwidth Working Modes Router Mode Access Point Mode HARDWARE Processor 1.5 GHz Quad-Core CPU Ethernet Ports 1× Gigabit WAN Port 4× Gigabit LAN Ports USB Support 1× USB 2.0 Port Supported Partition Formats: NTFS, exFAT, HFS+, FAT32 Supported Functions: Apple Time Machine FTP Server Media Server Samba Server Buttons WPS/Wi-Fi Button Power On/Off Button LED On/Off Button Reset Button Power 12 V ⎓ 1.5 A SECURITY WiFi Encryption WPA WPA2 WPA3 WPA/WPA2-Enterprise (802.1x) Network Security SPI Firewall Access Control IP & MAC Binding Application Layer Gateway Guest Network 1× 5 GHz Guest Network 1× 2.4 GHz Guest Network VPN Server OpenVPN PPTP SOFTWARE Protocols IPv4 IPv6 Parental Controls URL Filtering Time Controls WAN Types Dynamic IP Static IP PPPoE PPTP L2TP Quality of Service QoS by Device Cloud Service Auto Firmware Upgrade OTA Firmware Upgrade TP-Link ID DDNS NAT Forwarding Port Forwarding Port Triggering DMZ UPnP IPTV IGMP Proxy IGMP Snooping Bridge Tag VLAN DHCP Address Reservation DHCP Client List Server DDNS TP-Link NO-IP DynDNS Management Tether App Webpage PHYSICAL Dimensions (W×D×H) 10.2 × 5.3 ×1.5 in (260.2 × 135.0 × 38.6 mm) Package Contents Wi-Fi Router Archer AX20 Power Adapter RJ45 Ethernet Cable Quick Installation Guide OTHER System Requirements Internet Explorer 11+, Firefox 12.0+, Chrome 20.0+, Safari 4.0+, or other JavaScript-enabled browser Cable or DSL Modem (if needed) Subscription with an internet service provider (for internet access) Certifications FCC, CE, RoHS Environment Operating Temperature: 0℃~40℃ (32℉ ~104℉) Storage Temperature: -40℃~70℃ (-40℉ ~158℉) Operating Humidity: 10%~90% non-condensing Storage Humidity: 5%~90% non-condensing TEST DATA WiFi Transmission Power CE:
0 notes