#WP staging plugin
Explore tagged Tumblr posts
Visit Tumblr Blog
Explore Tumblr blogs with no restrictions, modern design and the best experience.
Last Seen Tumblr Blogs


Fun Fact
In February 2021, Tumblr had 518.6 million blog accounts.
Text
WordPress Staging Plugins 2024
TOP WordPress Staging Plugins 2024
In the ever-evolving world of web development, ensuring a smooth and error-free transition from development to production is crucial. WordPress staging plugins have emerged as indispensable tools for developers seeking to streamline their workflow, test new features, and eliminate potential issues before deploying changes to a live website. In this article, we will explore the significance of WordPress staging plugins and how they can enhance the development process.
Understanding Staging Environments
A staging environment is essentially a clone of your live website where you can test changes, updates, and new features before making them publicly available. WordPress staging plugins facilitate the creation of these staging environments, allowing developers to experiment without affecting the live site. This separation between the staging and live environments ensures a risk-free testing ground for modifications, reducing the chances of disrupting user experience or causing downtime.
Key Features of WordPress Staging Plugins
One-Click Staging: One of the standout features of staging plugins is the ability to create a staging environment with just one click. This simplifies the process of duplicating your website, saving developers valuable time and effort.
Easy Collaboration: Staging plugins often come with features that enable seamless collaboration among team members. Multiple developers can work on different aspects of a project simultaneously, and changes can be easily merged and tested in the staging environment before deployment.
Selective Content Migration: Staging plugins allow developers to choose which parts of the website to migrate from the staging environment to the live site. This selective content migration ensures that only the intended changes are applied, preventing unintended alterations.
Database Syncing: Keeping the database synchronised between the staging and live environments is critical. Staging plugins simplify this process by automating the sync gained from one-click staging and selective content migration translates into time and resource savings. Developers can iterate quickly, experiment with different ideas, and implement changes more efficiently.
Improved Collaboration: Staging plugins enhance collaboration within developmcing of databases, ensuring that both environments have the same data during the testing phase.
Backup and Restore: Before implementing changes, it's essential to have a backup in case something goes wrong. WordPress staging plugins often come equipped with robust backup and restore functionalities, providing a safety net for developers experimenting with new features.
Benefits of Using WordPress Staging Plugins
Risk Mitigation: By testing changes in a staging environment, developers can identify and resolve potential issues before they impact the live site. This significantly reduces the risk of introducing bugs or breaking the website.
Time and Resource Efficiency: The effent teams. Multiple team members can contribute to a project simultaneously, knowing that changes can be thoroughly tested in a staging environment before being pushed to production.
Client Approval: Staging environments provide a visual representation of proposed changes, making it easier for clients to review and approve updates before they go live. This fosters transparency and client satisfaction.
WordPress staging plugins have become indispensable tools for developers seeking to optimize their workflow and ensure a seamless transition from development to production. The ability to test changes in a risk-free environment, coupled with features like one-click staging and selective content migration, makes these plugins essential for anyone working on WordPress websites. By incorporating staging plugins into their development process, teams can enhance collaboration, mitigate risks, and deliver high-quality websites with confidence.
0 notes
Text
A Few Ways That Cloudways Makes Running This Site a Little Easier
New Post has been published on https://thedigitalinsider.com/a-few-ways-that-cloudways-makes-running-this-site-a-little-easier/
A Few Ways That Cloudways Makes Running This Site a Little Easier
It’s probably no surprise to you that CSS-Tricks is (proudly) hosted on Cloudways, DigitalOcean’s managed hosting arm. Given both CSS-Tricks and Cloudways are part of DigitalOcean, it was just a matter of time before we’d come together this way. And here we are!
We were previously hosted on Flywheel which was a fairly boutique WordPress hosting provider until WP Engine purchased it years back. And, to be very honest and up-front, Flywheel served us extremely well. There reached a point when it became pretty clear that CSS-Tricks was simply too big for Flywheel to scale along. That might’ve led us to try out WP Engine in the absence of Cloudways… but it’s probably good that never came to fruition considering recent events.
Anyway, moving hosts always means at least a smidge of contest-switching. Different server names with different configurations with different user accounts with different controls.
We’re a pretty low-maintenance operation around here, so being on a fully managed host is a benefit because I see very little of the day-to-day nuance that happens on our server. The Cloudways team took care of all the heavy lifting of migrating us and making sure we were set up with everything we needed, from SFTP accounts and database access to a staging environment and deployment points.
Our development flow used to go something like this:
Fire up Local (Flywheel’s local development app)
Futz around with local development
Push to main
Let a CI/CD pipeline publish the changes
I know, ridiculously simple. But it was also riddled with errors because we didn’t always want to publish changes on push. There was a real human margin of error in there, especially when handling WordPress updates. We could have (and should have) had some sort of staging environment rather than blindly trusting what was working locally. But again, we’re kinduva a ragtag team despite the big corporate backing.
The flow now looks like this:
Fire up Local (we still use it!)
Futz around with local development
Push to main
Publish to staging
Publish to production
This is something we could have set up in Flywheel but was trivial with Cloudways. I gave up some automation for quality assurance’s sake. Switching environments in Cloudways is a single click and I like a little manual friction to feel like I have some control in the process. That might not scale well for large teams on an enterprise project, but that’s not really what Cloudways is all about — that’s why we have DigitalOcean!
See that baseline-status-widget branch in the dropdown? That’s a little feature I’m playing with (and will post about later). I like that GitHub is integrated directly into the Cloudways UI so I can experiment with it in whatever environment I want, even before merging it with either the staging or master branches. It makes testing a whole lot easier and way less error-prone than triggering auto-deployments in every which way.
Here’s another nicety: I get a good snapshot of the differences between my environments through Cloudways monitoring. For example, I was attempting to update our copy of the Gravity Forms plugin just this morning. It worked locally but triggered a fatal in staging. I went in and tried to sniff out what was up with the staging environment, so I headed to the Vulnerability Scanner and saw that staging was running an older version of WordPress compared to what was running locally and in production. (We don’t version control WordPress core, so that was an easy miss.)
I hypothesized that the newer version of Gravity Forms had a conflict with the older version of WordPress, and this made it ridiculously easy to test my assertion. Turns out that was correct and I was confident that pushing to production was safe and sound — which it was.
That little incident inspired me to share a little about what I’ve liked about Cloudways so far. You’ll notice that we don’t push our products too hard around here. Anytime you experience something delightful — whatever it is — is a good time to blog about it and this was clearly one of those times.
I’d be remiss if I didn’t mention that Cloudways is ideal for any size or type of WordPress site. It’s one of the few hosts that will let you BOYO cloud, so to speak, where you can hold your work on a cloud server (like a DigitalOcean droplet, for instance) and let Cloudways manage the hosting, giving you all the freedom to scale when needed on top of the benefits of having a managed host. So, if you need a fully managed, autoscaling hosting solution for WordPress like we do here at CSS-Tricks, Cloudways has you covered.
#Accounts#app#arm#automation#Blog#CI/CD#Cloud#cloudways#Conflict#CSS#css-tricks#Database#deployment#development#digitalocean#dropdown#easy#engine#enterprise#Environment#Events#Forms#friction#github#Giving#gravity#Hosting#hosting provider#human#incident
2 notes
·
View notes
Text
How to Update PHP in WordPress: A Complete Guide for a Faster, More Secure Site Updating PHP in WordPress may not sound like that newsworthy topic, but absolutely must be done. PHP is a language that runs your WordPress site: older versions can slow you down while keeping security vulnerabilities open and create incompatibilities with other plugins and themes. This guide will cover everything you need to consider when working on PHP in WordPress from start to finish in a safe and effective way.

What is PHP, and Why Should One Update It? Let's first look at some basics before moving to the steps:
PHP is a programming language through which WordPress is built. All those themes, plugins, and core files, basically, run on PHP.
By virtue of being newly released, PHP versions are better and are fast and supported.
Time and again, an outdated PHP leads to slow load times, errors on your site, and the like: security vulnerabilities. Updating PHP doesn't update your tangible WordPress content; it just upgrades the software that makes it all work more efficiently. Check Your Current PHP Version First thing first, make sure you identify which PHP version your site is running currently. How to check:
Through WordPress Dashboard: From WordPress, go to the admin panel, Tools > Site Health > Info, and under the Server section, you will see your PHP version.
Via Hosting Control Panel: Most hosting providers usually display their version of PHP directly in their dashboard (cPanel, Plesk, or other custom panels). Why Updating PHP Is Vital for Your WordPress Site Still wondering why you should care? Here is what updating PHP will do for you: Better Performance:
Newer versions of PHP, such as PHP 8.2 onwards, are considerably faster. What this means is fastidious speed in loading your pages, better SEO, and happier visitors. Improved Security: Each new release fixes security holes found in older versions. Therefore, if one is running an old version, he is basically leaving his site open to known exploits. Plugin and Theme Compatibility: Since many plugin and theme developers support only the newer versions of PHP, by not upgrading, you may find some features aren't working properly. Future-Proofing: In the best experience possible, WordPress recommends using the most recent PHP version supported by your hosting provider. Back Up Your Site Before doing anything, make sure to back up your website. Sometimes, updating PHP can cause incompatibility issues with older plugins or themes, so it is wise to have a full backup so you can restore your site just in case. How to Back Up:
Do a backup using a plugin like UpdraftPlus or Duplicator, for both your files and the database.
Or, check your host service for backup options-Most hosts offer daily backups you can restore from. Test PHP Compatibility You now need to check for compatibility between your current setup—plugins, theme, custom codes—and the newer PHP version. Tools for Testing:
PHP Compatibility Checker: Plugins capacity like "PHP Compatibility Checker" from WP Engine scan your site for all potential issues really going to arise prior to your update of php.
Staging Environment: If your host does provide a staging environment, give the site a try with the new PHP version in that environment. Update PHP Version via Hosting Panel
Now, the main event: updating PHP itself. How you do this update depends on your hosting provider, but most will follow a similar process. For cPanel Users:
Log in to your cPanel dashboard.
Look for "Select PHP Version" or "MultiPHP Manager".
Select a domain you want to update.
Choose the latest PHP version available (say, PHP 8.2).
Save or apply the change. For Managed WordPress Websites: Managed hosts such as Kinsta, WP Engine, SiteGround, or Bluehost typically offer a PHP update option with a single click in their hosting dashboard. Please, refer to your hosting documentation for more information. Test Your Website Thoroughly After completing a PHP update, go ahead and check your website thoroughly:
Frontend Pages: See that everything looks as intended and loads fine.
Admin Dashboard: Go through menus, publish a post, update plugins, etc., with the system, and watch out for any errors.
Contact forms, eCommerce pages, and more: Check if vital functions still work correctly. If anything appears wrong, do not worry! Most errors after updating PHP usually arise because of outdated plugins or themes. Fixing Common Problems Here are a few simple steps in case you find yourself with a problem: White Screen of Death/500 Error:
Revert from a backup, or downgrade your PHP from the hosting panel.
Find out which plugin/theme is causing the conflict. Plugin or Theme Issues:
Ensure all plugins and themes are up-to-date.
If issues remain, then replace outdated plugins with counterparts that are currently being maintained. Keywords for Smooth PHP Update Update Everything First: Before you go on upgrading from a version, it pays to have your WordPress core, themes, and plugins updated. Use Staging: One big reason to test in a staging environment is to root out anything that might break before you push the changes to production. Reach Out to Your Host: There are times when you might not want to upgrade PHP yourself; many hosting providers will assist you with this. Reasons to Keep Your PHP Updated: By now, you realize that upgrading PHP is not simply a tick-box action but rather an enormous improvement of performance and security. Let's do a brief recap:
Speed: These are important criteria involving loading time and should result in the increasing of SEO ranking and user experience.
Security: Known security disclosures are patched so your site remains secure.
Compatibility: Ensures that your plugins and themes, If any, keep functioning well.
Peace of Mind: Having an up-to-date PHP version guarantees that your site is fundamentally sound. Take Charge of Your Site's Health! Upgrading PHP in WordPress is one of those things that might sound overly intimidating for some but is really one of the most simple changes with weighty impacts on the security and performance of your website. Ideally, performing compatibility testing on the codebase of your website, backing up the website, testing it, and updating through the hosting control panel are setting the website up for success in the long run.

This really is the ideal time. Back up the website, do the compatibility testing, and update our PHP. Would you ever get stuck or are unsure, please ask for support from the hosting provider support team! Ready to take your website to the next level? Partner with a trusted Digital Marketing Company in Chandigarh to boost your WordPress site’s reach and drive real results!
0 notes
Text
WordPress aufräumen: So entlarvst du ungenutzte Dateien mit Python

In diesem Beitrag möchte ich dir gerne einen Weg aufzeigen, wie du sehr einfach und ebenso sicher nicht verwendete Dateien in deiner WordPress-Instanz finden kannst. Du benötigst dafür ein wenig technisches Verständnis – aber keine Sorge: Ich nehme dich an die Hand und führe dich Schritt für Schritt durch den gesamten Prozess. https://youtu.be/T3iVrIGbtl8 Der Bedarf für diese Lösung entstand aus einem ganz praktischen Grund: Mein eigener Blog hat mittlerweile satte 174.000 Dateien angesammelt – da wird es höchste Zeit, etwas auszumisten und wieder Platz auf dem Server zu schaffen. Für das Finden von nicht benötigten Dateien unter WordPress gibt es diverse Plugins. Diese haben jedoch alle den Nachteil, dass sie direkt auf der WordPress-Instanz laufen, Systemressourcen verbrauchen und – wie viele Kommentare zeigen – nicht immer zuverlässig oder sicher funktionieren. Daher habe ich mir folgenden Weg überlegt: Ich exportiere die WordPress-Beiträge als JSON-Datei mit den wichtigsten Feldern (ID, Titel, Inhalt). Anschließend lade ich das Upload-Verzeichnis herunter und lasse ein Python-Skript prüfen, ob die Dateien in den Beiträgen referenziert werden. Alle nicht gefundenen Dateien können theoretisch als ungenutzt eingestuft und anschließend überprüft oder gelöscht werden. ⚠️ Wichtiger Hinweis: Ich empfehle dir dringend, vor dem Löschen von Dateien ein vollständiges Backup deiner WordPress-Instanz anzulegen. Idealerweise testest du die Löschung zunächst in einer Staging-Umgebung oder auf einer Kopie deiner Seite. In seltenen Fällen kann es vorkommen, dass Dateien fälschlich als ungenutzt erkannt werden – insbesondere wenn sie über PageBuilder, Custom Fields oder Medien-IDs referenziert werden.
Warum bestehende Plugins nicht immer zuverlässig arbeiten
Es gibt diverse Plugins wie Media Cleaner, DNUI (Delete Not Used Image) oder ähnliche, die versprechen, ungenutzte Mediendateien automatisch zu erkennen und zu löschen. Grundsätzlich eine praktische Idee – doch in den Kommentaren dieser Plugins häufen sich Berichte über falsch gelöschte Dateien, die offenbar doch noch in Verwendung waren. Die Wiederherstellung solcher Dateien ist oft aufwendig und erfordert entweder Backups oder manuelle Nacharbeit. Meine Lösung setzt daher auf einen anderen Ansatz: Sie analysiert die Inhalte kontrolliert und nachvollziehbar außerhalb des WordPress-Systems – und ist damit deutlich sicherer und transparenter.
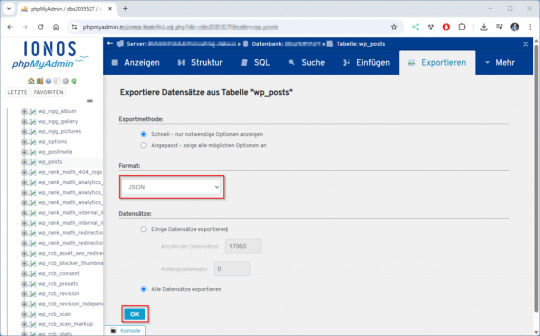
Schritt 1 – Export der Tabelle wp_posts als JSON
Als Erstes werden die Spalten ID, post_title und post_content aus der WordPress-Tabelle wp_posts exportiert. Der Tabellenpräfix wp_ kann bei dir abweichen – diesen findest du in der Datei wp-config.php unter: $table_prefix = 'wp_'; In manchen Fällen sind mehrere WordPress-Instanzen in einer Datenbank vorhanden. Achte also darauf, den richtigen Präfix zu verwenden. Der Export über phpMyAdmin ist dabei besonders einfach: Du führst lediglich ein SELECT-Statement aus, das dir die relevanten Inhalte liefert. Der eigentliche Export als JSON erfolgt über die integrierte Exportfunktion. SQL-Statement: SELECT ID as "id", post_title as 'Titel', post_content as 'Content' FROM wp_posts WHERE post_type in ('page', 'post'); Wenn du dieses SQL-Statement in phpMyAdmin ausführst, erscheint eine Tabelle mit den Ergebnissen. Scrolle nun ganz nach unten – dort findest du den Link „Exportieren“. Ein Klick darauf öffnet eine neue Seite, auf der du den Exporttyp von SQL auf JSON umstellst. Danach nur noch mit OK bestätigen, und der Export startet.


Je nach Anzahl der Beiträge kann der Download ein paar Sekunden dauern.
Schritt 2 – Download des Upload-Verzeichnisses
Im zweiten Schritt wird das komplette Upload-Verzeichnis deiner WordPress-Installation heruntergeladen. Dieses befindet sich standardmäßig unter: /wp-content/uploads/ Ich verwende dafür das kostenlose Tool WinSCP, das eine einfache und übersichtliche Oberfläche bietet. Du benötigst lediglich die SFTP-Zugangsdaten zu deinem Webspace. Diese findest du in der Regel im Kundenbereich deines Hosting-Anbieters. Falls dir kein direkter Zugriff per SFTP möglich ist, bieten viele Hoster eine alternative Lösung an: Du kannst das Verzeichnis online als ZIP-Archiv erstellen und anschließend herunterladen. 💡 Tipp: Achte darauf, die Ordnerstruktur beizubehalten – das Python-Skript analysiert später jede Datei im Originalpfad.
Schritt 3 – Ausführen des Python-Skripts zur Suche nach verwaisten Bildern
Für das Skript wird lediglich Python 3 benötigt – weitere externe Bibliotheken sind nicht erforderlich. Das Skript kann direkt über die Kommandozeile im Projektverzeichnis ausgeführt werden: python3 findunusedfiles.py Während der Ausführung listet das Skript alle Bilder aus dem Upload-Verzeichnis auf und zeigt direkt in der Konsole an, ob sie verwendet (✅) oder nicht verwendet (❌) wurden. Die Laufzeitausgabe sieht zum Beispiel so aus:

Nach Abschluss wird eine Datei namens unused_images.txt erzeugt. Darin enthalten ist eine Liste aller Bildpfade, die im Export der WordPress-Datenbank (siehe Schritt 1) nicht referenziert wurden.
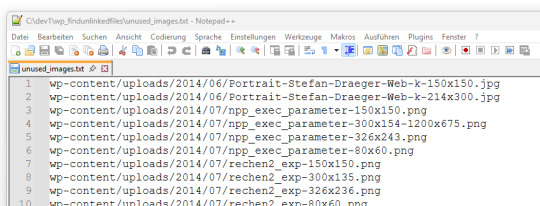
Diese Datei dient als Grundlage zur manuellen Prüfung oder zum späteren Löschen der nicht verwendeten Dateien. 🔗 Hinweis: Das hier verwendete Skript findunusedfiles.py sowie ein Beispiel-SQL-Generator findest du ebenfalls auf GitHub: github.com/StefanDraeger/wp-unused-files-cleaner Python Skript zur Suche nach nicht benutzen Bildern in wordPressHerunterladen Quellcode #!/usr/bin/env python3 # -*- coding: utf-8 -*- """ Titel: WordPress Upload-Verzeichnis auf ungenutzte Dateien prüfen Beschreibung: Dieses Skript durchsucht das lokale Upload-Verzeichnis einer WordPress-Installation nach Bilddateien und vergleicht diese mit den Inhalten aller Beiträge und Seiten, die zuvor als JSON-Datei aus der Tabelle `wp_posts` exportiert wurden. Dateien, die in keinem Beitrag referenziert sind, werden als potenziell ungenutzt gelistet. Autor: Stefan Draeger Webseite: https://draeger-it.blog """ import os import json import sys # Konfiguration UPLOADS_DIR = './wp-content/uploads' JSON_FILE = './wp_posts.json' IMAGE_EXTENSIONS = ('.jpg', '.jpeg', '.png', '.tiff', '.bmp') def format_size(bytes_value): if bytes_value < 1024: return f"{bytes_value} Bytes" elif bytes_value < 1024 ** 2: return f"{bytes_value / 1024:.2f} KB" elif bytes_value < 1024 ** 3: return f"{bytes_value / (1024 ** 2):.2f} MB" else: return f"{bytes_value / (1024 ** 3):.2f} GB" def load_json_data(json_file): if not os.path.isfile(json_file): print(f"❌ Fehler: Datei '{json_file}' nicht gefunden.") sys.exit(1) try: with open(json_file, 'r', encoding='utf-8') as file: raw_json = json.load(file) except json.JSONDecodeError: print(f"❌ Fehler: Datei '{json_file}' ist kein gültiges JSON.") sys.exit(1) for obj in raw_json: if obj.get('type') == 'table' and obj.get('name') == 'wp_posts': return obj.get('data', ) print("❌ Fehler: Keine Daten zur Tabelle 'wp_posts' gefunden.") sys.exit(1) def scan_uploads(content_list): if not os.path.isdir(UPLOADS_DIR): print(f"❌ Fehler: Upload-Verzeichnis '{UPLOADS_DIR}' nicht gefunden.") sys.exit(1) unused_files = checked_count = 0 for root, dirs, files in os.walk(UPLOADS_DIR): for file_name in files: if file_name.lower().endswith(IMAGE_EXTENSIONS): full_path = os.path.join(root, file_name) relative_path = os.path.relpath(full_path, '.').replace('', '/') checked_count += 1 found = False for i in range(len(content_list)): if relative_path in content_list: content_list = content_list.replace(relative_path, '') found = True if found: content_list = print(f"✅ Verwendet: {relative_path}") else: unused_files.append(relative_path) print(f"❌ Nicht verwendet: {relative_path}") return unused_files, checked_count def write_unused_list(unused_files): with open('unused_images.txt', 'w', encoding='utf-8') as f: for path in unused_files: f.write(path + 'n') print("📝 Datei 'unused_images.txt' wurde erstellt.") def write_sql_files(unused_files): with open('delete_attachments.sql', 'w', encoding='utf-8') as del_out: del_out.write("-- SQL-Befehl zum Löschen verwaister Medien aus wp_posts (Typ: attachment)nn") del_out.write("DELETE FROM wp_postsnWHERE post_type = 'attachment'nAND guid IN (n") for i, path in enumerate(unused_files): end = ",n" if i < len(unused_files) - 1 else "n" del_out.write(f" '{path}'{end}") del_out.write(");n") print("🗑️ Datei 'delete_attachments.sql' wurde erzeugt.") with open('select_attachments.sql', 'w', encoding='utf-8') as sel_out: sel_out.write("-- SQL-Befehl zur Prüfung verwaister Medien aus wp_posts (Typ: attachment)nn") sel_out.write("SELECT ID, guid FROM wp_postsnWHERE post_type = 'attachment'nAND guid IN (n") for i, path in enumerate(unused_files): end = ",n" if i < len(unused_files) - 1 else "n" sel_out.write(f" '{path}'{end}") sel_out.write(");n") print("🔍 Datei 'select_attachments.sql' wurde erzeugt.") def write_log(unused_files, checked_count): total_size_bytes = sum( os.path.getsize(os.path.join('.', path)) for path in unused_files if os.path.isfile(os.path.join('.', path)) ) formatted_size = format_size(total_size_bytes) with open('cleanup_log.txt', 'w', encoding='utf-8') as log: log.write("📄 Ausführungsprotokoll – WordPress Dateiaufräumungn") log.write("==================================================nn") log.write(f"📦 Verarbeitete Dateien: {checked_count}n") log.write(f"🗂️ Ungenutzte Dateien gefunden: {len(unused_files)}n") log.write(f"💾 Speicherverbrauch (gesamt): {formatted_size}nn") log.write("📝 Die folgenden Dateien wurden erstellt:n") log.write("- unused_images.txtn") log.write("- delete_attachments.sqln") log.write("- select_attachments.sqln") print("🧾 Logdatei 'cleanup_log.txt' wurde erstellt.") def main(): entries = load_json_data(JSON_FILE) content_list = unused_files, checked_count = scan_uploads(content_list) print("nAnalyse abgeschlossen.") print(f"Geprüfte Dateien: {checked_count}") print(f"Nicht referenzierte Dateien: {len(unused_files)}n") if unused_files: print("⚠️ Nicht referenzierte Bilddateien:") for path in unused_files: print(path) write_unused_list(unused_files) write_sql_files(unused_files) write_log(unused_files, checked_count) if __name__ == "__main__": main()
Schritt 4 – Aufräumen der WordPress-Datenbank
⚠️ Wichtiger Hinweis vorab: Bevor du Änderungen an deiner Datenbank vornimmst, solltest du ein vollständiges Backup deiner WordPress-Datenbank erstellen. So kannst du im Fall eines Fehlers jederzeit alles wiederherstellen. WordPress speichert alle hochgeladenen Medien – also auch Bilder – in der Tabelle wp_posts. Dabei handelt es sich um Einträge mit dem Post-Typ attachment, wobei in der Spalte guid der Pfad zur Datei gespeichert ist. Wenn du mit dem Python-Skript verwaiste Bilder identifiziert und vielleicht schon gelöscht hast, verbleiben deren Einträge trotzdem in der WordPress-Mediathek. Diese kannst du gezielt aus der Datenbank entfernen. Vorgehen: - Öffne die Datei unused_images.txt, die du im vorherigen Schritt erhalten hast. - Jeder darin aufgeführte Pfad (z. B. wp-content/uploads/2023/08/beispiel.jpg) lässt sich mit einem einfachen SQL-Befehl entfernen: DELETE FROM wp_posts WHERE post_type = 'attachment' AND guid LIKE '%wp-content/uploads/2023/08/beispiel.jpg'; - Um diese Aufgabe bei vielen Dateien zu automatisieren, kannst du folgendes Python-Skript nutzen. Es erstellt dir aus unused_images.txt eine vollständige SQL-Datei mit allen nötigen Löschbefehlen: # generate_delete_sql.py with open('unused_images.txt', 'r', encoding='utf-8') as infile, open('delete_attachments.sql', 'w', encoding='utf-8') as outfile: outfile.write("-- SQL-Befehle zum Löschen verwaister Medien aus wp_posts (Typ: attachment)nn") for line in infile: path = line.strip() if path: outfile.write(f"DELETE FROM wp_posts WHERE post_type = 'attachment' AND guid LIKE '%{path}';n") - Führe die generierte Datei delete_attachments.sql anschließend in phpMyAdmin oder über ein externes SQL-Tool aus. Optional: Erst prüfen, dann löschen Wenn du sicherstellen willst, dass die Statements korrekt sind, kannst du sie vor dem Löschen zunächst mit SELECT testen: SELECT ID, guid FROM wp_posts WHERE post_type = 'attachment' AND guid LIKE '%wp-content/uploads/2023/08/beispiel.jpg'; Mit diesem Schritt entfernst du nicht nur die Bilddateien selbst, sondern auch die dazugehörigen Mediathek-Einträge – für eine wirklich aufgeräumte WordPress-Installation.
Aufräumen via SSH
⚠️ Wichtiger Sicherheitshinweis: Bevor du Dateien vom Server löschst, solltest du unbedingt ein vollständiges Backup deiner WordPress-Installation und der Datenbank anlegen. In seltenen Fällen können Dateien fälschlich als ungenutzt erkannt werden – z. B. wenn sie über PageBuilder, Shortcodes oder Custom Fields eingebunden sind. Teste den Löschvorgang idealerweise zuerst in einer Staging-Umgebung. Wenn du Zugriff auf deinen Webserver per SSH hast, kannst du die ungenutzten Dateien aus der Datei unused_images.txt direkt automatisiert löschen – ohne mühsames Durchklicken per Hand. Voraussetzungen: - Die Datei unused_images.txt befindet sich auf dem Server (z. B. via WinSCP oder scp hochgeladen). - Du befindest dich im WordPress-Stammverzeichnis oder die Pfade in der Datei stimmen relativ zur aktuellen Position. Optional: Dry-Run vor dem Löschen Damit du vorab prüfen kannst, ob die Dateien wirklich existieren: while IFS= read -r file; do if ; then echo "Würde löschen: $file" else echo "❌ Nicht gefunden: $file" fi done < unused_images.txt Dateien sicher löschen (nach manueller Prüfung) while IFS= read -r file; do if ; then rm "$file" echo "✅ Gelöscht: $file" fi done < unused_images.txt Optional: Löschvorgang protokollieren while IFS= read -r file; do if ; then rm "$file" echo "$(date +"%F %T") Gelöscht: $file" >> deleted_files.log fi done < unused_images.txt
Fazit
Ein überfülltes Upload-Verzeichnis ist nicht nur unübersichtlich, sondern kann auch unnötig Speicherplatz und Backup-Zeit kosten. Mit dem hier vorgestellten Ansatz hast du eine sichere, transparente und Plugin-freie Lösung, um gezielt ungenutzte Dateien in deiner WordPress-Installation zu identifizieren und aufzuräumen. Durch die Kombination aus Datenbank-Export, Python-Skript und optionaler Löschung via SSH behältst du die volle Kontrolle – und vermeidest die Risiken automatischer Plugin-Löschungen. Zudem hast du mit den generierten SQL-Dateien und dem Log eine solide Dokumentation deines Bereinigungsprozesses. 💡 Tipp zum Schluss: Behalte die Anzahl deiner Medien im Blick, deaktiviere nicht benötigte Thumbnails und führe diese Art von Aufräumaktion regelmäßig durch – so bleibt dein System langfristig sauber und performant. Read the full article
0 notes
Text
Top 10 Essential Plugins Every WordPress Developer Should Know
WordPress has evolved into one of the most powerful and flexible content management systems available today. With over 40% of the web powered by WordPress, developers have an incredible opportunity to build robust, high-performing websites tailored to any niche or industry.
One of the key reasons behind WordPress's popularity is its vast plugin ecosystem. Plugins enhance functionality, streamline development, improve security, and boost performance—saving developers time and effort. But with over 60,000 plugins in the WordPress repository, choosing the right ones can be overwhelming.
To help you cut through the noise, here are 10 essential WordPress plugins every developer should know. Whether you’re building custom themes, working on client projects, or managing your own website, these tools are must-haves in your toolkit.
1. Advanced Custom Fields (ACF)
Purpose: Add and manage custom fields
Advanced Custom Fields is a staple for WordPress developers. It allows you to add custom fields to posts, pages, users, and more—giving you complete control over content structure.
Whether you're building a real estate site with custom listings or a portfolio with dynamic content types, ACF simplifies data entry and enhances your site's flexibility.
Why it’s essential:
User-friendly interface for clients
Supports complex field types (repeaters, galleries, flexible content)
Saves development time
2. Yoast SEO
Purpose: Optimize site for search engines
While it’s widely known among content creators, Yoast SEO is also an important tool for developers. It ensures that every page and post is properly optimized with SEO best practices in mind.
For developers, Yoast offers customizable breadcrumbs, schema integration, and control over robots.txt and sitemaps.
Why it’s essential:
Enhances search visibility
Adds structured data
Developer-friendly filters and actions
3. WP Rocket
Purpose: Performance optimization
Speed is a ranking factor and a user experience booster. WP Rocket is a powerful caching plugin that makes WordPress sites load faster with minimal configuration.
It handles page caching, browser caching, lazy loading, database cleanup, and CDN integration—all in one.
Why it’s essential:
Boosts Core Web Vitals
Developer hooks for customization
Compatible with eCommerce and multilingual sites
4. Query Monitor
Purpose: Debugging and performance analysis
Query Monitor is a must-have for diagnosing issues in WordPress development. It tracks database queries, PHP errors, hooks, REST API calls, and much more.
If your site is running slowly or you’re dealing with unexpected behavior, Query Monitor helps pinpoint the problem quickly.
Why it’s essential:
Real-time debugging
Works with themes and plugins
Identifies performance bottlenecks
5. Custom Post Type UI
Purpose: Create and manage custom post types and taxonomies
WordPress development often involves creating custom content structures beyond posts and pages. Custom Post Type UI provides an easy interface for registering custom post types and taxonomies without touching code.
It’s perfect for speeding up development and can be used alongside ACF for full control over content models.
Why it’s essential:
No-code setup for post types
Export functionality for use in themes/plugins
Saves hours of manual coding
6. Duplicator
Purpose: Site migration and backup
Duplicator makes it easy to clone, move, or back up a WordPress site. Whether you're moving from staging to production or delivering a completed project to a client, this plugin simplifies the process.
It packages your site files and database into a single archive for easy deployment.
Why it’s essential:
Hassle-free migrations
Great for creating boilerplate templates
No need for manual database edits
7. WP All Import
Purpose: Import data into WordPress
When working with client data, bulk content, or WooCommerce products, WP All Import is an invaluable tool. It allows you to import data from XML or CSV files into any post type.
It integrates seamlessly with ACF, WooCommerce, and custom taxonomies—giving developers control over how data is mapped and displayed.
Why it’s essential:
Handles large datasets
Flexible import options
Developer-friendly with PHP functions
8. User Role Editor
Purpose: Manage and customize user roles and capabilities
In complex WordPress sites, controlling access levels is crucial. User Role Editor lets you fine-tune permissions for different user roles, or even create entirely new roles tailored to your project.
This is particularly helpful for membership sites, eLearning platforms, and client dashboards.
Why it’s essential:
Easy UI for managing capabilities
Useful for multisite setups
Secure role management
9. Regenerate Thumbnails
Purpose: Recreate image sizes
When changing themes or modifying image dimensions in your functions file, WordPress doesn’t automatically apply those changes to existing media. Regenerate Thumbnails lets you update image sizes in bulk.
This ensures consistency in your layouts and prevents layout issues.
Why it’s essential:
Saves hours of manual editing
CLI support for automation
Works well in dev and production environments
10. Wordfence Security
Purpose: WordPress site security
Security should never be an afterthought. Wordfence offers real-time threat defense, malware scanning, login protection, and firewall features to keep your WordPress sites safe.
While developers might also work with server-level tools, Wordfence provides an easy layer of protection that’s client-friendly and highly effective.
Why it’s essential:
Real-time firewall and malware scanning
Brute force protection
Detailed traffic and threat reports
Final Thoughts
The WordPress plugin ecosystem is vast, and while there’s no one-size-fits-all solution, these ten plugins provide a solid foundation for any WordPress developer. They help speed up workflows, improve site performance, enhance SEO, secure data, and streamline debugging.
As a developer, knowing when and how to use these tools—and when to avoid unnecessary plugins—is part of mastering WordPress. Choose wisely, keep your stack lean, and always test for compatibility in your development environment.
Are there any plugins you can’t live without? Let us know in the comments!
0 notes
Text

Launching a new WooCommerce store is an exciting milestone for any business, but success hinges on more than just uploading products and picking a great theme. Choosing the right plugins can significantly enhance your store’s performance, user experience, and long-term scalability. From streamlining checkout to improving SEO and boosting conversion rates, the right tools can make all the difference.
Whether you're setting up a small niche shop or planning to scale into a large online marketplace, having expert WooCommerce Development Services from the start ensures your store is built with a strong, flexible foundation. But once your site is live, enhancing functionality through carefully chosen plugins is a key next step.
In this article, we’ll explore 10 essential WooCommerce plugins every new store should consider—carefully selected for their reliability, relevance, and value in 2025.
1. WooCommerce Payments
Why You Need It: Simplifies the checkout experience by allowing customers to pay via credit card, Apple Pay, or Google Pay directly on your site. Best For: Store owners who want to avoid third-party payment gateway hassles. Bonus: Fully integrated with your WooCommerce dashboard for easier transaction management.
2. Yoast SEO for WooCommerce
Why You Need It: Enhances your product pages with better metadata, schema markup, and optimized breadcrumbs—crucial for search rankings. Best For: SEO-focused brands that want to compete in competitive niches. Pro Tip: Use this in conjunction with a strong content strategy to drive organic traffic.
3. WooCommerce Subscriptions
Why You Need It: Enables recurring payments for products or services, allowing you to build a reliable revenue stream. Best For: Businesses offering memberships, digital products, or monthly kits. ROI Factor: Subscription models can dramatically improve customer retention.
4. MailPoet
Why You Need It: A powerful email marketing plugin built specifically for WooCommerce and WordPress. Best For: Store owners who want to manage newsletters and marketing automation without leaving WordPress. Feature Highlight: Abandoned cart emails, product follow-ups, and customizable templates.
At this stage, it’s also important to think about maintenance and ongoing support. Many store owners underestimate the importance of long-term care, especially when plugins conflict or new updates cause instability. That’s where WooCommerce Support Services come in—ensuring your site stays secure, fast, and functional even as you scale.
5. Advanced Coupons
Why You Need It: Adds powerful discounting tools like BOGO deals, scheduled coupons, and cart conditions. Best For: Stores that run frequent promotions or seasonal sales. Why It Stands Out: Far more flexible than WooCommerce’s default coupon system.
6. Product Add-Ons by WooCommerce
Why You Need It: Allows customers to personalize products with additional options like engravings, colors, or gift-wrapping. Best For: Customizable product businesses like apparel, gifts, and food services. Conversion Boost: Personalized options often increase average order value.
7. MonsterInsights
Why You Need It: Connects your WooCommerce store to Google Analytics with enhanced eCommerce tracking features. Best For: Data-driven business owners who want to monitor KPIs like conversion rate, bounce rate, and revenue sources. Ease of Use: User-friendly reports displayed right in your WordPress dashboard.
8. LiveChat
Why You Need It: Increases engagement by providing real-time support to site visitors. Best For: Stores with high ticket items or complex products. Customer Experience Factor: Quick responses can dramatically reduce cart abandonment.
9. TrustPulse
Why You Need It: Shows real-time user activity (like purchases or sign-ups) to build social proof and trust. Best For: New stores looking to establish credibility fast. Psychological Edge: FOMO (Fear of Missing Out) encourages more conversions.
10. WP Rocket
Why You Need It: One of the best caching plugins to dramatically speed up your WooCommerce site. Best For: All stores—fast loading pages reduce bounce rates and improve SEO. Added Value: Image optimization and lazy loading improve mobile experiences.
Bonus: Plugins Aren’t Everything—The People Behind the Store Matter Too
While these plugins are extremely helpful, the best results come when they’re selected, configured, and customized by someone who understands the bigger picture of your store’s goals. For growing businesses, it’s often a smart investment to Hire Professional WordPress Developer who can fine-tune plugin interactions, improve speed, and troubleshoot deeper issues that arise as your site grows.
Many plugins are powerful, but combining them without technical knowledge can create conflicts, slowdowns, and bugs that go unnoticed until it's too late. With expert guidance, your site can scale more smoothly—and you avoid expensive downtime or security vulnerabilities.
Final Thoughts
The WooCommerce plugin ecosystem is vast, but that doesn’t mean you should install every shiny new tool. Instead, choose plugins that enhance customer experience, improve site performance, and align with your long-term business model. These 10 must-have plugins will give your new store the functionality it needs without bloating your setup.As your store evolves, so will your needs—don’t be afraid to re-evaluate what tools you’re using and how they serve your brand. And when in doubt, lean on the support of experienced developers and services to keep your WooCommerce store running at its best.For ongoing tips and inspiration from behind the scenes of high-performing WordPress stores, you might enjoy following our work on Instagram, where we share insights, design highlights, and optimization wins in real time.
0 notes
Text
How WordPress Plugins Enhance Business Website Performance and Features?

When it comes to building a powerful and feature-rich website, WordPress leads the way—not just because of its flexibility, but because of its vast library of plugins. These small software tools add specialized features to your website, allowing it to do everything from SEO optimization to e-commerce, lead generation, and beyond.
But with over 59,000 plugins available, choosing the right ones and configuring them correctly can be overwhelming. That’s why working with a professional Web Design Company in Udaipur can help you unlock the full potential of WordPress while avoiding performance and security issues.
In this blog, we’ll explore the key benefits of using plugins and how businesses can use them to enhance their websites effectively.
What Are WordPress Plugins?
WordPress plugins are extensions that add new features or expand the capabilities of your website without requiring custom coding. Whether you need contact forms, image sliders, booking tools, or e-commerce integration, there’s a plugin for nearly everything.
Plugins make it possible for small and medium-sized businesses to build dynamic websites with minimal technical knowledge, while still offering scalability and customization.
Essential Plugins for Business Websites
Here are some core plugin categories that most business websites can benefit from:
SEO Plugins
Tools like Yoast SEO and Rank Math help optimize your pages and blog posts for search engines. They also assist with meta tags, sitemaps, and readability analysis.
Security Plugins
Wordfence and iThemes Security help protect your website from malware, brute-force attacks, and spam.
Backup Plugins
UpdraftPlus is a trusted solution for automatic website backups and one-click restores in case of data loss or site crashes.
Performance Plugins
WP Rocket and W3 Total Cache speed up your site with caching, minification, and image optimization.
Contact and Lead Capture Plugins
WPForms, Contact Form 7, and Fluent Forms are great tools for creating interactive forms and collecting leads.
E-Commerce Plugins
WooCommerce is the most popular plugin to turn your WordPress site into a complete online store with product listings, payments, and shipping.
Why Not All Plugins Are Good for Your Site
While plugins are powerful, not all of them are reliable or necessary. Using too many plugins can:
Slow down your website
Cause compatibility issues
Introduce security vulnerabilities
Lead to plugin conflicts or crashes
This is why expert guidance is important. A professional WordPress Development Company in Udaipur can help you identify high-quality, lightweight, and secure plugins that align with your website’s goals—without sacrificing speed or performance.
Custom Plugin Development: When You Need Something Unique
Sometimes, existing plugins can’t do exactly what your business needs. That’s when custom plugin development becomes essential.
Custom plugins offer:
Features tailored to your business process
Seamless integration with existing tools and CRM
Better performance compared to multi-purpose plugins
Full control over code and future updates
With custom plugins, you’re not limited by generic solutions. You get functionality built specifically for your audience and business goals.
Plugin Management Best Practices
Here are some tips for using plugins effectively and safely:
Install only well-rated, frequently updated plugins
Avoid installing unnecessary or duplicate plugins
Always back up your website before updates
Use a staging environment to test new plugins
Keep all plugins updated to the latest versions
Delete inactive plugins to improve speed and reduce risks
Following these practices ensures your website stays fast, secure, and scalable.
How Developers Help Optimize Plugin Usage
Professional developers do more than just install plugins. They:
Audit your current plugin setup for performance issues
Recommend better alternatives with fewer resources
Customize plugin functionality to fit your needs
Ensure compatibility with your theme and WordPress version
Implement caching and speed optimization with plugin integration
With their expertise, you avoid the pitfalls of plugin overload while gaining the full benefits of smart automation and functionality.
Final Thoughts
WordPress plugins are powerful tools that can transform a simple website into a high-performing business platform. From boosting SEO and security to enhancing customer engagement, plugins play a vital role in creating feature-rich websites.
However, using plugins the right way is critical. A trusted web design company in Udaipur can guide you through every step—ensuring that your site is fast, secure, and tailored for growth. And with the expertise of a dedicated WordPress Development Company in Udaipur, you gain access to advanced functionality, custom solutions, and long-term technical support.
0 notes
Text
youtube
Top WordPress Developer Plugins You Shouldn’t Code Without in 2025
As a WordPress developer, your toolkit defines your workflow, efficiency, and project success. Developing with WordPress goes far beyond themes and page builders—it’s about crafting scalable, performant, and secure experiences with precision. The difference between an average site and a professional-grade build often comes down to the developer plugins you rely on.
Whether you're debugging a site, crafting custom content structures, migrating environments, or managing performance, the right plugins save time and streamline the development process. Below is a comprehensive list of the top WordPress developer plugins you should be using in 2025—plus a few hosting insights from 4GoodHosting, a trusted Canadian web hosting provider for developers who demand more.
Debugging & Diagnostics Plugins
1. Query Monitor One of the most powerful debugging tools for developers. Query Monitor lets you inspect database queries, PHP errors, hooks, conditionals, and REST API calls—all in real-time. It helps pinpoint performance bottlenecks and diagnose theme/plugin conflicts.
2. Debug Bar Ideal for quick diagnostics, Debug Bar adds a debug menu to your admin bar and displays query, memory, and cache information. It's lightweight and useful for surface-level insights without overwhelming the interface.
3. Health Check & Troubleshooting Developed by WordPress.org, this plugin offers a “troubleshooting mode” that deactivates themes and plugins only for your session, allowing you to isolate issues without affecting live users.
Code Management & Customization Plugins
4. Advanced Custom Fields (ACF) A must-have for creating flexible content fields. ACF allows you to attach custom fields to posts, users, taxonomies, and more—perfect for creating bespoke content layouts.
5. Code Snippets Avoid cluttering functions.php with custom code. Code Snippets lets you organize, activate, and manage reusable PHP, HTML, and JavaScript snippets safely within the dashboard.
6. Custom Post Type UI Need to register custom post types or taxonomies? This plugin simplifies the process, allowing you to create unique content types like “Events,” “Testimonials,” or “Portfolios” without coding.
7. WP Crontrol WP-Cron tasks can be cryptic. This plugin gives you a clear dashboard to view, edit, and delete scheduled cron events—ideal for managing automated tasks or debugging scheduled jobs.
Performance Optimization Plugins
8. WP Rocket A premium caching solution that offers fast configuration and strong out-of-the-box results. It improves site load times through page caching, minification, GZIP compression, lazy loading, and database optimization.
9. Smush Image optimization is critical for performance. Smush compresses and resizes images without sacrificing quality, and it supports WebP conversion and lazy loading for speed improvements.
10. Autoptimize This plugin aggregates, minifies, and caches scripts and styles, optimizing load times by reducing file size and HTTP requests. It’s a perfect companion for any caching tool.
Security-Focused Plugins
11. Wordfence Security A comprehensive suite including a firewall, malware scanner, brute-force protection, and login security features. Wordfence also monitors real-time traffic and vulnerabilities.
12. iThemes Security (SolidWP) Offers extensive hardening options including two-factor authentication, file change detection, strong password enforcement, and scheduled database backups.
Workflow & Migration Plugins
13. WP Migrate Move databases between environments with ease. It replaces URLs and serialized data accurately, making staging-to-production transitions seamless. The Pro version adds support for file/media migrations too.
14. Duplicator Creates a full backup of your WordPress site—including database, themes, plugins, and content—in a compressed package. Perfect for creating staging environments or full-site migration.
15. User Switching Switch between user roles instantly without logging in/out. This tool is essential for testing permissions and visibility across different access levels.
16. WP Reset Need to test multiple setups? WP Reset restores your database to a clean installation state without touching your media. Perfect for developers who frequently test themes or plugins.
SEO & Content Development Plugins
17. Yoast SEO A staple for on-page optimization, Yoast SEO helps developers ensure that their builds are SEO-ready. It handles metadata, sitemaps, schema, readability, and more.
18. Redirection Manage 301 redirects, track 404 errors, and create clean link structures. Particularly useful after content migrations or site restructuring.
Best Practices for Plugin Integration
Even the best plugins can backfire if not managed properly. Follow these development practices to ensure stability and performance:
Test plugin compatibility before installing on a live environment.
Limit plugins to essentials—avoid bloated setups.
Keep plugins updated to stay protected and efficient.
Monitor site performance after every plugin installation or update.
Use version control (e.g., Git) for custom plugins or code snippets.
Hosting Consideration: Why Developers Trust 4GoodHosting
All these plugins need a stable, high-performance hosting environment to function optimally. That’s why developers across Canada turn to 4GoodHosting for their WordPress projects. Here's why:
Managed WordPress Hosting – Get automatic updates, free SSL, daily backups, and performance optimization out of the box.
Canadian Data Centers – Enjoy fast speeds and legal compliance for Canadian businesses.
Developer Tools – SSH access, staging environments, and Git integration.
Expert Support – Get help from professionals who understand WordPress development.
Whether you're building custom websites, managing client portfolios, or developing SaaS on top of WordPress, 4GoodHosting gives you the infrastructure you can trust.
Final Thoughts: Build Better, Code Smarter
WordPress development is about precision, performance, and continuous learning. By integrating the right developer plugins—and hosting your work on a trusted platform like 4GoodHosting��you position yourself to deliver secure, optimized, and scalable websites for any project.
Use these plugins not just as tools, but as enhancements to your entire development process. Combine them with clean code practices, regular testing, and smart hosting decisions, and you’ll not only save time—you’ll build better sites.
0 notes
Text

How to Set Up Your Local Development Environment for WordPress
Setting up a local development environment is one of the best ways to experiment with and build WordPress websites efficiently. It offers you a safe space to test themes, plugins, and updates before applying changes to a live site. Whether you’re a beginner or an experienced developer, having a local environment is essential in streamlining your workflow and minimizing website downtime.
Before we dive into the technical steps, it’s worth mentioning the benefits of WordPress for your business website. WordPress offers unmatched flexibility, scalability, and user-friendliness, making it an ideal platform for businesses of all sizes. When paired with a solid local development setup, WordPress becomes even more powerful in enabling fast and secure site builds.
Step 1: Choose Your Local Development Tool
There are several local development tools available that cater specifically to WordPress users:
Local by Flywheel (now Local WP): Extremely beginner-friendly with features like SSL support and one-click WordPress installs.
XAMPP: A more general-purpose tool offering Apache, MySQL, PHP, and Perl support.
MAMP: Ideal for macOS users.
DevKinsta: Built by Kinsta, it offers seamless WordPress development and staging capabilities.
Choose the one that suits your OS and comfort level.
Step 2: Install WordPress Locally
Once you’ve chosen your tool:
Install the software and launch it.
Create a new WordPress site through the interface.
Set up your site name, username, password, and email.
After setup, you’ll get access to your WordPress dashboard locally, allowing you to install themes, plugins, and begin your customizations.
Step 3: Configure Your Development Environment
To ensure an efficient workflow, consider these configurations:
Enable Debug Mode: Helps in identifying PHP errors.
Use Version Control (e.g., Git): Keeps your changes tracked and manageable.
Database Access: Tools like phpMyAdmin help manage your WordPress database locally.
If your project requires dynamic functionality, leveraging PHP Development Services during the setup phase can ensure custom features are implemented correctly from the beginning.
Step 4: Customize Themes and Plugins Safely
With your local environment set up, now's the time to begin theme development or customization. You can safely create or modify a child theme, experiment with new plugins, and write custom code without any risk of affecting your live site.
For those unfamiliar with theme structures or WordPress standards, it’s often wise to hire a professional WordPress developer who understands best practices and can ensure clean, maintainable code.
Step 5: Syncing to a Live Server
After building and testing your site locally, you'll eventually want to push it live. Popular methods include:
Using a plugin like Duplicator or All-in-One WP Migration
Manual migration via FTP and phpMyAdmin
Using version-controlled deployment tools
Syncing should always be done carefully to avoid overwriting crucial data. Regular backups and testing are essential.
Step 6: Maintain Your WordPress Site Post-Launch
Launching your website is only the beginning. Ongoing updates, security patches, and performance optimization are critical for long-term success. Enlisting website maintenance services ensures your site remains fast, secure, and up-to-date.
Services can include:
Core, plugin, and theme updates
Malware scans and security hardening
Site performance monitoring
Regular backups
Final Thoughts
A local WordPress development environment not only speeds up your development process but also protects your live website from unintended changes and errors. With tools and strategies now more accessible than ever, there's no reason not to use one.From learning the basics to running advanced builds, setting up locally gives you the confidence and space to grow your WordPress skills. And if you want to see real-world examples or follow along with tips and tricks I share, feel free to check out my work on Instagram for practical inspiration.
0 notes
Text
Smart School Zoom Live Class Nulled Script 5.1

Unlock Seamless Online Learning with Smart School Zoom Live Class Nulled Script Empower your educational platform with the Smart School Zoom Live Class Nulled Script, a dynamic solution tailored for schools, colleges, and educational institutions looking to deliver online learning with ease. This advanced script integrates Zoom’s powerful video conferencing capabilities directly into the Smart School system, enabling live virtual classrooms and real-time student-teacher interaction—all without the hefty licensing costs. What is Smart School Zoom Live Class Nulled Script? The Smart School Zoom Live Class is a premium module that lets educators conduct live Zoom classes directly within the Smart School management system. With this nulled version, users can access full features without activation or purchase, making it the ideal choice for institutions seeking affordability without compromising quality. Whether you're running an online academy or integrating remote learning into your curriculum, this script provides everything you need to go live smoothly. Technical Specifications Script Type: Addon Module for Smart School Integration: Native Zoom API support Requirements: PHP 7.x+, MySQL, Smart School Core Compatibility: Fully responsive on all devices Version: Latest Nulled Edition Powerful Features & Benefits The Smart School Zoom Live Class Nulled Script brings a multitude of benefits to your e-learning experience: Live Class Scheduling: Teachers can create and manage live sessions with time slots and durations. Student Notification: Automatic notifications to students about upcoming live classes. Seamless Integration: Built directly into the Smart School dashboard for ease of use. Secure Access: Only authorized users can join sessions with secure credentials. Class Recording: Optional recording features (if enabled in Zoom account) for future playback. Perfect for a Range of Educational Use Cases This nulled script is ideal for: Schools conducting distance learning or hybrid classes Colleges hosting webinars and virtual lectures Online coaching centers seeking real-time engagement Private tutors delivering 1-on-1 or group sessions How to Install and Use Installing the Smart School Zoom Live Class Nulled Script is simple and straightforward: Upload the module to your Smart School installation via FTP or file manager. Activate the module from the admin dashboard. Integrate your Zoom API credentials in the settings panel. Create and manage live classes directly from your admin interface. Once installed, you’ll have complete control over your virtual classroom operations, allowing for flexible, real-time instruction at any scale. Frequently Asked Questions (FAQs) 1. Is this script safe to use? Yes. The Smart School Zoom Live Class Nulled Script has been tested for security and performance. It’s fully functional and ready for deployment in real environments. 2. Do I need a Zoom paid plan? While the script works with free Zoom accounts, premium features like extended time limits and recording may require a Zoom Pro subscription. 3. Can I use this on multiple Smart School installations? Absolutely. This nulled version has no licensing restrictions and can be deployed on multiple domains or environments. 4. Will this work with future Smart School updates? Most updates are supported, but it's always recommended to test new versions in a staging environment before deploying to production. 5. Where can I download other useful tools? Looking to optimize your WordPress site as well? Check out the WP-Optimize Premium nulled plugin to boost your site’s speed and performance for free. And if you're enhancing your website design, don't miss out on the powerful elementor nulled pro plugin for professional-grade page building. Conclusion The Smart School Zoom Live Class is your gateway to modern, interactive, and cost-effective online education. It eliminates the barriers of traditional learning and equips educators with tools to manage virtual classrooms effortlessly.
Download it now and take your digital learning experience to the next level—100% free, no license required!
0 notes
Text
What Real Website Maintenance Looks Like (And How Our 4 New Plans Stack Up)

If you’re like most business owners, you’re probably paying for hosting that does the bare minimum — maybe it keeps your website online, but that’s about it. No help with updates, no eyes on performance, no SEO support, and definitely no one calling out when your site starts to break.
We get it. That’s why we rolled out four new fully managed website maintenance plans — each one designed to actually do something for your business. From core hosting and updates to full-blown SEO and outreach, these plans are built to grow with you.
Why Typical Hosting Isn’t Enough
Most hosting companies give you:
A login
A server
And a support ticket system that may or may not get answered
They don’t help you:
Keep plugins and core software updated
Monitor for malware or uptime drops
Improve site speed or performance
Stay SEO-friendly or ADA-compliant
And they definitely don’t include monthly developer time or content strategy.
Introducing Our 4 New Website Maintenance Plans
We’ve taken the guesswork out of what businesses need by packaging everything into four levels:
🛡️ Protect – $300/mo
Premium WP Engine hosting
Daily backups, plugin updates, and malware protection
ADA scan + quarterly SEO audit
2 hours/month of development time (that rolls over!)
🌱 Grow – $1,500/mo
Everything in Protect
Monthly SEO execution
1 blog post per month
Monthly SEO report & strategy check-ins
⚡ Accelerate – $2,100/mo
Everything in Grow
4 blog posts per month
Deep monthly SEO health report
Quarterly landing page refresh + image optimization
Priority phone/text support
🚀 Elevate – $3,500+/mo
Everything in Accelerate
Press release distribution
Social media content creation & posting
Competitive media analysis
Light media outreach & pitching
Explore all the plan details here
Why This Isn’t Just “Hosting”
Even our base plan gives you more than most full-stack dev retainers — at a fraction of the cost. For businesses that don’t want to think about their website but still need it to perform, this is a no-brainer.
And yes, we include ADA compliance, on-page SEO help, real support, and even rollover developer hours — because we know no two months are the same.
Every Feature, Explained
Want to know what “deep SEO health report” or “manual press release distribution” actually means? Visit our glossary of services for a plain-English breakdown of every item in our plans.
Is It Time to Switch?
If you’re paying $50/mo for basic hosting, but end up hiring a developer every time something breaks… you’re already spending more and getting less.
We built these packages for clients who value:
Peace of mind
Performance
And proactive support
If that sounds like you, let’s talk.
Ready to get more than just hosting? See the full plan breakdown here
Key Takeaways from Our New Website Maintenance Plans
We now offer four fully managed WordPress plans tailored for businesses at different growth stages — Protect, Grow, Accelerate, and Elevate.
Each plan includes core services like hosting, backups, plugin updates, and malware protection — services most other hosts leave out.
Every package includes real dev time and SEO support, even at the base level. That’s time you’re not getting from GoDaddy, Bluehost, or generic shared hosting.
We’ve added a full Glossary of Services so you can understand exactly what each feature delivers.
This isn’t just hosting — it’s website maintenance, SEO, and real support rolled into one predictable monthly package.
Ready to upgrade from “just hosting”? Explore the plans and see how your current provider stacks up.
Hosting & Maintenance FAQ's
What’s included in website maintenance? It depends on the provider. Our plans include hosting, plugin updates, backups, security scans, ADA audits, SEO support, and development time — all managed for you.
Do I have to host my site with you to get this? Yes — all of our packages include hosting as a foundation, so we can manage everything reliably from one place.
Can I upgrade or downgrade my plan later? Absolutely. Start where you are — grow when you’re ready.
Contact Us
At Reversed Out Creative, we understand the challenges and opportunities presented by AI disruption. Our team of experts specializes in web design, SEO, graphic design, and digital marketing services. Reach out to us through our contact form to learn more about navigating the evolving job market and embracing the potential of AI. Together, let’s shape a future that combines human ingenuity with the power of AI.
Content source: https://reversedout.com/website-maintenance-plans-comparison/
#Website Maintenance Plans#Website Support Services#Website Maintenance Comparison#Best Website Maintenance Plan#Website Security Updates
0 notes
Link
0 notes
Text
How to Keep Your WordPress Theme Updated Safely
Updating your theme sounds easy, right? Click “Update,” and you’re done.
But here’s the truth — updating WordPress themes without a plan can sometimes break your layout, erase custom changes, or mess with how your site looks. Yikes.
Don’t worry, though. In this guide, we’ll walk you through how to safely update your WordPress theme without losing your design or your mind.
1. Why You Should Update Your Theme (Yes, It’s Important)
Let’s start with the basics. Updates aren’t just about new features. They’re about:
Security — Fixing bugs or vulnerabilities
Speed — Improving performance
Compatibility — Making sure the theme works with the latest WordPress version and plugins
So if you’re using an outdated WordPress theme, you’re basically leaving your site open to issues you could’ve avoided.
2. Backup Your Website First (Always!)
Before you hit update, back up everything — your database, files, images, and content. This way, if something goes wrong, you can roll your site back to how it was.
You can use tools like:
UpdraftPlus
BlogVault
Jetpack Backup
Most modern WordPress themes won’t break during updates, especially if built well (like the ones from webxThemes), but it’s still smart to play it safe.
3. Use a Child Theme for Customizations
If you’ve ever edited your theme’s code directly — like changing fonts, layout spacing, or header sections — those changes can get wiped out when you update.
To protect your custom work, always use a child theme. It’s a separate layer that holds your edits, so when the main theme updates, your tweaks stay intact.
Many WordPress themes from premium providers support child themes by default. If yours doesn’t, you can create one manually or use a plugin like Child Theme Configurator.
4. Test on a Staging Site First
Don’t update your live site without testing first. A staging site is a copy of your website where you can try updates without risk.
Most hosting providers offer one-click staging environments. Or, use a plugin like WP Staging to quickly set one up.
Install the update on staging, check how everything looks and functions, and only then update your live site.
This is especially helpful if you’re using feature-rich WordPress themes with lots of customization.
5. Check Plugin Compatibility
After updating your theme, go through your key plugins and make sure they’re still working fine.
Sometimes a new theme version might not play nice with certain plugins. If you spot issues, you can either:
Update the plugin too
Look for alternative plugins
Revert to the backup and wait for a stable theme release
With professionally-coded themes like the ones at webxThemes, these problems are rare — but still good to check.
6. Don’t Skip Changelogs
Before updating, take a quick look at the changelog (usually found in the theme’s update notes). It tells you what’s been added, changed, or fixed.
If the update includes major layout changes or features, you’ll know in advance — and can plan accordingly.
Some WordPress themes even give you full update logs with screenshots so you know exactly what to expect.
Wrapping It Up
Updating your WordPress theme doesn’t have to be risky or stressful. Just follow these steps:
✅ Backup ✅ Use a child theme ✅ Test on staging ✅ Check plugin compatibility ✅ Read the changelog
And remember — high-quality theme developers like webxThemes make updates smoother by offering solid code, detailed documentation, and support when you need it.
So go ahead and keep your theme updated — safely, smartly, and without breaking a thing.
Let me know if you want a quick checklist or video tutorial to go along with this!
0 notes
Text
Tips for WordPress That Every Webmaster Should Know
1. Optimize Website Speed for Better Performance
Website speed is vital for user experience and SEO rankings. Slow-loading sites often lose visitors quickly. To improve speed, webmasters should minimize the use of large images. Compress images using tools like TinyPNG or Smush. Use caching plugins such as W3 Total Cache or WP Rocket. Reduce the number of plugins to avoid unnecessary bloat. Enabling lazy loading for images and videos can also enhance performance. Choose a reliable WordPress Development Agency for faster server response times.

2. Use SEO Plugins to Boost Visibility
Search engine optimization (SEO) is essential for driving traffic. WordPress offers several powerful SEO plugins. Yoast SEO and Rank Math help optimize content. They offer real-time suggestions on keyword usage, readability, and meta descriptions. Set proper permalinks with relevant keywords. Add alt text to all images for better indexing. Use internal and external links to strengthen the content’s relevance.
3. Strengthen Website Security
Webmasters must prioritize security to prevent hacking. Install security plugins like Wordfence or Sucuri. Use two-factor authentication (2FA) to protect admin accounts. Regularly update WordPress core, themes, and plugins. Use strong passwords and avoid using 'admin' as a username. Backup your website regularly using plugins like UpdraftPlus or Jetpack. Set up a firewall to block suspicious traffic.
4. Choose a Mobile-Responsive Theme
Most users access websites on mobile devices. Ensure your WordPress theme is mobile-friendly. Select a responsive theme like Astra or GeneratePress. Test your website on different devices and screen sizes. Use Google’s Mobile-Friendly Test tool to verify compatibility. Avoid using large pop-ups that may block content on smaller screens.
5. Regularly Update Plugins and Themes
Outdated plugins and themes are security risks. Always update to the latest versions. Updates often include bug fixes and performance improvements. Before updating, back up your website to avoid data loss. Use the ‘Enable auto-updates’ feature in WordPress. Deactivate and delete unused plugins.
6. Use Custom Permalinks for Better Navigation
Default WordPress URLs are not user-friendly. Use custom permalinks with clear keywords. Go to Settings > Permalinks and select ‘Post Name’. WordPress SEO Services make URLs readable and SEO-friendly. For example, use yoursite.com/tips-for-wordpress instead of yoursite.com/?p=123.
7. Leverage Content Delivery Networks (CDN)
A CDN speeds up content delivery by using multiple servers. It reduces loading times for global visitors. Popular CDN services include Cloudflare and BunnyCDN. CDNs also enhance website security by blocking malicious traffic. They reduce server load and prevent downtime during traffic spikes.
8. Optimize Images for Faster Loading
Large images slow down websites. Use image compression tools like Imagify or ShortPixel. Choose the correct image format: JPEG for photos, PNG for graphics. Use WebP format for smaller file sizes without losing quality. Enable lazy loading to delay image loading until users scroll.
9. Create Backups Regularly
Backups protect your website from data loss. Use backup plugins like UpdraftPlus or BackupBuddy. Store backups on external platforms like Google Drive or Dropbox. Schedule automated backups weekly or daily. Test the restoration process regularly to ensure backups work.
10. Enable Automatic Database Optimization
Over time, WordPress databases accumulate unnecessary data. This slows down the website. Use the WP-Optimize plugin to clean up revisions, spam comments, and transients. Optimize your database regularly to maintain performance.
11. Use a Staging Site for Testing
Never make direct changes to a live site. Use a staging site to test updates, plugins, or design changes. Staging sites are replicas of your live website. WordPress Consultant allow safe testing without affecting the live version. Many hosting providers offer one-click staging environments.
12. Optimize Your WordPress Dashboard
A cluttered dashboard slows down the workflow. Remove unnecessary widgets and plugins. Use the Screen Options menu to simplify the view. Organize frequently used tools for easy access.
13. Use Strong Call-to-Actions (CTAs)
Effective CTAs increase user engagement. Use clear and actionable language. Place CTAs strategically, like at the end of blog posts or on landing pages. Use contrasting colors to make CTAs stand out. Keep the CTA text concise, such as "Get Started" or "Learn More".
14. Integrate Google Analytics for Tracking
Google Analytics provides insights into website traffic. It helps track visitor behavior and popular content. Install the Google Site Kit plugin for easy integration. Use analytics data to improve content and marketing strategies.
15. Optimize Comments Section to Reduce Spam
Spam comments affect website credibility. Use anti-spam plugins like Akismet or Antispam Bee. Moderate all comments before publishing. Use CAPTCHA to prevent automated spam bots. Disable comments on older posts to reduce spam.
16. Use Schema Markup for Better SEO
Schema markup helps search engines understand your content. Use the Schema & Structured Data for WP plugin. Add schema types like articles, reviews, or FAQs. WordPress Expert improves rich snippets in search results.
17. Set Up Google Search Console
Google Search Console tracks your website’s SEO performance. It identifies indexing issues and broken links. Submit your sitemap for faster indexing. Monitor search queries and optimize content accordingly.
18. Optimize for Voice Search
Voice search is growing rapidly. Use conversational keywords and phrases. Optimize content with FAQ sections. Use schema markup to enhance visibility in voice search results.
19. Use Lightweight Themes for Better Speed
Heavy themes slow down websites. Use lightweight, fast-loading themes like Neve or Hello Elementor. Avoid themes with too many built-in features. Test your site speed with tools like GTmetrix or Pingdom.
20. Improve Internal Linking
Internal links boost SEO and keep visitors on your site longer. Link to related posts and pages naturally. Use descriptive anchor texts with relevant keywords. Ensure all internal links are functional and relevant.
By following these tips, webmasters can enhance their WordPress website's performance, security, and SEO. Consistent optimization and regular updates will ensure a smooth and efficient user experience.
1 note
·
View note
Text
These days it is sometimes easier to attract international customers to your website regardless of what you promote or write about. Whether you have a landing page or an online store you would love to optimize your conversions and gain new visitors.But how to deal with all those things that are so important for a successful international campaign? Multilingual content is a difficult thing to create, effective international SEO is an even more difficult thing to correctly implement and follow all the rules. There are many plugins out there that involve your deep-deep participation in the entire localization process, moreover involves other experts like SEO agencies, web developers, etc. ConveyThis translate is a relatively new plugin that has a bit of another approach as a whole. This plugin is the ultimate translation solution that gives you the ability to translate your entire website and have all the benefits of a multilingual site using only one plugin.Here Are Just Some Benefits You Will Get Using ConveyThis100+ of the most popular languages Unlimited trial with all features enabledFast, easy integration and instant resultsPowerful automatic machine translatorCompatibility with all themes and plugins Smart analytics to track international visitors Google multilingual SEO best practices Access to professional translatorsSimple translation interface Support to every customer If you decided to go international with your website, SEO optimization is the most important point here. Besides the content, of course, which the plugin provides you with in the first place.Once some of your pages are translated into another language it's still not guaranteed that foreign speaking visitor will see them. It does help you to make them more loyal due to language selection, but yet it's not enough for the whole international journey you will go on to. The most important part is to help search engines identify the translated content on your site and start ranking them higher in the appropriate search results. That's exactly what the plugin does, it creates separate URLs, adds "hreflang" tag, set up user language redirection and much more. When you have your website translated it will get so much exposure due to all these aspects.Before You StartNow let's have a look at the integration process and find out if it's really so simple.First of all, you need to install the plugin on your website.To do that go to your plugins directory in your WP admin and install ConveyThis.Once the plugin is installed it pops up on the top bar of your control panel.On the plugin's set up page, you will see that configuration is still required. To complete it you need to get an API key. Go to conveythis.com and sign up. After you confirm your account one of the first pages you will see is your main dashboard. It's pretty simple and at the same time very informative.Here you have all the most important indicators to follow your translation stage and international success. Grab your API key from this page and go back to the WP admin.Paste the key to the API section field, also select the source language and target language. Now the language switcher will appear on your website, you can go there and check. No other action’s needed to start translating your website, it's so simple.But before you actually start doing this we want you to pay your attention to the customization options.To open the list of settings click "show more options". As you can see this is where almost everything is subject to change. The handy preview button allows you do not have to switch to the website's tab to check out the result. Change whatever you want and see the result in real time. Actually, there is one more thing that could be extremely useful in some cases. Click "Change language flag" and you will be shown a spreadsheet where you can personalize up to five language-flag pairs. On the screenshot above you can see what it will eventually look like. All individualization changes that you might potentially need are covered here.
Translation InterfaceFinish translating some of your site's pages and go to "My Translations" to see how you can improve them. You can go there either from your account or from the plugin's page in your WP admin. There is an entire list of your translated pages here. By seeing the current number of page views you can understand what exact pages are the most effective ones. You can also delete those pages that have very few international visits and increase your word limit using it later for other pages. So here you have not only analytics but general testing capabilities.In the drop-down list, you can select a language you want to edit right now and also sorting options are also available to help you find the needed page. To start editing a specific page click on its link. On the right-hand side, you can replace the initial machine translation with yours. You will also be able to edit meta text and attributes.To help you improve all your content this interface provides you with an access to professional translators who you can contact right from your account. Whether you would like to have general proofreading or more in-depth editing it's up to you. Several translation agencies offer their services and due to their partnership with the plugin, you will have very low tariffs for this service.PricingConveyThis has three paid plans to cover various needs besides a totally free plan.And this is the last outstanding feature of this plugin - a free plan which has no expiration date, moreover you won't be asked to give your credit card information at registration. While testing the plugin on the trial all the features are enabled as on any advance plan and you can literally start your worldwide journey and gaining new customers completely for free.All paid plans have a money back guarantee and they cover various needs. So you have to pay only for your current volumes and can build bit by bit your powerful fully optimized multilingual website.Take advantage of this right now, sign up on their website and once you confirm your account use the coupon code MULTILINGUAL50 to get 50% off any paid plans.
0 notes
Text
How to Update Your WordPress Theme Without Losing Content

WordPress is one of the most popular platforms for website development, offering incredible flexibility and functionality. However, updating your WordPress theme can sometimes feel like a challenging task, especially if you’re worried about losing your carefully crafted content and customizations. This guide will show you how to safely update your WordPress theme while preserving your site’s content and functionality.
Table of Contents
Why You Should Update Your WordPress Theme
What to Do Before Updating Your Theme
Backing Up Your Website
Checking the Theme Changelog
Testing on a Staging Site
How to Update Your WordPress Theme
Updating Through the Dashboard
Manual Updates Using FTP
How to Keep Your Customizations Safe
Use a Child Theme
Save Your Custom CSS
Note Widget and Menu Settings
What to Do After Updating Your Theme
Clear Cache
Check Your Website for Issues
FAQs
Why You Should Update Your WordPress Theme
Updating your WordPress theme is critical for keeping your site:
Secure: Updates often include fixes for vulnerabilities that hackers can exploit.
Functional: Older themes may not work well with the latest version of WordPress or plugins.
Improved: Developers release updates to add new features and improve performance.
If you ignore updates, your website may face problems like slow loading, compatibility issues, or even security breaches.
What to Do Before Updating Your Theme
Before jumping into the update, take these steps to avoid surprises:
1. Backup Your Website
A backup is like an insurance policy—it lets you restore your website if something goes wrong. Use plugins like UpdraftPlus or All-in-One WP Migration to back up your:
Database (your content and settings)
Files (images, plugins, themes, etc.)
2. Check the Theme Changelog
Go to the theme developer’s website and look at the changelog. This document tells you what’s new in the update—bug fixes, features, or changes that might affect your website.
3. Use a Staging Site
If you’re nervous about updating your live site, use a staging site to test the changes first. Many hosting providers, like SiteGround or Bluehost, offer easy staging tools.
How to Update Your WordPress Theme
There are two ways to update your WordPress theme: through the dashboard or manually.
1. Updating Through the Dashboard
This is the easiest and quickest way:
Go to Appearance > Themes in your WordPress dashboard.
If an update is available, you’ll see a notification.
Click Update Now, and WordPress will handle the rest.
Pro Tip: Always make sure you’ve backed up your site before clicking “Update.”
2. Manual Updates Using FTP
For themes downloaded from third-party websites or if the dashboard update fails, you can use FTP:
Download the latest theme version from the source (e.g., ThemeForest).
Unzip the file on your computer.
Use an FTP client like FileZilla to access your website’s files.
Navigate to wp-content/themes and upload the new theme folder, replacing the old one.
By replacing the folder, your site will use the updated theme while keeping your existing content intact.
How to Keep Your Customizations Safe
Customizations are the heart of your website’s design. Here’s how to protect them during updates:
1. Use a Child Theme
If you’ve made changes to your theme files, they will be overwritten during updates. A child theme saves the day by letting you customize your site without touching the parent theme files.
How to Set Up a Child Theme:
Create a folder inside the wp-content/themes directory.
Add a style.css file and include the following lines: css /*
Theme Name: My Child Theme
Template: ParentThemeName
*/
Activate the child theme from your WordPress dashboard.
2. Save Custom CSS
If you’ve added CSS through the Customizer:
Go to Appearance > Customize > Additional CSS.
Copy your custom CSS into a text file before updating.
Reapply it if needed after the update.
3. Note Widget and Menu Settings
Sometimes theme updates reset your widgets and menus. Take screenshots of your layout and menu structure for reference.
What to Do After Updating Your Theme
Once you’ve updated your theme, there are a few more steps to ensure everything is running smoothly:
1. Clear Cache
Both browser and website caching can cause outdated files to appear, making your site look broken. Clear your browser cache and use a caching plugin like WP Super Cache to refresh everything.
2. Check Your Website for Issues
Test your site thoroughly:
Visit all major pages.
Test your forms, buttons, and interactive features.
Ensure your design looks the same.
If you spot issues, you can restore your backup or contact the theme developer for support.
FAQs
1. Can I update my theme without losing content?
Yes! Your posts, pages, and media are stored in the WordPress database and won’t be affected by a theme update. However, customizations in the theme files will be lost unless you use a child theme.
2. How often should I update my WordPress theme?
Check for updates regularly and apply them as soon as they’re released. Updates keep your site secure and compatible.
3. What happens if I don’t update my theme?
Your site may become vulnerable to hackers, experience compatibility issues with plugins, or miss out on new features and performance improvements.
4. What should I do if my site crashes after an update?
Restore your backup immediately, check for plugin conflicts, and contact the theme developer if needed.
5. Do I need professional help for theme updates?
If your site has heavy customizations or you’re unsure about the process, hiring WordPress theme development services can save you time and trouble.
Conclusion
Updating your WordPress theme is essential for keeping your site secure, functional, and up-to-date. By following the steps in this guide—backing up your site, using a child theme, and testing updates—you can confidently update your theme without losing content or customizations.
0 notes