#Xcode for mac 10.11
Explore tagged Tumblr posts
Visit Tumblr Blog
Explore Tumblr blogs with no restrictions, modern design and the best experience.
Last Seen Tumblr Blogs


Fun Fact
Tumblr was the first site to host the blog for President Barack Obama in 2011.
Text
Xcode for mac 10.11

#Xcode for mac 10.11 how to#
#Xcode for mac 10.11 for mac os#
#Xcode for mac 10.11 mac os x#
#Xcode for mac 10.11 install#
#Xcode for mac 10.11 software#
Make your choice from the rundown, and snap the Continue catch.
The Welcome screen shows, requesting that you select which nation your Mac will be utilized in.
#Xcode for mac 10.11 mac os x#
Follow the further guided steps to setup mac OS X El Capitan.ĭownload Xcode Mac OS X El Capitan setup process.
After the installation, the system will restart.
The progress bar will show the time required.
The installer will duplicate the needed files and then restart.
Type your administrator password and click OK.
#Xcode for mac 10.11 install#
Select the target disk and click on the install option.Read the terms and condition and agree with them.In the install os window, click the continue button.Performing clean installation Mac Os X 10.11.0 Download The installer will begin, despite the fact that it might take a couple of minutes. In the OS X utility window, select Install OS X, and snap the Continue catch.With the startup volume deleted, you’re currently prepared to start the establishment of OS X El Capitan.The Diagnostics and Usage window will inquire as to whether you wish to send data to Apple and its designers about issues that may happen with your Mac or its applications.You can choose your time zone by tapping on the world guide or pick the nearest city from a rundown of real urban areas around the globe. The Select Your Time Zone window will show.This is the head account, so make certain to take note of the username and password word you chose. Create a Computer Account choice will show.After that, read the agreement and agree to it.It’s up to you whether you have to enter an Apple Id or create a new one in the first step.Select the further option from the drop-down menu.Enable Location Services- By enabling this service, you are allowing the app to see the geographic location of your Mac.Here you can move existing information from a Mac, PC, or Time Machine reinforcement to the clean introduce of OS X El Capitan. The Transfer Information to This Mac window will show up.Make your keyboard layout selection and press continue.Follow the further guided steps to setup mac OS X El Capitan. Swift 3 includes more natural and consistent API naming, which you can experiment with in the new Swift Playgrounds app for iPad. New runtime issues alert you to hidden bugs by pointing out memory leaks, and a new Memory Debugger dives deep into your object graph. This radically faster version of the IDE features new editor extensions that you can use to completely customize your coding experience. Xcode 8 includes everything you need to create amazing apps for iPhone, iPad, Mac, Apple Watch, and Apple TV. Xcode 8.0 beta requires a Mac running macOS 10.11.4 or later. This is a pre-release version of the complete Xcode developer toolset for Mac, iPhone, iPad, and Apple Watch. Xcode Download and Install for your computer - either Windows PC 10, 8 or 7 and macOS 10 X, 32/64-bit processor, we have you covered.
#Xcode for mac 10.11 how to#
Mac OS X 10.10+ Yosemite Mac OS X 10.11+ El Capitan macOS 10.12+ Sierra macOS 10.13+ High Sierra macOS 10.14+ Mojave macOS 10.15+ Catalina macOS 11+ Big Sur or latest version How to Download Xcode DMG Installer Manually?
#Xcode for mac 10.11 software#
Compatible Mac OS for Xcode Installation: Apple Xcode software is compatible and supported with following macOS versions.It is offline installer and standalone setup for Apple Xcode 10.1 for Apple Macbook Macintosh. This is completely Tested and Working Latest Version Mac OS App of Apple Xcode 10.1.
#Xcode for mac 10.11 for mac os#
Click on below button to start Apple Xcode 10.1 Download for Mac OS X.
Download Apple Xcode 10.1 for Mac Free.
Xcode 8.0 beta requires a Mac running macOS 10.11.4 or later.Xcode 8 includes everything you need to create amazing apps for iPhone, iPad, Mac, Apple Watch, and Apple TV.
This is a pre-release version of the complete Xcode developer toolset for Mac, iPhone, iPad, and Apple Watch.
Please consider donating to help maintain it. Links on this site take you directly to Apple’s download pages.
0 notes
Text
Wineskin Mac Os X El Capitan
In a previous article, I have shown you how to install OS X El Capitan GM (golden master) or other Beta version without developer account. As I sometime still need Windows-based program such as Mikrotik Winbox, I need to have WINE (Windows Emulator) on my Mac. In this post I would like to guide you how to install Wine on OS X El Capitan. At the time of this writing, the latest version of OS X is OS X 10.11 El Capitan GM (Golden Master).
Wineskin Mac 10.15
Wineskin Winery Mac
Wineskin Mac Os X El Capitan Libro
Name Mac OS X El Capitan 10.11.4 Size 6.21 GB Created on 2016-03-22 12:50:16 Tracker Hash beeaf05. Your Mac will reboot, and in a few moments you can begin using your new, freshly installed (and ideally trouble-free) copy of OS X El Capitan. If, on the other hand, you’re installing El Capitan on a hard disk for the first time, you still have one last step to complete. After your Mac reboots, the Setup Assistant window appears.
UPDATE: If you also want to install Microsoft Visio on Mac, you can follow our post how to install Visio on Mac running OS X El Capitan.

Requirements
1. Latest version of OS X El Capitan (Golden Master build at this time of this writing) 2. Latest version of Xcode (Xcode 7.0 GM, you can download it from https://imzdl.com/osx.html if you are not a registered Apple developer. 3. Homebrew package manager for OS X. We will install Wine using Homebrew package manager.
I assume that you have done installing point 1 and 2 in the requirements above. So we just go to install Homebrew package manager.
Install Homebrew

Run the script below to install Homebrew:
Once it is installed, run the below command to install Wine.
Install WINE using Homebrew
The format to install package using brew is “brew install package_name”:
To run a Windows program, use “wine /path/to/program.exe”.
Wineskin Mac 10.15

Wineskin Winery Mac
Example below is to run Mikrotik Winbox using wine
Wineskin Mac Os X El Capitan Libro
Hopefully this post is helpful for anyone who want to install wine on OS X El Capitan.
1 note
·
View note
Note
Mac OS X Public Beta Kodiak\nMac OS X 10.0 Cheetah\nMac OS X 10.1 Puma\nMac OS X 10.2 Jaguar\nMac OS X 10.3 Panther\nMac OS X 10.4 Tiger\nMac OS X 10.5 Leopard\nMac OS X 10.6 Snow Leopard\nMac OS X 10.7 Lion\nOS X 10.8 Mountain Lion\nOS X 10.9 Mavericks\nOS X 10.10 Yosemite\nOS X 10.11 El Capitan\nmacOS 10.12 Sierra\nmacOS 10.13 High Sierra\nmacOS 10.14 Mojave\n
Mac OS X Public Beta KodiakMac OS X 10.0 CheetahMac OS X 10.1 PumaMac OS X 10.2 JaguarMac OS X 10.3 PantherMac OS X 10.4 TigerMac OS X 10.5 LeopardMac OS X 10.6 Snow LeopardMac OS X 10.7 LionOS X 10.8 Mountain LionOS X 10.9 MavericksOS X 10.10 YosemiteOS X 10.11 El CapitanmacOS 10.12 SierramacOS 10.13 High SierramacOS 10.14 MojavemacOS 10.15 FreenodemacOS 10.16 OpenboxMac OS X 10.17 Mac OS X 10.18 YosemitemacOS x 10.19 OpenJDKmacOS x 10.20 Xcode 4.7.6Mac OS X 10.21 Xcode 6.0.0-pre8macOS x 10.22 Xcode 6.0.0-alphamacOS x 10.23 Xcode 6.0.0-beta-9macOS x 10.24 Xcode 6.0.0-alpha-9Mac OS X 10.25 iOS 9.3macOS X 10.26 iOS 10macOS X 10.27 iOS 9.4.1 Safari 3.5.2Other Mac AppsKodi is the leading open source, and best-supported operating system for OS X. It is the most up to date, reliable, and comprehensive platform for your computing needs. It is the most widely available OS, and is one of the most optimized with support for the latest operating systems.Kodi has many features that will help you in your work.Download and install KOS X from its official site.Use our free installer for Mac OS X 10.10 and 10.10 Macs.Mac OS X 10.11 & 10.12 LionThe original version of Kodi, launched on the 6th of May 2010. It was still the most popular operating system, and now the most popular operating system ever, with a wide choice of applications.A full-featured, low power OS that runs on your Mac's iMac, iPhone, iPad and iPod touch.This new OS is not based on the X server with its own kernel, as it uses the Intel Intel Core processors instead. It also features a complete list of the most popular OSes available. It offers features such as Flash, USB Camera, a USB 2.0 port, Ethernet and bluetooth support, a full set of camera controls, and a built-in Bluetooth 3.0, all without any need for any hardware or software support.Kodi also contains a list of features such as a dedicated sound system and a comprehensive user interface. It lets you access the internet for easy access for any user to the movies, music, TV, and movies.As per the Mac version, there is no installer for Lion, so a
1 note
·
View note
Text
Coda for mac os x v.10.6.8

Coda for mac os x v.10.6.8 for mac#
Coda for mac os x v.10.6.8 mac os x#
Coda for mac os x v.10.6.8 update#
Coda for mac os x v.10.6.8 code#
Coda for mac os x v.10.6.8 Offline#
Please note that GNU/Linux distributors may provide packages for your distribution which have different requirements. MacOS 10.12 macOS 10.13 macOS 10.14 macOS 10.15 Recommended Hardware. 200MB of hard drive space Mac Operating Systems. Windows Operating Systems (32-bit and 64-bit). Firefox System Requirements Firefox 81.0.1. Mac OS X 10.6.6 or later (Mac OS X 10.6.8 is recommended).
Coda for mac os x v.10.6.8 mac os x#
Final Apple Mac OS X Snow Leopard 10.6 is a powerful Mac Operating System with various new features and many enhancements.
Coda for mac os x v.10.6.8 Offline#
Windows Operating Systems (32-bit and 64-bit). Download Mac OS X Snow Leopard v10.6 free latest standalone offline DMG image setup for Macintosh. Firefox System Requirements Firefox 68.0.2. Firefox will not run at all without the following libraries or packages: GTK+ 3.4. Operating Systems macOS 10.9 macOS 10.10 macOS 10.11 macOS 10.12. Supported Platforms and System Requirements. The application lies within Developer Tools, more precisely Webmaster. The actual developer of this Mac application is Panic Inc. The latest setup file that can be downloaded is 68.3 MB in size. Once your membership is activated, you can start seeing the 'XCode 4.2 for Snow Leopard' in the list of downloads (search for 'xcode. It would be provided for download only to a registered iOS Developer (99 fee). This Mac download was scanned by our built-in antivirus and was rated as clean. The latest available xcode version for Snow Leopard is 4.2.
Coda for mac os x v.10.6.8 for mac#
Software Requirements Please note that GNU/Linux distributors may provide packages for your distribution which have different requirements. The most popular versions among Coda for Mac users are 2.0, 1.7 and 1.6. And with Panic Sync, our free and secure sync service, your sites follow you on any computer.Firefox system requirements for mac. Opening a Site sets your file paths, your root URLs, where your files Publish to, source control settings, and more. MySQL lets you define structure, edit data, and more.Īnd its all wrapped up in our Sites, which get you started quickly. The Terminal can open a local shell or SSH.
Coda for mac os x v.10.6.8 code#
Theres also an HTML Validator, a Code Navigator, and more.įinally, hiding behind the Plus button in the tab bar is a built-in Terminal and MySQL editor, two amazingly powerful Tab Tools. And project-wide Find and Replace thatll work across multiple files. Like Clips, which let you create frequently used bits of text that you can insert into your document with special triggers. Open Codas Sidebar to discover a rich set of utilities that make you work better. Then, on top of that, we added AirPreview, a revolutionary feature that lets you use your iPad and Diet Coda to Preview pages as you code on your desktop.īelieve it or not, weve just scratched the surface. Use our WebKit Preview, which includes a web inspector, debugger, and profiler. Then youll want to see what your code looks like. Theres even support for Git and Subversion. Track local changes for remote publishing. Use the Files tab and move, rename, copy, transfer from server-to-server anything.
Coda for mac os x v.10.6.8 update#
The new update will bring your OS to versions 10.6.8 and is for. Open local files or edit remotely on FTP, SFTP, WebDAV, or Amazon S3 servers. If you are Mac user what is likely to be the final update before OS X Lion hits the store next month is now available for download. Coda has battle-tested, deeply integrated file management. There are nice touches everywhere.īut an incredible text editor is just a nice typewriter if you cant easily handle all of your files from anywhere. And as you type, Coda Pops let you quickly create colors, gradients, and more, using easy controls. For example, the Find and Replace has this revolutionary Wildcard token that makes RegEx one-button simple. But Codas editor has features you wont find anywhere else. Its got everything you expect: syntax highlighting for tons of languages. More than anything else, Coda is a text editor. And today, Coda has grown to be a critical tool for legions of web developers around the world. How do you elegantly wrap everything together? Well, we did it. While the pitch is simple, building Coda was anything but. Coda is everything you need to hand-code a website, in one beautiful app.
1 note
·
View note
Text
Gfxcardstatus catalina

Gfxcardstatus catalina Patch#
Gfxcardstatus catalina upgrade#
Make sure your kext has been built against the correct headers. (kernel) kxld: The super class vtable '_ZTV16IOAccelResource2' for vtable '_ZTV31AMDRadeonX3000_AMDAccelResource' is out of date. (kernel) kxld: The vtable '_ZTV29AMDRadeonX3000_AMDAccelShared' is malformed. (kernel) kxld: The vtable '_ZTV29AMDRadeonX3000_AMDAccelDevice' is malformed. Loading /Users/beta/Downloads/AMD-kext/AMDRadeonX3000.kext. Users/beta/Downloads/AMD-kext/AMDRadeonX3000.kext appears to be loadable (not including linkage for on-disk libraries). Kext with invalid signature (-67030) allowed: AMDRadeonX3000.kextĭefaulting to kernel file '/System/Library/Kernels/kernel' Today's new software in 2019 also still runs on Windows 7 (released 2009) so that's another 10+ AMD-kext % sudo kextutil -v. Quicken 2014 was supported on Windows XP. (In contrast, with MS Windows, a user could conceivably stay on Windows XP (released 2001) for 10+ years.
Gfxcardstatus catalina upgrade#
10.11 El Capitan released 2015 that's now 4 years-old has already fallen off the minimum required version for most mainstream application software.) This quick upgrade cycle also has a downstream effect on Apple hardware such that old Macbooks, iMacs, and Mac Pros lose the ability to upgrade to the latest macOS after about 6 years. In general, the Apple ecosystem really doesn't let you stay with old macOS versions for more than 3 years. The latest Vim released in July 2019 can run on 10.8 Mountain Lion. Some open source tools can run on very old versions. On the other hand, some new software like Quicken 2019 can still run on 10.11 El Capitan. MS Office 2019 is officially supported on last 3 versions of macOS which means 10.12,10.13,10.14.Adobe Creative Cloud apps as of 2018 (Photoshop, etc) require 10.12 Sierra.Apple Logic X 10.4.5 requires 10.13 High Sierra.Apple Logic X 10.4.0 requires 10.12 Sierra.
Gfxcardstatus catalina Patch#
Apple Xcode 11 requires 10.14.4 Mojave (which means this version is incompatible with Macbook Pro 2011 without a patch hack).
Apple Xcode 10.1 requires 10.13.6 High Sierra.
I can't speak for the original poster (Jester8) but some apps ( especially Apple's own software) always quickly raise the minimum required OS version to the recent releases.
0 notes
Text
Mac os x dmg virtualbox

#Mac os x dmg virtualbox mac os x#
#Mac os x dmg virtualbox install#
#Mac os x dmg virtualbox install#
Next rebuild VirtualBox and install it into /Applications/OpenSource/. You can prevent that by adding the following to LocalConfig.kmk: Starting with VirtualBox 4.1, extra debug symbols are created. It may also make sense to disable some of the development only stuff, like test cases. VBOX_PATH_APP_DOCS = "/Applications/OpenSource/VirtualBox.app/Contents/MacOS" VBOX_PATH_SHARED_LIBS = "/Applications/OpenSource/VirtualBox.app/Contents/MacOS" VBOX_PATH_APP_PRIVATE_ARCH = "/Applications/OpenSource/VirtualBox.app/Contents/MacOS" If you like to change that, say into /Applications/OpenSource/VirtualBox.app/, you need to add the following to the LocalConfig.kmk: The default install directory of VirtualBox is /Applications/VirtualBox.app/. Hardening needs some additional configuration and post-build steps. Never disable hardening (see previous section) when creating packages for redistribution. Enter out/darwin.x86/release/dist/VirtualBox.app/Contents/MacOS/.Execute and make sure the modules loads successfully. These can be found in out/darwin.x86/release/dist along with a small script ( loadall.sh) to load them. Load all the kernel extension modules.The default is to a release build, should you wish to do a debug or profile build add BUILD_TYPE=debug or BUILD_TYPE=profile as argument to kmk or export it as an environment variable in your shell. Whenever you want to build VirtualBox, you have to open a shell and source the generated environment setup script env.sh, i.e.This step only has to be done once (if something changes in your build tool setup, you might have to repeat it but keep in mind that both output files will be overwritten). Also, it will create an environment setup script called env.sh. If it finds everything it needs, it will create a file called !AutoConfig.kmk containing paths to the various tools on your system. You can manually set the target architecture with -target-arch=x86 or amd64, if some architecture related problems occur. Change to the root directory of the sources and execute the configure script:.If you are running 10.10 (Yosemite) there is a boot-args option for allowing the loading of unsigned kexts. Loading self-built kernel extensions (kexts) on more recent OS X may require changes to the system config unless you have a kext signing certificate and is running 10.14 (High Sierra) or earlier.įor 10.11 (El Capitan) and later boot to the recovery partition and either enabling loading of unsigned kexts:įor 10.15 (Catalina) and later you also need to disable the reboot requirement (also from recovery partition):.Sudo port install libidl acpica yasm subversion doxygen texlive texlive-latex-extra texlive-fonts-extra x86_64-elf-gccĭoxygen, texlive* and x86_64-elf-gcc are optional (first two for documentation, latter for the validation kit). Until recently the official builds were done using Xcode 6.2 (you may use the tools/darwin.amd64/bin/ script to 'install' the necessary bits on later OS X versions).Īfter installing MacPorts, do not forget to make sure the following two lines are in your ~/.profile or ~/.zprofile file and actually loaded in the shell you're using:Įxport PATH=/opt/local/bin:/opt/local/sbin:$PATHĮxport MANPATH=/opt/local/share/man:$MANPATH
#Mac os x dmg virtualbox mac os x#
Xcode matching your Mac OS X version ( ).10.10.x (Yosemite) or later running on Intel hardware (PowerPC hardware is not supported nor is building an X11 variant).Mac OS X build instructions Prerequisites on Mac OS X
0 notes
Text
Download navicat for mysql 11.2

#Download navicat for mysql 11.2 how to
#Download navicat for mysql 11.2 for mac os x
#Download navicat for mysql 11.2 for mac
#Download navicat for mysql 11.2 cracked
Adobe Photoshop CC 2019 Chinese crack version (Adobe CC2019 full range crack. Oracle and PostgreSQL The Navicat data model tool graphically creates a relatio. Adobe Photoshop 2021 v22.4.2 + Neural Filters posted on June 17, 2021 . Crashed when adding a trigger to PostgreSQL model. Turn your database data into visuals to have clear insights through charts and graphs. Navicat Premium is a database development tool that allows you to simultaneously. Navicat Data Modeler Program Keygen freeload Navicat Data Modeler Program Soft. Download Software Serial Activation Keys, IDM crack, IDM serial key, Adobe Photoshop Crack . The Flash Fill tool is sure to save time by learning data entry patterns and then. 1000+ sites on Windows/Mac without any key, crack, license code needed. 10 Crack + Serial Key Latest Version Navicat Premium 12. PremiumSoft Navicat Premium v15.0.6 for Win & Linux & MacOS + Keygen. PremiumSoft Navicat Data Modeler v3.0.3 x86 & 圆4 + Patcher.
#Download navicat for mysql 11.2 how to
Learn how to import and export models in Toad Data Modeler from Quest, the easy-to-use, cross-platform.
#Download navicat for mysql 11.2 cracked
vextractor 5 50# cracked corn parche 2014 actualizado para pes 6 keygen download game vampire vs zombie full crack navicat data modeler crack mac keeper.
Navicat Data Modeler V 1.0.8 Mac OS 10.11 El Capitan keygen.
Photoshop-recovery-toolbox 1.0.1 Mac OS 10.10 Yosemite crack Stellar Phoenix Mac OS X Data Recovery 4.1.0.1 Mac OS 10.11 keygen 이전글 Adobe Photoshop Cs5 Crack Mac Ita Brush 2020. Navicat Premium 12 Split + Permit Essential FullIn Inclusion, have got a. It sports a extensive data publisher, SQL handling abilities and data modeling and.
#Download navicat for mysql 11.2 for mac
Spotlight On Mysql Keygen For Mac Pro Download Break + Setupaims to offer you with. The access to our data base is fast and free, enjoy. 100 records - Train Sim Modeler serial numbers are presented here. navicat free, navicat data modeler, navicat crack, navicat for postgresql, navicat premium. 6-DFoX PremiumSoft Navicat All Products Multi Keygen+Patch v5 5-DFoX Navicat Premium 12. can be used for editing and drawing on Photoshop and other editing software. 7/13: Patch Set 11.2.0.4 for Linux and Solaris is now available on. Download Navicat Data Modeler Essentials 2.1.21 for Mac from our website. how to take screenshot windows 8 on mac.
#Download navicat for mysql 11.2 for mac os x
Navicat Premium 12.0.6 Cracked Serial For Mac OS X freeload.
Torrent + Direct Macos High Sierra V10.13.6 (17g2208). Torrent Windows 7 SP1 x86/圆4 52in1 incl Office 2019 Preactivated May 2021. Navicat for MySQL Crack 64-bit is the ideal solution for MySQL/MariaDB administration and development. Toad Data Modeler has been created as an. Navicat Premium Crack Mac visualizes your data in a way that makes it. Compile for macOS (I'm using Xcode 12.4 macOS 11.2.3) import SwiftUI struct. Get PC Softwares download links in full version for free, download cracks, serial key, activation code, keygen, patch, activator etc. Data has shown that Africans are underrepresented among Wikipedia editors. Wikipedia is a free, multilingual online encyclopedia written and maintained by a community of volunteer contributors through a model of open collaboration. Mac OS X Debian 9 or later, Ubuntu Especially the query builder helps me to save time. Navicat Data Modeler is a powerful and cost-effective database. Zoner Photo Studio X Adobe Photoshop v Internet Download Manager 6. PremiumSoft Navicat Essentials Premium v15.0.8 x86 & 圆4 + Patch. Dev | Navicat Premium is a database development tool that allows you to . Disk Drill: The best data recovery software for Mac OS X. Apple Final Cut Pro & Logic Pro X, Adobe Photoshop, Microsoft Office, Pixel Film Studios, Torrent. 0 Mac Crack Serial VirtualDJ Pro 8 Cracked The powerful.
0 notes
Text
Putty for mac os mojave

Putty for mac os mojave for mac os x#
Putty for mac os mojave install#
Putty for mac os mojave archive#
Putty for mac os mojave software#
Contains R 3.3.3 framework, R.app GUI 1.69 in 64-bit for Intel Macs, Tcl/Tk 8.6.0 X11 libraries and Texinfo 5.2.
Putty for mac os mojave for mac os x#
R 3.3.3 binary for Mac OS X 10.9 (Mavericks) and higher, signed package. The latter two components are optional and can be ommitted when choosing "custom install", they are only needed if you want to use the tcltk R package or build package documentation from sources. Contains R 3.6.3 framework, R.app GUI 1.70 in 64-bit for Intel Macs, Tcl/Tk 8.6.6 X11 libraries and Texinfo 5.2. R 3.6.3 binary for OS X 10.11 (El Capitan) and higher, signed package. Note: Previous R versions for El Capitan can be found in the el-capitan/base directory.
Putty for mac os mojave install#
Read the INSTALL file for further instructions. This file is only needed if you want to join the development of the GUI (see also Mac-GUI repository), it is not intended for regular users. Sources for the R.app GUI 1.78 for macOS. News features and changes in the R.app Mac GUI
Putty for mac os mojave software#
Any external libraries and tools are expected to live in /opt/R/arm64 to not conflict with Intel-based software and this build will not use /usr/local to avoid such conflicts (see the tools page for more details). If you wish to compile R packages which contain Fortran code, you may need to download GNU Fortran for arm64 from. This release uses Xcode 13.1 and experimental GNU Fortran 12 arm64 fork. Always re-install XQuartz when upgrading your macOS to a new major version. Note: the use of X11 (including tcltk) requires XQuartz (version 2.8.1 or later). Important: this version does NOT work on older Intel-based Macs. R 4.2.1 binary for macOS 11 ( Big Sur) and higher, Apple silicon arm64 build, signed and notarized package.Ĭontains R 4.2.1 framework, R.app GUI 1.79 for Apple silicon Macs (M1 and higher), Tcl/Tk 8.6.12 X11 libraries and Texinfo 6.8. If you wish to compile R packages from sources, you may need to download GNU Fortran 8.2 - see the tools directory. Important: this release uses Xcode 12.4 and GNU Fortran 8.2. For native Apple silicon arm64 binary see below. This release supports Intel Macs, but it is also known to work using Rosetta2 on M1-based Macs. Note: the use of X11 (including tcltk) requires XQuartz to be installed (version 2.7.11 or later) since it is no longer part of macOS. R 4.2.1 binary for macOS 10.13 ( High Sierra) and higher, Intel 64-bit build, signed and notarized package.Ĭontains R 4.2.1 framework, R.app GUI 1.79 in 64-bit for Intel Macs, Tcl/Tk 8.6.6 X11 libraries and Texinfo 6.7. Latest release: R-4.2.1.pkg (notarized and signed) If Apple tools are not avaiable you can check the SHA1 checksum of the downloaded image: Please check the integrity of the downloaded package by checking the signature: R 4.2.1 "Funny-Looking Kid" released on 3
Putty for mac os mojave archive#
Package binaries for R versions older than 3.2.0 are only available from the CRAN archive so users of such versions should adjust the CRAN mirror setting ( ) accordingly. Note: Although we take precautions when assembling binaries, please use the normal precautions with downloaded executables. Releases for old Mac OS X systems (through Mac OS X 10.5) and PowerPC Macs can be found in the old directory. This directory contains binaries for a base distribution and packages to run on macOS.
0 notes
Text
Install openmp mac osx sierra

INSTALL OPENMP MAC OSX SIERRA INSTALL
INSTALL OPENMP MAC OSX SIERRA SERIES
INSTALL OPENMP MAC OSX SIERRA DOWNLOAD
This will open up a site in Safari and prompt you to log in. Go to the Xcode menu, select “Open Developer Tool”, and choose “More Developer Tools …”. Now, you need to get the command line tools.
INSTALL OPENMP MAC OSX SIERRA INSTALL
Once it has installed, open Xcode, agree to the license, and let it install whatever components it needs. Go ahead and grab a coffee while it’s downloading and installing 4+ GB.
INSTALL OPENMP MAC OSX SIERRA DOWNLOAD
Main steps: 1) Download, install, and prepare XCodeĪs mentioned above, open the App Store, search for Xcode, and start the download / install. As of August 2, 2017, this will download Version 7.1.1. gcc7 (from MacPorts) :��This will be an up-to-date 64-bit version of gcc, with support for OpenMP.Download the latest installer (MacPorts-2.3.) here. As of August 2, 2017, this will download Version 2.4.1. You’ll particularly need it for getting gcc. MacPorts: This is a package manager for OSX, which will let you easily download, build and install many linux utilities.Please note that this is a 4.41 GB download! (Search for xcode.) As of January 15, 2016, the App Store will install Version 7.2. Download the latest version in the App Store. Evidently, it is required for both Macports and its competitors (e.g., Homebrew). XCode: This includes command line development tools.I highly recommend using the Homebrew version of this tutorial. This tutorial uses Homebrew: a newer package manager that uses pre-compiled binaries to dramatically speed up the process. Note 2: This process is somewhat painful because MacPorts compiles everything from source, rather than using pre-compiled binaries. Alas, this will not support OpenMP for parallelization. Note 1: OSX / Xcode appears to have gcc out of the box (you can type “gcc” in a Terminal window), but this really just maps back onto Apple’s build of clang. Of course, you can use other compilers and more sophisticated integrated desktop environments, but these instructions will get you a good baseline system with support for 64-bit binaries and OpenMP parallelization. The entire toolchain is free and open source. In the end result, you’ll have a compiler and key makefile capabilities. These instructions were tested with OSX 10.11 (El Capitan), but they should work on any reasonably recent version of OSX. These instructions should get you up and running with a minimal environment for compiling 64-bit C++ projects with OpenMP (e.g., BioFVM and PhysiCell) using gcc. Windows users should use this guide instead.
INSTALL OPENMP MAC OSX SIERRA SERIES
Note: This is the part of a series of “how-to” blog posts to help new users and developers of BioFVM and PhysiCell. Posted in BioFVM, gcc, MacPorts, OpenMP, OSX, PhysiCell - Janu4 Comments
0 notes
Text
Xcode 10.11

Question or issue on macOS:
Xcode 10 Download For Mac
Xcode For Macos High Sierra
Xcode 10.13
Xcode 10.11.6 Download
I am trying to update Command line tools on my mac osx.
All downloads are hosted by Apple. Links on this site take you directly to Apple’s download pages. This is not an official Apple website. Please consider donating to help maintain it. Xcode - Wikipedia has a complete compatibility listing for Xcode, what version works with which version of OS X. It also includes a listing of versions of Xcode’s support libraries for things like iOS and iWatch, for each version. I am searching for a proper IDE for iOS developement but MAC OS X version is 10.11.6 & because of this I am unable to install XCode. It says 'I should have MAC OS X 10.12+'. Developers who want to make use of the Xcode 8 SDKs from the command line must choose the SDK with xcode-select. Developers on OS X El Capitan who have installed versions of the Command Line Tools (OS X 10.11) for Xcode 8 Beta should install Command Line Tools (OS X 10.11) for Xcode 7.3.1.
1 Swift 5.5 is available as part of Xcode 13. 2 Swift 5.5 Windows 10 toolchain is provided by Saleem Abdulrasool.Saleem is the platform champion for the Windows port of Swift and this is an official build from the Swift project.
But when I run the update command, I get this error:
This doesn’t work either:
What is the exact string I should specify after sofwareupdate -i?
How to solve this problem?
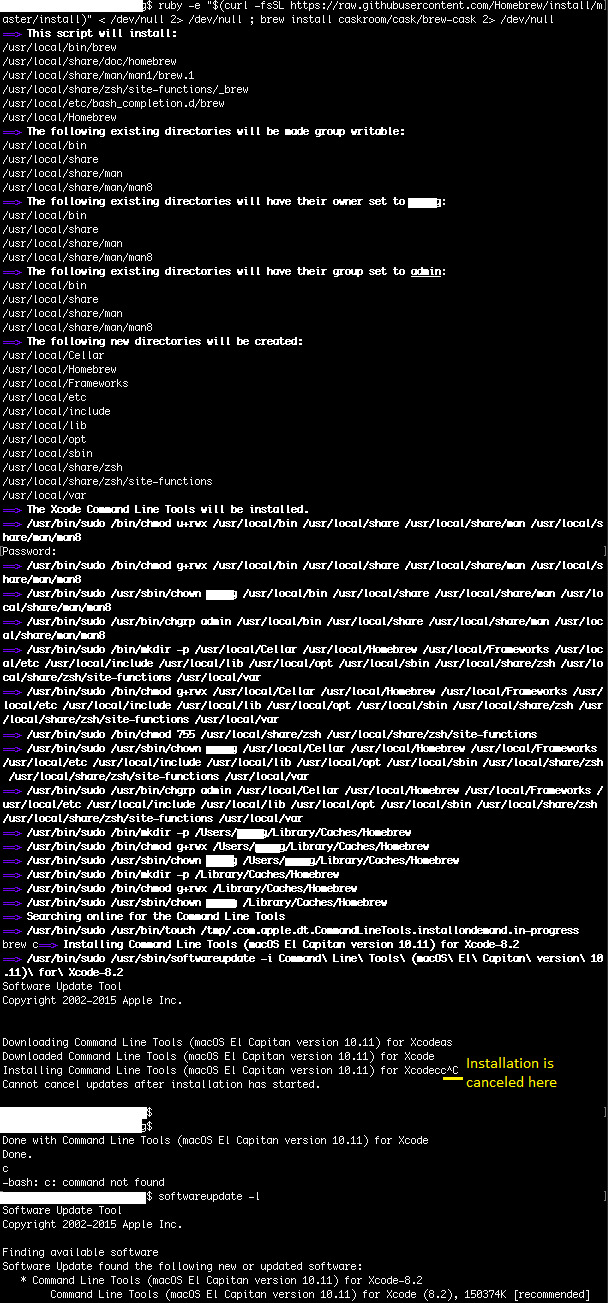
Solution no. 1:
For future travelers, here’s a version-agnostic approach. First, run softwareupdate --list. This will probably take a couple of minutes. When it’s done, you’ll see a bulleted (with an asterisk) output like this:
Find the bullet that refers to the Xcode command line tools. Copy that entire line (except the asterisk…). In the above case, you would copy: Command Line Tools (macOS High Sierra version 10.13) for Xcode-10.1
Then, run the install command (as shown by Brendan Shanks) with what you copied inside quotes:
Solution no. 2:
I’m going to answer a slightly different question here, because this question came up when I searched for a solution to my problem. Hopefully it’ll help someone (and it’ll surely help me next time I run into the same issue).
I wanted to upgrade the command line tools from version 8 to 9. The App Store didn’t suggest this upgrade, and neither did softwareupdate --list.
installed the new version of the tools. But clang --version still gave 8.0.0 as the version number. xcode-select -r and rebooting didn’t solve this issue.
xcode-select -p returned /Applications/Xcode.app/Contents/Developer, and clang --version reported an installation directory under there. I thought I’d start over again.
deleted version 8 of the tools. But xcode-select --install said the command line tools were already installed.
Now, sudo xcode-select -p returns /Library/Developer/CommandLineTools/.
It seems that the problem was that the new version of the tools are installed to a different directory, and xcode-select -r is not clever enough to find the latest version.
Solution no. 3:
Run softwareupdate -i 'Command Line Tools (macOS El Capitan version 10.11) for Xcode-8.2'. The quotes are important.
Solution no. 4:
I faced similar problem on MacOS Mojave version 10.14.3 with Xcode 10.3 installed. The real problem was, when I installed the Xcode 10.3, I deleted the “Xcode-beta.app” first and then installed the new version. Therefore, when I tried installing CLion for C++ development and configuring it, CMake gave me error And Updating Command Line Tool didnt work for me:
and showed me this response in terminal
Then I tried to check the version of Clang using:
And the response lead me to the real problem i.e. Active Developer path was still pointing to Old version of Xcode that I had already deleted.
Therefore, I switched the active developer path to latest Xcode App installed using:
And everything worked like a charm automatically.
Solution no. 5:
Xcode 10 Download For Mac
I ran the same command with sudo and that did the trick.
sudo softwareupdate -i 'Command Line Tools (macOS El Capitan version 10.11) for Xcode-8.2'
Solution no. 6:
when upgrading to MacOS Catalina, Version 10.15.* you can install the command line tools for xcode 11.3 like this:
Hope this helps!
Xcode for Mac OS and iOS
With Xcode you can work inside one window, split windows, and even compare options side by side. Source and project code can be shared across both platforms.
MacOS app developer made simple and easy
Design great apps on either Mac, iPad, or iPhone using Xcode.
MacOS or iOS developers need look no further than the Xcode developer tool to design great apps.
Xcode featuresSwift UI, which offers up its own syntax. Easy to read and write, Swift UI will help keep your apps smaller and download faster by using less code.
Updated functionality now lets you code, test and debug all inside one window. Debugging is done via the Xcode IDE. This added plus can identify errors in syntax and logic, and often fix the code for you.
Newly introduced dark mode is built into Xcode. Interface builder allows you to switch between light and dark modes, or even view them side by side.
The drag and drop function helps you to make changes to visual UI elements, quickly and easily. For developers who prefer multiple editing panes, Xcode provides you with total control of your work area. You can view your design changes instantly in another window.
Use the devices window to simulate other environments. If your users have slow networks or run in extreme heat, you can test those conditions out before releasing your app. For ease of use, source and project code can be shared by Mac and iPad, allowing you to convert existing iPad apps into Mac apps. The changes will take effect across both platforms.
Where can you run this program?
You can run Xcode on OS X 10.8 Mountain Lion or iOS 7 and above.
Is there a better alternative?
With its solid functionality, multiple panes, and shared source code, there is no need to look at any alternatives when choosing an app development tool.
Our take
App development tools have come a long way. Xcode is the perfect tool for experienced developers. To be able to code, test, and debug inside the same window, this download will certainly save development time.
Should you download it?
Yes. You won't need another developer tool once you install Xcode. You can share code across OS or iOS.
Highs
Develop apps for any iOS platform
Bad code corrected by Xcode IDE
Code, test, and debug inside one window
Switch between light and dark mode
Simulate user environments for testing
Lows
Xcode For Macos High Sierra
May not be suitable for beginners
Apple developer membership required
Interface isn’t always easy to use
Xcode 10.13
Xcodefor Mac
Xcode 10.11.6 Download
12.5
0 notes
Text
Mac Install Catalina
Mac Uninstall Catalina
Mac Catalina Install Xcode
Mac Os Install Catalina
To get the latest features and maintain the security, stability, compatibility, and performance of your Mac, it's important to keep your software up to date. Apple recommends that you always use the latest macOS that is compatible with your Mac.
Learn how to upgrade to macOS Big Sur, the latest version of macOS.
Check compatibility
The version of macOS that came with your Mac is the earliest version it can use. For example, if your Mac came with macOS Big Sur, it will not accept installation of macOS Catalina or earlier.
If a macOS can't be used on your Mac, the App Store or installer will let you know. For example, it might say that it's not compatible with this device or is too old to be opened on this version of macOS. To confirm compatibility before downloading, check the minimum hardware requirements:
macOS Catalina 10.15 hardware requirements
macOS Mojave 10.14 hardware requirements
macOS High Sierra 10.13 hardware requirements
macOS Sierra 10.12 hardware requirements
OS X El Capitan 10.11 hardware requirements
OS X Yosemite 10.10 hardware requirements
Then restart your Mac and hold the Option key until you see the Apple logo. In the Startup Disk, click the external drive name. When the boot resumes, you should boot into macOS Catalina installation wizard. At this stage, you should pick up the external SSD to install Catalina. Another way to boot Catalina is from System Preferences.
Use the 'createinstallmedia' command in Terminal. Press Return to enter the command. When prompted, type your administrator password and press Return again. Terminal doesn't show any characters as you type your password. When prompted, type Y to confirm that you want to erase the volume, then press.
Download macOS using Safari on your Mac
Safari uses these links to find the old installers in the App Store. After downloading from the App Store, the installer opens automatically.
Install macOS Catalina After setting up BIOS, the next step is to install macOS Catalina. Follow the steps below for the installation. Turn on your PC 2. Press F12 to enter boot menu. The boot menu key may not be same for all. If you're having a ASUS Motherboard, use F8, use F11 for MSI and AsRock Motherboards).
macOS Catalina 10.15 can upgrade Mojave, High Sierra, Sierra, El Capitan, Yosemite, Mavericks
macOS Mojave 10.14 can upgrade High Sierra, Sierra, El Capitan, Yosemite, Mavericks, Mountain Lion
macOS High Sierra 10.13 can upgrade Sierra, El Capitan, Yosemite, Mavericks, Mountain Lion
Safari downloads the following older installers as a disk image named InstallOS.dmg or InstallMacOSX.dmg. Open the disk image, then open the .pkg installer inside the disk image. It installs an app named Install (Version Name). Open that app from your Applications folder to begin installing the operating system.
macOS Sierra 10.12 can upgrade El Capitan, Yosemite, Mavericks, Mountain Lion, or Lion
OS X El Capitan 10.11 can upgrade Yosemite, Mavericks, Mountain Lion, Lion, or Snow Leopard
OS X Yosemite 10.10can upgrade Mavericks, Mountain Lion, Lion, or Snow Leopard
macOS Catalina is slightly outdated since the release of macOS Big Sur in November of 2020. Nevertheless, many users prefer to stick with it because it's much more familiar visually. And it offers a bunch of expanded features, such as a screen extension with an iPad or the new Apple Podcasts app. The problem is that it might not always work as intended. Glitches in macOS Catalina are commonplace: in fact, all existing operating systems like Mojave or High Sierra could freeze and crash from time to time. No software is immune.
But what do you do in this case? The surefire way to deal with jaded performance is to reinstall macOS Catalina altogether. Read through our guide below to learn how.
Mac Uninstall Catalina
How To Reinstall Mac OS Catalina
It’s important to note that when you reinstall macOS Catalina the process simply updates the operating system and doesn’t affect any files on your hard drive or user files or even settings. That makes reinstalling principally different from performing a clean install, which erases everything.
Here are the proper steps to follow to reinstall mac OS Catalina.
1. Back up your Mac first
By default, the best thing you could do before making any significant changes to how your Mac works is to back it up. Backups are just like saves before encountering challenges in video games — represent the point you can always come back to.
There are lots of great backup solutions on the market to suit every need. If you don’t have the time to search for something specific, your Mac features a decent native option — Time Machine.
To get Time Machine started:
Connect an external USB or WiFi hard drive to your Mac
Go System Preferences ➙ Time Machine
Click on Select Backup Disk…
Press Use Disk
2. Delete junk off your Mac to speed it up
There’s nothing better than the feeling of a brand new Mac with a brand new macOS. If only the latter is new, the experience could be subpar. Trying to get the most out of macOS Catalina on your older machine might be a challenge. But don’t hurry to your local Apple Store just yet — not all is lost.

Just like the dust behind your couch or on the top of your kitchen cupboards, small bits of system files, caches, and hidden libraries tend to aggregate over the years and never get deleted, eventually slowing down everyday processes. While it’s possible to clear out some of them manually, others require specific technical knowledge and lots of time.
Luckily, there’s a professional automatic solution available — CleanMyMac X. Optimizing behind-the-curtain processes on your Mac with CleanMyMac X is no more difficult than clicking a single button:

Download a free version of CleanMyMac X.
Open the app and navigate to System Junk in the left-side panel.
Click Scan and wait for the process to complete.
When done, press Review Details.
Uncheck anything you’d like to keep and click Clean.
Now your Mac is free of all the pointless log files, user caches, language files, old updates, and more. Which directly translates into improved processing power, memory usage, and response time. At last, your Mac is ready to take full advantage of macOS Catalina.
3. Reinstall macOS Catalina in Recovery Mode

With your Mac in top shape, it’s time to get that macOS Catalina download link. Surprisingly, you won’t find it in Software Update or even App Store (where it used to be in macOS High Sierra).

The correct way to reinstall macOS Catalina is to use your Mac’s Recovery Mode:
Restart your Mac and then hold down ⌘ + R to activate Recovery Mode.
In the first window, select Reinstall macOS ➙ Continue.
Agree to the Terms & Conditions.
Select the hard drive you’d like to reinstall mac OS Catalina to and click Install.
Automatically update all your software for Catalina
The reinstallation process will start shortly and roughly take 30 minutes. When complete, your Mac will start up as usual. No files should be lost, but it’s always a good idea to check CleanMyMac X’s Applications Updater to see if you can improve compatibility of the new macOS with any of your existing apps:
Launch CleanMyMac X.
In the left-side panel, navigate to Updater.
View any available updates and their notes and click on Update.
This Updater tool in CleanMyMac X automatically searches for latest available versions of ALL your apps. One or two clicks and everything feels fresh. It even updates the macOS file itself.
Trust in your backup
Finally, in case you notice any files or apps missing, or settings misconfigured, you could open up Time Machine to restore a specific folder or the whole backup from the step one:
Mac Catalina Install Xcode
Launch Time Machine from Applications.
Simply scroll all backup versions to find the file you’re looking for.
Click Restore.
Mac Os Install Catalina
If you decide to restore the whole backup, make sure to then repeat the whole process to optimize your Mac and reinstall macOS Catalina as detailed above. The good thing is that more often than not the reinstallation works wonders right from the first time.
0 notes
Text
Show System Library Folder Mac

Preview and selectively transfer: You can choose to transfer your files in bulk, or selectively. 100% successful sync: When between iPhone and iTunes, TunesMate safeguards your files knowing fully well that they are precious to you. TunesMate makes this choice available!. 2-way sync: With iMyFone TunesMate, you can freely transfer iTunes library from iTunes to iPhone or from iPhone to iTunes. How to save itunes library mac os. .
Show System Library Folder Mac Os X
Find Folders On Mac
Show System Library Folder Mac Version
Show System Library Folder Mac Sierra
May 30, 2019 Show Library folder on mac with Terminal in OS X 10.11 El Capitan and earlier versions Launch Terminal from Spotlight or Launchpad. Type in the window the next command. Jan 12, 2020 Launch Terminal, located in /Applications/Utilities. Enter the following command at the Terminal prompt: Press Return. Once the command executes, you can quit Terminal. The Library folder will now be visible in the Finder. Should you ever wish to set the Library folder back to its default hidden.
Look at the folder structure of a typical OS X installation. Open a Finder window and click the icon for your hard drive (which is typically called Macintosh HD) in the Sidebar. You should see at least four folders: Applications, Library, System, and Users. Within the Users folder, each user has his own set of folders containing documents, preferences, and other information that belongs to that user and account.
From the top: The Computer folder
The Computer folder shows all the storage devices that are currently connected to your Mac. The following steps show how you can start at the Computer folder and drill down through the folder structure:
To find the Computer folder, choose Go→Computer or press Shift+Command+C.
The Computer folder in this example is called Bob L’s MacBook Pro, and it contains a hard-drive icon (Mavericks HD) and a Network icon, with which you can access servers or other computers on your local network.
Double-click the icon that holds your OS X stuff.
Technically, this drive is called your boot drive. If you haven’t changed it, it’s probably called Macintosh HD.
Check out the folders you find there.
You should see at least four folders (unless you’ve added some; if you installed the Xcode programming tools, for example, you have more).
The Applications folder
You can access the Applications folder, located at the root level of your boot drive, by clicking the Applications icon in the Sidebar, by choosing it in the Go menu, or by pressing Shift+Command+A. In this folder, you find applications and utilities that Apple includes with OS X.
Fonts (and more) in the public Library folder
The Library folder, at the root level of your OS X hard drive, is like a public library; it stores items available to everyone who logs into any account on this Mac.
Leave the /System/Library folder alone.Don’t move, remove, or rename it, or do anything within it. It’s the nerve center of your Mac. In other words, you should never have to touch this third Library folder.
By and large, the public Library subfolder that gets the most use is the Fonts folder, which houses many of the fonts installed on the Mac
Finally, the Library in the Users folder is where OS X stores configuration and preferences files shared by all users.
Show System Library Folder Mac Os X
If your Mac is set up for multiple users, only users with administrator (admin) privileges can put stuff in the public (root-level) Library folder.
The System folder
The System folder contains the files that OS X needs to start up and keep working.
Apple’s new Photos application was released as part of a recent system update. By default, Photos creates its library in your Pictures folder, but it can be easily moved or newly created. There are any number of reasons you might want to create a new Photos library or move it to another location. 2020-3-18 Your Photos library holds all your photos, albums, slideshows, and print projects. If your library is large, and you want to free up storage space on your Mac, turn on iCloud Photo Library and use Optimize Mac Storage, or move your library to an external drive. Before you start, be sure to back up your library. How do i move photos from one library to another mac. 2020-3-31 Your Photos library holds all your photos, albums, slideshows and print projects. If your library is large, and you want to free up storage space on your Mac, turn on iCloud Library and use Optimise Mac Storage, or move your photo library to an external drive. Before you start, make sure that you back up your library.
Access mac library folder. For example, many apps put backups in the Library folder and you may want to back up the backup. Deleting some or all of these settings will at best force you to reinstall certain apps, and at worst, cause the whole system to collapse and require a complete reinstall.But there may be times when accessing the Library folder is necessary. Just like the Windows operating system, the MacOS operating system has a hidden Library folder full of settings you shouldn’t really touch. Or you might be customising your Mac, which will need access to certain library folders.Here is how to get there and not cause your Mac to collapse in a cloud of dust in the process.
Leave the System folder alone.Don’t move, remove, or rename it or anything within it. It’s part of the nerve center of your Mac.
The usability of the Users folder
When you open the Users folder, you see a folder for each person who has a user account on the Mac, as well as the Shared folder.
The Shared folder that you see inside the Users folder allows everyone who uses the Mac to use any files stored there. If you want other people who use your Mac to have access to a file or folder, the Shared folder is the proper place to stash it.
There’s no place like Home
From the Users folder, you can drill down into the Home folder to see what’s inside. When the user logs on to this Mac, his Home folder appears whenever he clicks the Home icon in the Sidebar, chooses Go→Home, or uses the keyboard shortcut Shift+Command+H.
Feb 09, 2013 Java Project Tutorial - Make Login and Register Form Step by Step Using NetBeans And MySQL Database - Duration: 3:43:32. 1BestCsharp blog 5,812,079 views. Watchtower Library for Mac 2 2.1 is available as a free download on our software library. The actual developer of this free Mac application is Roy Ratcliffe. The application is categorized as System Tools. Watchtower library 2013 para mac. Mar 15, 2018 Here is how you install Watchtower Library on Mac: Either insert the Watchtower Library disc or if you have the Watchtower Library setup files in a folder make sure you can find it. Download Wineskin Winery. Unzip Wineskin Winery if the downloaded file from the previous step is a ZIP file. Open the Wineskin Winery application. Watchtower Library Now Available for Download Watchtower Library can now be downloaded from jw.org to run on Windows computers. Learn how to download Watchtower Library to your computer.
Your Home folder is the most important folder for you as a user — or at least the one where you stash most of your files. It is strongly recommend that you store all the files you create in subfolders within your Home folder — preferably, in subfolders in your Home/Documents folder.
When you open your Home folder, you see a Finder window with a little house icon and your short username in the title bar. Seeing your short username in the title bar tells you that you’re in your Home folder. Every user has a Home folder named after his or her short username.
Find Folders On Mac
If your Mac has more than one user, you can see the other users’ Home folders in your Users folder, but OS X prevents you from opening files from or saving files to them.
By default, your Home folder has several folders inside it created by OS X. The following four are the most important:
Desktop: If you put items (files, folders, applications, or aliases) on the Desktop, they’re actually stored in the Desktop folder.
Documents: This is the place to put all the documents (letters, spreadsheets, recipes, and novels) that you create.
Library: This Library folder is invisible in Mavericks. Rest assured that even though it’s hidden, it’s still one of the most important folders in your Home folder, containing Preferences, fonts available only to you, and other stuff that you expect to use.
Public: If others on your local area network use file sharing to connect with your Mac, they can’t see or use the files or folders in your Home folder, but they can share files you’ve stored in your Home folder’s Public folder.
You can create more folders, if you like. In fact, every folder that you ever create (at least every one you create on this particular hard drive or volume) should be within your Home folder.
Photos in your System Photo Library are available in apps like iMovie, Pages, and Keynote. You can also sync them to iOS devices and view them on Apple TV. And if you want to use your own images as your desktop picture or screen saver, the images need to be in your System Photo Library before you can select them in System Preferences.
If you have only one photo library, then it's the System Photo Library. Otherwise, the first photo library that you create or open in Photos will become the System Photo Library. If you have more than one library, you might need to designate a System Photo Library, so other apps can access the photos and videos you want them to use.
Follow these steps to designate a System Photo Library:
Quit Photos.
Hold down the Option key and open Photos. One of the photo libraries is already designated as YourLibraryName (System Photo Library).
Choose the library you want to designate as the System Photo Library.
After Photos opens the library, choose Photos > Preferences from the menu bar.
Click the General tab.
Click the Use as System Photo Library button.
Show System Library Folder Mac Version
If you open a second or different library in the Photos app, and you haven't designated it as the System Photo Library, other applications will use photos from the original System Photo Library. Hold down the Option key when you open Photos to see which library is set as the System Photo Library.
iCloud and the System Photo Library
Show System Library Folder Mac Sierra
You can use iCloud Photos, Shared Albums, and My Photo Stream only with the System Photo Library. If you choose a different library in Photos without designating it as the System Photo Library, the iCloud tab in Photos preferences is disabled: Sonos and itunes library.
If you designate a new library as the System Photo Library and then turn on iCloud Photos, the photos and videos in the new library will merge with those already in your iCloud Photos. If you want to keep the contents of your photo libraries separate, don’t turn on iCloud Photos for more than one library in Photos.
0 notes
Text
Os X Version 10.15 Download

The best way is to download an installer package:.pkg on mac. Prefer the latest stable version. Here is the link: Node.js. This package will eventually overwrite the previous version and set environment variables accordingly. Just run the installer and its done within a few clicks. Coincidentally, the Mac OS X Mountain Lion download was the last paid upgrade to an OS X release. Future updates starting from the OS X Mavericks were all free. Apple also offered another marginal update on the Mac OS X Mountain Lion download called the Mountain Lion version 10.8.1. This update was released on August 23, 2012.
How Do I Download Os X Catalina
Os X Version 10.15 Download
How To Update To Os X Catalina
Os X 10.15 Download Iso
This directory contains binaries for a base distribution and packages to run on Mac OS X (release 10.6 and above). Mac OS 8.6 to 9.2 (and Mac OS X 10.1) are no longer supported but you can find the last supported release of R for these systems (which is R 1.7.1) here. Releases for old Mac OS X systems (through Mac OS X 10.5) and PowerPC Macs can be found in the old directory.
Note: CRAN does not have Mac OS X systems and cannot check these binaries for viruses.Although we take precautions when assembling binaries, please use the normal precautions with downloaded executables.
Moreover, the latest version of WinZip is available in professional and standard versions. The very first version of WinZip 1.0 for Mac OS X was launched in 2010. This first version of Mac OS X is compatible with Mac OS x 10.6 “Snow Leopard” and Intel-based v10.5 “Leopard” Mac. Javac -version javac 11.0.9.1 java -version openjdk version '11.0.9.1' 2020-11-04 OpenJDK Runtime Environment AdoptOpenJDK (build 11.0.9.1+1) OpenJDK 64-Bit Server VM AdoptOpenJDK (build 11.0.9.1+1, mixed mode) The output is correct and expected. But if you open a second Tab B and override that JDK do the following. Mac OS X was originally presented as the tenth major version of Apple's operating system for Macintosh computers; until 2020, versions of macOS retained the major version number '10'. Previous Macintosh operating systems (versions of the classic Mac OS ) were named using Arabic numerals, as with Mac OS 8 and Mac OS 9.
Adobe photoshop crack mac os catalina. Package binaries for R versions older than 3.2.0 are only available from the CRAN archive so users of such versions should adjust the CRAN mirror setting (https://cran-archive.r-project.org) accordingly.
How Do I Download Os X Catalina

Os X Version 10.15 Download
R 4.0.4 'Lost Library Book' released on 2021/02/15
Please check the SHA1 checksum of the downloaded image to ensure that it has not been tampered with or corrupted during the mirroring process. For example type openssl sha1 R-4.0.4.pkg in the Terminal application to print the SHA1 checksum for the R-4.0.4.pkg image. On Mac OS X 10.7 and later you can also validate the signature using pkgutil --check-signature R-4.0.4.pkg
Latest release:
R-4.0.4.pkg (notarized and signed) SHA1-hash: 0b2b3bc846f6ebc72a8bc0b53e6e85d600d95deb (ca. 85MB)R 4.0.4 binary for macOS 10.13 (High Sierra) and higher, signed and notarized package. Contains R 4.0.4 framework, R.app GUI 1.74 in 64-bit for Intel Macs, Tcl/Tk 8.6.6 X11 libraries and Texinfo 6.7. The latter two components are optional and can be ommitted when choosing 'custom install', they are only needed if you want to use the tcltk R package or build package documentation from sources.
Note: the use of X11 (including tcltk) requires XQuartz to be installed since it is no longer part of OS X. Always re-install XQuartz when upgrading your macOS to a new major version. Apple os x el capitan free download windows 7. Also please do not install beta versions of XQuartz (even if offered).
This release supports Intel Macs, but it is also known to work using Rosetta2 on M1-based Macs. Native Apple silicon binary is expected for R 4.1.0 if support for Fortran sabilizes, for experimental builds and updates see mac.R-project.org.
Important: this release uses Xcode 12.4 and GNU Fortran 8.2. If you wish to compile R packages from sources, you will need to download GNU Fortran 8.2 - see the tools directory.
NEWS (for Mac GUI)News features and changes in the R.app Mac GUI Mac-GUI-1.74.tar.gz SHA1-hash: 2c791fd1fd2d8f90b0887c1f9541882200a6eab8Sources for the R.app GUI 1.74 for Mac OS X. This file is only needed if you want to join the development of the GUI, it is not intended for regular users. Read the INSTALL file for further instructions. Note: Previous R versions for El Capitan can be found in the el-capitan/base directory.
Binaries for legacy OS X systems:
R-3.6.3.nn.pkg (signed) SHA1-hash: c462c9b1f9b45d778f05b8d9aa25a9123b3557c4 (ca. 77MB)R 3.6.3 binary for OS X 10.11 (El Capitan) and higher, signed package. Contains R 3.6.3 framework, R.app GUI 1.70 in 64-bit for Intel Macs, Tcl/Tk 8.6.6 X11 libraries and Texinfo 5.2. The latter two components are optional and can be ommitted when choosing 'custom install', they are only needed if you want to use the tcltk R package or build package documentation from sources. R-3.3.3.pkg MD5-hash: 893ba010f303e666e19f86e4800f1fbf SHA1-hash: 5ae71b000b15805f95f38c08c45972d51ce3d027 (ca. 71MB)R 3.3.3 binary for Mac OS X 10.9 (Mavericks) and higher, signed package. Contains R 3.3.3 framework, R.app GUI 1.69 in 64-bit for Intel Macs, Tcl/Tk 8.6.0 X11 libraries and Texinfo 5.2. The latter two components are optional and can be ommitted when choosing 'custom install', it is only needed if you want to use the tcltk R package or build package documentation from sources.
Note: the use of X11 (including tcltk) requires XQuartz to be installed since it is no longer part of OS X. Always re-install XQuartz when upgrading your OS X to a new major version.
R-3.2.1-snowleopard.pkg MD5-hash: 58fe9d01314d9cb75ff80ccfb914fd65 SHA1-hash: be6e91db12bac22a324f0cb51c7efa9063ece0d0 (ca. 68MB)R 3.2.1 legacy binary for Mac OS X 10.6 (Snow Leopard) - 10.8 (Mountain Lion), signed package. Contains R 3.2.1 framework, R.app GUI 1.66 in 64-bit for Intel Macs. This package contains the R framework, 64-bit GUI (R.app), Tcl/Tk 8.6.0 X11 libraries and Texinfop 5.2. GNU Fortran is NOT included (needed if you want to compile packages from sources that contain FORTRAN code) please see the tools directory. NOTE: the binary support for OS X before Mavericks is being phased out, we do not expect further releases!
The new R.app Cocoa GUI has been written by Simon Urbanek and Stefano Iacus with contributions from many developers and translators world-wide, see 'About R' in the GUI.
Subdirectories:

toolsAdditional tools necessary for building R for Mac OS X: Universal GNU Fortran compiler for Mac OS X (see R for Mac tools page for details). baseBinaries of R builds for macOS 10.13 or higher (High Sierra)contribBinaries of package builds for macOS 10.13 or higher (High Sierra)el-capitanBinaries of package builds for OS X 10.11 or higher (El Capitan build)mavericksBinaries of package builds for Mac OS X 10.9 or higher (Mavericks build)oldPreviously released R versions for Mac OS X

You may also want to read the R FAQ and R for Mac OS X FAQ. For discussion of Mac-related topics and reporting Mac-specific bugs, please use the R-SIG-Mac mailing list.
Information, tools and most recent daily builds of the R GUI, R-patched and R-devel can be found at http://mac.R-project.org/. Please visit that page especially during beta stages to help us test the Mac OS X binaries before final release!
Package maintainers should visit CRAN check summary page to see whether their package is compatible with the current build of R for Mac OS X.
Binary libraries for dependencies not present here are available from http://mac.R-project.org/libs and corresponding sources at http://mac.R-project.org/src.
How To Update To Os X Catalina

Os X 10.15 Download Iso
Last modified: 2021/02/15, by Simon Urbanek
0 notes
Text
Os X 12 Download

This directory contains binaries for a base distribution and packages to run on Mac OS X (release 10.6 and above). Mac OS 8.6 to 9.2 (and Mac OS X 10.1) are no longer supported but you can find the last supported release of R for these systems (which is R 1.7.1) here. Releases for old Mac OS X systems (through Mac OS X 10.5) and PowerPC Macs can be found in the old directory.
Os X Version 12 Download
Mac Os X 12 Download
The additional components needed to install mac os x can t be found. Note: CRAN does not have Mac OS X systems and cannot check these binaries for viruses.Although we take precautions when assembling binaries, please use the normal precautions with downloaded executables.
Resident Evil 7 Biohazard Mac OS X – GOLD EDITION for Mac. Resident Evil 7 Biohazard Mac OS X This is the 9th title in the Resident Evil franchise and brings back focus on the horror-survival theme. Download OS X Lion for Mac free. Important Note: OS X 10.7 Lion has been replaced by OS X 10.8 Mountain Lion.
Os X Version 12 Download
Install older OS X onto an external drive. The following method allows you to download Mac OS X Lion, Mountain Lion, and Mavericks. Start your Mac holding down Command + R. Prepare a clean external drive (at least 10 GB of storage). Within OS X Utilities, choose Reinstall OS X. Select external drive as a source. Enter your Apple ID. Testing conducted by Apple in October 2020 on production 1.4GHz quad-core Intel Core i5-based 13-inch MacBook Pro systems with 8GB RAM, 256GB SSD, and prerelease macOS Big Sur. Systems tested with WPA2 Wi-Fi network connection while running on battery power, with display brightness set to 12 clicks from bottom or 75%.
Package binaries for R versions older than 3.2.0 are only available from the CRAN archive so users of such versions should adjust the CRAN mirror setting (https://cran-archive.r-project.org) accordingly.
R 4.0.4 'Lost Library Book' released on 2021/02/15
Please check the SHA1 checksum of the downloaded image to ensure that it has not been tampered with or corrupted during the mirroring process. For example type openssl sha1 R-4.0.4.pkg in the Terminal application to print the SHA1 checksum for the R-4.0.4.pkg image. On Mac OS X 10.7 and later you can also validate the signature using pkgutil --check-signature R-4.0.4.pkg
Mac Os X 12 Download
Latest release:

R-4.0.4.pkg (notarized and signed) SHA1-hash: 0b2b3bc846f6ebc72a8bc0b53e6e85d600d95deb (ca. 85MB)R 4.0.4 binary for macOS 10.13 (High Sierra) and higher, signed and notarized package. Contains R 4.0.4 framework, R.app GUI 1.74 in 64-bit for Intel Macs, Tcl/Tk 8.6.6 X11 libraries and Texinfo 6.7. The latter two components are optional and can be ommitted when choosing 'custom install', they are only needed if you want to use the tcltk R package or build package documentation from sources.
Note: the use of X11 (including tcltk) requires XQuartz to be installed since it is no longer part of OS X. Always re-install XQuartz when upgrading your macOS to a new major version. Also please do not install beta versions of XQuartz (even if offered).
This release supports Intel Macs, but it is also known to work using Rosetta2 on M1-based Macs. Native Apple silicon binary is expected for R 4.1.0 if support for Fortran sabilizes, for experimental builds and updates see mac.R-project.org.
Important: this release uses Xcode 12.4 and GNU Fortran 8.2. If you wish to compile R packages from sources, you will need to download GNU Fortran 8.2 - see the tools directory.
NEWS (for Mac GUI)News features and changes in the R.app Mac GUI Mac-GUI-1.74.tar.gz SHA1-hash: 2c791fd1fd2d8f90b0887c1f9541882200a6eab8Sources for the R.app GUI 1.74 for Mac OS X. This file is only needed if you want to join the development of the GUI, it is not intended for regular users. Read the INSTALL file for further instructions. Note: Previous R versions for El Capitan can be found in the el-capitan/base directory.
Binaries for legacy OS X systems:
R-3.6.3.nn.pkg (signed) SHA1-hash: c462c9b1f9b45d778f05b8d9aa25a9123b3557c4 (ca. 77MB)R 3.6.3 binary for OS X 10.11 (El Capitan) and higher, signed package. Contains R 3.6.3 framework, R.app GUI 1.70 in 64-bit for Intel Macs, Tcl/Tk 8.6.6 X11 libraries and Texinfo 5.2. The latter two components are optional and can be ommitted when choosing 'custom install', they are only needed if you want to use the tcltk R package or build package documentation from sources. R-3.3.3.pkg MD5-hash: 893ba010f303e666e19f86e4800f1fbf SHA1-hash: 5ae71b000b15805f95f38c08c45972d51ce3d027 (ca. 71MB)R 3.3.3 binary for Mac OS X 10.9 (Mavericks) and higher, signed package. Contains R 3.3.3 framework, R.app GUI 1.69 in 64-bit for Intel Macs, Tcl/Tk 8.6.0 X11 libraries and Texinfo 5.2. The latter two components are optional and can be ommitted when choosing 'custom install', it is only needed if you want to use the tcltk R package or build package documentation from sources.
Note: the use of X11 (including tcltk) requires XQuartz to be installed since it is no longer part of OS X. Always re-install XQuartz when upgrading your OS X to a new major version.
R-3.2.1-snowleopard.pkg MD5-hash: 58fe9d01314d9cb75ff80ccfb914fd65 SHA1-hash: be6e91db12bac22a324f0cb51c7efa9063ece0d0 (ca. 68MB)R 3.2.1 legacy binary for Mac OS X 10.6 (Snow Leopard) - 10.8 (Mountain Lion), signed package. Contains R 3.2.1 framework, R.app GUI 1.66 in 64-bit for Intel Macs. This package contains the R framework, 64-bit GUI (R.app), Tcl/Tk 8.6.0 X11 libraries and Texinfop 5.2. GNU Fortran is NOT included (needed if you want to compile packages from sources that contain FORTRAN code) please see the tools directory. NOTE: the binary support for OS X before Mavericks is being phased out, we do not expect further releases!
The new R.app Cocoa GUI has been written by Simon Urbanek and Stefano Iacus with contributions from many developers and translators world-wide, see 'About R' in the GUI.
Subdirectories:
toolsAdditional tools necessary for building R for Mac OS X: Universal GNU Fortran compiler for Mac OS X (see R for Mac tools page for details). baseBinaries of R builds for macOS 10.13 or higher (High Sierra)contribBinaries of package builds for macOS 10.13 or higher (High Sierra)el-capitanBinaries of package builds for OS X 10.11 or higher (El Capitan build)mavericksBinaries of package builds for Mac OS X 10.9 or higher (Mavericks build)oldPreviously released R versions for Mac OS X
You may also want to read the R FAQ and R for Mac OS X FAQ. For discussion of Mac-related topics and reporting Mac-specific bugs, please use the R-SIG-Mac mailing list.


Information, tools and most recent daily builds of the R GUI, R-patched and R-devel can be found at http://mac.R-project.org/. Please visit that page especially during beta stages to help us test the Mac OS X binaries before final release!
Package maintainers should visit CRAN check summary page to see whether their package is compatible with the current build of R for Mac OS X.
https://visionfox102.tumblr.com/post/656113628147253248/mac-disk-maker. Binary libraries for dependencies not present here are available from http://mac.R-project.org/libs and corresponding sources at http://mac.R-project.org/src.
Last modified: 2021/02/15, by Simon Urbanek
This is a wide and variant collection of CD-ROM based software, that is, software that came on a CD-ROM for installation on computers, or played in consoles. Ranging from applications and games to gatherings of public-domain software or clip art, the heyday of the CD-ROM is roughly 1989 to 2001. Step1: Insert CD/DVD into CD-ROM, and start/restart computer. Step2: On the black screen, when you are prompted to press any key to boot computer from CD, press any key on the keyboard. After a while your computer will boot from the CD-ROM without setting any things. The main Hiren’s Boot CD file is in ISO format when it is downloaded and one would require a burning software for it such as Windows or Nero that supports this format. Once the burning is done to a CD you need to insert it to your CD-ROM and then start the computer. Ensure that in your BIOS you have set to boot from CD-ROM. How to boot mac from cd. This Mac OS 9.2.2 'boot kit' was made by @that-ben and makes the process of booting (and installing) Mac OS 9 on any G3 and most G4's from an USB stick a little bit easier, because not all the Mac OS 9 install CD images can be used to boot a Mac from an unlocked volume (such as from an USB stick or hard drive).
Since Wamp installs MySQL, all you need to do is set up a user and a database. Click the Wamp icon in the system tray, then go to MySQL » MySQL console. If the console prompts you for a password, just hit Enter. Create a MySQL database. Now you need to create a new MySQL database. You can do this by issuing the following command in the console. Create local mysql database mac. A database in MySQL is implemented as a directory containing files that correspond to tables in the database. Because there are no tables in a database when it is initially created, the CREATE DATABASE statement creates only a directory under the MySQL data directory.
VMware Fusion: Powerfully Simple Virtual Machines for Mac. VMware Fusion Pro and VMware Fusion Player Desktop Hypervisors give Mac users the power to run Windows on Mac along with hundreds of other operating systems, containers or Kubernetes clusters, side by side with Mac applications, without rebooting. Vmware fusion 11.5 crack mac os. VMware Fusion 3 Crack Download, Installer Autodesk Alias Speedform 2018, How To Intsall Techsmith Camtasia Studio 8, AutoDesSys Bonzai 3D Buy Cheap. Vmware Fusion 11, Installer Adobe Audition 3, Keygen For Avid Media Composer 6, Lumion 8.0 Crack.
0 notes
Text
Flash Video Player For Mac

Adobe Flash Player
Flash video player free download - Adobe Flash Player, Macvide Flash Player, Flip Player, and many more programs. Play Blu-ray disc/movies and watch 1080p HD/4K video on Mac. Adobe® Flash® Player is a lightweight browser plug-in and rich Internet application runtime that delivers consistent and engaging user experiences, stunning audio/video playback, and exciting gameplay.
What's new?
Staying Secure
Ensure your Flash Player installation is secure and up to date. Simply select 'Allow Adobe to install updates' during the installation process or choose this option anytime in the Flash Player control panel.
Gaming
Take your gaming to the next level with Flash Player's incredible Stage 3D graphics. Smooth, responsive, and incredibly detailed games are a click away. We've even added support for game controllers so come get your game on!
High Performance
Experience hardware accelerated HD video with perfect playback using Flash Player. Recent improvements allow supported Flash content and games to continue to deliver responsive feedback even when your CPU is maxed.
JavaScript is currently disabled in your browser and is required to download Flash Player. Click here for instructions to enable JavaScript.
Version 32.0.0.445
To mount a VMDK file (saved at C:temp) in read-only mode use the following command. As some of the commenters pointed out, the open-source archiving tool 7-Zip does happen to be the easiest way to open the VMDK file for you. By all means, give 7-Zip a try first and if. Paragon VMDK Mounter for Mac OS X specially developed to mount the virtual disk images in OS X systems with providing full read/write access to a virtual disk content. The following formats are supported by Paragon VMDK Mounter. The best solution is to back up your Mac to VMDK and launch it in the VMware Fusion virtual environment. This way, you can decide whether the new software is safe and fits your needs. You can mount an existing backup image in the read-only mode, thus getting access to its contents through the Finder. OS X 10.11 El Capitan; OS X 10.10. The latest version of Paragon VMDK Mounter is 2.1370 on Mac Informer. It is a perfect match for the System Tools category. The first solution with full high-speed access to virtual disks under OS X. The app is very easy to use – mount a virtual container by double clicking or using Finder's “Open With” context submenu. What is MacOS Mojave? Apple announced MacOS Mojave on World Wide Developers Conference on June 4, 2018, and it was released to the public on September 24, 2018. Vmdk mounter for mac os x el capitan.
Canon pixma ix6820 printer driver for mac. The guidelines could have been a little bit extra comprehensive as well as the printer did not include a printer wire.Requirements and additional information Canon MG3022OS: Windows 10, 8.1, 8, 7 & Apple macOS 10.14 – 10.12. It has Wireless PictBridge for direct printing from portable devices that have this function.I am just obtaining the opportunity to set up the printer.
Your system:
, English
About:
Adobe® Flash® Player is a lightweight browser plug-in and rich Internet application runtime that delivers consistent and engaging user experiences, stunning audio/video playback, and exciting gameplay.
Installed on more than 1.3 billion systems, Flash Player is the standard for delivering high-impact, rich Web content.
Optional offer:
Flash Video Player Firefox Mac
Terms & conditions:

By clicking the Download now button, you acknowledge that you have read and agree to the Adobe Software Licensing Agreement.
Note: Your antivirus software must allow you to install software.
Xcode 5 free download for mac. This version includes the SDKs for iOS 14, iPadOS 14, macOS Catalina, tvOS 14, and watchOS 7. Download from the Mac App Store. SwiftUI is an innovative, exceptionally simple way to build user. Rated 3/5 By 11,686 People. What does Xcode do? Xcode includes everything developers need to create great applications for Mac, iPhone, iPad, Apple TV, and Apple Watch. Xcode provides developers a unified workflow for user interface design, coding, testing, and debugging.
Total size: 20.6 MB
-->
Originally published: September 9, 2019 Updated: September 11, 2020
Formatting a flash drive for mac. Please go here to search for your product's lifecycle.
This article has been updated. Please go here for the latest.
Adobe will end support of Flash Player on December 31, 2020. Here's what you can expect in the meantime for each Microsoft browser:
In the next version of Microsoft Edge (built on Chromium), Flash will be disabled by default. However, users may re-enable it on a site-by-site basis. The timeline for Chromium-based browsers can be found here.
Flash will not be disabled by default from Microsoft Edge (built on EdgeHTML) or Internet Explorer 11 prior to its removal by December of 2020.
Flash will be completely removed from all browsers by December 31, 2020, via Windows Update. Group policies are available for enterprise admins and IT pros to change the Flash behavior prior to that date.
Companies reliant on Flash for development and playback of content are encouraged to remove the dependency on Adobe Flash prior to December 2020.
Flash Player Update For Mac
Please see our blog for more information.
Flash Video Player For Facebook Download
0 notes
Text
Download Xcode 12

Build a Basic UI
This lesson gets you familiar with Xcode, the tool you use to write apps. You’ll become familiar with the structure of a project in Xcode and learn how to navigate between and use basic project components. In the lesson, you’ll start making a simple user interface (UI) for the FoodTracker app and view it in the simulator. When you’re finished, your app will have a label for the meal’s name, a text field to change the meal’s name, and a button for resetting the name.
Learning Objectives
At the end of the lesson, you’ll be able to:
Create a project in Xcode
Identify the purpose of key files that are created with an Xcode project template
Open and switch between files in a project
Run an app in iOS Simulator
Add, move, and resize UI elements in a storyboard
Edit the attributes of UI elements in a storyboard using the Attributes inspector
View and rearrange UI elements using the outline view
Preview a storyboard UI using the Assistant editor’s Preview mode
Use Auto Layout to lay out a UI that automatically adapts to the user’s device size
If it Linux OS, care must be taken while download Cydia Impactor for particular 32-Bit or 64-Bit. USB drivers must be installed in the case of Android device. The process may generate provision.cpp.150 error, so it is recommended to have the latest iOS version too. Download Cydia Impactor iOS11/12 for Windows, Mac, Linux. This guide is geared towards MacOS 10.13 High Sierra, 10.12 Sierra, OS X 10.11 El Capitan, OS X 10.10 Yosemite, and Mac OS X 10.9, and newer releases. Mac users running prior versions of OS X can continue to directly install Command Line Tools and gcc (without Xcode) through a package installer available through the Apple Developer website as.
Create a New Project
Xcode includes several built-in app templates for developing common types of iOS apps, such as games, apps with tab-based navigation, and table view-based apps. Most of these templates have preconfigured interface and source code files. For this lesson, you’ll start with the most basic template: Single View Application.
To create a new project
Open Xcode from the /Applications directory.
If this is the first time you’ve launched Xcode, it may ask you to agree to the user agreement and to download additional components. Follow the prompts through these screens until Xcode is completely set up and ready to launch.
As soon as Xcode launches, the welcome window appears.
If a project window appears instead of the welcome window, don’t worry—you probably created or opened a project in Xcode previously. Just use the menu item in the next step to create the project.
In the welcome window, click “Create a new Xcode project” (or choose File > New > Project).
Xcode opens a new window and displays a dialog in which you choose a template.
Select iOS at the top of the dialog.
In the Application section, select Single View Application and then click Next.
In the dialog that appears, use the following values to name your app and choose additional options for your project:
Product Name: FoodTracker
Xcode uses the product name you entered to name your project and the app.
Team: If this is not automatically filled in, set the team to None.
Organization Name: The name of your organization or your own name. You can leave this blank.
Organization Identifier: Your organization identifier, if you have one. If you don’t, use com.example.
Bundle Identifier: This value is automatically generated based on your product name and organization identifier.
Language: Swift
Devices: Universal
A Universal app is one that runs on both iPhone and iPad.
Use Core Data: Unselected.
Include Unit Tests: Selected.
Include UI Tests: Unselected.
Click Next.
In the dialog that appears, select a location to save your project and click Create.
Xcode opens your new project in the workspace window.
The workspace window may have an error icon with a message that says “Signing for FoodTracker requires a development team.” This warning means you haven’t set up Xcode for iOS development yet, but don’t worry, you can complete these lessons without doing that. You do not need a development team to run the app in the simulator.
Explore Further
Before you can run the app on an iOS device, you need to set a valid team so that the app can be signed. If you are an individual or part of an organization that is a member of the Apple Developer Program, you can select that team here. Otherwise, your Apple ID is assigned to a personal team that you can use to launch apps on devices. However, you will need to join the Apple Developer Program before you can submit your app to the App store.
For more information, select Help > Xcode Help and search for “Signing workflow.”
Get Familiar with Xcode
Xcode includes everything you need to create an app. It organizes all the files and resources that go into creating an app. It provides editors for both your code and your user interfaces. Also, Xcode lets you build, run, and debug your app—providing simulators for iOS devices and a powerful integrated debugger.
Take a few moments to familiarize yourself with the main sections of the Xcode workspace:
Navigator area. Provides quick access to the various parts of your project.
Editor area. Allows you to edit source code, user interfaces, and other resources.
Utility area. Provides information about selected items and access to ready-made resources. The Utility area is divided into two parts. The top is the inspector pane, where you view and edit information about items selected in the navigator or edit areas. The bottom is the library pane, where you access user interface elements, code snippets, and other resources.
Toolbar. Used to build and run your apps, view the progress of running tasks, and configure your work environment.
Don’t be overwhelmed by all of the pieces; each area is described in more detail when you need to use it.
Run iOS Simulator
Because you based your project on an Xcode template, the basic app environment is automatically set up for you. Even though you haven’t written any code, you can build and run the Single View Application template without any additional configuration.
To build and run your app, use the iOS Simulator app that’s included in Xcode. The simulator gives you an idea of how your app would look and behave if it were running on a device.
The simulator can model a number of different types of hardware—All the screen sizes and resolutions for both iPad and iPhone—so you can simulate your app on every device you’re developing for. In this lesson, use the iPhone 7 option.
To run your app in the simulator
In the Scheme pop-up menu in the Xcode toolbar, choose iPhone 7.
The Scheme pop-up menu lets you choose which simulator or device you’d like to run your app on. Make sure you select the iPhone 7 Simulator, not an iOS device.
Click the Run button, located in the top-left corner of the Xcode toolbar.
Alternatively, choose Product > Run (or press Command-R).
If you’re running an app for the first time, Xcode asks whether you’d like to enable developer mode on your Mac. Developer mode allows Xcode access to certain debugging features without requiring you to enter your password each time. Decide whether you’d like to enable developer mode and follow the prompts.
If you choose not to enable developer mode, you may be asked for your password later on. These lessons assume developer mode is enabled.
Watch the Xcode toolbar as the build process completes.
Xcode displays messages about the build process in the activity viewer, which is in the middle of the toolbar.
After Xcode finishes building your project, the simulator starts automatically. It may take a few moments to start up the first time.
The simulator opens in the iPhone mode you specified and then launches your app. Initially, the simulator displays your app’s launch screen, and then it transitions to your app’s main interface. In an unmodified Single View Application template, the launch screen and the main interface are identical.
Right now, the Single View Application template doesn’t do much—it just displays a white screen. Other templates have more complex behavior. It’s important to understand a template’s uses before you extend it to make your own app. Running your app in the simulator with no modifications is a good way to start developing that understanding.
Quit the simulator by choosing Simulator > Quit Simulator (or pressing Command-Q).
Review the Source Code
The Single View Application template comes with a few source code files that set up the app environment. First, take a look at the AppDelegate.swift file.

To look at the AppDelegate.swift source file
Make sure the project navigator is open in the navigator area.
The project navigator displays all the files in your project. If the project navigator isn’t open, click the leftmost button in the navigator selector bar. (Alternatively, choose View > Navigators > Show Project Navigator.)
If necessary, open the FoodTracker folder in the project navigator by clicking the disclosure triangle next to it.
Select AppDelegate.swift.
Xcode opens the source file in the main editor area of the window.
Alternatively, double-click the AppDelegate.swift file to open it in a separate window.
The App Delegate Source File
The AppDelegate.swift source file has two primary functions:
It defines your AppDelegate class. The app delegate creates the window where your app’s content is drawn and provides a place to respond to state transitions within the app.
It creates the entry point to your app and a run loop that delivers input events to your app. This work is done by the UIApplicationMain attribute (@UIApplicationMain), which appears toward the top of the file.
Using the UIApplicationMain attribute is equivalent to calling the UIApplicationMain function and passing your AppDelegate class’s name as the name of the delegate class. In response, the system creates an application object. The application object is responsible for managing the life cycle of the app. The system also creates an instance of your AppDelegate class, and assigns it to the application object. Finally, the system launches your app.
The AppDelegate class is automatically created whenever you create a new project. Unless you are doing something highly unusual, you should use this class provided by Xcode to initialize your app and respond to app-level events. The AppDelegate class adopts the UIApplicationDelegate protocol. This protocol defines a number of methods you use to set up your app, to respond to the app’s state changes, and to handle other app-level events.
The AppDelegate class contains a single property: window.
This property stores a reference to the app’s window. This window represents the root of your app’s view hierarchy. It is where all of your app content is drawn. Note that the window property is an optional, which means it may have no value (be nil) at some point.
The AppDelegate class also contains stub implementations of the following delegate methods:
funcapplication(_application: UIApplication, didFinishLaunchingWithOptionslaunchOptions: (UIApplicationLaunchOptionsKey: Any)?) -> Bool
funcapplicationWillResignActive(_application: UIApplication)
funcapplicationDidEnterBackground(_application: UIApplication)
funcapplicationWillEnterForeground(_application: UIApplication)
funcapplicationDidBecomeActive(_application: UIApplication)
funcapplicationWillTerminate(_application: UIApplication)
These methods let the application object communicate with the app delegate. During an app state transition—for example, app launch, transitioning to the background, and app termination—the application object calls the corresponding delegate method, giving your app an opportunity to respond. You don’t need to do anything special to make sure these methods get called at the correct time—the application object handles that job for you.
Each of the delegate methods has a default behavior. If you leave the template implementation empty or delete it from your AppDelegate class, you get the default behavior whenever that method is called. Alternatively, you can add your own code to the stub methods, defining custom behaviors that are executed when the methods are called.
The template also provides comments for each of the stub methods. These comments describe how these methods can be used by your app. You can use the stub methods and comments as a blueprint for designing many common app-level behaviors.
In this lesson, you won’t be using any custom app delegate code, so you don’t have to make any changes to the AppDelegate.swift file.
The View Controller Source File
Mac software update not showing. The Single View Application template has another source code file: ViewController.swift. Select ViewController.swift in the project navigator to view it.
This file defines a custom subclass of UIViewController named ViewController. Right now, this class simply inherits all the behavior defined by UIViewController. To override or extend that behavior, you override the methods defined on UIViewController.
As you can see in the ViewController.swift file, the template’s implementation overrides both the viewDidLoad() and didReceiveMemoryWarning() methods; however, the template’s stub implementation doesn’t do anything yet, except call the UIViewController version of these methods. You can add your own code to customize the view controller’s response to these events.
Although the template comes with the didReceiveMemoryWarning() method, you won’t need to implement it in these lessons, so go ahead and delete it.
At this point, your ViewController.swift code should look something like this:
importUIKit
classViewController: UIViewController (
overridefuncviewDidLoad() (
super.viewDidLoad()
// Do any additional setup after loading the view, typically from a nib.
)
)
You’ll start writing code in this source code file later in this lesson.
Open Your Storyboard
You’re ready to start working on a storyboard for your app. A storyboard is a visual representation of the app’s user interface, showing screens of content and the transitions between them. You use storyboards to lay out the flow—or story—that drives your app. You see exactly what you're building while you’re building it, get immediate feedback about what’s working and what’s not, and make instantly visible changes to your user interface.
To open your storyboard
In the project navigator, select Main.storyboard.
Xcode opens the storyboard in Interface Builder—its visual interface editor—in the editor area. The background of the storyboard is the canvas. You use the canvas to add and arrange user interface elements.
At this point, the storyboard in your app contains one scene, which represents a screen of content in your app. The arrow that points to the left side of the scene on the canvas is the storyboard entry point, which means that this scene is loaded first when the app starts. This scene contains a single view that’s managed by a view controller. You’ll learn more about the roles of views and view controllers soon.
When you ran your app in the iPhone 7 Simulator app, the view in this scene is what you saw on the device screen. However, the scene on the canvas may not have the same dimensions as the simulator’s screen. You can select the screen size and orientation at the bottom of the canvas. In this case, it’s set to iPhone 7 in a portrait orientation, so the canvas and the simulator are the same.
Even though the canvas shows a specific device and orientation, it is important to create an adaptive interface—an interface that automatically adjusts so that it looks good on any device and in any orientation. As you develop your interface, you can change the canvas’s view, letting you see how your interface adapts to different size screens.
Build the Basic UI
It’s time to build a basic interface. You’ll start by working on a user interface for the scene that lets you add a new meal to your meal tracking app, FoodTracker.
Xcode provides a library of objects that you can add to a storyboard file. Some of these are elements that appear in the user interface, such as buttons and text fields. Others, such as view controllers and gesture recognizers, define the behavior of your app but don’t appear onscreen.
The elements that appear in the user interface are known as views. Views display content to the user. They are the building blocks for constructing your user interface and presenting your content in a clear, elegant, and useful way. Views have a variety of useful built-in behaviors, including displaying themselves onscreen and reacting to user input.
All view objects in iOS are of type UIView or one of its subclasses. Many UIView subclasses are highly specialized in appearance and behavior. Start by adding a text field (UITextField), one such subclass of UIView, to your scene. A text field lets a user type in a single line of text, which you’ll use as the name of a meal.
To add a text field to your scene
Choose Editor > Canvas, and make sure Show Bounds Rectangles is selected.
This setting causes Interface Builder to draw a blue bounding box around all the views in the canvas. Many views and controls have transparent backgrounds, making it difficult to see their actual size. Layout bugs occur when the system resizes a view so that it’s either larger or smaller than you anticipate. Enabling this setting helps you understand exactly what’s going on in your view hierarchy.
Open the Object library.
The Object library appears at the bottom of the utility area on the right side of Xcode. If you don’t see the Object library, click its button, which is the third button from the left in the library selector bar. (Alternatively, choose View > Utilities > Show Object Library.)
A list appears showing each object’s name, description, and visual representation.
In the Object library, type text field in the filter field to find the Text Field object quickly.
Drag a Text Field object from the Object library to your scene.
If necessary, zoom in by choosing Editor > Canvas > Zoom.
Drag the text field so that it’s positioned in the top half of the scene and aligned with the left margin in the scene.
Stop dragging the text field when it snaps to the left margin.
The blue layout guides help you place the text field. Layout guides are visible only when you drag or resize objects next to them; they disappear when you let go of the text field.
If necessary, click the text field to reveal the resize handles.
You resize a user interface element by dragging its resize handles, which are small white squares that appear on the element’s borders. You reveal an element’s resize handles by selecting it. In this case, the text field should already be selected because you just stopped dragging it. If your text field looks like the one below, you’re ready to resize it; if it doesn’t, select it on the canvas.
Resize the left and right edges of the text field until you see three vertical layout guides: the left margin alignment, the horizontal center alignment, and the right margin alignment.
Although you have the text field in your scene, there’s no instruction to the user about what to enter in the field. Use the text field’s placeholder text to prompt the user to enter the name of a new meal.
To configure the text field’s placeholder text
With the text field selected, open the Attributes inspector in the utility area.
The Attributes inspector appears when you click the fourth button from the left in the inspector selector bar. It lets you edit the properties of an object in your storyboard.
In the Attributes inspector, find the field labeled Placeholder and type Enter meal name.
Explore Further
In a production app, any String that can be seen by the user (such as the text field’s placeholder text) should be localized. For more information, see Build Apps for the World.
Press Return to display the new placeholder text in the text field.
While you’re editing the text field’s attributes, you can also edit the attributes of the system keyboard that’s displayed when a user selects the text field.
To configure the text field’s keyboard
Make sure the text field is still selected.
In the Attributes inspector, find the field labeled Return Key and select Done (scroll down if necessary).
This change will make the default Return key on the keyboard more pronounced to the user by changing it into a Done key.
In the Attributes inspector, select the Auto-enable Return Key checkbox (again, scroll down if necessary).
This change makes it impossible for the user to tap the Done key before typing text into the text field, ensuring that users can never enter an empty string as a meal name.
Next, add a label (UILabel) at the top of the scene. A label isn’t interactive; it just displays static text in the user interface. To help you understand how to define interaction between elements in the user interface, you’ll configure this label to display the text the user enters into the text field. It’ll be a good way to test that the text field is taking the user input and processing it appropriately.
To add a label to your scene
In the Object library, type label in the filter field to find the Label object quickly.
Drag a Label object from the Object library to your scene.
Drag the label so that it’s right above the text field and aligned with the left margin in the scene.
Stop dragging the label when it snaps to the guidelines.
Double-click the label and type Meal Name.
Press Return to display the new text in the label.
Now, add a button (UIButton) to the scene. A button is interactive, so users can tap it to trigger an action that you define. Later, you’ll create an action to reset the label text to a default value.
To add a button to your scene
In the Object library, type button in the filter field to find the Button object quickly.
Drag a Button object from the Object library to your scene.
Drag the button so that it’s right below the text field and aligned with the left margin in the scene.
Stop dragging the button when it snaps to the guidelines.
Double-click the button and type Set Default Label Text.
Press Return to display the new text in the button.
Reposition the button, if necessary.
It’s good to understand how the elements you’ve added are actually arranged in the scene. Look at the outline view to see which user interface elements have been added to your scene.
To view the outline view
In your storyboard, find the outline view toggle.
If the outline view is collapsed, click the toggle to expand the outline view.
You can use the outline view toggle to collapse and expand the outline view as needed.
The outline view, which appears on the left side of the canvas, provides a hierarchical representation of the objects in your storyboard. You should be able to see the text field, label, and button you just added listed in the hierarchy. But why are the user interface elements you added nested under View?
Views not only display themselves onscreen and react to user input, they can serve as containers for other views. Views are arranged in a hierarchical structure called the view hierarchy. The view hierarchy defines the layout of views relative to other views. Within that hierarchy, views enclosed within a view are called subviews, and the parent view that encloses a view is called its superview. A view can have multiple subviews and only one superview.
In general, each scene has its own view hierarchy. At the top of each view hierarchy is a content view. In the current scene, the content view is named View, the top level view inside the View Controller. The text field, label, and button are subviews of the content view. All other views that you place in this scene will be subviews of this content view (although they themselves can have nested subviews).
Preview Your Interface
Preview your app periodically to check that everything is looking the way you expect. You can preview your app interface using the assistant editor, which displays a secondary editor side-by-side with your main one.
To preview your interface
Click the Assistant button in the Xcode toolbar near the top right corner of Xcode to open the assistant editor.
If you want more space to work, collapse the project navigator and utility area by clicking the Navigator and Utilities buttons in the Xcode toolbar.
You can also collapse the outline view.
In the editor selector bar, which appears at the top of the assistant editor, switch the assistant editor from Automatic to Preview > Main.storyboard (Preview).
As you see in the assistant editor, the preview looks almost identical to the canvas. However, this does not really tell you anything new. Both the canvas and the preview are showing the same size screen (iPhone 7) and the same orientation (portrait). If you want to check and see if your interface is adaptive, you need to preview different size screens and different orientations.
To preview the landscape orientation, click the Rotate button at the bottom of the preview.
Unfortunately, things no longer look quite right. The text field, label, and button keep the same size and position relative to the screen’s upper left corner. This means that the text field no longer fills the screen from margin to margin.
To preview a different screen size, click the Add button at the bottom of the assistant editor, and select iPhone SE.
Again, the text field, label, and button keep the same size and position relative to the screen’s upper left corner. This time, however, the text field extends past the screen’s right edge.
To create an adaptive interface, you’ll need to specify how the interface should adjust to different screen sizes. For example, when the interface is rotated into a landscape orientation, the text field should grow. When the interface is displayed on an iPhone SE, the text field should shrink. You can specify these kinds of interface rules easily using Auto Layout.
Adopt Auto Layout
Auto Layout is a powerful layout engine that helps you design adaptive layouts that dynamically respond to any changes to the scene’s size. You describe your layout using constraints—rules that explain where one element should be located relative to another, or what size the element should be. Auto Layout dynamically calculates the size and position of each element based on these constraints. Zoom download in mac shortcut.
One of the easiest ways to define your layout is using a stack view (UIStackView). A stack view provides a streamlined interface for laying out a collection of views in either a column or a row. The stack view uses Auto Layout under the hood to calculate the size and position of all the views that it manages. This lets you easily access the full power of Auto Layout, while greatly reducing the complexity of your layout.
To adopt Auto Layout, wrap your existing interface elements in a stack view, and then add the constraints needed to position the stack view in the scene.
To add Auto Layout constraints to the meal scene
Return to the standard editor by clicking the Standard button.
Expand the project navigator and utility area by clicking the Navigator and Utilities buttons in the Xcode toolbar.
While pressing the Shift key on your keyboard, select the text field, label, and button.
On the bottom right of the canvas, click the Embed In Stack button. (Alternatively, choose Editor > Embed In > Stack View.)
Xcode wraps the user interface elements in a stack view, stacking them together. Xcode analyzes your existing layout to figure out that the items should stack vertically, not horizontally.
If necessary, open the outline view. Select the Stack View object.
In the Attributes inspector, type 8 in the Spacing field. Press Return.
You’ll notice the user interface elements space out vertically, and the stack view grows with them.
On the bottom right of the canvas, open the Add New Constraints menu.
Above “Spacing to nearest neighbor,” click the two horizontal constraints and the top vertical constraint to select them. They become red when they are selected.
These constraints indicate spacing to the nearest leading, trailing, and top neighbors. In this context, the term nearest neighbor means the boundary of the closest user interface element, which can be the superview, another user interface element, or a margin. Because the “Constrain to margins” checkbox is selected, the stack view in this case will be constrained to the superview’s left and right margins. This provides space between the stack view and the edge of the scene.
On the other hand, the top of the stack is constrained relative to the scene’s top layout guide. The top layout guide is positioned at the bottom of the status bar, if the status bar is visible. If not, it is positioned at the top of the scene. Therefore, you need to add a little space between the stack view and the layout guide.
Type 0 in the left and right boxes, and type 20 spacing in the top box.
In the pop-up menu next to Update Frames, choose Items of New Constraints. This causes Interface Builder to automatically update the frames of the affected views when you create the constraints.
In the Add New Constraints menu, click the Add 3 Constraints button.
The label, text field, and button are now left aligned and laid out with appropriate spacing, but the text field still isn’t stretching to fill the screen’s width. To fix that, you’ll need to add an additional constraint.
To adjust the text field width within the stack
In your storyboard, select the text field in the meal scene.
On the bottom right of the canvas, open the Add New Constraints menu again.
Above “Spacing to nearest neighbor,” click the right horizontal constraint to select it. It becomes red when it is selected.
Type 0 in the right box.
In the pop-up menu next to Update Frames, choose Items of New Constraints.
In the Add New Constraints menu, click the Add 1 Constraint button.
Checkpoint: Run your app in iOS Simulator. Rotate the simulator by choosing Hardware > Rotate Left and Hardware > Rotate Right (or Command-Left Arrow and Command-Right Arrow). Notice how the text field grows and shrinks to the appropriate size depending on the device’s orientation and screen size. Also notice that the status bar disappears in landscape orientation.
Click inside the text field and enter text using the onscreen keyboard (if you’d like, you can use your computer’s keyboard by choosing Hardware > Keyboard > Connect Hardware Keyboard).
Debugging Auto layout
If you don’t get the behavior you expect, use the Auto Layout debugging features to help you. These features can be accessed using the Update Frames button and Resolve Auto Layout Issues menu.
If you are getting warnings about misplaced views, use the Update Frames button. This button updates the frames of the selected view and all of its subviews. Select the scene’s view controller to update all the views in the scene. You can also Option-click the Update Frames button to update only the selected view.
If the layout does not behave as you expect, click the Resolve Auto Layout Issues button to bring up a menu of debug commands. All the commands in this menu have two forms. One affects the currently selected view. The other affects all views in the current view controller. If all of the commands are grayed out, select the scene’s view controller or one of the views and open the menu again.
Choose Reset to Suggested Constraints to have Xcode update your interface with a valid set of constraints. Choose Clear Constraints to remove all constraints on the user interface elements, and then try following the previous instructions to set up the constraints again.
Wrapping Up
In this lesson, you’ve familiarized yourself with the contents of an Xcode project, and with many of the tools used to design and run an iOS app. You’ve also built a simple user interface.
Although the project’s scene doesn’t do much yet, the basic user interface is there and functional. Making sure your layout is robust and extensible from the start ensures that you have a solid foundation to build upon.
Download Xcode 12 For Mac
Note
Download Xcode 12.4
To see the completed sample project for this lesson, download the file and view it in Xcode.
Download Xcode 12.4 Dmg
Copyright © 2018 Apple Inc. All rights reserved. Terms of Use | Privacy Policy | Updated: 2016-12-08
0 notes